Vodafone is one of the leading telecoms companies in Germany. Vodafone’s networks keep Germany connected: people and machines, families and friends as well as politics, business, and society. Millions of people are Vodafone customers – whether they are surfing, making calls, or watching TV; whether they are networking their office, their home, or their factory with Vodafone technology.
The Düsseldorf-based company provides a comprehensive portfolio of internet, mobile, fixed, and TV services. As a digital transformation expert in German business and industry, Vodafone is a trusted partner to enterprises of all sizes, from startups and SMEs to DAX-listed corporations. Vodafone Germany employs about 15,000 people and generates total revenue of around 13 billion euros with more than 30 million mobile customers, over 10 million broadband customers, approximately 12 million TV customers, and numerous digital solutions.
Vodafone is a key contributor to the development of Germany’s infrastructure, providing gigabit speeds to more than two-thirds of German households. Together with its partner OXG, Vodafone will build up to seven million new FTTH fiber connections in the coming years. With its 5G network, Vodafone reaches more than 90% of the population in Germany. Vodafone’s NB IoT network for the industrial and business sectors is delivering IoT connectivity on almost 97% of Germany’s total territory.
Vodafone Germany is the largest operating company of the Vodafone Group, one of the world’s largest telecommunications companies, contributing around 30% of its revenues. Vodafone Group has over 300 million mobile customers and one of the world’s largest IoT platforms.
The Problem
They ran into an issue when they began syncing across company borders to different vendors. The specific problem was they wanted to sync whole issues, but have vendors only see what they wanted them to see.
This is an important step for a lot of businesses. The issue needs to be viewed holistically, but the service provider, in this case, Vodafone, needs to be able to solve vendor issues without seeing the whole process. They wanted to align their teams to achieve data consistency. They had used Elements Copy & Sync for syncing their Jira environments before but it couldn’t achieve the level of sync they expected. After this, they decided to go with Exalate.
Why Exalate?
Exalate emerged as the ideal solution due to its exceptional features:
• Granular Access Control: Vodafone can meticulously define what data is visible to external partners, protecting confidentiality while promoting collaboration.
• Real-time Synchronization: Teams both inside and outside Vodafone always operate with the most up-to-date information, eliminating delays and miscommunication.
• Automated Workflows: Exalate’s trigger functionality streamlines processes. Specific issues are automatically synced based on predefined criteria, saving valuable time and reducing manual errors.
• Issue-based Monitoring of Success: Exalate provides real-time insight into the status of each synced issue, enabling Vodafone to proactively identify and address any synchronization errors.
After thorough evaluation, we realized other solutions couldn’t match Exalate’s precision and flexibility. The results speak for themselves: with over 20,000 synced entries and nearly 10,000 synced comments, Exalate has become vital to our cross-company collaboration.
Using Exalate helped Vodafone Germany keep control of their outgoing and incoming syncs completely autonomously. On top of ensuring that vendors outside the team receive only the information relevant to their needs, they also make great use of Exalate internally. Multiple teams inside the company employ our solution to sync Jira instances, so all teams have access to all of the relevant information.
Exalate serves as a cornerstone for our data integrity. It guarantees that information is consistently mirrored across all connected Jira instances. This translates to streamlined reporting and eliminates discrepancies, empowering us to make informed decisions based on a single source of truth.
Automated Integration
One of Vodafone’s primary requirements was automation and the Trigger function of Exalate ensured they had this at their disposal from day one.
Triggers allow you to input a set of circumstances that will automatically start a synchronization when met. This highlights another key attribute of why Exalate was the right solution for them: cost-effectiveness. When things have to be done manually, when data has to be entered by a person for example, costs tend to spiral. Whereas, with Exalate, automation takes care of a lot of this type of work.
Friendly to Users
When you have a tool that needs to work both inside and outside company borders, users must be able to make the solution function flawlessly. This is where Exalate’s user-friendliness comes in.
It can be user-friendly because you can connect syncs, and custom fields you have on both instances and just select which of the fields should be synchronized.
This type of usability ensures that all teams don’t just stay aligned but are aligned with ease. This level of user-friendliness goes hand in hand with Exalate’s extreme flexibility.
Use Case
Vodafone already used Exalate to sync issues internally between their Jira instances. Now, they have a use case of syncing a bigger Jira environment externally with their vendors to streamline their software release management process. They needed to sync only vendor-specific data instead of having to sync all issues under a particular project. Such automation would mean setting detailed and granular conditions to trigger the issue sync.
Results
• Data consistency and visibility across multiple instances • Decentralized and independent control of their sync ensured only relevant information is passed to vendors • Cost-effectiveness by automating their work instead of manual copy-pasting.
The Future
While Exalate has been a valuable asset in our current operations, we’re constantly evaluating new technologies to optimize our workflows. As we migrate to the Atlassian Cloud and integrate with GitHub and Azure DevOps, we’ll be exploring how these tools can complement Exalate’s functionality and ensure seamless communication across all our platforms.
LF Logistics (now rebranded to Maersk), is the logistics arm of the Li and Fung Group, a massive conglomerate operating primarily in Asia. They’re supply chain specialists, working in the sourcing and manufacturing for global brands. They work on elements of design, acquiring materials, and using the appropriate factories for production. They work along every single element of the supply chain, and, through LF Logistics, even the logistics of transporting products once they’re successfully produced.
The Problem
Li and Fung Group’s help center has always used ServiceNow, while LF Logistics used Jira.
They needed to ensure information wasn’t being lost between the two different departments, especially considering how important logistics is to keep the entire supply chain running smoothly and efficiently.
They needed a solution that could sync the two different platforms, without any potential data losses, all while ensuring that their teams were updated in real time. Due to both budgetary and logistical constraints, switching to ServiceNow was not an option.
The Solution
LF Logistics started exploring other solutions in the market for their integration. The primary requirement was that they wanted an integration with Jira already in place. After a couple of demos and internal discussions, Exalate impressed them with its features and functions at the best price.
They also observed that a few other solutions they considered not only had fewer features but also were more expensive.
LF Logistics began working with Exalate four years ago, to alleviate the potential risks and roadblocks caused by the wider group’s call center using ServiceNow. They found the solution instantly helpful.
The moment the ticket enters the help desk in ServiceNow, Exalate routes it to my team working in Jira. My team then provides feedback, which is immediately reflected in ServiceNow.
Ms. Teo, Team Lead – LF Logistics
Ms. Teo, the team lead at LF Logistics, can’t really imagine working without Exalate. The way it streamlined her team with the wider ServiceNow users at the parent company made work management extremely simple. She believes that even though some users are on ServiceNow and some on Jira, everything runs as smoothly as if both parties had been using the same system all along.
Why Exalate? • Real-time integration. No time-lapse. • Reliability • Seamlessness. The integration is such that all users feel they are working on a single system. • Cost-effective • No heavy technical setup or difficulty while onboarding
The integration with Exalate is seamless… It’s like we’re working in one system.
Ms. Teo, Team Lead – LF Logistics
The Use Case
All over users rely on the Li and Fung group’s help center to register their issues.
When a logistics-related issue is reported by a user within the logistics department, it is automatically directed to the LF Logistics team using Jira, facilitated by the Exalate integration.
When this ticket is created in Jira from Li and Fung’s ServiceNow instance, pertinent comments are added for the LF Logistics team.
Upon receiving the ticket, the Jira team promptly provides feedback and updates, which are instantly synchronized with ServiceNow.
Consequently, when users inquire about updates through the help desk, the ServiceNow team can readily furnish them with accurate information.
Meanwhile, the Jira team continues to work on resolving the issue. Once it’s resolved, the ticket is closed, triggering an automatic update to the ServiceNow team’s call center. The initial user who raised the ticket receives a status update or can directly view the status in the ServiceNow instance – it’s always up-to-date.
Results
• Reduced expenses with Exalate’s Jira ServiceNow integration • Cut down on user licenses in ServiceNow • Saved funds towards maintaining the ServiceNow call center
The Future
LF Logistics was recently acquired by Maersk, leading to massive structural changes in the way they organize their business and the way they keep track of tasks.
At the moment, they’re still using Exalate to seamlessly integrate different platforms in real time. When they move over entirely to Maersk’s way of doing things, they’ll still champion Exalate as the solution to keep their different work management systems and ecosystems flawlessly in sync.
Organizations using ServiceNow and Jira Data Center usually find it daunting to set up an integration between their tools. We helped one such organization solve its challenge of implementing workflow orchestration, managing multiple intricate relationships, and much more with a ServiceNow Jira integration.
Exalate came to their rescue to create a bridge that could hold all their integration requirements together without affecting their daily business operations.
Understanding the Challenge
Over the call, the delivery manager explained their integration scenario to us.
They use ServiceNow as their central hub for receiving various customer requests, including incidents, service requests, HR inquiries, and more.
On the other side, their development team relies on Jira DC to manage software development life cycle (SDLC) tasks across numerous projects.
This duality can lead to several issues:
Lack of visibility: With work dispersed across two separate platforms, gaining a consolidated view of all the organization’s activities is challenging.
Duplication of effort: Maintaining data consistency between SNOW and Jira often involves double entries, copying, and pasting information, leading to inefficiency.
Real-time data sharing: The need to ensure that the required data: comments, custom fields, attachments, etc. is consistently synchronized between the public ServiceNow instance and the private Jira DC instance.
They were looking for a solution that could overcome the above challenges and help them implement:
Real-time two-way sync between their ServiceNow and Jira instances
Orchestrate workflows between their service and development teams
Connect public instances with instances behind firewalls
Keep private conversations private
Impersonate comments exchanged between ServiceNow and Jira
Sync multiple ServiceNow entities like incidents, CMDB, change requests, problems, etc.
Sync custom fields between Jira and ServiceNow
Exalate: A Tailored Solution
Exalate provides a flexible and customizable solution to these integration challenges.
Here’s how it can help their organization:
Customization: Exalate empowers you with its scripting engine that uses Groovy scripts. This flexibility allows you to adapt the synchronization process to your unique needs. As Deepak, the Account manager at Exalate, mentions, “More or less anything is possible if you write a piece of code for it.”
Bi-directional ongoing sync: Exalate offers a full 2-way sync, giving you the freedom to choose the direction of your synchronization. You can start small and scale your integration as your needs evolve.
Real-time sync: Exalate’s default mode is real-time sync, ensuring that data is updated promptly between public and private instances of Jira DC. This includes attachments, descriptions, summaries, and even historical data migration for bulk operations.
Versatility: Exalate is not limited to SNOW and Jira DC integration. It’s versatile enough to address various use cases, such as project collaboration, and service management integration with external partners using different ITSM tools like Zendesk and much more. It also supports multiple popular platforms like Azure DevOps, Jira Cloud, GitHub, Salesforce, etc.
After a demo tailored towards the organization’s pain points, the delivery manager quotes “Everything looks good and Exalate seems to meet all our requirements“
To learn how Exalate can be tailored to your specific use case, book a discovery call with an integration engineer.
Integrating Jira and Zendesk combines the strengths of Jira’s project management capabilities with Zendesk’s comprehensive customer support features.
We’ll discuss a commonly encountered scenario: when an issue is resolved in Jira, a private comment containing the associated Jira issue key is automatically appended to the relevant Zendesk ticket.
In the following sections, we’ll discuss the use case requirements and the step-by-step configuration to set it up using an integration tool called Exalate.
The Use Case
Customer support teams need visibility on the ticket status once the dev team starts working on it. Stemming from this need, we had a customer with the following requirements:
Ticket summary, description, status, tags, and public comments must be synced from Zendesk to Jira.
Jira issue status should be mapped to the ticket status in Zendesk. When the issue is in “In Progress” in Jira, it must be changed to “Open” in Zendesk.
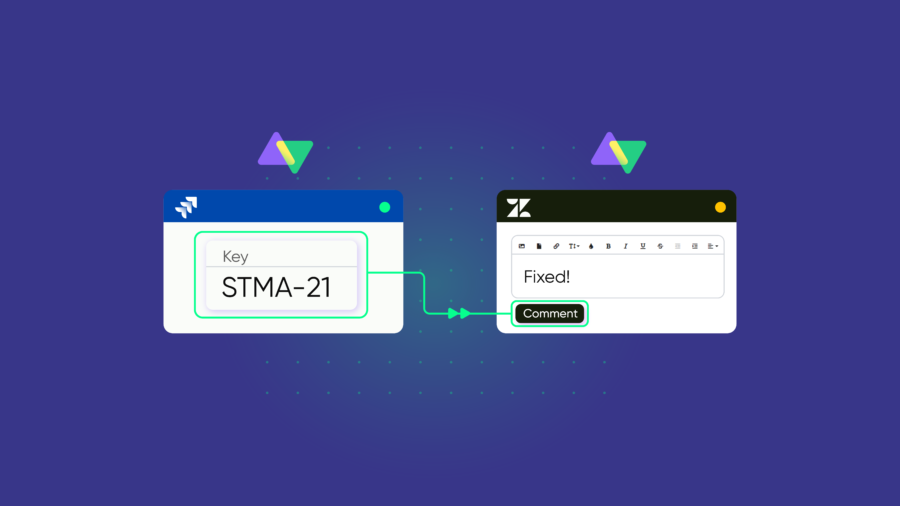
When the issue is marked “Done” in Jira, a comment saying: “Fix has been released by the Dev team for UD-386” must be added to the private comments in Zendesk. Here, UD-386 is the Jira issue key.
The Challenge
It’s easy to sync the ticket summary, description, tags, etc, since they are out-of-the-box sync configurations for most of the integration providers on the market.
The real challenge lies in appending a fixed comment to the public comments in Zendesk with the actual Jira issue key that resolves the ticket.
We’ll also need to use code-based solutions to implement this use case since it’s challenging with ready-made integration templates. We’ll need to ensure that the code written is error-free.
In an integration setup, network timeout errors also need to be taken into account.
Keeping in mind all these considerations, we’ll use Exalate to implement the use case.
Why Choose Exalate to Implement This Use Case?
Exalate is a synchronization solution that facilitates the exchange of data between work management systems and online repositories in both directions. It supports various platforms like Zendesk, Azure DevOps, ServiceNow, Jira, Salesforce, GitHub, and more.
What are the advantages of using Exalate?
It provides a seamless synchronization process for Jira issues and Zendesk tickets, requiring only a few clicks.
With Exalate’s Groovy scripting engine, you can create customized rules to address advanced use cases.
The Bulk Exalate and Bulk Connect features enable the synchronization of multiple issues and tickets simultaneously.
Exalate ensures the security of your data by safeguarding sensitive information during sharing.
How to Append the Jira Issue Key to a Private Comment in Zendesk When the Issue is Closed?
You need to install Exalate on both the Jira Cloud and Zendesk instances. Next, create a connection in the Script mode.
With Exalate’s Script mode, you get the flexibility to write your own Groovy scripts, allowing you to control the data transferred to the other side.
Proceed to click on the edit icon in the “Connections” tab in front of the connection name. You can also click the “Configure Sync” button to edit the connection.
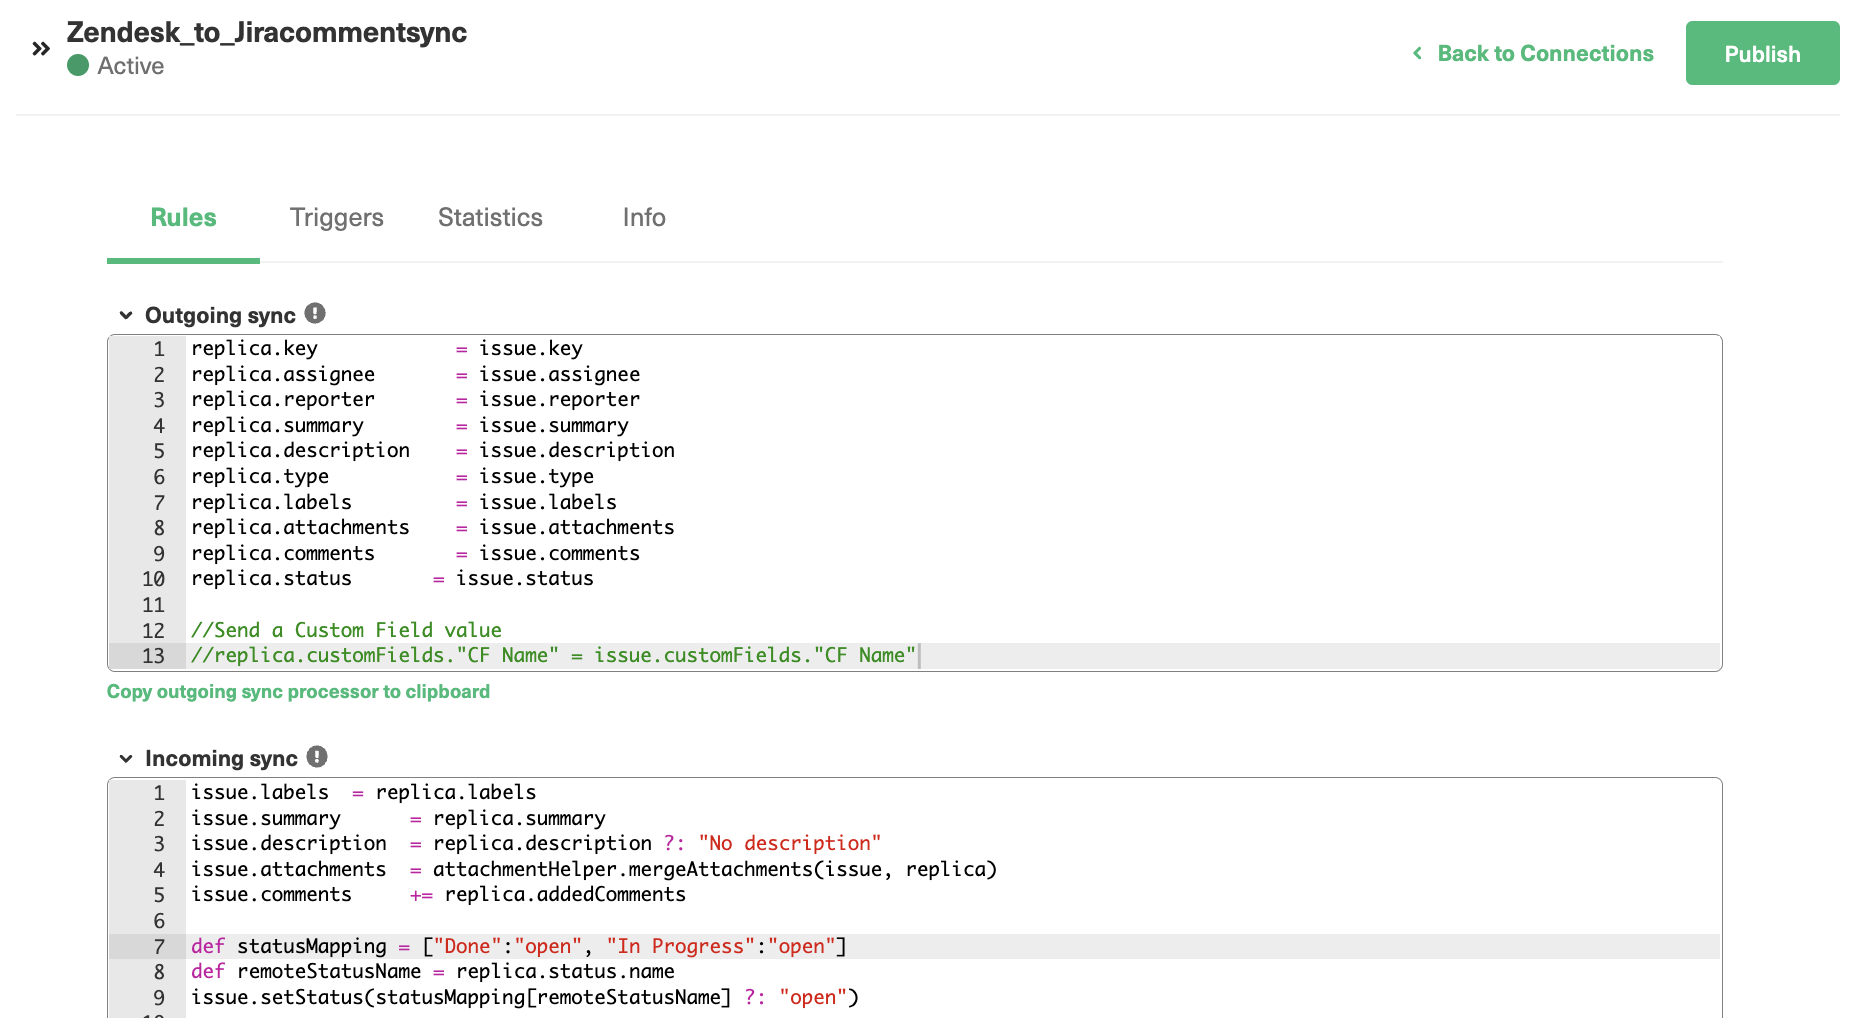
Navigate to the “Rules” tab in the Zendesk Exalate node and locate the “Incoming sync”.
if(remoteStatusName == “Done”) issue.comments += commentHelper.addComment(“Fix has been released by the Dev team for: “+replica.key, issue.comments)
The code maps the Zendesk status with the Jira status. For instance, when the engineering team in Jira starts working on the issue (status: “In Progress”), the ticket in Zendesk is marked “Open”.
Once the issue is marked “Done” in Jira, we use the commentHelper’saddComment method to add a comment on the Zendesk instance that consists of the appended Jira issue key.
Click “Publish” to save the changes you’ve made.
The Output
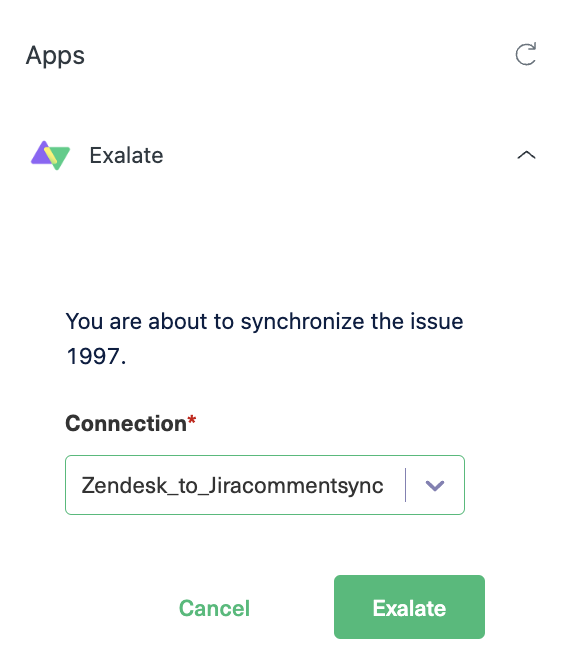
To see if the use case is working, go to your Zendesk instance and open the ticket you want to sync. Click on the “Apps” icon on the right side and click on the “Exalate” button. Select the connection you’ve just created from the list.
The ticket will now be synced to Jira as an issue. The ticket summary, description and other details will also be copied to the Jira issue.
Note: We’re manually syncing the ticket here, but you can also set up automatic sync triggers in JQL (Jira Query Language) for Jira and Zendesk search syntax for Zendesk.
Let’s mark the issue as “Done” in Jira now.
Exalate automatically picks this update and leaves a comment appended with the Jira issue key in the Zendesk instance.
Conclusion
Exalate enables the synchronization between Jira and Zendesk. Additionally, it allows you to configure personalized rules and triggers for automating the sync process. These data synchronization capabilities streamline your daily operations and enhance customer service delivery.
If you have any queries or wish to witness how Exalate can be tailored to your unique requirements, you can schedule a demo session with one of our integration engineers.
Picture this scenario: The project managers at Codify Solutions are tired of going to the organization’s GitHub repo anytime they want to see if new changes have been made. They want to be able to get instant notifications once a team member pushes new commits.
So, they start exploring GitHub integrations to eliminate the redundancy of shuffling from Slack to GitHub just to get updates. At the same time, they want all events and updates to the agency’s GitHub org to appear on a work management system, say Jira or Asana.
In this blog post, we’ll discuss GitHub integrations that could help project managers at Codify Solutions unify and automate their development workflow.
But before that, let’s discuss GitHub integration and how it works.
What is GitHub Integration?
GitHub integration is the process of connecting GitHub with one or more work management systems, CRMs, repositories, ERPs, cloud services, and other platforms.
App-native connectors and third-party solutions make it possible to integrate apps and services, whether on your personal, organizational, or enterprise GitHub account.
To get access to applications for GitHub integration, you can visit the GitHub Marketplace.
How do GitHub Integrations work?
GitHub integrations can either be app-native or third-party solutions. App-native solutions work for specific applications and services, while third-party solutions could be multi-purpose connectors for different platforms.
Unlike Salesforce integrations, every GitHub integration solution relies on GitHub APIs (REST APIs and GraphQL APIs) and webhooks to fetch and send data between two platforms. Once an event is triggered, the webhook will receive an HTTP POST payload.
For example, a payload is sent to the webhook’s configured URL every time an issue is opened or closed in your repository. Developers can now build an action that should be triggered whenever the endpoint receives this payload.
But how does this translate to integrations? That’s where GitHub Apps and OAuth Apps come in.
GitHub Apps
A GitHub App uses a webhook or API to interact with your repository and automate processes. It allows you to comment on pull requests and open issues.
GitHub Apps also have the freedom to act outside the GitHub ecosystem by interacting with other apps and services.
With GitHub Apps, you can:
Automate tasks,
Sign in with your GitHub account,
Integrate with external services,
GitHub Apps come with limited permissions, which makes them secure by restricting the level of access users have. Admins can also assign roles in an organization to tighten security.
OAuth Apps
An Open Authorization (OAuth) App is a method of GitHub integration that makes it possible to sign in to third-party applications with your GitHub Credentials. It uses the OAuth protocol to authenticate users, applications, and services.
Differences and similarities between GitHub Apps and OAuth Apps
GitHub apps and OAuth apps have a similar working principle and are both hosted by GitHub.
For instance, they both use OAuth tokens to give users access. This makes it possible for the apps to act without user input—a perfect feature for automation. Essentially, anyone who has the token can use the app.
But that’s as far as the similarities go.
OAuth apps must configure webhooks independently for every repository, while GitHub apps come with built-in, centralized webhooks.
GitHub apps can act independently of the user, while OAuth apps can’t. Only organization owners can install GitHub apps in a repository; users can’t be granted this access. For OAuth apps, the owner can grant installation access to authenticated users upon request.
Also, all webhooks automatically become inactive when you uninstall the GitHub app. Conversely, you have to manually disable the webhooks when you delete the OAuth app’s access token.
Speaking of access tokens, your installation token for GitHub apps has a one-hour lifespan, while OAuth tokens remain active until you revoke access.
Apart from that, access tokens for GitHub apps have an hourly rate limit of 5000 (for personal accounts) and 15000 (for Enterprise Cloud). OAuth apps have a flat rate limit of 5000 requests per hour.
Overall, GitHub apps provide a superior integration option for GitHub because they have tighter security thanks to short-lived tokens and granular permissions.They can also act as the user or independently of them. And most importantly, they offer a higher rate limit, which makes them highly scalable.
The only case for OAuth Apps over GitHub Apps is when you need your app to access enterprise resources. Users will still be unable to give enterprise permissions to GitHub Apps.
Benefits of GitHub Integrations
Companies like Codify Solutions can benefit from integrating their GitHub repository with the rest of their applications and services.
Here are the reasons why:
Workflow automation: GitHub provides several features that can speed up your development and QA processes. You can set triggers to merge and deploy code without relying on users to manage these flows manually. Tools like GitHub Copilot help you code faster while following coherent business logic.
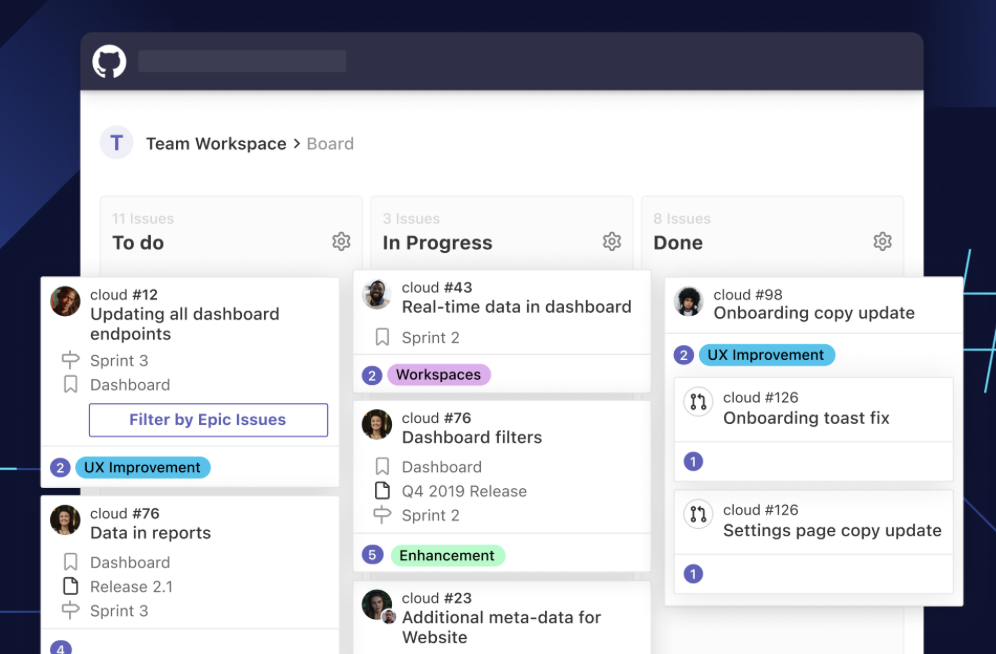
Smooth project management: Project managers can integrate project management systems like Jira with GitHub. This will give them a central view of project contributions, progress, updates, and blockers—all from one place.
Better analytics: You can also take advantage of analytics tools on GitHub (or external services) to track metrics like performance, uptime, and repository activity. This data will also help managers improve team productivity.
Improved communication and collaboration: Instead of pinging project and engineering managers every time you add a new feature, you can integrate GitHub with Slack and other messaging apps to send notifications for every event that occurs in the organization’s repository.
Code security: Syncing your external codebase with GitHub offers you an extra layer of protection in the form of OAuth tokens. You can also install apps to help you report, back up, and fix vulnerabilities.
These benefits should also be deciding factors when choosing an integration solution for GitHub. I’ll share some of my favorites with you.
9 GitHub Integration Solutions
Here are some integrations that are available in the GitHub Marketplace or as standalone third-party software solutions:
Jira Software + GitHub
As the name suggests, Jira Software + GitHub syncs your GitHub repositories and organizations with your Jira projects. This Atlassian-backed product integrates seamlessly with GitHub in order to obtain updates about pull requests, deployments, and commits.
Jira Software + GitHub also provides Smart Commits (special one-line commands) to make it possible for users to time-track and comment on issues. You can install this integration tool from the Jira Cloud Site or the Atlassian Marketplace.
Slack + GitHub
Just like the project managers at Codify, you can use this GitHub integration to stay up to date about events and actions taking place in your repository.
Think of Slack + GitHub as a bot that sends you a ping anytime someone does something in the repository. You’ll be able to follow all pull requests, commits, code snippets, code reviews, and deployment statuses from your Slack workspace. Sounds convenient, eh?
Slack + GitHub is free, but you’ll need to upgrade your Slack subscription to be able to install and activate it.
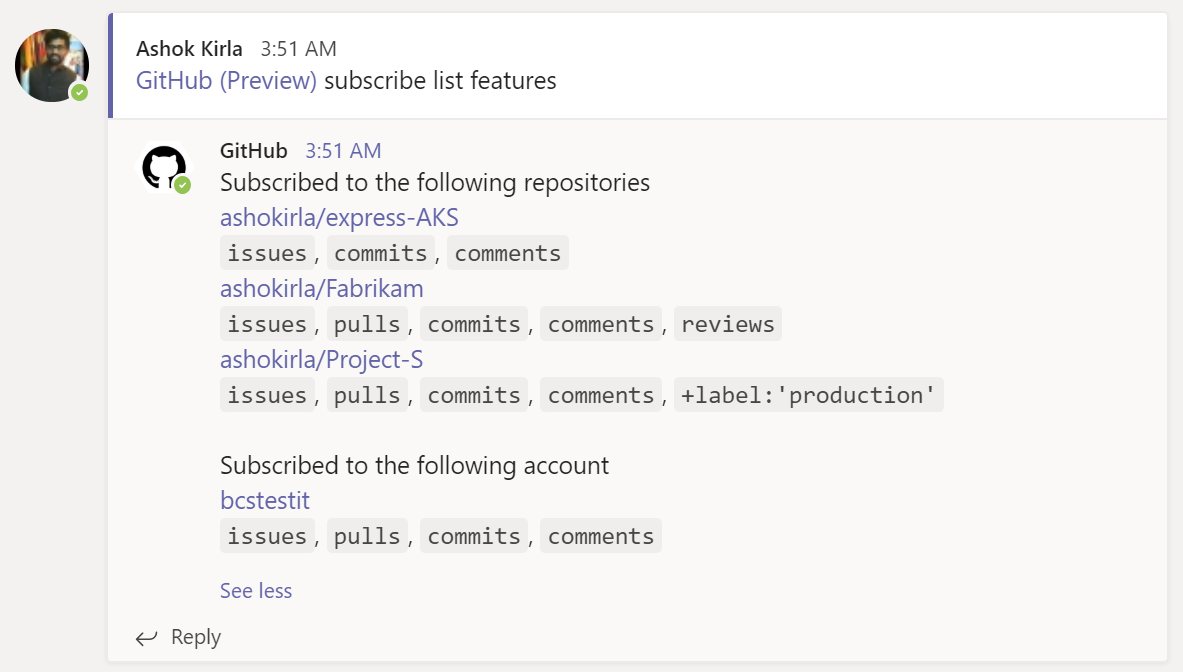
Microsoft Teams for GitHub
Owned and operated by GitHub, this integration solution allows you to connect your GitHub repository with Microsoft Teams. This ensures better visibility and smooth collaboration between internal and external teams.
First, you have to subscribe using the following command: @ github subscribe [owner/repo]. Then you can start receiving notifications about code reviews, releases, discussions, and pull requests.
This tool helps you keep the conversation going by making it possible to open/close issues and drop comments directly from Microsoft Teams. And the best part? You get this integration for free.
Monday.com + GitHub
This tool integrates your GitHub account with your Monday.com. To get the integration to work, you should first install Monday.com on your GitHub as the admin. You can choose to integrate all repositories or a select few.
After installation, you can start streamlining all redundant tasks, such as managing issues and commits. You can also customize automated actions that should occur when specific events are triggered in the GitHub repository.
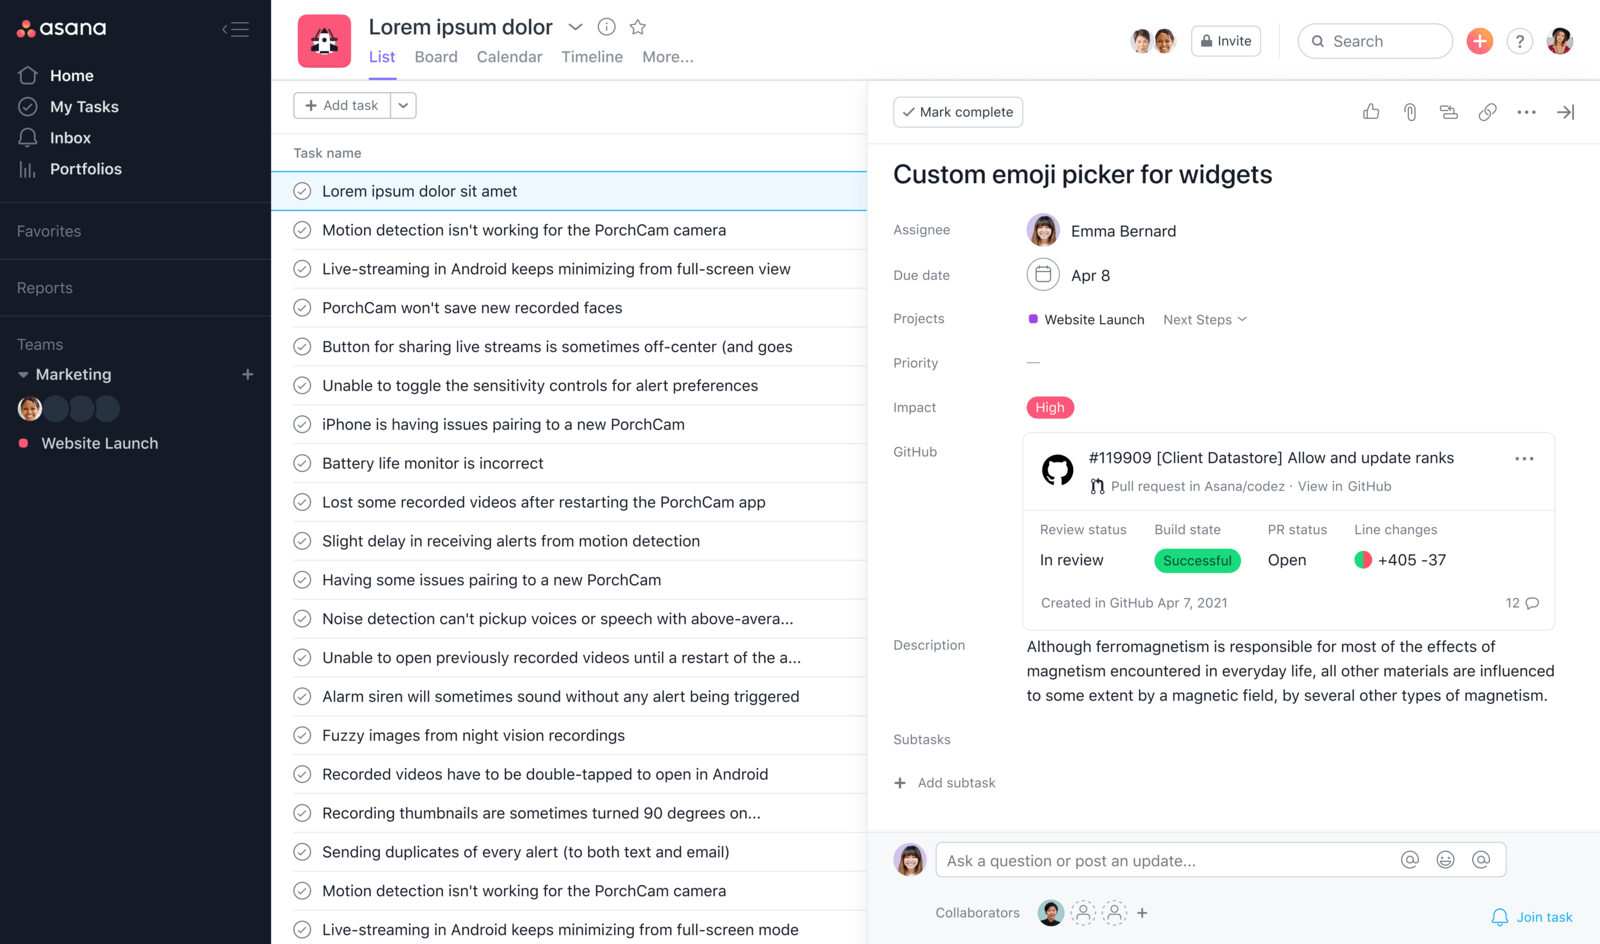
Asana App for GitHub
With this integration tool, you can automatically sync GitHub pull requests, comments, and issues to your Asana boards. Asana App for GitHub also allows users to sync attachments and get notifications, thanks to GitHub Actions.
If you have Asana Premium, Business, or Enterprise, you can get this integration for free.
Exalate
Exalate is a two-way integration solution that allows you to synchronize data in multiple ITSM systems with GitHub. With Exalate, you can sync multiple repositories within and outside your organization.
The Exalate Free Plan gives you access to no-code pre-built configurations and up to 1000 new issue syncs every month (under the Basic Mode).
The Premium Plan gives you access to features like Script Mode, with which you can fully customize your incoming and outgoing syncs and unlimited monthly syncs.
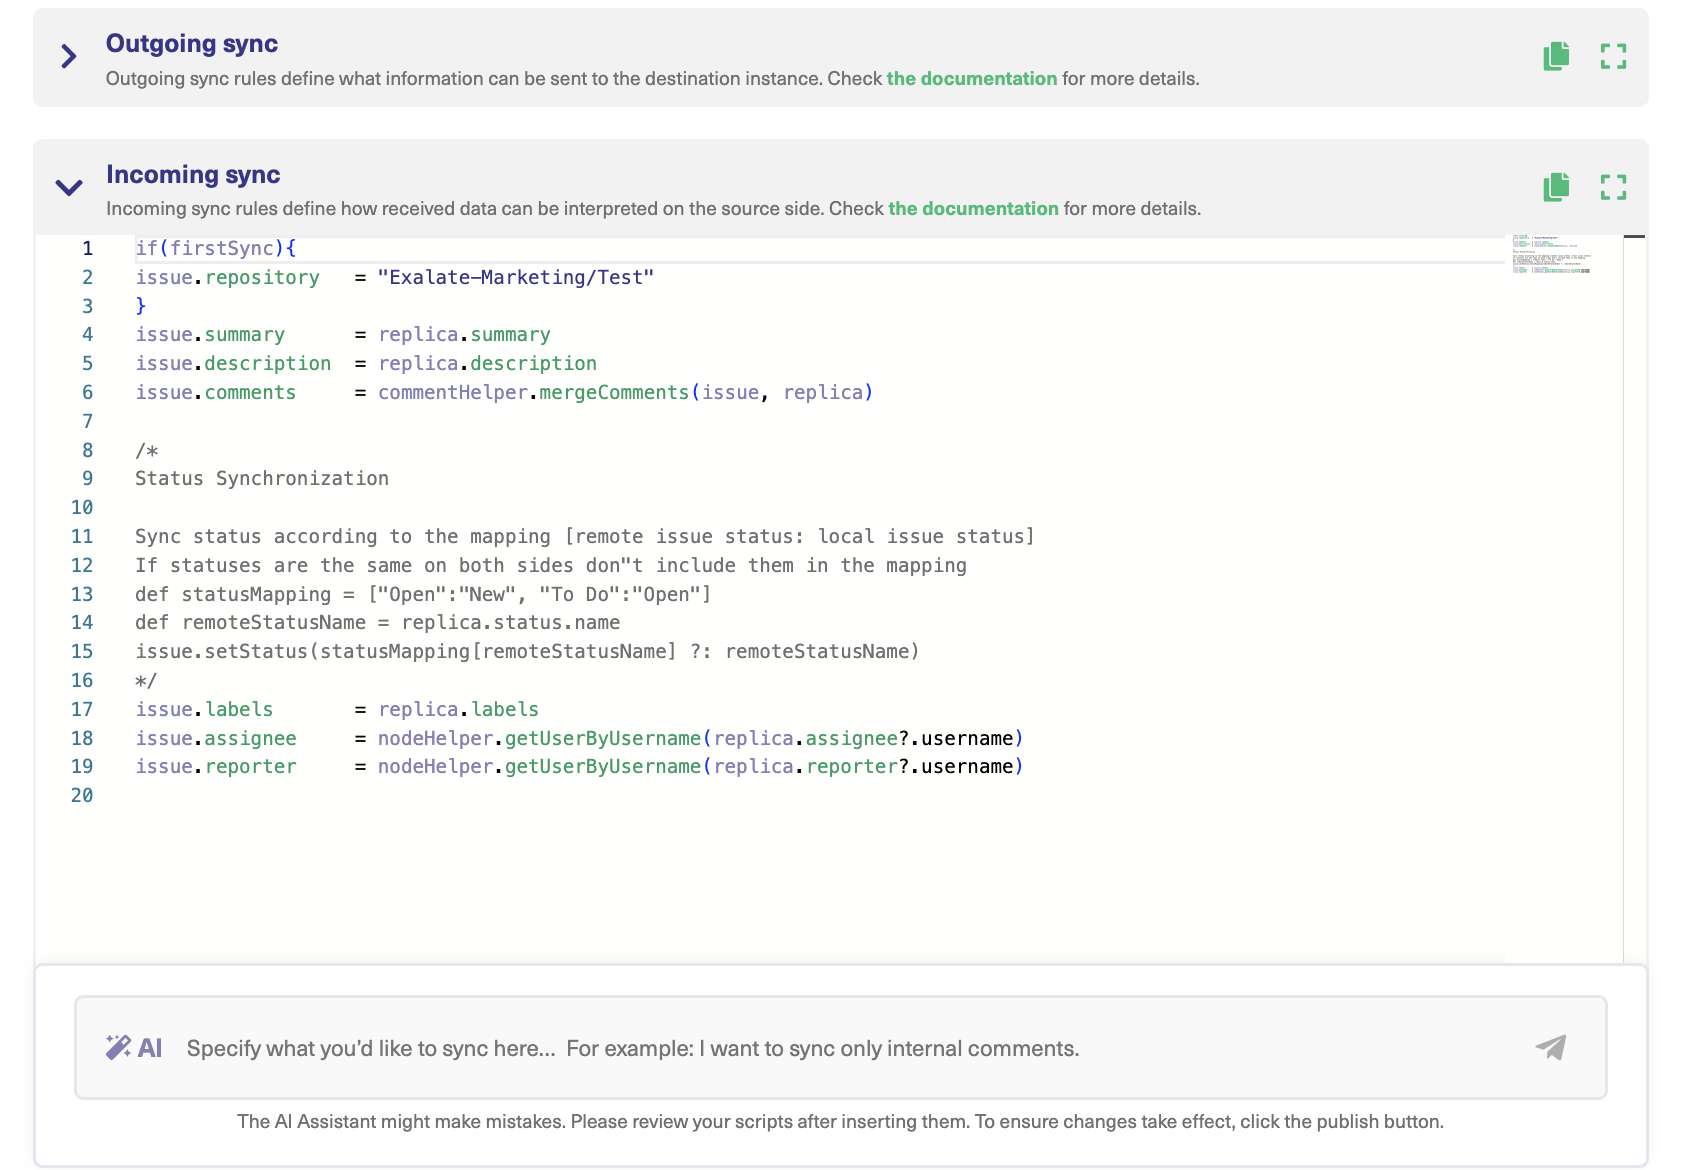
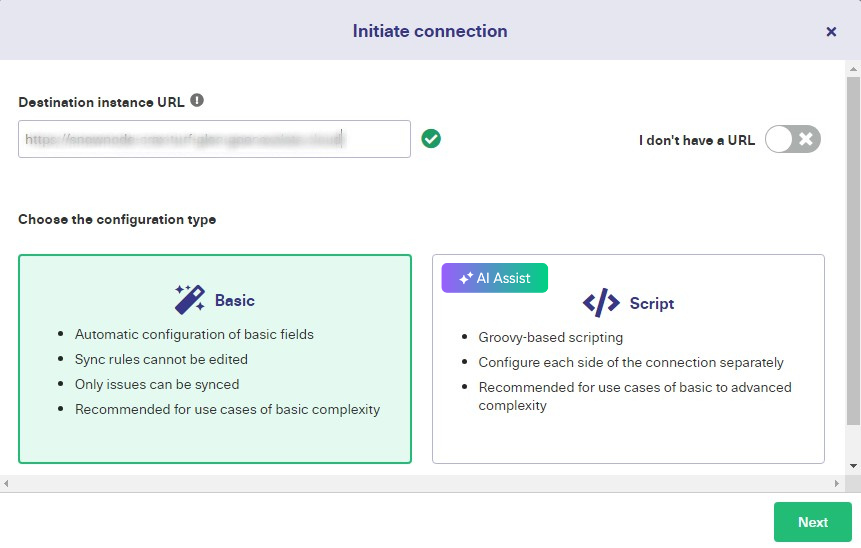
Exalate’s Script mode is ideal for implementing deep integrations between GitHub and other systems. Using Groovy-based scripts you can easily implement even the most advanced integration scenarios. GitHub users are generally familiar with scripting, so this should be easy. For all non-technical users, the Script mode also comes with AI Assist. This AI feature generates scripts based on human prompts. You simply enter the requirements, review the AI-generated scripts, refine if required, and publish the changes. As with any AI, it’s important to note that mistakes can happen, so be vigilant.
But the crowning jewel for Exalate is that it is not native to only one work management system, unlike other products in the GitHub Marketplace. This tool allows you to sync data with other systems like Zendesk, ServiceNow, Salesforce, Jira, etc.
Zenhub is a work management platform that integrates natively with GitHub. Trusted by NASA and Adobe, this solution makes it possible to track issues, plan sprints, visualize tasks, and gather insights from GitHub.
You can get the Zenhub extension directly from the company’s website or from the GitHub Marketplace. And since it relies on GitHub’s OAuth protocol, you are assured of security when syncing your data.
Companies get a 4-month free trial with the For Teams Plan before the first annual billing ($8.33 per user/per month). The For Enterprise Plan (on-premise and cloud) gives large organizations unlimited control, additional security, and premium support.
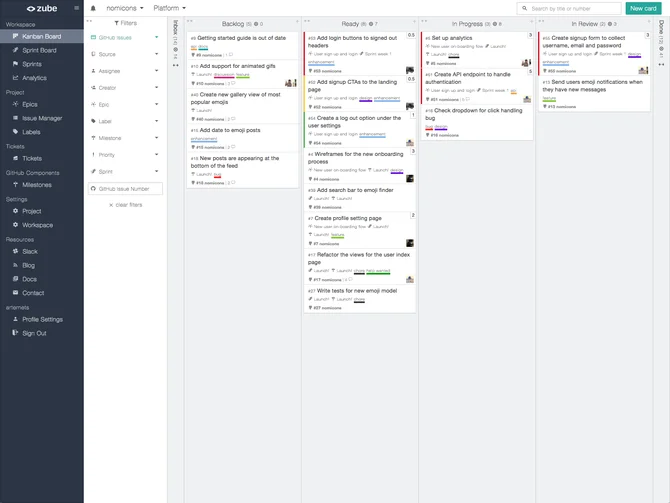
Zube
Zube is a project management solution that integrates seamlessly with GitHub. If you want to sync issues in real time and facilitate collaboration between devs and non-devs, you can add the Zubebot to bridge this gap.
Here is the pricing plan for Zube:
Free (up to 4 users)
Micro (up to 10 users) – $100/month
Startup (up to 25 users) – $250/month
Small Business (up to 50 users) – $500/month
Growing Business (up to 100 users) – $1000/month
Large Business (up to 200 users) – $2000/month
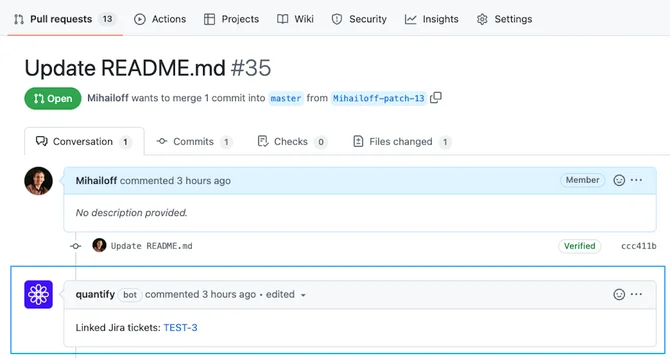
Quantify
Quantify is a solution that collects events from online repositories like GitHub and Bitbucket to provide a comprehensive view for your managed teams. The Quantify bot lets you link pull requests with Jira issues and get better development cost analysis.
You can also install the Quantify for Jira add-on to your Jira Cloud to automate time tracking and improve workflow efficiency.
Quantify is free to install and use. Unfortunately, you can only install it on organization GitHub accounts.
Key Takeaways
GitHub integrations allow you to sync your repositories and organizations with other services, applications, and systems.
These integrations rely on webhooks to send and receive payloads through GitHub Apps and OAuth Apps.
GitHub apps can work as the user and independent of the user, while OAuth apps can only work with the user’s permission.
GitHub apps are more scalable, and they also use OAuth tokens to restrict access and grant admin permissions. This makes them the preferred choice for building GitHub integration tools.
GitHub integration solutions can automate workflows and streamline processes. They can also improve the productivity of development teams and pipelines.
Frequently Asked Questions
How do I integrate with GitHub?
You can integrate with GitHub using the native GitHub REST API, GraphQL API, or webhooks. They act as the base of GitHub Apps and OAuth Apps, which facilitate the actual integration of GitHub repositories with external systems, apps, and similar services.
What are GitHub integrations?
GitHub integrations are software solutions that make it possible to connect and synchronize data between GitHub and other CRMs, messengers, ERPs, and cloud services. It could be an app-native integration like Zenhub or a standalone solution like Exalate. GitHub integrations are GitHub Apps or OAuth Apps that rely on the GitHub API (REST APIs and GraphQL APIs) to receive and share data with other system APIs.
What can I do with GitHub integrations?
With GitHub integrations, you can sync pull requests, comments, commits, branches, deployments, issues, and builds. You can also control DevOps performance by tracking key metrics such as cycle time, uptime, deployment speed, etc.
What is GitHub used for?
GitHub is a version control system that allows developers to collaborate freely. It helps you manage your code, track changes, build, and deploy from your GitHub repository. These features make GitHub an excellent open-source collaboration tool for documentation.
Why should I use GitHub integrations?
GitHub integrations make it easy to move code from your repository to another platform–GitHub AzureDevOps integration, for instance. You can also rely on them for monitoring changes within your codebase. They also enhance code security using OAuth tokens for user authentication. Teams collaborating on a single project can also use GitHub to improve communication and stay updated on project changes.
Is there a no-code tool for GitHub Integration?
Yes, you can use no-code tools to integrate GitHub with other systems, databases, and work management platforms. No-code integration solutions provide you with pre-built connectors, eliminating the need to write lines of code for one sync to start. Some no-code integration tools include Zapier, Exalate (Basic Mode), and SnapLogic.
In the digital age, the name of the game is innovation. And what is more transformative than Open AI’s ChatGPT and its revolutionary impact on SaaS products?
Integration is in our DNA and we’re excited to announce that Exalate is also taking its first steps into the amazing world of ChatGPT. We understand the importance of staying ahead of the curve and we’re exploring the potential of AI technology to increase Exalate’s capabilities and broaden our audience. But we’re also committed to ensuring this is all done in an effective, precise, and secure manner.
Exalate AI Services
Our exploration of AI technology includes three main initiatives:
Exalate for ChatGPT: We’re integrating AI into our support portal to optimize our support services and operations.
Assisted Integration: We’re developing a feature for the Exalate Script Mode that will function like a co-pilot in Github.
Auto-generated Integration: We’re planning to add an option that will allow you to prompt your use case and click one button. AI will handle the rest. This will simplify the integration creation and maintenance process.
Exalate for Chat GPT: Proof of Concept
We’ve already reached our first milestone by creating a proof of concept for Exalate for ChatGPT. This tool will assist the Exalate support team by categorizing tickets, summarizing them for escalation to development, and improving customer communication.
How it Works: A Seamless Integration
Once a ticket has been “Exalated”, it enters into a dynamic exchange with ChatGPT. This isn’t a one-time interaction but a continuous dialogue, a back-and-forth that unfolds as the ticket progresses.
When an internal comment is added to an exalated ticket, it triggers a call to ChatGPT. The AI then processes the comment, formulating a response that is added back to the ticket as another internal comment. This seamless integration allows for real-time interaction between the support engineer and the AI.
But what does this mean in practical terms?
For one, it means that support engineers can get assistance from AI to summarize lengthy tickets, especially those with 20-70 messages. This not only saves time but also ensures that the key points are captured accurately and concisely.
It can also help improve responses to users. ChatGPT can efficiently refine and beautify messages, ensuring clear and empathetic communication with customers.
Lastly, it means that support engineers can get valuable hints at the root cause of issues and potential workarounds. By analyzing the ticket content, ChatGPT can suggest possible solutions, speeding up resolution times and enhancing customer satisfaction.
ChatGPT has taken the world by storm. The AI language model is already being used to make life simpler and more efficient for writers, programmers, and even lawyers. AI is here to stay, and our R&D department is hard at work making Exalate more supportive and simpler to use than ever.
So this is not just a cool feature; it’s a game-changer. It’s about making the support process more efficient, more effective, and more customer-centric. And it’s all made possible with the power of AI.
What’s Next?
Are you curious about what’s next? Stay tuned or sign up to our waiting list to become a beta user and be the first to experience the future of integration platforms.
Syncing between two Jira Cloud instances helps companies share epics and issues between teams and beyond business borders. This can be done using third-party connectors and integration tools that are easily modifiable to your use cases. Manual and automatic options are available, giving you the ability to use custom triggers.
To shed more light on this topic, let’s explore a sample use case. I’ll use a third-party integration solution called Exalate for this illustration.
Epic Syncs: Jira to Jira Use Case
After creating an epic on one Jira Cloud instance, you can establish a connection with another Jira Cloud instance in order to share data between the two. In the same manner, changes on the origin (local) side will reflect instantly on the receiving (remote) side.
Let’s go through the requirements and potential challenges.
Primary Requirements
When you create a Jira epic and add issues to it on your instance, the changes should appear on the other end without having to replicate the same issues manually.
For this to work, you need to declare sync rules for the outgoing and incoming data fields. To automate the transfer of epic content, you can also create triggers using the Jira Query Language (JQL).
Potential Challenges
Network timeouts
Badly configured triggers
Code errors
How Can Exalate Solve This Problem?
Exalate is a bi-directional integration solution that helps sync data between work management systems and online repositories. Examples include Zendesk, Azure DevOps, ServiceNow, Jira, Salesforce, GitHub, etc.
Why use Exalate?
It allows you to sync Jira epics and issues in a few clicks.
Exalate’s Groovy scripting engine allows you to write custom rules for advanced use cases.
It allows you to sync multiple epics and issues using the Bulk Exalate option.
Exalate protects your data when sharing sensitive information.
How to Sync Jira Epics With Exalate
For starters, you need to install Exalate on both sides from the Atlassian marketplace. After installation, you can create your first connection. Refer to our Exalate Academy for a detailed explanation of the process.
To use the scripting engine for customizing connections, I recommend using Exalate’s Script Mode. It gives you the freedom to write your own Groovy scripts in order to control what goes over to the other side.
After setting up the local connection and accepting the invitation on the remote side, click the “Edit connection” icon (on the local side).
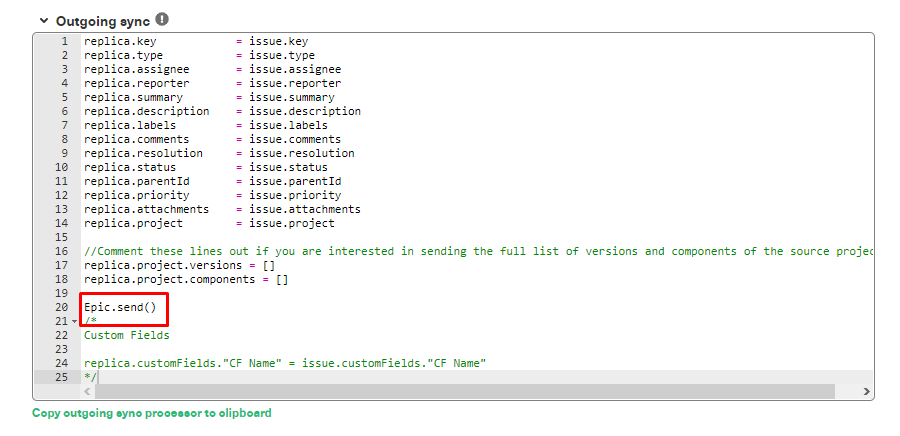
Go to the “Rules” tab and look for the “Outgoing sync” text field. Add the function Epic.send() to the console. This line of code sends out your Jira epic and its contents to a remote instance.
Click “Publish” to save and implement the changes.
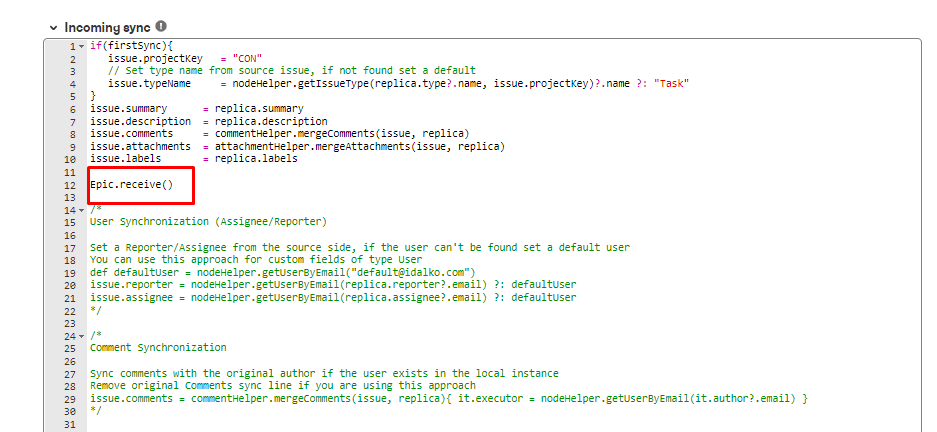
Then repeat the same procedure by opening the “Rules” tab on the remote instance (the receiving side). This time, go to the “Incoming sync” text field and enter the function Epic.receive().
The .receive() method tells the console to allow the remote instance to receive data from the sending instance (local instance).
Click “Publish” to save the changes.
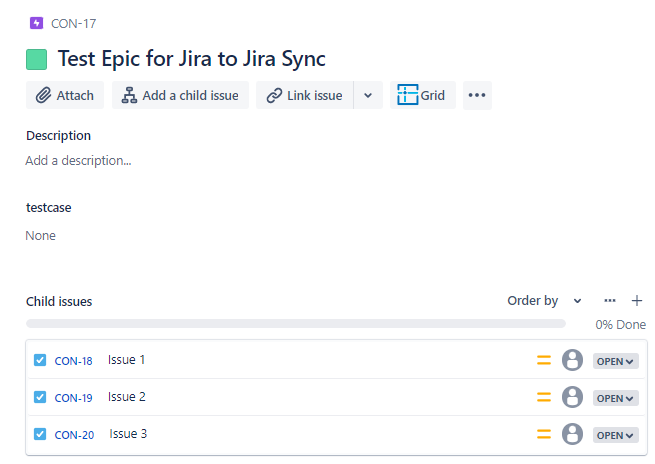
Once the connection is ready, head back to your Jira dashboard to create a new epic — add a name and description.
After creating the epic, go to the sidebar and click “Open Exalate.” Next, click “Exalate” and choose the connection name you created earlier.
Wait for the status to go from “Waiting for Remote” to “Synchronized.” Once this happens, click on the Remote Link, which will take you to the epic created on the other Jira instance.
You can confirm that the epic has been created.
Afterward, go back to the local instance and add three issues. Then go back to the remote side and refresh to see the issues within the newly created epic.
Note: If you don’t want to manually Exalate the issue, you can add Triggers to sync the issue automatically. So, anytime you create an epic on one side, it instantly replicates itself on the other side.
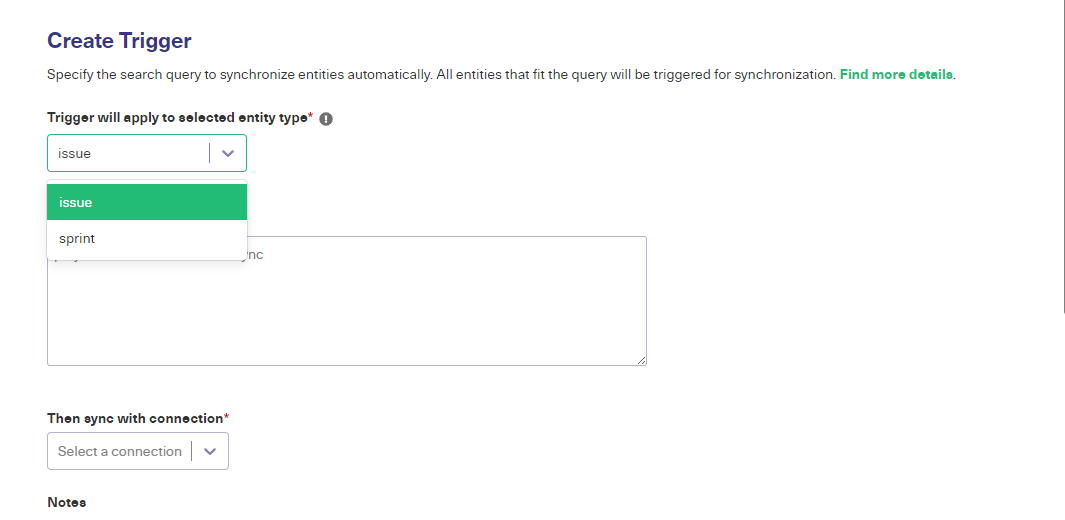
To create a trigger, click “Triggers” on the left sidebar. Click “Create Trigger” to start configuring your issue or sprint.
You can write as many conditions as necessary. If you have instructions, you can add them as “Notes” to the trigger. Once done, click “Create” to complete the process.
Congratulations! You’ve now set rules and triggers to help you sync epics between two Jira instances. Start monitoring things in order to adjust the rules according to the demands of specific projects and issues.
Summing Up
With Exalate, you can sync your Jira epics with another Jira Cloud account. You can also establish specific rules and triggers to automate the sync. These types of data syncs simplify your day-to-day operations and make providing better customer service easier. If you still have questions or want to see how Exalate is tailored to your specific use case, book a demo with one of our experts immediately.
Tableau ServiceNow integration equips organizations with expanded reporting functionalities to generate customized ServiceNow reports and build rich data visualizations crucial for complex, in-depth analysis.
ServiceNow’s reporting capabilities face two significant limitations. First, they only display the current state of data within the ServiceNow instance without capturing historical data trends or changes over time.
Secondly, they do not allow for the integration of multiple external data sources. This limitation stops organizations from building intricate, composite reports that can provide more comprehensive insights. As a result, they can fail to meet their specific and often complex reporting requirements.
Although these limitations exist within ServiceNow’s own system, leveraging Tableau can help overcome them while offering advanced reporting capabilities. And to make the transition smoother, we will look at an easy and streamlined method to export ServiceNow data to Tableau. That can aid your journey toward enhanced data reporting and visualization.
This guide provides detailed instructions for configuring ServiceNow Tableau integration, which enables organizations to take advantage of data analysis and acquire knowledge from a comprehensive perspective of their ServiceNow data.
So let’s get right to it!
When to Integrate Tableau and ServiceNow
The tactical integration of Tableau and ServiceNow can provide organizations with substantial benefits in their efforts based on data. ServiceNow Tableau integration offers organizations a powerful solution for managing and visualizing data.
Tableau’s advanced data visualization tools and ServiceNow’s comprehensive data management features enable organizations to extract maximum value from their data, navigate the information landscape, and make real choices based on relevant information.
ServiceNow integration with Tableau can provide organizations with helpful knowledge of essential metrics such as the time it takes to resolve incidents, the rate of successful service request fulfillment, the success rate of changes, and compliance with service level agreements.
Organizations can monitor customer satisfaction, employee performance, and resource utilization metrics to enrich their business operations. IT professionals can make statistically informed choices that improve IT service management by analyzing trends and identifying bottlenecks.
Consider ServiceNow and Tableau integration when:
Optimizing Service Management Process
When organizations focus on optimizing their processes to streamline service management, obtain actual time facts into service performance, and implement proactive measures for improvement, integrating Tableau and ServiceNow becomes a viable option. The integration allows organizations to convert detailed data into dynamic charts and graphs, aiding in making reliable choices by enhancing awareness of the data and providing practical information.
Improving Data Accessibility
The integration of Tableau and ServiceNow enables organizations to streamline their data collection process by integrating information from various data sources. This integration also facilitates easy access to customer data, thereby enhancing the efficiency of data analysis and management. It allows users to obtain precise and up-to-date information in real time.
Customizing Reports and Dashboards
Tableau integration with ServiceNow streamlines the complicated process of generating detailed reports and dynamic dashboards. The ability to create adopted reports and graphs is a valuable feature for organizations to develop further their data analysis and reporting strategies. By doing so, they can ensure that the displayed KPIs and metrics correspond with their unique requirements. Additionally, this information’s visual presentation is appealing to the eye and simple to understand for users.
Increasing Collaboration and Data Sharing
The integrated approach of Tableau and ServiceNow enables efficient teamwork and information exchange across various units and divisions. Reports, dashboards, and insights may be easily shared by users, encouraging a culture that values data and improving collaboration.
Boosting IT Operations
The integration of Tableau and ServiceNow allows organizations to conduct a comprehensive analysis of their IT operational data, which can help optimize their IT operations. The integration mentioned here enables the identification of areas that require improvement and streamlining processes such as incident management, problem management, and change management.
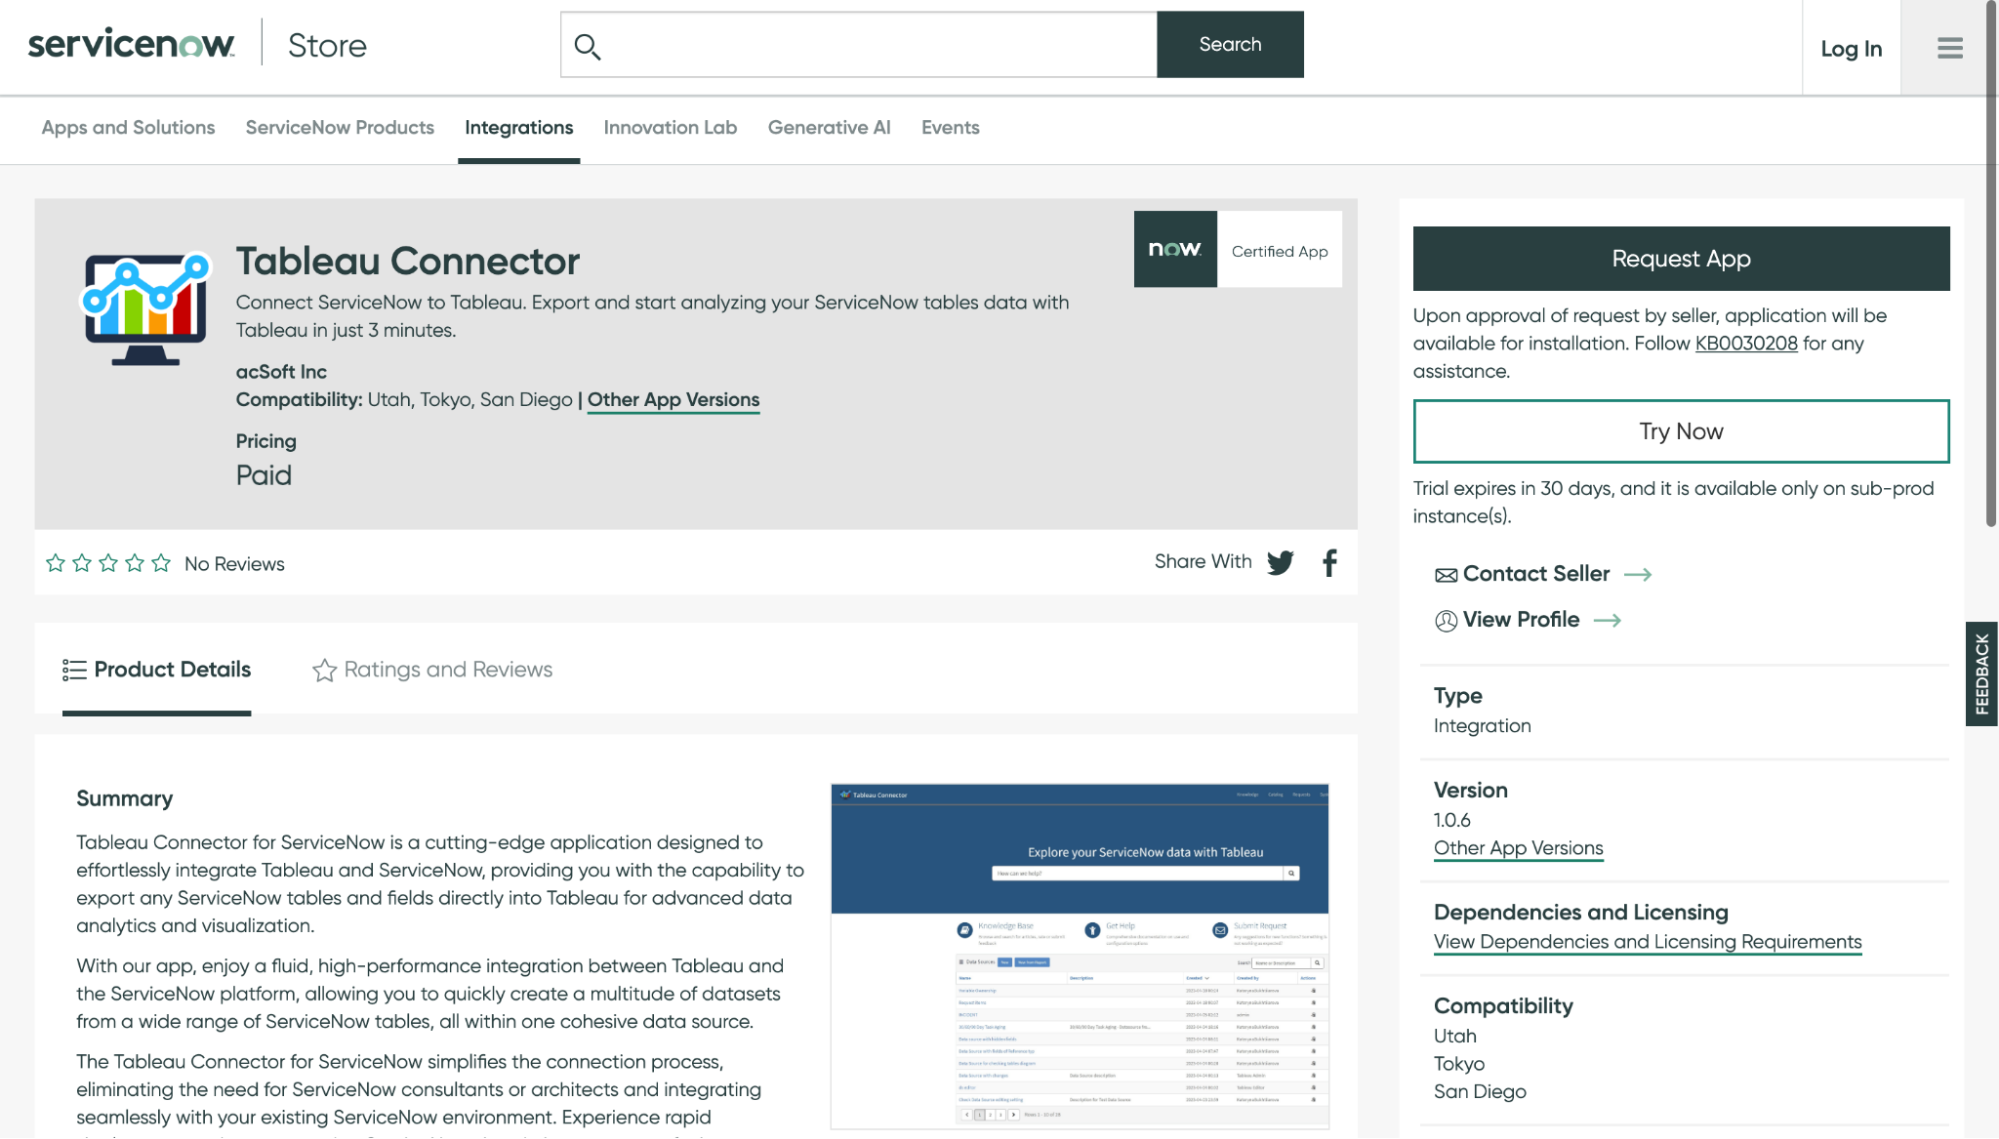
Available on the ServiceNow Store, this app enables organizations to integrate data by exporting ServiceNow tables and fields that offer flexibility and completeness in combining information. Integrating Tableau’s advanced data visualization and reporting features with an organization’s ServiceNow instance allows for build-up data analysis and reporting processes.
Key Features of Tableau Connector for ServiceNow
Tableau Connector for ServiceNow is an appealing choice for using the capabilities of both platforms since it possesses a number of critical features.
Simplified Data Extraction
Exporting ServiceNow tables and fields to Tableau has been simplified for users. Users can now select the desired tables and fields without requiring any complicated encoding or manual data extraction. The connector interface is designed to be easy to use, which alleviates the process of extracting data from ServiceNow.
Dynamic ServiceNow Dashboards
For teams in IT, support, or other areas, the connector makes it easier to create real-time Tableau dashboards that show key performance indicators (KPIs). The dashboards offer a means of obtaining real-time facts about a team’s performance. It enables organizations to keep track of their overall performance, monitor progress toward their goals, and identify areas that require improvement. The statement highlights the positive impact of promoting transparency, collaboration, and data utilization in developing decisions.
Combined ServiceNow Reporting
The connector enables organizations to generate all-inclusive reports in Tableau by merging data from different ServiceNow processes, such as incident management, problem management, etc. Integrating ServiceNow data with other systems such as CRM, ERP, Jira, and others can give organizations in-depth awareness of their operations. It can enable them to make informed choices based on a statistical data analysis.
Integrated Dot-Walking Mechanism
The mentioned feature enables users to efficiently retrieve and incorporate data fields from associated tables while exporting data to Tableau. Dot-walking is a technique that allows users to access and combine data from various tables within the ServiceNow instance by navigating relationships between them using dot notation. The tool permits users to seamlessly export data from multiple related tables, thereby increasing the adaptability and depth of their visual representations and reports, resulting in a more profound understanding and precise representation of information in Tableau.
Well-Thought-Out App Architecture
The architecture of the Tableau Connector for ServiceNow has been constructed to help with the export of vast quantities of ServiceNow data without causing any negative impact on the performance of your ServiceNow instance. The architecture is optimized to facilitate the extraction and transfer of data to achieve seamless integration between ServiceNow and Tableau. It enables organizations to handle large data sets without affecting the effectiveness and responsiveness of their ServiceNow setting, thereby improving their confidence when interacting with such data.
Advanced Data Security
The connector prioritizes data security and governance. ServiceNow Tableau Connector dispersed user roles to manage data access and security. There are three roles: Admin, Editor, and Viewer. The ServiceNow system admin determines users’ roles and permissions to export ServiceNow tables. Admin role has the most access, including reading, writing, creating, and deleting data sources. Editors can only read, write, and create data sources. Tableau Viewer cannot edit data sources but can export ServiceNow data to Tableau.
How to Connect Tableau to ServiceNow
The integration of Tableau’s data visualization and analytics capabilities with the data stored in ServiceNow can be achieved by organizations through a series of simple bending steps.
For a comprehensive understanding and detailed instructions, you can visit the app’s documentation.
Step 1: Install the Tableau Connector for ServiceNow
You can easily install the Tableau Connector for ServiceNow from the ServiceNow Store with system admin rights and HI credentials.
Since it requires no prerequisites, the Tableau Connector for ServiceNow is practical as it is a standalone app. The connector installs and applies without dependencies or configurations for a seamless experience.
Click the “Request an app” button and use your HI credentials to log in. Once the app is requested, you will receive instructions via email. The email will point you to the Installation Overview page.
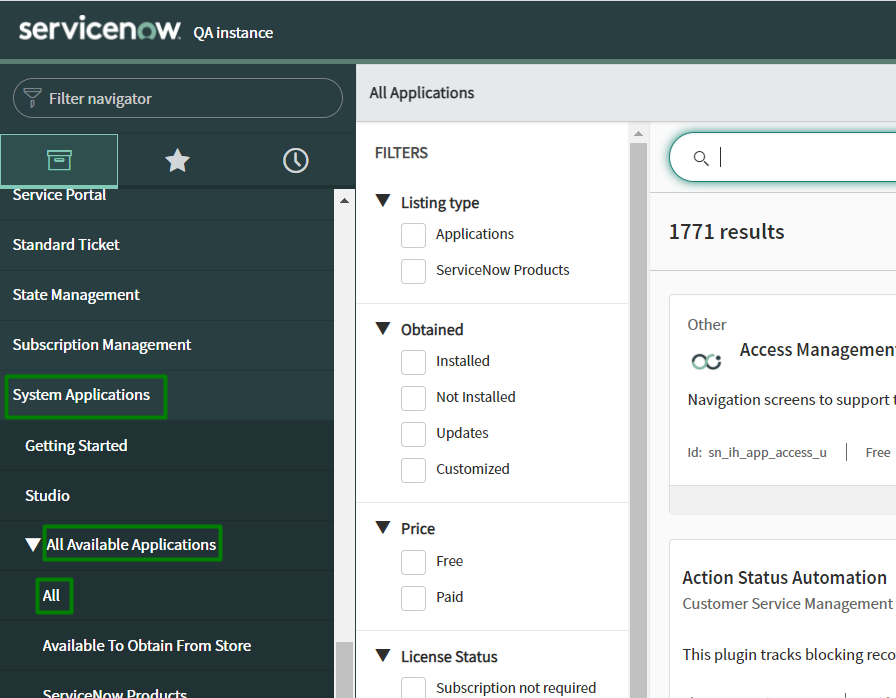
Users should access the System Applications section and select All Available Applications > All to locate and install the Tableau Connector for ServiceNow.
From there, they can use the filter criteria or search bar to narrow your search, find the Tableau Connector for ServiceNow, and click Install. Upon installation, users can access the connector through the menu.
Step 2: Assign Tableau Connector Roles to Users
The Tableau Connector for ServiceNow has specific responsibilities that ServiceNow System Administrators can assign to users to enable them to use it.
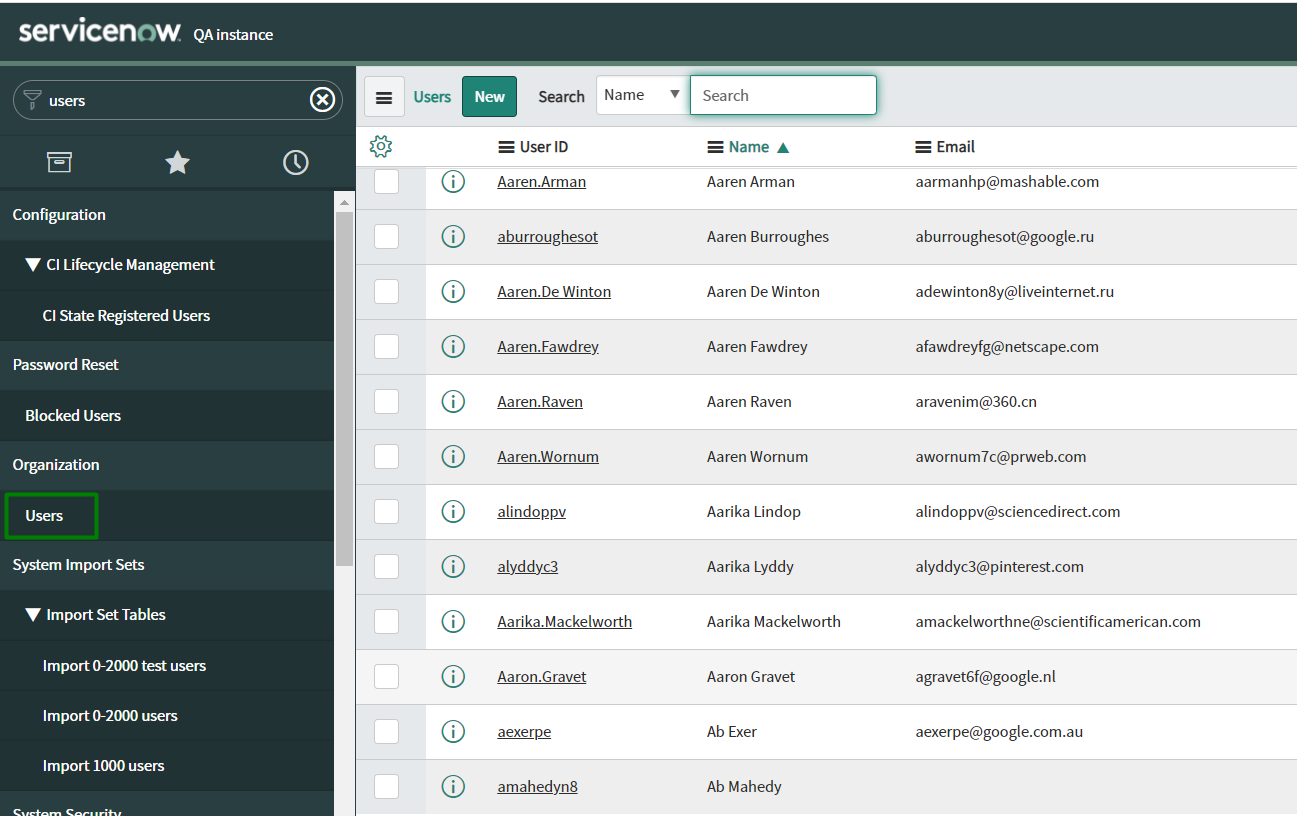
To assign roles and provide users with the required access, find the user to whom you wish to give the Tableau Connector role in the Users table.
Clicking on the user’s User ID will reveal their profile for modification.
Click the Edit button after switching to the Roles tab. ‘x_acsof_tableau’ should be typed into the Collection search area.
The search returns three roles for Tableau Connector for ServiceNow. Move the necessary roles to the Roleslist by choosing them from the Collection. After clicking Save, update the user.
Users will be given the appropriate permissions to operate with the Tableau Connector for ServiceNow by giving them specific roles, enabling them to take full advantage of its capability.
Step 3: Create a Data Source in ServiceNow
To create a Data Source using the Tableau Connector for ServiceNow, the user must have either the TABLEAU ADMIN or TABLEAU EDITOR role assigned (refer to Step 2 for more details).
These roles provide the necessary permissions and access rights to configure and manage Data Sources within the connector.
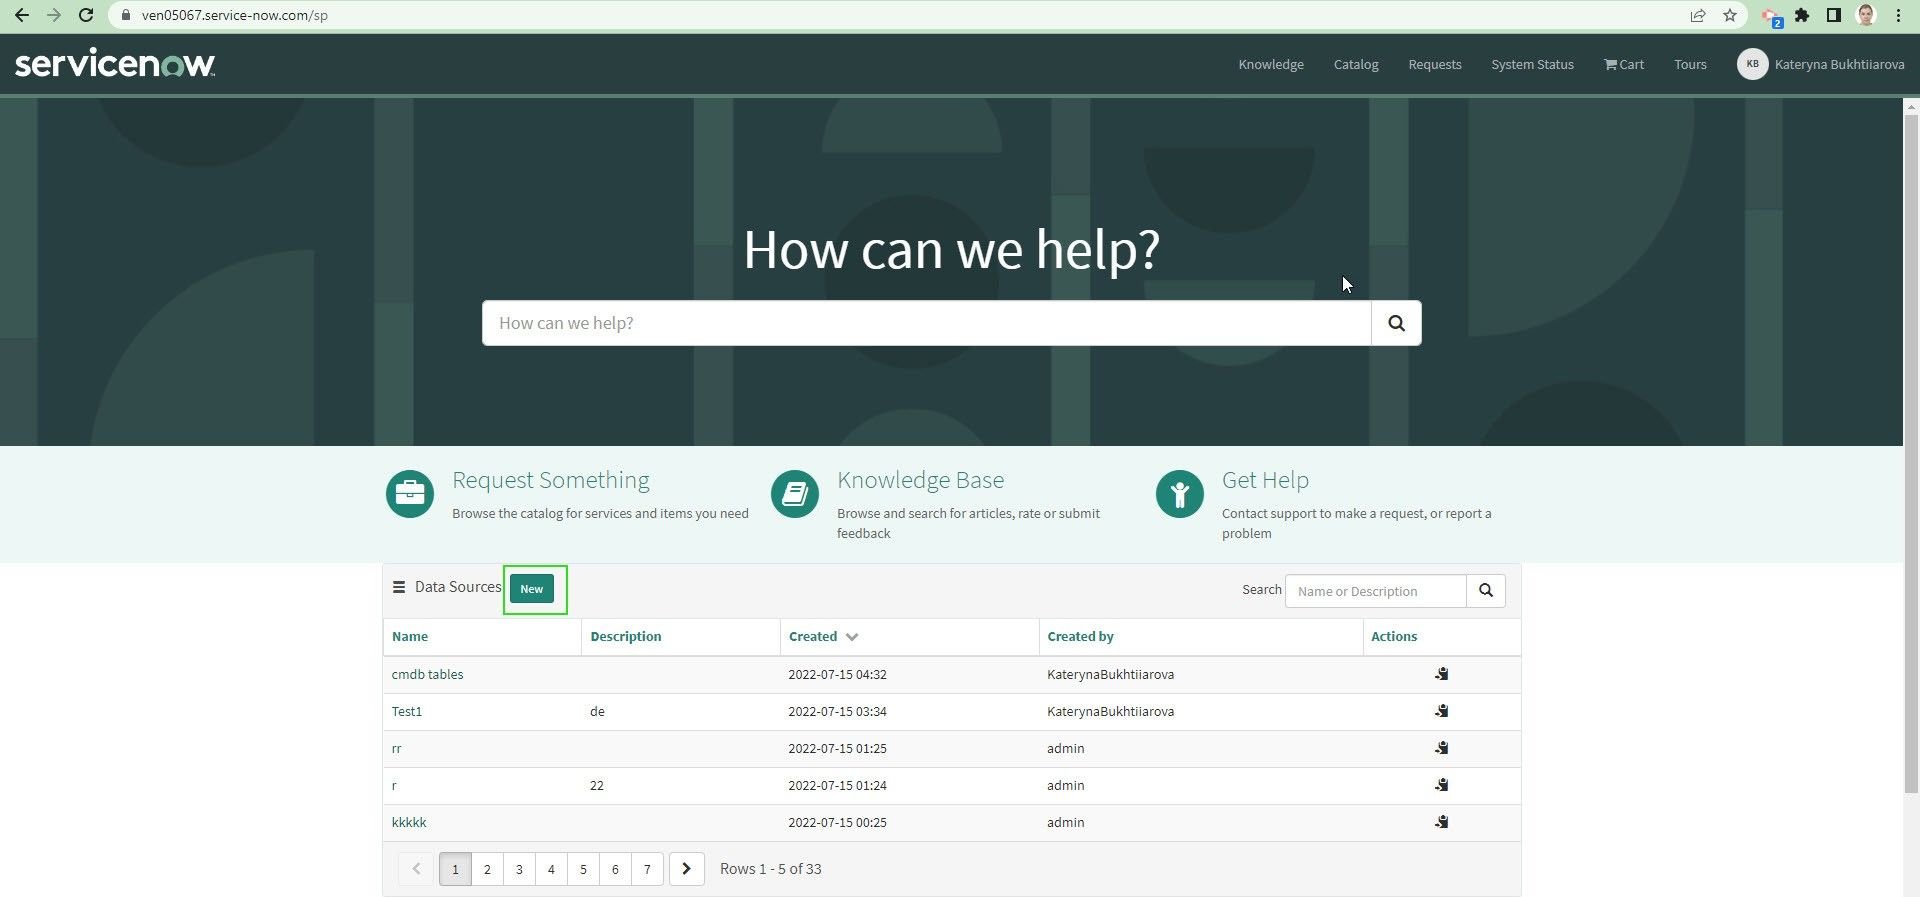
To Create Data Source using Service Portal Instance-Name.service-now.com/sp:
Within the ServiceNow interface’s Tableau Connector, scroll down to find the Data Sources table. After locating the Data Sources table, select New by clicking.
To Create Data Source using Tableau Connector page Instance-Name.service-now.com/tableau_connector:
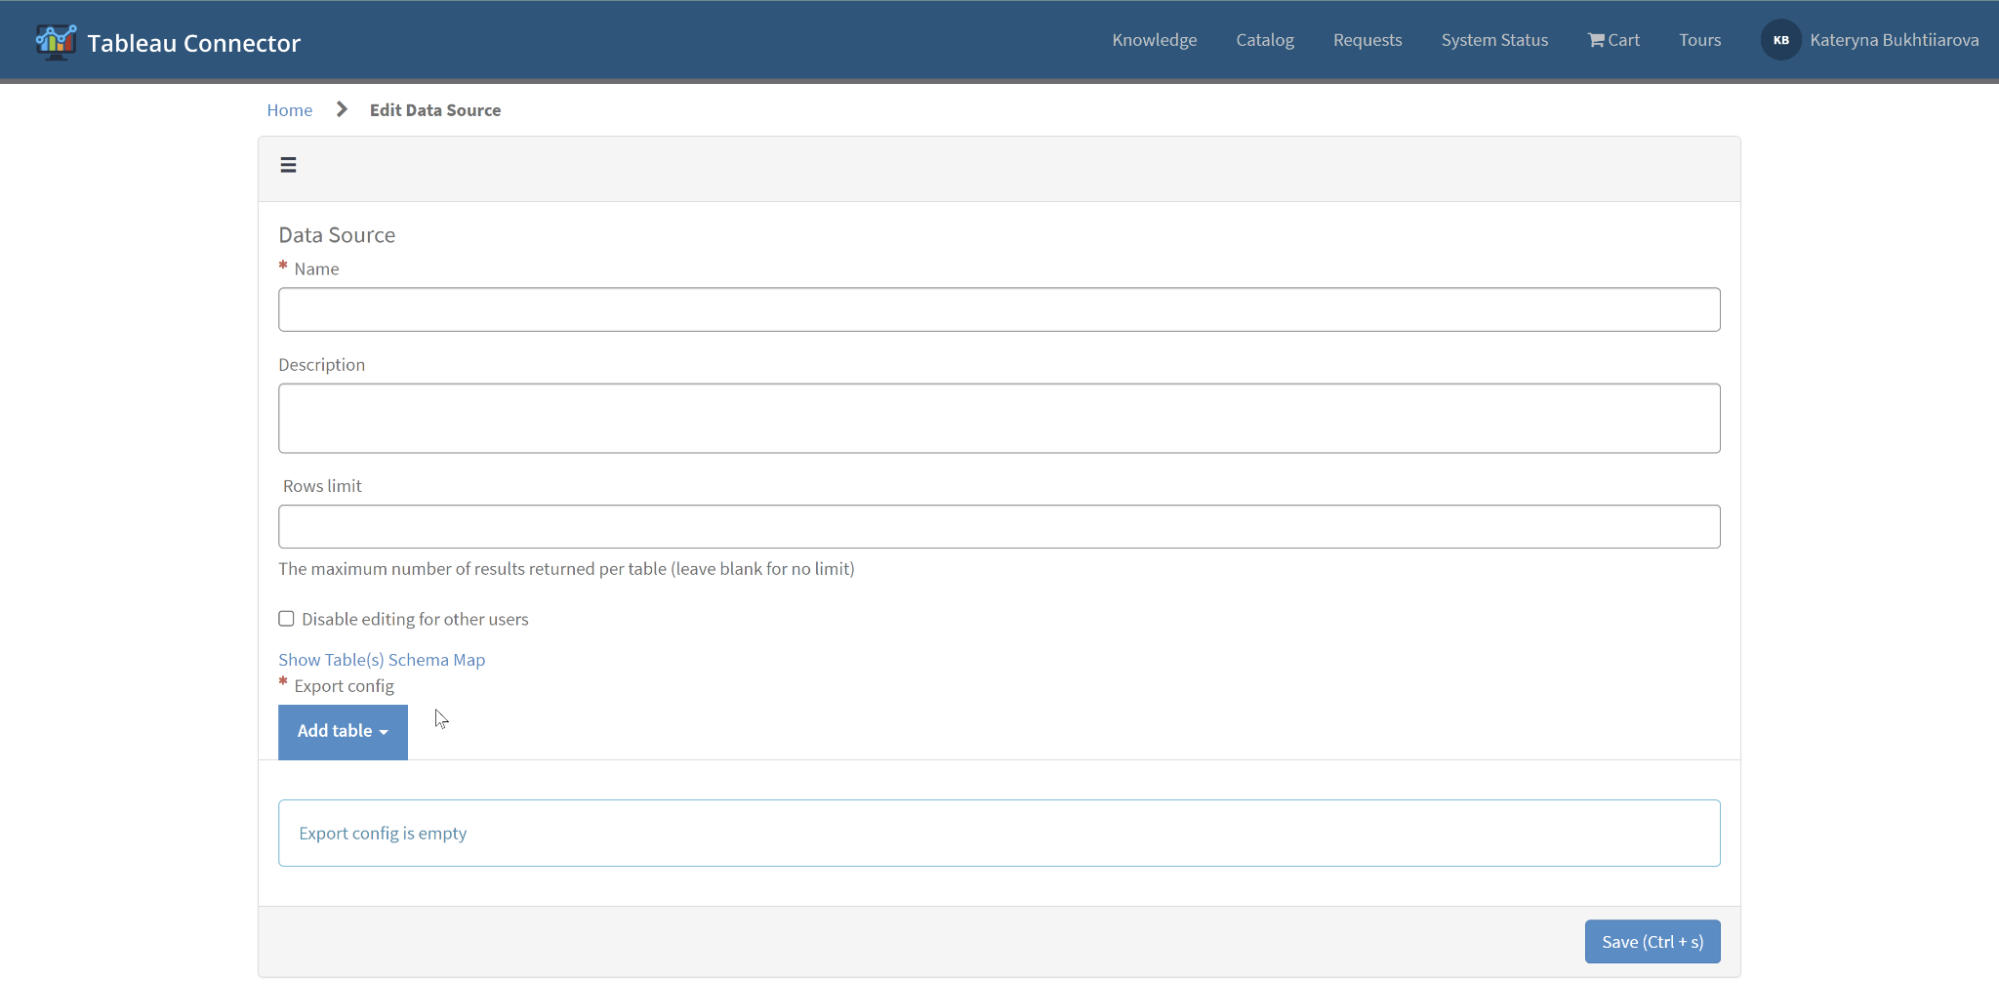
To initiate creating a new data source in Tableau, navigate to the Tableau Connector page and locate the New button.
Click on it to proceed. To properly set up the Data Source, it is necessary to complete all the required fields with the relevant information: Data Source name, Description (optional), Rows limit, Disable editing for other users, and set Use display value.
To configure the Export settings, click the Add Table button and start typing the table name in the search field, or scroll through the list to find the desired table you want to export.
Once selected, click the Add button.
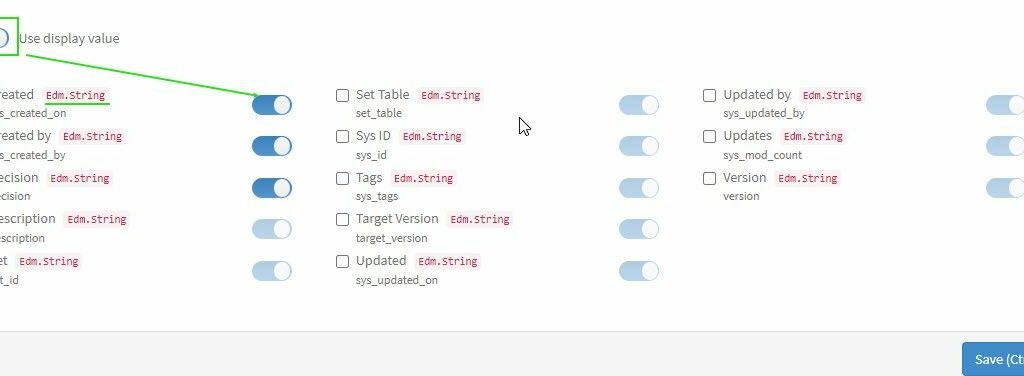
After adding the table, select the specific fields needed for your reports. You can export any ServiceNow tables and fields, including custom ones. If necessary, enable the Use display value option to export data in string format.
You can apply filters to the tables to further refine the export results. Click on the Filter icon and configure the desired conditions. Add conditions and click the Run button to apply the filter.
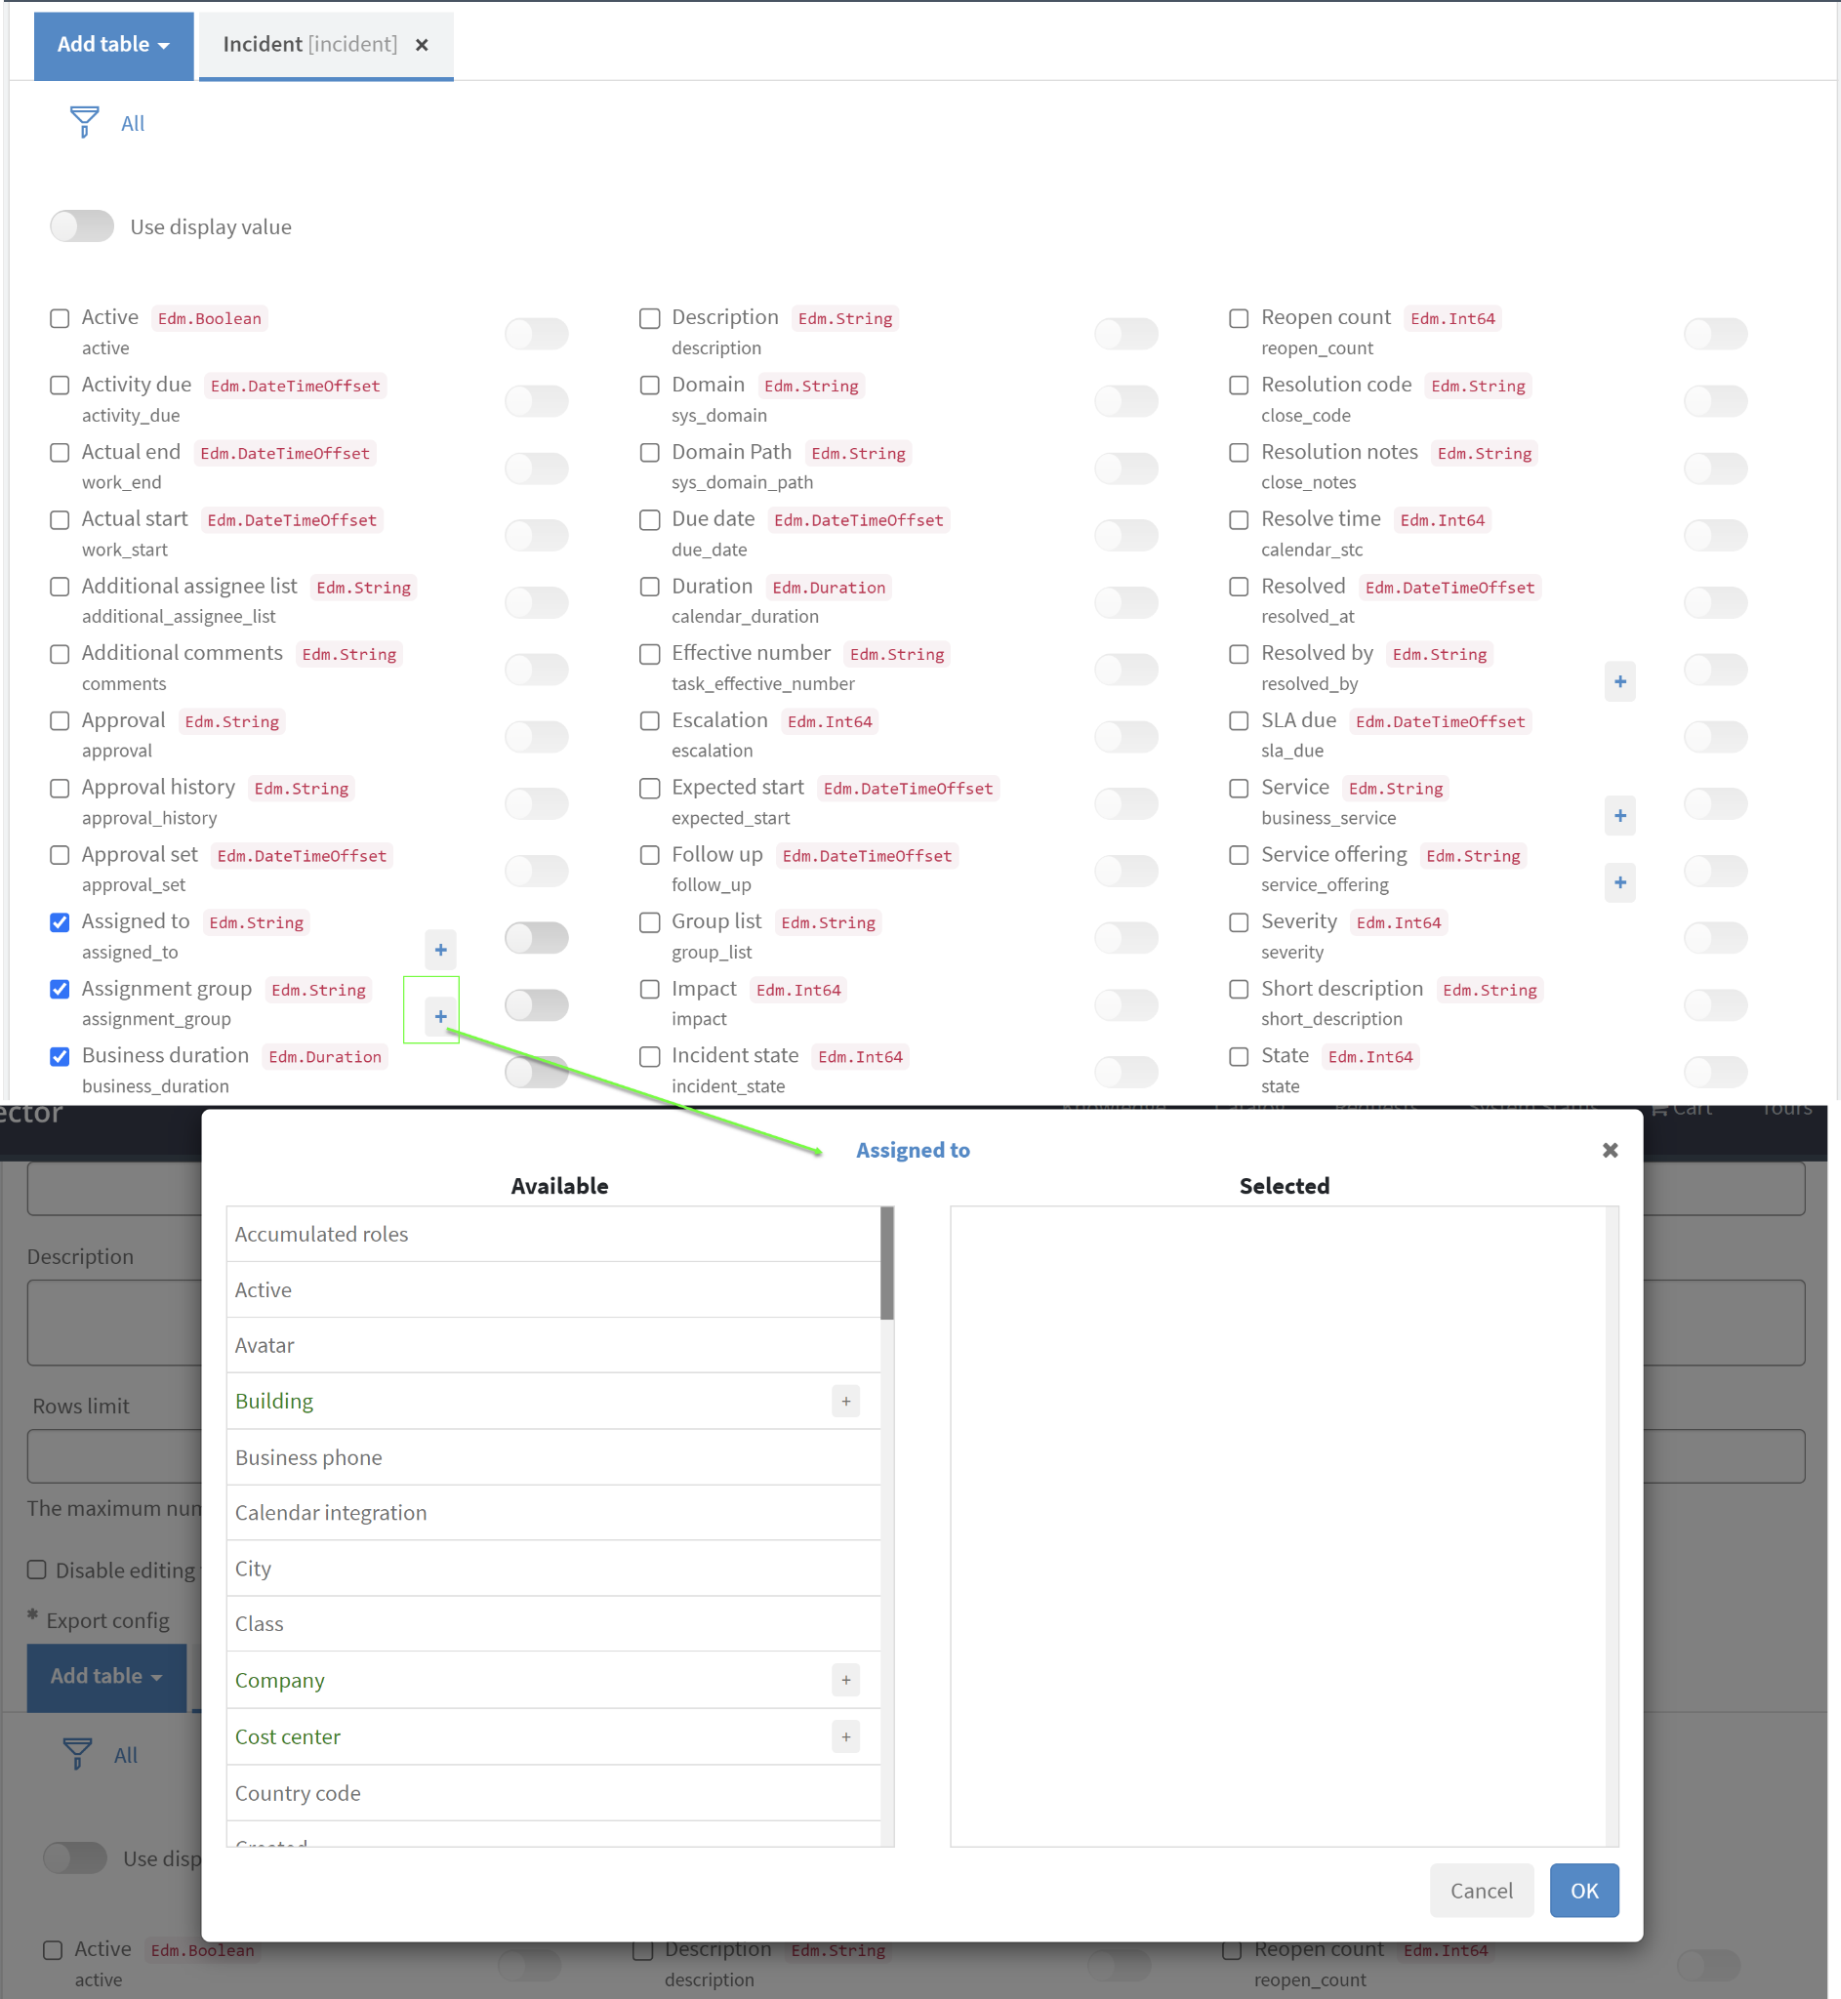
If you have a table that contains fields with a Reference type, click the “+” icon. In the opened dialog, select the fields you want to export.
Click OK to close the dialog.
Step 4: Import ServiceNow Data into Tableau
To import data from the Service Portal Instance-Name.service-now.com/sp:
Navigate to the table marked Data Sources located further down on the page. Apply the Search feature that has been made available. Provide the name of the data source you seek (the one you created in the previous step).
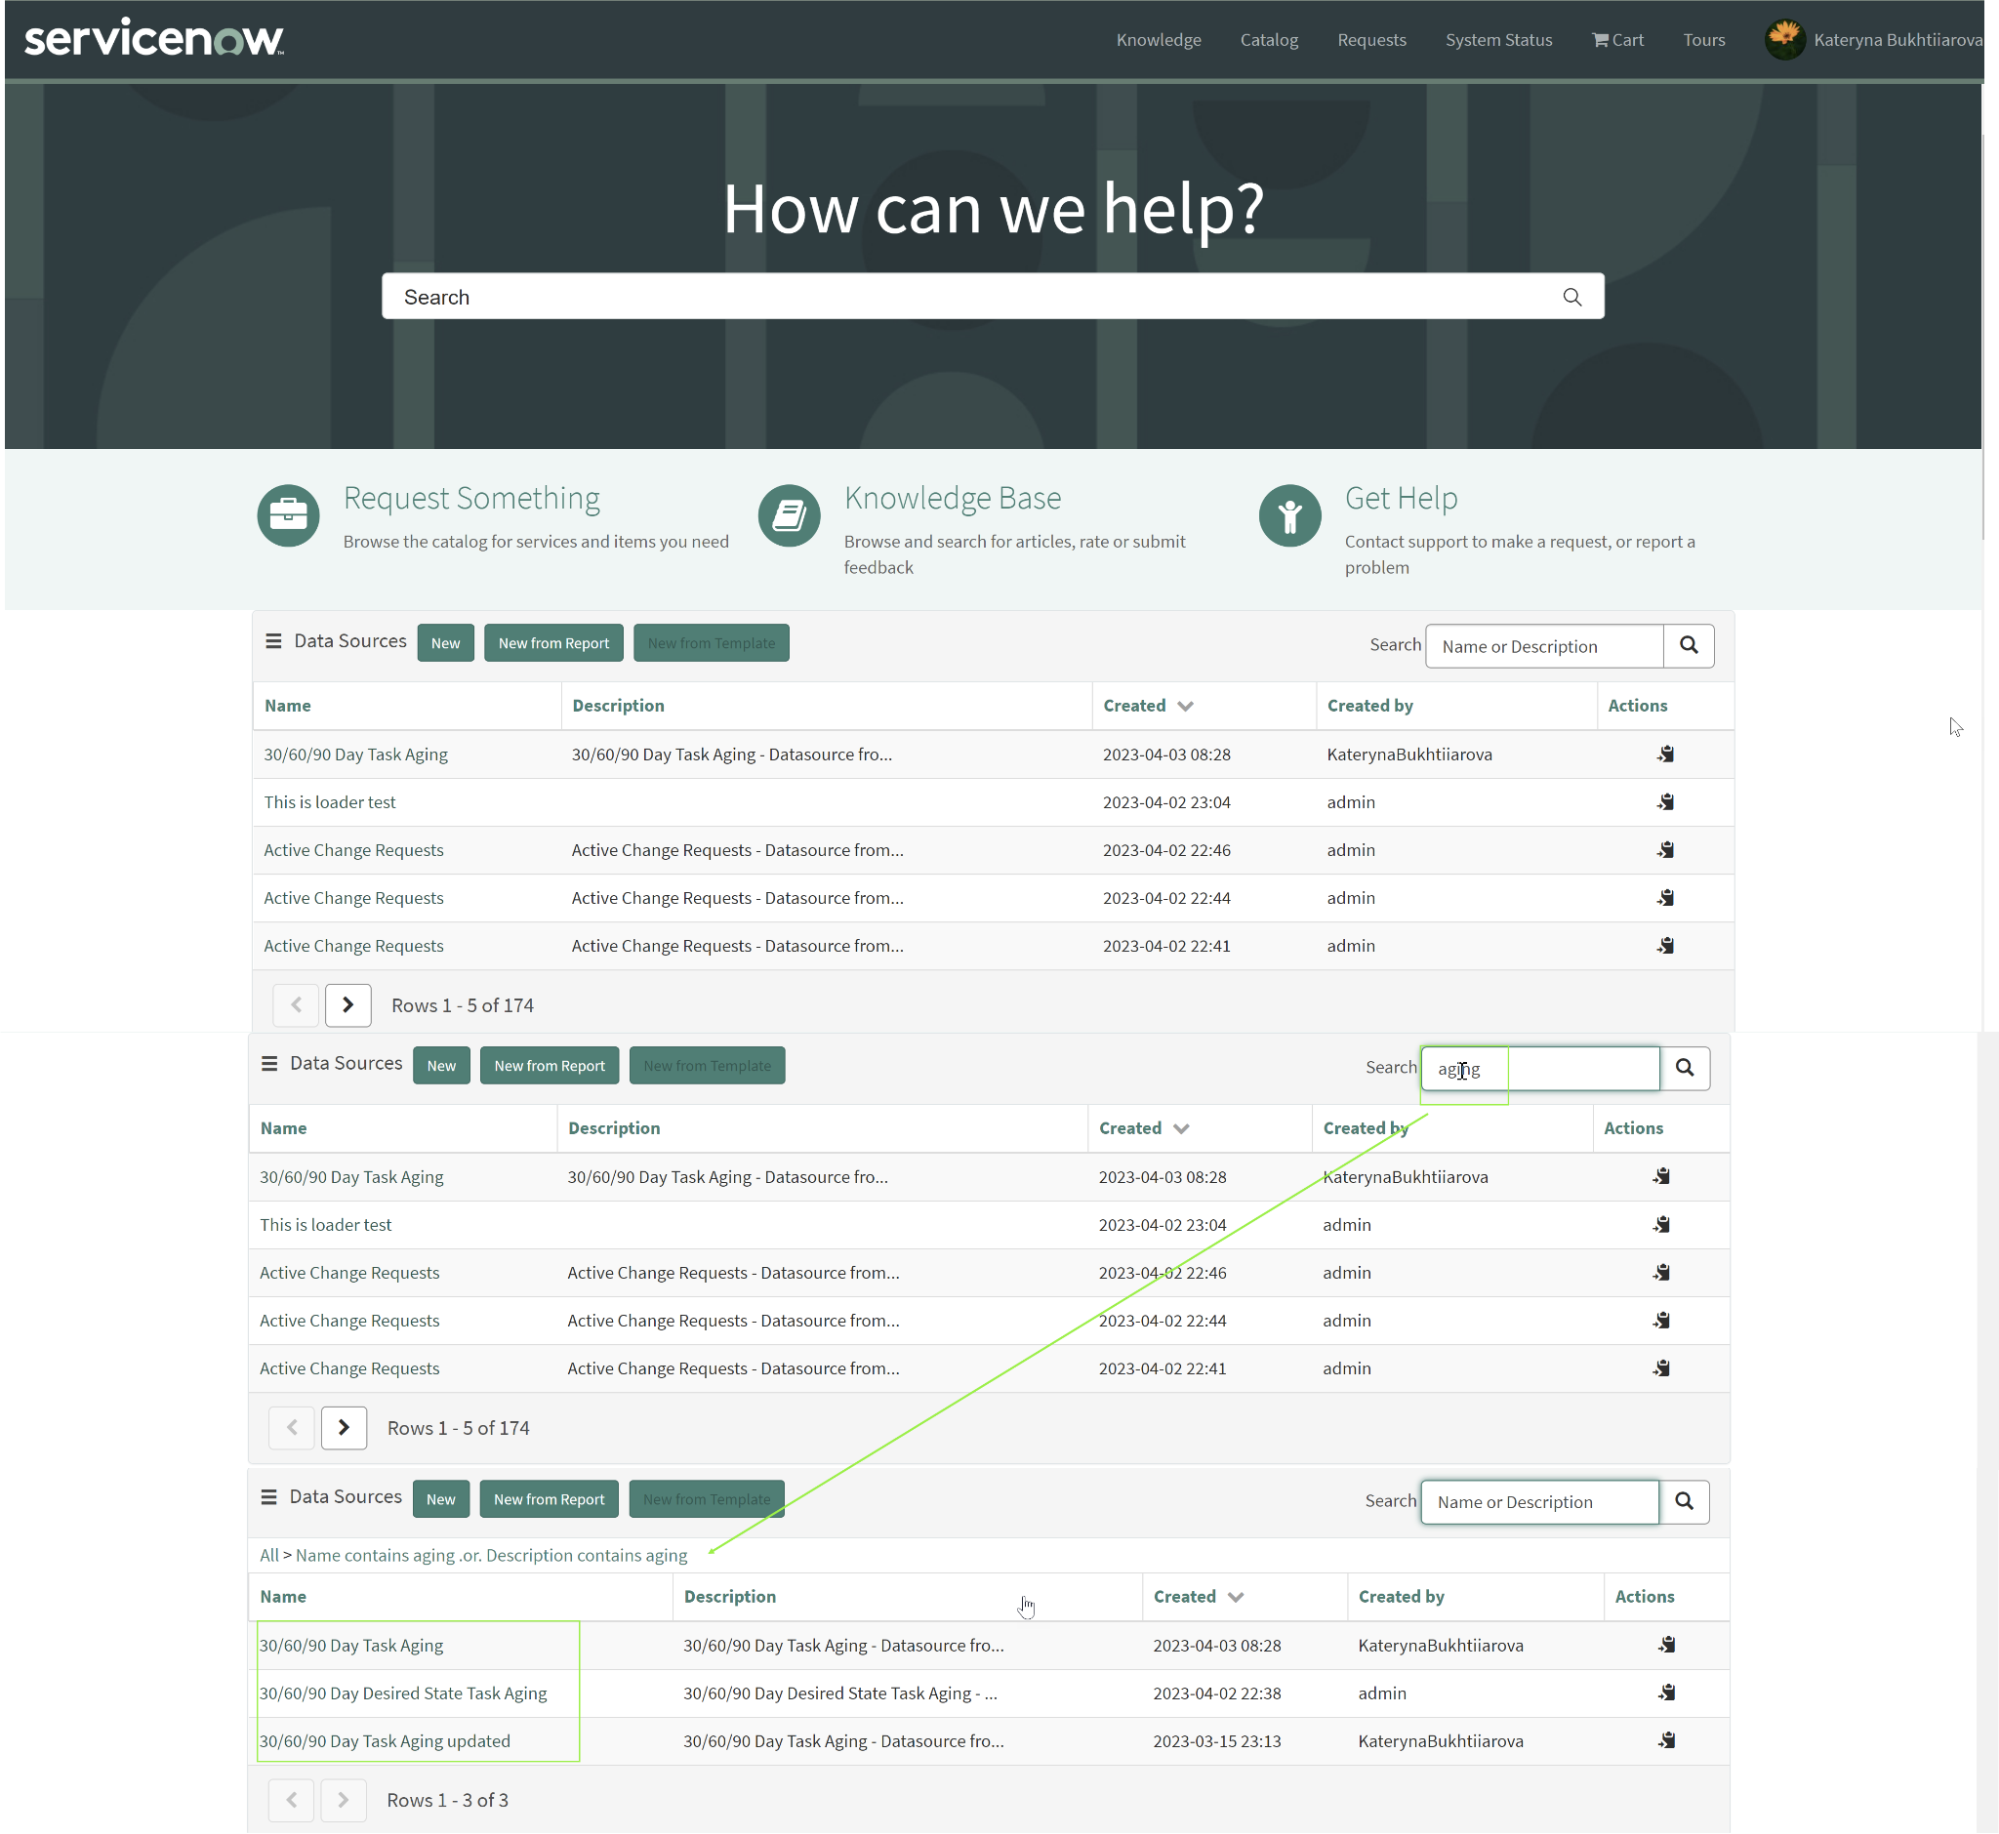
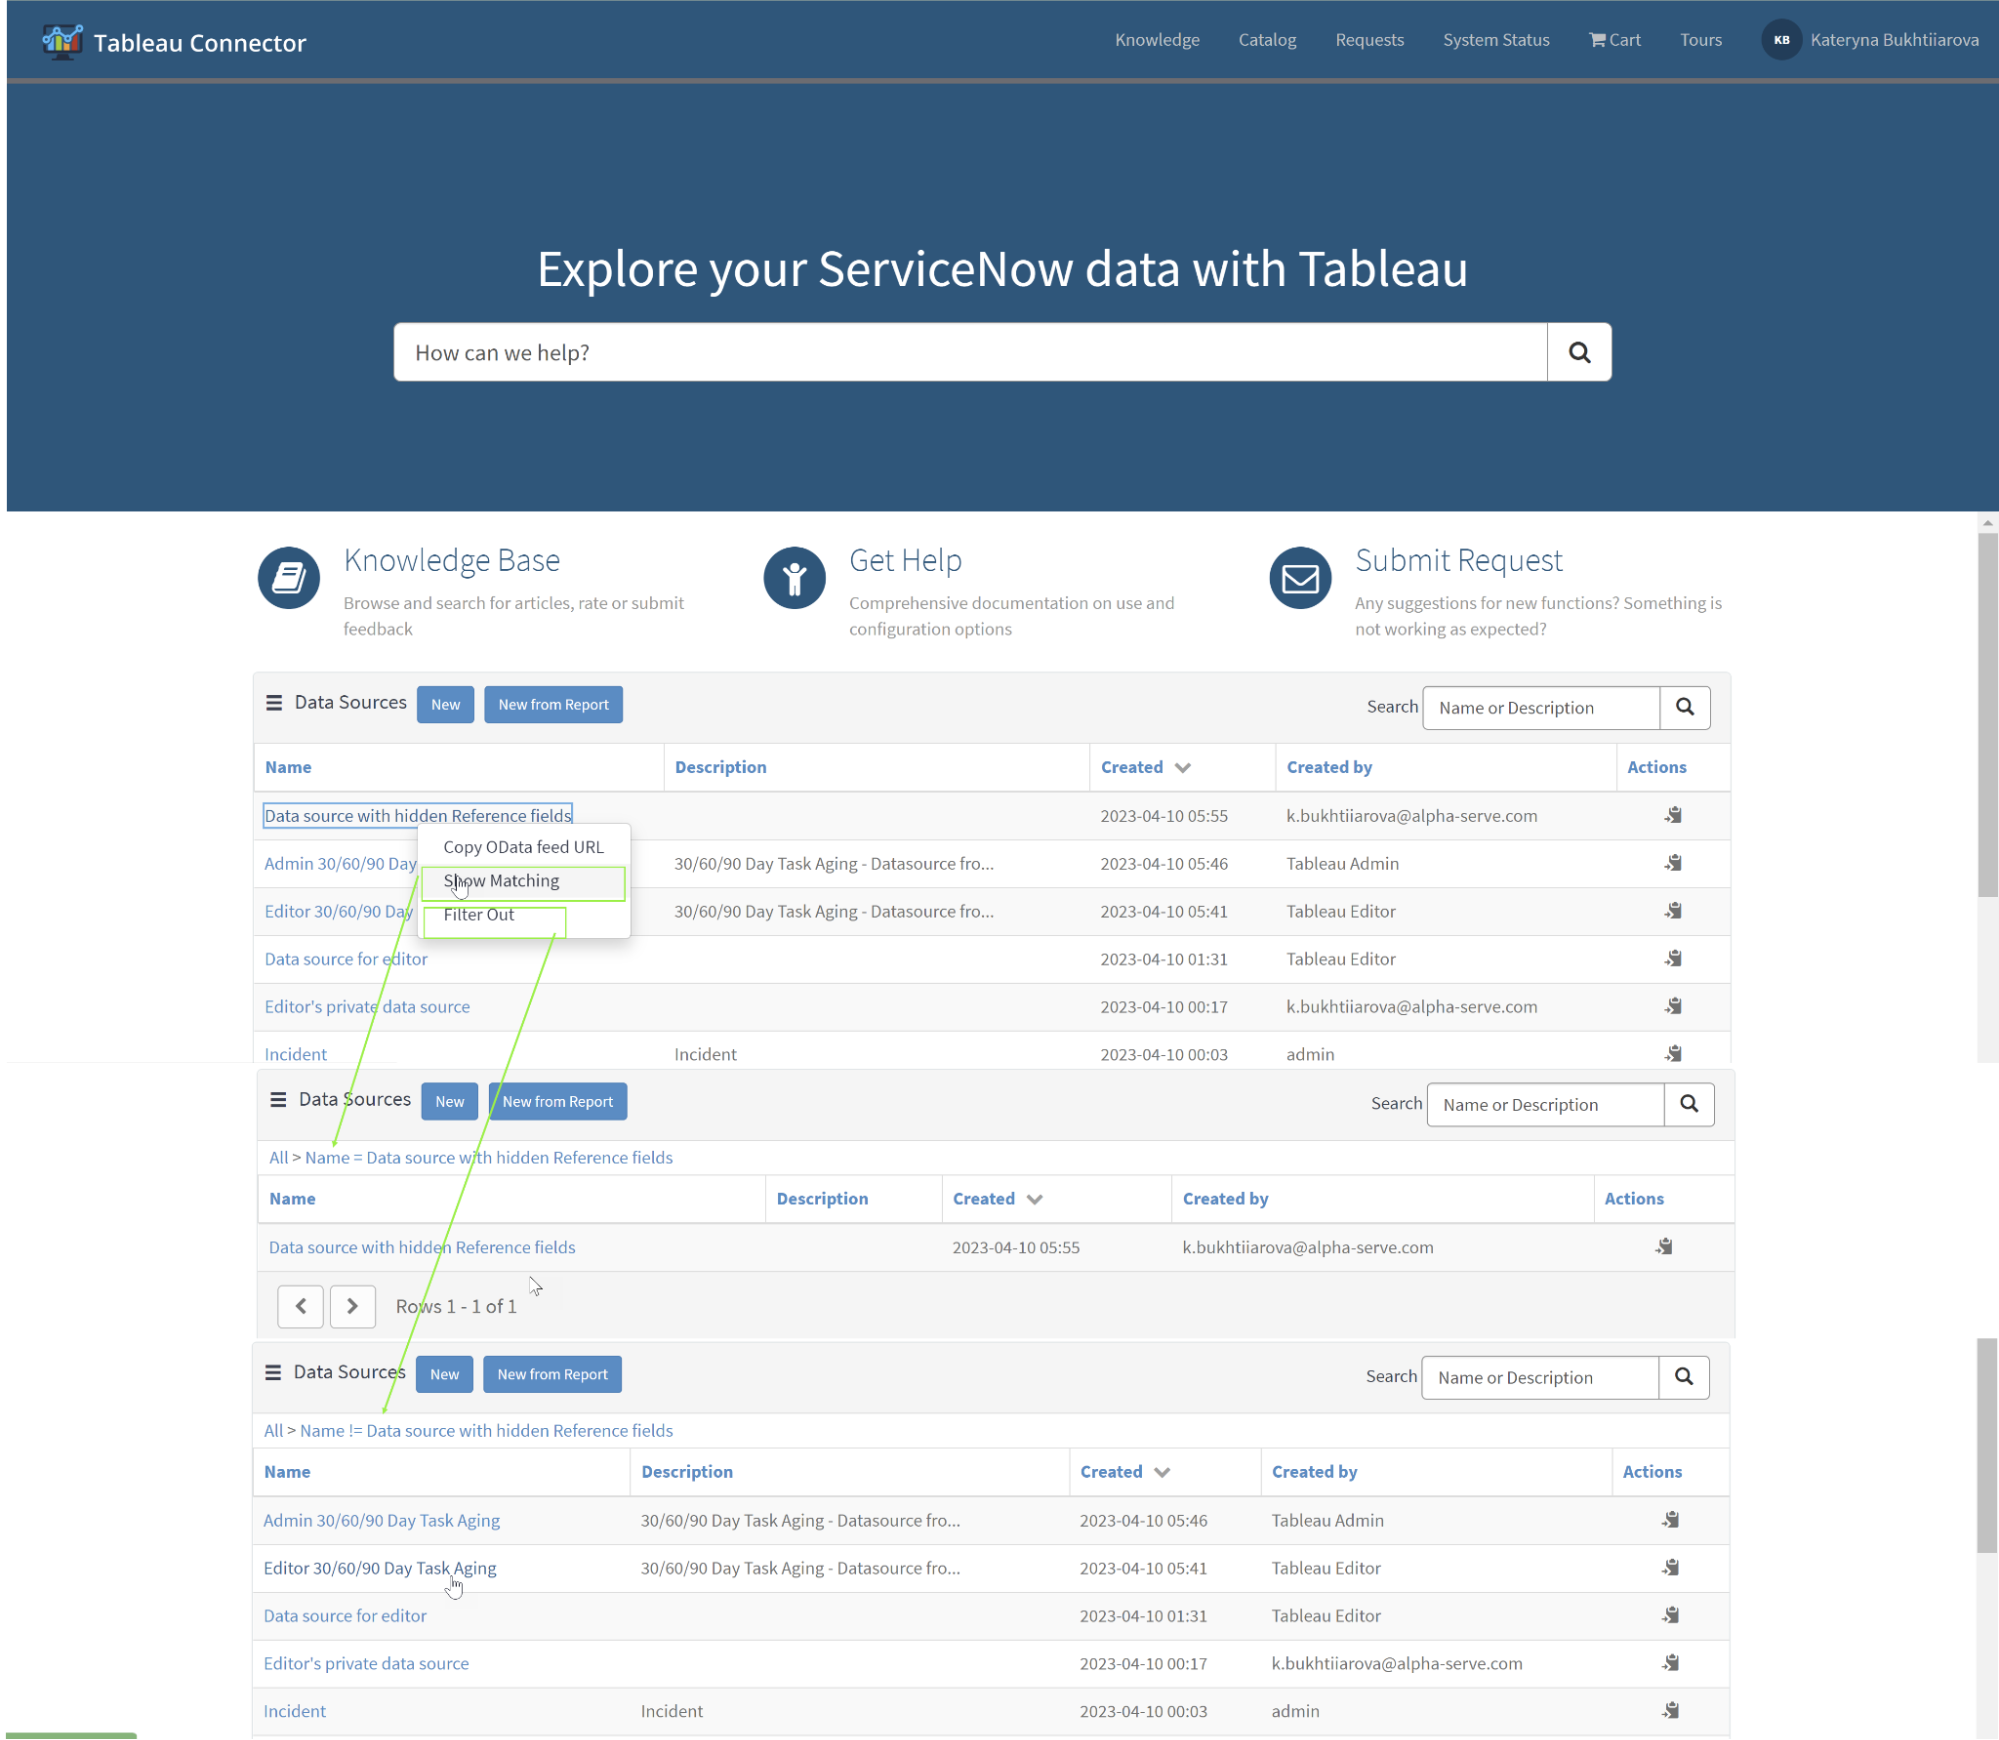
To import data from the Tableau Connector page Instance-Name.service-now.com/tableau_connector:
Use the Show Matching or Filter Out filters to reduce the number of data sources displayed in the list. Search the filtered list until you find the relevant data source (the one you created in the previous step).
To access the context menu, perform right-click on the data source.
Choose the Copy OData feed URL option. The OData feed URL of the chosen data source will be copied to your clipboard so you can utilize it later.
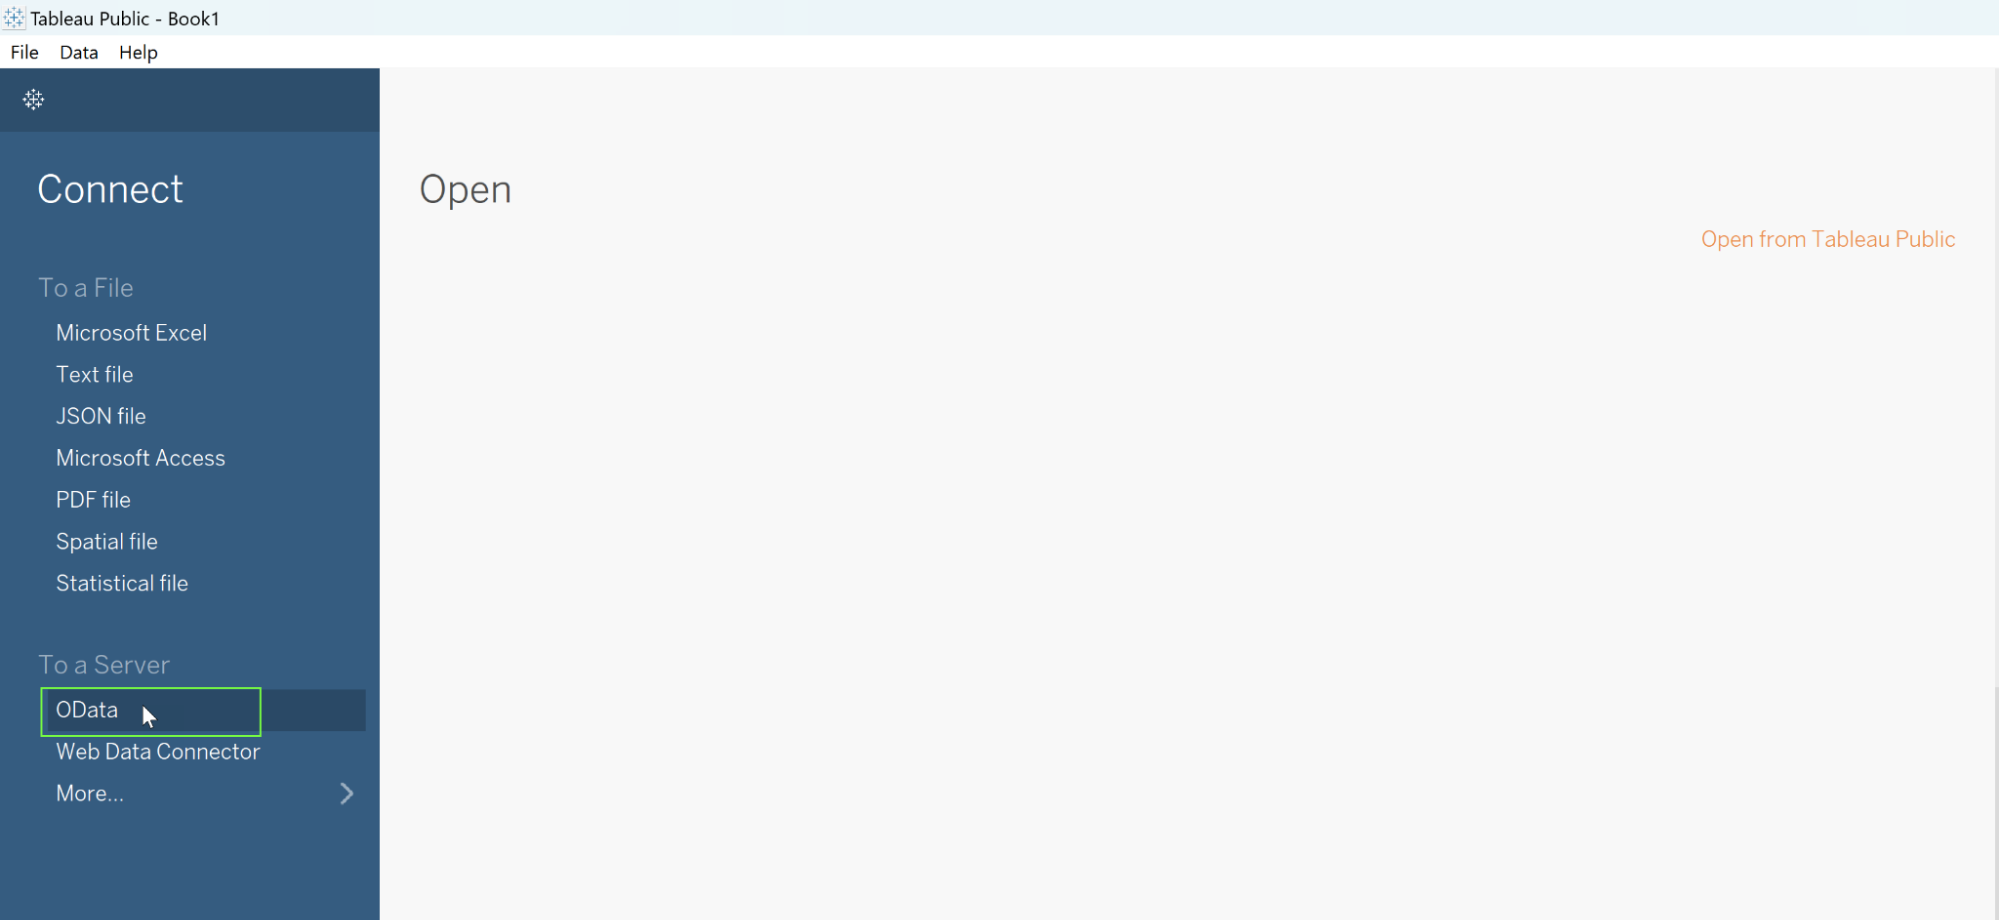
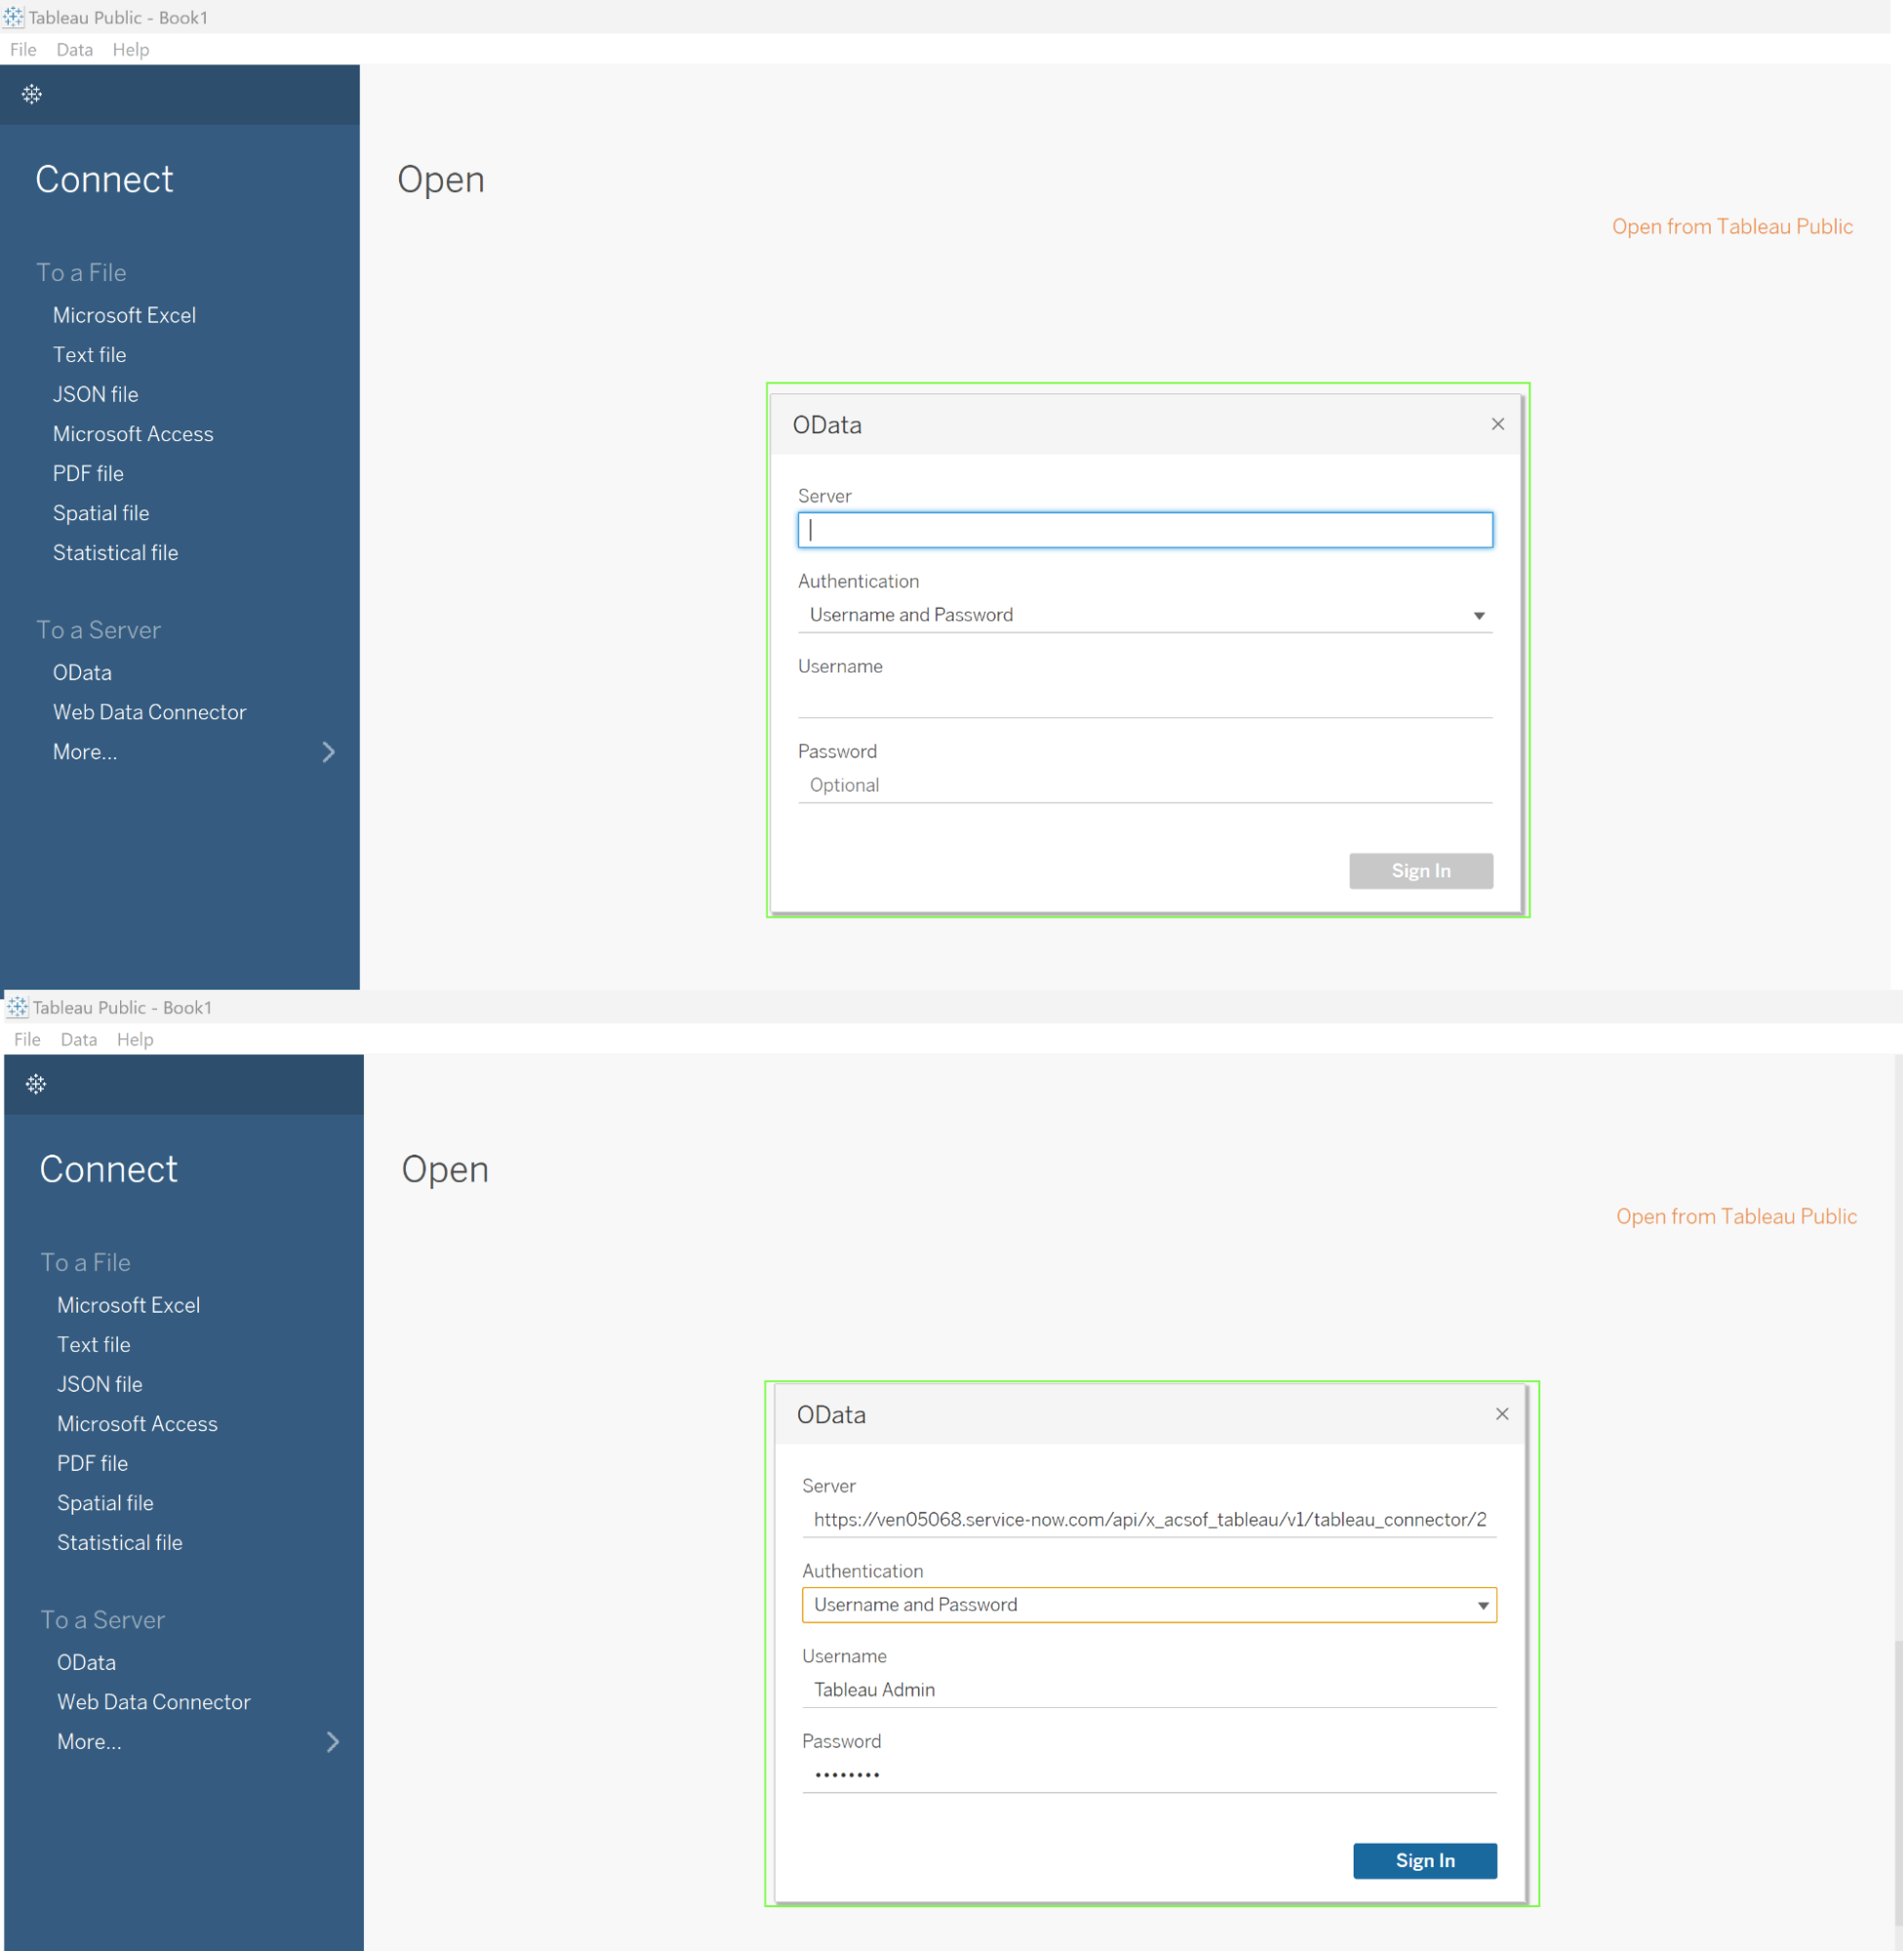
Open Tableau Desktop and pick OData. In the Server area of the newly opened window, paste the copied OData URL.
Select Username and Password as your authentication type. In the appropriate areas, enter your ServiceNow username and password.
To start the import procedure, click the Sign In button. When the import is finished, you can use Tableau Desktop to create visualizations and analyze the data imported from ServiceNow.
Wrapping Up
The Tableau Connector for ServiceNow facilitates smooth communication between Tableau and ServiceNow, providing businesses with a powerful means to leverage ServiceNow data for practical analytical purposes. The statement highlights the effectiveness of the connector’s user role management and security features in maintaining controlled access and data integrity.
Advanced features such as a user-oriented interface, dot-walking, and data manipulation enable users to access and assess linked data fields efficiently. Combining Tableau’s analytical capabilities with ServiceNow’s data presents an opportunity for organizations to enhance their operational efficiency and gain a competitive advantage centered around the data era.
Maya is the product manager at a software development company. Her team uses Salesforce for marketing automation, app development, and analytics. But she needs to get data from the support and sales teams, who are using ServiceNow and MailChimp, respectively. And she is now thinking of looking into Salesforce integration tools.
So how can Maya integrate data from ServiceNow and MailChimp with Salesforce?
If you are reading this, you probably have a similar question. So, this article will help you and Maya understand how Salesforce handles native and third-party integrations. And I will walk you through the top Salesforce integration tools you need for your specific scenarios.
What is Salesforce Integration?
Salesforce integration is the process of linking other applications, databases, cloud services, or work management systems with Salesforce. This process centralizes your data on the Salesforce platform, making it possible to improve productivity and exchange data bi-directionally.
You can set up a Salesforce integration using APIs, middleware, webhooks, enterprise service bus (ESB), third-party integrations, or native Salesforce tools.
But to pick out the right Salesforce integration tool for your use case, I suggest we first go over different types of integrations in Salesforce.
What Are the Types of Integration in Salesforce?
Salesforce integration falls under the following categories:
Batch integration: This involves the data integration of data in batches instead of individually. The system takes a “snapshot” of the data and integrates it later. This process of taking snapshots and merging changes is called Change Data Capture.
Single-platform integration: Salesforce often provides native methods for integrating individual platforms through AppExchange apps. Unlike batch integration, single-platform integration involves moving the data individually.
Custom code integration: Your developers have to build your connector from scratch using APIs and webhooks. The drawback is that this type of integration consumes time and requires advanced expertise.
Real-Time and Near Real-Time Integration: This involves the real-time movement of data between Salesforce and an external system (say, ServiceNow).
How does Salesforce Handle Integrations?
As a system that syncs data with multiple internal and external applications and systems, Salesforce handles integrations using the following methods:
Fire and Forget: As the name suggests, this integration pattern involves initiating a request to the remote system, which updates Salesforce with the new order number and status in a separate transaction. The Salesforce system then decides to wait for the order to reach completion or “forget” it and move to a different request.
Request and Reply: This is a variation of request process invocation in which the remote system waits for the process to end before tracking the current state based on the response.
Batch Data Synchronization: This approach involves data exchange between Salesforce and a remote system in batches rather than singly. This integration approach follows a predefined schedule controlled by a set of triggers.
Remote Call-In: This pattern involves Salesforce retaining the data while the remote system handles how to create, update, or delete the data in storage. The remote system can “call in” default Salesforce APIs or API composite resources to perform certain operations.
Data Virtualization: This involves Salesforce accessing external data in real time using AJAX calls and GET requests, as well as responding through JSON objects translated. This integration pattern ensures that your data does not persist on the system storage. It also allows you to access external data from on-premise and cloud services.
App-native Integrations
Some apps integrate natively with Salesforce, thanks to a system of APIs and built-in connectors. In Maya’s case, she can integrate her company’s Mailchimp data with Salesforce using the built-in connector in AppExchange.
Third-party Integrations
Third-party integrations act as mediators between incompatible systems that don’t integrate data natively. Integration tools like Zapier let you transfer data bi-directionally between Salesforce and Slack or Google Workspace.
And the good thing is that you won’t need to write custom code since most of them have pre-built connectors that you can drag and drop to sync data.
Native Salesforce Integrations
These are connectors built within Salesforce using the default Salesforce API. This means that you don’t need to integrate them; they are available by default for your Salesforce org.
Native Salesforce integrations remove the need for third-party integration solutions. They also reside within your Salesforce ecosystem, giving you complete control and visibility over essential metrics.
External systems can fetch data from Salesforce through the following methods:
Change Data Capture – for real-time and near-real-time integrations.
Outbound Messaging – allows changes in Salesforce fields to trigger automatic Salesforce actions, such as sending alerts or creating task records.
Apex Custom Code – for building classes and triggers (button clicks, record updates, etc.) in order to execute flows and transaction control statements. Apex has a similar syntax to Java.
Polling – for instructing the API client to call the server at specified intervals to check for changes in data.
Salesforce Connect – for integrating data seamlessly across system boundaries by allowing users to view and change data outside your Salesforce ecosystem.
Heroku Connect – for syncing data bi-directionally between Postgres and Salesforce.
Mulesoft Anypoint – for automating your workflows and integrating data between systems in order to deliver seamless, pleasurable experiences.
Other noteworthy native Salesforce integration tools include OmniStudio, Dataloader.io, Mulesoft Composer, native Salesforce APIs, platform events, PushTopic, and Salesforce CLI.
Since everything resides in Salesforce, there is no need to spend money and time on training your teams to use third-party tools.
But the flip side is of course the limitation of these native tools. If you’re specifically looking for enhanced functionality, cost-effectiveness, customizability, and easier maintenance (and in general a better, more flexible fit for your specific industry), then a Salesforce third-party tool is your go-to solution.
Why Use Integration Tools in Salesforce?
Let’s discuss the benefits of Salesforce integration tools.
Improves productivity
Salesforce integration makes it possible for companies to automate the integration of data. This increases the speed and quality of information synchronization and removes redundant tasks in the workflow.
Improves customer experience
Salesforce integration solutions improve the customer experience by giving your teams better information about customers and clients.
In the case of Maya’s company, integrating ServiceNow with Salesforce will bring all customer information and tickets from the support team to Salesforce. And with tools like Experience Cloud and Customer 360, her company can improve the roadmap to satisfy customers’ needs better.
Improves the quality of decisions
Integrating your applications, services, and systems with Salesforce gives you access to tools for making better business decisions. These tools also make it easier to gather and synthesize business intelligence.
Salesforce products that can help you make informed decisions include Tableau, Data Cloud, Net Zero, and Einstein GPT.
Boosts revenue
Sales teams can integrate data from external systems with Salesforce in order to take advantage of the platform’s advanced revenue intelligence and management products.
Salesforce Tableau allows organizations to monitor and predict market trends when generating pricing plans for products and services. This will help them minimize expenditures and boost profits.
Improves communication and reporting
When you integrate your system with Salesforce, you get access to advanced analytics and reporting tools. Marketers, developers, managers, and people who need pinpoint accurate analytics can use the tools to visualize and report data.
You can also integrate your Slack with Salesforce to establish fast, smooth communication channels for intra-company and cross-company communication.
7 Considerations When Choosing Salesforce Integration Tools
Before choosing any integration solution for Salesforce, here are some questions to ask yourself and your teams.
What does my business need?
When considering tools for Salesforce data integration, the first rule of thumb is to find out what your business needs.
Let’s take Maya’s company, for example; they want to sync data between marketers (from Mailchimp) and customer service representatives (from ServiceNow).
With a better understanding of the integration goals, they can choose whether to use a native solution like Mulesoft or to opt for a third-party solution like Zapier.
And not only that, but they also need to choose a Salesforce integration solution that their teams can use. This will flatten the learning curve, reduce errors, and improve productivity.
How secure is the solution?
Businesses also need to choose secure solutions in order to protect sensitive information in transit or at rest.
Native Salesforce integration tools give you the security blanket of the Salesforce infrastructure. But if you are choosing a third-party solution, always check the features they have. Keep an eye out for certifications like ISO 27001 and SOC 2.
Is the integration solution worth the price?
Pricing also factors into your business needs. If the solution is within your budget and meets all the requirements, consider paying for it. You also need to choose a suitable payment model: pay-as-you-go, pay-per-user, or pay-per-flow.
Does it support custom integrations?
Salesforce integration can be either no-code (Workato), low-code (Jitterbit Harmony), script-based (Mulesoft Anypoint) or a combination of all three (Exalate).
So when choosing your integration service provider (ISP), always focus on the one that allows you to customize the integration for any use case. If you have experienced developers, choose the script-based options. Otherwise, stick with no-code solutions to make things easier.
The sweet middle ground is to choose an AI-powered integration solution that can generate, refactor, and optimize scripts. Experienced developers will use it to explore advanced customization scenarios, while inexperienced users will use it to generate scripts faster.
Does the integration meet compliance requirements?
Depending on the data you want to integrate between systems, you have to meet certain compliance requirements. Some common compliance regulations include HIPAA, GDPR, CCPA, PCI DSS, etc.
What are the limitations?
Some Salesforce integration tools enforce API limits, while others only allow a specified number of concurrent users. So always confirm if the stipulated API limits will be convenient for your business to avoid service interruptions. You should also factor in large data volumes, especially if you are planning to integrate data from systems in bulk.
6 Third-Party Salesforce Integration Tools You Should Know
Now that you know what constitutes a reliable Salesforce integration tool, let’s review the best-in-class solutions that meet the criteria.
Dell Boomi
Dell Boomi is an integration platform that makes it possible to connect your applications and systems in order to automate business processes.
Industries in finance, marketing, manufacturing, healthcare, and the public sector use Dell Boomi to improve user experience and increase transparency. Organizations in these industries also use Dell Boomi to integrate Salesforce with legacy systems and modern applications such as FTP Server, NetSuite, and Workday.
Jitterbit
Jitterbit is a workflow automation that allows you to integrate your applications and cloud services with Salesforce.
q
Let’s say you want to integrate tickets from Zendesk with a Salesforce case. You can use Jitterbit to transfer data between fields. Users with little technical experience can use Jitterbit’s low-code integration platform Harmony to automate workflows and build applications.
Workato
Teams working in IT, marketing, and finance rely on Workato for automated ticket escalation, employee onboarding, compliance governance, and threat detection. This iPaaS solution provides a secure pathway for connecting Salesforce with cloud services and work management systems.
For instance, you can use the Workato connector to sync a Jira issue with a matching case in Salesforce. Similarly, you can sync attachments and customer profiles from Dropbox and NetSuite with the corresponding Salesforce case.
Mulesoft
Mulesoft is a Salesforce subsidiary that integrates natively with external systems. It allows organizations to combine the power of AI and CRM analytics to get a comprehensive view of customers.
Mulesoft also offers products like Anypoint, Composer, and RPA, which allow users to automate tasks, build apps, monitor APIs, and build connectors with the code-based API Designer.
SnapLogic
SnapLogic is a no-code integration platform that uses pre-built Salesforce connectors – or Snaps – to sync data between applications, databases, and cloud services.
When using SnapLogic, you also gain access to SnapGPT, the first generative AI solution for natural language integration and automation. What does this mean? You can extract data faster while decreasing the potential for errors with the help of an AI-powered troubleshooting assistant.
The Salesforce Snap Pack gives organizations access to attachment downloads, bulk actions, platform events, and wave analytics.
Exalate
Exalate is an integration solution that allows you to connect Salesforce with other work management systems and repositories. This solution stands because it supports low-code, no-code, and code-based integrations (using a Groovy Scripting engine).
Suppose Maya’s team wants to sync SLA records bi-directionally between Salesforce and ServiceNow; they can set up a connection using Exalate’s Basic Mode (no-code) or Script Mode (code-based).
The Script Mode also provides you access to the intuitive AI Assist chat feature, which will help you generate scripts for setting up syncs and connections within minutes.
Salesforce integration allows you to connect external systems with tools native to the Salesforce ecosystem as well as third-party solutions. Whichever option you choose, you need to consider security, reliability, pricing, and business fit.
Now that Maya understands Salesforce integration better, she can choose the best tool for connecting her work management platform, repositories, databases, and cloud services with Salesforce.
Exalate is an integration solution that helps businesses integrate Salesforce with multiple managed services, CRMs, and ERPs. This solution allows you to share data bi-directionally using custom scripts and event-specific triggers for every Salesforce case.
If you’re an Exalate for HP QC/ALM user, we have some updates for you.
We, at Exalate, understand that change is an inevitable part of technology, and sometimes that means retiring legacy tools and solutions. We also want to focus on the future of our product and ensure services remain as smooth and efficient as possible.
To this effect, we are moving Exalate for HP QC/ALM into basic maintenance mode and it will remain so until June 2024, after which support will be halted completely.
As a company, we understand that this can be daunting and we will try to ensure this change is handled with utmost care and minimal disruption.
What to expect as an Exalate HP QC/ALM customer moving forward
We will provide the following under basic maintenance mode to our existing Exalate for HP QC/ALM customers:
Bug fixes and critical security updates only upon request by customers
Bug fixes handled by L3 support
Releases as hotfixes or custom-builds only
No new feature releases
Duration of the Basic Maintenance Mode
This mode will be available for a year, until June 2024.
Compatibility Checks
If you have any questions regarding compatibility, please contact us. From our end, we will not perform any compatibility checks from now on.
Exalate currently supports HP QC/ALM version 15.0.
Why the Decision
Since HP QC/ALM is an older product and has been replaced by newer versions, it’s imperative to let go of legacy systems.
We have also seen a decline in the usage of the Exalate for the HP QC/ALM connector over time. There has been a steady decrease in tickets raised by customers using this connector.
As such, it’s essential for us to focus our time and resources on more upcoming, popular, and widely used platforms. So, we came to this decision unanimously.
If you have any questions or concerns, we are always a call away!