Companies acquiring other companies is not uncommon, especially when rapid growth is the goal. But how do you consolidate different workflows without losing productivity?
A Growing Media Company
DPG Media is a media business that owns several media outlets, including:
Radio stations
Television stations
Magazines
Newspapers
Websites
Their mission is to bring highlights and breaking news to audiences all over Belgium, the Netherlands, and Denmark.
The Challenge of Growth
In the past couple of years, DPG Media experienced rapid growth. The company grew from 2,000 employees to 6,000-8,000 in just a few years! They achieved this by rapidly acquiring other companies.
Thanks to their most recent acquisition, Medialaan, the company gained 800 full-time employees all at once – without mentioning the freelancers and sub-contractors that came in the mix.
However, growing so quickly does come with its challenges.
In this case, Jira already existed as part of DPG Media’s toolkit, which means the team already understood the tool. However, with this latest acquisition, the company needed to consolidate 2 separate workflows – Medialaan’s team mainly used Zendesk to deal with customer care and IT.
Before its acquisition, Medialaan developed digital products that are now on the market. The team used Zendesk to generate tickets from customers.
As a temporary solution to adapt to this acquisition, one IT employee from DPG Media took care of manually copying data from Zendesk customer care tickets to create Jira issues.
However, this came with 2 main drawbacks:
It is a huge waste of time for an IT employee to do this work manually
Once created, the Jira issues are unlinked from their corresponding Zendesk ticket
This took up many valuable hours daily from the IT employee’s time.
Trial and Error with the Default Jira to Zendesk Integration
In an attempt to automate the Jira to Zendesk workflow and use IT’s time more efficiently, DPG Media decided to try out the free Jira to Zendesk plugin.
However, this tool was not flexible enough to accommodate the workflow properly.
Because it only allowed for synchronization with 1 instance, it couldn’t work efficiently for the team’s multi-instance setup.
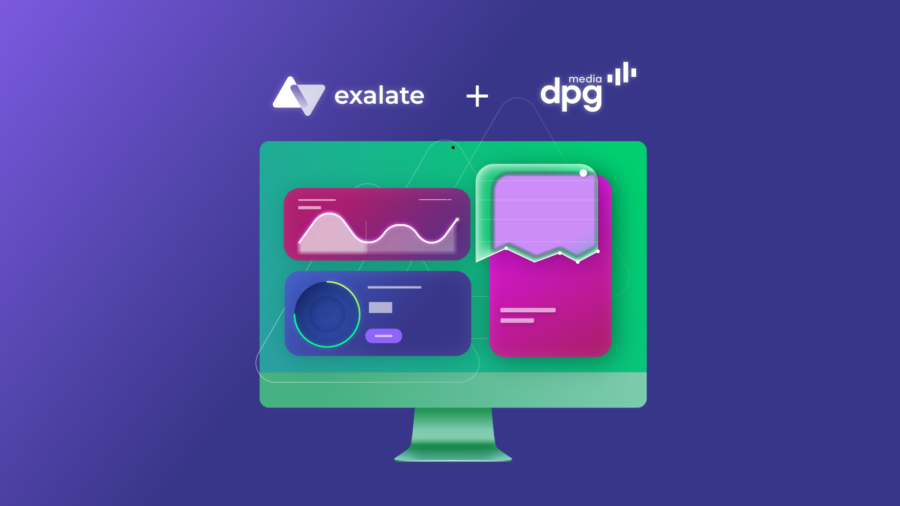
Automated Customer Care with Exalate
To replace the free plugin, DPG Media turned to Exalate.
This was the company’s second time using Exalate, the first of which had been with a product development partner who suggested the usage of this tool.
However, this was their first time using the new Exalate for Zendesk connector. Despite the complex workflow DPG Media needed to implement, Exalate was flexible enough to adjust to their pipeline. The team rapidly implemented the solution into their workflow thanks to the Exalate support team.
“The team was very hands-on and very responsive. If we encountered an issue, they were able to resolve it quite fast.”
Since implementation, DPG Media’s workflow has been running smoothly, and everyone in the team is happy with Exalate.
A More Productive IT Department
Now that Exalate takes care of synchronizing tickets from Zendesk to Jira, the IT employee responsible for the manual input is now fully transitioned into a completely new role as a product owner. Implementing Exalate increased DPG Media’s return on investment for both this employee and Exalate.
This employee now works on a livestream as a product owner to bring highlights and breaking news to DPG Media’s public.
All the work he completes on this livestream could not be accomplished if he was still manually copying data from Zendesk to Jira.
Boost Productivity with Exalate
DPG Media is quite happy with the results of implementing Exalate in their company. With boosted productivity and smoother workflows, they are better off now than ever before.
They are already seeing the untapped potential that Exalate can offer them and other companies like yours.
Maximize your potential by streamlining your workflow with Exalate. It’s flexible enough for any synchronization use case – book your demo here
This is where software development teams bond together in order to recognize another milestone that has been met. Another mountain that has been summited.
The size of the food table varies based on the magnitude of the release. Sometimes just having a chocolate is sufficient to celebrate the fourth release of the week. And sometimes the party can be more elaborate and extend to the establishment down the street.
However, too often these celebrations are interrupted by panicked clients calling with problems related to the hours-old release.
Something was missed. Something wasn’t tested properly. Data has disappeared. Party over…
To avoid this disaster, I’ve written this guide on Promotion Levels and collaborative tools to ensure your product is ready to ship.
Go-Live Day
Software releases can be daunting.
Project managers, product managers and software engineers have all experienced the uncertainty that comes with pushing major software updates into production. While holding their collective breath to see how it goes.
If you’ve worked on a software development team long enough, you’ve had those moments when you just aren’t sure if it is all going to come together.
This is especially true if you’re working on a team operating out of multiple offices.
Go/No-Go Approval Process
With any software product release, it is important that an informed and confident go/no-go decision can be made as the release date approaches.
Ideally, that decision should not be made at the last minute or without the necessary data to support it.
Significant bugs, poor user experience, security problems or even potential roll-backs can be devastating for some companies that rely on key systems to support their revenue or their corporate operations. Or both.
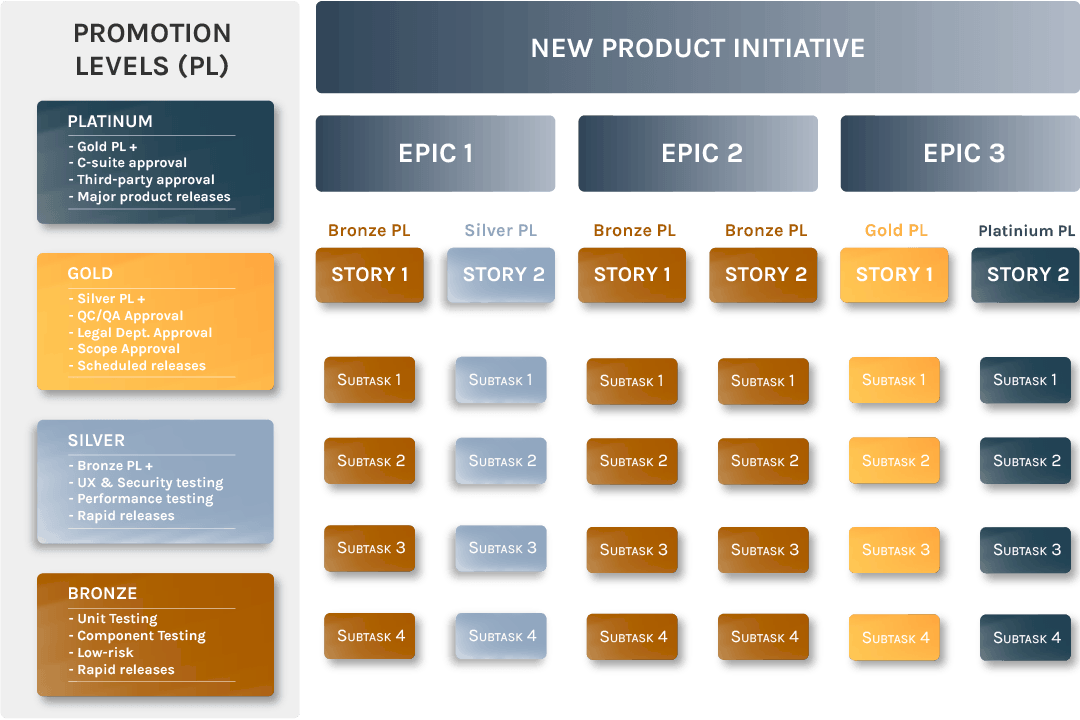
Summarize Quality Controls Using Promotion Levels
Promotion levels define a set of documented criteria that allows the software development team as a whole to effectively measure overall quality for a particular build. Additionally, promotion levels serve as an effective way to summarize quality controls.
By capturing promotion-level criteria in the Agile workflow, teams are encouraged to adopt a process that reduces errors and accelerates the approval process.
Promotion levels can reflect successful testing methods such as unit testing, integration testing, performance testing, and even security testing.
Promotion levels can also be used to:
Ensure all quality control procedures were followed
Confirm all legal requirements were met
Ensure all contractually obligated system requirements have been met
Confirm third-party regulatory requirements have been met
Consistent Naming Conventions for Promotion Levels
Naming conventions for promotion levels must be consistent and they must have documented meaning.
Using consistent nomenclature in test plans, training materials, presentations and even the lunch room can have a powerful impact on whether or not a team succeeds or fails.
Most importantly, the terms have to be paired with meaningful and operational definitions while being put into an actionable state using professional project management tools.
An example of a generic, four-tier promotion-level framework could be as follows:
Bronze : The Bronze promotion level indicates that all unit and component testing has been completed successfully. Examples of release types are low-risk bug fixes or small enhancements.
Silver : The Silver promotion level indicates that all Bronze-level testing was done along with the successful completion of the performance, UX, integration, and security testing. Silver promotion levels can cover a broad range of release types.
Gold : The Gold promotion level indicates that all Bronze & Silver level testing was done along with having a QC manager ensure that all procedures have been followed. Additionally, Legal has ensured all legal requirements have been met and the Product Manager has ensured that all “above-the-cutline” features and functionality have been included. Gold promotion levels can be used when complex enhancements are being deployed.
Platinum : The Platinum promotion level indicates that all Bronze, Silver and Gold level procedures have been followed while adding an extra distinction that can be reserved for new product rollouts. Milestones such as completing tasks associated with accounting, legal, sales, marketing, customer service and third-party authorities can be required before a Platinum-Level release is approved.
Promotion Levels are a Quality Control Multiplier
Promotion levels are key to operating a successful software development organization.
They provide a consistent and objective decision-making framework that defines acceptance criteria while guiding teams through their sprints, user stories, epics, and initiatives.
They also play a vital role in creating the flexibility to treat different types of releases in different ways while using a consistent governance structure.
Integrate Promotion Levels with Your Agile Process
Below are just some of the benefits teams will experience when effectively identifying and organizing releases using promotion levels:
Test plans can be more easily standardized to reduce testing man-hours and improve quality
For some release types, promotion levels afford teams the opportunity to sequence testing using a gated and sometimes automated approach
Approval processes can be standardized and captured in project management tools
Daily Scrum meetings are more easily organized and can be run more efficiently
More complex, higher-level releases can be properly scheduled and staffed
Retrospective review sessions are more organized, more efficient and more effective
Additionally, fully integrated promotion levels can be set-up to work seamlessly with other software development lifecycle (SDLC) techniques, including but not limited to:
Feature Scores
Critical Success Factors (CSFs)
Functionality Matrices
Project Plans
Communication Plans
Style Guides
Real-time Executive Dashboards
Customer Service Status Reports
User Community Communication
Rigor Promotes Flexibility and Speed
Software development organizations are made up of a variety of team members with vastly different skills.
Those teams are required to communicate and collaborate, often from different locations, in order to achieve incredibly complex objectives.
It is imperative that all planning, communication, management, and decision-making methods are understood by everyone on the team and then put into an actionable state.
Software products and systems are simply too vital to the health and viability of organizations. Relying on simple – but semantically rich – concepts such as promotion levels – helps to increase the effectiveness of any communication.
With that said, it is important to note that quality control and Agile methods are not mutually exclusive concepts. They are actually quite complimentary.
Promotion levels are a foundational element in collaborative software development environments where rigor not only mitigates risk but raises quality and reduces time-to-market.
By utilizing a unified approach to measuring quality, co-workers executing individual tasks are all focused on the same quality goals – even in an Agile environment.
Whether you’re a developer, administrator, project manager, or customer-facing problem solver, you’re familiar with the need for issue trackers like Jira, ServiceNow, or HP QC/ALM. And the benefits they bring to your role;
Improved visibility and prioritization
Increased speed of issue resolution
Happier customers
But increasingly, issue trackers are becoming a victim of their own success and your teams are being faced with a new set of challenges.
You will often work on an assortment of projects, across a number of teams, who are likely to be working with their own issue tracking instances or across different projects inside one issue tracker. The result? You arefaced with disjointed issues and inconsistent workflows. This is where we see issue tracker synchronization adding a new dynamic!
Described in simple terms…
Issue tracker synchronization tools ensure that relevant issue information is available across multiple systems – in real-time. Allowing teams to collaborate consistently on issues within their own environment.
In turn, this:
Reduces the chance of human or system error
Allows you to safely migrate your data to another system
Grants you full control and autonomy over your own system
Issue tracker synchronization is valuable because it creates a better way of working together across a huge variety of scenarios.
Let us explain…
1. Working with external teams & subcontractors
Your customer-facing team logs issues in one system and external subcontractors do the same in another system. These subcontractors play an important role in resolving these issues and you need to collaborate regularly.
The challenge;
How can your team deal with multiple issues efficiently when some of the issue information is maintained in third-party systems? There is the risk that you miss details, get confused by different reference numbers, and need to manually interact to resolve every issue.
Opening up your own issue tracker to collaborate creates additional problems, like having to configure privacy configuration and workflows.
The solution is to synchronize all relevant issue data from your subcontractors into your own environment, giving you a complete view of progress status without affecting your own workflow and environment. And keeping your confidential data secure.
You have multiple teams working in one single issue tracker across multiple projects. For example, a customer-facing team making tickets and an issue-resolution / development team resolving issues.
The challenge;
When working with different teams in the same issue tracker, each team will most probably have different workflows and responsibilities. Communicating on progress status takes time and leaves room for human error.
Your teams are currently collaborating on issues in one of two ways;
tracking each issue with an all-encompassing workflow to capture the tasks every team member has to undertake?
Have different workflows that track the work for each member?
In the first scenario it is difficult to get an accurate view of what is happening, and in the second scenario, there is the need for manual communication when an issue is resolved.
Instead of communicating through email and/or manually sharing data, synchronize all of your development issues and support tickets into one view. Use customization to keep your own workflow and choose what fields need to be shared. Gain a full overview of progress status and new information.
3. IT Outsourcing
You’re an organization which offers outsourced IT consultancy to a number of clients. All of these clients are using their own issue tracking technology.
The challenge;
As your client base grows, so does the number of issue trackers you are expected to work with. This requires huge investments in time and training to adopt clients’ issue-trackers, processes and workflows. Time which could be used on resolving the issues and customer queries themselves. Prioritization is almost impossible as there is no single view of information and task deadlines.
Synchronize all relevant issue data from your clients into your own environment. This allows your IT consultancy teams to organize client cases from their own trusted environments, and prioritize accordingly. One effective environment which serves both the IT consultancy and their clients.
4. Migrating to another issue tracker
You’re switching issue trackers, and you need to migrate all of your data over to a new system.
The challenge;
Implementing a traditional migration and duplicating data from one issue-tracker to the other inevitably requires downtime. This downtime is something your team cannot afford, along with the risk of losing key data.
The solution;
Live migration. Use real-time synchronization so you get to keep usage of the source tracker at the same time as switching over to the new instance. A smooth transition without any downtime whatsoever. You’re in full control at all times. Once all users have moved over to the new system and all required project data is synced, you can safely stop the synchronization.
Your working environment consists of a master parent issue tracker and several child issue trackers. Issues and tickets get raised in your parent issue tracker, then delegated downstream towards development teams. These separated teams have their own responsibilities and tasks, each one preferring to work in their own issue tracker instance, managing their own sets of issues.
The challenge;
Communication. When creating issues and assigning tasks through the ‘master’ instance, there is no live view of progress status and new data. Once progress is made, manual reporting is required which leaves room for error, information getting lost in translation and delays.
Often, managers using the centralized instance need to be able to have a full view of all issues in order to be able to set priorities for the issues.
The solution;
When you synchronize the centralized issue tracker with all child instances, you see one live “master view” of all progress. Allowing you to easily prioritize tasks, but allowing all teams to keep autonomy of workflows and processes.
Synchronization – the answer to a multitude of problems
We know that the concept of syncing multiple instances of issue trackers is not without concern. But most of the presumptions we come across can be easily resolved.
Will you lose time or require extra work to be completed by implementing synchronization?
Will workflows remain accurate and consistent?
Is acceptance from internal teams and external subcontractors, suppliers and clients a valid concern?
With tracker synchronization there will practically be no training needed for issue teams, and very little time needed to implement. Plus you’ll quickly see results;
Infinitely better cross-team collaboration
Vast time savings
Significant reduction in error
Better control over a previously uncontrollable environment.
So you know it’s the right thing for you, but how do you ensure buy in from the right stakeholders? The best synchronization tools are autonomous across existing systems and vast improvements to project visibility and issue resolution times can be made with minimal effort. There doesn’t need to be disruption to their current processes, and this better way of working will be quick to see.
If you’re aiming to scale up your capabilities you need to consider synchronization as part of your competitive advantage. Why?
Separated project data inevitably leads to:
1) more errors
2) more time wasted
3) more confusion
= more problems!
Remember, the very concept itself is to turn complexity into something simple and flexible. By adopting a synchronization tool, everyone involved in the process is gaining access to relevant, customised and accurate information. We call it the issue tracking utopia.
Summary
Exalate is the most flexible issue synchronization tool on the planet, and is the right fit for the most advanced use cases concerning synchronization across multiple trackers.
Our goal is to lead the way for organizations who need to be agile and scale their issue tracking capabilities. We aim to achieve this through our vision to enable a global network of connected companies to work together at the flip of a switch.
We can help you address the need for better internal processes, whilst supporting your clients, external suppliers and subcontractors.
Curious how synchronization can help your use-case? Have a look at Exalate or get in touch.
Did not find the use case you were looking for? We’ve covered a lot more use cases on our documentation site here.
Jira is hands down one of the best project management and communication tools out there for development teams. But when you work with outside teams, whether they be service suppliers, clients, or outsourced teams, your collaborative Jira process can get a little sticky.
Every team has its own workflows and pipelines within Jira. If you’ve ever tried onboarding an outside team onto your Jira project – or vice versa – you know how difficult it can get to manage separate workflows.
However, having two completely separate Jira instances or projects is just as much of a hassle. Information gets lost. Issues get confused for other issues. Manually syncing issues from project to project is not a scalable solution.
What if you’re working with a large number of teams within Jira? To have teams work together in a more structured manner, we’ll have to integrate multiple Jira instances or projects.
In this guide, I will explain to you exactly how to achieve a Jira to Jira issue sync, step by step.
Note:We will be using the Jira sync tool Exalate for this.Exalate enables teams to efficiently coordinate their work even when tracked in multiple projects or multiple Jira’s. This two-way sync automatically updates issues on both ends when a change is made.
Get the Jira to Jira Sync Guide
Learn how to achieve a seamless integration between multiple Jira instances, step-by-step.
Okay, so Jira to Jira sync sounds convenient, but how exactly can it help your project?
Here I’ll dive into a few of the several use cases in which Jira issue sync can come in handy.
Outsourcing Quality Assurance For Developers separated by multiple Jira instances
Many software and game developers outsource quality assurance to third-party teams.
These outsourced quality assurance teams have their own workflows within Jira. Especially since they often have to juggle separate clients with multiple workflow styles.
A QA team needs to constantly share issues and bug reports with the development team. However, the QA team doesn’t require access to all of the development team’s task-related issues and other development notes.
The traditional solution would be to have the dev team access both Jira instances or projects at the same time: their own project, plus the QA team’s project. The latter only contains bug reports.
However, constantly needing to keep up with two Jira projects (or instances) for the same development project is a waste of time that bogs down developers.
A synchronization tool enables both teams to stay within their own Jira projects and only sync Jira instances that are relevant to the other team. The workflow could be established as follows:
QA tester finds a bug
QA tester creates an issue in the QA Jira project
The tester’s team lead vets the issue and syncs it to the dev team’s Jira project
An instance of the bug is now created in the dev team’s Jira project
The Dev team updates the QA team on the status of the bug via their twin issue – all information is synchronized on the QA team’s end
With this workflow, only relevant issues get communicated between both teams for a more streamlined approach to quality assurance.
Setting up a Jira to Jira sync while excluding confidential information from unauthorized access
What if you want to sync Jira issues with an outside team without leaking confidential information?
With the traditional method, two separate issues would be created in two separate Jira instances (or projects).
The issue available to the outside team would only contain non-confidential information. However, this method requires dual work every time the issue is updated.
On the other hand, Exalate enables project administrators to sync only specific fields between two Jira projects.
For example, let’s say a dev team didn’t want to share certain screenshots with the quality assurance team.
But what if they wanted to add these screenshots to the issue to better keep track of the bug on their end?
In this case, the administrator could set it up so that all attachments on the development side do NOT get synchronized to the QA side.
This wouldn’t prevent the QA team from uploading attachments for the dev team, enabling them to share relevant information for bug reproduction.
Jira Service Desk Sync to Multiple Development Projects
Let’s say you have an IT support team reporting issues with a Jira service management instance when angry users come to them with problems.
In this use case, you have two Jira projects (or separate Jira instances):
the front-end support project
the back-end development project
The usual method to report bugs would be for IT support agents to forward these Jira issues via email.
Now, even if we set aside the fact that this gets developers’ emails flooded when they’re already busy, email is just not an effective way to share Jira issues. It’s a waste of time and information will inevitably get lost both ways.
That way, IT support agents can create issues and sync them so that the development team gets instant access to the issues. This is without having to comb through their email first.
This also means that the IT support agent has visibility on the status of the issue when the developers update it, making communication with angry users much simpler.
Now that we’ve gone over some use cases together, I’ll show you how easy it is to set up a Jira to Jira integration.
We use our own tool, Exalate, to establish a Jira issue sync. Simply, because it offers the most flexibility and is still relatively easy to set up.
Here, I’ll guide you through this process step-by-step. (And if you happen to get stuck, or have any questions, use the live chat widget on this page.)
Step 1: Establish Workflow With Both Teams
The very first step you’ll need to take – before even installing Exalate into your Jira projects – is to establish the workflow you’ll want to be used between both teams.
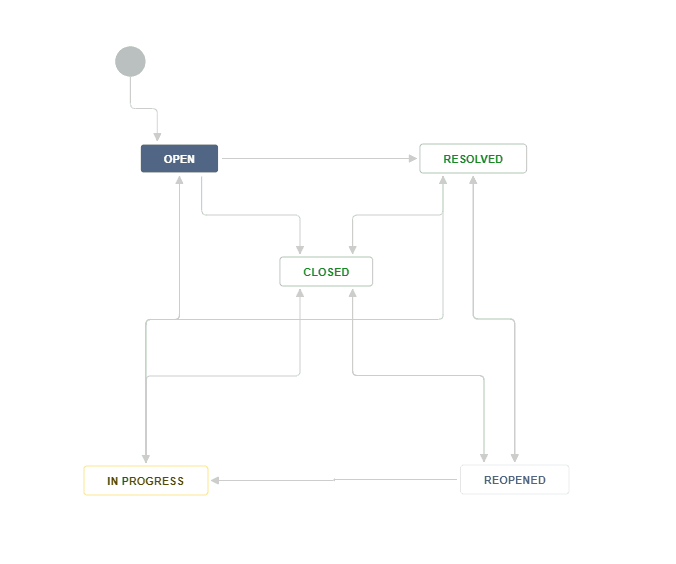
It’s possible for two teams to sync Jira projects without having the same workflow. For example, you could have one project with a workflow like this:
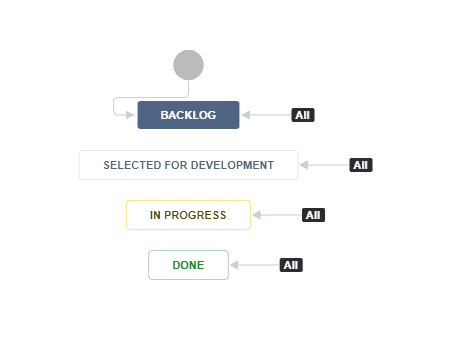
And have the second team adopt a workflow like this:
No matter what you decide to establish as your workflow on both sides of the Jira project, it’s important for you to agree on what information is exchanged. And how changes on one side need to be applied to twin issues on the other side.
This will avoid communication mistakes between the teams and ensure that the efficiency of the workflows is maximized.
Step 2: Choose an Appropriate Template for your Jira sync project
One of the great features that come from the Jira synchronization tool Exalate is the ability to pick from pre-existing sync templates when setting up a connection between two projects.
Sync templates establish which issue information gets synchronized, and which does not, as well as what this translates to on the other side.
For instance, you can sync the summary, description, comment, and attachment between twin Jira issues – right out of the box.
So before you set up a connection, make a list of all the relevant information you want to sync from Jira to Jira.
We’ll go into more depth on how to change this later.
Jira comes in 2 different deployment models – Jira Cloud and Jira on-premise (Including Jira Data Center and Jira Server).
Note: Atlassian announced that there’s going to be no more selling licenses or new feature development from February 2, 2021. However, the existing Server customers have access to maintenance and support for an additional three years, ending February 2, 2024.
For the purpose of this document, the following steps are for Jira Cloud.
If you are using Jira on-premise check out this documentation.
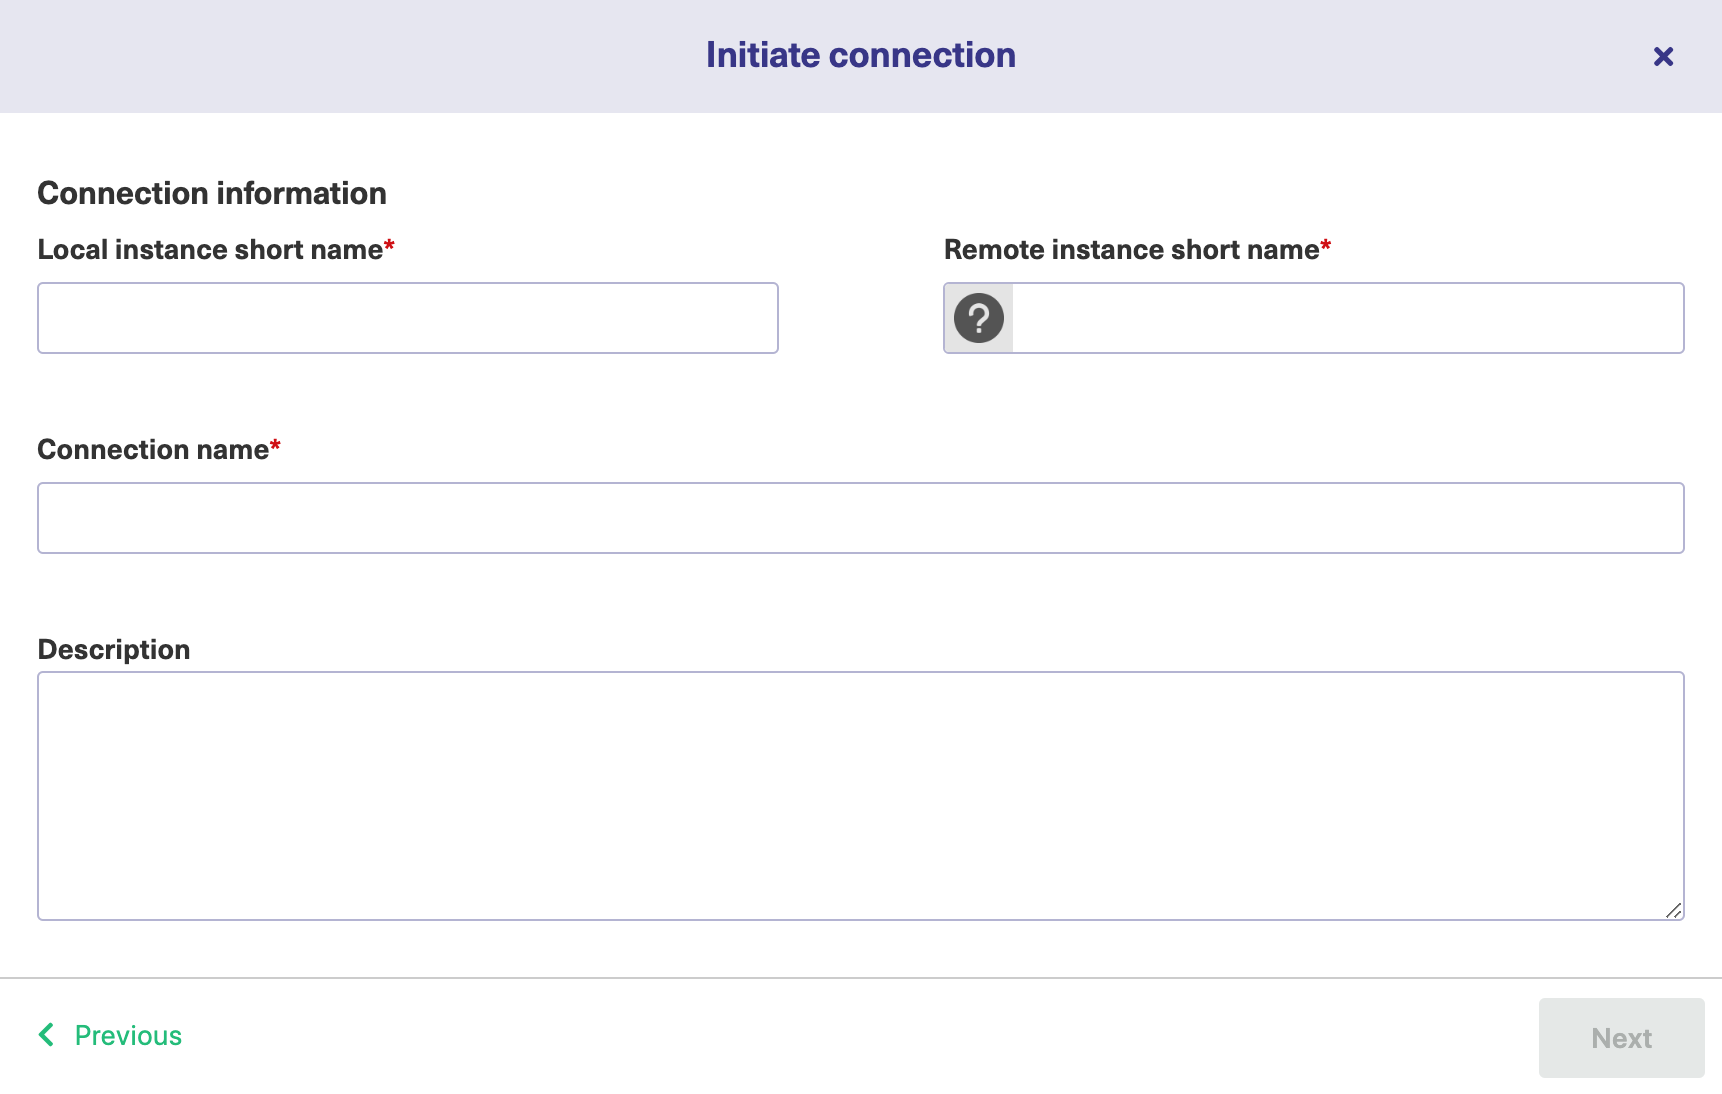
Step 3: Create a New Connection between your Jira instances or projects
For this step, you need to have Exalate already installed on both Jira Cloud instances.
Click on download and install the app to start a free trial.
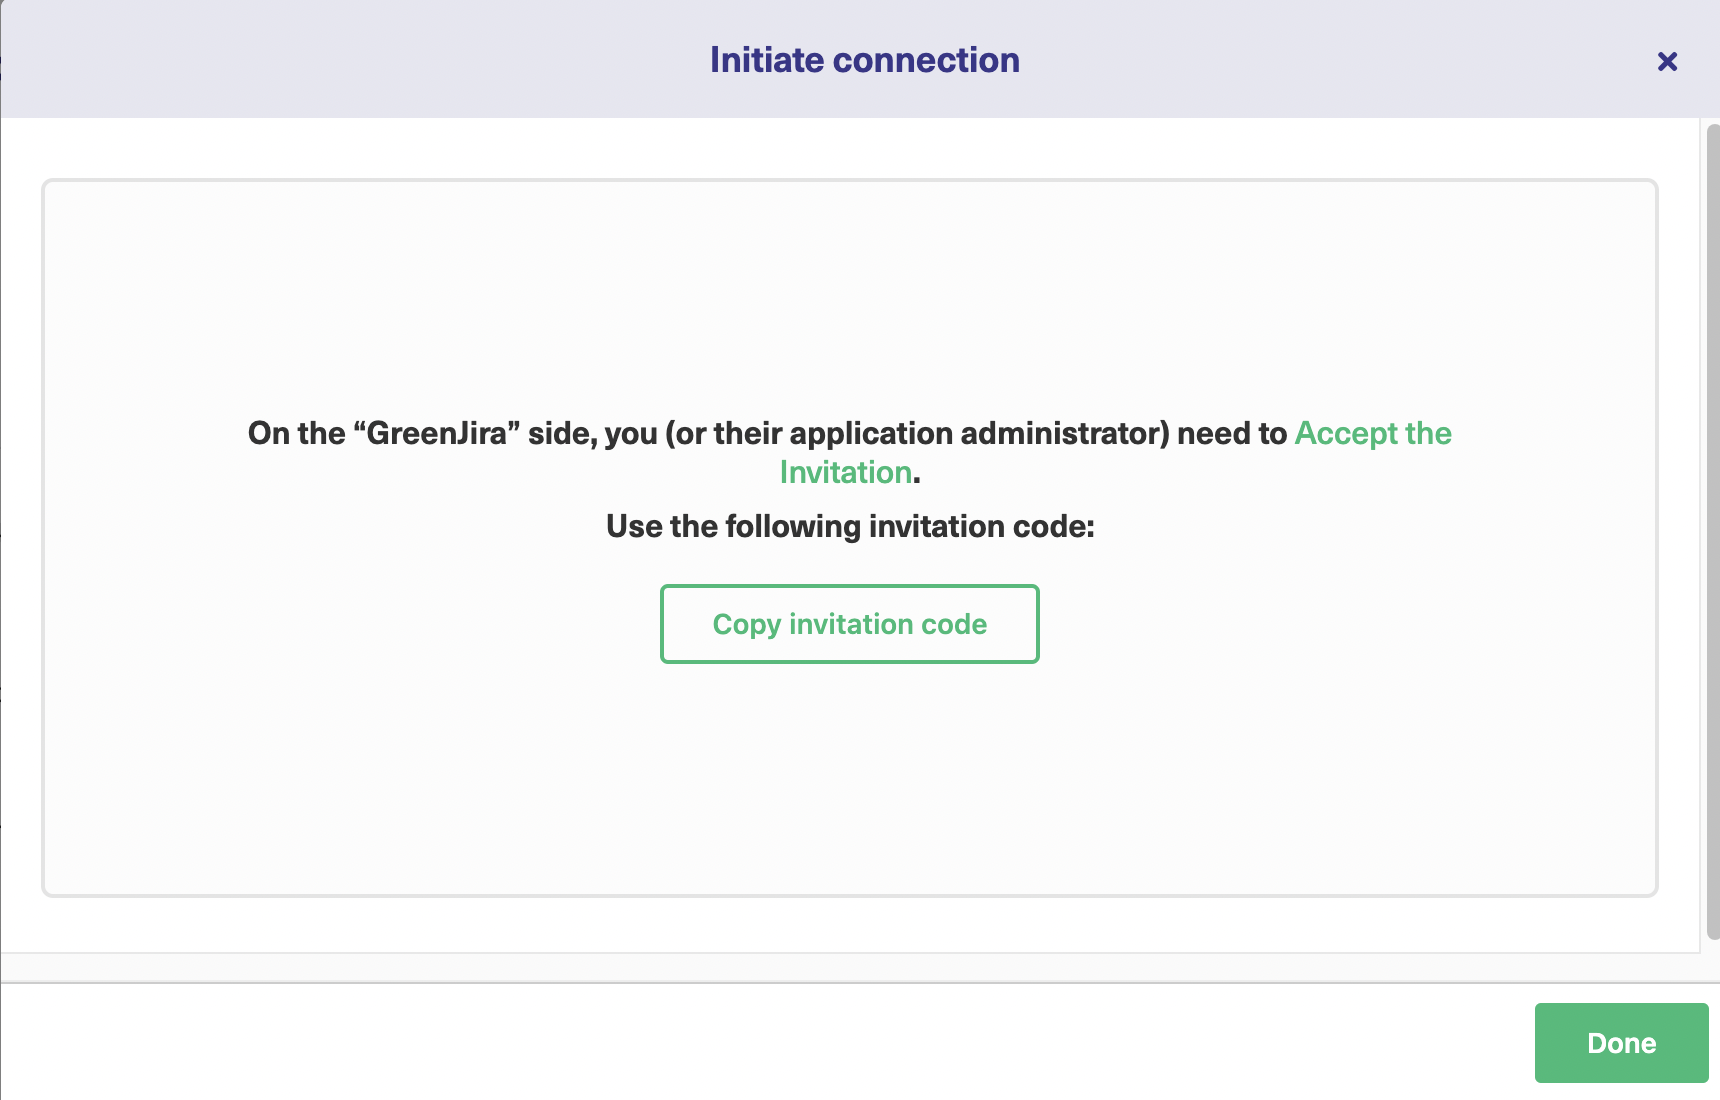
Once this is done, you’re ready to create a new connection. One team will initiate the connection while the other accepts the invitation. In this example, we’ll have a Blue Jira instance initiating the connection with the Green Jira instance.
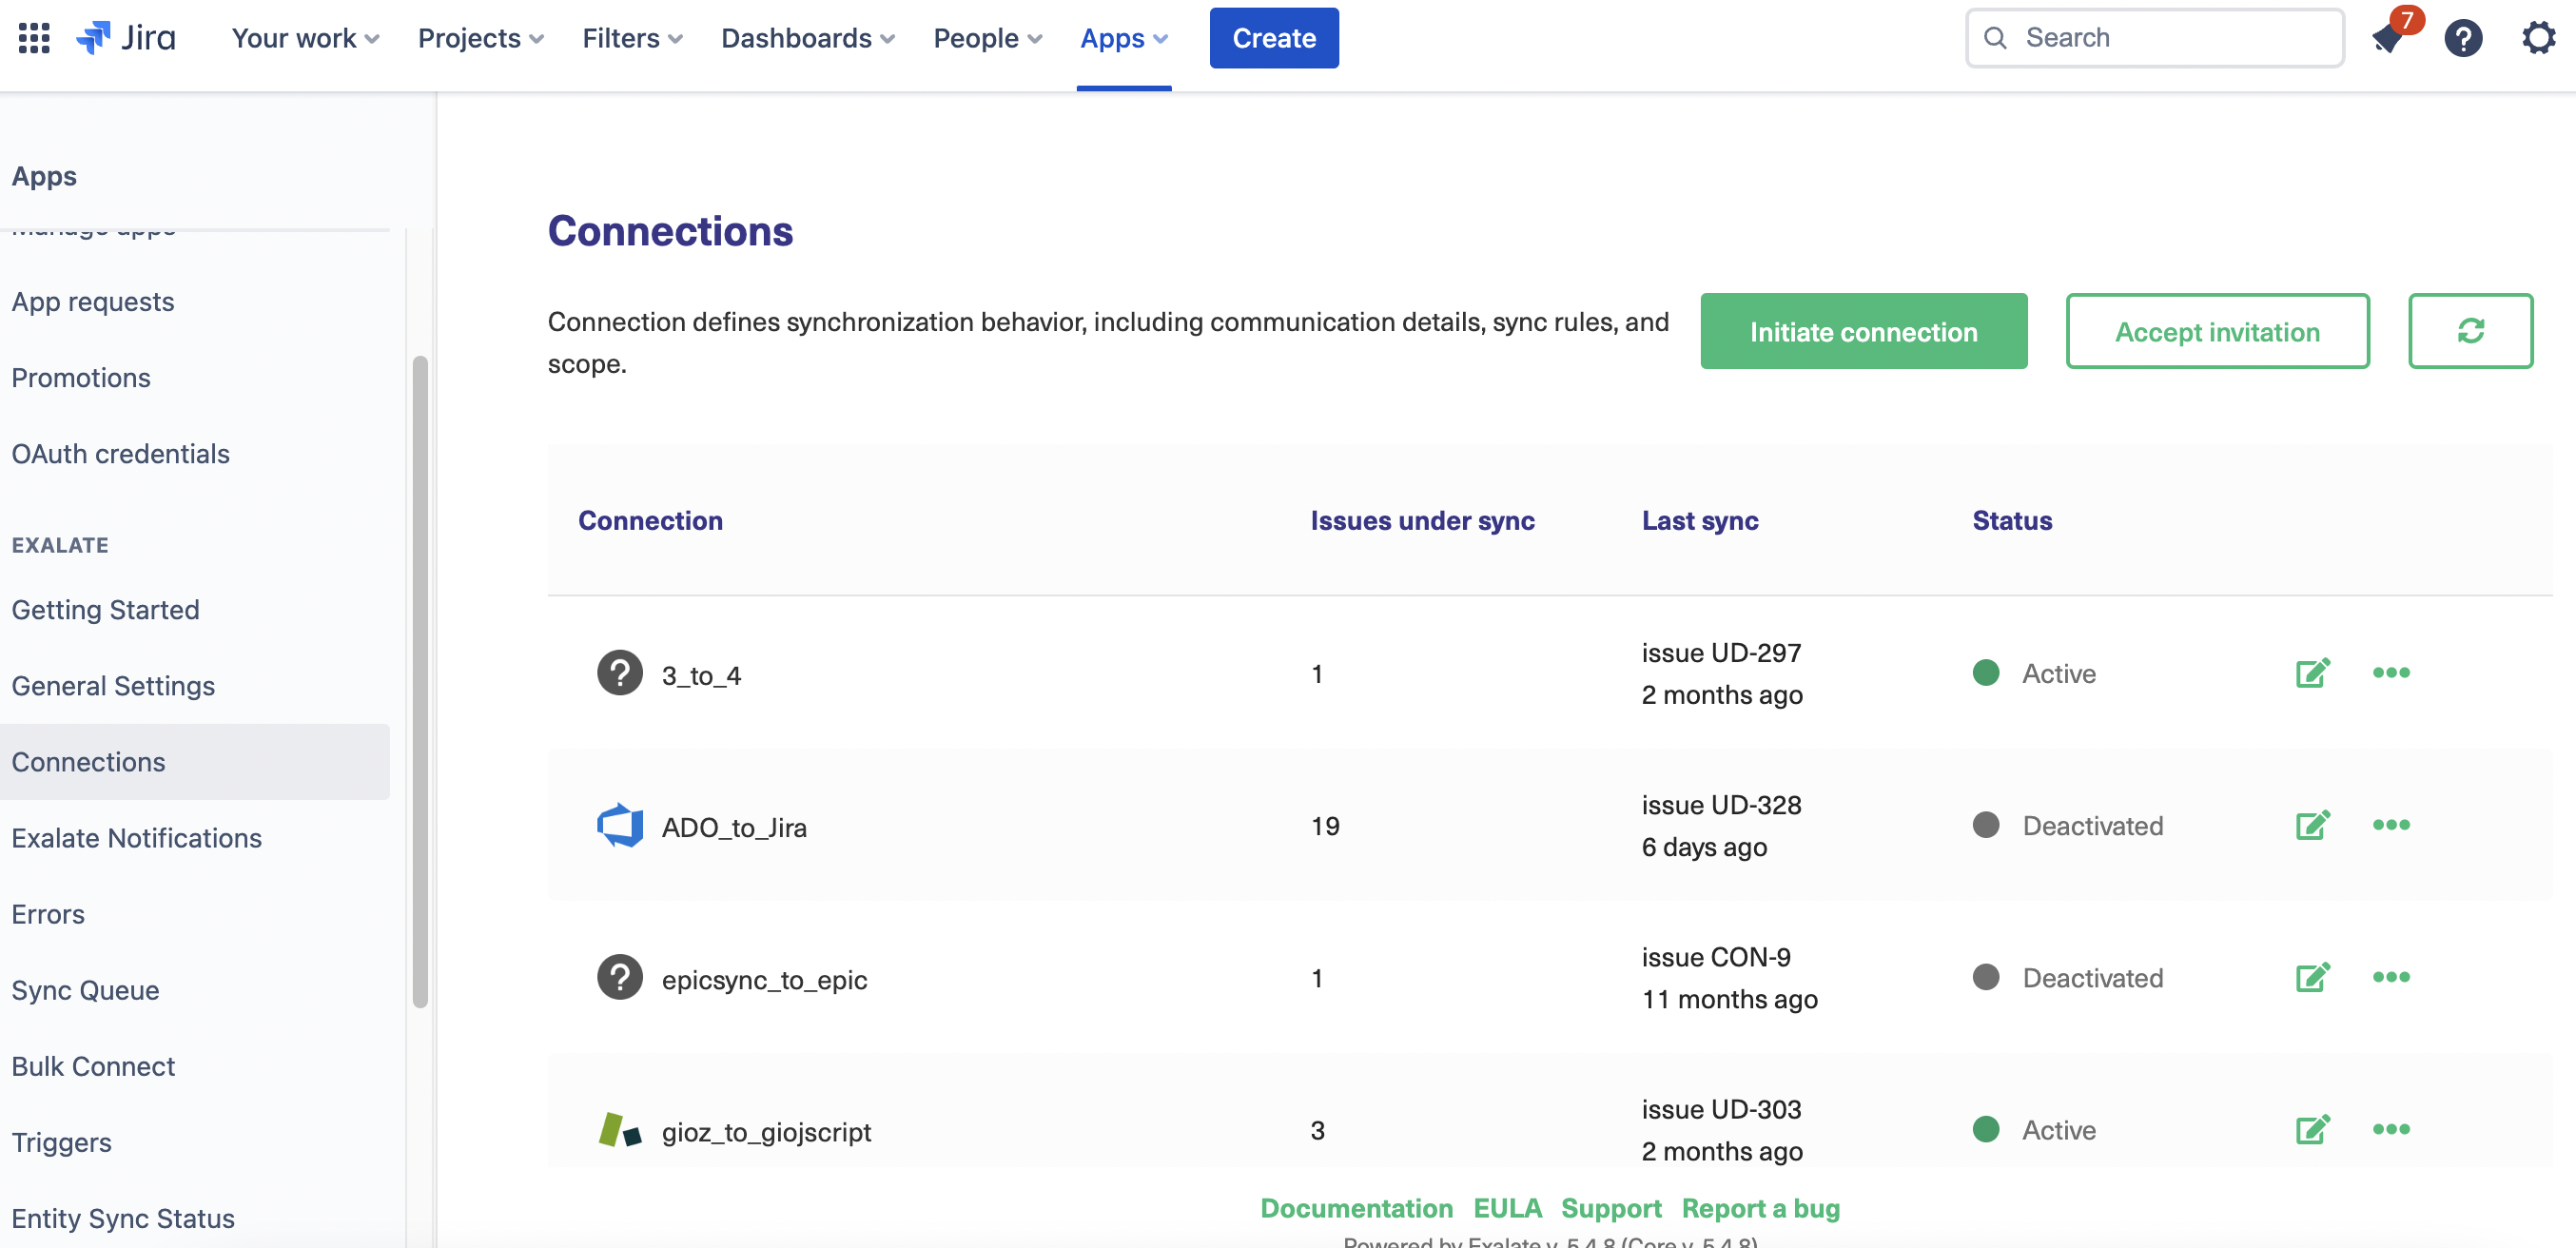
For the Blue Jira, click “Apps” in the top menu and click on “Manage your apps”. The “Apps” menu should give you several options on the left. If Exalate is installed you can see it in this menu. Click on “Connections”.
You’ll see any existing connections in this menu if you happen to have any. But if this is your first connection, this area will be empty.
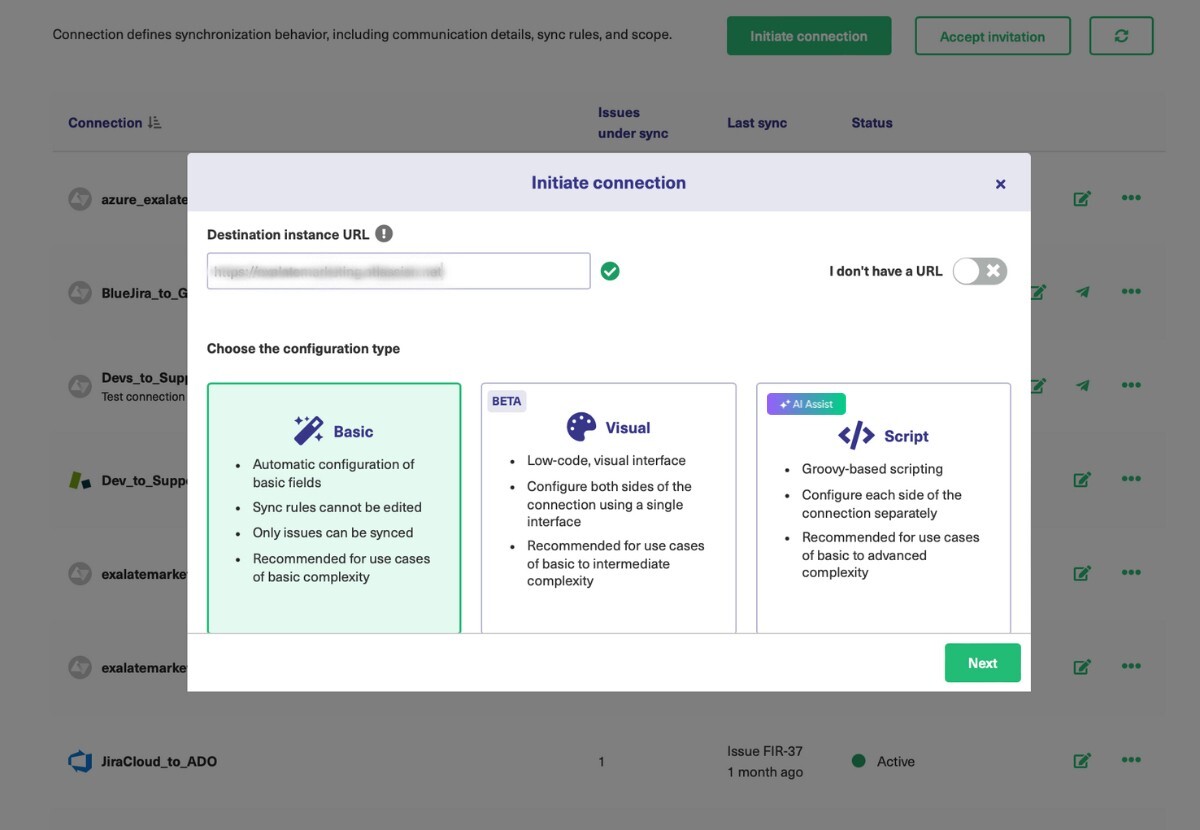
Click on the green “Initiate Connection” button.
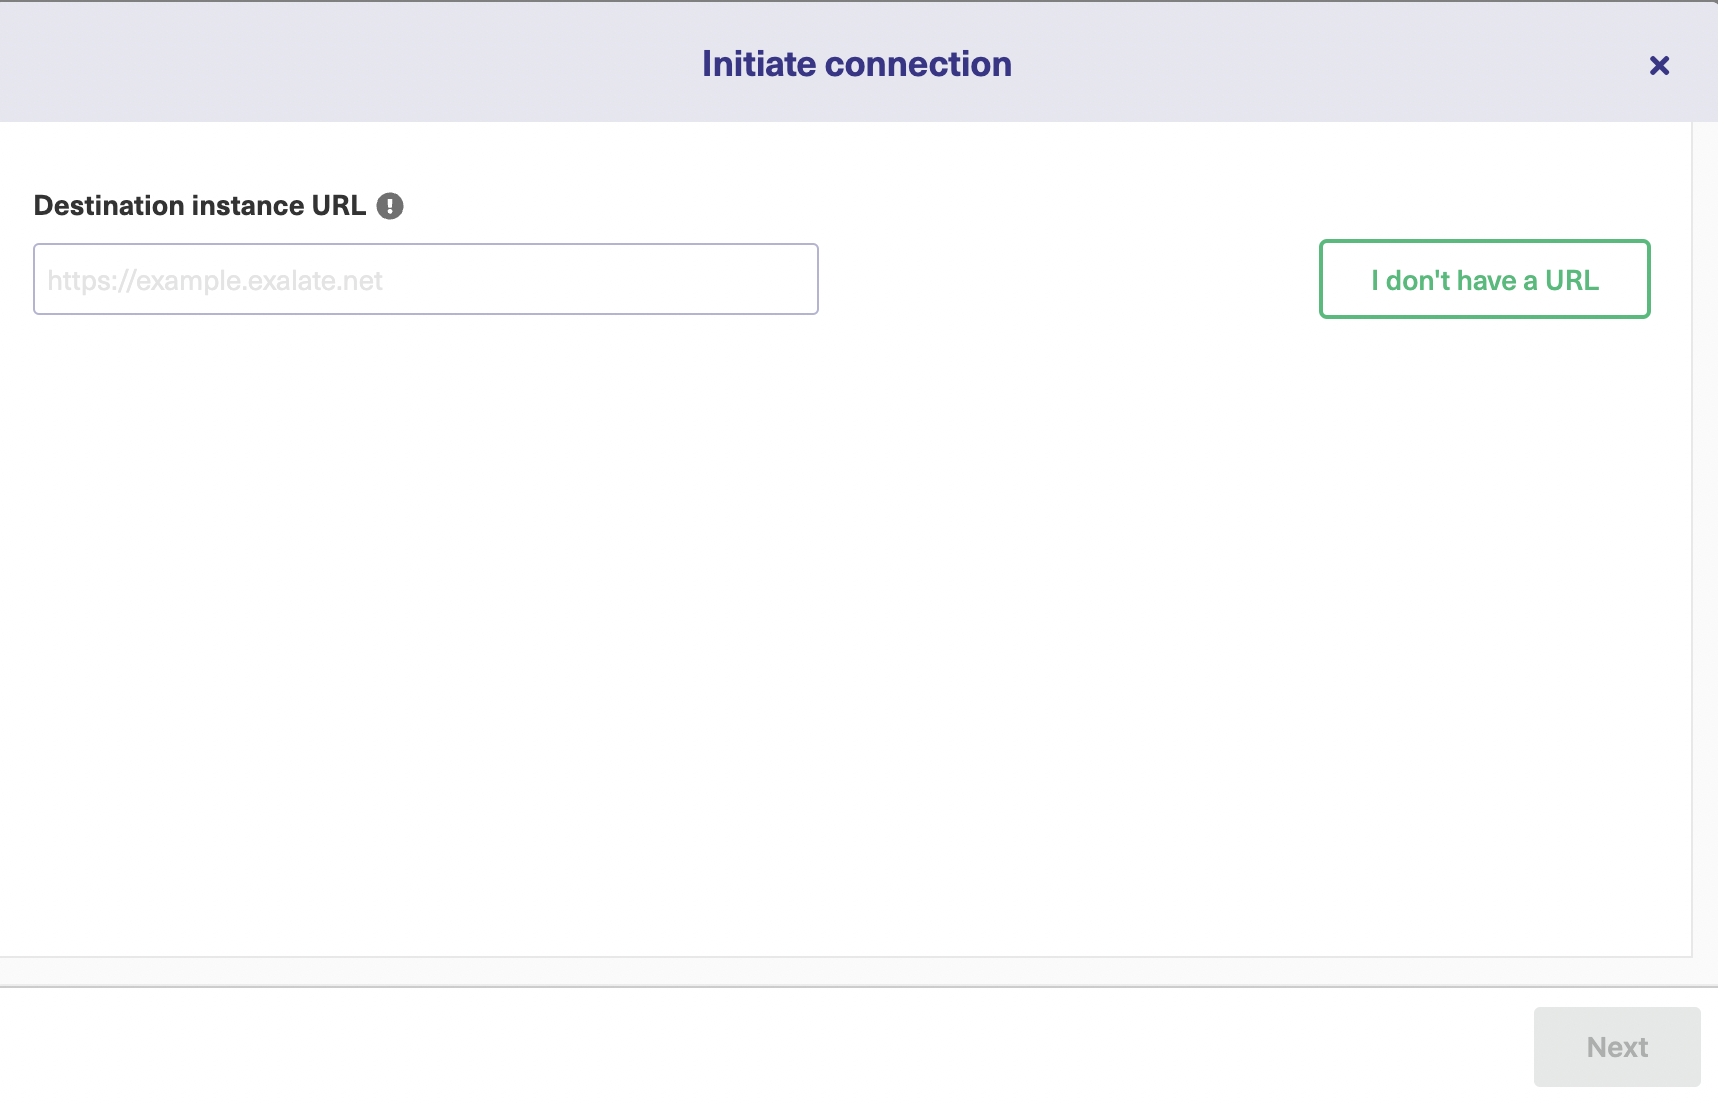
Now you’ll fill in the URL for the destination instance (Green) you’re synchronizing with. Exalate will let you know if you’ve made a mistake in the URL or if it cannot find the destination.
You can click the “I don’t have a URL” button in case you don’t have the URL of the destination instance and then follow these steps.
At this point, you can choose one of the three ways to continue. Exalate allows you to set up your connection using 3 modes: the Basic, the Visual, and the Script Mode.
Exalate’s Basic Mode enables you to set up a connection for a limited set of issue fields like summary, description, comments, attachments, and issue types.
The sync rules are generated automatically by Exalate and cannot be modified. These connections are recommended for use cases with basic synchronization needs.
Note:Exalate also has an option where not only Global administrators but also Project administrators can set up Basic connections from the Project settings. This helps establish the connection on a project level. Visit this page to learn more about how to do it.
Exalate’s Visual Mode gives you an easy way to set your connection up to share what you want, at the time of your choosing. If you prefer, you can use the script mode. Script mode is a bit trickier, but lets you use more advanced programming logic.
Another advantage of the Visual mode is that it is a one-side, one admin control that lets you configure everything together.
The Script mode, by contrast, is disparate, with someone on each side of the connection controlling the sync separately and autonomously. It uses a Groovy scripting engine to allow you to customize your Jira sync however you want.
This mode is also powered by AI which acts as an integration co-pilot. We will learn more about it in the next section.
Note: If you’re already familiar with Groovy, then great! But if you’re new to it, then check out chapter 4 of the Exalate Academy and learn all about it. It’s quite straightforward and once you get the hang of the logic, you can play around with your sync flexibly.
First I’ll walk you through the Basic Mode, then we will talk about the Visual mode, and finally the Script Mode. But if you are interested in learning about either of the 2 directly, then you can skip ahead and jump to the relevant sections.
Continue with the Basic Mode
For getting started with the Basic Mode, click “Next” after selecting it. This will take you to a screen where you must select the project on the Blue Jira instance side initiating the connection and hit “Next”.
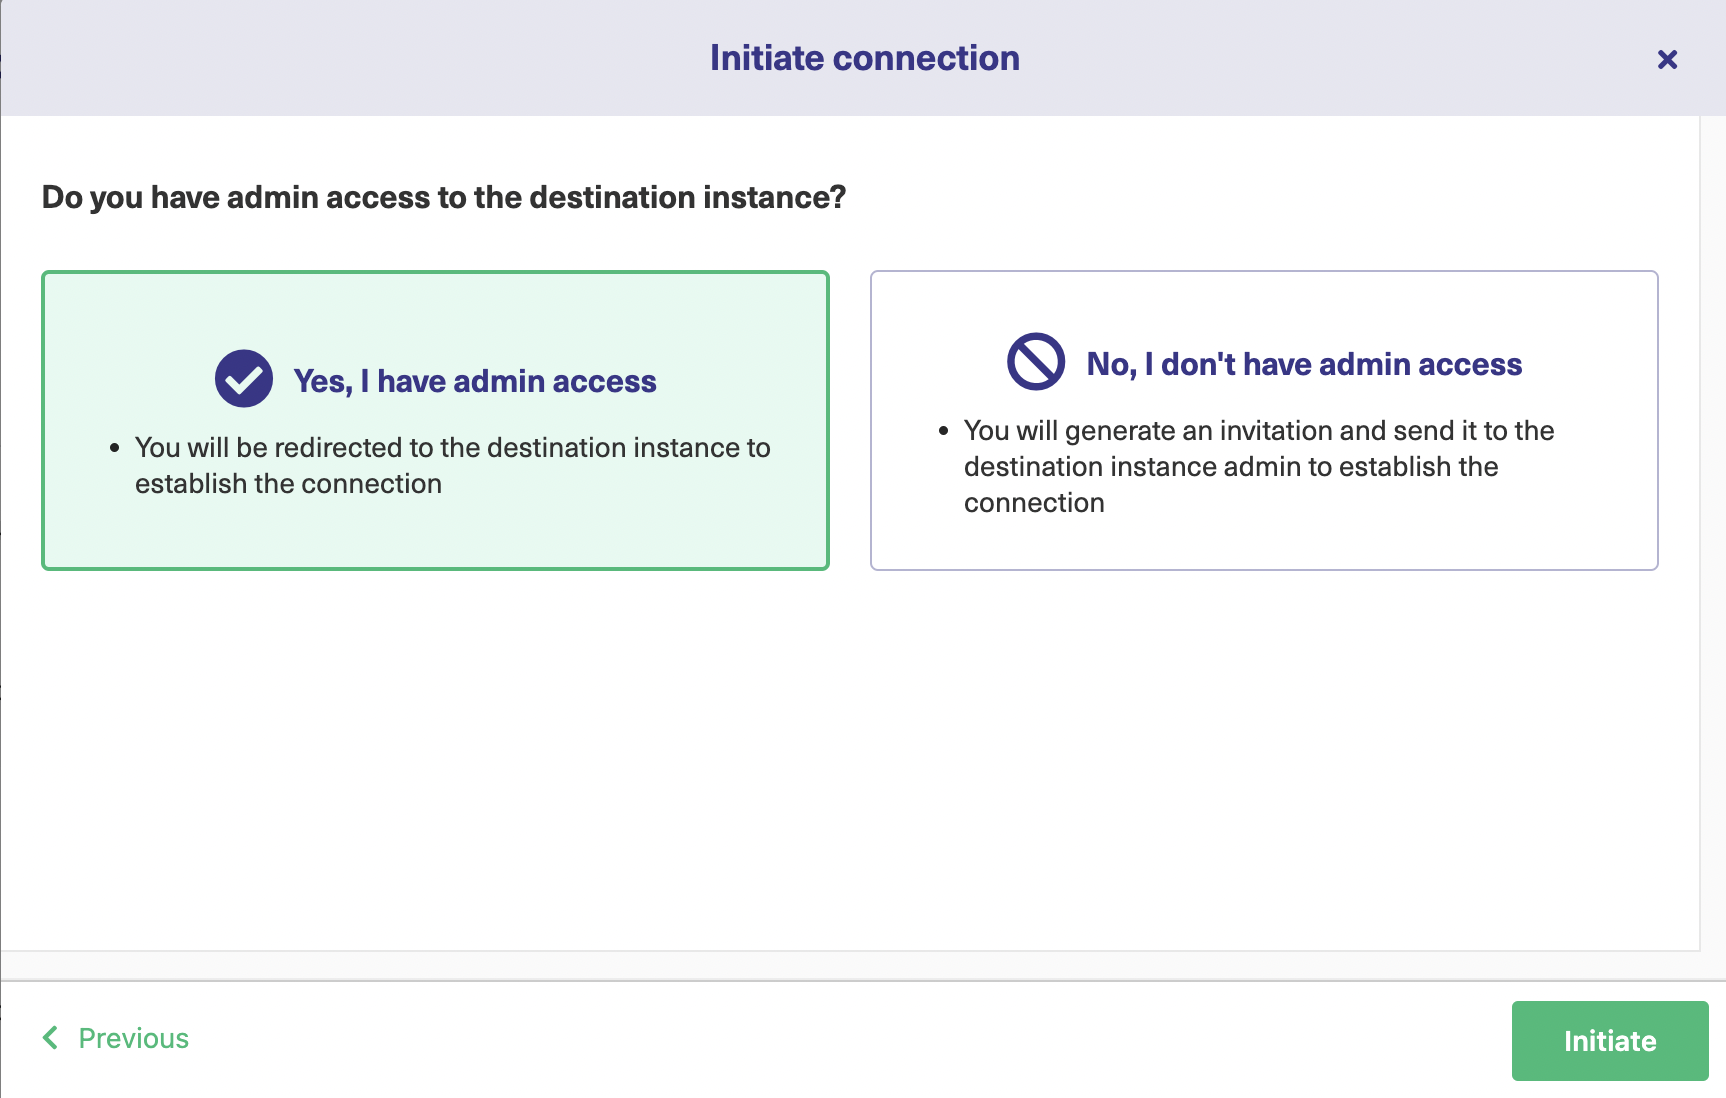
This will redirect you to a screen that will ask you whether you have admin access to the destination instance or not. Click on “Yes, I have admin access” and click “Initiate”.
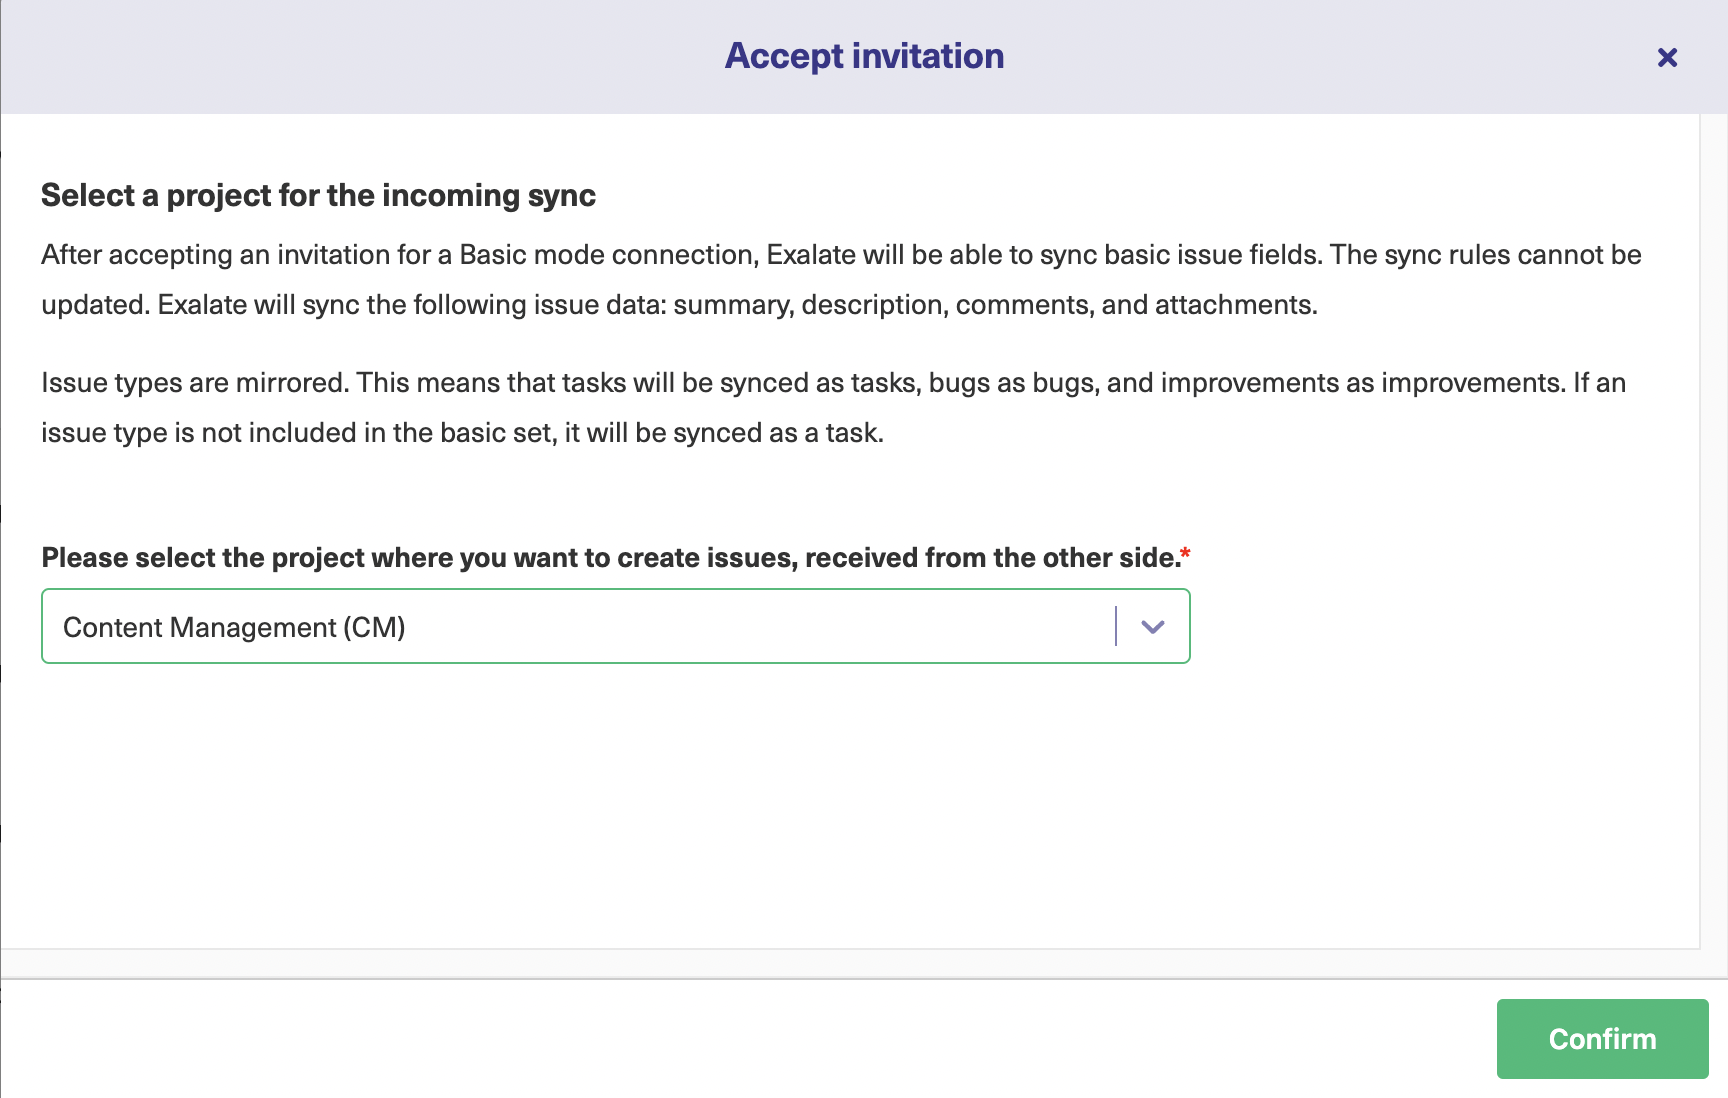
You will again encounter a screen on the Green Jira instance which will ask you to select a project on that side. After selecting the project, press the “Confirm” button.
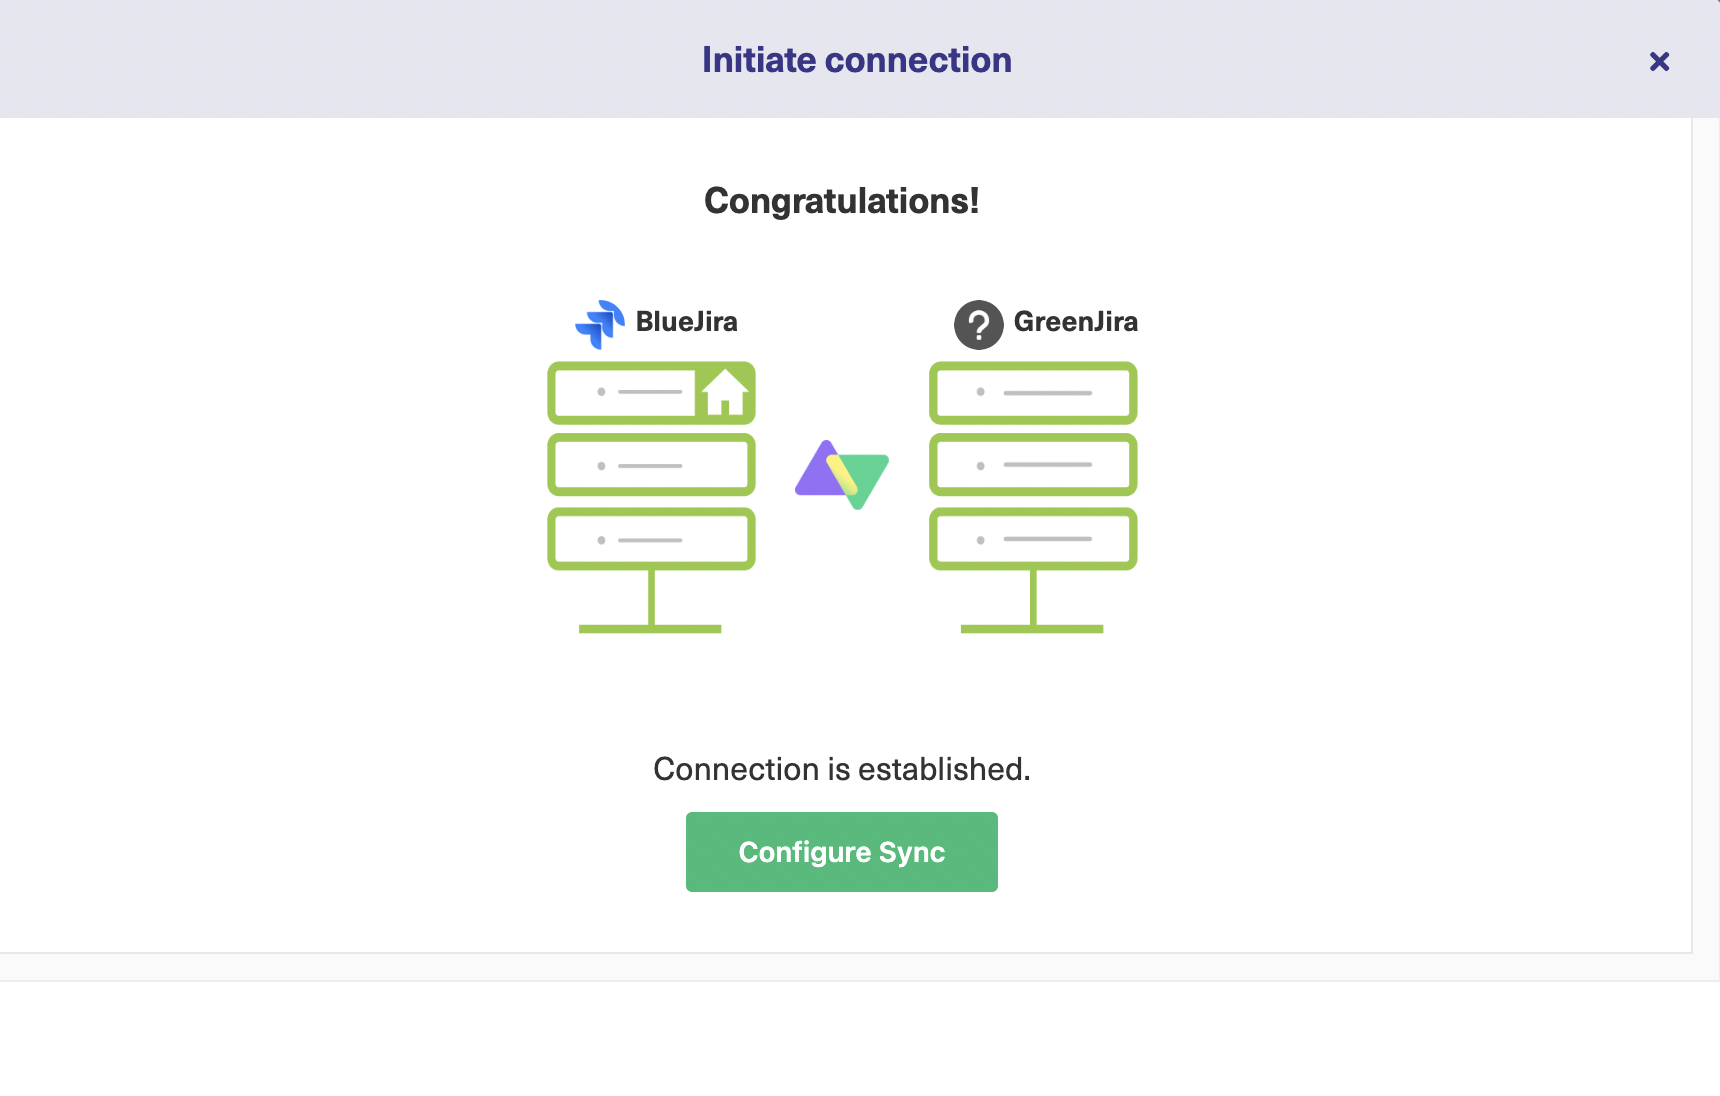
This successfully establishes a connection between the 2 Jira instances.
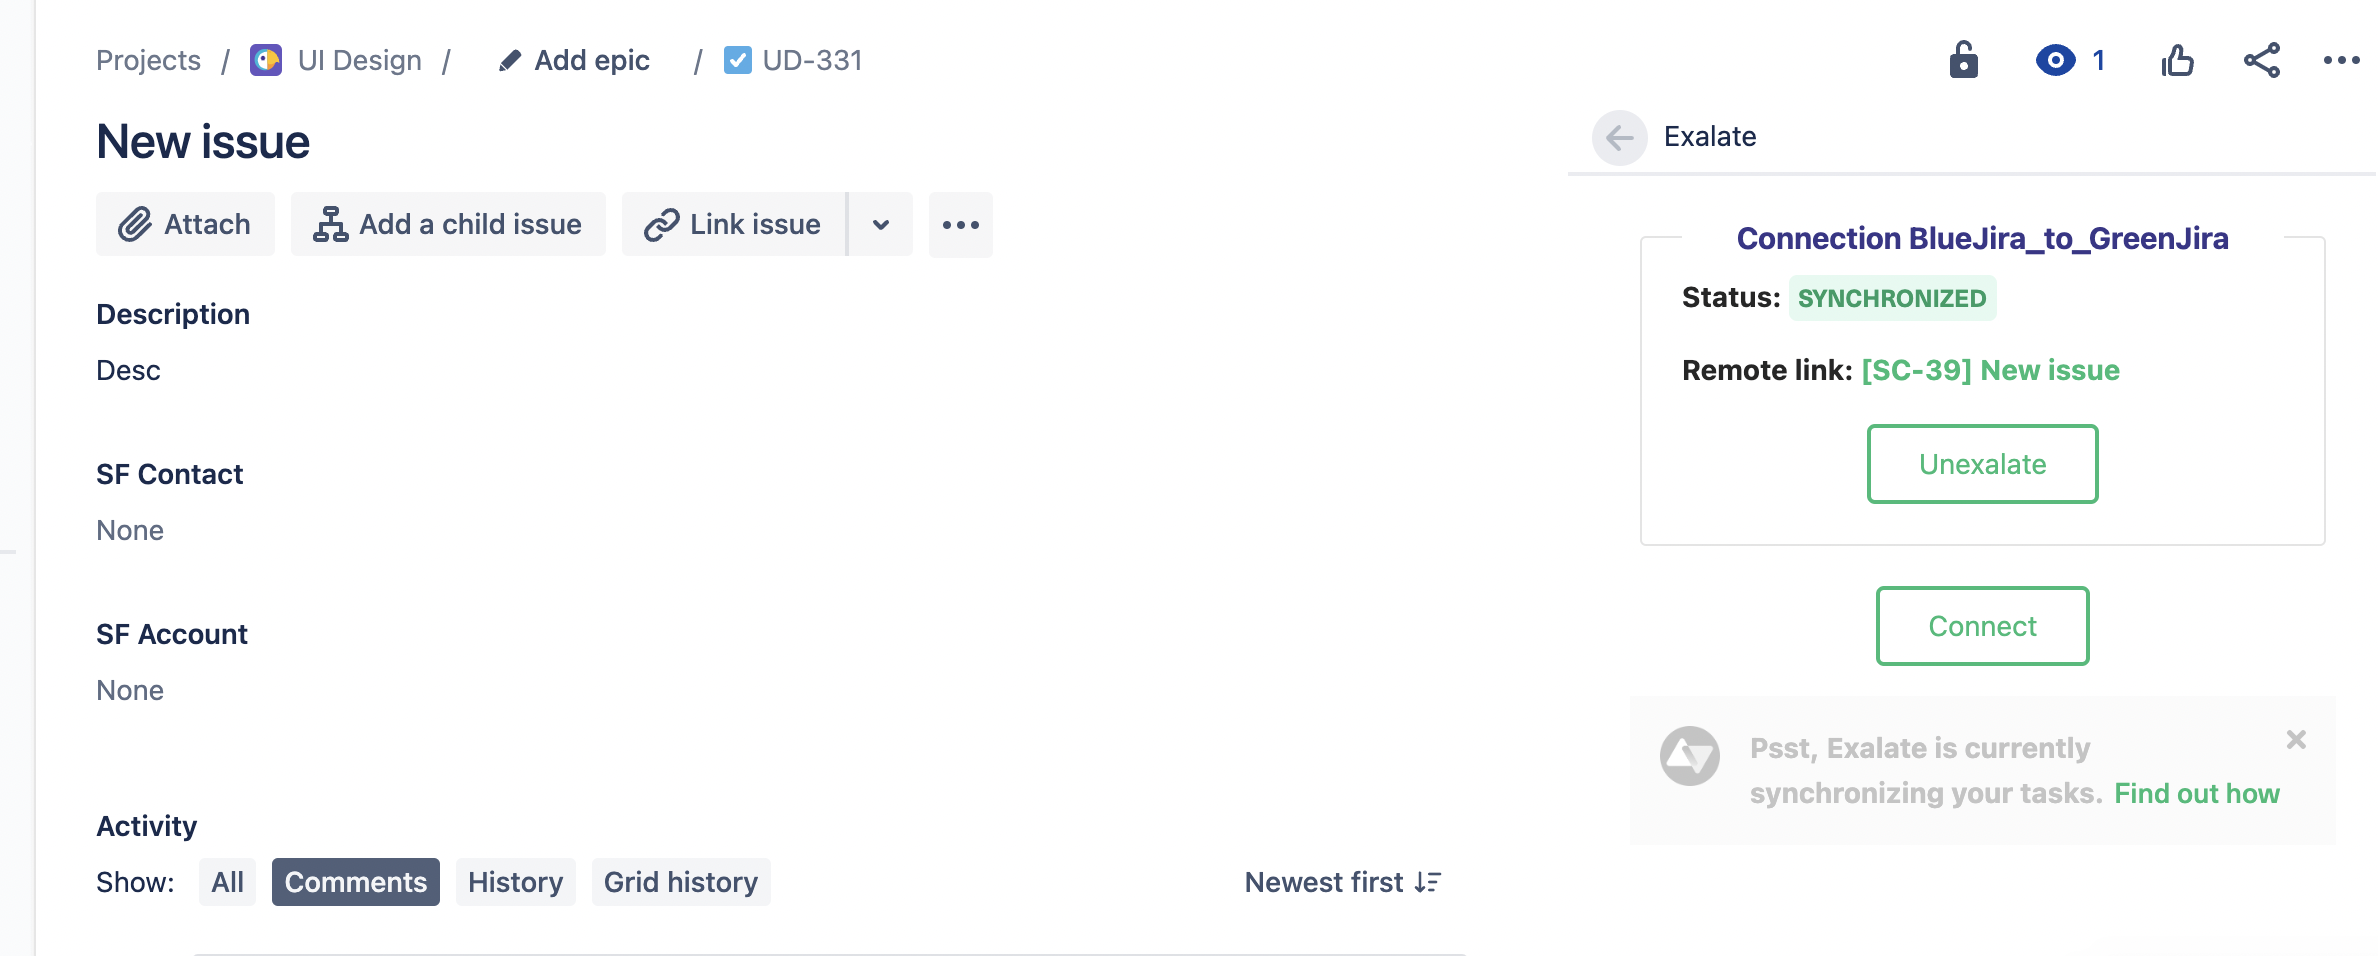
Now you can sync your first issue by directly entering the issue key as shown below, by creating a trigger, or by using the connect operation.
Once the connection has been established, you can directly see the status of synchronization.
Continue with the Visual Mode
If you want to use the Visual mode, click it to make sure it is selected in the screen asking you to choose the configuration type, and then click “Next”.
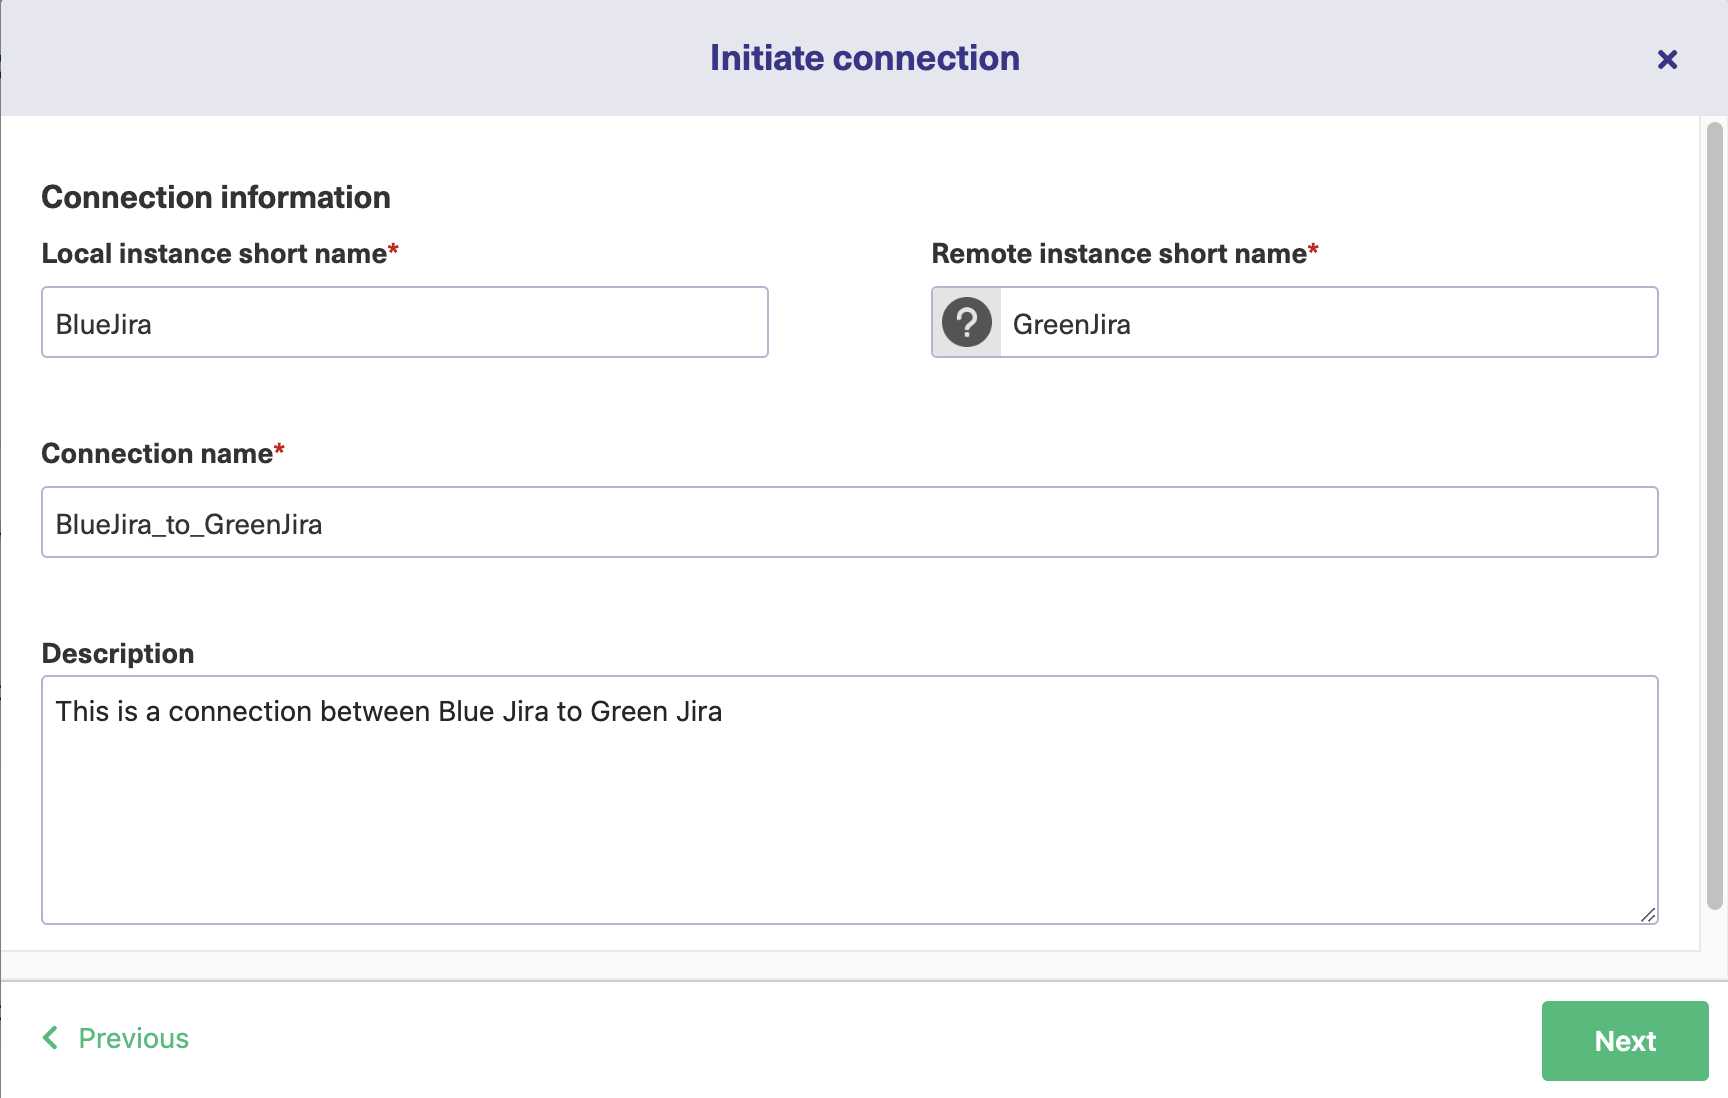
After this, you will be redirected to a screen that will allow you to enter the details of the connection you wish to establish.
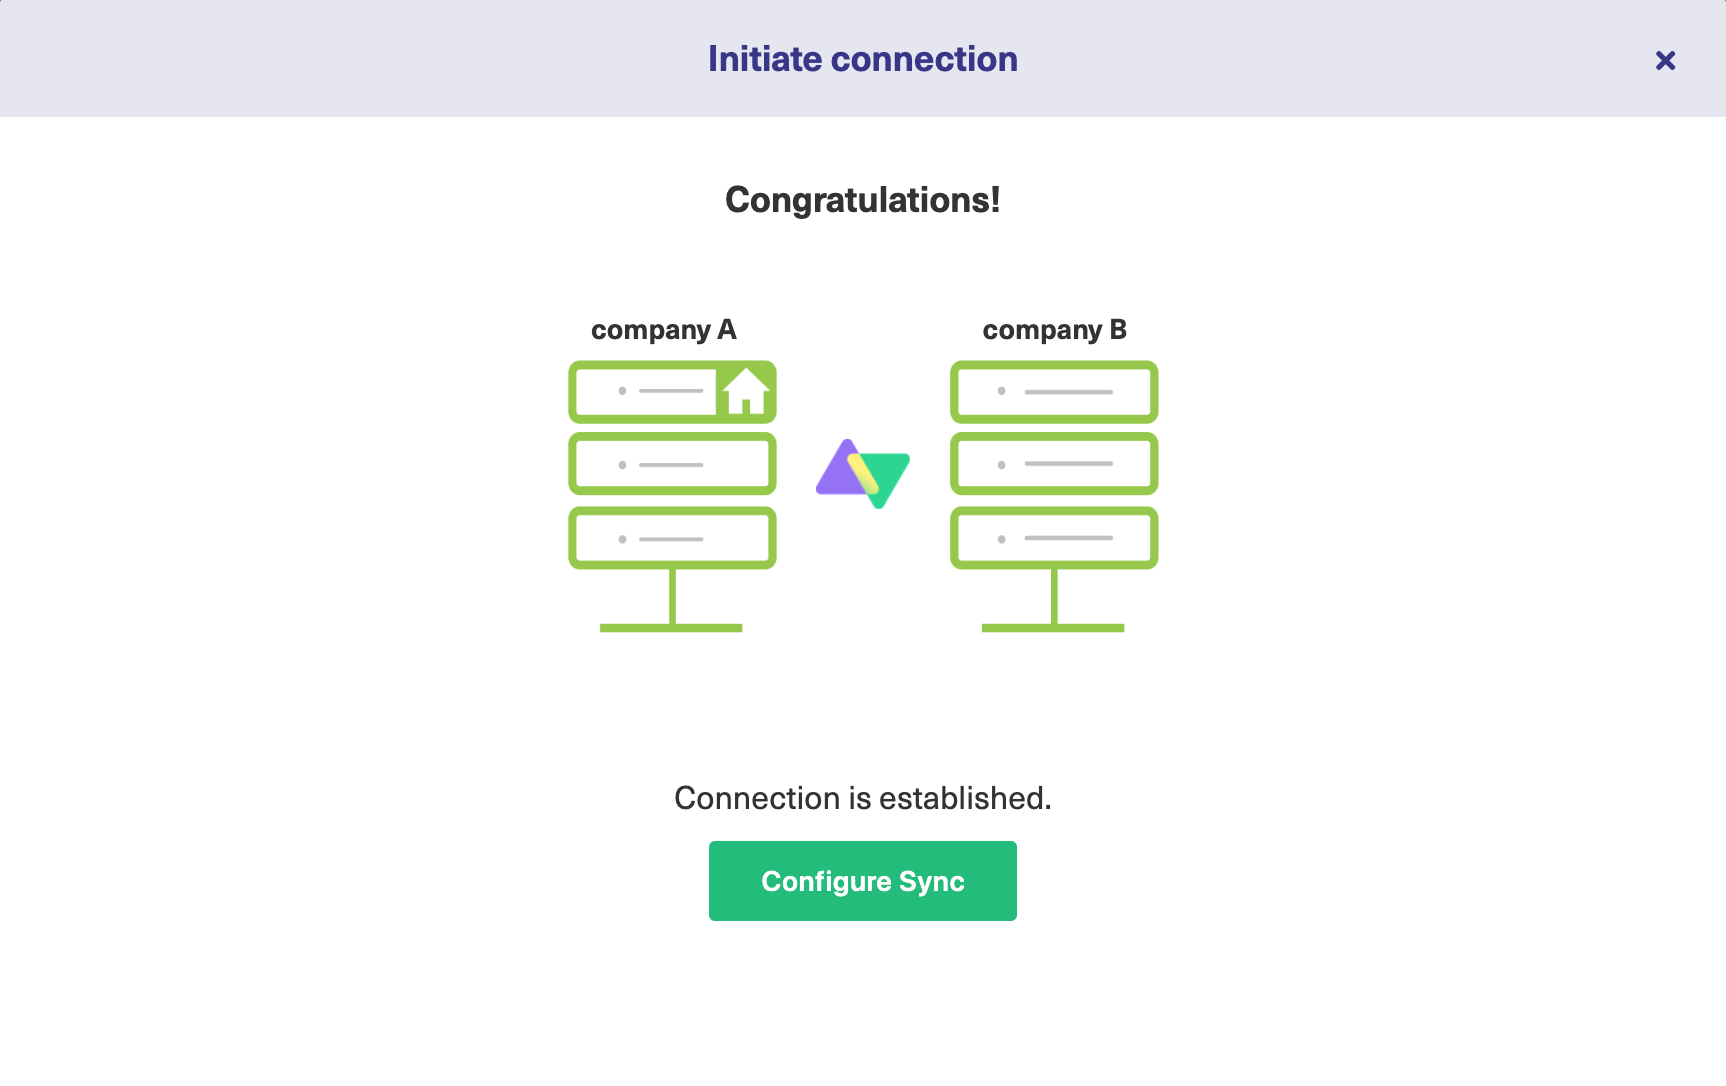
After the verification process from the destination instance (for which you need admin access), Exalate will take a few moments to get your connection set up for visual mode. When it is ready, click the “Configure Sync” button.
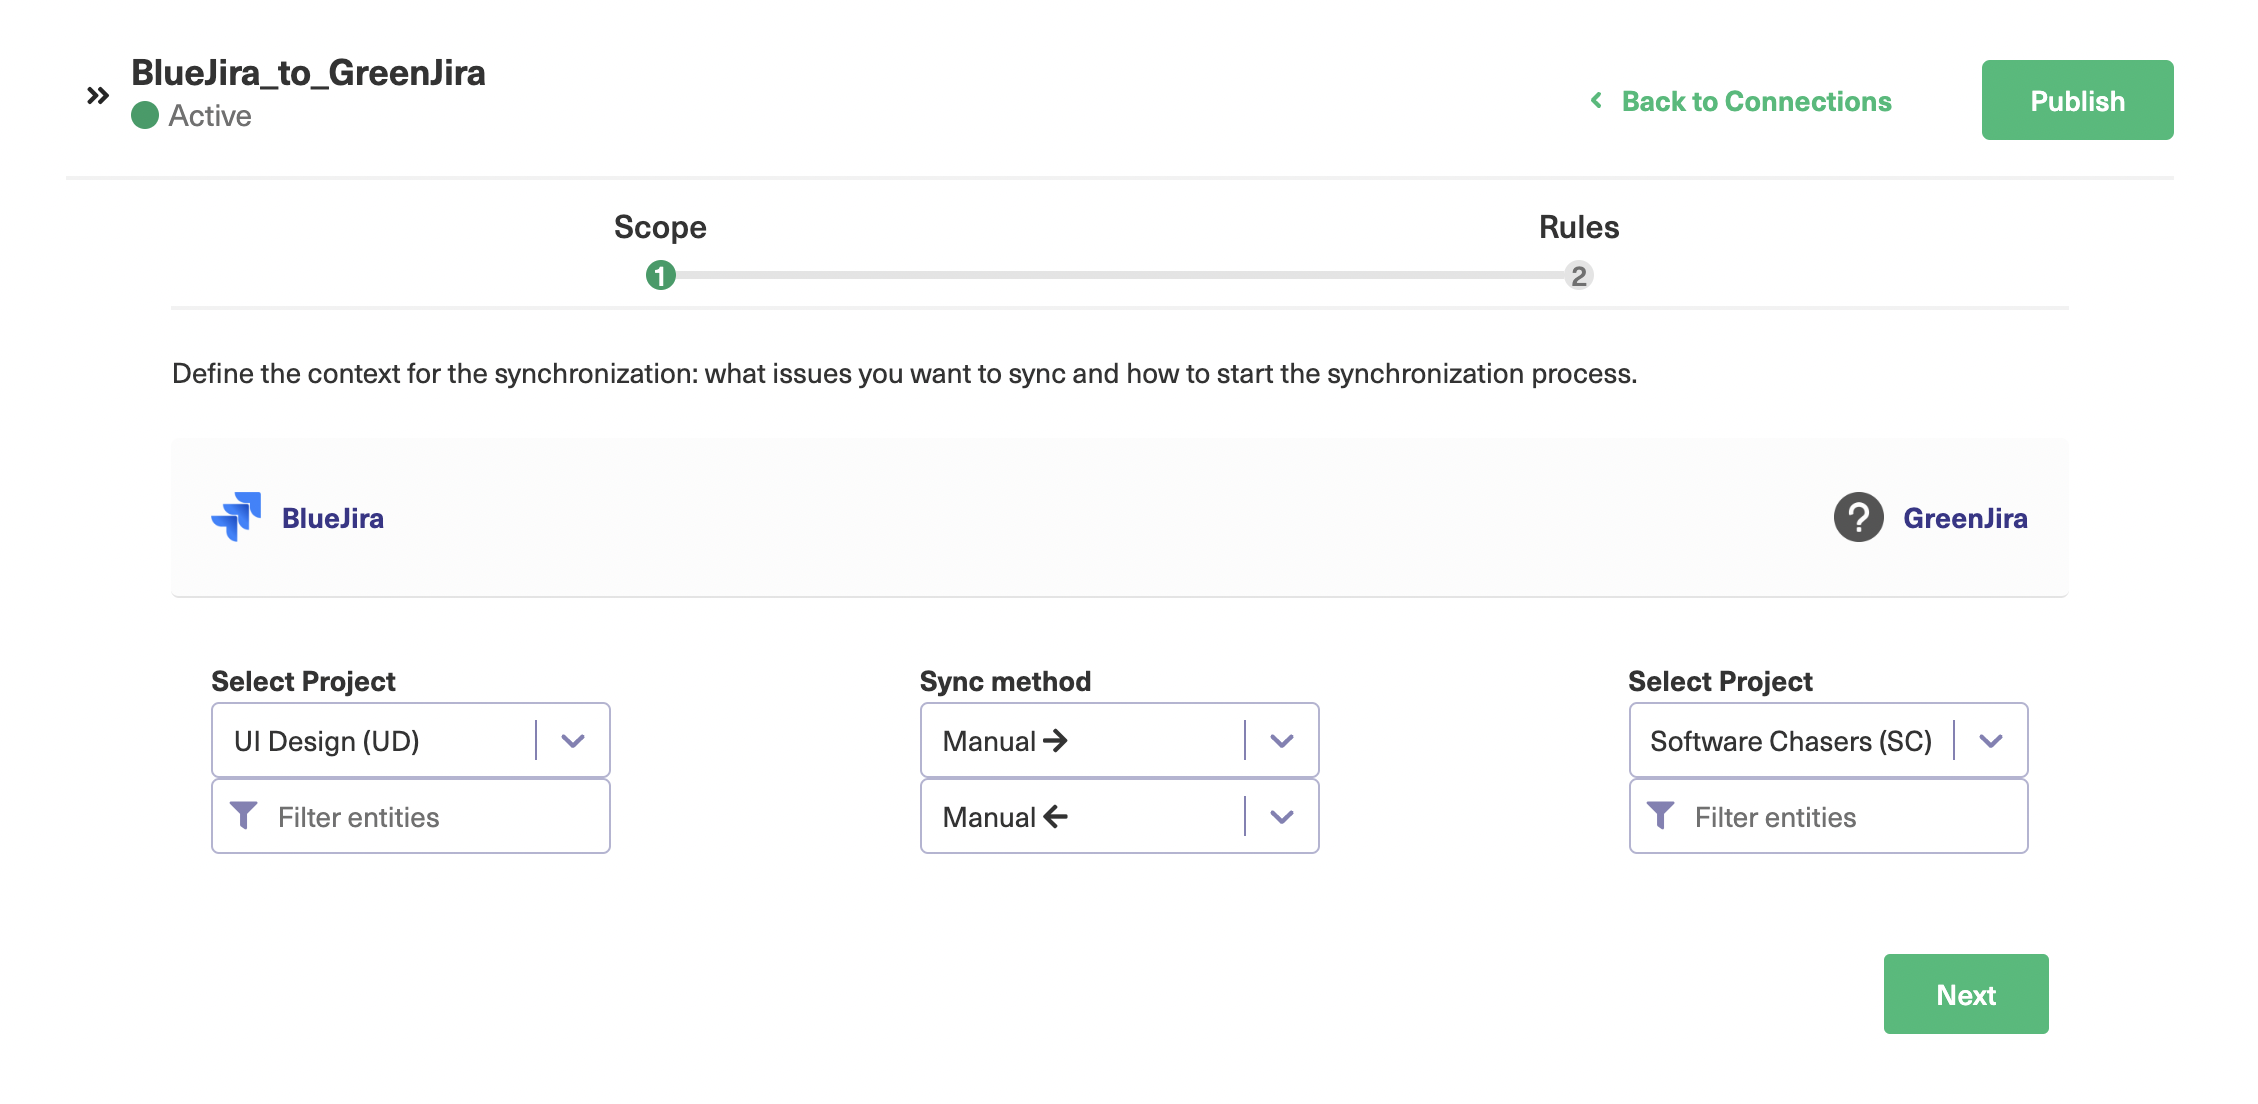
On the next screen, there are several fields allowing you to control the connection. Each side of the connection has its own separate fields for selecting a project and filtering entities.
The select project dropdown controls which project synchronized items will be taken from and added to.
The sync method dropdowns let you choose whether synchronization is automatic, manual, or disabled. There are two of these, one for each direction of the synchronization. In each case, the items are moving from one side of the connection to the other in the direction the small arrow is pointing.
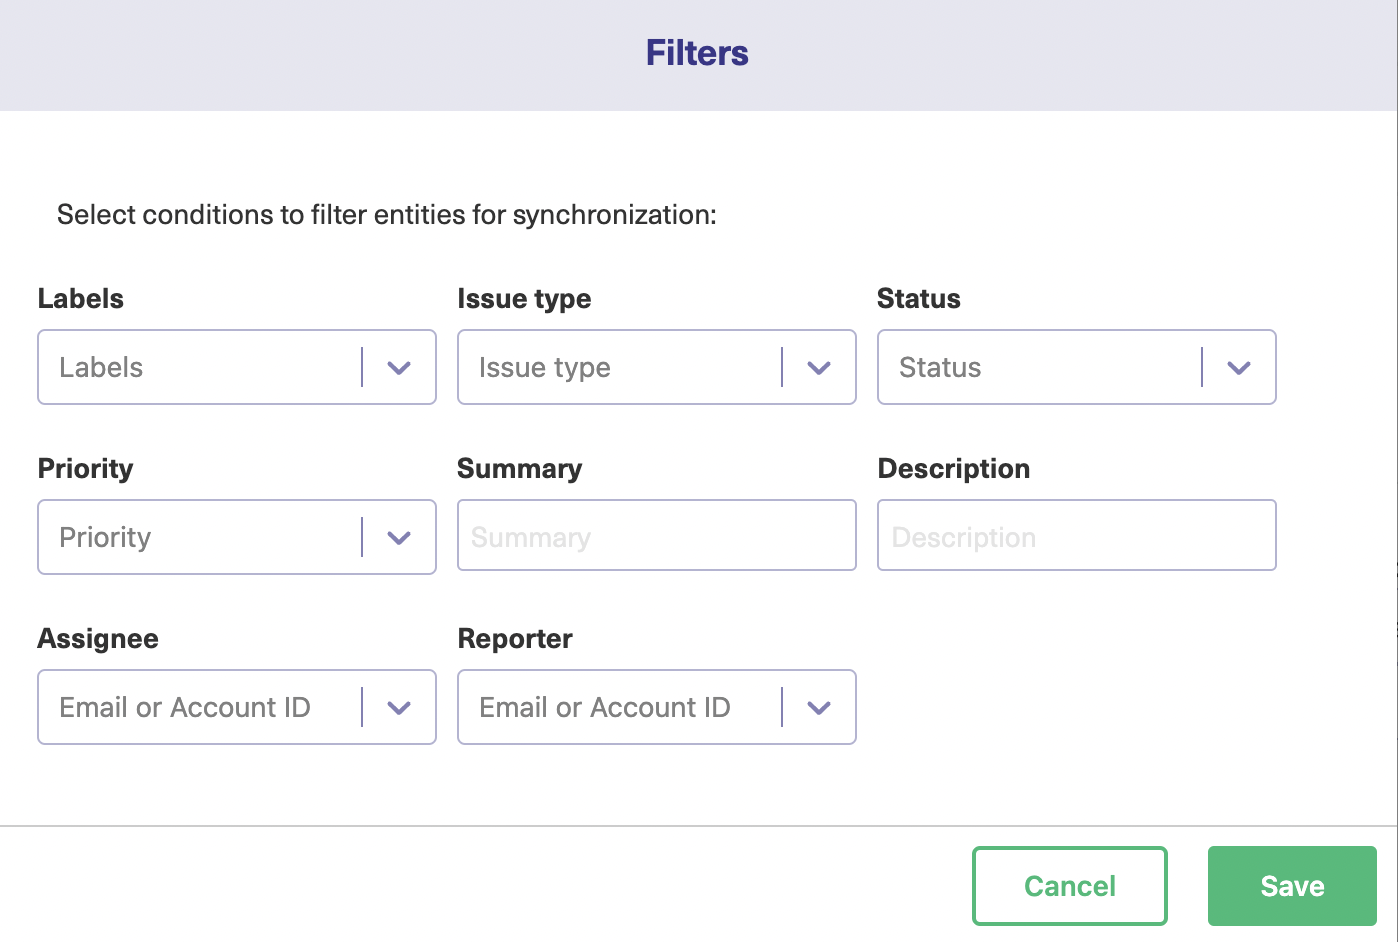
If you click the filter entities button, a pop-up with several controls will appear. You can click the “More” button to expand it and show more controls. The controls show various attributes of your entities.
Making selections in these controls, will filter the entities and determine what gets synchronized. If you want to synchronize all items assigned to a particular person, add them to the “Assignee” dropdown.
To choose entities of a specific priority, select the priority you want from that dropdown. It’s a similar process for all of them. You can combine filters too if you choose.
When you are finished, click “Save” and your filters will be applied.
Don’t forget that different filters are used for each side of the connection, so you’ll need to check the other one, too.
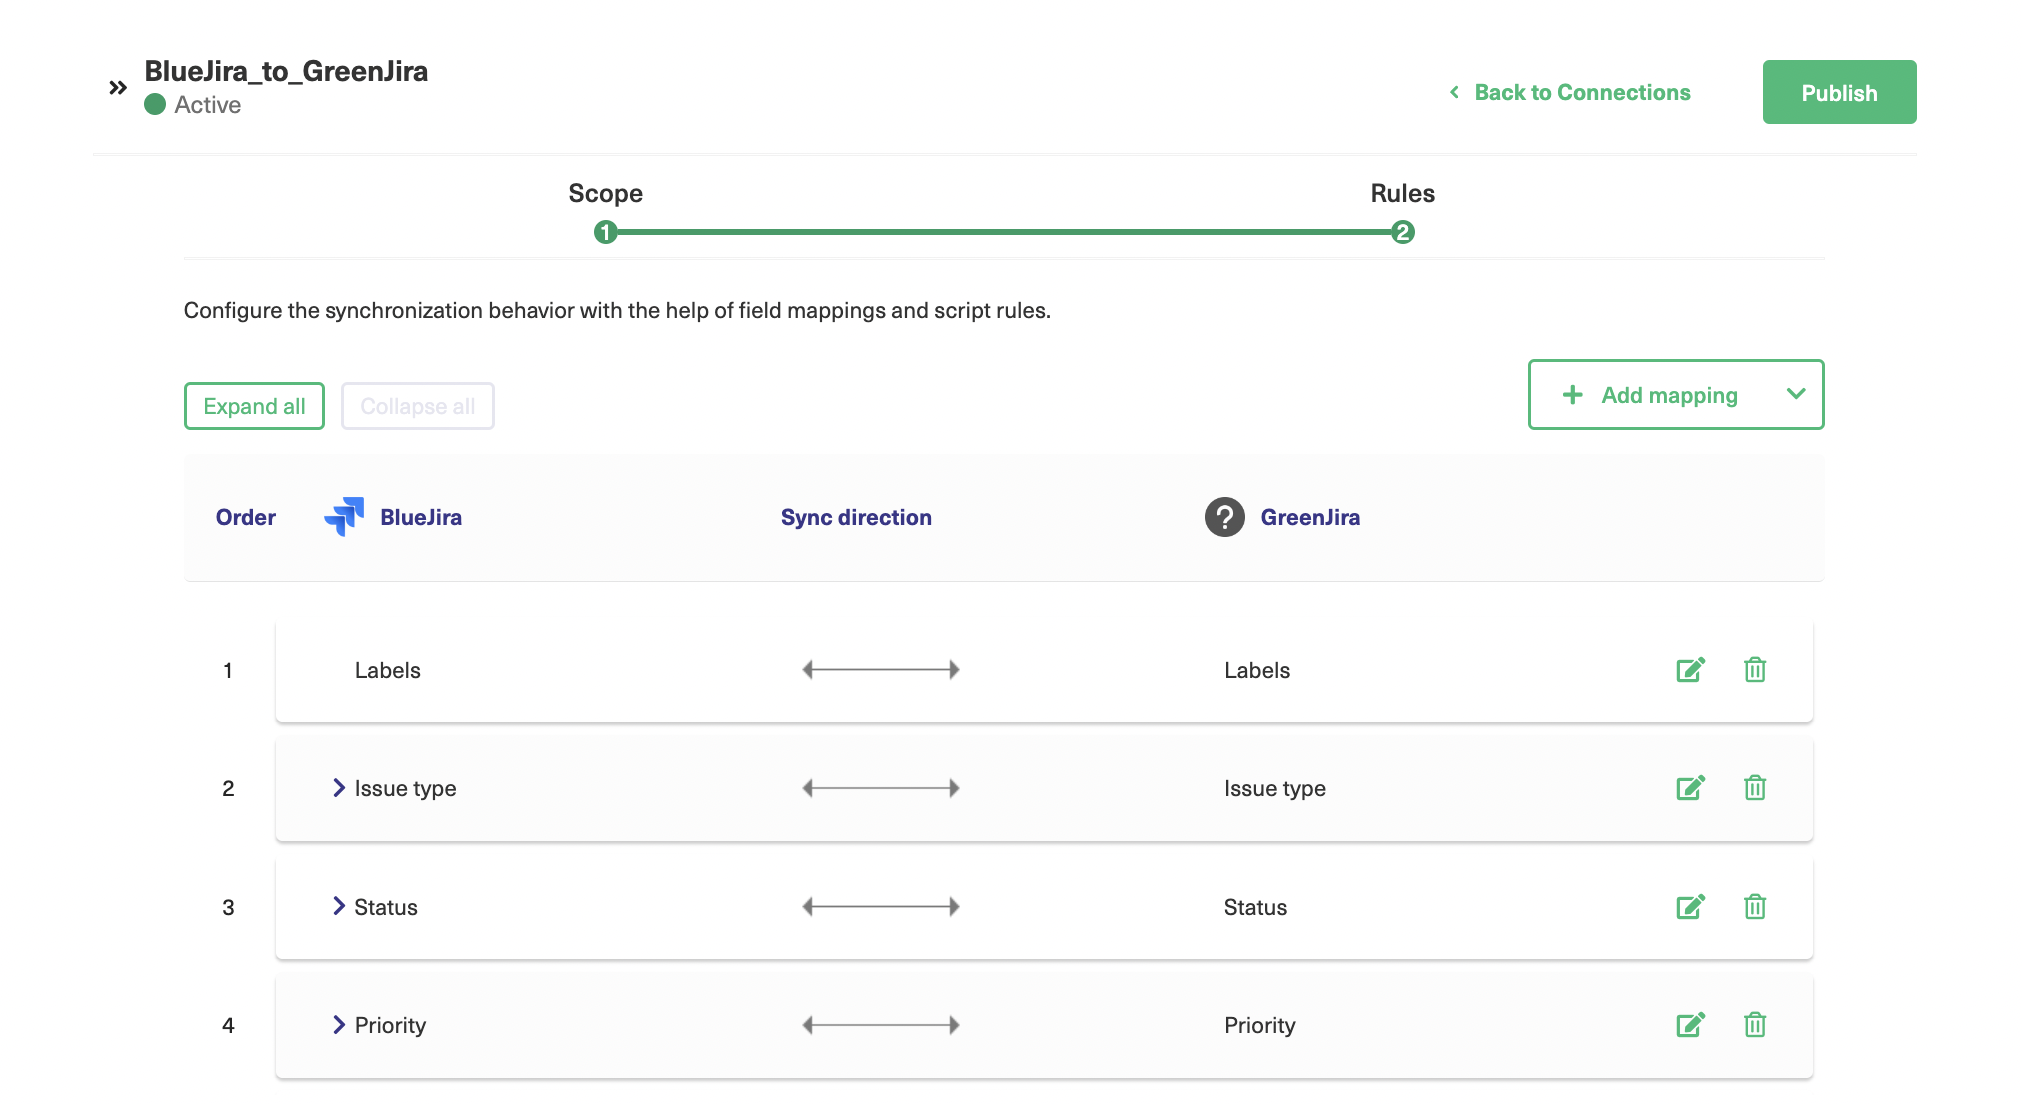
If you click the “Expand all” button, some of the entries will open up, and you’ll be able to see how particular values are mapped to each other. By default they are directly copied, but, for example, you could make a low-priority entity on one end a high-priority entity on the other, depending on the focus of the teams.
Some entries also have a button that lets you expand them individually. Not all entries can be expanded, just those that let you choose from a predefined set of values.
You can reorder entries by dragging them up and down. Each entry has its own edit button and a delete button.
For editing the default mappings, click the “Next” button to go to the rules screen (after configuring the sync scope). Or you can simply edit an existing connection by navigating to “Connections” on the main “Apps” submenu, then click on “Edit Connection” and then “Rules”.
For every connection, you can see a list of mappings that show which fields match each other. Since this is a Jira to Jira connection, the fields match identically named fields on the other side, but this may not be the case for you.
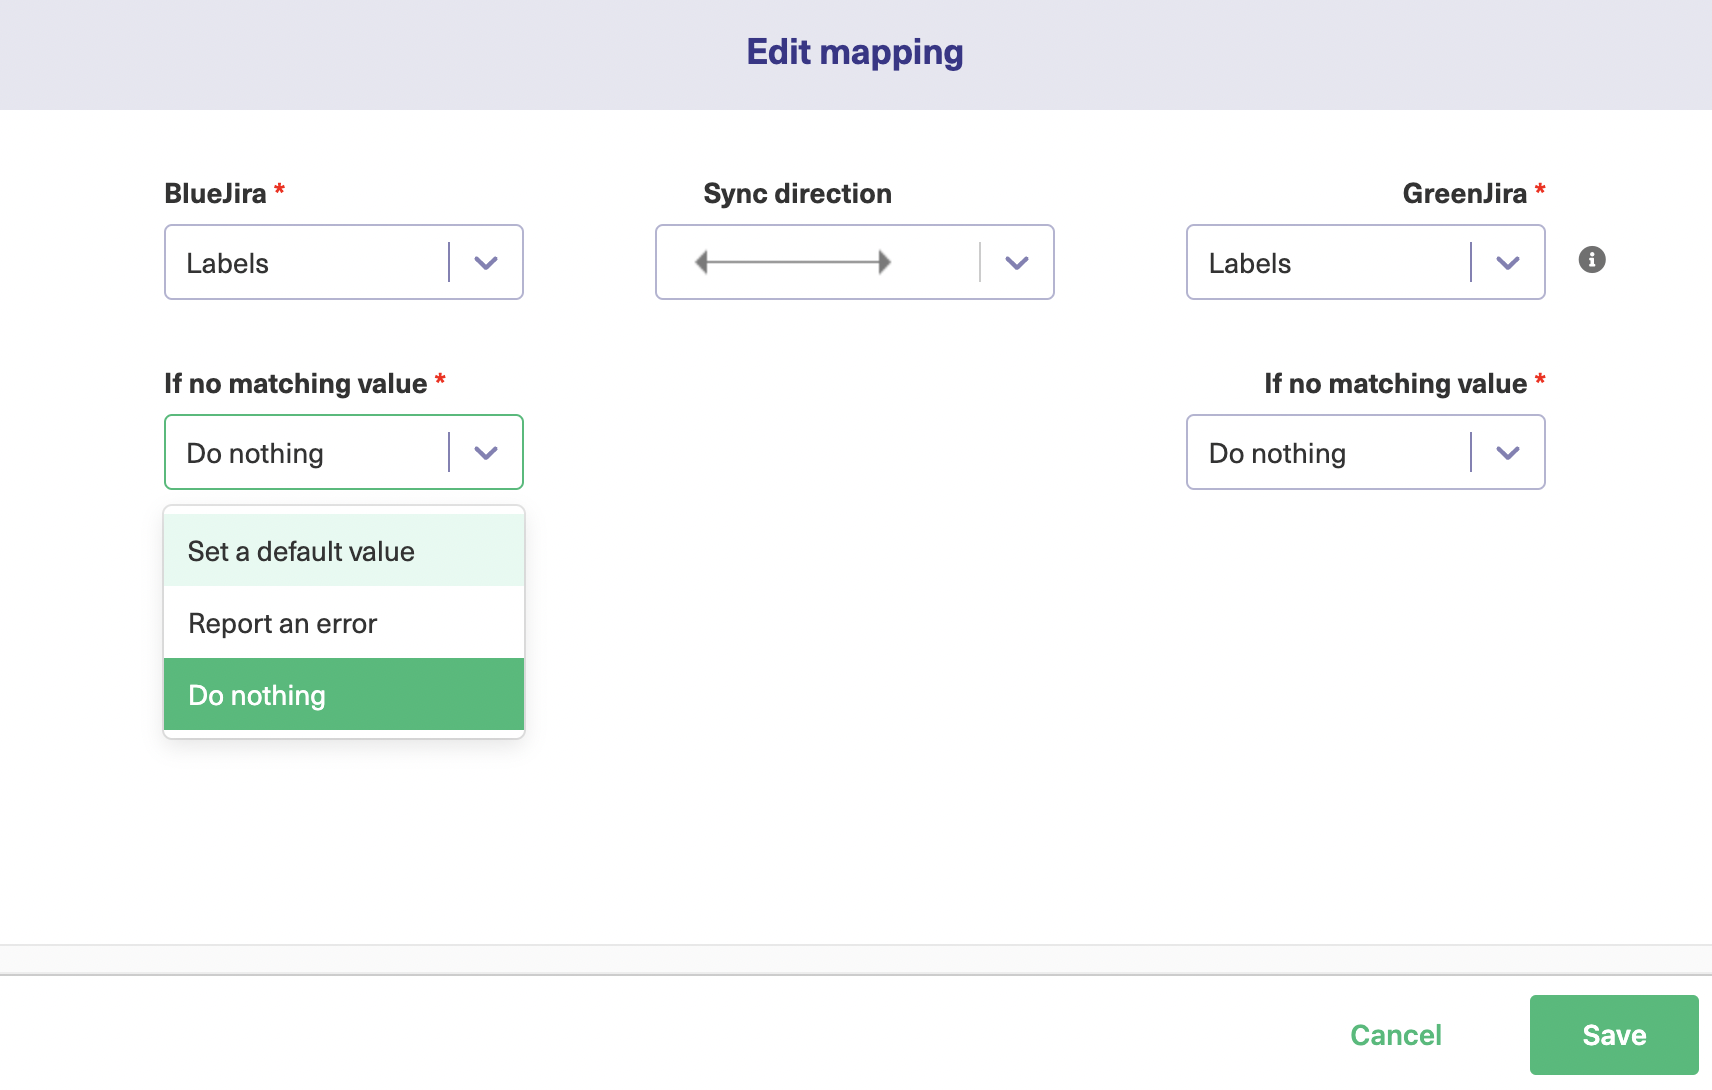
Click an entry’s edit button to bring up its edit mapping screen. There are various controls available.
There’s a sync direction button in the middle. This works like the ones on other screens, but here you can apply it on a field-by-field basis, so you can have specific fields mapped in one direction only if you want.
You can adjust the mapped field on each side of the screen. Perhaps you want the priority to be passed to the description, so the other team can prioritize it themselves while still seeing how the other team categorizes it.
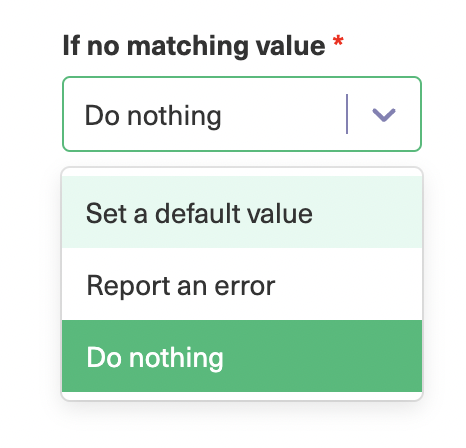
You can also decide what happens if there isn’t a value that matches. You can do nothing, report an error, or set a default value. That’s useful if you want a way of spotting problems or absent data.
Click the “Save” button when you’ve finished, or the “Cancel” button to ignore your changes.
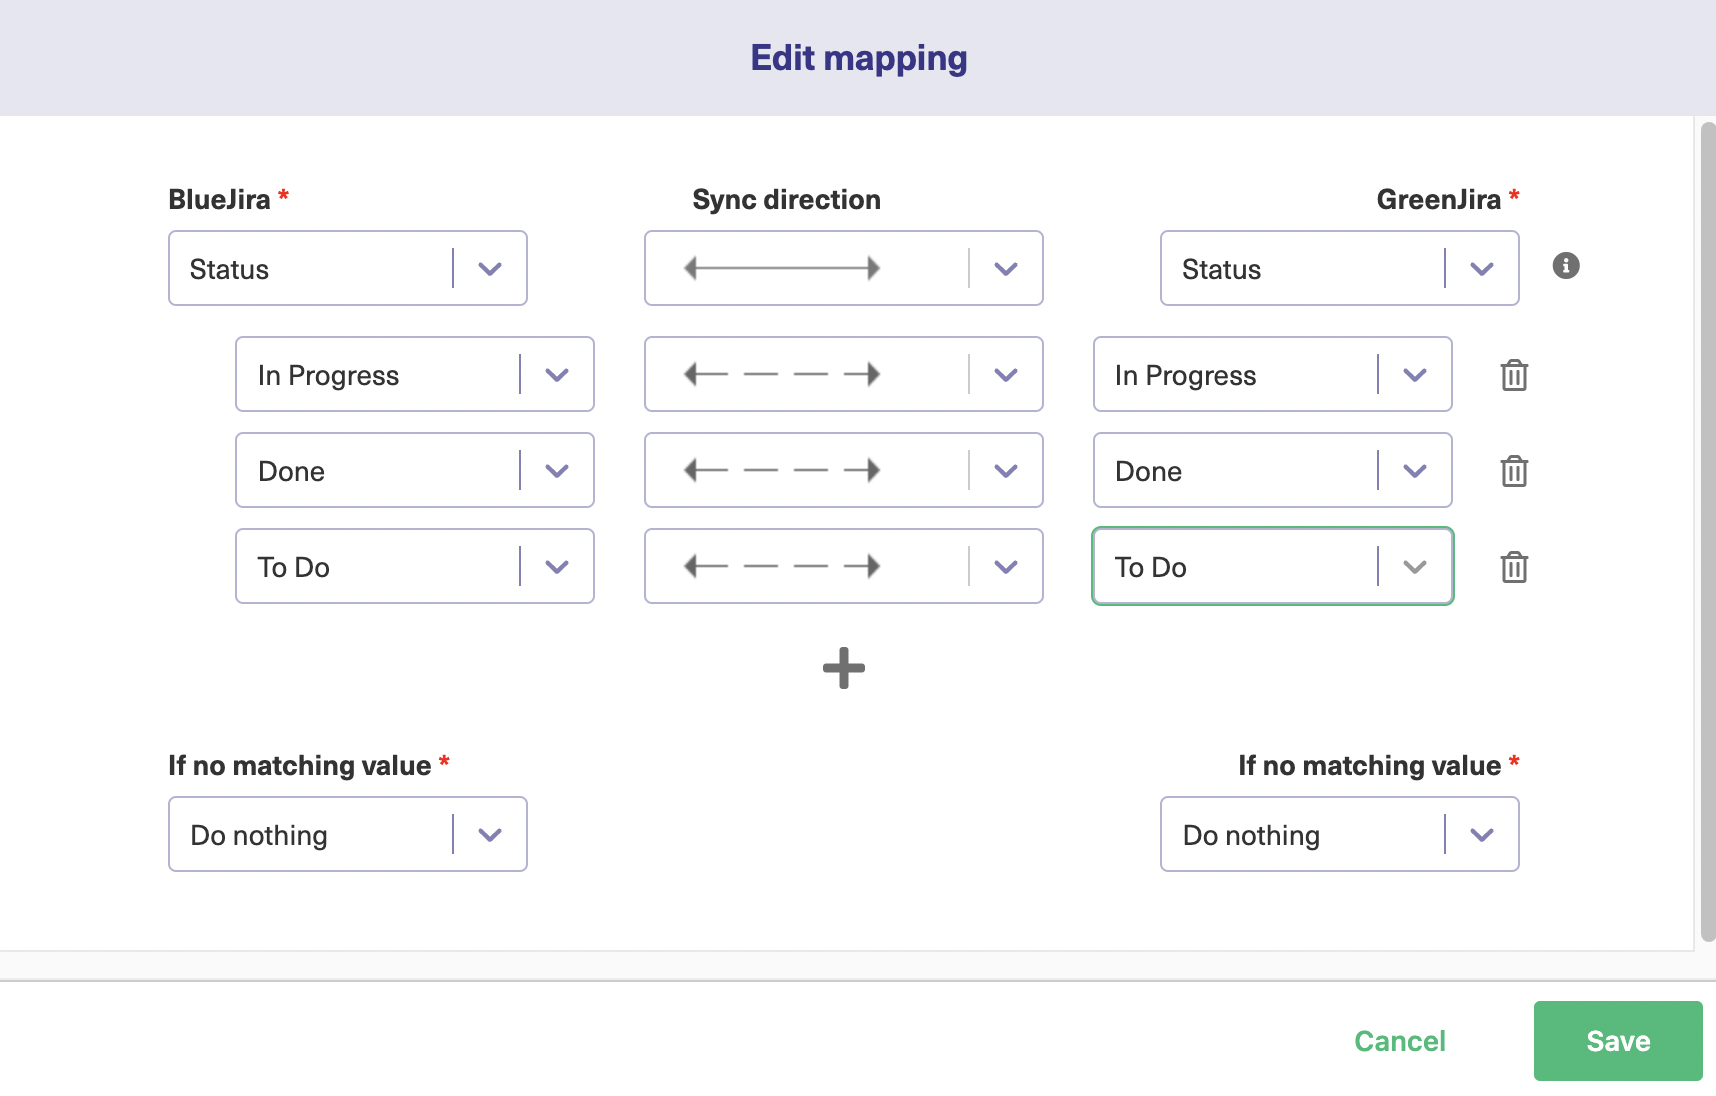
For fields with multiple pre-set mappings, such as “Status” shown in the screenshot above, the screen has a list of how the individual options map to each other. There’s also a plus button, so you can add a new option mapping if you want.
Again here, you can choose the sync direction for each specific option, as well as map it to a different option or delete it altogether.
Back on the rules screen, if you want to add a new mapping, click the “Add mapping” button at the top right. This works much like the edit mapping screen, but you have to choose the values to map from the drop-down boxes on the left and right. Once you’ve chosen them, you’ll see similar options to the other screens and can save your choices by clicking “Save”.
If you click the small arrow to the right of the button, you’ll also see an option to add a script. If you click this, a screen will pop up allowing you to add rules using scripting. These can be simple or advanced, though if you learn how it works, you can do things that aren’t possible otherwise.
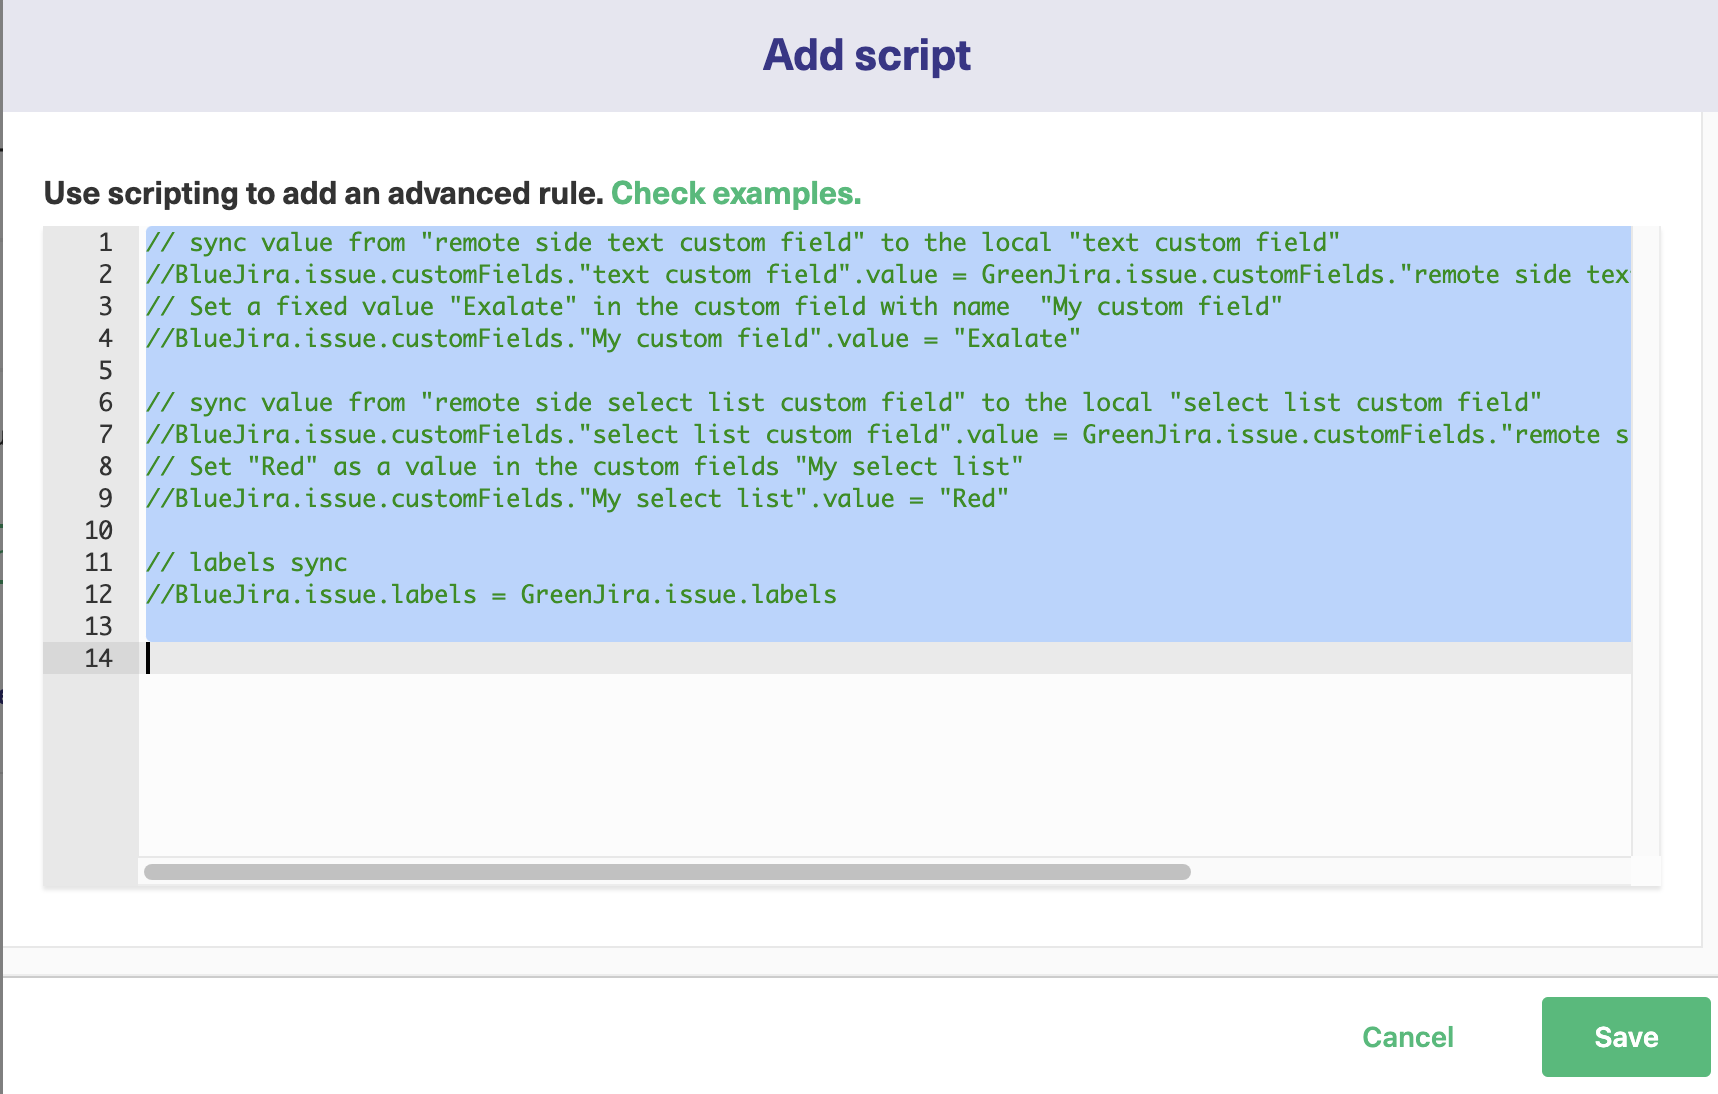
When the add script pop-up first appears you’ll see some sample text, as in the screenshot above. This will disappear when you click it to make your own entries.
Adding lines here lets you map fields onto each other. In the example above, you can see the text BlueJira.issue.labels = GreenJira.issue.labels. BlueJira and GreenJira are the names of the Jira instances being used. This line maps the issue labels field from GreenJira directly onto BlueJira. It’s a straightforward copy.
If you wanted to change to something different you could type BlueJira.issue.labels = GreenJira.issue.comments, or, if you wanted to use a specific value instead, BlueJira.issue.labels = ‘from Jira synchronization’.
You can use comments to quickly enable or disable lines by adding “//” to the start of any line you want. Commented code is ignored until you uncomment it by removing the slashes. You can of course also use comments to make comments letting you know what the script does.
Click “Save” when you are happy with your changes.
Finally, the “Publish” button will save all your changes and apply them to your connection. When synchronization next takes place, Exalate will use your new rules.
Continue with the Advanced Script Mode
If you decide to go with Script mode rather than Visual mode, here’s what to do.
First, you need to select it and click “Next”. You will then be asked to enter the connection details as shown below.
After which you select a project on the side initiating the connection and click on “Initiate”.
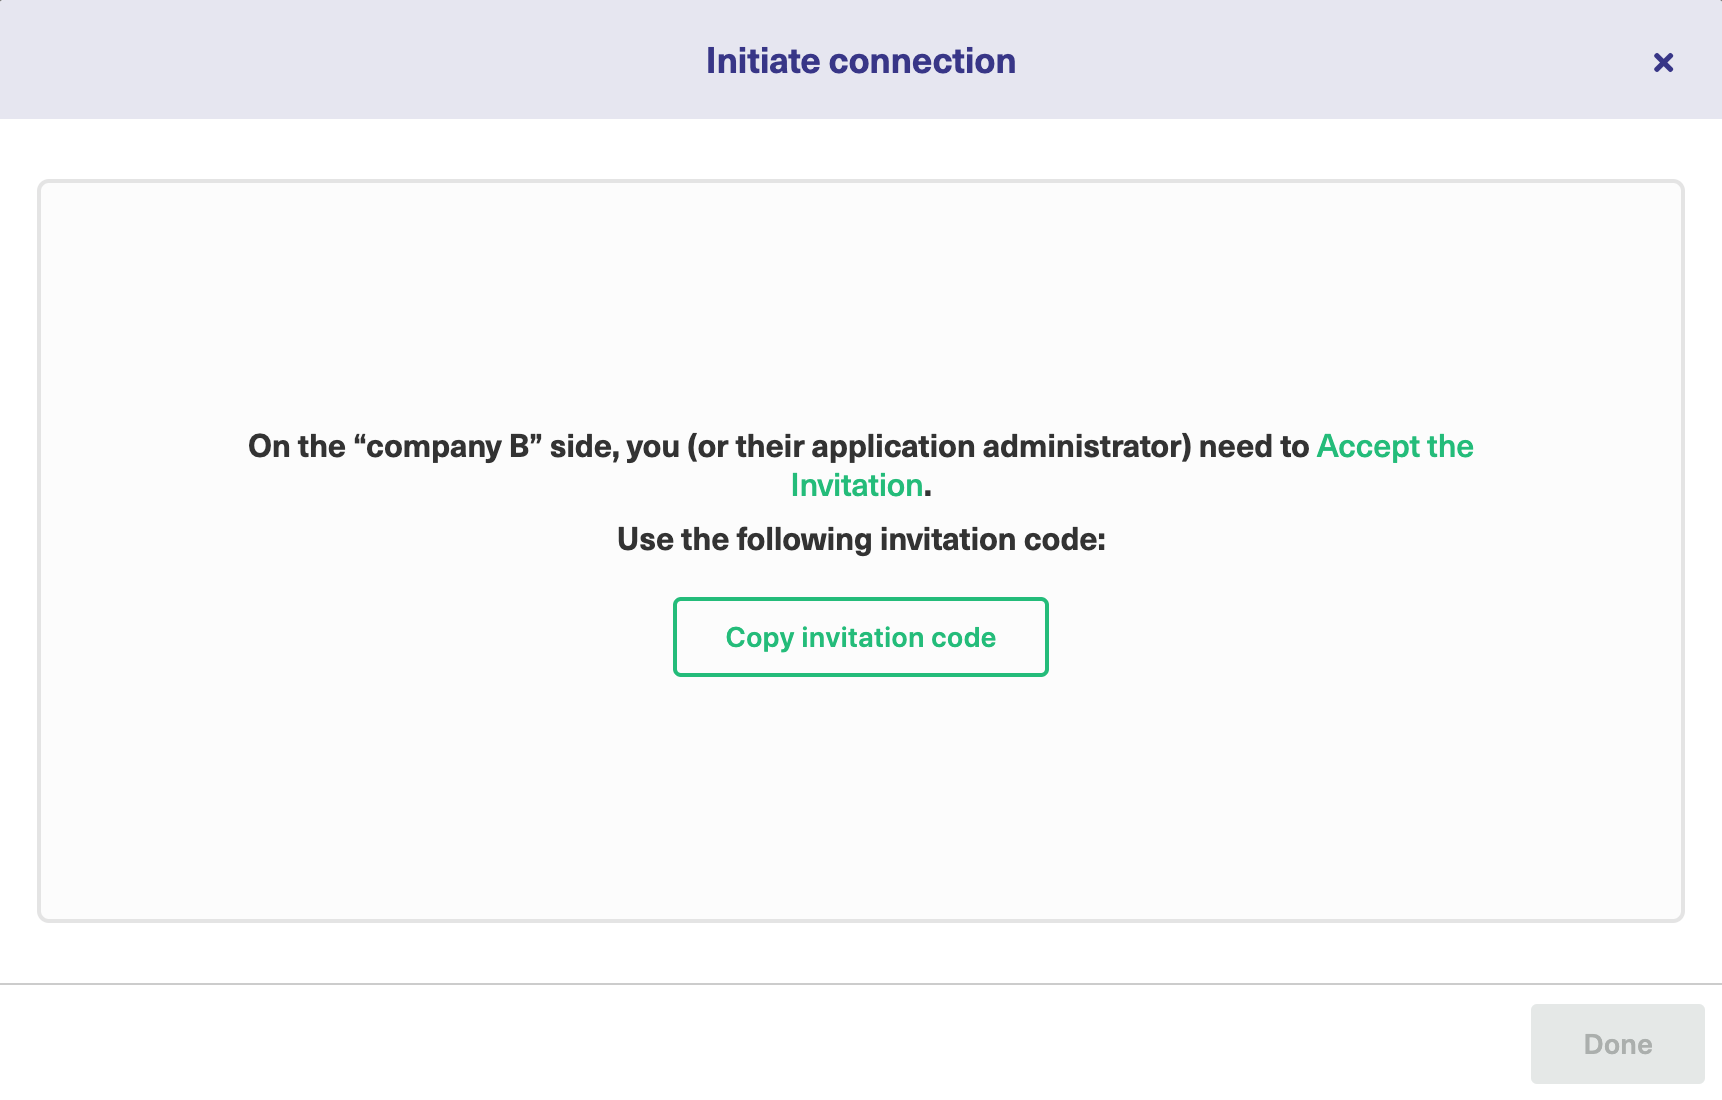
Then, click on “Copy Invitation Code” and click on “Go to remote”.
Note: You can also choose to activate or deactivate the connection. When the connection is deactivated, this will pause synchronization. But changes still get queued for later updates. This means that pausing the connection will not make you lose any data.
Step 4: Invite the other team to connect their Jira project
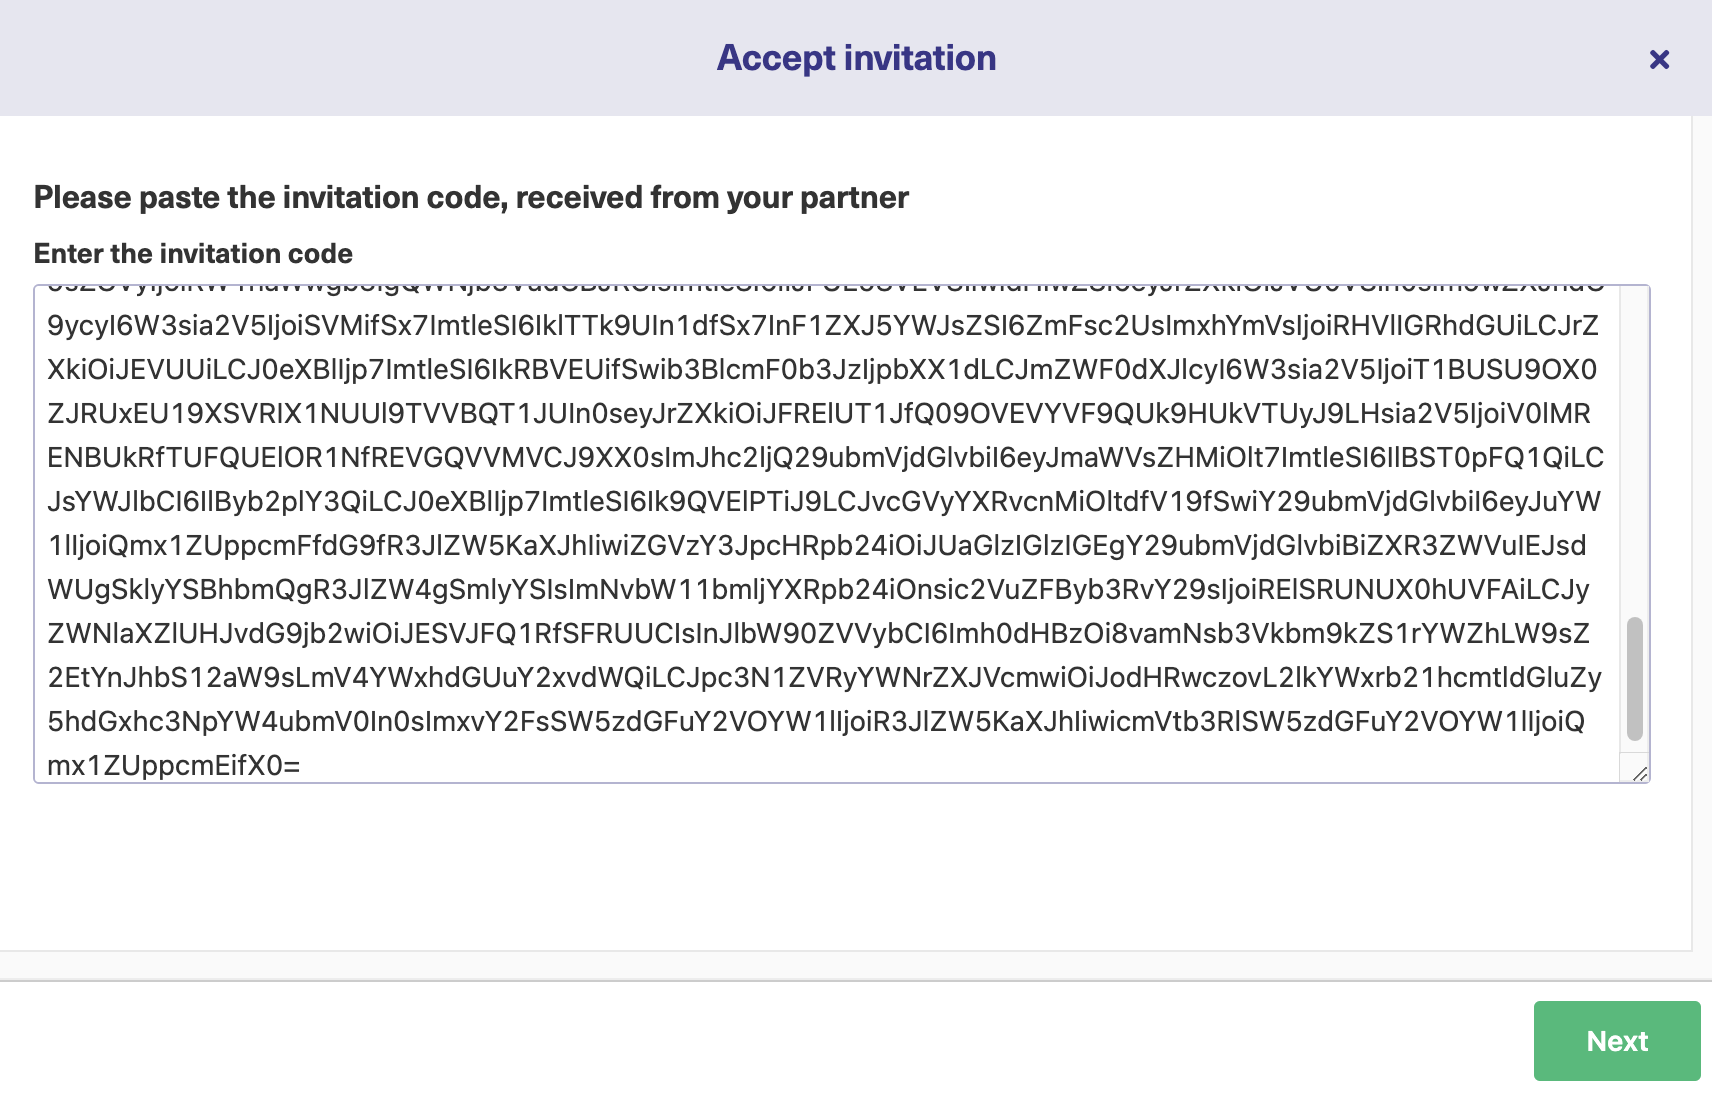
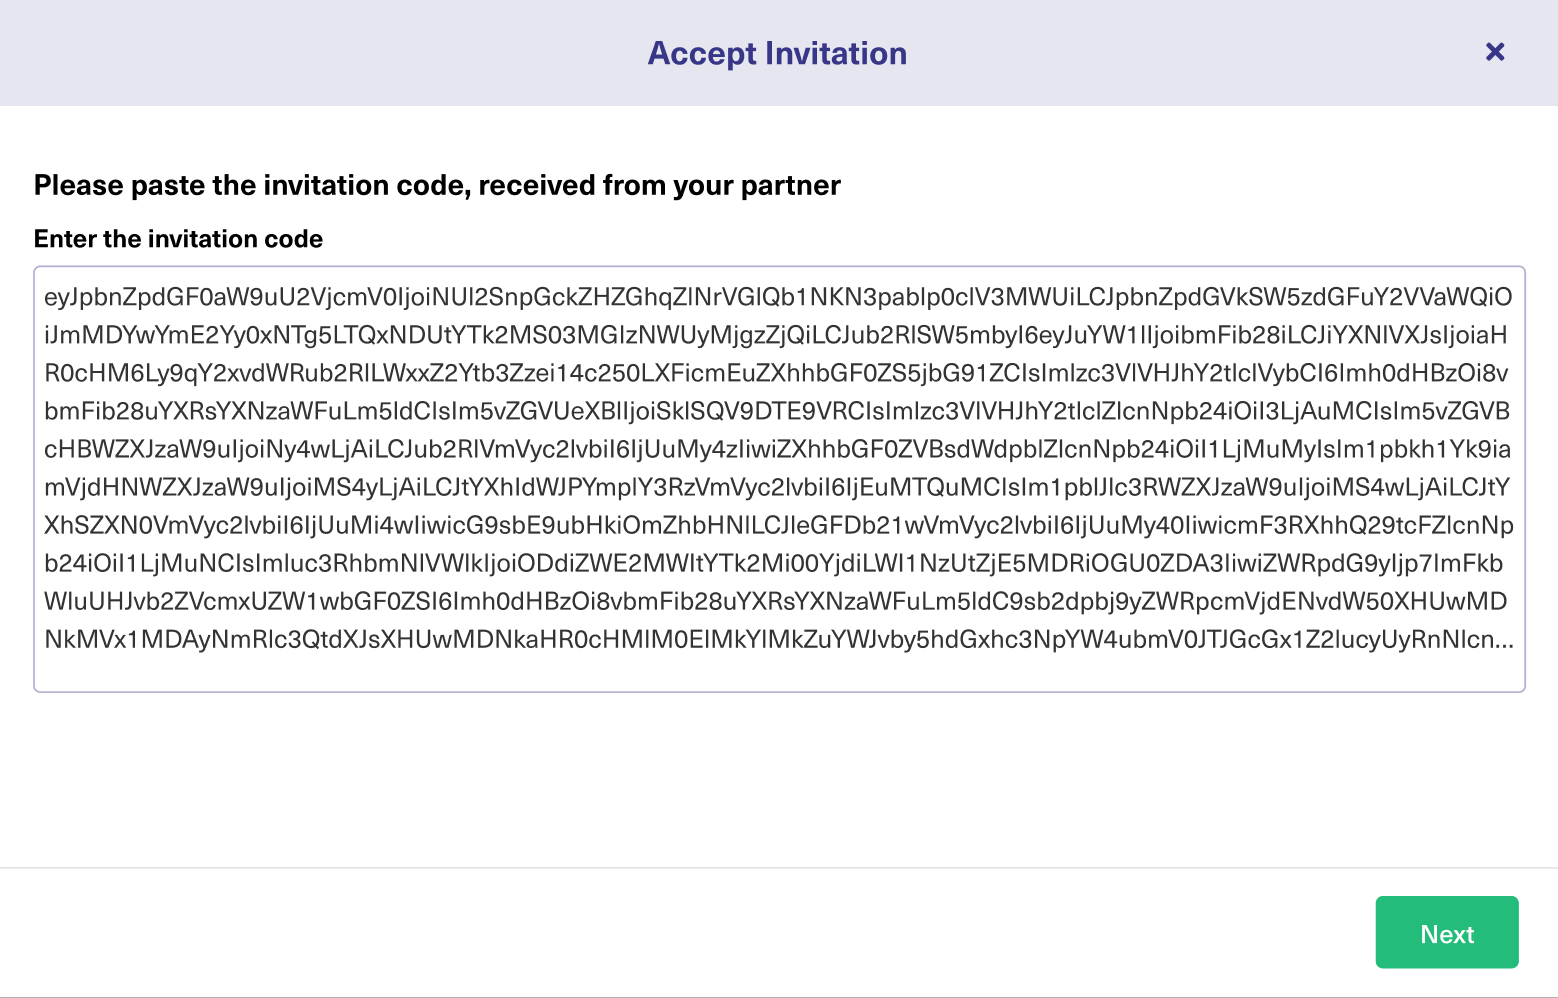
On the second team’s side (Green Jira instance), you’ll need to go through the same menu. But, this time, click on “Accept Invitation” in the Connections menu.
This is where you or your partner – whoever is accepting the invitation – will paste the invitation code generated in the previous step.
Once you click “Next”, you’ll get the same choice for selecting the project on the Green side.
Hit “Confirm” after selecting it.
This is how your established connection will look like.
That’s it – have a chocolate ?!
Step 5: Synchronize a Jira issue
All right, now let’s sync a Jira issue.
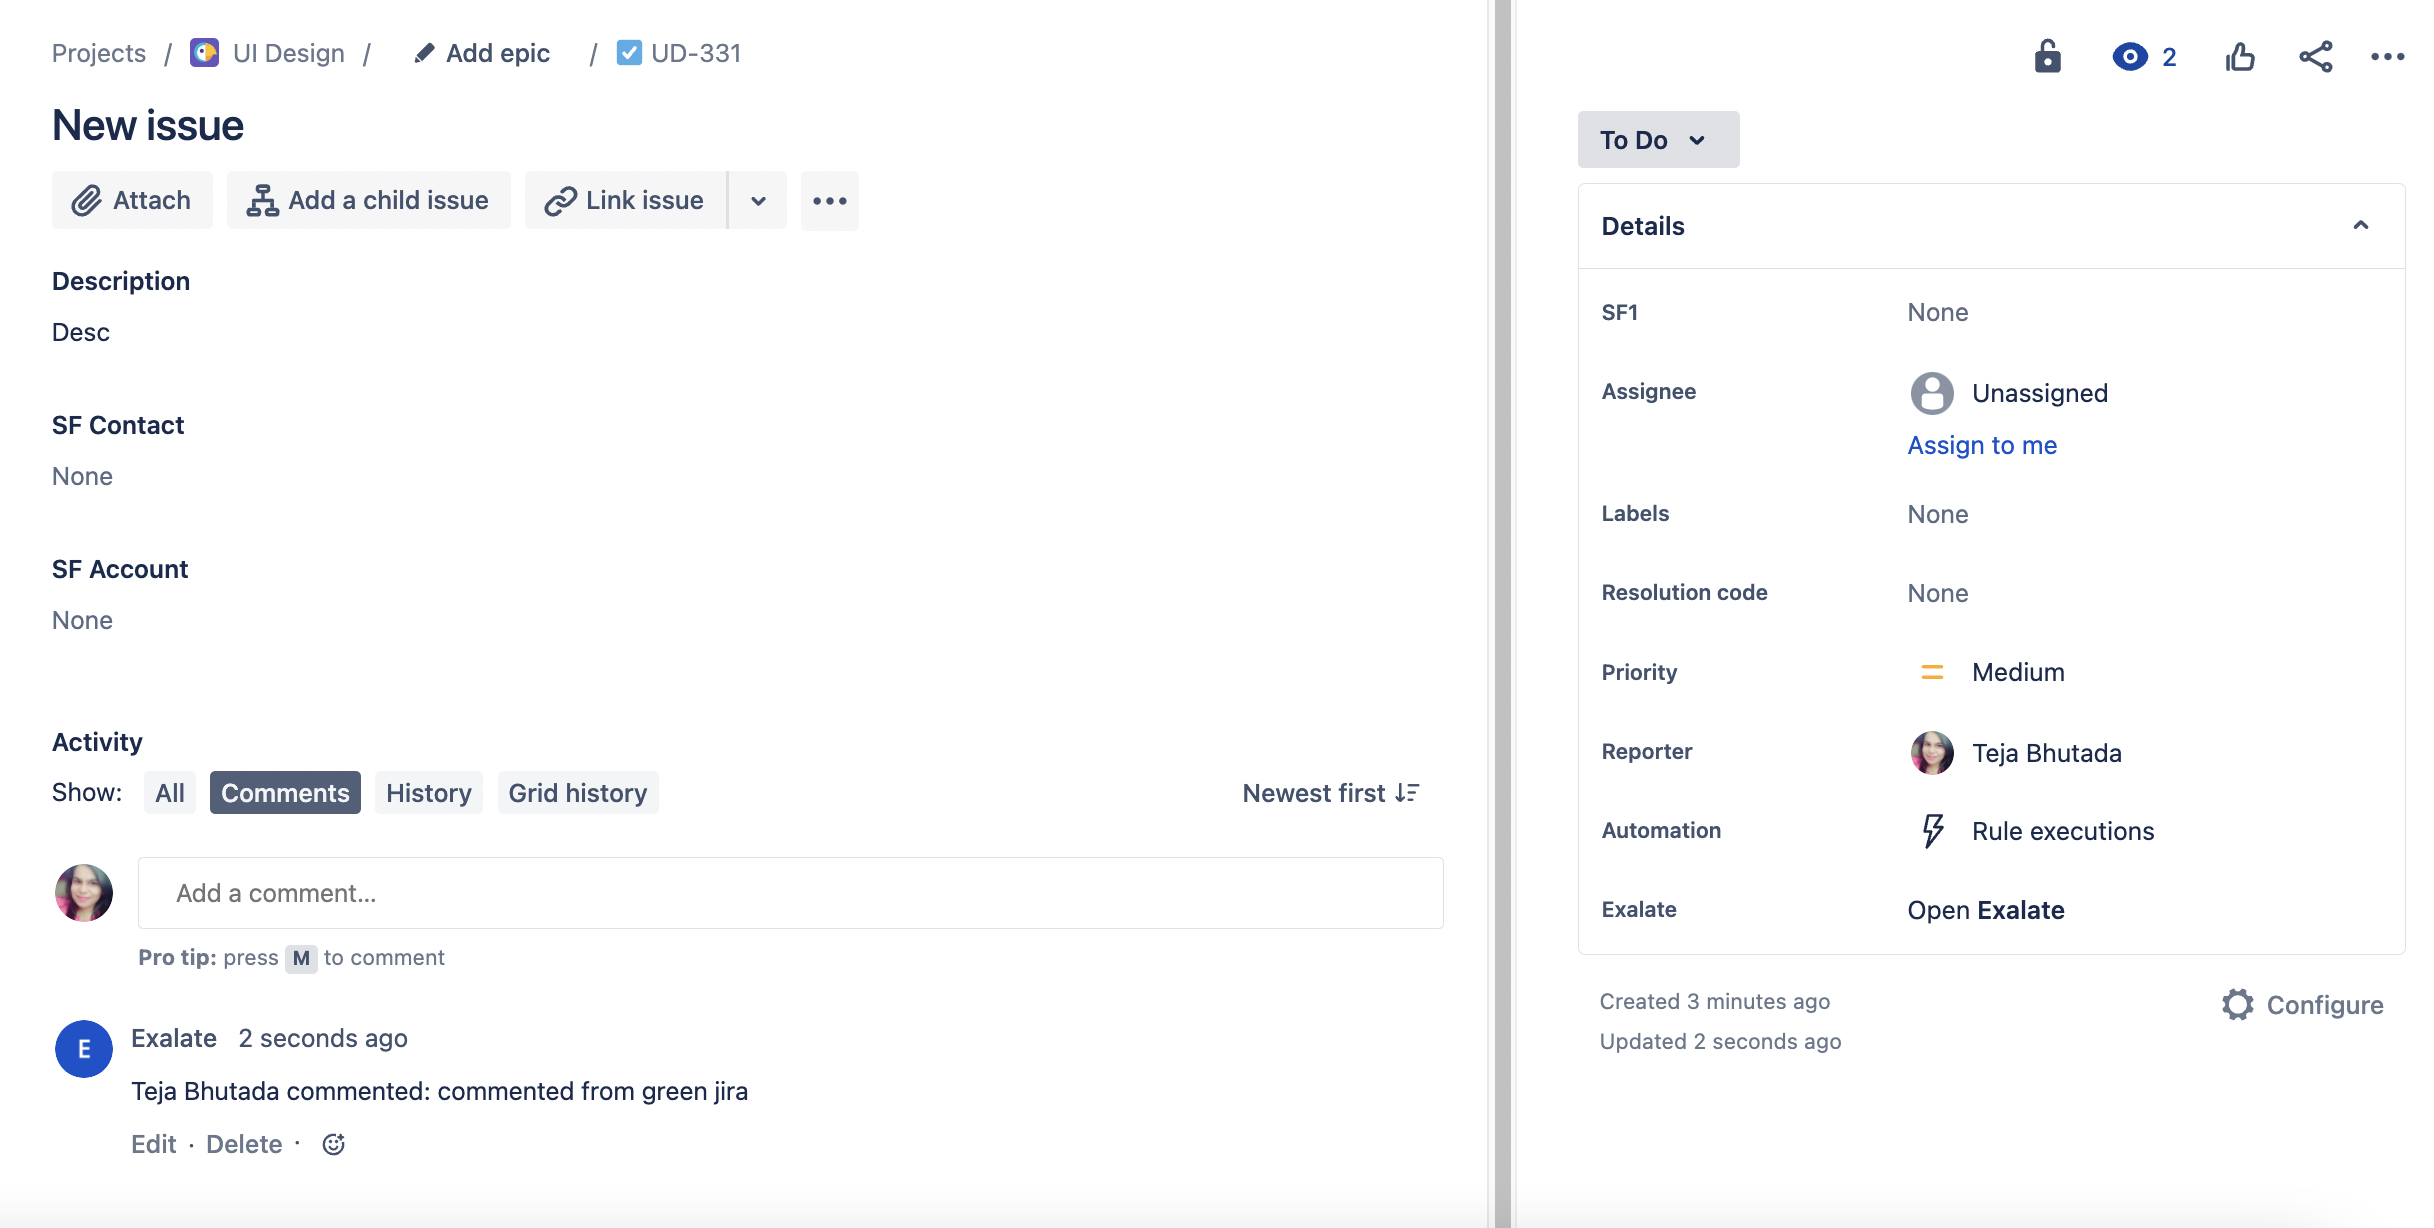
Now that you have installed Exalate, you get to see it under every issue action. You can find the Exalate button on the right sidebar on the issue view.
Once you click this, you’ll be asked to choose which connection you want to use from a drop-down menu. Be sure to choose the appropriate one and submit your Exalate form.
You’ll first see the “waiting for remote” message before it gets synced to the other side. This means your Jira issue is currently being synchronized. It should only take a few seconds for the synchronization to succeed.
You’ll know an issue has been synchronized once you see a Sync Status near the bottom right of your issue.
You can go back to the project and search for the issue which has been synchronized. The comments written on the issue that has been synchronized also appear on the other side.
Step 6: Customize Synchronization Rules Through Scripting
In this section, we are going to discuss customizing synchronization rules through scripting.
For this, we consider the case where first the comments from the Green side are synced and reflected on the Blue side. We then remove the comment sync on the Green side from its outgoing sync rules and see that the comments on the Blue side are no longer synchronized.
The screenshots below show that the comments have been synced.
From the Green side:
To the Blue Side:
Now, to change the sync rules, go to your Connections menu inside the Green instance and select the connection you want to edit. Inside, pick the “Rules” tab.
This is where you have access to the way issue fields are being synchronized. (Check out the Exalate Documentation for a full overview of these fields.)
In the Outgoing Sync filter, remove the issue comments line.
Alternatively, you can keep the code snippet intact and add “//” in front of the line to make it into a comment.
Don’t forget to apply these changes by clicking the “Publish” button.
After applying the new sync rules, the comments from the Green side are no longer synchronized. Here’s the image on the Blue side. As you can see all the comments have been removed.
Now if you leave a new comment from the Blue side, it will be synced to the other side.
And that’s it!
The synchronization rules have blocked the Green side comments from synchronizing to the Blue instance, but the Green team still has access to all Blue comments.
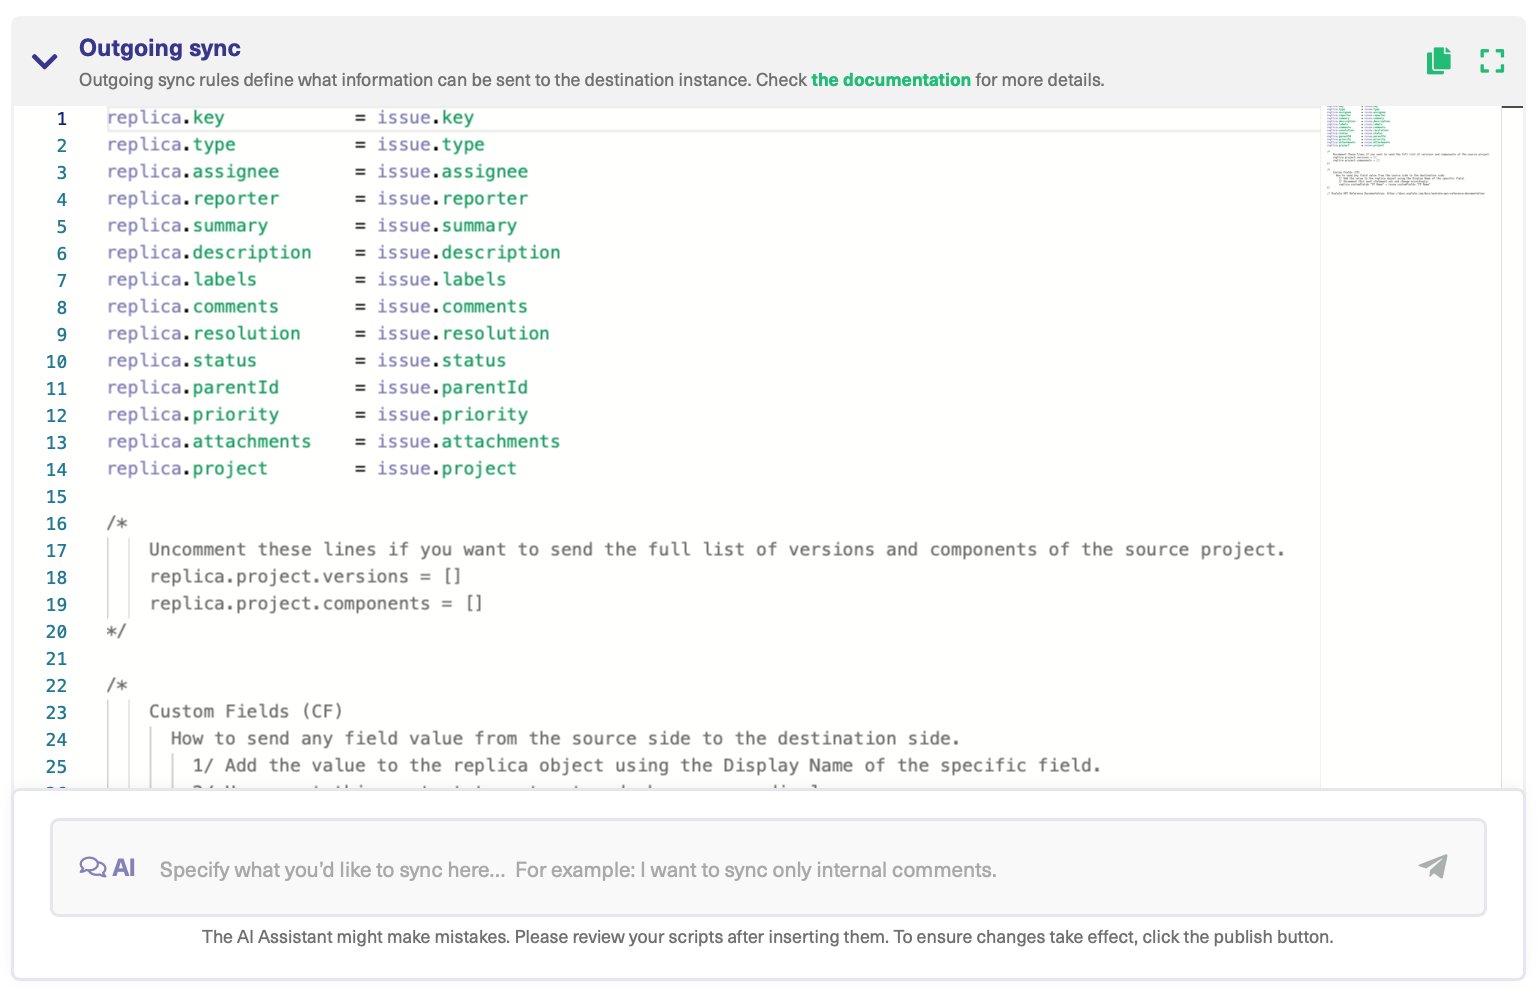
Use AI in Script Mode
We just saw an example of how you can edit the sync rules to configure information flow. Alternatively, you can also use the AI Assist feature available in the Script Mode to set up advanced integrations.
AI Assist is integrated right into both your incoming and outgoing sync rules tabs as a chat window. Simply type your sync requirements into the chat, and AI Assist will handle the script generation for you.
The scripts are crafted based on your input, existing configurations, and Exalate’s scripting API.
However, like all AI, it’s not infallible. So, the more precise and detailed you are with your prompts, the better.
Here’s how you can use AI Assist:
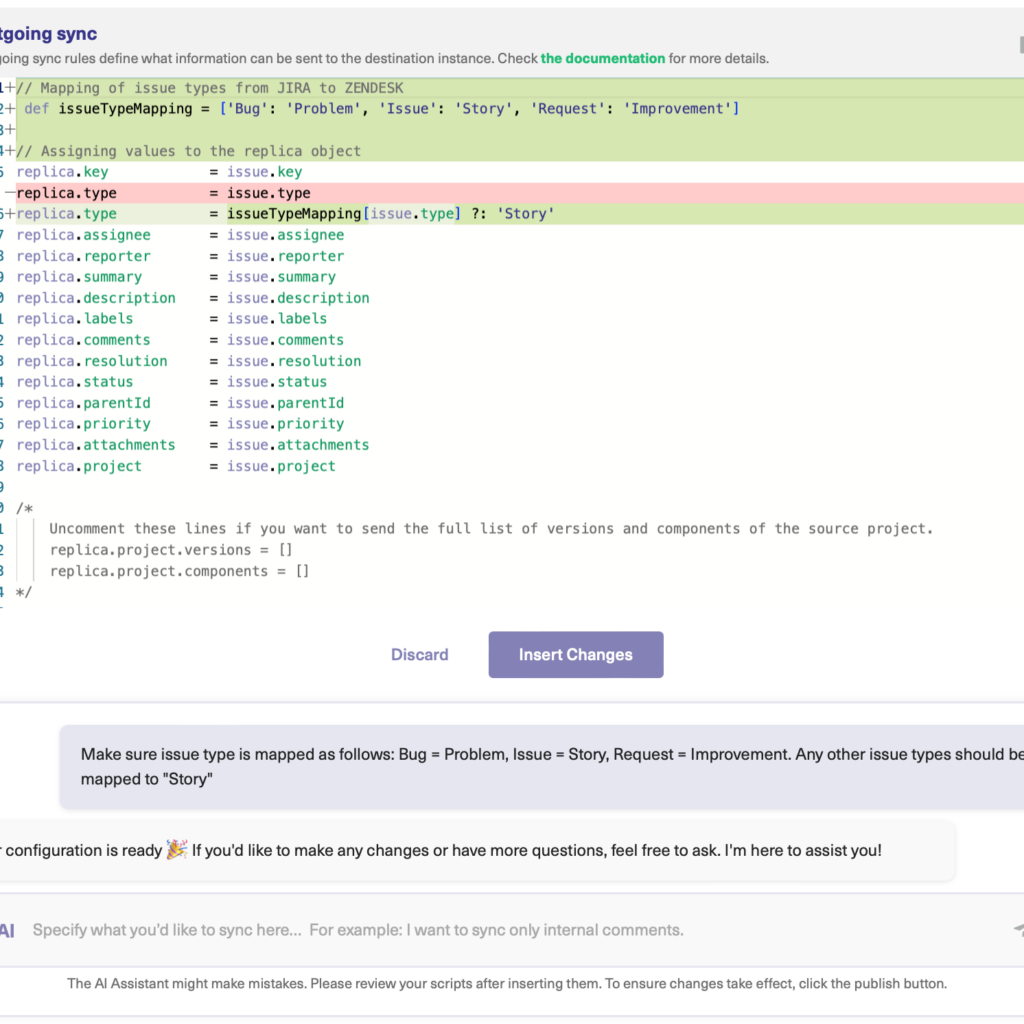
Let’s say you want to map and sync issue types between multiple Jira instances. You could type a prompt that looks like the one shown in the image.
After a moment, the script will be generated.
You have full control to accept or reject AI’s suggestions. If needed, you can refine your prompt and, once satisfied, publish the changes.
Now let’s go back to some of our use cases.
What if we want to sync attachments to the Green side without giving access to this information on the Blue side?
We can set this up using simple scripting.
What’s great is that we only need to do this on one side. So, if we want to block attachments from synchronizing to the Blue side, we can set this up on the ‘Outgoing Sync’ rules of the Green team.
So for this step, determine which information you want to send out through your outgoing syncs – and which incoming information you want from the other team.
In our case, we’ll set it up so that we can get incoming attachments from the Blue team. But the Blue team can’t access the Green attachments.
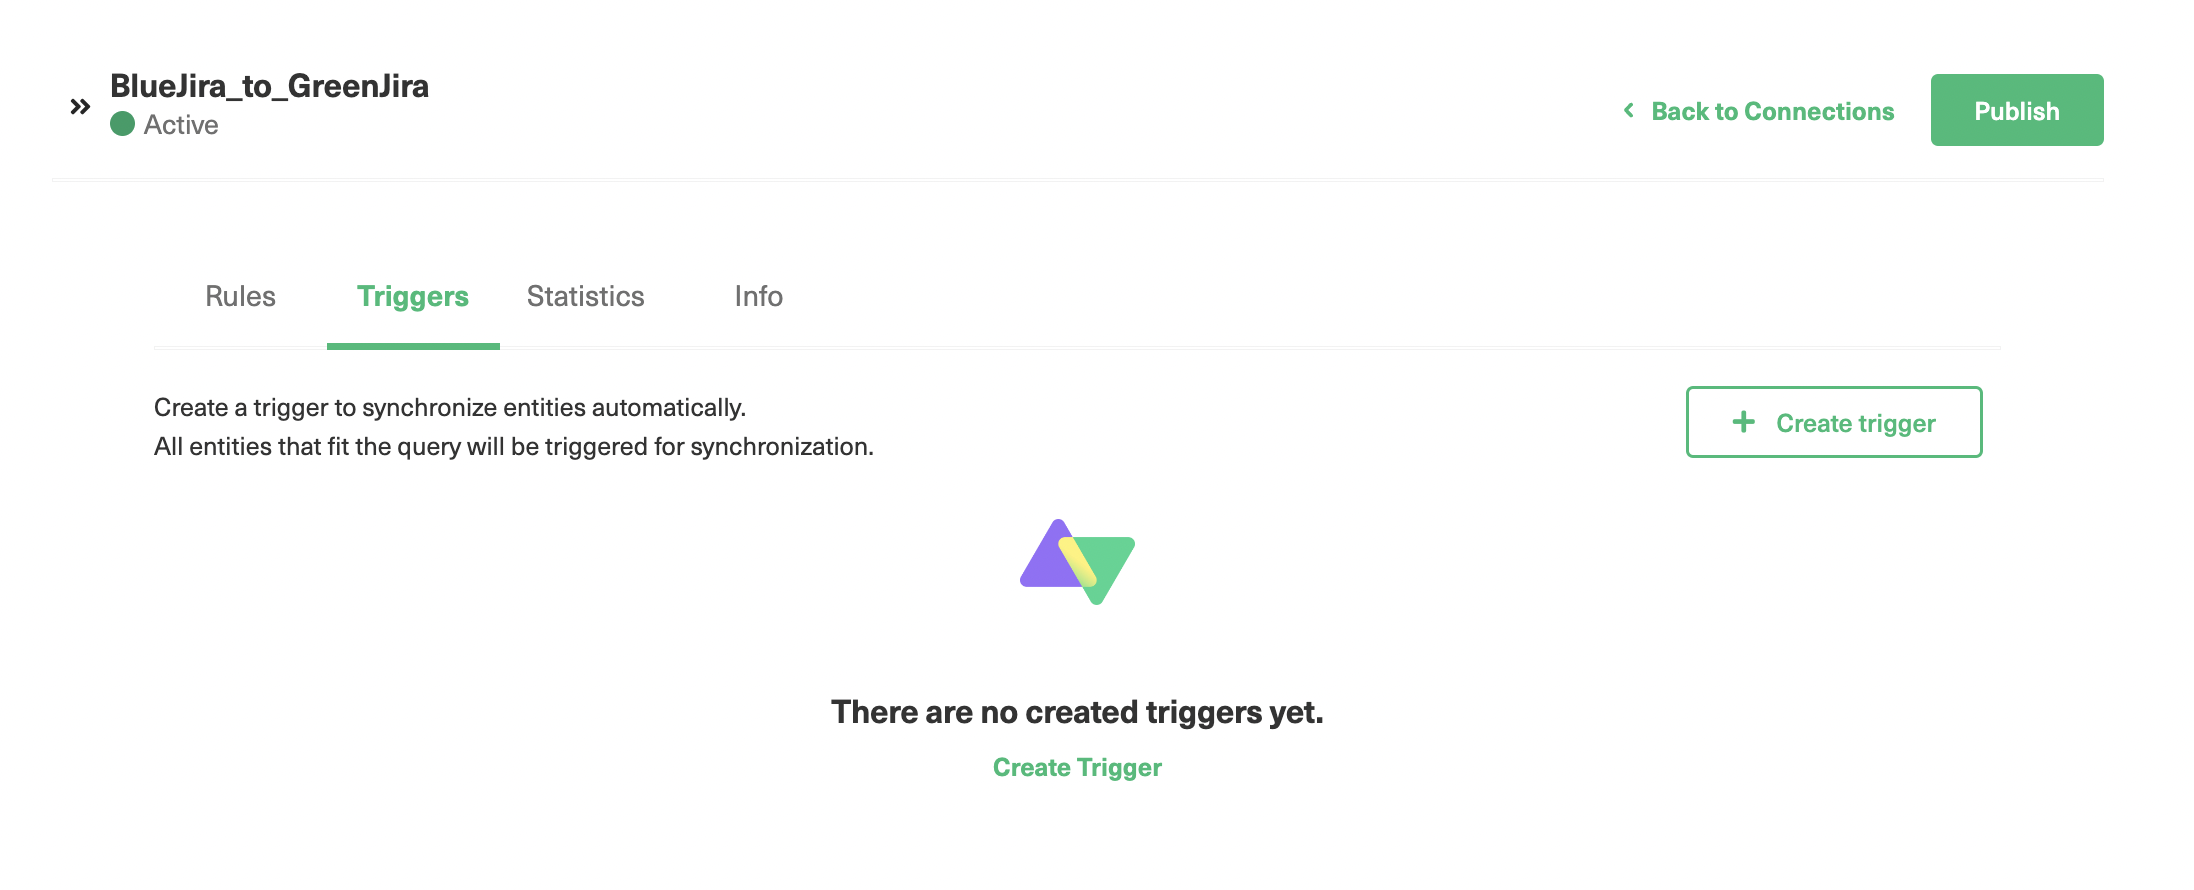
Step 7: Create automatic synchronization triggers
Triggers are used to synchronize issues automatically over the connection. You need to set certain conditions for trigger and if those conditions are satisfied, then the issues are synchronized based on the sync rules you have specified for that connection.
As seen there are already a few triggers created. But if it’s your first time, you won’t see any. The first trigger synchronizes issues that are assigned to “Kevin” and the second one synchronizes issues of the type “Story”.
You can edit or delete the trigger under the “Action” heading. If you click the 3 dots next to the name of the trigger, you can sync existing issues meeting the trigger condition by clicking the “Bulk Exalate” option.
Click the “Create trigger” button on the top right to create a new trigger.
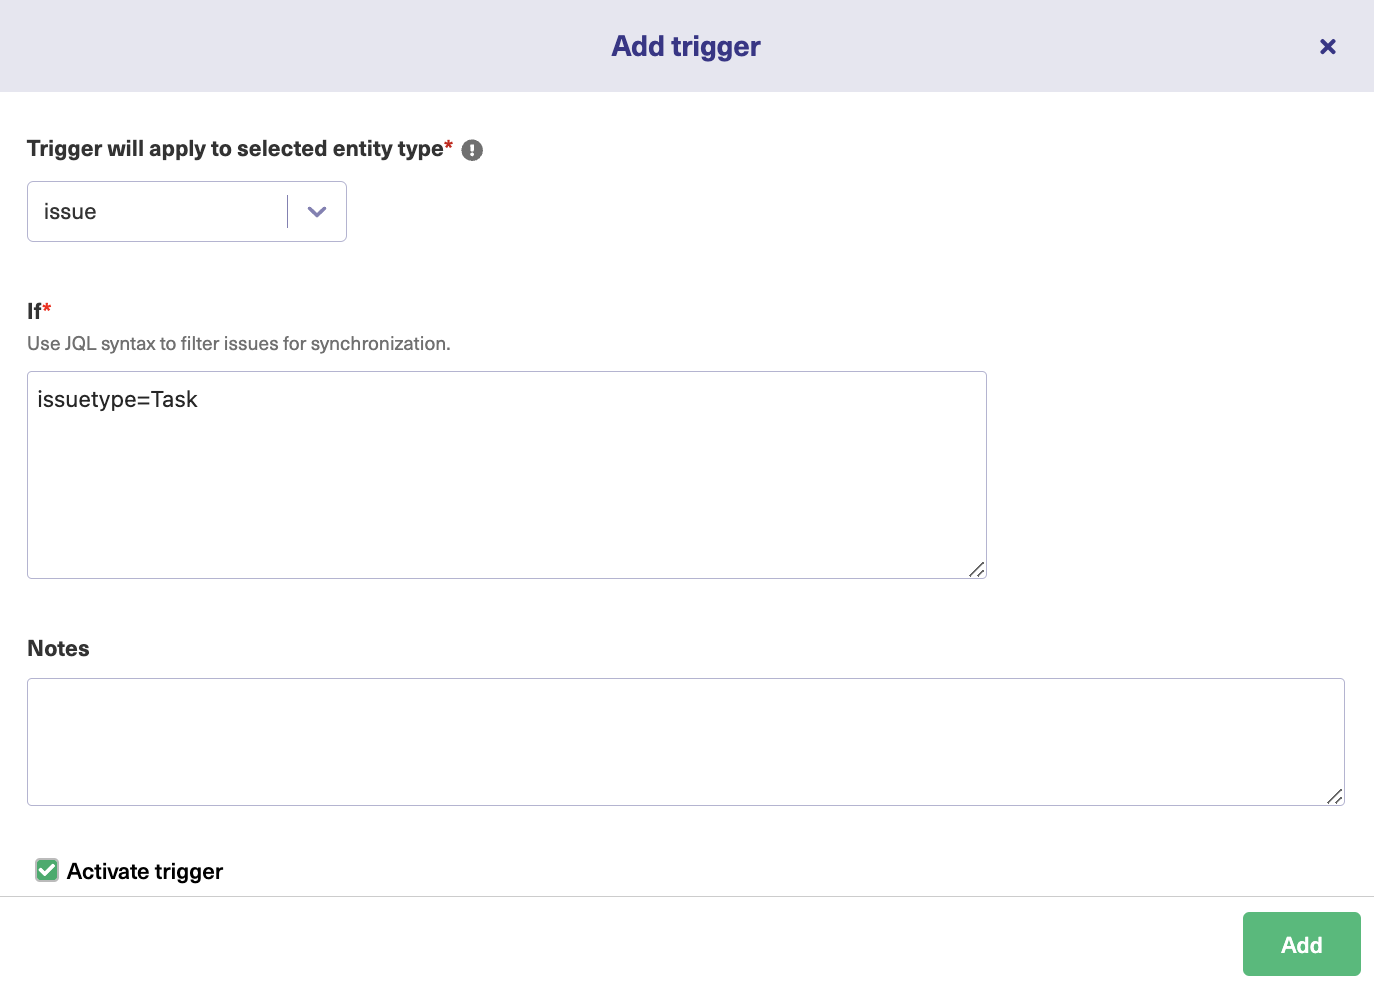
First, select the entity to which the trigger is applied from a drop-down list. In our case, we have selected “issue”. It means we are applying triggers to issues in Jira.
In the “If” section, specify the condition that sets the trigger off. Here, we use Jira Query Language for the conditions. It is extremely simple to understand.
As shown in the figure, we have created a trigger for issue types = “Task”. So all your tasks in Jira will be synchronized over the connection. Leave “Notes” to understand the purpose of your trigger.
There is an “Active” toggle switch to activate or deactivate the trigger. To make the trigger work set it to active. Then click “Add”. You can see the newly created trigger in your triggers list now.
Step 8: Handle Sync Errors
So what happens if an error occurs during a Jira issue synchronization?
Because Exalate works with a transaction-based system, any connection errors won’t break the synchronization and cause conflicts between the issue and its clone.
This basically means you don’t need to do any housekeeping in Exalate to fix conflicts if connection errors arise. Because there won’t be conflicts at all.
If an error occurs, you can seek assistance from the Exalate team. Once the issue is resolved, your synchronization will resume in the order the changes were made.
Wrapping it Up
There you have it, 8 steps to achieving a simple Jira to Jira sync. Here’s a quick recap of the basics:
Establish a connection on one end
Accept the invitation on the other end
“Exalate” your new or existing issues to establish issue synchronization
Tweak any sync rules if needed
By synchronizing Jira issues in this way using Exalate, you’ll avoid losing time and information. And you’ll make your workflow much simpler. Additionally, if you need separate connections with varying sync rules, you can create multiple connections between two projects with multiple sync rules.
If you have an interest in setting up sync using Exalate, you can try it free. If you need some help setting it up, we can schedule a demo on how to use it for your particular use case.
We all know there is no need to copy Jira issues by hand anymore. And now that you understand the power of automatic synchronization, you might have found yourself wishing you could use synchronization in every other aspect of your pipeline
Zendesk is a leader in customer service and engagement platforms. They provide automated solutions like chatbots, omnichannel customer support, self-service support, and much more.
Customers can submit tickets to your customer service team via Zendesk solutions integrated on your business website.
And for B2B teams, their platform also comes with customer relationship management (CRM) tools.
The Zendesk-Exalate Integration
If you’re already using Zendesk – or if this update has made you tempted to try it out – you’ll benefit from this new Exalate integration.
With Exalate, you can now synchronize your Zendesk tickets with Jira, GitHub, or HP QC/ALM – and many more to come with future updates.
The synchronization recreates all the necessary information that’s been filled out on your ticket. This includes comments, titles, descriptions, and anything else your customers input on their tickets.
You can configure the exact rules of synchronization by setting up specific triggers.
Triggers enable you to filter through which tickets get synchronized to the other side (to Jira, GitHub, etc), and which don’t. This is helpful to avoid cluttering your pipeline with irrelevant tickets.
For example, you could set up a trigger that synchronizes tickets to your Jira developer project, but only if these tickets have an ‘open’ status. This way, tickets that have already been taken care of won’t end up needlessly piling up in your Jira.
Use Case For the Zendesk-Exalate Plugin
Let’s walk through a possible use case of the Exalate integration for Zendesk.
If you have a development team working on a separate Jira or GitHub project from your customer service team – which is likely the case – this Exalate feature is for you.
On one end, you have the customer service desk receiving live chats. And on the other end, you receiving tickets from Zendesk tools. Traditionally, customer service agents would receive a ticket and email the information to your developer team. From there, the dev team would need to manually create a bug report in Jira and add this to their backlog.
However, your developers are busy and don’t need the extra weight of needing to input data manually.
Instead, you can set up a connection with Exalate within your Zendesk application.
Once this connection has been established, you can set up the necessary triggers that will automatically detect new tickets incoming from your customer service desk.
From this point on, you no longer need to manually input the tickets into your dev team’s Jira project.
And once the dev team updates information on their Jira instance, this information will synchronize to the other side as well. The synchronization is automatic and two-way.
This means your customer service desk will automatically be aware of any updates on the related issue, thus streamlining communication with the customers.
Why Choose Exalate Instead of the Free Zendesk-to-Jira Connector
Exalate is not the first solution to offer Zendesk-to-Jira synchronization. However, the pre-existing free plugin does have its shortcomings that Exalate can fix.
The free Zendesk-to-Jira connector only supports the default Jira configuration. It can not accommodate customer defect fields and rules. Unlike Jira, which is highly customizable, this solution is not.
On the other hand, the Zendesk-Exalate integration provides a more complete solution that can accommodate any type of workflow.
And it goes way beyond Jira. Exalate supports different platforms in one simple solution.
You can also create a connection between a single Jira project and multiple Zendesk instances, or the other way around.
And to top it all off, Exalate provides rock-solid support. So if you get confused in the process, no need to spend hours figuring it out on your own!
Wrapping it Up
If you’re feeling drowned in Zendesk tickets, the Zendesk-Exalate integration is for you.
This solution will help you simplify your customer service pipeline with:
In this article you will learn everything there is to know for you to set up an effective Jira Confluence integration.
At first, Jira and Confluence might seem like very different products to you.
On the one hand, you have Jira: a powerfully flexible issue tracker. And Confluence on the other: an equally valuable content management system.
At this point, lots of businesses could not even imagine how they would run properly without these tools.
But did you know Jira and Confluence can integrate seamlessly together? Well, they can. And when combined, they make for an incredibly powerful stack.
This guide will explain to you why integrating Confluence with Jira is a power combo. We’ll also discuss in detail how to set up the integration. And you’ll discover exactly what benefits this integration can mean for you.
Why set up a Jira Confluence integration?
Why integrate Jira and Confluence? Let’s have a look at the numbers:
For one, stats show that if you’re a Jira Software user there is more than a 50% chance you’ll also use Confluence at some point in your career. That means there are huge efficiency gains to be made by connecting the two.
And 66% said doing so improved communication between development teams and non-technical stakeholders.
Meanwhile, the number one benefit that it provided was creating a single source of truth for software documentation.
Jira is one of the most powerful task-tracking and project-management tools out there. And it enables deep-level customization. So you can build Jira workflows that are just right for your team.
Confluence, meanwhile, allows wider teams to collaborate around documents, plans, and reports. This means you can use Confluence to store technical documentation, as a knowledge base, or to act as a company intranet.
A Jira Confluence integration can be particularly valuable where it connects the work of A. these technical teams, using Jira, with B. the wider business on Confluence.
You will connect ideas and planning in Confluence directly with tasks and workflows in Jira. This will save you quite some time and make operations far more efficient.
A specific example could include creating Jira issues and generating charts or reports on Jira activity straight within Confluence. This will provide your team with an overview of the flow of your tasks and projects. But that is just one example. We will cover more use cases a bit further down this article. So keep reading.
How to integrate Jira with Confluence?
To get started, you will have to install Jira and Confluence as two separate pieces of software. And then you can connect them via an application link.
Note: You’ll need to have admin privileges on both Jira and Confluence to create this two-way link.
Setting up the Confluence Jira integration through the application link
This is how to achieve a Jira Confluence integration using the application link:
First, open your Confluence instance
Go to the settings icon in Confluence
Select General Configuration under Confluence Administration
4. Select Application Links in the panel on the left. You’ll then be directed to the Application Links configuration page.
5. Enter the URL for the application that you want to connect to Confluence (ie your Jira instance).
6. Click “Create new link”.
7. Tick “The servers have the same set of users…” and “I am an administrator on both instances”
8. And finally use the wizard to finish configuring the link. If you’d like to learn more about the Setup Wizard, have a look at this Atlassian documentation page.
With that done, your Jira Confluence integration is good to go.
Using the integration for a Jira user directory
Did you know you can delegate user management of Confluence to Jira?
This means you’ll be able to centralize management across both platforms. That will save you time and logistical headaches since you don’t have to manage two sets of users across both Jira and Confluence.
The setup for this is pretty straightforward, using the wizard we just discussed.
The image below illustrates how it works in the wizard. You add Jira user groups as Confluence users. So you only have to maintain one user group.
This Setup Wizard allows you to limit cross-platform access to specific Jira user groups. You can do this via the “User Groups” field.
That might be useful to you if cross-platform use would only be relevant for some teams or team members within your organization. Or if you’d just want to tighten up security.
How to display Jira issues in Confluence
Want to display a Jira issue on a Confluence page? You can use the Jira issue macro for that.
This functionality will allow you to display:
a single issue
or a list of issues
or to call up the number of issues.
And you can do this just by pasting a URL onto the page, for example:
<yourjirasite.com>/browse/CONF-1234 – will show a single issue
<yourjirasite.com>/issues/?filter=56789 – will show a list of issues, set to the relevant filter
<yourjirasite.com>/issues/?jql=project%20%3D%20CONF – will show a list of issues that match the relevant Jira search
You can also just drop the Jira issues macro onto the page.
To do this, choose “Insert more content” (or “+”) in the editor and then “Jira Issue/Filter”.
You can then navigate to find a specific issue. With the macro in place, you have complete control over how the issue is displayed and how much information is shown.
But this does not only affect your Confluence page. When you add this macro, this Confluence page automatically gets mentioned on the appropriate Jira issue.
Have a look:
You can also view Confluence pages from Jira using the Confluence Page Gadget.
How to create Jira issues from within Confluence
Integrating Jira and Confluence also allows you to create Jira issues straight from the comfort of a Confluence page.
To create a Jira issue while on a Confluence page:
Highlight some text on the page and select the “Create Jira issue” icon
Define the project, issue type, and description for the issue and press “Create”
You can also create multiple Jira issues at once by highlighting a table in Confluence, saving you even more time.
To create a Jira issue from the Confluence editor:
Select “Insert” (or “+”) then “Jira Issue” then “Create new issue”
Define the project, issue type, summary, and description for the issue; and press “Create”
Click “Insert”
Using the search tab in the Jira Issues menu you can call up a list of issues. This will allow you to check on their status from within Confluence.
How to create charts and reports on Jira activity in Confluence
Integrating Jira and Confluence also enables you to pull up charts and reports in Confluence on your Jira issue activity. Which is perfect for communicating what the team is working on towards the wider organization.
You can use the Jira Report Blueprint to create a Change Log or Status report.
This is how to create a Change Log (listing Jira issues):
Select “Create” and then “Jira Reports”
Choose a Report Type and your Jira server
Select a Project and Fix Version and then click “Create”
If you want a dynamic (rather than fixed) report, after selecting Report Type, click “Advanced” and then enter a JQL query or the URL of a Jira search; and then click “Create”
The Blueprint also allows you to create a Status Report, displaying the progress of a Jira project with pie charts defining status, priority, component, and issue type.
To create a status report:
Select “Create” and then “Jira Reports”
Choose “Status Report” and your Jira server
Select a Project and Fix Version (or enter a Jira URL or JQL query) and then click “Create”
You can also use the Jira Chart Macro to create charts.
To do so:
1. While in the Confluence editor, click “Insert” then “Jira Chart”
2. Select the type of report you want (see below) and your Jira server
3. Search for issues; you can enter the query using JQL or by simply pasting in a Jira URL directly
4. Click “Display Options” to customize the appearance of your chart
5. And click “Insert”
Options for charts include:
Pie charts – segmenting the chart by any of the following: Status; Fix version; Assignee name; Priority; Component; Issue type
Created vs Resolved charts – illustrating the number of issues created against the number of issues resolved
Two Dimensional charts – displaying statistics in a grid, selecting from Status; Fix version; Assignee name; Priority; Component; Issue type
How to display Jira dashboards in Confluence
You can also display Jira dashboard gadgets in Confluence and can call them up from the Confluence macro browser.
To do this, you’ll need to register external gadgets within Confluence.
The easiest approach to achieve this is to subscribe to all of the other application’s gadgets. This allows you to install all the gadgets from a Jira or second Confluence instance.
To make it happen:
Go to “Settings” in Confluence then “General Configuration” then “External Gadgets”
Select the “Gadget Feeds” tab
Enter the base URL for the application that you want to connect to. This might look like https://example.com/jira or https://example.com/confluence.
Then click “Add” and Confluence will turn the URL into a gadget feed
How to display Confluence pages in Jira dashboards
You can also display Confluence pages in your Jira dashboards.
With Jira-Confluence Application Links in place, you can select the Confluence Page Gadget from Jira’s gadget directory.
When placing the gadget you’ll be able to customize how it will appear.
How to quickly switch between Jira and Confluence
Of course, sometimes you will want to move between the two platforms. It can seriously be a pain when you have to do this manually. But your integration makes that easier as well.
If your Jira Confluence integration is via the application link, you will see a “Jira Links” button at the top of the page in Confluence. This allows you to quickly and easily toggle between the two platforms.
It also shows the number of Jira issues that have been associated with the relevant Confluence page. And, via a dropdown, this will provide you with details of all the issues, sprints and epics that you have permission to view.
Apps to connect Jira and Confluence
Apps can greatly extend the functionality of your Jira and Confluence platforms. Here are several examples that are specifically geared to assisting Jira-Confluence integration.
Issue Macro from Jira to Confluence allows you to control precisely how Jira issues will appear in Confluence. If you have multiple connected Jira instances, you can select which one to pull from, filter by ID, and issue ID using Jira Query Language (JQL). You can also view linked issues and sub-issues, just like you can in Jira.
Advanced Jira Issue Insert Macro provides options for inserting Jira issues into Confluence pages as well as enhancing traceability for issues. The app also assists with creating rich specifications, design, and planning pages in Confluence.
Conclusion
In this guide, we’ve explored:
Why integrate Jira with Confluence
How to set up Confluence and Jira
How to use Jira as a user directory, to centralise management
How to display Jira issues in Confluence, providing visibility across platforms
How to create Jira issues from Confluence, pairing projects and tasks
How to create charts and reports on Jira activity in Confluence, offering overview and oversight
How to quickly switch between Jira and Confluence, so you can move fast when you have to
Some apps that can help connect Jira and Confluence, making the integration even more valuable
Connecting Jira and Confluence can provide huge benefits in joining up your organization and ensuring that information is shared as well as be accessible.
By improving cross-departmental collaboration, your organization should be able to work better, faster, and with a clearer picture of what lies ahead.
The following article contains everything you need to know about the best practices and dangers of a Jira migration. At the end of this article, I have also included a step-by-step guide on how to actually implement the migration.
I have come to understand migrations are virtually inevitable.
Your business and organizational structure will evolve over time. This might be due to changing technical environments, the merging and splitting of teams, or even the sale of the entire company via an acquisition.
Whatever the reason, at some point you will have to migrate the Jira instance you’re working in.
In this article, we’ll provide tips on the best approach for a secure Jira migration and a step-by-step guide on how to achieve this.
A side note: We want to be as clear as possible on how to migrate Jira to another application like Azure DevOps or a Jira data center instance. That is why this article can get a little technical towards the end. So the end of the article might be mostly useful for your administrator. However, if you’re just using Jira as a user, (but not as an admin) this article will still be valuable. If you’re the Jira admin, great! Otherwise, I’d recommend you share this with your admin as well. He (or she) will definitely thank you for it!
Now, let’s get into the nitty-gritty of the challenge that is: implementing a clean Jira migration.
Types of Jira Migrations
There are several types of Jira migrations, each of which comes with its own pros and cons.
1. The Big Bang Approach of Migrating Jira
Following a Big Bang approach means you’ll be migrating Jira to a new Jira instance in one go.
You will achieve the migration in a single step.
Going forward, all access to your old system is redirected. So there can be no confusion as to where updates should be logged.
Because of these factors, a Big Bang migration can look superficially attractive.
However, it will mean downtime for users, and several other major drawbacks that we’ll discuss in a minute. So keep reading…
2. A Project-By-Project Approach to Migrating Jira
This approach means migrating projects, as required.
This is typically done when a project has been maintained on one Jira instance but then needs to be moved to another.
This might be due to reasons relating to infrastructure, security, or practicality.
When the migration is launched, access to the project is stopped and all data (including configuration information) is sent over to the new instance in one go.
Users can then be informed that the project is available on the new instance.
This approach can be used to migrate a complete configuration to a new environment gradually. And while it is a more measured approach, it nevertheless comes with many of the same problems as a Big Bang migration…
3. An Issue-by-issue Approach or a Live Jira Migration
Following this approach, issues are migrated from one instance to another as required.
So issues are simultaneously available on both platforms.
Team members can then work on either platform and gradually switch over from one to the other.
Many consider this the most flexible and foolproof approach.
The Dangers of Migrating Jira
A Big Bang migration sounds simple, but it can come with some major issues.
These include:
1. Losing valuable time when preparing for the migration process
A great deal of preparation is needed to ensure that the new system meets all operational requirements of the users and teams who depend on the system.
You can not underestimate this!
In many cases, people need to dedicate significant amounts of time to confirming that the new system is fully customized to their needs.
And, all too often, they’ll still miss crucial details.
2. Missing crucial details when migrating Jira to a new instance
During the transition period, you will have to factor in downtime during which neither Jira instance is operational.
You will likely want to schedule this for a low-traffic period, such as a weekend, with an advance announcement of the planned downtime.
However, if the migration fails, then everything needs to be rescheduled and repeated.
Trust me, that’s not fun!
You will have to follow up with further testing with repairs to the migration process. You’ll then need to do this again and again until you get it right.
This is the kind of big-bang migration that you really don’t want.
3. Losing crucial data after Jira has been migrated
When the moment of truth arrives, and staff begin really using the new environment, then no rollback is possible.
At this point, you’ll conclusively find out whether you’ve done enough preparation.
If one team finds a blocking issue, while other teams are happily using the new system, then the administrator hits a wall.
The dissatisfied staff will have to either wait for the functionality to be built or for a workaround to be devised for their issue.
But failing that, they’ll have to make do without it.
As with the real Big Bang, you can’t do a re-run…
Why Do We Prefer a Live Migration for Jira
2 words.
Less friction.
Running a Live Migration removes nearly all of the problems and friction that might occur when migrating Jira to a new server.
With a Big Bang migration, some degree of dissatisfaction is almost inevitable.
Staff want their environment to continue to work as they know it. And introducing significant changes will always have an impact on operations, however big or small.
That might make your staff cringe. A little bit like this:
Given limits to speccing and testing, there is a very good chance that at least some features and functionality will be missing, altered, or broken.
What’s worse, this will often only be revealed once your users pick things up on the other side of a Big Bang migration.
Our view is that bringing about change in an organization is best done by making incremental improvements to the environment without causing disruption.
A Live Migration achieves just this, allowing for projects and issues to be gradually transferred from one system to another. This makes the process simple and painless.
Staff can then choose to work in either system, as they want. Which makes everybody happy again:
Synchronization of data (using tools like Exalate) ensures that users will find what they need, as they need it, on both platforms.
Small changes can then be applied to the new system to make it just perfect.
All the while your staff can keep using both systems in their day-to-day operations.
If something doesn’t work to their needs, then they can continue to use the original system while the configuration is adapted to the new environment.
Once the new configuration is perfected, the whole team can make the switch. Only when the staff is completely satisfied the old configuration can be dismissed.
By building this flexibility into the transition, the migration is ultimately made far easier and safer.
Before we discuss the actual implementation I want to share a couple of common Jira migration use cases that companies usually look for.
Common Jira Migration Use Cases
Simply transferring your data from one Jira to another is not migration. It’s about ensuring your workflows, configurations, and teams can continue to operate without a hitch post-migration.
Let’s look at a few Jira migration use cases to help you prepare for what’s coming next.
1. Consolidating Multiple Jira Instances
Large organizations often end up dealing with multiple Jira instances after mergers, acquisitions, or other department-level purchases. Consolidating these instances will simplify the administrative work and provide a unified view of projects and issues across teams.
2. Migrating from Jira Server to Jira Cloud
With Atlassian phasing out the use of Jira Server and encouraging the move to Jira Cloud, organizations are slowly opting for this. It will ensure you have access to all the latest Jira features, lower maintenance overload, and better resource scalability.
3. Migrating from Jira Cloud to Jira Data Center
Enterprises that have strict security and compliance requirements or large-scale operations often prefer moving to Jira Data Center which offers high availability and robust performance. I have seen this happen a lot in the banking or healthcare sector, where control over data is critical.
4. Spliiting a Jira Instance into Multiple Instances
This use case is the opposite of the first one we discussed. Sometimes, organizations decide to split a Jira instance when teams need more autonomy or when sensitive data needs to be isolated due to regulatory requirements.
Jira migrations aren’t limited to moving between Jira setups.
Often organizations look to switch platforms entirely, such as moving from Jira to Azure DevOps (or vice versa), or from ServiceNow to Jira Service Management (JSM).
These migrations are driven by business needs, team preferences, or platform-specific advantages.
How to Implement a Jira to Jira Live Migration
At this point, you know about the types of migrations and the dangers they come along with.
Now it’s time to show you exactly how to migrate your Jira safely to a new data center (or cloud).
A heads up, this part is a bit technical. So if you’re not a Jira administrator, be warned.
For reasons, we explained above, we will be doing a live migration.
In this case, we’ll be taking an example of migrating Jira to another Jira. We’ll be migrating all agile information within the projects. This includes sprints, epics, all issue data including issue key, change history, issue links, sub-tasks, typical issue custom fields, etc.
Step 2: Install the Exalate Synchronization Tool on the Other Instance
To implement the migration, you will need to have Exalate installed on both the initiating instance as well as the destination instance.
So repeat step 1 for your other instance as well. You can choose the destination instance on the Exalate integrations page and proceed further.
Note that if more than 2 instances will be involved in the migration, just set up Exalate for any of the other instances as well.
Step 3: Connect the Jira Instances
Now we’ll configure a connection between the instances using Exalate.
Exalate connects instances based on invitations. This means you’ll have to initiate your connection on one side after which you will receive an invitation code on the other side.
Don’t worry, this is easier than it sounds. I’ll walk you through it.
Navigate to “Connections” in the left pane and click “Initiate connection”.
Now you’ll be asked to enter the URL of the destination instance.
Add the URL of the other Jira instance and click “Next”.
You’ll have to select your “Configuration type”. Exalate supports three configuration modes: the Basic mode, the Visual mode (BETA), and the Script mode.
For migration, we’ll consider the Script mode only.
Now you will have to add a “Connection name” and click “Next”.
Select the Jira project you’ll use for migration.
Now an invitation code will be generated to accept the invitation on the destination instance. Once that is accepted on the other side, you will be able to start the live migration of the Jira issues.
So copy the script to your clipboard and move on to the other instance (or send it over to whoever has access to the new instance).
On the other instance, this time click the “Accept invitation” button.
Paste the invitation code you just generated.
It will be automatically validated.
Click “Next” to proceed.
Select the project name again where you’d like to migrate the issues to.
Awesome, now the 2 instances are connected!
Once the connection has been set up, you can proceed with the migration.
Step 4: Configure the Connection for Migration
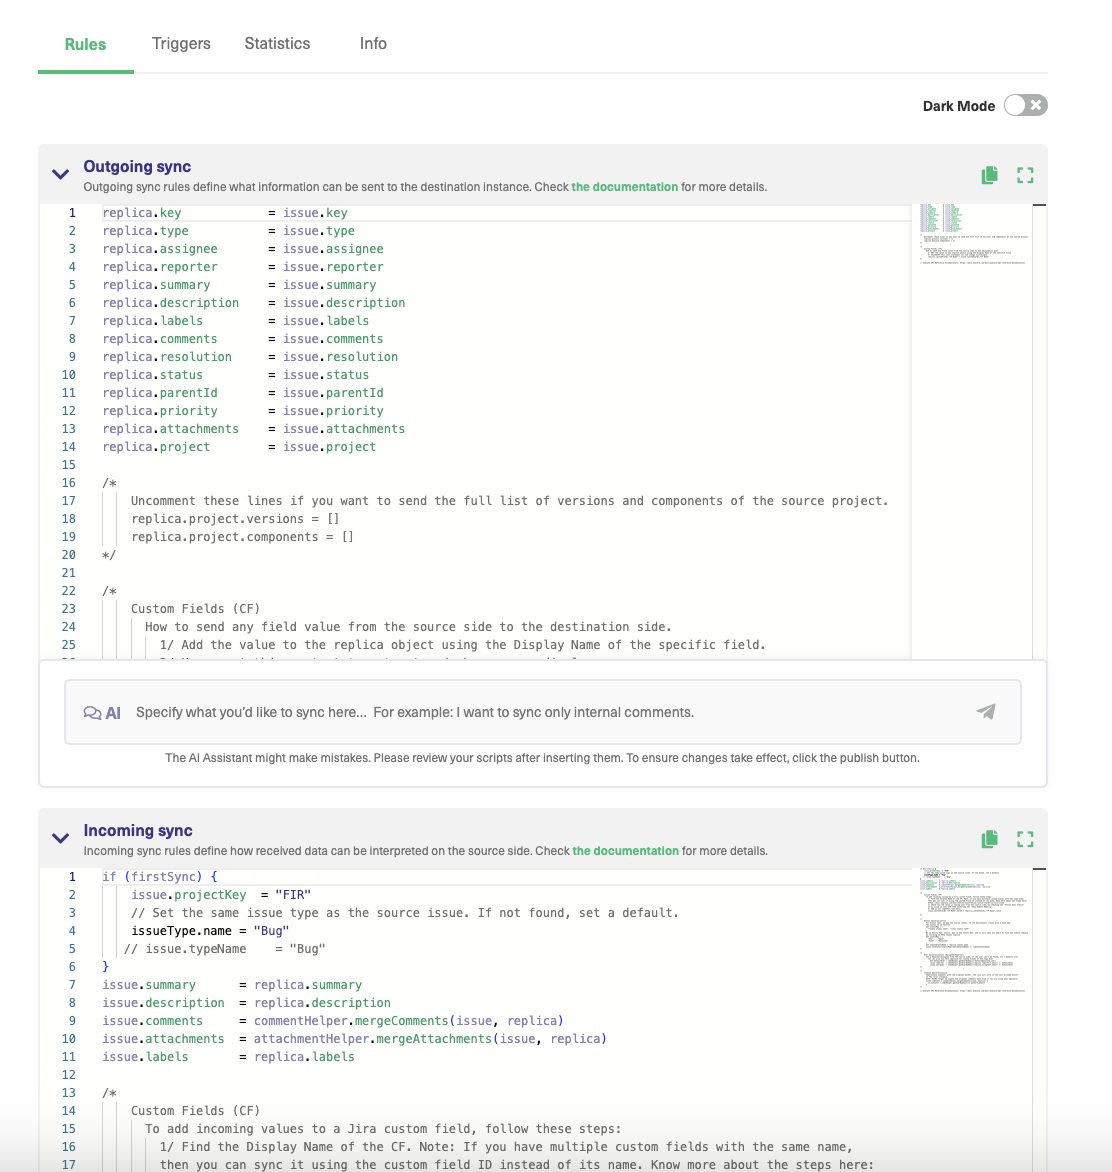
After the connection is set, you’ll still need to do some minor configuration to the synchronization rules. This way we’ll make sure the connection is correct for your specific migration use case.
With the default sync rules, you can migrate the summary, description, type, assignee, reporter, comments, attachments, and labels.
However, if your migration requires more advanced configuration, you need to edit them in this step.
To access the configuration, click on the “Configure sync” button shown in the image above or head over to “Connections” (from the left menu).
On the “Connections” screen, click on “…” next to the connection you would like to configure and click “Edit”.
After that, go to “Sync rules”.
This is where you should end up:
Now this part might be a little tricky, so stay with me.
Here you will have access to the scripts of:
Outgoing sync script – information leaving your Jira instance
Incoming sync script – information coming into your Jira instance
The same scripts exist on the other side as well, with their functionalities reversed.
You will have to copy/paste new scripts into each one of these based on your needs. If you don’t wish to migrate some data simply delete or comment those lines.
The scripts will differ based on whether you’re migrating from cloud to on-premise, or from on-premise to cloud, and so on.
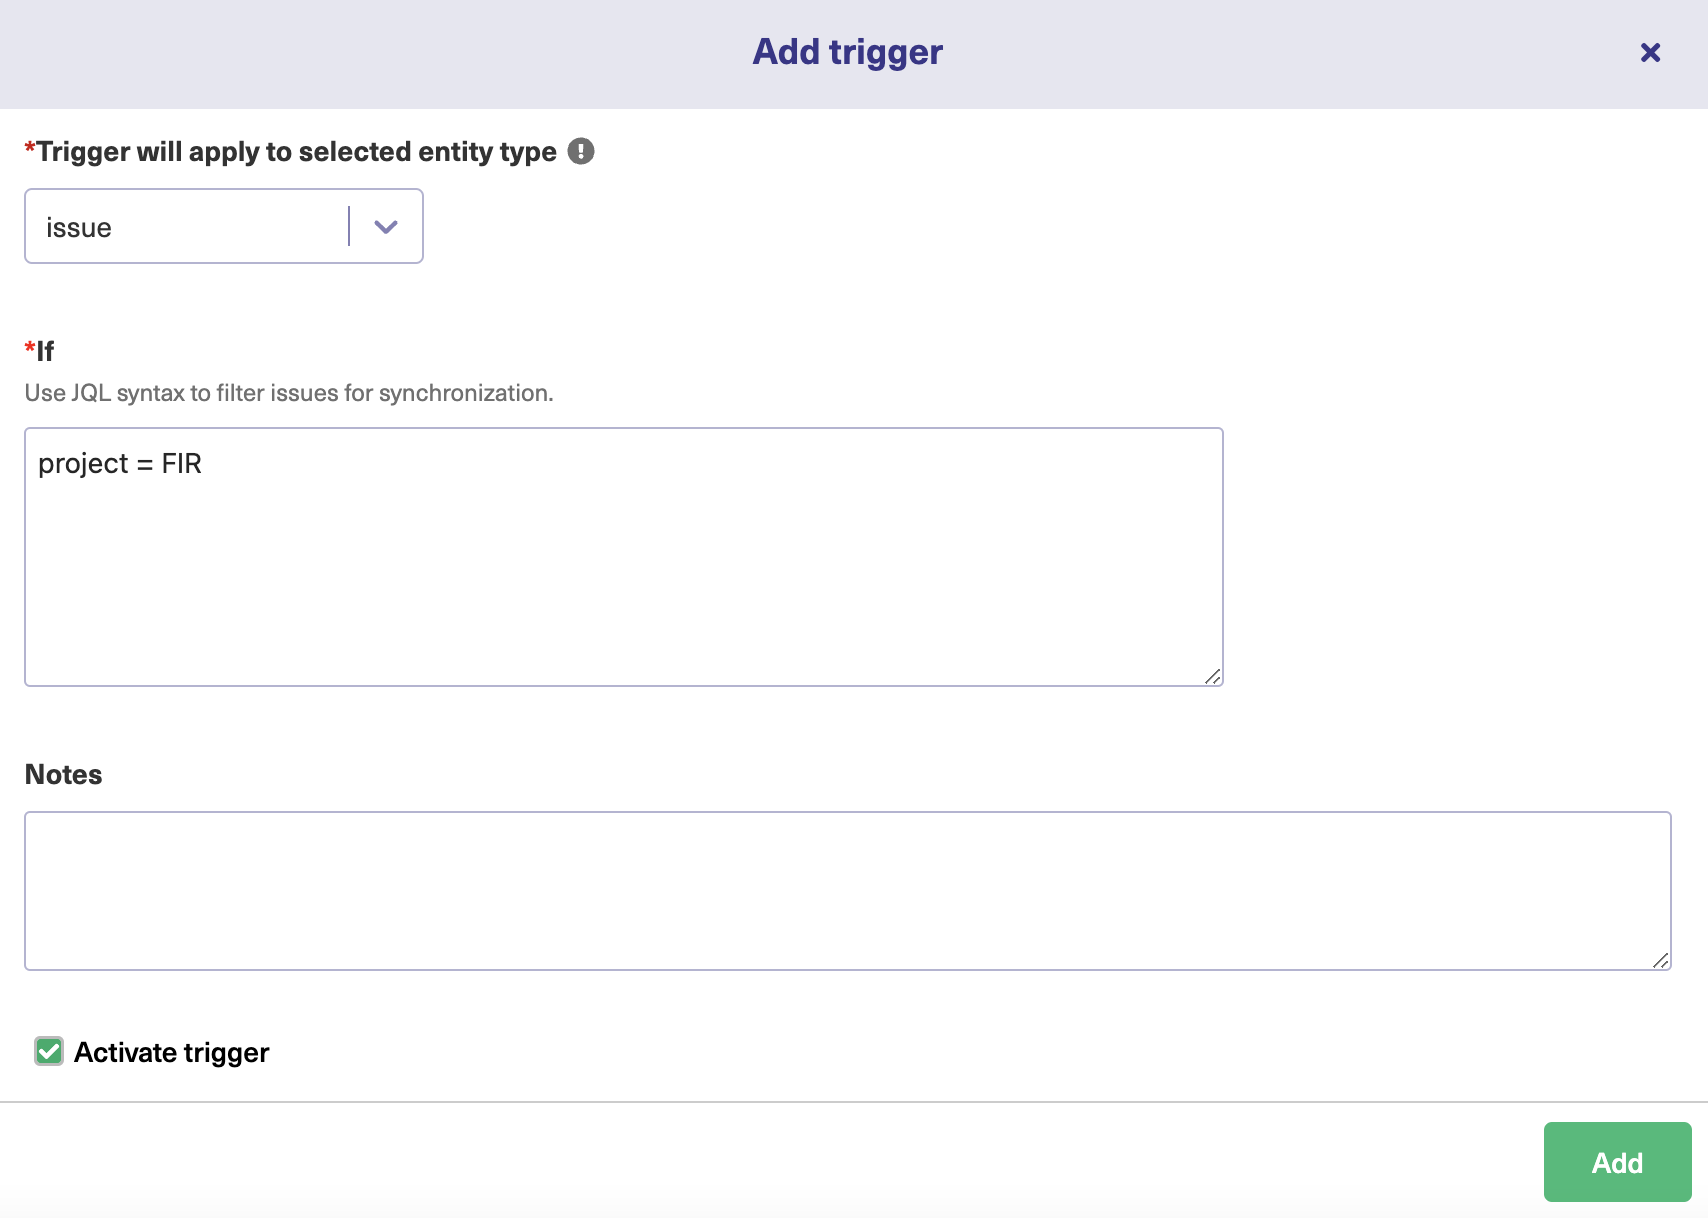
Step 5: Create the Migration Trigger
Now we’ll need to create a “Trigger”.
This will be super easy.
The “Trigger” will determine when issues will be migrated/synchronized to the other side. As well as choose when not to migrate issues. Of course, the second choice is completely optional.
To create the trigger, navigate to the “Triggers” tab in the configuration screen. Click the “Create trigger” button. Here you’ll want to choose to sync certain projects. Just add that project to the trigger.
Again, in this example, I decided to call the project “FIR”, but yours will have a different name.
Tip: You can also set advanced triggers in JQL like, choose to not migrate issues with the label “nosync” or empty labels.
If you’re satisfied with the trigger rules, activate it, and click “Add”.
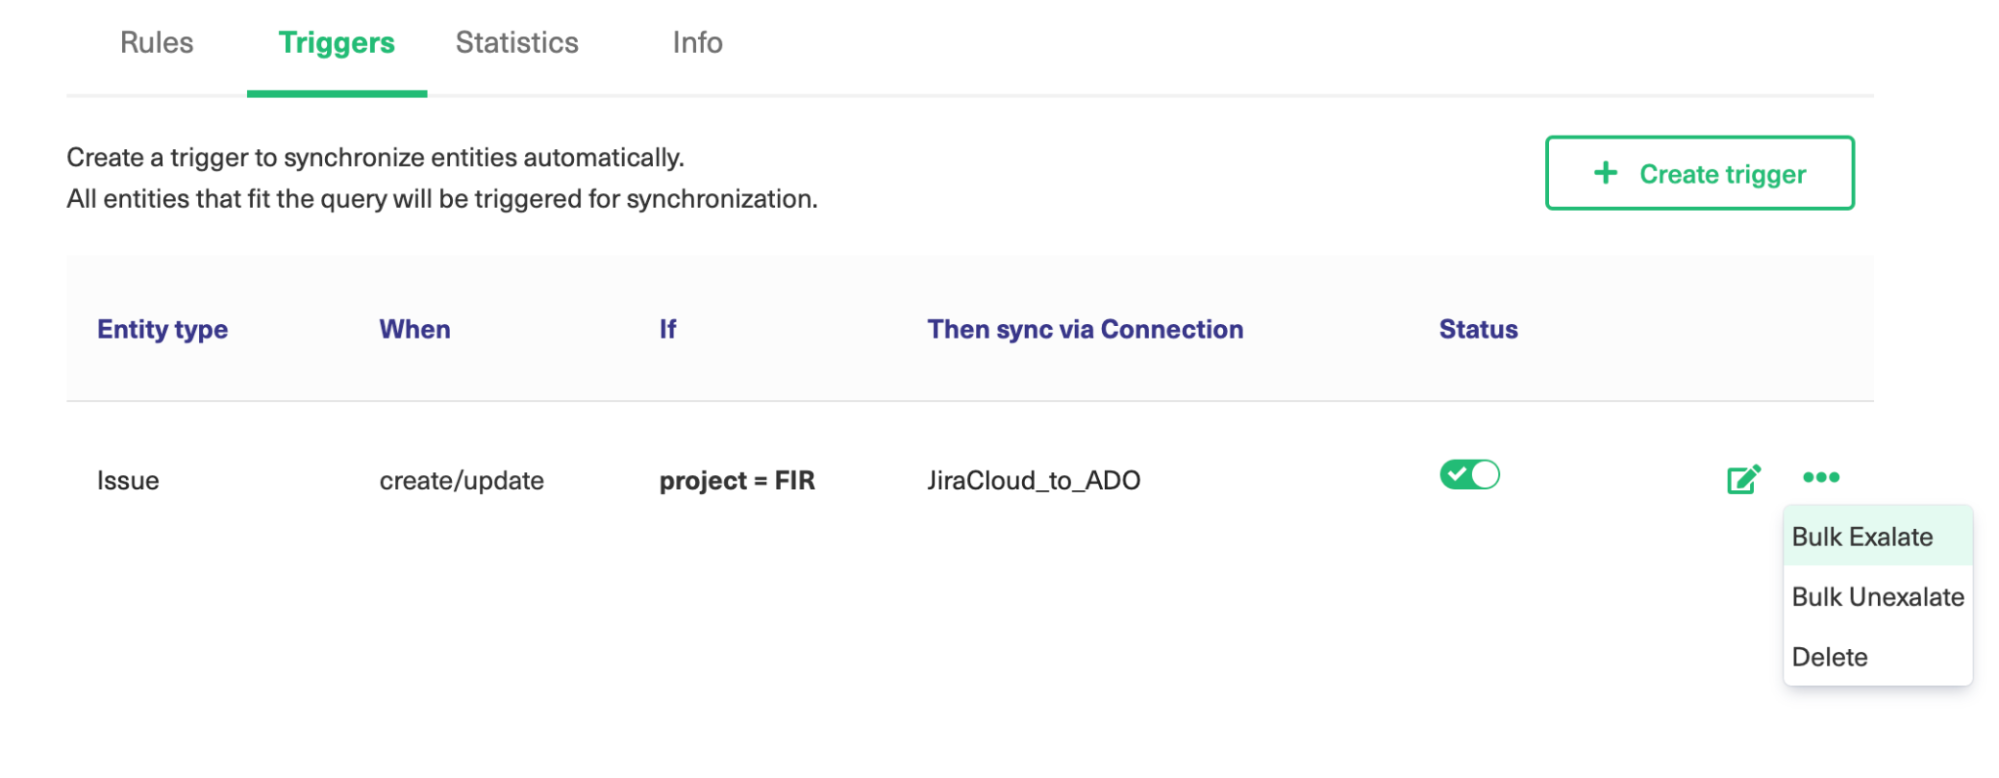
Step 6: Start Migrating the Jira Issues
After you’ve managed to successfully create the trigger, you’ll be able to start migrating issues.
To achieve this, click on the “…” button in the Action column next to the correct trigger.
There you’ll be able to select “Bulk Exalate”.
That’s it!
Now the issues in the project you’ve selected will be automatically synchronized to the other side.
You can check the “Sync queue” to see if any errors are occurring. Everything should be in order.
Step 7: Transfer the Whole Team by Providing Training
After migration has been completed, it’s possible your team will require some time to adjust to the new system.
In order to streamline the efficiency of using the system, I’d recommend dedicating some resources to training staff.
This will save you valuable time, human errors, and all-round confusion in the end.
Step 8: Stop Migrating Issues
When all of your data has been transferred and teams are familiar with the new system, you can stop the synchronization.
Step 9: Dismiss the Old System
Is everything running smoothly now? Is staff getting adjusted to the new Jira?
If so, it’s time to pull the plug on the old system!
Congratulations, you’ve completed a smooth transition from your staff to your new environment.
Hope it was a smooth ride. Kudos!
Conclusion
Performing a migration from one system to another is never easy.
Fundamentally, though, the challenges in the transition are not just about technology. It’s about the people using it and the way they work.
That’s why it’s crucial to ensure the new configuration completely meets their needs.
The problem here is that getting user feedback is always difficult. Users will rarely have enough time to explain their requirements in the necessary detail or validate new software to the degree that is required.
Because of this, a Big Bang migration may well be followed by a ‘WTF’ moment. This usually only happens when staff has to put the new instance to use.
And at this point, you might be left without having the option to roll things back.
The gradual transition made possible by a Live Migration, on the other hand, allows for an iterative and controlled evolution of the environment. That’s why we recommended this approach in some way for most use cases.
How about you? Did you find this article useful? Did you have any “cringy” migration stories people could learn from? Share your thoughts in the comments below!