Service Integration and Management (SIAM): The Complete 2025 Guide

Service Integration and Management

For many organizations, the complex nature of modern IT systems can be mind-boggling. There is the constant challenge of managing internal service providers and multiple third-party vendors. Fortunately, service integration and management (SIAM) has emerged to bring sanity to an IT world plagued with chaos.

Welcome to your complete guide to the SIAM multi-supplier methodology.

Here, you’ll find insights that address the problems of a multi-sourcing ecosystem. We’ll explain how SIAM simplifies supplier management while keeping service quality high. 

This guide will appeal to those seeking a broad set of ideas to help implement an effective SIAM governance model. It will also cater to those looking for ways to derive more value from their existing SIAM practices.

But we’re getting ahead of ourselves. Let’s first explore what Service Integration and Management really brings to the IT service delivery approach.

What is SIAM?

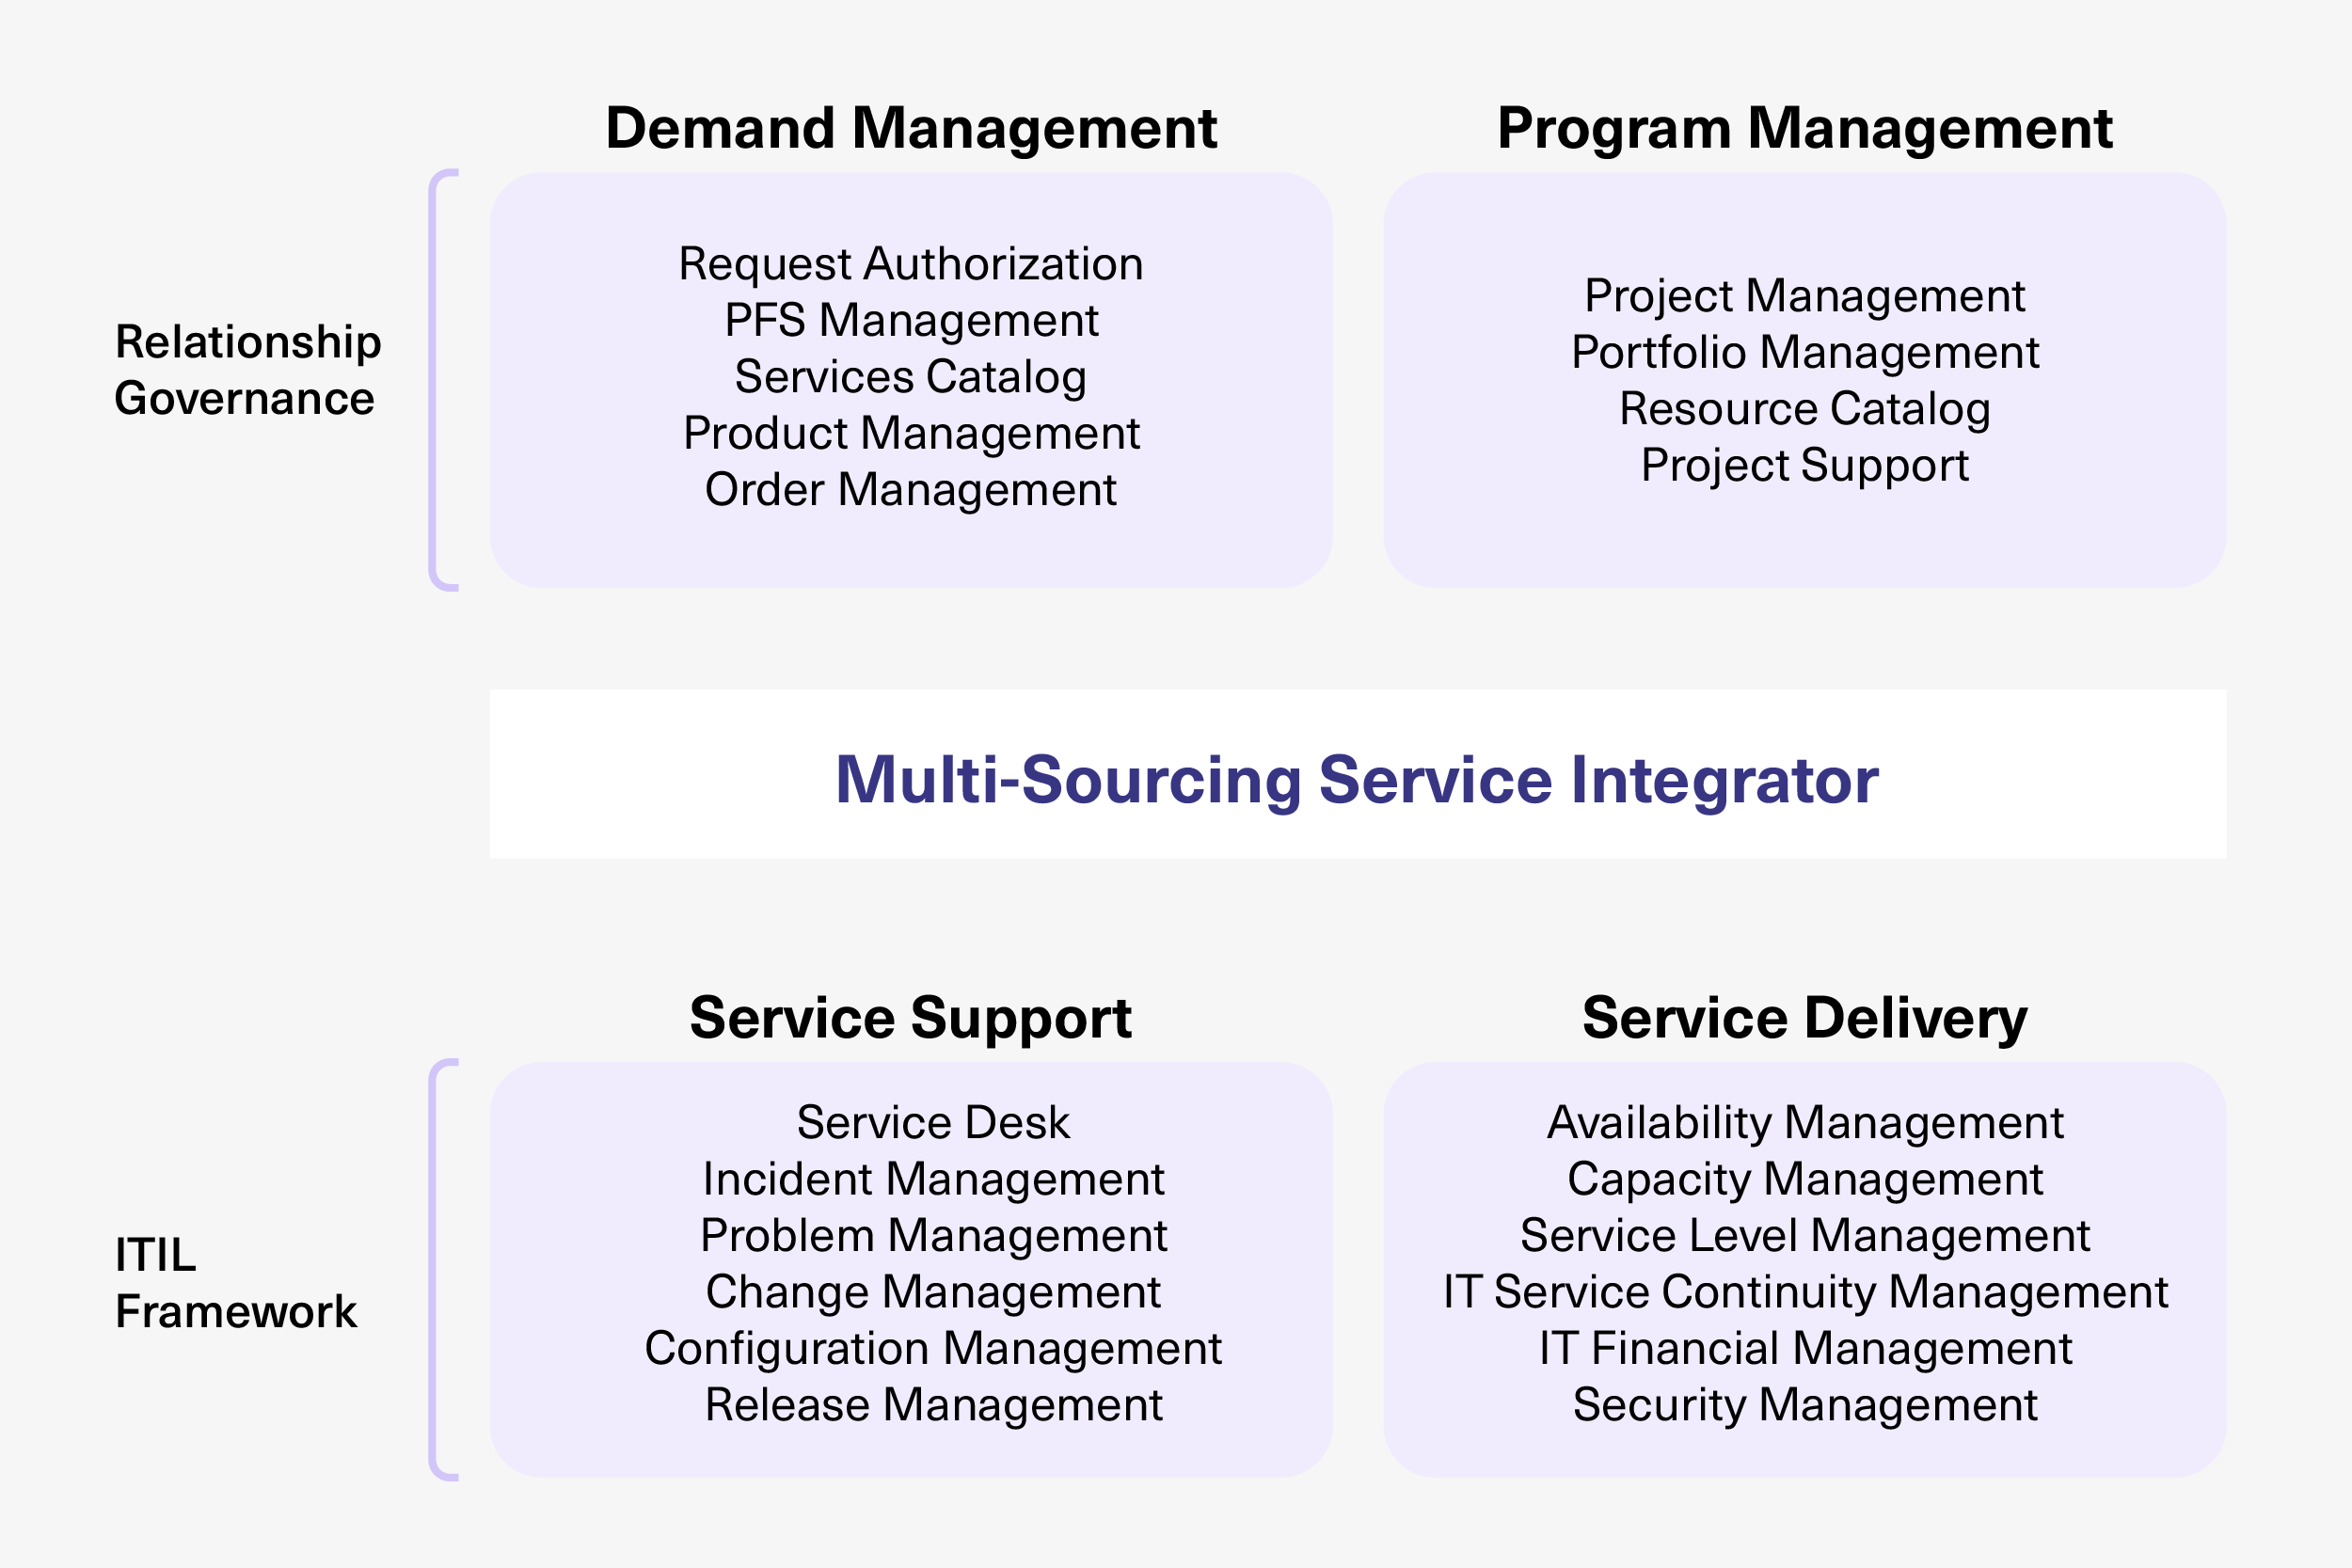
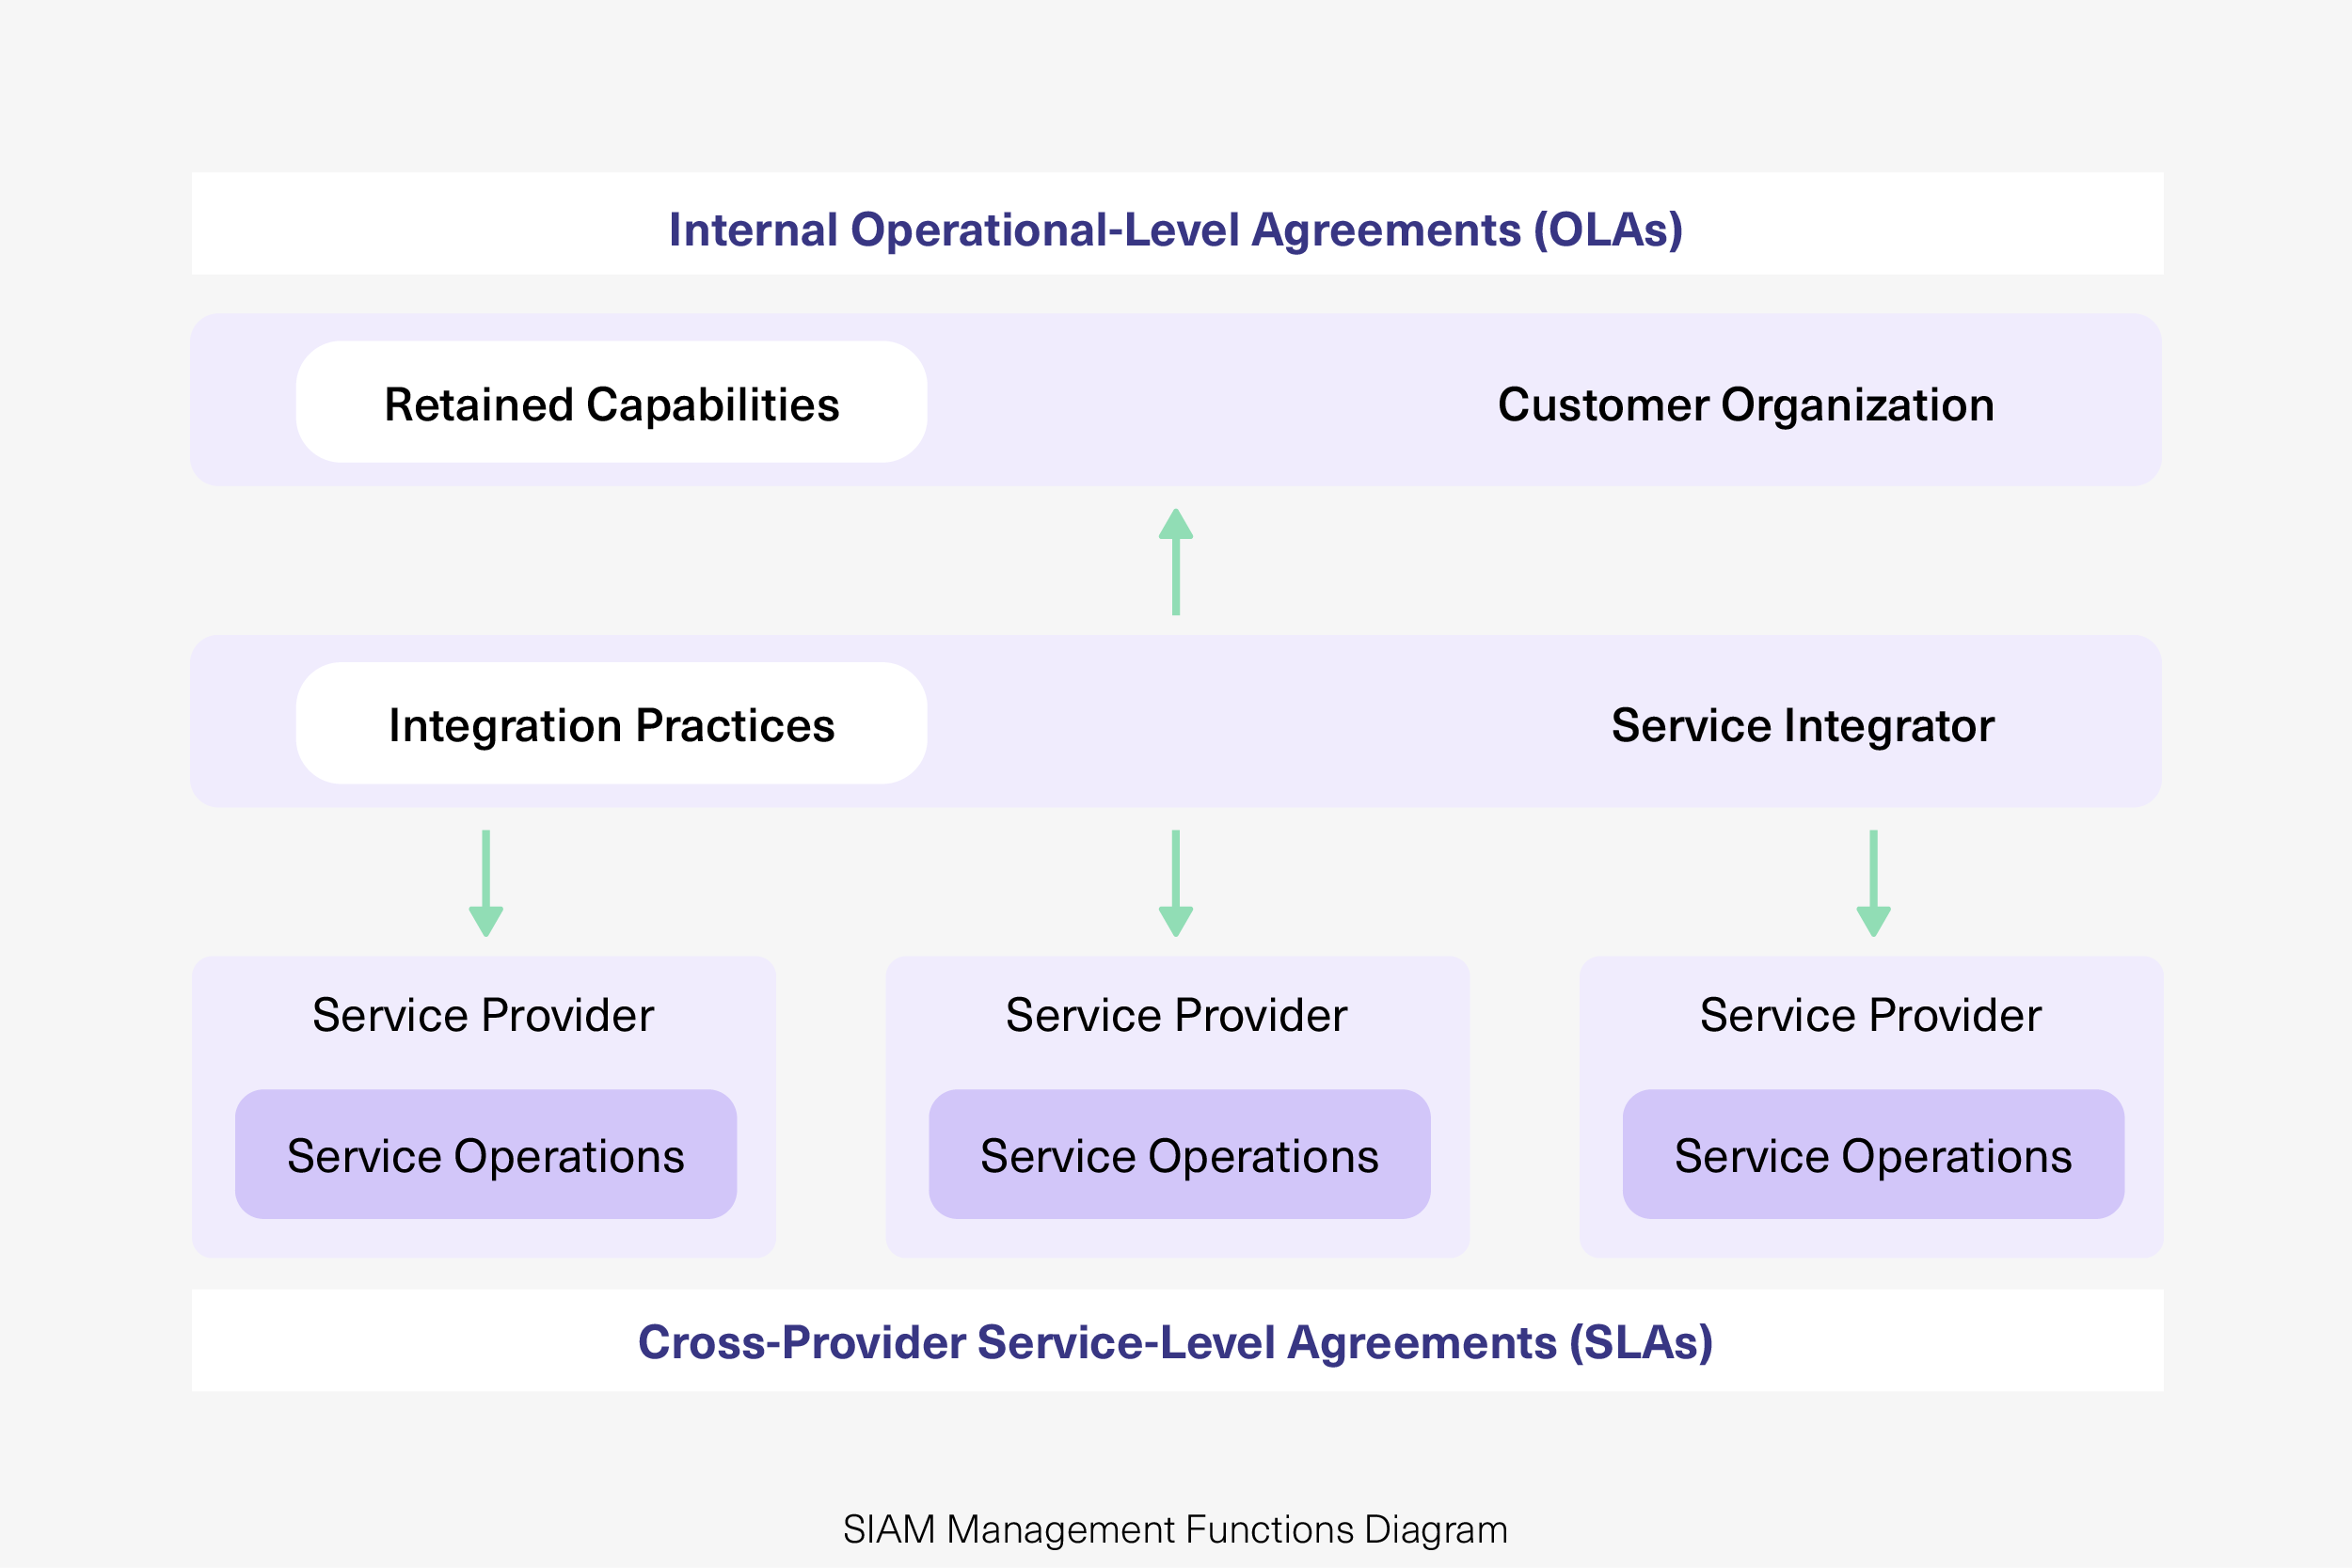
SIAM (Service Integration and Management) is an approach to managing multiple service suppliers by integrating them, so they can collaborate to give the customer great value. SIAM service integration introduces the concept of a single, customer-facing logical entity known as the service integrator.

The service integrator is an independent function that handles the management and integration of multi-source partners.

It handles the complexity of multiple-provider service delivery by making solutions, technologies, and systems work together, with a focal point on technology integration.

multi-sourcing service integrator table

SIAM Key Concepts

SIAM technology has been around for 10 years and is still quickly evolving. However, it isn’t a process reference framework like ITIL and COBIT, or a standard like ISO/IEC 20000.

Even so, growing research into the fields shows a clear distinction in purpose from its predecessors. They highlight how SIAM smoothly combines related services from different providers into end-to-end services to meet business needs.

These are what separates SIAM from “old-fashioned” service management standards:

  • The role of a service integrator is a distinct feature of SIAM.
  • A SIAM service management system capable of continuously improving service delivery while sustainably achieving cost optimization.
  • Accountability for integrating multiple service providers with service contracts that define expectations, manage risks, and realize benefits.
  • A service provider giving importance to deliver efficient services aligned with customer expectations and not based on individual goals. 
  • Efficient management and governance practices with the goal of providing maximum value to the business from its service providers.

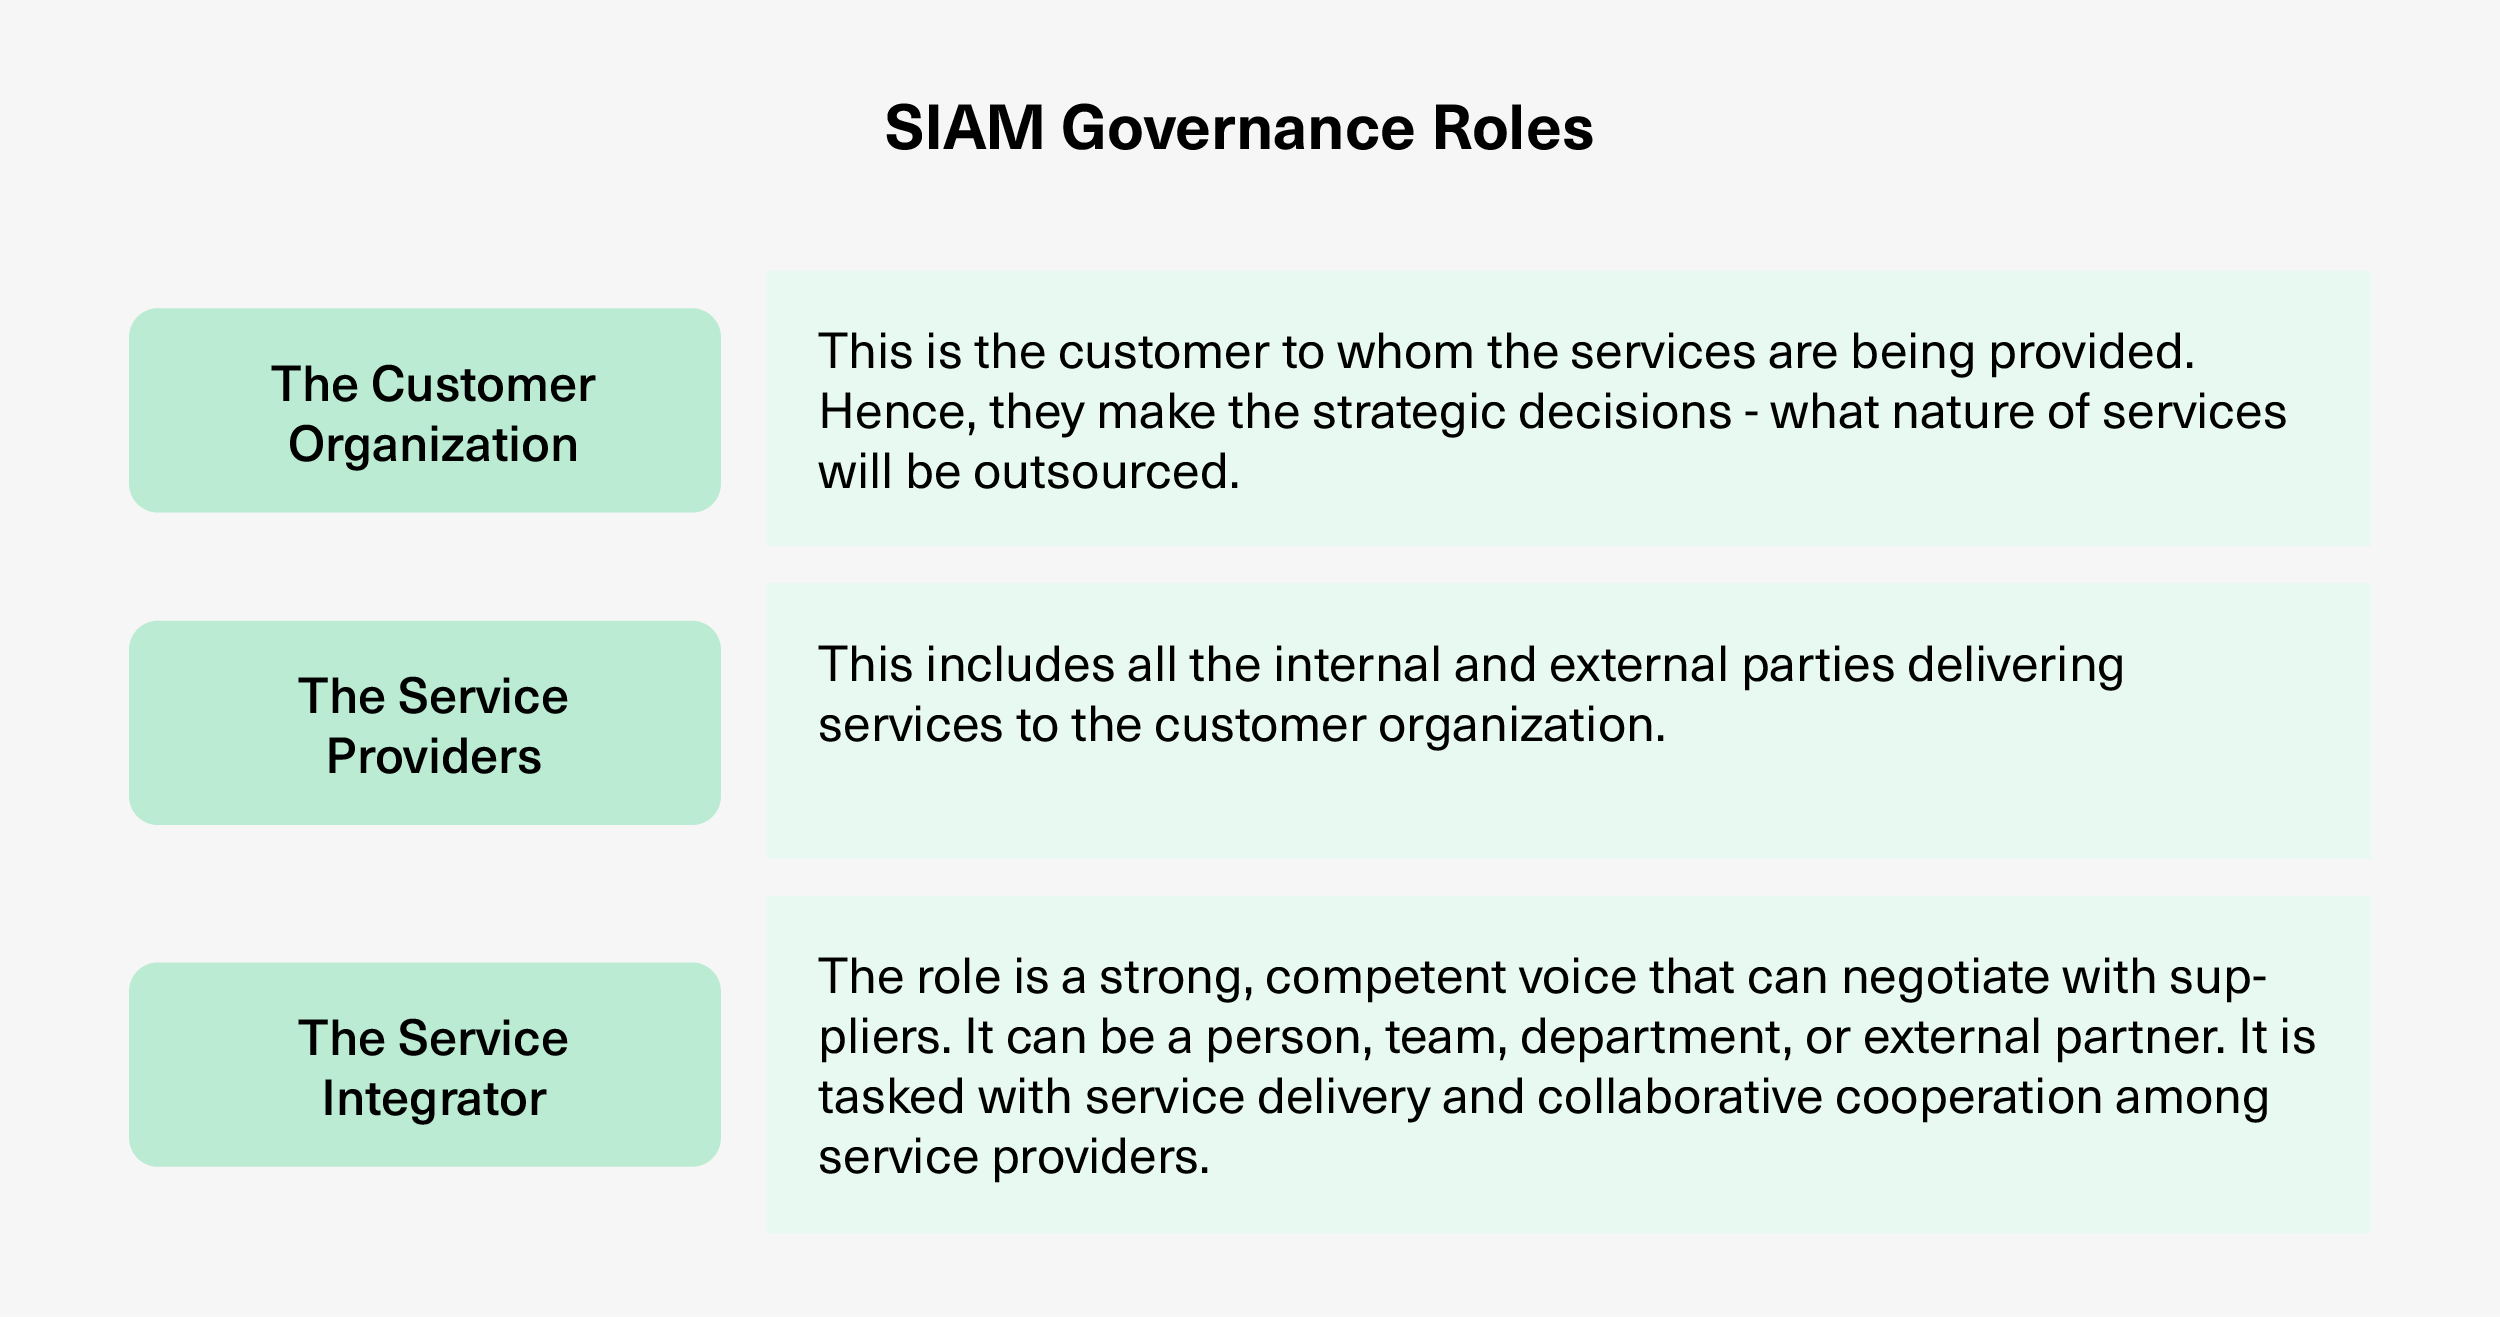
In addition, SIAM recognizes three governance roles based on 3 levels (strategic, organizational, and tactical) within an organization:

SIAM governance roles table

Apart from its role as a service integrator, SIAM also introduces other key concepts into service management delivery:

  • Establishing key performance indicators (KPIs): Ensuring supplier performance through reliable metrics.
    • Return on Value (ROV): SIAM produces benefits that are both tangible and intangible. ROV, therefore, becomes the ideal measurable instrument.
    • Total Cost of Consumption (TCC): As a consumer of services, SIAM favors the TCC metric.
  • SIAM Knowledge Management System: Providing valuable advice on best practices and proven IT service delivery techniques. 
  • Service portfolio management: SIAM provides supplier coordination, collaboration, integration, and interoperability. This is a governance framework empowered with Service Level Agreement (SLA) contracts. Therefore, all parties know their role and responsibilities.

How does SIAM Help an Organization?

Nowadays, organizations have to do a lot to stay competitive. They have to consume services from a broad range of service providers, in addition to developing their own skilled delivery services.

SIAM is currently a hot topic because of the advantages it brings to IT multi-service delivery when implemented properly. 

The Benefits of Service Integration and Management (SIAM)

Increased accountability: Taking end-to-end accountability for performance delivery. This is possible because service providers are aware of the required outcomes and expectations.

Optimized cost with improved value: Reducing the high cost of managing multiple operations and services.

Effective risk management: Enabling businesses to spread risk and obtain tailor-made services.

Improved flexibility: Increased access to expertise from a wider array of service providers avoids costly vendor lock-in.

Increased expertise: Through assembling best-of-breed provider portfolios at reduced costs.

Improved governance and control: Providing the needed control over suppliers on behalf of the organization.

Improved service quality: Enhancing the overall IT management process and quality service to end-users.

visualisation of Exalate linking multiple tools

The Role of SIAM in Changing IT Service Delivery Metrics

A common adage in business says “If` you can’t measure it, you can’t improve it.” This is relevant to IT services because they’re evolving from just being “cost centers” to things that deliver value. 

Consequently, measuring the value of IT service delivery needs appropriate instruments that capture value.

Furthermore, this creation of value is vital for suppliers in developing customer value models. Correspondingly, it enables customers to understand their own requirements and what satisfying those requirements is worth to them.

SIAM: Why ROV overrides ROI

SIAM helps provide a supplier assessment framework that goes beyond price. This is because the cheapest option doesn’t necessarily indicate you’re getting the best value. As Warren Buffet, the world’s most famous investor describes it, “Price is what you pay; value is what you get.” 

return on value and return on investment explanation

Traditionally, businesses have used Return on Investment  (ROI) as the measure of profitability. However, financial metrics don’t capture intangibles, which makes ROI an insufficient yardstick for SIAM. 

Therefore, to capture the effectiveness of SIAM, you have to look beyond ROI.

Luckily, Return on Value (ROV) provides a better way of articulating the value an IT initiative generates for business. It also takes into consideration both the tangible and intangible benefits.

SIAM: Why TCC overrides TCO

Total Cost of Ownership (TCO) lets a business know what it’s spending on infrastructure. But it doesn’t specify what they’re really using. In a service-oriented model, this distinction is key.

total cost of consumption and cost of ownership explanation

IT services are meant to be consumed. SIAM is a consumer of services. Therefore, fixating on TCO for measuring SIAM is irrelevant. 

Its measurement should be based on consumption. Hence, the need for Total cost of consumption (TCC).

TCC measures the cost per unit of consumption of IT services. 

This is relevant because SIAM focuses on empowering organizations to co-create effective value through collaborative service delivery.

internal operational-level agreements explanation table

How does Service Integration and Management (SIAM) Work?

There is a tendency to define SIAM through the lens of process areas commonly associated with traditional IT service management (ITSM). But SIAM isn’t a process.

The SIAM methodology involves practices, processes, functions, roles, and structural elements.

SIAM in Practice

The central philosophy of SIAM that ultimately guides its practices is this: 

Although you can outsource the provisioning of your organization’s IT services to third parties, you should never relinquish accountability for these services. 

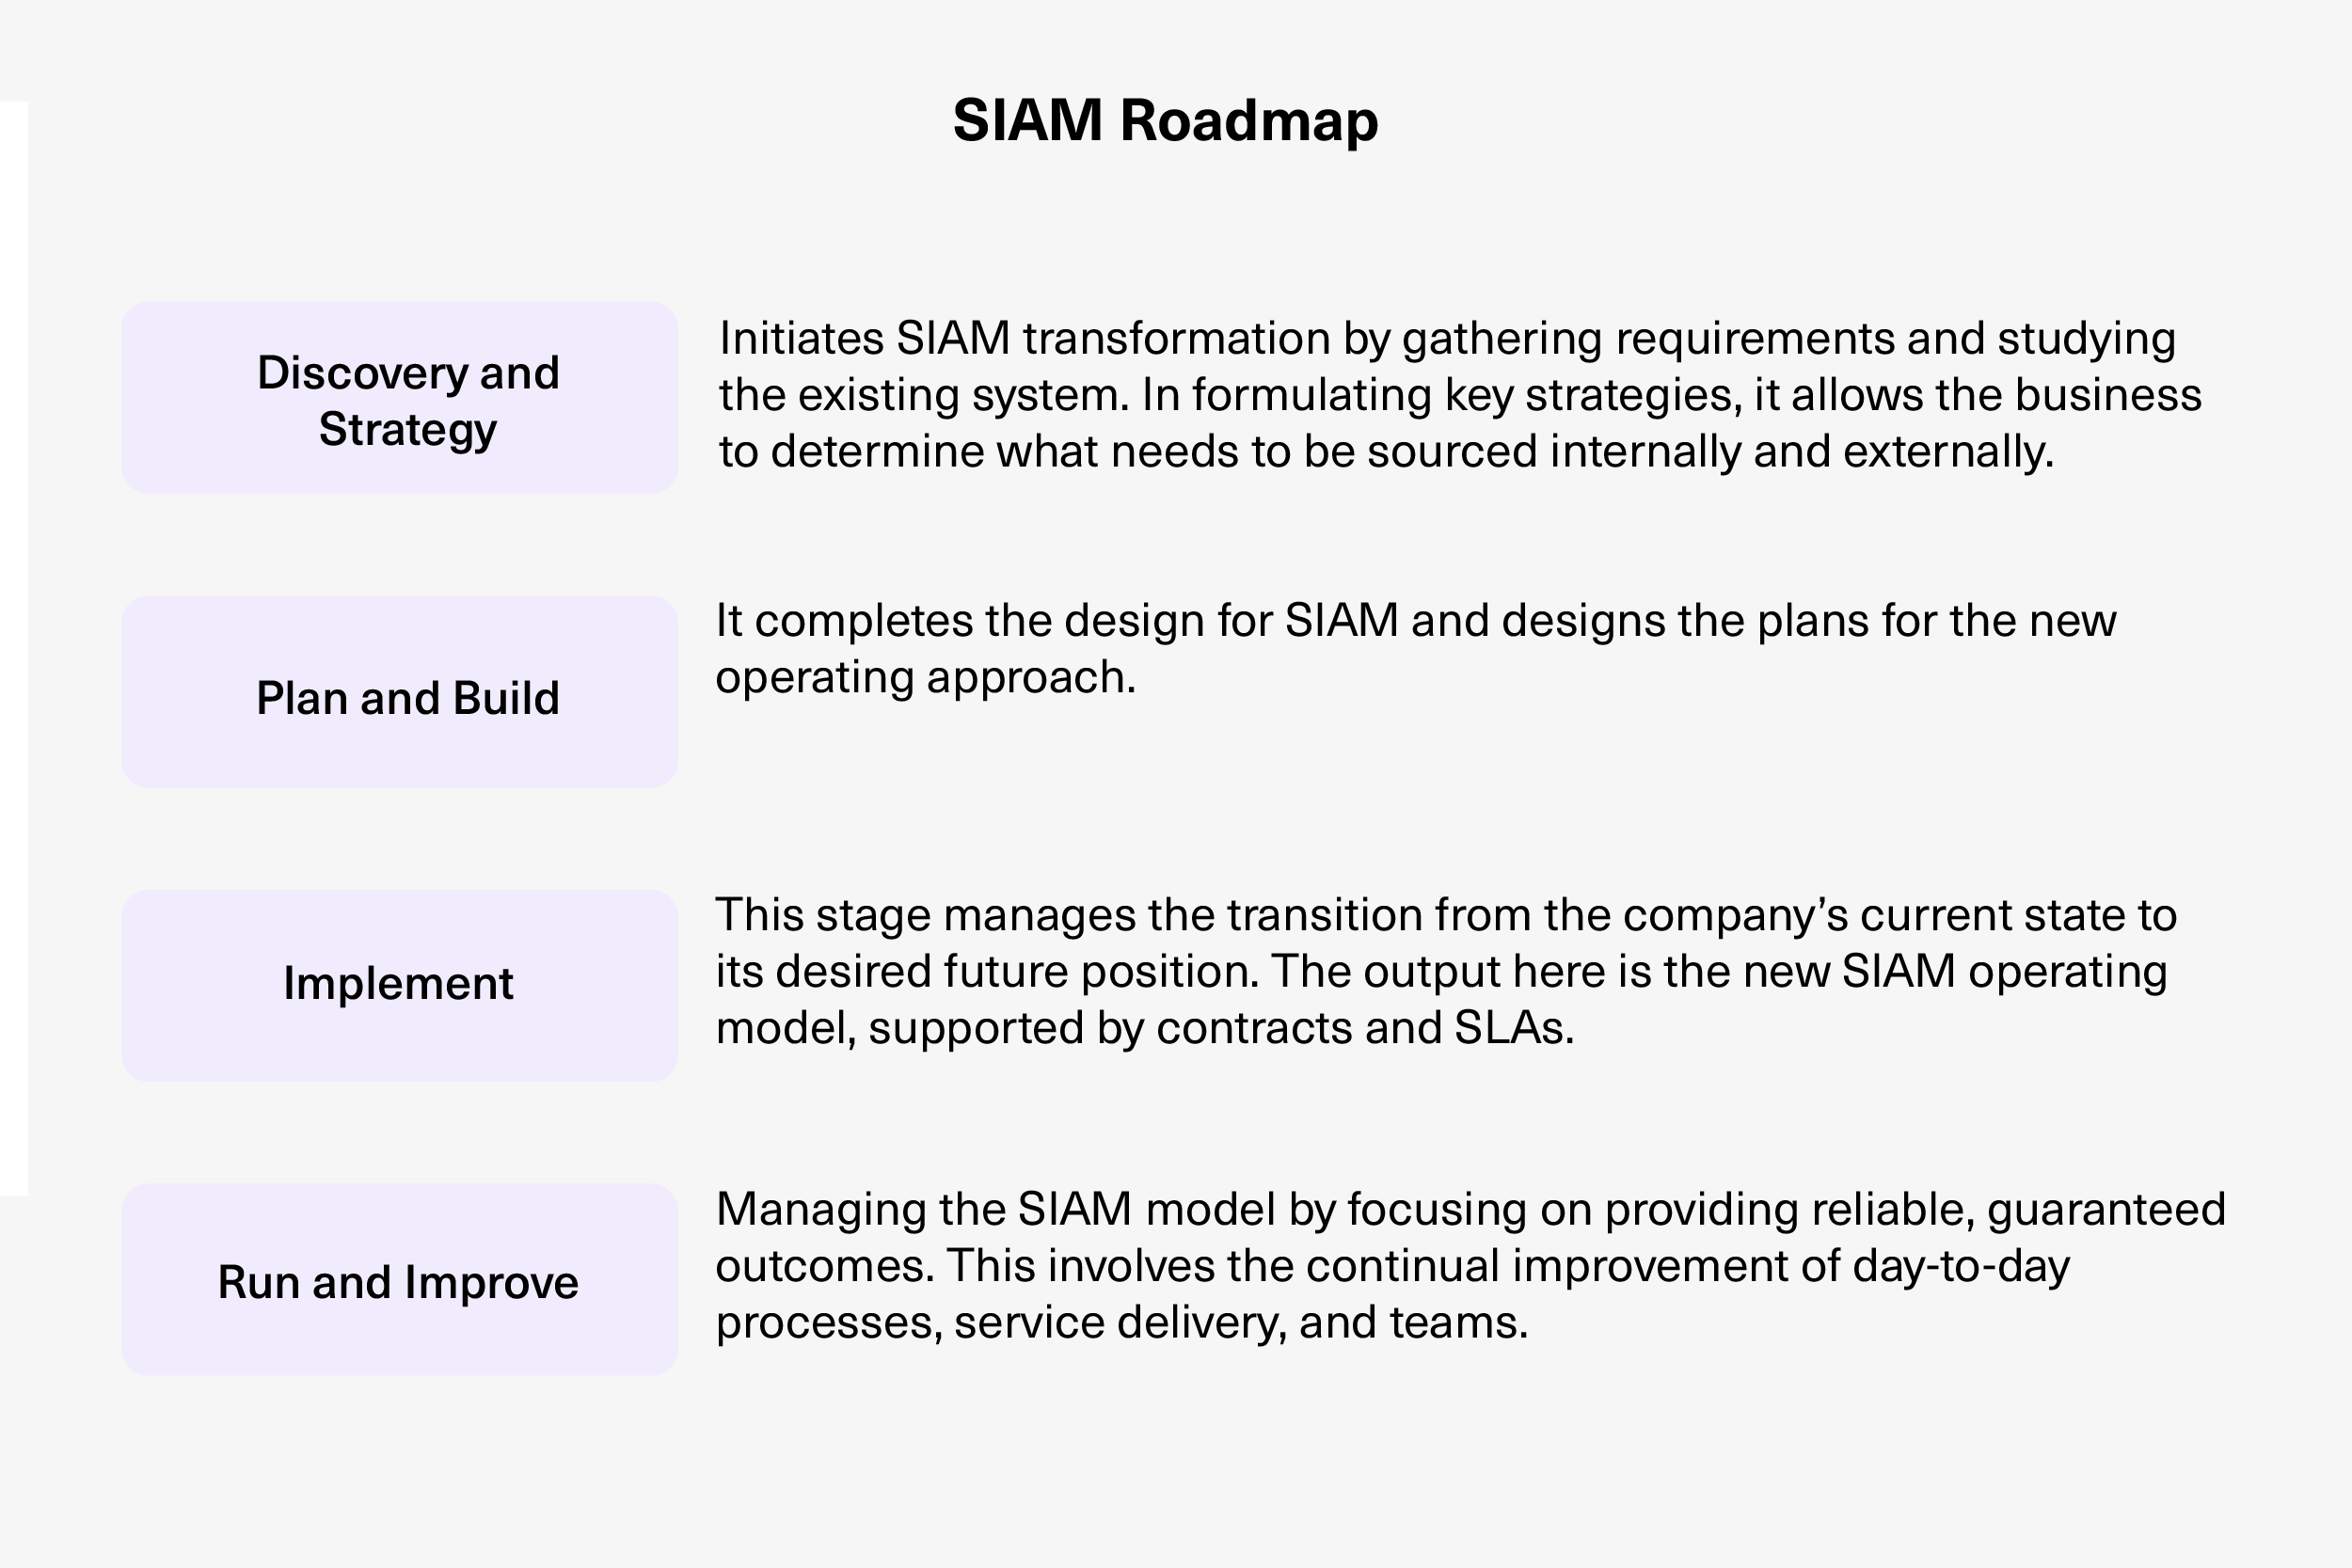
SIAM Foundation Body of Knowledge describes four stages that make up the SIAM roadmap:

SIAM roadmap table and explanation

Problems associated with SIAM implementation

  • The challenge of getting different suppliers to follow the same process.
  • The use of different technology tools and platforms by partners. Suppliers often have their own issue trackers and tools for reporting. Therefore, centralization is time-intensive and complicated.
  • A reluctance and resistance to collaborate effectively. Parties may meet contractual obligations but either can’t or won’t jointly invest the time to improve service delivery.

How to Get Started with SIAM

SIAM is a management methodology that draws on other management processes. There are 24 processes associated with it and listed in the SIAM Foundation Body of Knowledge by SCOPISM. 

While all of these 24 processes have their place and purpose in a SIAM strategy, the best three to start with are the following:

  1. Incident management
  2. Change management
  3. Problem management

Let’s briefly discuss the incident management use case in the SIAM IT context. For this example, we are considering Jira to be the customer system and two ServiceNow instances (A and B) as the ITSM systems of its service providers.

A SIAM Use Case: Incident Management 

The customer decides to outsource IT management to one of the service providers (A) to raise incidents like network outages, website downtimes, etc. 

Another ServiceNow instance (B) handles critical customer tickets.  

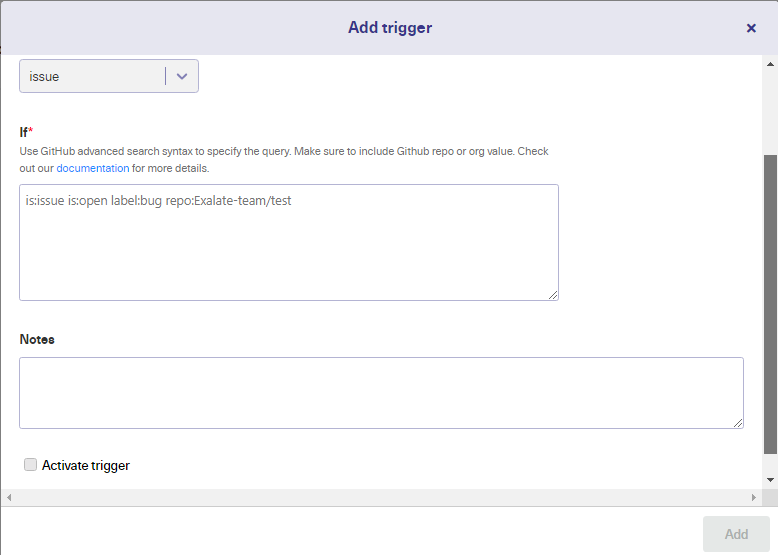
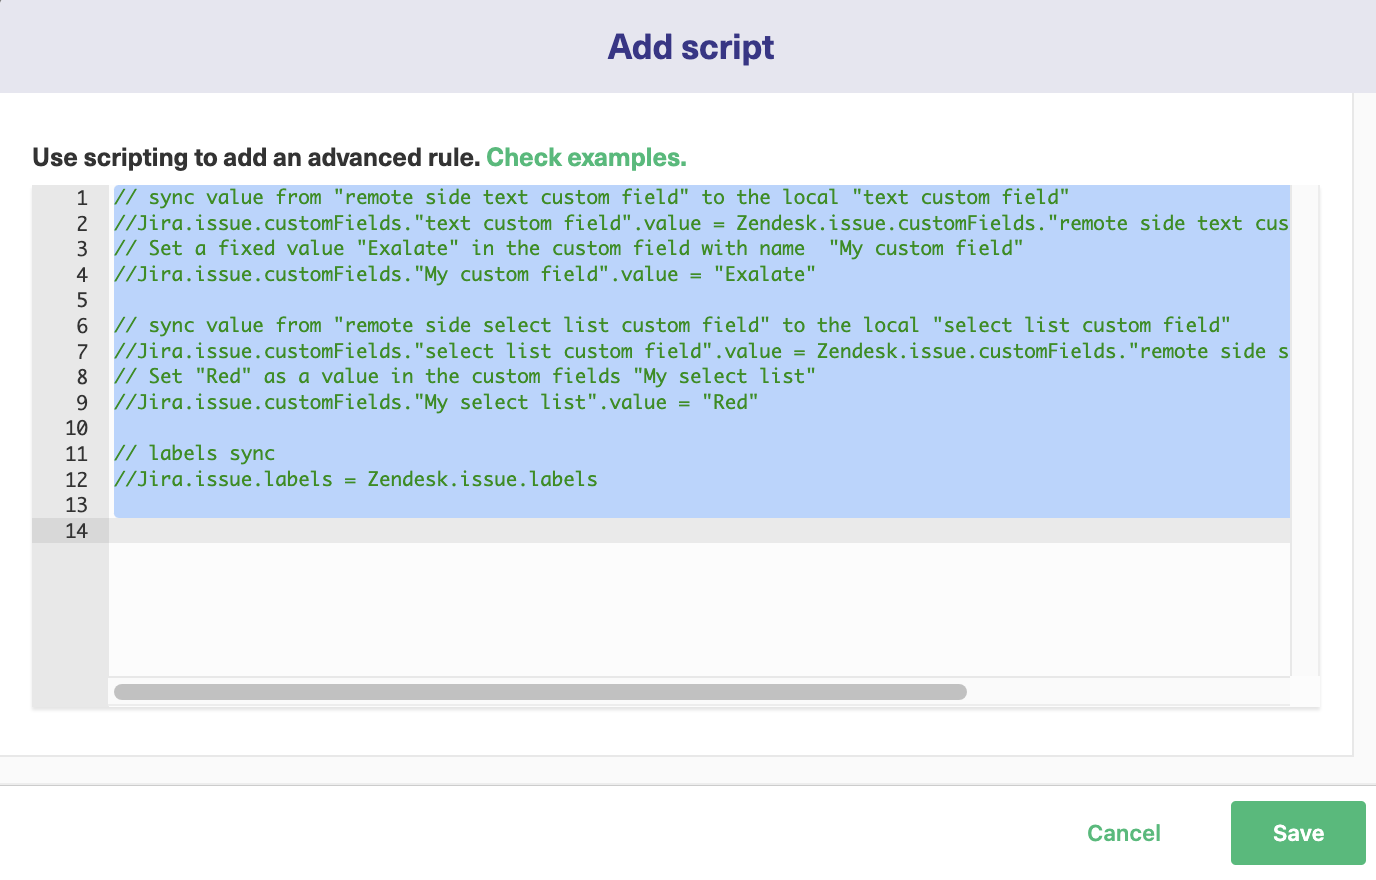
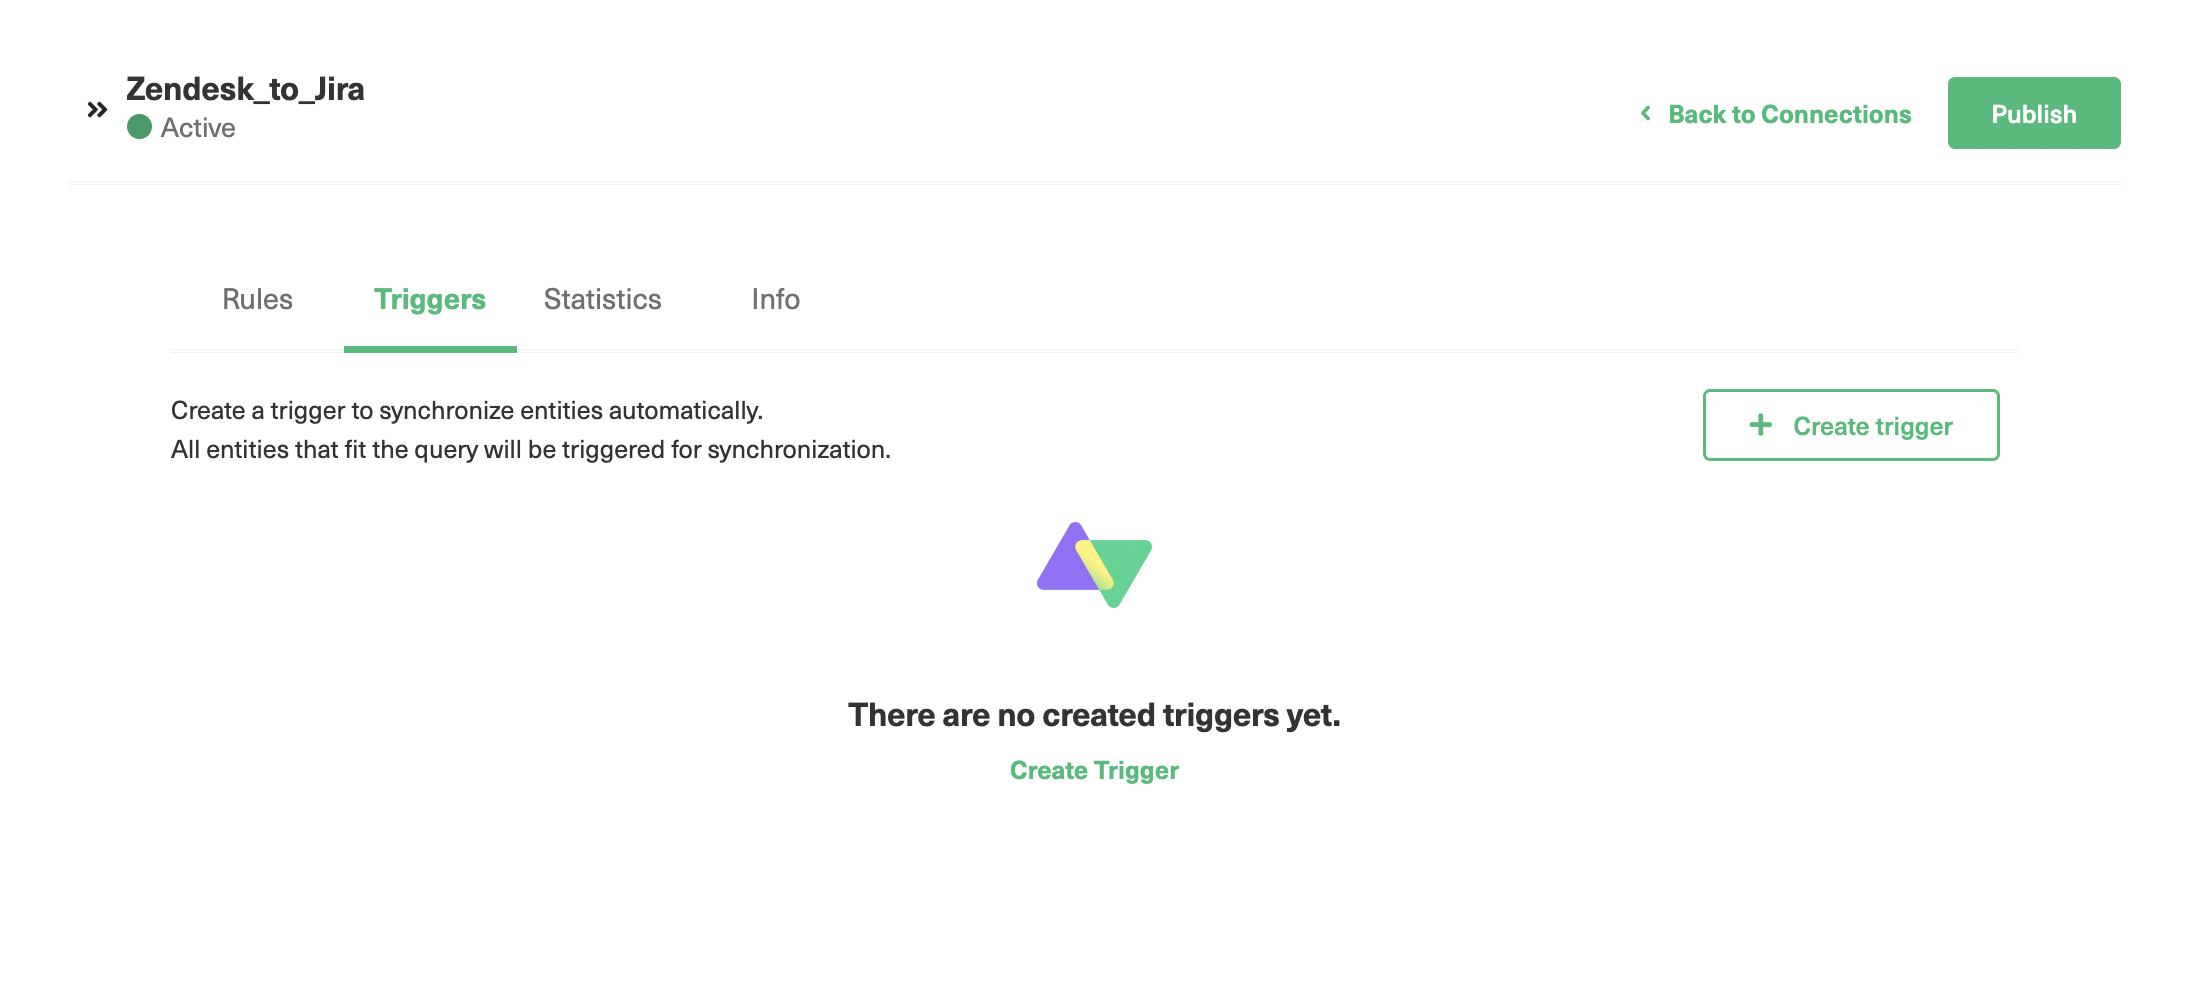
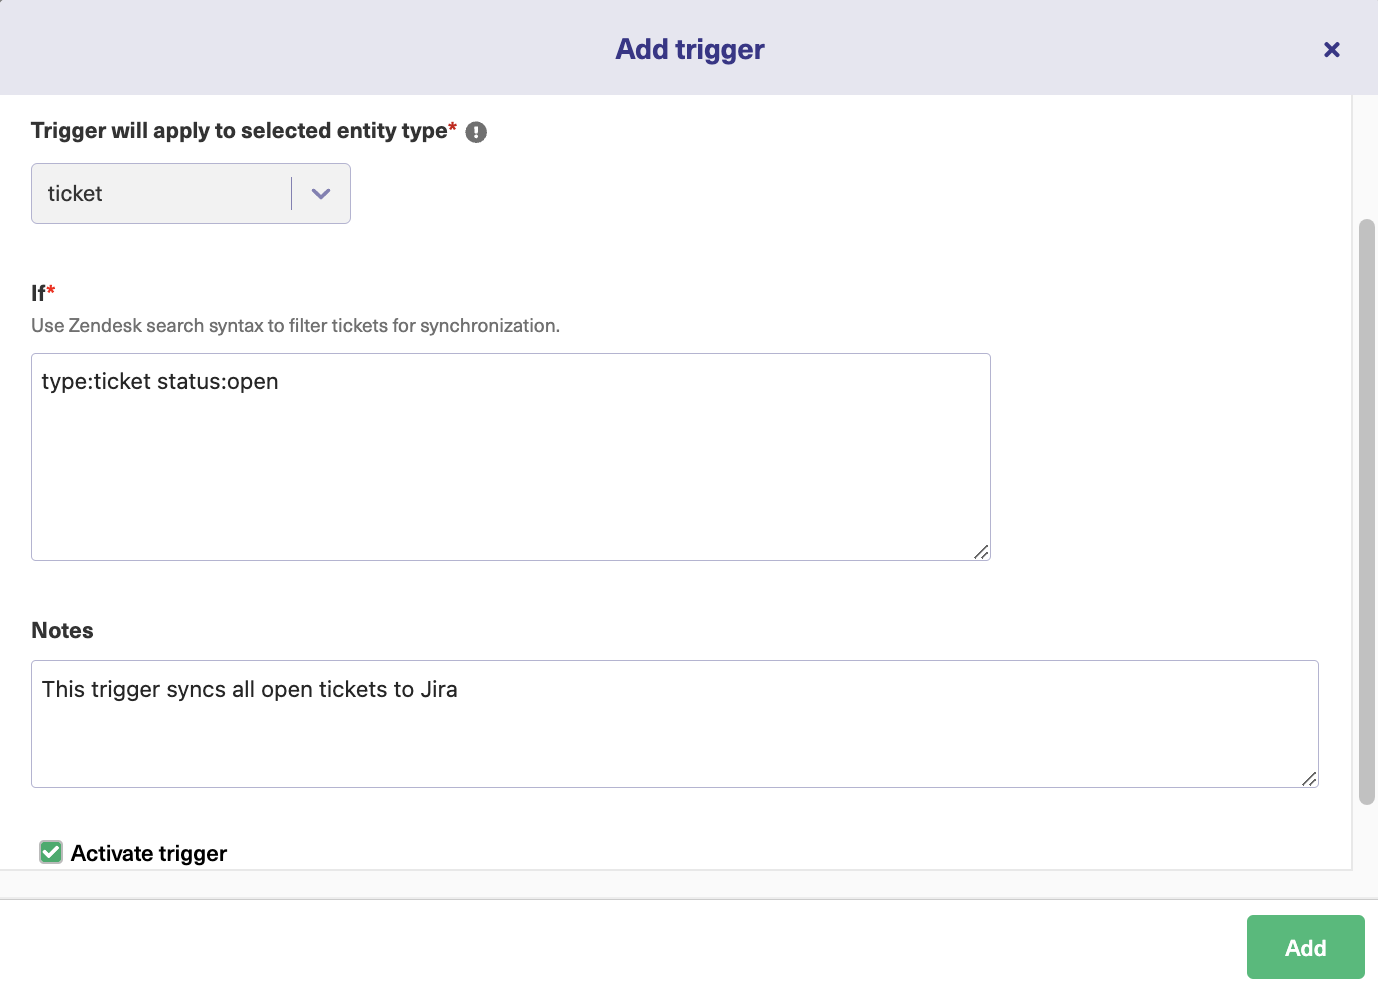
Every time the monitoring system raises an incident in ServiceNow A, Jira issues are created automatically in Proj A with the necessary summary, description, attachments, and work notes. 

And every time a critical customer ticket occurs in ServiceNow B, Jira issues are created in Proj B for the dev team. Again, the necessary information is attached to the issue. 

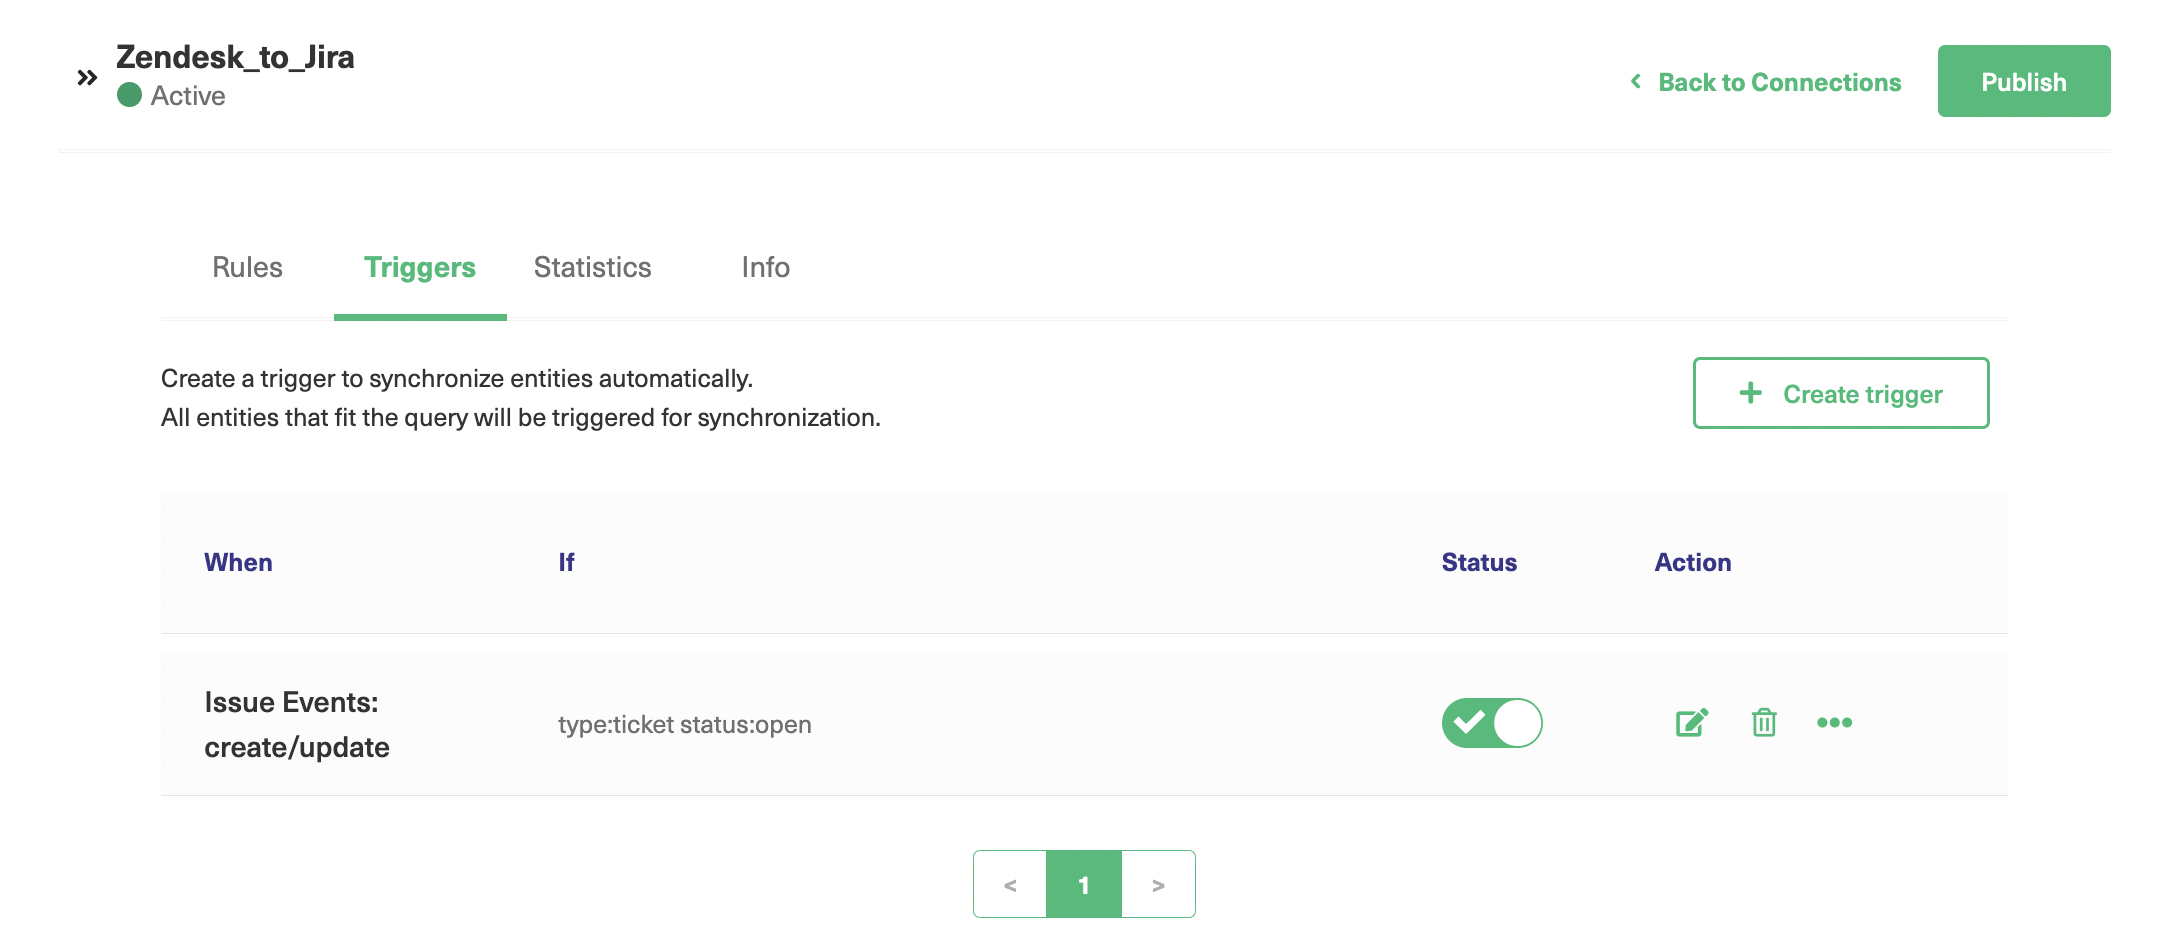
The automation and integration between all these instances is such that appropriate conditions trigger Jira issues in the set projects. All the required information is exchanged and acted upon in real time with necessary status updates to the stakeholders. 

This type of collaboration forms the basis of a strong SIAM service operational model where all providers have designated roles and responsibilities without any finger-pointing.

The SIAM Operational Model

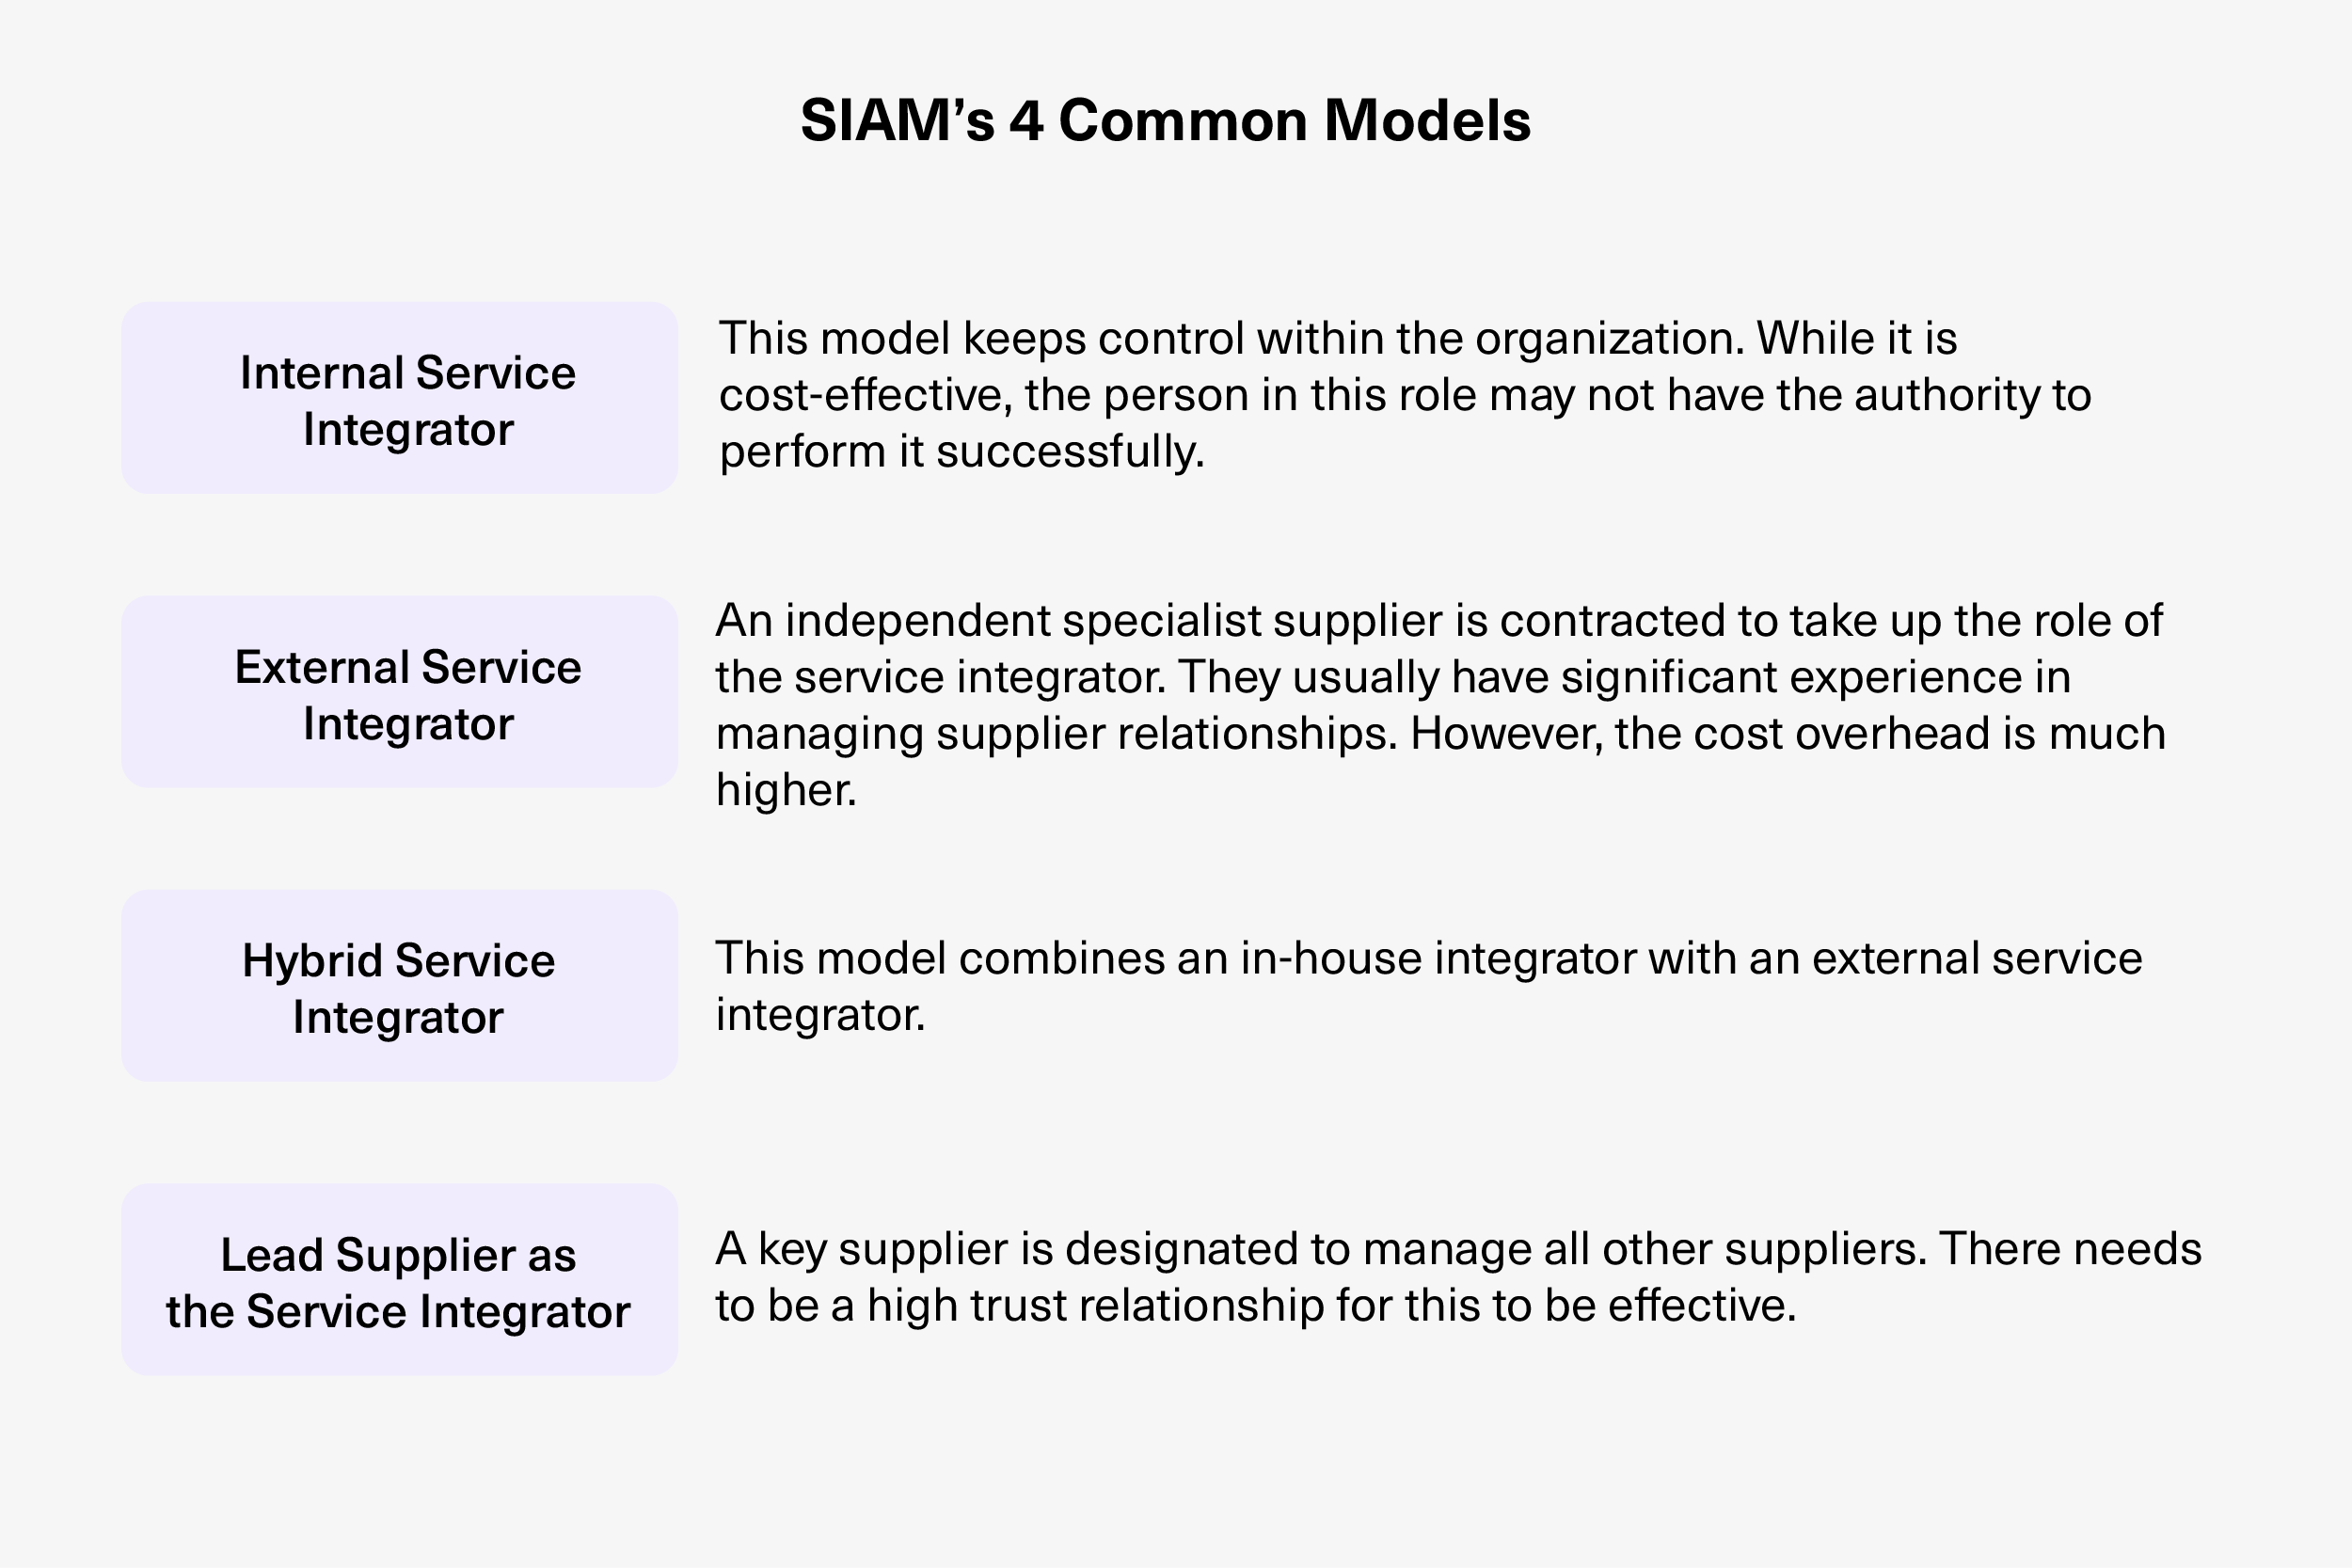
SIAM provides companies with a structure to manage vendors who supply IT services. It presents them with four common models to use. Organizations are free to choose whichever approach works best for them:

SIAM's four common model table and explanation

How SIAM Compares with Other ITSM Frameworks

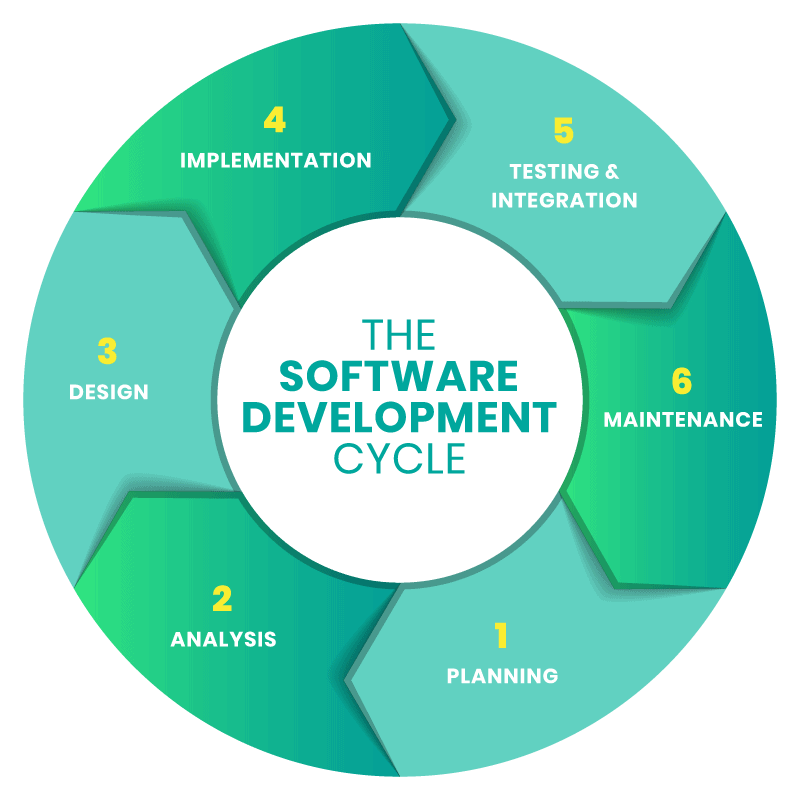
IT Service Management (ITSM) touches on all the lifecycle activities involving the creation, design, delivery, and support of IT services. 

However, ITSM and SIAM are often wrongly used interchangeably. This shouldn’t be the case since there’s a huge difference between the two. The noteworthy difference is the topic of supplier management, which is much more related to SIAM.

ITSM is aimed at managing IT services for an organization. SIAM builds over ITSM processes and helps adapt them for a multi-supplier environment. 

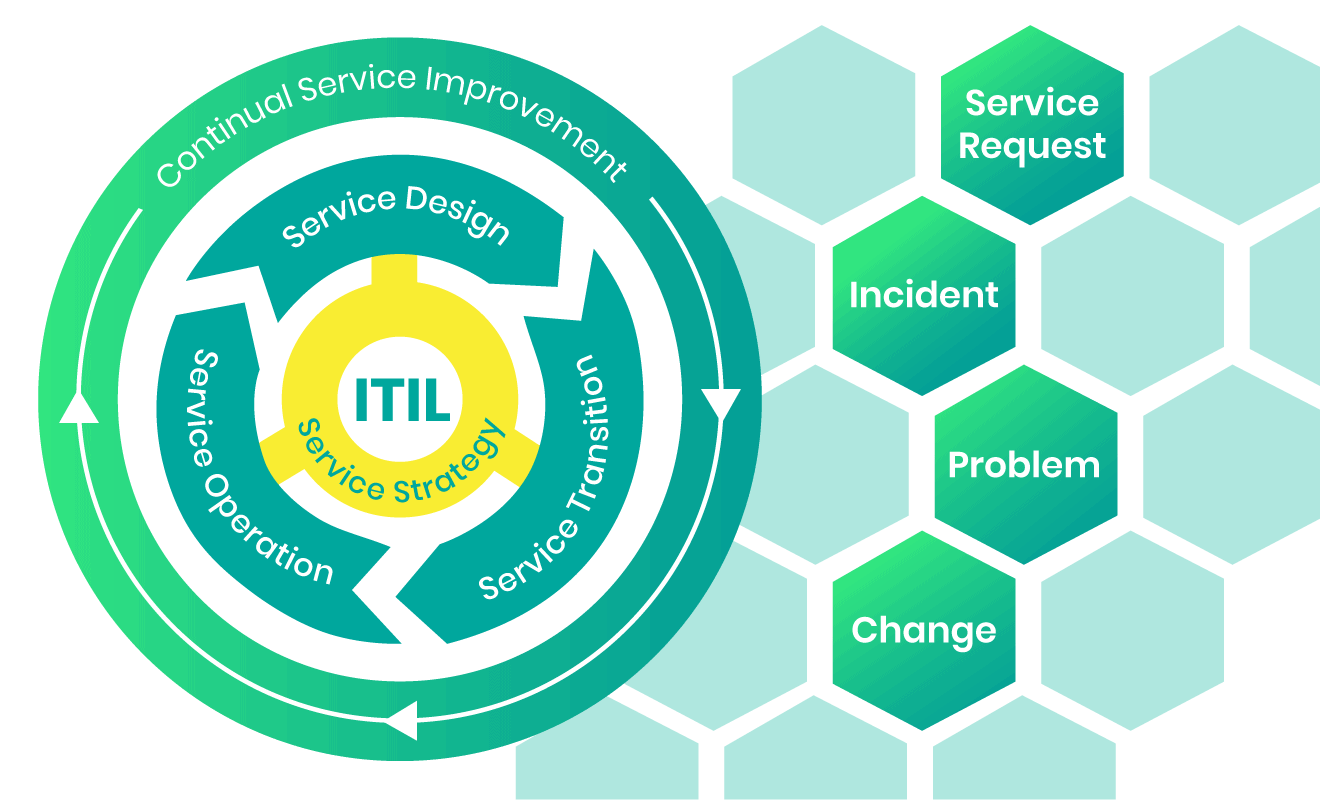
Sourcing for Success: SIAM vs. ITIL

On the other hand, ITIL is a set of practices that can be adopted for ITSM.

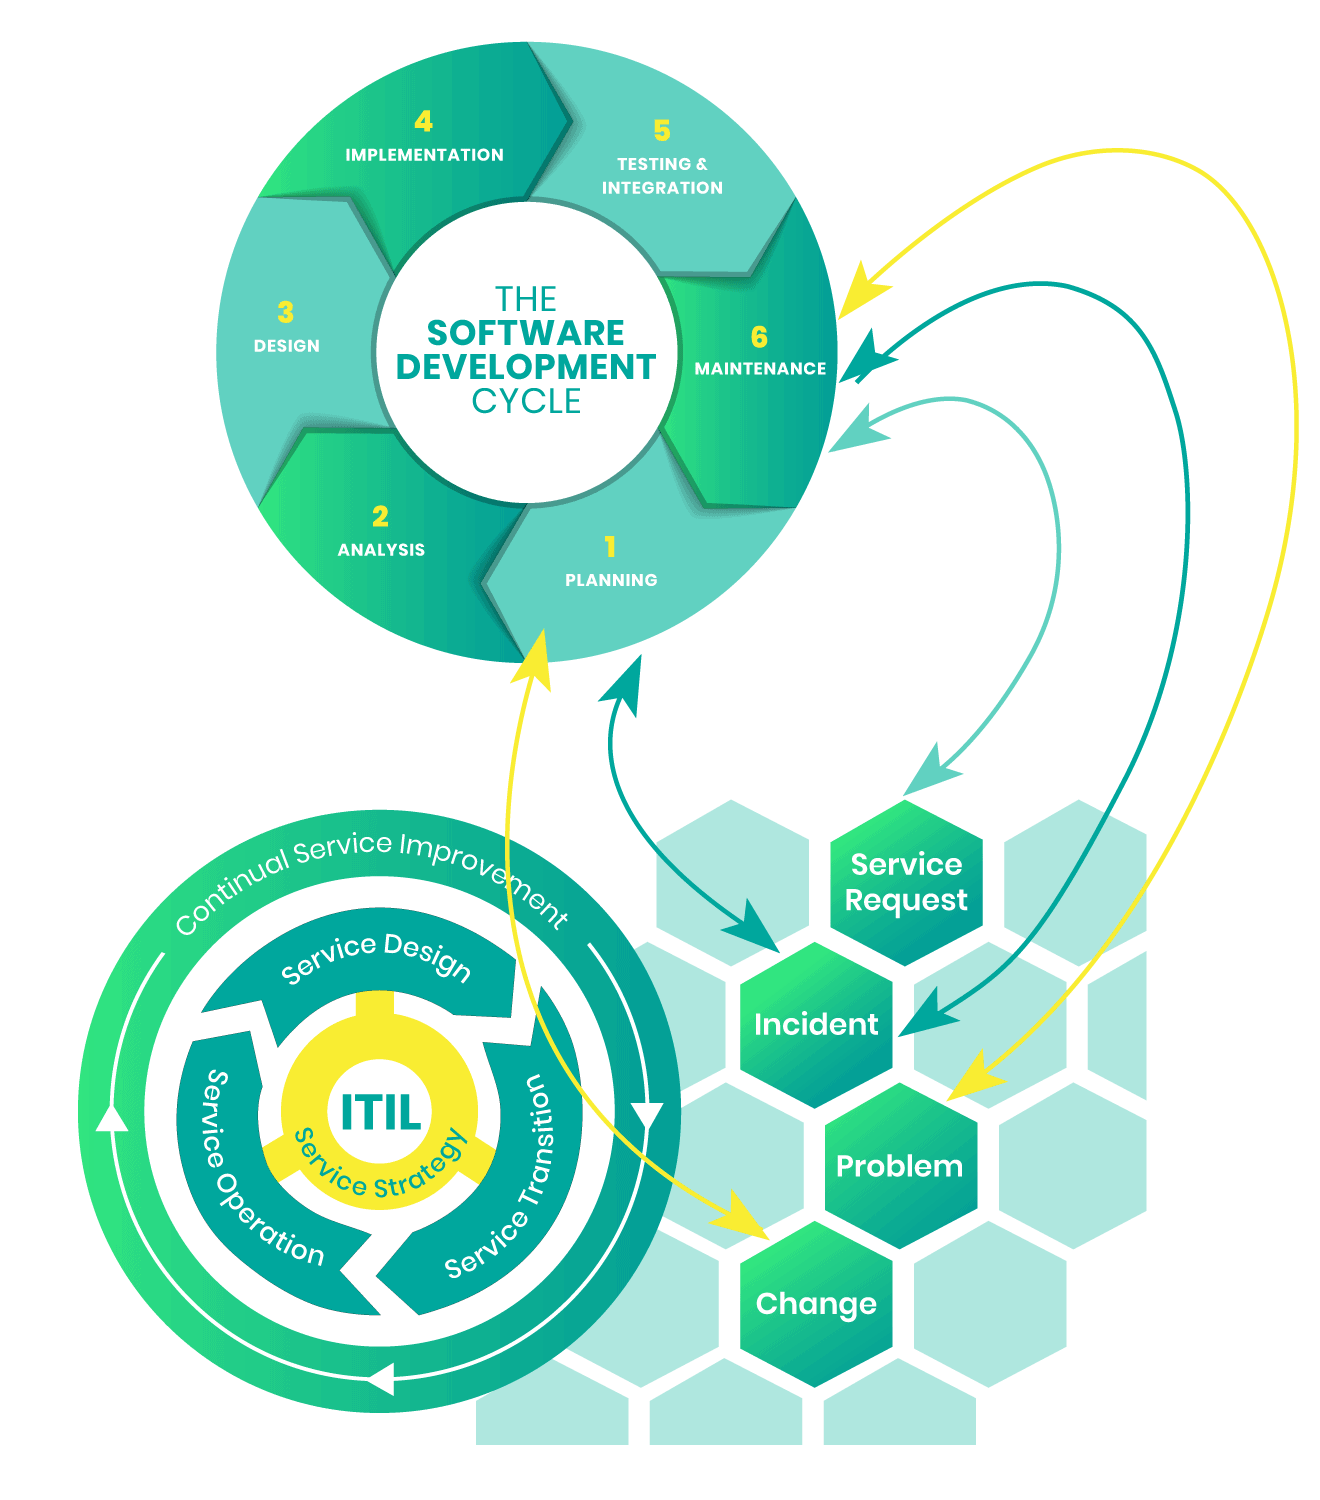
SIAM is viewed as the next generation of ITIL. However, some argue that SIAM is merely using ITIL in a different way. This is partially true in the sense that SIAM is an adaptation of ITIL but with a focus on multi-supplier delivery. 

ITIL continual service improvement table

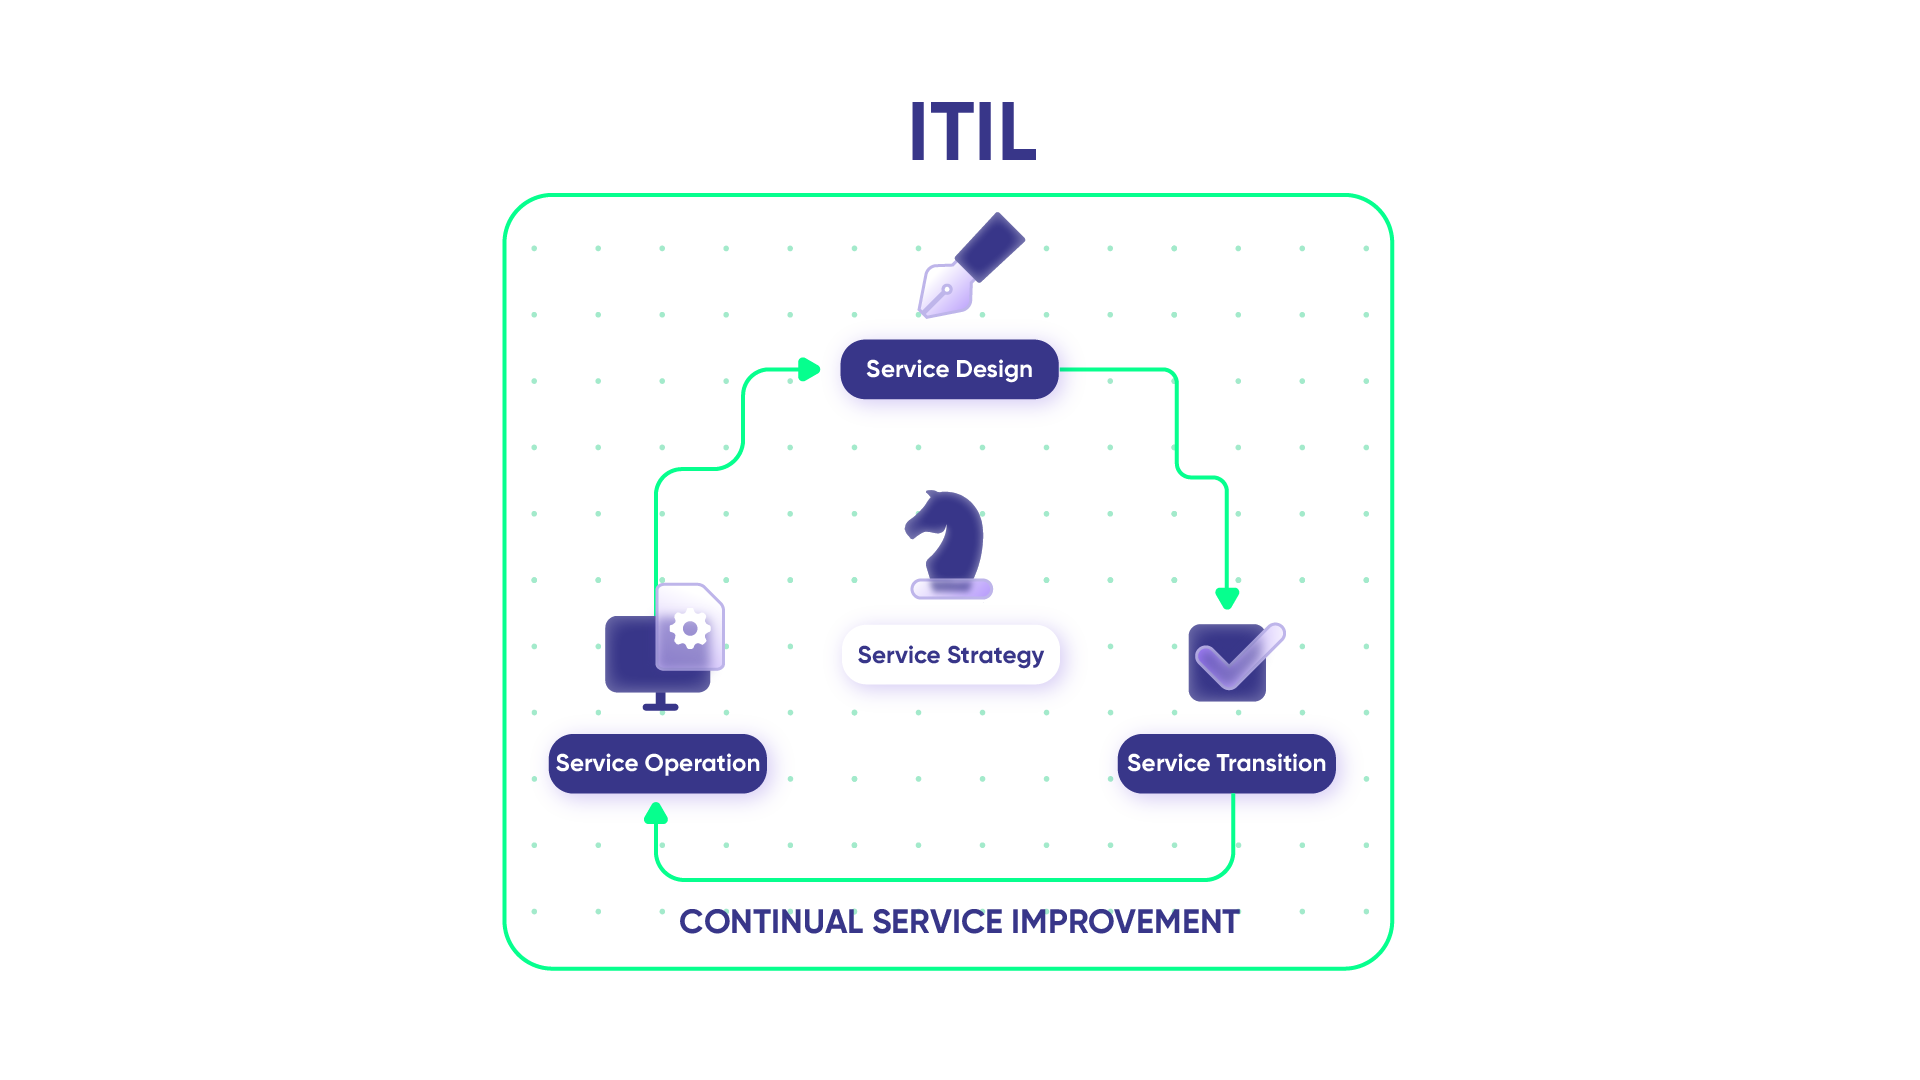
SIAM and ITIL work together to deliver services to an organization’s end users. They diverge in the sense that ITIL provides best practices for service definition activities. In contrast, SIAM assists organizations in sourcing the service from multiple vendor providers.

In summary, ITIL doesn’t “reflect multi-tenant sourcing models nor end-to-end service integration.” The service integrator role that SIAM supplies fills this void.

ITIL v3

For instance, ITIL v3 contains best practices for working with a single supplier. For the services provided, it suggests establishing delivery terms and conditions. Subsequently, you create operational-level agreements with internal business units and underlying contracts with external parties.

However, it says nothing about how you coordinate smartly with multiple suppliers.
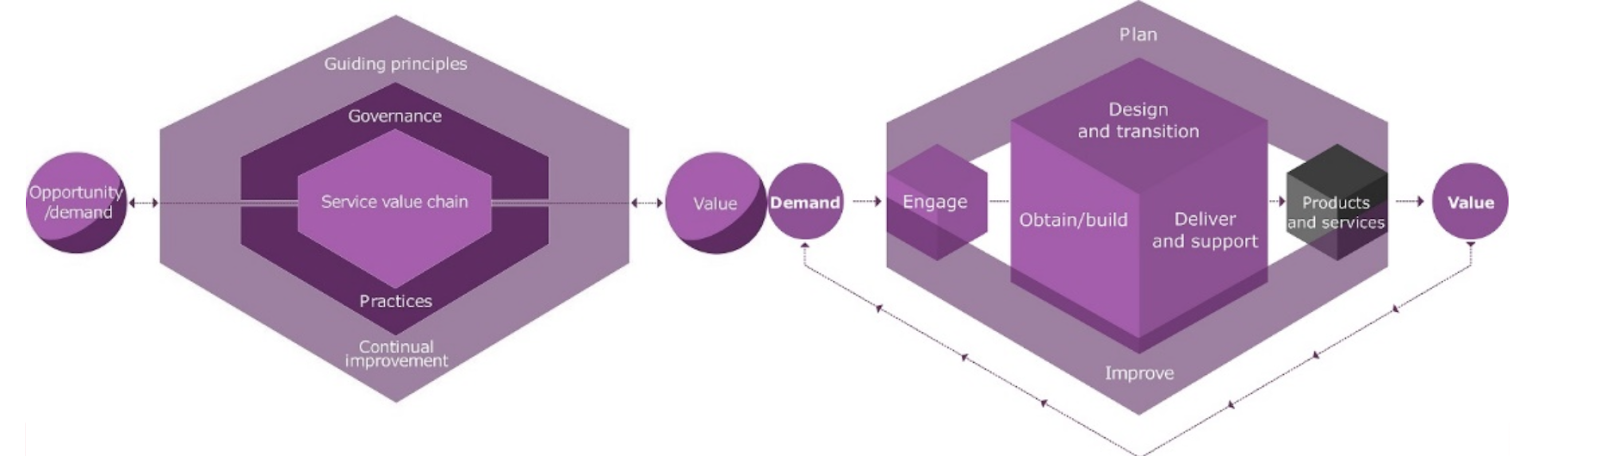
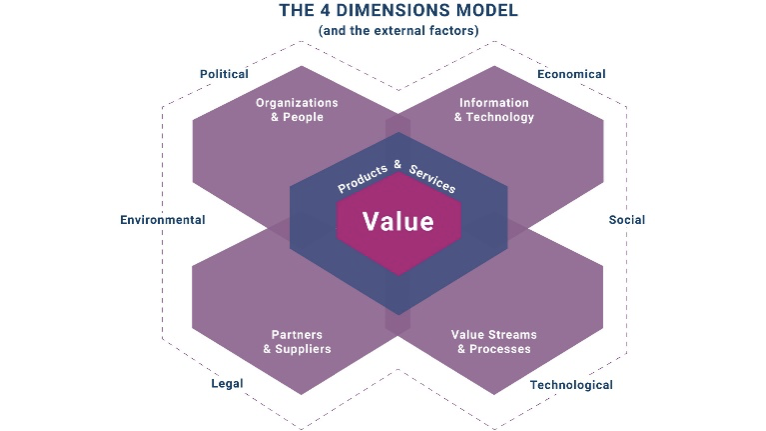
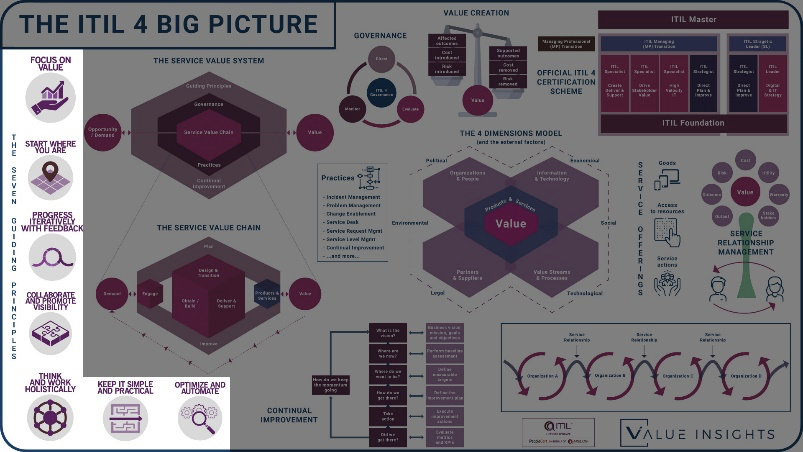
ITIL v4

ITIL v4 emerged in response to newer service management frameworks such as SIAM. It focuses on value creation and philosophies in the domains of service management. Examples such as DevOps, Agile methodologies, and development support processes readily come to mind.

If you’re interested in learning more about ITIL 4 and the right choice for your service management approach, read this guide to ITIL 4 and service management.

Note: You might also be interested in this episode of Integration Talks, a podcast on everything integration, where Clair Agutter provides an overview of SIAM, its deployment, combining it with ITIL 4, and more.

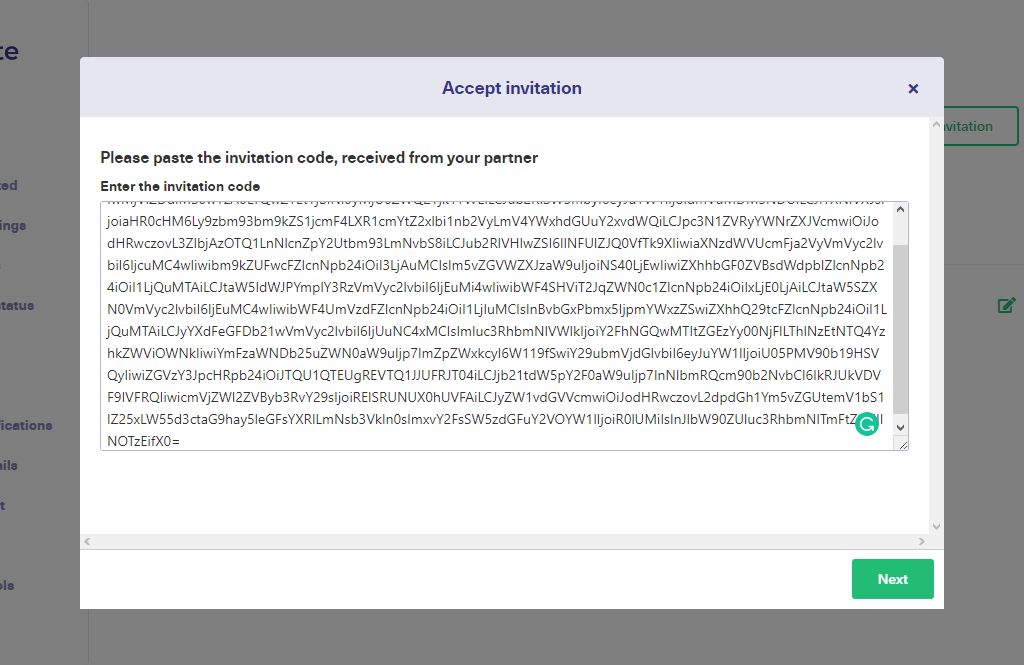
How Exalate Fits into Your SIAM Model

An effective SIAM implementation entails cross-provider, cross-functional, and cross-process integration. 

To reap the benefits of ROV in the SIAM context, it’s important to have a thorough understanding of how suppliers and providers can benefit from a cross-platform integration solution that promotes SIAM best practices. 

However, the story is not limited to solution providers alone, it also involves getting customers on board by educating them on the advantages of choosing the correct service provider. 

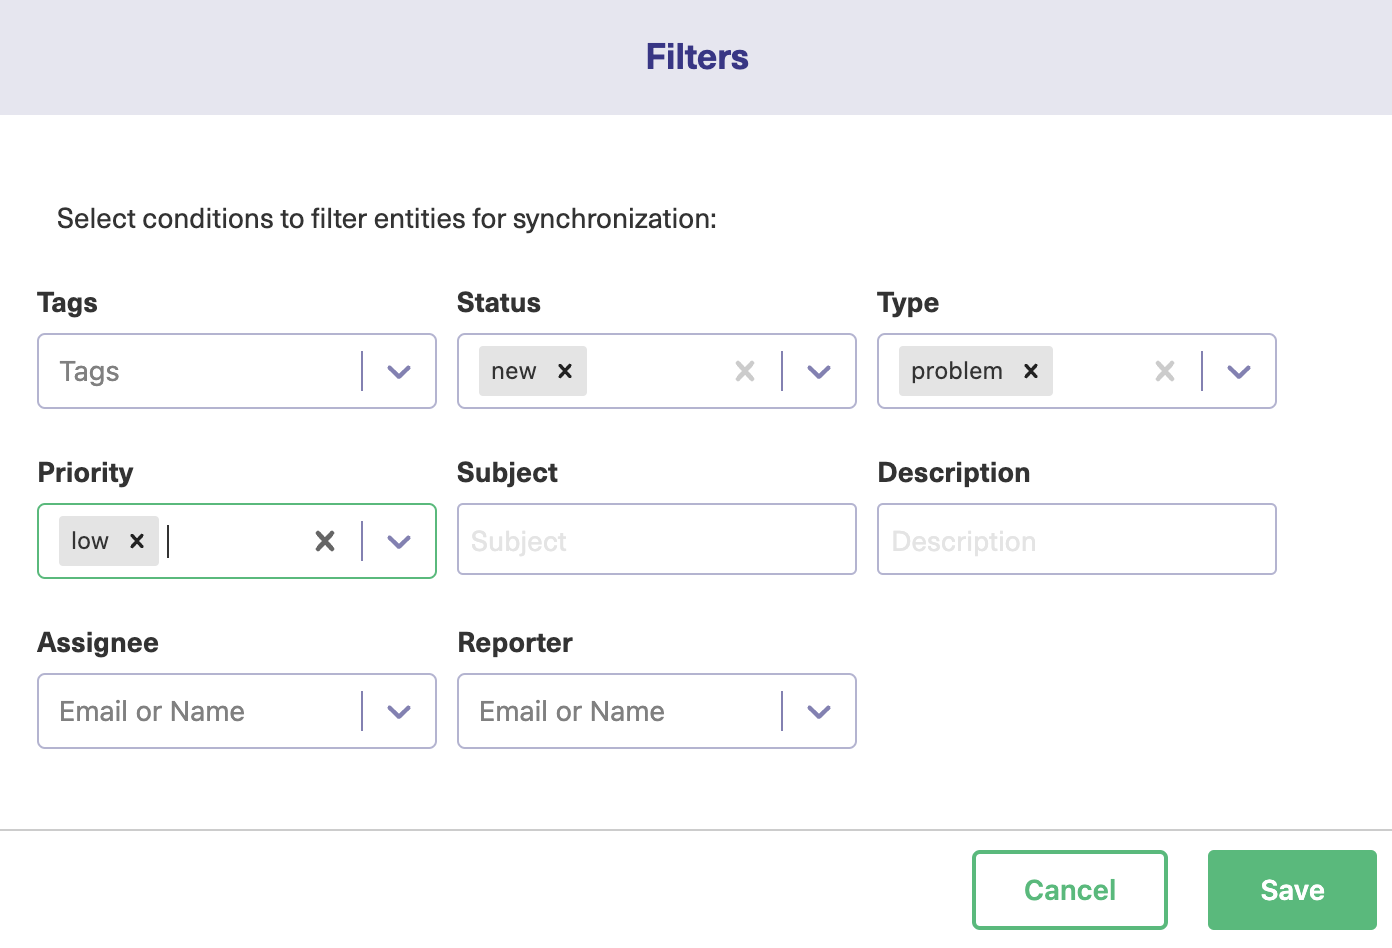
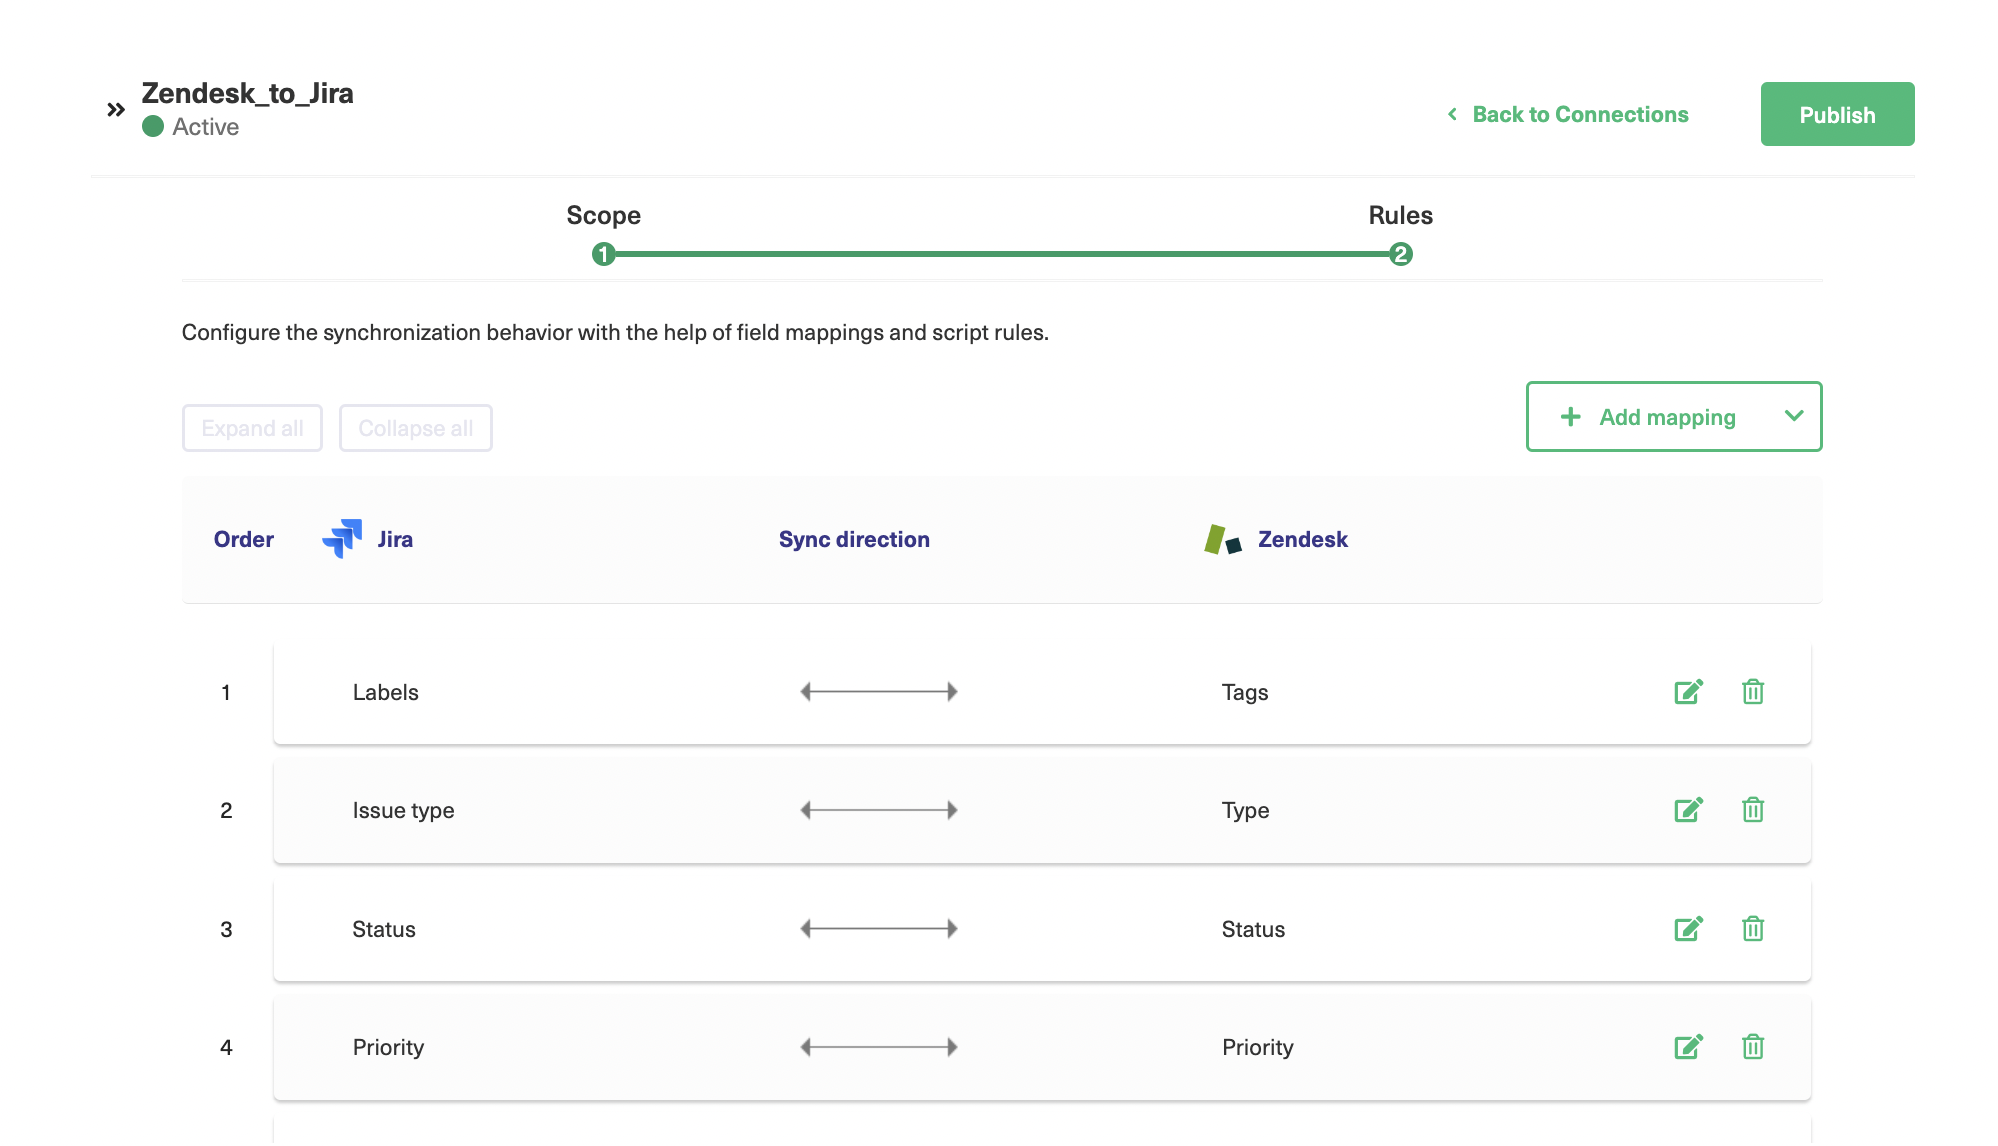
As such, let’s briefly understand how Exalate can be the right fit from both the customer’s and the solution provider’s perspectives. We’ll also highlight this in the context of the problems encountered while implementing SIAM. 

How SIAM Service Providers Can Use Exalate to Gain Competitive Advantage?

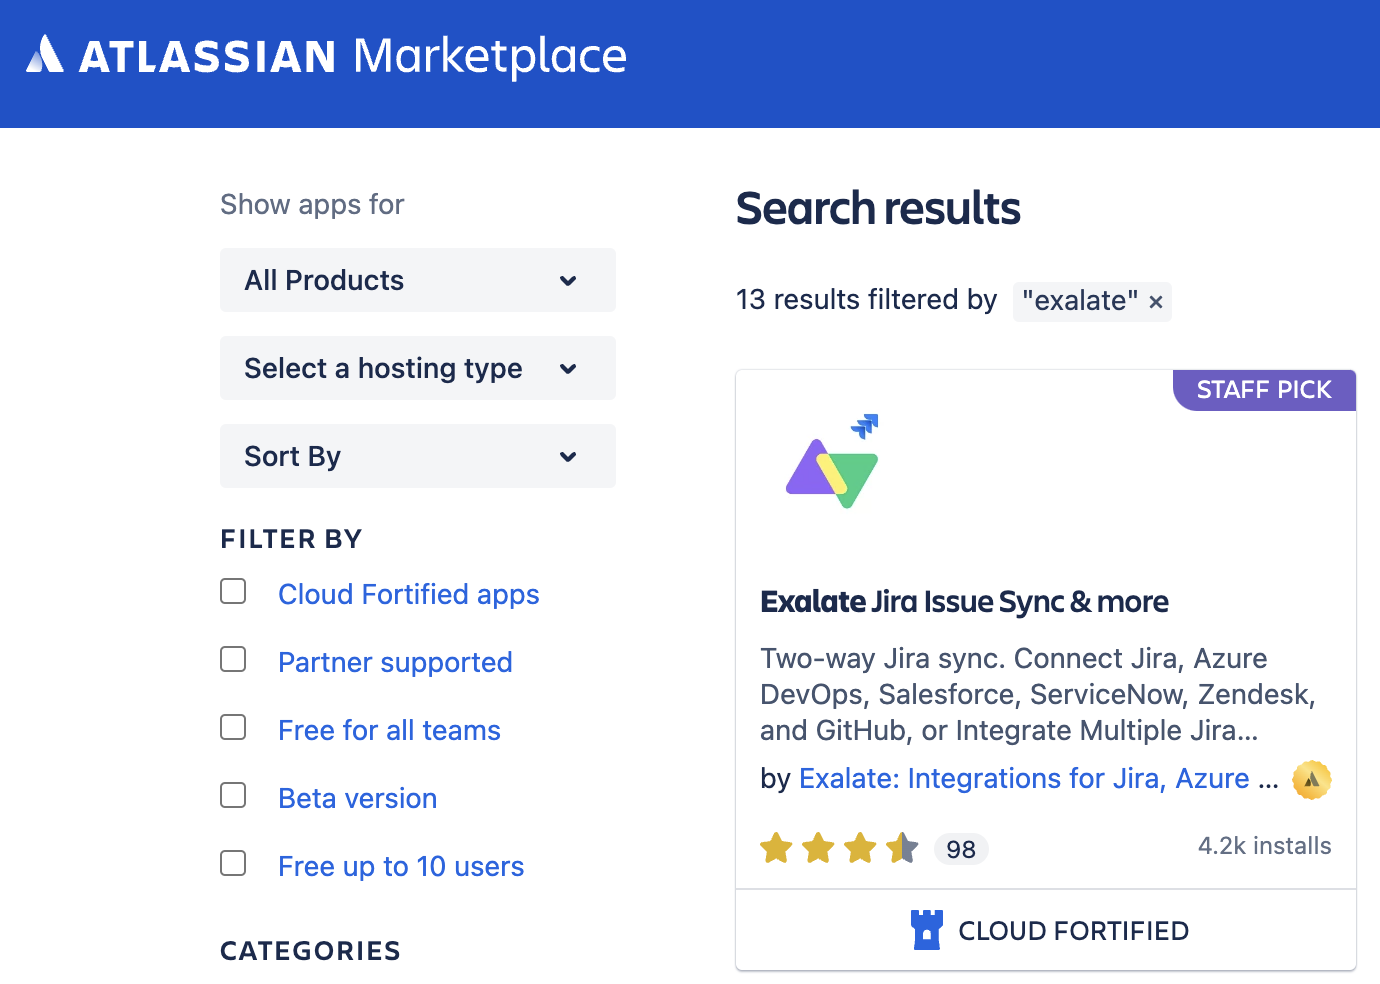
Service providers or Managed Service Providers can offer integrations as a part of their service. Such an effort will aim to solve the major hurdle of outsourced IT services: technology integration. 

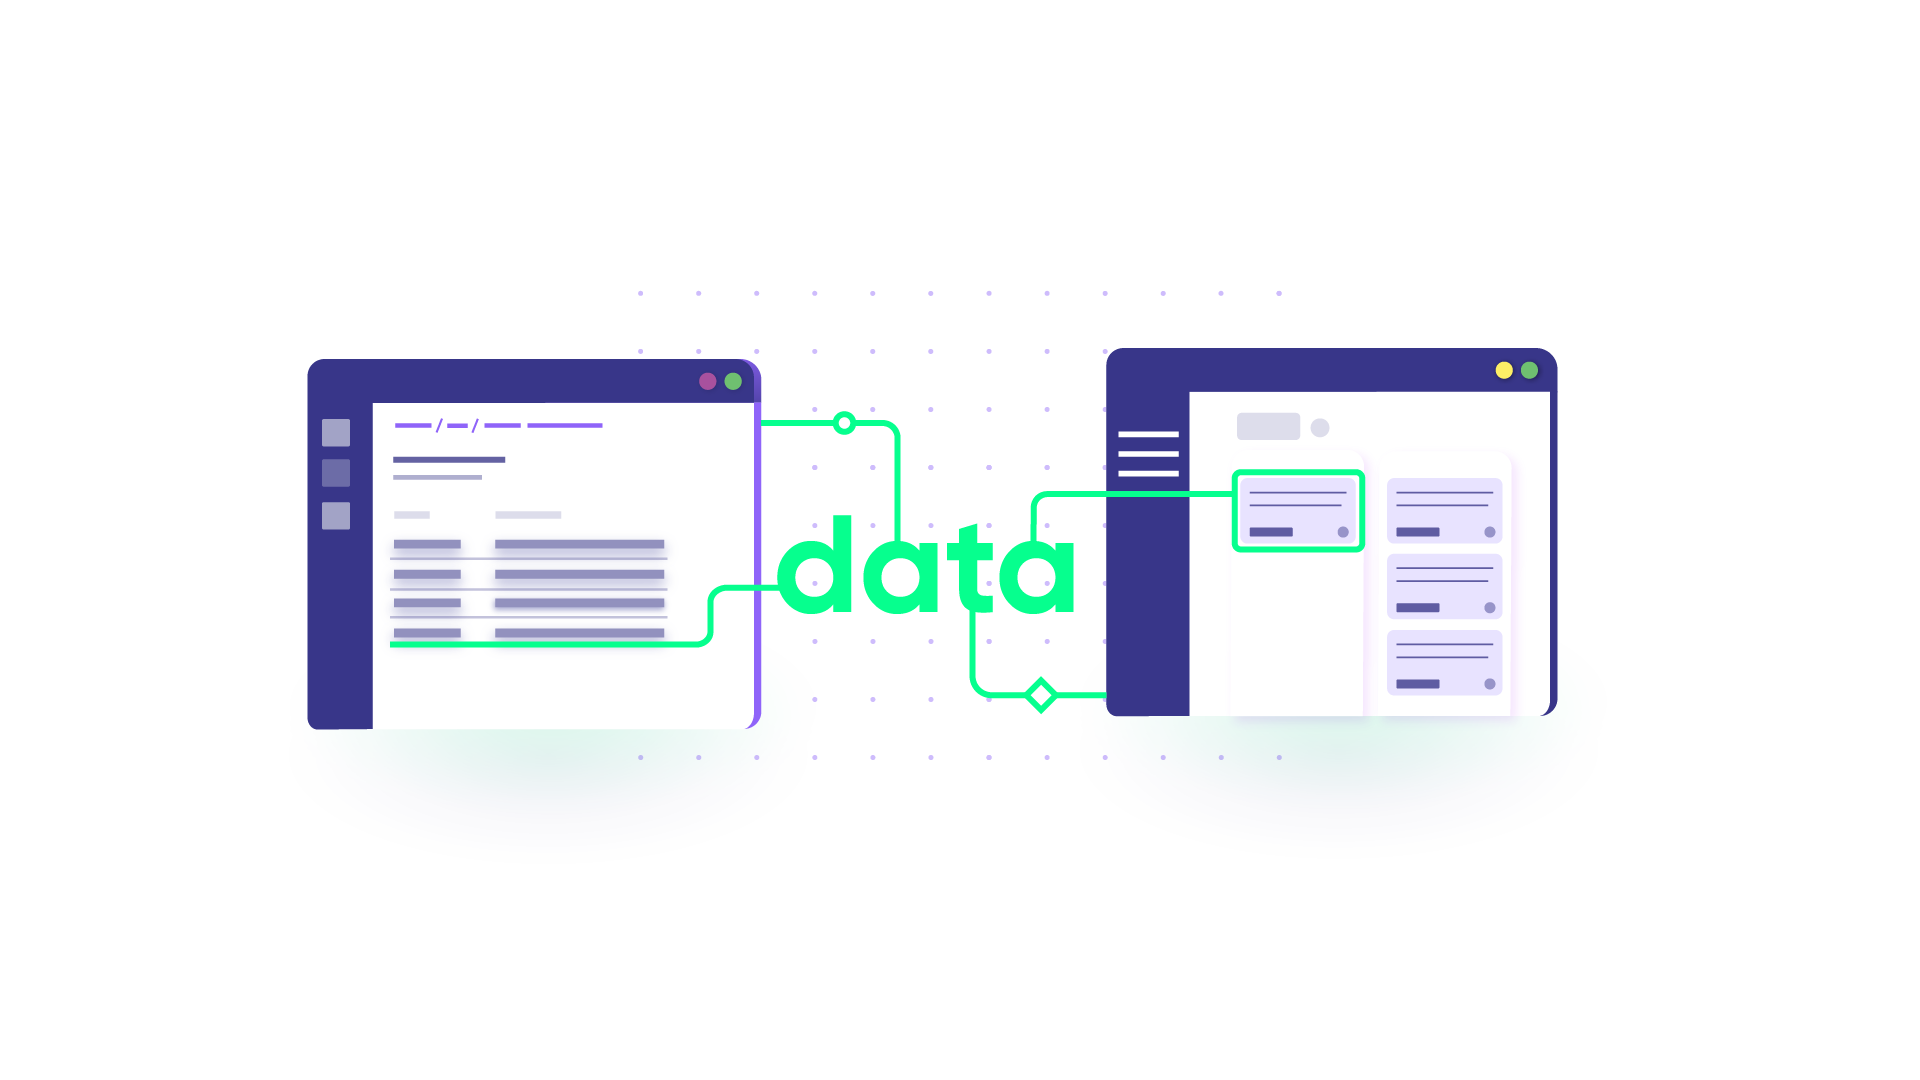
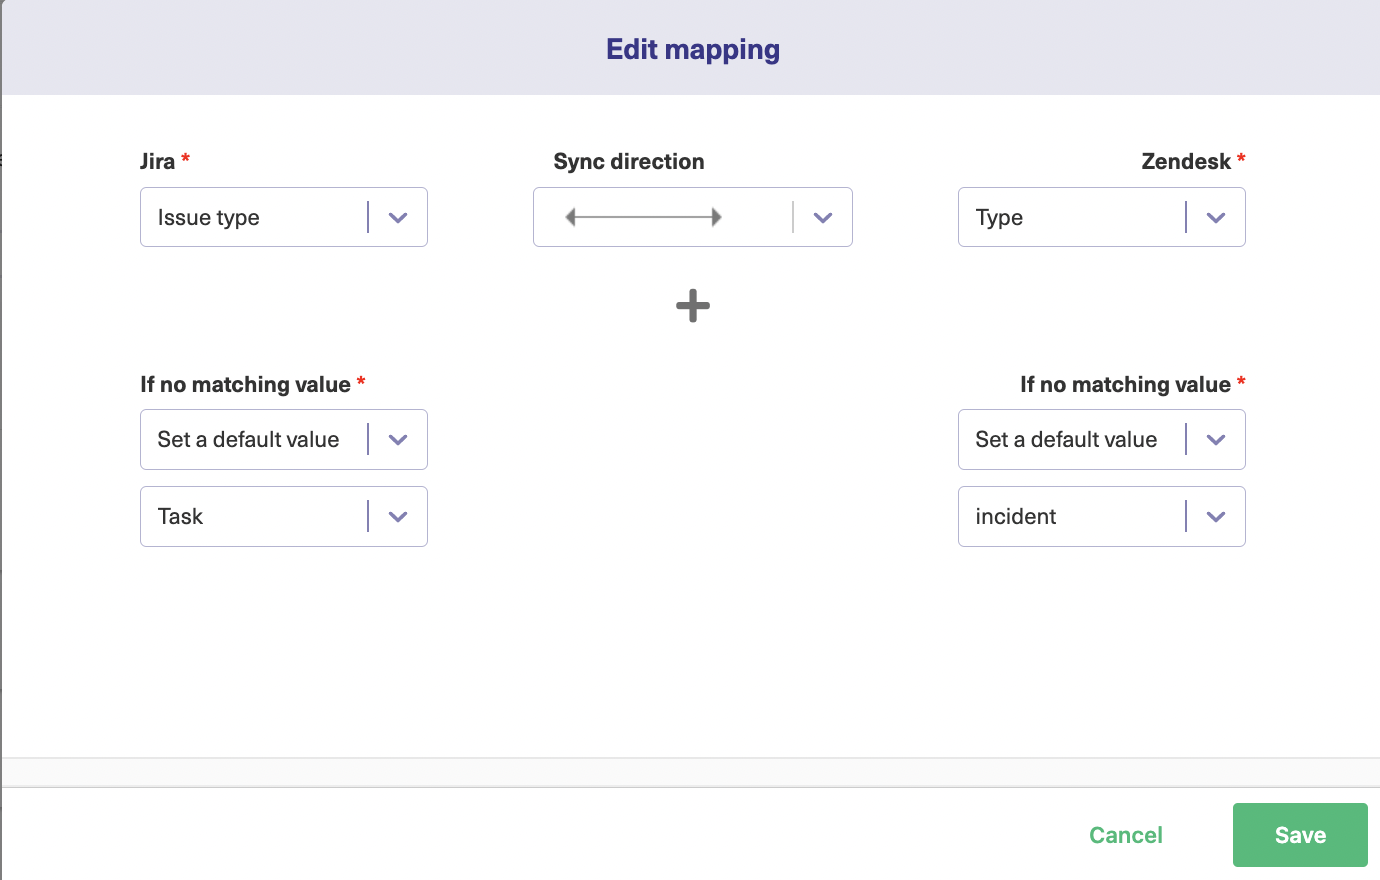
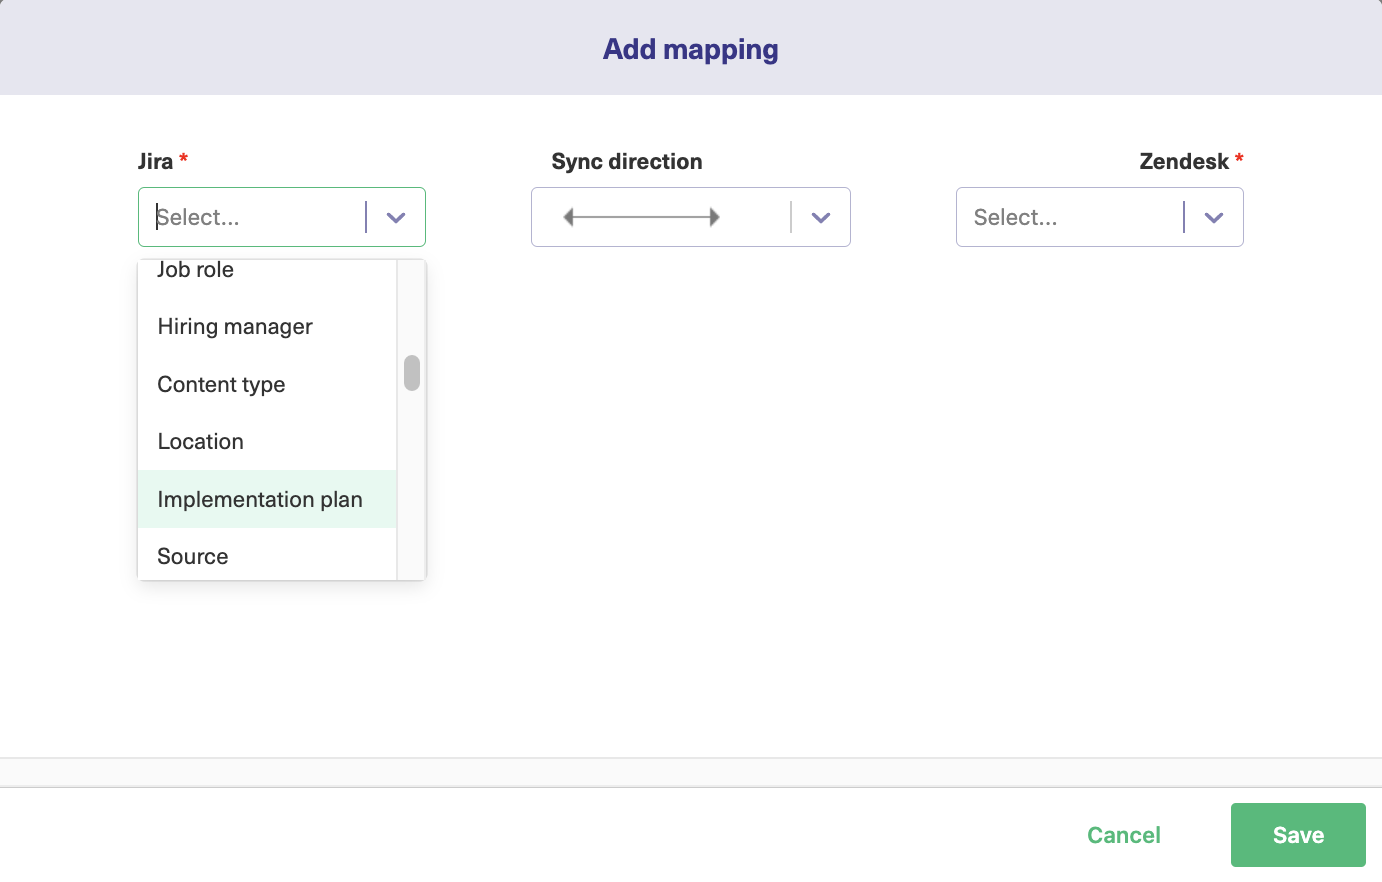
For instance, the ITSM toolsets used across the SIAM ecosystem are bound to be different. Hence, a need for integration service providers like Exalate that allow cross-integration of ticket data and workflows from a single source of truth to multiple providers. 

If integration is offered as a part of the service package, it’ll insulate providers from the IT service chaos that occurs due to tool differences. With the proper solution, the KPIs, SLAs, risks, security, and other integration considerations will all be handled through service contracts, setting the base for SIAM. 

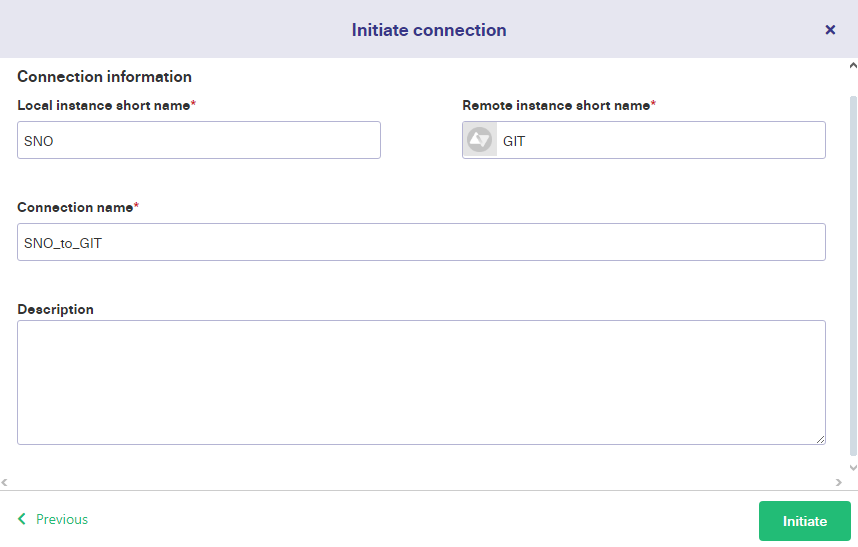
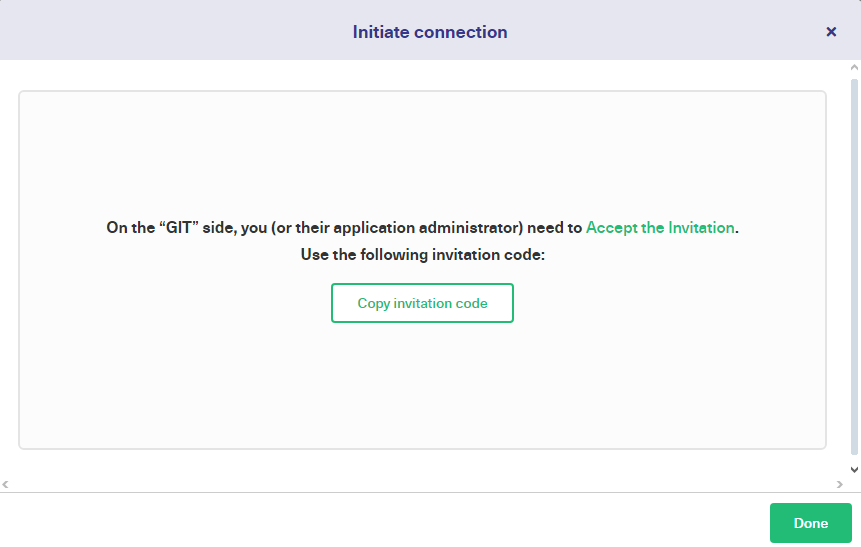
Exalate can also solve the inherent problem of centralization in SIAM by nipping it from the bud. A fully managed decentralized integration service ensures that each service provider has full and independent control over information passing between systems. This distributed architecture will overcome the resistance and reluctance service providers face while adopting SIAM. They control only their side of integration without having to worry about how other providers will affect them. 

And just like that, with the right integration in place, service providers can actually turn it into their competitive advantage to win customers. 

Integration for Service Providers

Effective ROV for the SIAM Customer

As a natural outcome of dealing with integrated service providers, customers no longer have to worry about how their technology stack will function with the outsourced service providers’ stack. 

They can expect enhanced service delivery with integrated processes and systems connected with their insourced or outsourced service providers. 

Using SIAM’s best practices, the TCC for SIAM customers will co-create value through collaborative service delivery.

Exalate: Your SIAM Sidekick

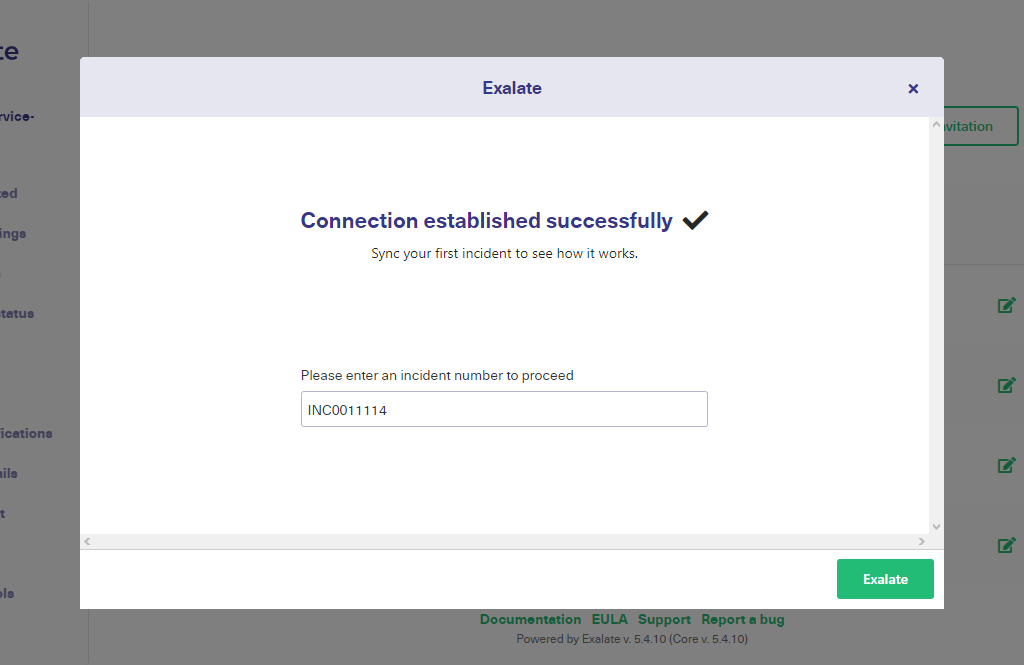
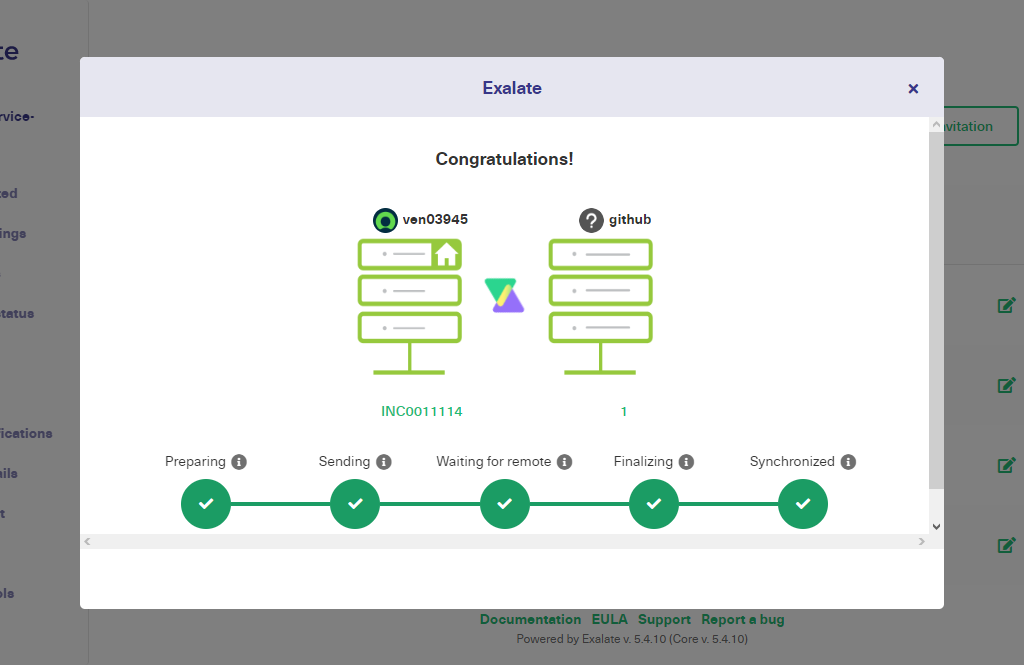
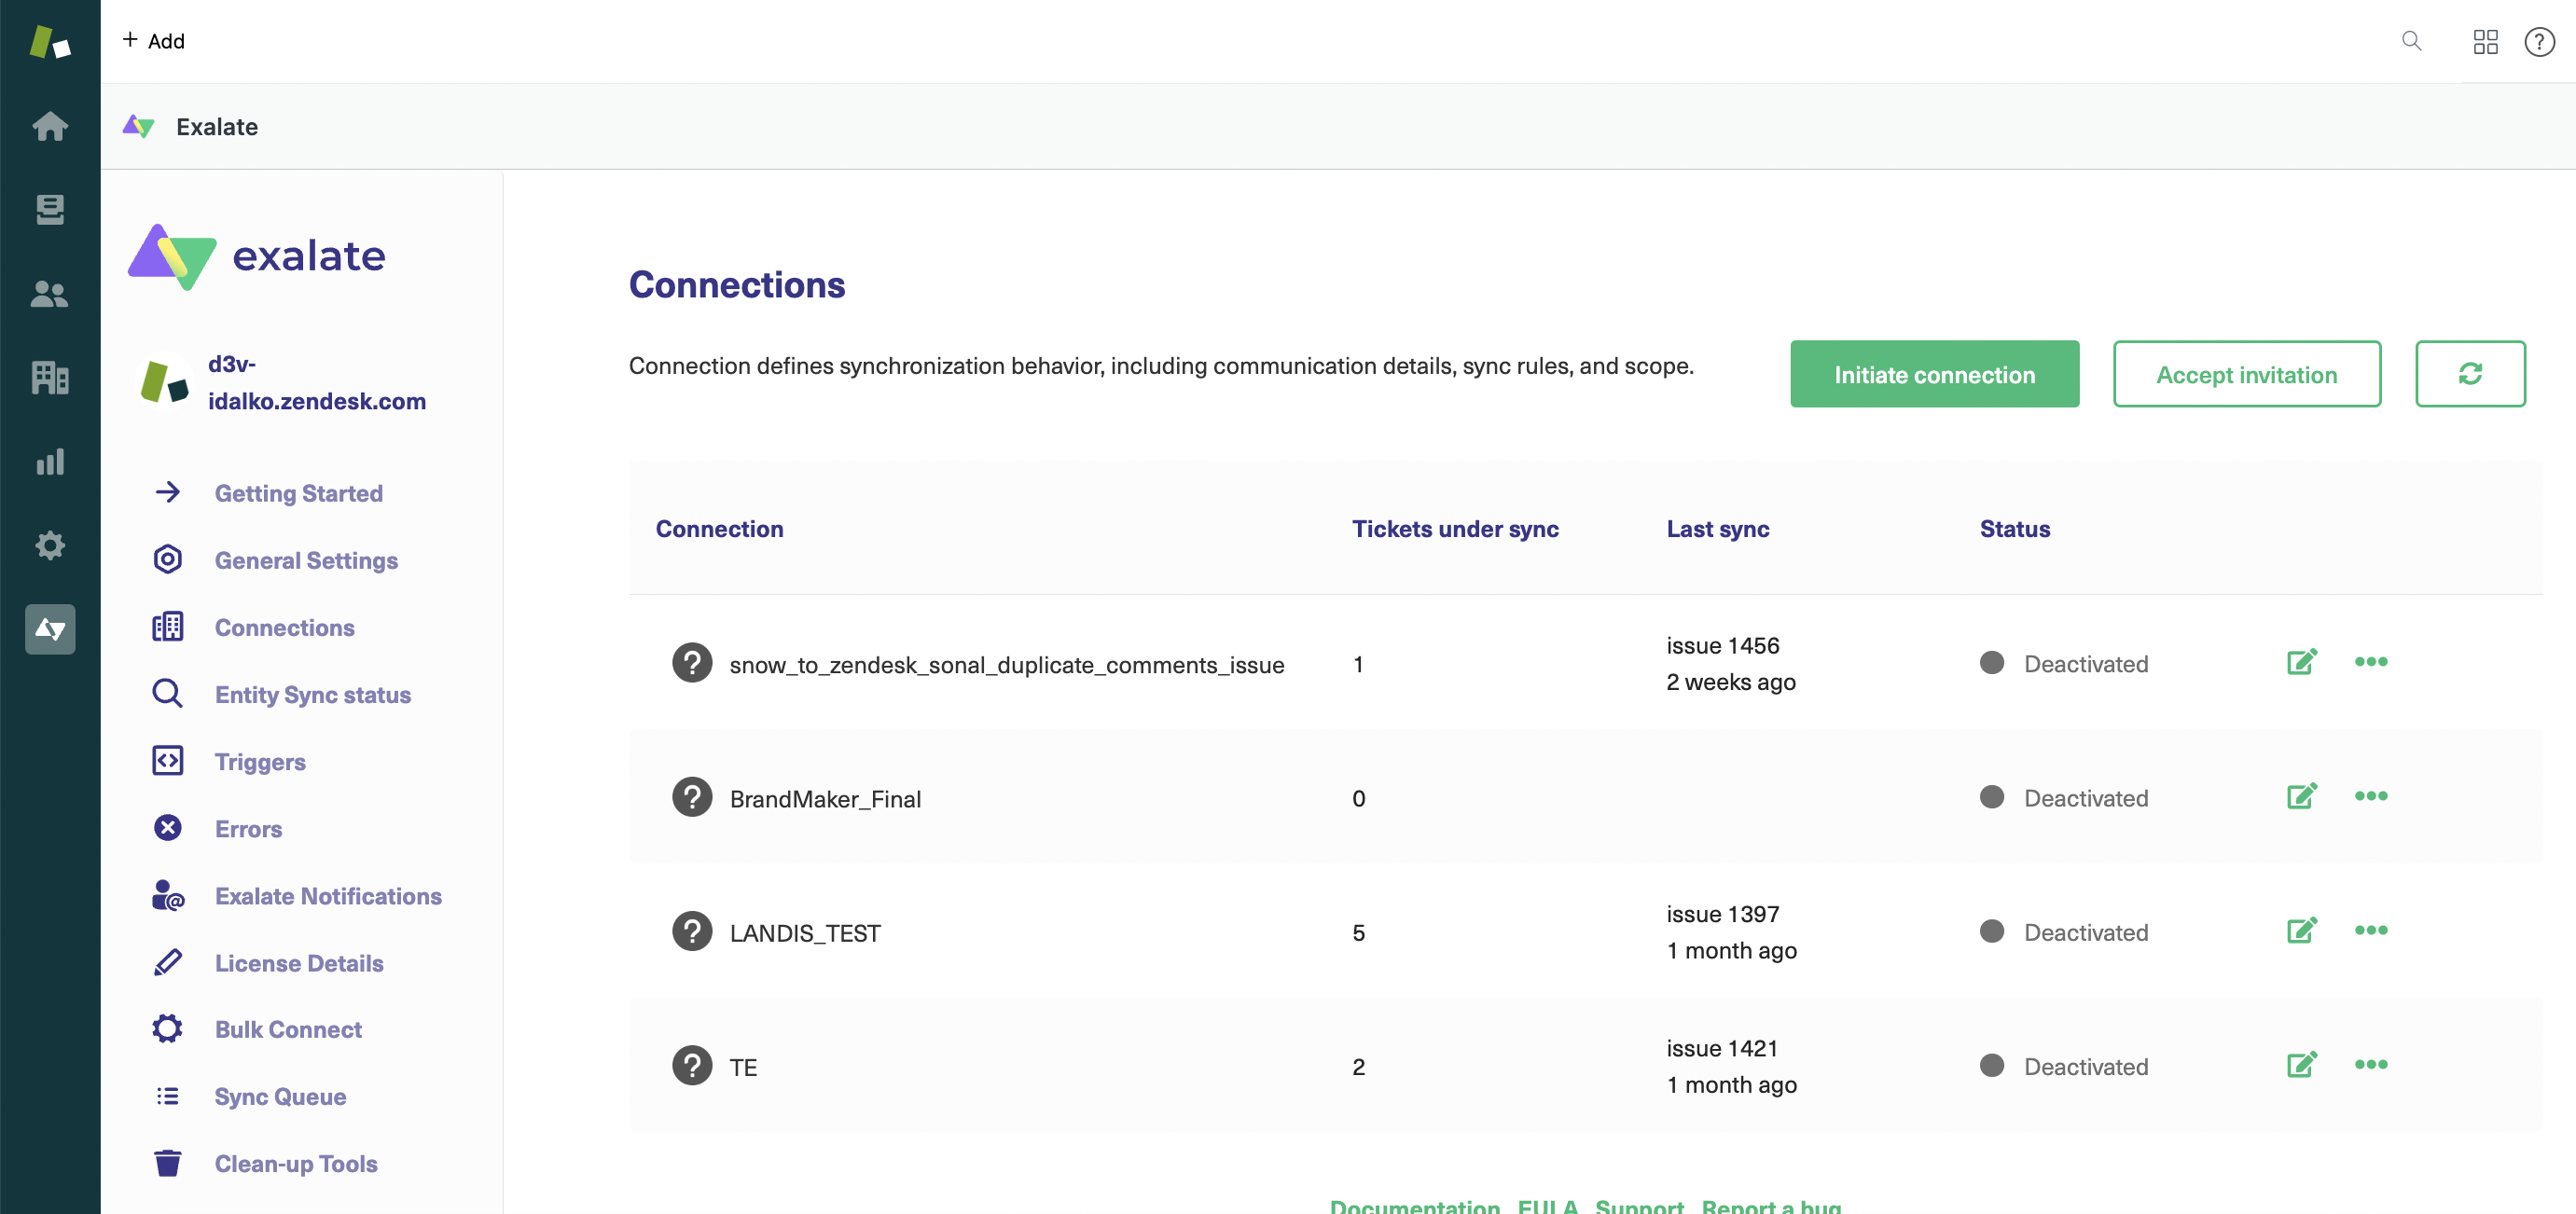
While SIAM keeps buzzing in the background and works on streamlining processes between service providers and customers, Exalate works tirelessly to ensure all the integration hassle is offloaded. 

With integrated technologies, people, and processes, collaborations can happen in an automated and effective manner, turning SIAM into a reality.

You can even take it up a notch

Recommended Reads:

Introduction to ServiceNow IntegrationHub

Integration Talks Podcast

This is another episode of Integration Talks, a podcast where we discuss everything software integration with thought leaders and experts across industries.

In this episode, Francis Martens hosts Chuck Tomasi to discuss ServiceNow IntgerationHub. Chuck is a senior developer advocate at ServiceNow and also an author, IT professional, podcast host, and in his free time, a martial artist!

About this episode: 

  • The roadmap around integrations
  • What is IntegrationHub? And how is it positioned? 
  • The level of experience a ServiceNow admin should have to build integrations 
  • and more

Not a fan of watching videos? Then listen to this episode on:

Episode Transcript

Francis Martens: Hey Chuck! Welcome to our podcast! I’m really delighted to have you on the meeting. So first of all Chuck, can you tell me a bit about yourself.

Chuck Tomasi: Well thank you very much for having me today, it’s a pleasure to be here and I’m always excited to talk about ServiceNow. So a little bit about myself. I’ll try to keep this short you know because old men have a lot of experience and I’m a podcaster and I like to talk, so I’ll do my best to respect the listeners’ time. I am a husband, a father, an IT professional, a content creator, I’ll explain that in a second, and a martial artist.

So I live in Phoenix, Arizona in the United States, I am currently a senior developer advocate at ServiceNow which means, ties back to that content creator part, I create videos and blog articles and write books and webinars, host events and I’m a community leader.

All of this is developer-facing for our developer audience whether they’re customers or partners or independent contractors, what have you, I am focused on the bridge between our ServiceNow developers and our internal product management team. So I take the information from them put it into content and represent it externally and also listen to our external voice of the customers and relay that back to our product managers.

Francis: Yeah sorry to interrupt here, but when you say ServiceNow developer, are these ServiceNow employees or are these like people who are using ServiceNow?

Chuck: These are yeah, these are the customers and partners that are using ServiceNow to configure, customize, build, extend, anything they’re doing on the platform is as simple as moving from fields around or going into some deep scripting and integrations that’s where I play. One final note, I’ve been a podcaster for more than 16 years and also the co-author of podcasting for dummies. A little bit of achievement.

Francis: I’ve seen that book, I really need to listen to it. So I’m looking forward to it. Maybe I can probably I will be able to learn quite a bit of it. Yeah so how long have you been a podcaster?

Chuck: 16 years, I started in late 2004 with a podcast that was then split into two different shows because there was significantly different content on that one show, and one of them is still running today. So I’m a very long, continuous podcaster.

Currently, I do three shows. One is called “podcasting for dummies” the companion podcast which is an audio test to our book. The other is called “Technorama” that’s the one that’s been running since early 2005. And the third is called “the topic is track” which is pretty self-titled you know it’s about Star Trek.

I do one for work for ServiceNow developers called “Breakpoint” so if you’re a ServiceNow developer and you’re interested in that, you can find that at bit.ly/sn/break/point.

I should have the little desk bell there when yeah in a URL or website you have to go ding! We’ll make sure that these links are being advertised but together with the podcast itself.

Francis: Yeah, all right… so being a developer advocate, how big is that audience? How many developers are you talking to?

Chuck: Oh, I just had the number the other day I don’t recall what it was. I know that as far as the ServiceNow community goes, we’ve got about 275 000 members in there. The developer community, I wish I… it’s less than that and I’m trying to remember what the number was. I believe it’s north of 100 000. Current active people in their developer instances on the developer program is in the 50 – 60 000 range, don’t quote me on that, I should know those numbers better than I do at this point. I apologize but it’s a significant audience.

Francis: Yeah, and it’s also a tremendous community if you look at all the reactions you can see on the community site, you ask a question and within a couple of minutes, you get a couple of answers which is very dynamic!

Chuck: Yeah, as somebody who’s been involved with that community, in fact, my community, my online community, involvement goes back into the 80s with electronic bulletin boards over the old dial-up stuff, you know, curated one of those.

With 40 years of experience, 30 plus years whatever it is, this is a wonderful wonderful community. Everybody is so helpful uh the ServiceNow community over at community.servicenow, there now I’ve got my bell!

And of course, the developer-specific community at developer.servicenow.com and we’ve got Slack channels and blogs and newsletters, it really is a wonderful community. We’re starting to see a lot of people branch out and start their own brand with their own blogs and their own video channels and that’s just magnificent because it’s one thing when you know someone inside ServiceNow shouts from the rooftops hey this is a wonderful feature and here’s how

Listen to this episode on:

Project Management Best Practices for Aligning Disparate Teams

Disparate teams

This article was written by Rachel Weaver, a Content Marketing Manager at monday.com

Bicoastal. Cross department. Multilingual. Stress-inducing for both project managers and employees alike, these words actually fall under a term you might not be familiar with disparate teams. 

The continued transition from in-office to remote or hybrid work models has called employees to become more flexible and creative than ever, turning to platforms and new methodologies to smooth the process.

Challenges of Working in Disparate Teams 

Disparate is just another way to say different, dispersed, or distinct. In the working world, this can present in different ways, whether it’s remote or virtual teams, teams located in different regions and time zones, or even cross-functional teams within the same location. 

It’s easy to imagine the complexities a project manager can face in working with teams like these. In addition to their core management functions, challenges such as different currencies, cultural sensitivities, languages, and suchlike make it even more difficult to develop an aligned team.

Why Align Disparate Teams?

According to a study conducted by the Harvard Business Review, 95 percent of employees, on average, are unaware of or do not understand their company’s strategy. Case in point, if marketing’s goal is to run campaigns, sales wants to rake in leads, and the product is building a new feature, it can be easy for these teams to not be tuned into the north-star goal (or goals) of the company. 

Aligning disparate teams prevents a disconnect between teams and company priorities. The effects of disconnected teams can reach far, whether it’s a company’s use of time and resources or even the company’s culture.

puzzle pieces of disparate teams

If these teams drift, subcultures could develop that affect judgment in what priorities are deemed important. For example, the finance team could fail to see the need for a social impact program budget, if they are only focused on the conversions from digital marketing efforts in a particular project.

Enter the project manager, who can provide a broader context to unify teams while ensuring consistency across each and every objective and plan. 

To learn more about aligning teams, you can have a look at this blueprint for agile collaboration between teams.

How to Align Disparate Teams Using Project Management Tools

Let’s start with the basics. In a nutshell, project management is one of the most important functions in business, as it aims to shape the trajectory of an organization, whether it’s reducing expenses, maximizing efficiency, or increasing revenue. 

The Project Management Institute (PMI) is a well-respected authority in project management best practices and certification. They generally see project management as five steps. Here’s a high-level overview.

pre image for five steps to good project management
  1. Initiating: as with any good project, preparation is a must. This phase is all about determining the project scope and creating a foundation. Scope describes the specific limits and boundaries for a project, that is what will get accomplished as a part of the project vs. what will not
  2. Planning: details, please! While they may change, it is crucial to set intentional and clear milestone dates and a final project completion date. It sets the team up for success, as they are all reaching for the same goal. It’s also the time for a project manager to choose team members, outline deliverables, and estimate resources. 
  3. Execution: you guessed it, this phase is all about getting stuff done. The team’s job here is to make sure the deliverables are realized.
  4. Monitoring/Controlling: project managers keep an eye on progress and task completion so they can quickly identify when a project has derailed and get it back on track. Accurate tracking and consistent check-ins are crucial here, highlighting the real need for project management tools
  5. Closing: this is the end of a given project, in which all activities are wrapped up and the final product is delivered, either internally or externally! It is also a best practice to do an audit or review of what went well, what didn’t, and future improvements.

The Importance of Project Management Tools

Maybe you’re a seasoned project manager, or maybe your responsibilities are quickly expanding with a growing company. Whatever the case, there is no question that any project manager seeking to realign dispersed teams needs to combine exceptional soft skills and trusted tools in their practice.

As a quick refresh, project managers, or PMs, are the champions who plan, organize, and direct the completion of specific projects for an organization. They ensure these projects are on time, on budget, and within scope. 

PMs must be flexible, able to include many different details at once (budgets, deadlines, points where teams are getting stuck, etc.), and know how to work with the people needed (team structure, personalities, schedules, and more). 

Naturally, it can be difficult to choose how many tools are needed, and what works best for the PM, and their diverse teams (can one workflow tool really work for an R&D team and a creative writing team?!). 

two work management systems linked by data

Project management tools are an essential part of any organized and efficient PM’s arsenal: they give leaders quick visibility into everyday work and ensure alignment with standard procedures.

Tips from PMs for Managing Disparate Teams

1. Know your team members’ strengths and use them

Leadership is a fundamental part of being a PM. Effective project management also comes from bringing out the best performance from all project team members, depending on their skills. 

By getting to know your team beyond their official job titles, you can tap into their strengths and weaknesses to ensure better time management, project completion, and general team harmony. 

2. Pick the perfect project management tool

Every project manager has a unique flavor that they bring to their teams. In order to create or maintain this superpower, it is important to take advantage of the right tools to serve as a store-house for all critical project information. 

linking all your favorite tools with Exalate

Having an online and centralized place for your own work, communicating and collaborating with colleagues bridges many gaps that stifle productivity.

There are many project management tools out there that specialize in one specific aspect of project management, like Gantt charts, budgets, or file sharing. Take into consideration what the needs of the project are if it’s something rather simple like one team’s ticket management or something that needs more expansion, like a product feature release that spans different teams.

Note: Learn about TeamWave, a project management software for small businesses

3. Meet your new best friend: the Work OS

As the number of disparate teams is on the rise, project management requires the flexibility and expanded capabilities of a Work OS. 

A Work OS is an open platform that allows anyone to create the tools they need to run every aspect of their work. By combining building blocks, like Apps and integrations, teams can build or customize the solutions of their dreams.

Because a Work OS brings all workflows in one place, teams can communicate in real-time about projects within the context of the work, reducing the need for disruptive meetings or long email threads. 

As an added bonus, the Work OS framework supports a strong culture of transparency and ownership, because it empowers every team member to manage their part in the process.

Best Practices for Members of Disparate Teams

Is anybody out there…out there…out there? Being a member of a disparate team member doesn’t have to be a sentence for isolation and siloed work. Everyone has a hand in fostering a connected and efficient team. Here are a few best practices to help create an engaged and connected team.

  1. Schedule check-ins with your manager

Short, routine check-ins with your manager can help you stay in the loop, and create a space to communicate openly and directly. Don’t forget the importance of timely performance reviews as well!

visualization of a working team
  1. Choose the right communication channel

Remember that there is a time and place for everything, including your virtual communication tools. Ask yourself what the most appropriate tools are for what you need- do you need a phone call or video meeting, or can you post it in your shared channel?

  1. Commit to team systems

If you don’t have the option for chatting across cubicles or a lot of face-to-face time with your team, it’s paramount to stay aligned with your disparate teams’ process for submitting, updating, and providing feedback on tasks and deliverables! Keeping everything organized and consistent will reduce headaches- absolutely priceless in the age of excessive screen time- and keep the ball rolling. 

Conclusion 

Disparate teams on the surface appear to face more challenges than traditional, onsite teams. While their unique challenges should be acknowledged, the enduring truth is that there are several ways for team leaders and members to succeed through considerate project management, the use of flexible tools, and a commitment to culture. 

As we covered in this blog post, project managers have a special part to play in aligning or maintaining the alignment of disparate teams, but they are also only as successful as the team members who follow through with best work practices. Paired with a Work OS or the right project management platforms, PMs and team members can maintain alignment and get the best results for their disparate teams. 

Software Vendor Integration: Trends, Integration Standards, and Managing APIs

Integration Talks Podcast

This is the very first episode of Integration Talks, a podcast where we discuss everything software integration with thought leaders and experts across industries.

In this episode, Ryan Lunka, the co-founder and CEO at Blended Edge, a company with the goal of helping software teams deliver integrations faster, easier, and more cost-effectively. He’s a former head of product and COO of an integration software vendor that served digital commerce and retail merchants. He’s an expert on integration, CX technology, Martech, and digital commerce. He is also the author of Adobe Experience Manager: Classroom in a Book, published in 2013, by Adobe Press.

About this episode:

  • Integration trends
  • How to deal with an integration market that changes all the time
  • Security Management in building integrations
  • What is “DE – Developer Experience”?
  • and more

Not a fan of watching videos? Then listen to this episode on:

Episode Transcript

Francis Martens: Hey Ryan! Thank you for joining out podcast! Today

Ryan Lunka: Happy to be here.

Francis: Before we get into today’s topics, what’s Blended Edge about? What are you guys doing?

Ryan: We help software companies build, primarily, product integrations, and do it faster, easier, and more cost-effectively. We recognize that there’s a little bit of a decentralization happening in the integration space where a lot of software vendors don’t necessarily want to send their customers off to a partner integrator to do all the integration work for them. Primarily talking about B2B software companies usually SaaS, too.

They want to have the integrations offered as part of their product and uh software vendors are having a hard time with that it’s a difficult task to take on it’s expensive and it takes a long time and there’s you know some software coming out that helps with that, but there’s a long way to go. So we are setting out to help solve that problem and help software vendors just be a lot more effective with building out product integrations.

Francis: I was wondering the logo of Blended Edge is a kind of special logo. You should have a look but what does it represent?

Ryan: It doesn’t really represent much other than I used a pretty low-priced logo generator tool and I liked it and it seemed kind of relevant to what we’re doing! When we named the business, to be honest, we started with what sounds reasonably aligned with integration and the things that we’re doing and I can get a .com with one or two simple English words, you know, we’ll see if that name persists over the long term but it’s what we needed to get started and that’s where we went.

Francis: All right, and so your main market is the software vendors who want to integrate with other tools?

Ryan: Yeah, we’re usually looking for a SaaS vendor because most software companies are SaaS, not that there’s necessarily a restriction that we couldn’t work with somebody who’s not a SaaS company, typically series A or later. But in the growth stage, because that’s when this problem becomes most acute for the software company, they tend to have really high growth expectations especially if they’ve taken venture capital.

And generally, they have some amount, sometimes a significant amount of potential customer demand kind of pent up behind availability of certain integrations. So yeah got a bunch of customers that say, I love your product I want to sign up but I can’t do it until you integrate to insert here. And the faster that the company is able to say hey we have that now, the faster they’re able to unlock that revenue potential, and that pattern you know is pretty consistent.

So that’s usually the focus but there’s also you know there’s a world where more mature companies who have built out a huge product integration program

Listen to this episode on:

ITIL 4 and Service Management: The Right Choice for your Service Management Approach

ITIL4 and Service Management

This article was written by Alexander Schmidt, Co-Founder and ITIL 4 Trainer at Value Insights

Have you been wondering about methodologies and frameworks on the market that aim to govern the processes and policies of organizations and how we work? Confused by all the buzzwords like Lean, Agile, Scrum, or Scaling Agile?

Well, you have come to the right place.

In this article, we aim to give you a solid overview of ITIL 4 and why it is the best choice for any Service Management organization.

What is ITIL 4?

Let’s start with the basics. ITIL stands for IT Infrastructure Library and is a collection of best practices in the area of IT Service Management, which has been around since the 1980s. Since then, it has gone through multiple minor and major updates, leading to the current iteration of it, ITIL 4.

This one is actually a huge step forward, as it allows us to adapt our Service Management approach to the high-paced and ever-changing requirements of the IT world, but more about that later.

Main Differences to ITIL v3

For now, we will quickly have a look at the major changes compared to the previous version, ITIL v3 Syllabus 2011, which has been around (you guessed it right) since 2011.

ITIL 4 service management value system and value change
  • The 4 Ps (People, Processes, Products, and Partners) are now called “The Four Dimensions of Service Management”
itil 4 Dimensions of Service Management
  • The Seven Guiding Principles have been included (which is one of the coolest things), introducing a refreshing Lean-Agile mindset into Service Management.
  • Processes are now called “Practices” to accommodate the notion that we need to look at them in a more holistic manner, not only as a list of steps that convert input into output.
  • And, last but not least, the concept of value co-creation with our customers and stakeholders, instead of the “Customer pays and IT delivers” mindset.

Here’s an article on the latest ITIL 4 changes. And read all about a complete overview of all the IITL 4 elements.

Why is ITIL 4 the best choice in the field of Service Management (Benefits & Advantages)

So why ITIL and not another Service Management framework or methodology?

The answer to that is quite simple. 40 years of experience in all industries around the globe.

As stated before, ITIL has been around since the 1980s. It originates in the UK but has quickly gained a lot of traction in different industries and countries. Over the years, the accumulated knowledge, the changing requirements of the market, and the evolving technology have led to several versions of the framework. All are better and more advanced than the previous one but still include the current best practices and things that have proven to work.

The latest version, ITIL 4, continues this evolution. Obtaining an ITIL 4 Foundation certification ensures that professionals are equipped with up-to-date knowledge and skills to manage modern IT service management challenges effectively.

This said, the current release, ITIL 4, can be the best choice because it also includes the following:

  • Guidance on how to adapt Service Management to align with an increasingly Agile world
  • Guidance on how to implement ITIL or any other framework/methodology in any organization
  • A huge community, supporting any possible struggles you may have on the matter
  • The Practice Guides, which are an enormous help when taking the first ITIL steps
  • And, last but not least, a wealth of knowledge available on the official axelos.com webpage

You can also have a look at the other alternatives like VeriSM or directly at the Service Management standard ISO20000

How is ITIL 4 used in Service Management?

Since ITIL 4 is a guidance and not a strict methodology, no rules are telling you what to implement and how to do it exactly. Nevertheless, some good practices will help you on your adventure.

Getting started

Before running, one must learn to walk. Before walking, one must learn to crawl.

This also applies to the implementation of ITIL 4 or any other framework, methodology, or way of working.

Therefore, we should first ensure that we understand the issues of our organization and identify ITIL as the chosen way forward. In case you are struggling with identifying the right problems, I advise you to run a Design Thinking workshop with your management team. The result can be miraculous.

So, let’s assume that based on your experiences, the issues your organization has and the previous section of this article, you are convinced that ITIL 4 is the right way. What’s next?

  1. Identification of the processes that produce the most issues

Perhaps, your Service Desk sends all the tickets to the second level. Or maybe, your SLAs are always red or you don’t have SLAs at all. What about the ticket resolution rate or customer satisfaction? Are changes tracked and controlled in the right manner, or are they perhaps causing more errors than good?

Interested in ITIL 4 and service desk integration? Listen to this Integration Talks episode.

  1. Run a maturity assessment 

For example, check out the CMMI one to see where you stand now, what the next level of maturity would be, and to understand how to get there.

ITIL 4 service management maturity levels
  1. Get your people trained

It may sound trivial, but there is more to it than you would think at first glance. You would not believe me if I told you how much time I have spent in meetings, discussing completely trivial terminology (or at least trivial if one has some basic ITIL knowledge). Just to give you one example, from a company trying to become more agile but still having more “traditional” processes in place:

“Why do we need ‘Change Tickets’ if we have ‘User Stories’?” And I keep telling them that these can be seen as the same thing. 

  1. And if nothing works, get external help

Sure, consultants are expensive, but if you get the right ones, they are totally worth the investment. Especially if you find ones with enough implementation experience, who know the little pain points of your stakeholders and understand how to handle organizational change. Never neglect organizational change, as “Culture eats strategy for breakfast”.

ITIL 4 and Service Management: Best Practices/ Tips

Needless to say, you should set yourself realistic goals for the implementation of ITIL 4 within your organization.

  1. Study and apply the ITIL 4 Guiding Principles:
    1. Focus on value
      kill activities you have been doing since forever but have not brought any value to anyone.
    2. Start where you are
      Reuse resources whenever possible.
    3. Progress iteratively with feedback
      Take baby steps and learn by doing.
    4. Collaborate and promote visibility
      Engage with your stakeholders and identify bottlenecks.
    5. Think and work holistically
      Remove silo thinking and keep the greater system in mind whatever you are doing.
    6. Keep it simple and practical
      Don’t overcomplicate things. You don’t need gold plating. Barely good enough is good enough. Follow the Pareto Principle.
    7. Optimize and Automate
      Maximize the value of human work by automating everything else in an economical manner.
service management with ITIL 4 big picture
  1. Find synergies between ITIL and other frameworks, methodologies, and schools of thought. Just because “we are using Scrum” or “we are not an IT company” doesn’t mean we could not utilize the guidance found in ITIL. Read more about it. 
  1. Embrace the change and ensure leadership support, because if senior managers do not stand behind the idea, it will die before it can fly. Also, pay special attention to mid-level management. They have a special potential to kill cool initiatives by smiling toward the top level and still doing whatever they want in their teams.
  2. Celebrate your wins, even if they are small ones to keep up the motivation and appetite for change within the teams. It can be frustrating to switch to a new way of working, and there will always be some nay-sayers. Try to give them important roles in the transformation and allow them some “creativity” within their own boundaries. Once the first little success stories start showing up, take them and celebrate them in the teams.
    A very good place and time for this is the Sprint Review (See? Another synergy between ITIL and Scrum…as I can and should implement ITIL 4 using the iterative approach of Scrum).

How to get certified

ITIL is an official trademark owned by AXELOS, and the right to certify people is owned by their partner, PeopleCert. So, if you want to jump into the exciting world of ITIL and get proof of your skills, the ITIL 4 Foundation certificate would be your first step. Let’s see how that works.

Foundation

First things first, you would need to gather the necessary knowledge to pass the exam. Since it is an entry-level certification, you would mostly need to know about the basics, like the terminology, the Service Value System, the Service Value Chain, and the Seven Guiding Principles, and you would need to have an understanding of the purpose of the Practices (formerly known as processes). The best thing would be to attend an official course, delivered by an accredited trainer.

After that, you have two options:

  1. Continue with some self-paced extra preparation, utilizing the many resources available online. To make it easier for you, here is a little selection:
    1. Free ITIL 4 Foundation exam preparation video series
    2. Online quiz plus a good amount of mock exam questions
    3. The official ITIL 4 Foundation book
  2. Jump into the exam with PeopleCert (you can book it on your own, or you can go through your training provider). The price for the online exam is approx. EUR 300 and you can take it anytime and anywhere. Find out more.

And, last but not least, once you pass the exam, you should claim your cool digital badge which earns you all the bragging rights on social media.

And Beyond (the Advanced Courses)

So, you have put a check on the ITIL 4 Foundation exam, but what now?

You can have a look at the official ITIL 4 certification scheme to decide the next step.

managing professional transition ITIL 4
  1. You can either start by becoming a Managing Professional
  2. Or you can jump into the Strategic Leader dedication

The Managing Professional (MP) dedication is the right choice for you if you are more interested in the operational and tactical aspects of modern IT Service Management organizations. To achieve this title, you will need to complete four courses and pass their respective exams. Here is the list of courses and a short summary for each:

  • Create, Deliver, and Support (CDS)
    Learn how the new ITIL framework supports the usage of Value Streams for the creation of IT-enabled products and services, while also managing support activities.
  • Drive Stakeholder Value (DSV)
    Get a deep understanding of all types of engagements between customers, providers, and other stakeholders, and how these are essential for converting demand into actual value.
  • High Velocity IT (HVIT)
    This module sets the focus on how modern organizations can leverage working practices such as Lean and Agile to maximize the value to their customers.
  • Direct, Plan and Improve (DPI)
    This course helps you understand how to apply Lean-Agile thinking to implement a learning culture focusing on Continual Improvement while maintaining a strong strategic direction.

The Strategic Leader (SL) dedication is more relevant for the strategic layer of management within an organization. It mostly concentrates on how to set the right direction and goals. To achieve this title, one must complete two courses and exams, of which one is also part of the Managing Professional curriculum:

  • Direct, Plan and Improve (DPI)
    This course helps you to understand how to apply Lean-Agile thinking to implement a learning culture focusing on Continual Improvement while maintaining a strong strategic direction.
  • Digital & IT Strategy (DITS)
    Understand how to align the IT Strategy with the Business Strategy, especially in a fast-paced world where market disruption has become an everyday business.

Once you have achieved both the MP and SL dedications, you are eligible to apply for the ITIL 4 Master dedication, but for the time being (March 2021), this program has not been released by AXELOS.

Conclusion

So here we are, at the end of our not-so-short summary of using ITIL 4 for service management. You might ask “Is ITIL 4 the right choice for me?”, and I tell you “Yes, for sure. There is no question about that.”

  • It has continuously proven to work for over 4 decades
  • It is a leader in all kinds of industries and geographies
  • It allows you to use any other methodology/framework in conjunction for best results
  • And finally, it is constantly and iteratively improving

Getting certified is fairly easy, at least on the foundation level, and anyone striving for more has a selection of great courses available, dedicated to specific areas of interest.

Don’t miss this chance to dive into the constantly evolving and amazing world of modern ITIL 4 and Service Management and become a member of the ITIL community.

Recommended Reads:

The Ultimate Guide to ServiceNow GitHub Integration For Independent Teams in 2025

ServiceNow GitHub integration

If you use platforms like ServiceNow and GitHub to organize your teams, you may want to consider a ServiceNow GitHub integration at some point along the way. 

Connecting these two platforms means easier and more accurate data sharing, especially with automated connectors.

Automatically filtering and sorting the many issues and tickets you use sounds like a difficult challenge. The right integration solution can make it much easier. 

So in this article, I’ll show you how to set up a ServiceNow integration with GitHub with the least fuss possible.

Why Integrate ServiceNow and GitHub

ServiceNow is a workflow platform that handles everything from service management to help desk support. 

With a focus on large teams and organizations, ServiceNow provides the right tools for tracking large amounts of information and handling complex business relationships.

On the other hand, GitHub is a code storage platform that enables developers to handle version control and code distribution easily.

GitHub supports open-source projects and is a great way to build a community of coders working together to help improve products.

Since both platforms are vital to operations, integrating them can help teams share data and manage workflows collectively without jeopardizing either side’s autonomy or security.

Choosing the Right ServiceNow GitHub Integration

Your teams need a solution that is reliable enough to handle outages and errors, flexible enough to adapt to their changing needs, and customizable enough to allow them to choose how to share information with the other side. 

The tool we’ve chosen for this guide is Exalate because it meets the above criteria above. It also allows you to sync the following entities:

  • Assignee
  • Reporter
  • Summary
  • Description
  • Labels
  • Comments
  • Attachments
  • Priority
  • ParentId
  • Resolution
  • Status
  • Projects (versions and components).

Your teams need a solution that is reliable enough to handle outages and errors, flexible enough to adapt to their changing needs, and customizable enough to allow them to choose how to share information with the other side. 

Other considerations include privacy, compliance, security, reliability, and customizability. The presence of a chatbot or AI Assistant to manage scripts and suggestions mappings is also a welcome addition.

Let’s see how to use it in practice.

How to Set up a ServiceNow GitHub Integration in Six Steps 

Step 1 – Install Exalate on ServiceNow

You can install Exalate on your ServiceNow instance with Docker, or reach out to the Exalate team via its integrations page to set up a separate node for you. I’ll use the second option in this tutorial.

To learn more about both options, take a look at this documentation.

Follow the steps on the page, enter your details, and click “Submit”. You’ll receive an email with the Exalate node.

You also need to create a ServiceNow account with the appropriate permissions.

Once you’ve created the right user accounts, go to your Exalate node and click “general settings”. Put in the URL of your ServiceNow instance, along with the username and password of your proxy user.

Now you should be able to access the Exalate console. You’ll need to use an account with administrator permissions to do so.

Note: You can also install Exalate for ServiceNow from the Atlassian marketplace if you want to connect GitHub with ServiceNow.

Step 2 – Install Exalate on GitHub

To install Exalate on GitHub, you should first request your free trial from either the Atlassian marketplace or the GitHub marketplace.

Note: Exalate is also available for GitHub Enterprise. For installing Exalate on GitHub Enterprise Cloud, check this article.

Once you’re set, Exalate needs access to your projects, and you can choose whether to give it access to specific repositories or to all of them. The system needs both read and write access to issues and pull requests.

If you are happy with that, click the green “Install” button.

Now, Exalate will automatically create a node for you. The system will redirect you to it, and you will have to enter your details. After that, click the “Agree and submit” button.

verify exalate instance for ServiceNow GitHub integration

You’ll get a confirmation email in your intray. Click the button in the email to verify your account. Then, click continue.

exalate for github access token

Next, you need to create an access token for use in Exalate. To do that, go back to GitHub. Open the top-right menu and click “settings”. On the next screen, look at the menu on the left and click “Developer settings”.

Then on the next screen, click “Personal access tokens”.

personal access token for ServiceNow GitHub integration

Click the “Generate new token” button toward the top right. A detailed set of options will appear. You can optionally add a note to help remind you what your token is for later. 

create an exalate access token

The only option you need to select is “repo”, which should also automatically select all the other tick boxes in its group. 

After that, click the green button at the bottom to generate the token. Copy the token and stash it somewhere safe because you’ll need it every time you log in.

Next, go back to the Exalate node page and paste it into the “Token” box. Click the login button and if all goes well, the system should take you to the main Exalate menu.

All right! You now have Exalate on both sides, so let’s set up the connection.

Step 3 – Connect Your ServiceNow and GitHub Instances

Exalate allows you to initiate the connection from ServiceNow or GitHub. For this guide, I’ll initiate the connection from GitHub and then accept it in ServiceNow. Exalate uses a common interface across platforms, so the process is much the same either way.

Exalate connections screen

In your GitHub node, go to the Exalate menu and click “Connections”.

Click “Initiate connection”.

Configuration modes in Exalate

Next, enter the destination URL, i.e., the ServiceNow URL. After checking if Exalate is on the destination side, you will need to choose the configuration type. 

Exalate comes in 2 configuration modes: the Basic mode and the Script mode.

  • The Basic mode already has GitHub and ServiceNow entities mapped with each other. You get up to 1000 free syncs per month.
  • The Script mode allows you to control what information to send or receive with the help of sync rules. It works best for complex and advanced integration use cases.

Let us see how they both work.

Connections With The Basic Mode

To continue using the Basic mode, click “Basic” on the screen shown above and then hit “Next”.

Select repository in Github for syncing

Proceed to select the repository on the GitHub side. This will be the repository in which Incidents from ServiceNow will be synced. Select the one you want from the drop-down list and click “Next”.

Note: By default, the Basic Mode supports syncing the summary, description, comments, attachments, and issue types.

Service now connects with Github

You then need to verify if you have admin access to the destination instance, i.e., ServiceNow in our case. Proceed with the verification by clicking “Yes, I have admin access.” Then click “Initiate”.

In case you don’t have access, you will be required to copy an invitation code on the GitHub side and manually paste it on the ServiceNow side. We will see how to do this in detail in the Script mode. 

Incident from ServiceNow to sync

After verification, you will be redirected to the ServiceNow instance. Here, you need to enter the incident number you want to synchronize on the GitHub side. 

Clicking “Exalate” creates a new GitHub issue and syncs information with the ServiceNow incident. A similar screen on the GitHub side will require you to give an issue key. Follow the same procedure to set up your connection.

incident synchronized between Github and ServiceNow

You can create automatic synchronization triggers for syncing issues and incidents, or you can sync existing entities using the “Bulk Connect” option.

Connections With The Script Mode

To continue with this mode, click “Next” when you select “Script”.

enter connection name

You then need to enter a name for your local instance (ServiceNow in this case), and the destination instance (GitHub). Add a description for the connection.

When you’re ready, click “Next”.

Invitation code in the Script mode

Exalate will now generate a code that you should copy and paste into ServiceNow to complete the connection. Click the “Copy invitation code” button, and paste the code somewhere safe. 

Then open ServiceNow. You can do this by clicking “Go to remote”, or you can navigate there directly. If you’re using your own instance, you can find the Exalate console by typing “Exalate” into the search field above the left-hand menu.

In the Exalate console, click “Connections”. Then click the “Accept invitation” button.

Paste the invitation code in ServiceNow

You’ll see a large text field. Paste the invitation code you got from GitHub here and click “Next”.

Then select the target GitHub repo and click “Confirm”.

Select repository in GitHub to sync

Click through the next confirmation screen and the connection will be established.

sync mode connection successful

Now you’ve set up your connection. If you click the “Configure Sync” button, the system will take you straight to the “Edit connection” screen.

Step 4 – Configure Your Connection

To edit a connection, find its listing in the connections screen. You’ll see four icons on the right. Click the furthest left to edit your connection.

You’ll now see a screen with four tabbed areas. These are “Rules”, “Triggers”, “Statistics” and “Info”. For now, make sure you select “Rules” and have a look at the boxes below.

Sync rules in ServiceNow

You’ll see two large text fields containing outgoing and incoming sync rules for controlling the connection.

Let’s take a closer look at the outgoing sync section. The rules here copy items from the issue to the replica that will go over to the other side. If you don’t want all the information sent over, you can comment or delete any line you like. 

Commenting by adding two slashes (//) at the start of the line helps you enable and disable items quickly. That’s useful if you want to restrict the information you send out, and then add it back later.

By default, the mappings use the same suffix for every item, so replica.assignee is mapped to issue.assignee

You could map the GitHub assignee to a label in ServiceNow by removing the assignee line and changing the label line to read: replica.label = issue.assignee.

Also, you can use specific values. For example, changing that line to replica.label = “from GitHub” would add that label to synced ServiceNow items. That way, your team can see which items came from the synchronization.

After configuring the mappings, click “Publish” at the top right to save your changes. Don’t forget to check with both of your teams to make sure items are being exchanged correctly.

To read more about sync rules, check out this documentation.

Connections in Script Mode Using AI Assist

The Script Mode allows you to generate and optimize scripts using the AI Assist feature — which appears as a tab under both the incoming and outgoing sync rules.

How does it work?

Enter your sync requirements into the chat box, and AI Assist will generate scripts based on your input, existing configurations, and Exalate’s scripting API.

It is also important to note that AI is not perfect. So, you need precise and detailed prompts to ensure the best results. 

Let’s say you want the name of the assignee of a ServiceNow incident to appear in another organization’s GitHub issue; the prompt could look something like this: 

“I want the name of the assignee of the ServiceNow incident to reflect in the GitHub issue whenever a new issue is opened.”

AI-assisted ServiceNow GitHub integration

After a moment, the script will be generated, with suggested changes highlighted in green and red. The green scripts are suggested additions, while the red scripts are suggested deletions. 

If the new snippet works for you, click on “Insert Changes”. Otherwise, you can discard the suggested code. If needed, you can refine your prompt and, once satisfied, publish the changes.

Step 5 – Set Up Automated Synchronization Triggers

Synchronization triggers define the conditions for information exchange and also control the syncs. 

You can edit triggers from the “Edit connection” screen used in the previous step, or you can click the “Triggers” tab. 

Snow Github triggers

The triggers screen shows your existing triggers but is blank the first time you look at them. To start, click the “Create trigger” button on the right.

add trigger to your sync

At the top is a dropdown box to select what type of entity the trigger applies to. Next, in the “If” section, you write a query that picks out the issues you want to synchronize. You can read more about the query syntax here

On the ServiceNow side, you can use the ServiceNow search syntax to specify the filter query.

There’s a space to leave notes describing the purpose of these triggers. 

Toggle the “Active?” switch to activate the trigger. When you’ve finished, click the “Add” button.

Step 6 – Start Synchronizing Tasks

Now that you’ve set everything up, all you have to do is wait for Exalate to synchronize your items. If it doesn’t start straight away, don’t panic! 

For performance reasons, Exalate doesn’t check continually. So go grab yourself a copy while Exalate does its magic. 
Self-starters can also use AIDA, the Exalate virtual assistant, to set up and troubleshoot connections without waiting for engineers.

Common Use Cases 

There are many scenarios where you might want to integrate ServiceNow and GitHub. Here are some examples.

Connecting Developers and Support Team

The right ServiceNow GitHub integration can automatically filter issues from the support team and copy them into the developers’ issue tracking system on GitHub. 

When the developers resolve the issue, the integration passes the updates back to ServiceNow, alerting the support team to inform the customer that the issue has been resolved.

Team collaborations

Merging Product Development and Quality Control

Implementing ServiceNow integration with GitHub allows teams to see information that is relevant to them and provide further feedback if needed.

If the quality control team is tracking their work in ServiceNow, they can monitor how the issues they raise are implemented in GitHub. 

Uniting the Efforts of Project Managers and Sales Reps

Project managers (and product managers) can rely on GitHub ServiceNow integration to monitor the progress of products and features.

At the same time, sales reps can combine data from both platforms to understand the financial impact of outages and other performance metrics.

Connecting Managed Services Providers With Clients

Managed services providers (MSPs and MSSPs) can use GitHub integration with ServiceNow to connect with clients. This type of cross-company collaboration is coming in outsourcing.

For instance, an MSP providing web development services can connect with their client’s ServiceNow to gain access to customer feedback faster.

Discovery call with Exalate

Conclusion 

Integrating software platforms is easy with the right solution. In just a few steps, you can get your teams (and even companies) to share information and work together seamlessly. 

Once the ServiceNow GitHub integration is ready, it can exchange items between your teams without creating extra work for anyone.

Making changes and evolving your integration allows you to control when and how data is shared without worrying that everything will come crashing down.

With a flexible ServiceNow and GitHub integration, your teams can focus on their own tasks in their own familiar environment while enjoying easy and secure collaboration.

Frequently Asked Questions

Can GitHub integrate with ServiceNow?

Zendesk can integrate with ServiceNow using native solutions like IntegrationHub as well as third-party integration tools like Exalate, which are available in the marketplace of both platforms. Dev teams using GitHub can connect with customer support agents working with ServiceNow.

How do I connect GitHub with ServiceNow?

To connect GitHub with ServiceNow, you’ll need to find a third-party integration solution from the marketplace. This solution (Exalate, Skyvia, etc.) fetches data from one platform’s API and sends it across to the other. 

Can I use a no-code tool to integrate GitHub with ServiceNow?

Yes, you can use no-code tools to integrate GitHub with ServiceNow. No-code integration solutions provide you with pre-built connectors, eliminating the need to write lines of code for mapping syncs. Some no-code integration tools include Zapier, Exalate (Basic Mode), and SnapLogic.

Recommended Reading:

ITIL4 Explained and Integrating Multiple Help Desks

This is the very first episode of Integration Talks, a podcast where we discuss everything software integration with thought leaders and experts across industries.

In this episode, Alexander Schmidt, an ITIL 4 trainer and owner of Value Insights with a lot of experience in multinational companies in Switzerland and Hungary, tells us all about ITIL 4 and its role in integrating multiple helpdesks.

About this episode:

  • Update from ITIL3 to ITIL4
  • Using ITIL4 and the voice of the customer with different helpdesks
  • ITIL4 and multi-helpdesk integration
  • Measuring the integration’s KPIs for the companies involved 

Not a fan of watching videos? Then listen to this episode on:

Episode Transcript

Francis Martens: Hey Alexander! Thank you for joining the integration podcast! Tell me a bit about who is Alexander.

Alexander Schmidt: Yeah, thank you very much for having me. My name is Alex Schmidt, I’m in Switzerland and I’m a co-founder of a small company here called Value Insights and our main business is actually training in the area of service management, everything around ITIL 4 the latest version, right? And everything around Scrum and also the scaled version of that which is done by yeah scaled agile and we do provide these trainings online, also in-house for companies, mainly for companies and for businesses and but we also do it for private people if there is any interest you know like public classes and so on. And besides that, we are also running a blog around these topics creating also mock exams which can be you know downloaded by people who are preparing for any of these exams.

Francis: Okay… so I was wondering Alex so regarding ITIL, how is that in Switzerland? Is it a big thing? Is this… what type of companies are working with ITIL at the moment?

Alex: It’s getting there, I mean it’s not that fast-paced as it might be in different other countries I’ve seen like in India it’s very big also the fourth version now of ITIL and in Switzerland, people take it a little bit more you know slowly. Stability is fine but more and more companies are getting into it so I’m really excited about that and I’m looking forward to maybe, you know, training a little bit more as well but it takes some time.

There are some regulations in Switzerland especially around data security and information security which need to…

Listen to the episode:

The Complete Blueprint for Aligning Your Service Desk and Development Teams (Process Integration and Best Practices)

Service Desk and Development integration

If you are working for an IT organization, you are most likely either part of the support team or development team. You also most likely will recognize some or all of the following friction between the teams in your respective role.

The friction from the Support side

As a SUP, you are supposed to answer all questions about a critical application. One day you get a lot of calls from users, complaining that the behavior of the application is changed. You know that a project has released new features, but you don’t know the details. So you can’t tell the user whether the changed behavior is desired or a bug.

You also know a lot of applications quite well, but you’re not a complete expert in any of them. Sometimes you get issues from users that you can’t solve. Sometimes you get requests to change things in an application. So, what do you do?

For one application you know a guy from the development team who can help. But he is busy. So you can’t tell users when you can get their issue solved.

The friction from the Development side

As a DEV, you are eager to develop new features in your specialist area. But
you are annoyed to also get banal questions, for which you really don’t have time.

You might most probably be working on some exciting new features. The deadline for release is close. All of a sudden you get word that there is an urgent change needed in existing functionality. What do you do first? Who can decide?

If you do recognize these frictions, you are working in an IT organization where the Support and Development processes are possibly disconnected.

In this blog post, we will discuss some ideas to integrate these processes and avoid friction altogether.

Note: You can use Exalate for an integration between support and development teams. Exalate is a cross-company integration solution that allows you to integrate data between a variety of work management systems and issue trackers.

The Development Process

Development can be further distinguished between Software, Product, or Service Development. The process for each development type can deviate a bit.

However, core process steps are the same. For the sake of simplicity, we will focus on the Software Development Process, which includes 6 main steps:

  1. Planning: To gather requirements from customers and stakeholders, to establish a business case and to determine the project approach
  2. Analysis: To analyze requirements; feasibility studies; to analyse impact/improvements on the current systems. And to produce a SW Requirement Specification
  3. Design: To determine the architecture, design modularity, data flow etc. And to produce a detailed Design Specification
  4. Implementation: to do actual coding and unit testing according to the Design Specification
  5. Testing & Integration: To establish a test environment. To conduct functional testing and user testing. And to solve issues that appear
  6. Maintenance: To release the product to customers and to gather Issues and Enhancement Requests. This is an ongoing step to keep the Software relevant and high quality.
Software development cycle

The circle depicts that this is a continuous process. One development cycle is usually achieved in a Software Development Project. The Project can be managed based on Prince 2 or Agile (Project management methodology is outside the scope of this guide though).

NoteLearn more about Scaling Agile Basics and the most useful frameworks.

The Support Process

The support process is a general term used to depict the activities that help the users of a Software/ Product/ Service.

Most companies define their support process based on ITIL Best Practice for IT Service Management.

ITIL (IT Infrastructure Library) is an extensive framework of best practices to manage IT services. While it is not practical, nor advisable to implement the ITIL process all at once, the processes linked to support activities are often implemented first. These are Incident Management, Problem Management, Service Request fulfillment, and Change Management.

ITIL service strategy

Incident, Problem, and Request management are part of the Service Operation. While Change Management is part of the Service Transition. Among these 4 processes, Incident Management is implemented first in most organizations.

The Need to Integrate the Development and Support Process

From the above overview of the Development and Support process, it is evident that the Development processes for a Software/Product/Service are interconnected with the Support processes.

integrating software development and  support process
  • The maintenance step of the Development process overlaps with the activities defined in the Incident/Problem/Request process. 
  • The Incident & Change Processes provide inputs to the planning step of the Development process

Process Integration: Problems and Solutions

The Development Process and the Support processes, based on ITIL, have already been established a long time ago and have been successfully implemented in many organizations. Yet the friction described in the first section of this guide is often encountered.

So, what can go wrong while implementing these well-known processes? As it turns out, a lot can go wrong. In the following, we will discuss some common pitfalls and possible solutions.

Breaking Organizational silos

Why Organizational silos occur

When we talk about processes, we also talk about Process Roles. A process
role defines the activities a person with the role needs to perform in the context of a Process.

However, every person in an organization also belongs to a team with a job title. Companies often have separate development teams and support teams, with development teams likely being part of Competence Center, and support teams likely being part of the Operation or Service Department.

A development team is likely to be dedicated to a single Software/Product. While a support team is likely to be customer-facing, covering several Software/ Products.

This organizational setup could induce the teams to implement their processes in an isolated way:

  • ƒ  The Development process has a Maintenance step, but the Development team treats it as being covered by the Support team and, in turn, has
    no resource allocation for it.
  • ƒ  The Development team has deep knowledge about a certain SW/ Product. But it is not involved in the Incident and/or Problem Management process when such deep knowledge is needed.
  • The Support team has no role in the Development Process. This gives the feeling that Projects cook things up and throw them over the fence when finished. That leaves the support team to clean up the mess.

How to break Organizational silos

The way to break the organizational silos is to implement process and process roles across these teams. You will have to assign Process Manager roles to be responsible for the end-to-end process.

In practice, the following setup should help. For the Support processes, ITIL recommends a 3-tier support structure:

  • ƒ1st line (Service Desk) is SPOC (single point of contact) for all IT Services and part of the Support team or outsourcing partners
  • ƒ2nd line support, a cluster of IT Application/Services, is part of the Support team
  • ƒ3rd line support has expert knowledge of a SW/Technology. It is part of the Development team. The 3rd line support role is typically involved in Incident resolution, Problem root-cause analysis and Change implementation.

The Development team assigns clear support roles and reserves resources. This reservation must not be taken by the project. Process Manager roles need to be assigned to the Support team.

But these roles have end-to-end Process responsibility. I.e. an Incident Manager is functionally responsible for 3rd line support performance.

For the Development process, support teams have to be involved in the following steps:

  • ƒPlanning: the Change Manager from the Support process is one of the stakeholders to raise requirements.
  • Test and Integration: 2nd line support is part of activities to set up the functional/ user test environment and will be the coordinator of UAT.
  • Maintenance: The Change Manager (or Release manager if implemented as an ITIL process) is involved in deciding on the go-live criteria and timing, to minimize the impact of the project go-live to the live environment.

Breaking Information Silos

Why Information silos occur

The divide of Development/Support teams is often reflected in separate toolsets used to execute the processes and to store information/knowledge.

This adds to the barriers in Process integration.

Support teams generally choose an ITSM tool, with an end-user interface that handles each process with a corresponding ticket and workflow.

Development teams, on the other hand, generally choose a Project management /SDLC tool where each process step produces a number of documents specific to that step.

Enduser & IT Support knowledge is stored on ITSM tools, owned by the support team. Functional & Design teams will document on the PM tool, owned by the Development team. Without consulting each other, the content becomes outdated over time.

Development and Support processes use different terminologies. E.g. Incident vs Defect, Change vs Enhancement, etc. . When an Incident needs to be handled by the Development team, it has to be transferred over to another system & becomes a Defect.

How to break Information silos

The way to break these information silos is to align the tools used for their respective Processes. There could be several ways to achieve this. Following are some scenarios.

Ideally, implement both ITSM and PM on the same platform. In this case, both Development and Support team works in the same tool. That means:

  • ƒ No tool barrier for Development teams to fulfill their roles in the Support processes & vice versa.
  • ƒ All information is stored on the same platform i.e. Support teams can easily consult the Project status or check included functionalities in a project release. Development teams can check the Incidents caused by a Project Change.

The above scenario is, however, not always feasible. The reason could be that the tools are already established and migration is too costly. Or there is no agreement on common tools. Or teams flat-out prefer different tools.

Another reason could be that a part of the Support and/or Development work is outsourced and the outsourcing partner is using a different tool. In this scenario, integration needs to be implemented between the tools to reduce the barrier and increase the efficiency of the teams.

  • ƒ It needs to carefully considered which processes are executed in both tools and how an integration can make the process execution seamless across those tools.
  • ƒ The integration technology applied needs to be Secure, Flexible and reliable. Otherwise the integration will hinder process integration more than help overcome it.

Let’s Verify the Process

Having discussed the process issues and solutions, we would like to get back to the frictions listed at the beginning of this guide and check whether our proposed solution can help avoid those issues.

This is what it will now look like from the support side:

  • As a SUP you would not be surprised if a lot of users call after a project goes live. You were involved in the User Acceptance test and know what new functionalities are released. You can explain to the user whether it is indeed an Incident or just a new feature.
  • As a SUP you get an Incident about an application which you can’t solve. You assign the Incident to the 3rd-line support team, these are experts of this application. Because it is a high priority Incident, it is picked within 30min as defined by the SLA

This is what it will now look like from the development side:

  • As a DEV you are allocated 20 percent of your time to do 3rd line support work. You also work on a project. But your project manager will respect the time you need to spend on support in his planning.
  • As a DEV you need to work on an Emergency Change, although you also have a project deadline. But you know this is agreed upon between the Change Manager and Project manager, as defined by the SLA.

Conclusion

There are many touching points between Development and Support processes. It is important to avoid silos in the process, teams, and tools. We discussed how you can break Organizational silos using process and process roles, based on ITIL best practices.

We also covered how you can break Informational silos by having teams in the same environment or by integrating their tools effectively. (note that you can use Exalate to set up such an integration)

Defining an integrated process with the support of integrated tools and clear process roles in the teams is the way to make both Development and Support a success for your customers.

Recommended Reading:

How a Large Open-Source Foundation Uses Exalate to Help Drive Adoption with its Communities

Sel4 case study Exalate

More and more organizations are now collaborating with outsourcing companies to deliver projects and meet goals more efficiently. 

The seL4 Foundation is an Open Source foundation around the highly secure seL4 operating system microkernel, with a large, active ecosystem of companies, research institutions, open-source developers, users, and platform providers. The sel4 microkernel is a high-security basis for autonomous systems in aviation, space, and ground-based vehicles, as well as secure communication devices, medical devices, and information systems.

As a director of the seL4 Foundation and the chair of the Technical Steering Committee that oversees the direction of the technology, Gerwin Klein, explains to us how Exalate has helped maintain a seamless collaboration between teams working in Jira and GitHub. 

Why Exalate? 
• Smoother collaboration between Jira and GitHub 
• Keeping the data updated Free license plan (Atlassian) for open-source companies 
• Not losing track of issue raising in a large number of GitHub repositories 
• Keeping data integrated while providing access to public 

Tackling the Challenge 

The seL4 Foundation manages over 50 active GitHub repositories, which grew out of more than 20 years of research on highly secure operating system kernels by UNSW Sydney, and later CSIRO, Australia’s national science agency.

For issue tracking as well as for project and sprint planning, the seL4 Foundation also runs an instance of Jira with three main trackers, again with accumulated knowledge and material from over 20 years of research. So if it could facilitate this collaboration between the two platforms, the Foundation could have better-integrated data and more control over what was shared with who and how. 

As with any large project, there are many roles. For instance, there is the open-source community of developers, companies, and contributors who provide the software, coordinate on Jira, and collaborate on GitHub. There are also their users or more casual contributors who will raise GitHub issues or pull requests but will typically not interact much with Jira.

This raises challenges:  

  • Issues were raised on GitHub and in many different repositories, but planning and the actual issue tracking and developer discussion were happening in Jira. 
  • 50 GitHub repositories did not map straightforwardly onto three Jira trackers with simple Jira automation.

“It’s slightly complicated to create the mapping between these Jira trackers and GitHub repositories. And that made us look for a synchronization solution like Exalate.”

says Gerwin Klein, chair of the Technical Steering Committee of the Foundation

GitHub is accessible and popular in the open-source community, but is too distributed for more complex planning and issue discussions. Jira is well-suited for the required features, complexity and coordination, but less accessible for users who typically only interact with one or few of the many repositories the seL4 Foundation manages.

“Being programmers, we first looked into writing our own synchronization solution, of course, including using Jira automation and GitHub integration. But it quickly became clear that this would have become a time consuming and probably an expensive side project. When looking at the solutions on the market, Exalate was the one with the right features and the most comprehensive solution. Even if time and budget had not been an issue, I think we would still have gone for Exalate.”

says Gerwin. 

So Exalate came into the picture to help facilitate the synchronization between the two environments in the most flexible way possible.  

Flexible Two-Way Synchronization with Exalate 

Exalate successfully met the Foundation’s requirements and users can now easily sync issues between Jira and GitHub, no matter how many repositories there are, commenting on one side and following up on the other for instance. 

For the seL4 Foundation as an open-source organization, there had been no security risks to address before adopting Exalate since both ends are public. But they needed security in the sense that not everyone should be able to change the data. So they needed data integrity but confidentiality was not an issue. 

We asked Gerwin about the most noticeable impact they have experienced in the short time they have been using Exalate:

“The most beneficial impact we’ve got from Exalate is the ability to be in full control of our GitHub issues that users raise. Because if you have over 50 active repositories, you cannot help with missing issues over time and they’d easily go stale. But with Exalate, we’re now able to manage them all in one place. That is a real lifesaver.” 

The long-term goal of the foundation is to drive adoption of the secure seL4 microkernel and to provide the open-source community around it with the tools to make that happen. 

The seL4 kernel is used in a number of industries, with demonstrators in autonomous systems in aviation, space, and ground-based vehicles, as well as secure communication devices and medical devices. To succeed long-term, it needs an ecosystem of companies that can compete and collaborate with each other, and at the same time support the open source community to drive the platform further.

Exalate is one of the key tools to make this diverse ecosystem happen. 

Results Recap 

  • Gaining full control of GitHub repositories 
  • Efficient data update 
  • Cost efficient  
  • Providing integrated public data 

As companies grow bigger and their collaboration goes cross-company, their need to adopt a seamless integration becomes more and more inevitable. You can save time, money, and resources with the right solution and of course, enjoy the ease of communication without having to handle everything manually.

Become an Exalate user and experience a seamless integration and an optimized workflow. It’s flexible enough for any sync use case. 

Book a demo now

Setting Up a Jira Zendesk Integration Bidirectionally

Jira Zendesk integration

If you’re on the support or development team, you will need a Jira Zendesk integration to connect the two teams and get everyone on the same page. 

Using the right tool to do the hard work lets your developers focus on building products and lets your support team focus on customers.

When you are setting up a Zendesk Jira sync, you must choose the right technology to keep data safe at rest and in transit, as well as ensure the transformation works correctly.

In this guide, I’ll explain the benefits of Jira Zendesk integration before discussing how to set one up.

Get the Jira Zendesk Integration Guide

Learn how to achieve seamless integration between Zendesk and Jira, step-by-step.

Why Opt for a Jira Zendesk Integration?

Jira is a project management tool for tracking issues and bugs. It is popular with software development teams and is geared toward agile development.

Zendesk is an automated help desk platform that lets you manage customers easily. It is a good option for any team that deals directly with clients, including customer support, marketing, and sales teams.

A Jira Zendesk integration can be hugely beneficial to both sides of the connection. In practice, you will be exchanging information between Jira issues and Zendesk tickets. 

So you need a system that can pick which issues and tickets need to be shared and then filter the specific information you need, leaving just what the other team needs to know.

Choosing the Right Technology for a Zendesk Jira Integration 

When choosing the right integration solution, consider a few features to ensure your integration delivers its best.

  • Decentralized Integration: The integration should enable everyone to adjust their side of the integration independently without jeopardizing security. Each side of the integration should be able to control what they send out and change how they deal with incoming data. 
  • Flexibility: When you set up your integration, you may want to share additional fields or use more advanced logic to process items; the other team might want to filter some of it out. Your integration solution must be flexible enough to enable these changes easily. You should be able to adapt to it quickly. 
  • Reliability: Since your integration involves two different platforms, it should be able to handle potential issues on either side and general connection outages. If your integration solution can’t handle outages properly, it may crash or need to be set up again. 
  • Security and compliance: Standard and advanced security measures, such as token-based authentication, HTTPS, role-based access, etc., are mandatory. You also need a Jira Zendesk integration solution that is ISO 27001:2002 certified and compliant with other industry standards.
  • Multi-platform support: You want a solution that is compatible with Jira, Azure DevOps, GitHub, and the like. This will give you the liberty to connect to just another of your customers, partners, suppliers, or vendors without having to build or configure a completely new integration yourself.

The tool I’m going to use for my Jira Zendesk integration is called Exalate. Exalate was designed with these three issues in mind and is built to solve the challenges that arise when connecting platforms.

How to Integrate Jira and Zendesk in 6 Steps 

I’ll start by installing Exalate on both platforms. Then I’ll create a connection between them. Once the connection is up, you can configure it to control what it sends and then define the conditions for data exchange.

But before we dive in, would you rather watch a tutorial than read a guide? Then check out this video:

Step 1 – Install Exalate on Jira

This tutorial uses Jira Cloud, which you can read more about here. You can also check out the Exalate documentation for Jira on-premise.

Log in to your Jira instance and find the Exalate app in the Atlassian marketplace. To do that, click the cog in the top right, and select “Apps” from the menu.

If you aren’t taken straight to the marketplace, click “Find new apps” in the left-side menu, and type “Exalate” into the search field. A list of Exalate add-ons appears with “Exalate Jira Issue Sync & more” at the top.

Exalate for Jira integrations

Click that, and choose “Try it free”. A confirmation screen will appear. Click the “Start free trial” button. 

After a brief pause, you’ll see a popup appear saying Exalate has been installed successfully. Click “Get started”.

Exalate for Jira trial

You’ll see the initiate connection button highlighted, but we’re going to leave Jira for the time being. We’ll return later on.

Step 2 – Install Exalate on Zendesk

Next, you need to install Exalate on your Zendesk instance.

You can either find Exalate’s Zendesk connector for Jira on the Atlassian Marketplace.

Or just log in to your Zendesk instance, then click the cog in the left-side menu. Go to Zendesk marketplace and type “Exalate” in the search field. 

On its store listing page, click “Install”. A pop-up will appear. Select your account from the drop-down list and click “Install” again.

install Exalate on Zendesk

You’ll be taken back into Zendesk with another install screen. On this screen, you can change the Exalate app’s name if you want to refer to it as something else. You can also set role and group restrictions if you want to limit who can use it.

Change those if you need to, and then click the “Install” button. Exalate will now install itself. You’ll see its icon listed under the settings cog in the left-side menu. Click the Exalate icon now.

Exalate panel zendesk integration

When you access it for the first time, Exalate will ask for permission to read and write data.

Click “Allow” to give it the permissions.

Zendesk Jira integration API tokens

Next, you’ll have to accept Exalate’s user license agreement. Click the green “Accept” button to do so.

Finally, you need to add a license to your installation. Click on the 30-day trial image. Enter your email address in the popup that appears, and click “Send”.

Check your inbox for the license activation mail. When it arrives, copy the code you get onto the clipboard.

Click the license button at the bottom of the Exalate license screen. Scroll down from the 30-day license image to find it. When you click it, a license key field will appear. Paste the code from your email into the field.

Click “Update” and Exalate will register the license for you. You are now ready to go. 

Exalate for Zendesk trial

Step 3 – Connect Your Jira and Zendesk Instances

Now that you’ve installed Exalate on both platforms, you can connect the two. To create the connection, you need to initiate it on one side and accept the invitation on the other side.  

You can start in either Jira or Zendesk. Exalate gives you a consistent interface across platforms so the process is the same either way.

This guide uses Zendesk, so if you aren’t there already, log in, select the Exalate icon on the left, and then click “Connections” in Exalate’s left-side menu.

Jira Zendesk connection

You can see all your connections here. To create your first one, click the green “Initiate connection” button. 

Now you need to enter the URL of the destination side. Here, enter the URL of your Jira instance. Verification is performed to check if Exalate is installed on the destination or not.

Click “I don’t have a URL” if you don’t have one and follow these steps.

Configuration modes in Exalate

At this point, you can choose one of the 3 ways to continue. Exalate allows you to set up your connection using 3 modes: the Basic Mode, the Visual Mode, and the Script Mode

Exalate’s Basic Mode allows you to work with preset sync rules that are generated automatically and cannot be modified. These connections are recommended for use cases with basic synchronization needs.

The Visual Mode gives you an easy way to set your connection up to share what you want, at the time of your choosing. If you prefer, you can use the script mode, which lets you use more advanced features and configurations using programming logic.

The Script allows you to sync almost anything. You can modify the sync rules using the “Groovy Scripting” language. This mode is also AI-assisted. We will learn more about it in the coming section.

We will have a look at all of these modes one by one.

Continue with the Basic Mode

For getting started with the Basic Mode, click “Next” after selecting it. 

This will take you to a screen where you must confirm if you have admin access to the Jira side. 

Click “Yes, I have admin access” and then “Initiate”. If you don’t have access then you will be required to copy and paste an invitation code manually from the Zendesk to Jira instance. 

exalate basic mode admin access

Now, move on to selecting a project on the Jira side.

Select it from a drop-down list and click “Confirm”.

accept jira zendesk sync invitation

This successfully establishes a connection between Zendesk and Jira. Now you can sync your first issue by directly entering the issue key as shown below, or by creating a trigger. You can even synchronize your issues in bulk.

Enter the issue key and click “Exalate” to synchronize it.

successful basic jira zendesk sync

This means an issue synchronized from the Jira side will generate a ticket on the Zendesk side. Wait until you get the “synchronized” message on the screen.

Continue with the Visual Mode 

The Visual mode gives you a straightforward interface that many people find easier to work with than outright scripting.

To get started, select “Visual” from the start screen and click “Next”

initiate zendesk to jira connection

Enter the name and description for both sides of the connection. When done, click “Next”. 

To verify that you have access to the other side of the connection, click “Verify admin access”.

verify admin access exalate integration

Click “Accept” to allow access. You’ll then be taken back to the other window, where you’ll see your confirmation of your verification.

Continue setting up the connection by clicking “Initiate”.

Next, there’s a brief wait while Exalate tries to establish a connection. After a while, you can click the green “Configure Sync” button to configure your connection.

zendesk to jira sync rules visual mode

Here you can see various controls to let you choose what is shared over the connection. On the Jira side of the connection, there is a “Select Project” dropdown box that lets you pick a project to use for synchronization.

zendesk jira integration filters

When you’re happy with the filters you’ve set, click “Next”. Here you can use field mappings to control what happens when items are synced. You might want to map similar items directly onto each other, or you might want to map fields to other fields.

Jira to Zendesk mapping

You can drag and drop these rules if you want to reorder them. The icons on the right of each mapping allow you to edit or delete them. If you select the edit button, you can choose to have that specific field mapped in one direction only, or the default which is both directions. 

edit jira zendesk sync mapping

Some fields, such as comments in the screenshot above, have additional checkboxes allowing you to filter them in more detail.

add mapping in Exalate visual mode

Adding New Mapping and Script

To add a completely new mapping, click the “Add mapping” button at the top right. The add mapping popup works in a similar way to the edit popup. The only difference is you have to pick the fields to get started. 

Once you’ve selected the fields, further controls may appear, allowing you to set conditions, as in the edit mapping popup. When you’ve set things up as you like, click “Save,” and the new mapping will be created.

add script to jira zendesk visual sync

Click the arrow next to the “Add mapping” button and you’ll also see the “Add script” button.

Click this and you’ll see a further popup letting you add rules using a simple scripting language.

The visual mode works better for simple rules, but scripting allows you to get more creative. Read this to learn more.

You add rules by typing them into the field. A few examples are shown when you open the page. 

If you want to sync a field you can type something like jira.issue.labels = zendesk.issue.labels. If you want to set a specific value for Jira’s labels, you can change that to jira.issue.labels = “synced from Zendesk”.

After adding the scripting rules, click “Save” to go back to the main screen.

When you’ve got everything set up, click the “Publish” button. With visual mode, that’s all you need to do. You can edit the connection later by clicking the “Connections” entry in the left-hand menu, clicking the edit icon on the connection you want to change, and going through these steps again.

You can skip and go directly to step 5 if you want to use only the Visual mode.

Advanced Synchronization with the Script Mode

If you don’t want to use visual mode, select the other option- “Script”. 

On the next screen, you need to enter the URL of the destination instance, in this case, the Jira node URL, and it will ask you to fill in the name for the connection and some other details, just like you did for the visual mode.

initiate zendesk to jira connection

When done, click “Next”. You’ll learn how to configure Exalate fully in steps 4 and 5.

copy exalate invitation code

Exalate will now generate an invitation code for you. Copy it to your clipboard. Then paste the code somewhere safe, such as a text editor. 

Now on the Jira side, if you’re not already on the “Connections” screen, navigate there by clicking “Add-ons” on Jira’s top menu, followed by “Connections” from the left-side menu under the “Exalate” heading.

jira zendesk sync invitation code

“Accept invitation”, paste the invitation code, and click “Next”. 

Next, you need to choose a project for synchronization on the Jira side. Choose one from the drop-down list, and then click “Confirm”.

Exalate connection in script mode

After your connection is set up, you can see the connection listed on the “Connections” screen in both Jira and Zendesk. 

In the next steps, you’ll learn how to configure the connection.

Step 4 – Configure Your Connection to Determine What Gets Shared

When Exalate synchronizes items, it copies data from the fields on one side of the connection to those on the other. You can also set specific values for synchronized tickets, or use advanced programming logic to fill in the information.

To get started, go to the “Connections” tab.

Click the edit connection icon. You’ll see four tabs on the next screen with “Rules” selected by default, along with “Triggers”, “Statistics” and “Info”. 

Note: You can configure the connection by clicking on the “Configure Sync” button while creating the connection as well. 

Zendesk sync rules

Looking at the outgoing rules, we can see how Zendesk ticket issues are mapped to the outgoing replica. In this case, all fields are mapped to equivalents with the same name.

If there’s any data here you don’t want to share, you can remove it. You can do that permanently by deleting the line or temporarily by making the line a comment.

Just comment lines by adding “//” to the start. You can also comment blocks by adding “/*” to the beginning and “*/” to the end of the section you want to comment.

If you want to give a specific value to a field, you can do that by replacing any of the issue values with a specified value in quotes. For example, instead of replica.type = issue.type, you can use replica.type = “sent from Zendesk”. 

The incoming rules show you how the data coming from Jira is used to create matching Zendesk tickets. Again, you can specify any values you want, or comment out any you don’t want to use.

There are also advanced ‘script helpers’ that handle complex processing for you. For example, in the incoming sync rules, the line issue.attachments  = attachmentHelper.mergeAttachments(issue, replica) uses a helper to process attachments. 

Attachments are complicated and may contain different file types, so using a helper can make your life much simpler.

There are many different helpers available. Read this guide to learn more. 

Use AI to Generate Sync Rules in Script Mode

Exalate’s Script mode now utilizes AI, with AI Assist appearing as a chat window in both your incoming and outgoing sync rule tabs. All you have to do is enter your sync requirements, and AI Assist will automatically generate the scripts for you.

These scripts are built based on your inputs, existing settings, and Exalate’s scripting API.

Keep in mind, that AI Assist isn’t foolproof. To get the best results, be as precise and detailed as possible when crafting your prompts.

Here’s an example of how AI Assist can help:

If you want to sync ticket statuses from Zendesk to Jira issue statuses, you can enter something like:

For incoming sync (Jira): “Map Zendesk status ‘New’ to Jira’s ‘Open,’ ‘Open’ to ‘In Progress,’ and ‘Solved’ to ‘Done’ in the Jira incoming configuration.”

AI Assist in Exalate

In just a moment, the script will be ready.

Changes are clearly marked: red lines indicate deletions from the existing script, while green lines show the additions. You can accept or reject the AI’s suggestions, and fine-tune your prompt if needed. Once you’re satisfied, make sure to publish the final script.

Step 5 – Set Up Automated Synchronization Triggers

Synchronization triggers determine the conditions under which issues and tickets are synchronized. You might want to synchronize all issues of a particular type or everything assigned to a particular team member. You might want to create a tag that one team can use that marks those items for sharing with the other team. 

Whatever conditions you want to set, it is likely you can implement them with Exalate. The process for creating triggers is the same in Jira and Zendesk, but they each use a different language. Jira uses Jira Query Language or JQL for short. Zendesk uses Zendesk search syntax.

Here’s a guide to setting it up in Jira, and here’s one for Zendesk. For the rest of this step, I’ll use Zendesk to create a trigger.

If you’re following this tutorial step by step, you should be on the edit connection screen. If not, get there by clicking “Connections” from Exalate’s left-side menu, and then clicking the edit button.

jira to zendesk sync triggers

Then click the “Triggers” tab. On this screen, click the “+ Create trigger” button on the right. You can access a similar screen by clicking “Triggers” from Exalate’s left-hand menu. That gives you a similar interface, but you’ll have to specify the connection for each trigger.

Trigger screen in Zendesk

There are several fields on the add trigger popup. There’s a drop-down box to let you choose the entity type the trigger applies to. In this case that will be a “ticket”.

Next, there’s a box where you can enter your query. Here in Zendesk, I’ve used the type: ticket status:open. That will synchronize all open tickets. I’ve also added a description of that effect in the box above. As with connections, it is a good idea to fill out description fields with as much information as possible.

There’s also a checkbox to turn the trigger on and off. When everything is ready, click the green “Add” button.

jira zendesk connection triggers

You should see the trigger listed on the previous screen.

Step 6 – Start Synchronizing Tasks

You’ve set your connection up and defined what is shared. You’ve also set the conditions for synchronization. When an issue meets those conditions, it will be synced. 

For performance reasons, Exalate checks for matching items periodically, so if you don’t see the sync begin immediately, check again after a few minutes.

After a while, you should see the synced items reflected in the connection entry in the connections list. If not, make sure your sync rules and triggers are set up correctly. Don’t be afraid to make adjustments and test them until everything is working as you intend.

Jira Zendesk Integration Use Cases  

Here are a few examples of situations where you can improve your workflows using a Jira Zendesk integration.

Sync Multiple Zendesk Tickets with One Jira Cloud Issue

You can use Exalate to transfer these issues from Zendesk to Jira under the conditions you specify. One way of implementing this is to sync multiple Zendesk tickets to a single Jira Cloud issue

Generic image

If your customer service team uses Zendesk and your developers use Jira Software, there is likely potential for useful information exchange. 

The customer service team will use Zendesk to create tickets based on their interactions with customers, which will include details of problems and bugs. They need to pass a few of these issues over to the development team working in Jira. An efficient way to handle this is to integrate both of these platforms.

Sometimes, many different customers report similar problems. Instead of creating a new issue for every problem, you can create a single Jira issue for all related problems and add all the relevant details to it.

Sync Multiple Jira Issues With a Single Zendesk Ticket or Task

The marketing team will want to know about new features so they can conduct further research to see what consumers think of them, and designers will want to know about the feedback.

By syncing different Jira issues from the design team related to the same problem with the dedicated Zendesk ticket, the marketing team will have access to relevant information in real time without bothering designers. 

Maintain Issue Priority Across Two Organizations

Teams in different organizations might have a vested interest in a project — say, an outsourcing partner providing development services for a customer. 

To ensure both teams are on the same page about timelines, you can sync issue priority between Jira Cloud and Zendesk. So whenever the admin on the outsourcing team changes the ticket priority, your team will get instant updates. 

Syncing issue priorities during the initial phase of mergers and acquisitions can benefit both parties. This can also be applied internally between teams working on a similar initiative.

You can also handle comment visibility by limiting the comments that will appear on the remote side of the connection.

Connect Sales and Onboarding Teams

If you’re offering services online, you may use Zendesk for sales and Jira to manage your user data. Your sales team will work with clients to set up contracts, during which they’ll collect various data stored on Zendesk. 

Connect sales and onboarding teams

When they make a sale, you’ll want to transfer some of this information to Jira. An integration tool can do this automatically, filtering the data and transferring necessary data to Jira tickets. Your onboarding team can use these tickets to help set the new customers up with their accounts.

An integration tool can do this automatically, filtering the data and transferring what’s needed to Jira tickets. Your onboarding team can use these tickets to help set the new customers up with their accounts.

Key Takeaways 

A Jira Zendesk integration can increase collaboration productivity, tighten connection security, and automate data exchange. 

Exalate lets you do this easily and gives you a flexible interface to control the integration. You can share what you want and set the conditions for sharing. All of it can be easily adjusted and switched on and off quickly.

If you want a reliable Jira ServiceNow integration, book a demo with our solution engineers.

Frequently Asked Questions

Why integrate Jira and Zendesk?

Integrating Jira and Zendesk can reduce information silos between the engineering and the support team. Tickets raised in Zendesk can be fast-tracked and forwarded automatically without manual errors as issues in Jira. You can filter and send only the required ticket information. The support team will have visibility over the status of the ticket without asking for updates from the engineering team. 

How do I connect Jira and Zendesk?

There are both native and non-native ways to connect Jira and Zendesk. 

A native app is available for connecting these platforms. It gives a holistic view of Zendesk tickets with customer conversations for the team working in Jira so they can resolve issues faster. There are various third-party integration tools like Exalate that help set up bespoke integrations between Jira and Zendesk. You can configure your integration via a visual interface or set up advanced data mappings using the Groovy-based script mode. 

What can I sync between Jira and Zendesk?

You can sync the ticket summary, internal comments, tags, customer information, etc from Zendesk to Jira. From Jira, you can pass the issue status, comments, attachments, etc to help the support agent give status updates to the customer. You can connect multiple Zendesk tickets to a single Jira issue or sync multiple Zendesk instances to a single Jira instance in an MSP (Managed Services Provider) setup. 

The possibilities are endless, so choose a solution that best suits your requirements. 

Can I integrate Jira and Zendesk for free?

Yes, you can integrate Jira and Zendesk for free using a native integration app. However, the app is limited by the data mapping and synchronization it provides. You would typically need to explore third-party apps or build a custom integration using APIs to connect Jira and Zendesk. While some apps or plugins offer free plans with basic functionality, more advanced features and capabilities might require a paid subscription. We recommend you visit the respective marketplaces to explore the available integration options.

Recommended Reads: