How to Set up a Jira GitHub Integration: The Step-by-Step 2025 Guide

Jira GitHub integration

In today’s fast-paced business world, managing tasks across different platforms is quite a challenge. Imagine you’re in Jira, and you need to sync seamlessly with a partner or a client using GitHub. That’s where a Jira GitHub integration comes in handy.

Jira and GitHub are both excellent tools for managing projects, but they have different feature sets, strengths, and weaknesses. Connecting them will enable teams to work in harmony and optimize their workflows without tampering with each other’s autonomy or security. 

By connecting these platforms, you create a shared space where teams can collaborate efficiently. But before diving in, let’s explore the benefits and potential challenges. We’ll then go ahead to choose the right integration GitHub Jira solution and implement it smoothly.

Get the Jira GitHub Integration Guide

Learn how to achieve seamless integration between Jira and GitHub, step-by-step.

Why Integrate Jira and GitHub?

A Jira GitHub integration that filters and sorts the shared data can present it to each team in a form most useful to them. Data they need is shared, but fields they don’t need can be removed from their copy. That means they can function autonomously and more effectively.

Teams using GitHub and Jira will likely make use of whichever features are the best fit for their needs. Using them both together means your teams will be able to take advantage of all the positive features while mitigating the drawbacks either platform may have.

They are both widely used in software development, so those of you working in that field will likely be familiar with them. 

Choosing the Right Technology for a Jira GitHub Integration

To get the most out of your integration you need to consider the potential issues that could arise with it. Problems are always easier to handle if you think about them in advance. With that in mind, choosing a platform that can handle these issues effectively will make life easier for your teams and allow them to focus on what they do best. 

Decentralized Integration

The items you share in Jira and GitHub consist of multiple fields containing different types of data. If you look at incoming items from the other team, you will find that some are useful, but others aren’t. You need a system that can give you fine control over what is shared and allow you to pick exactly what fields are stored. 

Two way sync

You don’t necessarily want to have a meeting every time you need to make a change in the system. Being able to change things independently without having to involve the other team and having control over what is shared and what is not will make things faster and easier. Decentralized integration for each end of the system is a clear goal.

Flexibility

You might also want to customize fields and give them specific values as well as assign specific kinds of items to specific people. Being able to identify and filter incoming data will help you here.

Each team may want to make changes to the way they use information as their needs evolve and their understanding of how they can use the synchronization deepens. You may want to add or remove data provided to the other team.

In addition to controlling what is shared, you also need to control the conditions that trigger information exchange. Being able to create and combine rules to do this can give you the flexibility you need to make your integration effective.

Reliability

In an ideal world, your GitHub and Jira integration would work perfectly when set up without any further intervention from you. In reality, these systems usually suffer downtime. Connections are dropped, servers need maintenance and software needs updates.

When this happens on one end of your integration, you need to be confident the whole system won’t break down. It needs to be able to handle outages to either side and recover gracefully when things are working again.

Integration security

Your system should be able to handle whatever the world throws at it, and get up, brush itself down, and continue to work as before.

I’ve chosen Exalate to set up the Jira GitHub integration as it is designed with these three specific features in mind. It promises to deliver autonomy, flexibility, and reliability and is simple to set up and configure.

How to Set up a Jira GitHub Integration in 6 Steps 

To set up your GitHub Jira integration, you need to install Exalate on both platforms and then create a connection between them.

After that you can configure the connection to meet your integration needs, controlling what is exchanged, and setting the conditions under which exchange takes place. 

But before we dive in, would you rather watch a tutorial than read a guide? Then check out this video:

For more information on any of these steps, have a look at Exalate’s documentation

Note: You can also use Exalate to set up a GitHub Enterprise Jira integration. The steps are the same, but the installation step might be a bit different.

You can do these first two steps in either order, but I’ll start with Jira.

Step 1 – Install Exalate on Jira

The exact process depends on which version of Jira you are using. This guide is for Jira Cloud. You can read more about that here.

If you are using Jira Server or Data Center, have a look at this guide instead. And if you want to connect multiple Jira instances read this guide.

After logging in to your Jira Cloud instance, click on the cog in the top right to open the settings menu. Click on “Apps”, which should take you straight to the “Find new apps” section of the Atlassian Marketplace.

Click the search box and type, “Exalate”. Press enter and several Exalate apps will appear.

Exalate for Jira integrations

The one we want, “Jira Issue Sync & more”, should be listed first. Click it. You’ll be taken to Exalate’s marketplace page where you can read more about it. 

Click the “Try it free” button in the top right, and then, on the pop-up that appears, click “Start free trial”.

After a brief wait, Exalate will be installed and a pop-up will appear to tell you when it is ready. You can click “Get started” to have a look around.

Exalate for Jira trial

It should also appear listed in the left-hand menu on Jira’s “Apps” screen.

Step 2 – Install Exalate on GitHub

You can either get Exalate’s GitHub Connector for Jira on the Atlassian Marketplace.

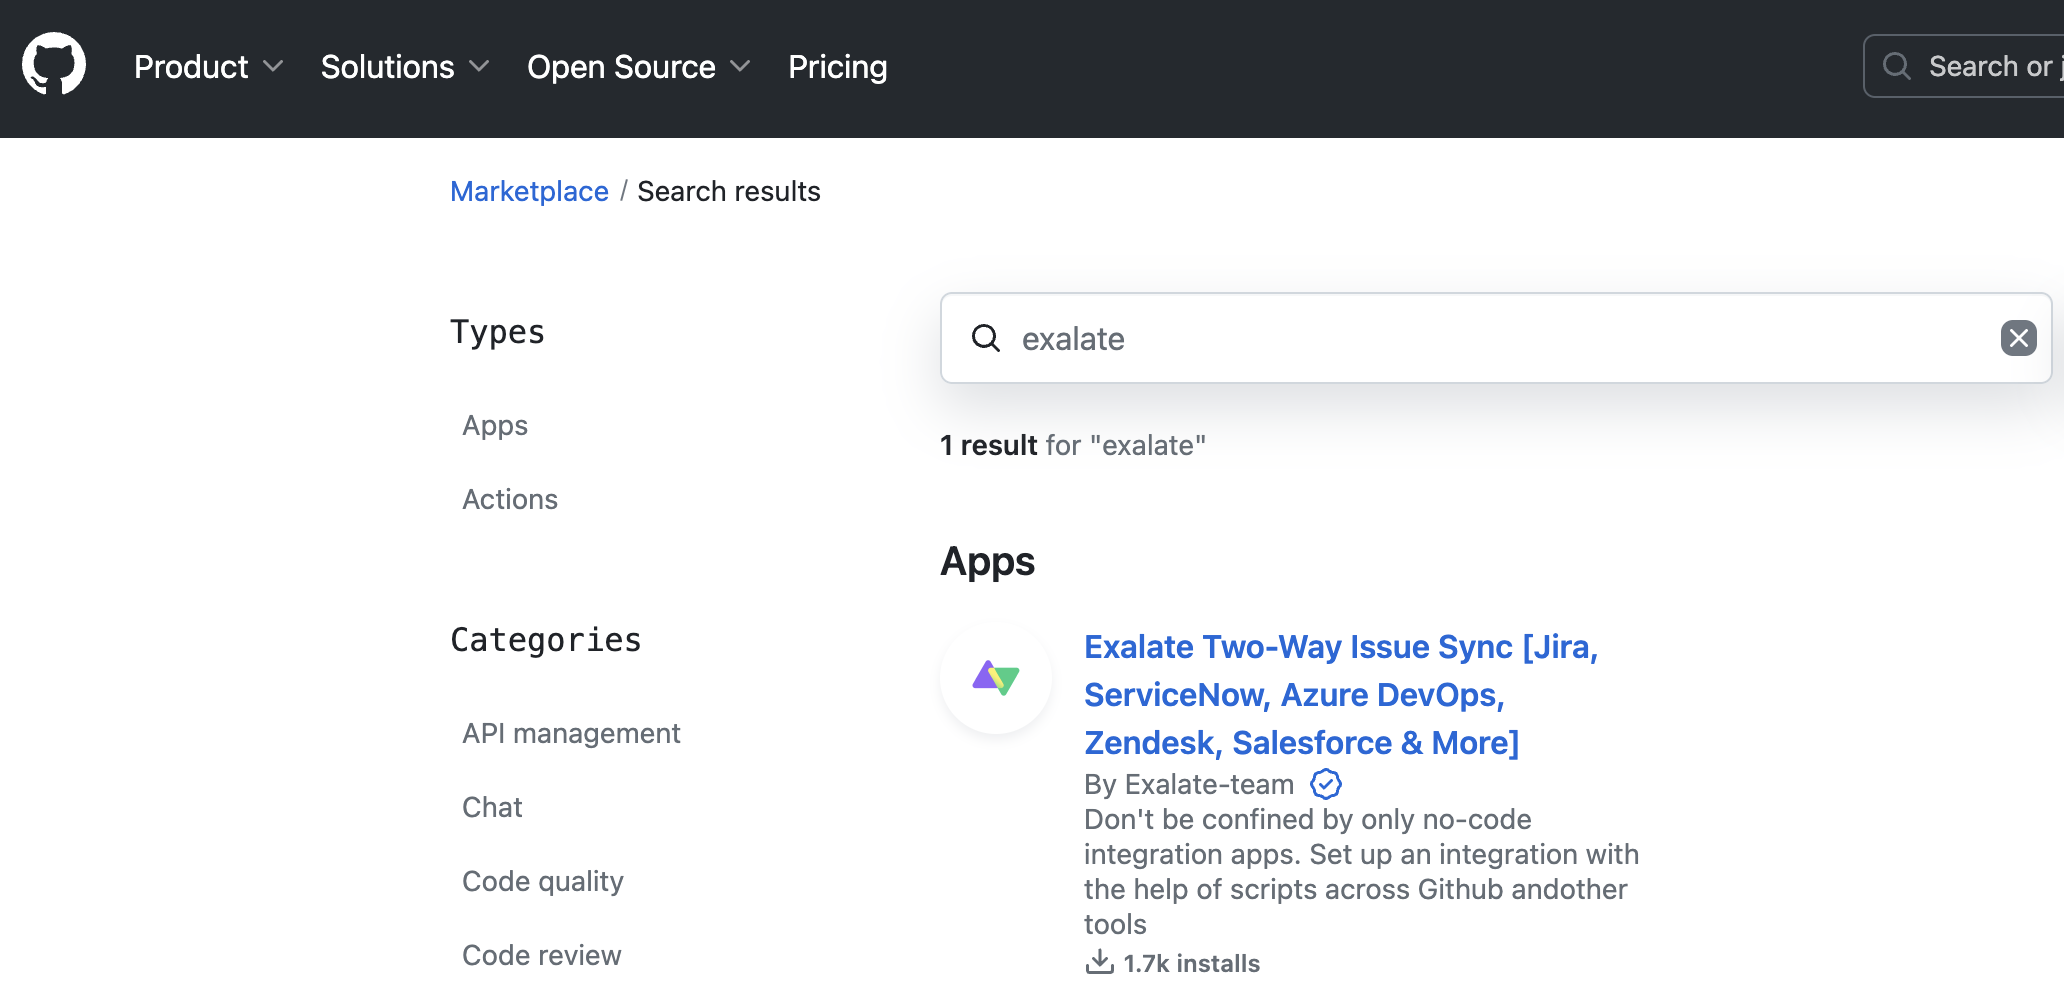
Or just go to your GitHub instance, click “Marketplace”, and then type “Exalate” into the search field.

Note: For installing Exalate on GitHub Enterprise Cloud, check this article.

Exalate for GitHub integrations

“Exalate Issue Sync” should appear, so click it to continue. Click on the “Set up a plan” button. Choose “Install it for free”, and Exalate will be available on your GitHub account.

You need to choose which of your repositories to grant Exalate access to. You can allow it to access all of them, or pick specific ones if you prefer.

When you install Exalate, it gets access to the data it needs to exchange over your connection. Code access isn’t necessary, but Exalate needs access to metadata, issues, and pull requests. 

Exalate for GitHub repository

Give it access to these and then click the “Install” button. You’ll need to either set up an OAuth token or allow Exalate to use your username and password to access GitHub.

Finally, you need to get an evaluation license for GitHub. Exalate is a paid app but is free to try, so there’s no need to pay for now. Click “License Details” in Exalate’s left-side menu. Then click the area at the top that says “30-Day Trial”. 

Enter your email in the popup that appears. When the license email arrives in your inbox, copy the evaluation key to your clipboard.

Back in GitHub, click the green “License Key” button at the bottom left of the “License Details” screen. Paste your license key from the email into the field that appears. Then click the “Update” button. Your license will now be installed and Exalate is ready to be used on GitHub.

Exalate for GitHub trial

Step 3 – Connect Your Jira and GitHub Instances

Exalate is now installed on both Jira and GitHub, but your instances are not yet connected. To create a connection, you need to “Initiate connection” from one side and “Accept invitation” on the other.

You can start from either side. Exalate’s interface is consistent across platforms, so once you’ve set it up, you can repeat the process easily.

I’ll start from the Jira side. 

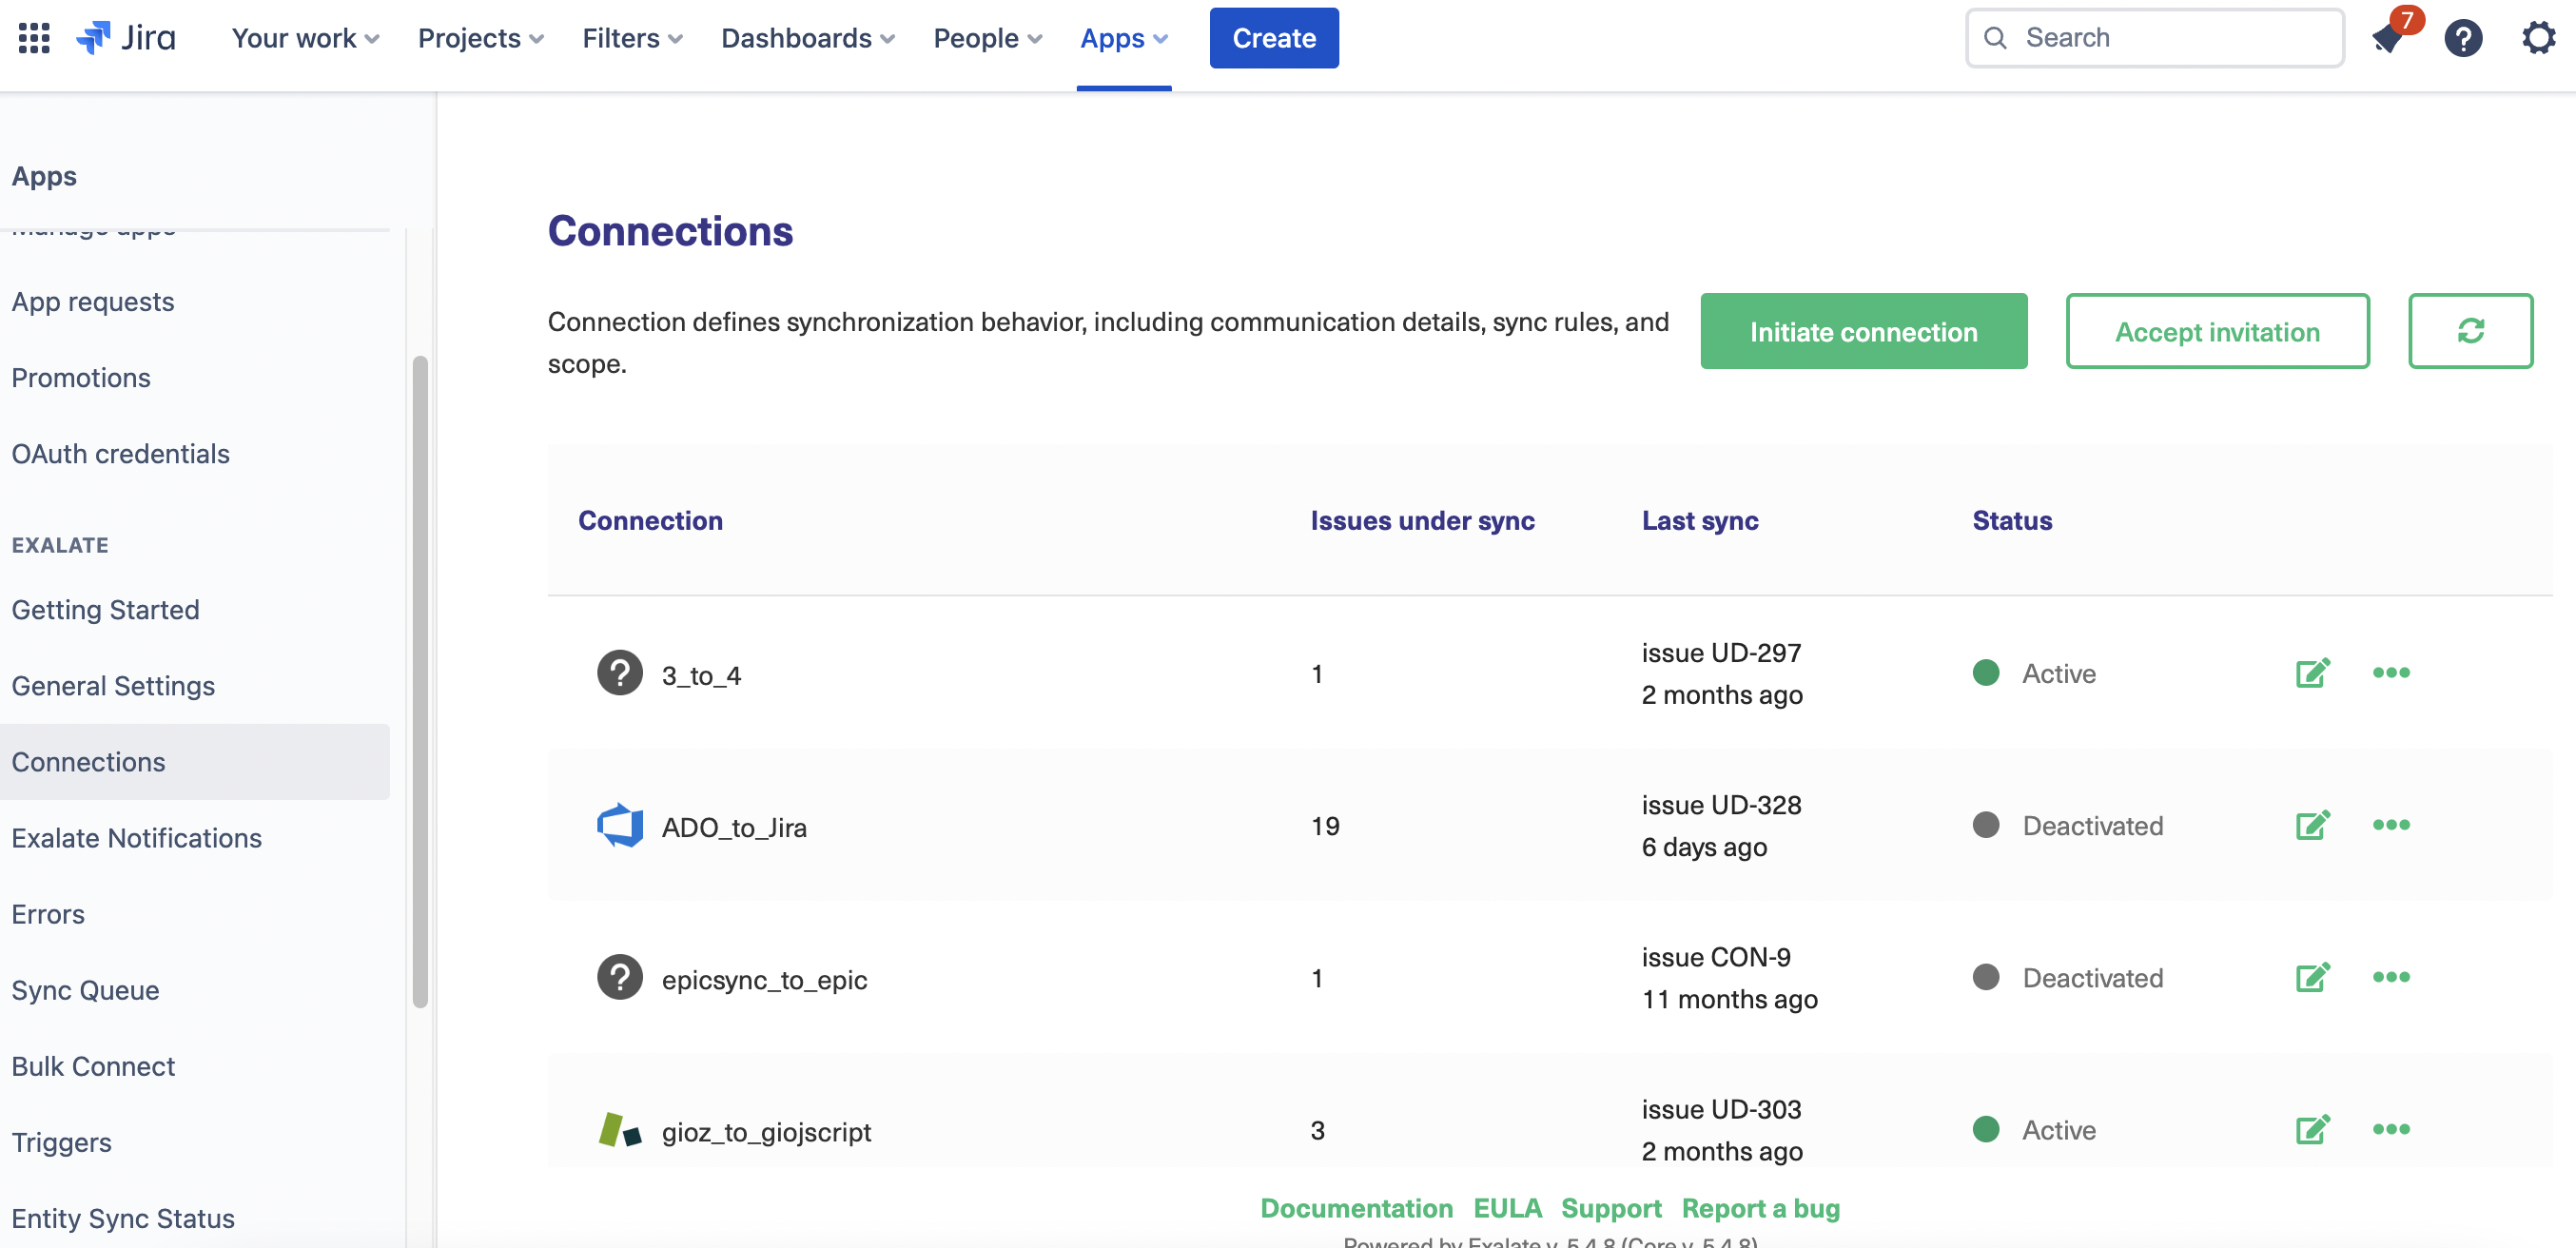
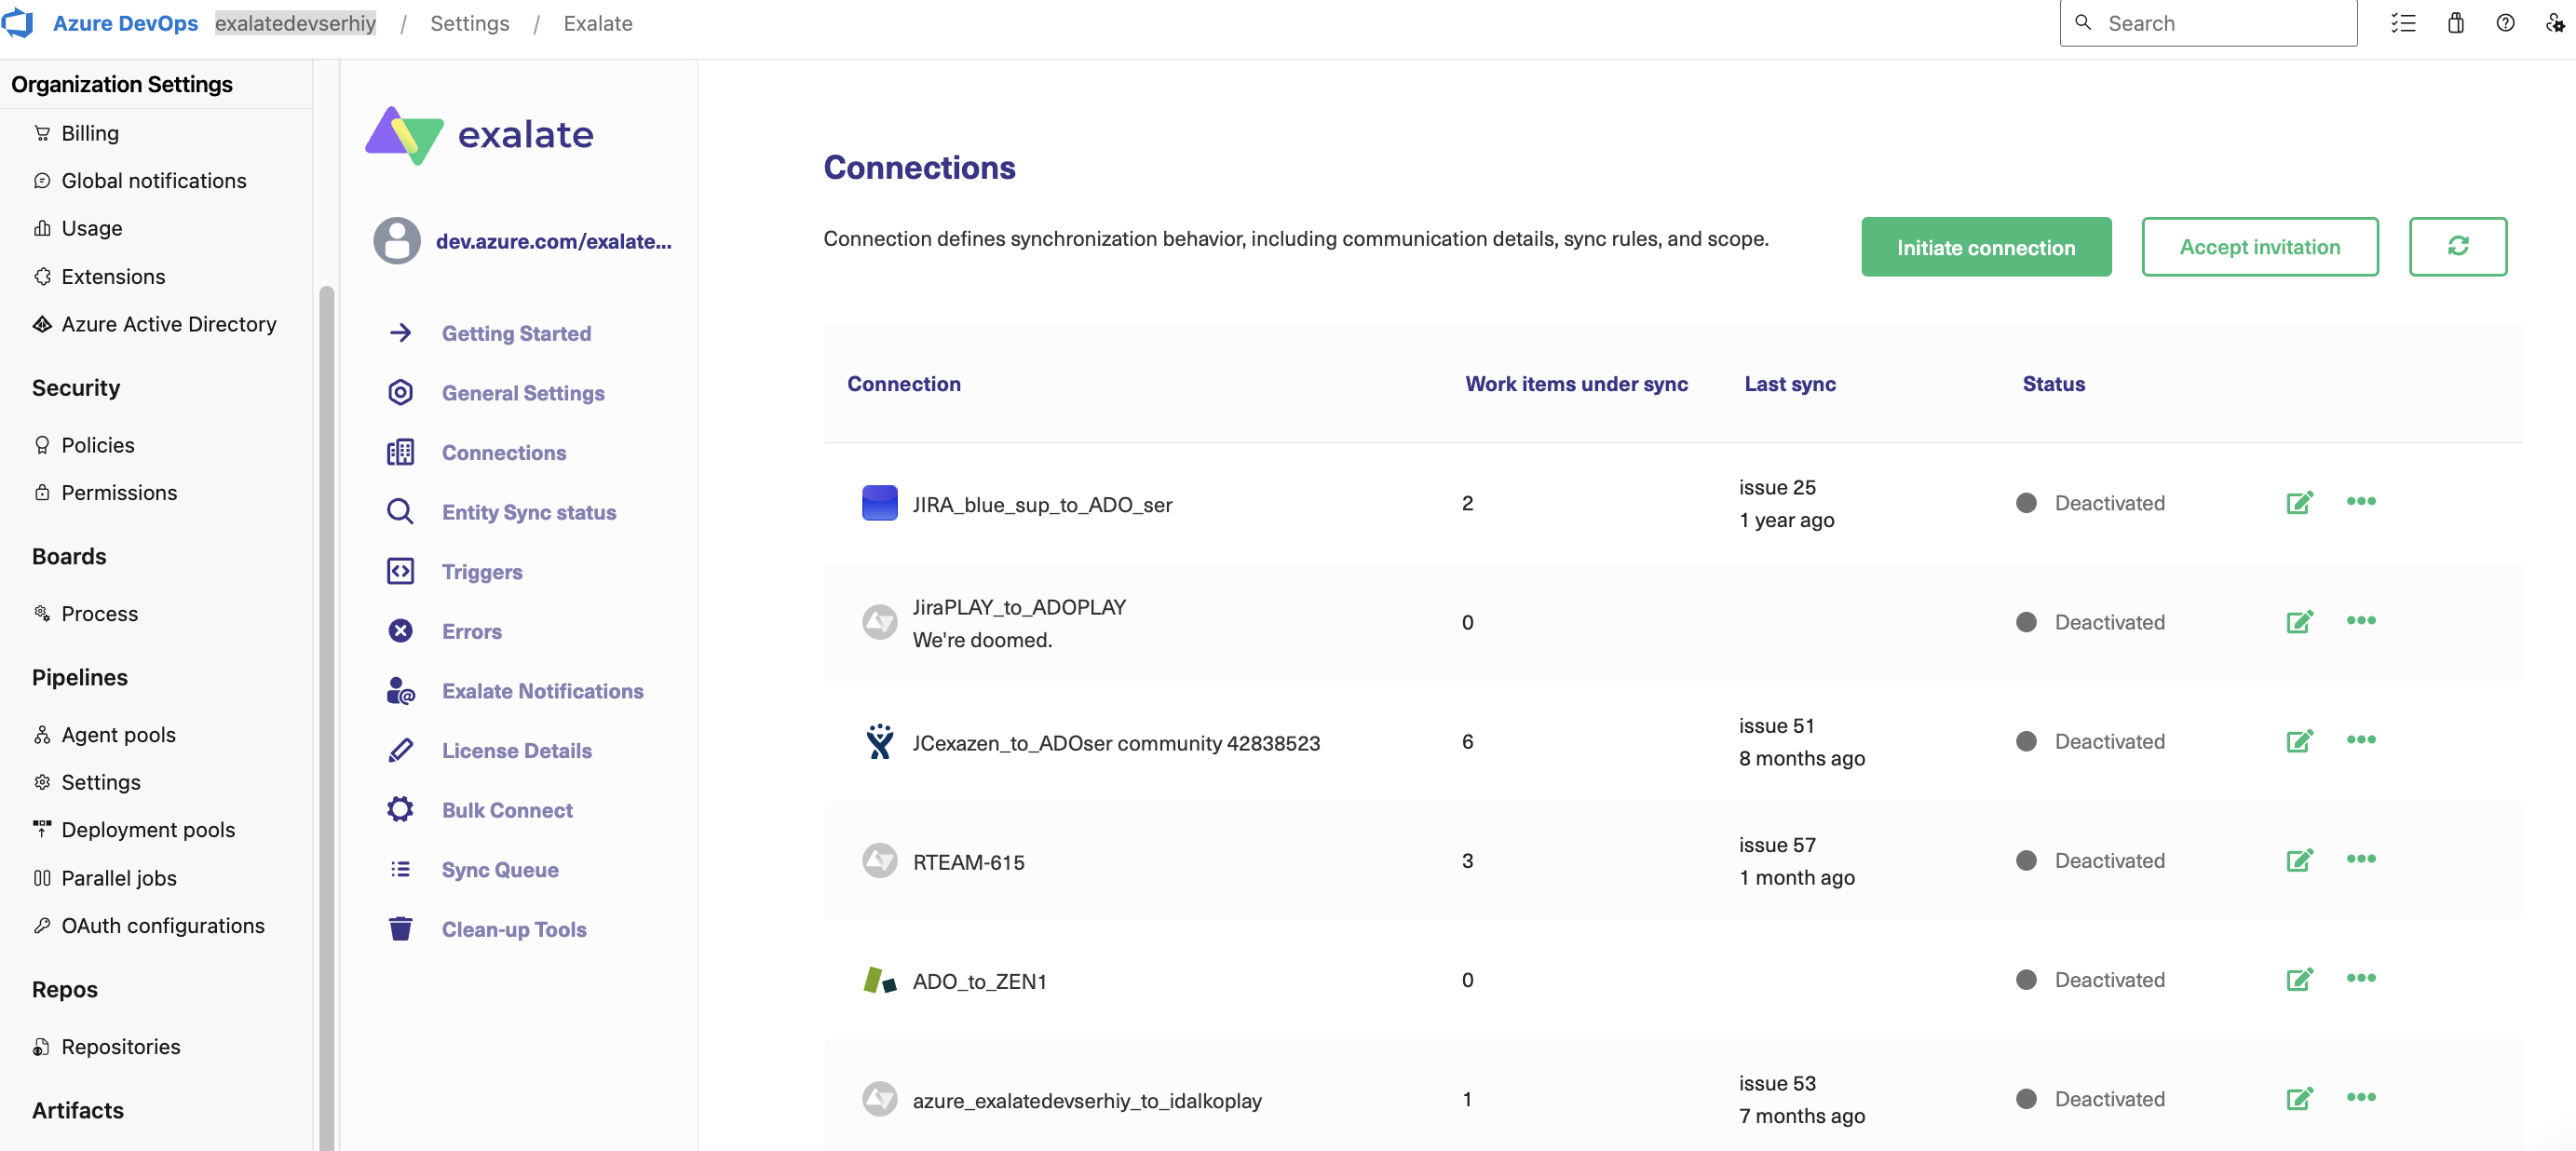
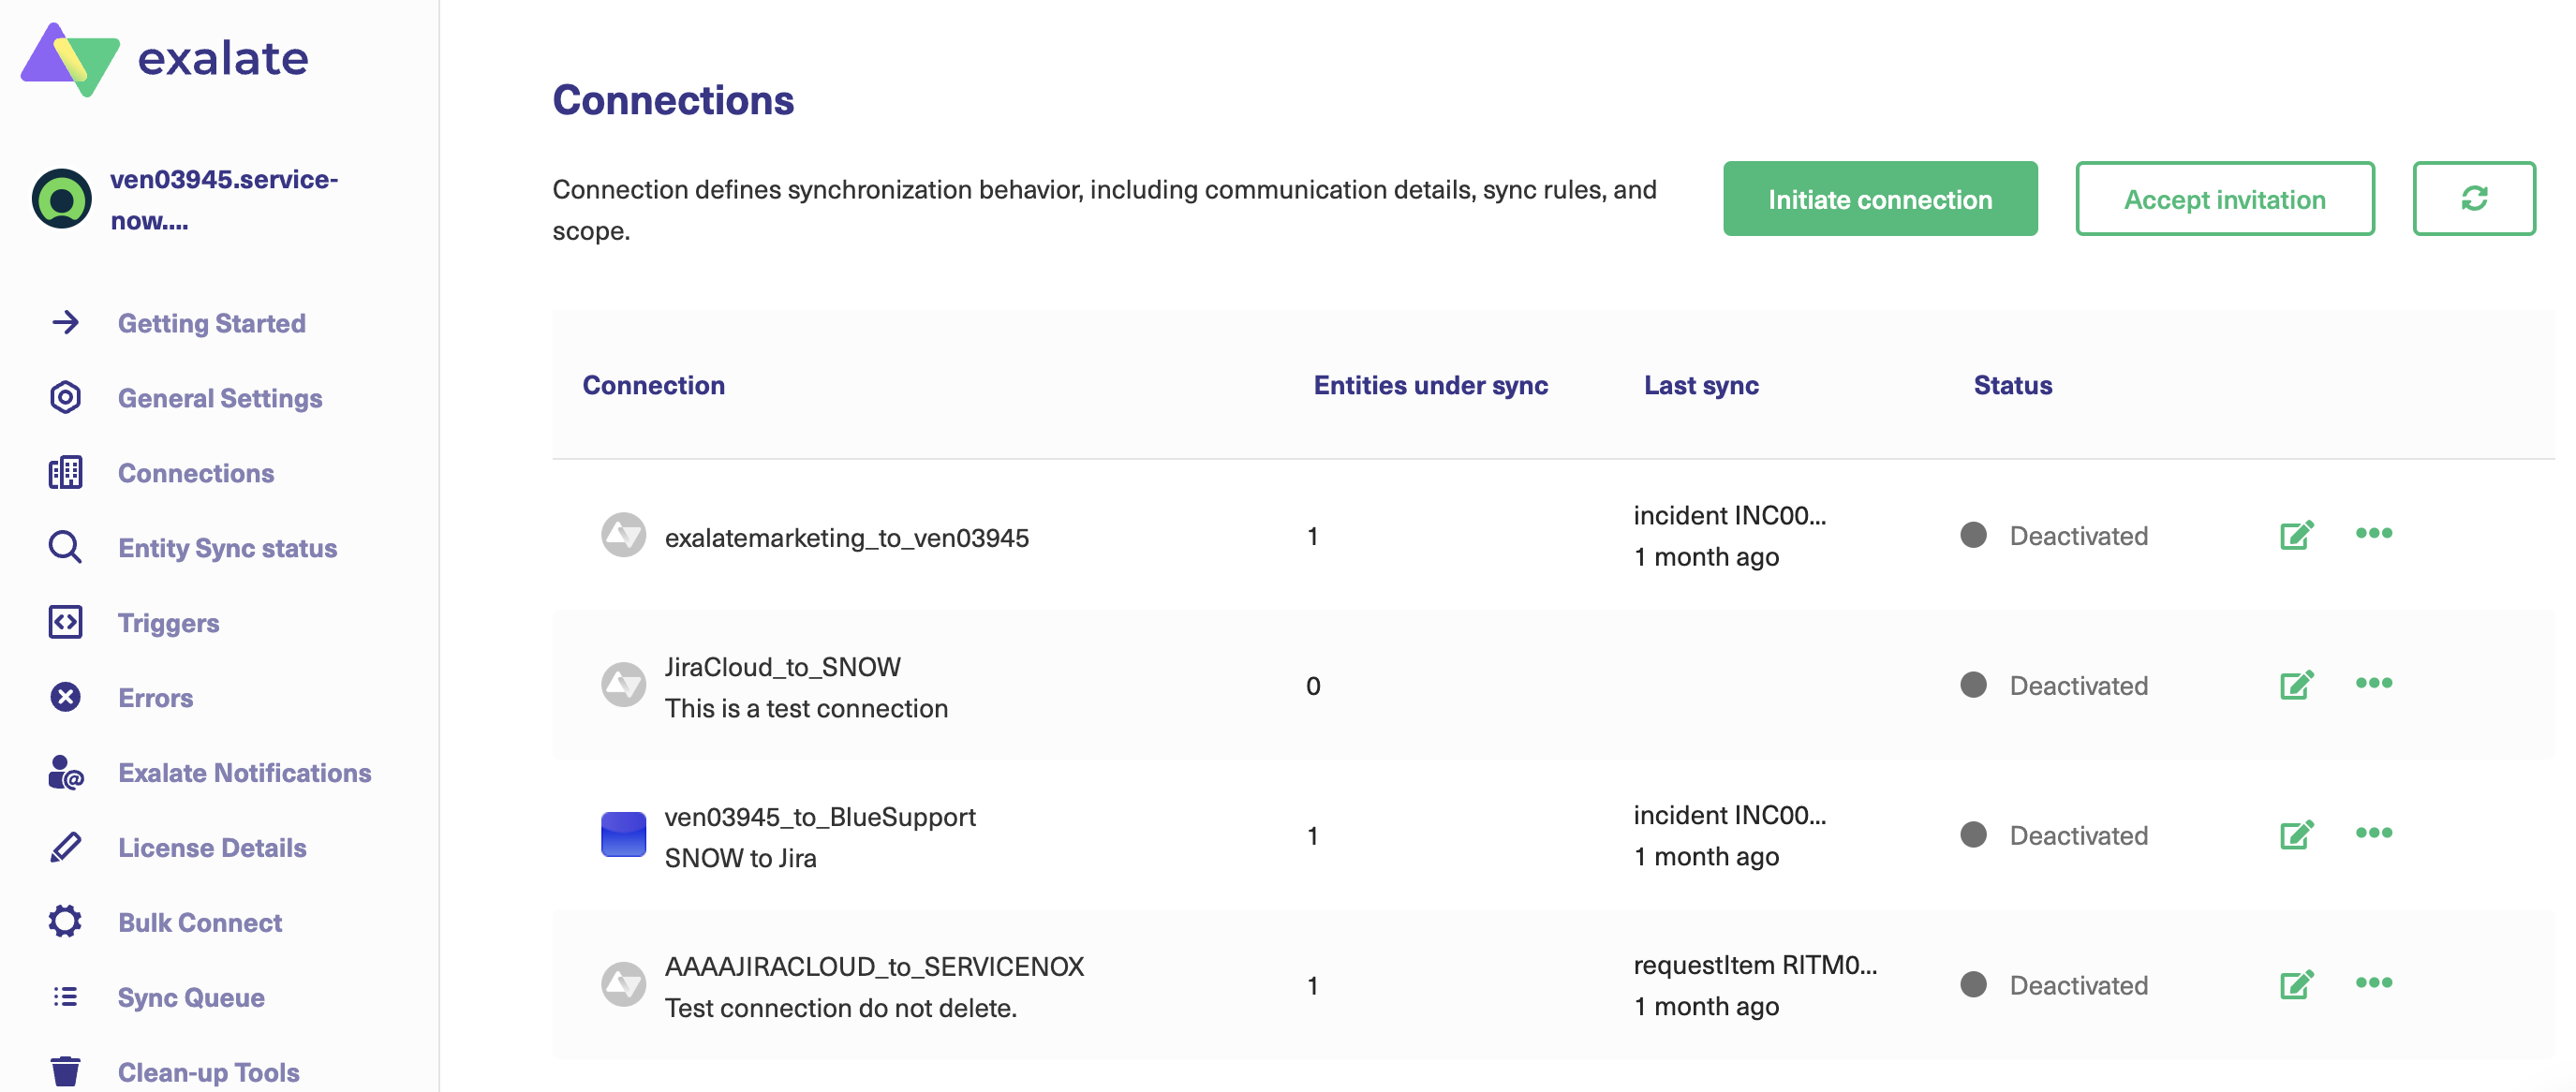
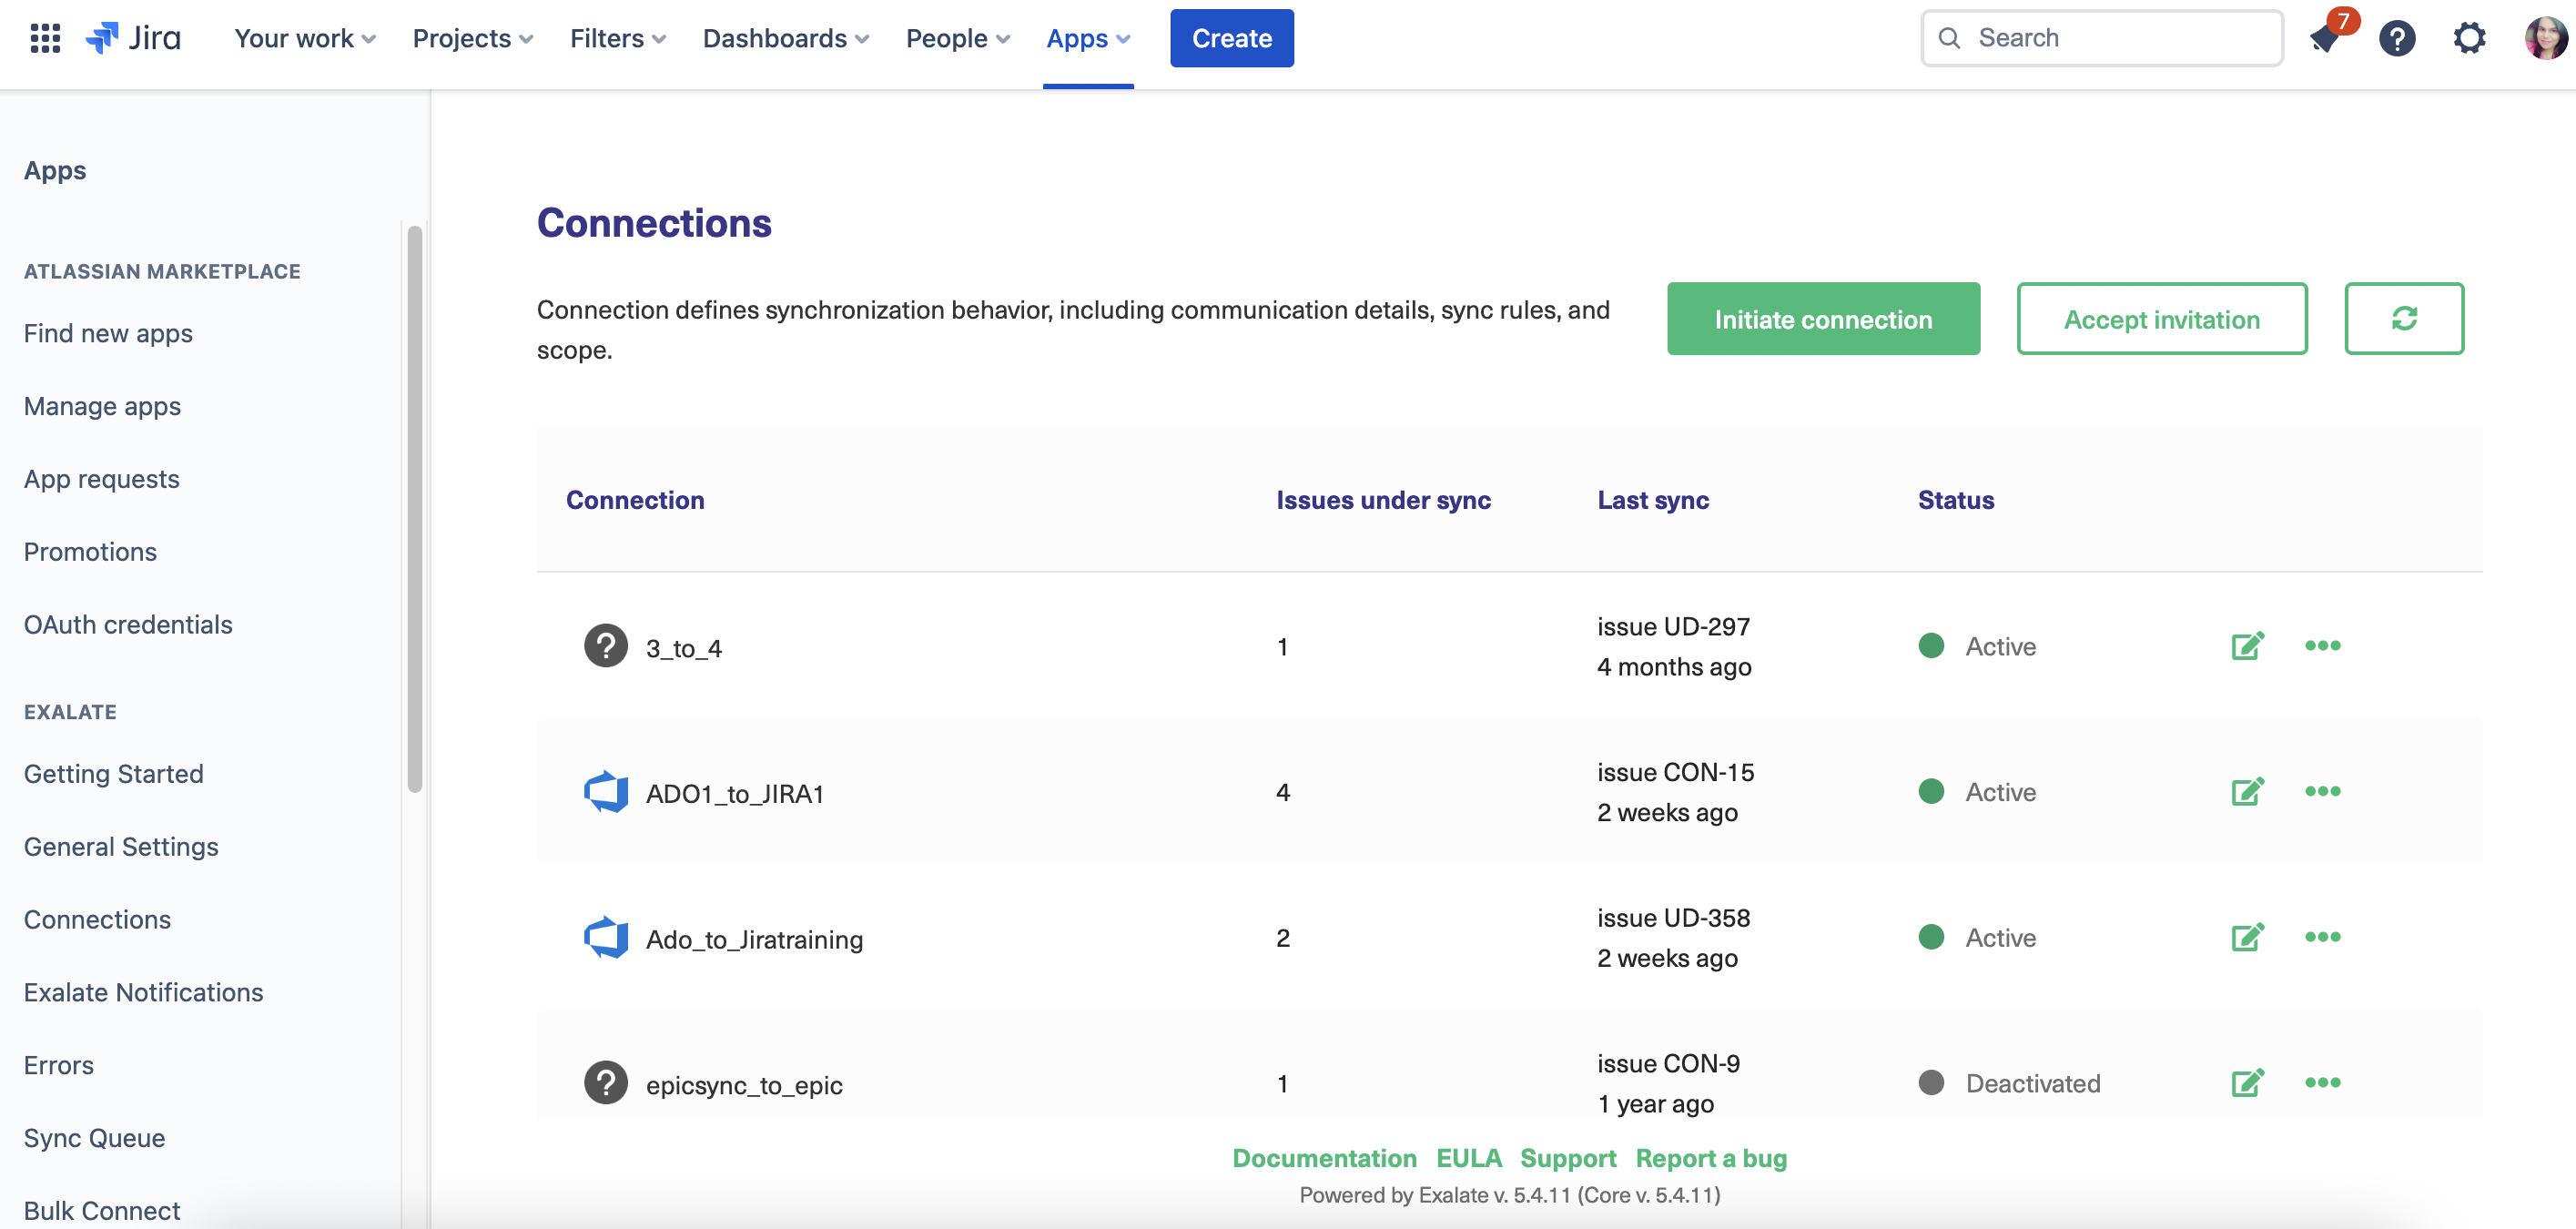
On Jira, click “Apps” and then look for “Exalate” in the left-hand menu. Click “Connections”. Connections you create will be added here. Click on the “Initiate Connection” button.
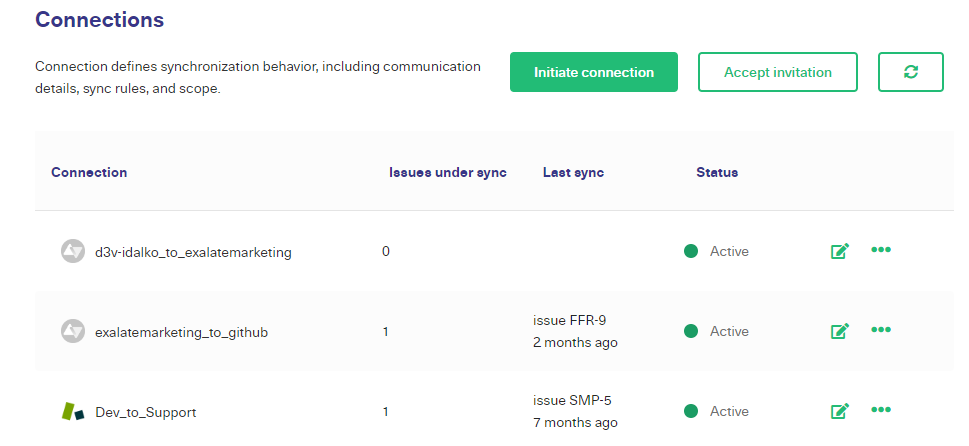
Exalate connections dashboard

You’ll be taken through several screens that let you configure your connection.

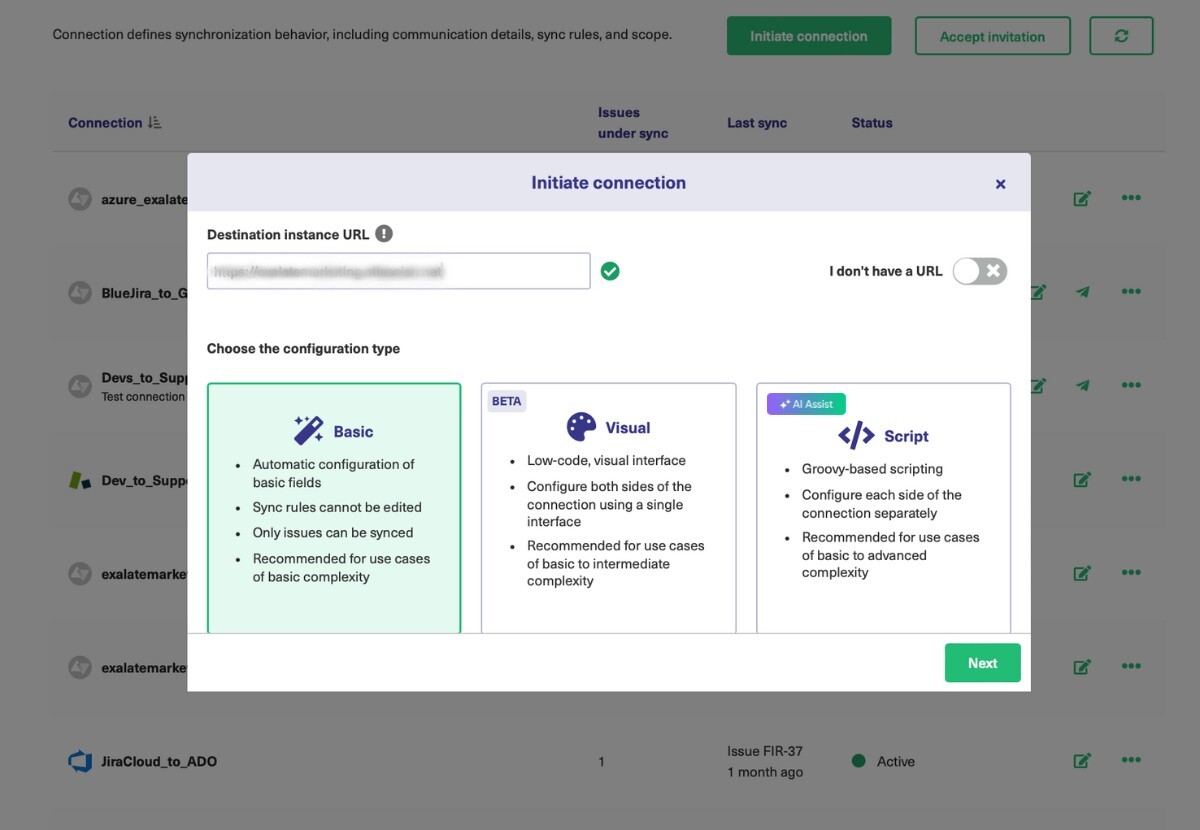
On the first screen after clicking “Initiate Connection”, you need to let Exalate know where your other instance is. Since we’re in Jira, enter your GitHub instance URL in the field provided. If you were in GitHub, you’d enter your Jira address instead.

Configuration modes in Exalate

After Exalate finds your GitHub instance, you will be asked to choose the configuration type. It supports 2 modes: the Basic Mode and the Script Mode.

You can learn more about the Free Plan supporting the Basic connection here.

Note: The Visual Mode is a low-code interface for setting up connections between issue trackers. However, it is not available for Jira integration with GitHub.  

The connections in Exalate use a set of sync rules to determine what to sync. The Basic mode has a set of predefined sync rules that allow syncing issue fields like summary, description, and comments. But they cannot be updated in this mode. 

To unlock Exalate’s full potential with advanced features and configurations, it’s better to use the Script mode instead. It gives you the flexibility of choosing what you want to sync between the 2 sides with the help of sync rules, ensuring complete autonomy. It is also possible to use AI with Script mode. We will learn more about it in the coming section.

We will go through both configuration modes in this section. 

Continue with the Basic Mode

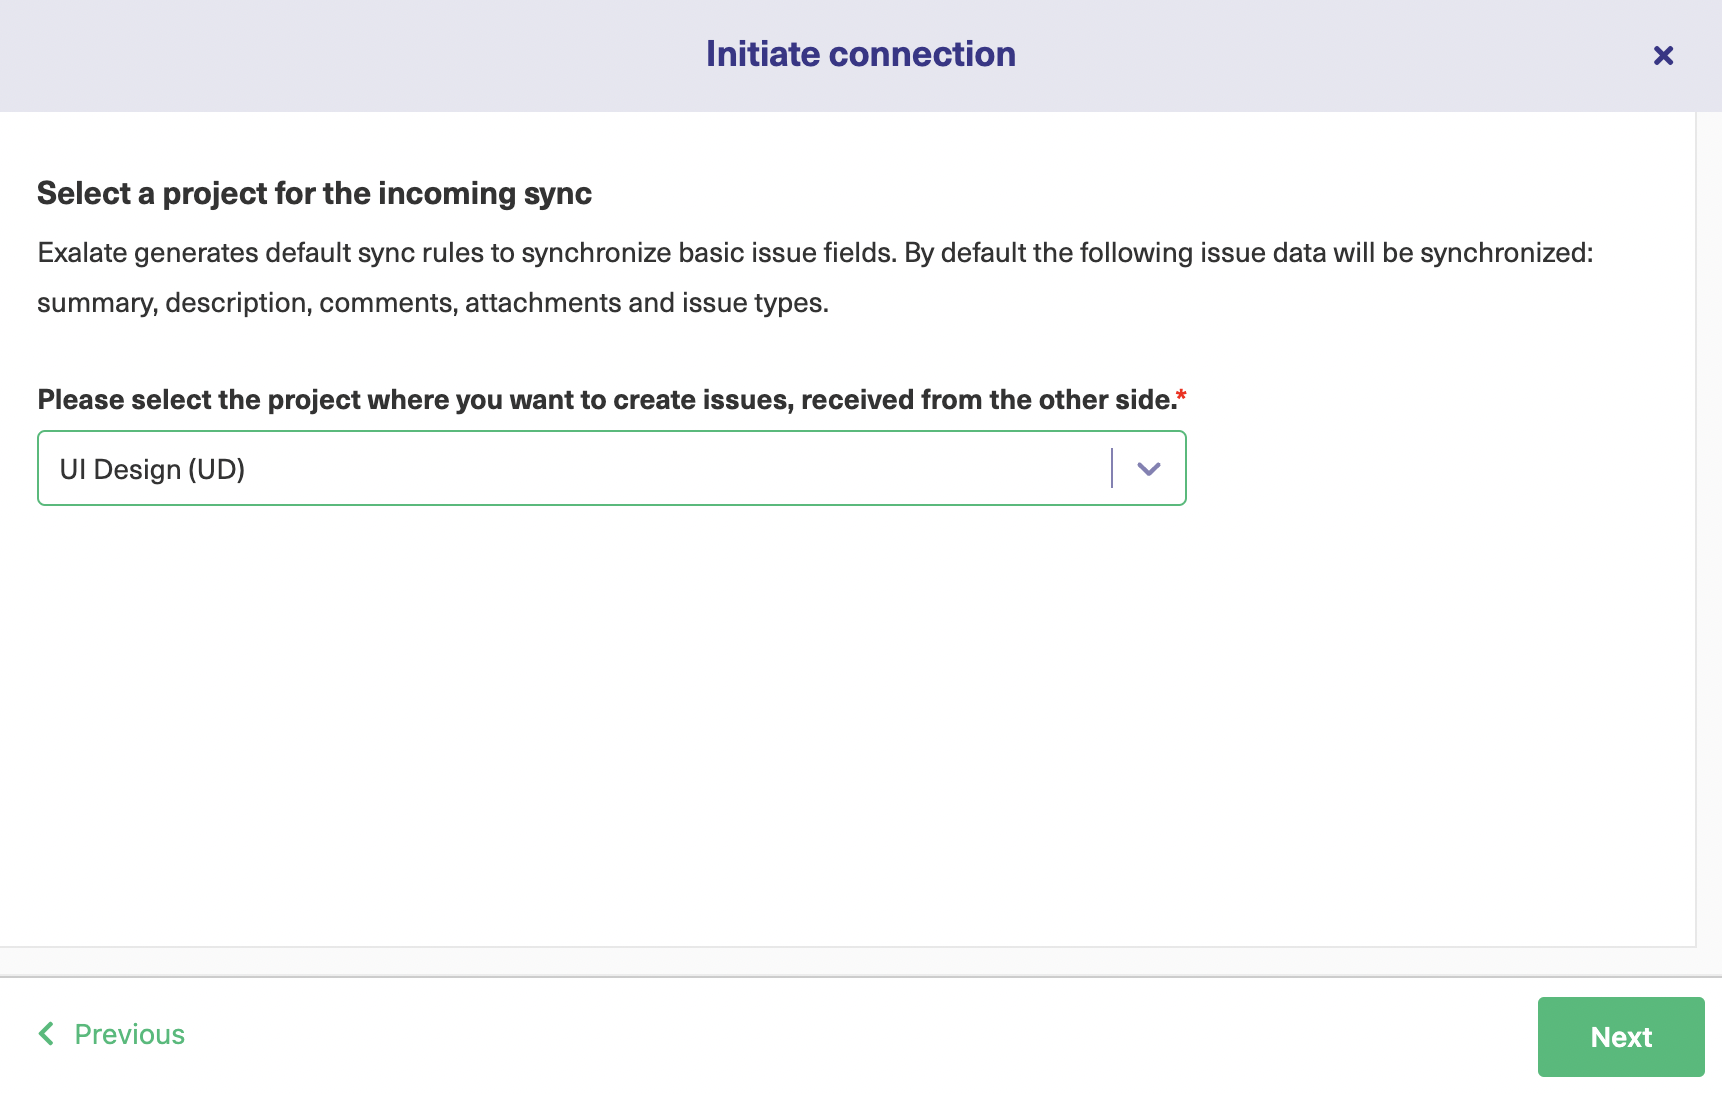
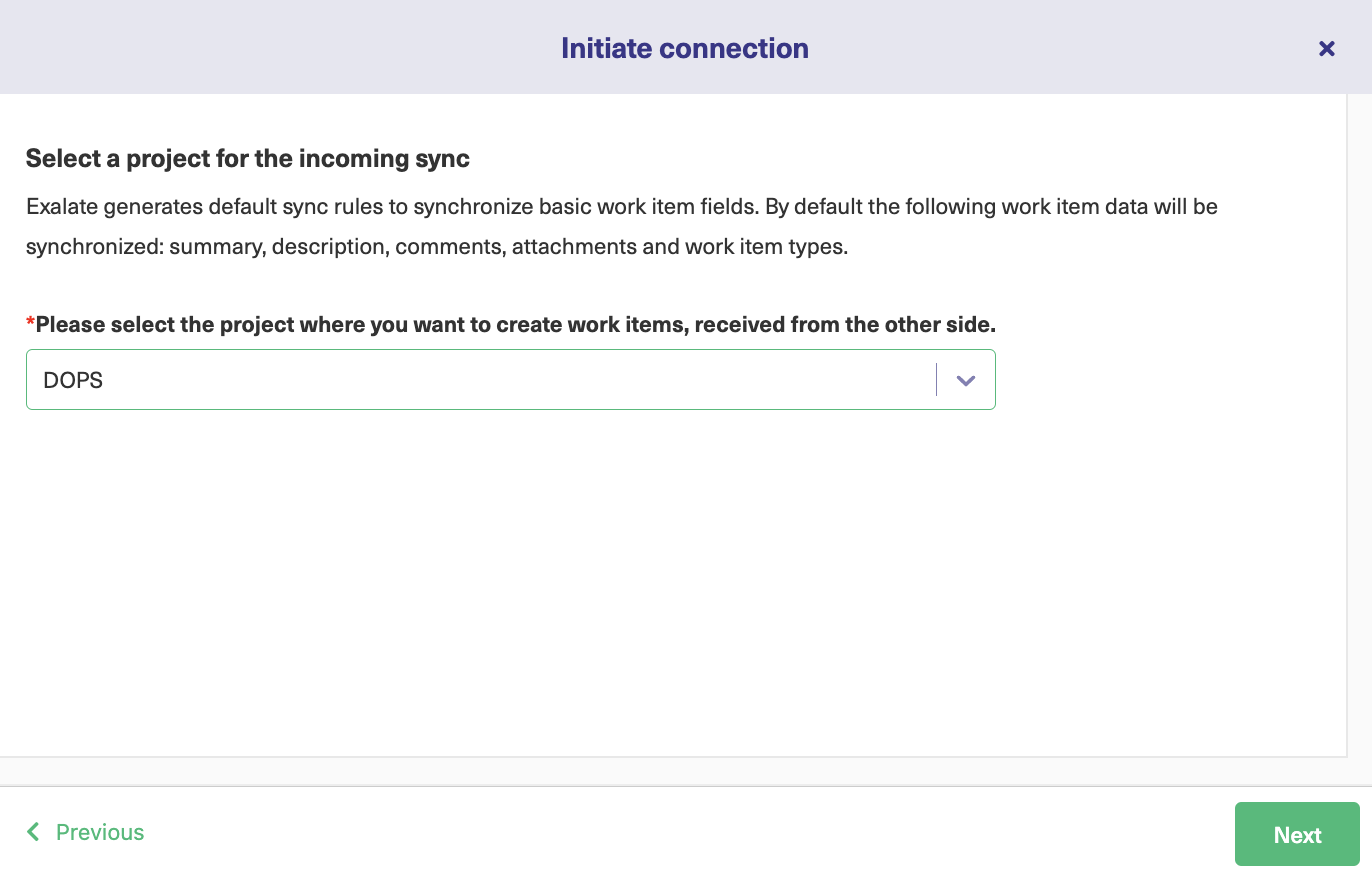
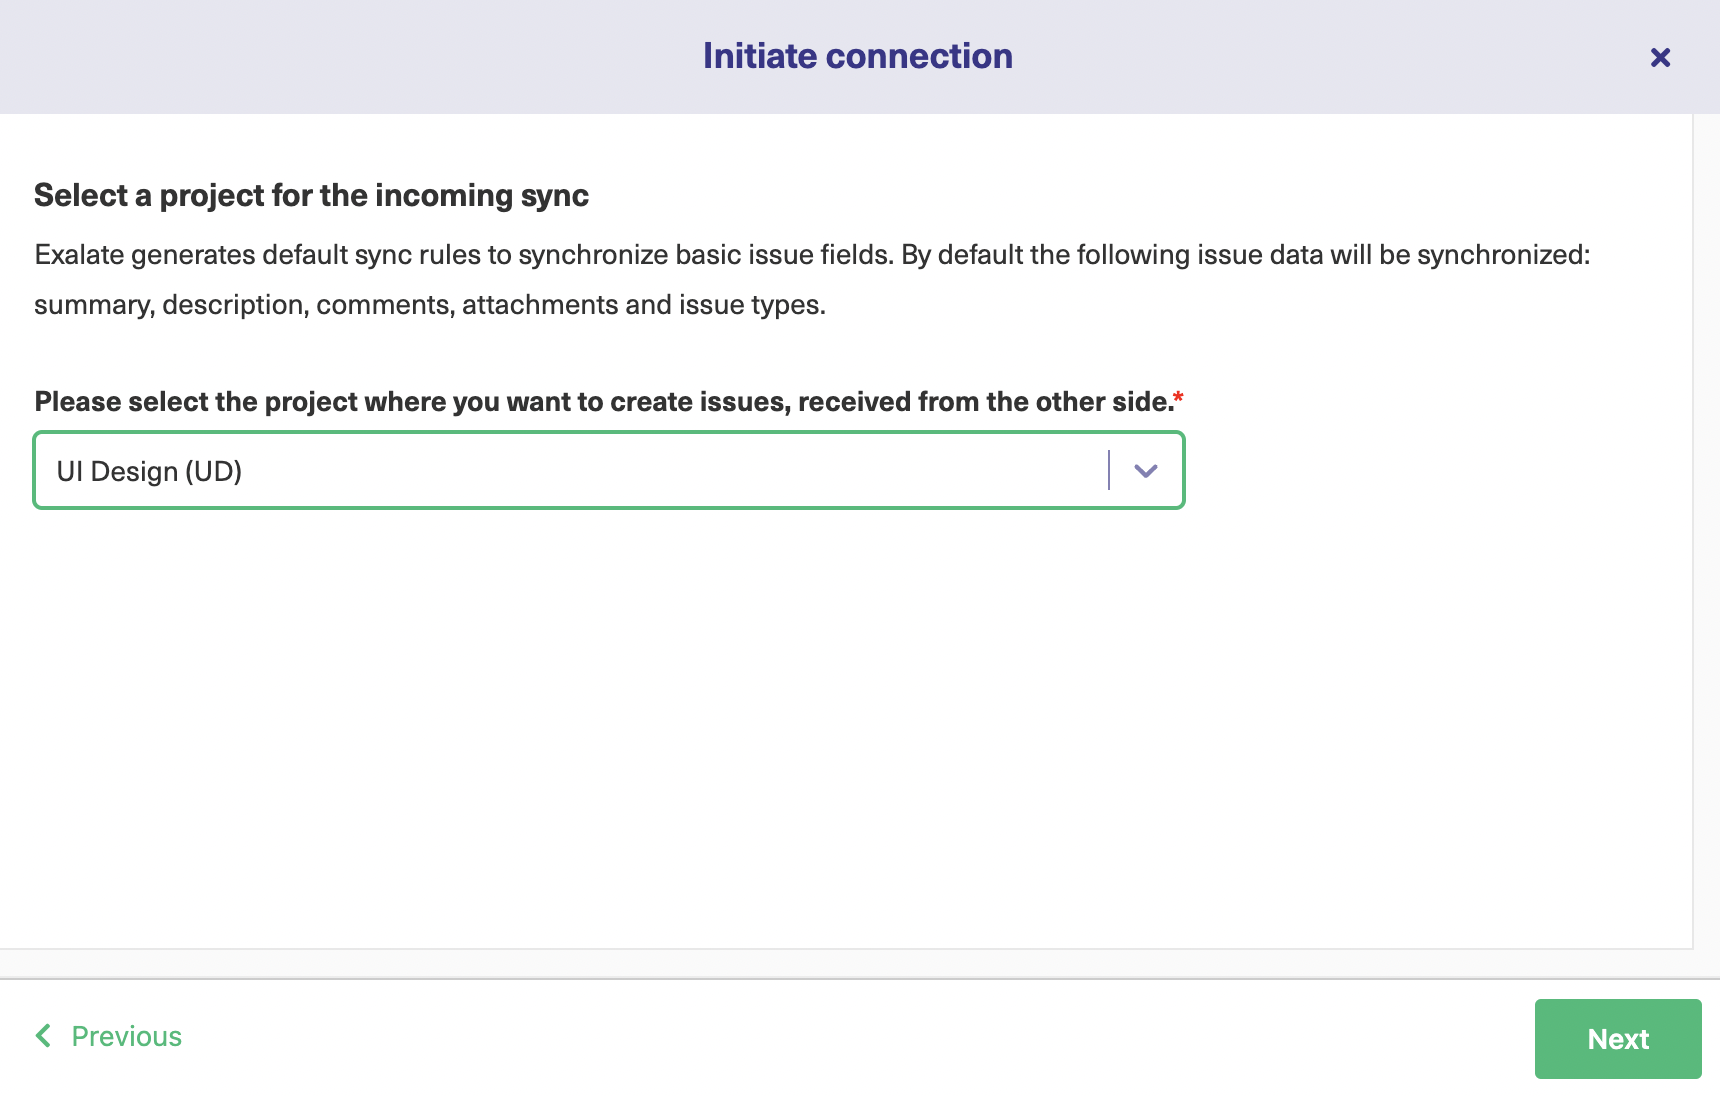
After selecting “Basic” on the screen above, click “Next”. This will redirect you to selecting a project on the Jira side. It’s the project in which you want to synchronize issues from Jira. Choose the appropriate one from a dropdown list. 
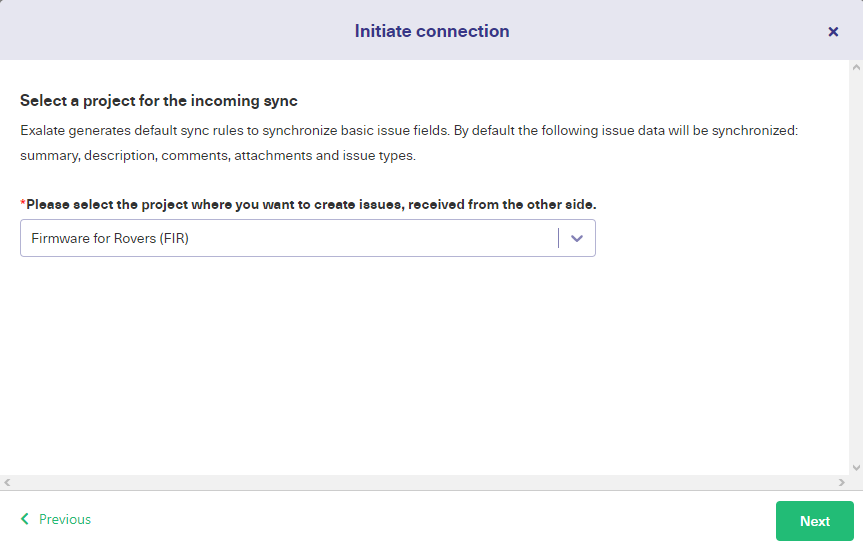
Sync with Basic mode

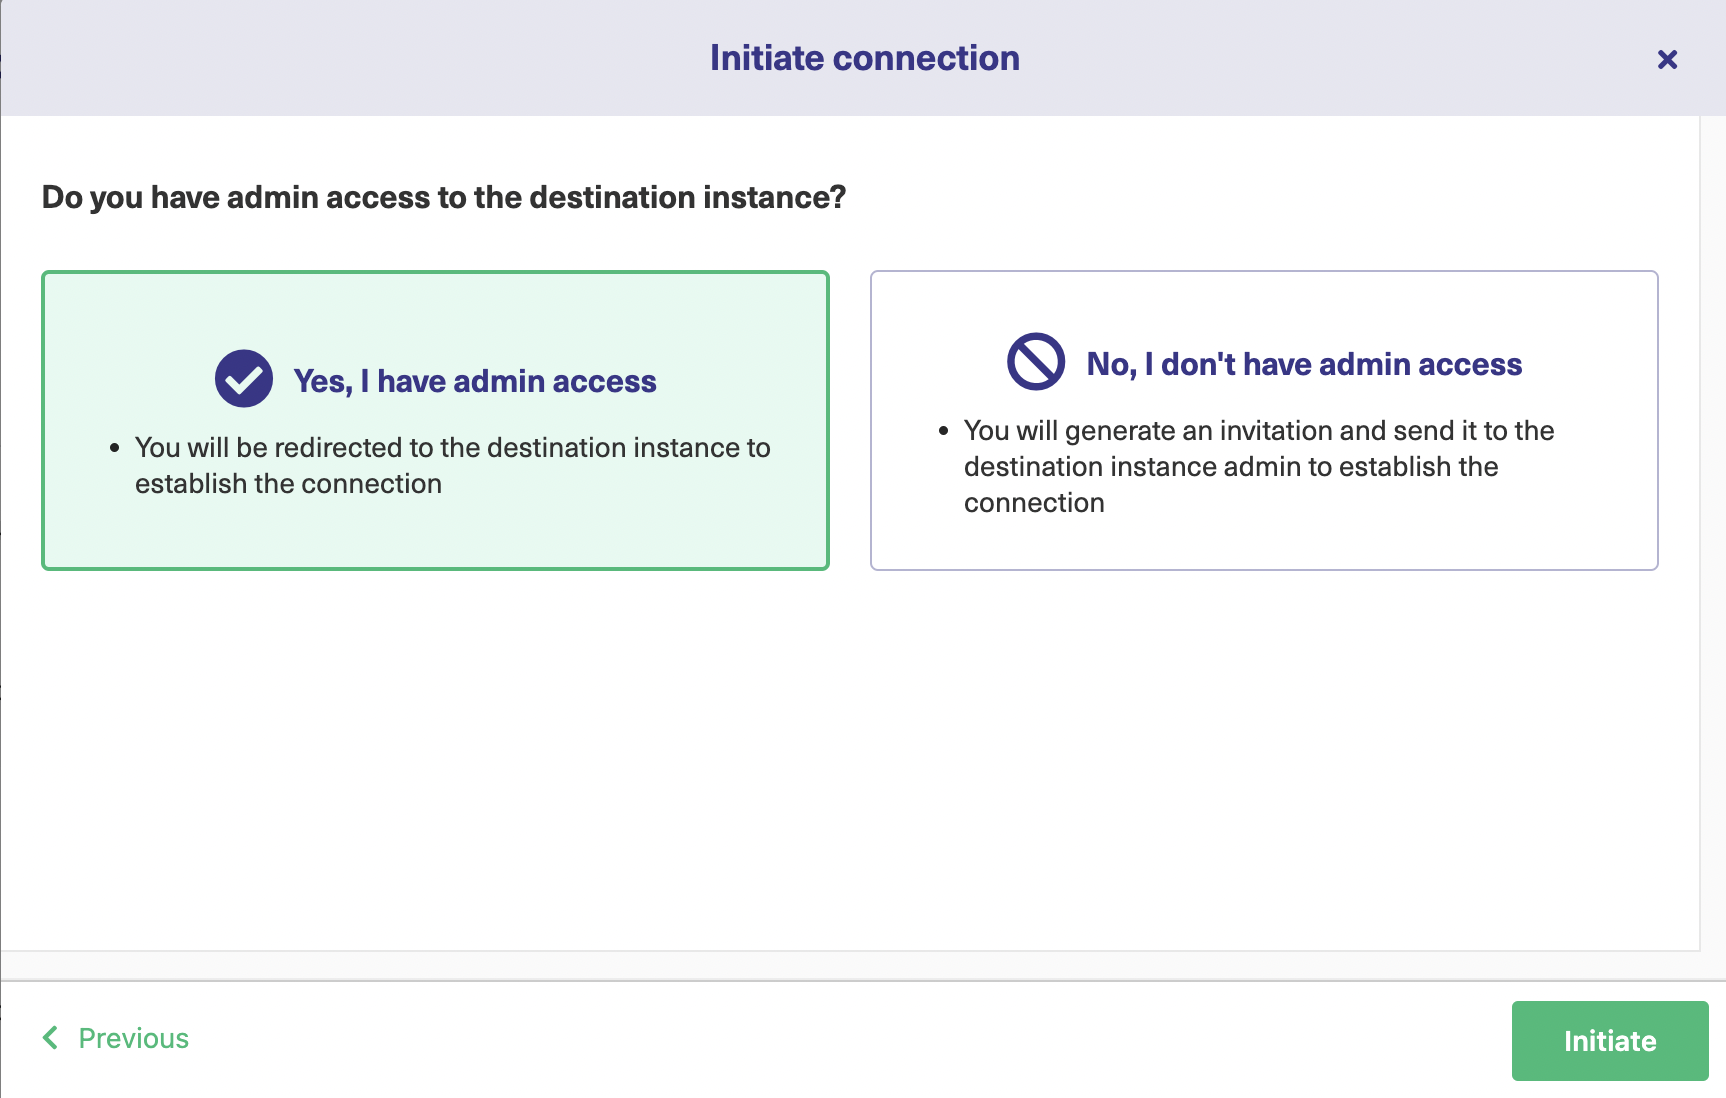
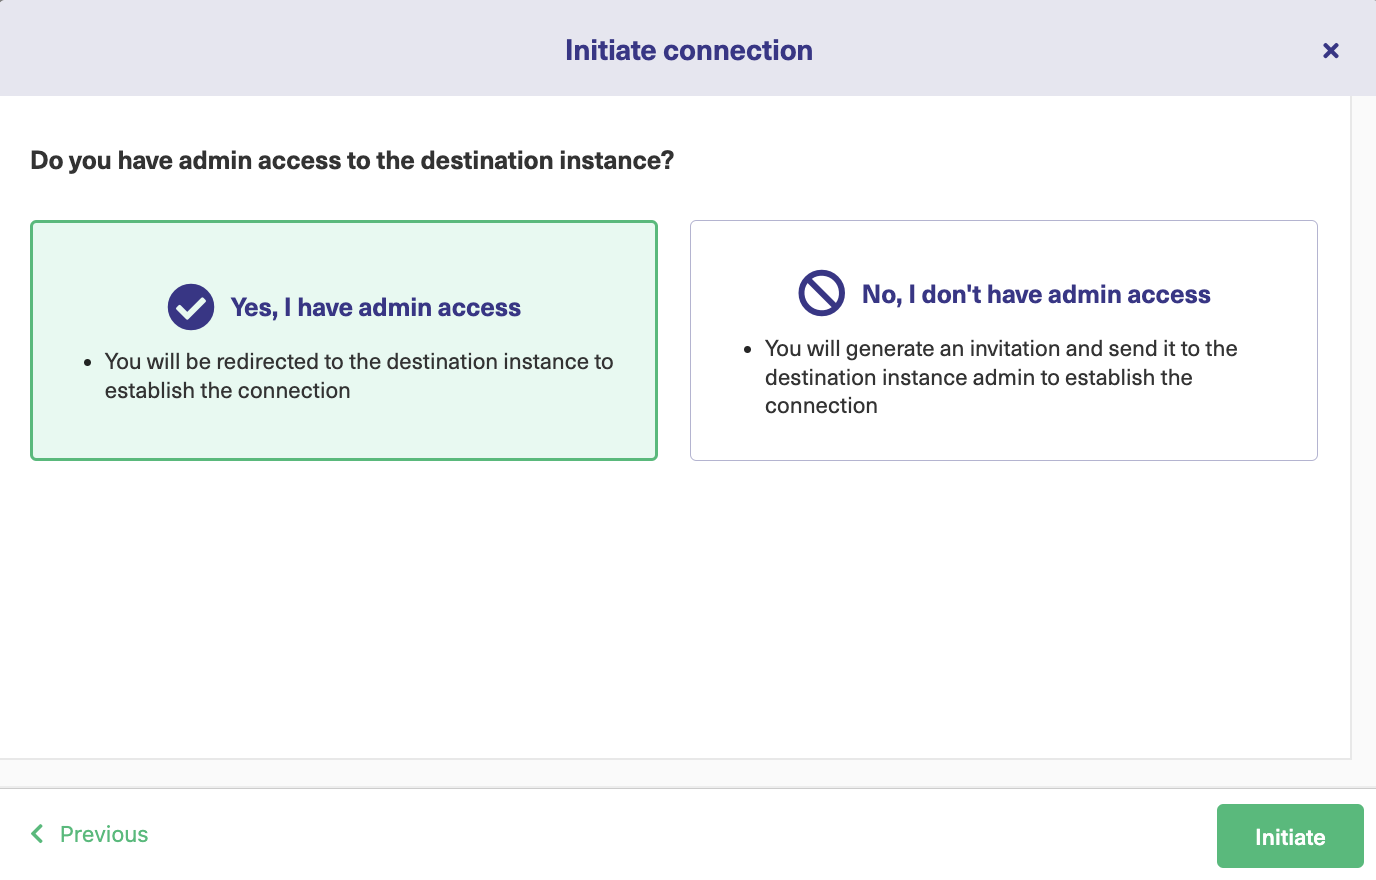
After clicking “Next”, you need to verify if you have admin access to the GitHub side. If you don’t have admin access, you will be redirected to the GitHub side to paste an invitation code.

For now, we click on “Yes, I have admin access” and then “Initiate” since we already have access to GitHub.
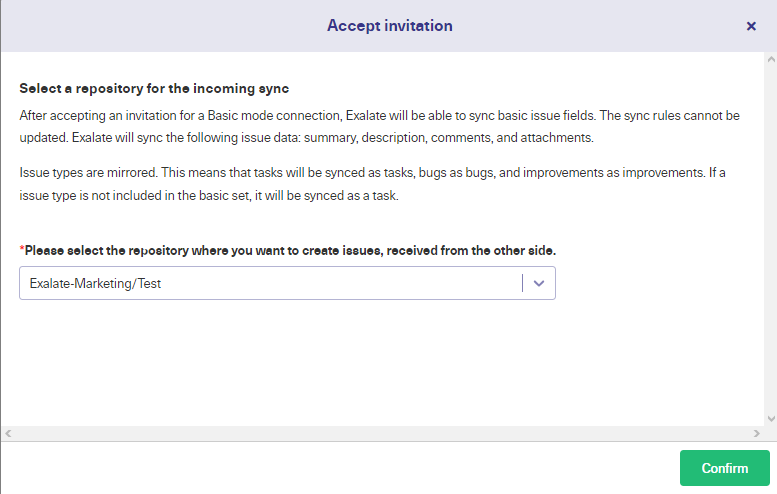
accept a jira GitHub sync invitation

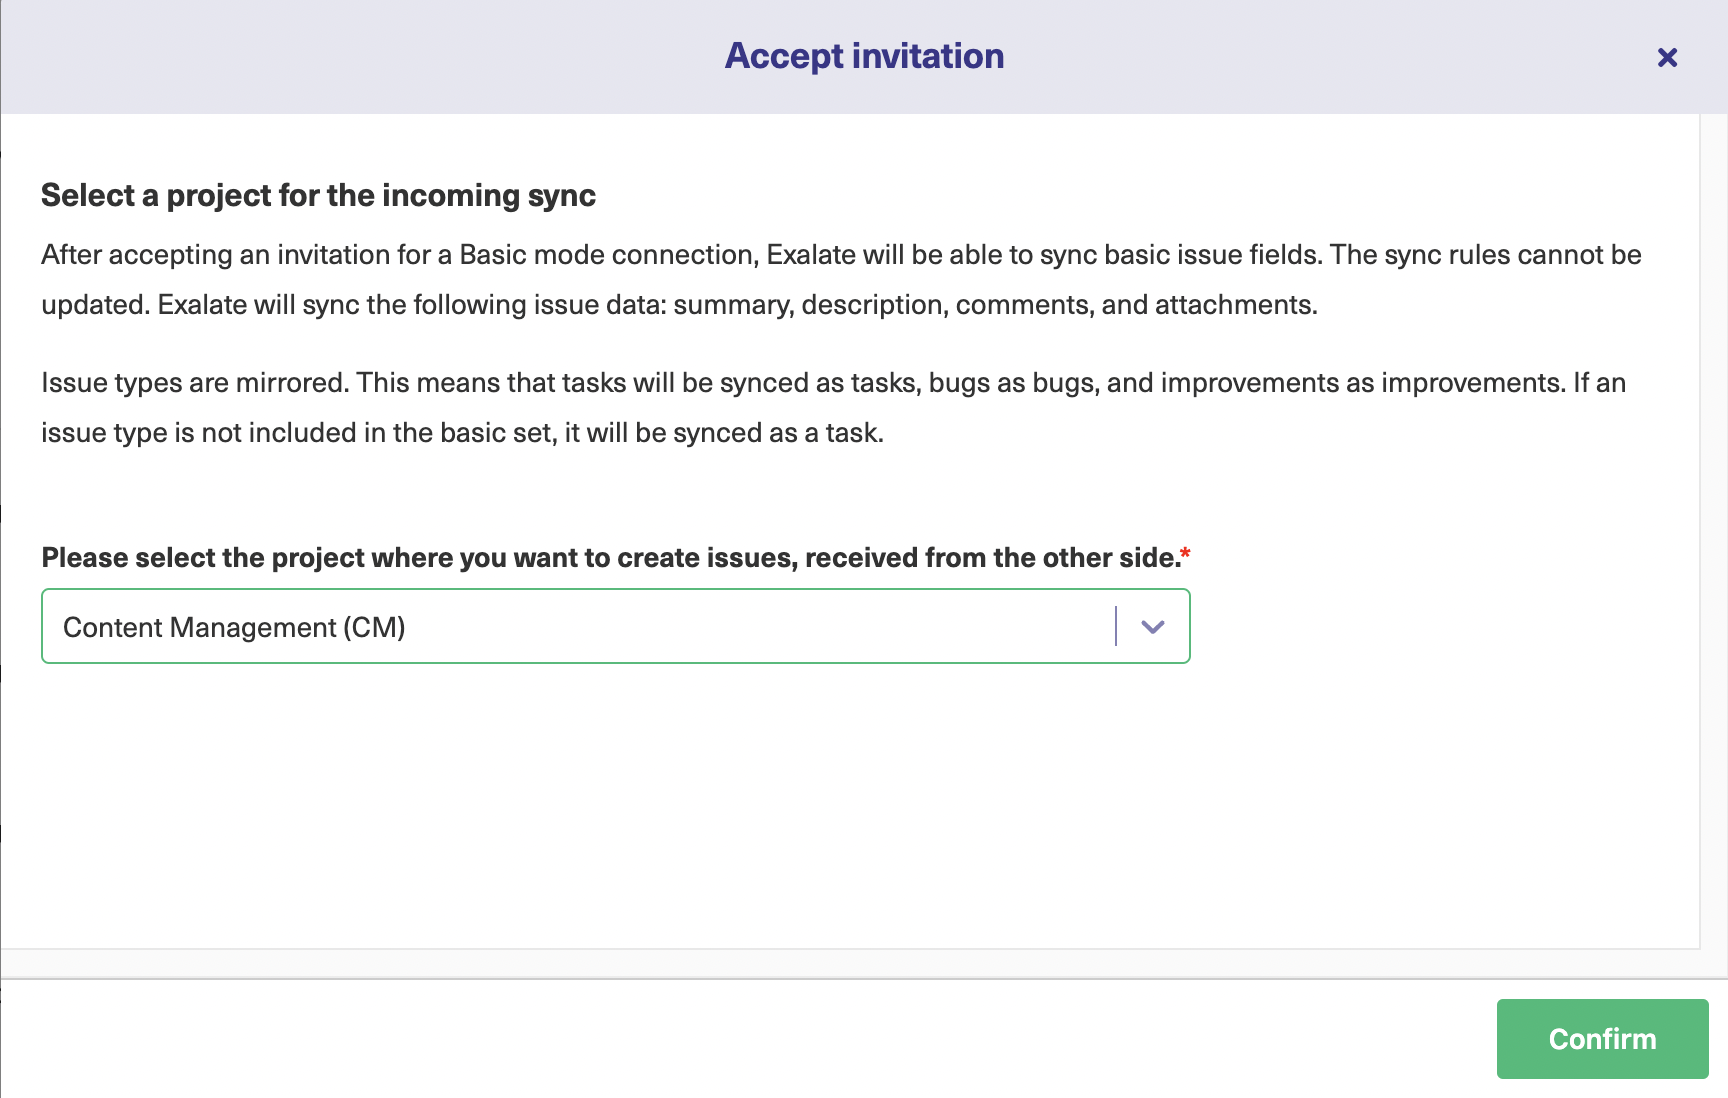
Select the repository you want to synchronize on the GitHub side and click “Confirm”. 

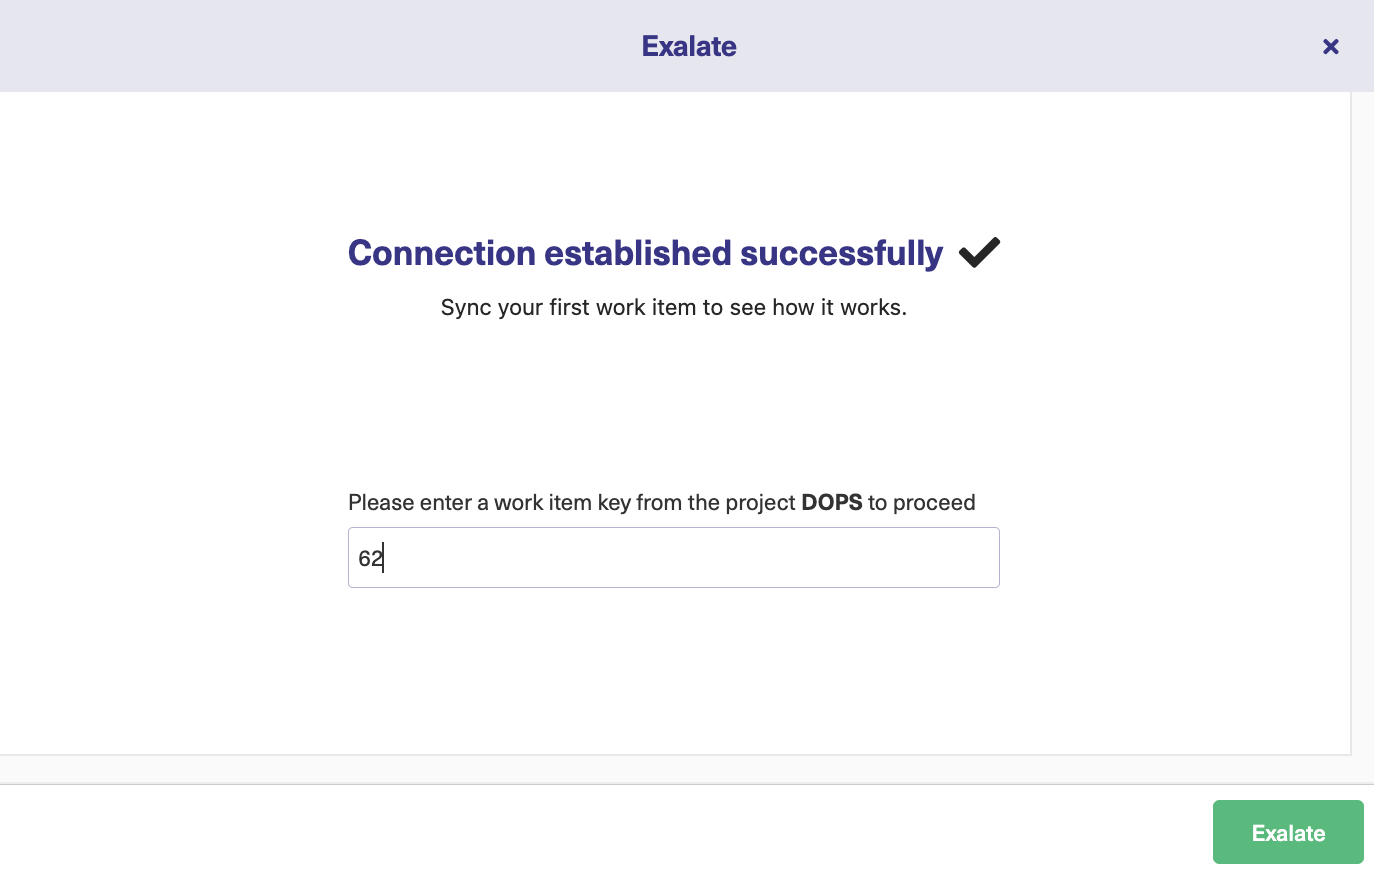
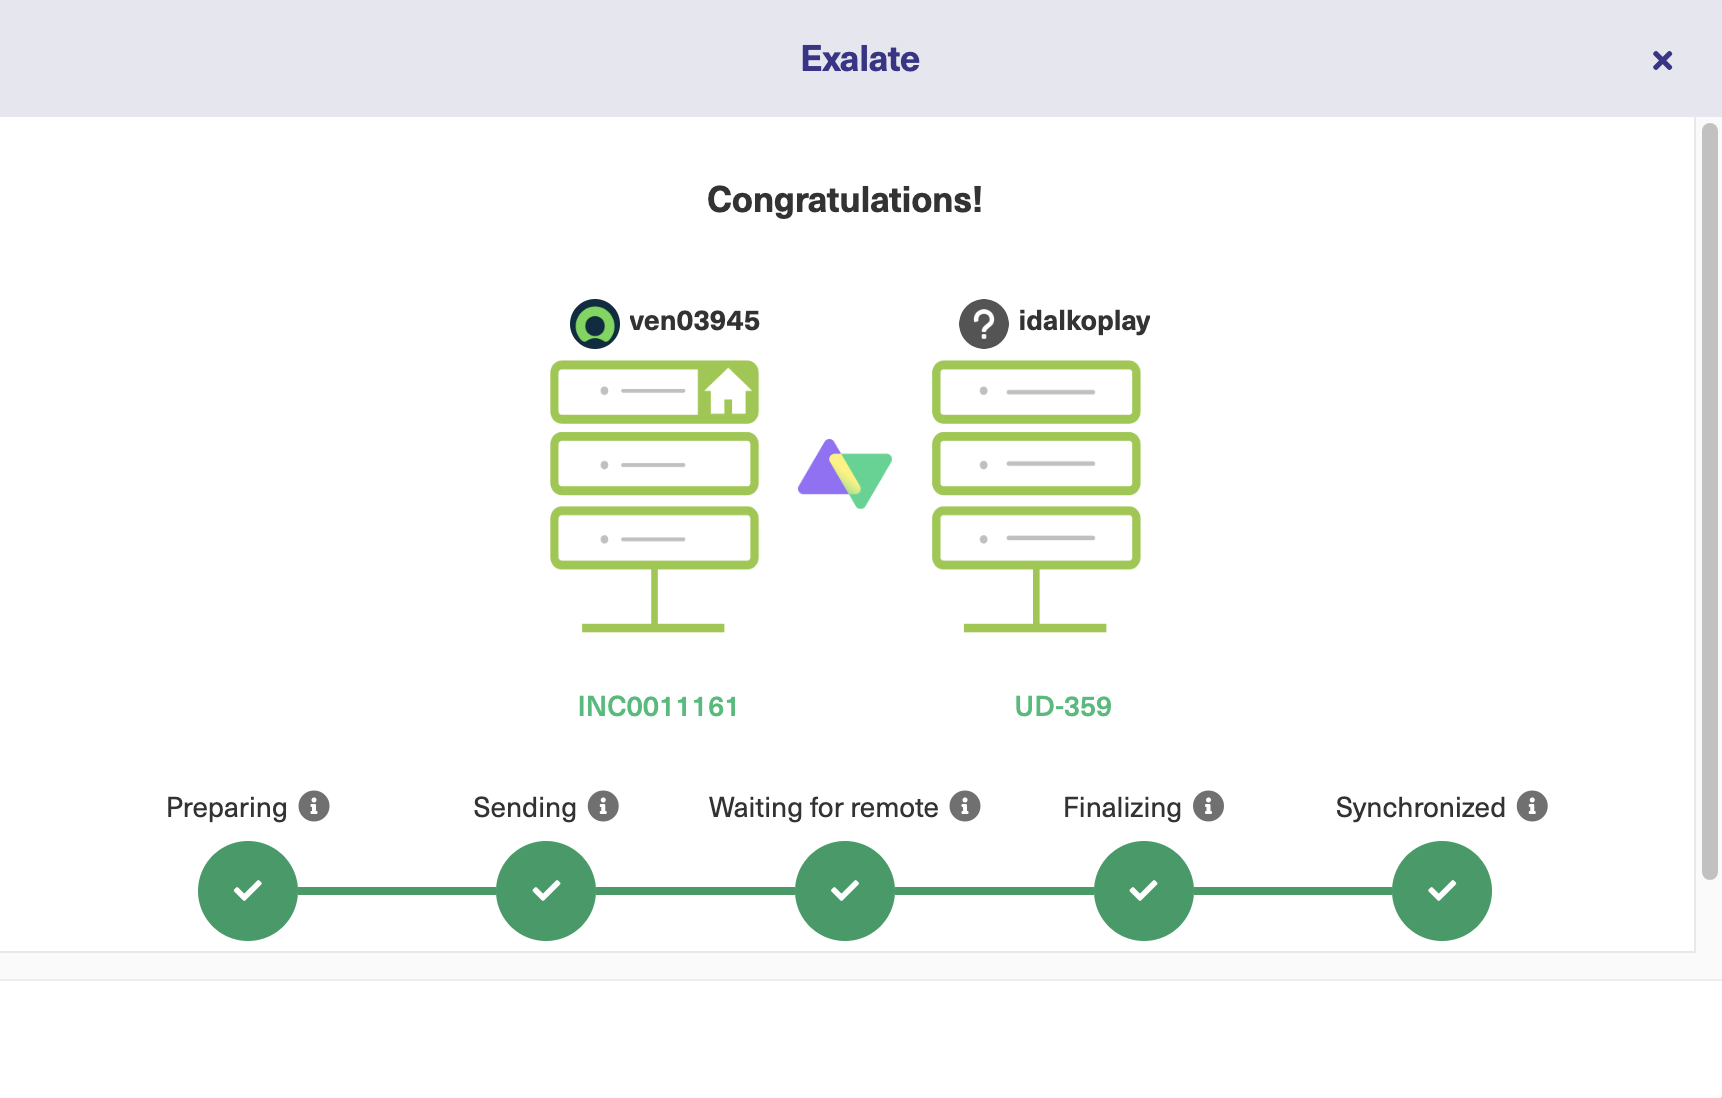
Once the connection has been successfully established, you move ahead to syncing your first issue. The best thing about the Basic mode is that you can start directly with syncing specific issues, or you can always create triggers or sync issues in bulk

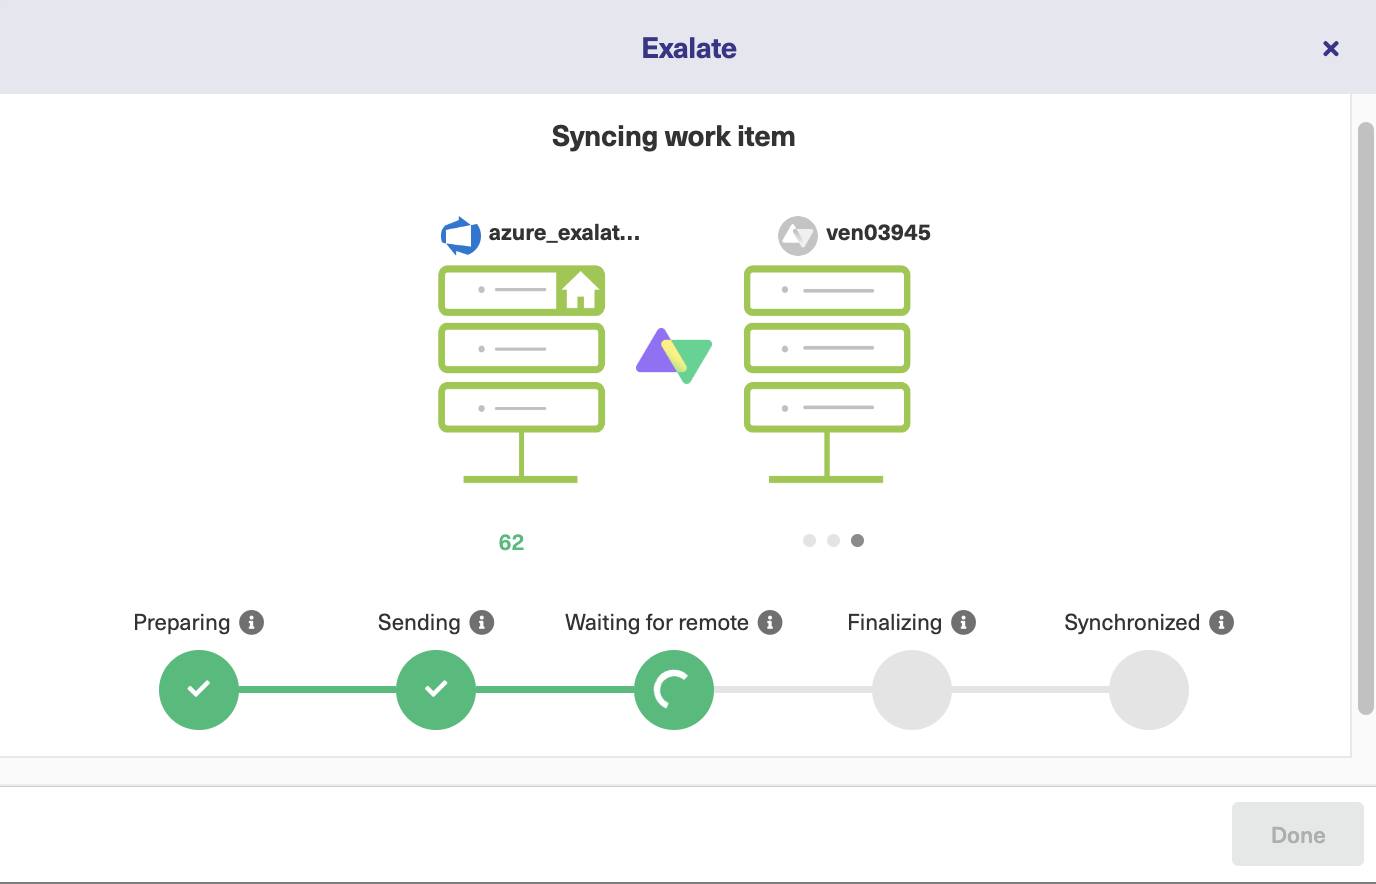
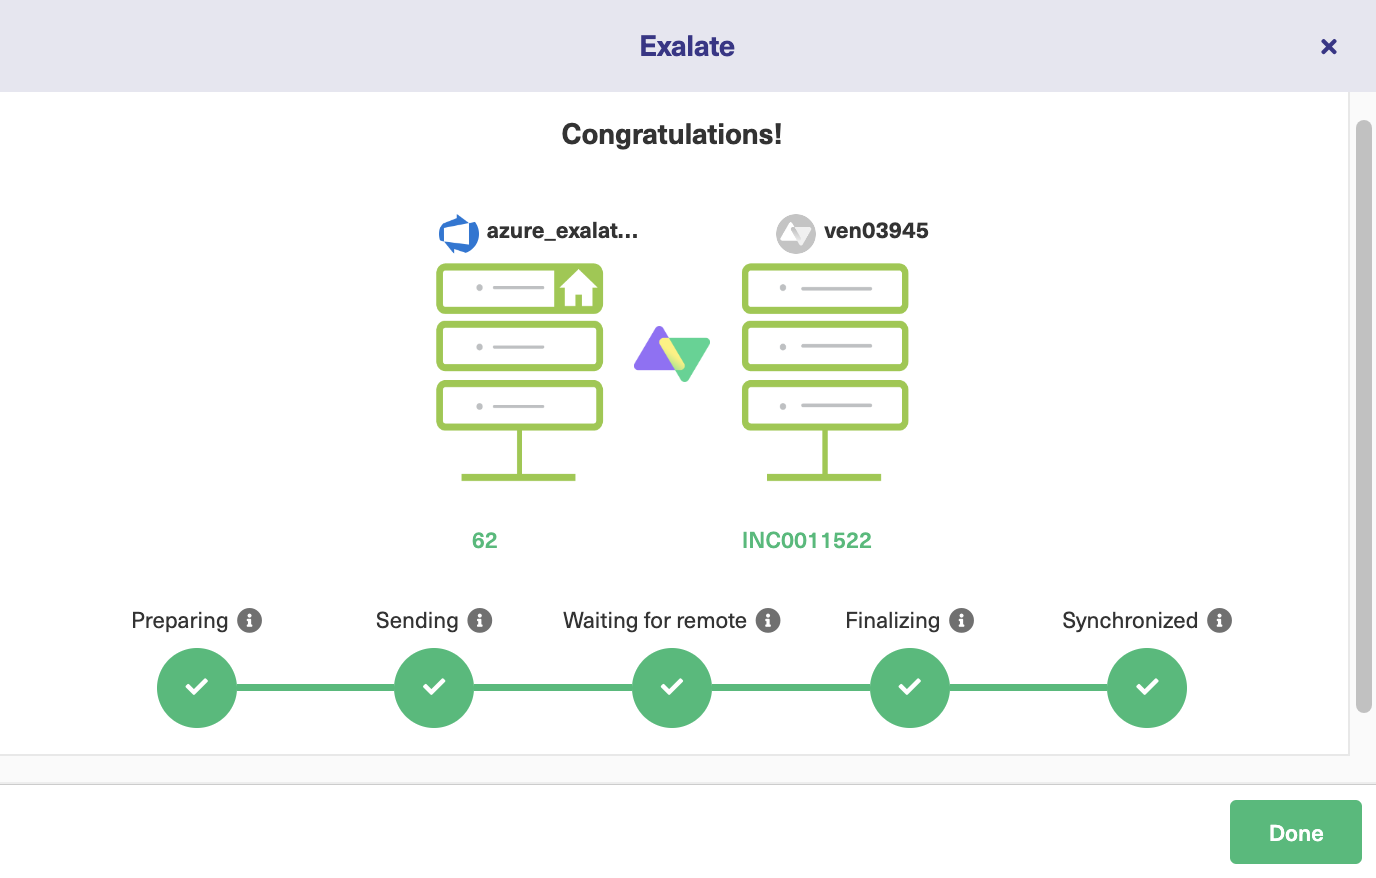
Enter the issue key from the repository and press “Exalate”. Wait for some time before the issue successfully synchronizes.

Continue with the Script Mode

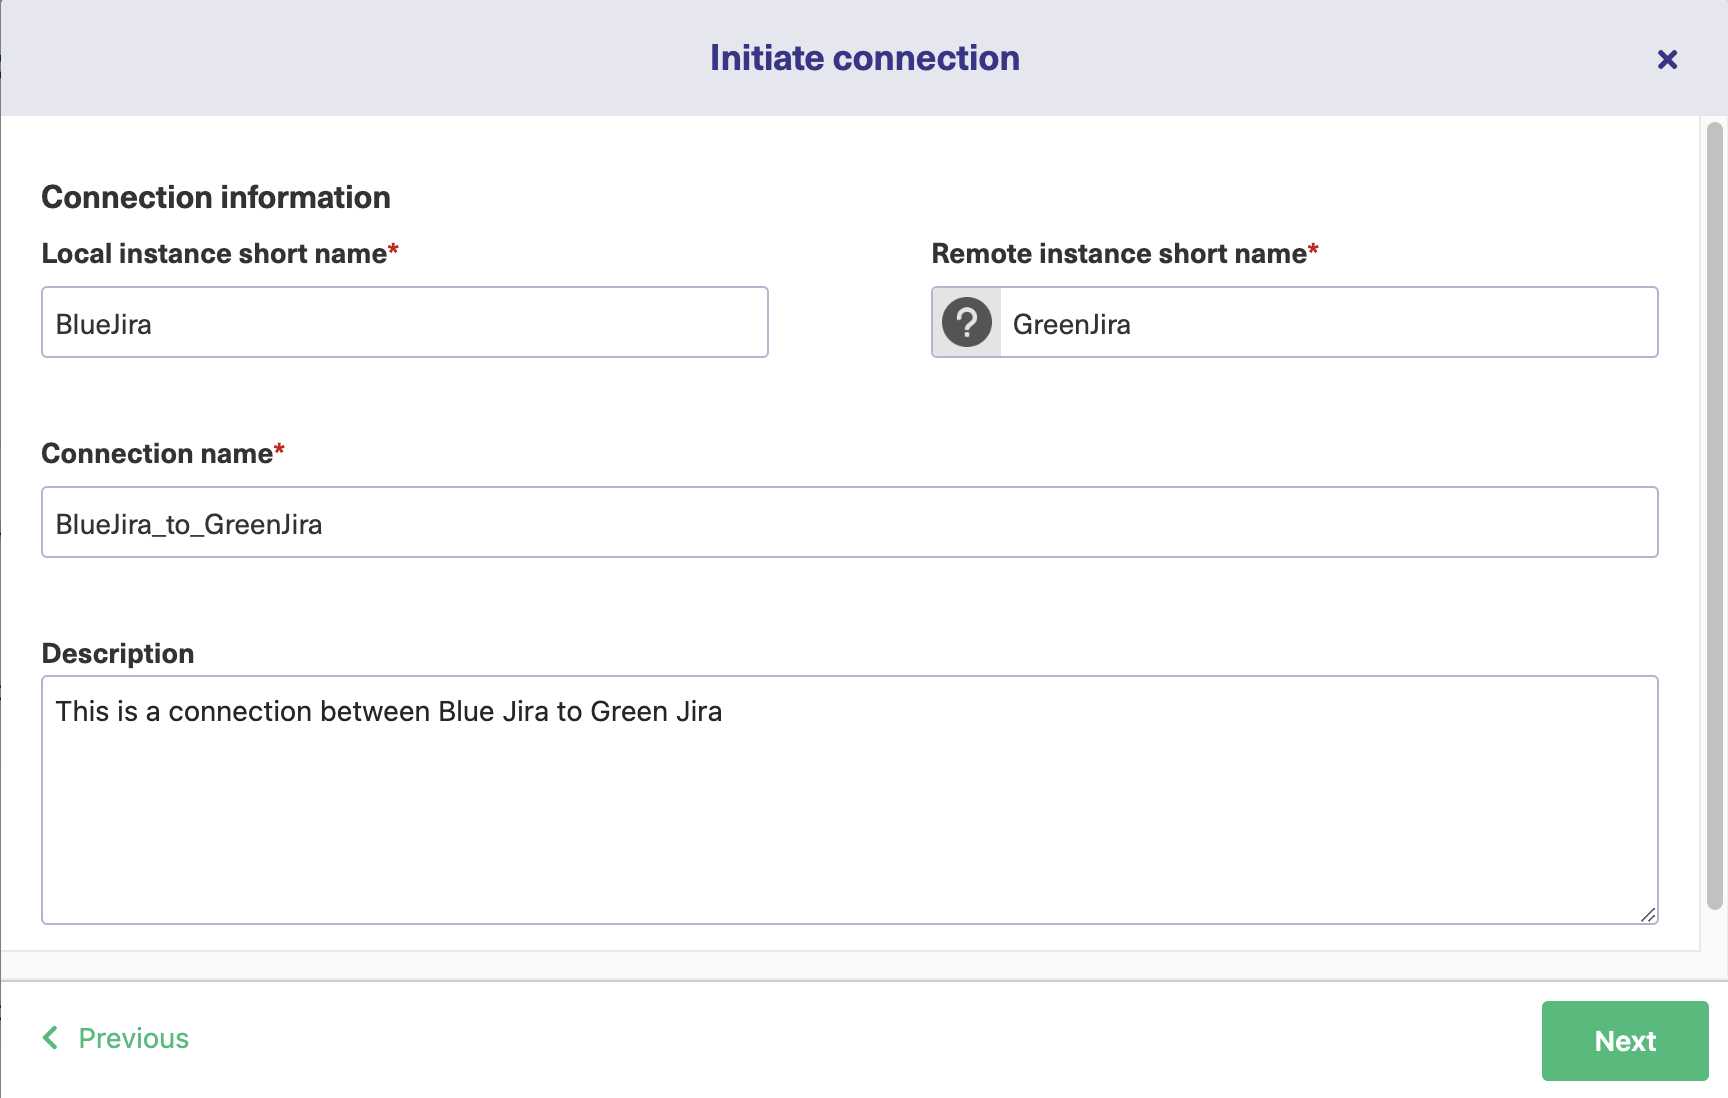
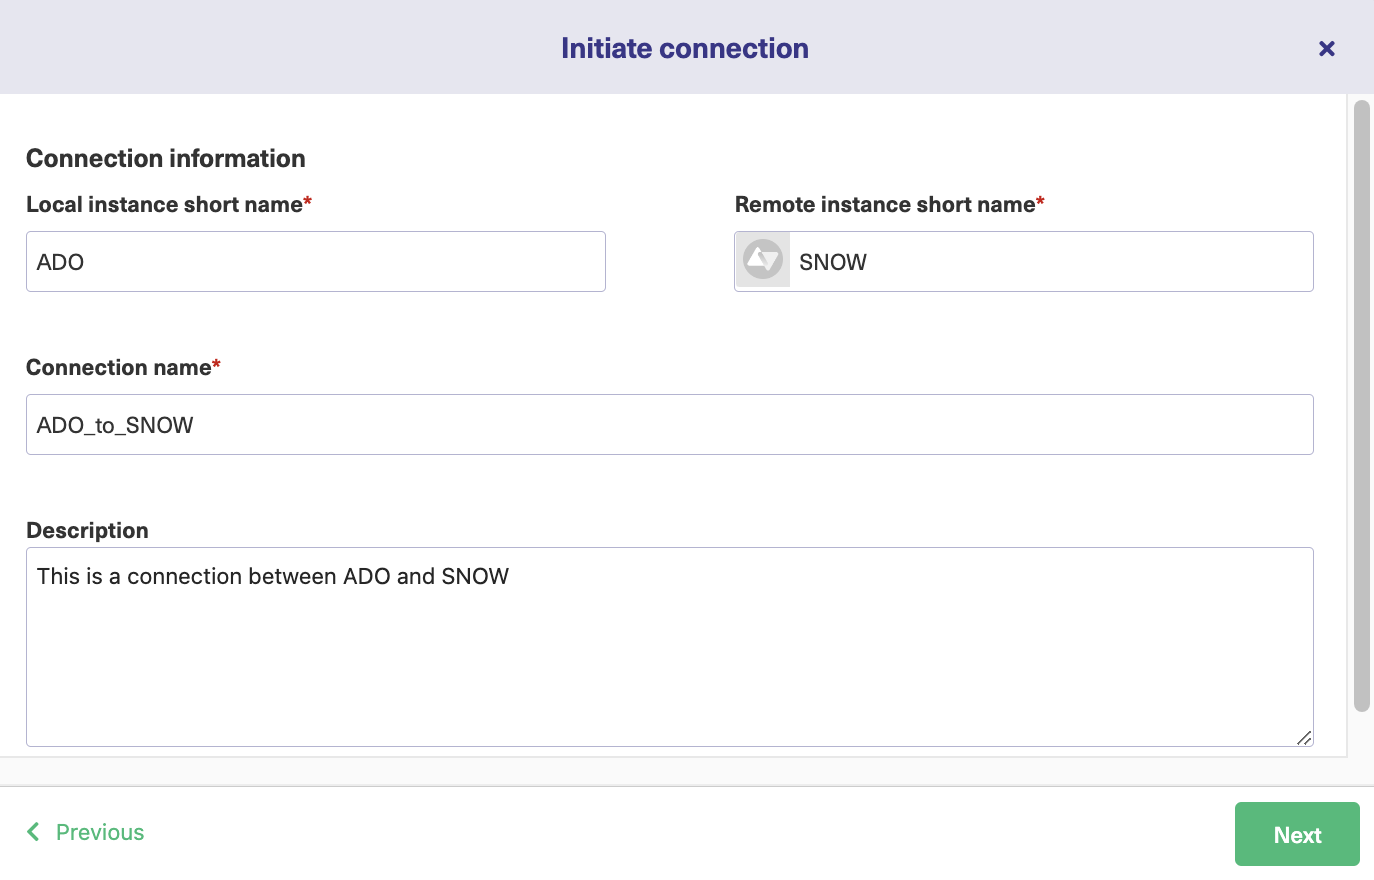
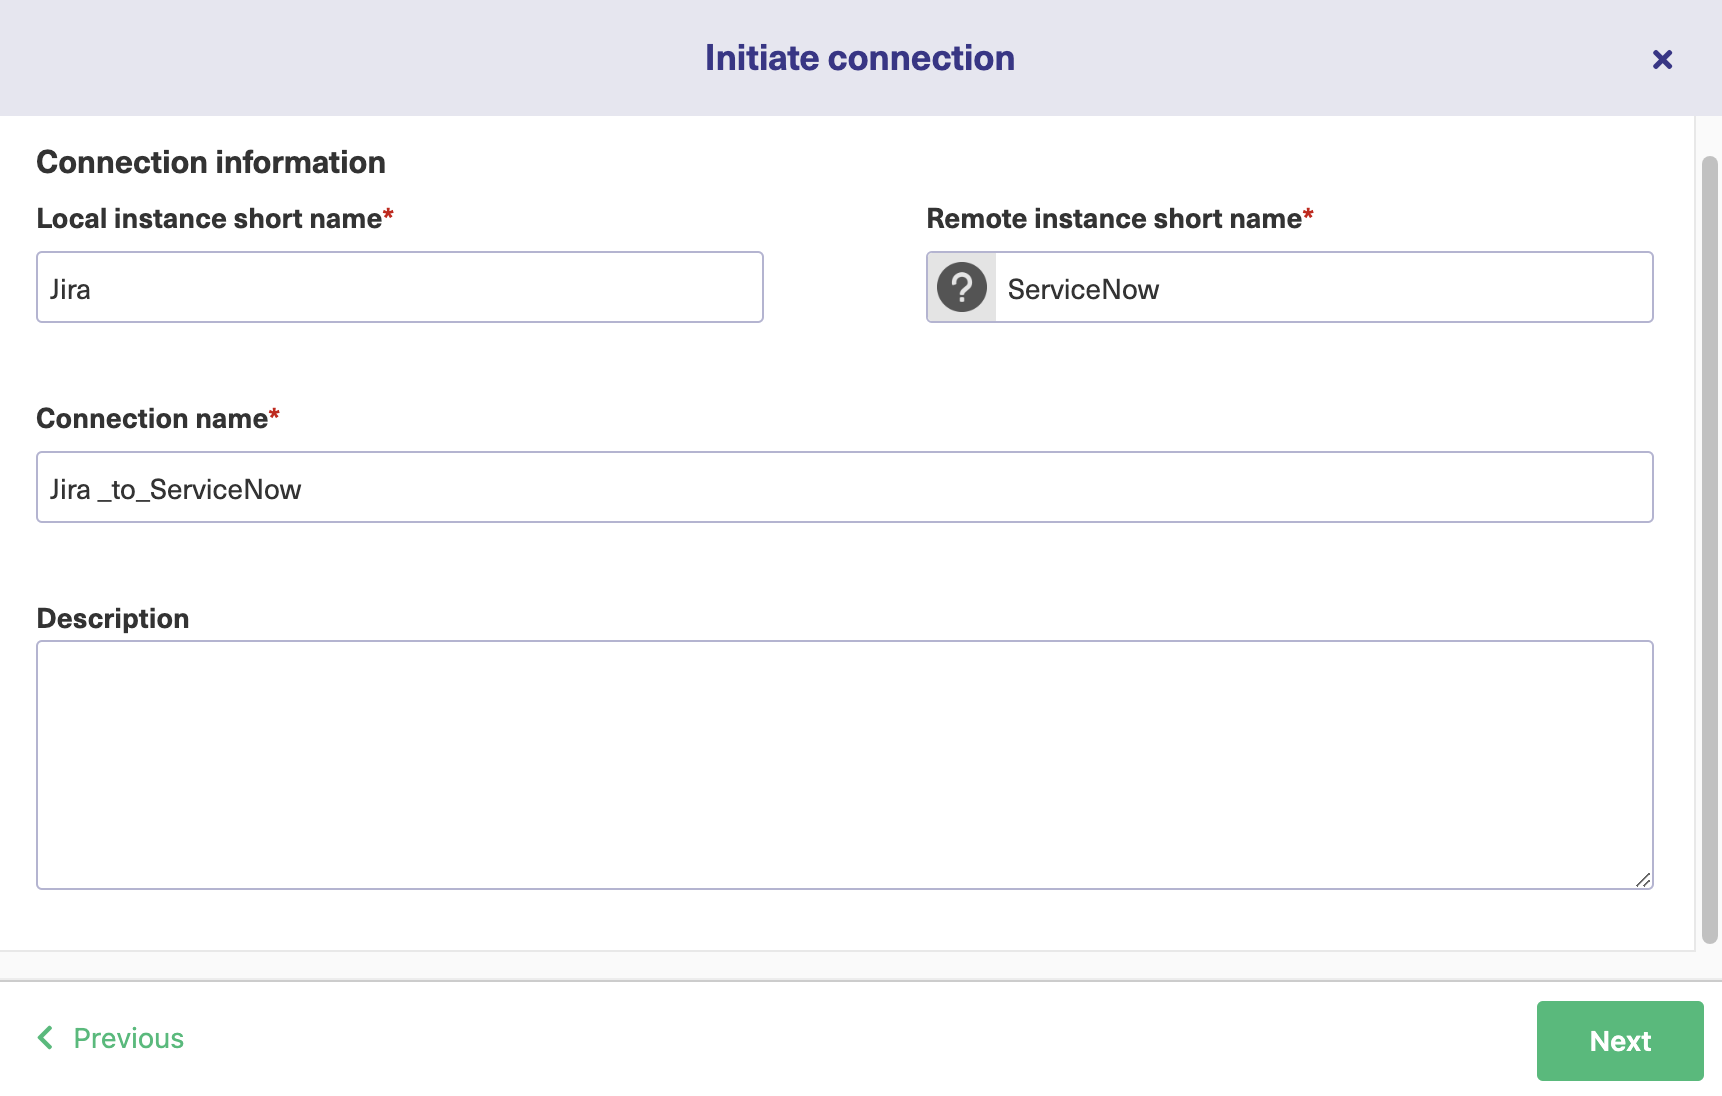
To continue with this mode, click “Next” after selecting “Script” from the screen displaying the configuration types. Some more fields will appear allowing you to name each side of your connection. You might just want to call them Jira and GitHub, but alternatively, you could give them a name that reflects their role, or the team using them.
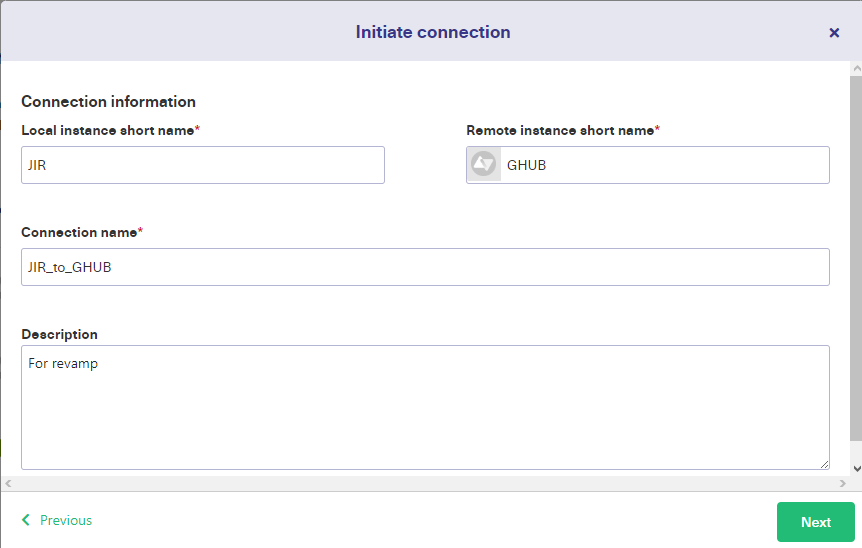
initiate jira github connection

For instance here, we have made connections between the software development team using Github and the UI Design team using Jira. 

Exalate will create a connection name using the instance names you used for each side. You can change this too if you like. 

There’s also an optional description field in case you forget what the connection is for later, or if someone else needs to check it. If you end up with lots of connections, this will also help you figure out what each one does.

Click “Next” when you’re happy with the description.

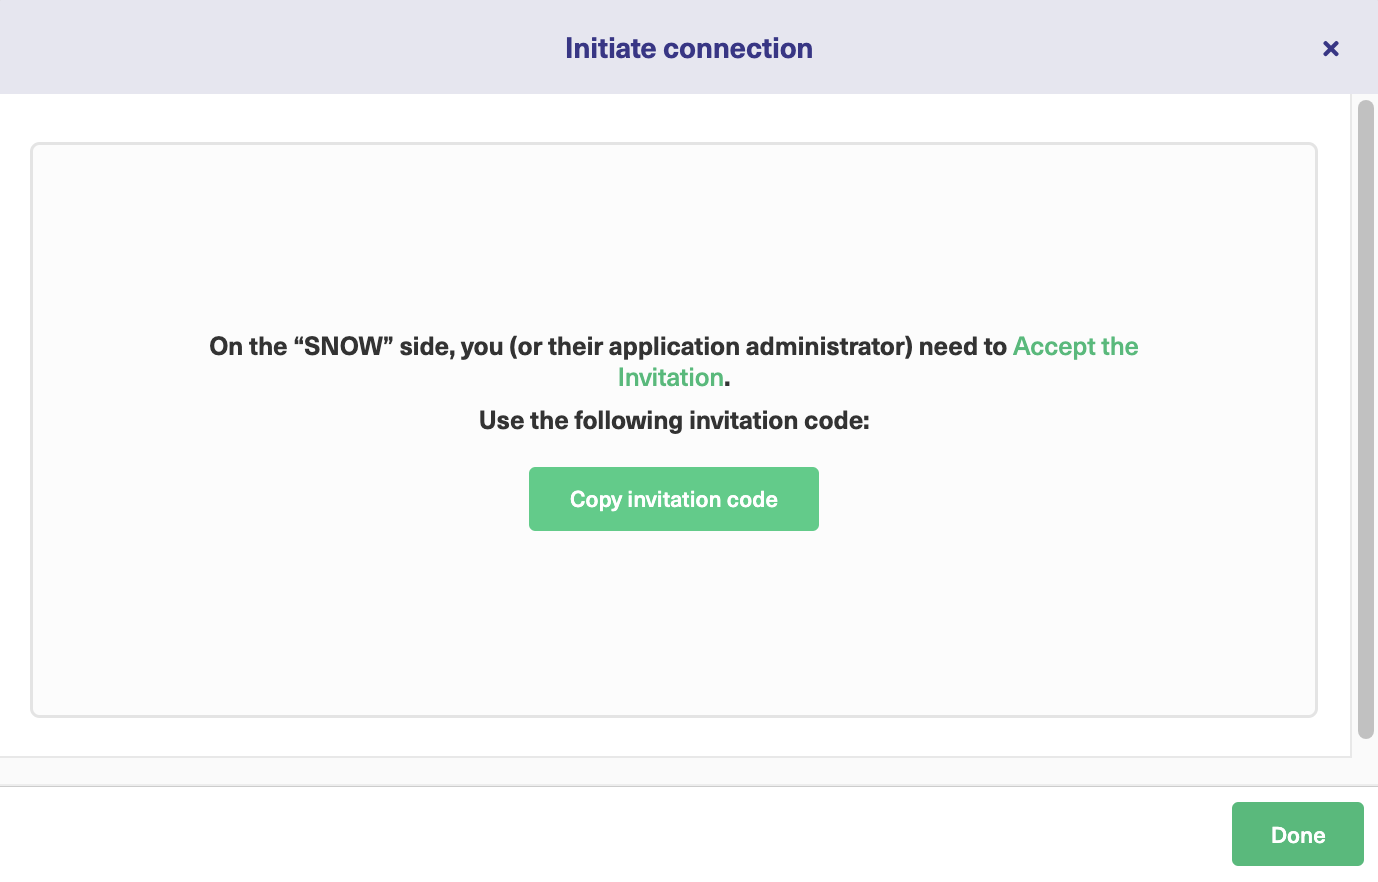
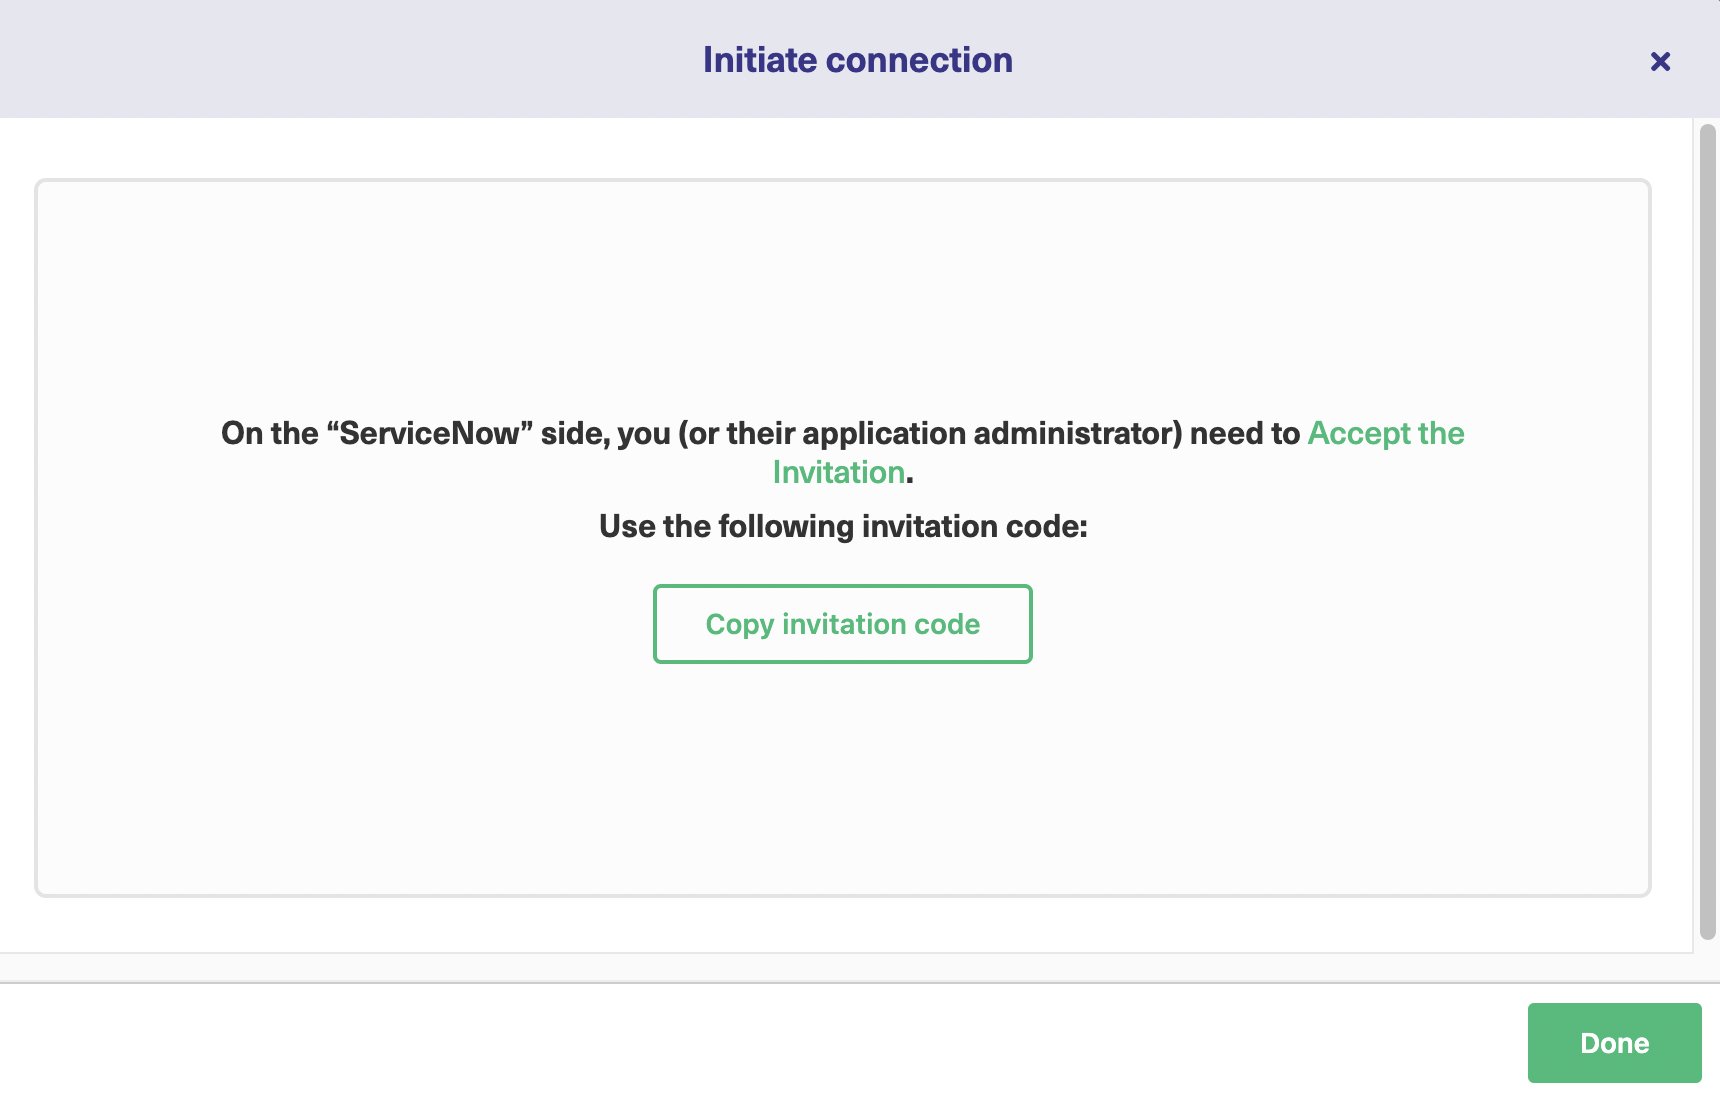
Now select the project on the Jira side and click “Initiate”. Exalate will now generate an invitation code for you. Click the green button to copy it to your clipboard. You should paste it somewhere safe.
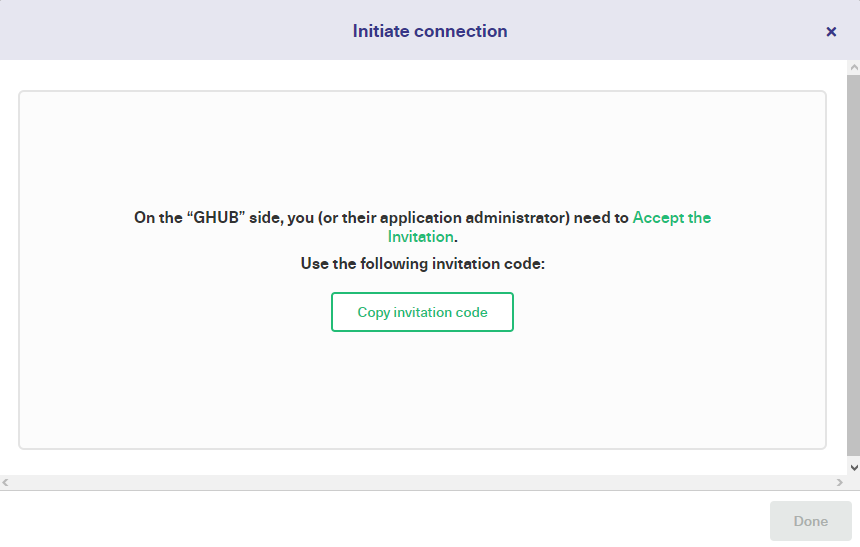
jira GitHub sync invitation code

Now we need to go to GitHub (you can do this by clicking “Go to remote”) and use our code to activate the connection. In the left-hand Exalate menu, click “Connections”. Then click the “Accept Invitation” button.

Paste the invitation code into the field that appears and click “Next”.

You’ll go through a process similar to the one you used when you created the invitation in Jira. As before, choose the repository name from the drop-down list.

Click the green “Confirm” button.

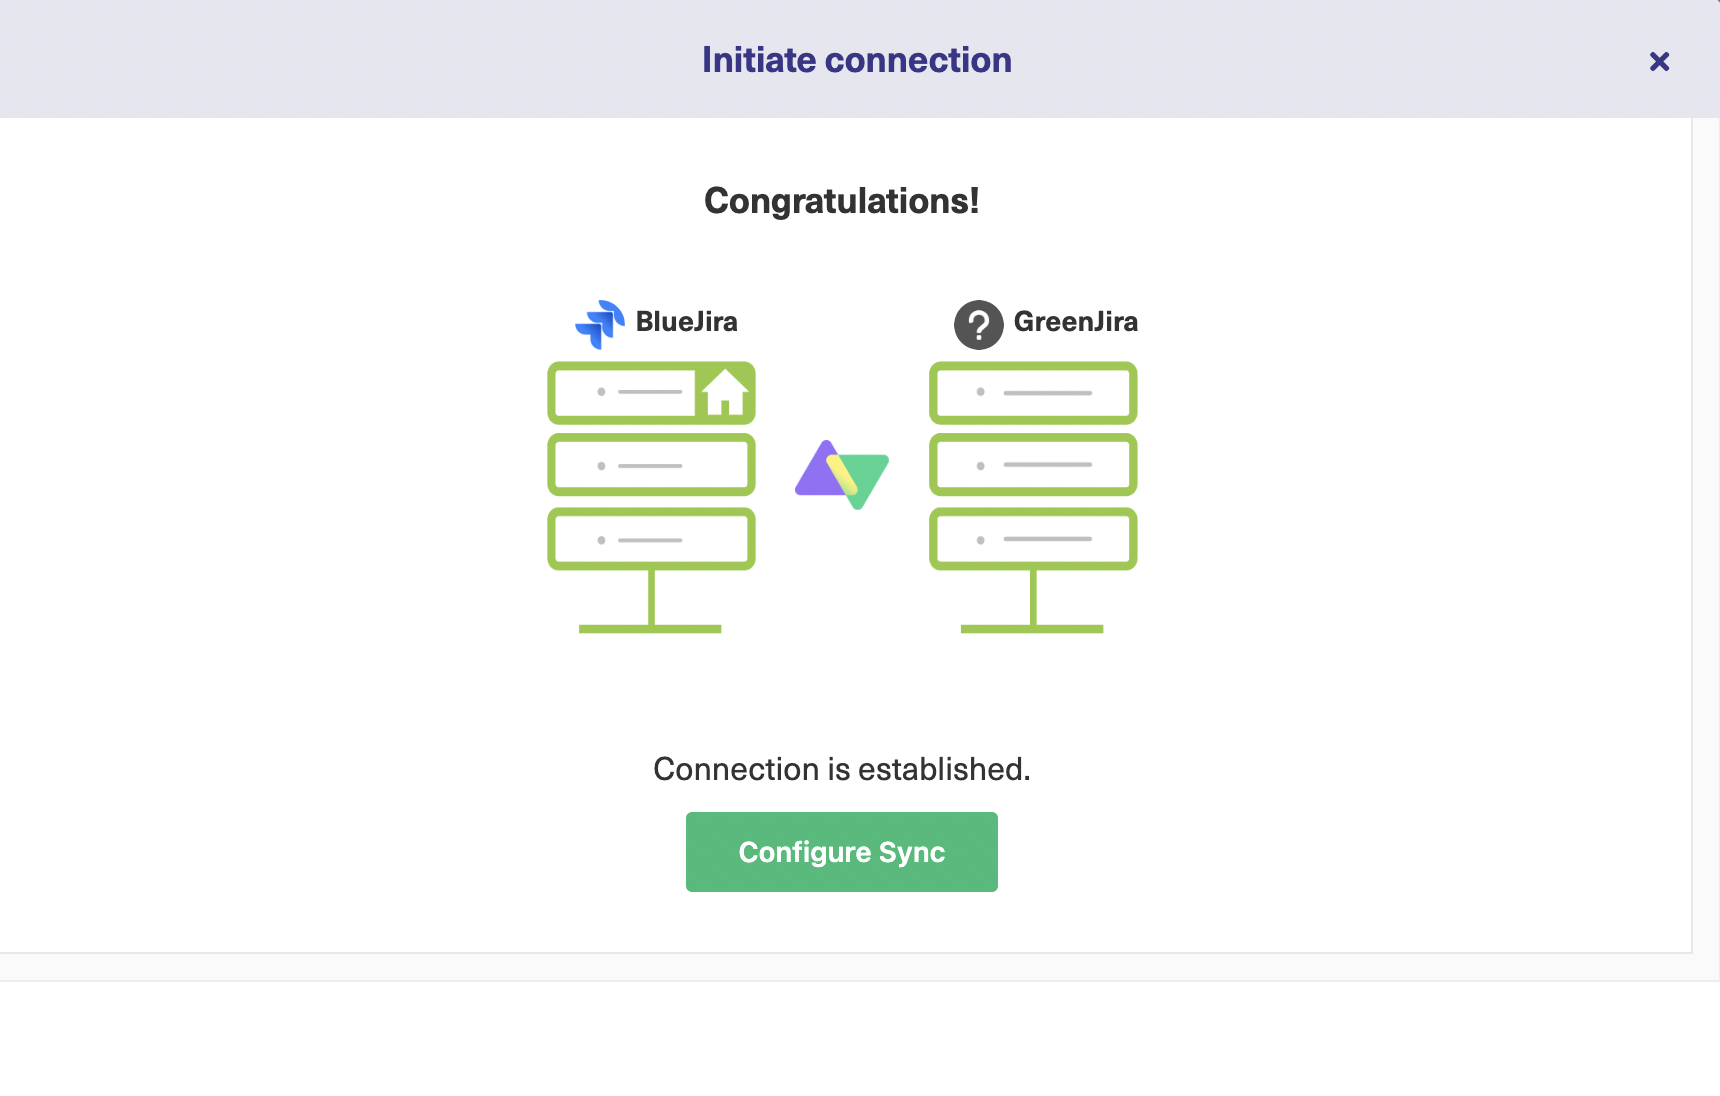
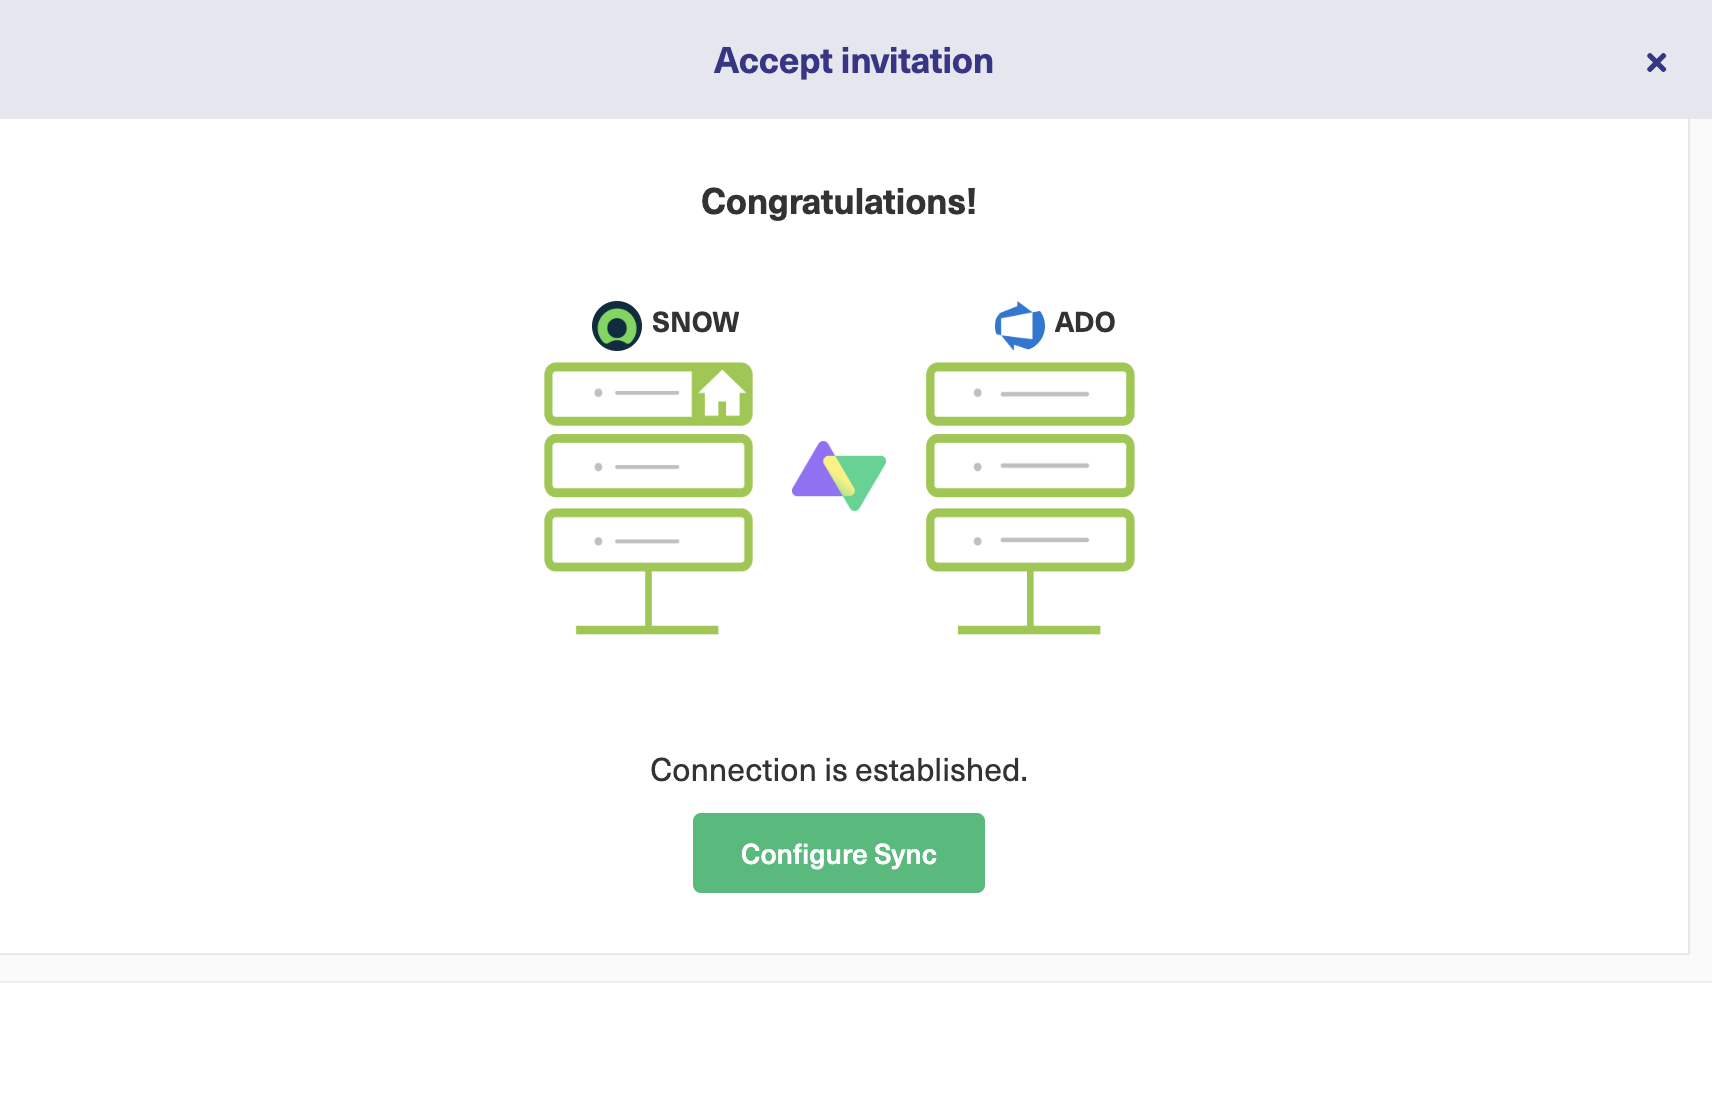
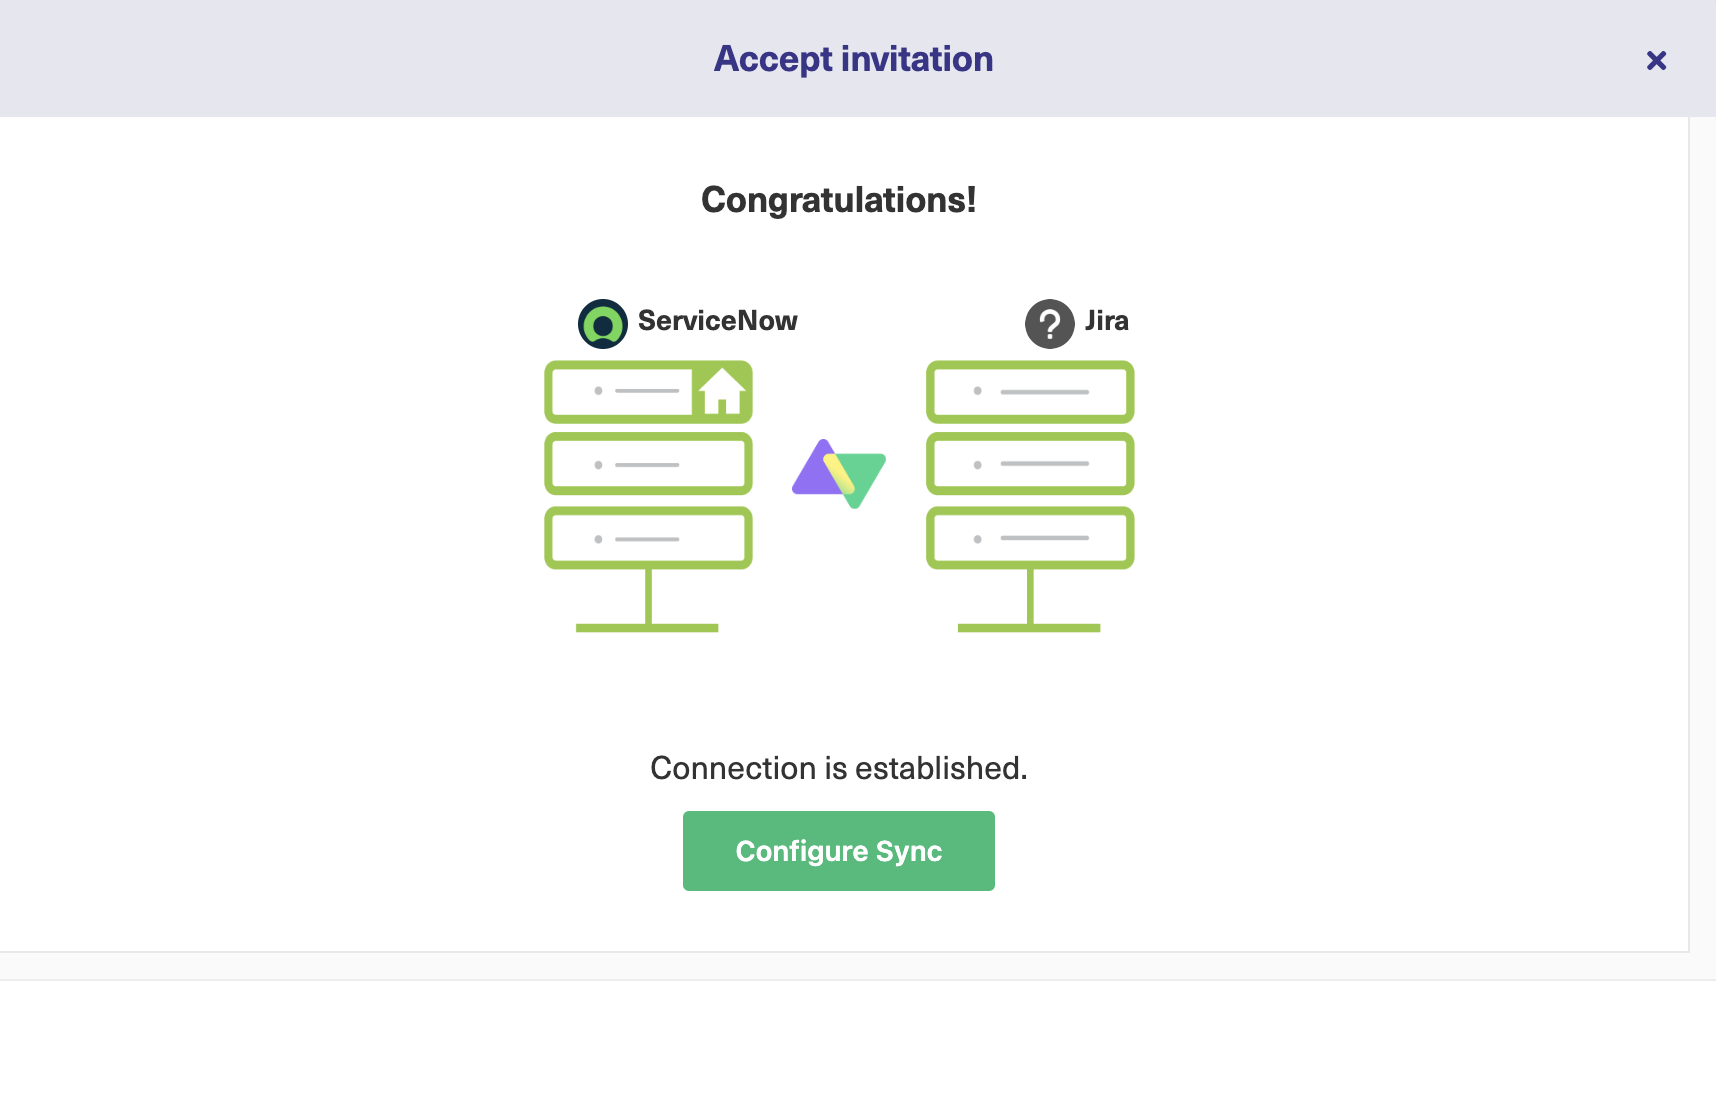
After that, your connection is ready and you can move on to configuring it. 
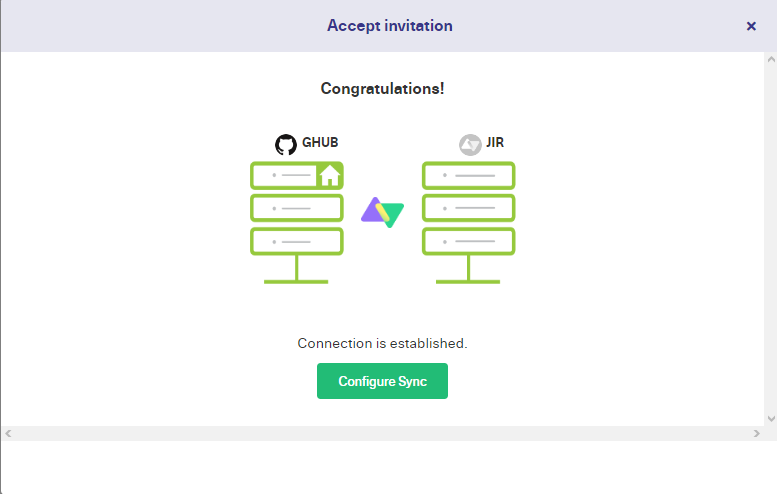
configure jira GitHub integration

Step 4 – Configure Your Connection to Determine What Gets Shared

In this step, you’ll take control over what your connection shares, and learn how to map data for Jira GitHub issues integration. You can do this step in either Jira or GitHub, the process is the same for each one.

The configuration can be done after pressing the “Configure Sync” button on the above screen or by the “Edit Connection” under the “Connections” tab. The difference between them is that the first approach allows for configuration to happen for the first time when the connection is being created while the latter allows editing the connection after it’s active. 

In this guide, I’ll use Jira, so take a look at the Jira connections screen and move your mouse over the connection you just created. 

Several icons will appear. There’s an “Edit” icon that lets you edit your connection, a radio signal icon that takes you to the other side of your connection, and three dots that let you activate or delete your connection.

edit jira GitHub connection

Click the “Edit connection” icon. You’ll see a screen with four tabs. In the next step, you’ll learn about the “Triggers” tab, and in a second, I’ll tell you about the “Rules” tab, but it’s worth knowing about the other two.

The “Statistics” tab gives you information on how many issues are being shared and lets you know when items were last synced. On the “Info” tab, you can see the URL for the other end of the connection and some other data.

Sync rules in GitHub

For now, click on the “Rules” tab. Here you can see two sets of rules. At the top, the outgoing sync rules control how data in Jira issues are sent out to GitHub. Below that, the incoming sync rules show how data Exalate fetches from GitHub are interpreted by Jira. 

Rules are written in the Groovy scripting language. Each line handles a specific field. You can also see comments, which start with “//” for single-line comments or are surrounded by “/*” and “*/” for multiple-line comments. 

Comments are just there to tell you how things work, but you can also use them to temporarily disable anything you don’t want to sync. To do that just put “//” at the start of the line. You can remove it again to reactivate it.

If there is information you don’t want to share, then comment that line out in the outgoing sync rules and Exalate won’t send it from Jira to GitHub.

You can also change the value Exalate copies to a particular field. To change it to a specific value, just replace the incoming value with the value you want to use, in quotes.

For example in the incoming sync rules, you can see the line issue.summary = replica.summary. You could change that to issue.summary = “from GitHub”. Doing that would mean all synced issues would have “from GitHub” as their summary value. You could also add a line, for instance, issue.assignee = “Kevin” to assign incoming issues to a specific person.

If you’re comfortable with core programming concepts, you can use conditional statements to give you even more control over what happens. An if statement can let you sync items that meet the conditions you specify.

You could write if( replica.assignee == “Sally” ) { issue.priority = “Critical” }to ensure issues from Sally are given the urgency they deserve.

You can no doubt think of other ways to route the information. As you use the synchronization more, you will learn which information is useful to you. You can then adjust it to meet your requirements.

To learn more about sync rules, take a look at the documentation.

Use AI Assist with Script Mode

Exalate’s Script mode is now AI-assisted, with AI Assist available as a chat window within both your incoming and outgoing Sync rules tabs. Simply type in your sync requirements, and AI Assist will generate the scripts for you.

These scripts are generated based on your input, current configurations, and Exalate’s scripting API.

However, like any AI, AI Assist isn’t perfect, so it’s crucial to be as clear and detailed as possible with your instructions.

Here’s an example of how to use AI Assist:

Suppose you want to sync issue statuses from GitHub with issue statuses in Jira. In the AI chat, you could input:

For incoming sync (Jira): “Map GitHub status ‘open’ to Jira’s ‘Open,’ and ‘closed’ to ‘Done’ in the GitHub incoming configuration”

AI-assisted script mode in Exalate

Give it a moment to generate the script.

Changes will be highlighted: red lines represent deletions, while green lines show new additions. You can choose to accept or reject these suggestions. If necessary, adjust your prompt. Once satisfied, don’t forget to publish your changes.

Step 5 – Set Up Automated Synchronization Triggers

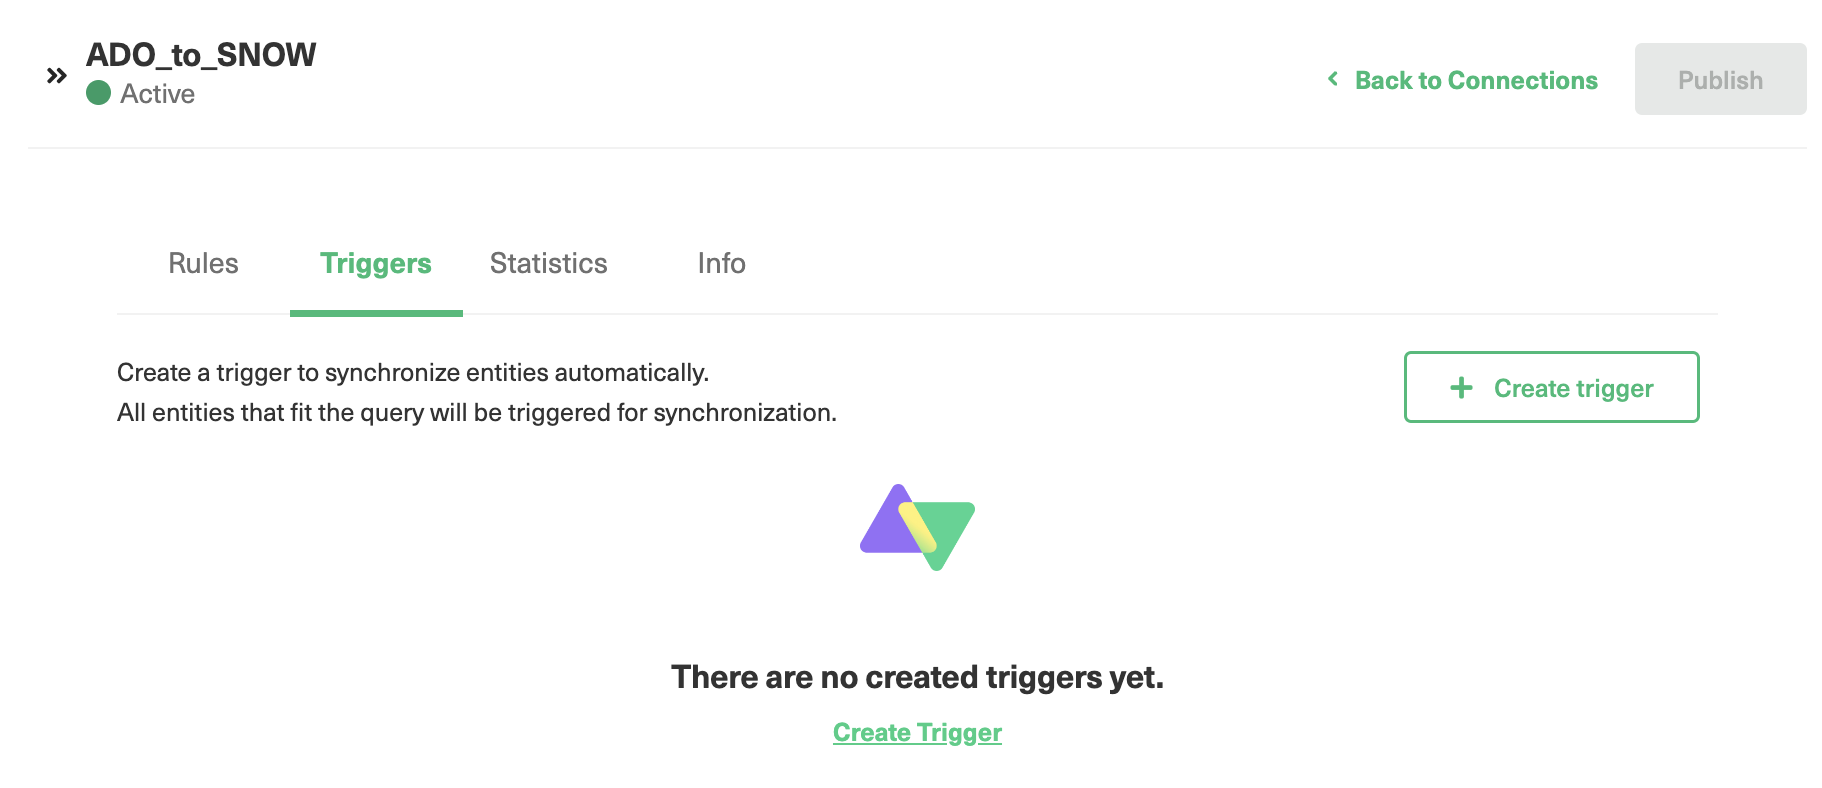
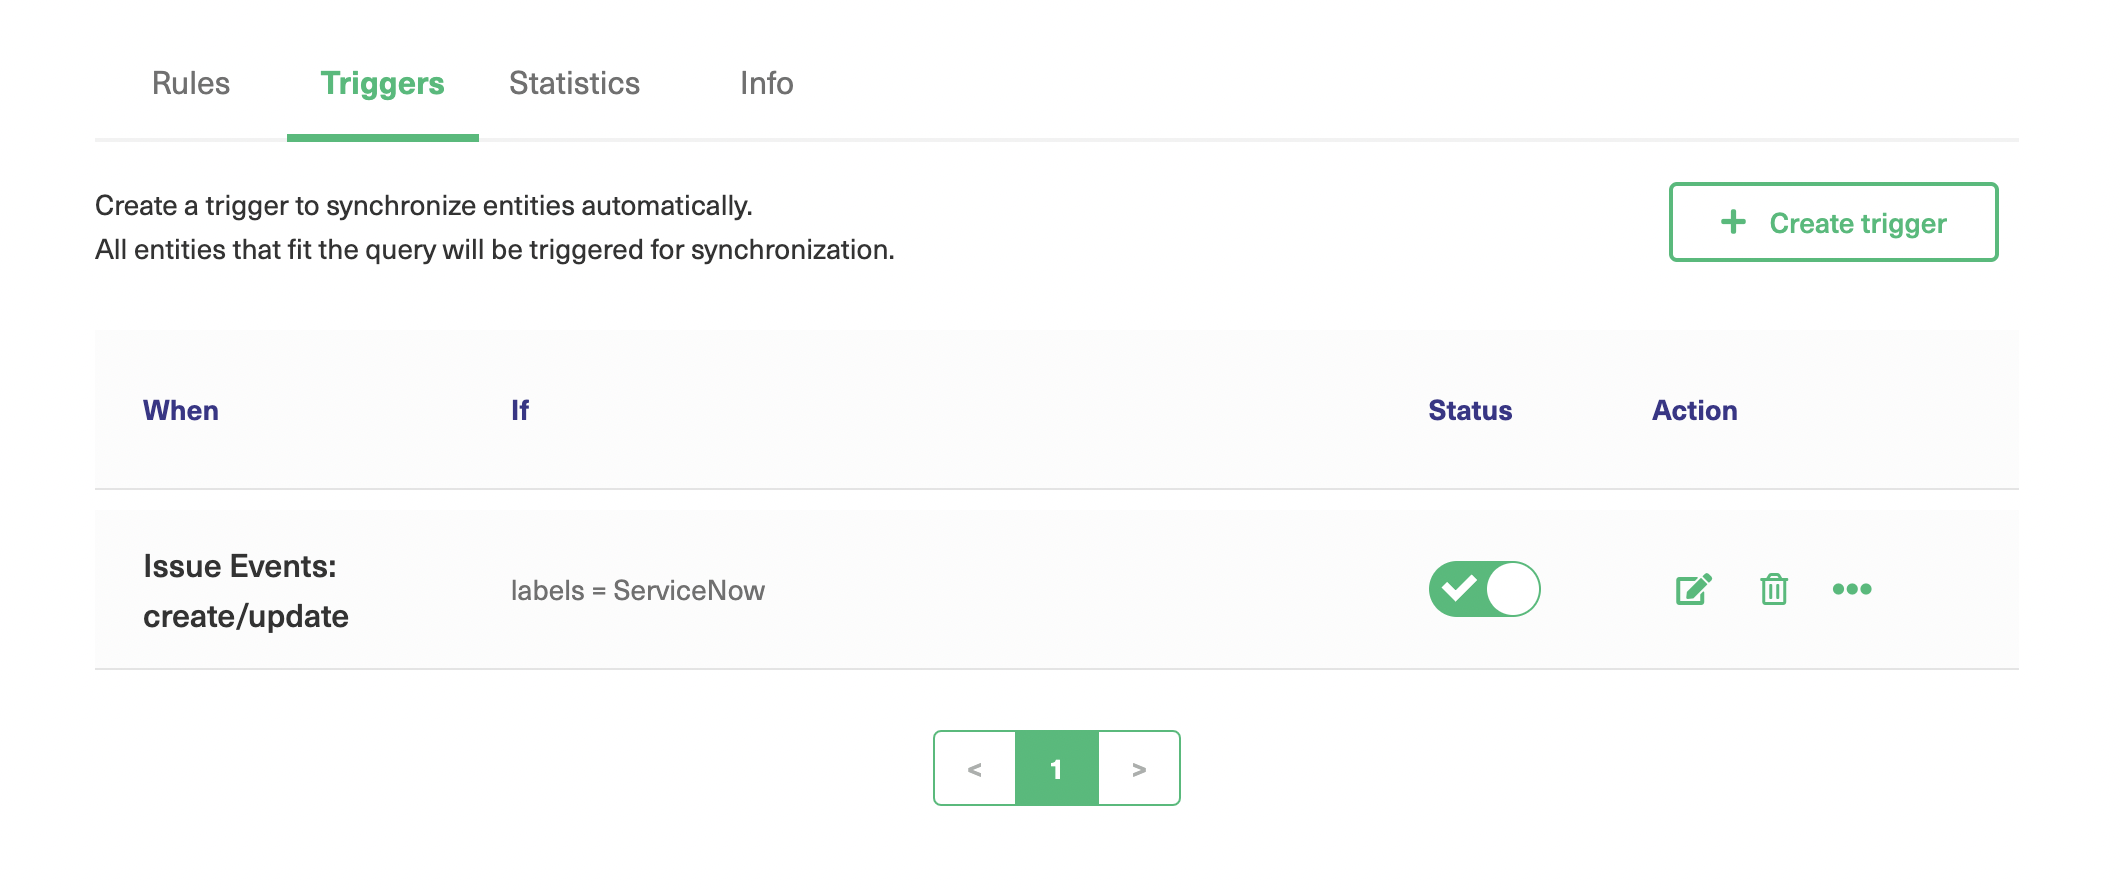
In the previous step, you defined what to share between Jira integration with GitHub, and how they map it onto items. Now you’ll define the conditions that trigger information exchange. On the edit connection screen (see the previous step), click the “Triggers” tab.

There’s also a “Triggers” item in the left-hand menu which works similarly.  If you use that, you’ll see a list of triggers with an entry showing what connection they are for, and can pick one to edit. If you create a new trigger from this screen the only difference is you’ll need to choose which connection it applies to.
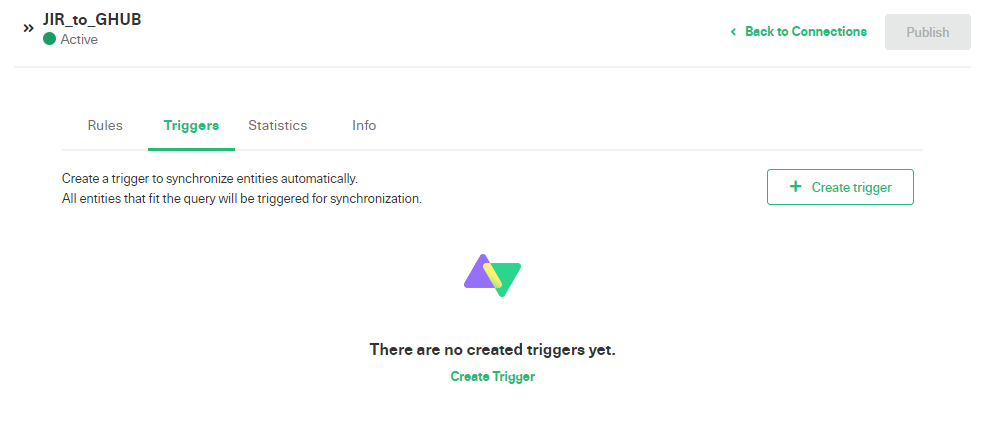
Jira GitHub sync triggers

To create your first trigger, click the white “Create trigger” button. The “Add trigger” pop-up will appear. The first field, at the top, is a drop-down menu letting you pick the kind of item that the trigger applies to. In the screenshot, I’ve selected “issue”, but you can pick whatever you like.
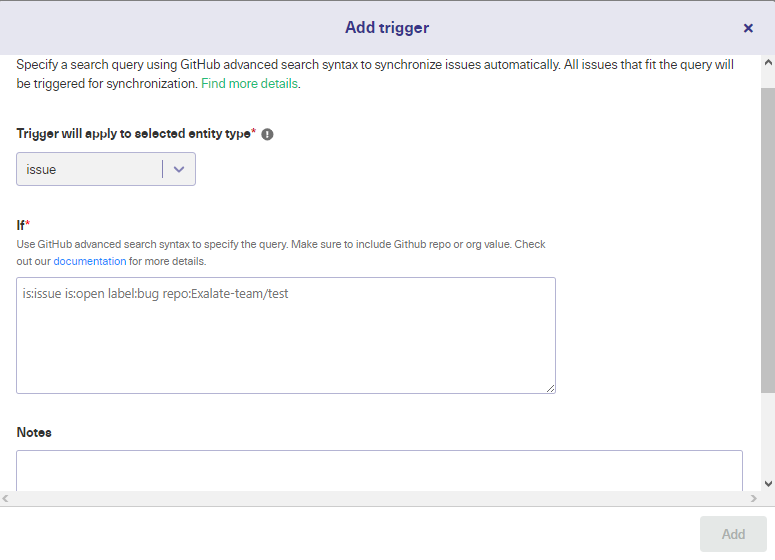
Exalate configure trigger

Below that is a conditional field. This is where you set the rules that apply to the type of entity specified in the drop-down menu.

GitHub triggers can be created using its advanced search syntax. Jira’s triggers use the JQL query language. Using it, you can create simple conditional statements to select specific entities, and also combine them using logical operators like “AND” and “OR”.

Read more about JQL triggers in the documentation.

If you wanted to synchronize open GitHub issues that have a label:bug. If you wanted to pick out these issues from a particular repo, you could add repo:Exalate-team/test. To synchronize issues that meet all these conditions simultaneously, you could use is:issue is:open label:bug repo:Exalate-team/test.

There is also a notes field, where you can describe what you’ve done. The more detail you add here, the easier it will be to work with later. This is especially useful if you have multiple triggers, or if other people are going to be using the synchronization.

Under the notes field is a switch that lets you activate the trigger. It won’t work if you don’t activate it! Triggers can be turned on and off easily, so instead of deleting them when you don’t need them, you can disable them, and quickly reactivate them later if you need to.

When you’re ready, click the “Add” button and the trigger will appear in your list. If there are tickets that match it, Exalate will start syncing them.

Step 6 – Start Synchronizing Tasks

Now that Jira and GitHub are connected you can start sharing tasks between them. Exalate can take a few minutes to synchronize everything, so don’t panic if they don’t get shared immediately.

If you wait a few minutes and check your connection statistics, you should see that items have been shared. If not, take a look at your rules and make sure there are some items they apply to. It might be worth creating an item that meets your conditions to test if the connection is working.

Common Use Cases 

Teams are using Jira and GitHub in many different scenarios and there are all sorts of Jira GitHub integration benefits. To give you a few ideas on what you can do with integration, here are some example situations.

Software Project with Code on a Public Git Repository

If your developers have publicly available code, they may want to take advantage of GitHub’s project management and issue reporting features and bring data into their private system. With an integration that is easy to do.

You can have items pulled into Jira from GitHub letting you track the public discussion while keeping your own team’s comments private. Issues on the public codebase can be assigned to someone specific, who can decide if the team needs to take further action on them. 

Two-way sync

You can then have fields that you want to share synced back to GitHub from Jira. That allows you to work with the open-source community while keeping internal discussion private and gives you the best of both worlds.

Customer Service Team and Engineering Team

Your customer service team has to deal with problems reported by your customers, and they record them as issues in Jira. They can handle many of those themselves, but sometimes they will need to pass them on to engineers. 

Instead of doing this manually, you can set up a GitHub integration with Jira that automatically copies relevant fields from flagged tickets into GitHub. The Engineering team can then deal with these how they like and when resolved, the integration passes specific details back into Jira. 

That way any solutions or suggestions from engineering are sent back to customer support, who can pass them on to customers.

Product Development and Quality Control

Your quality control team needs to ensure your product meets legal requirements in every market where it is available. They need a system for tracking legal issues and figuring out how to handle them. They also need to monitor the product for potential issues. 

Quality control in integrations

Your development team needs to be aware of these requirements and respond to them. A GitHub to Jira integration can automatically send issues that require changes over to the development issue tracking system in GitHub. The developers can then work on these as part of their normal workflow. 

When issues are resolved, quality control is informed automatically, as the integration copies that information to their system.

Discovery call with Exalate

Conclusion  

Integrating your systems can give your teams a crucial edge over the competition. As you’ve seen, the technology is out there to connect platforms like Jira and GitHub seamlessly and help you solve the challenges involved.

A flexible autonomous Jira and GitHub integration can help teams on both sides of the connection continue working in the familiarity of their environment without worrying about the security or duplication of their data.

Frequently Asked Questions

How can I connect Jira with GitHub?

You can connect Jira with GitHub using third-party applications from the GitHub Marketplace. These tools allow organizations to sync their GitHub repositories with their Jira workspace. If you follow the best Jira GitHub integration best practices, you will be able to sync and share information between teams.

Why do I need to integrate Jira and GitHub?

You need to integrate Jira and GitHub to share information between both platforms. Updates to your GitHub repo will reflect automatically within your Jira issue, epic, or story. This makes it easier for teams to collaborate.

Can I sync my GitHub repo with my Jira project?

Yes, you can sync your GitHub repo with your Jira project. You can map fields like issues, comments, pull requests, and updates. Follow this Jira & GitHub integration guide to figure out how to do so from scratch.

What tool can I use to automate Jira and GitHub sync?

You can automate your Jira to GitHub syncs using a third-party solution called Exalate. This solution allows you to set triggers and write custom scripts for your connection instead of having to move everything manually.

How do I sync comments between Jira and GitHub?

You can sync comments between Jira and GitHub by mapping the comment field in your repository to a specific Jira epic. Tools like Jira Software for GitHub and Exalate can help you choose what to sync.

Recommended Reading:

How to Use Exalate to Synchronize Insight Objects

Insight object sync

Exalate was designed with the core concept of flexibility in mind and that is the feature that allows Exalate to be used as a solution in a variety of integration use cases, including this precise use case of synchronizing Insight Objects.

So in this article, we are going to focus more on Exalate’s flexibility and will walk you through how it can be used to synchronize Insight objects. We’ll show you:

  • How to retrieve object attributes including the following references
  • How to search for objects 
  • How to create new objects

The Scenario

Team Blue is using Jira Service Desk to manage all the details to get Game of Thrones out of the door. Team Blue is working with Team Green for all costumer-related requests. Team Green is actually an external team using Jira to manage all the requests from multiple customers.

As each customer has their own ways of managing their information, a mapping will be required between the two environments. Furthermore, both companies are using Insight Asset Management for keeping track of their assets.

Note: This is a purely fictional scenario.

Team Blue

  • Jira Service Desk with one service desk project to track all the details of the Game of Thrones series
  • Insight asset management
    • Top-level object – GOT House
    • One child – Character
use case for insight objects sync

The character has one attribute, ‘House’.

Sync Insights data

The ticket has an insight object custom field allowing to select from the drop-down.

Team Green

  • One Jira Software project 
  • One Insight Object Schema, ‘Directory’
  • One Object type, ‘Person’
Insights directory

Next to standard fields, one extra field has been added (‘ExternalRef’) which will be used to track the source of the person.

And it works!

Here is a video to demonstrate how the integration works:

Technical Details

Background Information

Most of the background information has been extracted from the Groovy Script Examples.

The point is that Exalate allows us to instantiate any Jira Service, even when it is delivered by an add-on such as Insight.
An example of how one can access Tempo Worklog attributes is available here. It boils down to:

// get the class of the service you would like to instantiate
def IOFacadeClass = ComponentAccessor.pluginAccessor.classLoader.findClass
("com.riadalabs.jira.plugins.insight.channel.external.api.facade.ObjectFacade")
// get the service
def IOFacade = ComponentAccessor.getOSGiComponentInstanceOfType(IOFacadeClass)

Overview of the Implementation

The approach for configuring an integration is always the same:

  • On the source side (Blue), ensure that all required information is sent.
  • On the destination side (Green), apply the information.

For this use case:

  • On Blue

    send the character name, character key, house name, and house key to the other side.
    The character key will be used to find the character in the directory by doing a query on the ExternalRef.

  • On Green
    • Try to find the character using the character key.
      • If not found, create a new person.
    • Assign the target person to the custom key.

Details of the Implementation

Accessing the Insight app Services

// do not forget to import the ComponentAccessor
import com.atlassian.jira.component.ComponentAccessor
 
// Get the Insight Object Facade
def IOFacadeClass = ComponentAccessor.pluginAccessor.classLoader.findClass("com.riadalabs.jira.plugins.insight.channel.external.api.facade.ObjectFacade")
def IOFacade = ComponentAccessor.getOSGiComponentInstanceOfType(IOFacadeClass)
 
// Get the Insight Query Language for doing searches
def IQLFacadeClass = ComponentAccessor.pluginAccessor.classLoader.findClass("com.riadalabs.jira.plugins.insight.channel.external.api.facade.IQLFacade")
def IQLFacade = ComponentAccessor.getOSGiComponentInstanceOfType(IQLFacadeClass)
 
   
// Get Insight Object Type Facade from plugin accessor
Class IOTypeClass = ComponentAccessor.getPluginAccessor().getClassLoader().findClass("com.riadalabs.jira.plugins.insight.channel.external.api.facade.ObjectTypeFacade");
def IOType = ComponentAccessor.getOSGiComponentInstanceOfType(IOTypeClass);
   
// Get Insight Object Attribute Facade from plugin accessor
Class IOTypeAttClass = ComponentAccessor.getPluginAccessor().getClassLoader().findClass("com.riadalabs.jira.plugins.insight.channel.external.api.facade.ObjectTypeAttributeFacade");
def IOTypeAtt = ComponentAccessor.getOSGiComponentInstanceOfType(IOTypeAttClass);
 
 
// Get Insight Object Attribute Bean Factory 
Class IOAttBeanClass = ComponentAccessor.getPluginAccessor().getClassLoader().findClass("com.riadalabs.jira.plugins.insight.services.model.factory.ObjectAttributeBeanFactory");
def IOAttBean = ComponentAccessor.getOSGiComponentInstanceOfType(IOAttBeanClass);

On source – extract attributes from a specific object and add to the replica.

// This code section goes into your outgoing sync processor of the connection
 
// Character is the Insight Object custom field, and we assume that the character has been provided
 
def CHARACTERNAME=824  // this id can be looked up in the Object Schema configuration
def CHARACTERHOUSE=827
 
def character = issue.customFields.Character?.value?.get(0)
def characterName = insightObjectFacade.loadObjectAttributeBean(character.getId(), CHARACTERNAME).getObjectAttributeValueBeans()[0];
 
// dereference the house attribute
def characterHouse = insightObjectFacade.loadObjectAttributeBean(character.getId(),CHARACTERHOUSE).getObjectAttributeValueBeans()[0]
def refHouse = insightObjectFacade.loadObjectBean(characterHouse.getValue() as Integer)  // characterHouse.value is a Long, while an Integer is expected
 
 
// add the attributes to the replica.customKeys such that these values are included in the message from blue to green
 
replica.customKeys.characterName = character?.name
replica.customKeys.characterKey = character?.objectKey
replica.customKeys.houseName = refHouse?.name
replica.customKeys.houseKey = refHouse?.objectKey

On target – search for the directory entry using the character key.

Note: Searching/ creating the Insight objects requires an authenticated environment, which can be set up as documented here

// some constants
def DIRECTORYSCHEMA=1
def PERSONOBJECTTYPE=2
def PERSONNAMEATTRIBUTE=8
def PERSONCOMPANYATTRIBUTE=11
def PERSONEXTREFATTRIBUTE=12
 
// this goes in the incoming processor on green
 
def authContext = ComponentAccessor.getJiraAuthenticationContext()
def currentUser = authContext.getLoggedInUser()
def userKeyToSet = "admin"
 
def targetPerson
...
       
try {
    // ensure that the processor is run under a user permitted to search / create Insight objects
    // The try will catch will ensure that the user is returned to the current user
 
    authContext.setLoggedInUser(ComponentAccessor.getUserManager().getUserByKey(userKeyToSet));
     
    // Search for the person using an IQL which looks like 'ExternalRef in ("CUS-12345")'
    def iqlQuery = "\"ExternalRef\" IN (\"${replica.customKeys.characterKey}\")"
    def persons = IQLFacade.findObjects(DIRECTORYSCHEMA, iqlQuery)
 
    if (persons[0] == null) {
       // create the person
       ...
    } else {
      targetPerson = persons[0]
    }
} finally {
    authContext.setLoggedInUser(currentUser);
}

On target – create the object if not found.

if (persons[0] == null) {
        // found no record, so lets add it
         
       def IOTypePerson = IOType.loadObjectTypeBean(PERSONOBJECTTYPE);
           
       /* Create a new person object */
       targetPerson = IOTypePerson.createMutableObjectBean();
           
         
       /* Set up the attribute list */
       def IOAttBeans = new ArrayList();
           
       /* Set the name of the person */
       def nameBean = IOTypeAtt.loadObjectTypeAttributeBean(PERSONNAMEATTRIBUTE);  
       IOAttBeans.add(IOAttBean.createObjectAttributeBeanForObject(targetPerson, 
nameBean, replica.customKeys.characterName));
         
         
       /* Set the company of the person */
       def companyBean = IOTypeAtt.loadObjectTypeAttributeBean(PERSONCOMPANYATTRIBUTE);  
       IOAttBeans.add(IOAttBean.createObjectAttributeBeanForObject(targetPerson, 
companyBean, replica.customKeys.houseName));
     
          
        /* Set the external reference of the customer */
        def extRefBean = IOTypeAtt.loadObjectTypeAttributeBean(PERSONEXTREFATTRIBUTE);  
        IOAttBeans.add(IOAttBean.createObjectAttributeBeanForObject(targetPerson, 
extRefBean, replica.customKeys.characterKey));
     
     
        /* Set all object attributes to the object */
       targetPerson.setObjectAttributeBeans(IOAttBeans);
           
       /* Store the object into Insight. The targetPerson will be updated with an 
unique ID */
       try {
           targetPerson = IOFacade.storeObjectBean(targetPerson);
           log.warn("targetPerson: " + targetPerson);
        } catch (Exception e) {
           log.warn("Could not create issue due to :" + e.getMessage());
        } 
         
    } else {
       targetPerson = persons[0]
            
    }
 
   
} finally {
   
    authContext.setLoggedInUser(currentUser);
   
} if (persons[0] == null) {
        // found no record, so lets add it
         
       def IOTypePerson = IOType.loadObjectTypeBean(PERSONOBJECTTYPE);
           
       /* Create a new person object */
       targetPerson = IOTypePerson.createMutableObjectBean();
           
         
       /* Set up the attribute list */
       def IOAttBeans = new ArrayList();
           
       /* Set the name of the person */
       def nameBean = IOTypeAtt.loadObjectTypeAttributeBean(PERSONNAMEATTRIBUTE);  
       IOAttBeans.add(IOAttBean.createObjectAttributeBeanForObject(targetPerson, nameBean, replica.customKeys.characterName));
         
         
       /* Set the company of the person */
       def companyBean = IOTypeAtt.loadObjectTypeAttributeBean(PERSONCOMPANYATTRIBUTE);  
       IOAttBeans.add(IOAttBean.createObjectAttributeBeanForObject(targetPerson, companyBean, replica.customKeys.houseName));
     
          
        /* Set the external reference of the customer */
        def extRefBean = IOTypeAtt.loadObjectTypeAttributeBean(PERSONEXTREFATTRIBUTE);  
        IOAttBeans.add(IOAttBean.createObjectAttributeBeanForObject(targetPerson, extRefBean, replica.customKeys.characterKey));
     
     
        /* Set all object attributes to the object */
       targetPerson.setObjectAttributeBeans(IOAttBeans);
           
       /* Store the object into Insight. The targetPerson will be updated with an unique ID */
       try {
           targetPerson = IOFacade.storeObjectBean(targetPerson);
           log.warn("targetPerson: " + targetPerson);
        } catch (Exception e) {
           log.warn("Could not create issue due to :" + e.getMessage());
        } 
         
    } else {
       targetPerson = persons[0]
            
    }
 
   
} finally {
   
    authContext.setLoggedInUser(currentUser);
   
}if (persons[0] == null) {
        // found no record, so lets add it
         
       def IOTypePerson = IOType.loadObjectTypeBean(PERSONOBJECTTYPE);
           
       /* Create a new person object */
       targetPerson = IOTypePerson.createMutableObjectBean();
           
         
       /* Set up the attribute list */
       def IOAttBeans = new ArrayList();
           
       /* Set the name of the person */
       def nameBean = IOTypeAtt.loadObjectTypeAttributeBean(PERSONNAMEATTRIBUTE);  
       IOAttBeans.add(IOAttBean.createObjectAttributeBeanForObject(targetPerson, 
nameBean, replica.customKeys.characterName));
         
         
       /* Set the company of the person */
       def companyBean = IOTypeAtt.loadObjectTypeAttributeBean(PERSONCOMPANYATTRIBUTE);  
       IOAttBeans.add(IOAttBean.createObjectAttributeBeanForObject(targetPerson, 
companyBean, replica.customKeys.houseName));
     
          
        /* Set the external reference of the customer */
        def extRefBean = IOTypeAtt.loadObjectTypeAttributeBean(PERSONEXTREFATTRIBUTE);  
        IOAttBeans.add(IOAttBean.createObjectAttributeBeanForObject(targetPerson, 
extRefBean, replica.customKeys.characterKey));
     
     
        /* Set all object attributes to the object */
       targetPerson.setObjectAttributeBeans(IOAttBeans);
           
       /* Store the object into Insight. The targetPerson will be updated with an 
unique ID */
       try {
           targetPerson = IOFacade.storeObjectBean(targetPerson);
           log.warn("targetPerson: " + targetPerson);
        } catch (Exception e) {
           log.warn("Could not create issue due to :" + e.getMessage());
        } 
         
    } else {
       targetPerson = persons[0]
            
    }
 
   
} finally {

   
    authContext.setLoggedInUser(currentUser);
   
}

On target – apply the found/ created person to the customField.
// The customField expects a collection
 
issue.customFields.Person.value = [targetPerson]

issue.customFields.Person.value = [targetPerson]

Additional functions that could be implemented:

  • If the character changes the name, update the corresponding person.
  • If the character changes the house or the house changes the name, update the corresponding company name.
  • If the character is deleted, mark the person as deleted on the other side.

Recommended Reading:

Announcing the Exalate Visual Mode

Exalate Visual mode

Here’s some good news for those who have been waiting for a more intuitive sync rules editor, the Exalate Visual Mode is here!

A Brand New UI for Low-Code Fans: Why you Need the New Visual Mode 

Exalate was designed with the core concept of flexibility in mind to make it possible for a wide range of use cases to work out, thanks to its Groovy scripts

And what if you didn’t want to play around with code? Well, that’s why we’re introducing the Exalate visual mode to make it as easy as possible for the users who prefer low-code. The Exalate visual mode is a new interface that is way more intuitive than the scripts for the users who do not want to do code. 

Configuration modes in Exalate

The new interface allows you to set up a connection from an instance to another. You can then configure and sync projects between these two public instances, or locally between projects on your own device. It also helps you configure the connection and map fields in-between from one single place. 

It is now available for Jira Cloud, Jira Server, Zendesk, and Azure DevOps and will soon be available for other trackers, too. 

How to Get Started with the Exalate Visual Mode 

You can use the visual mode to initiate a connection and configure and map the sync. 

Before you initiate a connection, make sure your connection is public. You should also have admin access to the remote instance in order to be able to use the visual mode. So you need to verify the access to the destination instance and continue using the editor. 

Admin access in Visual mode

In case you do not have admin access on the other side, you can continue to configure your end and then send an invitation to your partner. And if that’s the case, you will only be able to configure the connection with scripts in Sync Rules.

How to Initiate a Connection in Visual Mode

Go to the Connections tab in the Exalate console and click Initiate connection

Choose the public connection type to enable configuring the connection in the visual mode. Enter the connection information, e.g. the info about the instances and a description. 

Now at this stage, you have to verify that you have admin access. So click Yes and continue. Then click Finish verification to finish the verification process.

Verification in Visual mode

Congratulations! Your connection is now set up. 

Configure Sync Scope in Visual Mode

Now that your connection is up and running, you can proceed to set up the sync scope. 

In the scope, you specify the details like what issues should be synchronized and how to start the synchronization process. 

Local Jira connection

Here, you can also apply filters to projects if necessary. 

Check out this documentation to learn more.

Add Field Mapping in Visual Mode 

After you specify which projects to sync, you can add field mapping to determine what fields you want to sync. Mapping is available by default after you create a connection for some basic fields:

  1. summary
  2. description
  3. comments
  4. attachments 
  5. status
  6. priority
  7. issue types
  8. assignee
  9. reporter
Visual mode mapping

You can also map text and option custom fields. Easily select how to map custom fields between instances from the drop-down when configuring the mapping.

These custom field types are currently supported: 

  • text: single and multi-line (Jira Cloud, Zendesk)
  • option/select ist ( Jira Cloud) 
  • user picker (Jira Cloud)
  • drop-down list (Zendesk)

Check out this documentation to learn more.

Make Your Own Rules

You can still add script rules if the standard mapping rules are not sufficient to cover a specific use case. So you don’t have to get confined by the UI. Creating a script rule is pretty straightforward. You just need to:

  • Edit your visual connection
  • Select the rules
  • Choose the “add script”
Scripts in Visual mode

The scripts are groovy-based, so you’ll have ultimate flexibility to define your sync however you want. For instance, you can easily map between the assignees of one side with the instance name “left”, and another side with the instance name “right”.

Below you can find examples of the most common field types that are usually synchronized

  • Labels
  • Components
  • Resolution
  • User fields
  • Text/String custom fields
  • Single select list/radio button
  • Multi-select list/Checkbox
  • Multi-cascade custom fields
  • Date/DateTime custom fields
  • URL custom fields
  • Label custom fields
  • User picker custom fields
  • Number custom fields

You can learn more about it in this documentation.

What’s to Come

At the moment, you can use the visual mode for Exalate for Jira Cloud, Jira Server, Zendesk, and Azure DevOps. And it is going to be available for Exalate for other trackers.  

Stay tuned for more nodes to be added to the list in the future!

How WirelessCar Uses Exalate to Streamline Collaboration with Leading Automotive Brands

WirelessCar case study Exalate

It is never enough to emphasize the importance of keeping your data intact and secure by consulting the right experts when it comes to collaborating with other teams and companies. 

That’s why in this case study, we went straight to Riada (acquired by Eficode), an Atlassian Platinum solution partner, to tell us all about the journey they took to set up a synchronization between WirelessCar and their customers using Exalate

WirelessCar is an innovative player in the field of connected digital services providing connectivity and digitized ecosystems for carmakers who want to optimally modernize their offers. They work with leading brands in the automotive industry like VW, Volvo Cars, Subaru, Jaguar Landrover, Daimler, and Nissan.

In this very scenario, WirelessCar wanted to have an integration set up between their Jira and their customers’ ServiceNow to make things run more smoothly and to handle tickets more efficiently without losing any more time and energy. 

The Expert 

As an Atlassian solution partner, Riada is a one-stop shop for all the organizations running Atlassian products. They provide all Atlassian and agile services from expert consulting and hosted solutions to training and license sales. Aside from handling the technical part, they also train their customers to help them get the most out of the investment. 

Daniel Miks, the Atlassian solution expert at Riada, had used Exalate before and was familiar with the solution and its features. So when WirelessCar reached out to Riada to use their expertise to establish a cross-company integration, he proposed Exalate.

“I really like the app as it fulfilled all my requirements, it is easy to administer and implement, and everything just works perfectly for me.”

Says Daniel. 

It was a specific use case requiring an autonomous integration between Jira and ServiceNow. 

Why Exalate? 
• Saving time and resources when dealing with customer tickets 
• Every piece of data is traceable and intact as well as the whole
workflow
• Easier and more flexible issue handling 
Guaranteed security when it comes to data pulling 
• Working autonomously in the same environment while integrating data with another platform 

Optimizing the Workflow with the Least Fuss Possible

WirelessCar enables connected cars and powers them with digital services. They amplify car makers’ digital visions and business models by accelerating service creation and turning car data into pure business value. And as expected from their name, they develop cutting-edge digital services and mobility fit for the future. 

WirelessCar had always been open to adopting a solution that could play along with the agility they promised their customers. But when it came to ServiceNow on one side of the connection, this process tended to be: 

  • time-consuming as it was done through emails which was definitely not the best approach for such communication.
  • inefficient as they handled the customer tickets via a portal to be sent over to WirelessCar. 

That was the reason why they started looking for a solution to integrate their data more smoothly without having to leave their own platform or using email.

And that’s when WirelessCar reached out to Riada, with whom they’d already been working, to use their expertise in the field and to implement an integration between the customers’ ServiceNow and WirelessCar’s Jira.  To set up a better more flexible collaboration with their customers, they decided to opt for Exalate. 

“I suggested Exalate as I knew it was very easy to implement, we had a Proof of Concept for it which worked totally fine, and we had a start-up meeting with both sides. They were eager to try it out. The result was quite impressive and positive on both sides, especially for the ServiceNow side as they could remove the email process and work in the same environment without the need to use any other means of communication”

Explains Daniel.

They only needed to make very small adjustments to their work process. For instance, they could assign something to different teams and Riada would trigger the connection. It only required a small amount of training and that was it. Everything else would work automatically from thereon.

The ServiceNow side had integrated with Ericsson before but now they were looking for a more flexible solution to set up another integration with the least fuss possible. So when Exalate was suggested, they were happy to try it out and the result was satisfactory, too. 

Tackling the Security Challenge with Exalate   

When WirelessCar asked Riada to set up the integration between them and their customers, the challenge was not actually to get parties to try out Exalate, but it was mostly with the integration process itself. 

Each end wanted to work in their own environment and synchronize data and send and receive tickets between themselves without risking their security or autonomy. 

Due to the tight security measures on the ServiceNow side, especially when it came to third-parties and API gateways, they didn’t want to allow Exalate to access their database as they wanted full control over the info that was sent to the other side. So the specific information would be sent over to Exalate and Exalate would then exalate it to the WirelessCar side. 

On the other hand, Riada, as the consultant, could not do the usual testing and investigation on-premise in the ServiceNow environment before the implementation due to the same security process. So everything had to be set up first and tested afterward. 

To make things more technically challenging, there was also a third-party API gateway behind the firewall on the ServiceNow side. And as it was needed to send over specific pieces of information (customer tickets, for instance) to the other end of the connection, the Exalate team built a new API gateway, particularly for this integration. And Riada handled the way the data was pulled and sent over.  

On the other end, WirelessCar only wanted to observe how data was handled by Exalate through the extra-secure data sending channel. 

“Once the connection was up and running, everything was working just fine and both sides were happy with the result.”

Says Daniel.

Creating a Network of Interconnected Companies with Exalate 

After this challenging integration was set up and running, WirelessCar started to extend its Exalate network by integrating with a number of other customers. And they’re looking to expand this network of interconnected companies in the near future. 

Daniel ensures that because of Exalate’s features, especially its flexibility, any other integration will work just as smoothly as it did in this case. 

So we asked Daniel about Exalate’s most prominent feature for an Atlassian expert?

As for the customers, it’s easy to sync and map every field from either side. Daniel explains that what stands out in a solution for the customers, is not actually how the sync is implemented, but the fact that it goes swimmingly and meets their requirements for specific use cases. It’s important that the connection runs smoothly, helps them save time and resources, is flexible, and is problem-free. And that’s the outcome that everyone involved in this synchronization was happy with. 

Results Recap

  • Traceability of the tickets and the workflow 
  • Turning a time-consuming process into a smoother, more efficient one 
  • Easier issue handling thanks to the running synchronization
  • Less work and more productivity resulting in customer satisfaction

Note: By the way, you can read more about this specific use case, a ServiceNow Customer Case to a Jira Epic synchronization, here.

Become an Exalate user and experience an optimized workflow and high productivity. It’s flexible enough for any sync use case. 

Book a demo 

Jira to Jira Integration: The Comprehensive Guide to Jira Sync in 2025

Jira to Jira integration

If you’re a Jira user and you want to share some data with a user working in another Jira, you’ll need a Jira to Jira integration to ensure smooth collaboration. 

This software shouldn’t just help individual teams work flawlessly on their own, it should also help them connect and integrate.

In this article, you’ll see why connecting multiple Jira instances together is useful and what technology is available to synchronize them effectively. After that, you’ll go through a step-by-step guide explaining how to set up a connection between two Jira nodes. 

I’ll show you how you can customize the connection and synchronization. You’ll also find some use cases to show you what a Jira to Jira integration can do to help improve your workflows and keep your teams connected and your data intact.

Get the Jira to Jira Sync Guide

Learn how to achieve seamless step-by-step integration between multiple Jira instances.

Why you Need a Jira to Jira Integration

Teams performing different roles very often overlap in the information they track. For example, customer feedback is useful to the customer support team, who will be the ones directly handling it. 

It is also useful to the engineering team. However, engineers will want to know about bugs or issues with their user interface. They will also want to know what features customers want to see.

On the other hand, marketing teams will want to have a view of the people who are using their product, and what they like and dislike about it. 

Generic image

These teams will want to share information, but they don’t necessarily want to share all of it. Engineers might not be interested in a customer’s contact information but will want to know about pressing issues. 

To solve these problems, you need to synchronize the information that is useful to both teams. It is possible to share data by email, but this is slow, laborious, and error-prone. So if you manage to do it automatically, you can save everyone time and money, and keep the data intact along the way.

When teams collect information themselves, they can run into an issue known as siloing. Teams can collect data effectively, but they keep it on internal systems. That wouldn’t help the wider organization, especially when going outside the borders.

Providing information to other groups is obviously important, but it is rarely a priority for people on a day-to-day basis. But you can solve this problem by using software to automate the process of information synchronization.

How to Choose the Right Technology for a Jira to Jira Integration

When setting up your integration, you need to consider potential problems and ensure that your solution can handle them. The tool I’ve chosen, Exalate, meets three specific software integration requirements.

Decentralized Integration (Autonomy)

First, you want your teams to be able to make changes independently while working in their familiar environment. 

Setting up the sync will likely involve extensive consultation, and after that, they need to be able to make changes without consulting each other. This is the essence of a decentralized Jira to Jira integration setup.

Teams must be able to control what enters through Exalate and ensure that confidential data doesn’t cross over to the other side without permission and proper security.

Flexibility

Your multi-Jira integration needs are likely to change over time. You might want to change what data is synchronized or the synchronization criteria. Exalate offers a flexible system for controlling the shared data, as well as when the sharing happens. 

Its advanced scripting engine lets you define precisely how you want to integrate data. This flexibility allows you to adapt it to any use case required.

You can alter connections at any time by switching them on and off with a single button. Controlling and adapting the integration as your projects evolve is as straightforward as possible.

You can even use AI to generate your integration scripts in Exalate’s Script mode. We will learn more about it in the next section.

Security 

Another key consideration when choosing the right solution for Jira to Jira integration is platform security.

Reliability in integrations

When choosing an integration tool, always check out the features for protecting user data. Review their infrastructure to see how they handle data storage and transfer.

Since both sides intend to share and store sensitive information, you must invest in extra security features such as firewalls, encryptions, and others.

Reliability

You need software that works as close to 100% of the time as possible. It also needs to handle problems gracefully. That means that if one of your systems has some downtime, the integration software is able to handle the outage and resume operations when the systems are back up again. 

The solution should be able to get the systems back in sync as soon as possible without you having to spend time resetting it or tweaking the settings. 

Ideally, once you have set the system up, you should be able to forget about it. Synchronization should happen without you needing to do anything else.

Exalate is also convenient and easy to work with. It has a free trial, and you can test it without having to enter payment information. Also, it doesn’t take long to install and set up. I’ll run you through the process of doing that next.

Our customers wanted to work on security tickets within their own service desks and didn’t particularly want to work in multiple vendor portals.

MICHAEL FOWLER
ENGINEERING LEAD AT QUORUM CYBER

How to Set up a Jira to Jira Integration (the Step-by-Step Process) 

There are several deployment models of Jira, and you need to know which you have before you start. You have Jira Cloud and Jira Server, along with Jira Data Center, which is essentially a scaled-up version of Jira Server for Enterprise organizations.

To read more about the deployment models, check out this article

Jira hosts Jira Cloud on its own servers as a subscription-based service, while users can host Jira Server and Data Center on their own machines.

Let’s get down to setting up the Jira to Jira integration, step by step.

You might be a fan of video tutorials, so watch this instead:

Step 1: Install Exalate on Jira

Firstly, log in to one of your Jira Cloud instances. Find Exalate Jira Issue Sync & more in the Atlassian Marketplace. To find it, click the cog-shaped settings button in the top-right of the screen and then click “Apps” in the menu that appears. 

Note: The installation process depends on the version. I’m focussing on Jira Cloud here, and there’s a further guide to it in the Exalate documentation. If you’re using Jira Server or Data Center, please look at this guide instead.

In the marketplace search field, type “Exalate”. You’ll see several versions of Exalate appear, corresponding to the platforms Exalate supports.

Select “Exalate Jira Issue Sync & more”. Click “Try it free” on the next page.

Exalate Jira issue sync & more

A pop-up asking you to “Add to Jira” will appear. You can view the app details from here if you want. Then click “Start free trial”.

Wait for some time while the app loads.

You’ll be redirected back to Jira, where you’ll see a pop-up telling you that the app has been added. Click the “Get started” button.

Alright, your installation is complete.

Next, you need to repeat the same process on your other instance.

If your other instance is Jira Cloud, use the steps above, otherwise, check the links for details on the Jira Server or Data Center installation process.

Step 2: Connect your Jira Instances

Now that you’ve installed Exalate on both Jira instances, you need to create a connection between them. The way to do that is to set up a connection from either instance.

One side actually invites the other side to connect and the other side accepts.

During the connection setup, there are several screens that let you configure exactly how Exalate behaves. In some cases, I’ll pick the defaults, but look in more detail at those areas in steps 3 and 4. Exalate will pick sensible default settings, exchanging data between identical or equivalent fields.

So in the later steps, I’ll look at how to adjust the established connection.

First, let’s set it up.

On one of your Jira instances, click “Apps” in the top menu, and then select “Manage your apps”. If Exalate is present, you’ll see it listed as a heading in the left-side menu.

Click “Connections”. 

initiate connection for a jira to jira integration

If you’ve created any connections before, you’ll see them listed here.

If not, you’ll see a message saying that none have been created yet. Either way, click the green “Initiate connection” button.

On the next screen, enter the URL of the other instance.

After entering the URL you will be redirected to a screen that will allow you to choose between 3 configuration modes: Basic, Visual, or Script Mode.

Configuration modes in Exalate

Continue with the Basic Mode

This is the newest addition to the type of connections provided by Exalate. Basic connections have a set of predefined sync rules to help you sync basic issue fields like summary, description, comments, attachments, and issue types. You cannot modify these sync rules. This type of connection works best for basic synchronization needs. 

Note: Exalate also has an option where not only Global administrators but also Project administrators can set up Basic connections from the Project settings. This helps establish the connection on a project level. Visit this page to learn more about how to do it.

The above screen redirects you to select the project on the side that initiated the connection. 

initiate a jira sync

Hit “Next” and then you will need to confirm whether you have admin access to the destination Jira instance or not. Click “Initiate” if you have access or else follow these steps.

jira sync basic mode access

On the destination instance, select the project and then click “Confirm”. After establishing the connection, you can sync your first issue in Exalate to see how it works: by entering the issue key and clicking on Exalate as shown below, by using the connect operation, or by syncing issues in bulk or creating a trigger.

accept a jira to jira connection

While syncing your first issue you can also see the status of your sync as “synchronized”.

Continue with the Visual Mode

In this mode, you can give names to your local instance and destination instance. The form will use these to create a name for the connection, which you can modify if you like.

initiate jira sync

There’s also an optional description field. The more information you enter here, the more easily you’ll be able to identify and work with your connection later on. This is especially important when you have multiple connections and different people working with them. Adding enough detail here can save you work later on.

When you’re ready, click “Next”.

For using Visual Mode, you need admin access on both sides of your Jira instance. So when you click “Next” on the screen above, you will be redirected to a screen that asks you to confirm the admin access. 

Firstly, Exalate will try to establish a connection between your nodes. That might take a few seconds.

successful visual Jira to Jira integration

When it’s ready, click the green “Configure sync” button to proceed.

On the next screen, you have several options to control how you integrate your Jira projects.

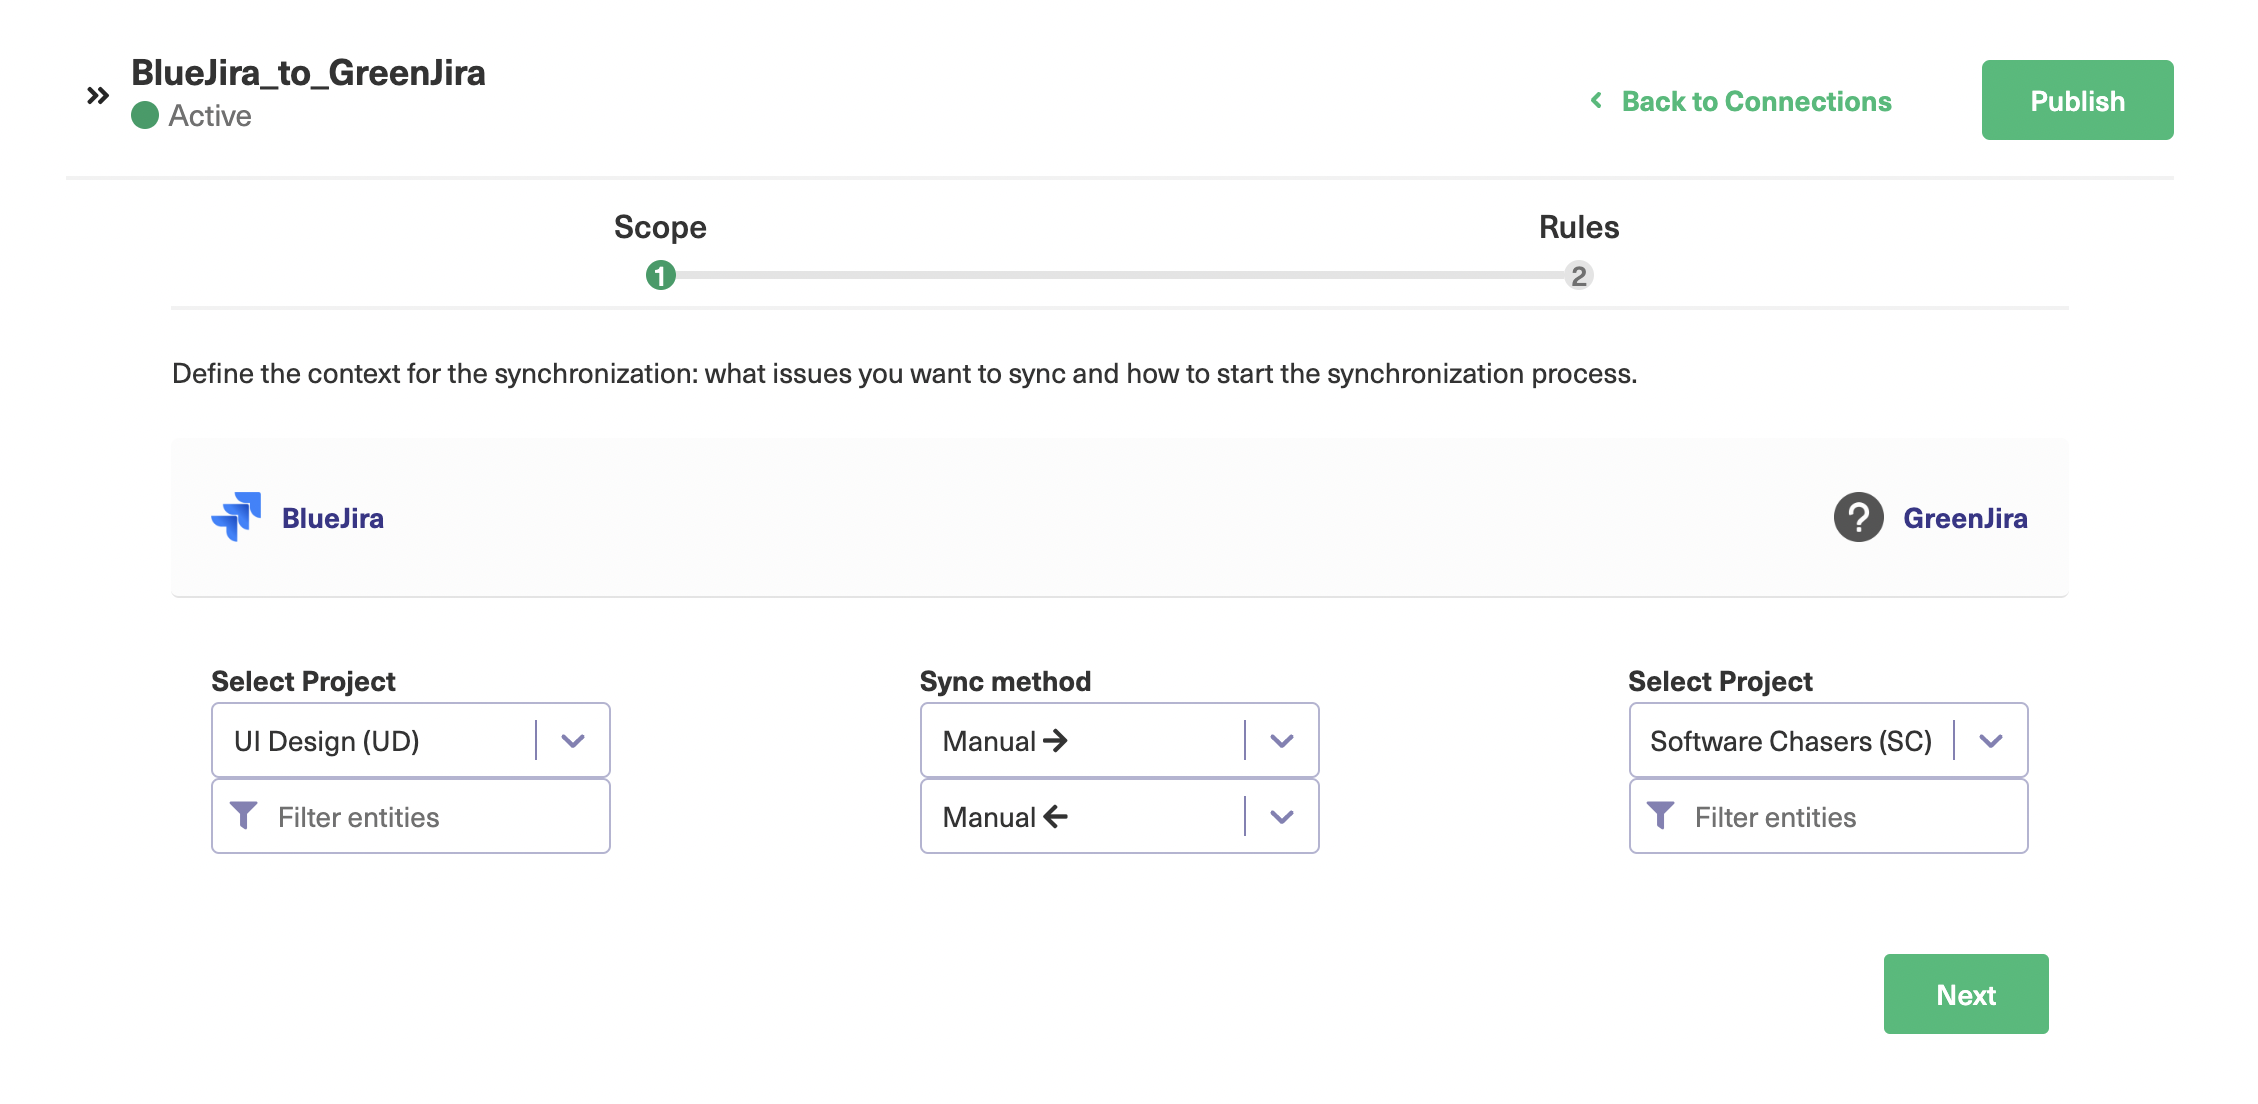
exalate visual mode jira sync scope

The connection names appear, and under each of them is a drop-down menu where you can pick which project is used for synchronization. The filter issues screen takes you to a further screen, where you can configure what goes over to the other side. 

In the middle, the “Sync method” drop-down lets us pick whether synchronization is done manually or automatically, or whether it is disabled entirely.

We can make this choice for both synchronization directions, so if you just want to copy issues one way, you can do so.

You could also have synchronization occur manually in one direction and automatically in the other, it’s up to you.

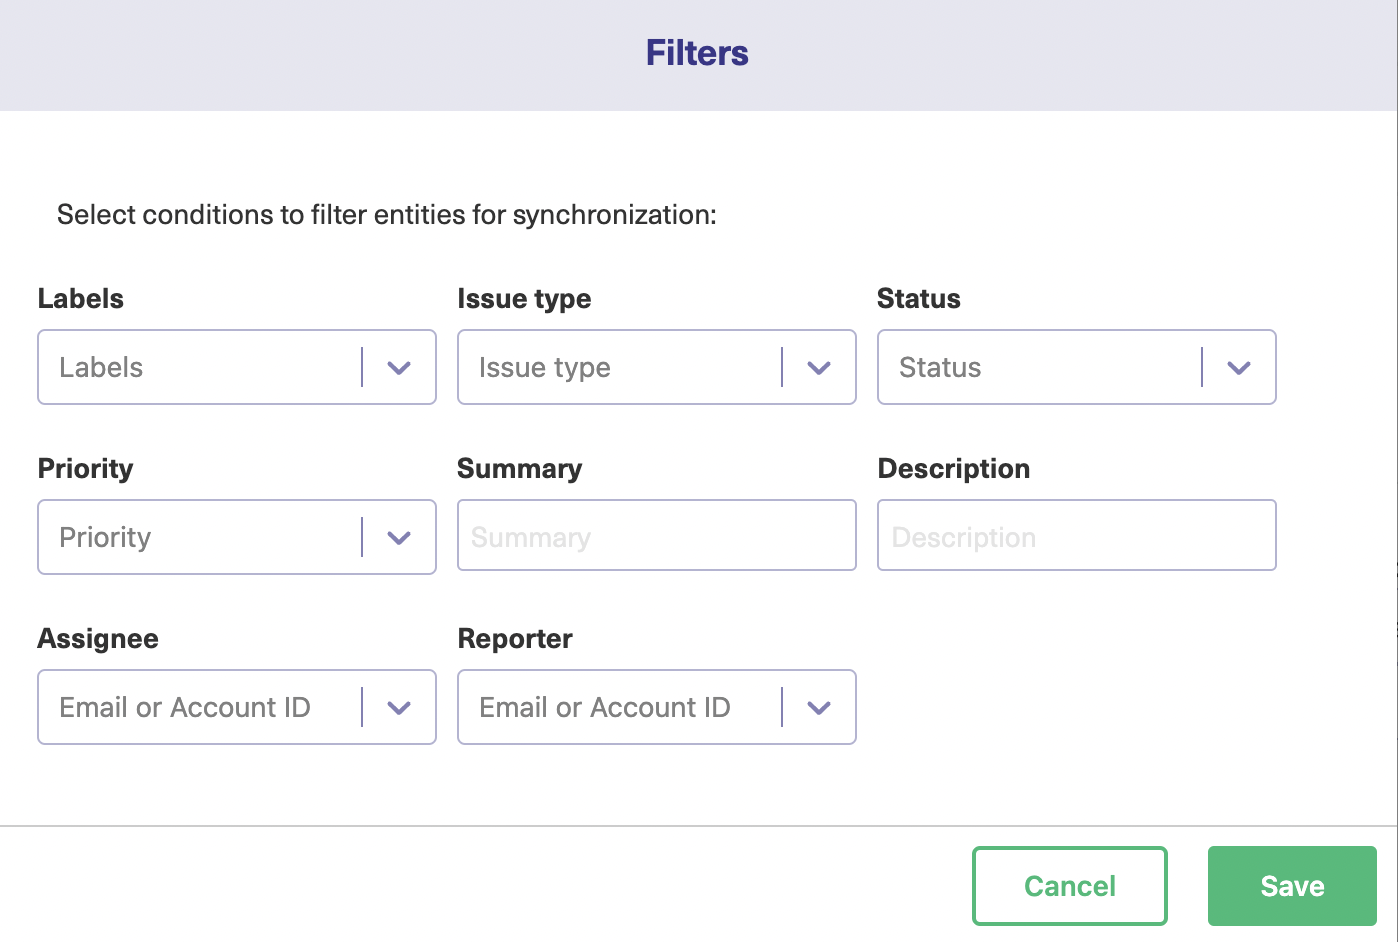
Let’s look in more detail at the screen that appears when you click the “Filter entities” button. 

jira to jira integration filters

There are various filters you can set to choose which issues to synchronize. If you want to sync all of them, just leave these fields blank. You can choose to filter issues of a specific type, or you can select a status, priority, or which labels to use. 

If you click the “More” button, a few more fields will appear allowing you to specify the Assignee or Reporter.

You can also add a specific description, or summary, which will select matching items.

Click the “Save” button when you’ve made your selections.

jira issue mapping

Back on the main scope screen, click “Next”, to move on to the next step.

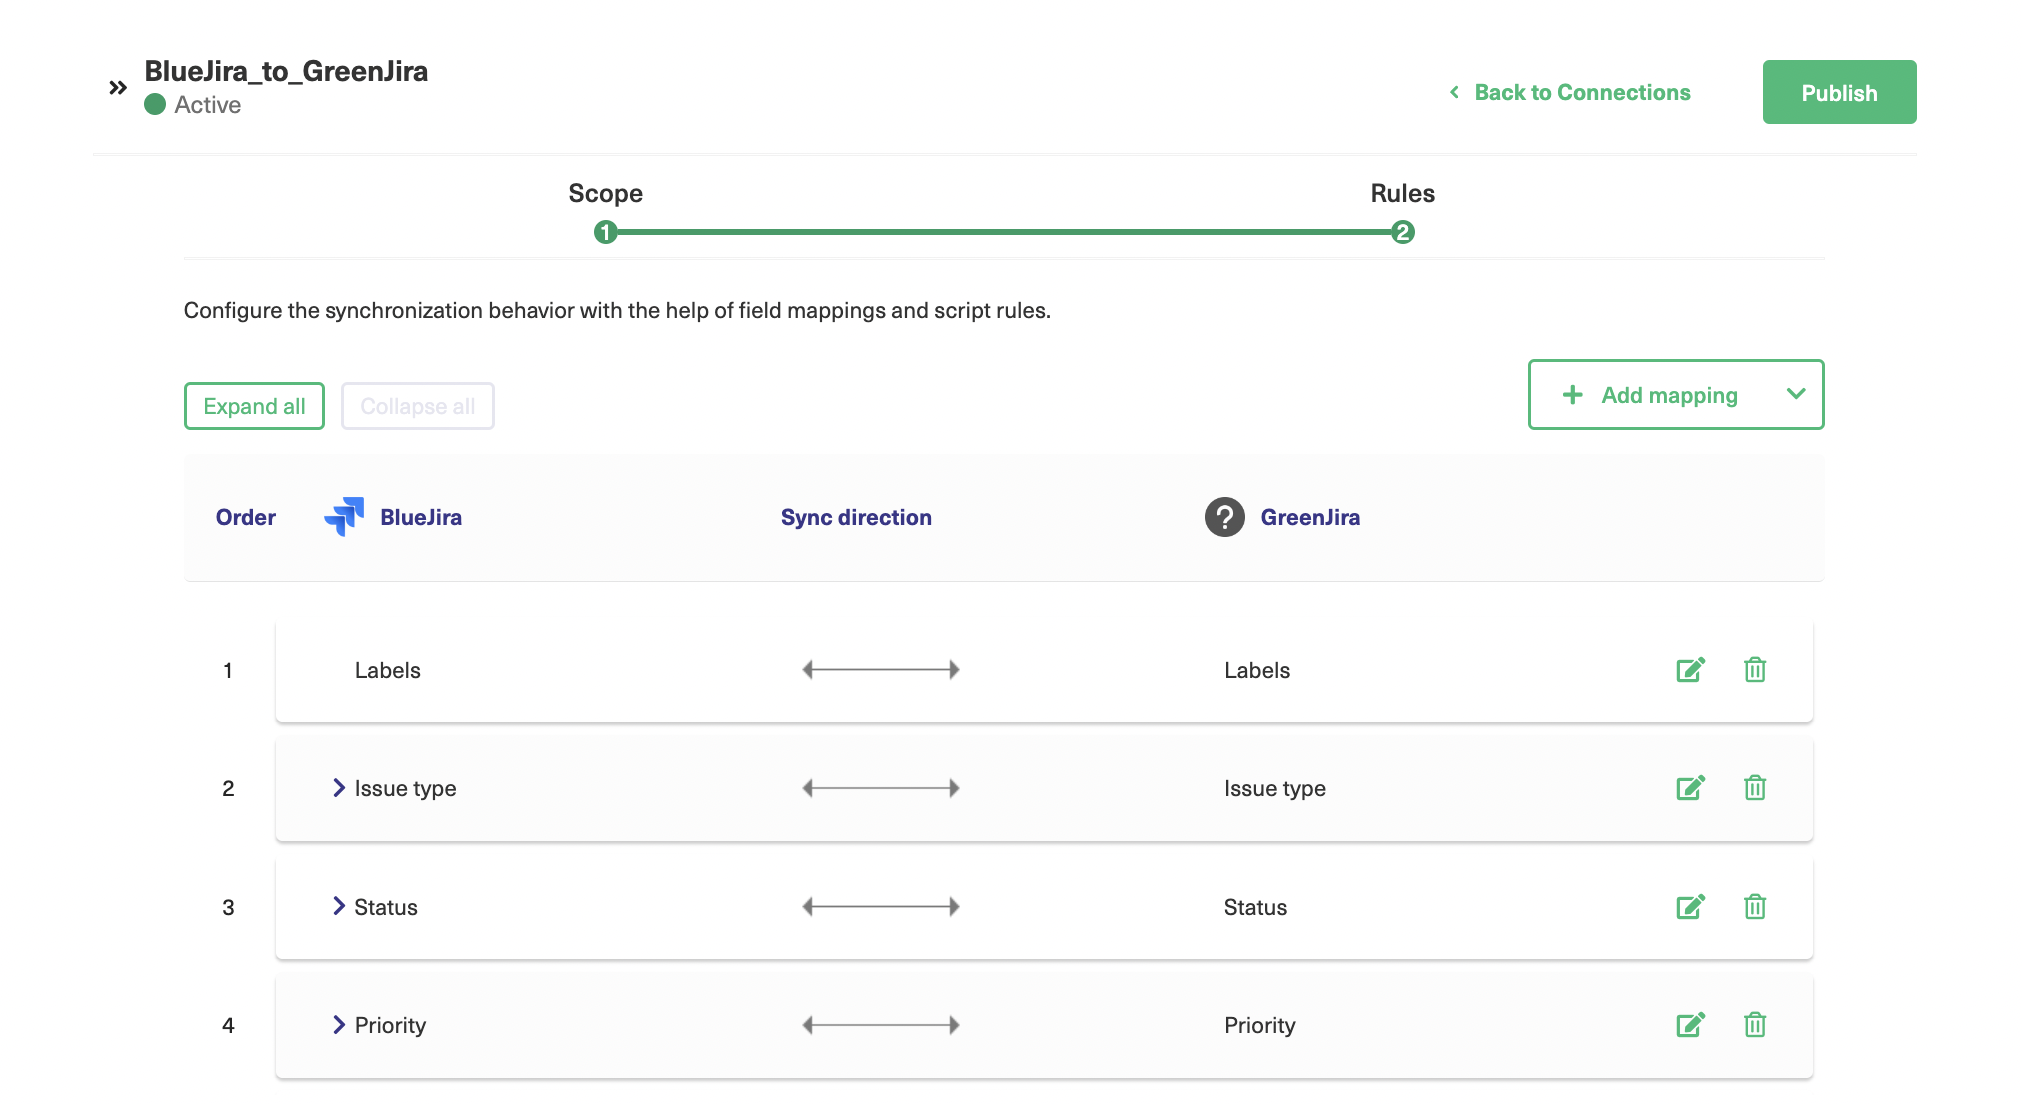
On the “Rules” screen, you specify which fields should map onto each other. Since the integration uses two Jira instances, fields are mapped one-to-one with identically named fields.

If you’re using Jira with another platform, such as a Jira Zendesk integration or a Jira Azure DevOps integration, similar fields may have different names.

You can drag the fields up and down to re-order them. You can also expand them to reveal further options. The “priority” field, for example, lets you choose how priorities map to each other.

The “Expand all”, and “Collapse all” buttons at the top left let you show or hide all the extra fields at once, which is useful if you want to check everything quickly. 

If you want to create a new mapping, click the “Add mapping” button. Here you can select further fields for mapping. Your 2 instance names are on the left and right sides, and you can choose the fields for mapping from the drop-down boxes under their titles. 

The sync direction field in the middle lets you choose whether the synchronization goes in both directions or in a single direction.

add mapping to jira to jira connection

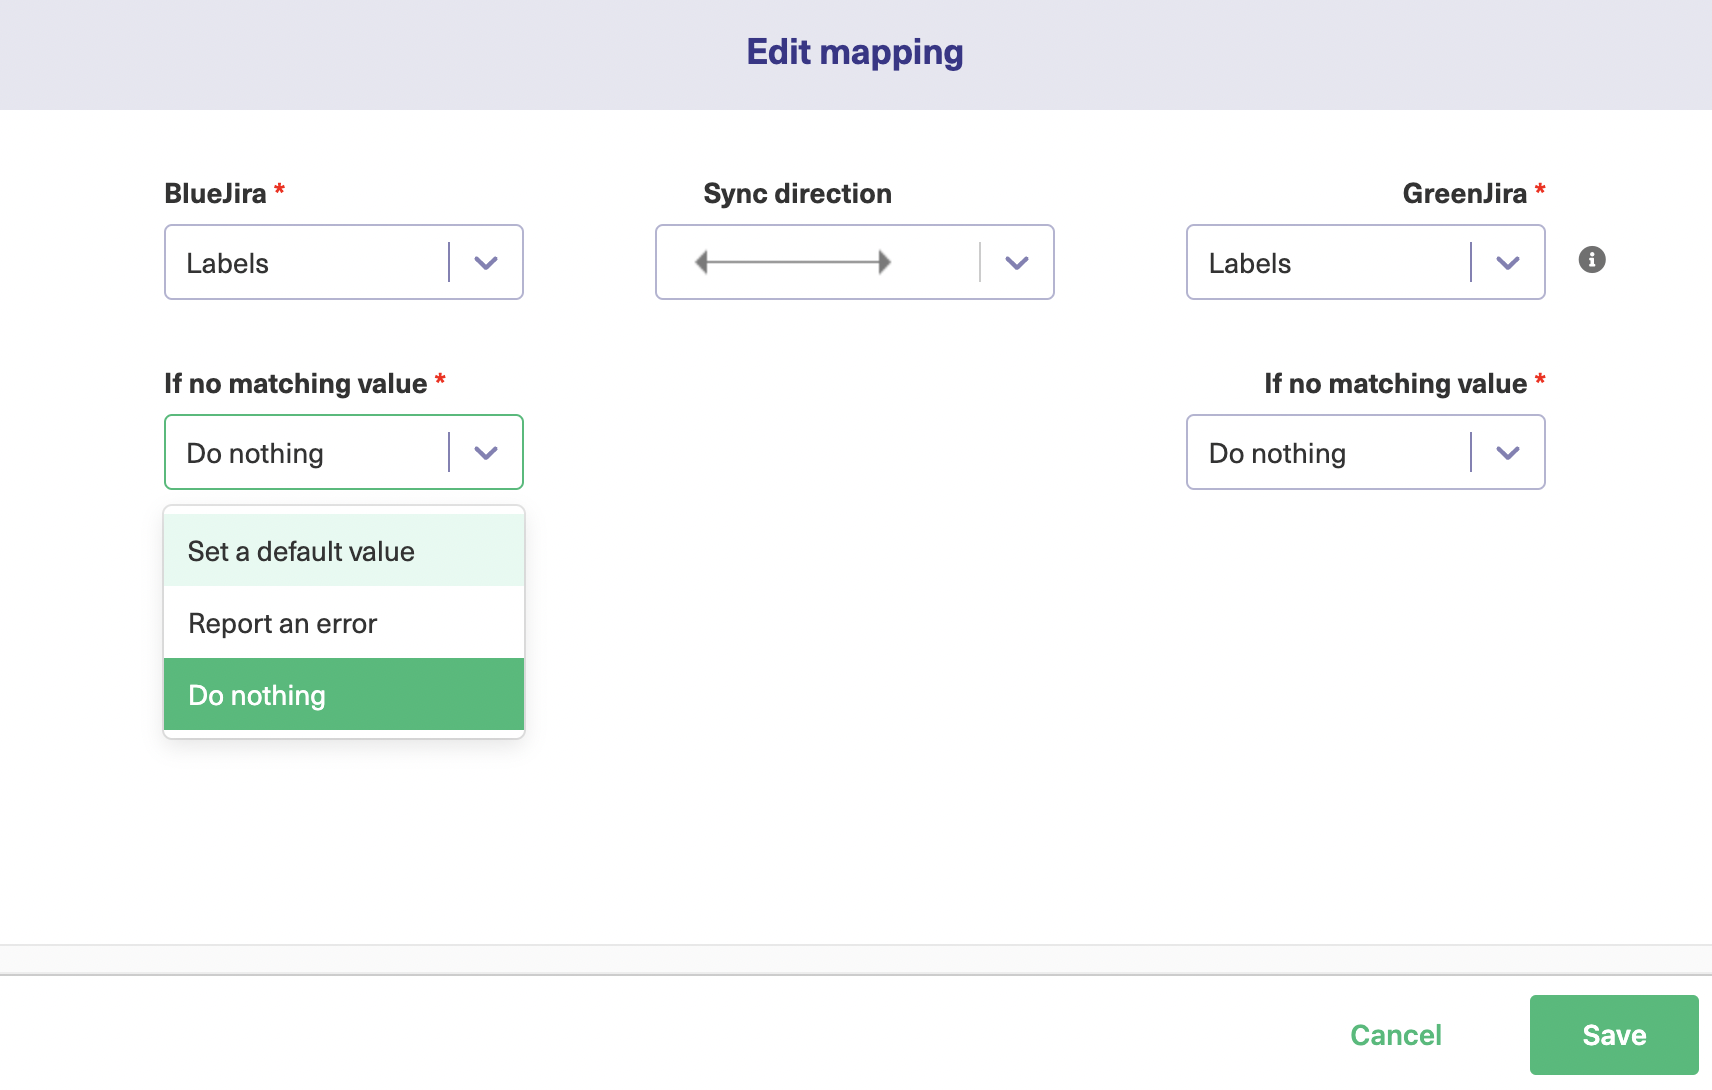
There are further drop-downs letting you choose what happens if there is no matching value in the field.

In this case, Exalate can set a default value, which you select with another drop-down box. Alternatively, it can report an error, or do nothing. This behavior is unique on each side of the connection, so it doesn’t have to be identical.

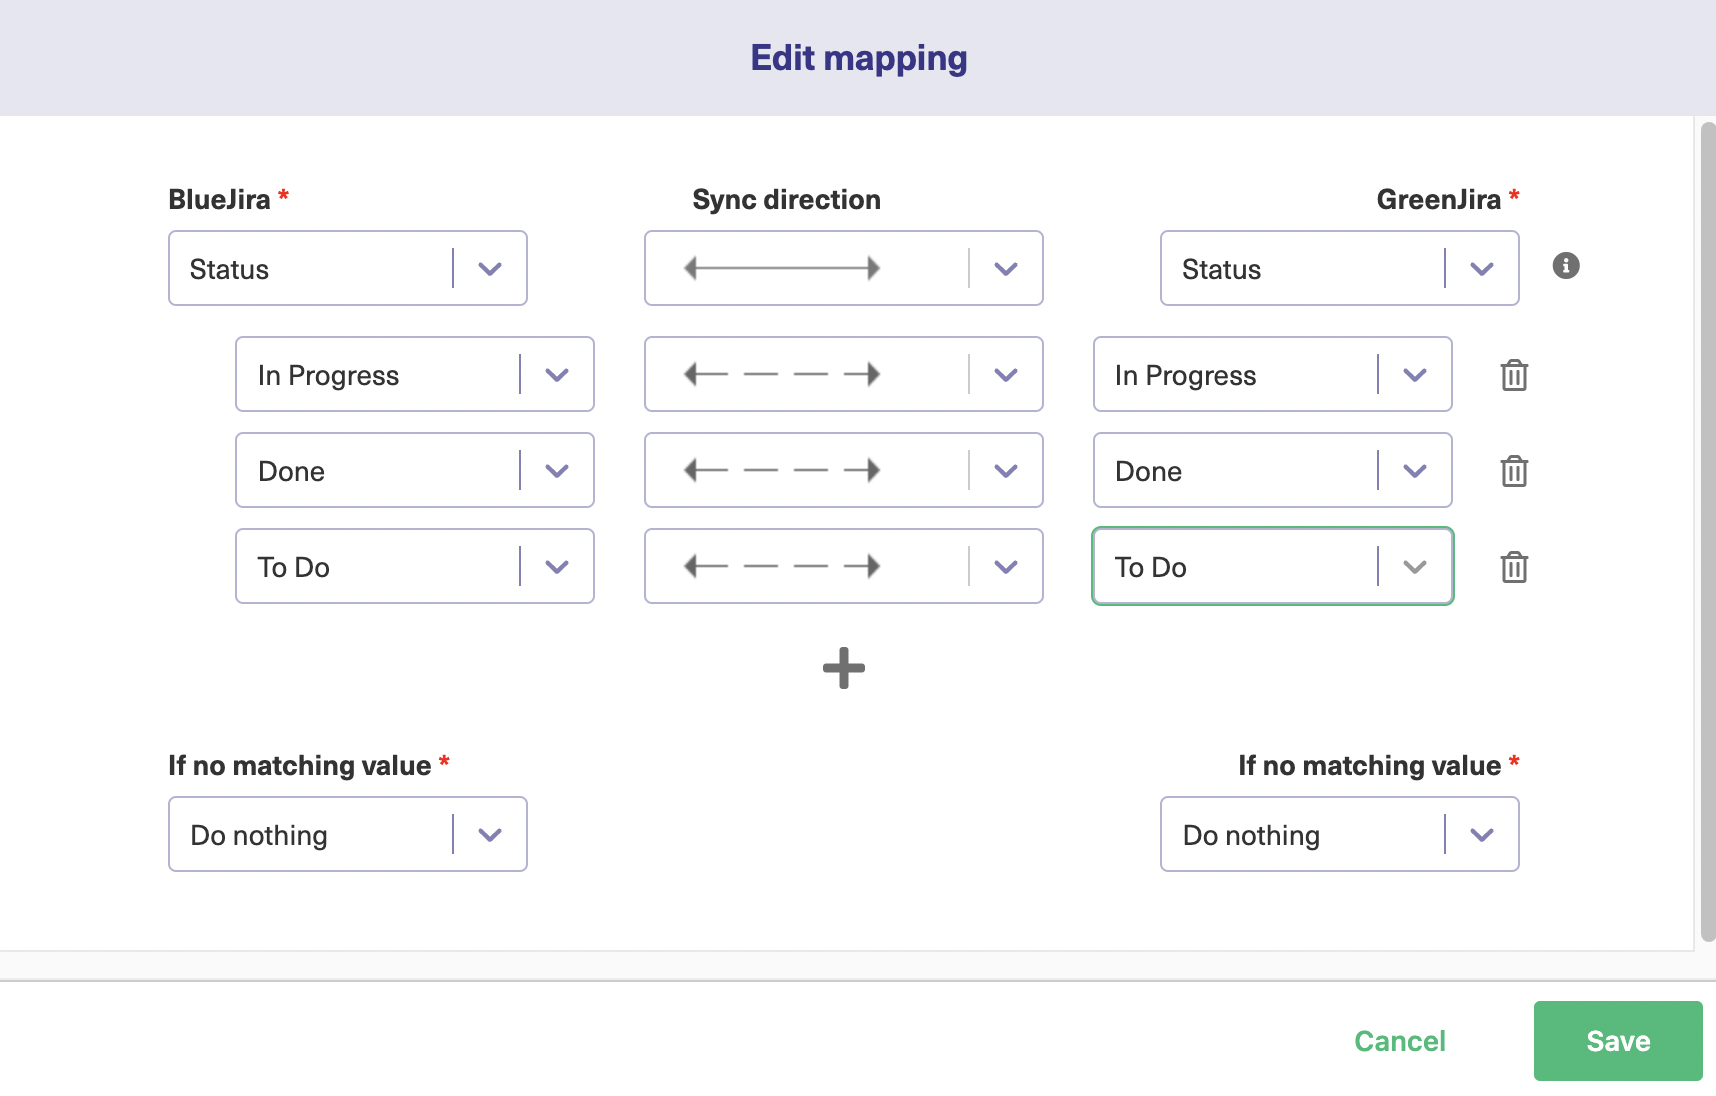
If you click the plus button, you can map specific values for the field to one another. This is especially useful if you are using different platforms.

But even with 2 Jira instances, you may have teams that use different terminology, so this feature can be useful there. There’s a small delete icon next to each entry you can click if you want to remove it.

When you’ve finished on this screen, click the “Save” button if you want to keep your changes, or the “Cancel” button if not. 

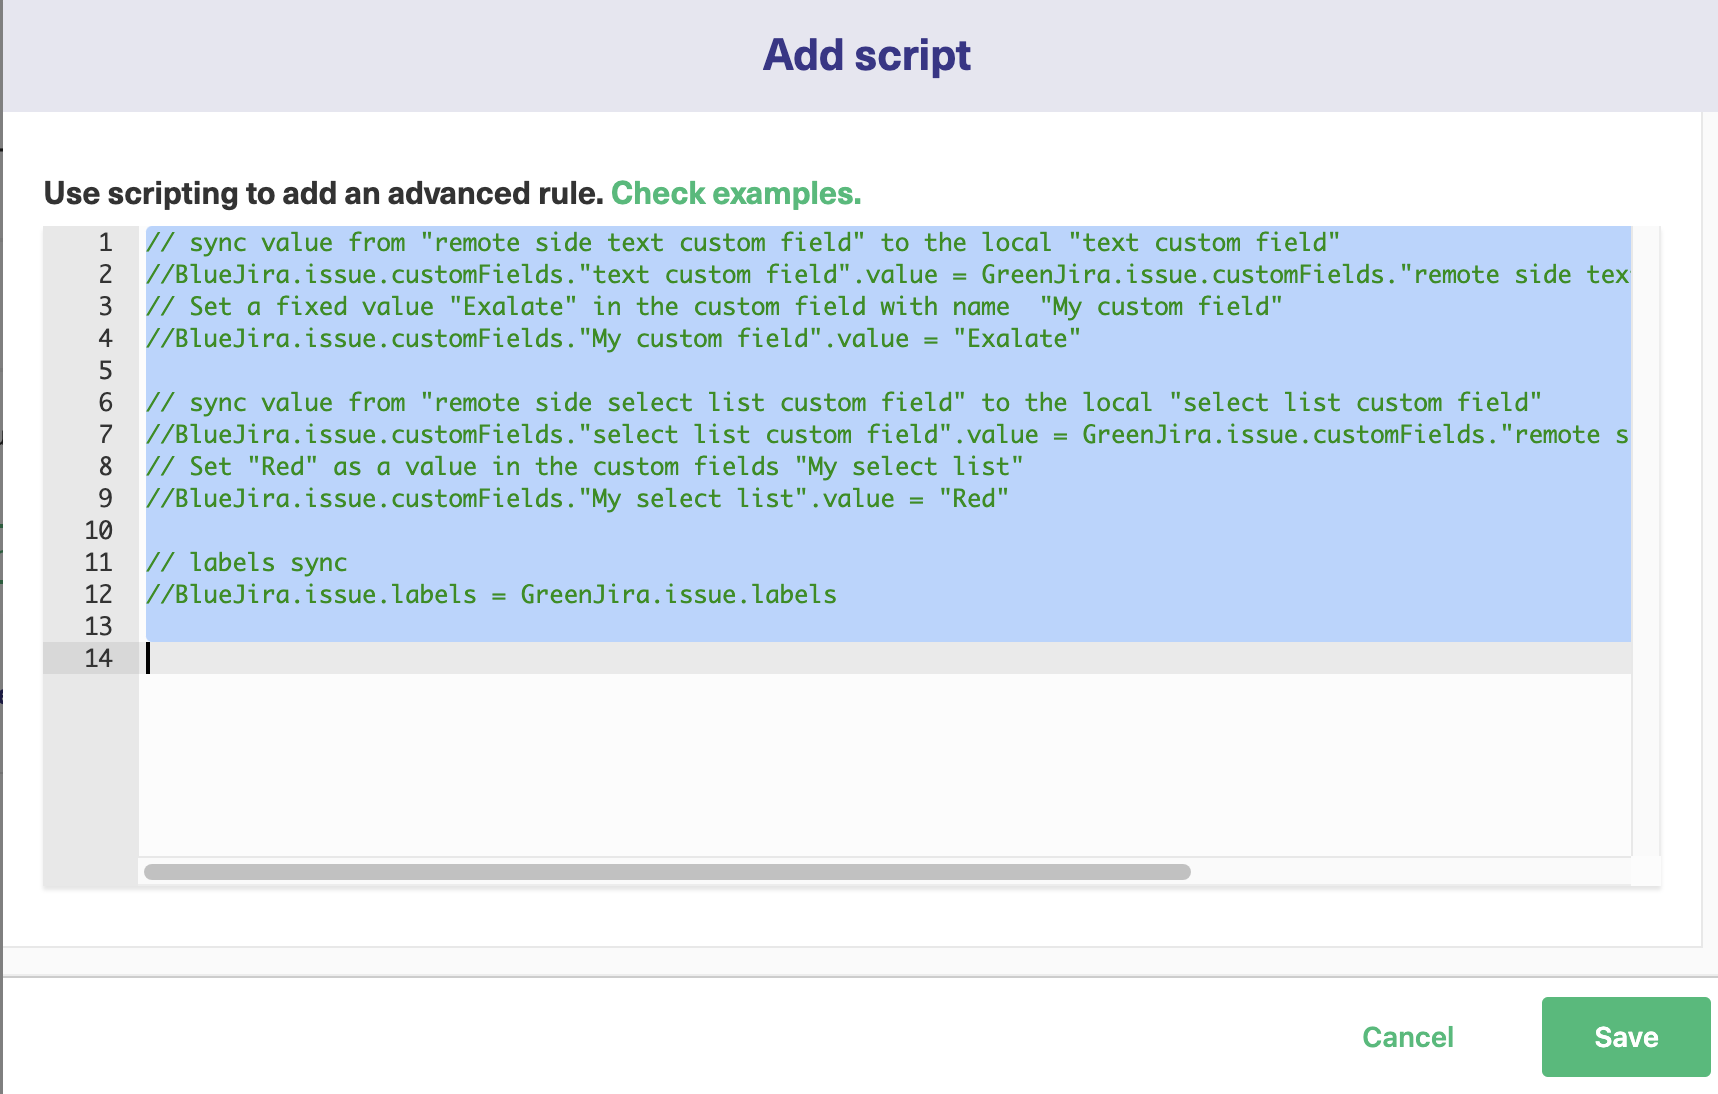
If you click the small arrow at the side of the “Add mapping” button, you’ll see an “Add script” option. If you click that, a new screen will open.

add scripting to jira integration

Here you can add lines of code that control your mappings in more detail. The lines of code there already show how you can set specific fields to specific values, or map them onto other values.

Script rules can be confusing, but they are very powerful if you learn how to use them. To learn more, click the “Check examples” text in Exalate to read some script rules examples.

When you’ve finished, click “Save” to keep your changes, or “Cancel” to discard them.

edit jira sync mapping

If you want to edit any of the fields that are there, hover over it and click the “Edit mapping” icon next to the delete icon. The “Edit mapping” screen works the same way as the “Add mapping” screen.

You might not want to map all the fields by default, so delete any you don’t want by clicking the “Delete mapping” icon, on the right of each one.

When you have everything set up to your liking, click “Publish”, to finalize your choices.

Continue with the Advanced Script Mode

If you want to customize your Jira sync how you want, then the Script mode is your way to go. It uses the Groovy scripting engine, which allows for utmost control over your data exchange. You can also use AI with this mode.

The methods offered on the wizard here are the same as I’ll cover in later sections, so you can mostly just accept the defaults when installing Exalate.

To start with, after selecting “Script Mode”, you will see a screen that will allow you to enter the details of the connection.

initiate jira sync

Once you enter the details and click “Next”, you have to choose a project at the Jira instance to initiate the connection. Select one from the drop-down list and click the “Initiate” button.

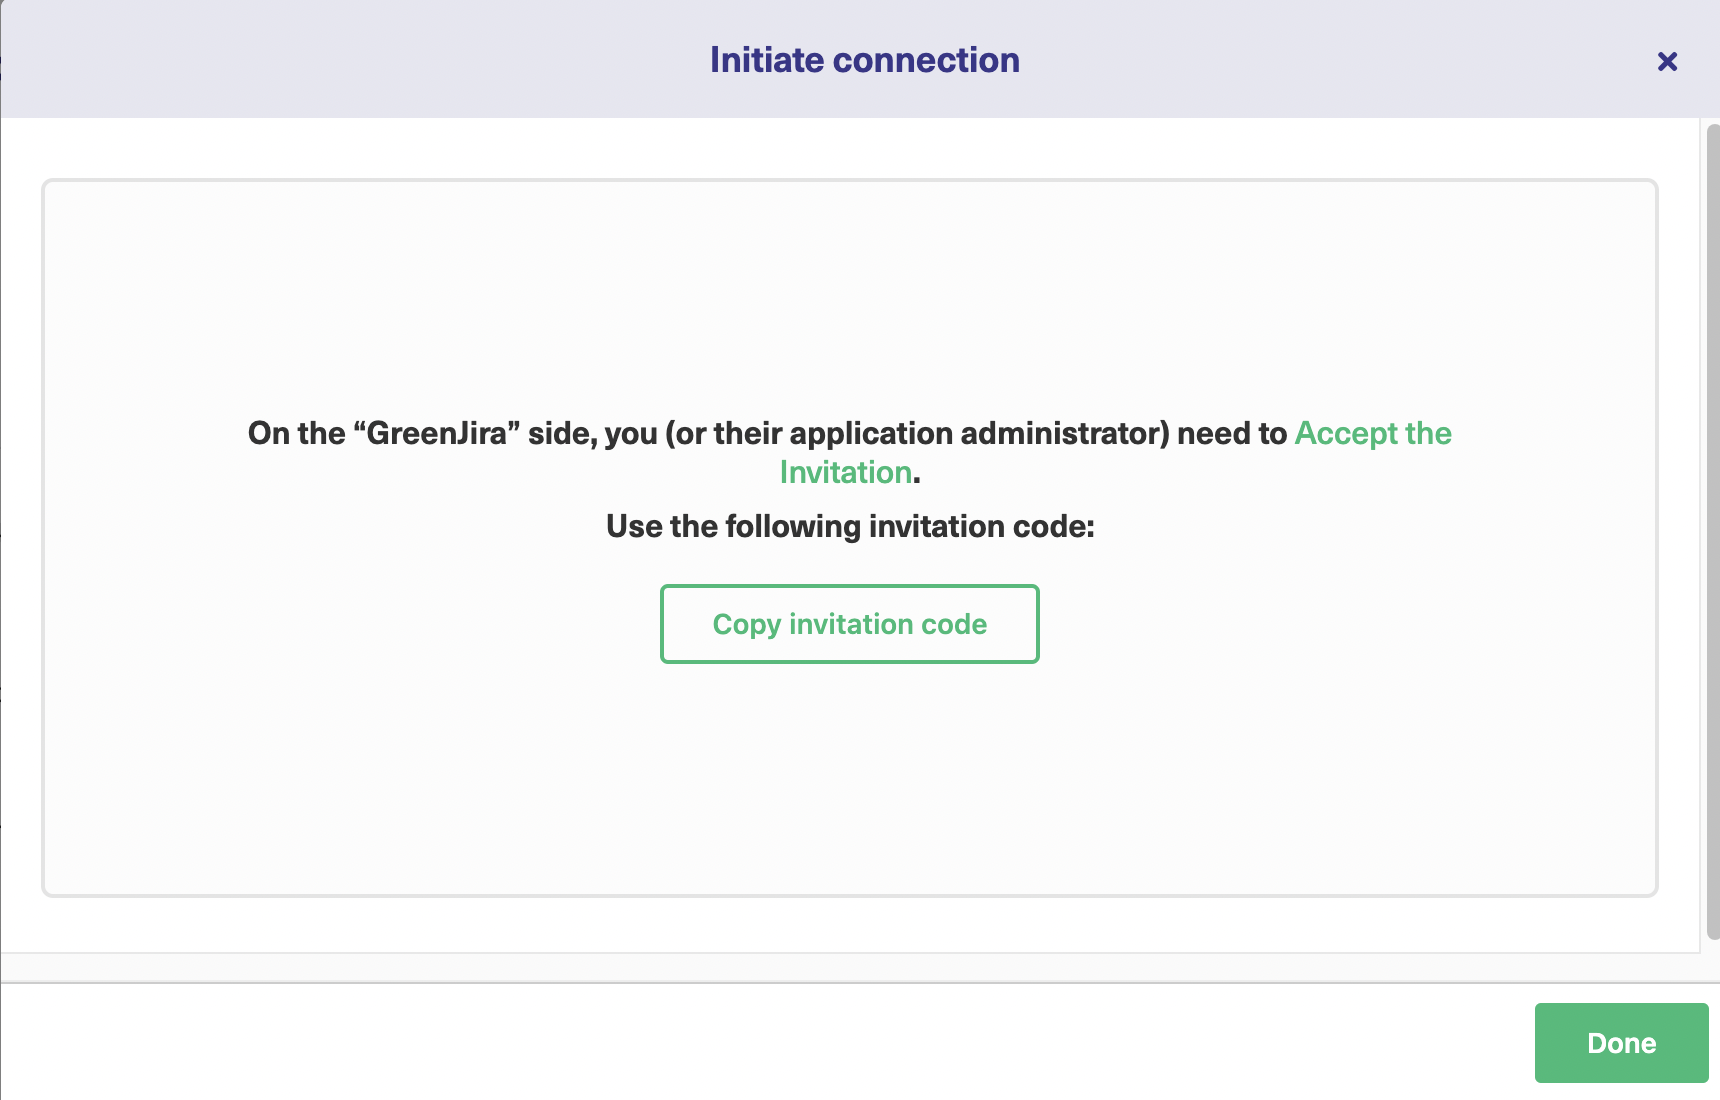
Lastly, the system will generate an invitation code, which you need to copy and paste into the other Jira instance. Click the “Copy invitation code” button. Paste this somewhere safe, such as a text file, and save it for later.

copy invitation code to a jira sync

Next, log in to your other Jira instance. Look for the Exalate connections screen in the same way as before. This time, click the “Accept invitation” button.

jira to jira integration invitation code

Paste the invitation code into the field provided, then click “Next”.

accept a jira sync invitation

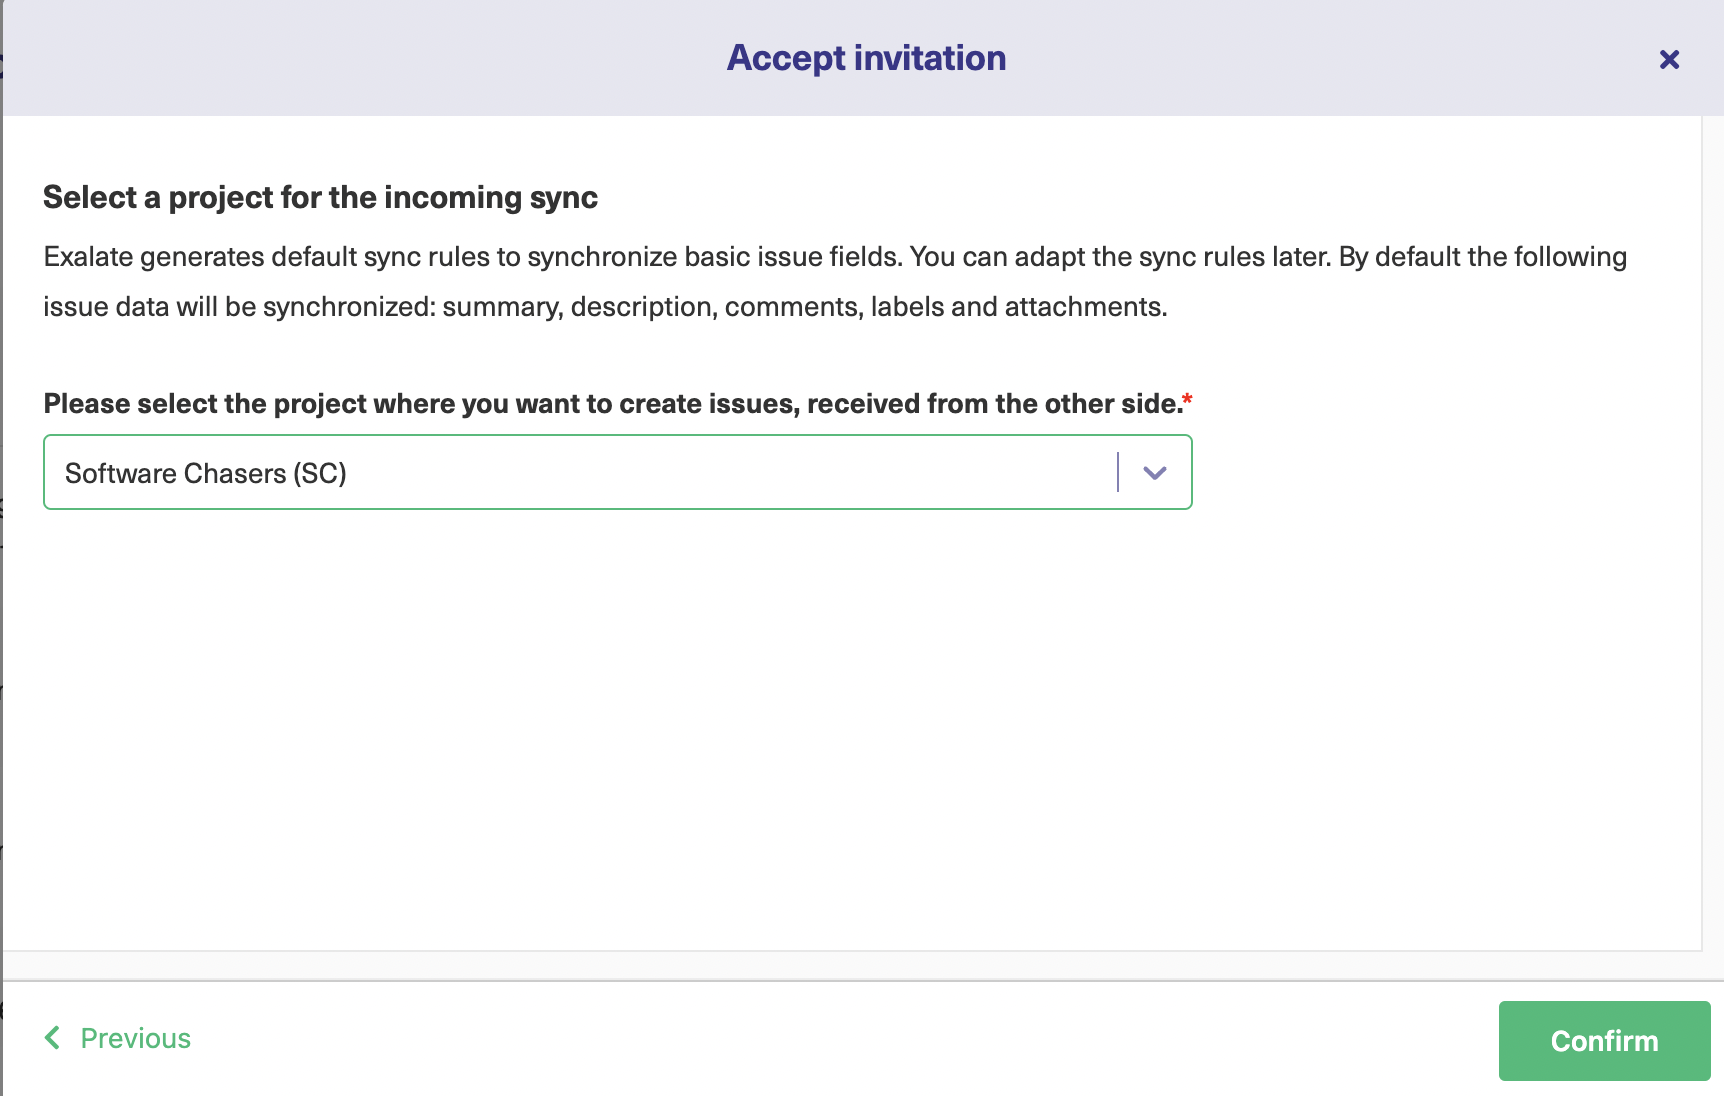
When accepting the connection invitation, you choose the project on this side that you want to synchronize with the other side.

After you’ve made your choices, you’ll see this connection listed among any others you created before.

Jira to Jira connection

Now you’ve connected both Jira instances, let’s look at some of the things you can do with the connection.

Step 3: Configure Your Connection to Determine What Information Gets Shared

As mentioned, Exalate will use common defaults when creating your connection. You can edit these at any time. For this, click the “Configure sync” button immediately after establishing the connection.

edit jira to jira integration

You can even find your connection in the list, move the mouse over it, and click the “Edit connection” icon that appears. Click on the “Rules” tab in the connection screen.

Script mode sync rules

The rules use the Groovy language, so if you already have some experience, all the better. Anyone familiar with core programming concepts should be able to adapt to them fairly easily.

Note: New to Groovy? Then check out chapter 4 of the Exalate Academy or refer to our Groovy scripting guide.

Each rule shows how fields are mapped onto each other. As this is a Jira to Jira connection, the field names are identical, such as replica.labels = issue.labels.

There are also some helper functions that, for example, can map lists of comments or attachments from one instance to the other, such as issue.comments = commentHelper.mergeComments(issue, replica).

You can adjust these lines to change anything you like. If there are fields you don’t want to sync, delete them. And if you want to map fields to other fields, adjust them.

If you want to give a specific value to a field, change it to do that, for example, you might want to change replica.labels = issue.labels to replica.labels = ‘synced from Jira Server’.

You can use conditional statements and logical operators to give you different behavior in different situations. You can have specific types of items ignored when synchronizing, and you can combine operators to change their behavior for combinations of field values too.

Read more about the sync rules here.

When you’re done, click the green “Publish” button to save your changes.

Use the AI-powered Script Mode

You can do all of this we discussed here and much more using AI with the Script mode.

Exalate’s Sript mode also comes with AI Assist, which appears as a chat window in both your incoming and outgoing sync rules tabs.

Just tell AI Assist what you need, and it will generate the scripts for you.

The scripts are based on your input, your current configurations, and Exalate’s scripting API.

Keep in mind that AI Assist isn’t perfect, so it’s important to be clear and specific with your instructions.

Here’s an example of how it works:

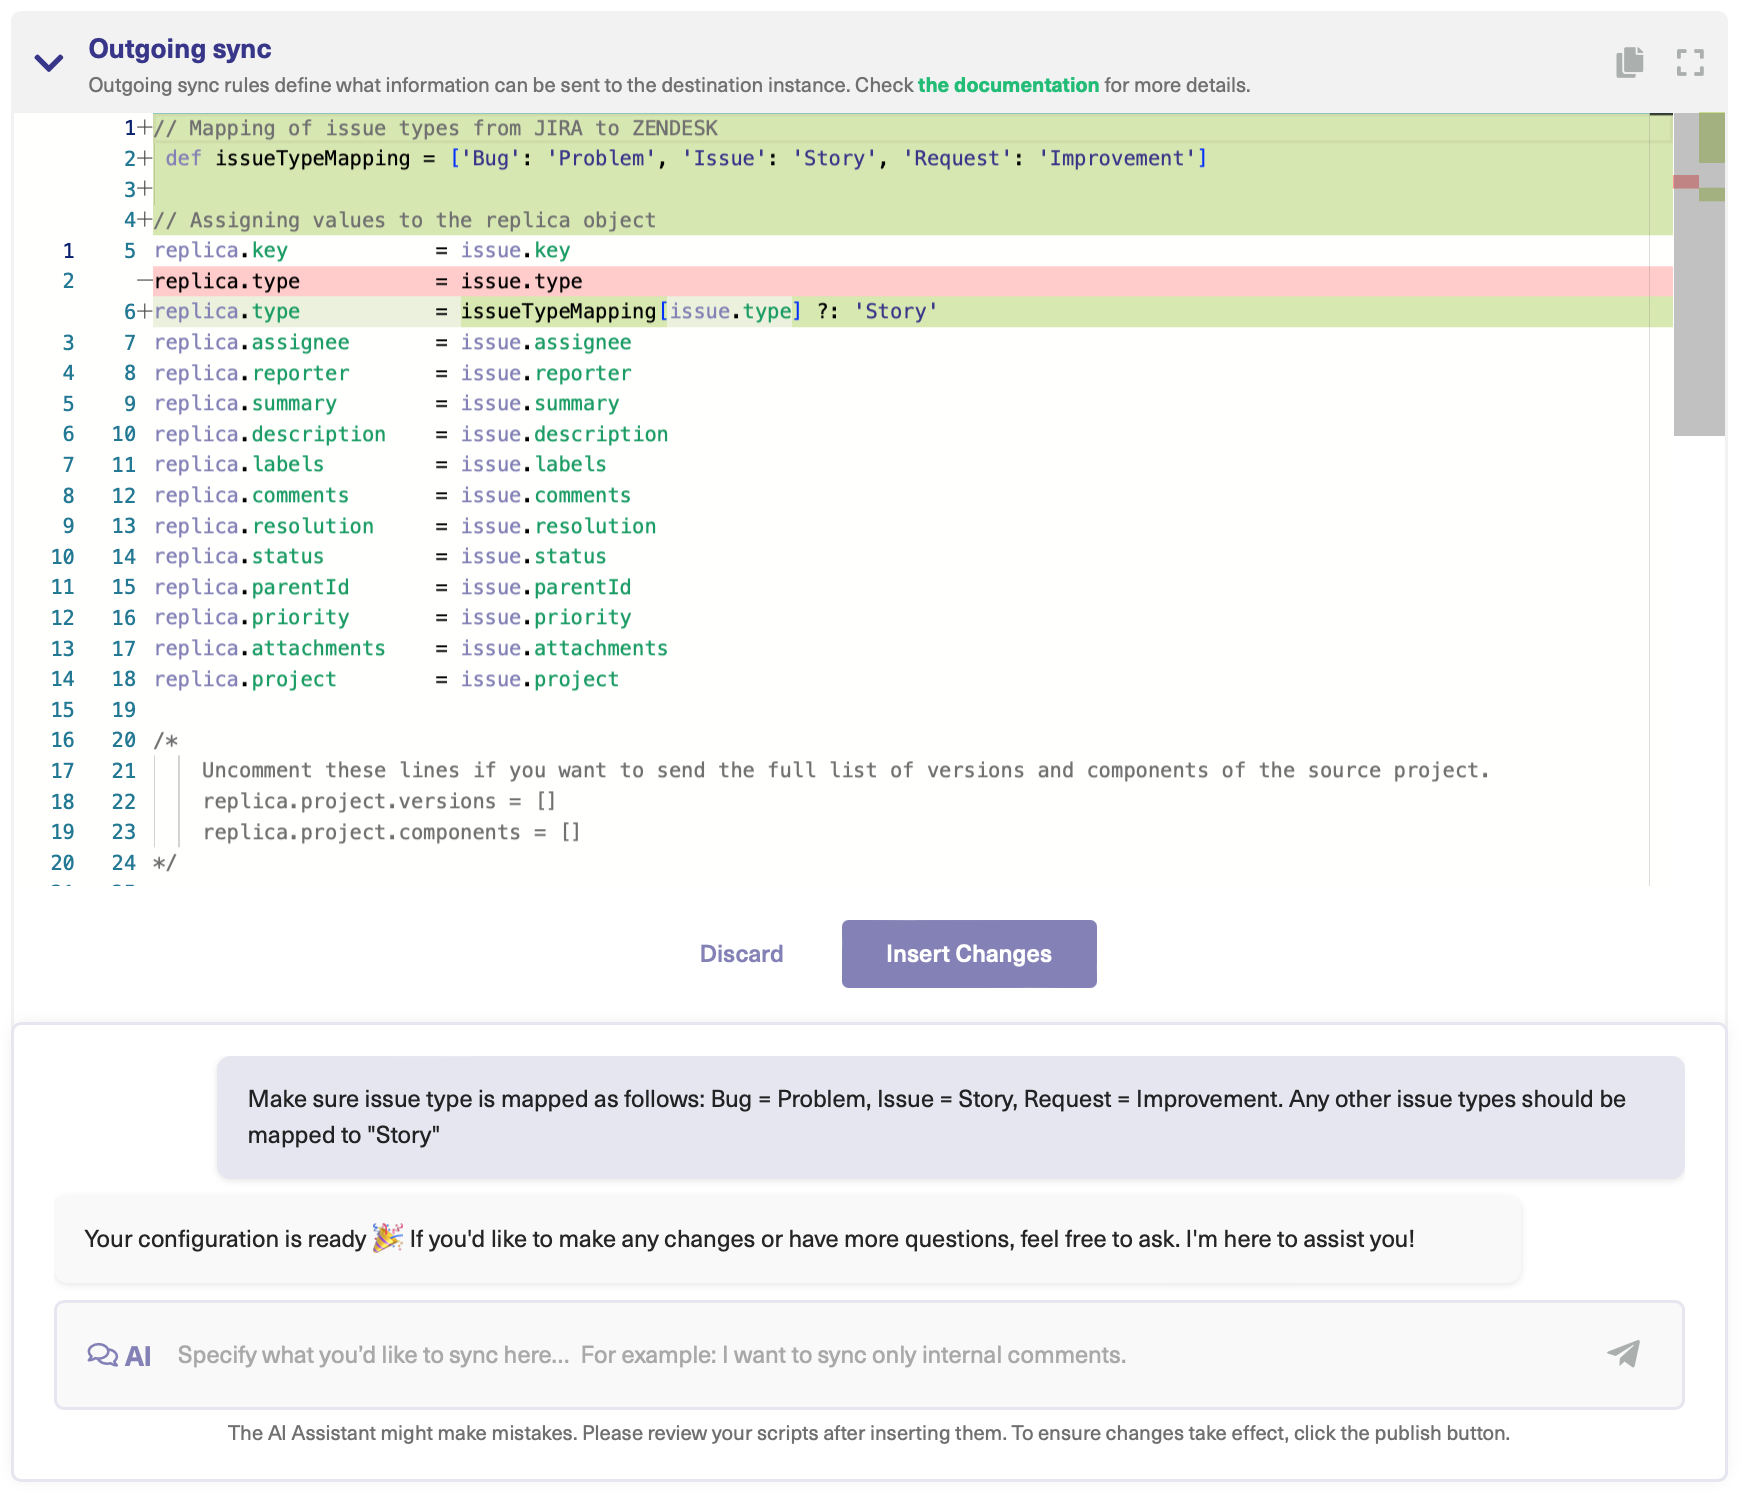
If you want to map and sync issue types between the two Jira instances, you could enter something like this in the AI chat.

Map and sync issue types between multiple Jira instances

Your scripts will be ready in some time.

Red highlights show lines that will be removed, while green ones mark new additions. You can accept or reject what AI generates. If necessary, tweak your prompt until you’re happy. Once it’s all set, don’t forget to publish your changes.

Step 4: Set Up Automated Synchronization Triggers

Triggers define the synchronization conditions. As with the sync rules, you can use code to control these conditions. The sync rules determine the specifics of what is shared under synchronization, the triggers determine if specific items are synchronized or not.

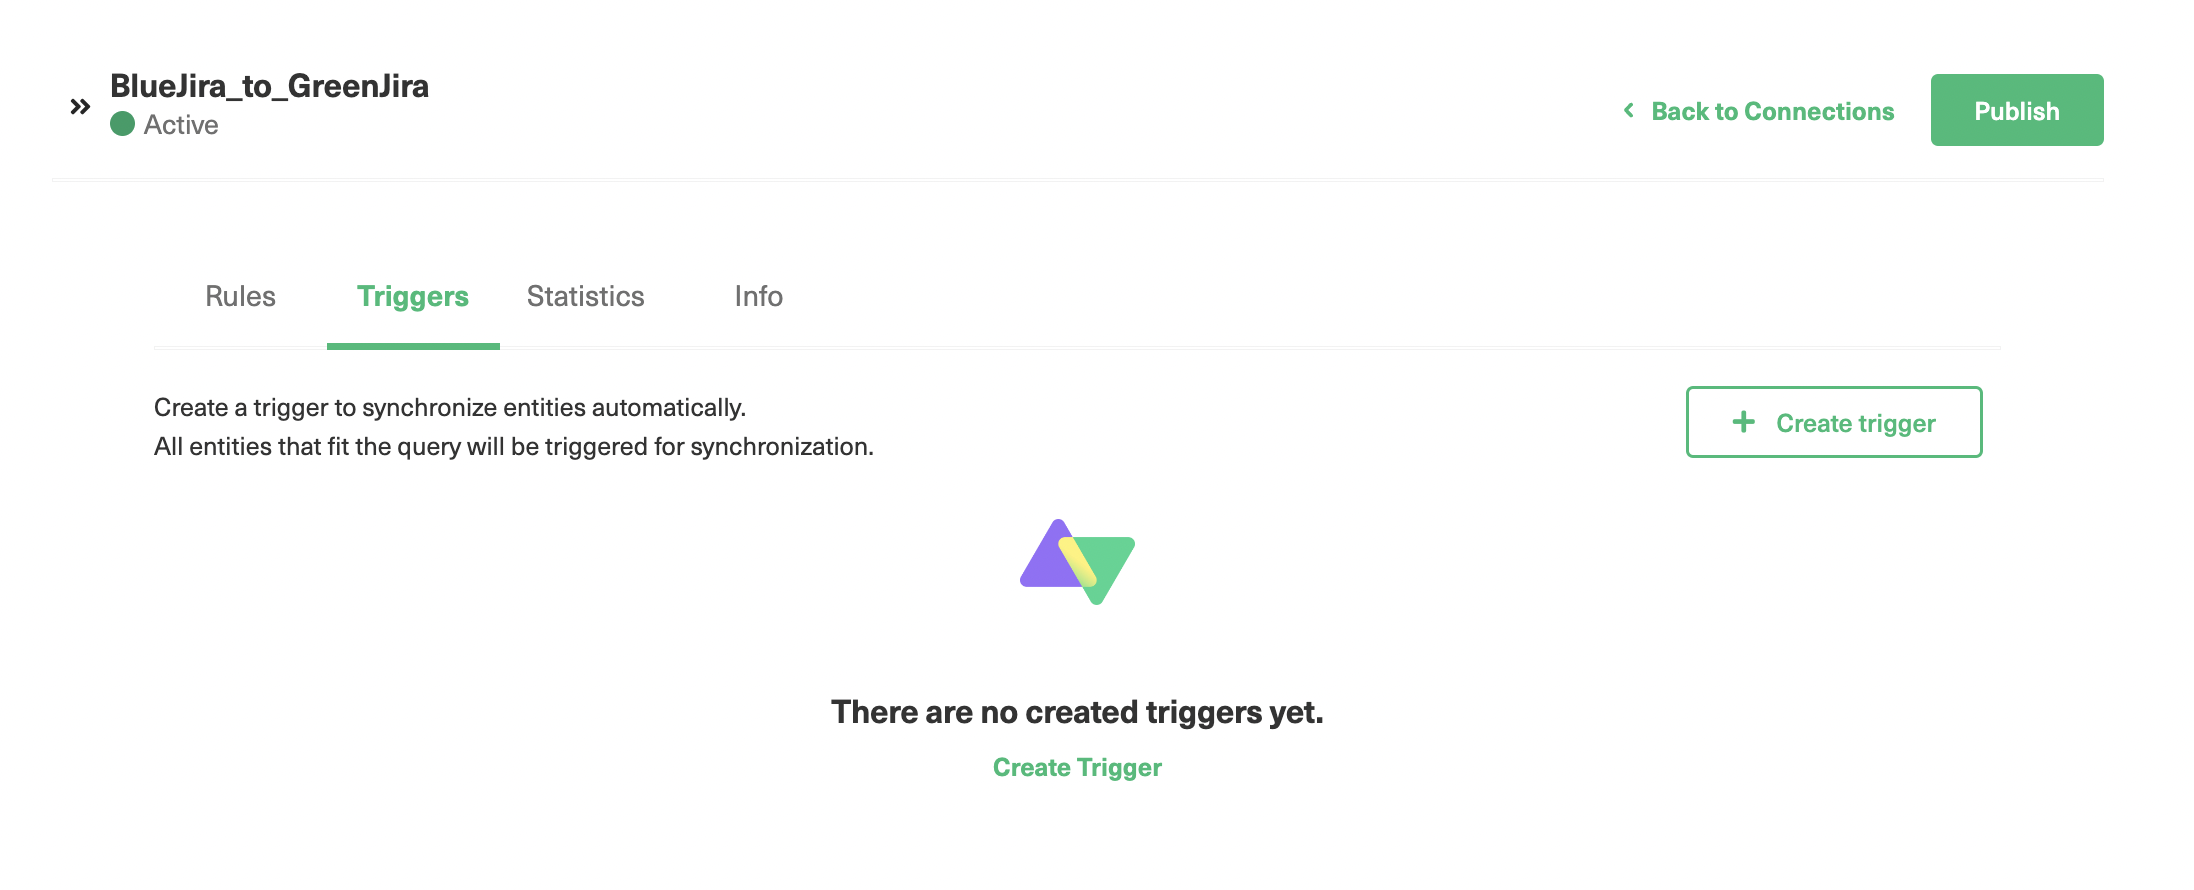
If you click the “Triggers” tab in the edit connection screen, you can access the automated synchronization triggers.

You can also find a summary of all of your active triggers, by clicking “Triggers” in the left-hand menu.

Jira sync triggers in Exalate

If you follow the first method and want to create a new trigger, click the “Create trigger” button at the top right.

Triggers are written in a different language depending on the platform. Jira uses its own query language, JQL. Note that this is different from the “Groovy” language I used for the synchronization rules. Read more about it in the documentation.

automatic sync triggers

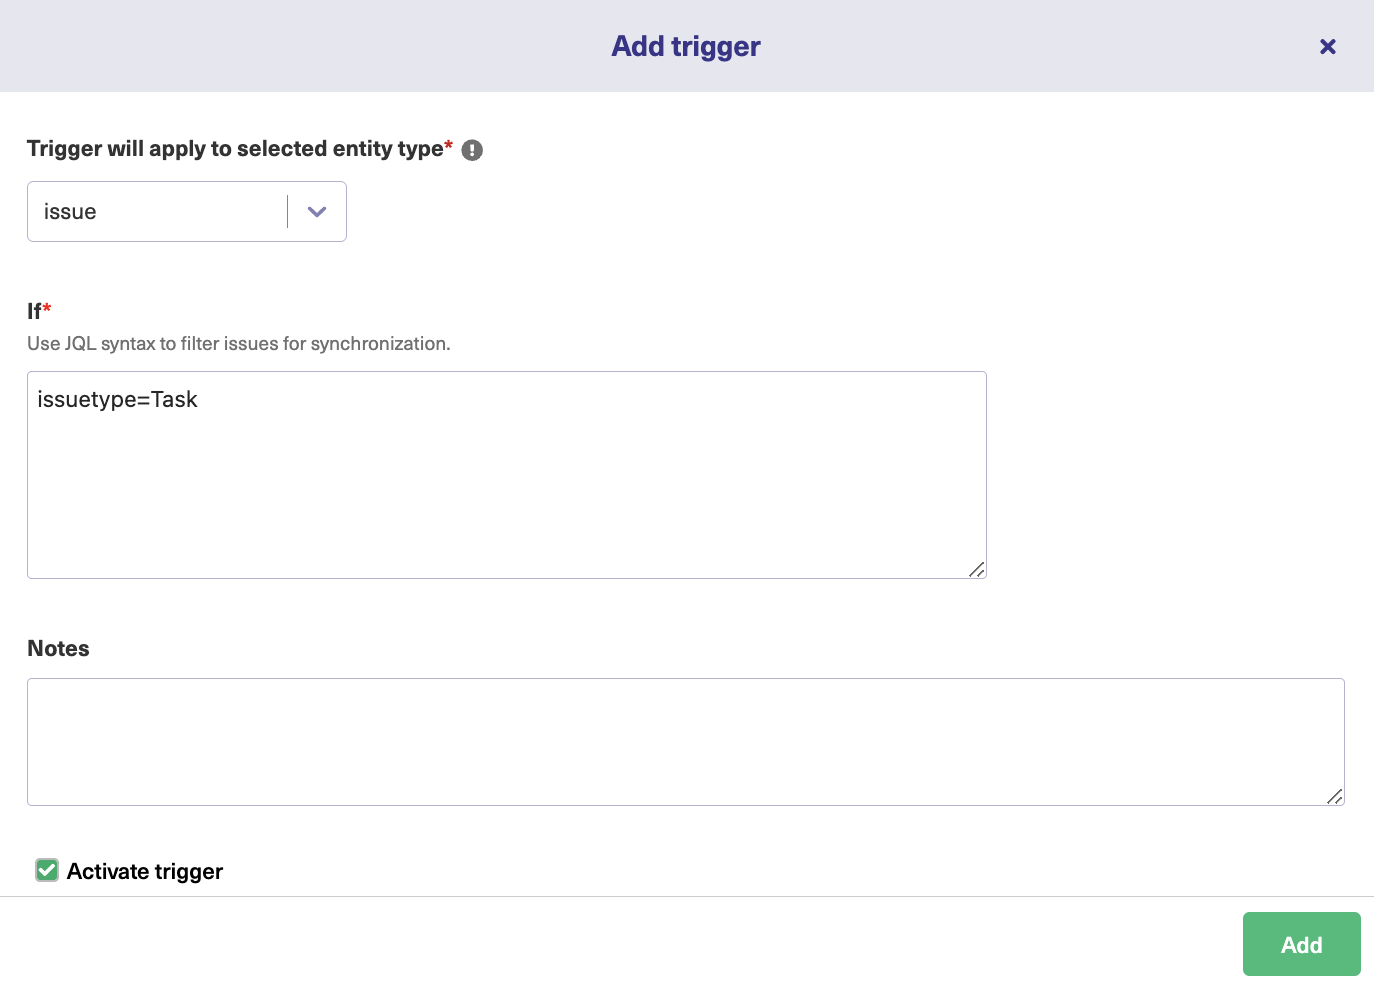
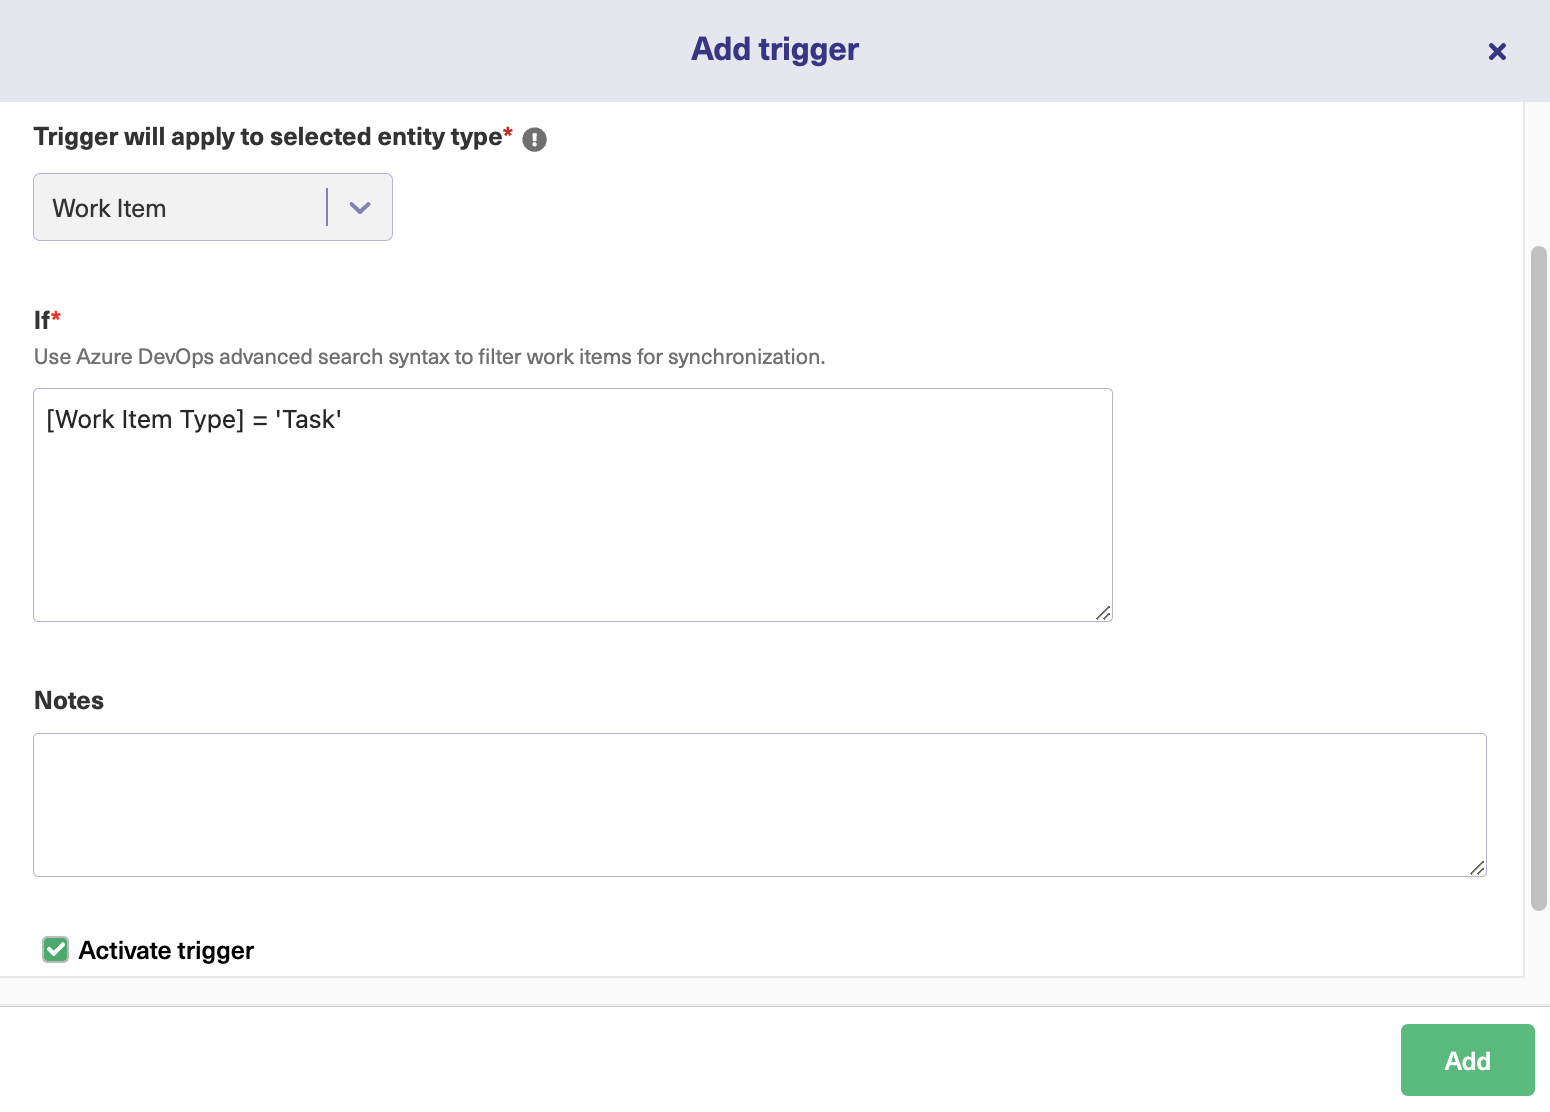
On the “Add trigger” screen, there’s a drop-down box at the top where you can select what kind of entity the trigger applies to. I’ve selected “issue” in this case. In the next box, below the “If”, you enter your query. Here, I’ve chosen to sync issues where the type is “Task”.

I’ve also added a note, describing what the trigger does, and set the trigger to “Active”. If you don’t do that, it won’t work! Finally, click the “Add” button at the bottom.

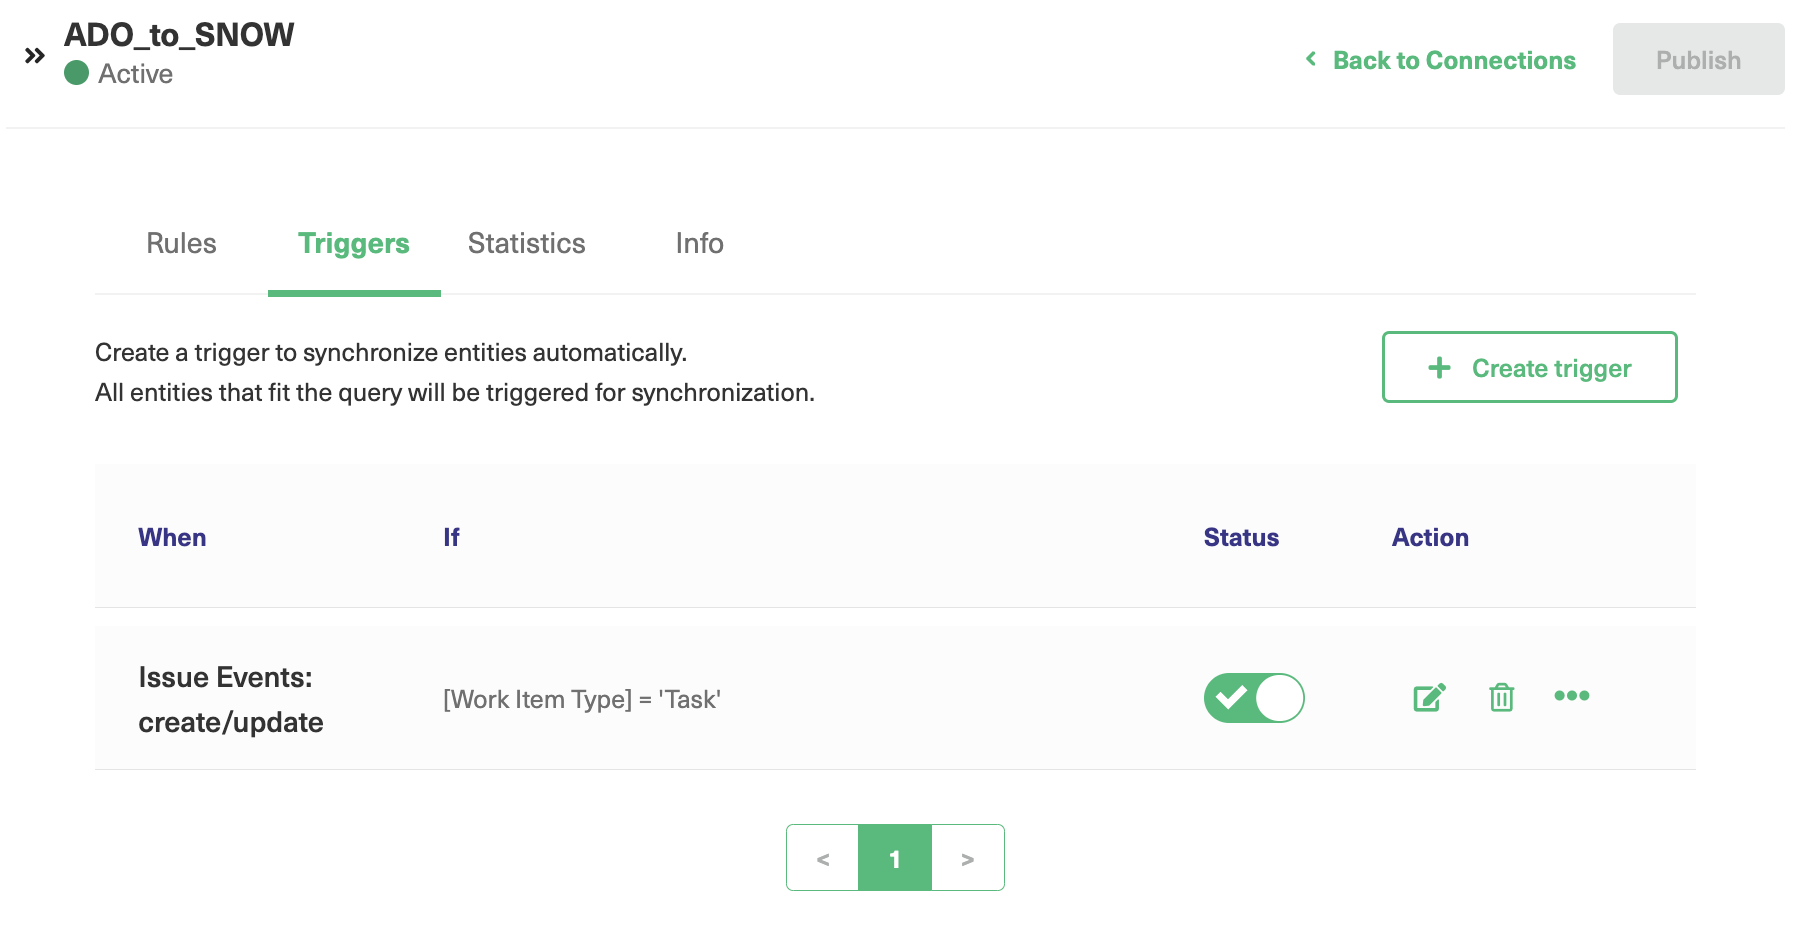
Back in the trigger list, you can see the entry you just created. Now, items that match the condition will be synced automatically.

You can edit or delete these triggers by clicking the respective icons in the list, under the “Action” heading. If you click the three dots, you also get the option to “Bulk Exalate” and “Unbulk Exalate”.

Step 5: Start Synchronizing Tasks

Now your connection is ready, you can start creating tasks, and if they match the criteria, they will be shared between platforms. Exalate checks for new tasks every few minutes, so please wait for a little while if you don’t see them transferred immediately.

If you don’t see anything after a while, take a look at the rules and make sure they exactly match the items and fields you want to exchange.

Common Use Cases for Jira to Jira Integration

Let’s review a few practical examples of Jira-to-Jira integration.

Case 1: Connect Customer Support and Development Teams

Customer support teams receive a lot of feedback from customers, from technical problems to areas where the user interface isn’t clear to suggestions for new features. Developers will want to know if something doesn’t work and why, and they will be open to new suggestions. 

However, they won’t necessarily want all the details, and they won’t need to see all the discussions between customers and the support team.

You can set the sync rules to send the developers the information they need. Then, any solution to the problem will go back to the support team. Perhaps you could also have a time limit field or comments that support can relay to the customer.

The Gantner Group used Exalate to establish a frictionless collaboration ecosystem between developers and support staff, which increased resolution speed by 50 times.

Case 2: Connect Marketers and Designers

The marketing team keeps track of features that are popular in competitor products or that consumers respond to in campaigns. The design team analyzes these and sees whether they would be a good fit for the team’s product.

If you create a label that corresponds to these features, perhaps called ‘new-features’, you can then create a trigger that says label = new-features. This should be a one-way synchronization, as the marketing team won’t need to see the design team’s work.

Vodafone leveraged Exalate’s multi-Jira integration solution to optimize the efficiency of all internal and external collaborations. This helped them achieve data consistency and visibility across multiple instances. 

Case 3: Connect with Multiple Suppliers

If you have multiple suppliers, you might want to connect your systems with theirs, while keeping the suppliers’ information separate from each other and providing each end with the maximum autonomy possible. 

With a cross-company integration solution like Exalate, you can make sure you exchange information safely with each supplier, letting you collate the information without leaking suppliers’ data to each other.

Team collaborations

Case 4: Help Managed Services Provider with Customer Handling

It allows you to comment on or add to the information, and control which of it you share. In this way, you can create “safe islands”, where you can work with the data you need while being confident you aren’t going to breach customer confidentiality.

Insurance company Turkiye Sigorta was able to regain control and connect with multiple suppliers using Exalate’s third-party iPaaS solution.

A managed services provider, or MSP, needs to handle issues with its customers. The businesses it deals with may have different contracts and expectations. 

If an MSP has a small number of large clients, they might well have specific people assigned to handle each one, and Exalate can make sure relevant issues are assigned to the correct person.

It can also share information between systems while keeping some information internal to the MSP. What is shared and what isn’t can be defined for each specific client, depending on the business relationship.

Case 5: Onboarding Staff Members

Exalate can help new staff members learn the ropes. You can set Exalate up to copy tickets created by newcomers to another system so managers can check their progress and ensure they are responding to issues correctly. 

To do this, create a synchronization trigger that looks like assignee = team-member-name and then set the sync rules to copy over whatever management wants to check up on. When the new team member is up to speed, you can delete or deactivate the trigger.

For example, Netguru implemented Exalate’s Jira connector to link the ITSM and business teams. This reduced licensing costs and established harmony between the teams.

Case 6: Connects Companies with Outsourcing Partners

If your organization outsources services such as customer support or web development, Exalate has the perfect solution to help you integrate Jira Service Management and Software instances smoothly.

So, by using Exalate, both sides can separate their instances and have the autonomy to guarantee that only essential information is shared with the partners. This will also make it easier to de-couple if the collaboration ends.

Quorum Cyber has implemented this model to enhance cybersecurity operations and improve the average response time.

Case 7: Create a Network of Systems

We can see the application of this use case in the way SPK leverages Exalate to streamline operations in order to save each engineer 5 hours weekly.

Teams can explore multi-platform integration using Exalate’s AI-powered scripting engine.

So, let’s say a company is using Jira Software and is in sync with another company whose developers are using Jira Service Management. If they want to onboard a third party working with Jira On-premise, they’d definitely need a solution for that.

To make sure all three sides are on the same page, a solution like Exalate can serve as the three-way bridge between them. So your organization and partner organization should only see the tickets that either of them chose to sync with the other.

Discovery call with Exalate

Conclusion 

As you’ve seen, it’s easier than ever to get your teams working together more effectively. If you set up an effective Jira to Jira integration, you’ll boost your team’s productivity and enable them to benefit from the information captured and processed by different departments.

You also know how to install an integration solution like Exalate and set it up to exchange data between your Jira systems. You can also tune the connection to match your needs and make sure each system gets exactly the information it requires.

Looking to connect multiple Jira instances without much stress? Book a demo with our engineers to get started.

Frequently Asked Questions

What is Jira to Jira integration?

Jira to Jira integration is the process of connecting two separate Jira instances in order to share information. With Jira to Jira integration tools, you can sync comments, attachments, and custom fields within one organization or externally.

How can I integrate two Jira instances?

You can integrate two Jira instances using a connector. This connector could be a native app from the Atlassian marketplace or a standalone third-party solution.

Is it possible to sync Jira Cloud with Jira Server?

Yes, it is possible to sync Jira Cloud with Jira Server. Despite the disparity in infrastructure, you can configure your integration solution to share data between your cloud or on-premise versions.

Is real-time sync possible between two Jira projects?

Yes, you can sync data between two Jira projects in real time instead of copying the data manually. With an integration solution like Exalate, you can sync two Jira projects —  whether it is between internal teams or different organizations.

Do I need a tool to connect two Jira instances?

Yes, you need an integration solution to connect two Jira instances. Exalate is an excellent option if you are looking for a decentralized integration solution that supports bi-directional synchronization.

Recommended Reading:

How to Set Up a ServiceNow Azure DevOps Integration: The 2025 Step-by-Step Guide

ServiceNow Azure DevOps integration

Keeping track of the huge quantities of information circulating your business can be a headache, but it also presents an opportunity to sync data and collaborate effectively with other teams. 

Let’s say you’re working in Azure DevOps and you need to integrate with another team in ServiceNow. An Azure DevOps ServiceNow integration can make things run way more smoothly. 

So in this blog post, I’ll walk you through a step-by-step process for Azure DevOps integration with ServiceNow with the least fuss possible.

Azure DevOps ServiceNow Sync Guide

Learn how to achieve a seamless integration between Azure DevOps and ServiceNow instances, step-by-step.

Why Integrate Azure DevOps and ServiceNow?

Azure DevOps is an excellent tool for a range of purposes, including managing servers and websites, as well as product development. 

It is stacked with features for versioning, project and requirements management, build automation, and software development lifecycle management. 

Technical teams can use Azure DevOps on the cloud or host it on their local servers. 

Azure has a marketplace where you can get features and integrate them with other platforms. It can also be extended directly via its SDK.

ServiceNow mainly supports service management features, like incident management, change management, release management, etc.

Using ServiceNow is a great way to handle customer requests and organize the way your customer support team interacts with clients. It lets you keep track of incidents and problems and allows your team to stay on top of all the information generated by customers.

Benefits of a ServiceNow Azure DevOps Integration

Teams often need to share information, and the specifics of what they need to know will differ. 

Keeping them on the same page without duplicating or losing information is quite a challenge. So a tool that can take care of it automatically will be a huge asset.

integrating data between platforms

Here is a common scenario.

The customer service team working in ServiceNow usually becomes aware of problems or incidents that the engineers working in Azure DevOps need to know about. The engineers will fix these problems, and the customer service team can then pass the result on to the clients.

This data can be exchanged manually, but there are several problems with doing that. 

  • It takes time and effort.
  • Some entities don’t get transferred.
  • The transferred data is in the wrong format.
  • The data quality is too low or practically unusable.

With an automated system, you can ensure smooth data transfer between both platforms. You can set conditions and filters for the exchange.

ServiceNow integration with Azure DevOps can help teams automate and streamline their processes.

Let’s see what a ServiceNow Azure DevOps integration looks like in practice.

ServiceNow Azure DevOps Integration Use Cases

An integration between Azure DevOps and ServiceNow can be beneficial for various teams.

Development and Customer Support Teams

Customer incidents or problems come in through ServiceNow. Sometimes, they need the development teams’ attention, working in Azure DevOps. 

An integration between these two applications will ensure both teams have the same information at a given point in time. 

Say all incidents of urgency = 1 and belonging to a specific assignment group are synced to Azure DevOps as bugs or issues.

The development team starts working on it and changes the status. This status automatically reflects in ServiceNow. Any additional information appears in comments, work notes, or attachments. 

By doing so, the customer support team has complete visibility on the dev issue until it gets resolved. Everyone stays on the same page, and the customers are always up-to-date on their ticket status.

Development and QA teams

The dev team working in ServiceNow always sends bugs, issues, problems, or change requests to the QA team working in Azure DevOps. 

An Azure DevOps to ServiceNow integration streamlines the software development work cycle. 

By automatically exchanging issues, updating statuses, and sending the required data back and forth between Azure DevOps and ServiceNow, teams can ensure everything runs smoothly without any hiccups. 

This will help the organization reduce release cycle times, address customer concerns faster, and fix bugs promptly. 

What Data Can be Synchronized Between ServiceNow and Azure DevOps?

Let’s take a quick look at what you can sync within each system.

  • All the work items in Azure DevOps, like bugs, issues, tasks, and test cases. 
  • ServiceNow entities, including incidents, problems, change requests, RITM, catalog, and tasks.

You can map the entity fields in any way you require. For instance, Work Items (Bugs) in Azure DevOps to Incidents in ServiceNow. Another option is to map statuses, e.g., “Waiting for Support” mapped to “In Progress”.

Other practical applications include maintaining the parent-child hierarchy between Azure DevOps work items and ServiceNow entities. This involves syncing incidents, sync statuses, and correlation details.

By letting an integration tool take control of the Azure DevOps and ServiceNow integration, you can save yourself work and ensure data is exchanged consistently under the conditions you specify.

How to Choose the Right Technology for Setting up an Azure DevOps ServiceNow Integration 

When picking an integration solution, it is important to clarify the problems you need to solve. 

There are three particular criteria to bear in mind when choosing a solution for ServiceNow and Azure DevOps integration.

Security

Considering that teams would be sharing sensitive information with other teams or companies, integration security should be paramount when choosing a solution.

The system should also allow teams to maintain privacy so they only share the information they want to. 

To that effect, you need to look for solutions with advanced encryption and safety protocols, such as tokenization, role-based authentication, and pseudonymization. Additionally, ISO 27001-certified solutions should be a safe bet.

Shared collaborations between teams

Reliability

The integration solution must be able to cope with downtime or problems on either side of the connection and recover when things are back up. 

Outages happen when working online, and the system should be capable of rescheduling data exchange without anything getting lost and without engineers needing to become involved.

Flexibility (Scalability)

The teams on either side of a ServiceNow to Azure DevOps integration may want to expand the range of data shared as the teams grow and requirements change. 

In that case, the integration must be able to handle these changes and adapt to the needs of users on each end of the connection.

For our integration, we’ve chosen Exalate, a solution built to solve these three particular challenges. It is robust and flexible and allows your teams to operate independently.

And the cherry on top is that Exalate supports an AI-enabled scripting assistant for generating mappings and optimizing rules for your connection. This feature suits both technical and non-technical users.

Now let’s look at how to set up our ServiceNow Azure DevOps integration.

How to Set up an Azure DevOps ServiceNow Integration (a Step-by-Step Process)

First, you need to install Exalate on both sides.

Note: You can watch the step-by-step Azure DevOps ServiceNow integration tutorial.

Step 1: Install Exalate on Azure DevOps

You can install Exalate by requesting a trial on the Exalate integrations page. The Exalate team will reach out to help you with the Exalate node.

Note: You can also install Exalate via Docker.

Once set with your trial, follow these steps to install Exalate on your Azure DevOps.

Make sure you are logged in as an admin. Scroll down to the bottom left of the screen and click on ‘Organization Settings’. On the screen that follows, click “Extensions” in the left-hand menu.

azure devops organizational settings

On the extensions screen, click the ‘Browse marketplace’ in the top right.

azure devops marketplace

In the marketplace search field, look for Exalate for Azure DevOps. 

Click it and you’ll be taken to its marketplace page. Click the green ‘Get’ button to install it.

Next, you have to pick an organization to attach your installation to. Choose one from the drop-down list and click the blue “Install” button.

select an azure devops organization

You’ll also need to request an evaluation license to use Exalate. You can do that by clicking “Exalate” in the left-hand Azure DevOps menu. Then click “License details”.

exalate license for azure devops servicenow sync

Click on the 30-day trial image and then enter your email into the popup that appears. You’ll get an email with an evaluation code, which you should copy.

Back in Exalate, in the license details area, click the green “License Key” button at the bottom left.

exalate evaluation license for azure devops

Paste your key in and click “Update” to register your license.

You’re now all set on Azure DevOps. When we get to step 3, come back here to configure your connection.

Note: You can also install Exalate on your Azure DevOps instance via the Atlassian Marketplace to connect Jira and ServiceNow.

Step 2: Install Exalate on ServiceNow

To install Exalate on your ServiceNow, request a trial from the integrations page. You’ll be helped by the Exalate team to go through the next steps.

Next, download an XML “update set” from Exalate. The information in this file tells ServiceNow how to work with Exalate. Follow this guide.

ServiceNow platform

Once you’ve stored the XML file somewhere safe, log in to your ServiceNow account. In the left-side menu, click the “All applications” icon, if it isn’t already selected.

Look for the “System Update Sets” entry and click to open it. This menu can get very crowded, so use the search field to locate it if you have trouble finding it. Then click “Retrieved Update Sets”.

ServiceNow system update sets

Under the “Related Links” heading, click the text that says “Import Update Set from XML”. Next, click the “Choose File” button and select the XML file downloaded earlier. Click the “Upload” button to complete the process.

The Exalate XML file will be uploaded and listed. You should be able to see it. Click the file and then click the “Preview Update Set”. If it asks you to update your setup, click the “Accept remote update” button to do so.

Once that’s done, click the “Commit Update Set” button. Exalate is now installed on ServiceNow.

Note: You can also install Exalate on your ServiceNow instance via the Atlassian Marketplace to connect Azure DevOps and ServiceNow.

Step 3: Set up a connection between Azure DevOps and ServiceNow

To create a connection between Azure DevOps and ServiceNow, we log into one platform and create an invitation, which we then paste into the other. 

This step and most of what follows is essentially the same for these and other platforms, so Exalate allows you to connect multiple platforms very easily once you are familiar with it.

For this example, we’ll start in Azure DevOps. Find Exalate in the “Organization Settings” under “Extensions”.

Exalate connections in Azure DevOps

If you aren’t already there, click “Connections” in Exalate’s left-side menu. You should see either a list of existing connections or a message saying you don’t have any. Either way, click the green “Initiate connection” button to get started.

On the next screen, enter the URL of your destination instance. Again, that will be our Exalate ServiceNow node. After you enter the URL, a few more fields will appear.

Configuration modes in Exalate

You will be required to select the configuration type of your connection. Exalate offers two modes: Basic and Script.

The Basic mode has predefined mappings and sync rules that cannot be modified. It is suitable for use cases of basic complexity. 

Exalate offers a Free Plan that comes with the Basic mode connection, offering up to 1,000 free syncs per month. It is a great way to see how Exalate works firsthand.

The Script mode allows you to configure each side of advanced integration cases separately using Groovy-based scripting. 

With the Script mode, you can generate your own rules and share almost any kind of information with the other side.

You can even upgrade your Basic connection to Script mode anytime you want!

Let us have a look at both these modes one by one.

Connections with the Basic mode

Click “Next” when you select “Basic” on the screen above.

Select the project on the Azure DevOps side. This will be the project you want the ServiceNow entities to sync into. Choose the one you want from the dropdown list and hit ‘Next’.

Project selection for an integration

Exalate will then ask you to verify if you have admin access to the other side. In our case, it is ServiceNow. Click “Yes, I have admin access” if you have access.

In case you don’t have admin access, an invitation code will be generated for you. Copy this invitation code and paste it manually on the ServiceNow side.

We will see how to do this in the Script mode.

Admin access for Basic mode

Click ‘Initiate’ after confirming admin access.

After a quick verification is done on the ServiceNow side, your Basic mode connection between Azure DevOps and ServiceNow is established. You can now move on and sync your first Incident or Work Item.

Here, we have entered a work item number to start the synchronization from Azure DevOps.

Sync work items from Azure DevOps to ServiceNow

If you navigate to the ServiceNow side right now you will come across the same screen asking you to enter the Incident key to sync.

In either case, click “Exalate”.

Work item sync status

Wait for some time for the synchronization to happen. You’ll receive proper sync status updates.

Work item successfully synced to ServiceNow

The Work Item you have synchronized creates an Incident in ServiceNow, which allows the syncing of statuses and any other vital updates bidirectionally.

You can also follow the Work Item or Incident by clicking the remote link generated on the Azure DevOps and the ServiceNow sides.

Using the Basic mode, you can synchronize Work Items or Incidents. To sync existing Azure DevOps and ServiceNow entities, you can create triggers or use the “Bulk Connect” option.

We will cover triggers in detail in a bit. 

Connections with the Script Mode

To continue with this mode, select “Script” on the screen to choose the configuration type and click “Next”.

Configuration modes in Exalate

You can give each side of the connection a name and an optional description. This will help other people who may need to work with these connections later.

Connection details in Exalate

After entering the details, click the green “Next” button.

You need to pick the project that is going to be synchronized via the connection. Use the drop-down box to choose from the available projects and then click the green “Initiate” button.

Invitation code for Script mode

Exalate will generate an invitation code. Copy this and paste it somewhere safe. Head over to ServiceNow for the next.

Accept connection invitation between Azure DevOps and ServiceNow

Click “Connections” in the left-hand sidebar. Again, you’ll see a list of existing connections if you have any.

Click the “Accept invitation” button in the top right.

Paste invitation code for Script mode

On the next screen, you’ll see a text field. Paste in the invitation code generated in Azure DevOps. Then click the green “Next” button.

Successful Azure DevOps ServiceNow connection in Script mode

The connection between Azure DevOps and ServiceNow is successful. You can start configuring it as shown in step 4 or by clicking the “Configure Sync” button.

Note: Back in the connection list, we can see our connection is there, with the details we selected earlier. Now, we will edit the connection and control what it does, and when it does it.

Step 4: Configure Your Connection to Determine What Information to Share

In the Azure DevOps connections list, hover the mouse over the connection we just created.

Click the edit icon that appears in front of its name. 

From here, you can edit triggers, write sync rules, and view statistics to know how many issues are under sync.

For now, click the “Rules” tab.

Sync rules in Azure DevOps

We can see a list of outgoing sync rules and incoming sync rules. Since we are in Azure DevOps, the outgoing sync rules refer to items sent from Azure DevOps to ServiceNow. The incoming rules refer to items sent from ServiceNow to AzureDevOps.

Sync rules in ServiceNow

If we view the same screen in ServiceNow, we will see a similar screen, but with these relationships in reverse.

Let’s look more closely at the incoming rules in Azure DevOps.

Sync rules in Azure DevOps

There are several lines, such as workItem.summary = replica.summary that control how data is mapped from one platform to the other. ‘Replica’ here refers to the payload exchanged between our Exalate nodes. It contains the details of the item from ServiceNow that is in sync with the ‘Work Item’ in Azure DevOps.

In this case, several fields are mapped directly onto each other. The summary, description, priority, and label fields will all be copied directly when the fields are synced. 

If you don’t want a field mapped, delete the relevant line. If you want fields to map differently, change them. You could map them to a different field, for example, by writing workItem.labels = replica.priority. 

You could also add specific text of your own, for example, workItem.description = ‘synced from ServiceNow’.

The attachments and comments fields use functions that automatically handle these items. These are a little more complicated, but you can investigate them and change them if you need to. 

Again, you can easily delete them in case you don’t want those fields mapped. The commented areas, that start with /* and end with */, give you information about what you can do with the edit rules. To learn more, read our script helpers guide.

Connections in Script Mode Using AI Assist

The Script Mode allows you to generate and optimize scripts using the AI Assist feature — which appears as a tab under both the incoming and outgoing sync rules.

How does it work?

Enter your sync requirements into the chat box, and AI Assist will generate scripts based on your input, existing configurations, and Exalate’s scripting API.

It is also important to note that AI is not perfect. So, you need precise and detailed prompts to ensure the best results. 

Let’s say you want to sync the status of an Azure DevOps work item with the state of a ServiceNow incident; the prompt could look something like this: 

“I want to sync the status of an Azure DevOps work item with the state of a ServiceNow incident to make sure the priority and urgency are reflected.”

AI-assisted Azure DevOps ServiceNow integration

After a moment, the script will be generated, with suggested changes highlighted in green and red. The green scripts are suggested additions, while the red scripts are suggested deletions. 

If the new snippet works for you, click on “Insert Changes”. Otherwise, you can discard the suggested code. If needed, you can refine your prompt and, once satisfied, publish the changes.

Step 5: Set Up Automated Synchronization Triggers

Now we’ve looked at what we’re sending, we’ll look at how to configure automated synchronization triggers. These set the conditions for sending items from one platform to the other.

Triggers in Exalate

Go to the ‘Triggers’ section. Now, click the “Create trigger” button. 

The “Add trigger” dialog box will appear. You can choose the entity type to work with from the drop-down box. 

In this case, we only have one option, ‘Work item’. On other platforms, you may have other options available to select from. For instance, in ServiceNow, the drop-down will have many ServiceNow entities like Incidents, Problems, Change Requests, Catalog Tasks, etc.

In the ‘If’ text field, we can enter a search query to select matching items. You can use this query to exchange all items of a particular type or from a particular user. 

You could send urgent queries or queries that have comments. Additionally, you can set up multiple triggers to send items that match different conditions.

The search query uses Work Item Query Language (WIQL) for short.

Add triggers in Exalate

For this example, let’s create a query that syncs items of the “Task” type. To do that, we type the code into the ‘if’ field. This trigger will apply to any item where “Task” is set as the type. You can substitute ‘Task’ for any other type.

You can also add a description. It is best to add as much information about what you are doing and why you are doing it. That makes it easier to work with if you come back to it later, and also enables others to understand what is going on.

There’s also a checkbox to activate the trigger. You need to click this, or the trigger won’t do anything. Later you can use this to quickly switch existing triggers on or off.

Triggers screen in Exalate

Click the green “Add” button and you’ll see your trigger listed, and active. Items that meet these criteria will now be synchronized automatically.

Common Pitfalls to Avoid after Setting up the Azure DevOps ServiceNow Integration

There are a few things to be aware of when setting up an Azure DevOps ServiceNow integration that will help you ensure things go as smoothly as possible.

Role Clarification

While it is highly beneficial to exchange information, you don’t need to share everything.

Support teams don’t need to know the technical details, and developers don’t need to know the full history of interactions with customers.

So, when choosing what fields to sync, be careful to make sure teams get the information they need and nothing more. You can create a dedicated field where the support team summarizes each issue rather than pass on all the customer comments.

Similarly, developer comments may not be useful to the customer support team, but they are likely to want to know when an issue has been resolved and what the solution is. Try to set your sync rules up to reflect each team’s needs.

Too Many Messages

Teams may get notifications when new tickets are created or comments are added. When synchronizing platforms, make sure notifications don’t buzz people into frustration. That increases engagement and makes synchronization more useful to team members.

Conclusion

Azure DevOps ServiceNow integration helps teams work more smoothly and efficiently. It also consolidates data and prevents the creation of siloes between teams and partners.

There are many things to consider when connecting teams, and taking careful account of the issues raised here will help your organization get the best value possible from their integration.

With care, you can ensure you craft a process that delivers exactly what you need, making the best use of the information your teams gather while minimizing the need for maintenance and avoiding problems with duplication and wasted effort.

We’ve seen how Exalate can bridge the gap between different groups and help them share information while giving them enough flexibility to evolve. It does so reliably, allowing everyone to focus on what they do best.

Frequently Asked Questions

Why integrate Azure DevOps with ServiceNow?

By integrating Azure DevOps with ServiceNow, you can connect the development and IT service management activities. The integration provides a unified view for teams working in these environments. It saves duplication of work, avoids shared access, saves time, and reduces errors. You can achieve smooth collaboration between development and operations teams, ensuring faster issue resolution.

Which is better Azure DevOps or ServiceNow?

It is impossible to say whether Azure DevOps or ServiceNow is better because both serve different purposes. When it comes to software management Azure DevOps is the better option, but when it comes to IT service management, ServiceNow takes the cake.

How do I connect Azure DevOps with ServiceNow?

You can connect Azure DevOps and ServiceNow by using various integration methods:

  • Building a solution in-house. But it’s not always feasible, scalable, and maintainable. 
  • The native integration method ServiceNow provides is called IntegrationHub. But it doesn’t offer advanced mappings or handle complex use cases inherently. 
  • Third-party integration solutions are available on the Azure DevOps marketplace and ServiceNow store. One such solution is Exalate, which offers pre-built integration templates for basic use cases in addition to tailored custom scripts for advanced synchronizations. 

What can I sync between Azure DevOps and ServiceNow? 

In Azure DevOps, you can sync work items such as tasks, user stories, bugs, issues, test cases, and any other user-defined ones. 

In ServiceNow, you can sync incidents, problems, change requests, RITMs, tasks, or any other ServiceNow entity

You can 

  • Update and reflect status, priority, or assignment in ServiceNow and vice versa,
  • Sync attachments to ServiceNow associated with work items, allowing easy access to relevant files,
  • Sync discussions, comments, and work notes in either system for better visibility and communication history. 

Can I integrate Azure DevOps and ServiceNow for free? 

No, you cannot integrate Azure DevOps and ServiceNow for free. 

You need a subscription to use the native ServiceNow integration functionality called IntegrationHub. You can also install third-party apps for integrating Azure DevOps and ServiceNow. Exalate is a third-party app that offers tailor-made integrations between various platforms. It has a free plan for syncing 1,000 entities per month. It also has a Groovy-based script mode for implementing advanced use cases. 

Explore the various options based on your use case, implement a POC, understand the pricing, and make an informed decision.

Recommended Reading:

How Netguru Uses Exalate to Significantly Reduce License Costs and Connect DevOps with their ITSM & Business Teams

Netguru Exalate case study

From Design to Development, Netguru Helps you Face your Challenges 

As a growing innovation consulting company with more than 650 people on board, Netguru builds digital products, from designing and developing fintech apps to building a multiplatform digital assistant for healthcare facilities.

They actually work with you to come up with a revolutionary digital product for your specific use case. So you can simply share your challenge with them, they will advise how to solve it and then will take care of it. 

As a known company with mostly international clients around the world, their clients have changed the way people do banking, listen to music, learn languages, and rent bikes. 

They started in 2008 as a Ruby on Rails company, to then support all sorts of modern technologies and offer a variety of services, from Angular to React, Python, and AI. They also provide design support, including both development and software design.

As a one-stop-shop, they also provide a variety of consulting, optimization, and marketing services. In March 2020 they became a Certified B Corporation, committed to change the world using technology and business as a force for good.

Why Exalate?
• Reducing the monthly costs of marketing’s Service Desk by around 95%
• Handling larger numbers of tickets 
• Flexible and easily configurable to meet every use case’s requirements 
• Smoother workflow

Paving the Way for a Smoother Collaboration    

Netguru, with the ambition to become a global leader in digital transformation, has to constantly work on optimizing processes. They wanted their DevOps team, who operate on their own internal Jira Service Management, to be up-to-date on the work of other teams and in perfect sync with the commercial projects.

Plus, their Growth (marketing) team wanted to start using Jira as an issue-tracking and reporting solution. Naturally, they receive various requests on a daily basis from members of different teams, so it seemed to be a good idea to make use of Jira Service Management for the process of ticket creation. 

But they faced some challenges:

  • There was no easy way that a DevOps team, usually consisting of less than 10 people, could keep track of more than 100 active, commercial projects in the Jira environment and track if DevOps related tickets are properly connected and synced with commercial projects and their teams.
  • The size of the Growth team combined with Jira Service Management’s per-agent billing rule noticeably increased their monthly costs of Atlassian subscription.

So they decided to take action and smooth out the collaboration while optimizing the costs. And this is where Exalate came into the picture to integrate Jira Service Management and Jira Software. 

Flexibility and Cost Optimization with Exalate 

Netguru was experimenting with different tools and solutions to check if any of them met their specific use case’s requirements. That was especially the case with tools like Exalate that offered a free trial. This way, they could comfortably assess the solution, decide if they wanted to adopt it for the long term, and convince the board to make a purchase.

There was a case where the marketing team wanted to use the Service Desk ticket creation process, but due to the size of the marketing team, the cost of running Service Desk agents for about 20-30 people was quite high with Jira.

As a solution, they managed to synchronize different types of projects with Exalate and they were able to save that money on agents because they now could use normal Jira accounts for marketing team members while maintaining the ability to use the Service Desk reporting solution.

In the DevOps case, Exalate is configured to connect commercial projects to their Jira Service Management. So whenever there’s a “DevOps synchronization” label, Exalate would pick it up as a trigger and create a synchronized reflection of that ticket on the Service Desk. Teams can then sync the flows using Exalate even if the workflows themselves are different. And afterward, the right people can take care of the tickets’ estimation, assignment, and execution. 

There’s also the possibility to configure the fields that need to be synced, so the commercial projects and the DevOps teams are always collaborating smoothly and are kept up-to-date when it comes to their workflows and their tasks. 

“There haven’t been any concerns or security risks to address when we decided to implement the solution back then, as Exalate provided full control over what is synchronized and how. If everything is configured properly, you can rely on the tool and security is maintained. This does not mean we take general Jira environment security for granted. We have configured and recommend everyone to have 24/7 security monitoring mechanisms in place.”

explains Piotr, Senior Project Manager at Netguru.

The DevOps team has benefited greatly from this. There has been an increase in the number of tickets the DevOps team is handling because they don’t need to spend time looking for appropriate commercial projects in the Jira environment to connect the executed work to. They have everything in one place thanks to Exalate that keeps everything in sync.

And what does stand out as the most prominent feature of the solution? We asked Piotr. 

“It’s definitely Exalate’s flexibility. The solution is really configurable, and we could configure what we needed by following the documentation. If you know what you’re doing, you really can configure all sorts of things with it and get it to work for your specific use case. You can even think outside the box to save money as a result. Actually we did not know this could be an extra benefit of using the tool in the first place!”  

Netguru is also thinking about rolling out its Exalate network in the future in case there is a need to integrate their systems with external teams and other companies, as Exalate can easily support such use cases. 

Results Recap 

  • Cost reduction
  • Optimized processes
  • Maintained security and guaranteed autonomy
  • Increased harmony between different teams

As companies grow bigger and their collaboration becomes more extensive, the need to adopt a seamless integration is inevitable. With the right solution, they can save time, money, and resources and of course enjoy the ease of communication without having to handle everything manually. This will all lead to having stronger teams, smoother workflows, and more productivity. 

Become an Exalate user and experience an optimized workflow and high productivity. It’s flexible enough for any sync use case. 

Book a demo now

How to Synchronize a ServiceNow Customer Case to a Jira Epic

Sync SNOW Case to Jira Epic

When it comes to cross-company integration solutions, it is highly critical to know if the solution can handle various use cases across different platforms. These use cases might vary from a simple use case like setting up a connection between two issue trackers to more technically advanced ones like implementing a synchronization from a ServiceNow customer case to a Jira epic.

Some time ago, a company asked if Exalate could handle a more advanced synchronization challenge – ‘Case to Epic’. This company’s request was to integrate Jira and ServiceNow in such a way that ServiceNow ‘Customer Cases’ could be escalated towards Jira as Epics.

Any additional problem that is uncovered in the context of that particular customer case, should create a story in the context of the epic. 

ServiceNow customer case to jira epic sync

As flexibility is one of Exalate’s strongest suits, we decided to buckle up, accept the challenge, and get the configuration done. This piece will provide you with the details setting up such behavior yourself.

See it in action

Let’s see how this can be done in action:

Configuration

Configuring an Integration

With the distributed nature of Exalate, you always need to keep in mind in what context you are configuring.

Bidirectional synchronization requires that you specify how the synchronization is behaving in either direction:

  • From ServiceNow to Jira
  • From Jira to ServiceNow

Furthermore, for each direction, you need to specify what information is sent from the source and how it is processed on the receiving end. 

Exalate provides a groovy-based scripting engine which brings the necessary flexibility to implement this behavior.  As an Exalate administrator, you will configure an incoming and outgoing processor on each side. The outgoing processor is used to specify what information is being sent from the local tracker, and the incoming processor is used to define how incoming messages need to be processed.

So here are the steps to setting up a bidirectional configuration:

Sync ServiceNow Customer Case to Jira Epic
  • Specify what information is being sent from ServiceNow to Jira by configuring the outgoing processor on the ServiceNow side.
  • Specify how this information is being applied on the Jira side by configuring the incoming processor on the Jira side.
  • Specify what information is being sent from Jira to ServiceNow by configuring the outgoing processor on the Jira side.
  • Specify how this information is being applied on the ServiceNow side by configuring the incoming processor on the ServiceNow side.

Whenever a connection is being set up, the incoming and outgoing processors are configured with a template allowing them to synchronize summary, description, comments, and attachments. To configure this particular case, a number of additional configurations are required.

Detailed Specifications

Before starting to implement the use case, it is always good to have an overview: 

  • Whenever a case is assigned to an ITSM Engineering assignment group – Exalate it towards the Jira, the issue created on the Jira side must then become an epic. Exalate is the action where an incident (problem. issue …) is being escalated towards another system. Subsequent updates on the object are called synchronizations.
  • The epic name (which is a mandatory field in Jira) must be set to the case identifier.
  • On the ServiceNow side, Correlation.id should be set to the key of the Jira issue and a custom field ‘issue link’ should provide a direct link to the Jira issue.
  • Whenever a problem is created in the context of a customer case, that problem needs to be automatically Exalated towards Jira, in the context of the corresponding twin.
  • For problems, correlation.id and the issue link also need to be set.
  • It is sufficient to synchronize comments and attachments, but Jira comments on the ServiceNow side must be work notes (not visible for the customers).

Installing Exalate on ServiceNow and on Jira

To implement the autonomy requirement, Exalate needs to be installed on both sides of the connection.

jira servicenow connection

The instructions to setup Exalate on both sides are detailed in these pages:

Setting up the Connection

Configuring the connection is pretty straightforward. Check out this step-by-step guide or just follow these instructions:

You can also check out this video if you’d prefer to learn it visually:

ServiceNow to Jira Configuration

The Outgoing Message

The messages sent from ServiceNow to Jira should contain:

  • entity type (customer case or problem) such that a decision can be made on the Jira side
  • identifying the number
  • title
  • description
  • comments
  • attachments

In case of a problem, the customer case number is also required to find the epic back on the Jira side. The customer case number is tracked in the problem. parent field.

problem parent field

Inspecting the default setting of the connection – it appears that almost everything is already pre-configured, except for the entity type. 

We could decide that the status is not necessary, but we can leave it in as well. You never know what the Jira colleagues would do with it.

// Configure the replica with the fields from the customer case and problem
 
 
// EntityType is required to distinguish between a customer case and a problem (or anything else)
replica.customKeys.entityType = entityType
 
if(entityType == "customerCase") {
    replica.key            = customerCase.key
    replica.summary        = customerCase.short_description
    replica.description    = customerCase.description
    replica.attachments    = customerCase.attachments
    replica.comments       = customerCase.comments
    replica.status         = customerCase.status
 
}


if(entityType == "problem") {
    replica.key            = problem.key
    replica.summary        = problem.short_description
    replica.description    = problem.description
    replica.attachments    = problem.attachments
    replica.comments       = problem.comments
    replica.status         = problem.status
 
    // the URN of the customerCase is required to look up the corresponding Epic
 
    replica.customKeys.parentURN = problem.parent
 
 
}

Configure the incoming Processor on the Jira Side

Whenever a message is accepted on the Jira side, in the case of Exalate, an Epic needs to be created:

/*
** if firstSync is true, then an issue needs to be created in the right project and the right type
** The project is 'CCSNOW' (customer cases from ServiceNow)
**
** Depending on the case, create an epic, a story or a task (in all other cases)
** The epic name is the key of the customer case
**
** 
** In case of a problem, the twin epic (which corresponds to the customer case) needs to be found
** The nodeHelper.getLocalIssueFromRemoteURN method is being used.
*/
 
 
if (firstSync){
   issue.projectKey = "CCSNOW"
 
   switch (replica.customKeys?.entityType) {
          case "customerCase":
               issue.typeName = "Epic"
 
               issue.customFields."Epic Name".value = replica.key
               break
 
        case "problem":
            issue.typeName = "Story"
             
            // the getLocalIssueKeyFromRemoteURN is returning a BasicHubKey with has the URN as one of its attributes
            def parentIssueURN = nodeHelper.getLocalIssueKeyFromRemoteUrn(replica.customKeys.parentURN,"customerCase")?.URN
            if (parentIssueURN) {
 
                // the Epic Link custom field requires an issue object
                def im = com.atlassian.jira.component.ComponentAccessor.getIssueManager()
                def localIssue = im.getIssueByCurrentKey(parentIssueURN)
                issue.customFields."Epic Link".value = localIssue
            }   
            break
        default:
            issue.typeName = "Task"
            break
 
   }
}
// set all other fields
 
issue.summary      = replica.summary
issue.description  = replica.description
issue.comments     = commentHelper.mergeComments(issue, replica)
issue.attachments  = attachmentHelper.mergeAttachments(issue, replica)

Jira to ServiceNow Configuration

The specifications require that the correlation.id and issue link are set to the remote issue key and a link to the Jira link. This requirement can be implemented as long as the Jira issue key is known on the ServiceNow side. The issue key is part of the message sent from Jira to ServiceNow, so no modification is required for the outgoing sync on the Jira side

In the incoming processor on the ServiceNow side – the following statements need to be added: 

...
if (entityType == "customerCase") {
   …
   customerCase.correlation_id = replica.key
   customerCase.u_issue_link = “https://targetjira/browse/“ + replica.key
}
 
if (entityType == “Problem”) {
   …
  problem.correlation_id = replica.key
  problem.u_issue_link = “https://targetjira/browse/“ + replica.key
}

Note: To automatically transfer the issue key after the object has been created on the Jira side, it is important that this information is sent back from Jira once the issue has bee created. The syncHelper.syncBackAfterProcessing() method allows us to trigger this functionality.

Wrap it up

The proof of the pudding is in the eating! So set up the synchronization yourself and try it out. and let us know if you have any questions or comments below.

Recommended Reading:

How Open GI Uses Exalate to Streamline their Internal Workflows while Leaning on Top-Notch Support

Open GI Exalate case study

Every Insurer and Broker Needs a Software Specialist 

Being part of the Open International Group, Open GI is one of the leading technology partners to the general insurance industry in the UK and Ireland. Open International Group is a highly successful and growing organization with a strong record of innovation that stretches way back to 1979. The Group is 550 people strong across offices in Worcester, Dublin, London, Winchester, Milton Keynes, Skopje, and Krakow.

Open GI

As an insurance software specialist, Open GI offers a range of configurable solutions to insurance brokers, underwriting agencies, insurers, and MGA’s. Their solutions, which include Mobius and Core, provide their customers with multi-line, multi-channel, and multi-brand trading capability complemented by the latest eCommerce and mobile technologies. 

Why Exalate? 
• No more manual data copying by the support team and the Business
Analysts 
• Smoother and more accurate collaboration between different teams 
• A more efficient intuitive referral process 
• Less money and time loss 

Paving the Way for a Smoother Collaboration

A system will run most efficiently when every part works in complete harmony with the others. The same thing also applies to companies. Either between internal teams and/ or external ones, a smooth collaboration will guarantee a streamlined workflow. 

That’s why Open GI decided to move its customer service center from a legacy system to Jira Service Management. But like any other migration, they faced some challenges: 

  • They needed the ability to refer to various areas of the business as some were using Jira Service Management, some Jira Software, and some Azure DevOps. This referral process should be as efficient and intuitive as possible in order to ensure that all information was passed onto the referral team. This would allow for updates to be passed back to the support team. 
  • There were also Business Analysts receiving requirements from customers via Jira Service Management and had to manually create issues for the development teams in Jira Software at a point. Manually updating the respective systems with any updates was a huge overhead and wasn’t the best use of time for the Business Analysts.
choosing the right software integration solution

“As for the support team’s migration to Jira Service Management, there wasn’t a problem to overcome regarding connecting to other teams. It was simply a requirement as part of their move from the legacy system. But our Business Analysts, who receive change requests and UAT feedback from external customers, were frankly frustrated with having to manually create related tickets”

says Howard Kenny, a process improvement specialist at Open GI. 

That’s when Exalate comes into the picture to pave the way for a smoother more flexible collaboration between their three platforms: Azure DevOps, Jira Software, and Jira Service Management. 

Exalate: an Integration Solution with a Top-Notch Support 

As Open GI was searching for options on the Atlassian Marketplace to find the right software integration tool, they came across Exalate and signed up for a free trial. 

There was also another tool used to integrate Jira Service Management and Azure DevOps at the time, but it became apparent over time that it was not fit for their purpose. So they decided to move to Exalate instead and they’re now much happier with the result. 

Howard adds that when it came to risks, they mostly considered performance:

“But again the support is always so close at hand that if we need any assistance or have any questions, we’re sure that they’ll take care of it. The support team has always worked closely with us to enhance the product and to ensure our challenges are overcome in the smoothest way possible.” 

Having a Clearer View of the Workflow with Exalate 

The Open GI team has saved a significant amount of time by automating the data integration process using Exalate. Their support team is no more creating tickets manually in various other places or monitoring the updates. They just press a button and it’s all taken care of automatically. 

So what do you consider as Exalate’s best feature? We asked Howard: 

“Its status and comment synchronization. It allows teams to clearly see with whom an issue resides which provides a clear audit trail for all teams in their respective systems. And in turn, our customers can see the latest status, too. ” 

Therefore, the teams can have a clear view of the workflow and can easily follow an issue from being created to being resolved without worrying about updating the status manually anymore. 

But as Howard tells us, they’re just scratching the surface of what Exalate can do for them. They intend to dive deeper into its capabilities and to make use of the benefits that it offers on a larger scale. 

Results Recap 

  • A more flexible collaboration between teams 
  • Saving the support team from having to manually create tickets and monitor updates 
  • Saving time, money, and resource by automating the process 
  • Easy status and comment sync with a click of a button 
  • Making use of great support to ensure that the integration is always running smoothly

As companies grow bigger and their collaboration becomes more extensive, the need to adopt a seamless integration seems more inevitable. With the right solution, they can save more time, money, and resource and of course enjoy the ease of communication between the internal and external teams without having to track everything manually. This will all lead to having stronger teams, smoother workflows, and more productivity. 

Become an Exalate user and experience an optimized workflow and high productivity. It’s flexible enough for any sync use case. 

Book a demo now

ServiceNow IntegrationHub or Exalate: How do they Compare?

ServiceNow IntegrationHub vs. Exalate

Modern software teams use multiple software platforms to organize their work. There are many options, like IntegrationHub and Exalate, for teams looking to integrate them. Obviously, they all have their pros and cons and it’s important to be aware of these if you want to choose the right technology. By picking a system that meets your needs, you’ll be able to maximize the advantage you get from synchronizing your data.

There’s a key question when deciding whether to use ServiceNow IntegrationHub or Exalate: How do they compare? We’re going to look at both systems in detail today and see what they have to offer. We’ll also take you through the full setup of both systems so you can really understand what solution they both provide. Finally, we’ll cover common use cases for both IntegrationHub and Exalate.

ServiceNow is hugely popular with teams working on the cloud. Its IntegrationHub solution allows it to share workflows with other services.

Exalate is an integration solution that connects multiple platforms like Jira, ServiceNow, Salesforce, Azure DevOps, etc. It has many high-profile clients including brands like Dell, Panasonic, and IBM.

As well as describing what each platform does, we’ll see how they perform in use cases and will get an idea of what they do best. 

ServiceNow IntegrationHub and Exalate: a Quick Comparison

As there is a vast variety of integration scenarios, it would be a good idea to first look from a broader perspective before comparing IntegrationHub and Exalate for a particular use case. We should also acknowledge that ServiceNow IntegrationHub and Exalate target different sorts of organizations and needs.

IntegrationHub: It is used by enterprises as the main platform to manage IT services with the intention of taking IT automation to the next level. For such a purpose, IntegrationHub, along with the flow designer and the spokes for various systems, provides an excellent foundation. So with that purpose in mind, if an organization does not choose IntegrationHub, it would most probably be for strategic reasons.

Exalate: It is an integration solution for intra-company or cross-company scenarios and connects teams working on different platforms, like ServiceNow, Jira, Salesforce, Azure DevOps, GitHub, etc. It intends to streamline the collaboration between teams by synchronizing their tickets, incidents, and other entities. Exalate is a good candidate for such a purpose, because of its autonomy(decentralized integration), flexibility, and reliability. So if a company is looking for a way to sync incident/ change requests/ problems with Jira issues/ projects/ stories, then Exalate is a good solution.

Now that we’ve gone over the differences between the platforms, we’ll walk you through setting each of them up. We’ll then examine some use cases to see how things work in practice.

Let’s continue our investigation by looking at both solutions, starting with Exalate

Exalate for ServiceNow and Jira

First, we need to install Exalate on both platforms. Then we’ll look at configuring it. Finally, we’ll examine some use cases to see how it performs in action.

To know more about what a Jira ServiceNow integration entails, read this document.

Install Exalate on ServiceNow

To set up an integration between ServiceNow and other platforms, we need to install Exalate on ServiceNow.

You can start your installation for ServiceNow by visiting the Exalate integrations page. Fill in your details and book a short call with us to discuss your use case. After the call, you’ll receive your ServiceNow Exalate node.

Once this is done, download an Exalate “update set”, which is an XML file. Click here to download it. 

Exalate update set for servicenow

Then open your ServiceNow account. From the “system update sets” menu on the left-hand side, navigate to “Retrieved Update Sets”. From here, click on the import update set from XML. Click the “Choose File” button and select the XML file you just downloaded. Then click the “Upload” button.

exalate for servicenow xml update

You should be able to view the uploaded file, with “Exalate” mentioned in the description.

Click the Exalate file and then the “Preview Update Set” button. If you see some errors, you might need to update your setup by clicking the “Accept remote update” button.

If things are working fine, click the “Commit Update Set” button and the installation should be complete for ServiceNow.

Install Exalate on Jira

Next, you’ll need to install Exalate in Jira. The process is different depending on whether you have the Cloud or on-premise version of Jira.

In either case, you can get started with your free trial from the Atlassian marketplace.

On the Cloud version, you can find Exalate in the marketplace within your Jira instance. If you use on-premise, look in the add-ons menu.

Click “Find New Apps” and then search for “Exalate”. The app you want is called “Exalate Jira Issue Sync & more”. 

Click on the “Try it free” button. An “Add to Jira” pop-up displays a summary of Exalate features. Click on the “Start Free trial” button next.

While Exalate is added to Jira, a corresponding status update will be displayed.

After a short while, click “Get started” and you’re done.

For more details, read this Jira Cloud installation guide, or Jira on-premise installation guide.

Now we’ll discuss connecting the platforms and then move on to our use cases.

Note: You can also start your Jira installation by visiting the integrations page.

Connect ServiceNow and Jira via Exalate

With Exalate installed on both sides, the next step is to connect them. We do this by generating an invitation on one platform and accepting it on the other. We can create the invitation on either platform. The process is similar from both sides. For this example, we’ll look at creating it in Jira.

Connections tab Exalate on Jira

First, navigate to the “Connections” tab in your Exalate node. From here, click the green “Initiate connection” button to begin.

Enter the destination URL, in our case, it is the ServiceNow URL. After checking if Exalate has been installed on the destination side, new fields will appear.

Configuration modes in Exalate

You have to choose the type of configuration mode.

Exalate comes in 2 modes: the Basic mode and the Script mode. These modes make Exalate customizable, so that it can be used easily by both technical and business users.

The Basic mode offers predefined mappings between Jira and ServiceNow entities that cannot be changed. The Script mode on the other hand has an intuitive scripting engine, due to which you can customize your integration case as you want. It is also powered by AI. We will look into it in the coming section.

For the Basic mode:

Press “Next” after selecting “Basic” on the screen above. Then proceed to select the project on the Jira instance. This will be the project in which you will synchronize ServiceNow Incidents. Select the correct one from the dropdown list and hit “Next”.

select project in Exalate

Proceed to verify if you have admin access to the ServiceNow instance.

Exalate performs a check to determine if you have admin access. After confirmation, enter the “Incident” number on the ServiceNow side. If you navigate to the Jira instance now, you will be prompted to enter the “Issue key” to sync. Either way, click “Exalate” when you are done.

Incident to sync in ServiceNow using Exalate

Wait for some time for a successful synchronization to happen.

Basic mode synchronization

For the Script mode:

After clicking “Next” on the screen to select the configuration type, add a connection name. It is a good idea to give it a meaningful name, as you may have multiple connections later and it is useful if the name conveys what each one does.

Jira ServiceNow connection for Exalate

You can also add a description to give you more information about the connection. This is optional but again, it is good to have this information. It can be very helpful for you and anyone else who wants to know what your connection does. Click “Next” when you are ready!

Just like you selected a project for the Basic mode, select the Script mode as well. This will be the project you want to use to synchronize ServiceNow entities.

An invitation code will be generated. Copy this and paste it somewhere safe. You’ll need it in the next step.

Invitation code in Exalate

Now you need to go to the other platform. Since we started in Jira, we’ll now switch over to ServiceNow. Click the “Done” button and head over to ServiceNow.

Look for the connections item in the left-hand menu. From there click the “Accept Invitation” button in the top right.

accept integration invitation

You’ll see a box with text about it saying “Enter the invitation code”. Paste the long code we just generated into this box and click the “Next” button.

You will see the status of a successful synchronization.

JIra ServiceNow integration

Now let’s go over a couple of use cases to see what we can use it for.

Exalate Use Cases

Use case 1 – Create a Jira Issue from a ServiceNow Incident

With Exalate we control when data is shared using synchronization triggers, and we control what is shared by editing our synchronization rules.

The sync rules control how data in each platform is matched to data in the other.

To create a Jira issue from a ServiceNow incident we need to edit the outgoing sync rules in ServiceNow and the incoming sync rules in Jira. To do this in Jira, look at the connections screen and click the three dots next to the connection we created earlier.  Click the edit button and then the “Rules” tab on the screen that appears.

Adjust the rules so they look like the screenshot below.

Sync rules in Jira

In ServiceNow, we do the same thing, finding our connection, and selecting edit. The outgoing sync rules already exist there. These sync rules already sync the basic incident fields like short description, description, state, etc.

If you want to change the information to be sent or received, we can always edit the sync rules later.

We also need to define a synchronization trigger, to make sure Jira creates an issue when ServiceNow creates an incident. We will create a trigger, that looks like this.

To create a trigger, select “Triggers” from the left-hand menu. You’ll see a green “Create Trigger” button. Click it to get started. You can also create a trigger by editing the connection and clicking the “Triggers” tab.

Triggers in ServiceNow

You can use ServiceNow search syntax to define exactly what conditions to set. The query we’ll use is: “urgency = 1”. It means that the Incidents having the urgency = 1 in ServiceNow will create an issue in Jira.

Enter that and choose your previously named connection from the dropdown box. You can add some optional notes if you want to make what you’ve done easier for other people to figure out. When you’re ready, click the “Add” button and you’re ready to go.

Use case 2 – Create a ServiceNow Incident from a Jira Issue

Now let’s move on to the inverse scenario, creating a ServiceNow Incident from a Jira issue. One advantage of Exalate is that it uses the same interface and steps for different systems, so we can integrate several platforms without having to learn a new process each time.

The process for this use case is essentially the same as the first one but in reverse. 

To do it, we’ll need to look at our incoming and outgoing sync rules. This time, we’ll change the incoming rules on ServiceNow and the Outgoing rules on Jira.

Firstly, let’s look at the incoming rules on ServiceNow. From the Exalate screen, click on “Connections” in the left-hand menu. Find the connection we created earlier and click the edit button that appears when you hover the mouse over the connection.

Then click “Rules” and adjust what’s there as required. They should look like the inverse of the rules in use case 1. The rules page contains the incoming and outgoing sync rules. You’ll have to scroll down to see the incoming rules, which should look like this:

Incoming sync rules in ServiceNow

You can see the first entry, starting with the text “if(entityType == “incident”) {“. That will map incoming data from Jira to our incidents. Adjust the specifics here if you want to do it differently. Rules for other types of items have also been created. You can delete these if you don’t need them.

Now go to Jira and adjust the outgoing rules in the same way. Click the “Connections” text, then select the “edit” button near the connection. You can then adjust the rules so the information matches that on the other side.

Powered by AI, Exalate’s script mode includes the AI Assist chat window in both your incoming and outgoing sync rules tabs. Just enter your sync requirements, and AI Assist will generate the scripts for you.

These scripts are crafted based on your input, existing configurations, and Exalate’s scripting API.

Remember, AI Assist isn’t perfect—like any AI, it can make mistakes. So, the more precise and detailed you are with your prompts, the better the results.

Next, let’s look at the synchronization triggers on our ServiceNow Exalate node.  We can find that by clicking “Edit”, then the “Triggers” item at the top. 

Click the “Create Trigger” button and a pop-up will appear. Make sure “issue” is selected from the drop-down box and then enter the appropriate JQL to create the incident from your issue. You can see how we’ve done it below:

Triggers in Exalate

In this case, we’ve used the code labels = ServiceNow as our trigger condition. As we’ve noted, this will send issues to ServiceNow if we give them the “ServiceNow” type within Jira. This might not exactly match your setup, so you may need to adjust it. Take a look here for some information about the JQL query language.

We’ve also made sure the trigger is active, by clicking the tick to select it. Click the green “Add” button, and we’re done.

If you want to learn how Exalate can solve your integration problems and synchronize your teams, you can easily book a one-on-one demo with an expert here.

Advanced Jira ServiceNow Integration Use Cases Using Exalate

Exalate’s Script mode makes it a very flexible solution to implement advanced use cases between Jira and ServiceNow. It is not limited by the use cases that the UI has to offer, as is the case with IntegrationHub.

Here are a few advanced scenarios we implemented:

What does ServiceNow IntegrationHub do?

IntegrationHub enables the execution of third-party APIs as a part of a flow when a specific event occurs in ServiceNow. These integrations are referred to as spokes, provide powerful actions without the need to write a script. IntegrationHub provides the following functionalities:

  • Spokes for integrations to a number of third-party tools
  • Creates custom integrations
  • Automate the administration of servers and applications in a network behind a firewall

Installing ServiceNow IntegrationHub and Jira Spoke

IntegrationHub is a separate subscription feature. It has four flavors as indicated below.  Jira is included in the Standard subscription package.

integrationhub subscription feature

Installing IntegrationHub with a subscription

If you have an Integration Hub subscription, ServiceNow will install it on your production and sub-production instances for you.

Installing IntegrationHub on a Sub-production Instance without a Subscription

If you just want to evaluate IntegrationHub before deciding to subscribe or not, check out the information here first on how to request it. You do need to have a ServiceNow HI instance account to request it (meaning that you have an active ServiceNow instance subscription).

Installing IntegrationHub on a PDI (Personal Development Instance)

If you just want to evaluate IntegrationHub without an active ServiceNow Instance, you can request a free evaluation on a PDI. 

Go to your Developer’s account and find “My Instance”.

integrationhub evaluation

Click the “Activate plugin” and choose any of these installers that include the Jira Spoke:

activate plugin integrationhub jira spoke

Verify the Installation of IntegrationHub and Jira Spoke

On the ServiceNow instance, type “IntegrationHub” in the “Filter Navigator” on the left pane. You should be able to see the IntegrationHub Application.

ServiceNow IntegrationHub application

In order to verify that Jira Spoke is installed correctly, you need to check that the Jira Spoke Actions are available in the ServiceNow Flow Designer Application.

Flow Designer is a Now Platform® feature for automating processes in a single design environment. Flow Designer lets process owners use natural language to automate approvals, tasks, notifications, and record operations without coding. In connection with IntegrationHub, Flow Designer communicates with external instances and third-party systems. 

(Flow Designer should be installed automatically on your ServiceNow instance. If not, you can activate it by going to “System Definition” → “Plugins” → “Flow Designer – Designer” → “Activate”)

Search for Flow Designer on the Left Pane and open it. 

integrationhub flow designer
actions in jira spoke

Go to “Actions” and type in “Jira Spoke” under “Application”. You should find a number of Actions belonging to the Jira Spoke application that can be used in the Flow Designer for the integration with Jira.

How to set up Jira Spoke

Use Jira Spoke to manage issues, users, stories, and groups in Jira. Retrieve Jira data to use in a flow. Use bi-directional webhooks and subscribe to Jira with a ServiceNow callback URL (Note: The bi-directional webhooks are supported in Jira Spoke version 2.6.5)

ServiceNow documentation has Step-by-Step instructions on: 

IntegrationHub Use Cases

Use Case 1: Create a Jira Issue from a ServiceNow Incident

In this use case, the trigger for the integration is an event in ServiceNow. e.g. an Incident is created and assigned to the Assignment group ServiceDesk-Jira. A corresponding Issue in Jira needs to be created. The integration is achieved by utilizing the Jira Spoke Action, the “Create Issue”. The sequence of integration steps is defined in a Flow:

Open ServiceNow “Flow Designer” → “Create New” → “Flow”.

integrationhub the flow trigger

Define the trigger of the Flow: An Incident is created & assigned to ServiceDesk-Jira.

creating incident flow trigger integrationhub

Define the Action to Create an Issue in Jira:

  • The Action “Create Issue” is one of the Actions provided by Jira Spoke.
  • The Project Key “DESK” is defined on the Jira side. It defines in which Project the issue will be created.
  • Summary: The scripts define that the issue summary will be derived from the Incident short description.
  • All the other listed attributes can have either a fixed value or can be derived from the Incident.
creating an issue jira spoke

The Issue created on the Jira side looks as follows:

jira issue integrationhub

The above description gives an idea of how the Flow Designer works. In a real set-up of the Integration, the flow must be further configured to cover the subsequent scenarios of an integrated Incident/Issue.

  • When an Incident/Issue is updated, update the twin ticket.
  • Cover the Error case i.e. define Actions when the Creation/ Update has errors.

Below is an overview of the Jira Spoke Actions related to the Issues. For each Action, the supported attributes are defined/explained:

integrationhub jira spoke actions

Besides the Actions for Issues, Jira Spoke also provides Actions to manage the following entities in Jira. See more details on supported Actions by Jira Spoke here.

  • User
  • Group
  • Project
  • SDLC
  • MetaData retrieval

Use Case 2: Create a ServiceNow Incident from a Jira Issue

In this use case, the trigger for Integration is an event in Jira. e.g. an Issue is created. Through a webhook created in section 1.3, ServiceNow is informed about this event. This triggers a so-called Subflow. There is an OOB Subflow defined as an example, which is not editable. Users can copy this Subflow and do adjustments according to their own needs.

For this User case Subflow, “My process Jira Webhooks” is created and used in the default routing policy for the Jira webhook event.

servicenow incident my process jira webhook

The “My process Jira Webhooks” begins with a section that defines the Input and Output data. The Input data is the data that is transferred from Jira to ServiceNow when a Webhook event is triggered.

  • The Input Data from Jira can be limited.
  • OOB Subflow has included all the supported Jira Data.
  • Because the Jira Webhook does define what event in Jira will trigger the Webhook, in practice only the relevant table, e.g. the Issue, should be included in the Input data.
jira webhook integrationhub

When the Jira Webhook Event “Issue Created” occurs, trigger ServiceNow Platform Action “Create Task” to use the Input data from Jira to Create an Incident in ServiceNow.

creating incident in ServiceNow

Due to the Routing Policy defined in the first step, whenever Jira Webhook events are triggered, this Subflow is executed and in case of a new Issue creation, an Incident is created in ServiceNow correspondingly.

subflow integrationhub

The Subflow works in a stand-alone way as shown above. However, in an integration scenario, the subsequent synchronization of the integrated Issue/Incident pair needs to be covered in a Flow that uses the above Subflow.

IntegrationHub or Exalate? The Verdict

Both of these tools are worth investigating if you’re looking to help your organization evolve, and it is worth spending time considering what they offer and how they match your organizational needs.

But if we want to compare the two based on a simple concrete integration use case, for example creating an Incident (Issue) from an Issue (Incident), the following conclusions could be drawn: 

  • To achieve such a simple integration scenario, ServiceNow IntegrationHub needs more configuration work and is consequently more costly from a financial point of view. 
  • Jira Spoke is a third-party application designed for IntegrationHub, the included Actions are extensive but fixed. Therefore, the integration of customized attributes/ process logic on an Incident/Issue depends on what each Action supports. If an Action needs to be adjusted to allow more flexibility, an updated version from the creator of the Spoke is then needed.
  • IntegrationHub provides the immediate means of creating a Jira Issue from different ServiceNow ticket types (e.g. Problem, Change, etc). The support of Integration scenarios is more flexible, for instance, it allows integration between Incident/ Issue, Change/ Story, Change/ Project, etc., with the same ServiceNow/ Jira connection. But different flows need to be designed in ServiceNow for every desired integration scenario, eventually increasing the number of steps to set up a new integration.

So the bottom line is that IntegrationHub is more of a ServiceNow infrastructure for integration/ automation. Exalate is a solution for internal and cross-company integration scenarios between a variety of platforms. They are actually not direct competitors to one another. And if somebody intends to use ServiceNow IntegrationHub only for Jira integration, it would be like shooting birds with a cannon!

Conclusion

Getting your teams working together harmoniously doesn’t have to be a headache. We’ve looked at two excellent tools for connecting platforms and automating the transfer of data between them. IntegrationHub is a useful tool for connecting ServiceNow to other platforms. 

Exalate is also an excellent solution that allows you to link data between multiple platforms. One of its advantages is that it gives you a consistent interface on different platforms, which can make it easier to work with as your business grows and your collaboration goes from internal to cross-company integration. 

Become an Exalate user and experience an optimized workflow.

Book a demo now

Recommended Reads: