Rapid technological change in the digital era has created challenges for organizations, especially in IT-based service delivery. This requires their underlying IT systems to provide outstanding customer value with fast and flexible service management.
Speed is an important component of this service delivery, but it shouldn’t be sacrificed for quality. Integrated Service Management (ISM) is a mechanism that helps companies implement best-of-breed, customer-focused service that delivers business value.
This article highlights the capabilities of ISM and how it works to deliver IT services faster, better, and more effectively.
What is Integrated Service Management (ISM)?
ISM is based on the IT Infrastructure Library (ITIL). Hence, to fully comprehend ISM and its capabilities, you need to understand ITIL. This is relevant since they share common relationships and logical frameworks.
ITIL is based on IT service management, providing best practices and a systematic approach to delivering IT services that meet business and customer needs.
While ITIL points to best practice guidelines, ISM is the streamlined and trimmed-down professional version representing actual implementation. In other words, ISM provides companies with a standardized method of executing ITIL.
Furthermore, ISM improves IT service management within an organization through enhanced designs, delivery, and controls.
However, the quality of service management is contingent upon the ability of service providers to fulfill their own end of the bargain. As a result, the importance of service level agreements (SLA) in ISM is pivotal to its success.
Services and Service Level Agreements (SLA) in ISM
A service in ISM represents a deliverable, ready-to-use benefit valued by the customer. Services must also be delivered to the customer conveniently, so the IT delivery mechanism through which they consume the service needs to be as frictionless as possible.
ISM places heavy emphasis on a durable service lifecycle, which ensures that services can change, adapt, and evolve to meet the customer’s needs. ISM facilitates this through Service Level Agreements (SLA).
As its name suggests, an SLA is an agreement between a service provider and the end customer of the service, specifying the parameters of the services to be provided. The service providers should understand the expectations from the client in terms of what they are expected to deliver, along with their objective, measurable outcomes.
SLAs need to be nimble, so they lay out response times and measurable performance metrics, including the parties and processes responsible for implementing them.
Service Level Agreements can be hierarchical and layered since a service provider can also have its SLAs with other third parties that provide products and services.
When properly implemented with robust SLAs, ISM empowers service-oriented work management in organizations. As a result, ISM facilitates improved process interaction within the supplier domains.
ISM deals with service providers through SLAs, but service integration and management (SIAM) takes this concept to a much higher, broader level by managing and integrating multiple service suppliers.
Therefore, whenever multiple service suppliers need to be integrated into ISM, SIAM comes into the picture.
The Key Components of Integrated Service Management
The crucial elements of integrated service management or ISM are its system and value stream orientation. Organizations often look to uphold
These are the other core processes that allow ISM to operate successfully as a service delivery model:
Incident Management: An incident is an unplanned event, typically associated with IT operations, that disrupts a service or reduces its quality. Incident management ensures business operations proceed smoothly, so users experience minimal downtime and loss of service.
Effective incident management requires a fast incident response, as detailed in the SLA’s response resolution, along with efficient and rapid handling of user issues, tickets, and risk management. Incidents that teams have to grapple with include the inability of a user to login or access the corporate network, internet connectivity, email delivery issues, or disaster recovery needs from power outages or natural disasters.
Change Management: In service management, changes are typically the cause of new incidents arising in the system. Also, change is inevitable in IT service environments. This dynamic environment means organizations must flexibly accommodate the addition, modification, and removal of IT services. Also, there’s the need to ensure future changes align with the organization’s business goals.
However, with change comes risk, so change management also has the responsibility of measuring risk and controlling the change lifecycle. Risk impact assessment ensures the organization has the appropriate risk tolerance for the inevitable disruptions change agents will bring.
Change management also provides standardized methods to streamline the handling of infrastructure changes. Examples of change management include implementing a bug fix to the production environment, deploying a software security patch, incorporating a new data center, or even implementing mergers and acquisitions.
Configuration Management: IT infrastructure needs to be appropriately configured to operate correctly. Configuration management guarantees that the hardware and software components operate in a desired state.
Moreover, configuration management ensures misconfiguration vulnerabilities aren’t mistakenly introduced into the system. Misconfigurations, in turn, allow hackers to use them as access points to compromise the system.
Configuration management also involves implementing standardized configurations and executing routine configuration audits. An example of configuration management may involve building a configuration database to maintain accurate, up-to-date information of IT assets, their configuration, and relationships between components.
Operations Management: Operations management makes sure service components and service delivery operate smoothly in conformity with SLA specifications. Operational efficiency focuses on the optimization of resources to balance cost and revenue.
Quality Management: As its name implies, quality management ensures there’s adequate quality control. It ensures standards of excellence are maintained regarding tasks and service delivery activities. It mandates a level of quality control, so suppliers provide customers and users with a baseline of quality assurance.
ISM Best Practices
Prepare for work culture change: To succeed, integrated service management requires a change in the work culture, especially one that is much more customer-centric. In addition to the basic training required and the adoption of new processes, organizations need to prepare employees mentally for the paradigm-shift ISM requires. Otherwise, it can easily fail.
Focus on end-users and prioritize customer experience: Organizations must focus on the people that ISM serves instead of processes. For instance, the purpose of a service desk in the ISM framework is to deliver maximum results by creating value — prioritizing the customer first and, ultimately, the organization.
Applying automation: Using automation to create self-service capabilities and eliminate repetitive processes.
Establish achievable key performance indicators (KPIs) and metrics: KPIs are vital benchmarks necessary to establish operational excellence in ISM strategies. However, they also require continuous evaluation and monitoring to yield the desired improvements. This KPI approach also compels organizations that implement ISM to continually refine their strategy while identifying areas and opportunities for improvement.
Examples of metrics to monitor might include costs, self-service usage, self-service/employee satisfaction, and so on.
Choosing appropriate service management tools: The tools you choose to facilitate ISM are pivotal because they’ll be foundational to all your IT services. The tools typically include bug tracking, issue tracking, incident management, and ticket creation. The good news is that there are many capable tools in the market, from free, open-source ones from Atlassian like Jira and managing cloud digital workflows with platforms like ServiceNow.
Conclusion
Embracing integrated service management or ISM is highly relevant for businesses that wish to build and sustain an IT environment geared for scalability, flexibility, and change. ISM ensures that the quality of products and product delivery doesn’t suffer.
ISM is based on the concepts derived from ITIL and SIAM. So, effective implementation of ISM equally requires connecting your customers, suppliers, and subcontractors to tools that adopt the best practices of ITIL and SIAM.
Hence, you might want to consider a cross-platform integration tool like Exalate to operate within these overlapping contexts to reap the maximum value.
If your organization uses Jira Cloud and Jira on-premise concurrently, then syncing user mentions in comments between the two systems is challenging.
With Exalate, it’s possible to synchronize user mentions bi-directionally, making it easier for teams to collaborate seamlessly across both Jira instances.
In this blog post, we’ll dive in and implement this use case with Exalate.
The Use Case
The following are the use case requirements:
Synchronizing summary, description, attachments, etc between Jira Cloud and Jira on-premise.
Synchronizing comments bi-directionally between Jira Cloud and Jira on-premise. This includes
synchronizing simple text comments.
synchronizing user mentions when users exist in both systems.
synchronizing user mentions when the user does not exist in one of the systems. In this case, a custom message along with the user mention must be synced.
There are a few challenges to address.
The Challenges
The real challenge is that Jira Cloud and Jira on-premise handle comments differently.
They also have different formats internally.
Both systems handle user mentions as follows:
Jira Cloud uses the format [~accountid:account-id-string] to represent mentions. You can read more about this in the Atlassian community.
Jira Server uses the format [~username] to represent mentions. You can read more about this here.
Considering the advanced nature of the use case, it’s recommended to use integration solutions to implement it.
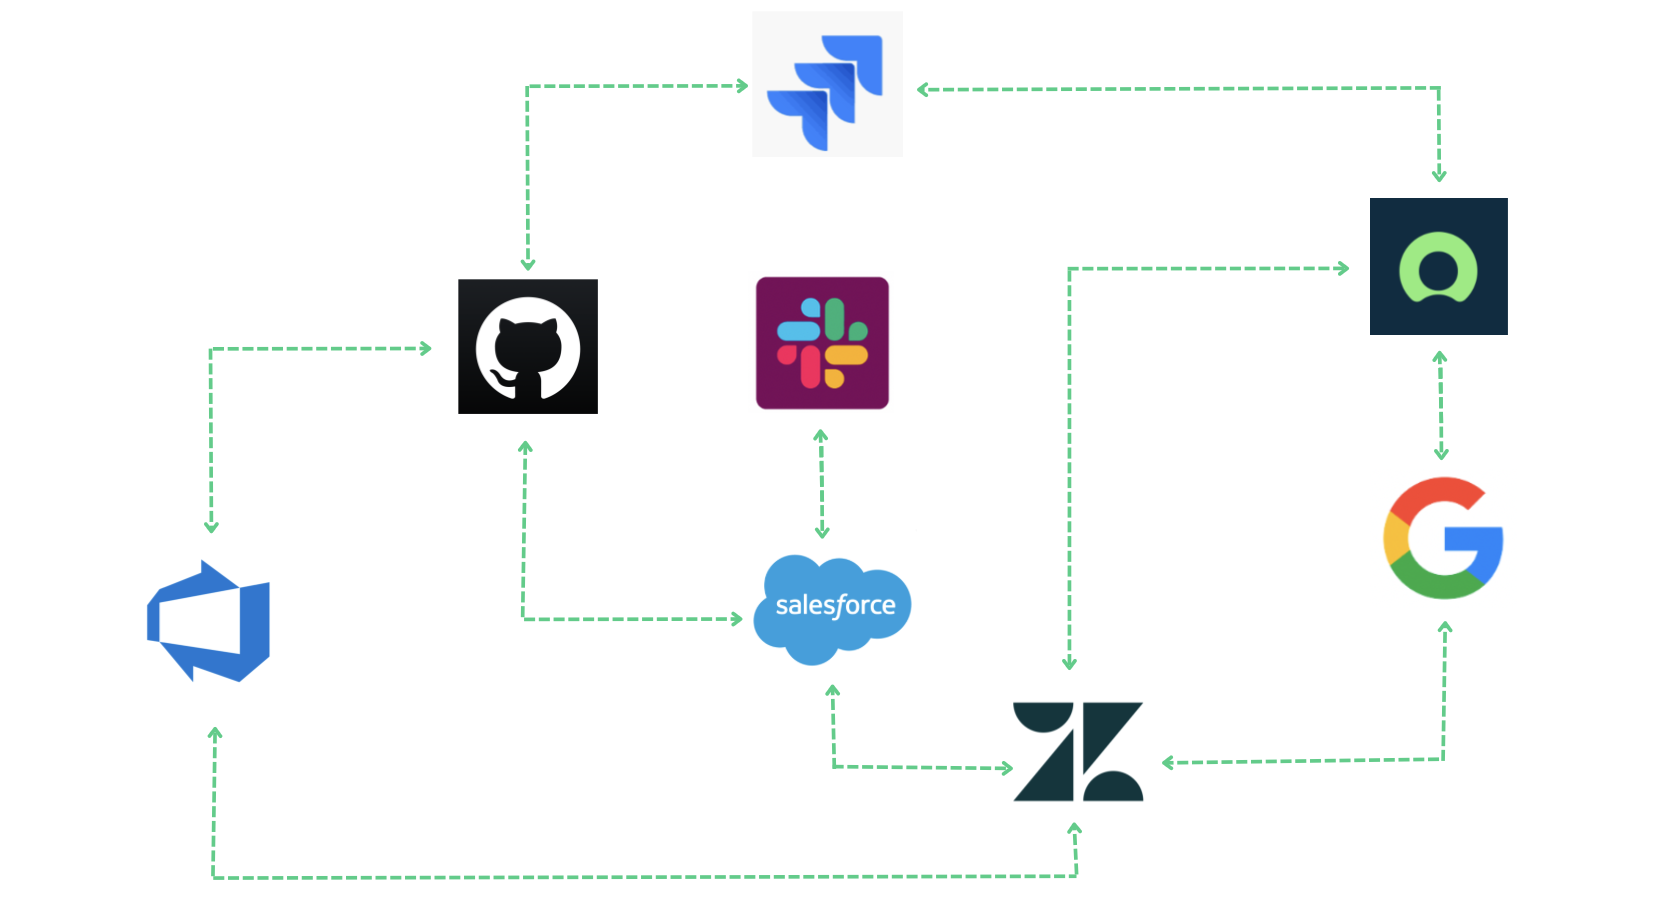
Exalate is a fully customizable bi-directional synchronization solution. It can set up integrations for popular platforms like Jira Cloud, Jira on-premise, Azure DevOps, Zendesk, ServiceNow, Salesforce, GitHub, etc.
The scripting engine that Exalate supports makes it an ideal solution for implementing advanced use cases. It also has an intuitive visual drag-and-drop interface having pre-built sync rules and mappings.
It is the only decentralized integration solution in the market. This feature allows you to handle user mentions on both systems differently and independently without messing with each other’s sync.
Let’s see how to implement this use case with Exalate.
Synchronize User Mentions Bi-directionally Between Jira Cloud and Jira On-premise
After setting up the connection, you need to configure the sync rules to control what information must be sent and received at both ends.
Then you can set up triggers to enable the automatic exchange of information.
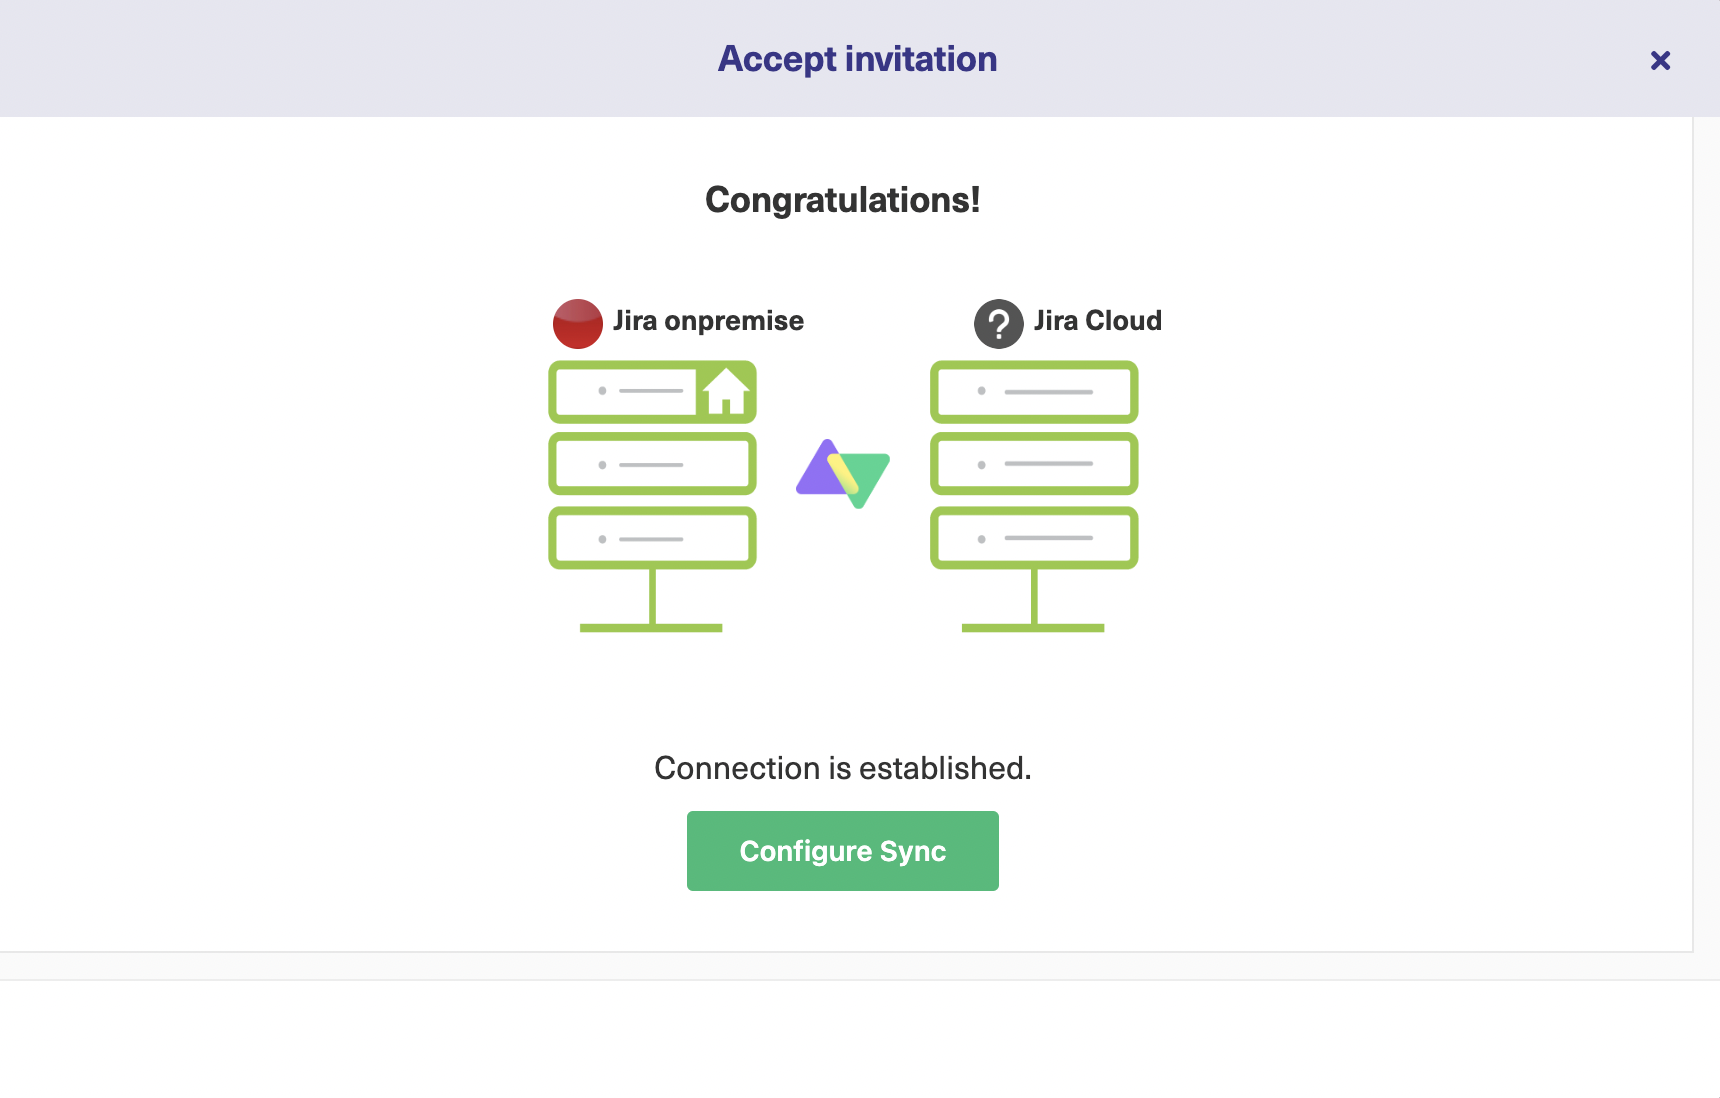
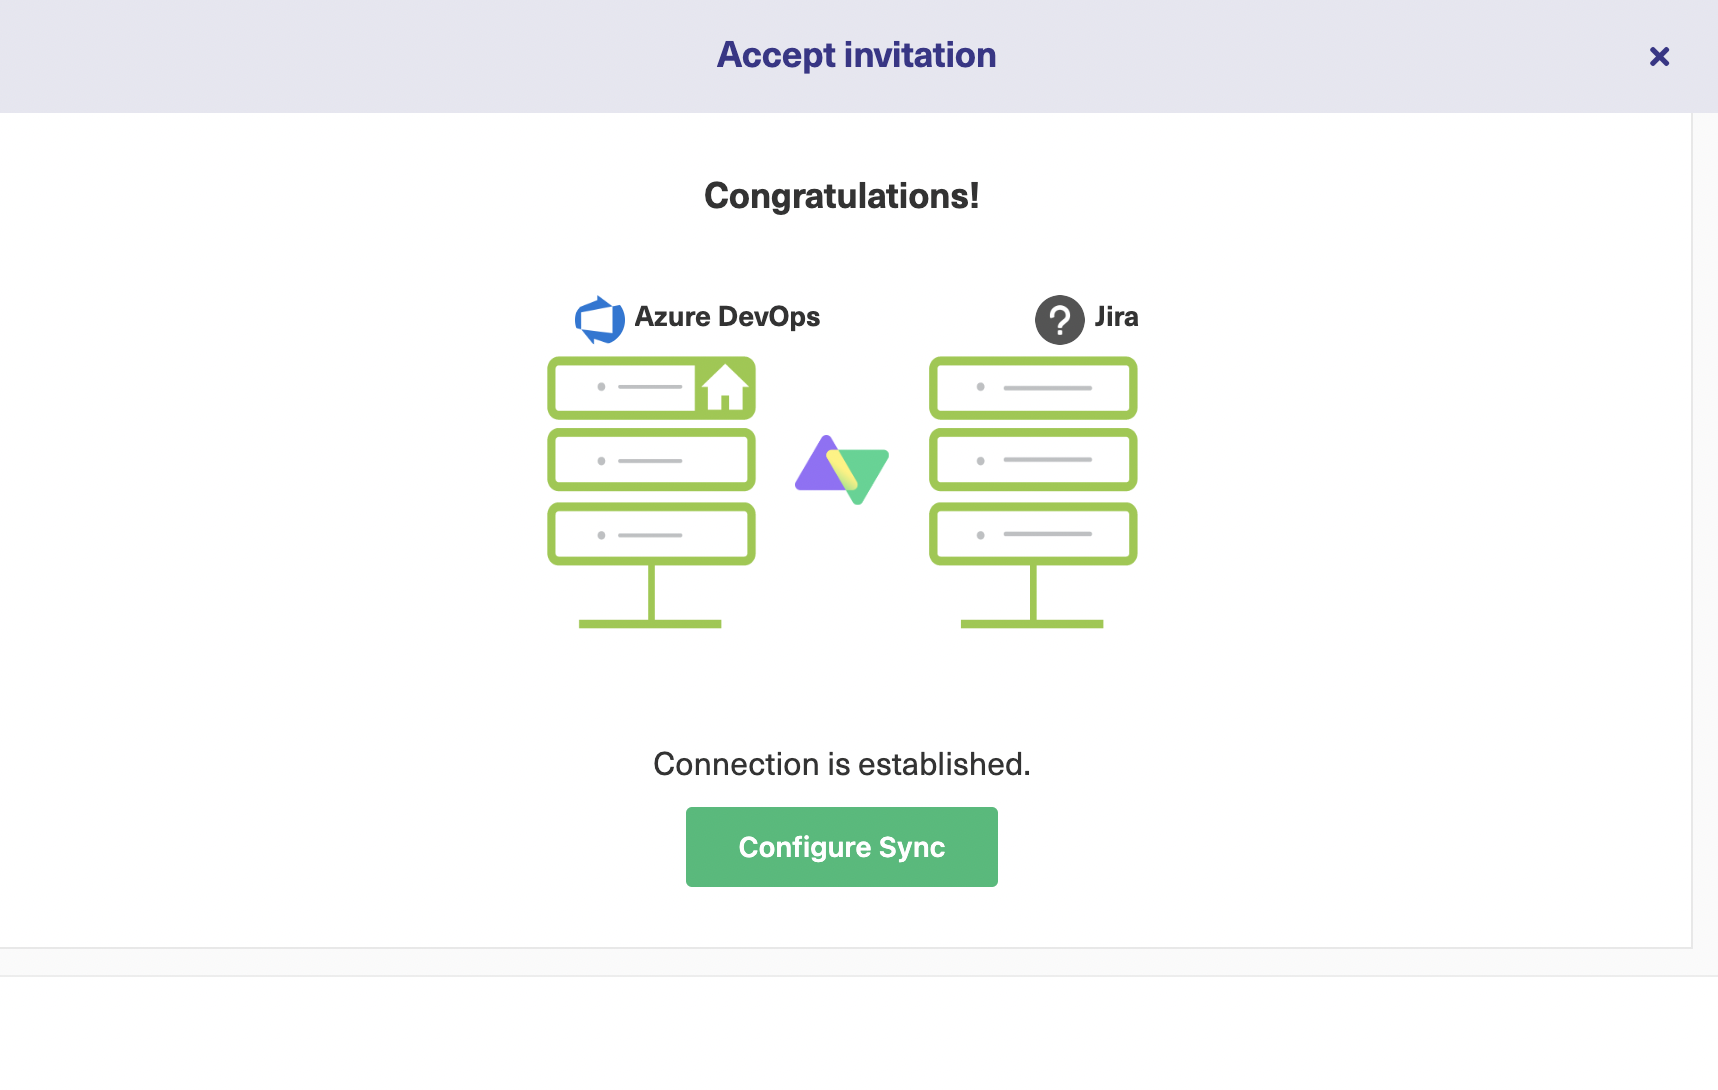
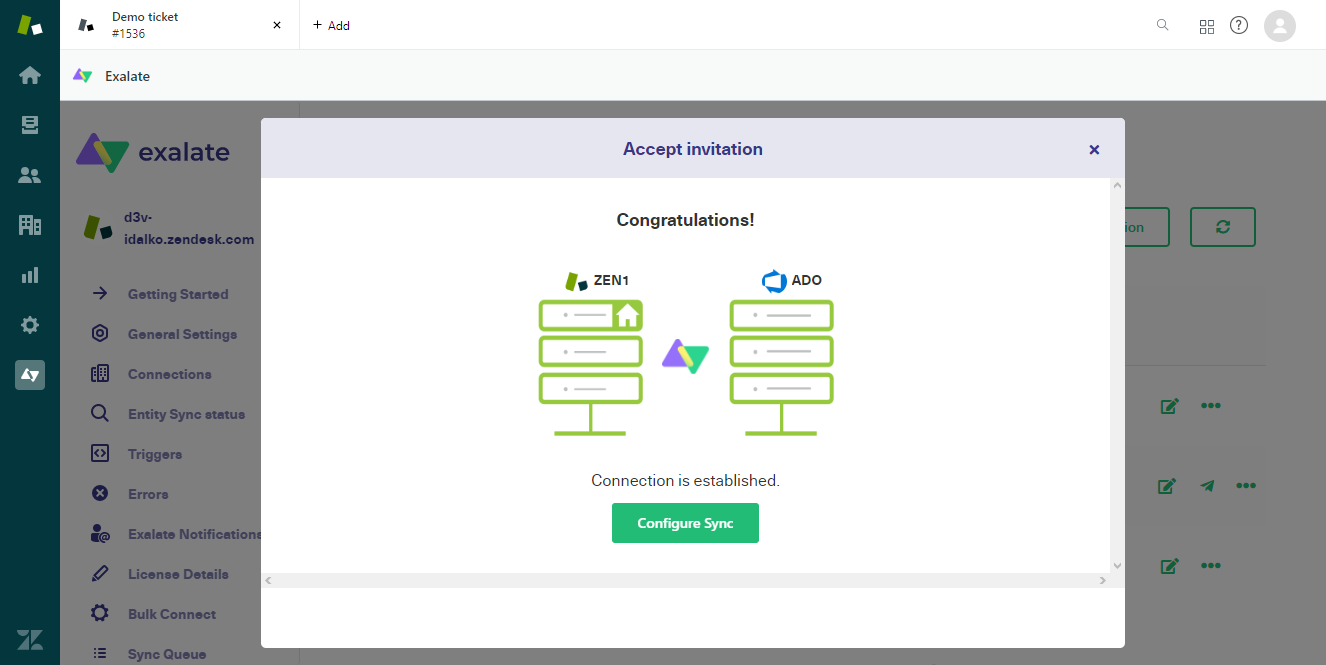
You can reach the configuration screen by clicking the “Configure Sync” button after the connection is established. Or you can even click the edit button on the connection list.
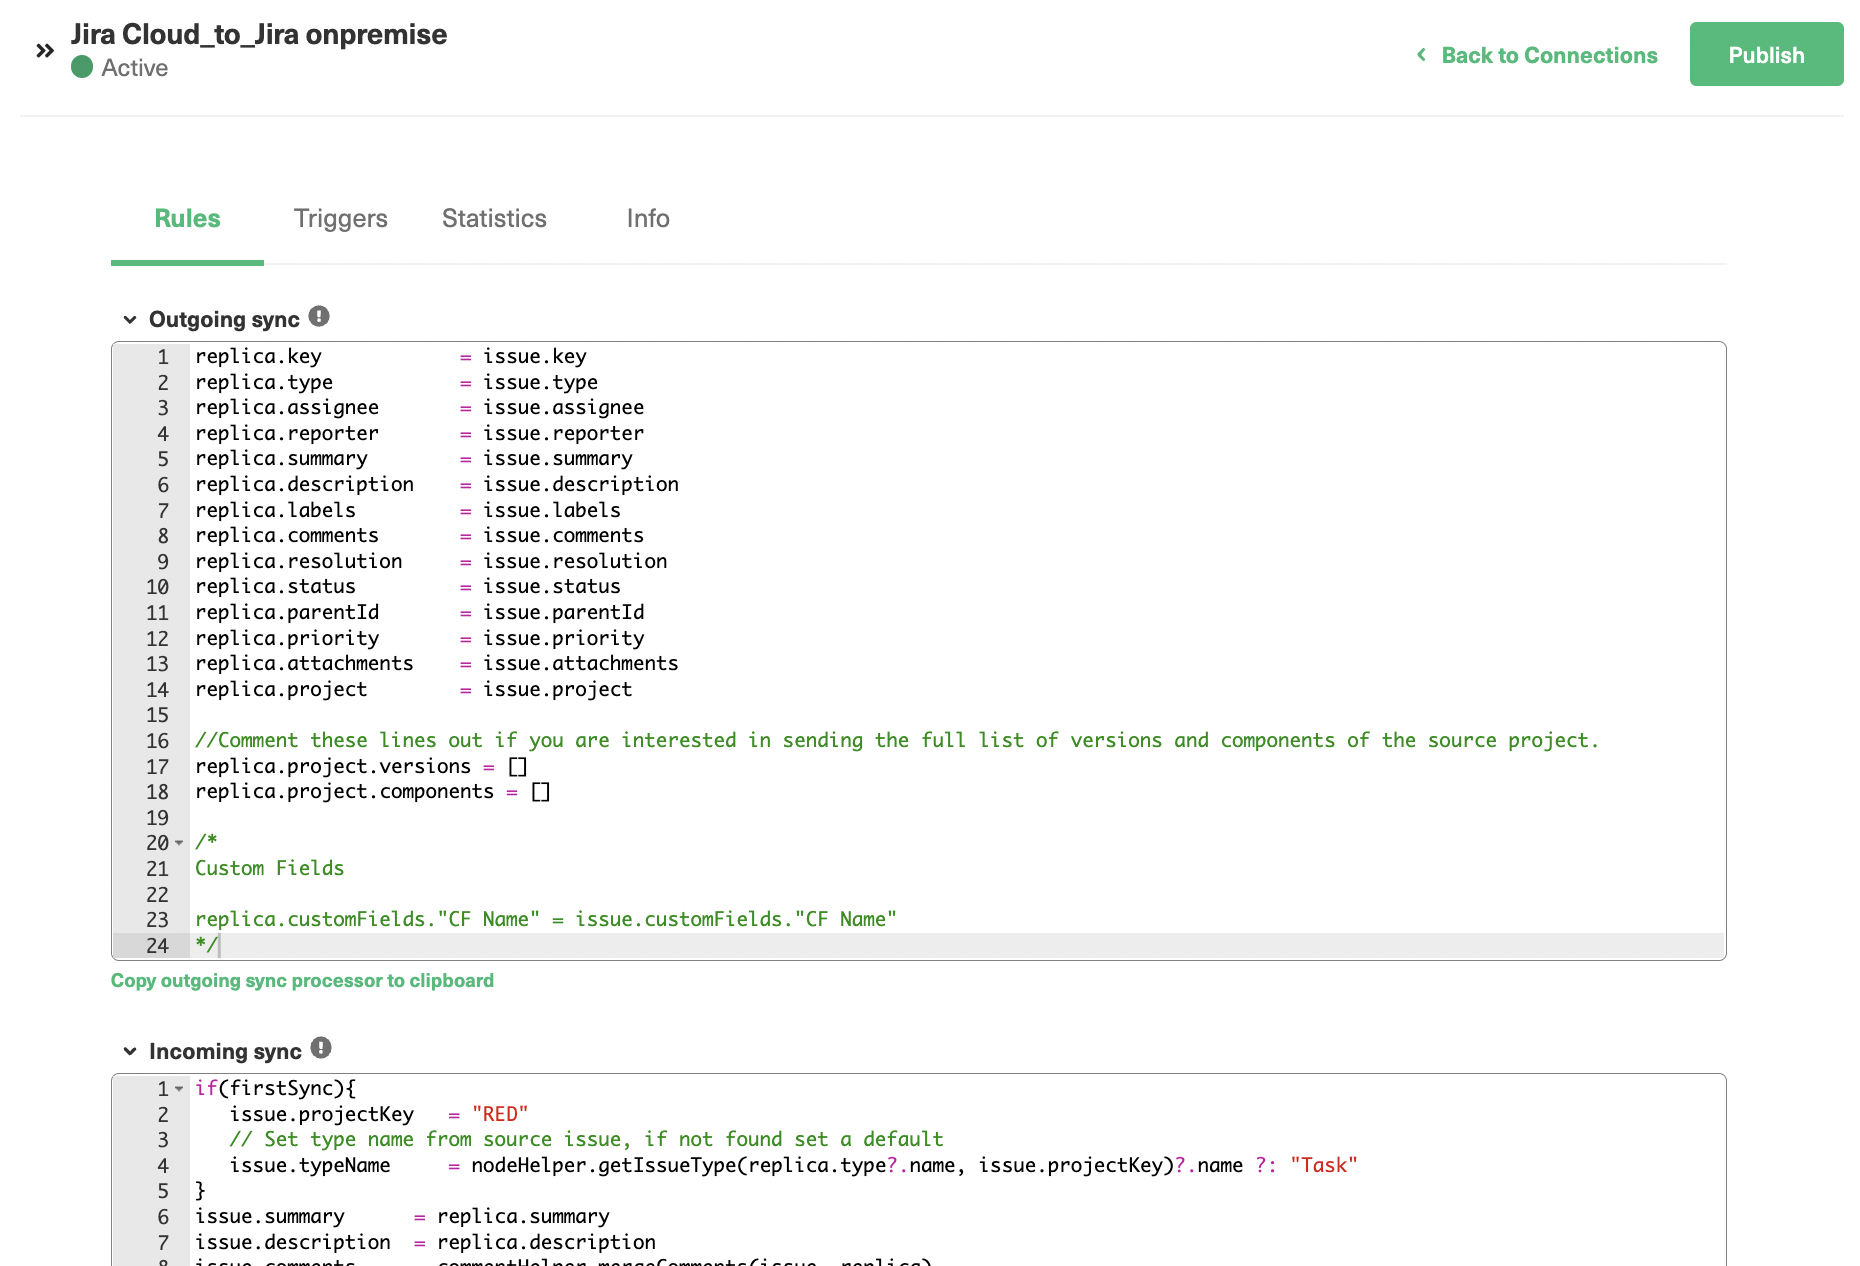
The sync rules (“Rules”) tab consists of the following two sections: the Incoming sync and the Outgoing sync.
In Jira Cloud:
The “Incoming sync” denotes information send from the Jira Cloud to Jira on-premise.
The “Outgoing sync” denotes how to interpret information coming from Jira on-premise.
These syncs exist on the Jira on-premise instance as well.
Scripts to Implement the Use Case
Let’s see how to can handle the situation when information goes from Jira Cloud to on-premise.
A regular expression finds comments having user mentions in them.
We replace the user mention with the email address of the corresponding user for each such comment.
To do this, we use the nodeHelper.getUser() method. So the replica sent to the on-premise instance contains the actual email address instead of the user mention.
Note: Replica in Exalate context is the payload used to transfer the required information between the two systems.
Once the information arrives at the on-premise instance, we perform a reverse process.
We deploy a regular expression to check whether an email address is present within the comment body.
If it is present, you can find the user account corresponding to the email address using the nodeHelper.getUserByEmail() method.
Then replace the email address with the username. This operation ensures that the on-premise format of the user mention is taken care of.
If the on-premise instance does not find the user, it replaces them with a custom message. This message can also state that the user mentioned on the source side does not have an associated account in the instance.
Now we’ll consider the use case in the other direction, from Jira on-premise to Jira cloud.
The logic remains the same; only the format of what we search for changes.
Once the replica arrives at the Jira Cloud instance, we deploy a regular expression to check whether an email address is present within the comment body.
Then the email address is finally replaced by the username.
We take care to maintain the cloud format of user mentions throughout the process
If the Jira cloud instance does not find the user, it replaces them with a custom message. This message can also state that the user mentioned on the source side does not have an associated account on this instance.
Conclusion
Exalate provides a powerful solution for synchronizing user mentions bi-directionally between Jira Cloud and Jira on-premise.
By following the steps outlined in this use case, you can ensure that team members can communicate and collaborate seamlessly, regardless of which Jira instance they are working in.
If you want to do more than sync user mentions, book a demo with Exalate engineers and see it in action!
Automated integration has become increasingly important in today’s digital landscape where organizations face an explosion of data like never before. Most of this data comes from the surge of purpose-built applications like CRMs, ERPs, proprietary systems, work management systems, and cloud or mobile-based applications.
Organizations opt to integrate these applications to address challenges posed by inaccessible information and growing software silos.
Automated integration can accelerate and simplify the process of integration.
In this blog post, we’ll explore it further and provide insights into how automation can streamline your integration process, reduce errors, and improve efficiency.
We’ll also discuss a practical plan for automated integration and deliberate on different solutions available in the market.
So let’s get started.
An Introduction to Automated Integration
Businesses strive to accelerate service delivery and enhance customer experience. At the same time, various software applications have penetrated the deepest levels of daily business conduct, mass-producing data.
Project management software, MAS (marketing automation software), ERPs (Enterprise resource planning), supply chain management tools, and accounting solutions are present everywhere.
Businesses adopt integration and collaboration practices to manage the large volume of data these applications generate and prevent team silos.
But with technology developing at the speed of light, they desire to speed up all processes. So they want faster integration, quicker collaboration, error-free operations, and automation of daily tasks.
Automating the integration process is the solution to this need. And to automate an integration, organizations often look for cutting-edge technologies.
Also, technology has evolved to meet the changing needs of businesses, offering more adaptable and innovative solutions, such as cloud or mobile services and AI (artificial intelligence). So adopting the conventional ways of ETL and ESB for automating the integration doesn’t always cut it.
Let’s dig into this a little more.
The Journey of Automated Integration: How It Began
The need for automation in integration isn’t a recent development.
In the past, businesses achieved integration, but only within a limited scope. It was typically about connecting a few departments like customer success, support, HR, ITSM, etc.
The basis of integration was extracting information from the source system, modifying the format and structure, and placing it in the target system.
They either hand-coded the integration or used tools like ETL (Extract-Transform-Load) and ESB (Enterprise Service Bus).
However, the ETL approach was inefficient, complex, not scalable, and cumbersome to manage. It also lacked standardization. On the other hand, ESB wasn’t suitable for modern applications based on IoT, cloud, or mobile technologies. So this led to a need for modern solutions.
Modern Integration Requirements
Modern integration demands the following:
Implementing bi-directional advanced integration scenarios and not simple data transfer from one system to another. For instance, orchestrating a complex workflow between 2 applications that simplifies team collaboration. It allows each team member to continue using their application and follow their established workflow, eliminating the need to switch to the other team’s workflow.
Rolling out integrations within a shorter time frame, days and weeks rather than months.
Enhancing scalability, reliability, and flexibility of integrations to adapt to changing business needs.
Ensuring business drives the integration and not the other way around.
Ensuring integrations adhere to stringent and current security requirements, including GDPR and other applicable regulations.
Automated Integration Use cases
Curious to know what automated integration will look like in practice? Let’s explore a few use cases to illustrate the points we have made above.
Automatically importing customer data from a website into a CRM system for sales and marketing purposes.
Automating the process of passing customer orders from an e-commerce platform to a shipping and fulfillment system.
Integrating financial software systems to automate the reconciliation of transactions across multiple accounts.
Automatically creating and updating project tasks and timelines across different project management tools.
Judging by the vast applications of automated integration, it’s important to see how the technological approach differs for every scenario.
Types of Automated Integration
Classifying automated integrations can be challenging due to significant overlaps between the categories.
Nonetheless, we have attempted to provide the most effective categorization.
Automated API Integration
Automated API integration involves using Application Programming Interfaces (APIs) to connect different software applications and automate data transfer between them. With his approach, you can connect any software or service, be it 3rd-party or in-house, with an API.
Automated Application Integration
Automated application-to-application (A2A) integration can connect different applications and enable them to communicate and share data.
You can implement this integration by consolidating software applications and their subsystems into an integrated business environment, for instance, a unified interface to link ERPs, finance and accounting, HR, inventory management, etc.
Automated Business Process Integration
Automated business-to-business (B2B) process integration automates complex business workflows end-to-end, optimizing efficiency and productivity along the way. It helps companies connect with their suppliers, vendors, or partners.
For instance, you can connect an e-commerce application and shipping software to exchange information automatically with an inventory management solution.
Automated Data Integration
Automated data integration involves integrating databases, data warehouses, or data lakes to automate data transfer and synchronization across different systems. It can also include modifying data from one format to another or accessing it from a unified UI.
You will be able to achieve better decision-making and business outcomes if your data becomes the single source of truth.
Automated data integration can also involve connecting different devices and sensors to automate data collection and transfer.
Let’s now understand how automated integration can be put into action!
The Process of Automating an Integration
Automating an integration is a complex process. It requires planning the minutest details to make it successful. It’s time to study how you can implement an automated integration.
Generally, it is advisable to follow a plan. Here’s what it can actually look like:
Start with an integration strategy. Identify the data mappings, transformations, and events to initiate data exchange. Engage appropriate stakeholders from the outset to prevent changes later in the project.
Choose the correct integration solution. You need a robust, reliable, and scalable solution to manage the thriving data arriving at high speed from diverse channels in varying volumes. We will delve into details on this one in the next section.
Use a modular approach to integrate such that data mapping and transformation rules are implemented one component at a time. Conduct a PoC (proof of concept) to verify the feasibility or potential of the integration solution.
Deploy the integration in production, where it can run automatically and continuously.
Test the automation against multiple integration scenarios to ensure it works as expected and meets the desired performance criteria.
Finally, maintain the automated integration to keep it running smoothly and adapt to any downtimes or changes in the system.
We saw why it’s not feasible to automate an integration manually or with outdated techniques such as ESB or ETL, so businesses opt for other modern solutions.
These solutions adapt to emerging IT trends in the most scalable and flexible manner.
Let’s explore them in the next section.
Automate Your Integration with Solutions
The right automated integration tool enables the business to deliver integration as demanded.
They exist in the following forms:
Middleware Platforms
Middleware platforms offer a range of tools and services that facilitate data transformation, aggregation, mapping, syncing, and routing.
They also ensure the security, monitoring, and management of the integration. They support multiple integration patterns like point-to-point, hub-and-spoke, publish-subscribe, and event-driven architectures.
Some popular middleware platforms for automated integration include MuleSoft, Apache Kafka, and IBM Integration Bus.
They might require an upfront investment in hardware, licensing, and maintenance but provide greater security and control over data integration and processes.
Integration (Platform) as a Service)
IaaS (Integration as a service) or iPaaS (Integration platform as a service) is a cloud-based software offering that provides pre-built connectors, templates, and workflows to help integrate different software applications and services, regardless of their location or technology stack.
They offer a range of integration scenarios, such as application-to-application (A2A), business-to-business (B2B), and data integration. They can include features like data mapping and transformation, API management, data routing, event-driven workflows, and data governance.
They provide a higher level of agility as they can quickly adapt to changing business requirements. For instance, Exalate, an IaaS solution, provides an intuitive scripting interface for complex integration scenarios but also has a visual UI that supports pre-built integration templates.
Exalate also provides an AI-powered Script mode, known as AI Assist, that allows users to create custom scripts for advanced integration scenarios.
Some examples of popular iPaaS or IaaS solutions include Dell Boomi, Exalate, Jitterbit, and Microsoft Azure Integration Services.
API Gateways
API gateways automate integration for software components that act as a front-end interface for managing and securing access to different APIs.
They provide API versioning and documentation for consistency and clarity in API interfaces, traffic management capabilities, authentication and authorization if required, analytics, and monitoring to track usage patterns and detect anomalies.
Some examples of popular API gateway solutions for automated integration include Amazon API Gateway, Google Cloud Endpoints, and Microsoft Azure API Management.
Automated integration solutions can be a game changer for your business needs. Data from Statista shows that the spending on digital transformation services will exceed 3.4 trillion USD by 2026.
Now is a good time to see how integration solutions can transform the digital roadmap of your organization.
How Automated Integration Solutions Can Simplify Your Work
Here’s a summary of the key benefits of automating via integration solutions:
It enables organizational agility in a rapidly evolving world where a singular approach to integration is no longer viable. Automated integration tools can handle various integration styles and target multiple stakeholders.
It accelerates the integration delivery speed since they are experts and might have done it a thousand times already.
It boosts the integration quality. Robust automated integration solutions can provide optimizations and constant feedback to improve the quality of your integration.
And it enables the data to be secured and protected in transit and at rest. It also meets other GDPR and the latest security and integrity requirements easily.
Conclusion
By now, you’ll have realized there is more to automated integrations than you think.
It helps you connect with modern-day applications in a simplified manner and automate your daily business processes. So you are left hassle-free to continue doing what matters to your business.
Automated integrations can optimize your resources and put them to better use, expand the reach of information, and simplify cooperation between teams. A well-chalked-out process for automated integrations can bring all these benefits together and help you achieve more positive outcomes.
And soon enough, automated integration solutions become an integral part of your business ecosystem.
APIs (Application Programming Interfaces) are everywhere in today’s digital landscape. We tend to interact with them without even realizing it. For instance, every time we check – the weather or book a flight ticket, we use them behind the scenes. But have you ever wondered how these APIs talk to each other? That’s where API integration comes in.
A common conundrum associated with API integration is the challenge to integrate unique APIs with different data formats and structures. It becomes trickier when businesses evolve in size and need to connect with newer ones.
How then can compatibility and consistency be ensured across integrations, particularly with frequent updates to APIs?
Read on to learn more about API integration, its benefits for businesses, common use cases, selecting the appropriate integration solution, and what an implementation would entail.
An Introduction to API Integration
API integration is vital to businesses today. Chances are, if you have used a 3rd-party application or service, you have already experienced API integration in action.
But before we go any further, let’s take a step back and understand what APIs are in the first place.
Demystifying APIs
During my decade-long career as a software developer, I have frequently encountered the need to explain the concept of APIs to individuals without a technical background. I have come to appreciate the following analogy:
When operating a vehicle, the primary concern is driving. You might not always be well-versed in the intricacies of the engine or the components at play. As a result, any unnecessary information is concealed while you only focus on the task at hand.
The illustration highlights the programming concept of abstraction, where details are concealed to present only the most pertinent information to the driver.
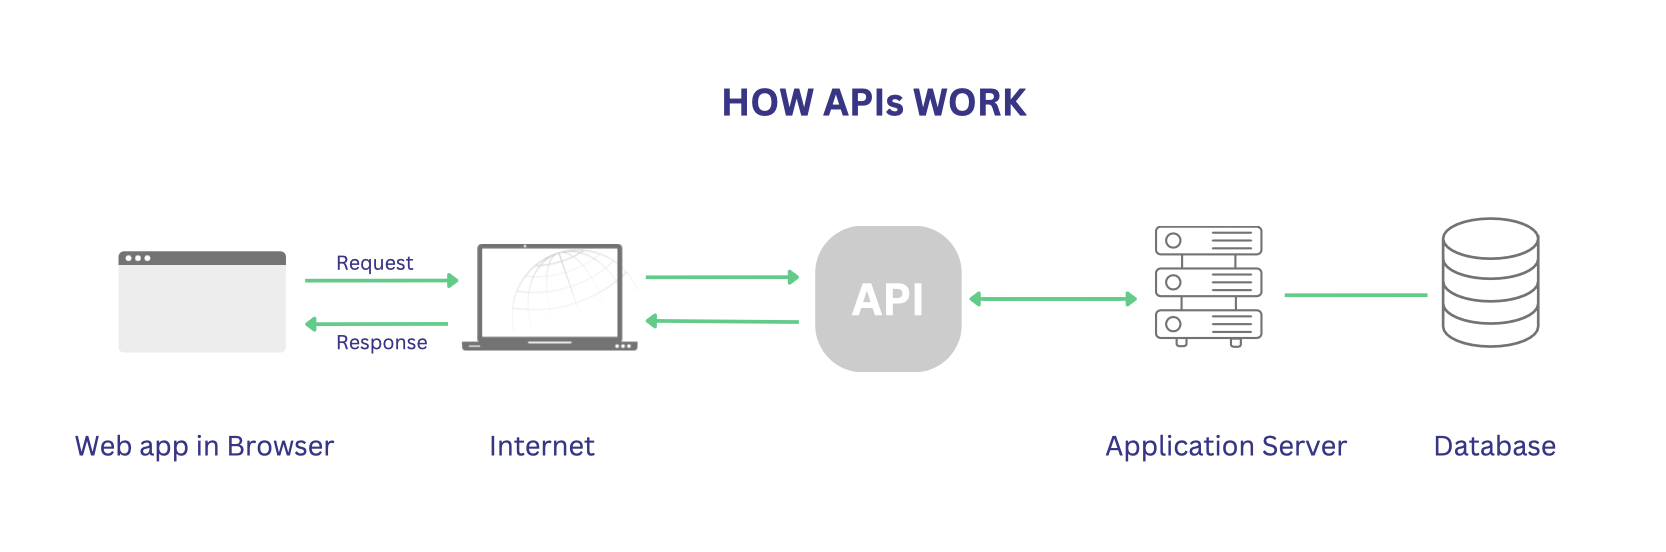
APIs provide an abstraction layer for software applications, providing subroutines, protocols, and tools necessary for their development.
They also set rules for how applications and database servers interact with each other through a request/ response mechanism.
But just like with friends, you have to speak the same language! So you must send a request in a format that the API can understand. If not, it will kindly let you know with an error message.
They are platform-independent. So you can fetch any information from an application without worrying about your technology stack.
APIs offer endpoints. These are URLs you can use to refer to the exposed data.
To maintain security, sometimes APIs may require authentication.
Note: REST (Representational State Transfer) APIs are the most popular architectural style for web-based applications. There are also others like SOAP (Simple Object Access Protocol) and RPC (Remote Procedure Call), not so common.
Many software vendors or providers offer public (or open) APIs that developers can use to access software applications or web services.
But how to connect these APIs that have different formats and structures? How can you innovate faster with APIs? How to ensure communication between proprietary applications reaches new levels of service delivery and achieves flexibility in information exchange?
API integration plays a crucial role in this context.
What is API Integration
Businesses use a lot of applications – SaaS, custom-built, legacy, ERPs, CRMs, etc. Teams using these applications will benefit from working together.
The development team can benefit from input from the support teams. Or they might want to collaborate with the marketing team to create better marketing campaigns.
API integration is the process of connecting multiple APIs. It enables the transfer and synchronization of information for a successful business operation or informed decision-making.
Additionally, it can transform data between two application APIs while maintaining data integrity.
Think about an e-commerce website that automatically integrates with a shipping carrier’s API, calculates shipping rates, and generates shipping labels. The integration can streamline the order fulfillment process and ensure accurate and timely delivery information.
If teams leverage the power of APIs, they can create integrations that are more scalable, flexible, and adaptable to business needs.
Still curious about API integration? Let’s explore this further.
Common API Integration Use Cases
Here are some typical examples of API integration in action.
Payment Gateway Integration
Payment gateway integrations can enable secure verification of credit or debit card details. It can also perform other necessary authentications within your application. Rather than building all this from scratch, you utilize readily available APIs.
Automating the Software Development Workflow
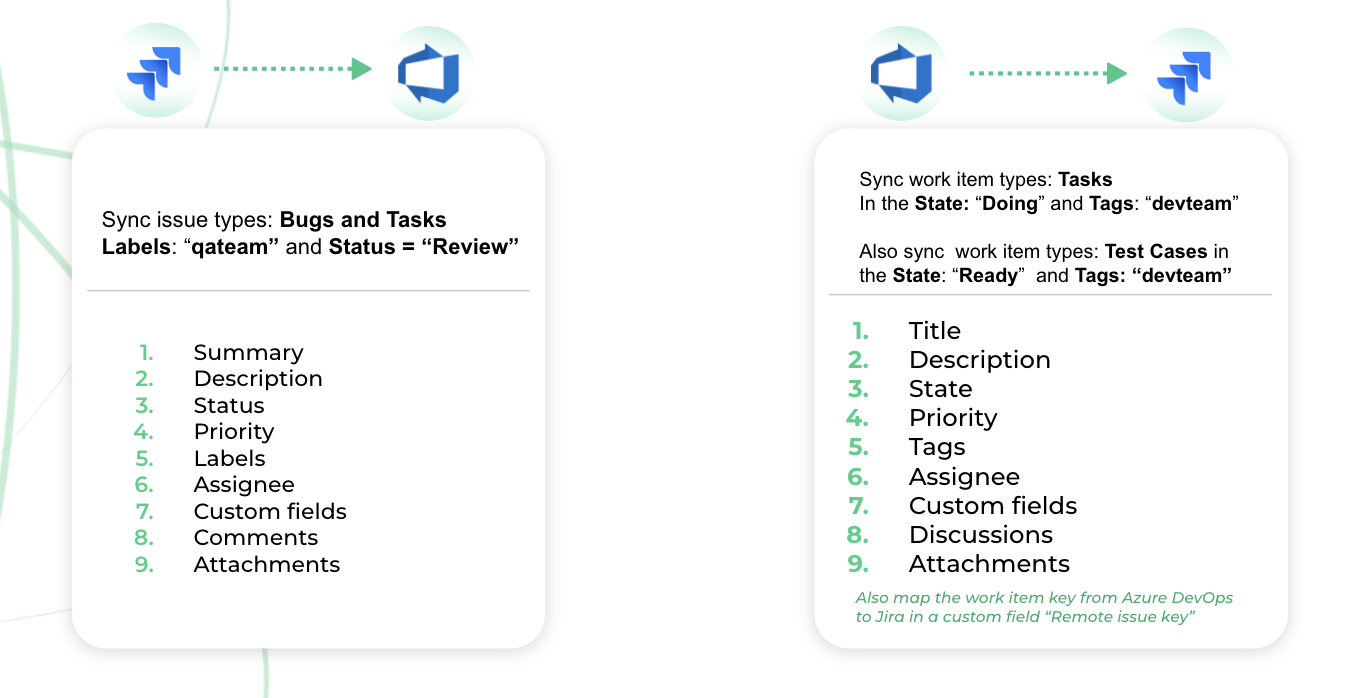
Software development can be a complex process. The developers might need to send issues from Jira (a tool they use) to the QA team for testing, who might use a different tool, like Azure DevOps. Statuses need to be updated automatically when any team makes a transition.
Additionally, they may want to simplify access to the application for the front-end developers without in-depth knowledge of the code.
An API integration can automate the software development process by accessing the APIs, automating tasks, or creating new ones to assist team members.
Connecting with a CRM to Enhance Customer Experience
Salesforce (a CRM) is used to manage customer data and interactions.
Imagine fetching customer details and creating records automatically in your ERP system (e.g. Netsuite) in real time. Further automating this based on preset conditions, for instance, an Opportunity State turns “Won”.
API integration allows you to put down manual, repetitive tasks and help avoid mistakes that accompany them.
To put this into perspective, it can
improve team efficiency since they no longer have to dedicate their productive work hours to copy-pasting or toggling between applications.
optimize collaboration and communication across teams by connecting diverse APIs to perform a joint function.
enhance reporting and analysis by extracting relevant data from the desired application. For example, you can use ZenRows’ scraping APIs for that purpose.
elevate service quality and delivery levels by understanding the needs and expectations of customers. It can help identify areas of improvement, such as response times, communication channels, or product offerings.
maximize the flexibility of information sharing by integrating APIs into applications and deciding what data to receive or how to manipulate it.
Ready to take your data to the next level? Let’s implement an API integration.
How to Implement an API Integration
Implementing an integration is easier than you think. Is it? Think again.
API Integration Process
In API integration, data is pushed and pulled between applications automatically instead of manually.
So it adds three layers to the APIs you want to integrate:
Abstraction
Automation
Transformation
This is done such that data is
exchanged based on the conditions you specify (uni or bi-directionally).
updated or created anew when something changes in one of the applications.
transformed from one format to another.
There are various ways to integrate APIs, some native, some smart, and others outright complex.
It eventually boils down to your business requirements.
Let’s look at some common ways businesses achieve API integration.
Custom-code to Build an API Integration
So you want to create a custom-made integration for your business. Possible? Yes. Feasible? Not so much.
Firstly, you must create the entire integration layer and then provide automation for exchanging information. It means manual hand-written code for transforming, consolidating, refining, and transferring data from diverse sources or applications. This can take weeks or sometimes months to complete. It also wastes a lot of productive development time and resources.
Secondly, consider that each application has its own set of REST APIs. Developers must ensure that they appropriately map, store, capture, and use different data formats.
Thirdly, you need to maintain the integration yourself – manage the APIs, handle downtimes and errors, enable reporting and monitoring, and spend time nurturing it to ensure it works as expected.
Technology develops at the speed of lightning. So does the advancement in the integration construct.
Instead of writing the code yourself, would you prefer someone already did that for you? You can just choose what to send or receive.
In the upcoming section, we discuss 2 other options to get the ball rolling.
Fundamentally, these methods are the same, albeit with a few subtle differences.
Using Native API Integration Capabilities
Lately, software vendors have acknowledged the need for integration.
So, a lot of commercially renowned platforms provide predefined native integrations. These work as middleware that handles the needs of small and large businesses alike.
For instance, with a simple drag-and-drop interface, you can easily integrate popular applications like Jira, Salesforce, Zendesk, ServiceNow, etc.
These native tools connect applications in a point-to-point manner, effectively handling all the complex details for you.
They invoke the necessary APIs. The data is accessed, aggregated, updated, transformed, or exchanged. Therefore, an automation and abstraction layer is in place to facilitate these API calls.
You get an interface to develop your integration flow and decide what data you want to exchange and how you want to exchange it.
But there is also a flip side to this. Native API integrations are often limited in the functionality they offer. For instance, they are perfect if you only need to send data in a single direction, from one system to another, but not for complex bi-directional workflow orchestrations. Moreover, it is difficult to incorporate any changes in your integration requirements. Sometimes, even a small change can mean you must edit the entire flow.
Third-party integration tools are the preferred and widely accepted approach to integrating APIs, as they eliminate the need to write code from scratch or constrain your integration options.
Integrating with 3rd-Party API Integration Solutions
Before we examine this further, let’s see why a 3rd-party API integration platform can help you reach maximum integration potential.
These tools have the following significant features:
They provide pre-built integration templates for various applications but also allow custom integrations.
They handle multiple data types (JSON, XML, etc) and simplify data mapping, eliminating concerns about data formats and architectures.
They offer various functions for transforming, consolidating, syncing, mapping, and updating data from APIs.
They support advanced conditional logic and complex mappings for flexible data exchange.
They offer a comprehensive API integration and management solution that ensures scalability, data integrity, and automation across your entire technology stack.
They handle security or other GDPR considerations for data exchange.
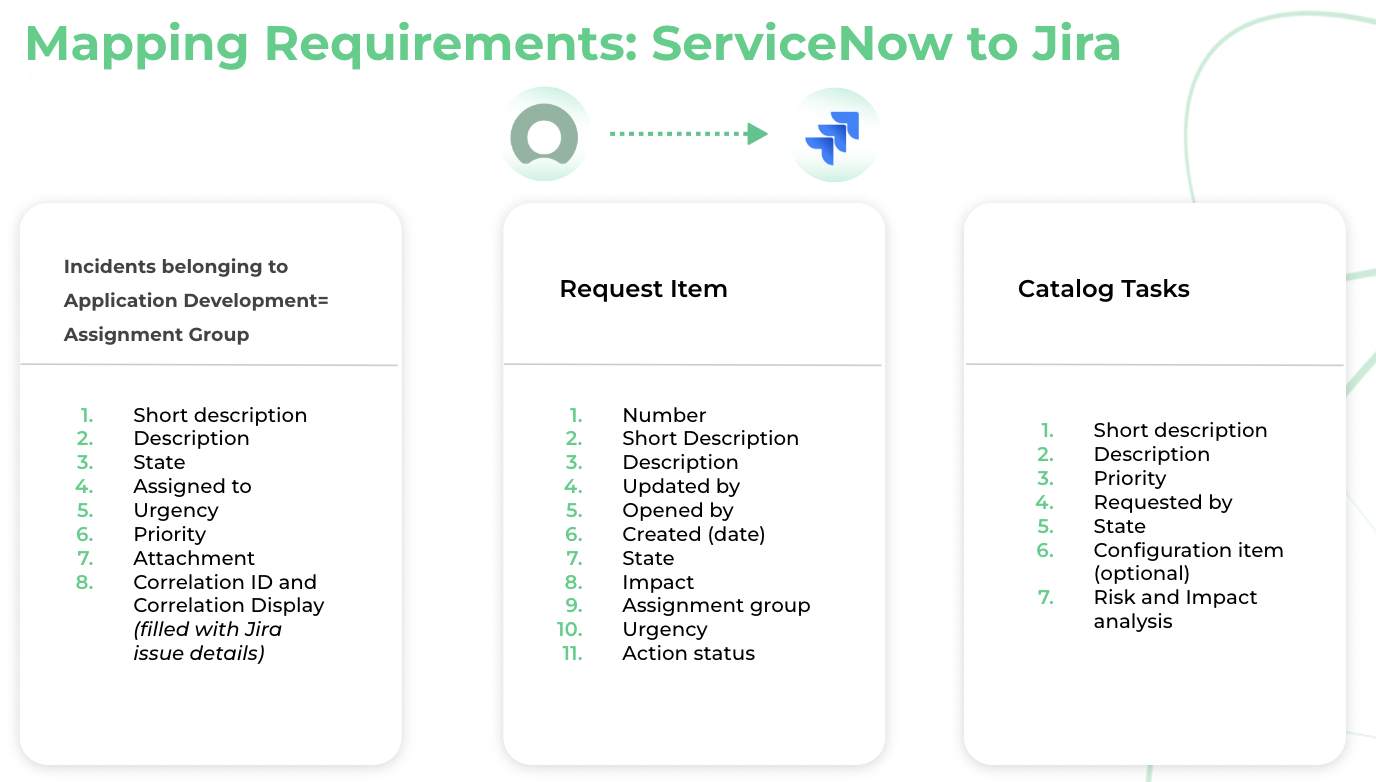
Using these tools, you can easily implement the following information flow requirements from ServiceNow to Jira:
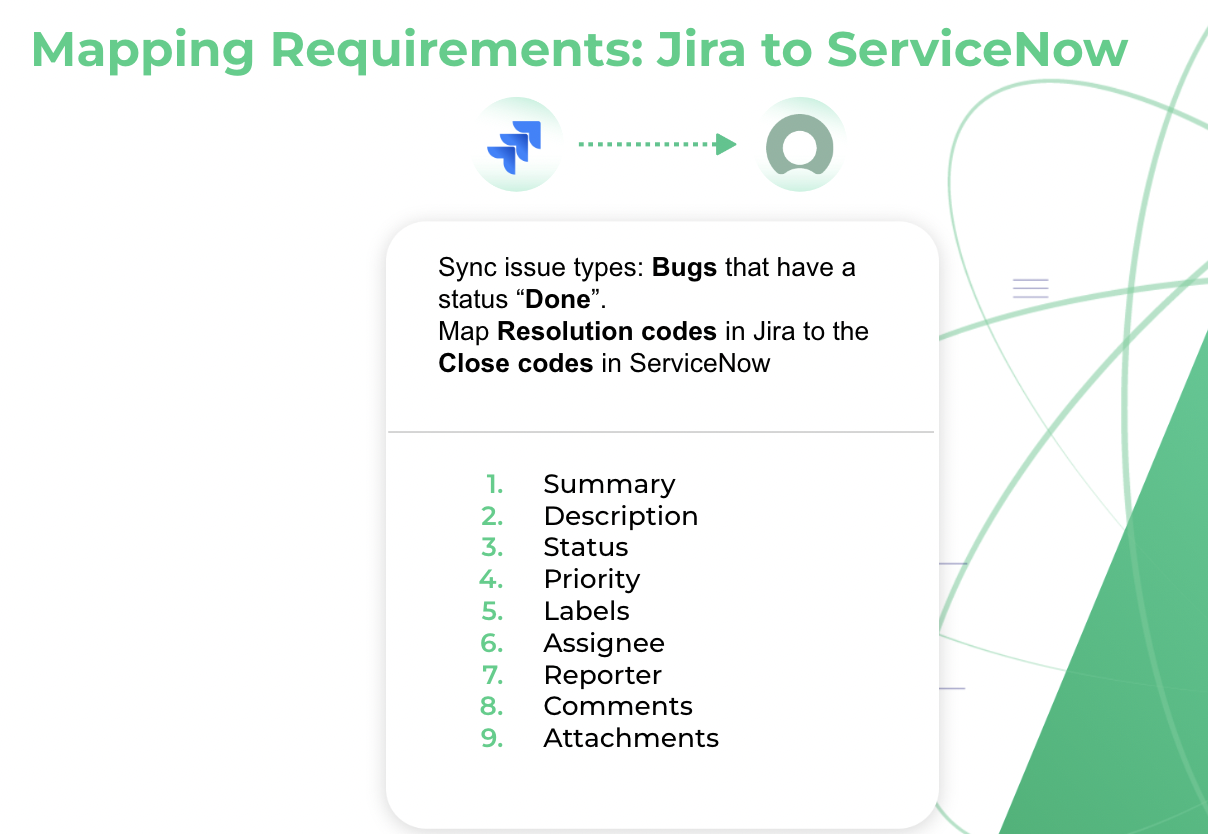
And have an entirely new set of requirements for information flow from Jira to ServiceNow.
As evident, most integration solutions perform the same basic function, and numerous options are available in the market. However, by asking the right questions and selecting a solution that aligns with your specific integration needs, you can reach a decision.
API Integration Tools: Key Questions to Ask
Almost there!
Honestly, there isn’t a right or wrong choice.
It all depends on a few questions you may ask.
What does the solution primarily do? Is it automation, synchronization, transformation, or real-time data streaming?
How does the tool ensure security measures are in place?
What is the pricing model for the API integration service it offers? Is it connector-based with an adaptive price model or a flat rate for unlimited integrations?
How does the tool handle monitoring and alerts? What happens in case of downtimes or errors? Does the tool crash or resume automatically without manual intervention?
Does the tool handle advanced API-based data integration requirements with ease? Does it offer a diverse range of use cases while reducing implementation efforts?
Is the tool future-proof and flexible enough to accommodate inevitable changes in an integration requirement?
And the final question remains. How do I know the right one?
Choosing the Right API Integration Solution for Your Needs
API automation platforms like Zapier, a flow-based solution, are designed to automate repetitive tasks, saving time and increasing efficiency. It can trigger an action in one application based on an event in another application.
But it’s not suitable for ongoing bi-directional API integrations between applications. Also, after a point, its flows are limited, inflexible, and time-consuming to maintain.
Exalate is an API integration solution with a built-in scripting engine.
It can perform the following tasks:
Abstract, automate, transform, and manage the underlying APIs.
Allow users to implement complex integration use cases without constantly focusing on the API structure.
Offer two modes: a no-code mode and a script mode, making it accessible for both technical and non-technical teams.
Provides the option to offload your entire integration hassle to us with the integration as a service offering.
Exalate provides a Script mode that uses AI-powered algorithms in a chatbot to generate scripts and field mappings, which can be used for complex configurations.
A scalable and adaptable integration solution handles a variety of use cases. It is also flexible enough to adapt to changing future business needs and technology. Such solutions can minimize the implementation effort and maintenance.
Exalate strives to achieve this intricate balance.
Honestly, there isn’t a one-size-fits-all answer to the question. There are always solutions that work the best for particular requirements and ones that don’t.
The questions we posed may serve as a useful starting point, but there is still much more to be accomplished.
The integration of an API is a project on its own, encompassing all necessary stages from planning and requirement gathering to implementation and ongoing maintenance.
Conclusion
As technology evolves, APIs will play a crucial role in shaping the future of software development.
In this blog post, we saw how integrating APIs can bring significant benefits like – improved user experience and reduced development cost and effort.
However, successful integration requires careful planning and consideration of factors such as API compatibility, security, and scalability.
We discussed how API integration solutions leverage these APIs and can set up advanced integrations in a simple and flexible manner. They can help you stay ahead of the curve and build applications of tomorrow.
Frequently Asked Questions
What is an API?
API stands for “Application Programming Interface.” It is a set of rules and protocols that allows different software applications to communicate and interact with each other, enabling them to access and exchange data or functionalities.
What is API integration?
API integration is the process of connecting and enabling communication between different software systems or applications using their APIs, allowing them to share data and functionalities seamlessly.
Why should I integrate APIs?
Integrating APIs allows you to leverage the capabilities of other software systems, access valuable data, and extend functionalities, resulting in improved efficiency, enhanced user experiences, and the ability to create innovative solutions faster and more cost-effectively.
What are API integration examples?
API integration examples include:
Integrating payment gateways into an e-commerce website to process transactions securely.
Integrating Google Maps API to display location-based information on a website or application.
Connecting CRM APIs with marketing automation tools for seamless data synchronization.
Integrating messaging APIs to enable real-time communication between users in an application.
Automating the software development workflow across multiple applications like Jira, Azure DevOps, etc.
How to implement API integration?
You can implement an API integration either by custom building an API integration in-house or by using native API connector applications. However, both these approaches lack customization, scalability, and flexibility. Integrating with third-party integration solutions like Exalate can help you reach maximum integration excellence while still maintaining the required flexibility and scalability.
Data is the driving force behind the success of every organization. That’s why companies in several industries are looking for advanced data management and integration solutions (along with models like Integration as a Service) to collect, store, manage, and analyze as much information as possible.
But here is the problem: these data management platforms are usually not interoperable. You can’t exchange data between them without an integration solution. And this leads to information silos emerging between internal and external teams.
Companies now explore the (IaaS) Integration as a Service model for transferring data, comments, files, and other assets to address this problem.
Let’s explore the definition of Integration as a Service as well as the attributes, benefits, and challenges of using this delivery model.
What is Integration as a Service (IaaS)?
The definition of integration as a service varies depending on who you ask. But, the overall consensus is that Integration as a Service (IaaS, not to be confused with IPaaS) is a solution delivery model that integrates data across multiple data management systems.
Instead of approaching integration as a standalone part of data management, companies can now get the integration solution in one package (as a service). This means that users only need to download and install the integration software, while the supplier handles the security, maintenance, and functionality.
IaaS vs. IPaaS: What is The Difference?
As mentioned earlier, people usually confuse IaaS with IPaaS. But the differences are clear.
For starters, IaaS means “Integration as a Service” while IPaaS means “Integration Platform as a Service”. Let’s break it down further.
Under the IPaaS model, you get access to an IDE for building and maintaining the integration solution on your own, completely autonomous of the vendor. However, you will need in-house developers to build, configure, and maintain massive code bases for the integration to work.
Conversely, the IaaS model gives you access to a ready-made solution for integration between different systems. The only thing you need to do is configure the solution to meet your specific needs. For simpler integrations, you might not even need to write any code to get things started.
Overall, IPaaS gives you more control over what you can build, but it introduces additional responsibilities for coding and maintaining anything you create. But with an IaaS solution, you don’t need to bother yourself with maintenance because the vendor handles that side.
Common IaaS Implementation Models
IaaS solutions are cloud-based services that usually come as pre-built connectors like Zapier, Microsoft Power Automate, and Exalate.
They come in the following forms:
Cloud-based integration platforms: These IaaS tools have a suite of features and pre-built connectors for standard applications and services. You can use these tools to integrate several systems without writing custom code.
Integration middleware: This IaaS model provides an abstraction layer that allows communication between different systems. Under this IaaS framework, organizations can use the middleware as a buffer for protecting the central architecture from exposure.
API-based Integration: This model uses application programming interfaces (APIs) to establish interactions between different systems.
Data integration: With this IaaS model, companies can access advanced data transfer protocols for secure transmission. The features available in this model include data warehousing, ETL (Extract, Transform, Load) processes, and real-time data streaming.
How Does Integration as a Service Work?
To understand how IaaS works, let’s examine this Integration as a Service example.
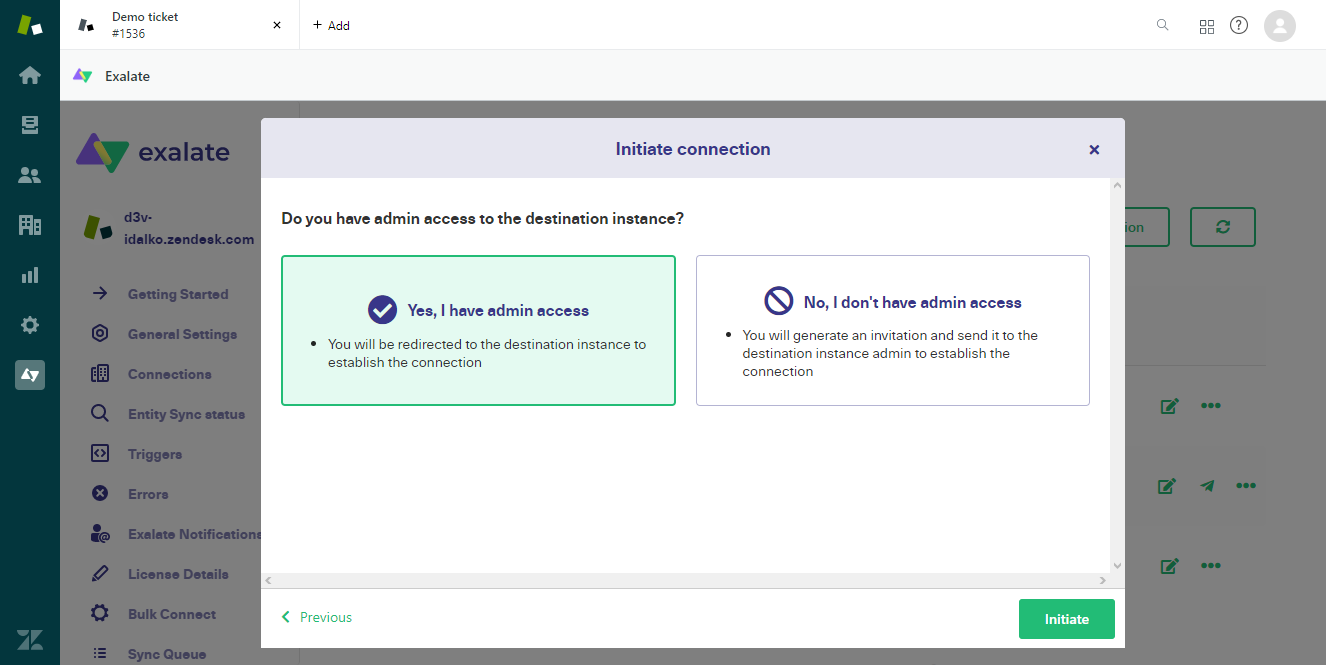
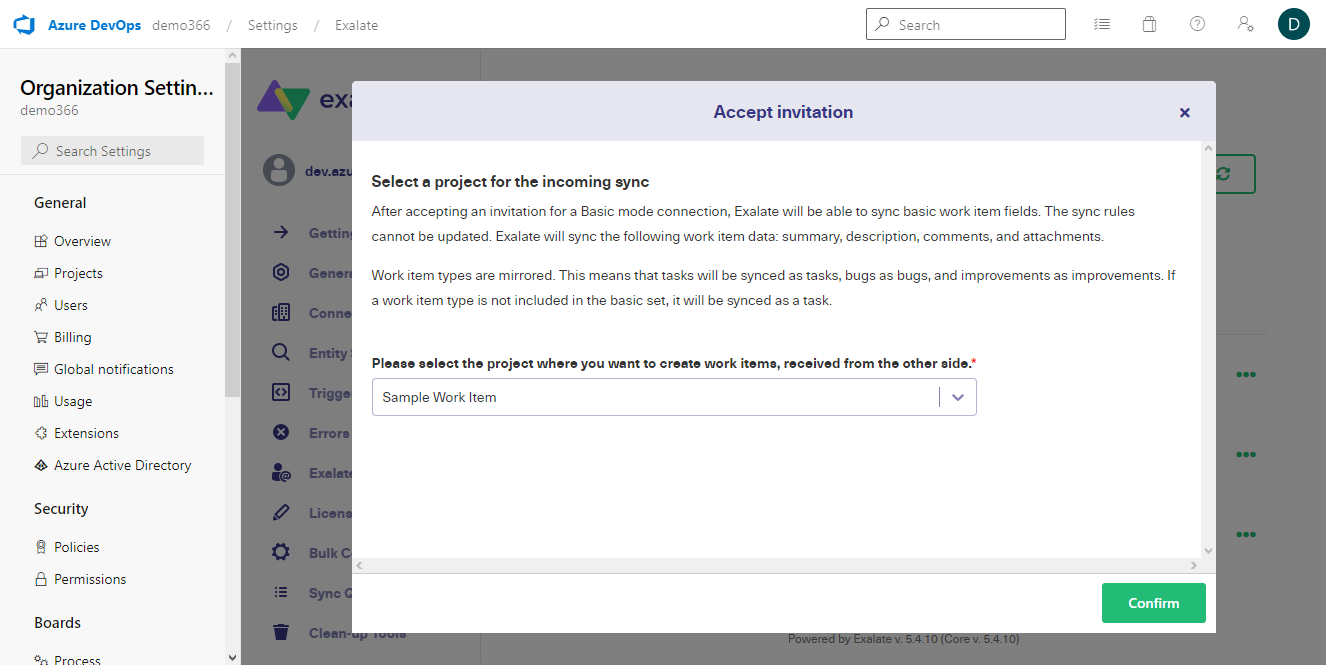
The support team at Company A (MamaMia) wants to sync data with developers at Startup B (PapaMia). But the problem is that MamaMia uses Zendesk, while PapaMia uses Azure DevOps–and both of them insist on sticking with their respective platforms because of security concerns.
In this scenario, the only compromise is to employ reliable Integration-as-a-Service software to sync data from both organizations. By doing so, PapaMia and MamaMia outsource the integration problem to the IaaS solution provider, who now has to ensure the tool continues functioning without extended downtimes, security concerns, and reliability issues.
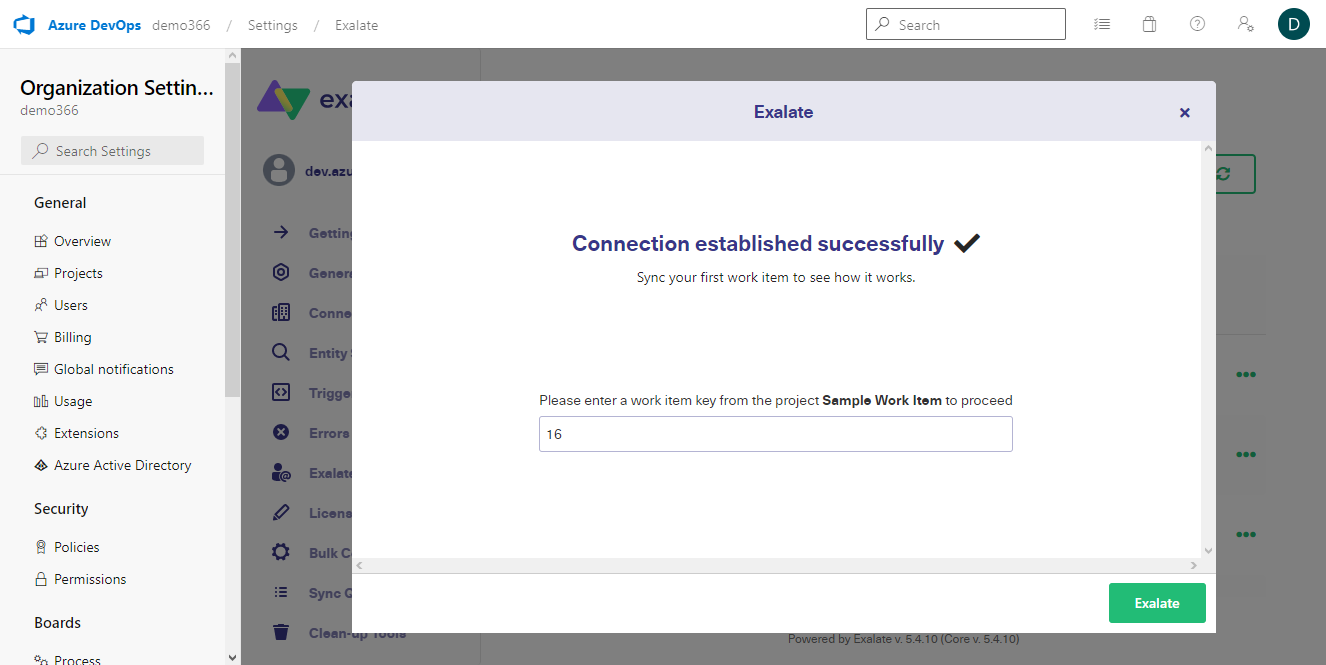
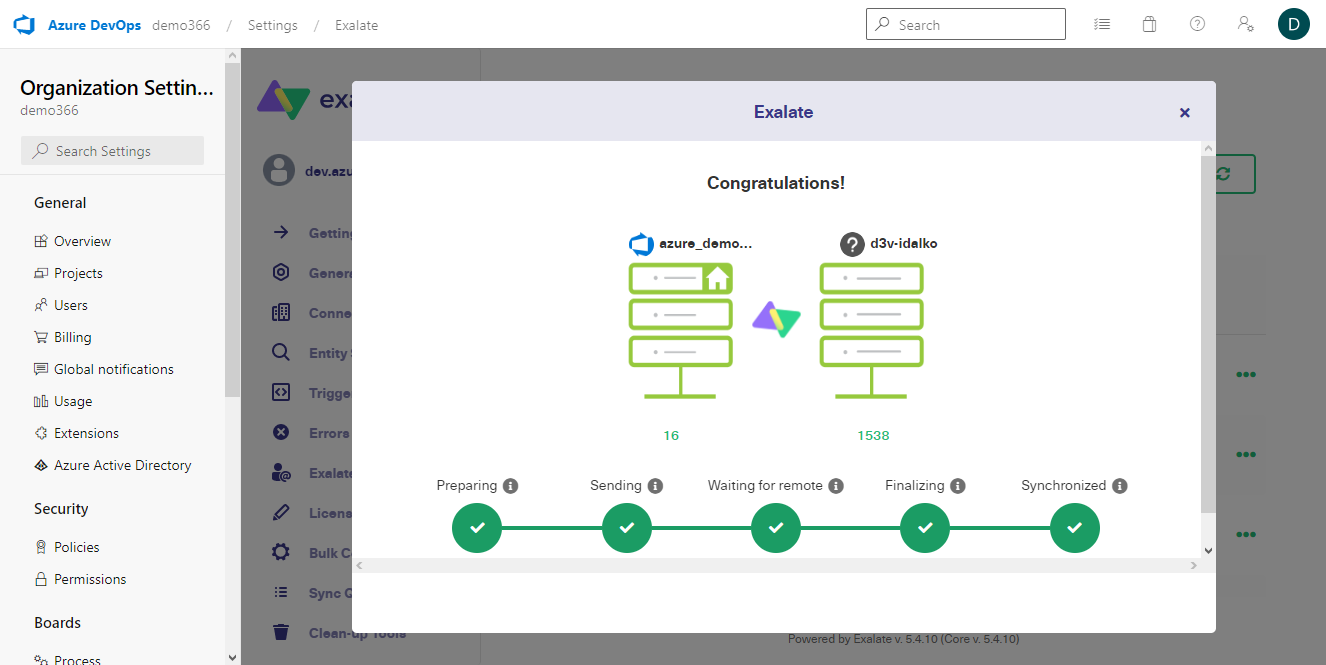
With that, MamaMia and PapaMia can automatically share data bi-directionally without using webhooks, scripts, and other less reliable integration methods.
Implementing IaaS Solutions: What are the Steps?
Here are the stages you must pass through in order to properly implement an IaaS solution for your organization.
Analysis Before implementing, you need to evaluate your company’s existing infrastructure to determine what to integrate or isolate for security reasons. Also, a proper analysis will help you select the most effective integration approach suited to your system infrastructure and developers’ expertise.
Installation and configuration After choosing the integration solution, the next step is to install it into your system and configure it for the specific use case. This often involves setting up connectors, adapters, or gateways to enable the systems to communicate with each other smoothly. You can also add custom scripts, triggers, and additional firewalls to gain more control over the transfer and protect your data from unauthorized access.
Data transfer After setting up the IaaS solution, the data exchange can begin. This involves mapping the data between systems, converting data formats, and validating the data for accuracy and completeness.
Maintenance During this stage, you need to implement management tools and interfaces for monitoring the status of connections, tracking information flow, handling errors, and monitoring security. IaaS solutions like Exalate and Zapier allow you to gather statistics and track performance, which helps users to find out when to tweak the settings to improve performance.
Core Attributes of a Reliable IaaS Tool
As with every industry, the IaaS sphere is becoming saturated with different solutions. After conducting thorough research, we’ve figured out what makes an IaaS solution dependable and foolproof.
Here are the core attributes of a reliable IaaS tool.
Versatility
Any reliable IaaS solution should be flexible enough to sync data between different platforms. For instance, you should be able to use an Azure Integration as a Service solution to connect a service management platform like ServiceNow with Azure DevOps.
This versatility will enable you to employ only one IaaS solution for all synchronization without spending on different ones for every unique scenario.
Cost-effectiveness
Only use an Integration as a Service platform that saves your company money. Generally, IaaS platforms reduce how much you spend on workflow synchronization since you no longer have to build, test, manage, and maintain a unique solution in-house.
At the same time, you need to look for affordable tools within your organization’s budget in order to cut costs.
Secure Connectivity
Data security is one of the main reasons companies are skeptical about using IaaS connectivity tools. When shopping for an IaaS vendor, always consider their track record with security. You should also check the access controls and encryption protocols they use for protecting user data in transit.
Some common security measures to consider include:
Access tokens (JSON Web Tokens, Secure Shell Keys, etc.)
Level-based access controls
ISO 27001:2002 certification
Passwords and encryption
Customizable Interface
Always prioritize usability and customizability when choosing an IaaS platform, because the last thing you want is a tool your employees will struggle to work with.
Opt for highly customizable tools with simple interfaces that someone with a limited tech background can use. If possible, go for low-code software programs that offer drag-and-drop features.
Tools like AI Assist make it easy for admins to generate scripts and automate integrations in order to speed up connections between systems within the organization or across companies.
Scalable Infrastructure
Find a tool that can grow with your company. Before adding an IaaS solution to your tech stack, always check if the available features can handle larger workloads as your company scales operations.
Doing so will help you prevent switching to a new interface to accommodate increasing demand and avoid frequent downtimes.
Responsive Support
When something goes wrong with the IaaS – an error occurs, a feature stops working, or a node goes down during data transfer – you’ll need to contact support to fix this issue as fast as possible.
If the IaaS provider’s support agents can address issues promptly, this will help you avoid bottlenecks and backlogs resulting from the integration.
Vibrant Community
The robustness of the IaaS vendor’s community will show you how far they’ve penetrated the market–how confidently people trust the product. Similarly, a vibrant community of users and experts will also provide you with solutions to problems from a fellow end user’s POV.
Detailed Documentation
Some IaaS providers provide custom configurations for advanced use cases. Developers might also want to understand how your product’s infrastructure works to play around with it. To this end, any reliable IaaS solution must have the backing of extensive, detailed documentation.
IaaS Use Cases: Sample Scenarios in Different Sectors
As mentioned earlier, companies and startups in various industries can use data integration as a service because of its versatility.
Here are common use cases for IaaS solutions:
To share eCommerce data between salespeople and marketers to better understand consumer behavior and market trends. eCommerce websites can use a Shopify-Power BI IaaS solution to export store data for further analysis.
To connect multiple applications through Integration as a Service in cloud computing without having to build or install a middleware. MSPs and MSSPs, for instance, use deep ticket integration between Jira and ServiceNow to connect with their customers.
To establish communication channels between interdependent teams and organizations. Support teams can move issues from the helpdesk to the development stage without manually assigning every task.
Integration of services in healthcare for hospitals and caregivers to have a 360-view when figuring out effective treatment methods. Healthcare professionals and pharmaceutical companies used IaaS solutions to sync data, resulting in delivering COVID-19 vaccines in record time.
To archive historical data to reduce the demands on your company’s main server. The New York Times used Amazon’s Elastic Compute Cloud to archive historical data within 48 hours.
In general, you can find an application for IaaS solutions if you are in a data-centric sector– which is every sector in the modern world.
Benefits of Integration as a Service
Here are reasons why you should consider using IaaS solutions:
To Keep your Integrations Secure
Moving data between systems could introduce potential security vulnerabilities that hackers could exploit to compromise your data.
Fortunately, IaaS solutions use advanced encryption protocols to ensure your data doesn’t fall into the wrong hands. Users within your network will also have to generate access tokens for using your instance. Most importantly, IaaS solutions use role-based permissions to determine who can access what data.
To Move Data between Platforms Seamlessly
Network administrators and project managers can control workflow integration across independent teams (or companies) with the help of IaaS solutions. These tools provide customization options that you can tweak to your business needs.
For instance, you can write custom scripts to automate the transfer of information from Jira to Salesforce. You can also set triggers with specific instructions regarding the fields and attachments to transfer in both directions.
To Improve the Customer Experience
Using IaaS tools to establish seamless team connectivity will improve the user or customer experience.
Here is how: the IaaS solution connects all the teams involved in the process (support, sales, development, QA, design) to ensure everyone is singing from the same sheet. By eliminating the formation of siloes, these teams can share information without friction and delays.
As a result of this close collaboration, the company can gather insights and feedback from users in order to improve its products and services. And with all this data, spotting emerging trends in user behavior becomes easier.
To Save Money
IaaS solutions help companies save money, which they could have spent on building their own integration system from scratch, as well as maintaining it. So instead of hiring developers to build an integration solution in-house, you could find an IaaS tool that interconnects multiple service management systems.
Of course, IaaS solutions will cost you money; you’ll need to pay for a subscription (fixed, pay-as-you-go, or pay-as-you-use). But this cost pales in comparison to what you’ll spend on building a fully-fledged, reliable tool.
To Make Decisions Faster
IaaS tools improve the speed of decisions by providing a universal, central source of truth. You can synchronize data from multiple applications to one central platform, from which you can extract data for further analysis.
Insights from this analysis will help organizations make business-critical or life-changing decisions faster, as seen in the example of Big Pharma and COVID-19 vaccines.
The Future of Integration as a Service
With a better understanding of the current state of IaaS, time to look ahead.
IaaS vendors will focus more on creating user-friendly tools with a flat learning curve. This trend aligns with the current increase in preference for easy-to-use, low-code (possibly no-code) solutions.
Moving on from custom scripts, middleware, adapters, ETL (extract, transform, load) tools, and ESBs (enterprise service bus) might take a minute, but it is inevitable. Users will opt for more flexible IaaS alternatives to automate workflow integration across several platforms.
And AI will play a massive role in this. Future IaaS tools will use machine learning algorithms to recommend integration configurations to guarantee the best results. AI tools will also clean up your data and handle other redundant tasks involved in integrations.
With AI driving future iterations of IaaS platforms, we might see a broad implementation of adaptive IaaS – an IaaS model that can be customized or adapted to work with multiple platforms simultaneously. This innovation will slam the door on the current trends of companies needing 10 to 100 integrations geared towards different goals.
Conclusion
The Integration as a Service model has jazzed up how businesses manage integrations. This delivery model also offers user-friendliness and cost-effectiveness. Adopting an IaaS solution in your workflow will disintegrate siloes and improve collaboration between teams, externally and internally.
Implementing IaaS tools gives you access to low-code, decentralized integration solutions that connect Jira, Salesforce, ServiceNow, GitHub, and other service management platforms. You can use them for bi-directional syncs in real time.
Nevaris software has been in construction technology solutions for over a decade and covers all aspects like financial accounting, ERP, extensive construction wages, etc.
One of their products, Nevaris Build, is used for construction management and supports all functions and data for your entire construction project in a single software.
The Struggle
The fundamental issue Nevaris Build faced was unclear and ineffective communication between different teams working on the software.
For instance, the dev team was using Azure DevOps, but the Quality Assurance (QA) team wanted to keep working in Jira for test cases and release management.
So they wanted to look for a solution that allowed the dev team to work in Azure DevOps but still have the important data reflected in Jira for the QA team.
We reached out to David Müehlenhoff, the development team lead at Nevaris Build, to talk about his experience with Exalate.
Why Exalate?
Streamlined collaboration between teams
Enhanced customization capability through scripting engine
Flexibility to adapt different workflows
Cost efficiency and reasonable price
Adapters for other systems like Salesforce
“We evaluated different products and Exalate was the one. It was also the most cost effective overall.”
David Müehlenhoff, development team lead at Nevaris Build
Challenges
Inefficient collaboration between different departments
Siloed Information flow across teams
Initially, most of the teams worked in Jira and each department had its own issue types, tasks, rules, and boards. But there wasn’t a single interface that could give an overview of where the entire team, as a whole, stood.
Further on, the tools changed and the development team switched to Azure DevOps. This increased manual work of copying and sending information between Jira ( QA team) and Azure DevOps.There were almost 30 tickets that were copied on a daily basis.
The dev team needed visibility on the test cases and releases that were planned and executed by the QA team, whereas the QA team needed to see the dev team’s progress.
The biggest issue Nevaris Build faced was information flow. Every team wanted visibility on each other’s issue types, rules, and workflows. They also didn’t want to leave the tool they were currently using.
“For us, flexibility with a large margin is the most important feature of Exalate.”
David Müehlenhoff, development team lead at Nevaris Build
That’s why they started looking for a solution to help them bridge the information gap between applications.
Solutions
An In-house tool
3-rd party synchronization solutions
Nevaris Build started connecting the 2 systems (Jira and Azure DevOps) with a tool they owned, which was just a once-off replication.
The tool allowed pushing issues from Jira to Azure DevOps. They had visibility on the issues that were being pushed, but the synchronization wasn’t real-time. Plus, comments or changing specifications never reached the other system without manual communication or making the change manually in both systems.
They also decided to not pursue building a synchronization solution, because it required a lot of development effort on their part.
At this point, they started exploring other solutions in the market. They chose Exalate to integrate Jira and Azure DevOps.
The reason they chose Exalate was its scripting capabilities. They could easily customize their processes and implement their own logic to transfer data.
“A lot of our peers liked the scripting feature of Exalate because they rightfully think they can solve complex mappings with it, although the other solutions in the market might be a bit easier.”
David Müehlenhoff, development team lead at Nevaris Build
Results
Decentralized control of the integration (avoiding a single point of failure)
Decreased issue-handling times thanks to automatic and accurate information exchange between teams
Optimized costs as developers for Exalate were assigned and workflows ran smoothly
Initially, teams working on Nevaris Build had to spend a lot of time and effort manually transferring information or syncing information in batches.
Using Exalate, the admins could orchestrate the information exchange without the teams even realizing what goes on behind the scenes.
“It is also nice to have this distributed architecture that Exalate supports so failure on one side can’t affect the other side.”
David Müehlenhoff, development team lead at Nevaris Build
They now continue getting the information they want in Jira and Azure DevOps since Exalate continues working in the background whenever needed.
Earlier the developers had to spend a lot of their working time sending information back and forth between systems and keeping track of all the synced information and its related processes. And of course, issue-handling times increased because of this.
“The company doesn’t realize we’re using Exalate, which is a good thing. We have 3 people trained in Exalate, so they administer the solution whenever there’s a sync requirement or an error. The rest of the team doesn’t even notice because it just works.”
David Müehlenhoff, development team lead at Nevaris Build
With Exalate in place, the issue-handling time is reduced. Additionally, they get to spend time on tasks that really matter.
The teams have actually become more productive in managing their time and issues.
Use Case
Nevaris used Exalate for an internal use case where it wanted to connect 3 departments. The dev team, the product management team, and the QA team.
Every department has its own processes, workflows, and tools that it uses, and they were looking for a way so that all of them could work as one and have a centralized view of user stories, issues, bugs, etc.
“Exalate works pretty smoothly. And With the scripting engine, we could implement our own logic and transfer the data however we wanted.”
David Müehlenhoff, development team lead at Nevaris Build
Certain reports within Jira used by the QA team needed to be worked on in Azure DevOps used by the dev team.
So they used Exalate to implement a synchronization that helped pass the required information between Jira and Azure DevOps. They also wanted to orchestrate workflows between the Dev, the QA, and other teams.
They used Exalate for its configurability, specifically for user mentions in comments.
Future
Having connected the development and the QA team with a Jira Azure DevOps synchronization, Nevaris Build aims to expand further.
It wants to connect its support team using Salesforce with Azure DevOps to streamline communication between them.
“Exalate is a winner there because it supports Salesforce Integrations. In our case, Salesforce is used by our support team and we want to set up synchronization between Salesforce, Jira, and Azure DevOps.”
David Müehlenhoff, development team lead at Nevaris Build
Their vision is to smoothen information flow and increase transparency between teams using disparate applications so that internal and external workflows are processed automatically.
Companies often need to set up advanced or customized integrations between Jira and Azure DevOps. Such integrations are commonly used to streamline communication between disparate applications.
In this article, we discuss how to maintain issue links and their relationship types between Jira and Azure DevOps. We also see a secondary requirement of syncing the parent-child equation of issues and sub-tasks.
We use a synchronization solution called Exalate to implement this use case.
The Use Case
The following are the use case requirements:
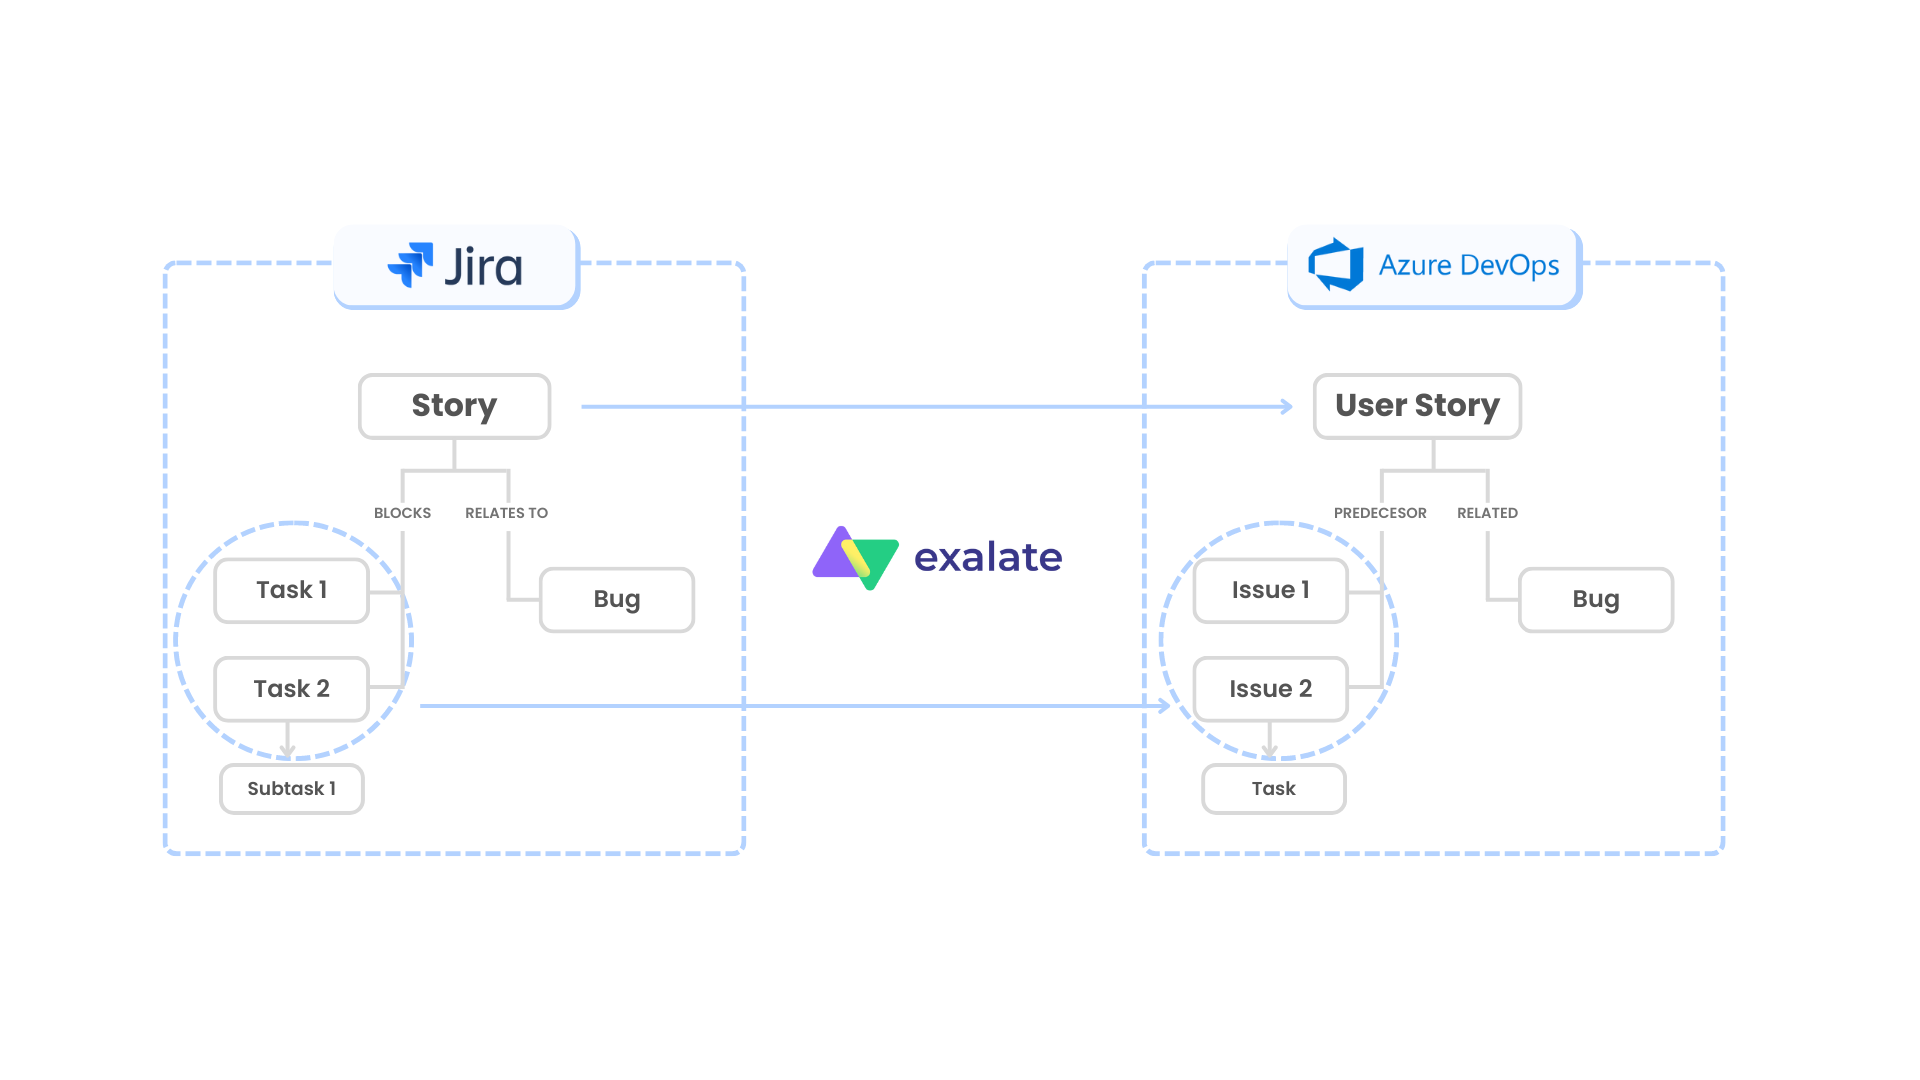
Stories in Jira should arrive as a User Stories (work item) in Azure DevOps.
Stories have issue links: Tasks and Bugs. These need to be reflected in Azure DevOps under the corresponding User Story as issues and Bugs.
Tasks have a “blocks” relationship type with the Story. They must be synced over as issues with a “predecessor” relation to the User Story in Azure DevOps.
Bugs in Jira have a “relates to” relationship with the Story. They should be reflected as bugs work item type with a relation “related” to the User Story in Azure DevOps.
Sub-tasks of Tasks in Jira are to be mapped to Tasks (as a child relationship) under the corresponding issues in Azure DevOps.
A visual depiction of the use case will make things clearer.
Potential Challenges
The requirements are unique and advanced. So there are a couple of challenges we need to address first:
Syncing a Story in Jira to User Story in Azure DevOps Tasks in Jira fly as issues in Azure DevOps. Bugs are to be kept as Bugs. Maintaining these mappings is important.
Mapping of the parent-child relationship between the sub-tasks and Tasks in Jira to Tasks and issues in Azure DevOps
Customizing the relationship types fully You can define and map them as you want. For instance, the “blocks” relationship type is mapped to “predecessor” in Azure DevOps. Or the “relates to” relationship type is mapped as “related” in Azure DevOps. These are just examples, the actual mappings will depend on your synchronization requirements.
After taking note of these challenges, it’s time to implement the use case.
But first, we need to understand why we chose Exalate.
3rd-Party Synchronization Solution: Exalate
Exalate is a 3rd-party synchronization solution that supports integrations for various work management systems like Jira, ServiceNow, Azure DevOps, Salesforce, Zendesk, GitHub, etc.
Why Exalate
We chose Exalate to implement this advanced integration use case for the following reasons:
Intuitive Scripting Engine It has Groovy-based scripts that help set up complex logical mappings between the entities to be synced.
Advanced automatic sync triggers It supports triggers that can be fine-grained to advanced levels and enable automatic synchronization of data. These are native to the systems under sync. For instance, you can create triggers in JQL if you use Jira and in WIQL if you use Azure DevOps.
Independent control of information flow Since the use case we want to implement needs complex mappings in both Jira and Azure DevOps, we need independent control of the information to be sent and received. This ensures that you don’t mess with each other’s synchronization.
Bulk synchronization of entities
Sometimes there is a need to sync entities in bulk if a particular condition is satisfied.
Sync Issue Links, Relations, and Sub-task Mappings between Jira and Azure DevOps Using Exalate
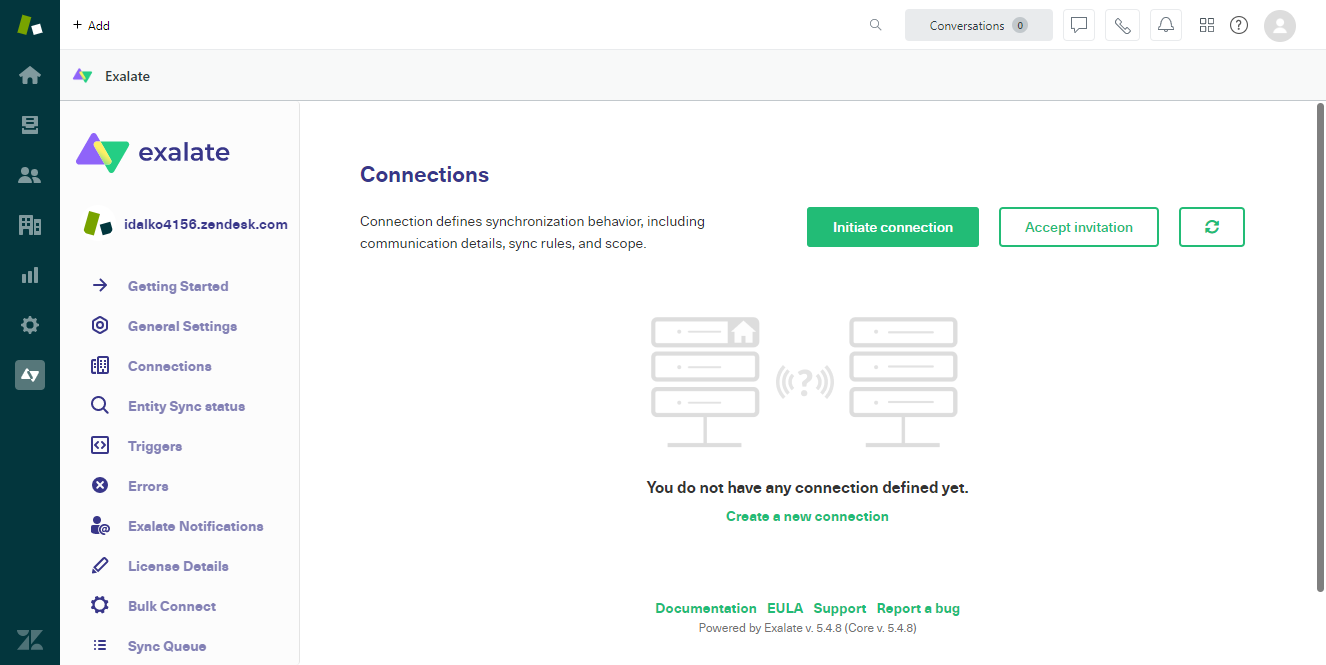
Start by installing Exalate on the integrating systems, Jira and Azure DevOps in our case.
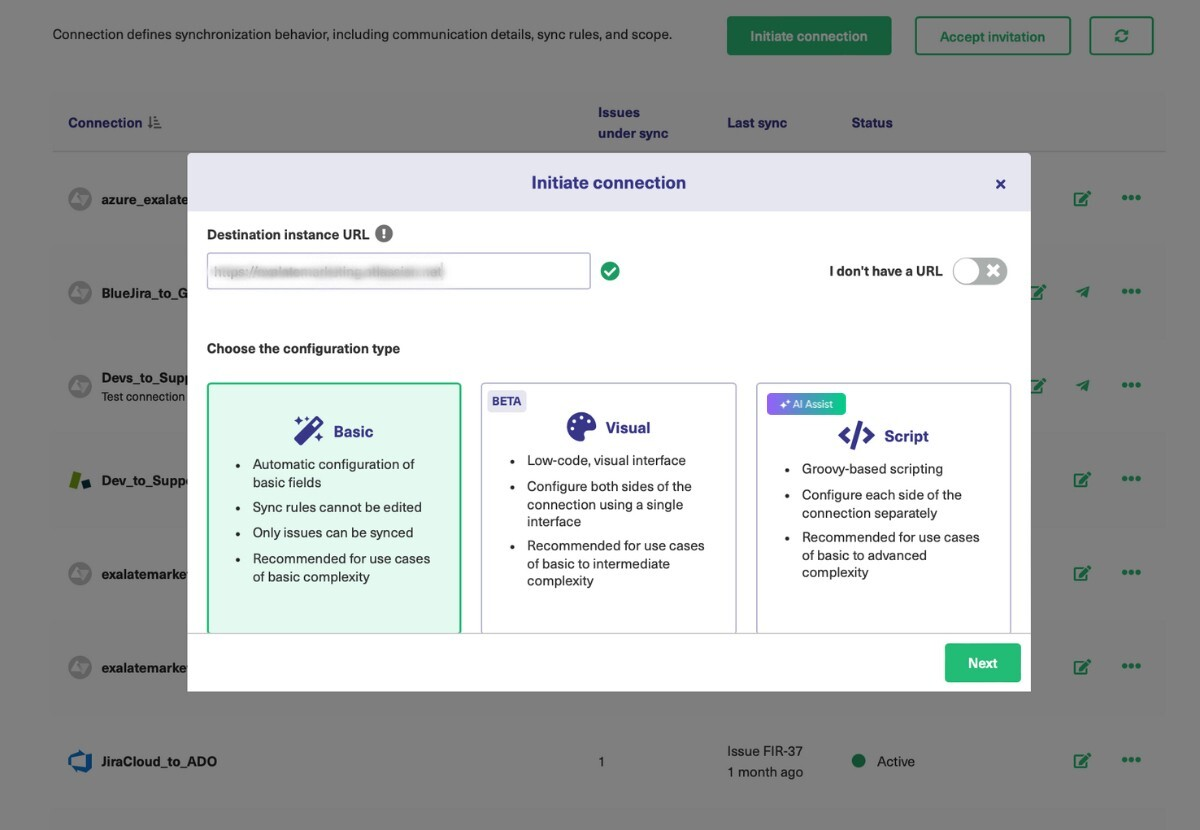
Then you can establish a connection between the 2 instances in the Script Mode.
The Script mode has Groovy-based scripts in the form of “Incoming sync” and “Outgoing sync”.
When a connection is established, click on the “Configure Sync” button or edit the connection to access the “Rules” tab. This is where the syncs we just talked about reside.
These syncs are present in both Jira and Azure DevOps instances. That means:
Outgoing sync defines what information is sent from the source to the destination.
Incoming sync defines how information must be received from the source.
The Scripts
Let’s look at the actual scripts required to implement this use case.
Outgoing Sync: Jira
Essentially, the only information that must move out of Jira are the issue links and the parent ID for the sub-tasks.
Once you have set all of this up, it’s time to see the output.
Output
You can set up automatic sync triggers to start the sync whenever a Story is created in Jira.
In Jira
Create a story in Jira.
Create the issue links
Create 2 tasks: Task 1 and Task 2 with the required relationship types.
Create a bug with the required relationship type.
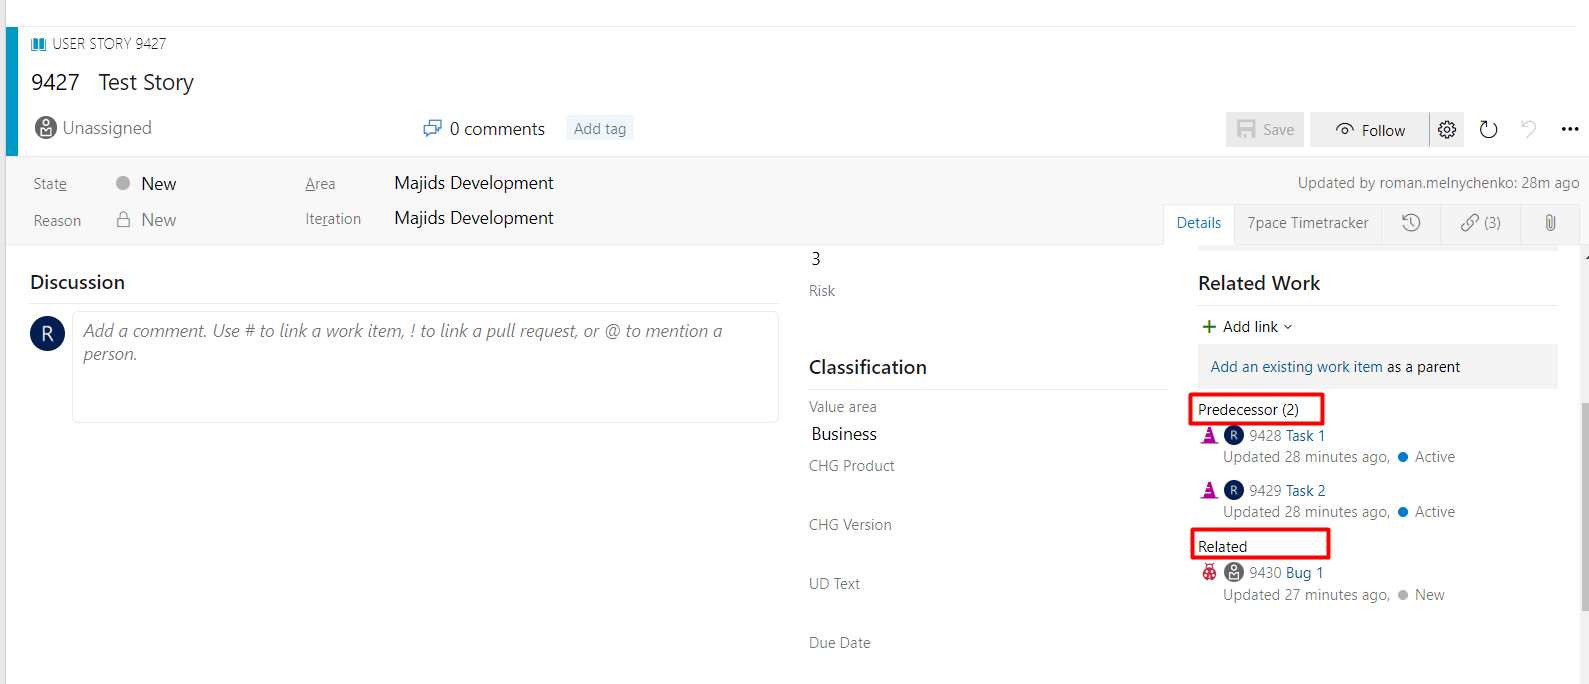
In Azure DevOps
Work items and the relations are synced and the parent-child hierarchy is maintained.
Note: For additional information about Exalate, watch the Exalate Academy videos.
Conclusion
Integrating Jira and Azure DevOps can bring in a lot of benefits. It can reduce manual efforts, increase the visibility of important information, and bring everyone on the same page. You can use 3rd-party tools like Exalate to implement similar integrations.
Book a demo with us to see how it works for your specific scenario.
You can integrate custom data between Jira and Azure DevOps with the help of secure third-party tools. Such custom integrations are necessary to maintain the hierarchy of data when moving between both sides of the integration.
For better clarity, we’ll explore a sample use case. We’ll also use an integration solution called Exalate.
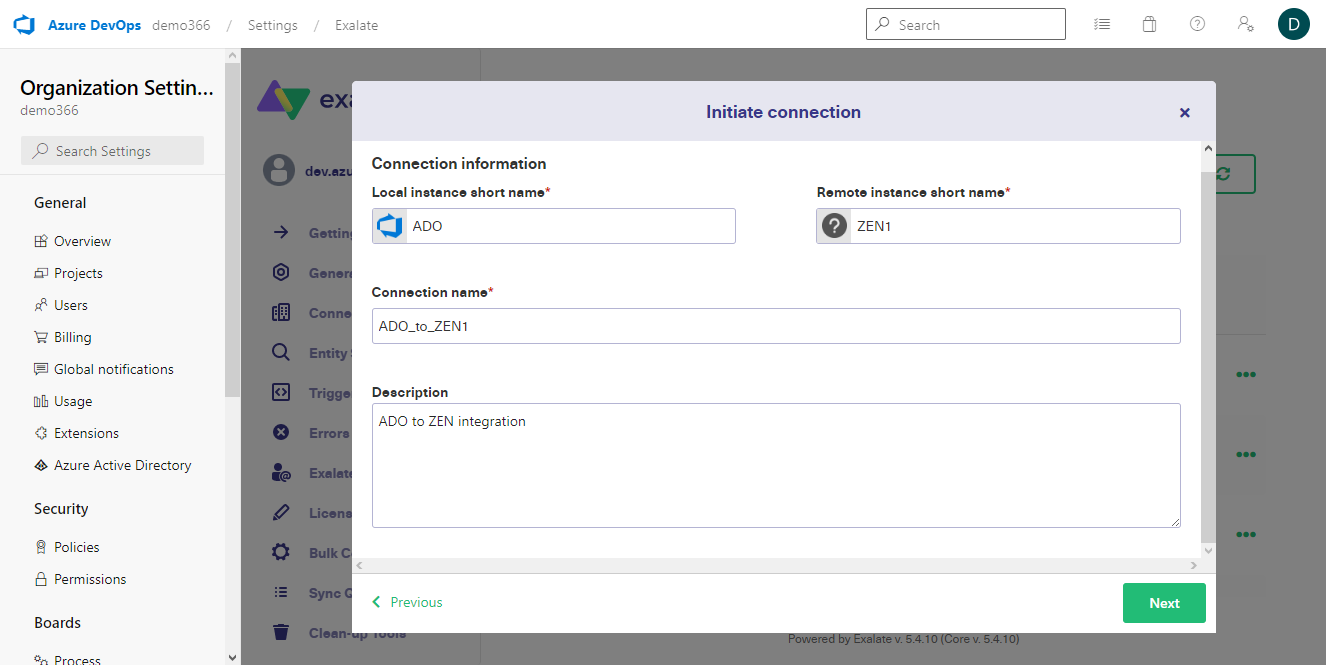
Custom Integration: ADO to Jira Use Case
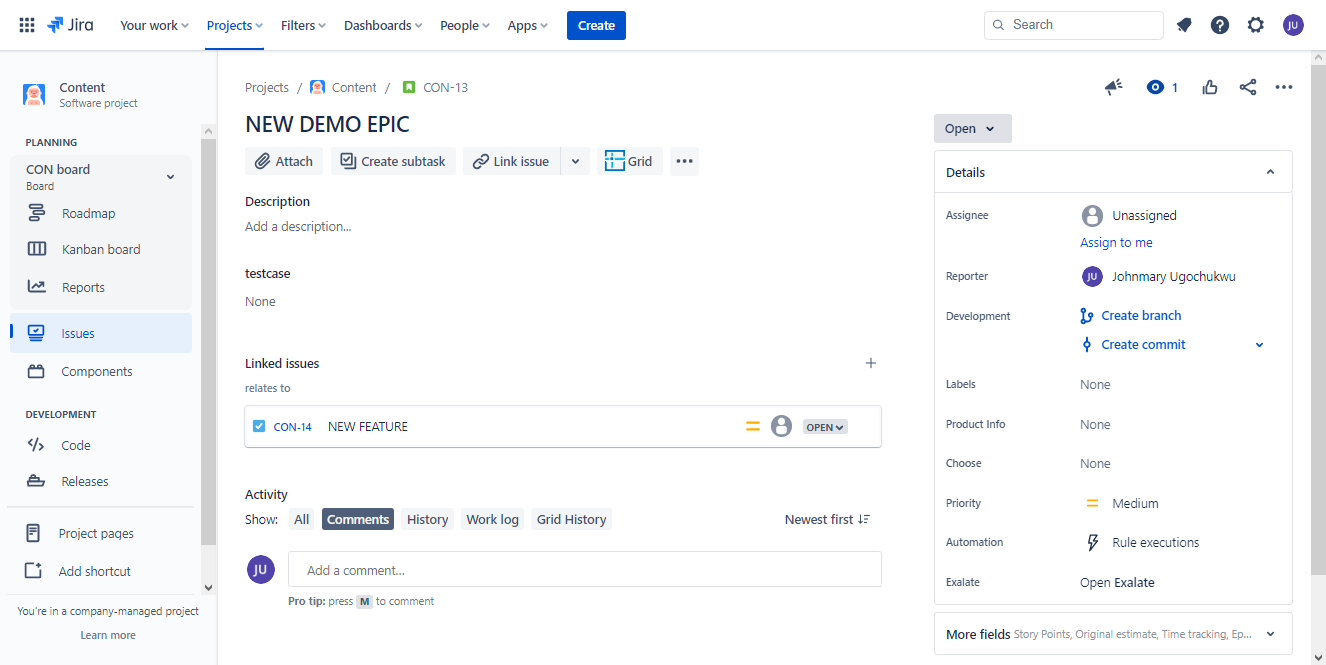
Any work item (Epic, Task, or Feature) created on Azure DevOps is reflected as a ticket (Story, Task, or Bug) on the Jira side. Making any adjustments to the ticket name or description is reflected automatically on the other side.
You will also see a link between work items or tickets based on the established hierarchical structure.
Let’s go through the requirements and challenges:
Primary Requirements
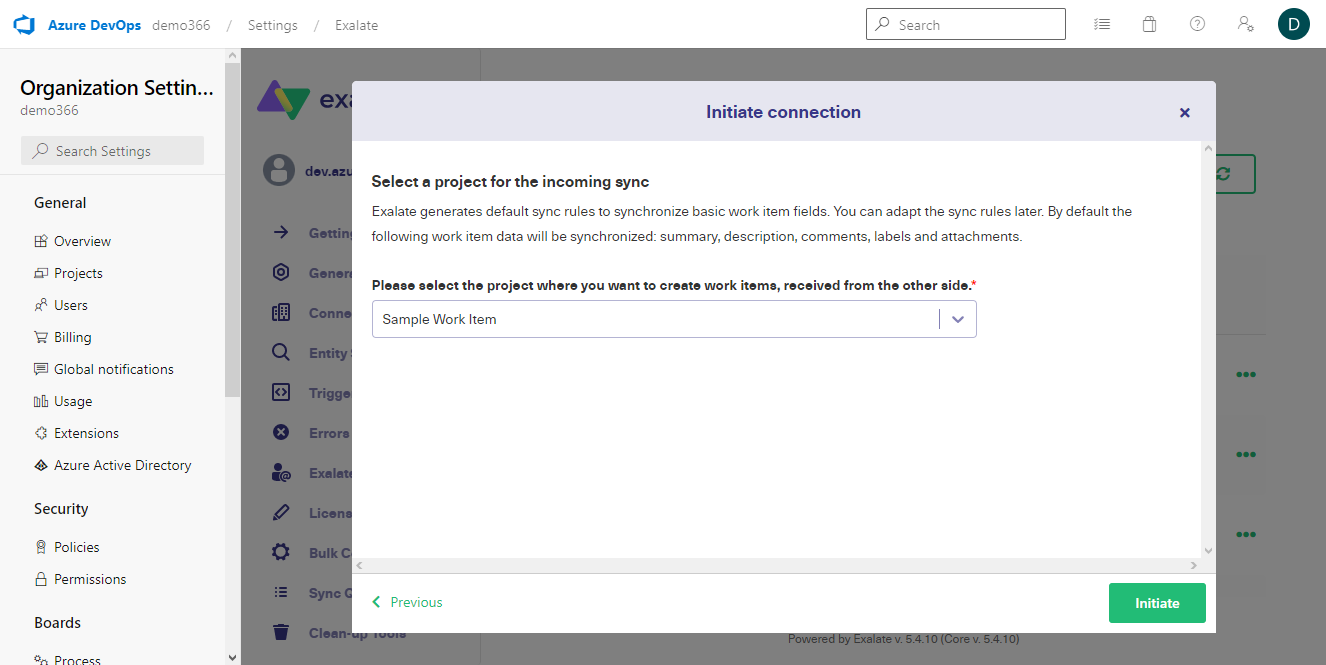
When a user creates a task, epic, or feature on the Azure DevOps side, it should be mapped to a story, task, or bug on the Jira on-premise side. You also need to create a 3-level hierarchy between all 3 work items.
In addition, you need to establish sync rules for the incoming and outgoing data on both sides.
Potential Challenges
Inaccurate mapping of fields
Network failure
Triggers with errors
Poorly written rules
The Solution: Exalate
Exalate is an integration solution that enables bidirectional synchronization with work and service management platforms such as Zendesk, Azure DevOps, ServiceNow, Jira, Salesforce, etc.
Why Use Exalate?
It allows you to sync fields between Jira and Azure DevOps.
You can configure your use cases with the help of the Groovy engine.
It allows you to set custom triggers for automatic syncs.
Using the bulk connect option, Bulk Exalate will save you time when you have multiple syncs to complete.
How to Implement Exalate for Data Updates
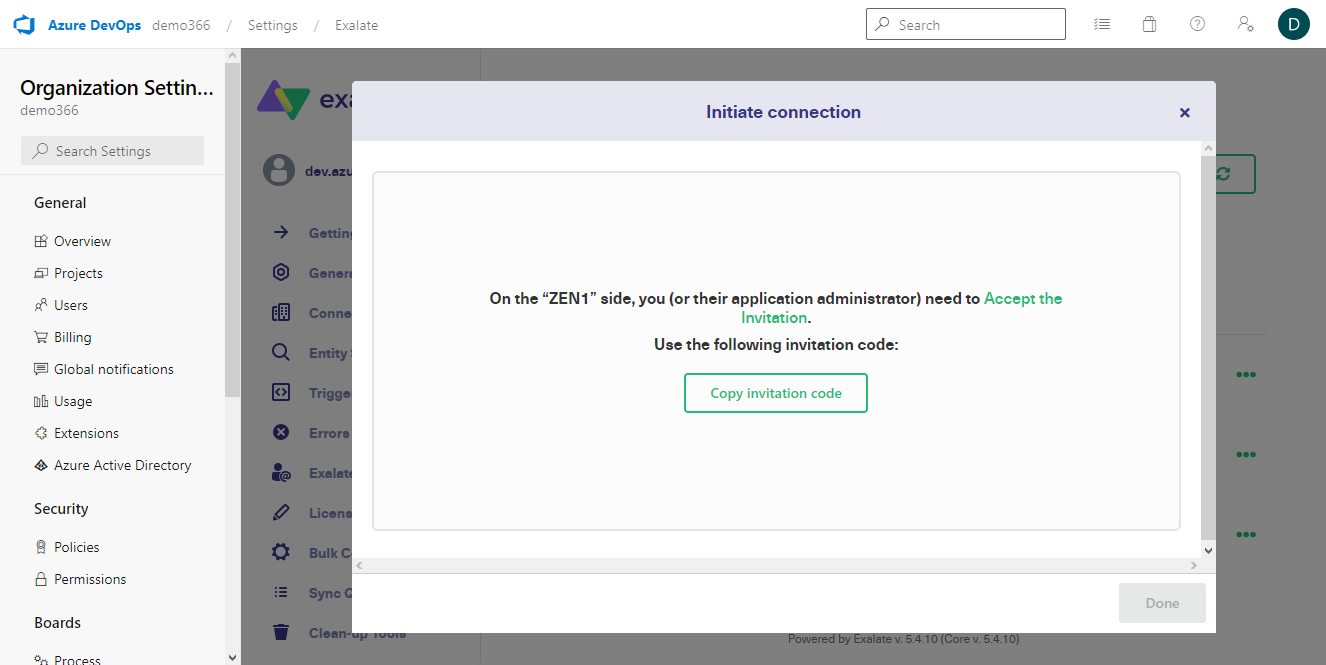
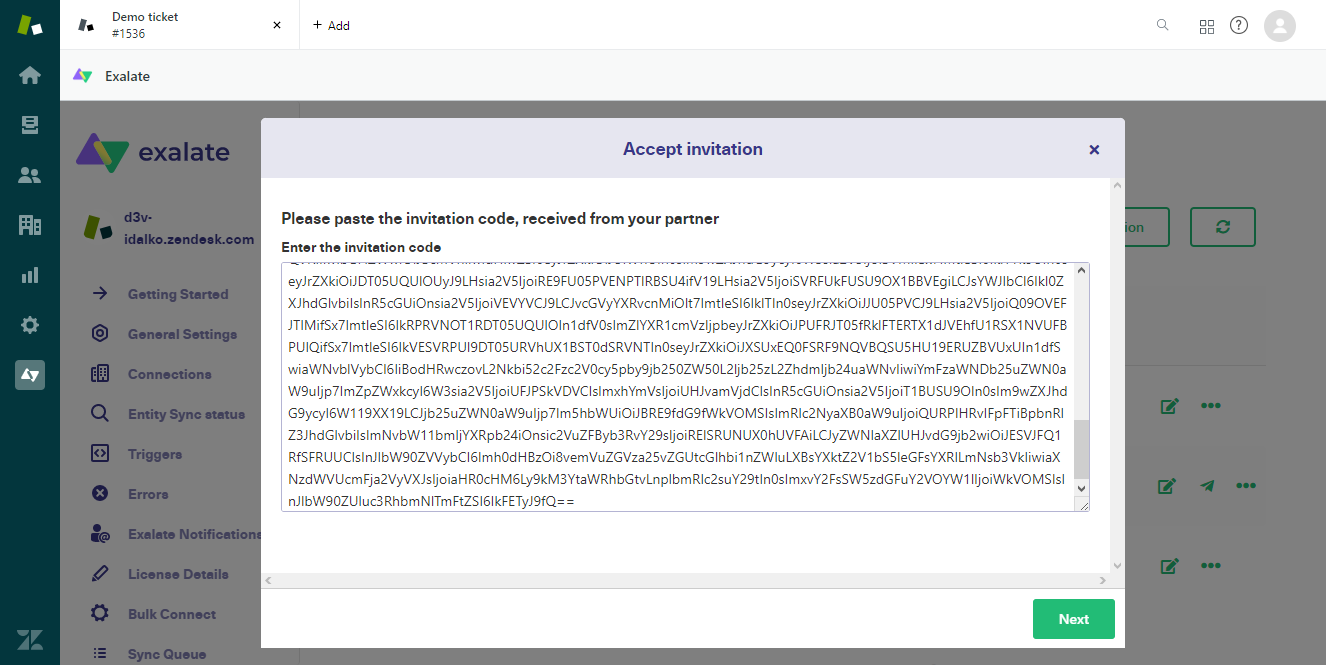
Before using Exalate, you need to install it on both the Jira and Azure DevOps sides. To establish your first connection, follow the instructions in this comprehensive guide.
Considering that this specific use case requires advanced integration and some coding, you must establish the connection using the Script Mode.
When setting up a connection, you need to configure the incoming and outgoing syncs:
Outgoing sync (on the Azure DevOps side) refers to the data to be sent over to the Jira side.
Incoming sync (on the Jira side) refers to the data to be received on the Azure DevOps side.
Under the “Rules” tab on the Azure DevOps side, enter the following code snippet into the “Outgoing sync” text area.
replica.parentId = workItem.parentId
Note: The workItem.parentId function refers to the unique ID of any work item created on the Azure DevOps side. The replica.parentId function contains the information you want to pass between the two instances.
def res = httpClient.get("/_apis/wit/workitems/${workItem.key}?\$expand=relations&api-version=6.0",false)
if (res.relations != null){
    replica."relation" = res.relations[0].attributes.name
    replica."relationid" = (res.relations[0].url).tokenize('/')[7]
    }
The code snippet above uses httpClient to call the API for the work item using the GET method. It picks up information about the relationships for work item attributes such as name and description.
Once done, click “Publish” to save the changes.
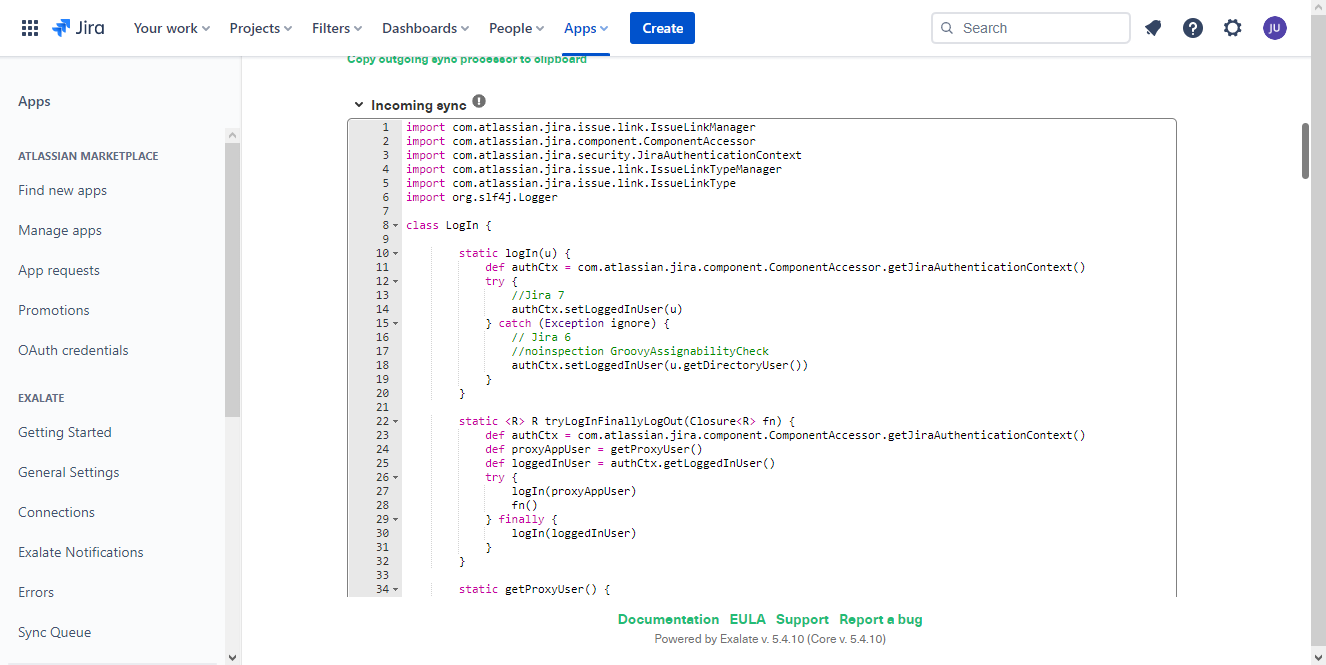
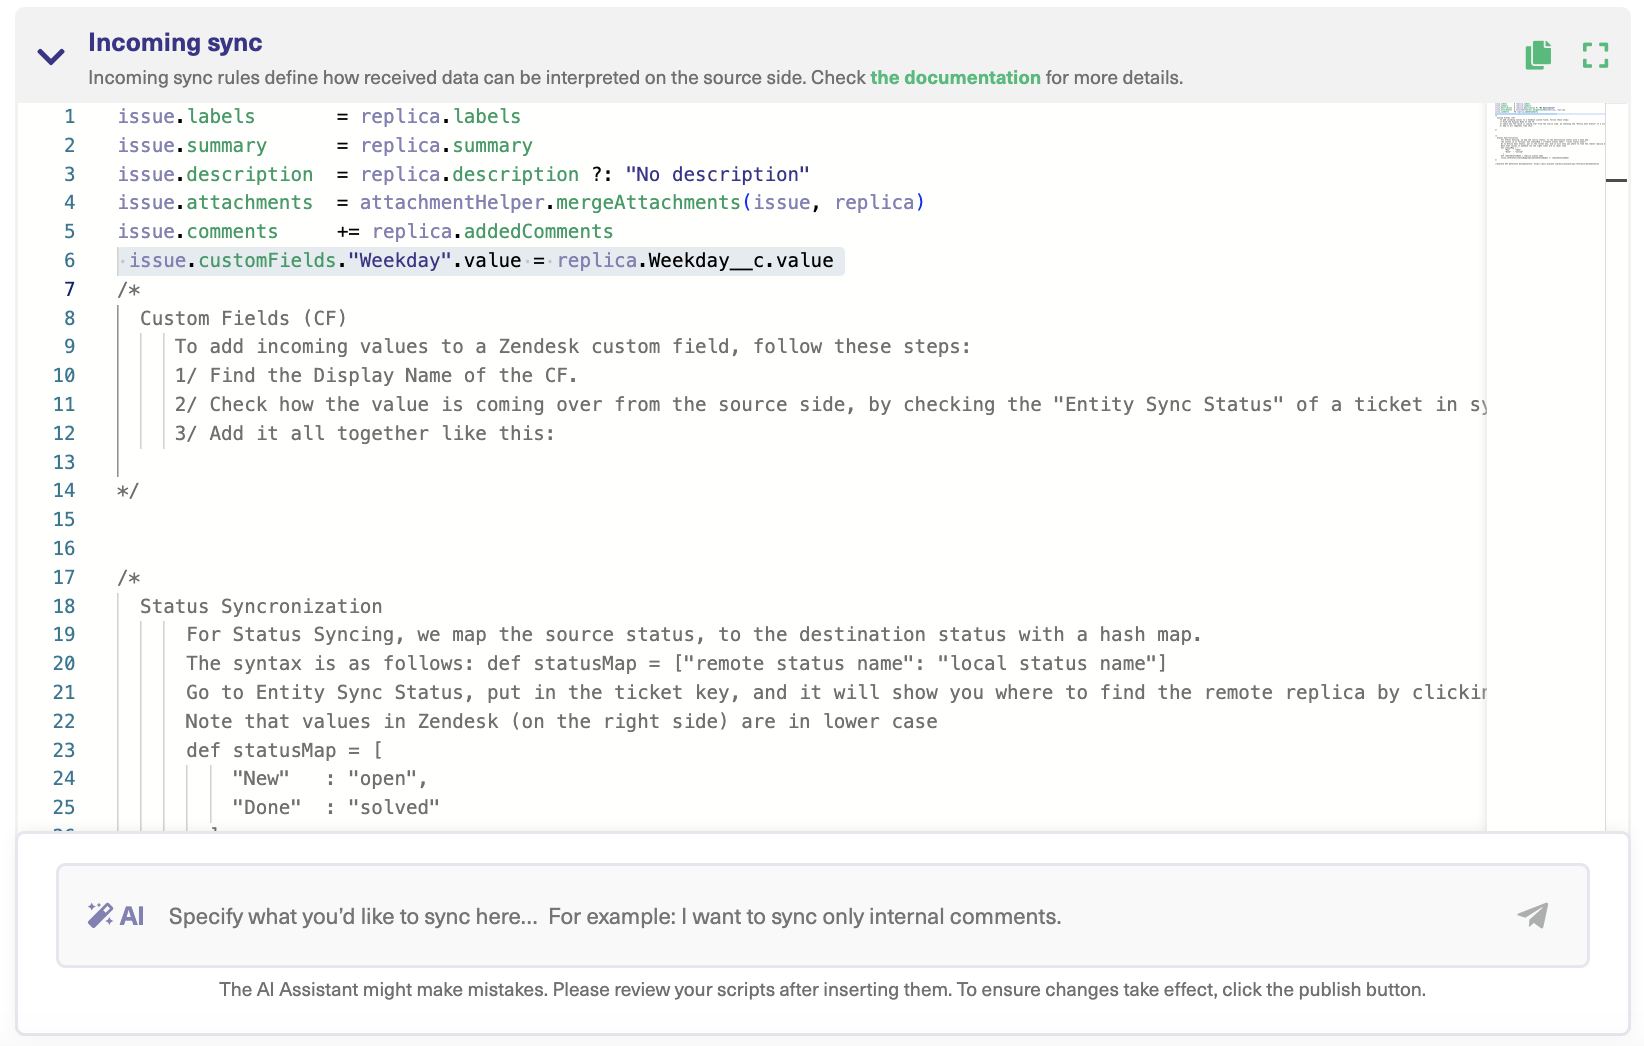
On the Jira side, go to the “Incoming Sync” text area under the “Rules” tab. Replace the placeholder code with default functions for handling the syncs.
This linkTypeMap object specifies how the relationships between work items and issues should be mapped between Azure DevOps and Jira (Parent-Relates, Duplicate-Duplicate).
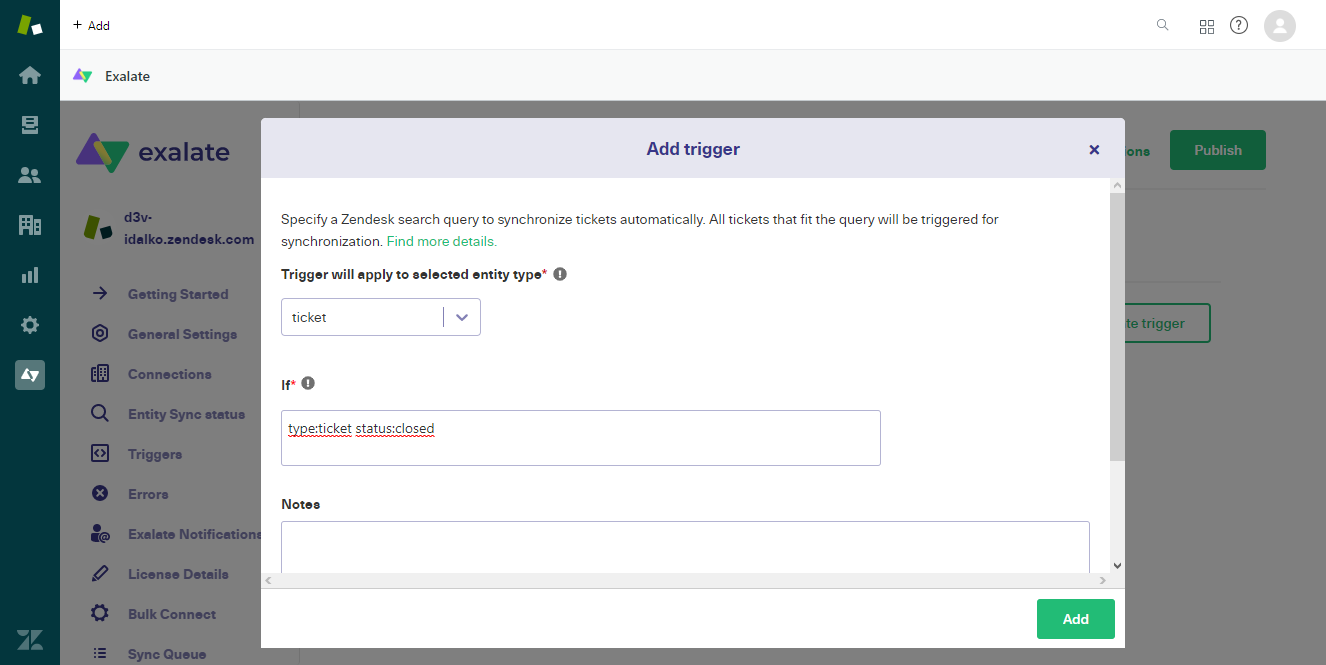
Congratulations! Your connection is set. You can now set triggers to help you automatically update and sync Jira issues with Azure DevOps. Subsequently, you can tweak the code for specific projects.
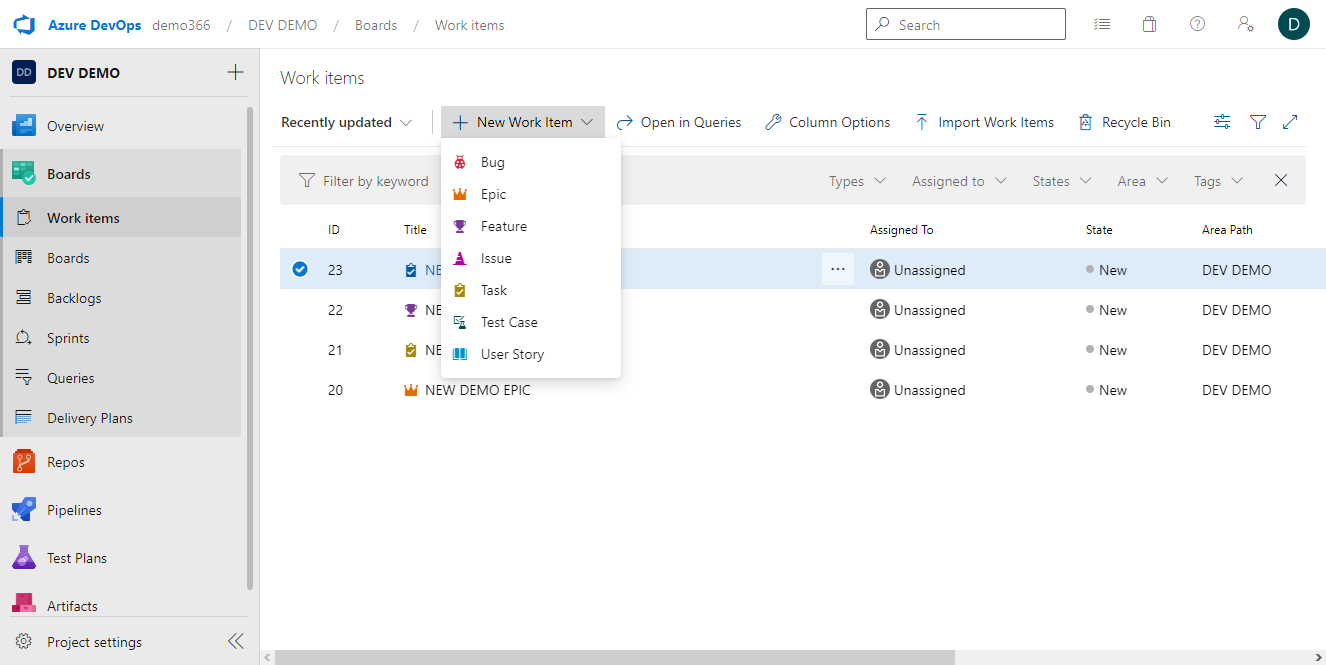
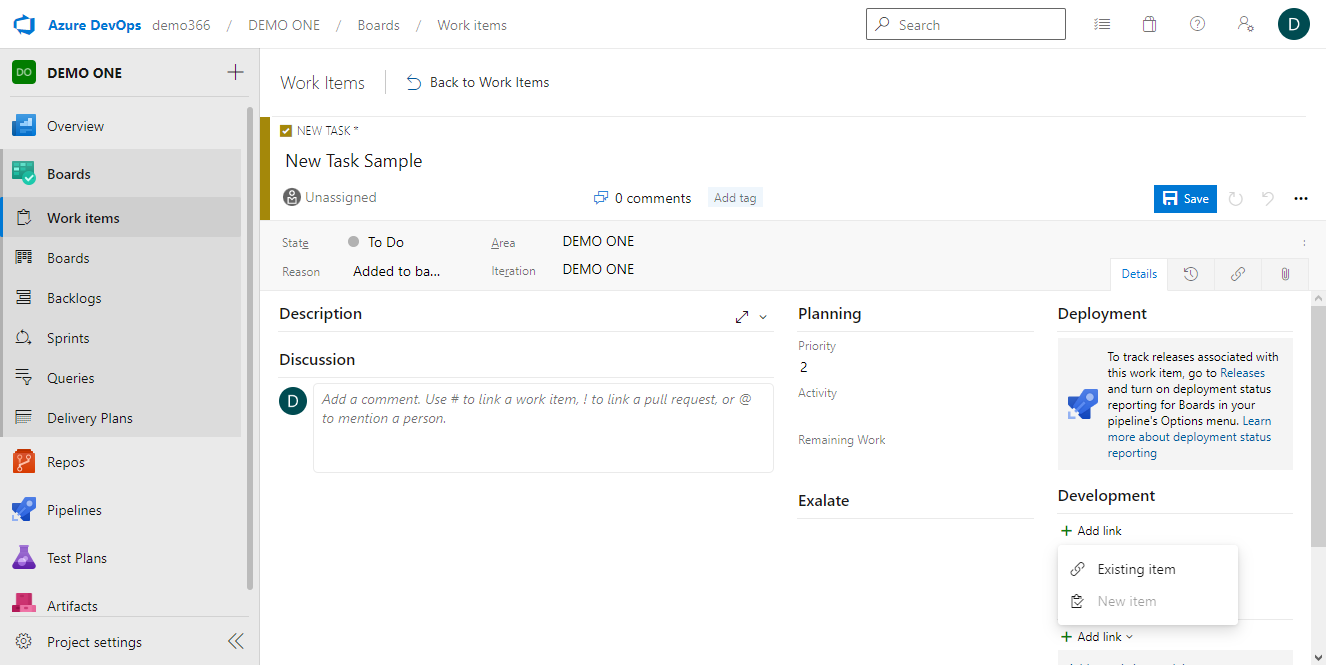
With your connection in place, go to your Azure DevOps dashboard and create a new work item.
Click on “New Work Item” on your selected board. Select “Epic” from the dropdown menu.
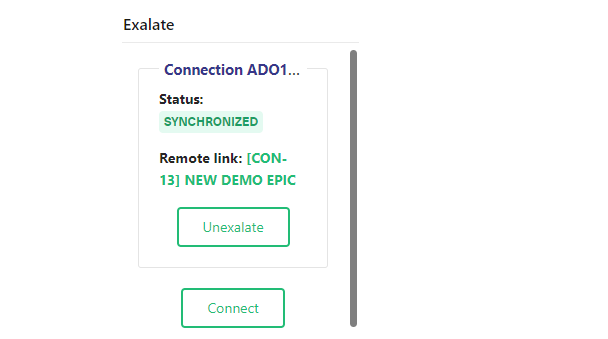
Change the name and click on “Save” to effect the changes. Afterward, you can scroll down to the bottom of the Epic to see that the connection has started syncing automatically.
When this is complete, you can click on the link to view the ticket on the Jira side.
Follow the same steps to create a Task and a Feature.
With the Feature tab open, add a name and description. Then, go to the “Related Work” section on the right and click on “Add link” then select “Existing Item”.
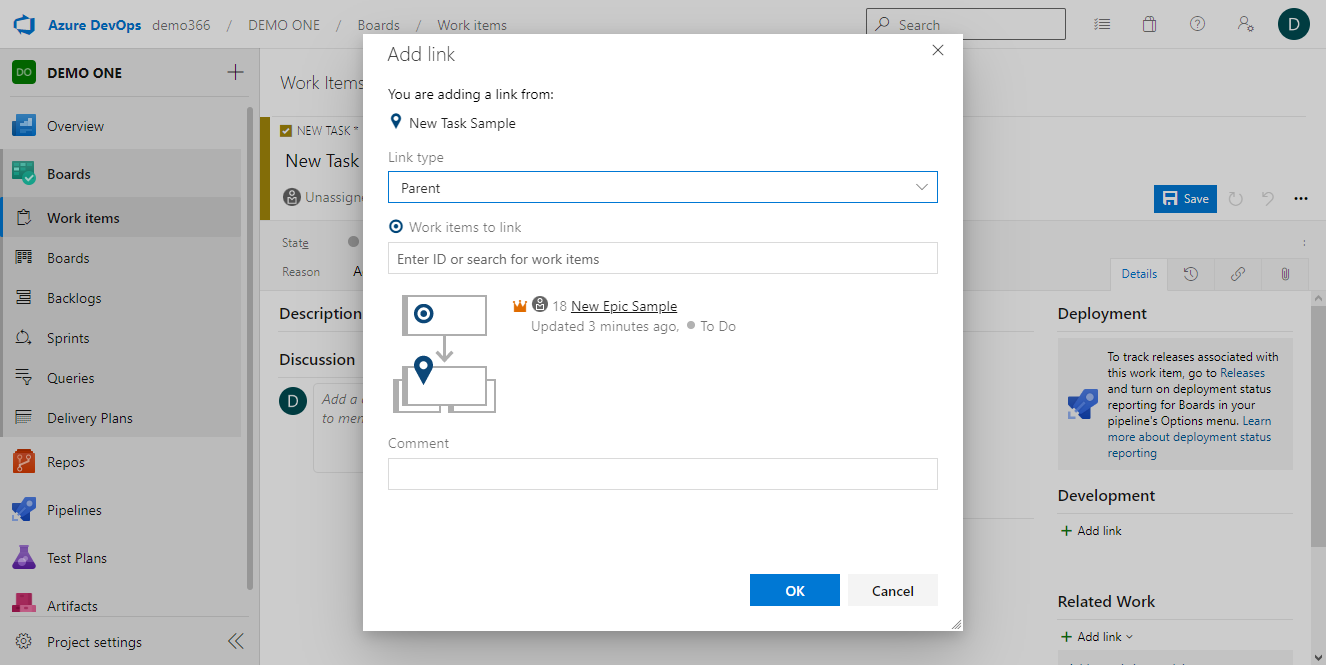
You will see a pop-up modal. Select “Parent” as the link type and make the Epic you created earlier the parent. Click on “OK” to complete the process and save the changes.
Next, create a Task and make the Feature its parent. Afterward, you can view them on Jira to see the established hierarchy.
Conclusion
Exalate is a solution that enables you to update custom Azure DevOps work items with Jira issues. It also allows you to set custom rules and triggers to meet the requirements of any specific use case.
If you still have questions or want to see how Exalate is tailored to your specific use case, book a demo with one of our experts.
Zendesk is a customer service platform that over 100,000 businesses rely on to create a complete, pleasant customer experience. This tool makes it easy for companies to connect with customers, talk to them, and address their concerns as fast as possible.
But using Zendesk presents an issue: businesses find it difficult to integrate other tools with this CRM platform. Let’s say you want to integrate Zendesk with Salesforce Service Cloud or a Jira ticket; using native Zendesk CRM integrations won’t deliver the required robustness and flexibility.
You’d still need a third-party integration to guarantee your sync’s success.
This blog will explore the benefits and shortcomings of existing Zendesk native integrations. Continue reading to discover the right third-party integration solution for syncing your customer service data across independent platforms.
Why Use Zendesk Integrations?
Development and customer support teams use Zendesk for Service to handle customer support issues. The ticketing system enables support agents to track all communications in order to provide better assistance in the future.
Similarly, marketers can use Zendesk for Sales to attract prospects and nurture existing leads, regardless of where they are in the buying journey. Team managers can also use Zendesk to improve team productivity and keep the entire organization on the same page.
But on its own, Zendesk has several limitations. The most common one is that you cannot create follow-up tickets for messaging – and many other problems, which we’ll discuss later.
Notwithstanding, integrating Zendesk with other CRM and ticket management tools is a no-brainer because of the following reasons:
Automate all synchronizations: Teams need essential Zendesk integrations so they can automatically sync their data with other internal and external teams without the need to migrate the data manually.
Centralize information: Using Zendesk integrations to gather information from Salesforce, GitHub, Jira, etc., helps you establish a single source of truth – which is Zendesk in this case.
Choose what matters: Integration tools for Zendesk usually come with filters and triggers that help you configure what needs to be synced and what should stay separate.
Enhance collaboration: With Zendesk support integrations, teams can improve collaboration and communication instead of allowing the creation of information silos due to a lack of a centralized data source.
Increase transparency: Since every team member now has access to the central data source (depending on role and authorization), useful Zendesk integrations will foster an atmosphere of openness. As a result, this will encourage seamless cooperation toward achieving the business goals.
Zendesk Integrations: Common Use Cases
As promised earlier, let’s cover the common scenarios for using Zendesk integrations:
Store and Track Information
Keeping track of information is easier with Zendesk integrations for customer support since your business has a centralized source of truth. All user comments and attachments are synced (and stored) bi-directionally, making it possible for teams to have a 360-perspective when communicating with clients.
For instance, the sales team can view a customer support ticket to figure out potential issues that users face at every stage of their journey with the product. This will help the sales team tailor their processes to the customer experience.
Zendesk app integrations are valuable to interdependent teams, whether internally or externally. Here is a typical scenario between development teams and customer support representatives.
Assuming a customer opens a Jira ticket about a failing sync, the support agent could analyze the root of the problem and then forward the ticket to the development team. In turn, the development team will start working on a fix while providing real-time feedback and updates in the same ticket.
Teams in different organizations can also use Zendesk integrations externally to create a harmonious environment for collaboration.
Migrate Customer Data
If you want to migrate data from an external system, or vice versa, you’ll need an integration to bridge both systems.
Let’s say you want to move your customer service tickets from Zendesk to ServiceNow; this is where third-party integrations shine.
Note: Before migrating your data out of Zendesk, always back up every file, ticket, or line of code. This will help you retrieve them if anything goes wrong during migration. You also need to plan the migration scope and map the fields that should be shared to avoid losing data during the process.
Native Ways to Implement Zendesk Integrations
The Zendesk Marketplace contains a lot of solutions that integrate with GitHub, Asana, Jira, Azure DevOps, Slack, Salesforce, and other platforms.
A ZIS Flow is a JSON-based object that defines the number of steps to follow when passing data between states. This includes flow timeouts (usually 100 seconds) and state transition limit (250 max). Flow states can obtain information from configuration settings and OAuth tokens.
ZIS Actions are wrappers for HTTP requests, typically used for simple data transfers. ZIS Actions allow you to send requests (or create external actions) to 3rd-party APIs for systems like Slack.
Finally, a Job Spec object specifies the event triggers and the flow to run. JobSpecs covers native Zendesk events, 3rd-party events, and custom Zendesk events.
Let’s have a look at some of the benefits of using Zendesk native integrations:
Installation is swift and easy.
The integration focuses on one specific tool.
You can sync with the remote side instantly.
You have absolute control over what syncs–and what doesn’t.
You can map multiple issues to one Zendesk ticket.
Potential Challenges of Native Zendesk Integrations
Here are some of the drawbacks of using native Zendesk API integrations:
Error reporting is non-interactive.
You can’t set automatic triggers on the remote side.
Field mappings are limited to uni-directional syncs.
Configuration options are minimal. You cannot sync issues in bulk.
The system is not flexible for other scenarios outside support and development.
The integration is centered around one Zendesk admin account, which could break the integration once the account owner leaves the organization.
Bearing these constraints in mind, you’ll need a third-party integration tool that guarantees a smooth bidirectional synchronization between different work management systems.
What to Consider When Choosing a Third-Party Solution for Integration
The best Zendesk integrations must have the following attributes:
Security
Using a third-party integration to synchronize your data across systems presents security risks; hackers can exploit vulnerabilities in the connector or on the remote side. So when choosing a third-party solution for integration, look for one with a proven track record of protecting sensitive communications.
Also, check if the solution has role-based access, OAuth verification, and multi-factor authentication (MFA), as well as uses HTTPs and other secure protocols to fetch and send data. Additionally, solutions that are ISO 27001:2002 certified must be your top choice.
Versatility
Every company uses a preferred tool for their stack: some prefer ServiceNow over Salesforce, while others find Jira more convenient than Trello.
So, instead of getting a different tool for every platform, you can find Zendesk apps and integrations that interconnect multiple platforms. This will give you the leeway to connect with any client or partner without having to add another tool to your workflow.
Ease of use
Remember that your sales and customer service teams might lack the coding skills required for advanced configurations. To make things easy for everyone, look for a tool that is easy to install and use.
Although some tools require advanced scripting to get some functionalities to work, always look for solutions with an intuitive, low-code, user-friendly interface with drag-and-drop functionality.
Reliability
Automating your syncs doesn’t make it foolproof. One mistake can muddle up the entire synchronization process. To ensure your syncs are successful, use Zendesk channel integrations with a longstanding reputation for reliability. You can read customer reviews from independent sources to get a broader picture of the solution’s competence.
Support
The availability of fast-paced support can make or break your business process. To be on the safe side, look for solutions with excellent customer support. This will save you time by quickly getting your workflow back and running whenever a feature stops working.
One integration tool that fits all these criteria is Exalate. It helps you achieve bi-directional sync across work management platforms, including Zendesk, Jira, ServiceNow, Salesforce, GitHub, and others.
Brands use Exalate for the following reasons:
It provides a secure synchronization environment by using role-based access controls, HTTPS, and a JWT-based token mechanism.
Exalate is a versatile tool that supports integrations between Zendesk and other platforms like Jira, Salesforce, Azure DevOps, ServiceNow, HP ALM, GitHub, and others. You can also use AI Assist with Exalate’s Script mode to simplify the process of creating advanced integration use cases. We’ll discuss more about this in the upcoming section.
It is easy to use, thanks to a user-friendly interface. Besides, the interface is the same on all platforms, which makes it easier to use.
Exalate allows you to create rules and triggers, as well as to customize the code for specific (outgoing and incoming) integration scenarios on both sides.
How to Set up Zendesk Integrations Using a 3rd-Party Solution
To set up any integration with Exalate, you need to install it on each side of the connection.
Here are the steps to follow when installing Exalate as a third-party solution for Zendesk.
Step 1: Start with a plan
Like every other business process, you need to establish a plan and outline the expected outcomes. This plan will help you tailor your data exchange to specific needs.
You also need a properly vetted Zendesk integrations workflow for cross-company integrations because you need to factor in authorizations, API limits, and differences in architecture.
Step 2: Install Exalate on both sides
To start, you must install Exalate as a dedicated app on the Zendesk side. You can do that by visiting the Exalate integrations page or via the Zendesk marketplace.
In the Zendesk Marketplace enter “Exalate” into the search bar.
Click on “Install” on the right side.
On the pop-up modal, select the account where you want to install Exalate. Click “Install”.
The system will ask you for authorization to access your Zendesk account.
You will then receive a verification email. Click on the link in your email to complete the verification.
Voila! You’ve now successfully installed Exalate on Zendesk.
To do the same on other platforms, go through this documentation and choose the instance that works for you. Alternatively, you could watch the installation videos for different platforms.
Step 3: Establish a Connection
The process of setting up connections in Exalate is similar for Zendesk, Azure DevOps, Salesforce, ServiceNow, Jira, and other work management systems.
For the purpose of this article, let’s say you want to sync your Zendesk with Azure DevOps.
Click on “Initiate Connection” to start creating your first sync.
Enter the URL of the destination instance to confirm if Exalate has been installed there. You will receive a pop-up confirmation regarding the status of the destination instance.
You will also see the option to choose between the Basic or Script Mode.
Here is the difference between both installation modes:
The Basic Mode handles simple integrations between 2 platforms, but you won’t be able to customize your configurations. This mode is perfect for trials because it gives you 1000 free monthly syncs.
The Visual Mode is a low-code version of Exalate that allows you to configure both sides of the sync from a single interface.
If you want more flexibility, then the Script Mode is the perfect option for you. Using this mode allows you to configure your (incoming and outgoing) sync on both ends by mapping specific objects to each other. As discussed earlier it also comes with the option of AI-assisted integration.
You can also establish rules and set triggers to control and filter the data being exchanged between Zendesk and other platforms.
Back to the installation. Let’s explore the Basic Mode first. You’ll need admin access to sync data with the destination instance.
If you are the admin, select “Yes, I have admin access” and click “Initiate”.
You will be redirected to the Azure DevOps instance, where you will be prompted to select the project you want to sync.
Select the project and click “Confirm” to proceed. Your connection will be established instantly.
Enter a work item key and click “Exalate” to proceed.
Congratulations! You’ve successfully set up your first Zendesk – Azure DevOps sync.
Now, let’s try this with the Script Mode:
Initiate a connection, enter the destination URL, and select the “Script Mode” before clicking “Next” to proceed.
Enter the names of both the local and remote instances. Add a name and description for the connection and click “Next” to continue.
Select a project for the incoming sync and click “Initiate”.
An invitation code (acting as a secret key) will be generated automatically. You will need to copy this code to the buffer for authentication.
Click on “Copy invitation code”.
On the Zendesk side, click “Accept invitation” and enter the code from the buffer.
Click “Next” to continue.
A modal will appear, confirming that you’ve successfully connected both instances.
Step 4: Configure the Synchronization
Click the “Configure Sync” button to change the synchronization settings. Alternatively, you could go to the “Connections” page on your Exalate console and click the “Edit” icon.
In both cases, you will be taken to a screen with 4 tabs: Rules, Triggers, Statistics, and Info.
We need to focus on Rules for now to configure the rules governing the outgoing and incoming syncs.
The “Outgoing Sync” specifies rules governing the information that the Zendesk side should send. For instance, replica.reporter = issue.reporter means that the reporter of the issue is mapped onto the reporter on the other side.
You can delete any line of code for any entity or object you don’t want to be transmitted to the other side.
Step 5: Set up Triggers
Triggers specify conditions for data exchange between two instances.
To create a trigger, go to the “Trigger” tab and click on “Create Trigger”.
Choose the type of entity you want the trigger to apply to. Then set the conditions for the trigger to work. You can also enter notes to explain how it works.
Click “Add” to complete the process.
Once you are creating the triggers, go back to the connection page and press “Publish” to save and implement the changes.
Step 6: Let the Sync Begin!
There are several ways to sync your Zendesk tickets with other platforms:
Enter the case number in Salesforce (available in Basic Mode) to verify if it exists and initiate the sync from there. The Basic mode works for the most common platform entities like issues in Jira, work items in Azure DevOps, tickets in Zendesk, etc.
Sync the object from its dashboard in the object view (available for Jira, Zendesk, Salesforce, and Azure DevOps).
Use the “Bulk Exalate” or “Bulk Connect” to sync multiple objects with the help of advanced custom options.
Conclusion
Zendesk integrations help improve internal and cross-company communication and collaboration. You can use a properly curated Zendesk integration workflow to sync data and exchange information between platforms like Jira, Salesforce, etc.
Although Zendesk provides native integrations, they present challenges in terms of functionality and flexibility. So, we proposed using a third-party solution like Exalate, because of its user-friendly interface, airtight security, reliability, and extensive support.
Follow the steps outlined in this blog post to install and configure Exalate on Zendesk and other platforms.
Frequently Asked Questions
What is Zendesk integration?
Zendesk integration is the process of connecting your Zendesk CRM with other applications, services, cloud infrastructure, or databases in other to share data from standard and custom fields. Connecting Zendesk with other systems helps organizations to streamline processes and automate workflows, which also improves the quality of services delivered and the overall customer experience.
How many apps does Zendesk have?
According to the data from the Zendesk marketplace, the CRM has over 1500 apps and themes. These apps cover different functionalities, including analysis and reporting, email & social media, time-tracking, quoting, and billing.
Can you integrate Salesforce and Zendesk?
Yes, you can integrate Salesforce with Zendesk using Zendesk for Salesforce integration. Alternatively, you can integrate Salesforce and Zendesk using a bi-directional, third-party integration tool called Exalate. This tool allows you to sync information from fields, including custom fields, in order to unify the efforts of the sales and customer support teams.
What are Zendesk Integration Services?
Zendesk Integration Services (ZIS) refers to a system of different systems that handle integrations within the Zendesk ecosystem. ZIS handles business logic and workflow automation between Zendesk and other work management systems. Using ZIS simplifies the process of building integrations. With the ZIS Connections Service, you can fetch and store API credentials.
Should I use Zendesk integrations?
You should use Zendesk user integrations to automate redundant processes such as manually copying and transferring data between systems. Zendesk integration tools also come with triggers and filters that give you granular control over what you want to share between systems. These features are vital for cross-company integration scenarios where you want to keep some of your data private.
POSaBIT is the premier cannabis point of sale (POS) and payments platform. The system relies on a robust back-end infrastructure and responsive customer support to solve customers’ problems and keep them satisfied.
As a QA Engineer at POSaBIT, Adrian Salazar is responsible for ensuring that the product delivers on its promise of handling robust payments with minimal interruptions. Adrian works with the internal team of developers to test products and features before release.
After months of using Exalate, we reached out to Adrian to ask him about his experience with the product.
Why Choose Exalate?
Asked about the reasons for choosing Exalate over other integrations, Adrian mentioned the following:
Makes the flow of information seamless and flexible.
Facilitates the sharing of tickets with the right department instantly.
Ensures secure communication and information transfer.
Saves cost because you no longer need to add developers on the Salesforce side.
Makes it possible to gather more information from tickets.
Offers excellent product support and online community assistance.
“I’d definitely advise people to join the Exalate community. I was able to figure out a lot from what was going on there. I remember at one point, I had to map specific status from Salesforce to GitHub, and there was already a community question asked there.”
Adrian Salazar, QA Engineer at POSaBIT
Challenges
Challenging communication between dependent teams
Manual data extraction, mainly through Slack
Security of sensitive data
Rigid workflow due to the difficulty in tracking issues
Operating in the cannabis industry is a challenging task for any startup or company, especially when it comes to establishing seamless communication between different teams. Prior to using Exalate, the communication systems between dependent teams at POSaBIT were overcomplicated, rigid, and tedious.
“We needed to get information about what is going on with the dispensaries through Slack and back-and-forth communications. It was quite long, busy, and overcomplicated work.”
Adrian Salazar, QA Engineer at POSaBIT
For example, getting the needed data from support tickets for the sales team had to occur manually on Slack. As a result, internal teams struggled to track and update issues effectively, resulting in a lack of structure within the company’s communication channels. Moreover, their data was at risk of getting lost in transactions.
Also, POSaBIT needs to factor in security when choosing any integration to ensure that sensitive information doesn’t fall into the wrong hands.
So, adopting an integration solution that could sync multiple teams and tickets seamlessly (without them having to leave the platform they worked on) while providing airtight information security was an absolute necessity for POSaBIT.
Solutions
The first attempt to address the issues was to use third-party integrations on individual platforms.
Developers and sales reps at POSaBIT tried to connect cases and internal documentation with GitHub using Zenhub. But it had only limited components for GitHub integration, which made it difficult to add epics and file release reports.
Additionally, teams at POSaBIT started using Zapier when a case was created, but they couldn’t gather enough information from Salesforce and the integration was not as deep as they required.
“Before the PM team had to create tickets for any information that came in through Slack, but now the PM team does not have to worry about that…They’d do their triage to put that information down every other morning. So that increases their chances of not having to go back and forth. If you were doing this without Exalate, you’d have to create the ticket from Salesforce to GitHub manually.”
Adrian Salazar, QA Engineer at POSaBIT
After trying out these solutions to no sustainable avail, they ended up using Exalate because it made it possible to gather more information from Salesforce. They were able to use instances for dev teams, specifically for GitHub and Salesforce.
Optimization of the workflows of independent teams
Faster and easier calls to the client library
Enabling developers and engineers to make changes to cases on GitHub and vice versa
Optimizing costs by adding developers on the Exalate side
Easy mapping of specific statuses from Salesforce to GitHub
High-quality support and an active community
Adopting Exalate helped POSaBIT improve expectations as a startup because it allowed them to create tickets faster without manually generating them on Salesforce–or tracking them individually in Slack threads. This also helped internal teams optimize workflows and stay in perfect sync with one another.
Adrian also marveled at the speed of response from the Exalate support staff whenever the team encountered problems.
“Learning how to map specific statuses from Salesforce to GitHub was easy because we were able to find solutions from community posts and user guides.”
Adrian Salazar, QA Engineer at POSaBIT
Thanks to Exalate’s secure system infrastructure, POSaBIT engineers were able to call the http client library faster and make changes to cases on GitHub and vice versa. And by adding developers on the Exalate side, they were able to save more costs compared to adding them on the Salesforce side.
“Without Exalate, we would have had to add each developer to Salesforce to be able to track that information, which would have been a huge cost on our side.”
Adrian Salazar, QA Engineer at POSaBIT
Future
Based on the current experience, the company is considering using more instances for internal and external support issues. As the company continues to grow, Exalate will help them create a network of connected teams, clients, and companies.