ServiceNow eBonding: The Complete 2025 Guide

ServiceNow eBonding

ServiceNow is a popular ITSM platform that helps many companies deliver a world-class IT service management experience. A lot of ServiceNow users also want to collaborate with other enterprises working as their partners, managed service providers, other ITSM organizations, or customers for their day-to-day operations.

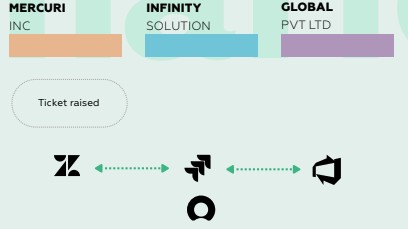
eBonding can help these different applications residing in different organizations interact and exchange information securely. Also, if 2 ServiceNow instances need to be synced, then it is logical to discuss the ServiceNow eBonding Spoke. 

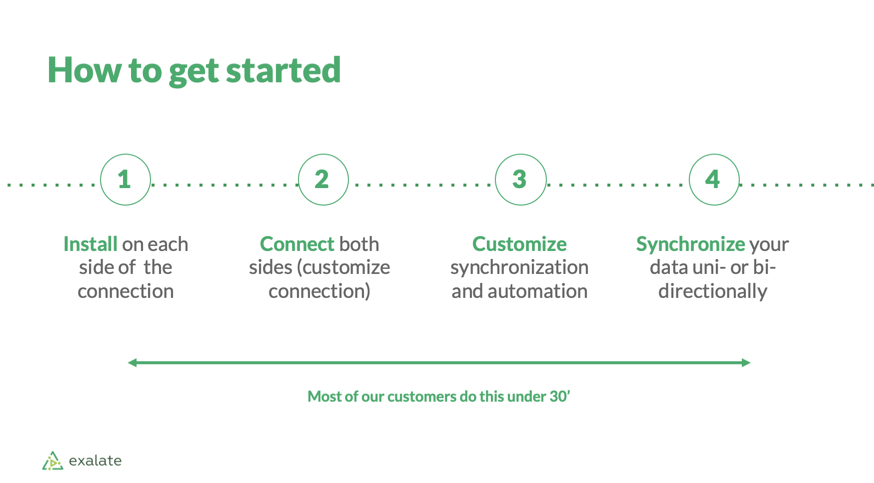
This is a guide where we’ll discuss the eBonding Spoke in detail, enlisting its use and benefits, and also have a look at a few of its use cases. Then see how it’s implemented and also have a brief overview of other players in the eBonding market.

So let’s get this show on the road! 

What is eBonding? 

eBonding (also called bridging) is a form of system integration that makes it possible to exchange data between multiple applications. It is a way of bi-directionally synchronizing data between unique companies and their systems. The data is sent across automatically, in turn streamlining workflows. 

With eBonding in place, you can choose to filter out what information you want to share with the other team and how you want to receive the information. This prevents unauthorized access to shared information and helps maintain privacy and confidentiality. 

In today’s data-driven world, the importance of having consistent, coherent, and accessible data cannot be stressed enough. People all over the world use different applications or tools to manage their data for various purposes like service desk, project management, software development, etc. 

So, when these people sitting across completely different applications want to share data that might be useful to the other team, they have to find ways to do it automatically. Because if they resort to manual ways of phone calls, emails, or chats, the data passed around can get duplicated, altered, or lost. It can even lead to frustrating teams, increased friction, and negative customer experience. 

Why is eBonding important?

Say your customer’s ticketing system is using an application to keep track of requests, reply to, and resolve tickets within their SLAs. But not all tickets can be closed by the customer support agents, in which case they need, maybe their managed services provider (MSP) to resolve those tickets. 

So they pass the ticket information to the MSP. The MSP then starts working on the ticket. The entire time they are working on the ticket, the customer support agent is unaware of what needs to be communicated to the customer. Once the ticket is resolved, the MSP again manually passes over the information required for the closure of the ticket to the customer support agent. 

As clearly seen, information is indeed exchanged, but manually. And as common sense prevails, manual mistakes are bound to happen. A bit of research from hereon will open the doors to eBonding

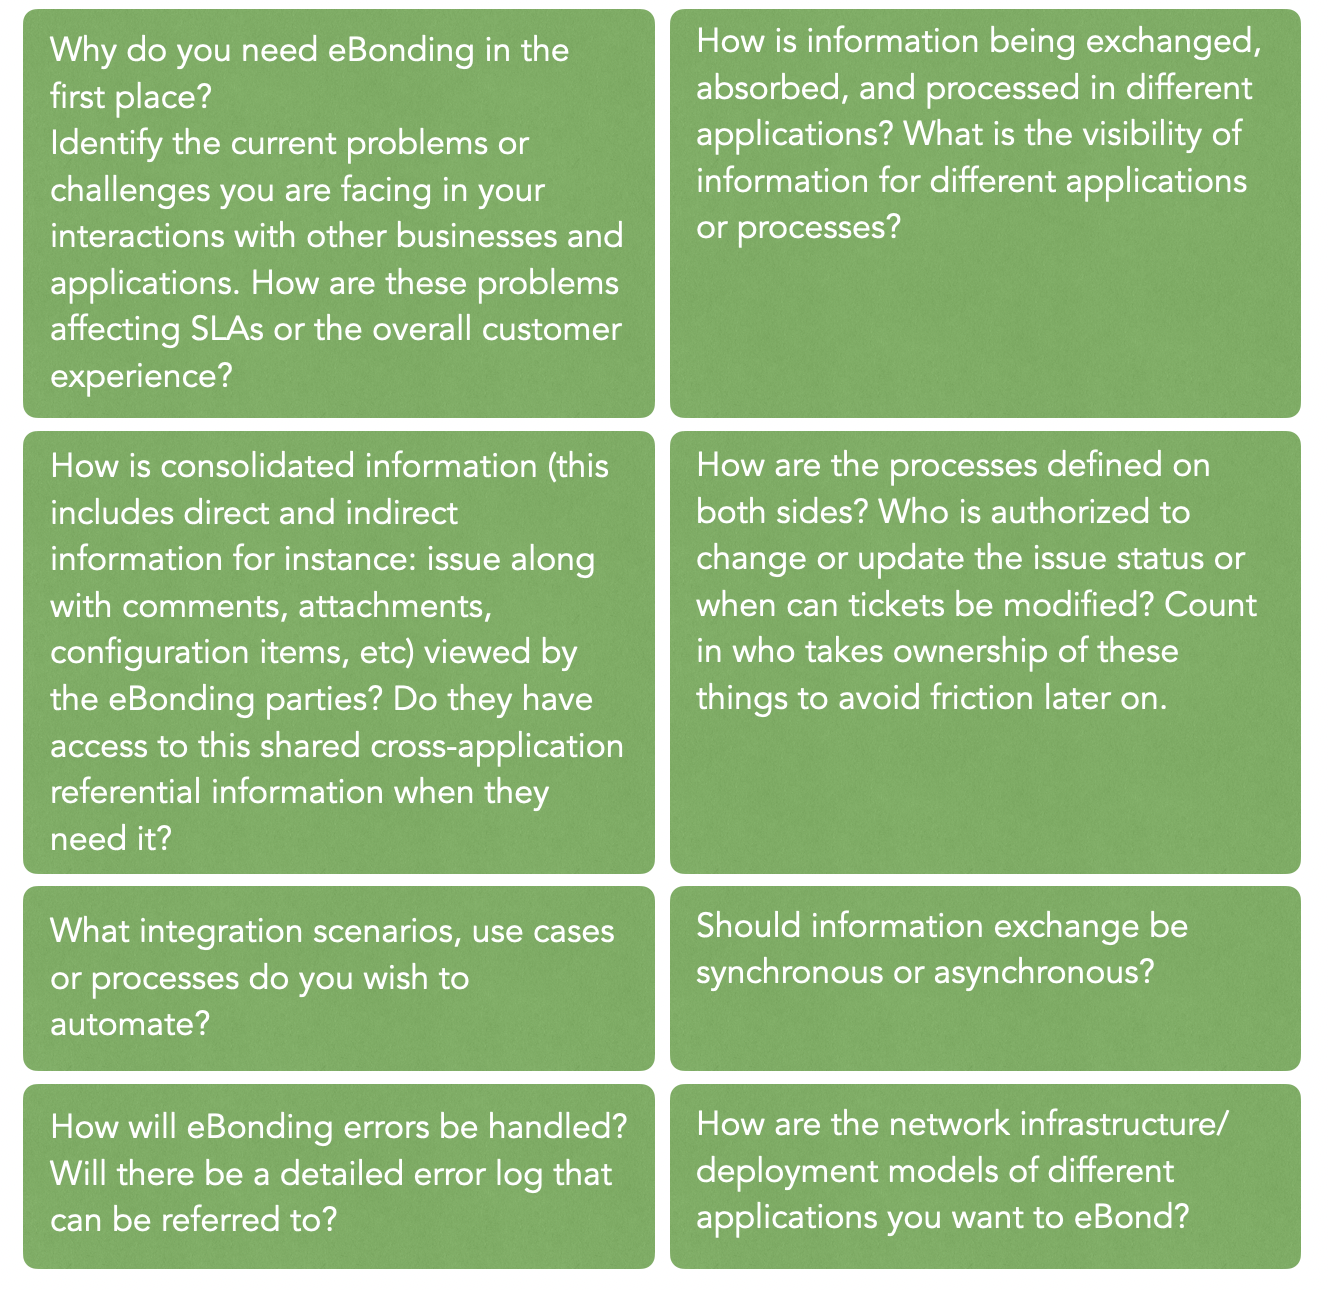
So is eBonding the right solution for your problems? 

Yes, if you and your team need access to the same data then you can definitely give eBonding a thought. 

But it’s important to understand here that eBonding does not simply mean bi-directionally synchronizing information between 2 applications. It is much more than that. It requires careful planning, allocation of resources, and the right tools, systems, and processes in place, so the eBonding solution can work as intended. If implemented in a jiffy, without the right processes it might lead to an inelegant and ineffective solution.

ServiceNow eBonding Spoke: Introduction

What is ServiceNow?

For those of you who aren’t familiar with ServiceNow, it’s a popular ITSM solution that helps companies manage digital workflows for their enterprise operations. 

ServiceNow

eBonding 2 ServiceNow instances (using an eBonding spoke) or a ServiceNow instance with other applications (using IntegrationHub) within the same company or with other companies acting as customers, suppliers, vendors or partners has been popular for some time now. 

With such an implementation in place, data/ messages between 2 systems can be exchanged securely. These messages have a predefined format so that each end of the communication can understand and make sense of them. 

What is IntegrationHub?

IntegrationHub is ServiceNow’s capability to automate integration tasks using its own Flow Designer. It also supports custom integrations and requires a separate subscription. 

IntegrationHub executes 3rd-party APIs as a part of a flow when a specific event (like creating or updating an incident) occurs in ServiceNow. This kind of integration is executed with the help of Spokes that are easy to configure and require no coding. There are different spokes to help integrate ServiceNow with different applications like Slack, Jira, Zoom, GitHub, GitLab, Salesforce, etc. 

The integration patterns supported through these spokes have limited capability in terms of the use cases supported, and in case there is a need for a certain customization (not included in the default flow) then a request to the creator of the Spoke needs to be made.  

eBonding Spoke of IntegrationHub

Let’s also have a look at what eBonding Spoke is. 

As mentioned above, IntegrationHub has various spokes to connect ServiceNow with different applications. Out of this, one is the eBonding Spoke which allows synchronization of incidents across 2 ServiceNow instances. Common integration design patterns are used by this Spoke serving a common use case: to synchronize incidents across ServiceNow instances. 

The best thing about this spoke is that you do not require an IntegrationHub or Orchestration subscription. It is included by default (OOB capability: Out-of-the-box) in your ServiceNow instance, so you should be able to eBond incidents across multiple instances. 

Here’s how eBonding achieves this:

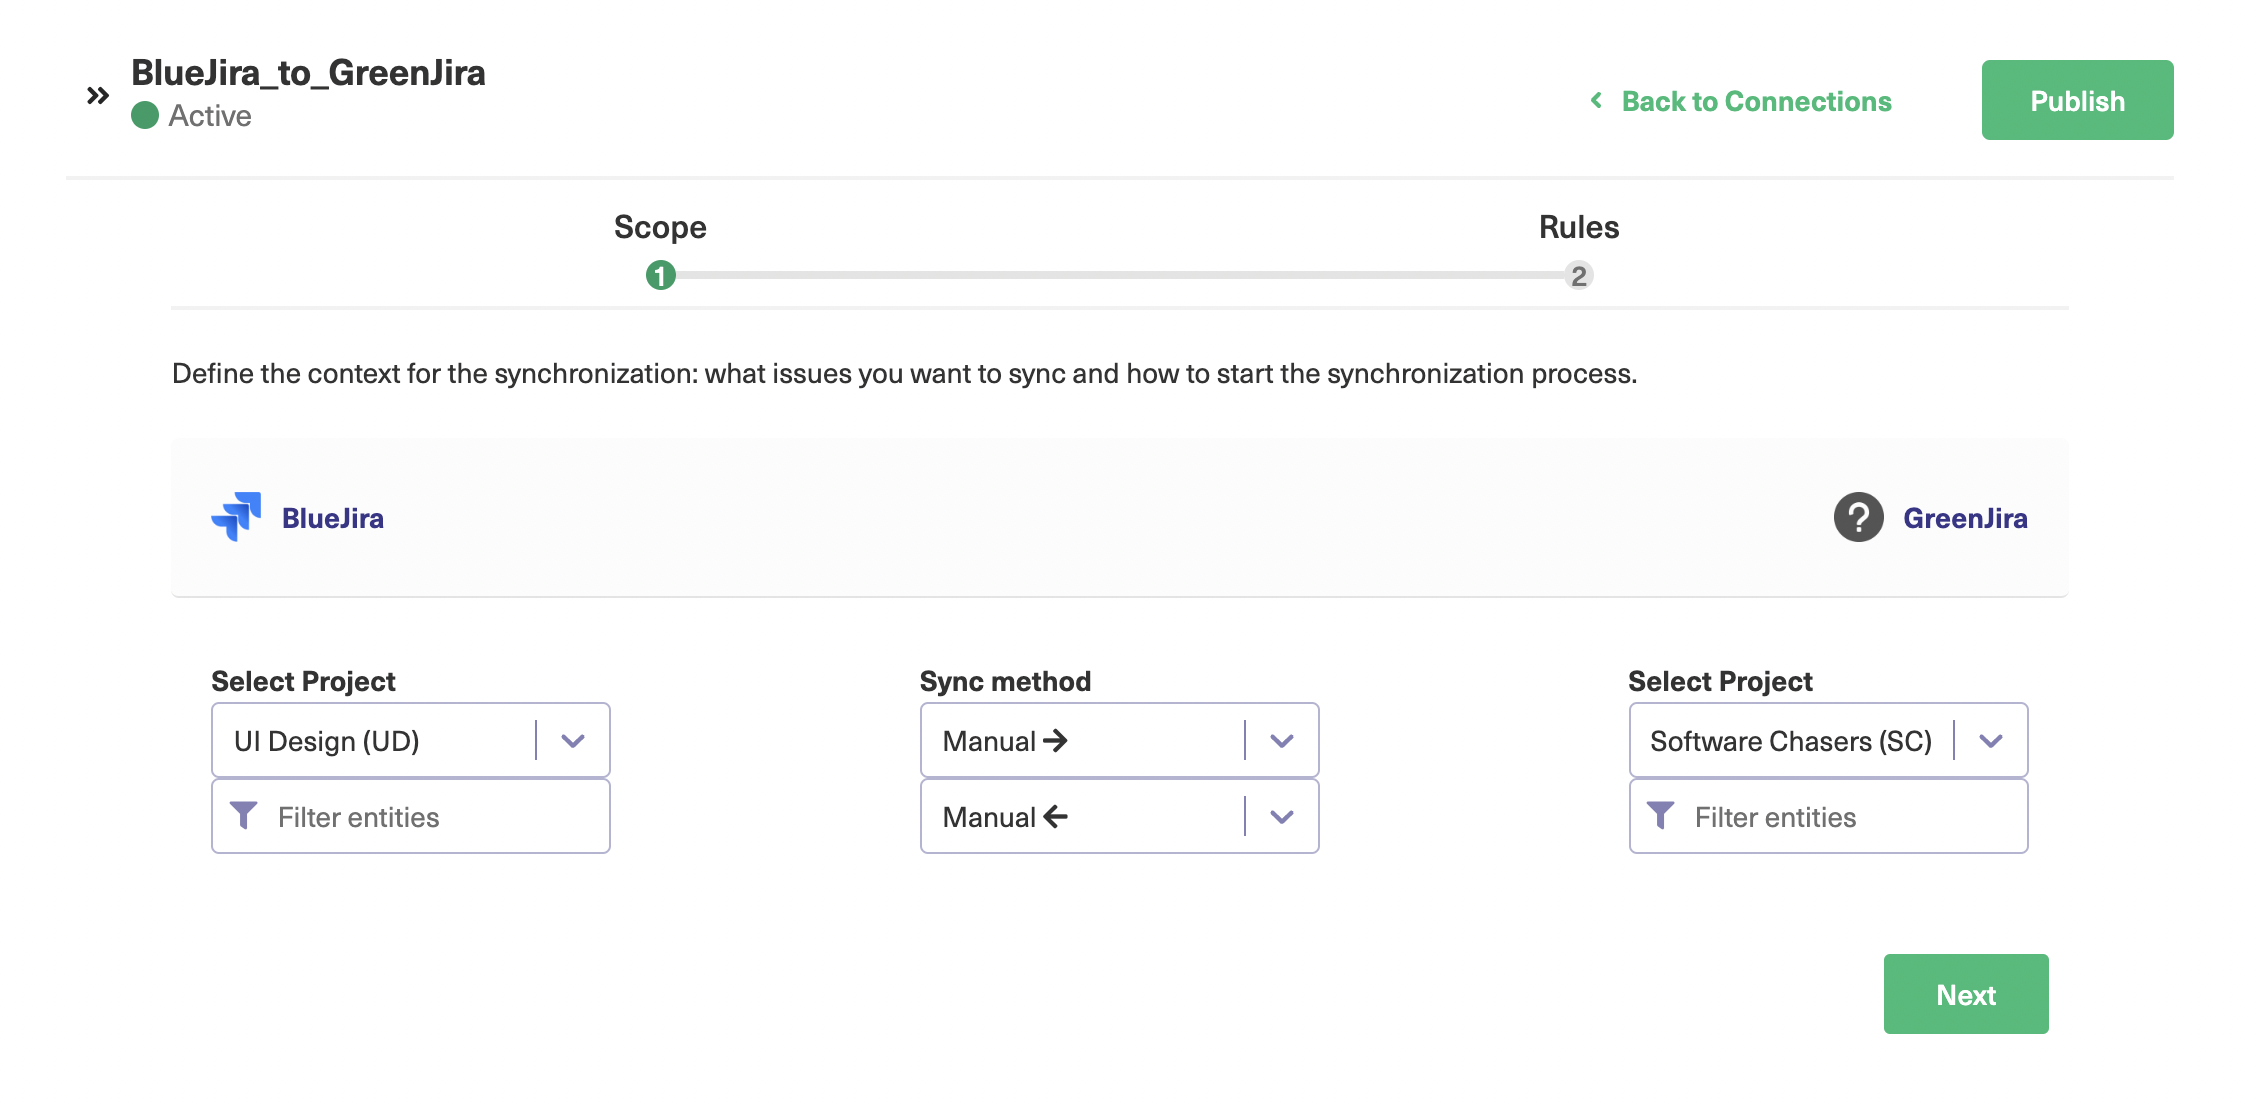
Basic eBonding spoke actions

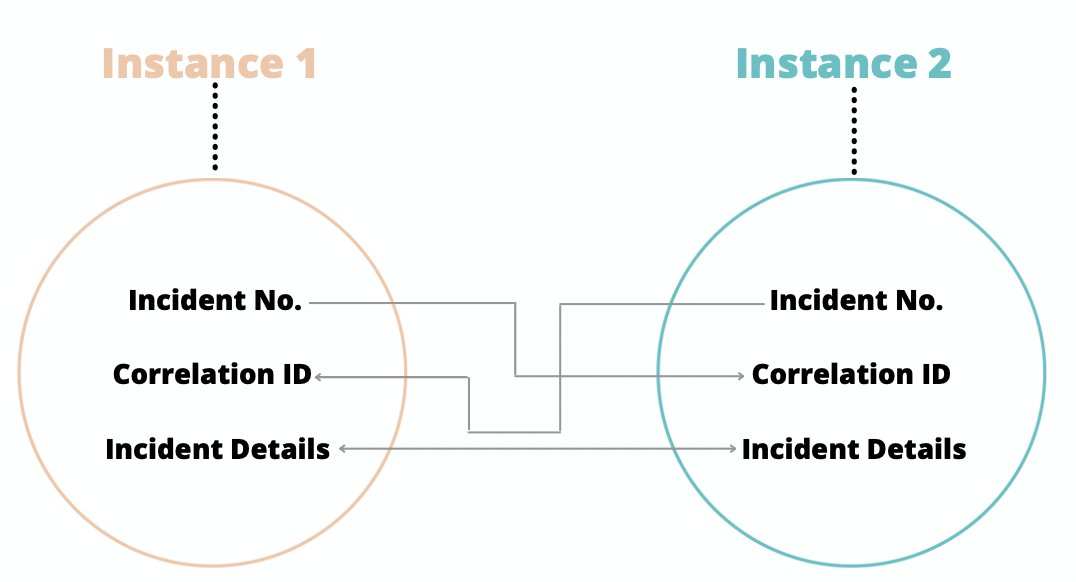
Imagine you have 2 production ServiceNow instances. Let’s call one the source system; this is to manage external customer-facing operations. The other is the target system; to manage your internal operations. 

The need here is to connect these 2 instances such that both have identical incidents and their referential data. Suppose an incident originates at the source system, then a matching incident must be created on the target ServiceNow instance as well. Updates and changes to the respective incidents are then tracked and reflected on both sides. 

For such a use case, ServiceNow’s eBonding Spoke supports the following OOB actions. 

  • Create remote incident action
  • Lookup remote incident action 
  • Update remote incident action

These actions are pretty self-explanatory, but let us discuss them in brief.

Create remote incident action

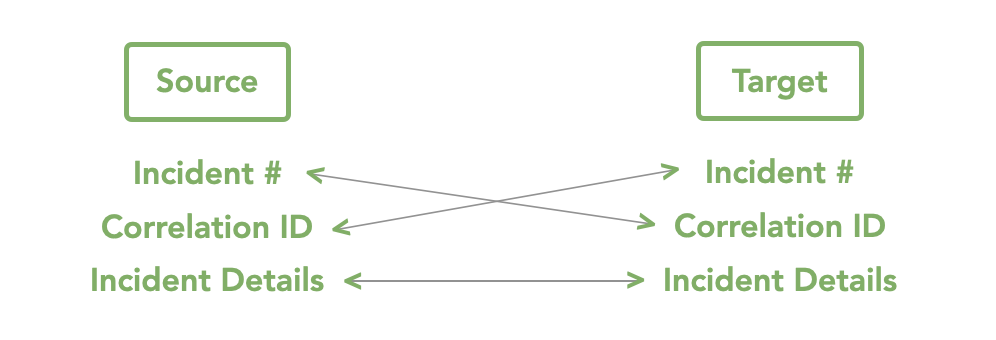
According to the use case we have discussed above, the incident originates in the source system and needs to have an identical incident on the target system. For this, the target incident is created from the details of the source incident. 

So the source incident number is passed as the Correlation ID on the target incident. Once this is done, the target incident number is updated as the Correlation ID on the source incident. This helps both instances to correlate with each other through their incident numbers. 

This action is for when a new incident needs to be created.

Sync correlation details in ServiceNow

The next 2 Actions are used for: when an existing incident is eBonded and some actions like updates to an incident or simply fetching the incident details need to be done.

Lookup remote incident action 

This action, as its name suggests, is used to look up the remote incident details like the short description, description, priority, etc. So the remote incident’s details are fetched with the help of the Correlation ID and provided to the instance requesting them. 

Update remote incident action

This action is used when we update the source incident, and those updates need to be reflected on the target incident. So the Correlation ID is fetched from the source incident and the remote incident is looked up. Then the details on the target incident are updated from the source incident.  

Having based our background on understanding what ServiceNow has to offer in terms of integration capabilities and also understanding the basic actions that eBonding Spoke supports, let us also have a look at a few use cases where such capabilities can help you. 

ServiceNow eBonding Spoke Use Cases

ServiceNow as we have already seen can be integrated with other applications. But since we are on the topic of eBonding right now, let’s see how bonding 2 ServiceNow instances can help us.  

Use Case 1: MSPs

Perhaps a use case you can already envision is an MSP that has its own ServiceNow and wants to integrate with its customer’s ServiceNow instance. 

Customer tickets (aka incidents) are often dealt with by support agents sitting at the customer site on a tight SLA. They usually try to resolve such incidents themselves. But suppose they come to know that the incident is something that would require intervention from the development team, working as the MSP here. 

In this case, eBonding the incident on the ServiceNow of the MSP would help the support agents avoid manual duplication and stay in the loop regarding the current status of the incident. All this can be done with each team viewing it in their own instance. 

Use Case 2: ServiceNow to ServiceNow

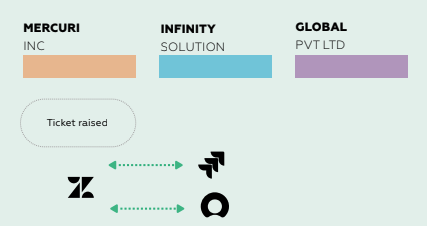
It is not uncommon to eBond different ticketing systems of your suppliers, contractual partners, vendors, or customers, all having their own ITSM systems, maybe ServiceNow itself. This means that information must be passed between these internal or external ServiceNow instances. 

An eBonding integration here can help these unique companies exchange ticketing information with each other which can help them avoid the manual way of creating duplicate incidents in each other’s ServiceNow instances. This can help increase visibility, help the right people get access to the right information, at the right time, and consolidate a data store for better reporting and insights. 

Having seen how an eBonding integration can help you avoid context switching between different ServiceNow instances, let us buckle down to see how an eBonding spoke can be implemented.

How to eBond 2 ServiceNow Instances Using eBonding Spoke 

As we have discussed above, the eBonding Spoke uses Correlation ID to relate both source and target incidents. So the source incident number is the Correlation ID on the target instance and vice versa. 

Step 1: Request the ServiceNow Personal Developer Instances 

Probably the first and the most obvious thing you would need to do is request a ServiceNow personal developer instance. It’s super easy and quick.

But since eBonding spoke works with 2 ServiceNow instances, you need to have another one. 

Once you have both of them in place, start by enabling the ServiceNow IntegrationHub Installer plugin. In case you don’t know how to do it, please follow the instructions on this page

Step 2: Create Credentials in the Source Instance

For this implementation, I have the following 2 ServiceNow instances:

Source instance: https://dev79664.service-now.com/

Destination instance: https://dev21491.service-now.com/ 

Note: You will need the admin user ID and password for the destination instance, i.e dev21491.

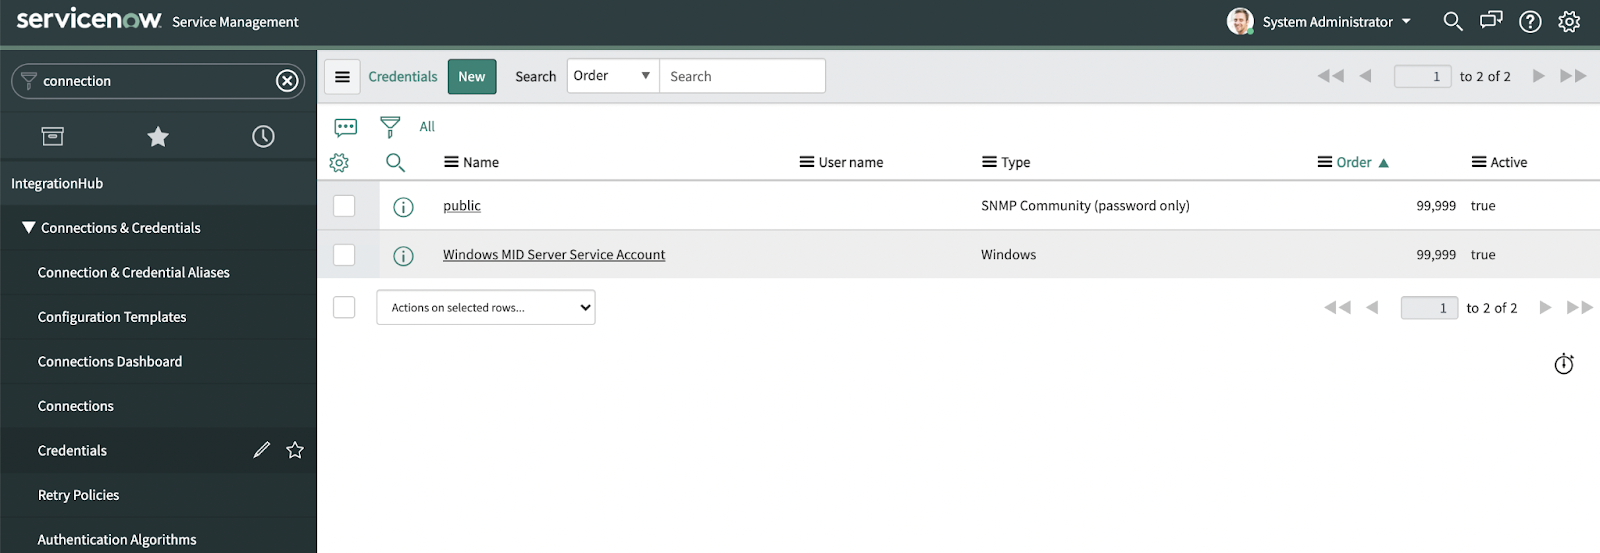
On the source ServiceNow instance (dev79664), navigate to “IntegrationHub” >  “Connections & Credentials”. For this, you can simply type the text in the left-hand search bar. 

Then click “Credentials” in the left-hand menu. 

servicenow ebonding spoke connections and credentials

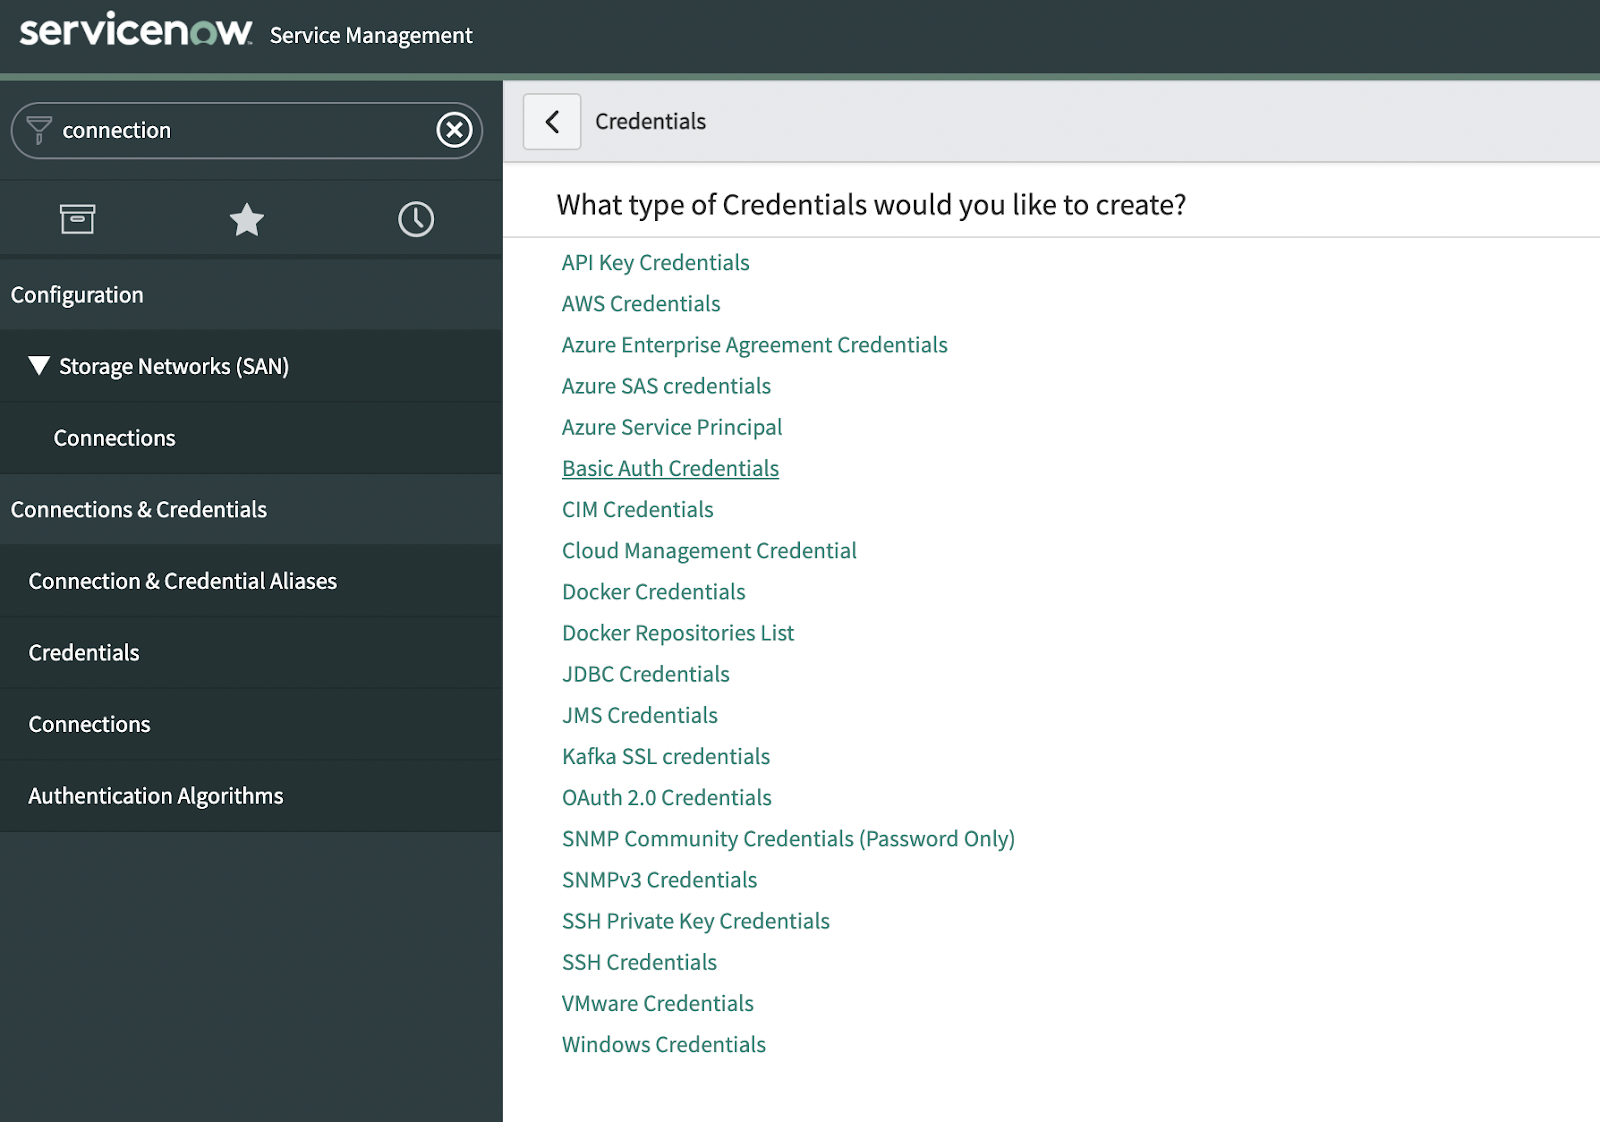
Click on the green “New” button in the top-center of the screen. 

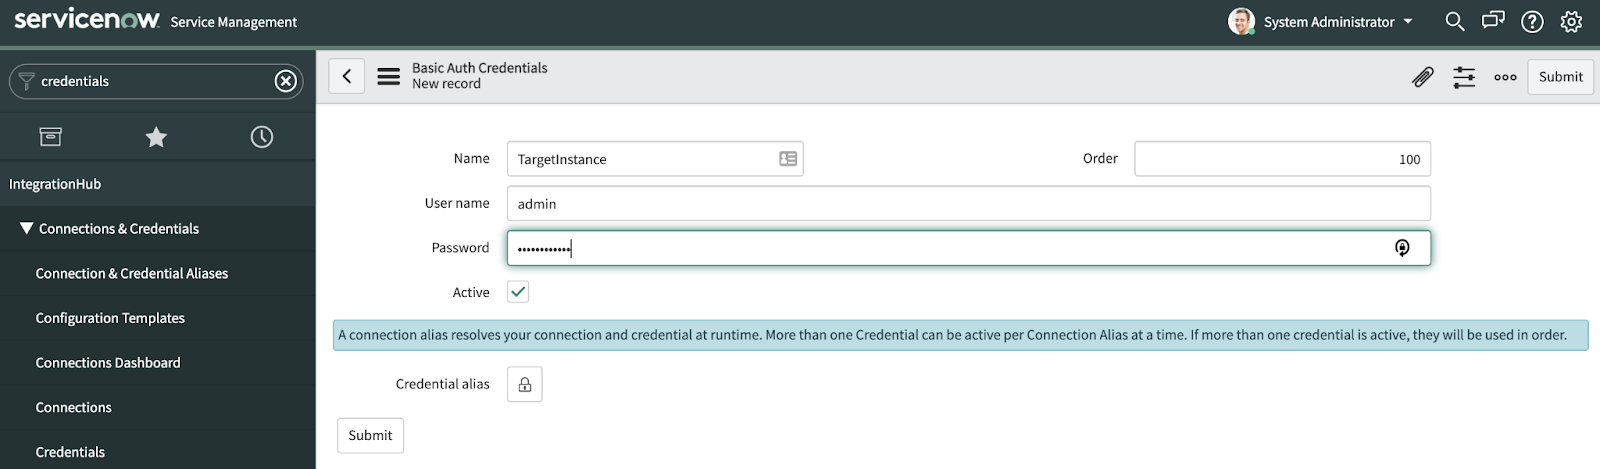
From the list, select “Basic Auth Credentials”. 

servicenow spoke basic Auth credentials

The next screen is where you will enter your destination instance credentials. 

So give a name of your choice in the “Name” textbar. Enter the “User Name” and “Password” of your destination instance(dev21491). 

Then click “Submit”.

This will successfully create credentials for your destination instance. 

servicenow instance credentials

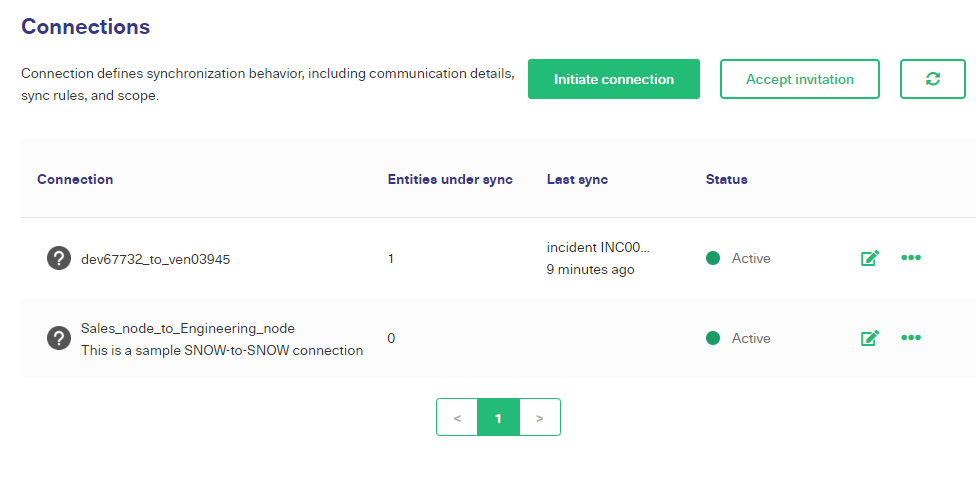
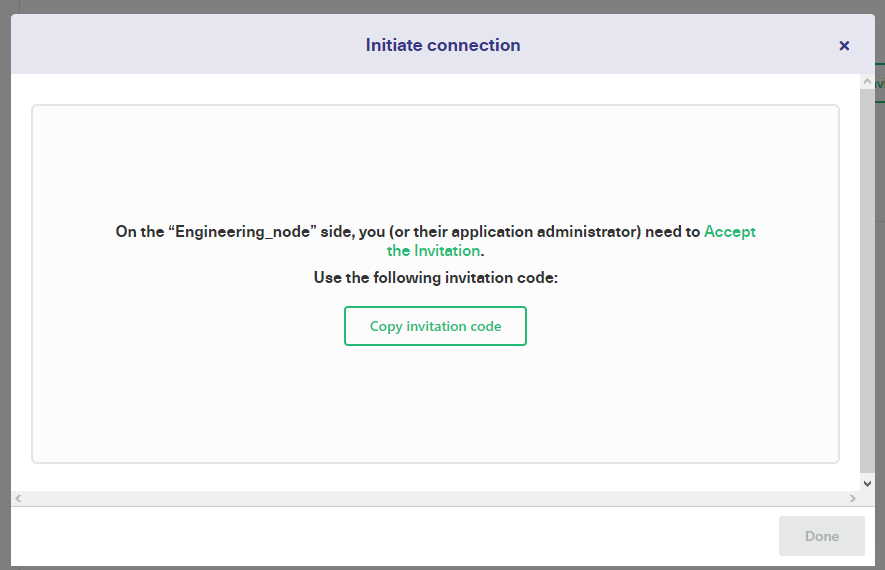
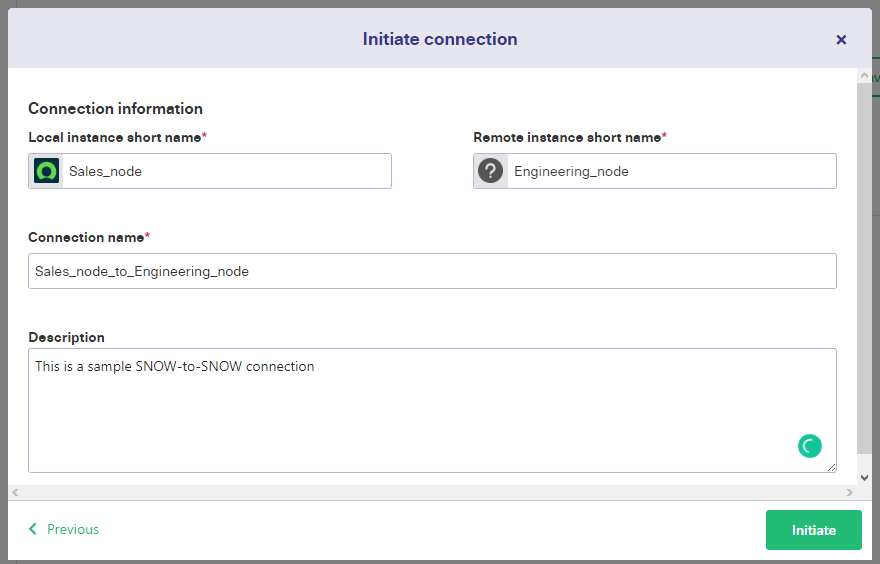
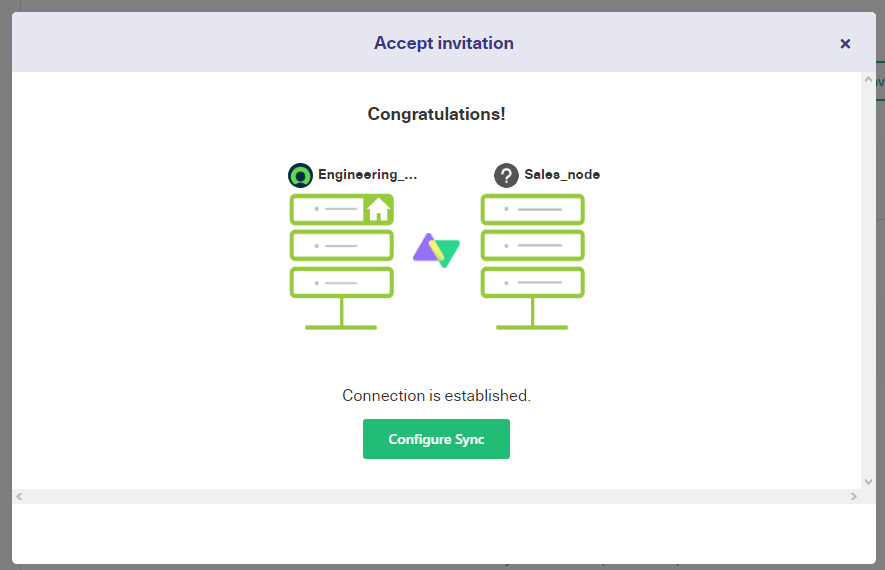
Step 3: Create Connections in the Source Instance 

A connection needs to be created between the 2 instances now. Remember that the number of connections you create will depend on the number of target ServiceNow instances. 

Here, I will show one, but the procedure is the same for others. 

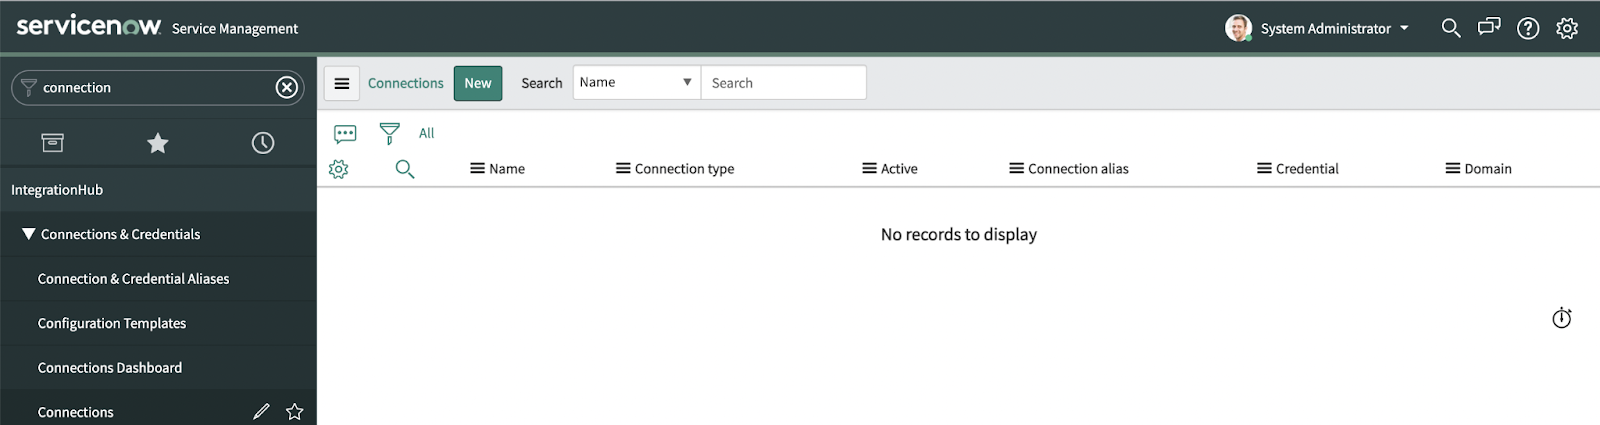
Navigate to “Connections & Credentials” again, but this time click “Connections”. 

And then click “New” again.

new connection servicenow spoke

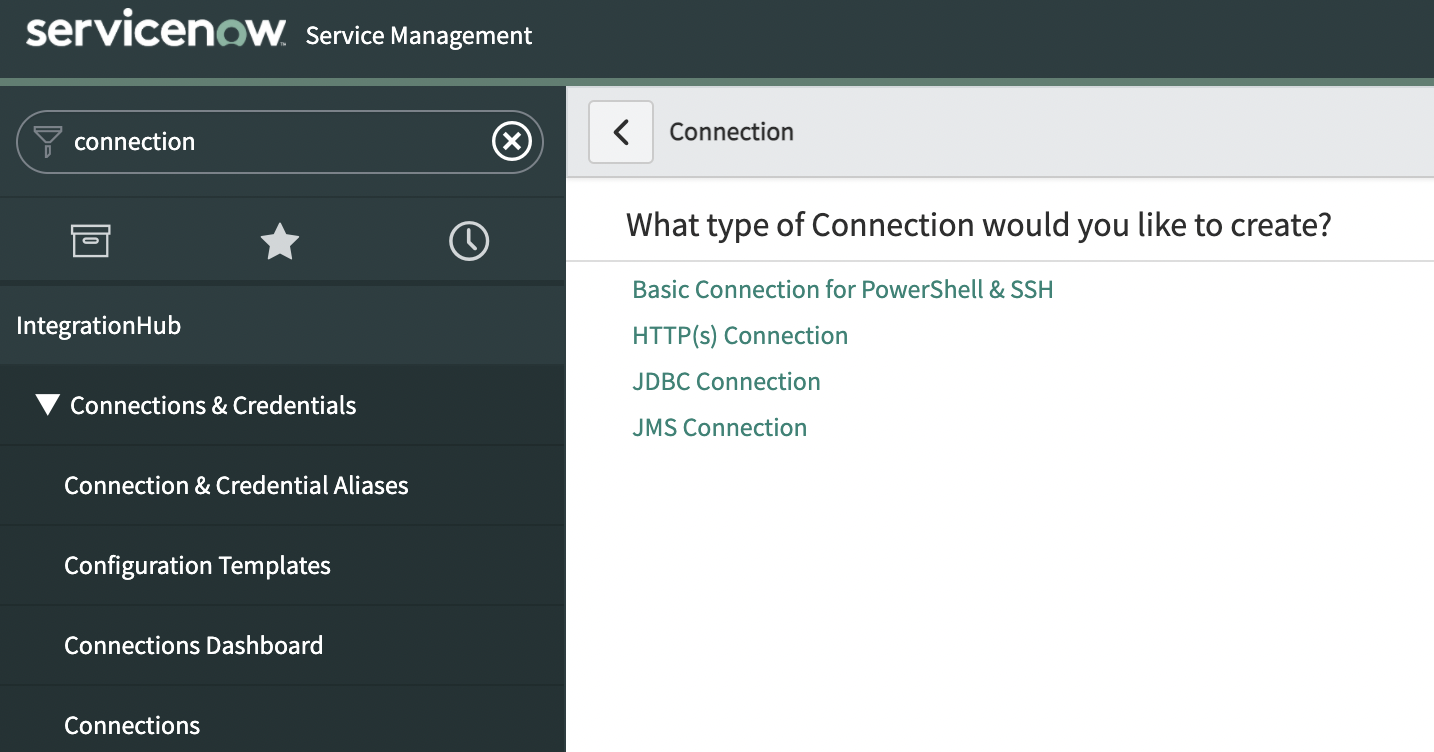
Select “HTTP(s) Connection” from the list. 

servicenow HTTP(s) connection

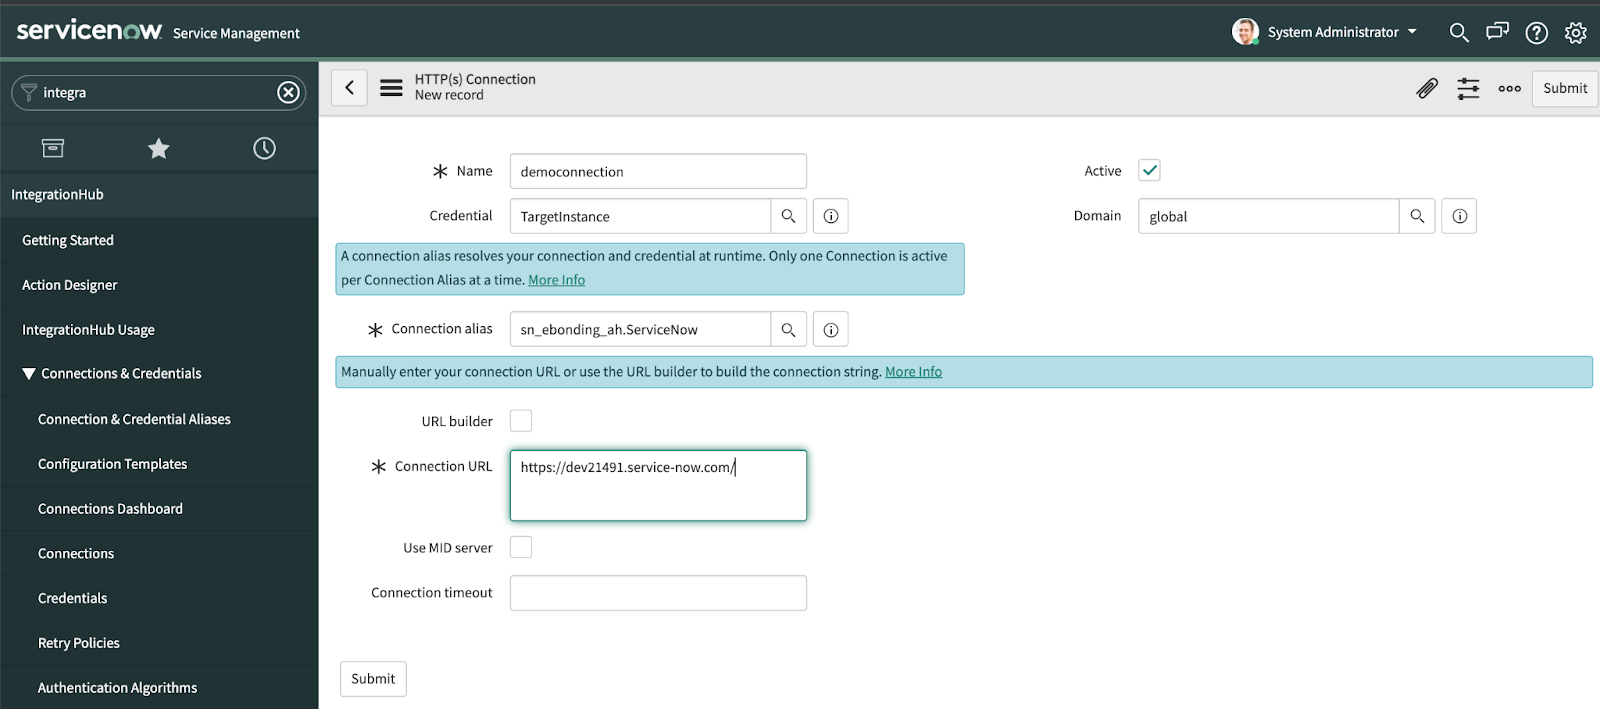
On the “New Record” form below, fill in the details as follows:

Name”: Can be anything. I have given the name “democonnection”. 

Credential”: Click on the search bar to select the credentials you have created in step 2.  

Connection alias”: Click on the search bar next to it and select “sn_ebonding_ah.ServiceNow”.

Connection URL”: Enter the URL of the destination ServiceNow instance. 

All the other fields can remain the same. Once done, click “Submit”. 

servicenow spoke connection

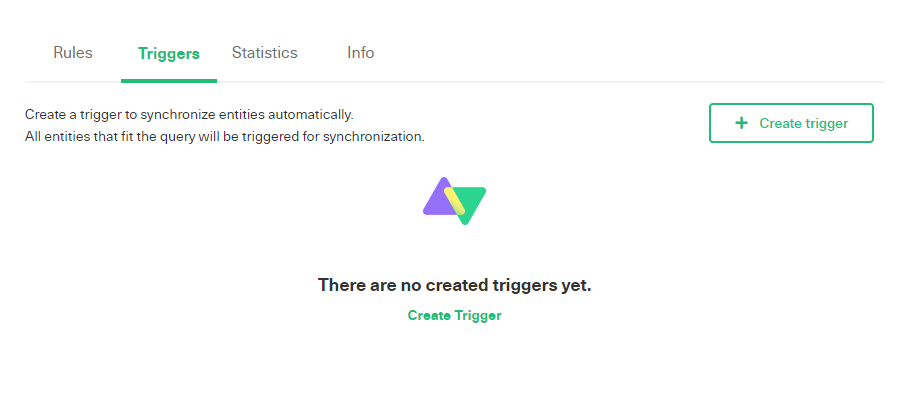
Step 4: Design the Flow

After setting up the connection, it’s time to design the eBonding flow. This flow represents how you want to configure the eBonding connection, like specifying the condition for the incident to be synced to the destination instance, etc. 

First, navigate to IntegrationHub> “Action Designer”. 

IntegrationHub action designer

Under the “Actions” tab, click the “New” button on the extreme right. 

Activate a new flow in ServiceNow

Select “Flow” from the list. This will open the Flow designer. 

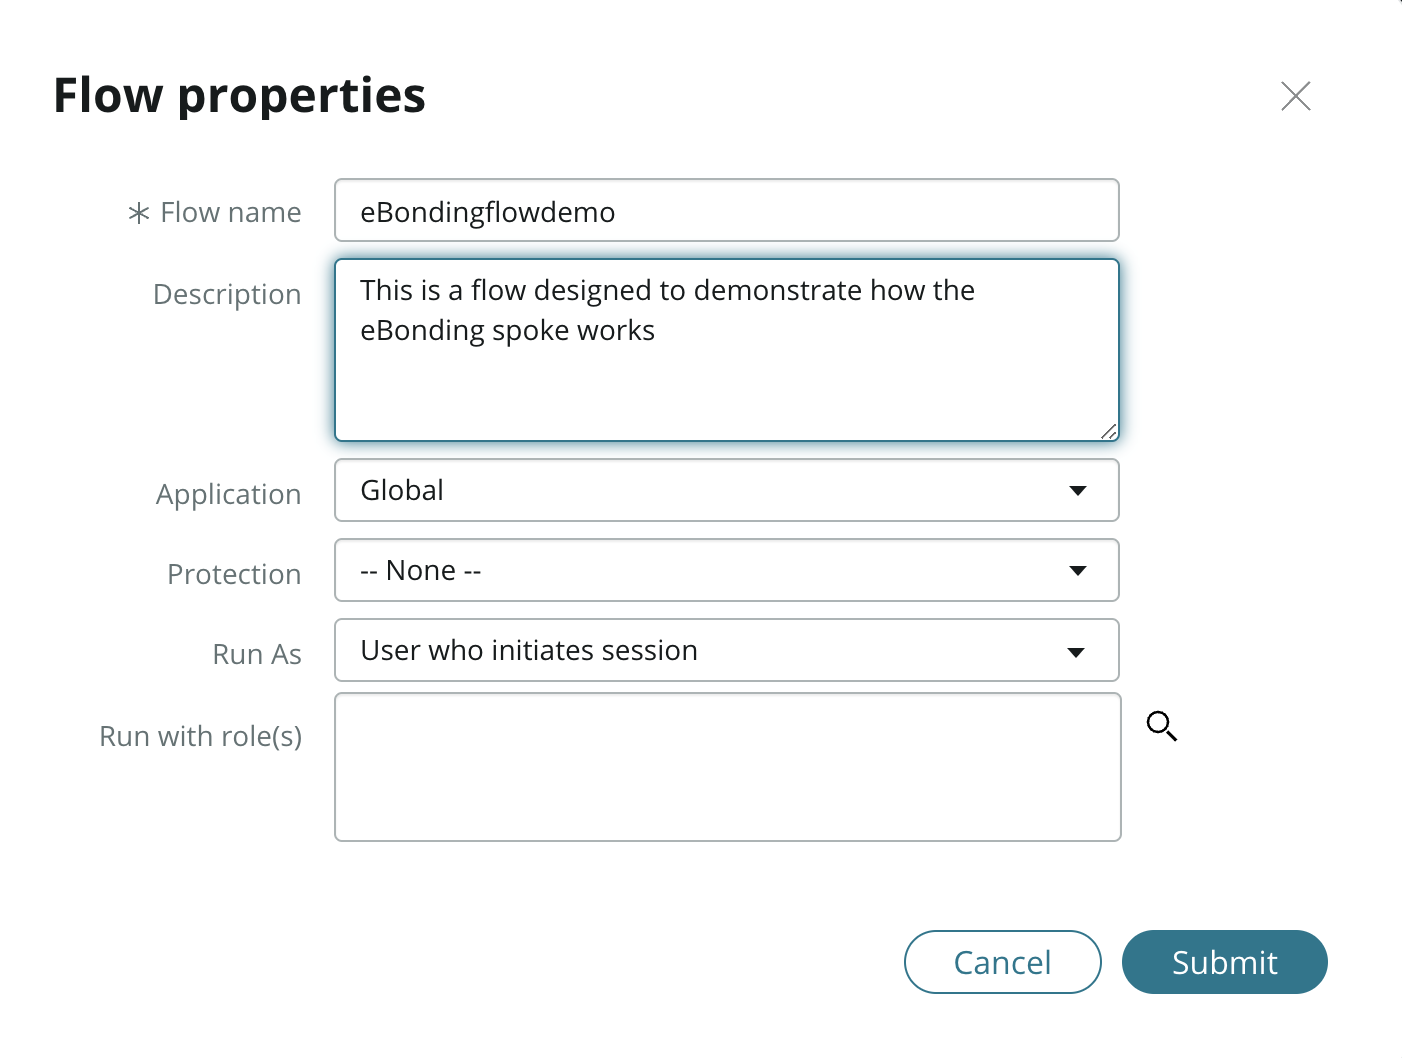
Next, give a name to the flow, provide a description for it, and click “Submit”.

On this form, you can choose the roles that can access this flow, or choose who should be able to run this flow and the like. I have kept the defaults. 

ServiceNow eBonding spoke flow

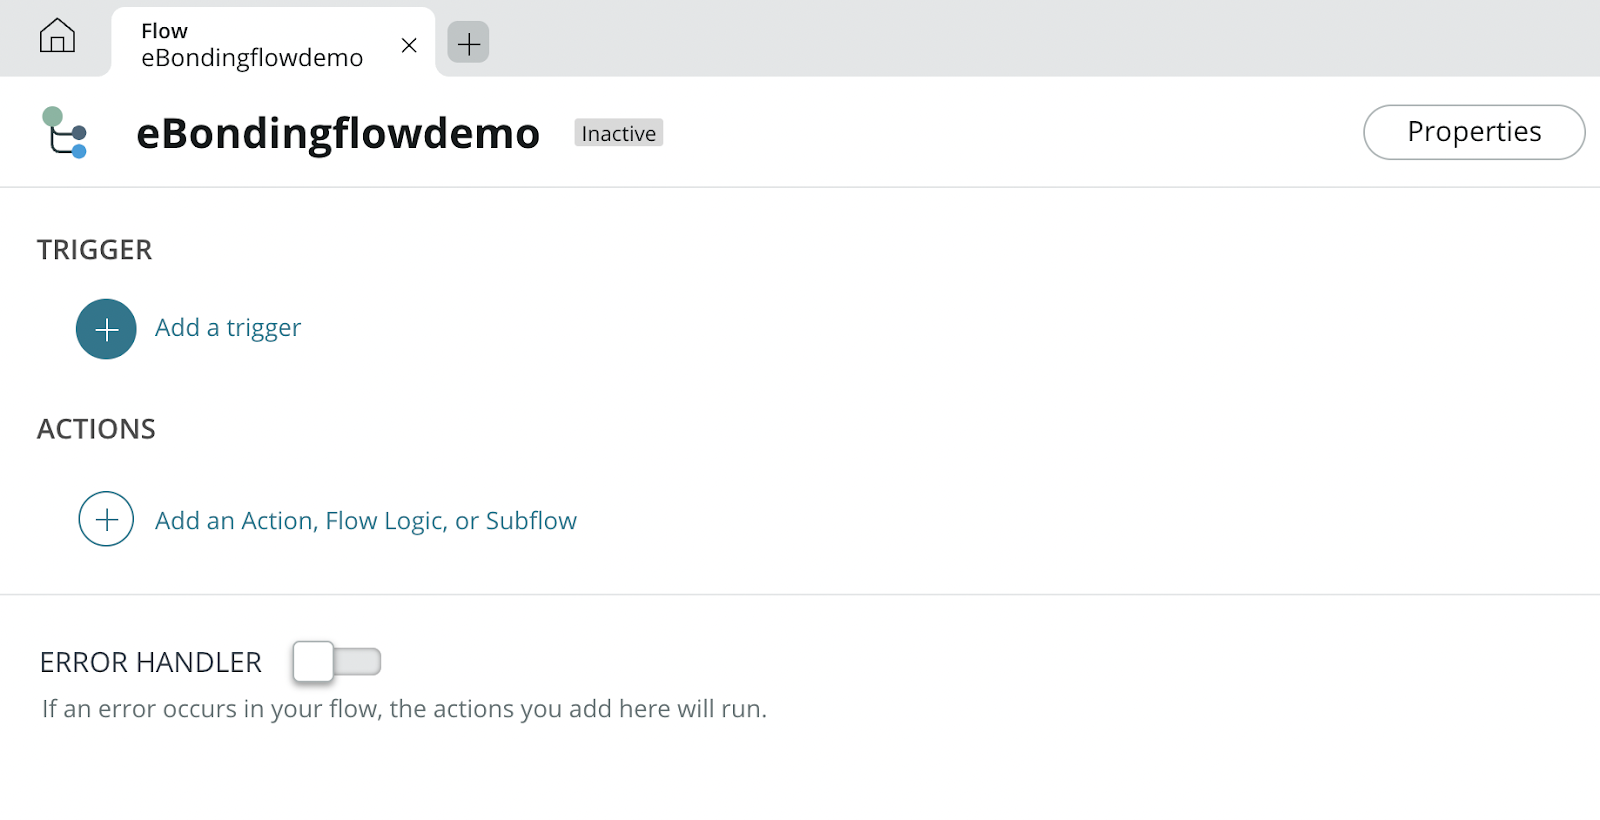
Now you have to add triggers and actions to the flow. 

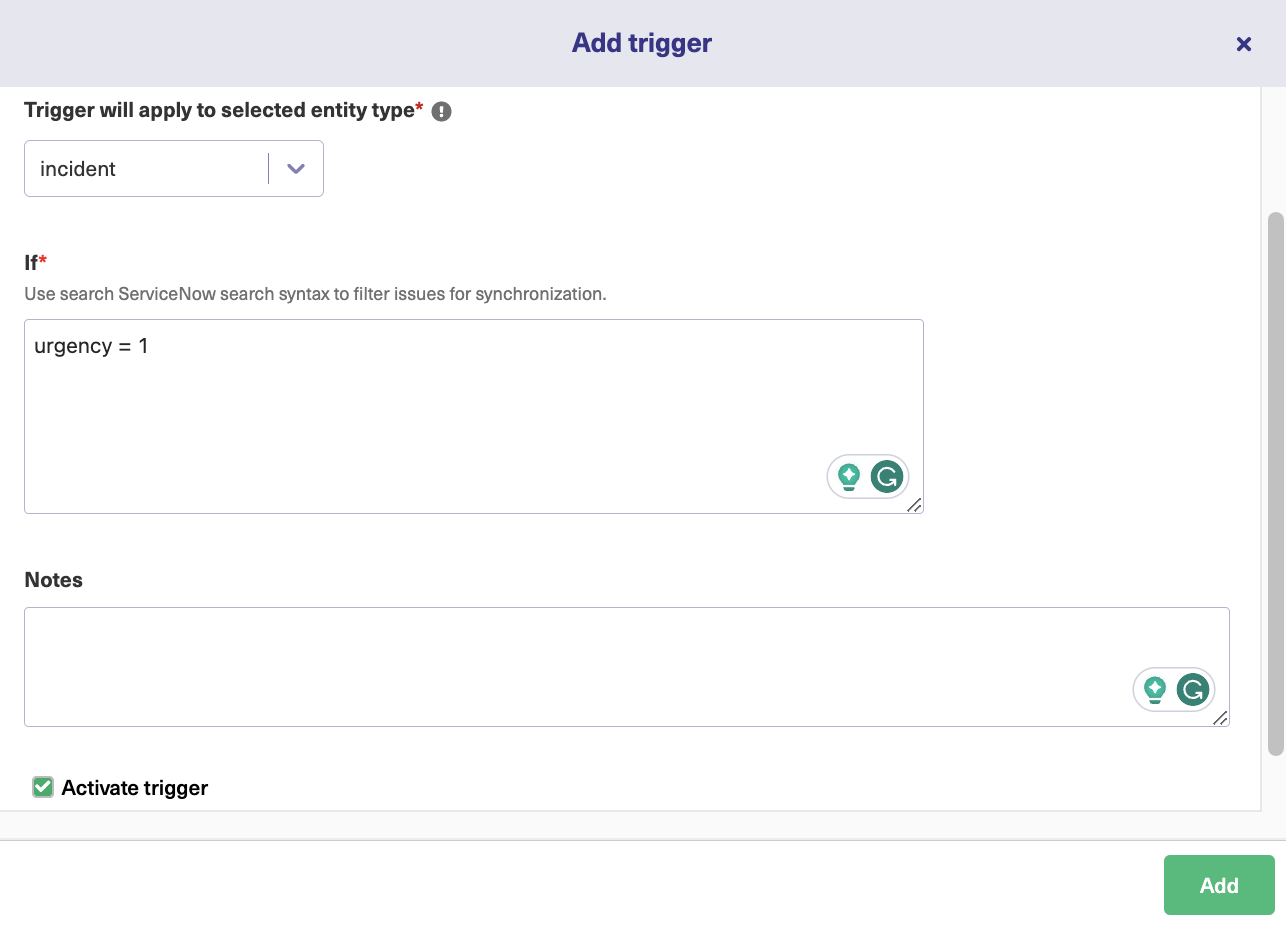
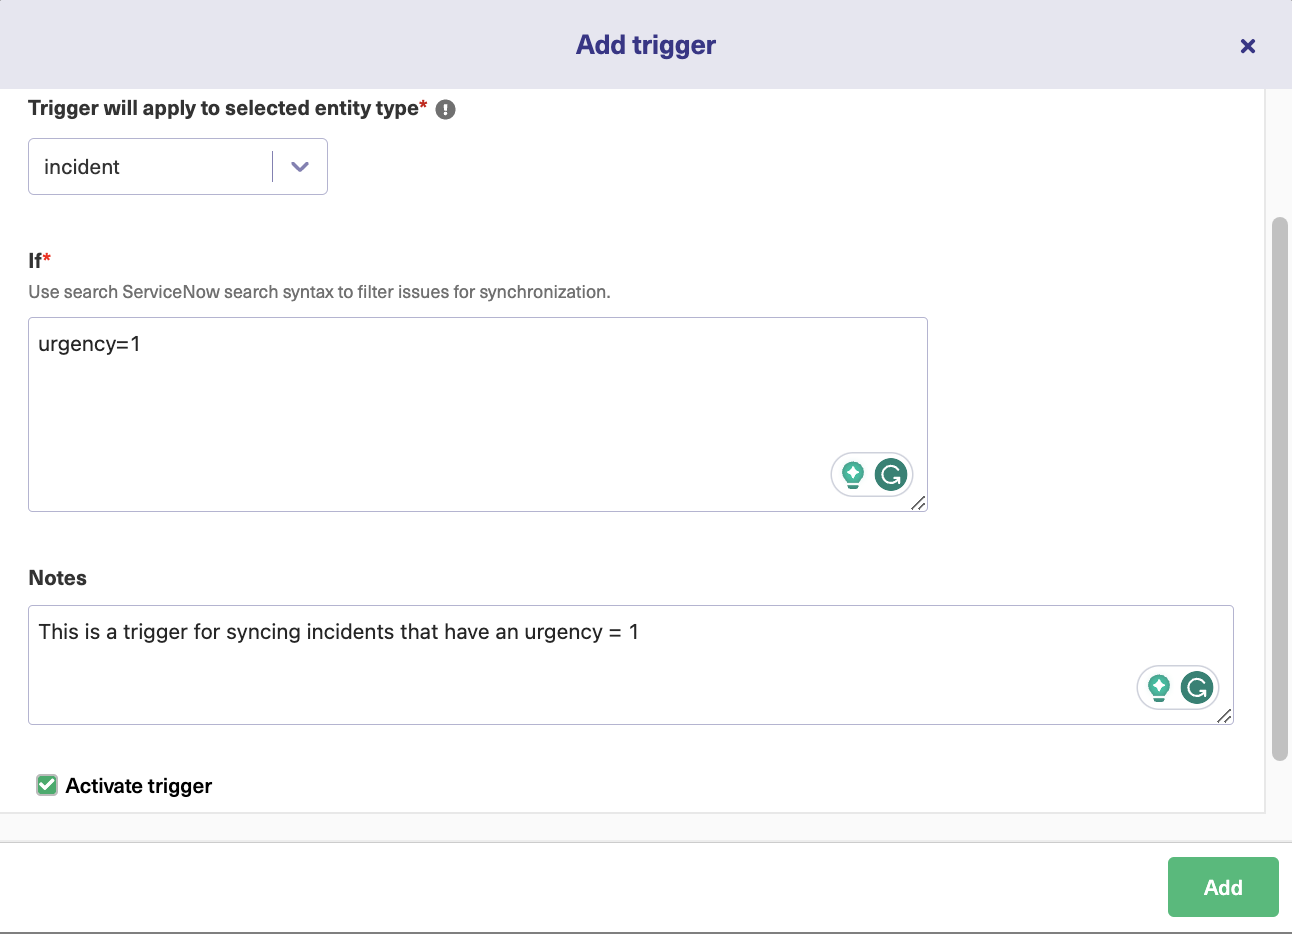
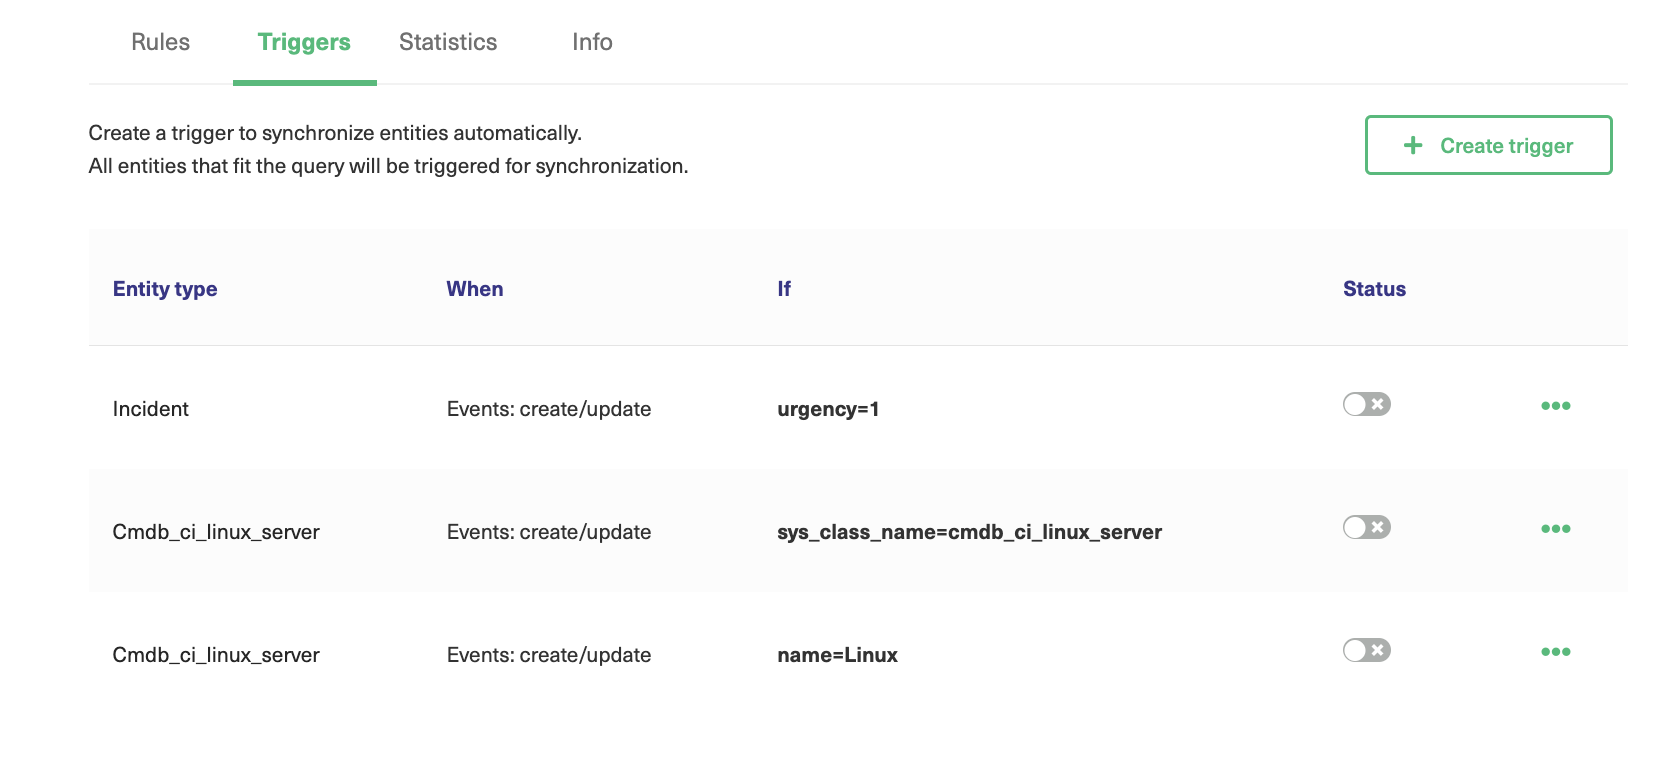
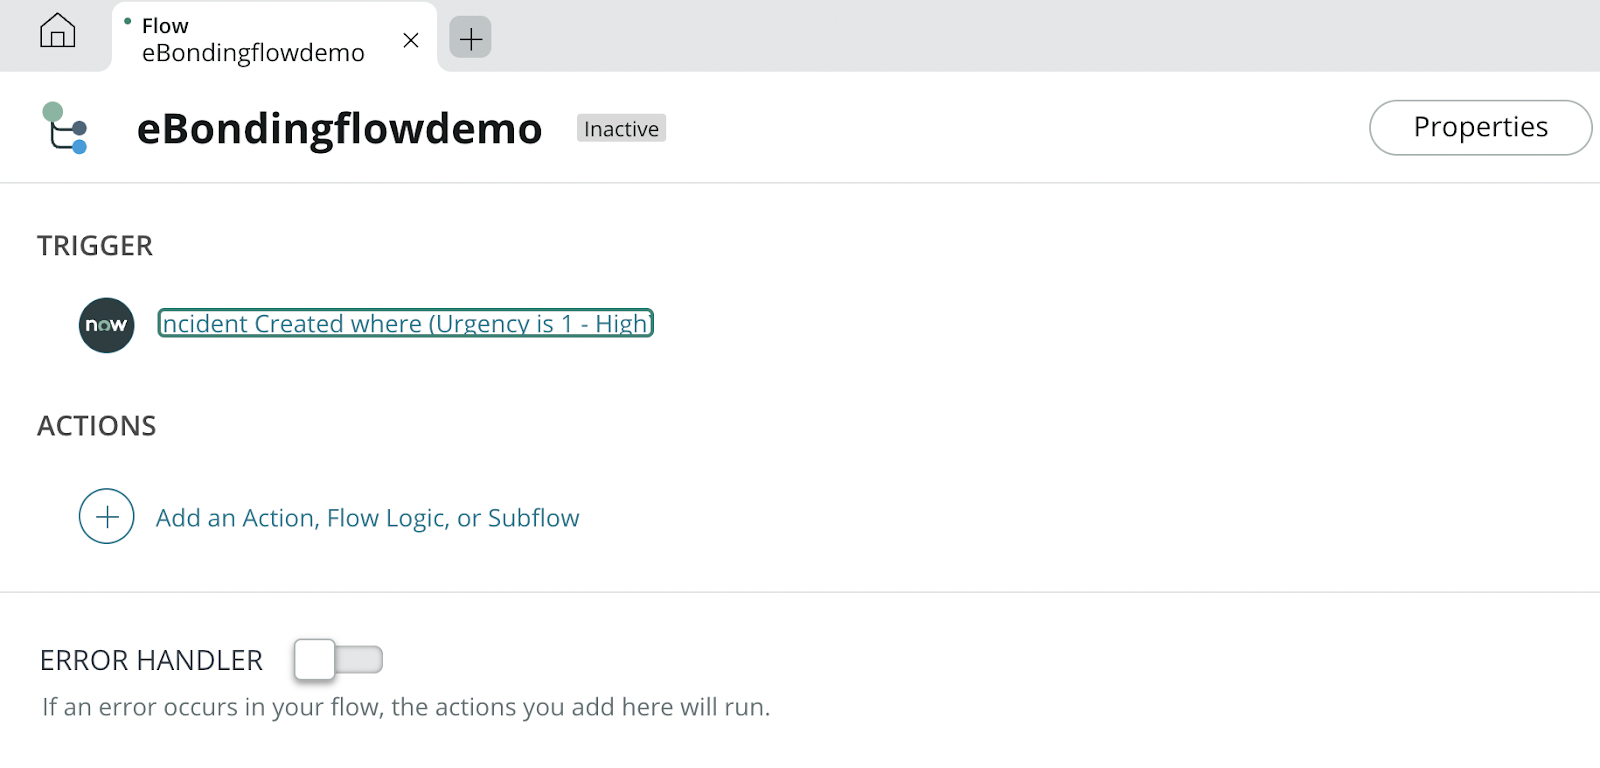
Let’s start with triggers. They are used to detect certain events. Whenever such an event (like creation or update or both) occurs that meets the trigger criteria then synchronization happens. To create a new trigger, click “Add a trigger” on the screen shown below. 

eBonding flow servicenow

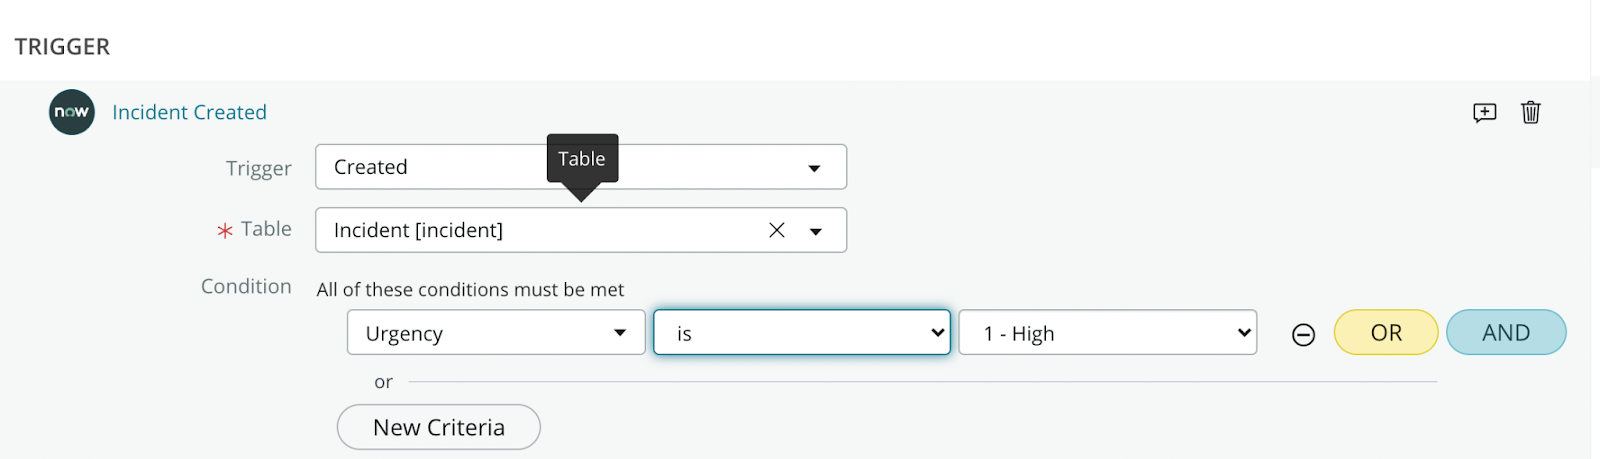
As shown in the image below, there are different triggers for when a record (in our case incident) is created, updated, or both.

Select “Created”. 

servicenow eBonding triggers

You then need to select the “Table” to which the trigger needs to be applied. We have selected “Incident”. 

Then under the “Condition” section, select the condition for filtering. The interface is pretty self-explanatory, so it should be easy to set your conditions even if you are doing this for the first time. 

Here I have created a trigger for syncing incidents that have Urgency=1. 

You can even choose to add “New Criteria” and try and experiment with the triggers using the “OR” and “AND” options. 

servicenow inciden criteria

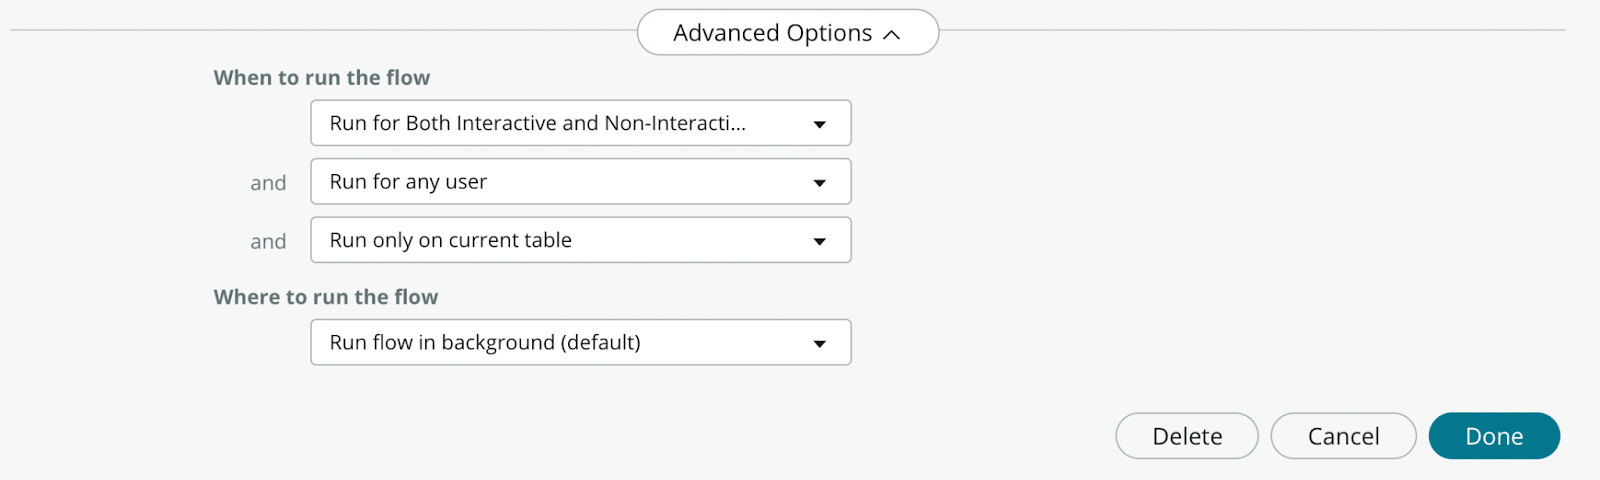
There is also an ‘Advanced Options’ button below on this page. These options allow you to decide when and where you want the flow to run. 

Advanced options in ServiceNow eBonding spoke

Once you decide on all your requirements, click the “Done” button and you will be able to see your trigger on the previous page. 

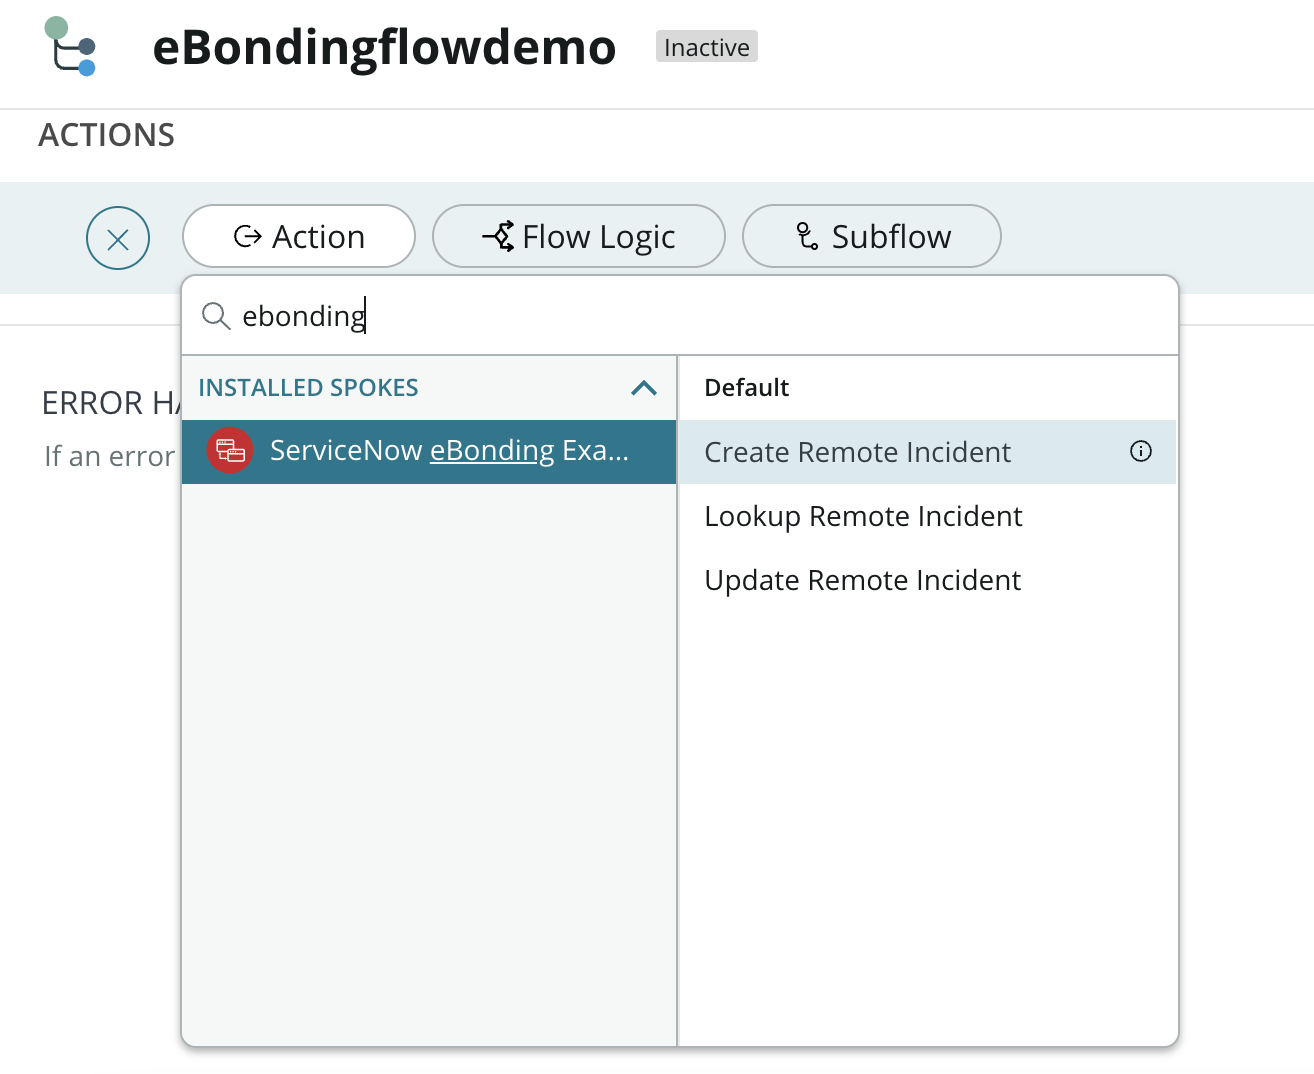
Now it’s time to add “Actions”. 

So under “Actions”, click “Add an Action” on the screen shown below.

servicenow ebonding flow

In the search bar, simply start typing eBonding, and once the result comes up click “ServiceNow eBonding Example” and then choose the “Create Remote Incident” action, but you can choose any action you want to implement. We have already discussed these actions in the above section. 

ServiceNow eBonding Example

Under “Actions” of “Create Remote Incident” click on the data pill picker button. 

servicenow remote incident

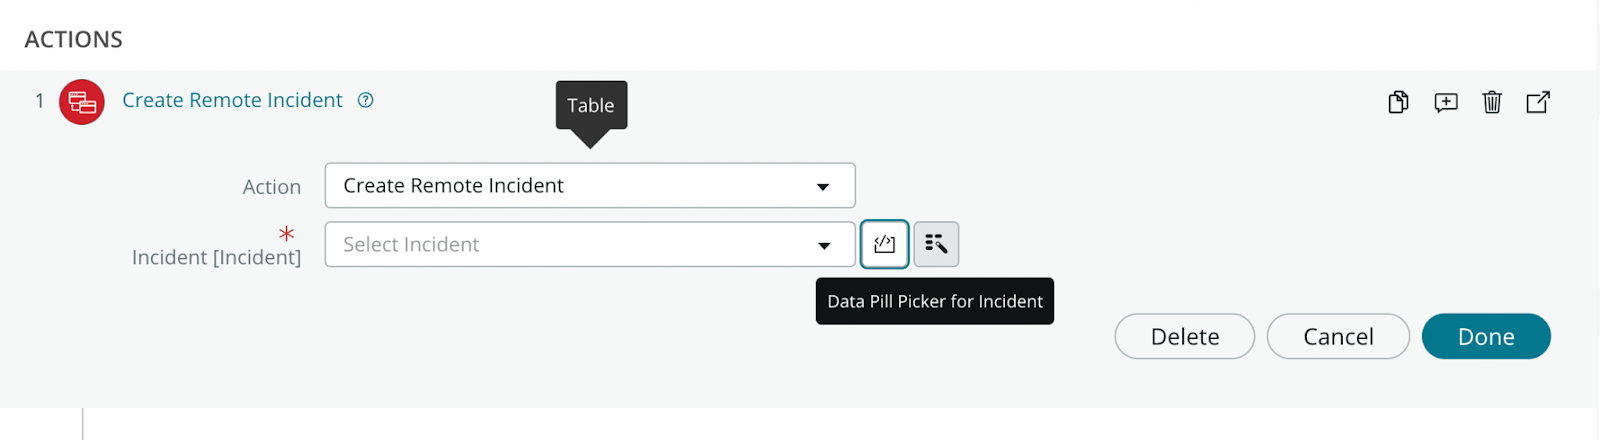
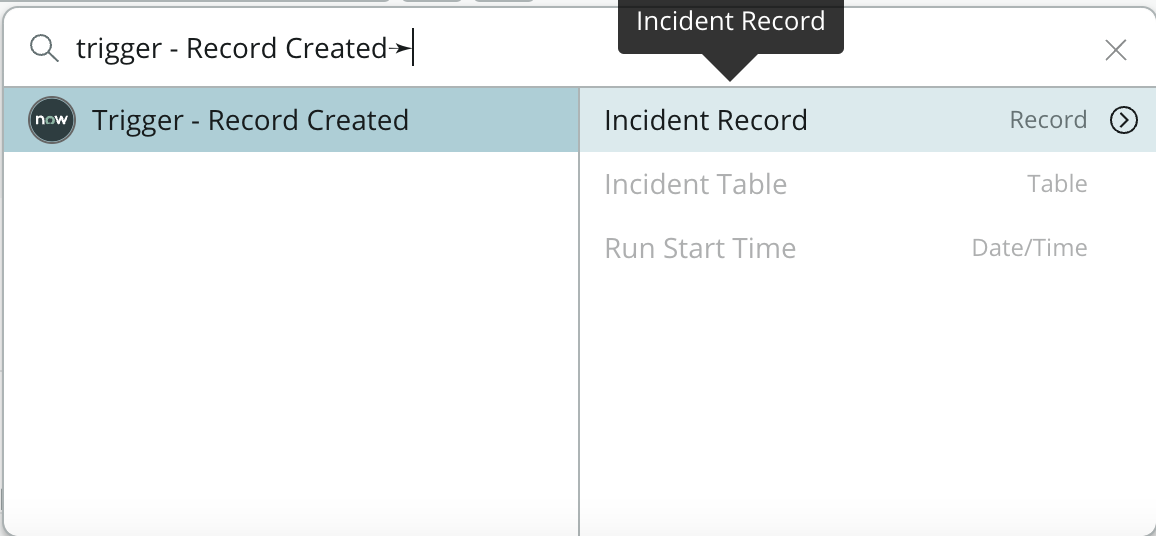
On the screen that pops up, select “Trigger-Record Created” and click on the “Incident Record” on the right tab. This will define what actions to perform when an incident is created. 

servicenow incident record

You can also choose to activate the “Error Handler” toggle button present at the bottom of the page. In this case, you can choose to perform particular actions in case an error occurs in your flow. 

Once you are done adding Triggers, Actions, and Errors(optional), click on the “Save” button on the top-right corner of the screen to save your flow.

eBonding flow in ServiceNow

Then click the “Activate” button to activate the flow. You will find it right next to the “Save” button in the screen above. 

Step 5: Testing the eBonding Flow

After we have done this initial setup, it is time to test our connection. 

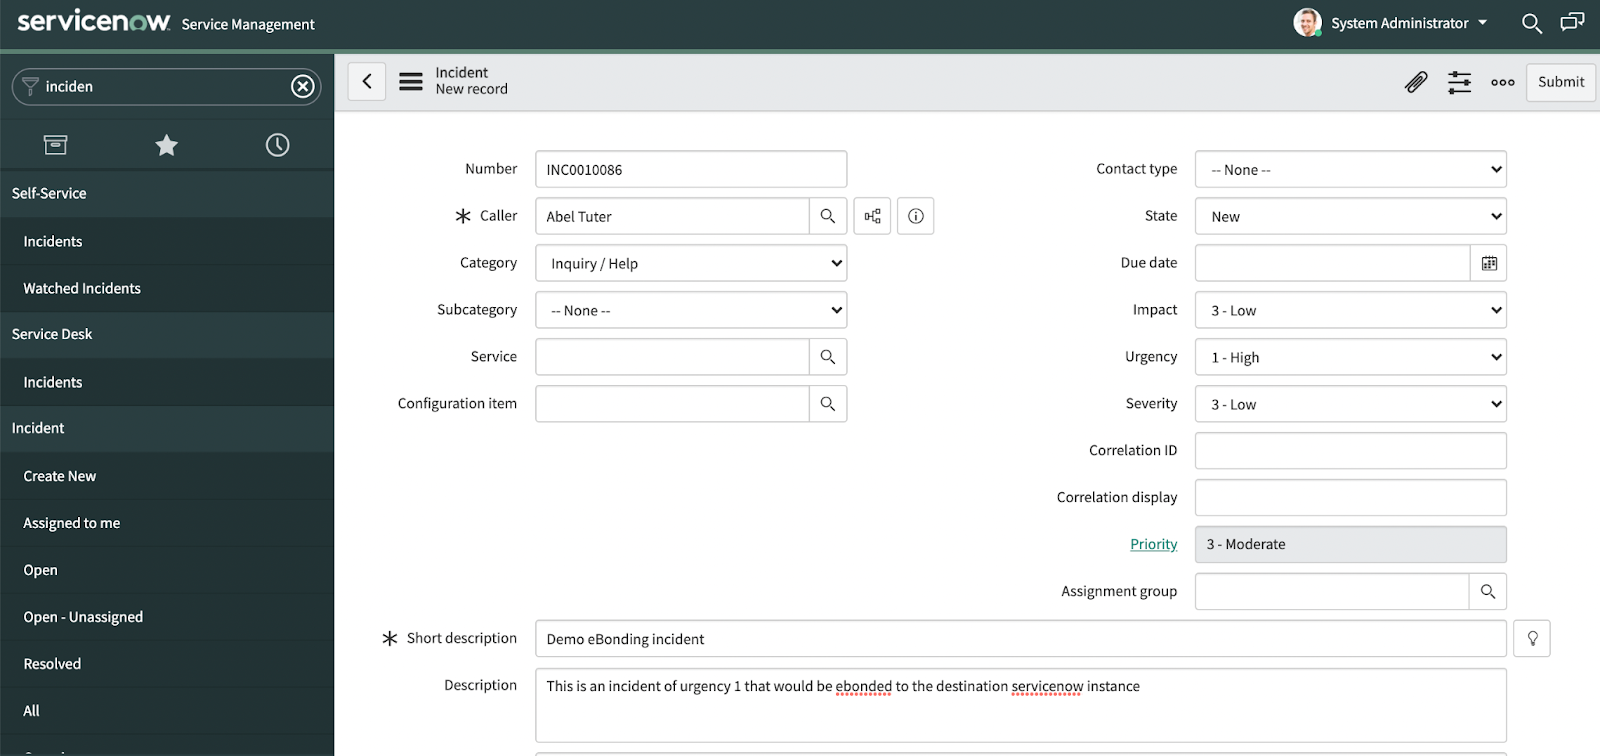
For this, I will create an Incident of Urgency=1 as shown below on the source ServiceNow instance (dev79664) and we will see this incident being reflected on the destination ServiceNow instance (dev21491). Fill in the details and click “Submit”. 

To start creating an Incident, head over to your source ServiceNow instance (dev79664) and search for “Incidents” on the left-hand search menu. Click on “New” to create a new one. 

Note: The following incident is created on dev79664, our source instance. 

servicenow incident ebonding

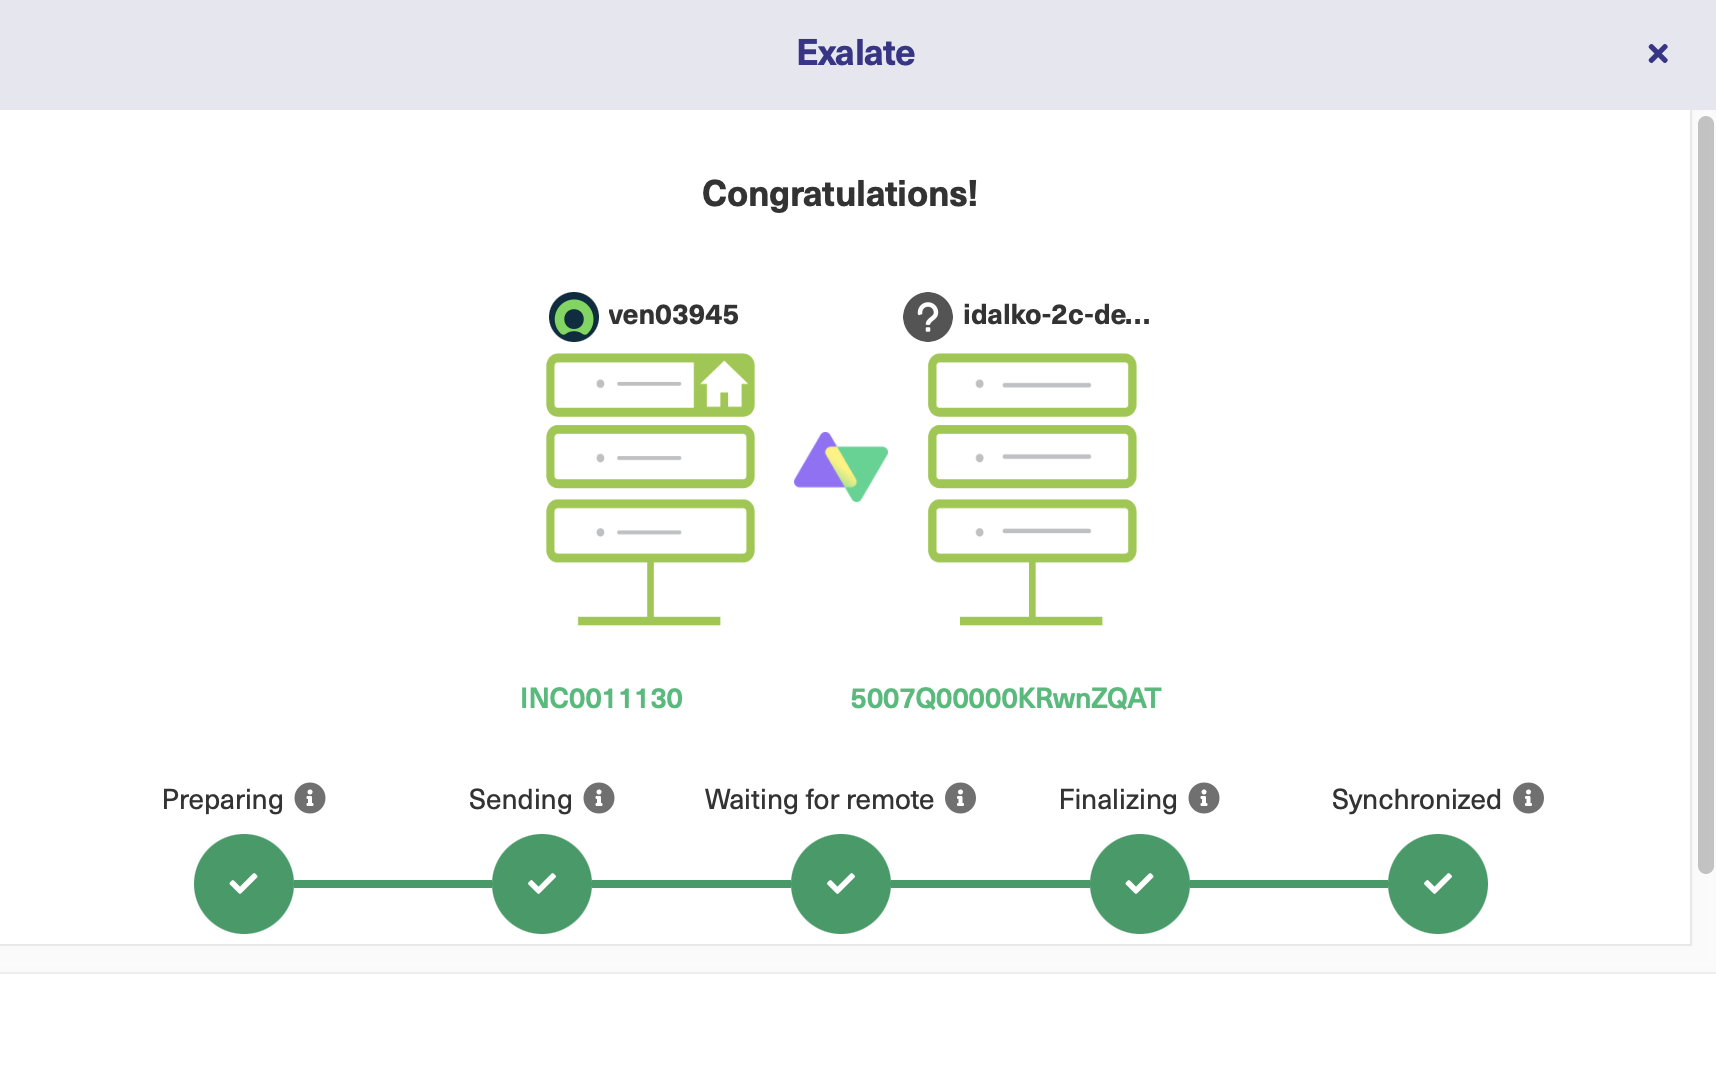
Here you can see that initially, the Correlation ID field is blank, but once the incident is created, this Correlation ID field gets automatically filled with the incident number created on the destination instance. This is shown in the image below. 

servicenow ebonding correlation id

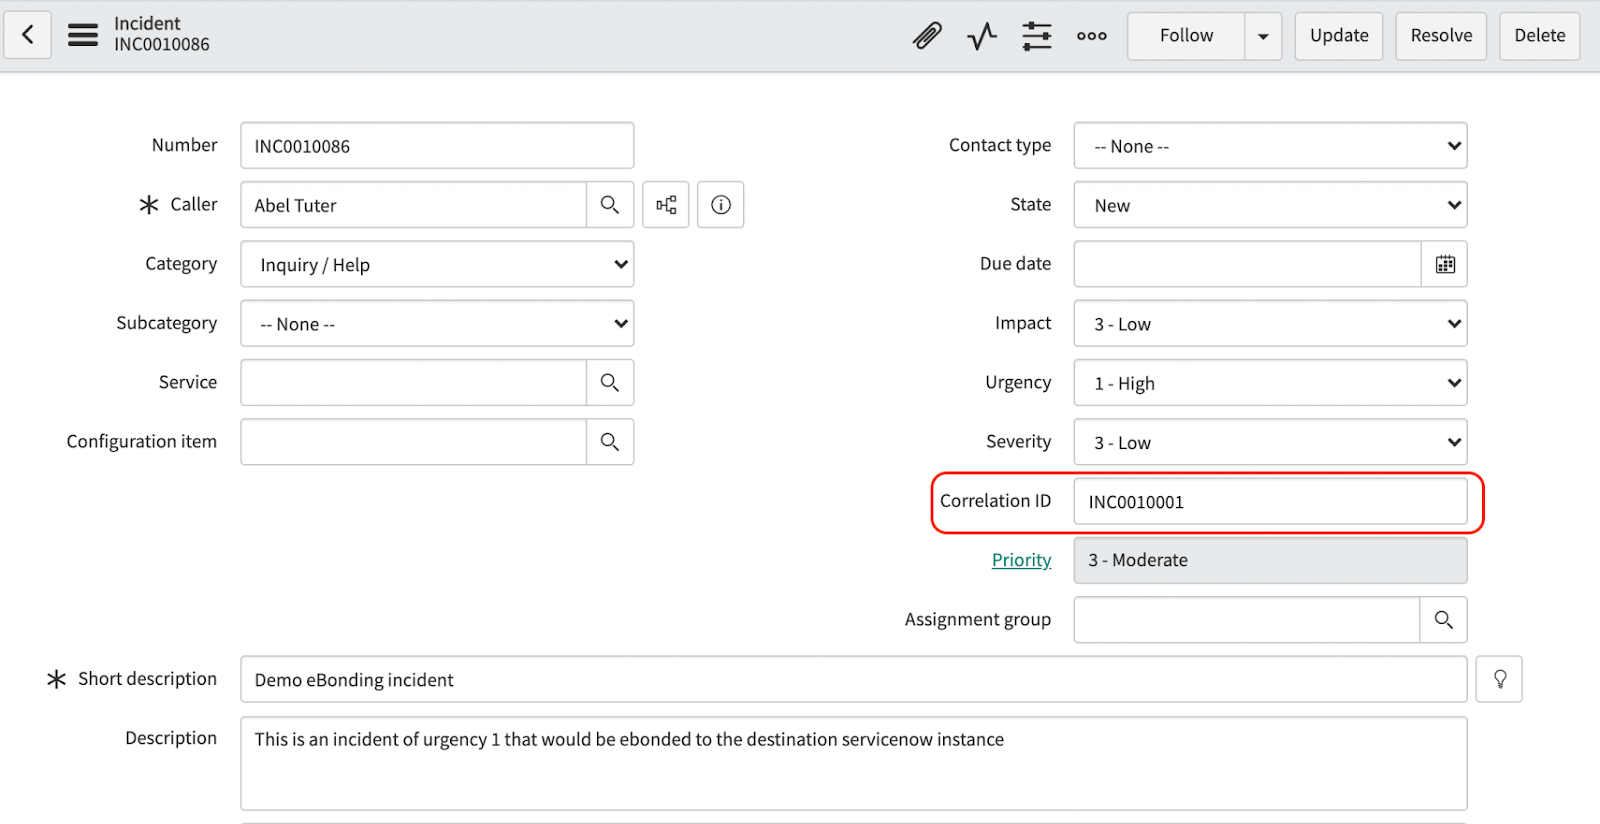
On the destination side (dev21491), this scenario is the opposite. 

servicenow correlation id ebonding

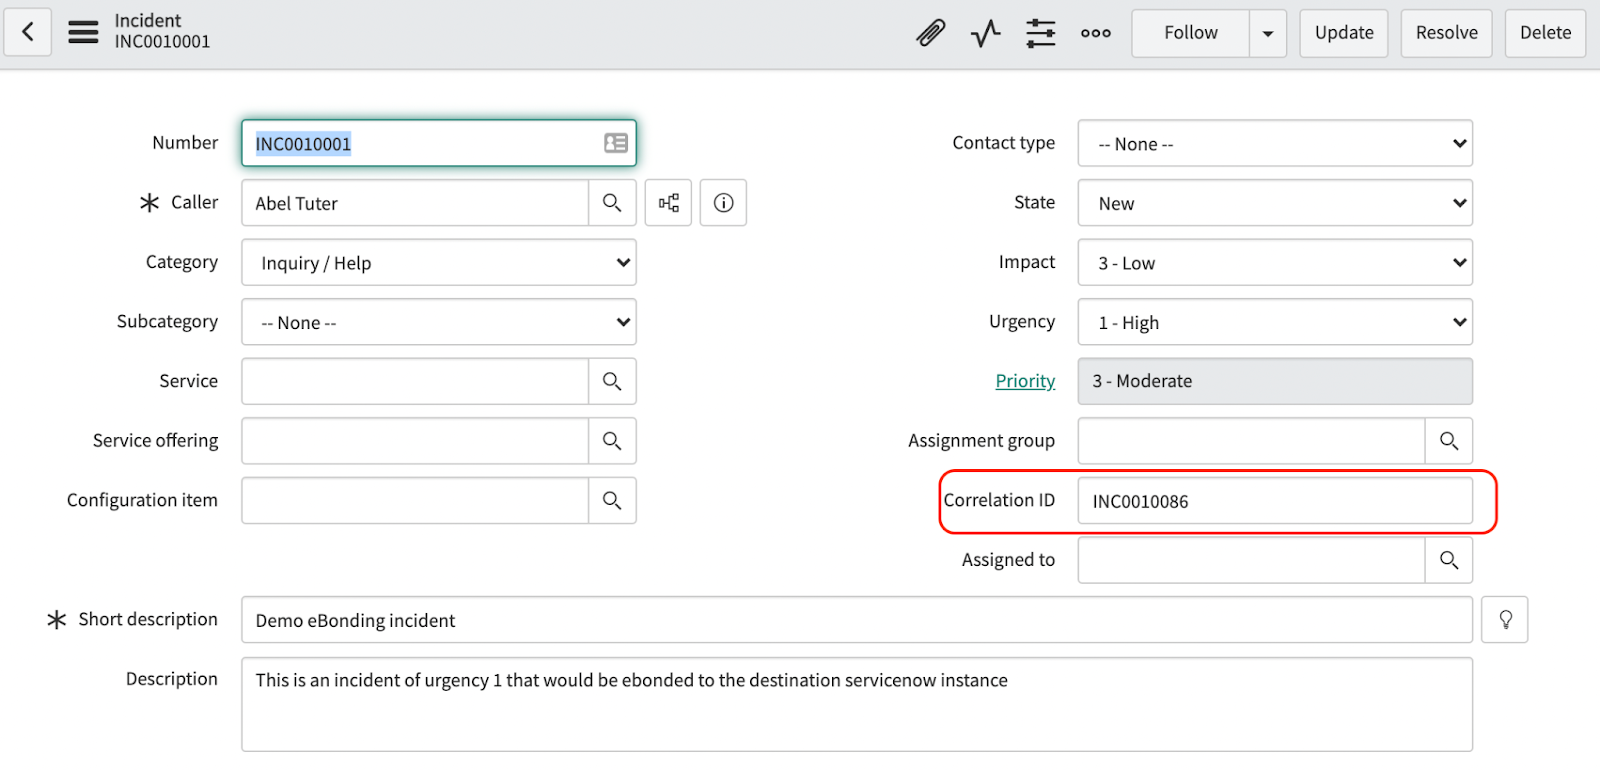
So in short, the Correlation IDs store the incident numbers from the opposite ServiceNow instances once the eBonding action is triggered. 

This is just an example of a flow you can implement with the eBonding spoke. However, there are a lot of different triggers and actions that you can try out for different scenarios you wish to implement. 

ServiceNow eBonding Spoke Alternative 

Well, we have discussed the eBonding Spoke till now. But this leaves us with the question of whether this is the only solution available in the market. Well, clearly not. 

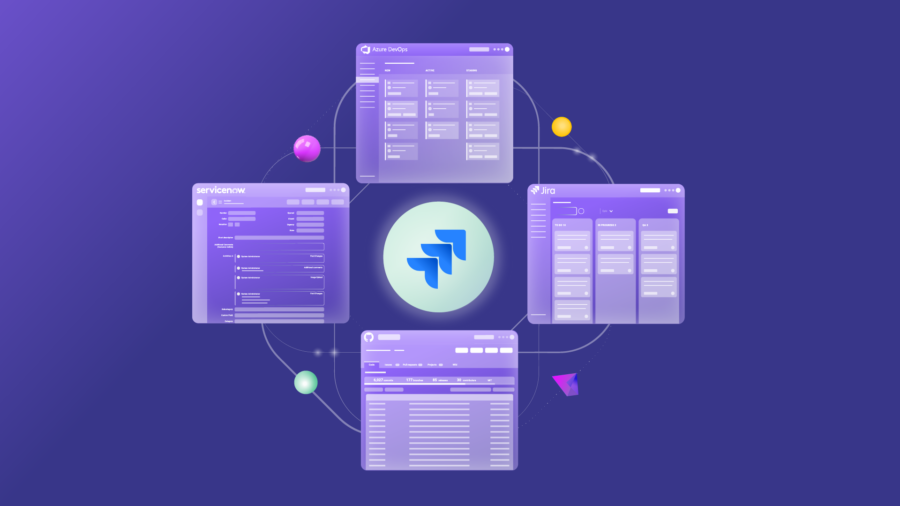
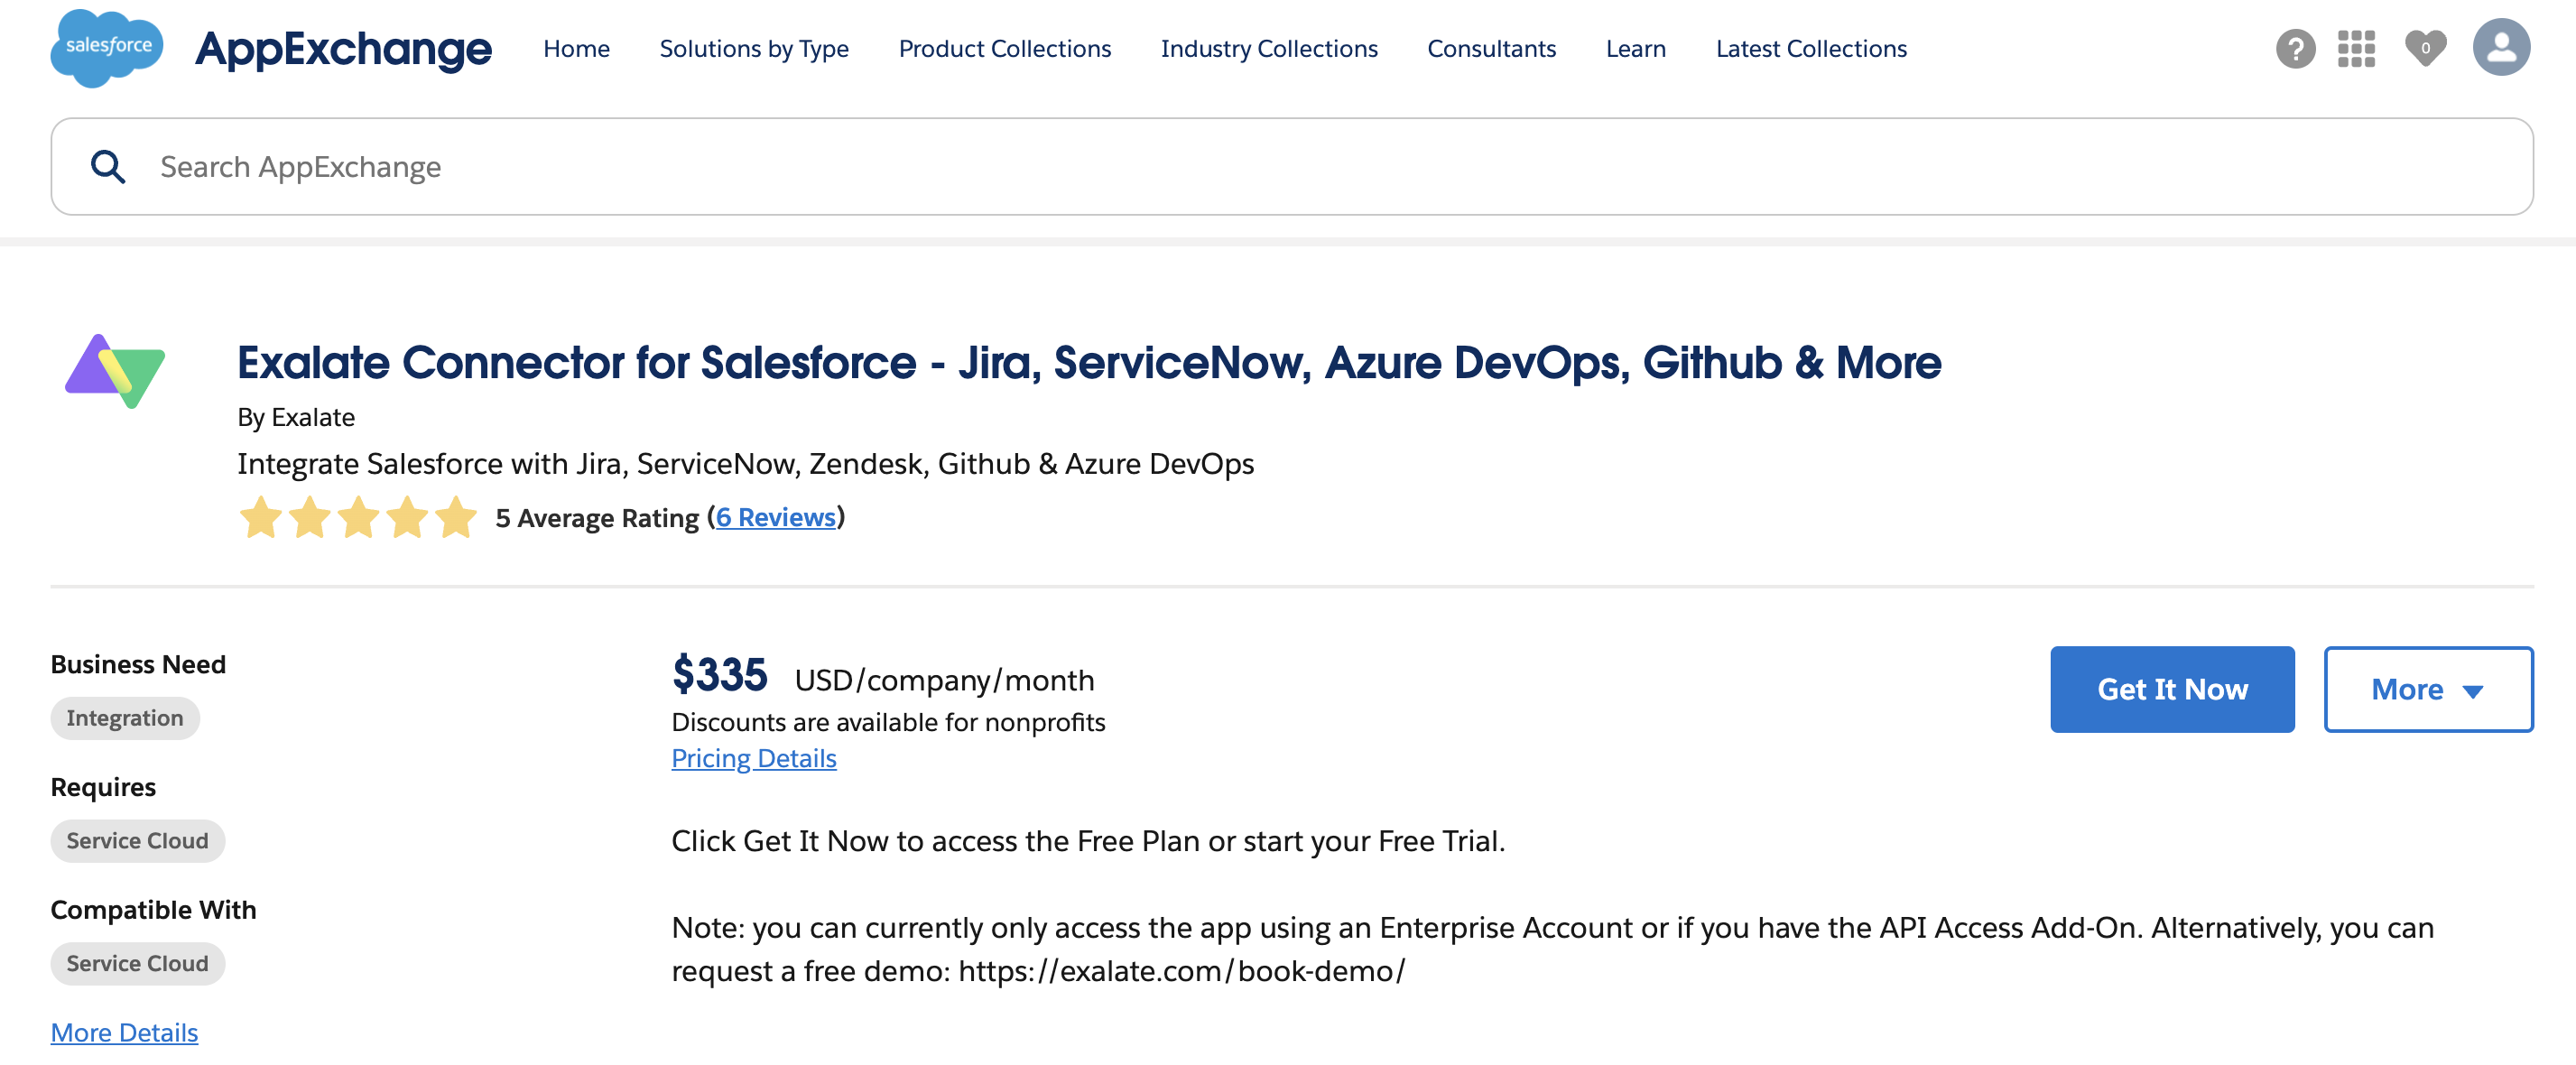
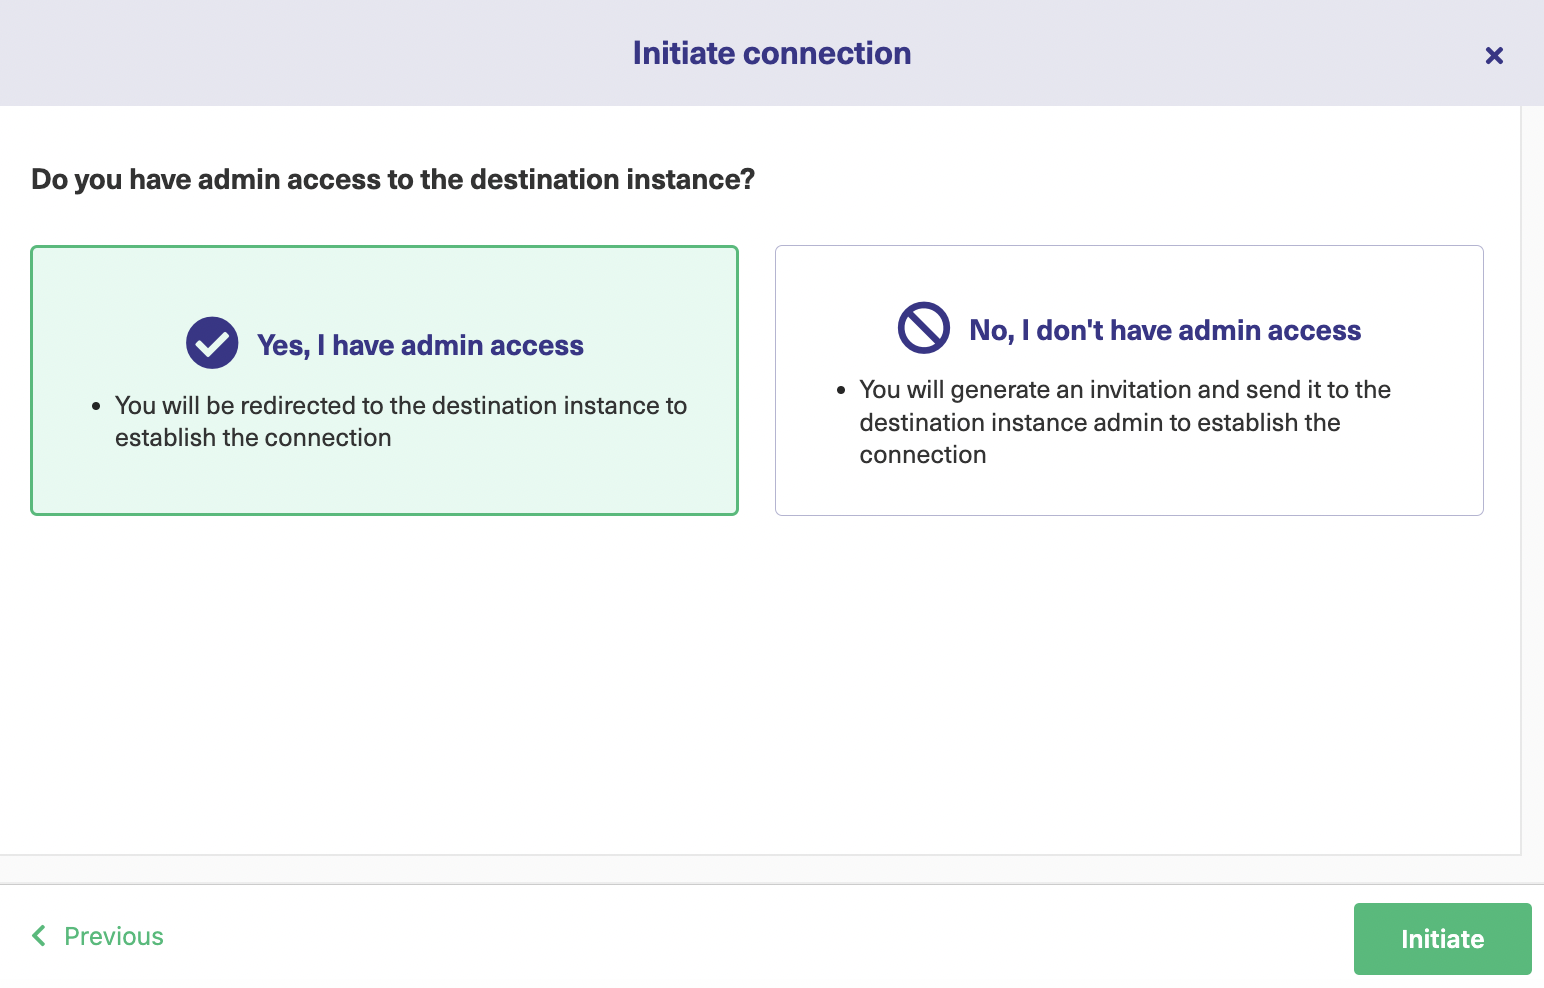
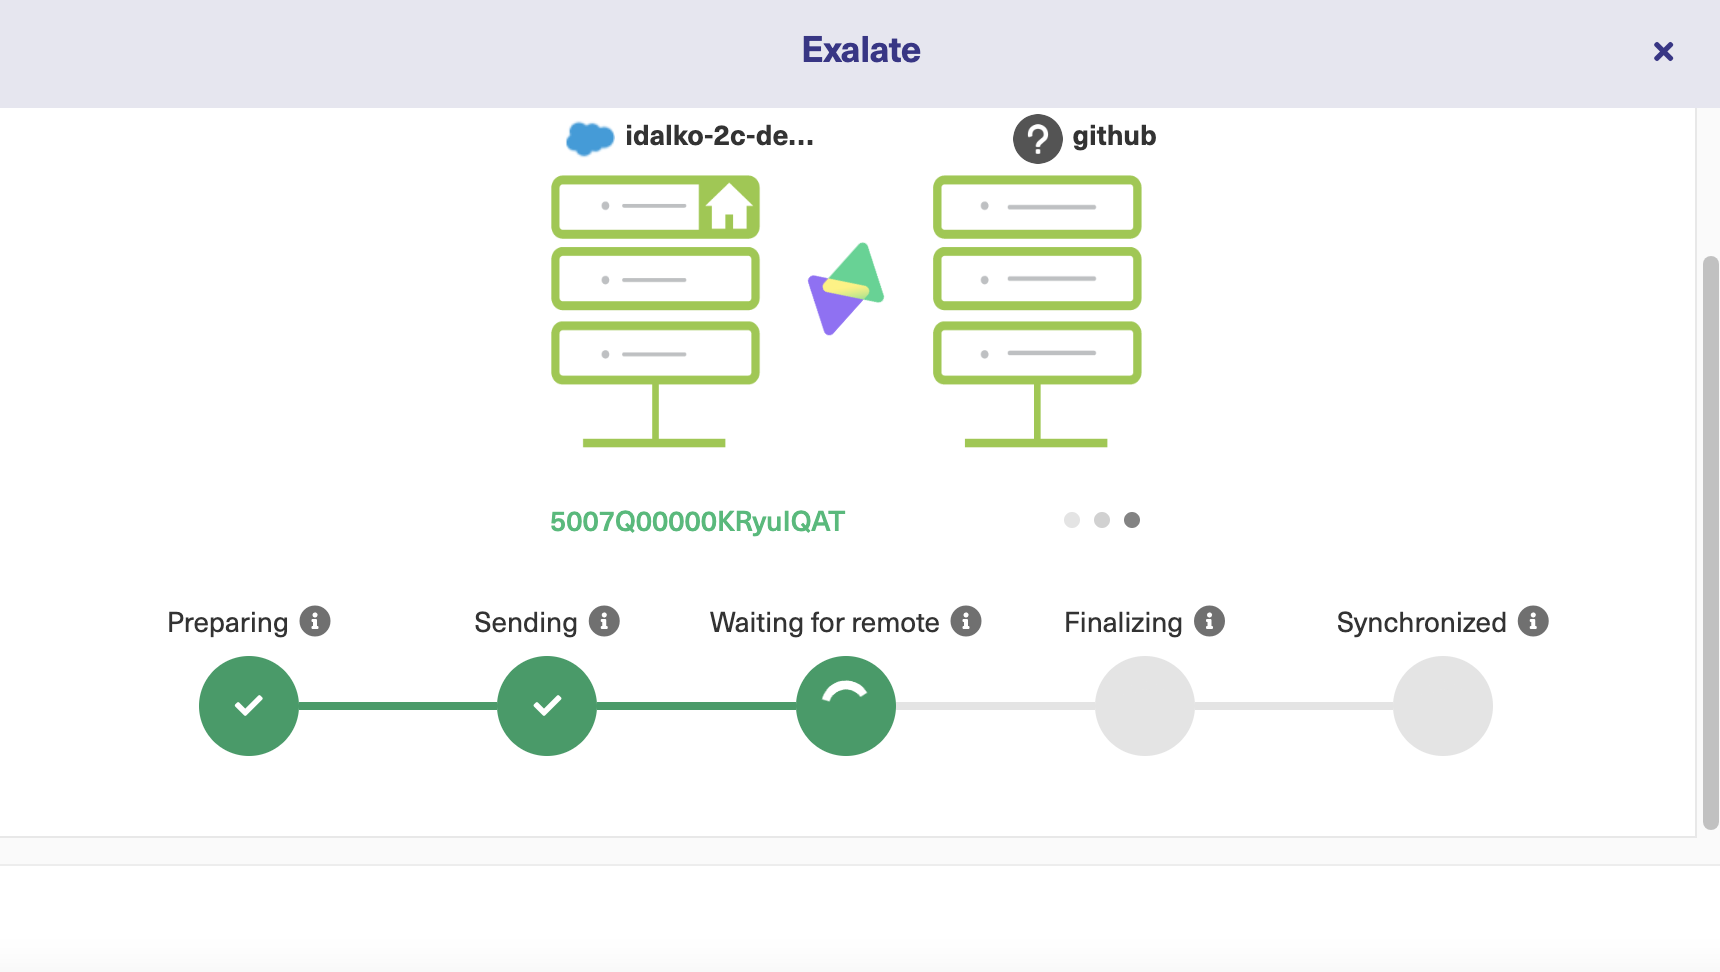
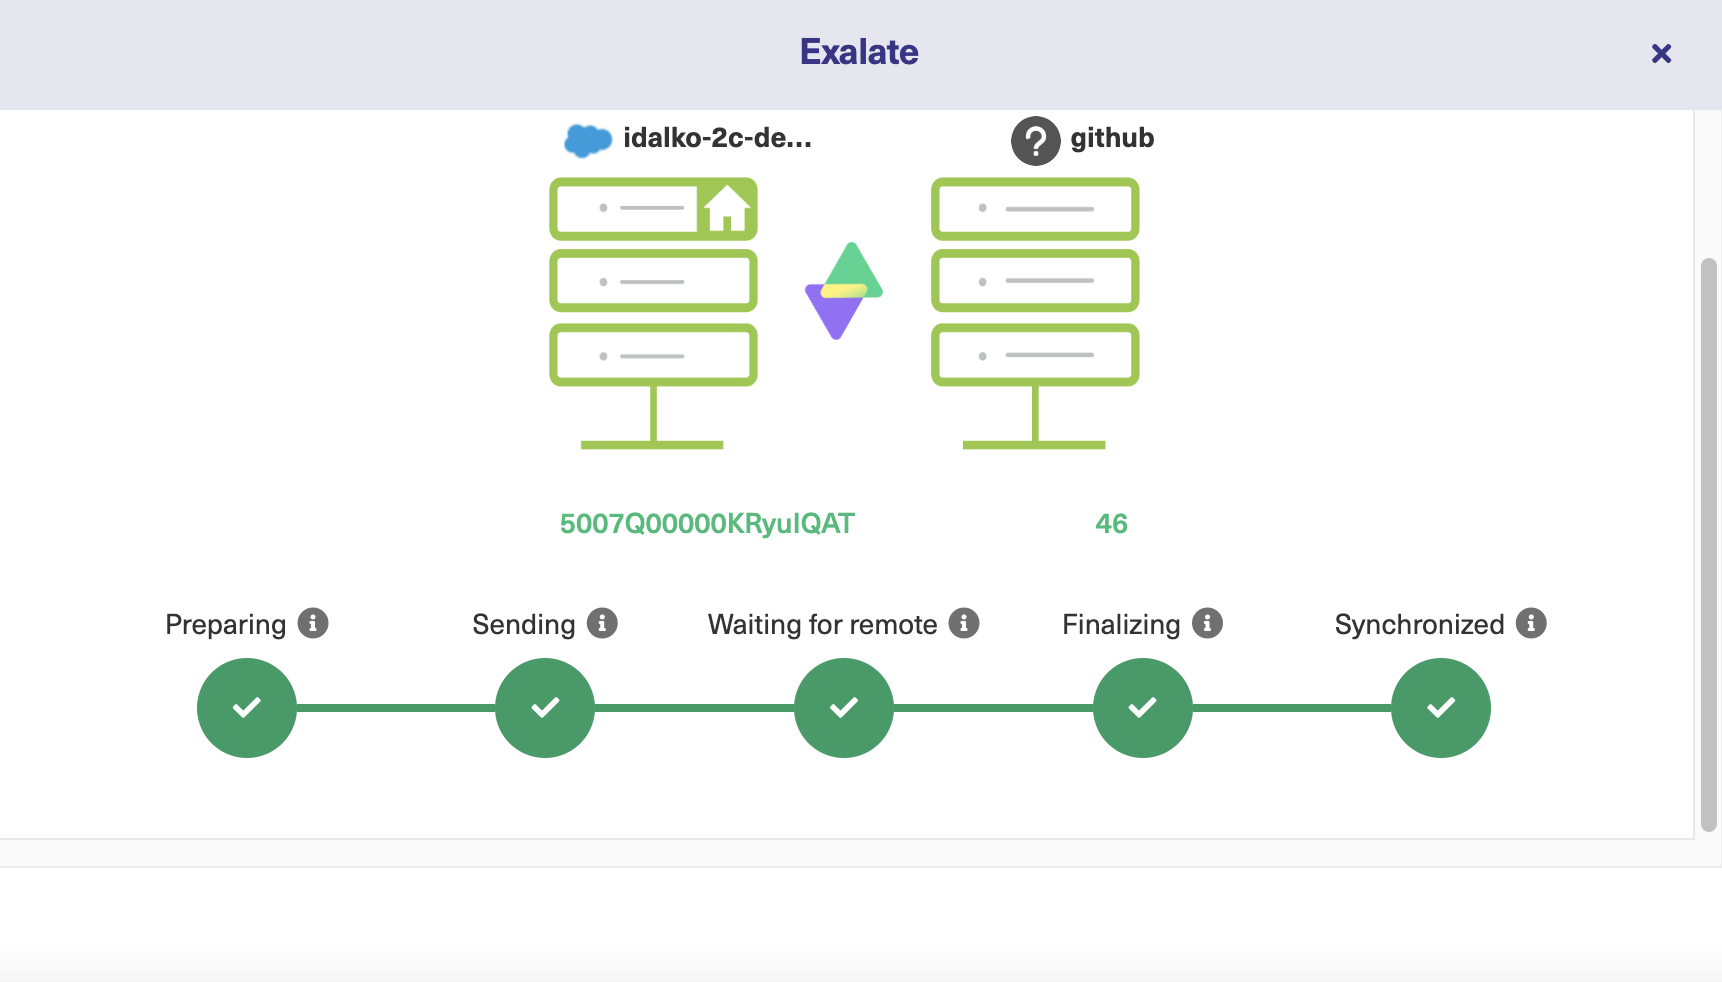
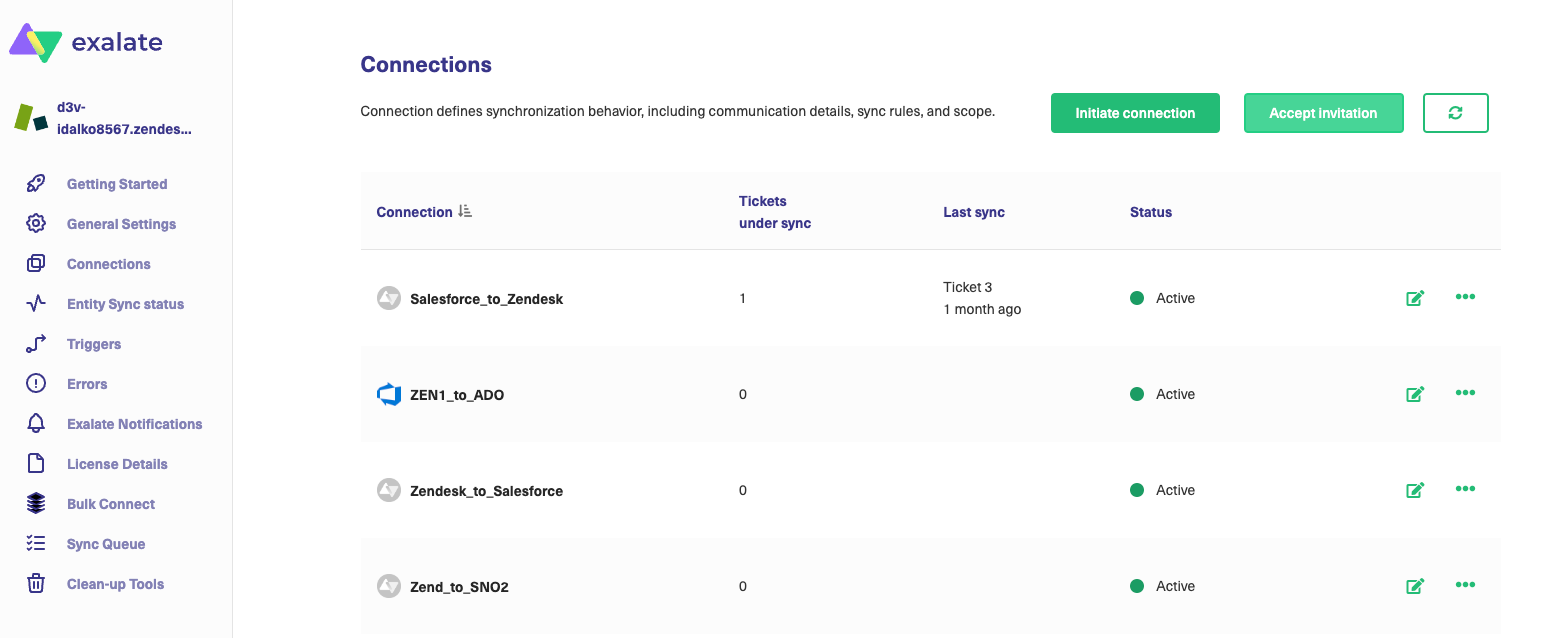
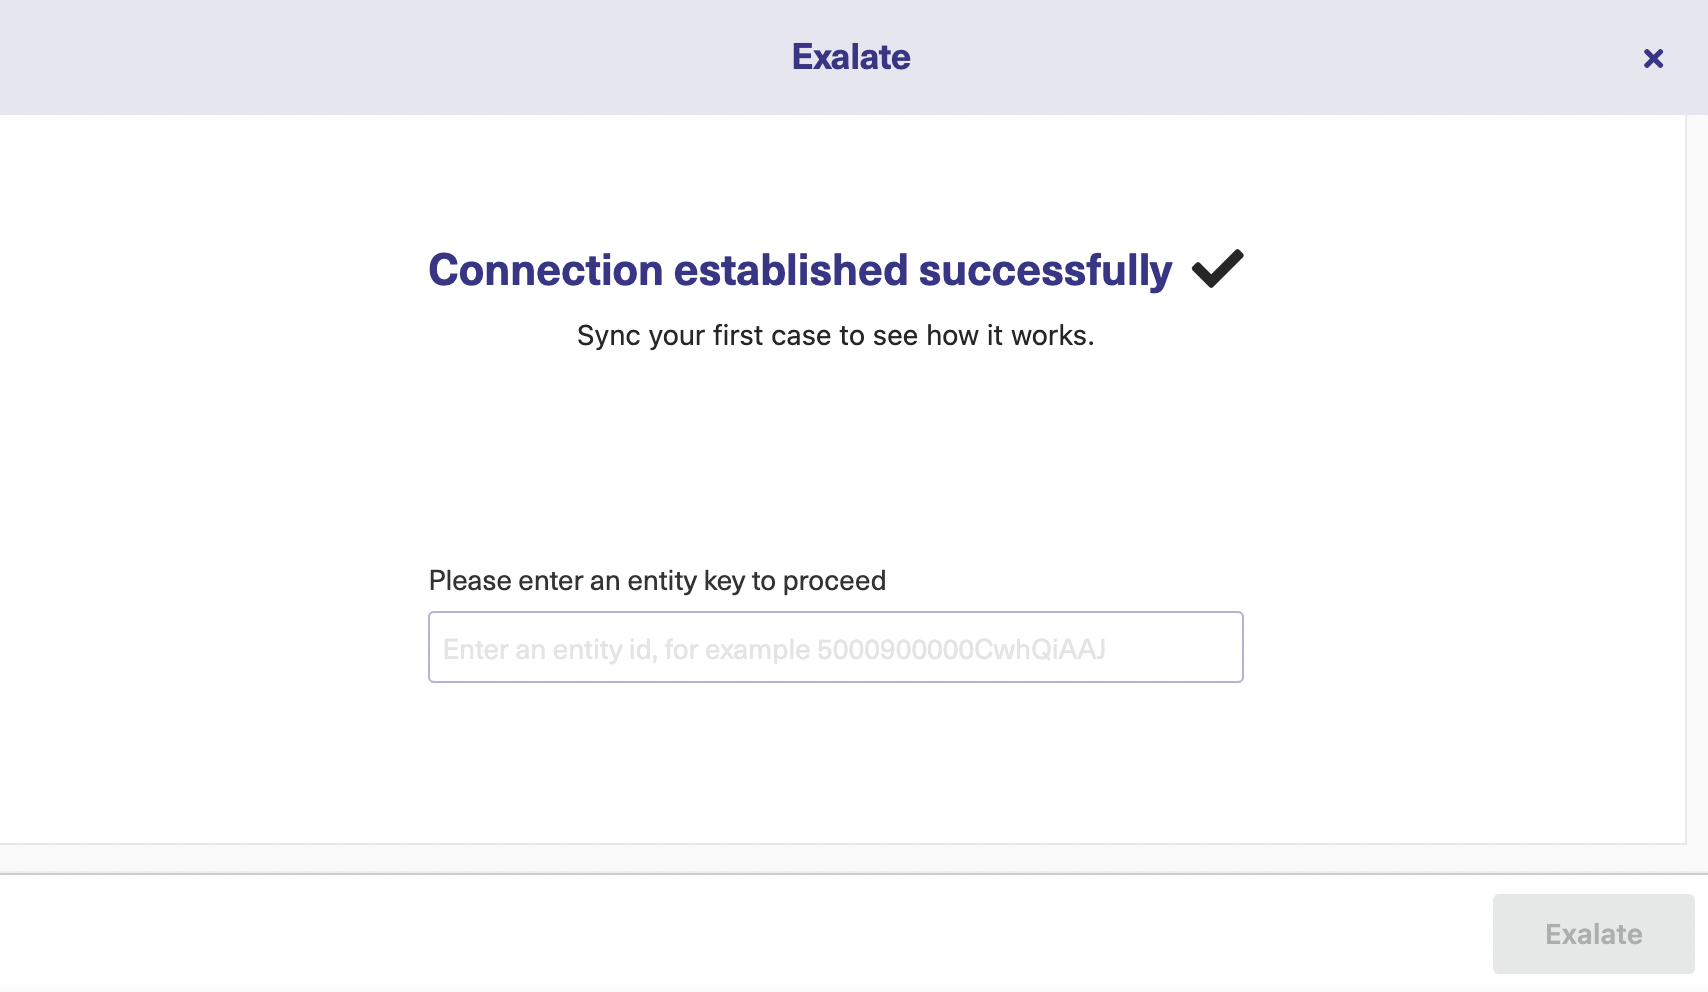
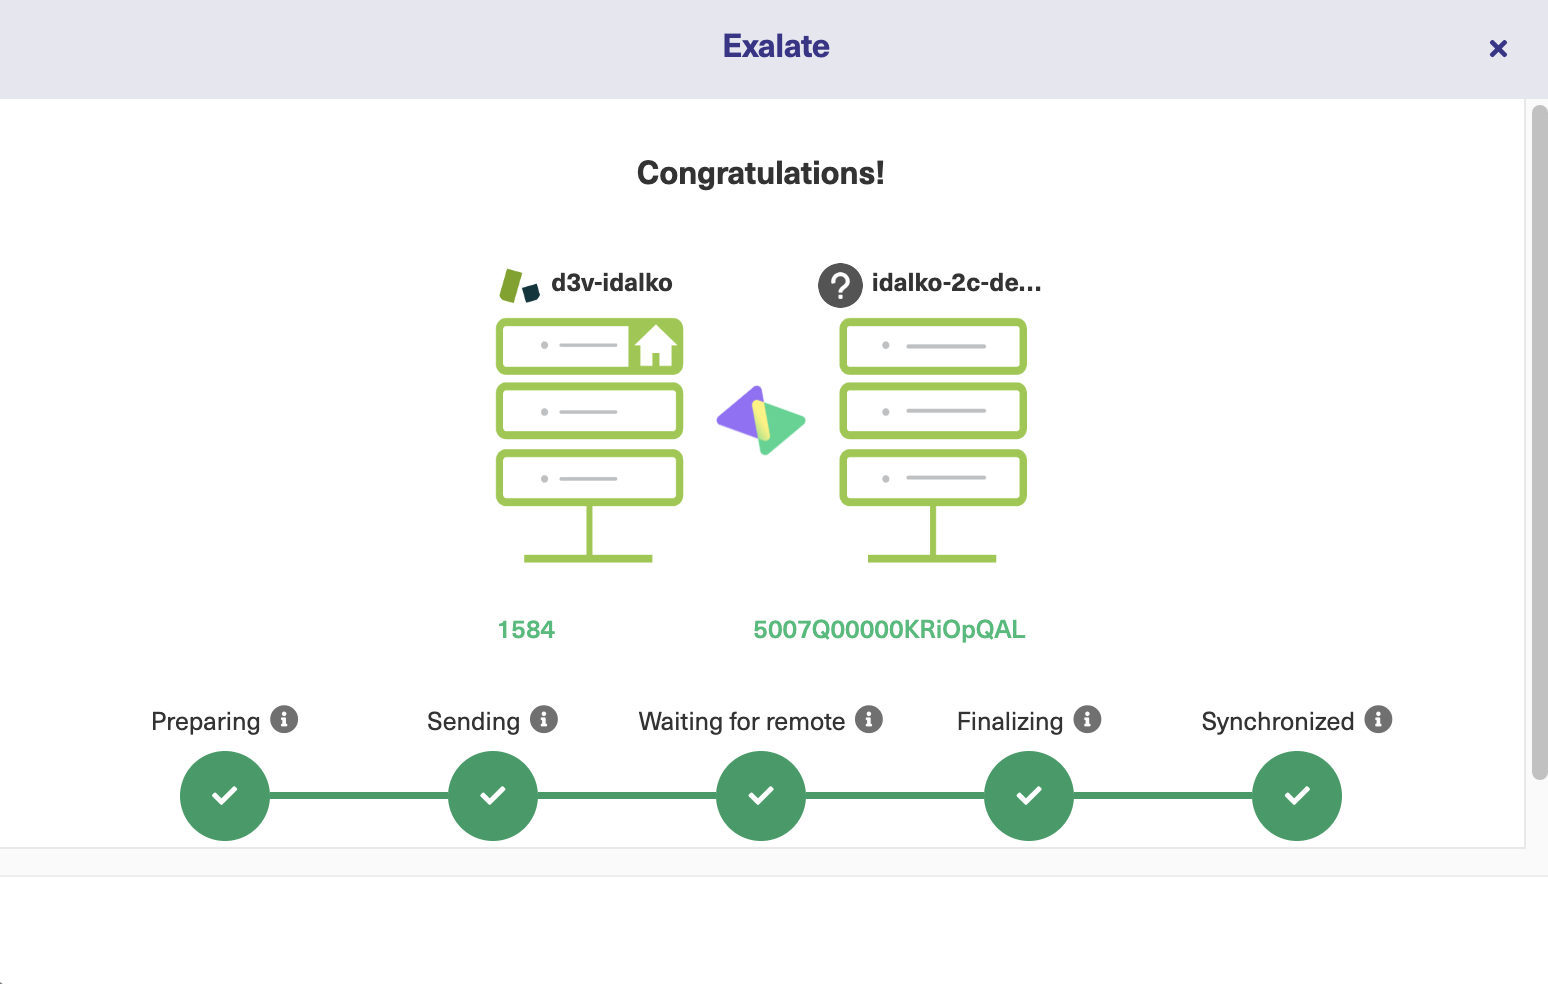
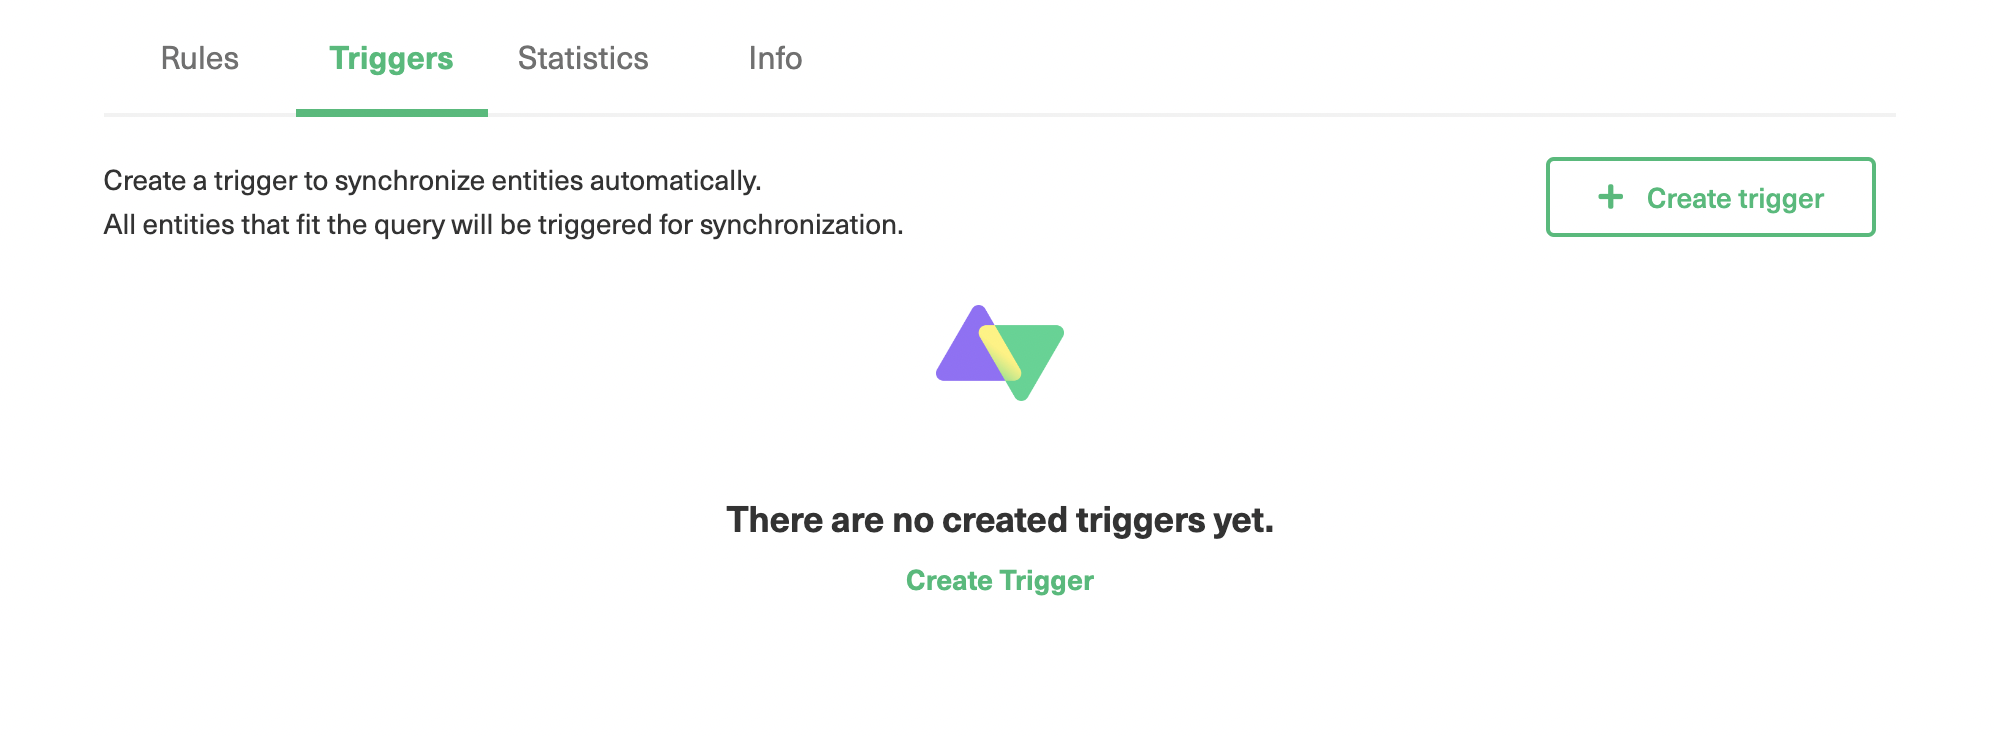
There are players who support and do the exact same thing that eBonding Spoke does. Exalate is one such tool. 

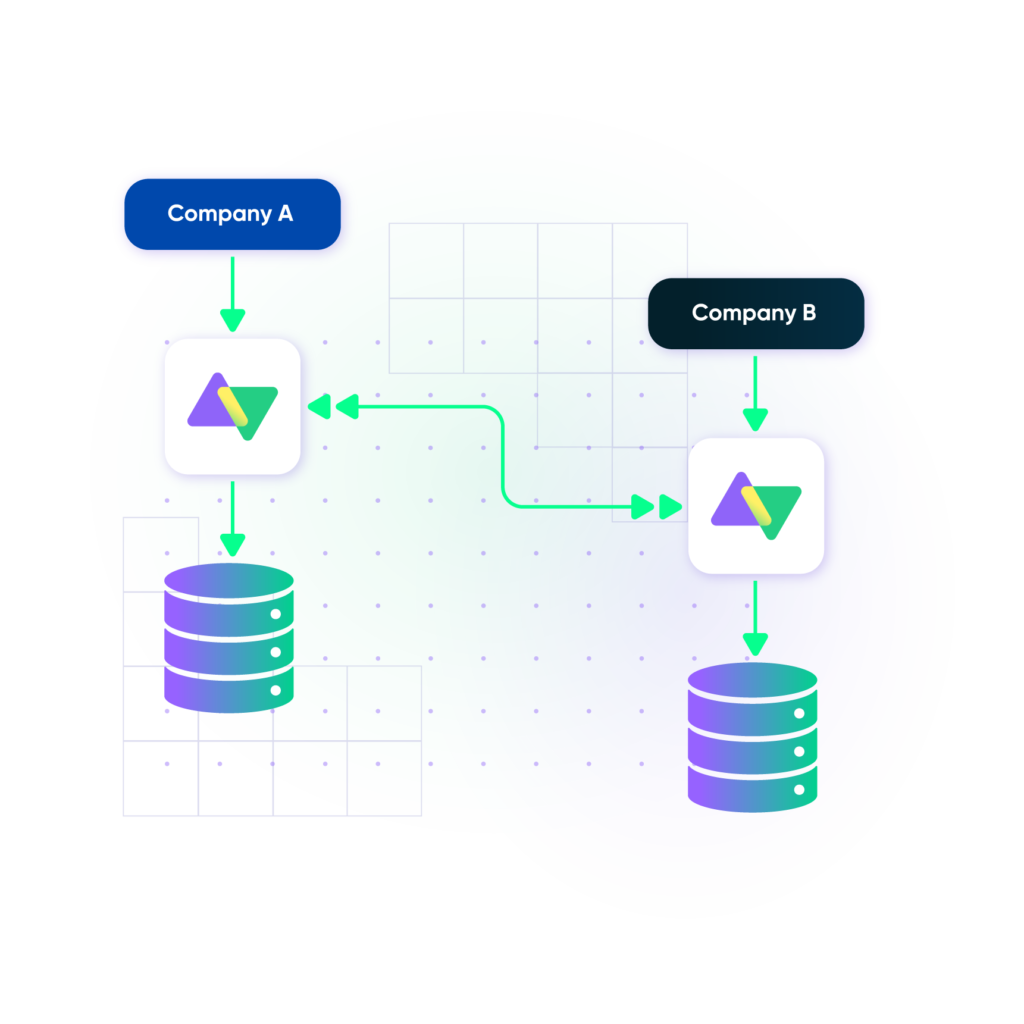
It is a bi-directional synchronization tool (aka an eBonding tool) that helps streamline collaboration and connects your work across multiple teams or projects within a single company or across multiple companies, in real time. 

Why we are discussing this particular tool is for the following reasons:

  • It supports decentralized integration. Meaning that each side of the integration independently (or autonomously) controls what it sends and receives. This is possible because of the distributed architecture it supports. It also essentially means that each side can choose what to send over and what to receive from the other side, making the integration data to be accessed and viewed only by authorized parties. If there is some information you don’t want the other eBonded side to view, you simply don’t send it, and the same goes for receiving information too.
  • Inferring from the above point, the eBonded systems using Exalate become loosely coupled, in essence making them more manageable and scalable. To mitigate the data integration issues that arise from loosely coupled systems, it implements mechanisms like transactional sync queues. This increases the reliability of your eBonded integration since the sync queues can help ensure that changes or updates since the last downtime get automatically transferred to the other side.
  • It also supports security mechanisms like encrypted data transfer, JWT-based token mechanisms, access controls, and secure transfer protocols like HTTP(s). You can check out the security and architecture whitepaper
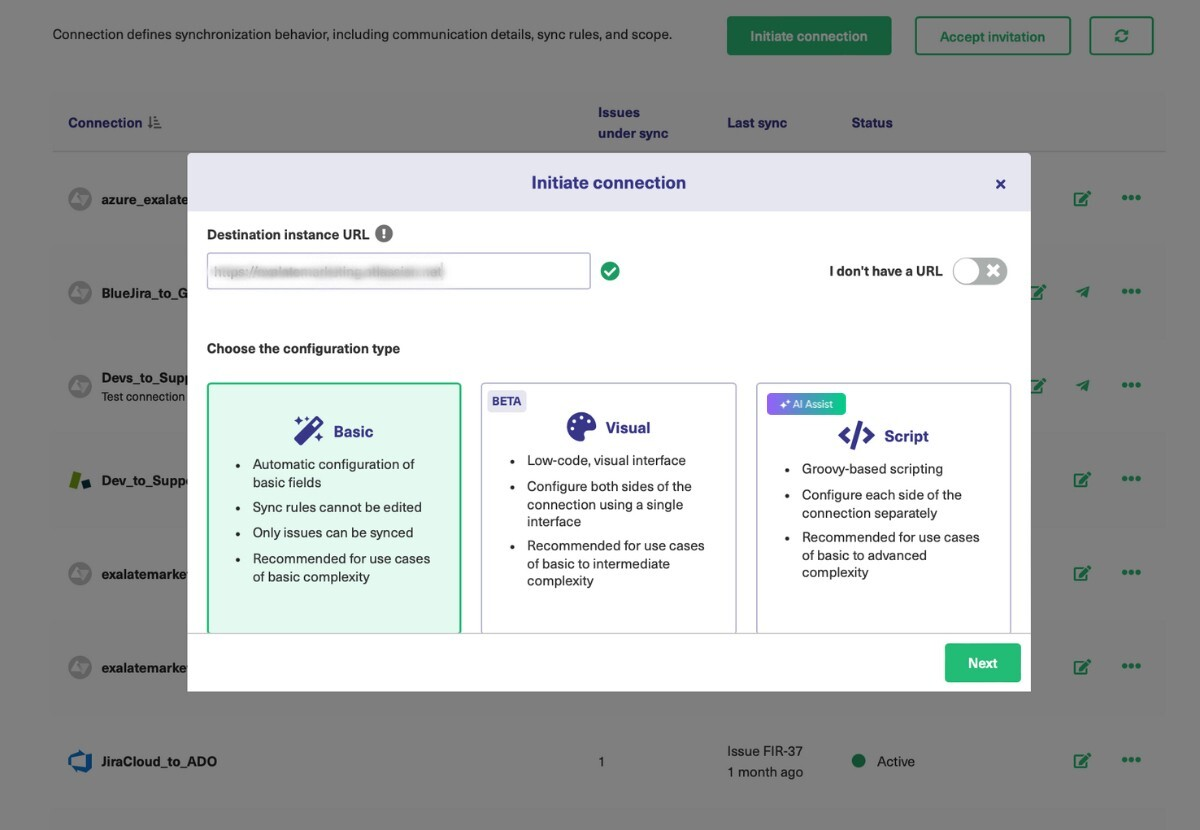
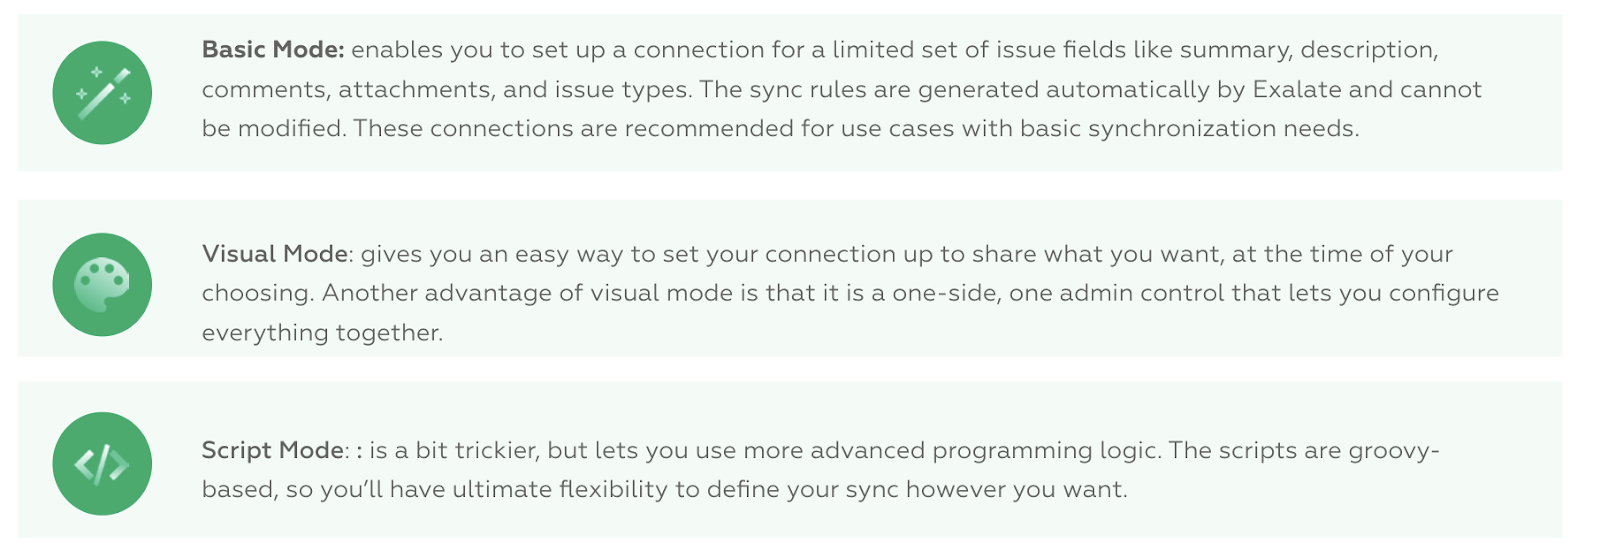
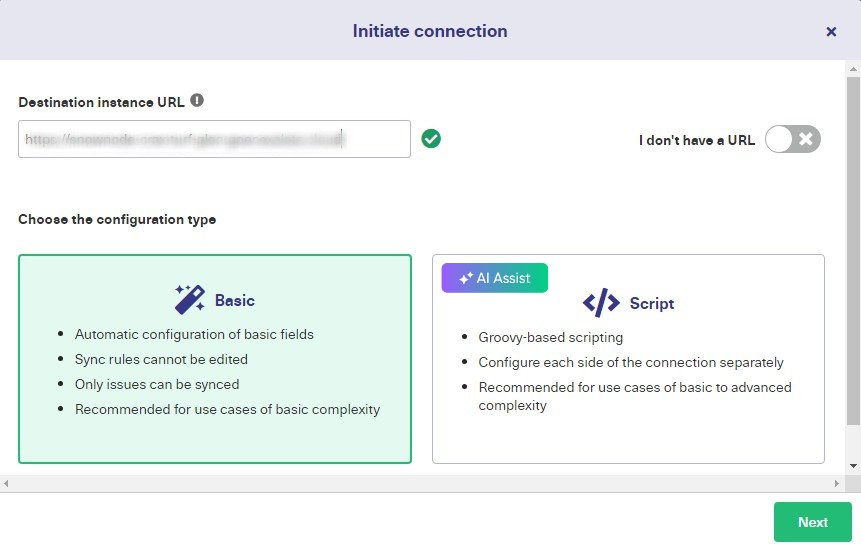
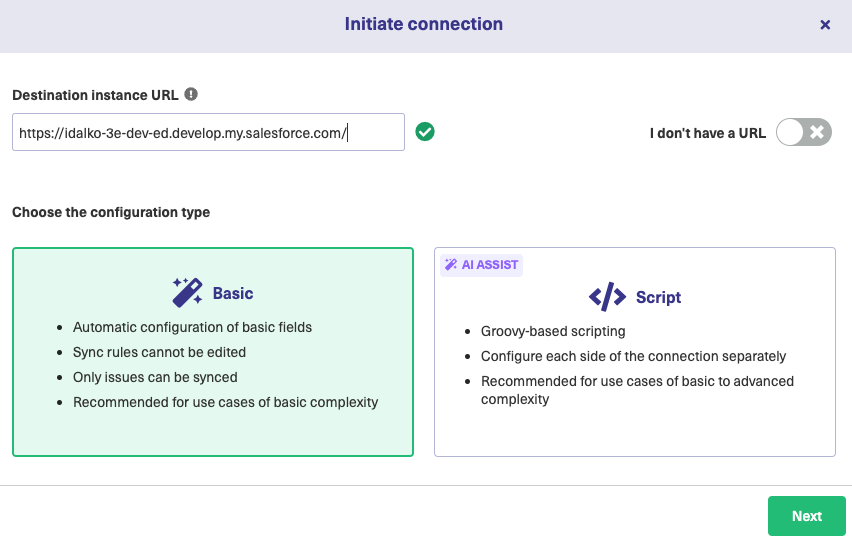
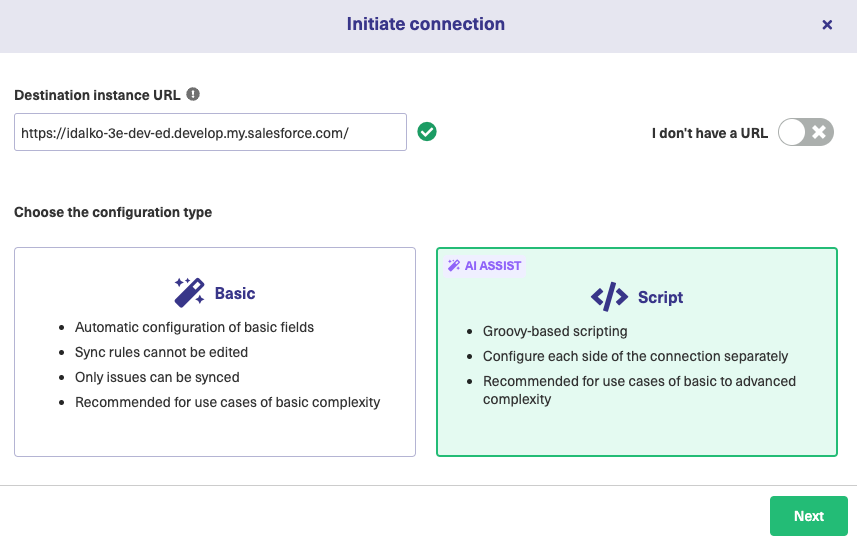
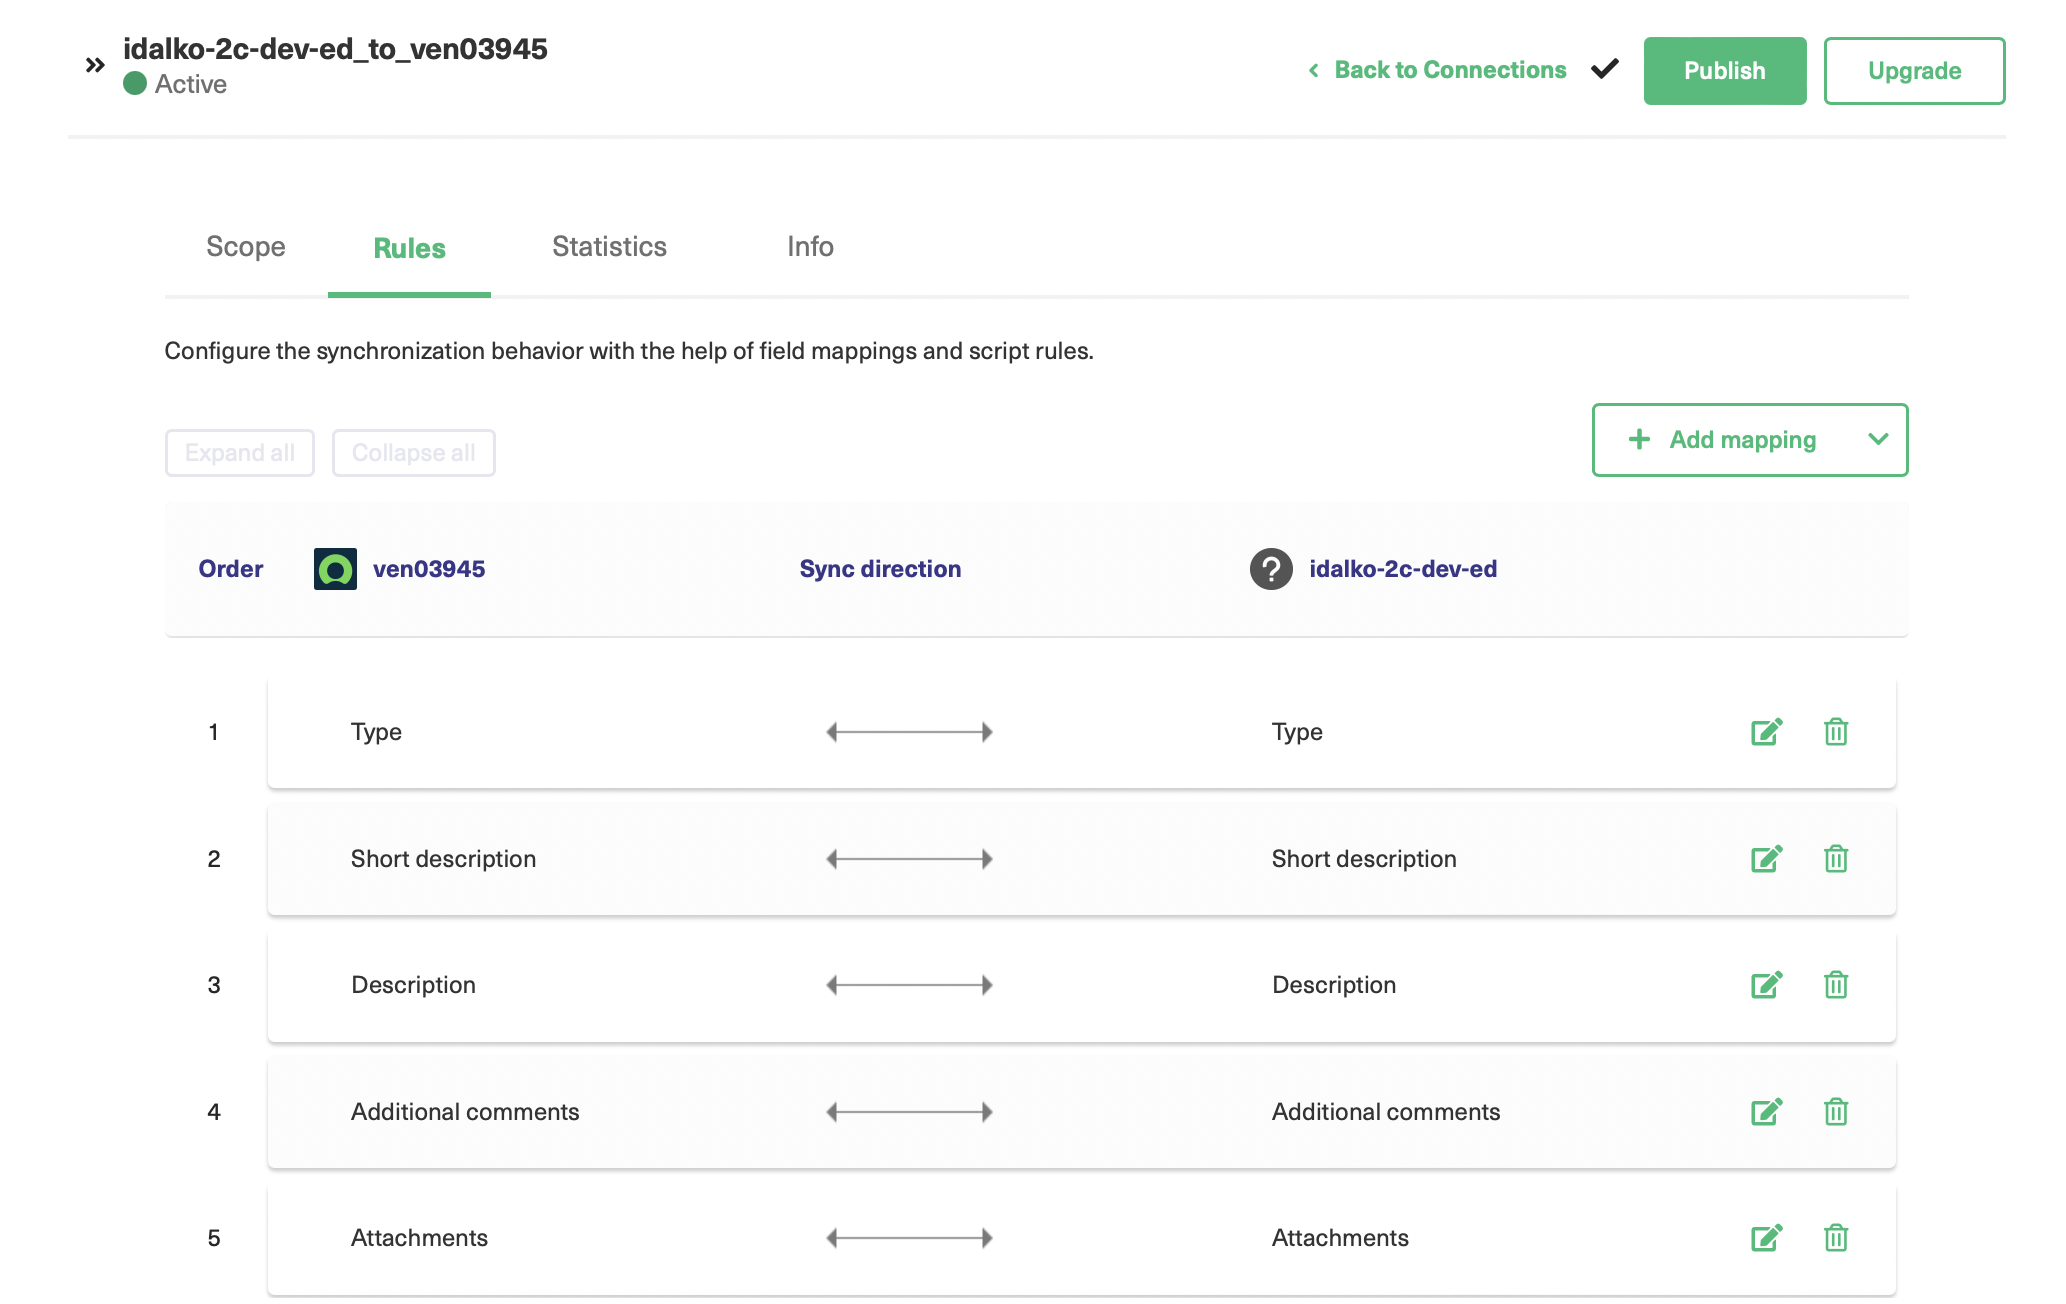
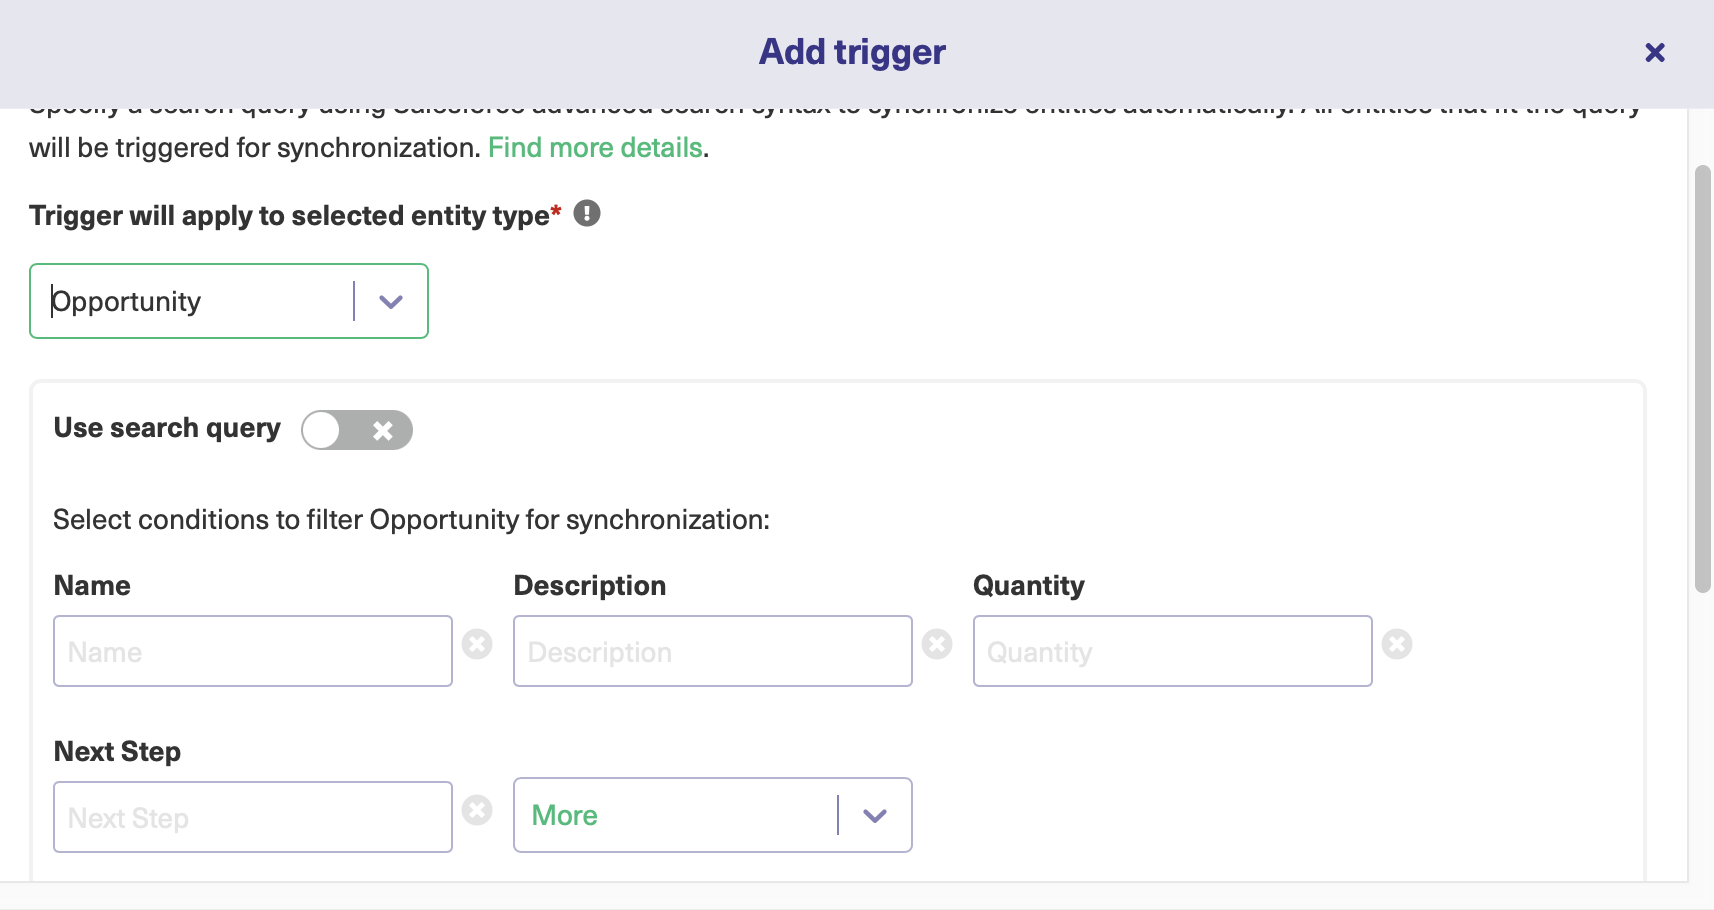
  • Exalate supports two configuration modes:
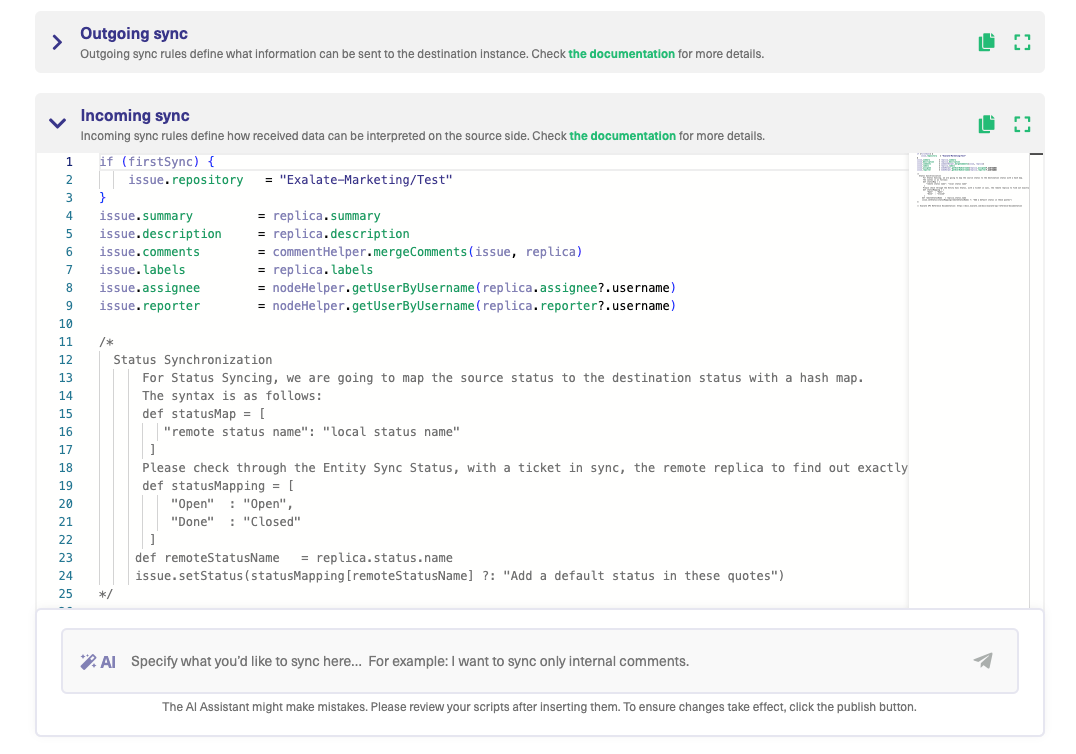
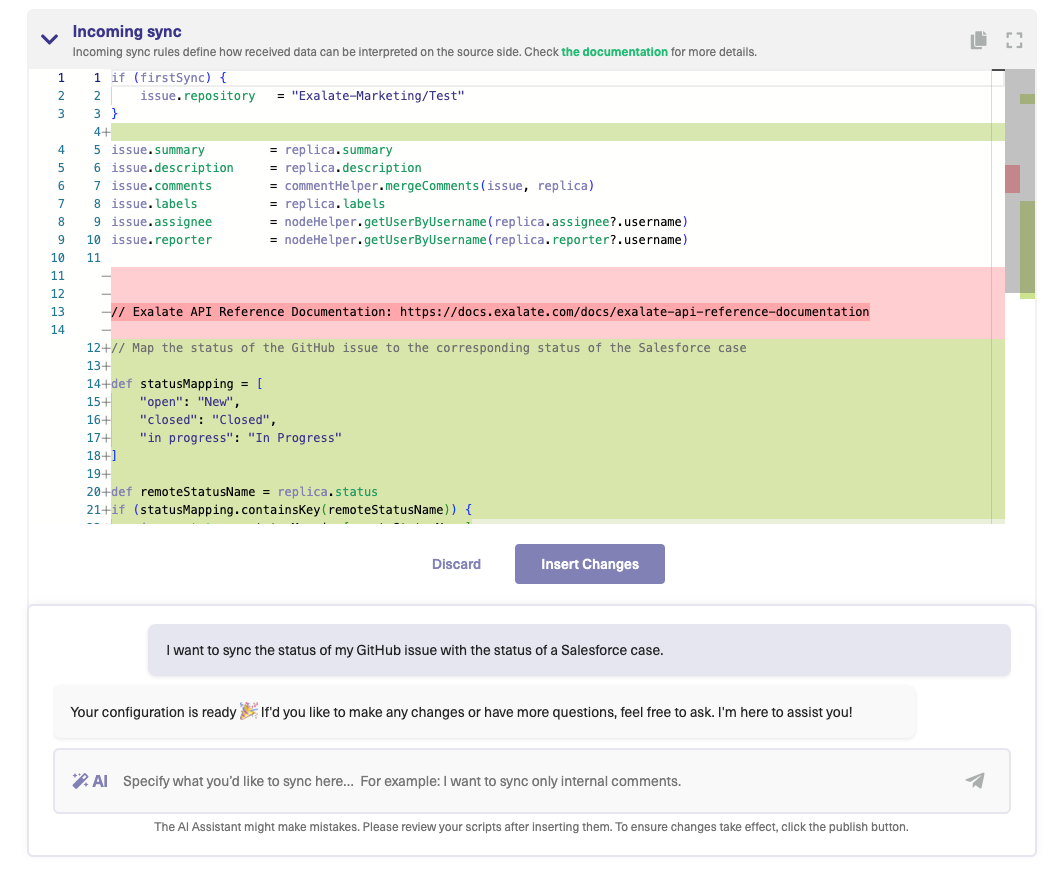
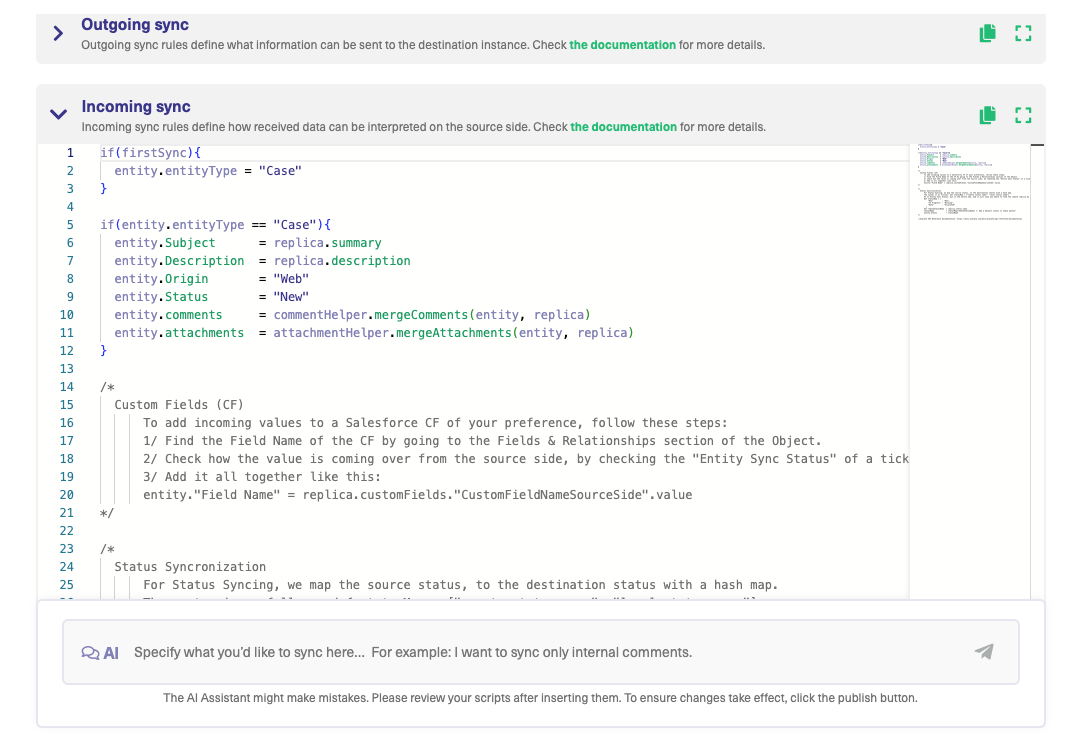
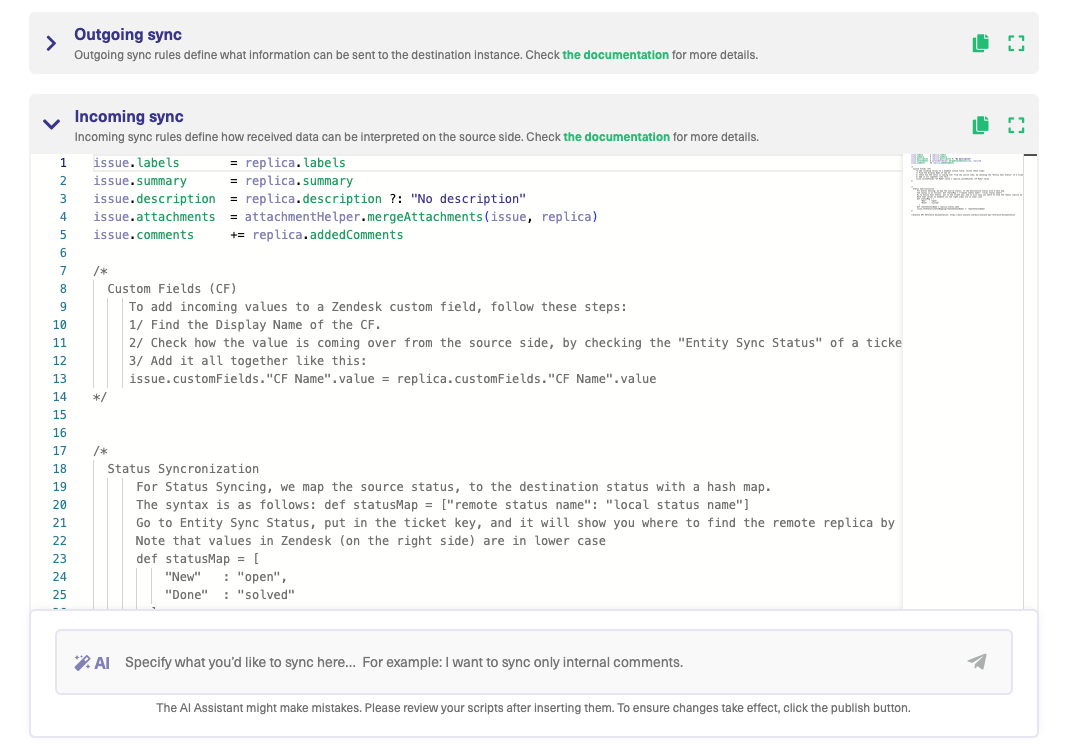
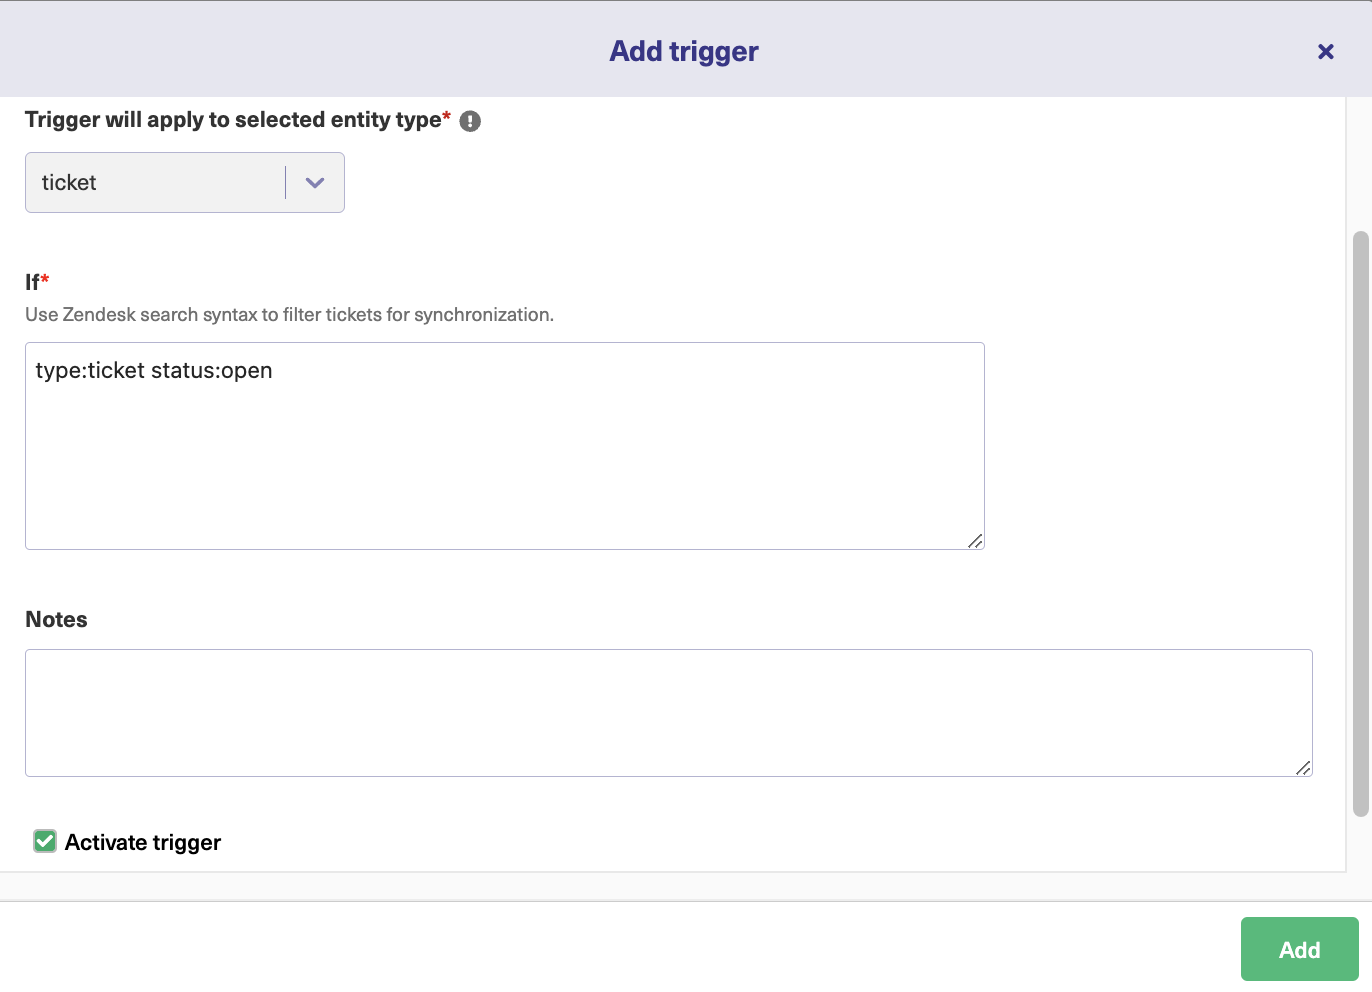
    1. Basic mode: This mode allows you to eBond (or sync) using predefined mappings between 2 applications. These mappings cannot be changed. For example: for ServiceNow, you can sync the short descriptions, comments, descriptions, and attachments of incidents only. So this mode works best for basic eBonding integration needs. 
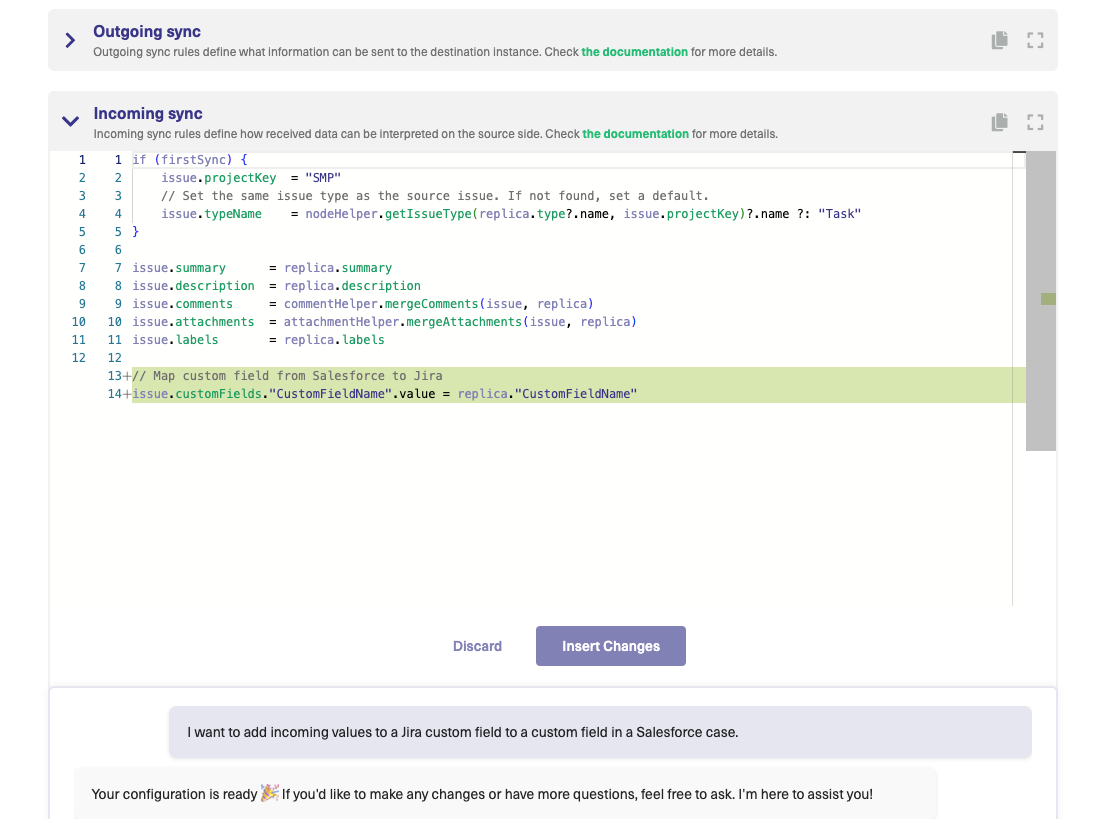
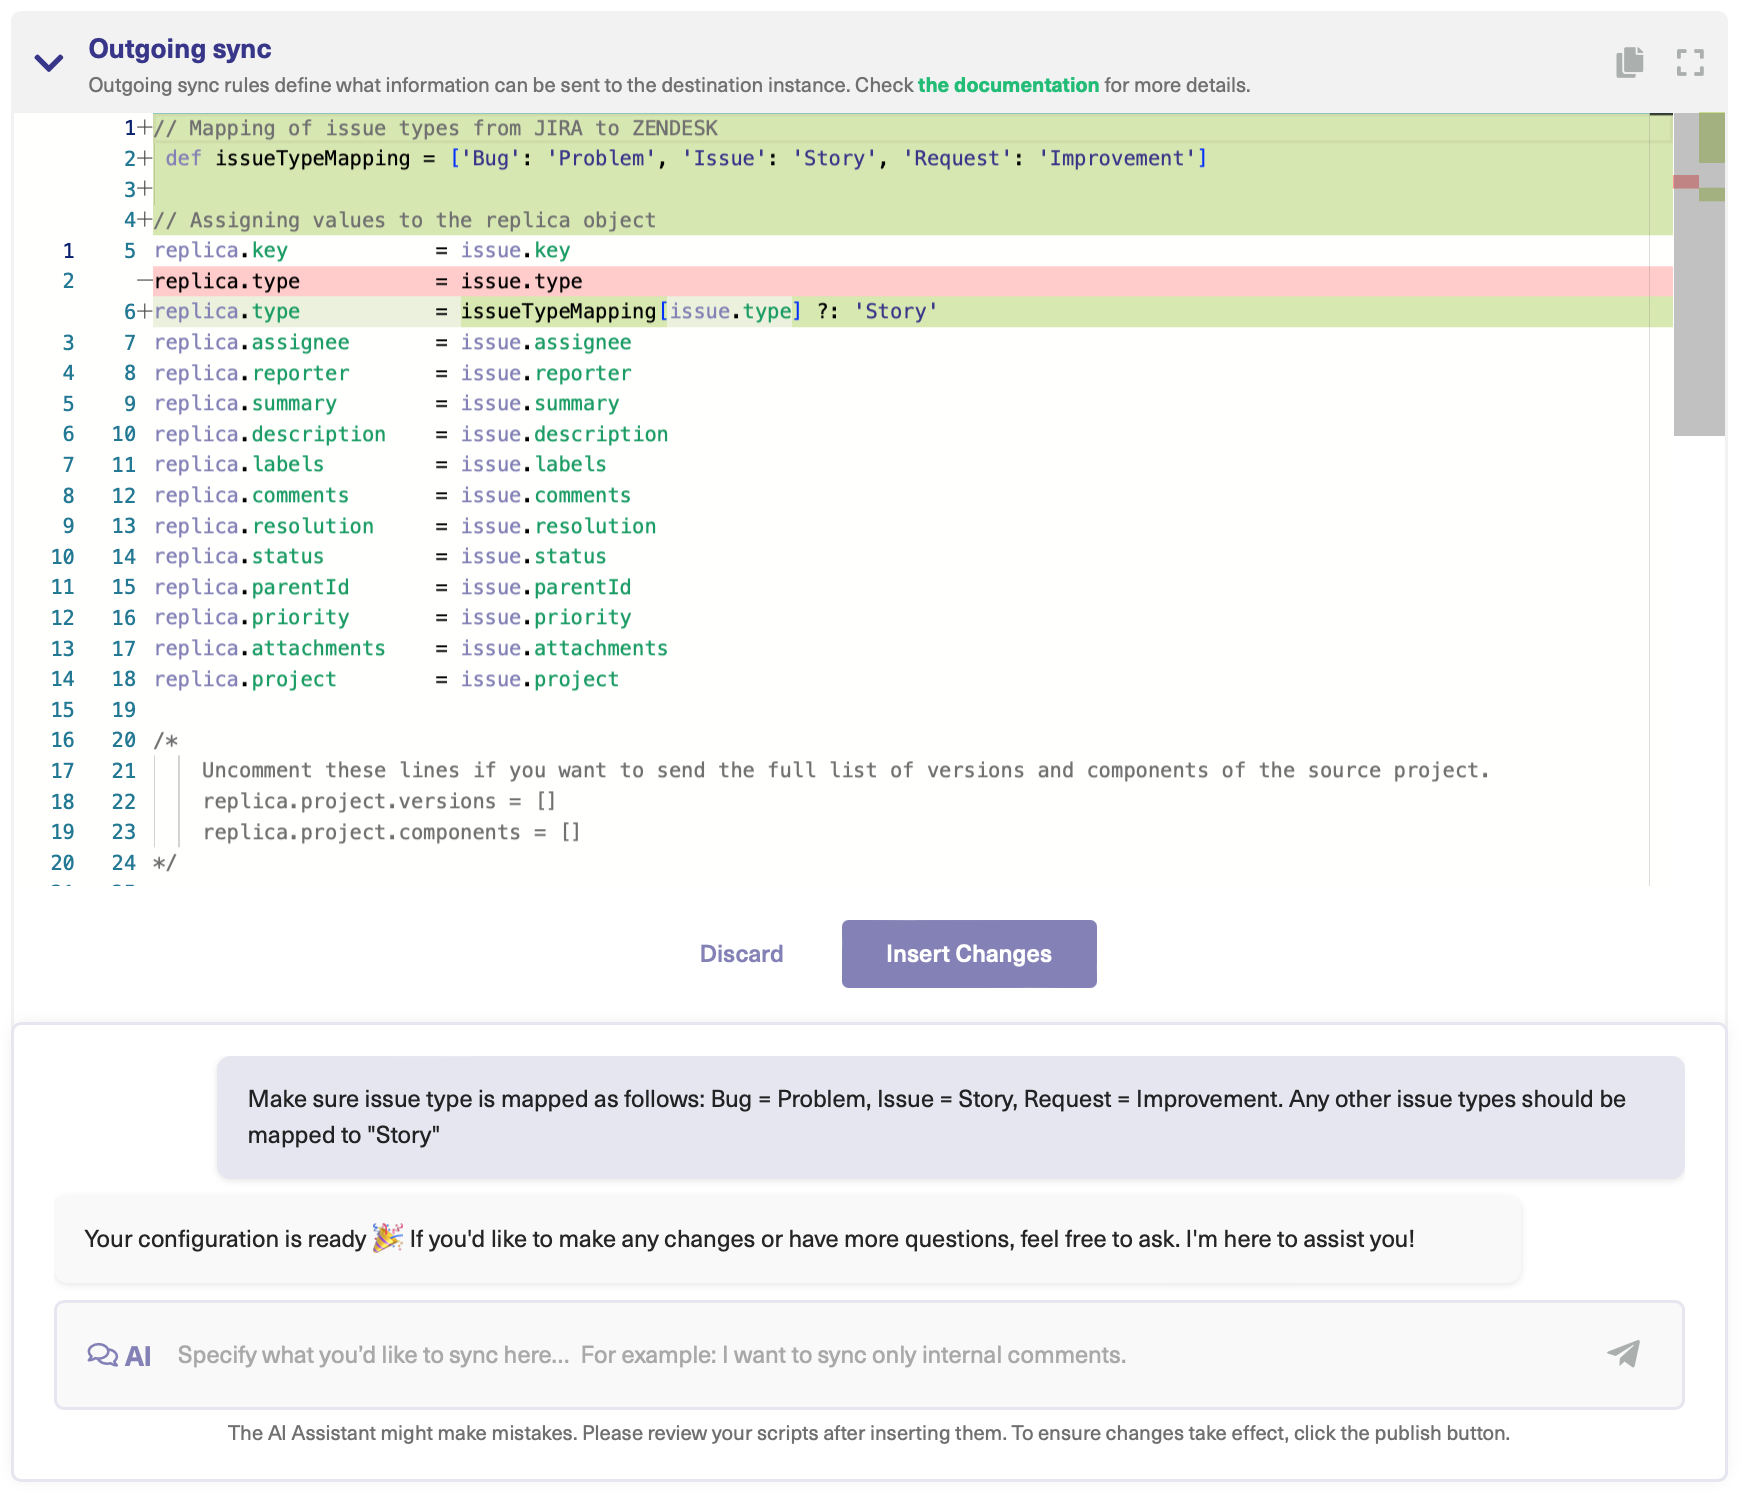
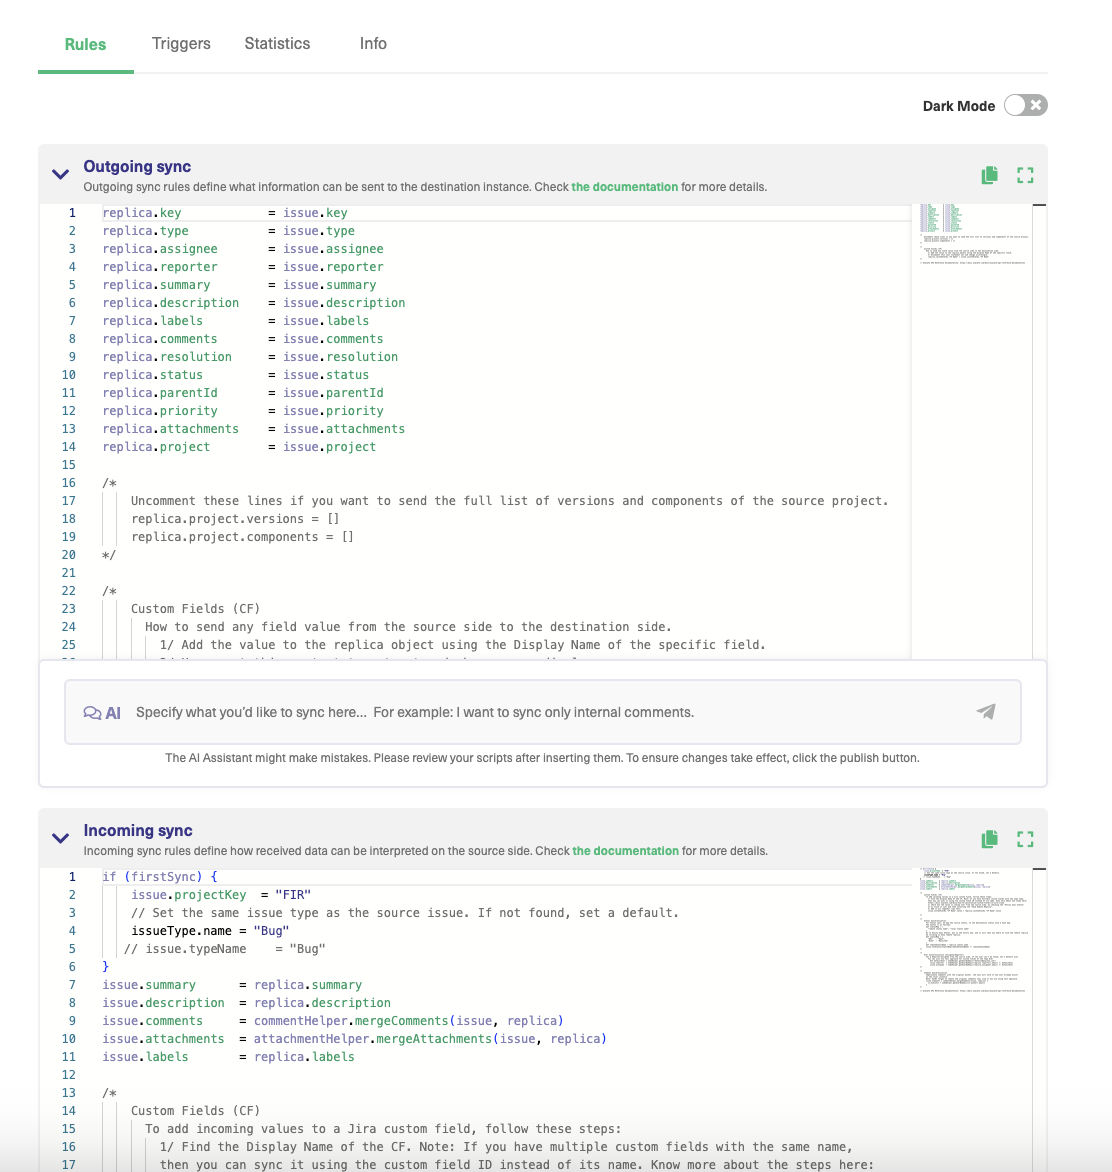
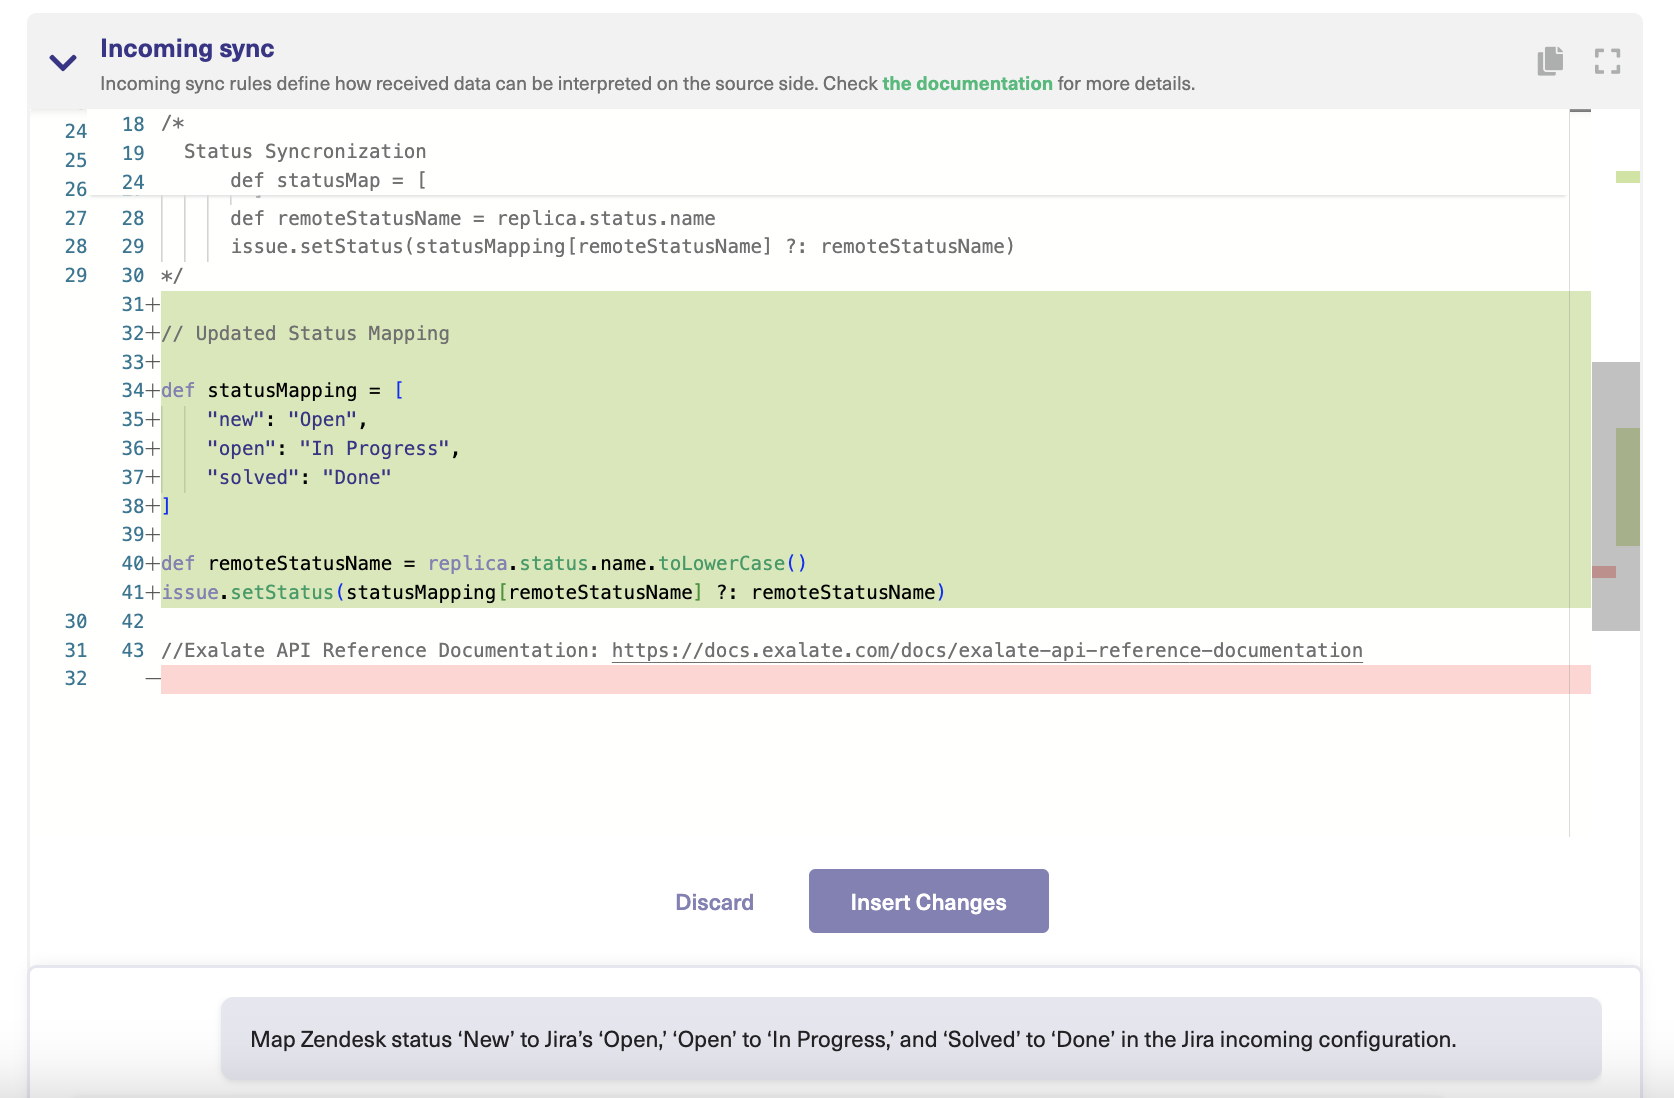
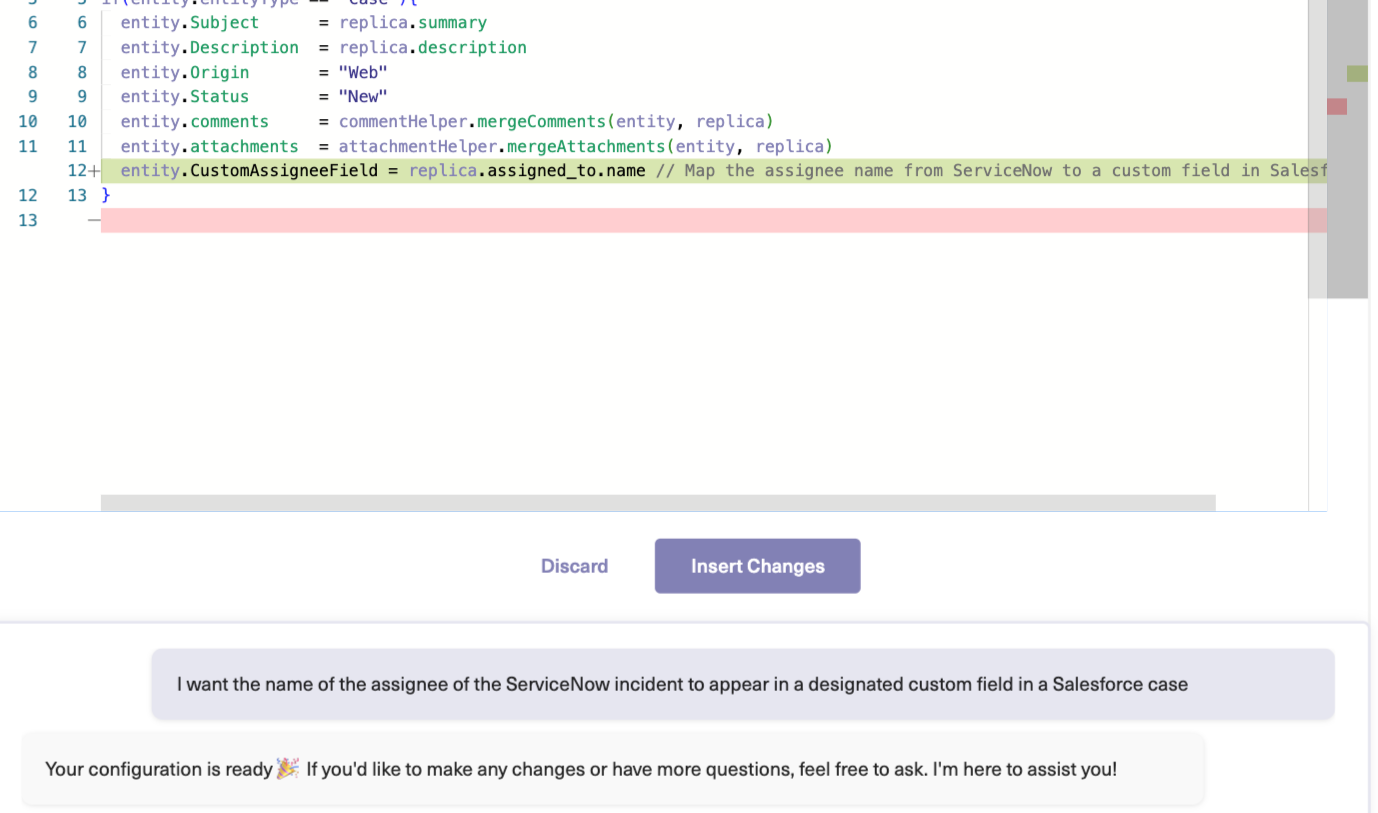
    2. Script mode: This mode is based on an intuitive scripting engine. Groovy-based scripts help you control what you send and receive on each side independently. You can set up new mappings or integrate advanced logic with this mode, helping you accommodate even the most complex sync requirement. This mode is ideal for cross-company (with multiple companies) integration use cases. This mode also has AI Assist that helps you generate sync scripts based on human prompts. You simply need to type your sync requirements and the code is automatically generated. However, just like with any AI, it’s important to review AI-generated scripts before publishing changes.
      These modes make Exalate a perfect fit for all kinds of users: business or technical. They also make it possible to use Exalate for various eBonding use cases within a single company or across multiple companies. So it is very flexible in this regard.
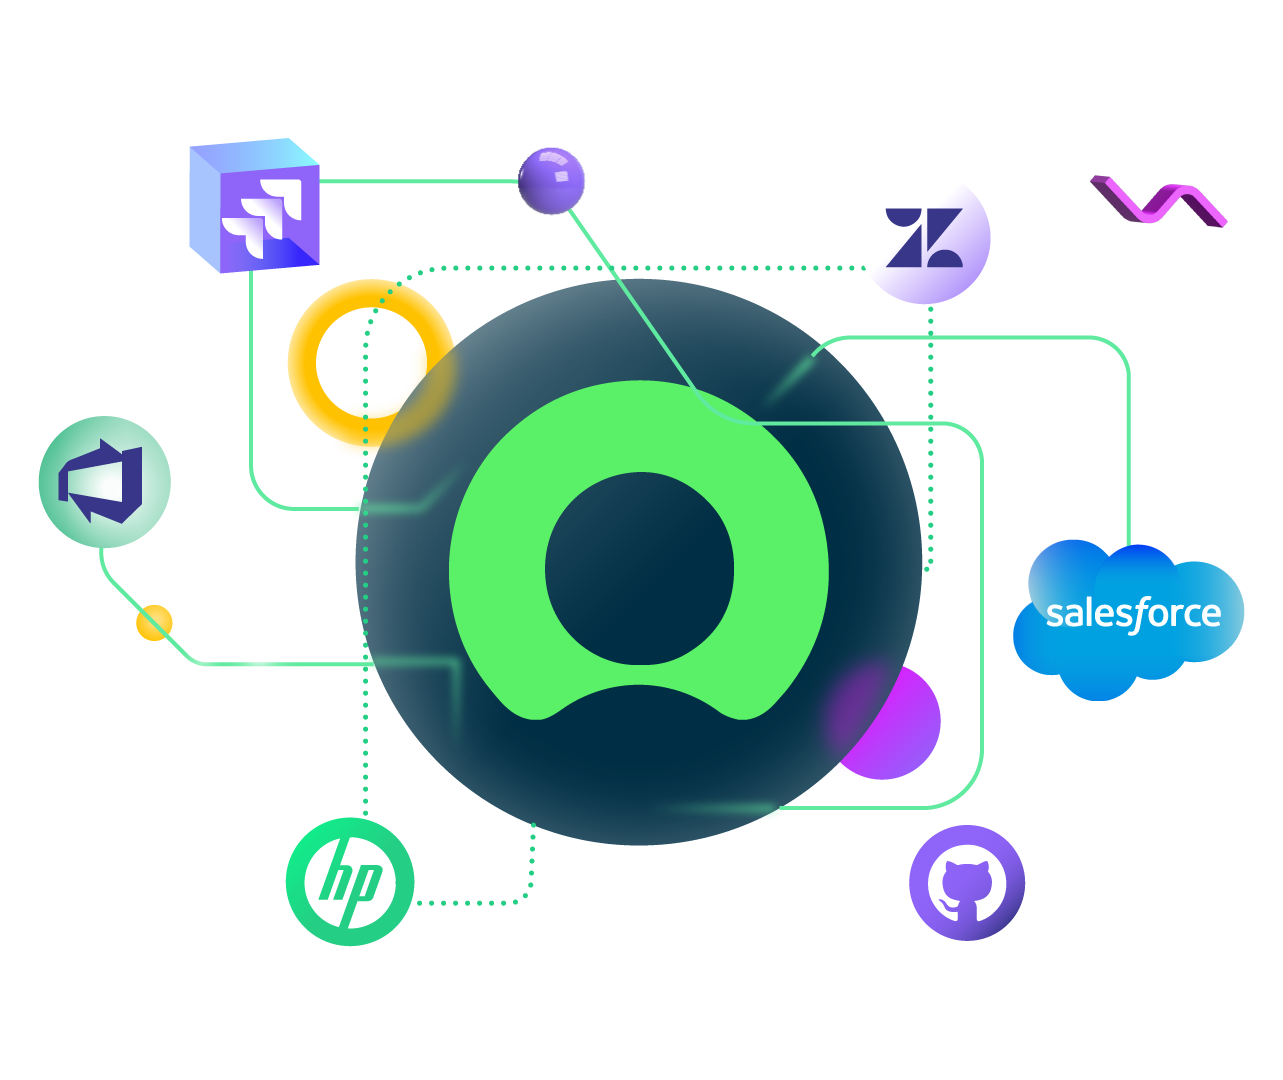
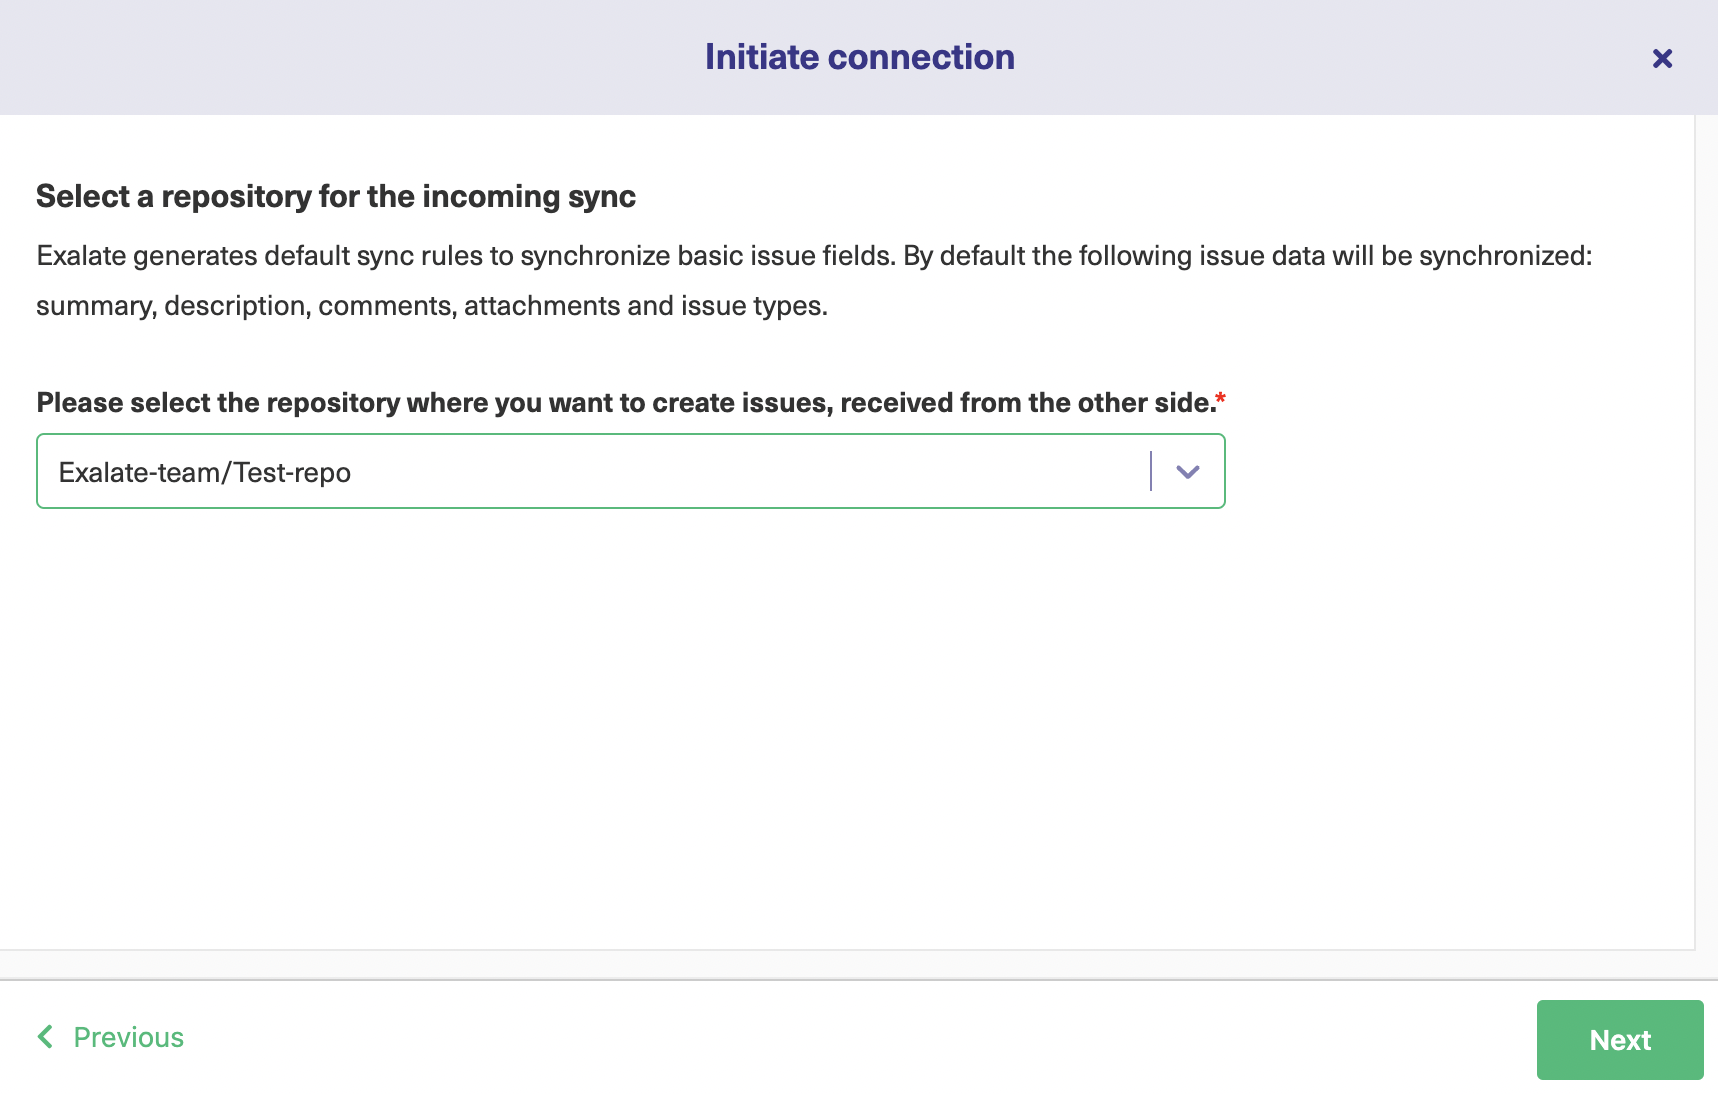
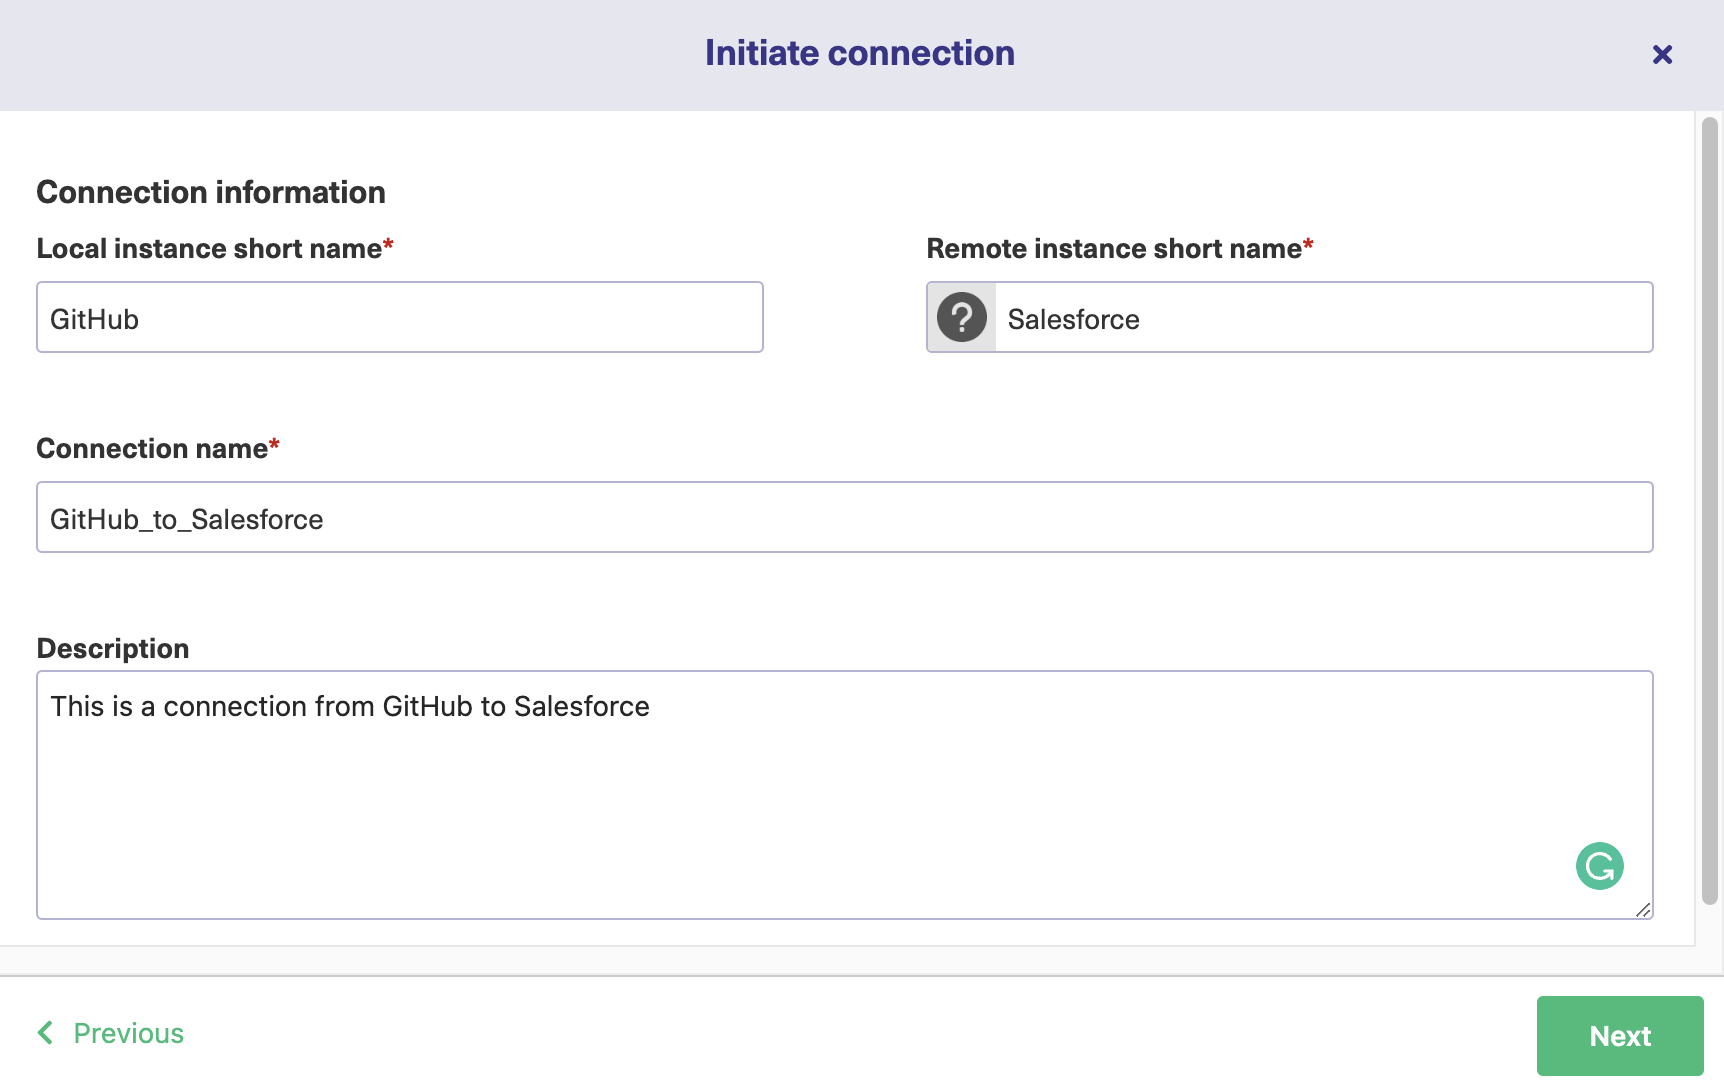
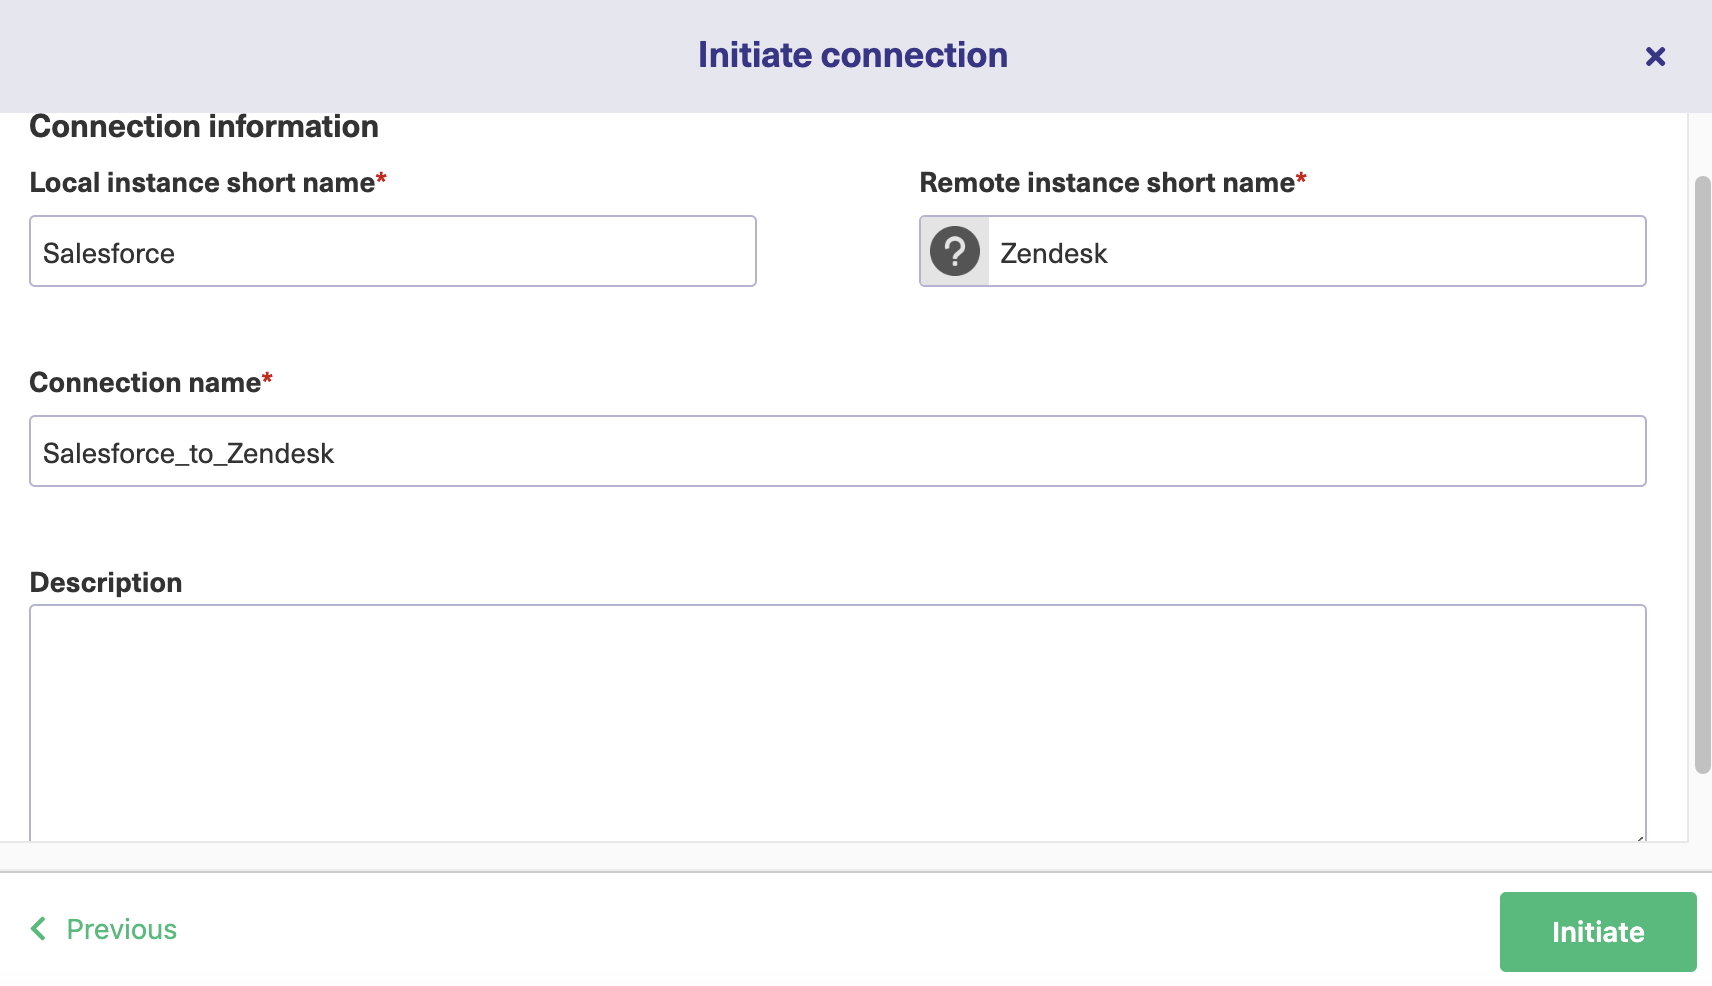
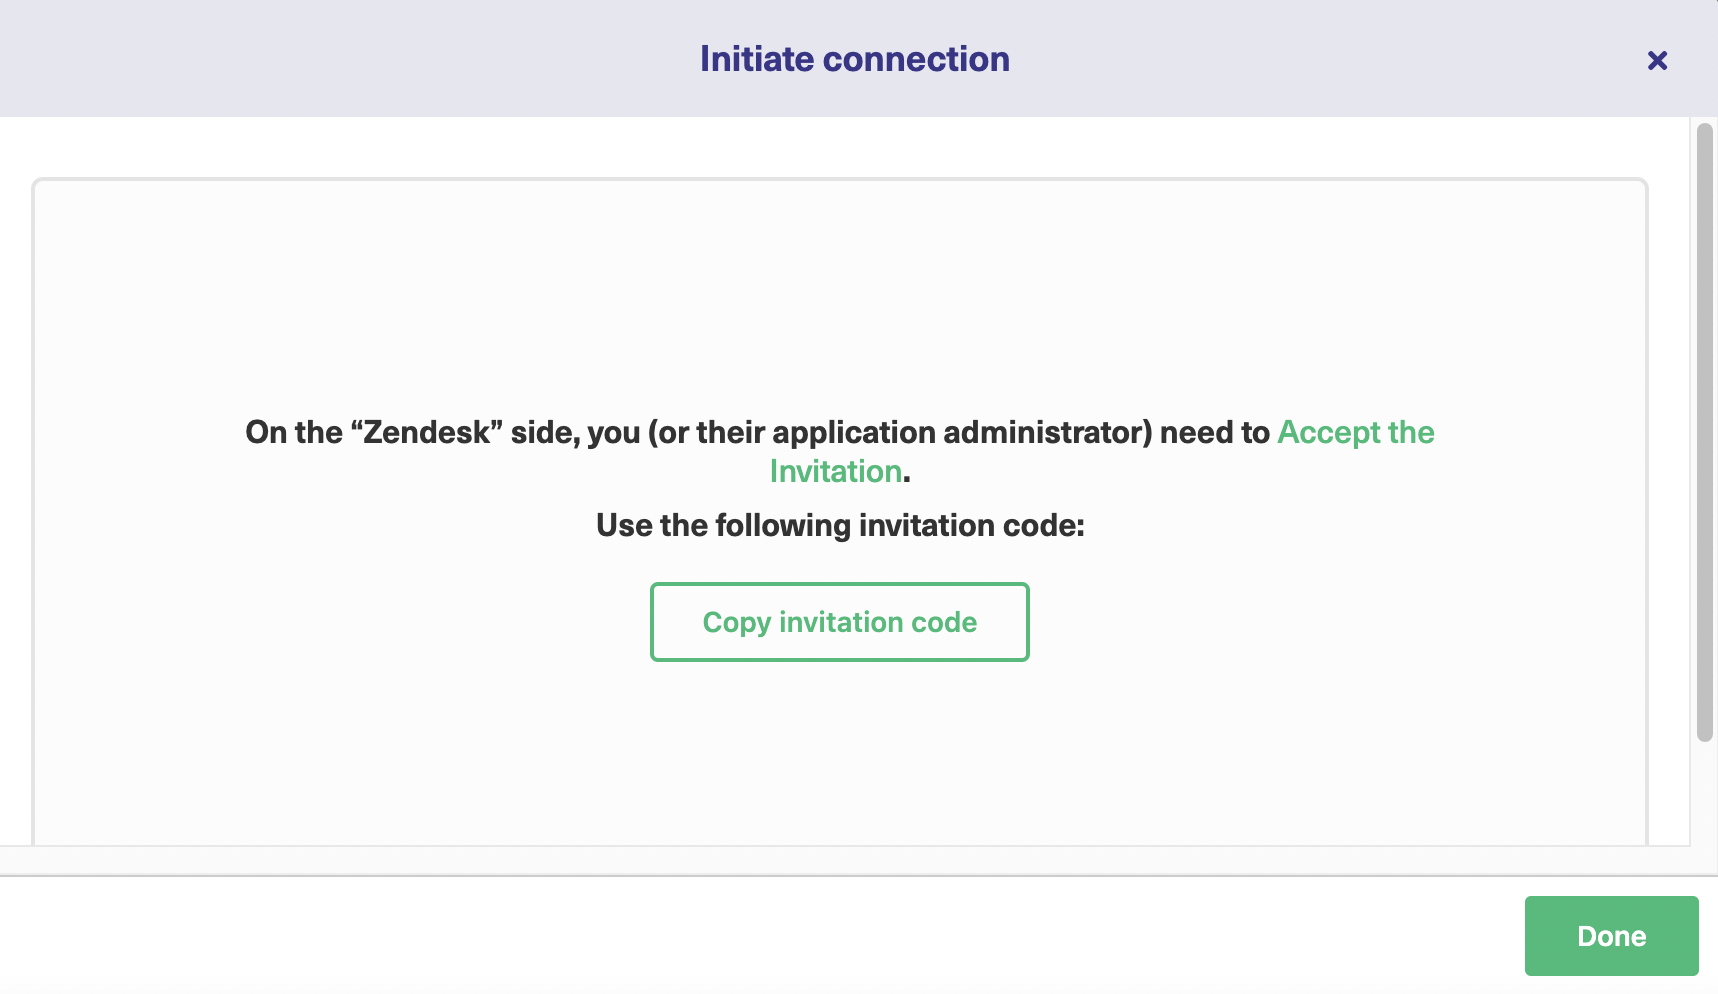
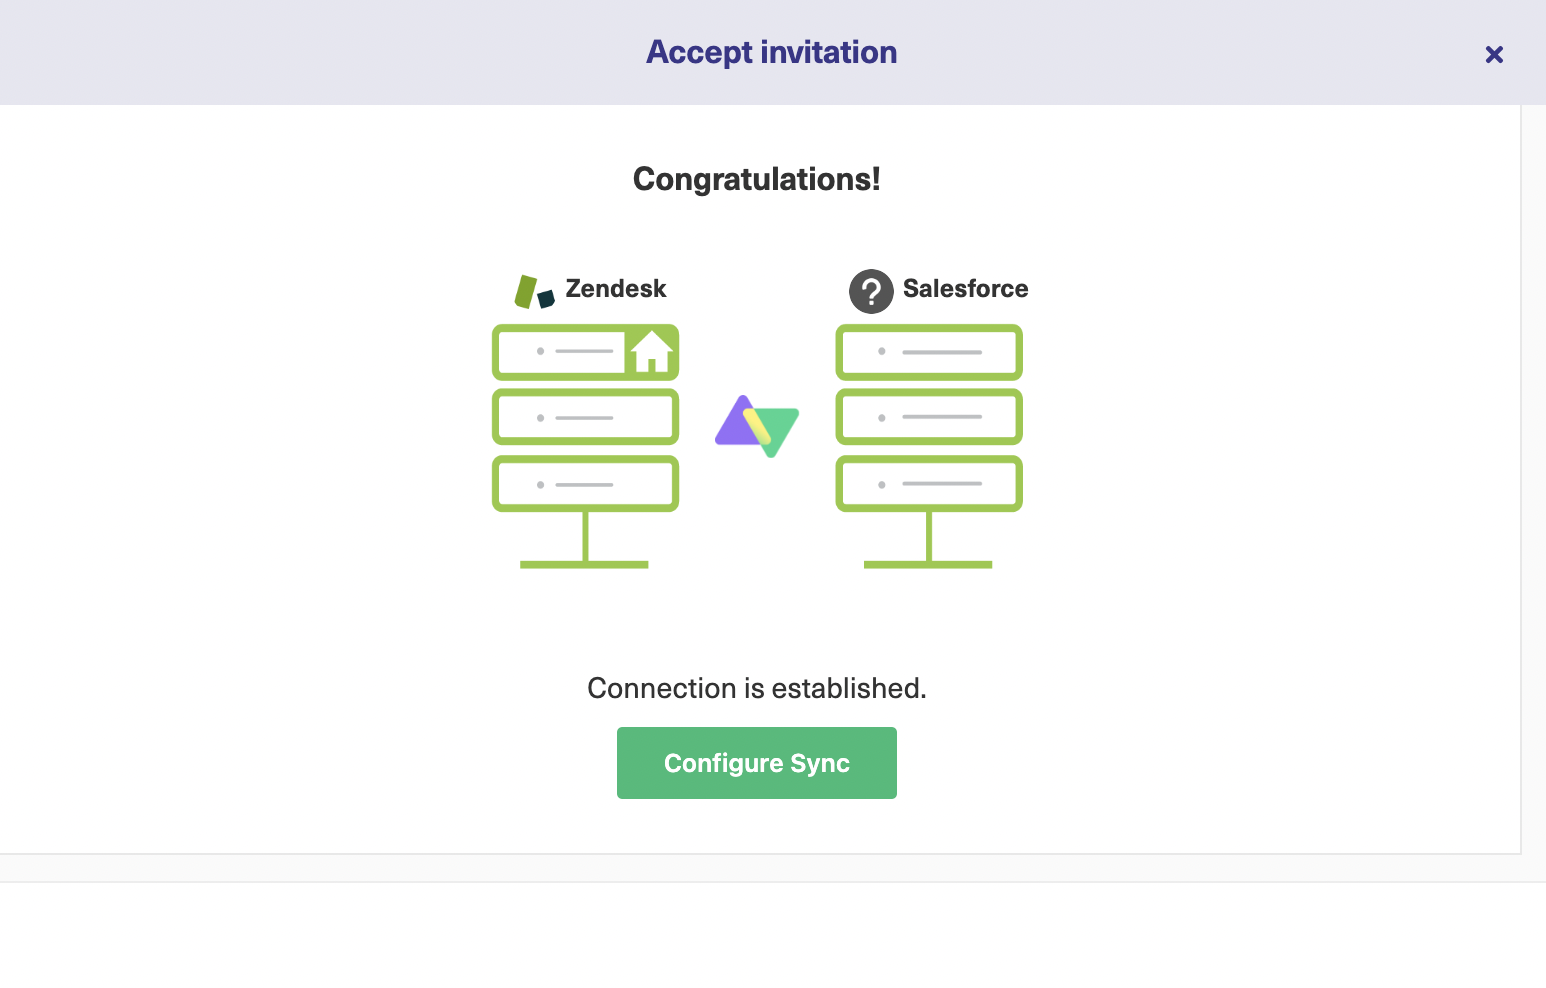
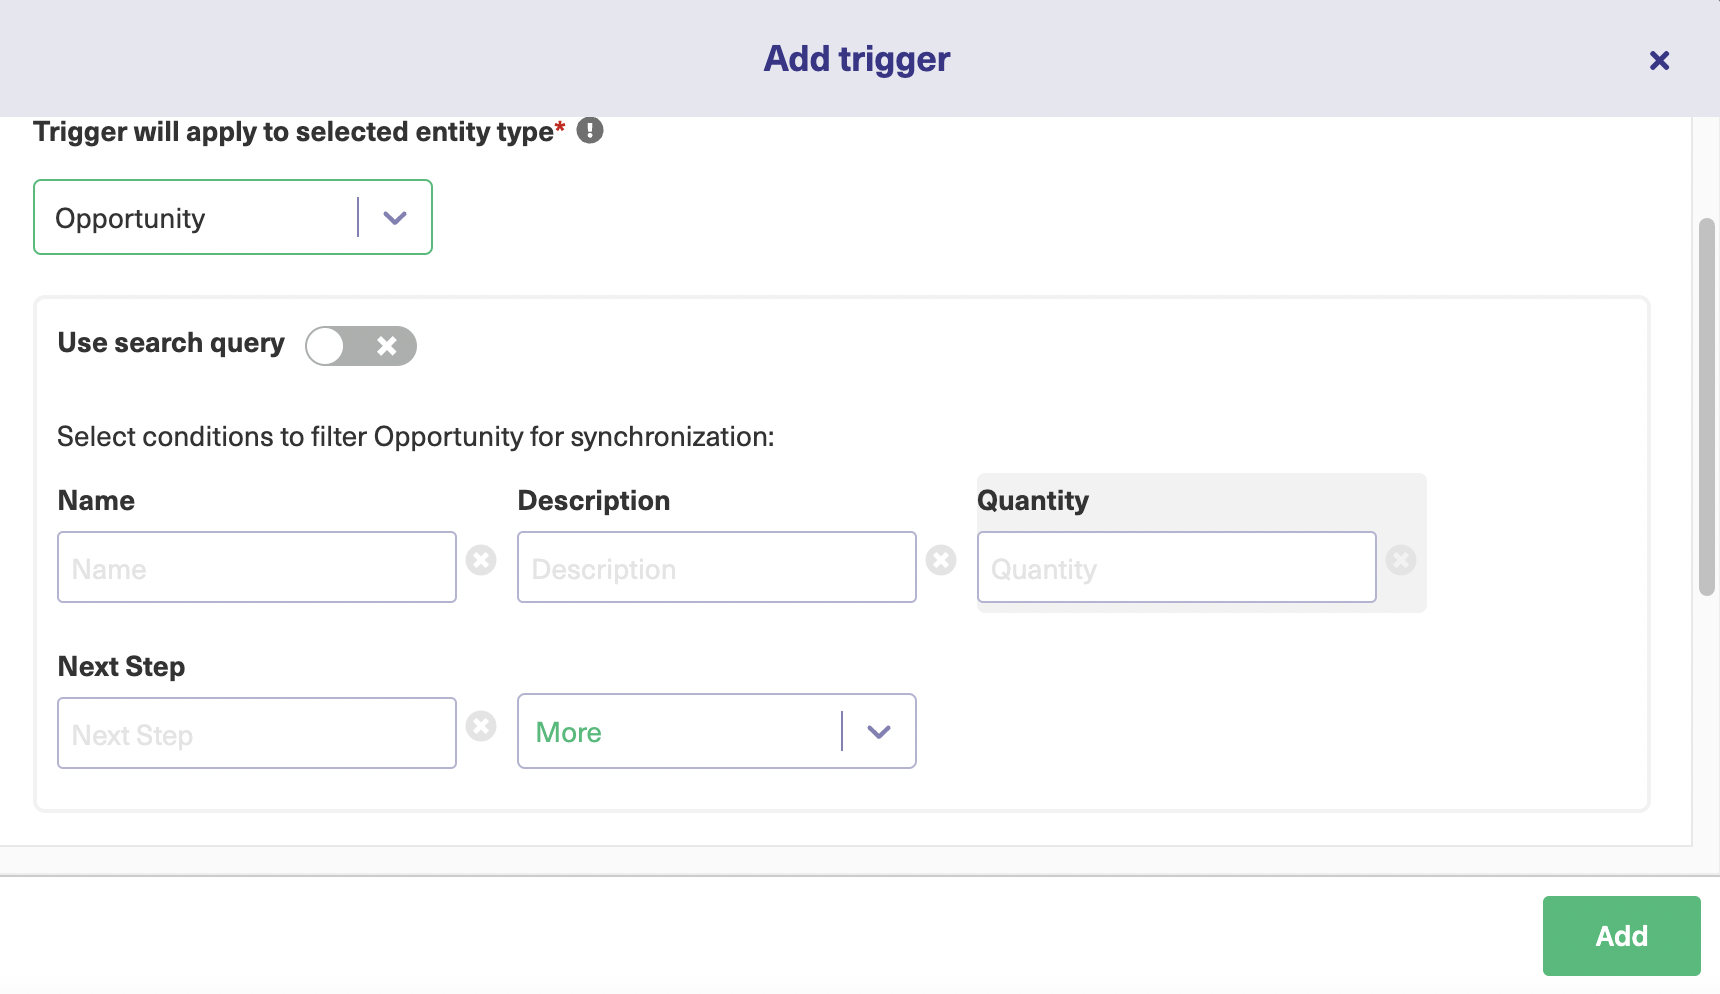
  • Exalate supports a lot of different systems that can be eBonded. Tools like Jira, ServiceNow, GitHub, Salesforce, Zendesk, Azure DevOps, and the like. And all these new applications can be easily added to your existing workflows using the different configuration modes that we just saw. 

If you want to learn more about how Exalate enables you to integrate multiple ServiceNow instances, here’s the complete guide to a ServiceNow to ServiceNow integration

You can also request your Exalate for ServiceNow trial from its integrations page.

With Exalate, you can also offload the entire integration hassle and focus on what matters the most for your business.

Note: Check out the recommended reads at the end of this blog post to read all about ServiceNow and other work management systems’ integration like Jira, Salesforce, and the like.

Bottomline

For the use case, we discussed in the section above i.e. syncing an incident of Urgency=1 between two ServiceNow instances, both eBonding spoke and Exalate can work. You can also design more advanced workflows with the help of these tools. 

However, there are inherent differences between the 2 tools that need to be taken into consideration. 

Firstly, eBonding Spoke supports only ServiceNow-ServiceNow bonding. So it would work best if you have 2 ServiceNow production instances catering to different functions, maybe one is for internal use and the other exposed externally, i.e customer-facing. But if you want to eBond ServiceNow to other applications like Jira, Azure DevOps, etc, or maybe even a Jira-Salesforce, Zendesk-Azure DevOps eBonding integration then Exalate is the obvious choice.

Secondly, eBonding Spoke is a default part of the ServiceNow environment and does not require an additional subscription cost. So if you want to use predefined design integration patterns with 2 ServiceNow instances and a simple use case that can be accommodated under them, you can choose to use this ServiceNow offering instead of Exalate. 

Thirdly, the Actions along with the different flows (in Flow Designer) that can be designed with eBonding Spoke provide exhaustive functionality to eBond 2 ServiceNow instances, but after a point they become static. So it is difficult to have advanced process logic or customized attributes with eBonding Spoke, as it gets limited by ServiceNow’s own infrastructure. With Exalate, Groovy scripting allows you to accommodate even the most complex eBonding integration cases. 

Fourthly, just as a spin-off of the first point here, ServiceNow’s integration automation capabilities are further extended through IntegrationHub which allows you to connect ServiceNow with other applications like Jira, GitHub, etc. 

In this case, ServiceNow will be in the driving seat orchestrating all the operations required for synchronization. This can seem feasible for simple eBonding cases. But in reality each environment, and thus each eBonding integration over time develops at its own pace. During this phase, if there is tight coupling between the systems under integration it leads to intricate complexities, resulting in increased overheads. 

In such a situation keeping the systems loosely coupled is important. Exalate supports loosely coupled systems and hence is a safe bet in such situations. You can have a look at this blog post to get an overview of how IntegrationHub compares to Exalate. 

All in all, to sum this up, the choice between eBonding Spoke and Exalate is more strategic than random. So make an informed decision based on the context set up through this blog post. 

Conclusion

This article threw light on what eBonding is and how it can be beneficial for today’s fast-growing, digital, and data-driven companies. We saw how an eBonding integration can help such companies interconnect with other companies using ITSM applications like ServiceNow. 

We then focussed on understanding ServiceNow infrastructure for providing eBonding capabilities in the form of IntegrationHub and eBonding Spoke. We also discussed what a typical eBonding OOB Action looks like. 

Moving ahead, we saw a simple use case of eBonding an incident between 2 ServiceNow instances using the eBonding Spoke. 

And then finally, we covered which other eBonding tools exist in the market. I chose to compare Exalate because of its feature offerings like scripting engine, distributed architecture, decentralized integration, and the like. We also discussed how they aren’t direct competitors, and the choice between one of the eBonding solutions (eBonding Spoke or Exalate) depends on your specific requirements and long-term vision.

Recommended Reading:

Exalate Service Awards 2021

Exalate service awards

Technology allows you to increase your revenue, scale your business, and do so much more! But it can also steal quite some time from you while you’re getting up to speed. That’s why we always recommend working with a partner. They can provide consistent support, show you how to make the most of the solution, and roll out the working solution in a matter of days. 

That’s why we present to you our best of the best Exalate Partners!  

Top 20 in Exalate Services

Eficode

Certified Exalate Partner
Integration projects completed: 7
Integrations included: Jira, ServiceNow
Website: https://www.eficode.com/root-devops-platform
Location: Finland, Denmark, Sweden, Switzerland, 

Eficode is a leading DevOps company in Europe, driving the DevOps movement across six countries with ideas that put customer value and team satisfaction on center stage. As an Atlassian Platinum Partner, they help companies with proven consulting, training, hosting, migration, maintenance, and support services. Their hands-on competences scale from single tool installation to complete, high availability Atlassian toolchains – and beyond! Eficode’s community of more than 300 professionals is building the future of software development. 

Cententia

Certified Exalate Partner 
Integration projects completed: 7
Integrations included: Jira
Website: https://cententia.com/
Location: Greece

Cententia offers services of the highest quality, covering a wide spectrum of business needs and meeting international standards and the specific needs of the local business environment. These Services converge with its Software solutions, enabling organizations to strive within the demanding and fast-evolving environment of the global new economy.

Tecnofor

Certified Exalate Partner
Integration projects completed: 6
Integrations included: Jira, ServiceNow
Website: https://tecnofor.es/
Location: Spain

Tecnofor is a technology consulting and training company that focuses on helping clients to manage their IT Project portfolio and they also offer all kinds of services related to Jira. Every technological project needs three axes that must be managed as a whole: methodology, training, and tools. Through agile, efficient, and professional attention, you can find in Tecnofor a remarkable provider and a long-term partner. 

Avoset

Certified Exalate Partner 
Integration projects completed: 5
Integrations included: Jira
Website: https://www.avoset.fi/en/
Location: Finland

Avoset is an Atlassian Gold Solution Partner, which implicates strong commitment, a high level of expertise, and a desire to produce additional value to customers with Atlassian products. They became Atlassian Partners back in 2010. Since then, they have constantly developed their knowledge and understanding of Atlassian product development and communication tools.

Coyote Creek

Certified Exalate Partner 
Integration projects completed: 8
Integrations included: Jira, ServiceNow, GitHub
Website: https://coyotecrk.com/
Location: USA

Coyote Creek is a professional services firm headquartered in Silicon Valley. The team works with organizations to provide exceptional IT and engineering services. Clients turn to Coyote Creek when they need trustworthy outside help to do a project, or when they need peace of mind knowing their environment is monitored 24×7. Coyote Creek specializes in Atlassian consulting. The services include consulting projects, Cloud services, Atlassian License sales and guidance, and Catalyst, which is our proactive subscription for delivering Atlassian consulting services. Coyote Creek team has been successful for over 20 years because they’re clear about what they do AND don’t do, they own our mistakes and fix them, and their ultimate priority is doing what is right, fair, and honest!

bit2bit Americas

Certified Exalate Partner
Integration projects completed: 7
Integrations included: Jira, Zendesk, Azure DevOps, ServiceNow, Salesforce
Website: https://bit2bitamericas.com/en/
Location: Peru, Mexico, Colombia, USA

bit2bit Americas provides professional services focused on agile software development, business processes, and service desk solutions. Their team is experienced in practices and frameworks including Scrum, Kanban, XP, DevOps, SAFe®, ITIL, and CobIT. bit2bit Americas Atlassian Expert services are delivered throughout the Americas in Spanish or English.

cPrime

Integration projects completed: 9
Integrations included: Jira, ServiceNow, Azure DevOps
Website: https://www.cprime.com/
Location: USA, Spain, Italy, Netherlands, Romania, UK, Canada

Cprime is a global consulting firm helping transforming businesses get in sync. They help visionary business leaders compose solutions, execute implementations, and perform against business goals. As a leading global Agile and DevOps solutions provider, their software and talent solutions work together to deliver transformations.

Adaptavist

Integration projects completed: 8
Integrations included: Jira, ServiceNow
Website: https://www.adaptavist.com/
Location: UK, USA, Spain, Canada, Estonia, Malaysia 

Founded in 2005, its team spans over 300 employees globally, with a 10,000+ customer base representing more than half of the Fortune 500. Adaptavist is a Platinum Atlassian Solutions Partner in EMEA and North America, a SAFe® Gold Transformation Partner, and a trusted Slack partner. It offers expert consultancy, enterprise apps, training, managed services, and licensing solutions.

Trundl

Certified Exalate Partner 
Integration projects completed: 4
Integrations included: Jira
Website: https://trundl.com/
Location: USA, India

Trundl is an Atlassian Platinum Solution Partner, providing hands-on support and services for companies using Jira, Confluence, and the larger Atlassian ecosystem of tools and Marketplace addons. Trundl helps deploy, configure, and support Atlassian-based solutions for both business (HR, Marketing, Security, Legal, Finance) and technical teams (IT, Dev)

Inlogiq

Certified Exalate Partner (with the biggest Exalate team – 6 Exalate experts)
Integration projects completed: 2
Integrations included: Jira, Azure DevOps
Website: https://inlogiq.com/
Location: Spain

Inlogiq is a young company with sound experience in Software Quality. They specialized in the Atlassian suite of products and they leverage the features offered by Atlassian products to provide tailor-made solutions to their customers. They are also an expert in toolchain implementation for Software project management, Test automation, and also monitoring.

Demicon

Certified Exalate Partner 
Integration projects completed: 3
Integrations included: Jira, ServiceNow
Website: https://www.demicon.de/
Location: Germany

A premium partner in Berlin, Hamburg, Stuttgart for digital transformation. As a consultancy and Atlassian Expert, the Demicon team combines many years of experience in process, collaboration & innovation management, and vehicle engineering. By providing a high-quality service, they enable companies to work more efficiently and connect staff in an innovative way.

Avisi

Certified Exalate Partner 
Integration projects completed: 3
Integrations included: Jira, Azure DevOps
Website: https://www.avisi.nl/en
Location: Netherlands

It is Avisi’s mission to help customers implement best-in-class tooling and best-practice processes that allow them to fulfill their strategy. Through support, training, and consultancy, Avisi team helps customers to implement and integrate Atlassian and Gitlab tooling optimally with their existing tooling and processes.

Life in Codes

Certified Exalate Partner 
Integration projects completed: 2
Integrations included: Jira, ServiceNow
Website: https://www.lifeincodes.com/
Location: Romania, Belgium, Estonia

Life in Codes is an Atlassian Solution Partner active in Romania and Belgium. They help teams and organizations change the world by providing them with the collaboration tools needed in order to work in a more efficient and enjoyable way.

Glintech

Integration projects completed: 2
Integrations included: Jira, GitHub
Website: https://www.glintech.com/
Location: Australia

An award-winning Atlassian Platinum Experts, they offer expert consulting, migration, implementation, and upgrade services. GLiNTECH will further help you master the technology with licensing assistance, training, and support. GLiNTECH will create faster, intelligent, automated processes and services to help your teams drive digital transformation.

Nagarro 

Integration projects completed: 2
Integrations included: Jira, Azure DevOps
Website: https://www.nagarro.com/en
Location: Norway, India

As an Atlassian partner for more than 10 years, Nagarro provides a complete set of services supporting your Atlassian solutions and the teams using them. They deliver solutions for software and IT teams integrating processes for Agile Product Development, DevOps, and Service Management. They also provide solutions for a wide variety of business teams.

HyperVelocity Consulting

Integration projects completed: 3
Integrations included: Jira, Zendesk
Website: https://hypervelocityconsulting.com/
Location: USA

HyperVelocity Consulting has helped app developers, biotech firms, startups, and Fortune 500 companies get the insights and tools they need to improve their business.

Dragonsoft (DSD)

Integration projects completed: 2
Integrations included: Jira
Website: https://www.shdsd.com/index.html
Location: China, Japan

DragonSoft Digital Technology (DSD) is a growing IT Consulting Company funded in 2006. they offer customers IT services such as consulting, design, development, and maintenance. Especially in the ALM field, They offer professional services of consulting, implementation, training, and customization development, which are all built on Atlassian products. Their veteran consultants, systems engineers, and developers are experts in comprehensive ALM programs and services. 

Communardo

Integration projects completed: 3
Integrations included: Jira, Azure DevOps
Website: https://www.communardo.com/
Location: Germany, Austria

Communardo is an Atlassian Platinum and Enterprise Solution Partner and a leading specialist for digital workplace solutions located in Germany and Austria. Their mission is to create and maintain solutions for smart communication and collaboration. They also provides enterprise solutions for Atlassian products including licensing, consulting, software engineering, managed services, hosting, support and training.

Ovyka

Integration projects completed: 3
Integrations included: Jira
Website: https://www.ovyka.com/
Location: France

Ovyka has recognized expertise in IT Strategy and very strong references in innovation, collaborative solutions, and is an Atlassian Gold Solution Partner recognized by many of the biggest companies in Europe. Ovyka also has strategic partnerships with vendors such as Exalate, to help provide expert consulting and best practices for successful integration of their plugins.

kreuzwerker

Integration projects completed: 4
Integrations included: Jira
Website: https://kreuzwerker.de/
Location: Germany, Switzerland, Poland 

As your Atlassian Platinum Solution Partner, kreuzwerker will be at your side with their extensive experience to aid you during the introduction, expansion, and maintenance of the complete Atlassian toolchain. They have successfully introduced Atlassian services to companies ranging from the IT, automotive, and Pharma industry to media houses and global FMCG companies all the way to government and non-profit organizations. Their experts, coaches, and consultants advise on cutting-edge technology solutions, infrastructure, security, strategy, and process optimization.

Exalate Gurus

It’s important to celebrate team effort, but it’s also important to recognize the leading experts and fans within those teams. 
So we present to you our champions, who made integrations a part of their service portfolio and delivered those with admirable excellence.

(You go, guys!)

And here’s what they say about Exalate, about how it benefits their organizations and their customers.

When it comes to orchestrating cross-company workflows and satisfying sophisticated data synchronization needs for our customers, Exalate is the maestro! Awesome product with an excellent team behind it.

I use Exalate every time there is a need to connect separate instances or separate Jira projects.
Thanks to the functionality of Exalate, it is possible to create a connection despite the rigid firewall settings or when permissions do not allow users from outside a secured project to see its full content.
Also, it is worth mentioning that Exalate, thanks to its scripted connection functionality, allows the implementation of various advanced scenarios. For me, what makes Exalate stand out from most Atlassian add-ons, is the fact that the documentation for this plugin is very extensive. When you need a script for your specific scenario, it is already waiting for you in the documentation.

Application integration is still a hot topic. With the help of Exalate we have successfully helped various customers ranging from relatively simple to complex use cases. In the case of (technical) issues, Exalate Support has helped us quickly and decisively.

Exalate has helped us collaborate in many ways. Our internal Jira instance is linked with multiple of our customers’ Jira to keep track of all requests they have for us or to provide them insights into our development status. We have integrations across Cloud and on-premise with more complex network landscapes. Additionally, we have helped some customers integrate their Jira with ServiceNow to allow data reporting all from one centralized place.
The flexibility of Exalate allows us to implement complex synchronizations rules beyond what seems initially possible. It’s undeniably an essential part of our day-to-day business.

For InlogiQ, Exalate has streamlined the implementation of Jira when our customers require synchronizations or integrations with other tools.
During 2021 we have carried out different implementations with Exalate, we have synchronised Jira Server with Jira Data Center, Jira DC with Cloud, or Jira Cloud with Azure DevOps, among others.
For our customers, this means the security of not having to maintain their own synchronization tools, in addition to the security and stability that is provided by Exalate.

As an Atlassian Consultant setting up synchronizations for my customers, it is almost too easy with Exalate. The app helps me look like an absolute expert and with the easy setup you can have an advanced setup up and running in less than an hour. For basic ones less than 10 minutes. You can even use the graphical interface with no knowledge of Groovy coding. So the app is for all Jira roles actually, from hardcore coding administrator to more or less Jira newbie.
And finally, thank you iDalko team for the absolute outstanding support.

Exalate is the best tool on market for synchronization between our customers’ principal products, whether Jira to Jira, Jira to Salesforce, Jira to Zendesk, Jira to ServiceNow, Jira to Azure Devops and so on and so on and so on. Our customers love the flexibility of integration with the ability to scale without performance issues.

  • Alvaro Jardon (Tecnofor)

We have been working closely with Exalate’s team for many years, and they are always ready to help and provide the fastest response and the most efficient solution for us or our customers. There are many customers that we have been able to help thanks to Exalate, either integrating two or more Jira instances or with other tools.

Exalate allowed us to automate most of the processes and reduce the manual work, redirecting the requests to the team that corresponds and simplifying their work. Exalate applications guarantee the security of the information that is shared on the different platforms.

  • Yaakov Shami (Methoda)

The flexibility of Exalate allowed us to creatively fulfill all our needs. I never received such treatment from any other addon – you’re the most professional and most fluent about your product (which is awesome, btw) and I always enjoyed talking to you and our meetings, even when there were problems.

Curious to learn about all 130+ Exalate Partners?
Visit Exalate partner directory.

Jira Integrations: Integrate Jira and Other Systems Bidirectionally

Jira integrations

Jira has been around for more than a decade and is still standing strong. Agile teams love the power it brings in the form of Scrum and Kanban projects. It is also one of the most popular tools for issue and bug tracking, helping teams monitor, track, assign, and report day-to-day operations. Jira integrations, on the other hand, are what every team needs to extend the platform’s potential beyond its limits. 

So here, we will discuss how Jira can be integrated with other tools and apps. But before that, we will have a look at why such integrations are needed in the first place and also delve into a few use cases. We will also cover how choosing the right integration solution can help you get the benefits you have always expected from Jira integrations

Do I Need Jira Integrations? 

A quick detour: What is Jira? 

Atlassian has a lot of Jira products: Jira Software, Jira Work Management, Jira Service Management, and Jira Align are a few popular ones. It’s used by different teams like Development, Product Discovery and Project management, Operations, Sales, Customer support, and the like. 

Jira Software is very popular among the development and project teams due to the gamut of built-in templates it offers that accommodate purpose-built agile scenarios. Issues (also called cards) in Jira define a single unit of work and workflows are tracked using boards by passing these issues across it. That makes it easy for teams to have a uniform and consistent source of information in a single Jira interface. 

And then you go to its Marketplace and find many apps supporting integrations with Jira. And you can’t help but wonder, why do you need them in the first place? 

But before we see the why part, let’s see how Jira natively tries to integrate with different applications, like GitHub, for instance. 

We consider this use case because GitHub is popular among the development teams who often need to collaborate with the project managers using Jira and hence a Jira GitHub integration is much sought after since it can help eliminate manual ways of working. 

Automation in Jira can help integrate Jira and GitHub natively, but it is limited by the templates it offers. Also, it is available in Jira Cloud without any extra addon or subscription but can be accessed as an add-on (aka an app) on Jira on-premise. 

Sometimes, Jira APIs allow data to be retrieved and synchronized between Jira and other applications like Salesforce.

These are just examples we have considered. There are still a lot of native features for integrating Jira with other applications like Confluence etc. However, all these methods are rigid in the terms of functionalities offered and often involve initial setups that require time. 

Plus, since many Jira integration apps are already available in the marketplace, it makes sense to use them for advanced integration use cases and leverage the different choices they offer. Since they have different integration templates, configurations, number of applications supported, deployment models, etc, it is easier for companies to hit the bull’s eye by finding an app fulfilling all their integration requirements.  

Alright, let’s quickly head back to the topic we were about to discuss: Why do we need Jira integrations? 

Stop Manual Synchronization and Get Automated 

Teams use Jira to manage their daily work, but it’s also a fact that they need to collaborate with other teams at some point. These can be in the same company or with other companies (cross-company) that might be partners, suppliers, customers, or vendors. 

Such different teams are already comfortable with their own environment of software applications. These can be ServiceNow, Salesforce, GitHub, Azure DevOps, Zendesk, HP ALM, or another tracker. 

All these apps are tailor-made for specific functions and support different tasks like managing sales pipelines, managing DevOps projects, handling customer support, handling development issues, tracking bugs, etc. 

The useful information is locked away in different applications across different teams. But it can become very useful if unlocked and synchronized in the correct manner. For this synchronized information exchange, teams should avoid context-switching between different applications or resort to manual methods like emails or phone calls. 

As a Jira user, would you not like to envision having Jira as your single source of truth, with information coming in and going out of it automatically, in real-time, to different applications, such that your business processes are automated end-to-end? 

Such integrations can help you:

a) increase visibility on the critical business information that can be accessed anytime within tools that you already use.

b) automate information exchange and in turn business processes. Due to this, the information is always coherent, consistent, and accurate. 

c) filter relevant information that can be accessed by authorized users whenever needed.

d) increase cross-collaboration and communication across teams and help them work together effectively towards common business goals.

e) bring transparency between team members resulting in better planning and resource allocation. It also helps all team members to be “in agreement” with what needs to be exchanged and how integration must happen, thus reducing unnecessary friction.  

Jira integrations can just make this seemingly difficult task look like a walk in the park where you take a break from manual ways of doing things to automate them.  

But before we start walking that path (literally), let’s quickly have a look at the different use cases you can possibly carry out with Jira integrations. 

Jira Integrations: Common Use Cases 

As I already mentioned, teams can be co-located in a single office space or can be miles away, and if one of them uses Jira, then you can definitely think about integrating it with apps other teams use. 

Let’s have a look at a few such scenarios.

Development and Quality Assurance Teams

Perhaps the most common outsourcing that you might be familiar with is development and quality assurance. It’s not uncommon for the dev team to use GitHub or Jira and the quality assurance (QA) team use Jira. 

The QA team has to send bug reports and create new issues to be handled by the dev team. But manually doing this can mean that they create issues in both Jira and GitHub. This can lead to duplication and waste of time. 

A Jira integration here can mean that such bug reports and issues are automatically created in Jira and then status updates or any comments thereon are synced bi-directionally. 

With such an integration only valid information useful to both teams can be passed. 

For instance, the QA team might not be interested in all the attachments that the dev team uploads in their issues, but might only need a few of them along with status updates. 

Development and Project Management Teams

Another use case for Jira integrations would be between a development team using GitHub, Jira, or Azure DevOps (if you have a DevOps team) and the project management team using Jira. The project managers are responsible for managing the day-to-day operations of software projects and doing it well in Jira. 

For this, they either raise issues or work items manually in the other application and then information is passed back and forth. Sometimes they can even end up making 2 projects for the same work, again for duplicating information manually. 

With a “Jira to Jira/ Azure DevOps/ GitHub” integration, these teams can pass critical information back and forth automatically. They can even choose to filter and map information across these applications such that “High Priority issues should be assigned to George- a Senior Developer while network or infrastructure issues should be handled by John – the SysAdmin”. Here, the workflow on both sides can be mapped to synchronize information smoothly. 

Customer Support and Development Teams 

Say your customer support agents use Zendesk, ServiceNow, or Jira Service Management and the development team uses Jira. 

After the agents perform a root cause analysis of the tickets customers have raised, they either respond to them with a workaround or simply forward the requests through an email to the development team. The dev team then creates an issue for it and starts working. 

By the time the issue is worked on, the customer support agents have to make frantic phone calls and send endless emails to the dev team to get updates on the ticket, so they could update the status to their customers. If a Jira integration is in place here, all this manual back and forth can be avoided and these teams can enjoy real-time updates about the current status of the tickets within their own familiar tools. 

Sales and Development Teams 

Imagine your sales team uses Jira or Salesforce and your development team uses Jira, GitHub, or Azure DevOps. The reason we are discussing the sales teams here is that they have direct access to closed deals, customer queries, and feedback. 

If such valuable information is siloed, it can become unproductive. Sometimes it’s possible that this information can also be beneficial for the other team members. So creating issues or work items from Salesforce or Jira can definitely help the dev team to work on them faster and improve the SLA. The sales team in turn can enhance their customer experience with prompt answers to customer questions. 

What to Consider When Integrating Jira and Other Work Management Systems 

But treading on this path is not easy. The variety of apps available on the Marketplace can confuse even the most sorted person and eventually defeat the purpose of getting an integration tool in the first place. 

So walk slowly, take your time, explore your options, maybe take a free trial and then make a decision. Hurrying this up is surely going to be heavy on your pockets, not to mention the time and effort you would waste on it. 

Before you get in the driving seat, keep the following checklist in mind, just so you make your choice a little bit easier.

Secure Information Exchange

There is no point stressing the importance of secure information exchange because its need is obvious. Token-based authentication mechanisms, encrypted data both in transit and at rest, secure transfer protocols like HTTPS, and role-based access control are just a few starters. ISO 27001-certified solutions are always a safe bet.

The whole point here is to keep your information secure from “man in the middle” attacks, data being sent to the wrong destination, or being received from the wrong source, and the like. 

Restricting Confidential Information to Authorized Access 

An additional aspect of the above point is restricting the information access to authorized users only. This can be envisioned in an environment where the integration is decentralized. Meaning that both the senders and the receiver independently have control over what they send and receive. 

So you simply don’t send information you don’t want the destination application’s user to view and you deal with the information the destination application sends you the way you want to. This solves the problem of unwanted viewing, editing, or misusing information. It also means your confidential information stays with you, your destination instance admin won’t mess up your sync and you don’t have to worry about the effects of changes the other system makes. 

Serve Advanced or Complex Integration Use Cases

Integration needs are pretty dynamic. There is always a new set of data you need to exchange periodically, or a new logic to sync data with or something completely tailor-made for you. 

Acknowledging these changes and having the integration tool adapt to them with ease and minimal technical tweaks or configurations should be high up on your checklist.    

Ease of Use by Both Technical and Non-Technical Users

You might think, integration is definitely a topic for geeks, but that doesn’t mean it should only be restricted to a certain IT cubicle in your organization. The beauty of an integration tool must be reflected in the way it can be handled by both technical and business users alike.

Choose tools that have both drag-and-drop interfaces or low-code configurations so that all kinds of people can use them with equal ease.  Also, consider the presence of AI-powered code generation, scripting assistants, and chatbots.

Number of Supported Applications

Since all we are talking about here are different Jira integrations, it means you can already imagine a wide range of applications on the other end. Be it another Jira instance or ServiceNow, Azure DevOps, Salesforce, or much more. 

This is a checklist point for obvious reasons: the more applications the tool supports, the more possibility there is of you having to connect with just another department or a new supplier/ customer altogether. 

Automatic Handling of Downtimes and Failures

The Facebook and WhatsApp outage is sufficient evidence of the reality of downtimes and failures. They are just part and parcel of a software application’s life. So you can’t run away from them but can definitely choose a tool that can hopefully outrun them.

 Looking for information that has changed since the last downtime and applying it in the same order as its initiation, checking if all the sync updates are applied correctly without the need for manual intervention is important and can be achieved if the right tool is chosen.   

Distributed Architecture 

Last but not least, further elaborating on the 1st point in this section, having a centralized processor handle all synchronizations is just not a feasible option. 

Firstly, every time there is a change in the sync, it needs to be configured on the central hub, making it a single point of failure. 

Secondly, it defeats the purpose of having both sides independently control information exchange, which is an important consideration we saw earlier. 

Thirdly, a distributed architecture leads to loosely coupled systems that are less dependent on one another, thus making the entire integration more manageable and scalable. 

I will use a solution called Exalate to demonstrate Jira integrations with other tools. Let’s also see the reasons behind it. 

  1. It supports decentralized integration, where both sides independently control information exchange. This is achieved with the help of sync rules present on both sides. 
  2. It uses an intuitive scripting engine that can be accessed through the Script mode so you can purpose-built even the most advanced or complex integration cases with it. 
  3. It implements a JWT-based token mechanism for source and destination authentication, uses HTTPS, and has role-based access controls in place. You can learn more about its architecture and the security mechanisms it implements in this whitepaper. 
  4. It has 2 configuration modes: Visual mode (point-and-click interface) for business users and Script mode (Groovy scripting language) for technical users. Non-technical users can also generate scripts with AI Assist.
  5. It supports Jira integration with another Jira instance (cloud or on-premise) and also integrates with Azure DevOps, Zendesk, ServiceNow, Salesforce, HP ALM, GitHub, etc. 
  6. Its transactional synchronization engine ensures all synchronizations are handled automatically in case of downtimes and system failure within the least amount of time. 

Having understood the reasons behind the choice, let’s see how it can be practically used for different Jira integrations. 

How to Set up Jira Integrations with Other Apps/ Systems 

Step 1: Prepare the Groundwork

Before proceeding with integrations, it is necessary to take a step back and understand the purpose behind it. What are the expected benefits of it, shortcomings, or pitfalls you are ready to overlook? Also important to note what information must be exchanged, who has access, and at what times. These important questions need to be addressed beforehand. 

Identify the use cases you want to bring under synchronization, identify and explore the tools for it (we have chosen Exalate if you have directly jumped here), and take a proof-of-concept in the form of a free trial if necessary. 

Assuming you have done all this groundwork and much more than that, feel free to proceed to the next step. 

Step 2: Install Exalate on Jira and the Other Application

We start by installing Exalate on both Jira and the other application. 

As already mentioned, it supports decentralized integration, so it needs to be installed on both your Jira (on-cloud or on-premise) and any of the other applications it supports. 

Installing it on the Jira cloud is pretty straightforward. I will cover that here. 

Go to settings, click “Apps” and go to “Find new apps” in the left-hand menu. On the marketplace Apps section, type “Exalate” in the search box and click enter. 

There are a few Exalate apps, such as Exalate for ServiceNow, GitHub, etc. Choose “Exalate Jira Issue Sync & more”. 

Click the “Try it free” button on the next screen. 

Exalate for Jira integrations

From there follow the installation wizard. After a brief wait, Exalate will be added to your Jira cloud instance. 

You will see the “Get Started” screen on Exalate. If you don’t, you can go to Exalate from the left-hand menu as well. 

To do this, click on “Apps” as you did before and click “Connections” under Exalate in the left-side menu after. 

Exalate for Jira trial

To install Exalate on other applications, you can check this documentation page. Select the tracker you want and follow the steps. 

Step 3: Connect Jira and the other application

To proceed with Exalate, the first thing you need to do is to create a connection between Jira and the other application. A connection works like an initial handshake which authenticates both the sender and receiver.

You can start creating a connection from either Jira or the other side. No matter which side you start, Exalate has a uniform UI on both ends. So it shouldn’t be a problem to follow. 

Under “Connections”, click the “Initiate connection” button in the middle of the screen. 

initiate jira integrations

The next screen prompts you to enter the destination URL. In our case, it can be the other Jira instance or any other application Exalate supports. Then a check is performed to ensure Exalate is installed on the destination instance. 

Based on what the other application is and Exalate’s version, you will need to choose between either 2 or 3 configuration modes. For instance, if you have ServiceNow on the other side, you can choose between two modes, but for a Jira to Jira integration, you will have three modes to choose from. 

The Basic mode, the Script mode, and the Visual mode. 

Configuration modes in Exalate

Let’s go over a brief explanation of each. 

The Basic mode supports pre-built mappings between Jira issues and the entities on the destination. For instance, Jira-Azure DevOps would have issues mapped to work items, and Jira-Salesforce issues are mapped to Cases and so on. 

Note that these mappings cannot be modified. To modify them the connection must be upgraded to either the Script mode or the Visual mode, which offer greater configuration features. 

Basic mode is available to sync issues in Jira and GitHub, work items in Azure DevOps, Cases in Salesforce, Incidents in ServiceNow, and tickets in Zendesk.

It comes with a Free Plan allowing you to sync 1000 entities for free per month. Since it does not allow you to customize your synchronization behavior, it is best suited for simple use cases where you can try Exalate firsthand. 

But what makes all these efforts worthwhile is to explore the Visual and the Script modes.

The Visual mode is a point-and-click interface that allows you to integrate 2 applications in a much more advanced manner.

You can add new mappings, prioritize the information you want to send and receive, and even filter entities you want to synchronize through intuitive visual screens. You can even add custom logic for advanced use cases. It is easy for business users to understand as it does not involve coding. It can also be used if a single user has access to both the source and the destination applications, in which case you can control the synchronization from one side itself.  

Perhaps what makes Exalate stand out as a tool is the Script mode, which offers an intuitive Groovy-based scripting engine that helps you synchronize even the most complex or unique use cases. 

So technical users can adapt easily. This mode allows both sides to control the synchronization through sync rules independently. So admins on both sides can change the sync rules to control information flow. 

We will have a look at all the 3 modes in detail now since the screens are a little different for all of them.  

Note: If you’re looking to integrate multiple Jira instances, then you should watch this tutorial:

Starting with the:

Basic mode 

Once you choose the Basic mode and click “Next” to go ahead, you will be asked to choose the project on the Jira side, since we have started initiating the connection from the Jira side. 

Select the appropriate one from a drop-down list and click “Next”. 

exalate basic mode jira sync

You then have to verify admin access to the other side. 

If you have access, a quick verification will redirect you to the destination side (other applications i.e Jira, GitHub, etc). This process will be reversed if you start from the other side and want to establish a connection with Jira. 

jira integrations admin access

Depending on whether the other side has any projects or repositories you will be asked to select one in this instance. Do it like you just did. If there isn’t anything like that, then click “Confirm”.

Then you can start by entering the issue key and directly synchronizing with the other side by clicking “Exalate” as shown below. If you navigate to the destination right now, specific entities like tickets and incidents can be synchronized by entering their details. 

accept a jira sync invitation

After a while, you will see your Jira issue being successfully synchronized with the other side. 

Visual Mode 

To establish the connection using this mode, choose “Visual” and click “Next”. You will be required to name the connection on both the Jira side and the other side. Choose a proper name to avoid confusion later. And then write in some description to help you remember. 

initiate jira integration invitation

Then you will be asked to select the project on the Jira side, do so as you did for the Basic mode. 

Then again verify if you have admin access to the other side. After a brief wait and upon successful verification, you will be choosing the project or repository on the other side if applicable. If not, then the connection is successful. 

You can then proceed to Step 4 for configuring the connection. 

Script Mode 

If you want to see how the Script mode connection is established, click “Script” and then hit “Next”. Name the connection as you did for the Visual mode and then click “Next”. Choose the project on the Jira side and click “Next”.

There is an invitation code that is generated now. This is a unique code that will need to be copied to the destination side. Click on “Copy invitation code” to copy it and save it someplace safe. 

exalate invitation code

Then head over to the other side. Depending on the application, navigate to the Exalate app. There under the “Connections” menu of Exalate click “Accept invitation” and paste the copied code into the large text box. 

accept jira sync invitation script mode

Then once again if applicable choose the project or repository on the other side and click “Confirm”. 

successful jira integrations

Your Script mode connection is successful. Proceed to the next step to configure the sync. 

Step 4: Configure the Connection to Choose What to Share and What not to

The basic idea of this step is to decide what needs to be sent and received from Jira and the other side.

So you need to configure the connection for that. There are 2 ways to do this. Either click the “Configure sync” button shown on the screen above or go to the “Connections” tab and click on the edit connection icon in front of your connection name. 

Either way takes you through the same screens. 

I will discuss only the Jira side here, but it shouldn’t be different for any other applications as well. It will just be tailored according to the specific application. 

Configure the sync using the Visual mode

You can edit the Scope and the Rules in the Visual mode.

configure jira sync visual mode

The Scope screen decides which entities under which projects (if applicable) need to be passed between the 2 sides. 

For instance, you can choose the Jira project on one side, and click on “Filter entities” to choose which entities you want to synchronize. You can also choose whether the sync is manual or automatic and whether the sync direction should be uni or bidirectional, the arrow directions will guide you through.

Here, the destination side is Zendesk, but it can be any other depending on which application you want to synchronize with. 

The filter entities screen on the Jira side will look like this. To apply them on the other side, configure them the same way on that side too. 

jira integrations filters

There are a lot of entities you can choose to filter like Priority, Labels, Assignee, etc. 

Once you choose what needs to be done, click “Save” and you will return to the previous screen. Then you move ahead to configure the “Rules”.

Edit jira sync mappings

These Rules specify the mappings between Jira and the other application entities. Like Issues being mapped to tickets, incidents, or work items. These default mappings can be edited by clicking the edit icon on the right side of the mapping or you can choose to delete any if you don’t need it. Drag and drop them up and down to prioritize them. 

You can even add a new mapping by clicking the “Add Mapping” button. 

Perhaps you want Priority in Jira to be mapped as a short description in ServiceNow so the other team handles it according to their needs. You can choose such on both sides. 

You can even choose what happens in case no matching values are found. You can choose to do nothing, report an error, or else set a default value. 

exalate visual mode value

Mappings can be added by selecting appropriate ones from a drop-down list or you can add a new one by adding a script as well. 

You are done for now with the Visual mode and you can directly skip to step 5 if you aren’t interested in the Script mode. But if you want to know how it works, read along. 

Configure the sync using the Script Mode

For Script mode, Exalate uses Groovy-based scripting to control what information is sent and received.

You can edit the connection just like for the Visual mode by clicking the “Configure sync” button or by editing the connection. 

Here you can see 4 tabs: Rules, Triggers, Statistics, and Info. 

We are going to look at the Rules tab in this section. Triggers are to be covered in the next step. 

Under the “Rules” tab, you will find some code that looks like this:

Sync rules

These are called sync rules, and they exist on both sides of the connection as “Incoming sync” and “Outgoing sync”.

As in the image, the Outgoing sync on the Jira side decides what information Jira will send across to the destination instance, and the Incoming sync decides how it wants to receive information from the destination. 

These rules exist on the other side; their outgoing and incoming syncs are reversed. 

The information from the issue is saved in a replica. This works like a placeholder, allowing you to store information that you need to pass back and forth. 

To control the information flow, you can remove the sync rules by deleting that line or by commenting it. 

Adding comments (“//”) in front of the line in the Outgoing sync, for e.g.: //replica.description=issue.description means that the description will not be passed from the Jira side. The synchronization engine simply ignores the commented lines. 

Use AI in Script Mode

We just saw an example of how you can edit the sync rules to configure information flow. Alternatively, you can also use the AI Assist feature available in the Script Mode to set up advanced integrations.

AI Assist is integrated right into both your incoming and outgoing sync rules tabs as a chat window. Simply type your sync requirements into the chat, and AI Assist will handle the script generation for you.

The scripts are crafted based on your input, existing configurations, and Exalate’s scripting API.

However, like all AI, it’s not infallible. So, the more precise and detailed you are with your prompts, the better.

Here’s how you can use AI Assist:

Let’s say you want to map and sync issue types between multiple Jira instances. You could type a prompt that looks like the one shown in the image.

After a moment, the script will be generated.

You have full control to accept or reject AI’s suggestions. If needed, you can refine your prompt and, once satisfied, publish the changes.

AI assist in Script mode

Now, let’s go back to some of our use cases.

What if we want to sync attachments to the Green side without giving access to this information on the Blue side?

We can set this up using simple scripting.

What’s great is that we only need to do this on one side. So, if we want to block attachments from synchronizing to the Blue side, we can set this up on the ‘Outgoing Sync’ rules of the Green team.

So for this step, determine which information you want to send out through your outgoing syncs – and which incoming information you want from the other team.

In our case, we’ll set it up so that we can get incoming attachments from the Blue team. But the Blue team can’t access the Green attachments.

You can add new scripts to this code as well. There are a lot of script helpers Exalate provides that you can refer to. 

Step 5: Automatically Synchronize Information through Triggers

To start synchronization automatically, you can use triggers. These are conditions you set, that when satisfied, start the synchronization process in line with the sync rules you have set.

The trigger screen can be accessed in the Script mode by clicking on the “Triggers” tab. If not, you can access it from the left-hand menu as well.  

jira integrations triggers

Click on the “Create trigger” button and you will be taken to the “Add trigger” pop-up.

There you can choose the entity to which you want to apply the trigger. 

In the “If” section, mention the conditions in the form of “Jira Query Language”. This will be platform-specific. So on the other side, it would include the query suitable to that application. 

add trigger exalate

For instance, in the example shown above, we are going to synchronize issues having the issuetype as Task. Leave “Notes” for the triggers. Activate the trigger by clicking the “Active” button and then click “Add”. 

You can see your trigger on the previous screen. You can also choose to edit or delete the trigger from there. There’s also an option to “Bulk Exalate” issues matching the trigger criteria from here. 

Step 6: Enjoy your First Synchronization

You are all set to see your first issue being synced! 

You create issue types meeting your trigger criteria and see the issues being synced automatically.

Exalate has its own panel in the Jira issue view as well. You can access it directly from the issue as shown below. 

Jira sync status

Click on “Exalate”, then choose the connection you want to synchronize with. 

After a while, your issue will be synced to the other side. 

manual jira integration configuration

This is another way of manually synchronizing Jira issues. 

Conclusion 

Jira is an excellent tool for many teams and its power can be harnessed with a load of applications available on its marketplace.

We saw how Jira integrations can help your teams un-silo themselves and collaborate with other teams to experience increased productivity and efficiency.

We also had a look at what must be considered while choosing the integration tools from the marketplace because you are going to be spoilt for choice there. And finally, we chose Exalate as our tool because it natively supports all our checklist criteria: flexibility, decentralized integration, reliability, and secure information sharing. 

So roll up your sleeves, prepare an integration plan, explore the tool, and decide for yourself.  

Frequently Asked Questions

What is Jira integration?

Jira integration defines the process of one or more apps to the Jira ecosystem. You can download the integration solution from the Atlassian marketplace, or you can build your own from scratch.

What tools can be integrated with Jira?

Jira can be integrated with a wide range of tools, from Microsoft Excel to Confluence and GitHub. Some of these tools rely on no-code solutions that come with pre-built connectors, while others depend on script-based integration solutions. Depending on the integration solution, you can even cover the range to include more systems. Exalate is an integration tool that allows users to connect Jira with Salesforce, Zendesk, ServiceNow, GitHub, Azure DevOps, and more. 

Can I interact with the Jira API?

The Jira REST API enables you to interact with Jira programmatically. You can use this API to build apps, enable script interactions with Jira, or develop any other type of integration. There are lots of REST resources available in Jira Cloud, including the HTTP response codes and example requests and responses.

Do I need Jira integrations?

Yes, you need Jira integrations to integrate data between Jira and other systems. This will help you save time that could have been wasted by setting up the syncs and API calls manually. Jira integrations also create a decentralized ecosystem that brings every important piece of information into one unified view. This will enhance reporting and transparency between teams collaborating on a project.

Recommended Reads:

eBonding Integration: The Ultimate 2025 Guide to Flexible Data Sync

eBonding integration

In the material world, a bond is used to join 2 things together by means of an adhesive. But this bond can be extended to the digital world as well. That’s what eBonding, literally electronic-Bonding, is here for. 

And what exactly do we want to bond together? “Inherently disparate business applications” through integration. 

In this article, we will have a look at how eBonding makes such integration a reality. We will also see why it is needed in the first place with a few real-life scenarios, then we will help you choose the right solution for it before finally seeing how it can be implemented.   

So let’s eBond! 

What is eBonding?

eBonding (also ebonding or e-bonding) is the use of automated connectors to synchronize information between different business applications so they always have matching data. 

Changes in one system are reflected in the other, so they both deliver an end-to-end business process. Yes, eBonding doesn’t just mean synchronizing data bi-directionally. It is a well-thought-out, well-planned process of integrating business applications to deliver an end-to-end automatic workflow, resulting in better value and service to customers.

For this reason, people sometimes also prefer to call it a B2B software integration methodology

A little too much? Well, I will make it simpler. Let’s start by going over the why

Where did it all start?

eBonding isn’t brand new. It traces its origins to the telecommunications industry where large customers were looking for solutions to enable their different ticketing systems to communicate automatically with one another so they didn’t have to use emails to pass information every time. 

Getting inspired by this early on, other industries began to acknowledge its power and importance. Further, as companies started providing managed services (MSPs) and outsourcing grew, so did the number of applications people used. With these different applications having different workflows and processes, it became difficult for information to be passed between them. 

People surely found a way to deal with it, but it was manual, through emails and phone calls. They often switched between different applications to dig for the information they needed, giving rise to what’s known as a “swivel chair approach”. 

But this way of information exchange was annoying and caused friction between them (because they were actually swiveling their chairs around). Naturally, these manual interventions also led to duplicated, misplaced, wrong, or altered data. 

So they searched for automatic ways of “synchronizing information”. This is when they found eBonding as a life-saving solution.

Why do you need it?

  • Since the data exchanged through eBonding is automatic and in real-time, you don’t need to get all familiar with someone else’s application anymore. Enjoy consistent and coherent data in the comfort of your own familiar application without even having to lift a finger, literally. 
  • Inferring from the above point, you can expect automation and simplification of your business processes and workflows, leaving your teams to focus on what really counts. 
  • Implementing eBonding in the correct way can help you foresee a complete “digital transformation” of your business. It can help you connect with your customers, vendors, partners, or suppliers in a digital, secure, automatic, and reliable manner. 

Are these reasons good enough for you to continue reading? If you are still debating it, I suggest you have a look at some of these practical use cases. 

eBonding Scenarios

Here are the most common eBonding scenarios: 

Intra-Company and Cross-Company

Outsourcing/ multi-sourcing or MSPs is a norm nowadays. It helps deliver projects faster and more efficiently by leveraging the right expertise.

So the scenarios that I discuss in this section will cover both: intra-company (within one company; maybe different teams, departments, or projects) and across company borders (let’s call it cross-company) to integrate with their suppliers, vendors, customers, or partners. 

I have specifically made this distinction because cross-company scenarios have different sets of challenges when it comes to eBonding, since we are talking about bonds extended outside companies; think of security, reliability, and scalability challenges multiplied. 

So let’s delve a little deeper. 


Intra-Company- the Case 

jira GitHub integration

A software company has its development team using GitHub to create and manage dev issues and the quality assurance team uses Jira to handle issues related to test cases, test plans, and their executions. 

At the outset, everything should look fine, right? But not really! Problems have begun to creep in. 

Every time a GitHub issue is worked on, it needs to be passed over as a new issue in Jira for the QA team to handle. If all the test cases work fine, an update via an email/ phone call needs to be given to the dev team, so they can process it further. 

If bugs are discovered, then the QA team again manually sends over the status to the respective team members, who then work on the issue in GitHub. Then there is some back and forth until the situation is resolved. 

Alright, hold that thought. 

Cross-Company – the Case

An investment company (let’s call it Alpha), uses Jira internally to manage issues and plan projects. It has outsourced software development to another company (Beta) that uses Jira for project management. It has also outsourced its ticketing system to another company (Theta) that uses Zendesk. 

A classic example of multi-sourcing. 

Jira Zendesk integration

To keep track of dev issues handled by Beta, Alpha sends endless emails to them and gathers the relevant information. It then keeps track of all this in its own Jira by creating appropriate issues and updating its statuses. 

Yet again it needs visibility of tickets that are raised in Theta’s Zendesk, right?

We’ll get there in a little bit.

Servicenow on One Side

Are you wondering why I have considered ServiceNow specifically? Well because eBonding for a long time has been associated with it. It has become a popular solution in the form of an eBonding spoke (we will cover this shortly) such that when you search for it, ServiceNow appears along.

We are also going to consider another tool called Exalate (we will also see the why part of it) in the same section. 

For now, let’s consider a case when ServiceNow exists on one side of our eBonding. 

ServiceNow Jira – the Case

Jira ServiceNow integration

So a company uses ServiceNow to track incidents customers raise. Imagine a certain incident has presented itself. The support agents analyze it and then provide a workaround, maybe after spending a few hours searching for its solution. 

On a tight SLA schedule, they come to know that it needs technical expertise. 

So they manually forward (yes, yet again!) it to their service provider (basically the dev team) using Jira. The team then takes up the issue and starts working on it.

It is worth mentioning here that all the time, the issue is worked on in Jira, but the support agents have no visibility on its current status and are clueless about what needs to be communicated to the customer. Remember, if all this goes even a tad bit wrong, the overall customer experience is going to get hampered, not to mention the effect it is going to have on the SLA. 

Integrating Multiple Platforms 

We just talked about ServiceNow being on one side of an eBonding integration. But it is not uncommon for companies to use different work management systems like Jira, ServiceNow, Azure DevOps, Salesforce, GitHub, Zendesk, and the like. 

So of course, if teams in your organization are using them internally or your eBonding partner uses any of them, you would want integration between them. For instance, your team uses Salesforce as their CRM and you want to eBond it with Jira, Zendesk, GitHub, ServiceNow, or Azure DevOps. 

Let’s look at an example. 


Jira-Salesforce – the Case

Modern teams are digital, global, and not always co-located. So what do they do when they need information and expertise from other teams? 

For instance, your sales team using Salesforce will definitely benefit from exchanging information with the development team using Jira. Cases in Salesforce have valuable customer feedback, queries, and questions. If such information is percolated to Jira for the development team to work on, the overall customer experience will just get better. 

Both teams will then always have the most up-to-date and consistent information in Jira and Salesforce. But again how does it get passed? Manually? Er…   

Have you observed a pattern here? 


Yeah right, the information is being passed manually in all the cases we have seen above. This has created manual data entry errors and has increased friction amongst teams. 

eBonding here can help business-critical information get synchronized in both directions in the respective applications automatically and in real-time. This will help automate processes end-to-end, help drive transparency, and keep everyone on the same page. 

But it isn’t a one-off effort. 

Challenges of eBonding: 

There are a lot of things that can go wrong.

This is because every organization and its applications follow different processes, have different schemas, naming conventions, different ways of handling tickets or issues, and so on. 

For instance, Jira issues have “Summary” while there is “Short-description” in ServiceNow. Priorities in one application can be Severity in the other. 

So finding a common ground to agree upon information exchange is a task in itself. This can sound easy for 1 or 2 eBonded integrations but becomes a gigantic mess when implemented for growing integrations. 

Since processes are different, the way people handle tasks also differs. For instance, when an incident is put on hold, is resolved, or is automatically closed after the resolution is going to be different for every team, or in some applications, you cannot add any new information to closed tickets. Handling such scenarios means outlining detailed steps to accommodate these differences.  

Typical integration errors are hard to find and detect. If not worked early on, it’s possible they get lost in the general error log (containing every error or warning there ever was) or go completely undetected till they become a blocker. 

So take a deep breath, spend some time, and chalk out: 

eBonding Integration: questions to ask

These are just a sample set of driving questions, but you get my point. 

Get Started with eBonding 


Strategize, plan, and prepare a team of developers, testers, project managers, software architects, etc, build the solution and roll it out.  

While it sounds easy at the outset, building an eBonding solution in-house is not always the best way out.  

The amount of time, effort, and money you put into building a solution is not always proportionate to future business requirements. Such an eBonded system will work initially, but over time, it becomes a nightmare. 

  • Maintenance costs 
  • difficulty to scale 
  • the rigidity of an in-house solution 

These only add to the woes of the team members who need to spend endless hours on it to rebuild and repurpose. And every time you want to sync with a new customer or supplier, you have to go through the process of setting up a new integration all over again. What a waste of money and resources.

Also, many times companies push their developers off their limits and bring the eBonding integration out as soon as possible. This approach doesn’t give them the breathing time to think about the strategy, the technology, the systems they are going to use, etc, leading to an inadequate, clumsy, and ineffective solution.  

Thankfully tech geeks have come up with commercial off-the-shelf eBonding solutions. And they come in a variety of different flavors: deployment models, pricing, number of supported integrations, code or no-code configurations, and architectures. 

You also get to experience out-of-the-box integrations with such tools. It’s way easier to set up customizations through them because, after all, they are the experts. Not to forget, you don’t need technical people all the time to run your integrations for you. Business users can make it happen with equal ease.  

After a while, you will realize that an eBonding tool is surely going to save a lot of your man-hours and money and will get you a faster time to value.

Since they are readily available and are gaining momentum, it’s time we have a look at the endless possibilities such tools offer.  

But before we actually see how they are implemented, let’s first understand what you need to look out for in such solutions. 

Here’s what. 

What to Consider When Choosing an eBonding Tool

Decentralized integration (Autonomy) 

What would your reaction be, if the following notification pops up: “Please contact your integration partner if you want to make changes to your sync”, or “Please verify if changes in your sync are saved in the central hub”? Frankly, I would be frustrated and I am sure you would too.  

Well, having a solution that supports decentralized integration means each party has complete control (or autonomous control) over what is sent and received, without having to bother the other side. Such control can be achieved through a distributed architecture rather than a centralized one. 

With such a distributed architecture, you don’t need to configure changes to a central hub every time your integration requirements change, but independently control your information flow at either end. 

Such a setup also ensures that your systems are loosely coupled. So let’s touch base with this point next.

Loosely-Coupled Systems

The distributed architecture as discussed above points towards an often overlooked aspect of an integration tool, i.e. it should allow the systems to be loosely coupled to keep both eBonding parties less dependent on each other. 

However, being less dependent in no way affects the quality of the integration. In fact, it means that changes on one side do not affect the other. 

In essence, this can force you to think that it might create data synchronization issues. Because it is all the more difficult to maintain the correct synchronization sequence and apply it locally if the systems are loosely coupled and there is no central entity into which the changes are easier to track and apply. 

To avoid this, additional coordination mechanisms like transactional sync queues must be in place. Only then can it be ensured that all data synced is applied in the correct order in which it is initiated. 

So considering these points, if you choose a tool that supports such mechanisms, then in the long run it can make the integration even more manageable and scalable.

Security


Drawing an inference from the point above, since each side controls what it sends and receives, you no longer have to be skeptical about your information being accessed by someone who shouldn’t, you just don’t send it. 

Automatically, only authorized people will be able to access and process information passed between applications. 

Adopting proper security measures is also an important aspect of an eBonding tool. Companies are always privy to sharing information with others, especially if it’s outside their borders (cross-company). So token-based authentications, encrypted file transfers, VPN connections (if necessary), and secure transfer protocols like HTTPS are what you should be looking for. 

Flexibility

Whoever said “Flexibility is the key to stability” clearly did not exaggerate (if you’re wondering, it was John Wooden, the American basketball coach). 

Businesses today revolve around flexibility, especially for IT integrations (aka eBonding). 

Because they are already comfortable with their own ecosystem of applications and don’t want to make the switch, they are on the lookout for ways to integrate and collaborate with other software applications without leaving their own. 

There is also a realization that change is a part of IT, so are changing eBonding integration requirements. Information passed today can become obsolete tomorrow, or you might want to share something completely new the day after. 

You might have a simple eBonding use case or a really complex one. Having your tool rapidly adapt to these changes is important. So keeping flexibility higher up your checklist is the key to a great performing solution. 

Reliability 

All systems break down at some point, so does your eBonded integration, right? Wrong!

True that downtimes and system failures exist, but that should not tumble your tool down. It should be up and running gracefully within the least amount of time without anyone meddling in between. Such that no one should even notice the outage.

Scalability 

At the core, eBonding is integrating different applications of your partners, customers, or suppliers. Meaning it’s always going to be more than one. More than one eBonded integration, application, and company. 

So it must be scalable to be able to cater to a variety of different audiences and applications: Jira, ServiceNow, Salesforce, Azure DevOps, and the like. The more the merrier! The tool should easily be able to adapt to growing integrations so that a new application or a new partner can be onboarded with minimal effort and tweaking. 

So keep this in mind while doing your research. 

All these points sound good, now let’s see how we can implement them.  

How to Implement it?

I consider 2 tools here, IntegrationHub’s eBonding spoke and Exalate. 

Why these?

Well, because like I already said, the first tool is a popular eBonding solution and the second one (if you haven’t already heard of it) is climbing the charts for supporting decentralized integration and loosely-coupled systems and being flexible. 

So you can explore both of them. Ideally, after you are at the end of this blog.  

IntegrationHub: eBonding Spoke

If you have directly jumped to this section, let me start by telling you a little about ServiceNow, in case you are new to it.

ServiceNow is a leading tool for managing IT services and is popular among its customers. 

IntegrationHub is a result of ServiceNow’s effort towards IT automation. It has pre-defined integration design patterns that can help synchronize information (uni, bi-directionally) between 2 ServiceNow instances (eBonding spoke) or between a ServiceNow and another instance (for example, Jira, Slack, Remedy, Salesforce, GitHub, etc) using their respective spokes along with the flow-designer. 

There are 2 reasons why we are only discussing the eBonding spoke here: first, it doesn’t require an IntegrationHub or Orchestration subscription and is available by default in your ServiceNow instance. And second, because this article is all about eBonding, right? 

eBonding spoke allows bidirectional integration between 2 ServiceNow instances. That means you can synchronize incidents, problems, change requests, etc with your other ServiceNow instance. 

This is very useful when you and your eBonding partner have 2 production environments for ServiceNow. Maybe one at the back-end (source system) and the other at the front-end (the target system). You want to create matching incidents on both these instances, so different teams can handle them as per their roles and responsibilities. 

For this, ServiceNow eBonding spoke contains OOB actions like the following: 

Create Remote Incident action:

This takes Incident details from the source instance to create one on the target instance. It has a Correlation ID on both systems that have each other’s Incident numbers. So the source Incident number is passed to the target instance in the Correlation ID and vice versa.  

remote incident action

Lookup Remote Incident action:

This action is used for looking up the details of the remote incident like the short description, summary, priority, etc. 

Update Remote Incident action:

This is used to update the incident on the remote instance from the details looked up from the source instance. The Correlation ID we saw above is used for this. 

So effectively both the ServiceNow instances will always have matching Incident data. Changes to one instance are reflected in the other using the Actions mentioned above. 

As you just saw, the eBonding spoke works well with 2 ServiceNow instances and can be used without much technical expertise. It is also easy to set up and configure. 

But if you need integrations between ServiceNow and other non-ServiceNow applications you need to add particular spokes (e.g.: Jira spoke, GitHub spoke, etc). These spokes are provided in IntegrationHub but at an additional price. 

Also, these are 3rd party APIs that have OOB actions included in them. They are pretty extensive but become rigid after a point. So integrations are limited to the Actions supported. If you need to fit in new advanced integration logic, then a request for the updated version to the creator of the spoke needs to be made. 

But we are diverting from the topic here. Getting back to eBonding, let’s see what Exalate has in store for us. 

Exalate

Exalate is a cross-company (or B2B) integration solution that helps organizations and teams to close their gaps. Gaps of having to deal with inconsistent, incoherent, and scattered information spread across applications and teams, and especially across company borders.

It helps streamline collaboration across work management systems like Jira, Azure DevOps, ServiceNow, Salesforce, GitHub, HP ALM, and other trackers.

So for instance, if you want Zendesk-Salesforce, GitHub-ServiceNow, or simply ServiceNow-ServiceNow (just like eBonding spoke) integrations, Exalate can be explored. 

It allows information to be synced bi-directionally so business processes are automated end-to-end. Secure information exchange, decentralized integration with the help of a distributed architecture, reliability, and flexibility are some of its primary feature offerings. 

Suppose your customer support team is using Zendesk and your development team has Jira as its go-to app. 

The tickets raised need to be handed over to the development team (clearly a Jira-Zendesk integration scenario). They start working on it and update the issue status in Jira. Support agents are clueless about the issue the customer has raised and what to inform them, and, yes, panicking!

With Exalate, you can help this situation by following the steps below:

Step 1: Install Exalate on both ends of the eBonding applications i.e Jira (cloud or on-premise) and Zendesk

Step 2: Secure a connection between Jira and Zendesk. 

A connection in Exalate defines the synchronization behavior. It is used to uniquely identify each end of the eBonding integration. 

While setting it up, you are asked to choose between 3 configuration modes.

If you are one of those tech geeks, then Script mode is the most interesting offering Exalate has in store for you. It is highly customizable and allows you to sync almost any kind of information between software applications.

It uses the “Groovy Scripting” language for adding scripts that allow you to control what information is sent and received. It is also powered by AI. Let me elaborate on this a little in the next step. 

integrate ServiceNow with the apps

Step 3: Configure the sync to control how information flows. 

There are Outgoing and Incoming sync rules on both sides of the eBonding integration. 

So Jira’s outgoing sync will decide what information will be passed from Jira to Zendesk i.e development to customer support. And the Incoming sync will decide what information will be received from Zendesk to Jira. The same on the Zendesk side as well. This makes Exalate’s integration decentralized, secure, and flexible. 

Exalate's sync rules in Script mode

Use AI Assist with the Script Mode

Exalate’s Script mode is enhanced by AI, with Exalate AI Assist appearing as a chat window within both your incoming and outgoing sync rules tabs. Simply type your sync requirements into the chat, and AI Assist will generate the scripts for you.

The scripts are tailored based on your input, existing configurations, and Exalate’s scripting API.

Keep in mind that, like any AI, AI Assist may make mistakes. To ensure the best results, be as precise and detailed as possible with your prompts.

Exalate's AI Asisst

Step 4: Create automatic syncs through triggers.

Once you have decided what to send to and receive from the other side, you can create triggers to start your sync automatically. Triggers are conditions that when satisfied sync according to the sync rules you have set in Step 3. 

Step 5: Take a break or have a cup of coffee. 

So what’s my point? 

Phew! That was a lot of information. 

Long story short, I’m not comparing the 2 tools in any way, simply because they are not direct competitors. But there are certain facts that you must consider before making a decision. 

eBonding spoke works best if you are a company using ServiceNow, and want to eBond with other teams using ServiceNow. It allows customization, but that can be limited by ServiceNow’s own infrastructure. 

For non-ServiceNow eBonds, Exalate is the better choice. It works with multiple ServiceNow instances as well as other work management systems. 

Of course, you can integrate ServiceNow and other applications using IntegrationHub, but that would be less intuitive. You can have a look at this comparison between Exalate and IntegrationHub

So make an informed decision, read this again if you want, and eBond! 

Conclusion

This article explained what eBonding is in the first place. We also saw how it all started with the telecommunications industry and then was acknowledged by others. Then we saw a few real-world scenarios. 

Moving forward, we saw how implementing an eBonding solution is not always a good option and why you should rather opt for a commercial one. Then we went over a few factors you must consider while choosing such solutions. 

Finally, we saw a glimpse of what eBonding spoke (IntegrationHub) and Exalate have to offer.

Recommended Reads:

ServiceNow to ServiceNow Integration: How to Set up a Two-Way Sync

ServiceNow to ServiceNow integration

If different teams (working in ServiceNow) have their own instances, they can easily manage that data independently while making it available to the other teams through a ServiceNow to ServiceNow integration.   

Such integration can automatically exchange data between ServiceNow instances. Both sides can control what they send and set the conditions for data transfer.

This opens up all kinds of possibilities for teams wanting to help each other work more effectively. It can also make existing data transfer tasks faster, cheaper, and more reliable.

Setting up a two-way ServiceNow to ServiceNow integration can improve productivity, but it also comes with several challenges. Let’s discuss them in more detail.

Who Needs ServiceNow to ServiceNow Integration?

If your organization uses ServiceNow for IT service management (ITSM), then you’d need an integration to connect with other teams or companies using ServiceNow as well.

For example, IT teams in one organization can connect their ServiceNow instance with the instance of a customer support team in another company. This will help them improve the quality of services they deliver to customers.

ServiceNow to ServiceNow integration also helps to establish a collaborative environment between service providers, clients, vendors, and suppliers. 

5 Things to Consider for ServiceNow to ServiceNow Integration 

Here are a few things to factor in when choosing an integration provider or solution for two ServiceNow instances:

  1. What are the intended outcomes? You might want to share data with another team and keep them updated about service progress.
  2. What is the cost? Check how much you’ll pay for the solution’s maintenance and licensing.
  3. Who should have access? Conduct a thorough evaluation to determine who should have access to the system. This will inform how you share role-based access.
  4. What are the available integration options? Determine whether it will be better to use available native integration options or build a custom solution in-house.
  5. Is there a team available? Make sure you have a team of developers or engineers who can configure, customize, and optimize the ServiceNow integration solution.

What Are the Common ServiceNow Integration Solutions?

The ServiceNow to ServiceNow integration you need can either be a native solution, a custom application, or a third-party integration tool. You just need it to connect with the API to fetch and transform payloads in near real-time.

Integration Hub

Integration Hub allows users to connect their ServiceNow instances with other ServiceNow and third-party systems. It is a product of ServiceNow.

This solution also relies on Steps, Actions, and Spokes to call APIs in order to interact with other systems. Other available Integration Hub features include:

  • Spoke Generator
  • Flow Templates
  • Remote Tables
  • Rest API Trigger
  • Stream Connect for Apache Kafka

Although Integration Hub supports eBonding, the scripting capabilities have limited scope and customizability.

Third-party Applications

If Integration Hub and third-party integrations cannot address your needs, consider a third-party solution like Exalate.

Exalate supports bidirectional ServiceNow to ServiceNow integration, which you can use to sync any entity. 

The AI-powered scripting engine uses Groovy language to configure connections to your specific use case. You can also use automated integration triggers to control syncs independently.  

What makes Exalate the standout option for ServiceNow to ServiceNow integration is that it has an AI Assist feature embedded into its UI, which you can use to generate prompts for scripting your connections.

We’ll discuss how to set up and use Exalate for ServiceNow to ServiceNow integration in further detail.

Custom Solutions

An alternative to Integration Hub and third-party integrations is to build one from scratch. This involves developing an application or module that can interact with ServiceNow APIs to fetch and transform vital data.

However, the major drawback of building custom ServiceNow integrations is that they require too much effort and money to get working.  

Why Integrate Multiple ServiceNow Instances?

Here are some reasons why companies sync multiple ServiceNow instances:

  • Consolidate data from both platforms to a centralized hub in order to make informed decisions.
  • Increase workflow productivity by reducing the time spent on manual data requests and transfers.
  • Save money by accessing only essential data without having to add extra instances to your stack.
  • Improve the user experience by connecting service desks in order to decrease resolution time and increase customer satisfaction scores.
  • Establish a transparent, trust-based collaborative environment for internal and external collaboration.
  • Streamline intra-company and cross-company collaborations as well as mergers and acquisitions.

What Are the Use Cases for a ServiceNow to ServiceNow Integration?

Let’s look at a couple of specific examples of situations where you can benefit from this integration.

Quality Control and Customer Support

Your customer support team deals with incidents and problems reported by clients. They file these in ServiceNow and keep track of related customer communications. Quality Control tracks product issues themselves in their own system.

Generic image

Both teams have an interest in some, but not all, of the other team’s data. With a ServiceNow to ServiceNow integration, you can exchange the appropriate entities and fields that are important to each team’s work.

Consolidating Regional Databases

If multiple sales teams run their own customer databases, you have a wealth of data that can be combined and studied. To your data analysts, this information is a treasure trove of insights waiting to be uncovered. 

Generic image

Using integrations, you can move data from regional servers to a common data store for your analysts to use to determine which customers are providing the most value and which marketing actions are most effective. They can then share that data with your regional teams.

Handling Supply Chains

When a customer support team and a service delivery team are using separate ServiceNow instances, the only way for both sides to keep updated is with the help of an integration solution.

So, if the delivery team encounters an incident or change request, they can forward it to the customer support team to escalate to the responsible team.

Discovery call with Exalate

How to Set up a ServiceNow to ServiceNow Integration in 5 Steps 

Now you’ll learn how to set up an integration between multiple ServiceNow instances. The tool I’ll use to do this is Exalate.

Exalate meets the challenges you encounter when setting up a potentially complex data integration. 

Firstly, it is reliable, meaning you don’t have to worry about fixing it when something goes wrong. If one end of your connection experiences an outage, it can handle it and will start working again automatically when the connection is restored.

Secondly, it supports decentralized integration. You can manage your own end of the connection autonomously, controlling what is allowed out, and how what comes in is mapped to items on your system.

Thirdly, it is flexible, giving you easy ways to decide what is exchanged, how it is mapped between instances, and when data exchange takes place.

So let’s see how a ServiceNow to ServiceNow integration is implemented, step by step.

Step 1 – Install Exalate 

The first step is to install Exalate on your ServiceNow instances. If connecting two instances, you need to repeat this step for each of them.

You can also set up an integration on a single server if you need to exchange information between projects. That can be useful if your departments share a server. In that case, you’ll get the option to create the connection locally in step two.

The easiest way to get started is to request an instance from Exalate via its integrations page. Alternatively, you can install Exalate yourself via docker, though that can be complicated. I’ll discuss the first way.

For more details on either method, consult our documentation.

ServiceNow integrations

If you have teams using other platforms, you can use Exalate to integrate them with ServiceNow too, so take a look at what else is available.

Once you have your Exalate node, go back to your ServiceNow account.

You need to create a proxy user with the correct permissions, which you can read about here. You’ll also need the Role Management V2 REST API plugin available and active. It’s included from the ‘New York’ version of ServiceNow onwards.

Now access the Exalate node, using the URL you got in the email. You’ll need to accept the EULA. After that, provide the node with the details it needs to connect to your ServiceNow instance. Enter the URL, along with your proxy account details. You’ll also need to provide your evaluation key, which was also in the email you received.

Now you’re ready to move to the next steps. You’ll need a ServiceNow account with administrative access to proceed.

Note: You can install Exalate for ServiceNow from the Atlassian marketplace and the ServiceNow Bridge app the ServiceNow store.

Step 2 – Connect Your ServiceNow Instances

To connect your ServiceNow instances, you need to generate an invitation code on one end and paste it into the other. That creates a link between the two, that you can then configure to exchange the data you want.

connect servicenow instances

Open your Exalate node in your browser and navigate to the Connections screen via the left-hand menu. Click the “Initiate connection”.

Enter the URL of the instance you want to connect to. Exalate will look for it, and check Exalate is also installed there. When it finds it, you’ll be given the option to proceed using the Basic mode, or Script mode.

Configuration modes in Exalate

The Basic mode is free and configures everything for you automatically. It’s great when you don’t want to worry about the details, and also lets you test everything out easily.

The Script mode is more advanced and lets you decide the details of how things are shared. You can specify what fields are shared, how they are mapped, and set the conditions for sharing. You can also use this mode with AI. We will learn about that in the coming section.

Let’s start with the Basic mode and return to Script mode later. Click “Basic” and click “Next”.

ServiceNow to ServiceNow basic connection

You will then be asked to choose whether you have admin access to the destination ServiceNow instance. Click “Yes, I have admin access” if you have access. Else click “No, I don’t have admin access.”

In case you don’t have access, you can generate a code to paste into your other instance. Click “Copy invitation code” to copy the code to your clipboard as shown in the image above. Paste it somewhere safe, you’ll need it later. 

Click “Go to remote” to access your other instance or navigate there directly. On the connections screen, click “Accept invitation”. You’ll see a text field where you can paste the code you just generated. Do that, and click “Next”.

After a brief wait, Exalate will establish the connection. To give you a taste of how it works, you can enter an incident number to test the synchronization.

Now let’s try setting up a connection in Script mode. 

Initiate a connection using the green button as before, but on the mode selection screen, choose the Script mode before clicking next.

ServiceNow Integration information

This time, you’ll get more advanced options to choose from. Firstly, decide what you want to name each side of your connection. The names you choose will be combined automatically to create a connection name, but you can overwrite that if you prefer. 

You can also add a description which is highly recommended. If you have multiple connections, or several people use the same connection, the description can help identify it. That’s very helpful when returning later to modify it.

accept a servicenow to ServiceNow sync invitation

Click “Initiate” when you’re ready. You’ll receive a code to copy as before, so follow the same steps. When the connection is ready, Exalate will let you know.

Click “Configure Sync” to choose some of the details that control how your connection behaves.

Sync rules in Exalate for ServiceNow

You’ll see four tabs:

  • Rules
  • Triggers
  • Statistics
  • Info

You’ll look at the rules in step three and the triggers in step four. The Statistics tab shows data on how many items you are sharing and when you last synced them. The Info tab provides a few details, including the URL for the other side of the connection.

When you’ve made changes, click “Publish” to save them. You can return to this screen any time by finding your connection in the list and clicking the “edit connection” button.

The connections screen also lets you delete or deactivate any of your existing connections.

Step 3 – Configure Your Connection to Share the Right Data

Take a look at the first screen, the rules tab.

Sync rules in Exalate for ServiceNow

When items are synced, they are copied from one side of your integration to the other. Items contain multiple fields. 

You can choose which ones to sync, and can also set specific values if you prefer. For example, you might want to mark a field as ‘synced from the Sales team’. You can also use code to create advanced rules or to conditionally determine the system shares.

The rules use the Groovy scripting language.

The Outgoing sync rules define how items on the instance you are looking at will go over to the other instance. The Incoming rules define how the data your instance receives is mapped onto the synced items on your side.

Each line corresponds to a field. For example, in the outgoing sync, you can see the line replica.description = entity.description.

That means the description will be copied from items on this node to the corresponding items on the other node. If you don’t want that to happen, just delete the line.

If you want synced items to have a fixed description, you could change it to replica.description = ‘synced from sales team’ 

You could even change it to add that text at the beginning of the existing description with replica.description = ‘synced from sales team’ + entity.description

There are also helper functions you can use to manage items like comments and attachments. For more on those and other things you can do with sync rules, take a look at Exalate’s documentation.

Use AI Assist to Generate Sync Rules

Exalate’s script mode includes AI Assist, accessible through a chat window in both the incoming and outgoing sync rules tabs. Simply enter your sync requirements into the chat, and AI Assist will generate the scripts for you.

The scripts are built based on your input, existing configurations, and Exalate’s scripting API.

However, like any AI, AI Assist isn’t flawless and can sometimes make mistakes. To get the best results, make sure your prompts are as clear and detailed as possible.

Here’s an example of how to use it:

If you want to map statuses between multiple ServiceNow instances, you could type something like this into the AI chat

AI Assist in Exalate for ServiceNow

The AI will generate the script shortly.

Red lines indicate what you should delete from the existing script, while green lines represent new additions. You can accept or reject these changes and refine your prompt if needed. Once everything is correct, don’t forget to publish your changes.

Step 4 – Create Automated Synchronization Triggers

Synchronization triggers determine when synchronization takes place. To create one, you define a condition using ServiceNow search syntax.

ServiceNow Integration triggers

To start, go to the “Triggers” tab and click “Create trigger”. On the dialog box, you can choose the type of entity the trigger applies to, using the dropdown box.

Triggers in ServiceNow

There’s also a field to enter your condition. Entities that meet this condition will be synchronized.

The suggested example is urgency = 1, so any items that have their urgency attribute set to one will be exchanged with the other side. You can use any field to decide whether to sync. 

The system is highly flexible. You could sync tickets that are assigned to a specific person, sync tickets with comments, or have specific text in their description.

There’s also a field to make notes. Again, it’s a good idea to do so. It will help you keep track of things if you add more triggers, connections, and users later.

Finally, there’s a checkbox to activate the trigger. Naturally, you’ll want to activate this if you want anything to happen. You can switch triggers on and off, which is useful if you have one you want to apply temporarily, but regularly. Perhaps you want to share work with another department when things get busy, for example.

Once done, click “Add”. The trigger is ready and you’ll see it in the list.

For each entry in the list, you can edit or delete it using the icons on the right. You can also click the dots on the right and select “Bulk Exalate” which will tell you if any items match the query and synchronize them for you. That’s a great way to test if your triggers are working as you expect.

Step 5 – Start Task Synchronization

Now your instances are connected and will automatically exchange information at regular intervals. It isn’t instantaneous, as that would create performance issues, so grab a coffee, come back, and see if items are exchanged. If it doesn’t happen within an hour or so, have a look, and check that there are items matching the conditions you have set.

Once it works, you can sit back and let Exalate do the hard work of synchronizing your data. Enjoy!

What are the Common Challenges when Integrating Multiple ServiceNow Instances?

Here are some potential obstacles when integrating two ServiceNow instances:

Network Issues and Delays

Integration solutions require an active internet connection to perform as expected. So when the system goes offline or the solution malfunctions, the syncs will end up in the queue.

Generic image

Scripting Accuracy

Unlike no-code integration solutions, script-based tools require extensive scripting and knowledge of a programming language. 

However, that presents a different problem: The admin or engineer in charge of the integration needs an in-depth understanding of debugging and optimizing the code snippets to deliver the expected results. 

Notification Overload

When setting up a brand-new integration, it can be tempting to share as much information as possible. Be cautious. Filtering what people see is important. If people keep getting alerts when synchronizations happen, they might start ignoring them. 

If people are only alerted to the items they need to deal with, they are more likely to check their notifications and spend their time on things that are relevant to them.

Role Clarification

When integrating systems, there is a risk of going too far and having teams perform the same tasks. It is important to clarify who is responsible for what and avoid the replication of efforts.

Generic image

If there’s a risk of overlap, make sure your integration labels items appropriately so everyone knows who is ultimately responsible for each one. 

Also, ensure progress-related data in areas of overlap is shared and not stored exclusively in different systems so people on different teams can see what has already been done.

Security and Privacy

ServiceNow data usually contains sensitive user and business information, so it needs to be secure at all times—at rest or in transit.

In some cases, lax data management practices on one end of the connection can put both sides in jeopardy.

If people are only alerted to the items they need to deal with, they are more likely to check their notifications and spend their time on things that are relevant to them.

Note: Exalate lets you filter items using the username field, and you can use the configuration to have separate behavior for teams or individuals, so you can control synchronization on a very granular level if you need to.

What Are the Best Practices for Servicenow to Servicenow Integration?

Integrations go wrong all the time. But if you follow these best practices, your integration will deliver accurate exchanges when needed.

  1. Define the expectations and objectives of the integration on both sides of the connection to establish a clear pathway to success.
  2. Work with the right stakeholders to design an integration workflow that every team member buys into.
  3. Choose the right integration solution that will allow your administrators to write scripts for connections and advanced use cases. 
  4. Give access only to the right people based on their roles in order to track their activity and limit who can make changes to the system.
  5. Use automated triggers to make sure the exchange happens based on specific conditions and stipulations instead of manually.

Key Takeaways 

Setting up a ServiceNow to ServiceNow integration is easy, provided you use the right tools, and the rewards are more than worth it. By connecting your teams, you can make sure everyone in your organization benefits from sharing knowledge. 

With Exalate, you sync systems in minutes and have complete control over what you share and when you share it. It’s fast, efficient, and reliable. You can leave it to work autonomously and easily update it when you want to make changes.

If you want to implement a ServiceNow to ServiceNow integration, book a demo with our engineers right away.

Frequently Asked Questions

What is a ServiceNow integration?

ServiceNow integration is the process of connecting a ServiceNow instance with another application so that both systems can share data. This involves getting the APIs of both platforms to interact via a third-party application.

How Long Does it Take to Implement an Integration with ServiceNow?

When working with Exalate, you can set up a Script mode connection between two ServiceNow instances within 10 minutes. If you use the AI Assist feature for scripting, you can reduce the overall setup time to 5 minutes at most.

What is ServiceNow to ServiceNow integration?

ServiceNow to ServiceNow integration is the process of connecting two separate ServiceNow instances to share information. With ServiceNow to ServiceNow integration tools, you can sync comments, attachments, and custom fields within one organization or externally.

How can I integrate two ServiceNow instances?

You can integrate two ServiceNow instances using a connector. This connector could be a native app from the Atlassian marketplace or a standalone third-party solution such as Exalate. The most important thing is that both Exalate instances will maintain autonomy within the ecosystem.

Do I Need a Tool to Connect Two ServiceNow instances?

Yes, you need an integration solution to connect two ServiceNow instances. This tool will help you activate automated syncs and reduce human error when moving data between instances. Exalate is an excellent option if you are looking for a decentralized integration solution that supports bi-directional synchronization.

Recommended Reading:

Launching Exalate for the World’s Leading CRM: Exalate for Salesforce is here!

Exalate for Salesforce

Salesforce is a one-stop destination for the complete sales workflow right from generating leads to providing after-sales support, all through a single interface. It also offers a high level of flexibility, is easy to manage, and comes with a variety of best-in-class apps. 

There’s no doubt then that Salesforce is the world’s no.1 CRM tool. And now with Exalate’s newest Salesforce integration, we bring the power of this tool to help you close the gaps between your sales, support, and product teams. And you can start it for free with the Exalate Free Plan today. 

Don’t Leave Your Favorite Tool 

Jira, GitHub, Zendesk, ServiceNow,  Azure DevOps, … are some popular tools that are used by many teams worldwide for a variety of purposes: customer support, software development, project management, service management, DevOps, and the like. 

With Exalate’s Salesforce integrations, you can now enjoy the comfort of your favorite tool, work in an environment you are familiar with, and still experience a smooth integration with your CRM. 

Close the Gap between Your Teams 

Modern sales teams no longer work in silos. They need to quickly find experts who can help them close deals faster. 

See your business and revenue-driving data flow seamlessly between these different tools in a unified manner through a single interface. 

They also often have to make a collaborative effort to engage with different teams like: 

  • customer support agents, to resolve tickets faster
  • developers, to ensure product updates or bug fixes are implemented and communicated in a timely manner 
  • customer success representatives, to maintain a low churn 
  • back-office, to ensure licensing or contracts are generated and maintained effectively
  • marketing, to drive personalized customer campaigns 

To get the right information from the right people, sales often has to resort to endless meetings, phone calls, emails, or simply toggle between different applications for copy-pasting. 

This leads to delays, manual data-entry errors, discrepancies in information, a waste of time and effort, and ultimately drives down customer satisfaction and revenues. 

Exalate’s Salesforce integration helps your sales team make the transition from switching between applications for information to envisioning a single source of truth in Salesforce

Such integration can help them get all the information they need without having to leave Salesforce. At the same time, it enables them to get real-time, automatic updates from other teams inside their Salesforce environment. This promotes data transparency and ensures everyone stays on the same page. 

Invest Your Time in What Matters Most 

Time is of the essence! This is especially true for sales teams since a delay in closing deals can lead to revenue and business loss. 

So instead of going through the pain of getting the information you need through mundane, unnecessary manual tasks, increase efficiency and productivity by focusing on what’s important. Collaborate with other teams for critical tasks and spend time resolving key issues. 

With Exalate’s automatic, real-time, two-way synchronization, you can: 

  • connect your Zendesk or ServiceNow with Salesforce and get updates on support tickets or incidents of key Opportunities without having to track them through endless phone calls and emails. 
Salesforce UI
  • allow your customer success teams to have a complete customer overview from Account, Case, and Opportunity in Salesforce to ensure they maintain a low churn and deliver a consistent customer experience. 
  • bridge the gap between your development team using Github, Jira, or Azure DevOps and your sales team by:
    • enabling the sales team to escalate bugs and feature requests right from within Salesforce.
    • tracking issues or work items straight from Salesforce.
    • getting product updates directly into Salesforce.
  • allow stakeholders using project management tools like Jira to sync Opportunities in Salesforce with back-office tasks like managing licenses and contracts and tracking deal progress.  

What does Exalate for Salesforce Offer?

  1. A holistic view of information to revenue-owning teams by bi-directionally syncing Salesforce objects with Jira, Github, Zendesk, Azure DevOps, ServiceNow, or HP ALM. The most popular ones that can be synced are Task, Case, Account, Product, and Opportunity.
  1. Flexibility by not being confined to inflexible UI. The integration comes in 2 configuration modes:
Configuration modes in Exalate
  • Basic mode, a low-code, no configuration UI that allows basic synchronization scenarios straight out of the box. With this mode, you get up to 1000 syncs per month for free.
  • Script mode with advanced scripting options for extended customizability; suitable for complex integration cases. 
  1. 5-minute (or less) sync set-up

  1. Maximizing business agility due to decentralized integration. So each side of the synchronization can control what information is sent to the other side and how incoming information is interpreted, without having to worry about configuring the other side. 
Jira Salesforce connection
  1. A Free Plan allowing you to experience Exalate firsthand with up to 1000 free syncs per month. It comes with the Basic mode only and is suitable for simple synchronization use cases. 

Get Started

You can get Exalate for Salesforce on the Salesforce AppExchange.

Salesforce GitHub Integration: How to Set up a Sync in 6 Steps

GitHub Salesforce integration

Sales and development teams benefit from automatically exchanging information through a Salesforce GitHub integration because it gives them access to consistent and up-to-date business data.

In this guide, we will examine how teams and organizations can benefit from GitHub Salesforce integration and consider factors to consider when choosing integration technology.

We’ll then study a step-by-step approach to implementing this integration and examine the most common use cases of Salesforce GitHub integration.

Note: For this guide, we are using an integration tool called Exalate. We will learn more about it as we proceed. 

Get the GitHub Salesforce Integration Guide

Learn how to integrate GitHub and Salesforce, step-by-step.

Why Set up a Salesforce GitHub Integration in the First Place

Enhanced customer support and better query resolution are significant factors in keeping existing customers happy and maintaining low churn. 

To achieve this common goal, teams in an organization strive hard to search for the information they need in different applications or ask other team members for it. 

But this way of doing things is manual. 

In the workplace, teams no longer need to ask for information via email, get in endless meetings, or spend time copy-pasting information by toggling between different applications. 

This results in manual data entry mistakes, redundant, misplaced, or altered information, and, above all, a great deal of wasted productive time. 

Automated information exchange with the help of a cross-company integration tool can help teams maintain a single, consistent view of business-critical information without having to leave their current platform of choice. 

If your teams use Salesforce and GitHub, an automatic, real-time data exchange through a Salesforce GitHub integration can help them deliver a better customer experience and allow them to collaborate harmoniously.

Use Cases for GitHub Salesforce Integration

Let’s discuss some practical business applications for Salesforce to GitHub integration:

  1. Customer support and development collaboration: When a customer reports an issue via a Salesforce case, the key contents, such as description and assignee, should appear in the issue over on GitHub. Custom fields can also be integrated bi-directionally to accommodate more information.
  2. Share update bidirectionally: You can sync statuses between GitHub issues and Salesforce cases in order to provide the sales team with real-time progress updates about fixes coming from the development team’s repository. When a GitHub Issue is marked as “In Progress” or “Resolved,” automatically update the corresponding Salesforce case. 
  3. Prioritize high-value cases and feature requests: Based on the SLA timelines and assigned priority, the incoming Salesforce case will head to the corresponding GitHub issue without the need for the admin to manually sort them according to urgency or priority. Triggers can also be used to map the automatic escalation of these entities from both sides. 
  4. Speed up customer support: Automating the creation of GitHub issues from Salesforce cases and vice versa will help you avoid the duplication of bug reports. This also impacts resolution times and speeds up triage timelines.
  5. Improve analytics: Besides being able to track resolution speed and other analytical data, integrating GitHub and Salesforce makes it possible to access a unified dashboard for tracking data. This will help your organization to make better decisions in real time.

Other use cases are applicable if you have a customizable GitHub and Salesforce integration tool that you can configure to your liking.

Choosing the Right Technology for a Salesforce GitHub Integration 

Implementing a Salesforce GitHub integration requires researching different tools and technologies and choosing the right one based on your business needs. 

Here are a few drivers to get you started. 

Decentralized Integration 

A tool having a decentralized integration must be your top choice because it will allow you the autonomy to work in your environment without consulting the other side. This lets you control what information you send and how you want to receive it. 

So, each side of the Salesforce GitHub integration has independent control over the information exchange rules.  

Security

Data is of paramount importance for any business. So when you want to exchange it, you must be careful to put the correct security measures in place. 

The tool should also support encrypted file transfers, access control mechanisms, and secure transfer protocols like HTTPS.  

Additionally, it’s a bonus to look for tools that are ISO 27001:2022 certified. Pay attention to industry data regulations. This will save you from a lot of compliance and security headaches.

Flexibility

Integrations mature and change with time, and so do your requirements for sending and receiving information. Sometimes, you want to share something extra, or you want to stop sharing some data. 

You need to acknowledge beforehand how the GitHub Salesforce integration tool adapts to these changing requirements. The tool you choose must be able to accommodate unique and advanced business integration use cases with minimal configurations. 

One other feature that extends flexibility to even non-technical users is AI-powered scripting. This feature will help admins generate scripts for specific synchronization use cases in seconds. They can now choose to optimize the output or use them without any changes. 

Reliability

Computer systems are prone to downtimes and failures. In such situations, your Salesforce and GitHub integration tool must be able to withstand the downtime and apply the changes queued for synchronization in the same manner as they had originated. 

All this should happen automatically so the integration parties don’t feel that there was anything wrong in the first place. 

Number of Integrations Supported

We are discussing a Salesforce GitHub integration here, but it’s just one single possibility amongst many others. You might have partners, suppliers, customers, or MSPs who use different applications like Jira, Azure DevOps, ServiceNow, Zendesk, and the like. Adopting a tool that already supports these integrations is an added advantage.  

For this article, I have chosen Exalate because it has a built-in decentralized integration architecture, ensured by sync rules on both sides. Plus, it uses security measures like encrypted file exchange and role-based access controls. Check this security whitepaper for further details. 

Exalate also comes with a Groovy-based scripting mode and a low-code UI mode, which is suitable for both business and technical users. These features help you easily adapt it to your specific integration needs. 

It has a transactional synchronization engine that queues all the applicable changes automatically and breaks them down into atomic steps to be retried in case of a failure, even when a system is being upgraded to a new version and/or a firewall is being reconfigured.

And last but not least, it supports integrations for a variety of applications like Jira (cloud and on-premise), ServiceNow, Azure DevOps, Zendesk, and others. 

So let’s get to implementing a Salesforce GitHub integration.

How to Set up a Salesforce GitHub Integration: the Step-by-Step Process

To start setting up a Salesforce GitHub integration, you must first install Exalate on both GitHub and Salesforce. This ensures you have autonomy since the Exalate app on both sides allows you to configure each side separately and helps you control what to send and deliver. 

After that, you can set up a connection, configure it, add automatic synchronization triggers, and experience 2-way sync to handle your synchronization needs effectively. 

If you prefer to watch videos, you can always refer to our tutorial.

So let’s get started!

Step 1: Install Exalate on GitHub

You can start installing Exalate on GitHub via its marketplace or the integrations page.

Note: Exalate is also available for GitHub Enterprise. For installing Exalate on GitHub Enterprise Cloud, check this article.

You can use Exalate on GitHub with the 30-day free trial. 

If you’re trying Exalate out through the marketplace, click on the “Set up a plan” button. Then click the “Install it for free” box. 

Exalate for GitHub issue sync

Then you will receive a prompt to permit Exalate to access your GitHub repositories. You can choose to give access to all of them or select specific ones only. 

It is important to note here, that Exalate does not access the GitHub code, but only has access to metadata, issues, and pull requests. 

Access permissions for repositories in GitHub

Select the permissions you want to give and click “Install”.

This installer will then redirect you to the Exalate site to accept the user agreement to continue. 

Next, you need to select how Exalate accesses your GitHub account, either by an OAuth token or by entering your GitHub account username and password. In case you want to regenerate your OAuth token, follow these steps.

You will then need to request an evaluation license for using Exalate on GitHub. The steps for this are pretty straightforward. 

Note: You will not be able to synchronize your issues without requesting the evaluation license.

Step 2: Install Exalate on Salesforce

Start installing Exalate for your Salesforce instance via the integrations page.

Note: Exalate accesses Salesforce through APIs. Salesforce has its own guidelines for API Access add-ons. For instance, API access is provided by default in Enterprise accounts, but it’s not the case with other accounts like Professional. Visit this documentation page to learn about the different Salesforce editions Exalate supports. 

You can also install the app through the Salesforce AppExchange. Once you find it, click the “Get it Now” button.

Exalate on Salesforce AppExchange

You will then need to choose where to install Salesforce: either “Install in This Org” or in a Sandbox org. I opted for the former.

Install Exalate on Salesforce org

Scroll down to the bottom of the screen and agree to the terms and conditions, then press “Confirm and Install”.

Confirm and install Exalate in Salesforce

Next, select the users for whom you want to install Salesforce; you can always modify this later. In my case, I chose “Install for All Users” and clicked “Install”.

Exalate installation on Salesforce

After that, “Approve Third-party Access” and click “Continue”. The installation process will be completed. To finish, click on “Done”.

Exalate successful installation

Now, navigate to your Salesforce instance and create a connected app. Make sure to save the “Consumer Secret” and “Consumer Key” provided. Then, within your Salesforce instance, locate “Apps” and search for “Exalate”.

Exalate under apps in Salesforce

For requesting an Exalate node, enter the previously saved “Consumer Secret” and “Consumer Key” and click “Request Node”. You will receive a prompt to click “Allow” to grant access permissions to Exalate.

Request Exalate node in salesforce

Go to the “Setup” page in Salesforce. Search for “Trusted URLs” and click “Add new trusted URLs”.

Fill in the following information section:

  • API name: free input string
  • URL: *.exalate.cloud

Check all the boxes in the “CSP Directives” section. Click “Save”.

Proceed by providing your personal details and click “Agree and Submit” to await an email from the Exalate License Manager.

Exalate registration on Salesforce

Once received, open the email and click “Verify Exalate instance”, which will redirect you to the Exalate admin console.

From this point, you can proceed to establish a connection between GitHub and Salesforce.

If you ever get logged out of your Salesforce instance, just follow these steps to log in again.

Step 3: Establish a Salesforce GitHub Connection 

Now it’s time to set up your connection! 

With Exalate, one side initiates the connection, and the other side accepts it. After setting up the connection, you can proceed with configuring it to start sending information back and forth.  

This is an important first step if you want to start synchronizing GitHub issues and Salesforce entities. 

Say you want Cases to fire up new Issues in GitHub. Or trigger dev issues/product updates directly from Salesforce to GitHub. Whatever the case is, we will see how to do that in the next few steps. 

After installing the Exalate app, you should be redirected to a welcome screen.

From there, you can navigate to the “Connections” tab in the left-hand menu.

Connections in Exalate define how your synchronization behaves. It includes what information you want to send and receive and includes other configuration details. 

With Exalate, you can initiate the connection from either the GitHub side or the Salesforce side. The UI for all the Exalate screens is the same, so it doesn’t matter which side you start with. 

For this guide, let’s start from the GitHub side. 

Click the green “Initiate Connection” button to start setting up the connection process. 

initiate a GitHub salesforce integration

Then, you will need to enter the destination URL — your Salesforce URL. You can copy it by going to “Getting Started” on the left-hand Exalate menu. 

After this, Exalate performs a quick check to see if it is installed on the destination instance or not. It will send appropriate messages while it does this. 

More fields will appear, asking you to choose the configuration mode you want for the connection. 

Configuration modes in Exalate

Exalate provides 2 such modes: the Basic mode and the Script mode. 

The Basic mode has default mappings of different Salesforce entities and Github issues. You can’t change them. It has an intuitive UI and you can start your synchronization immediately with this mode. It is suitable for use cases of basic complexity. 

Note: With the Free Plan, you can set up a connection in the Basic mode, allowing you up to 1000 free syncs per month. You can get started here.

The Script mode has AI-powered advanced configurations, customizable mappings, and features. With this mode, you can change the existing mappings, configure new ones, and control what and how you want the information to go over to the other side. It allows you to sync almost any Salesforce entity with GitHub issues, the way you want to. This kind of customization allows you to adapt Exalate to use cases of advanced complexity.

We recommend you try this mode since it allows you to customize your synchronization and use Exalate’s full functionality. 

You can choose to upgrade the Basic connection in Salesforce or Github and move to the script mode anytime you want.

We will have a look at both modes one by one. 

Continue with the Basic mode

Once you select “Basic” on the screen above, click “Next”. 

You need to select the repository whose issues you want to sync on the Salesforce side. Select one from the dropdown list. Click “Next” when you are ready. 

initiate GitHub salesforce sync

You will then be asked to verify admin access to the destination instance. In our case, that’s Salesforce. Click “Yes, I have admin access” if you have it, otherwise click on “No, I don’t have admin access”. The latter approach will generate an invitation code that you will need to copy and paste on the other instance. 

Since I have access, I click on yes and hit “Initiate”. 

exalate admin access

After a quick verification, you will be redirected to the destination side (Salesforce). 

The Basic connection allows you to start synchronization immediately. You can enter the Case key you want to sync, hit “Exalate”, and you are good to go. 

successful GitHub salesforce basic connection

Note: The Case number entered above comes from the URL of the Case you want to sync as shown in the image below.

Case ID in Salesforce

On the GitHub side, the same Exalate screen will prompt you to enter the issue key. 

Note: On the GitHub side, the same screens will be displayed but will be specific to issues. 

In case you don’t want to “Exalate” your Case immediately, you can choose to press the close button on the screen above and use the trigger option to create automatic syncs to the other side or use the ”Bulk Connect” option to sync Cases in bulk. 

We will cover how to create triggers in step 5. Meanwhile, you can learn more about “Bulk Connect”. 

Once you Exalate the Case, it takes a while for the sync to complete. 

GitHub salesforce integration in progress

And finally! You’ve synced your first case. You can also sync the subject, comments, status, and description for this Case automatically. 

To go to the remote issue created on the GitHub side, click on the link generated for the issue (8 in our case). To refer to the Salesforce Case, click on the link below. 

successful Salesforce Github sync

Continue with the Script mode

Moving to the Script mode, press “Next” on the screen after you select “Script”.

Configuration modes in Exalate

You now need to name the connection. 

For this, enter the local instance name (GitHub). This is the side you initiate the connection from. Then enter the remote instance name (Salesforce). This is the destination side name. 

Exalate then generates an automatic connection name for you. But you can edit it if you want.

Give your connection a description as well. This will be helpful when you have a list of them. 

After finalizing all this, click “Next”.

initiate GitHub salesforce integration in script mode

Choose the repository you need to sync issues from the GitHub instance. Select the correct one from the drop-down list. Click “Initiate”.

sync github to salesforce

Now an invitation code appears. 

This code is a unique secret that allows you to form a connection with the other side. You simply need to copy and paste it. 

So click on “Copy invitation code” and save the copied code somewhere handy. 

exalate invitation code

Your work on the GitHub side is over for now. Then open your Exalate console on Salesforce. 

Navigate to the “Connections” tab on the left side and click on the “Accept Invitation” button. 

exalate connection list

The code you had copied, now needs to go in the text box. After pasting it, click “Next”.

paste exalate invitation code

Now you’ve successfully established a GitHub Salesforce connection. You can continue to configure your connection next. 

You can do this in two ways: either by clicking the “Configure Sync” button shown on the screen below or by editing the connection to configure it. We will see how to do this in detail in step 4. 

configure GitHub salesforce sync

Step 4: Configure the Connection to Decide What Information is Shared

If you have followed the steps sequentially, you will now be redirected to the following screen. 

This screen allows you to configure the connection to control what information is shared with the other side and how you want to interpret the incoming information. Maybe you want to map the issue summary in GitHub as an internal comment under a Case in Salesforce or you may want to sync all open issues on GitHub to Cases in Salesforce. 

All of this can be done by configuring the connection. We will get to a detailed explanation of this screen shortly.

Sync rules in GitHub

Meanwhile, as I mentioned earlier, you can configure the connection by clicking on the edit connection button as well. The connection you created earlier can be viewed under the “Connections” tab. 

This tab specifies all the connections you have created as a list, with different options for each connection given next to their names. Every connection has a status that shows the connection being “Active”, “Pending”, “Error” or “Deactivated”. 

You can also see the number of issues under sync and the last synced time here. 

The edit connection button shown in the image below allows you to configure the connection 

There is a remote antenna button that takes you to the other side. Clicking the 3 dots allows you to activate, deactivate, or delete the connection. You can even “Exalate” a single issue or a Case here. 

edit Salesforce Github connection

The screen has 4 tabs: “Rules”, “Triggers”, “Statistics” and “Info”. 

We will cover “Triggers” in step 5. 

The “Statistics” tab gives an overview of the synchronization information about the number of issues under synchronization, the last sync date, etc. 

The “Info” tab provides a general description of the connection, stating its name, destination URL, description, and type. 

The “Rules” tab has scripts written in Groovy Scripting language. These are sync rules that specify what information should be sent to the other side in the “Outgoing sync” rules, and map the information coming from the other side in the “Incoming sync” rules. 

Both the outgoing and incoming sync rules are present on the Salesforce and GitHub sides as shown above. 

You can alter the sync rules using scripts anytime you want. Alteration means editing the

  1. outgoing sync rules by
    1. not sending existing information anymore by deleting the rule 
    2. sending new information by adding scripts
  1. incoming sync rules by
    1. not receiving some information anymore by deleting the rule 
    2. receiving new information by adding scripts

You can decide to not send or receive certain information by deleting or commenting on a particular line (read the rule) from the text box shown above. 

Commenting means the particular line will be ignored at the time of synchronization. To comment, simply add a  “//” at the start of the line. To remove multiple rules, add “/*” at the start of the block of lines and then “*/” whenever you want to end. 

For instance, if you don’t want to send a description of the Case from Salesforce to Github, you add “//” as follows:  //replica.description = entity.Description.

Sometimes you want to send or receive additional information. This is when you add new scripts in the outgoing and incoming syncs.

For instance, if you want to sync “Task” in Salesforce in addition to “Case”, you add the following script in the outgoing sync box.

if(entity.entityType == "Task") {
    replica.key        = entity.Id
    replica.summary    = entity.Subject
    replica.description = entity.Description
}

Connections in Script Mode Using AI Assist

The Script Mode allows you to generate and optimize scripts using the AI Assist feature — which appears as a tab under both the incoming and outgoing sync rules.

How does it work?

Enter your sync requirements into the chat box, and AI Assist will generate scripts based on your input, existing configurations, and Exalate’s scripting API.

It is also important to note that AI is not perfect. So, you need precise and detailed prompts to ensure the best results. 

Let’s say you want to sync statuses between GitHub and Salesforce; the prompt could look something like this: 

“I want to sync the status of my GitHub issue with the status of a Salesforce case.”

Sync rules in GitHub using AI Assist

After a moment, the script will be generated, with suggested changes highlighted in green and red. The green scripts are suggested additions, while the red scripts are suggested deletions. 

If the new snippet works for you, click on “Insert Changes”. Otherwise, you can discard the suggested code. If needed, you can refine your prompt and, once satisfied, publish the changes.

There are countless possibilities in the way you can edit these script rules to suit your specific use case. So experiment as much as you want!

You can always refer to Exalate docs for GitHub and Salesforce to learn more about how to work with them. 

Move on to creating triggers. 

Step 5: Set up Automatic Synchronization Triggers to Share Information 

Rules define what you want to send to or receive from the other side, but triggers define how you want to start the synchronization process. 

They allow you to specify under what conditions you want the synchronization to happen. 

For instance, when the sales team logs a feature request raised by an important customer under a Case in Salesforce, an issue is automatically created in GitHub.

 Such and many other conditions can be set under the search query, and if the condition is met then the trigger automatically starts synchronization based on the outgoing and incoming sync rules you have set. 

For this, click the “Triggers” tab. 

This tab shows a list of all the triggers you have created. 

If this is your first time, the list is empty. Click “Create trigger”. 

triggers screen on exalate

An “Add trigger” screen pops up. 

Note: You can also create triggers by clicking on the “Triggers” tab in the left-hand Exalate menu. When you choose this option, you need to additionally choose the connection name you want to execute the trigger for. 

The “Add trigger” screen first asks you to select an entity type. I have selected an “issue” type here since the screen is for GitHub. We will see how the Salesforce screen looks, shortly. 

Under the “If” section, enter the search query. 

These search queries are platform-specific. Here, we are syncing all the issues with the status as open. 

To know more about GitHub search queries visit this page. For Salesforce, Exalate uses the SOQL (Salesforce Object Query Language) syntax. Learn more about it here

Add appropriate notes to help you understand why you have created this trigger. 

Click the “Activate trigger” checkbox to activate or deactivate the trigger. This saves you time when you don’t want to create a trigger from scratch but don’t need to use it right now. 

Click “Add” once you are done. 

Triggers in Exalate

On the Salesforce side, let’s have a glimpse of what the add triggers screen looks like.

There are many entity types supported by Exalate. But the most popular ones are Opportunity, Product, Account, Case, and Task. 

After you select Opportunity as the Salesforce entity type, you select conditions to filter entities for setting the trigger.

create triggers in salesforce github integration

Enter the search query with the toggle button as shown below. 

search query Salesforce GitHub sync

You can learn more about how this is done on the Salesforce and the GitHub side if you want. 

You can see the created trigger listed as follows. If you want, you can choose to edit or delete the trigger from here. 

By clicking the 3 dots next to the trigger you can choose to “Bulk Exalate” all the current issues or entities fitting the search criteria. 

GitHub to salesforce integration triggers

Don’t forget to click “Publish” when you have finished making the changes. 

Common Use Cases

The most plausible use case that can be supported by a GitHub Salesforce integration is enabling seamless collaboration between sales and development teams. 

Sales teams get a lot of customer queries, feedback, and new feature requests. An integration solution like Exalate can allow them to fire these customer concerns into GitHub right from within Salesforce. This will create an issue in GitHub. The issue progress and the appropriate status updates can then be viewed by the sales team from the Salesforce UI. And they are in a better position to update their customers on the status of the issue. 

Important product updates or feature request issues undertaken by the development teams in GitHub can be automated and synchronized with Salesforce entities. So the sales team always has the most recent and up-to-date product information ready to be taken up with their customers who have been waiting for exactly that update or feature. 

Discovery call with Exalate

Conclusion 

We saw how a Salesforce GitHub integration can help sales and development teams collaborate and share business-critical information to help them enhance customer experience. 

We also discussed how choosing the right technology for your integration can manifold the benefits such integration can bring along. Every organization has its drivers for choosing an integration tool, but we chose Exalate since it checks most of our criteria. 

Finally, we covered a step-by-step approach to implementing a Salesforce GitHub integration to ensure that the integration is handled systematically. 

Frequently Asked Questions

What is a Salesforce GitHub integration? 

A Salesforce GitHub integration is a way to connect your GitHub repository with a Salesforce Org. Such an integration will enable seamless collaboration between the business teams using Salesforce and the developers using GitHub. 

How does Salesforce integrate with GitHub?

Salesforce can integrate with GitHub by providing a version control and collaboration platform on Salesforce projects. You can connect your Salesforce Org to a GitHub repository and use Git to manage changes to Salesforce metadata and code. 

How do I deploy changes from Salesforce to GitHub? 

You can use tools like Salesforce CLI or third-party integration solutions like Exalate to facilitate the deployment process from your GitHub repository to Salesforce. 

What tool can I use to integrate GitHub and Salesforce? 

You can use third-party tools like Exalate to integrate GitHub and Salesforce. This solution allows you to create custom scripts to tailor the integration to your specific requirements. So you can integrate any Salesforce objects into GitHub repositories. 

Can I integrate Salesforce and GitHub for free?

Yes, you can integrate GitHub and Salesforce for free. Both these platforms offer free plans to connect. But only the core integration with basic features is free. Additional integration requirements may have associated costs. You can try other third-party tools that have various integration options at a fair price. 

Recommended Reads:

How to Set up a Salesforce ServiceNow Integration: The Complete Step-by-Step Guide

Salesforce ServiceNow Integration

If your teams use powerful platforms like Salesforce and ServiceNow to increase productivity and efficiency, a Salesforce ServiceNow integration can help them gather and collate their ever-increasing information in a better manner. It will help them share important and accurate information with each other, automatically and with the least fuss. 

You can allow teams to stay on their own platform and, at the same time, share data bi-directionally with other teams. This guide walks you through why a Salesforce ServiceNow integration can be beneficial and how you can choose the right tool for achieving it. Then it goes on to discuss how to configure and implement such an integration end-to-end.

So let’s begin! 

Get the Salesforce ServiceNow Integration Guide

Learn how to integrate Salesforce and ServiceNow, step-by-step.

Why Integrate Salesforce and ServiceNow

Salesforce is a leading CRM (Customer Relationship Management) platform that bridges the gap between customers and companies.

salesforce

It provides a range of services and apps to different departments in the company, like sales, marketing, IT, and the like to help them enrich and enhance their relationships with customers. 

ServiceNow

ServiceNow is a cloud-based platform that automates workflows. It helps streamline routine work tasks, reducing the time spent on administrative work. ServiceNow also assigns and prioritizes incidents raised based on agent availability and skill level. It has its roots in ITSM (IT Service Management). 

Why Do You Need a Salesforce ServiceNow Integration?

Both these platforms are capable of handling huge amounts of information, which is beneficial for the teams to do their tasks effectively. 

This information, if shared between them, can help them enhance their overall business objectives. Customer service teams using ServiceNow can benefit from customer overviews, feedback, and queries from Salesforce. And the sales team using Salesforce can keep track of incidents reported by important customers. 

Sometimes the same information both teams need exists on different platforms, leading to duplication and inefficiency. 

So sharing this information will help different teams gather and collate important information within their own platforms. However, if done manually, it can be time-consuming, error-prone, and can even lead to incorrect or duplicate information. 

If this is all done automatically and in real-time, it can help teams deliver better customer service and an end-to-end enhanced customer experience. The teams won’t even have to leave their platforms or switch between applications to exchange information. A Salesforce-ServiceNow integration can help teams achieve all this with the least possible fuss. 

Generic image

With such integration in place, teams can share relevant information between themselves. For instance, a sales team might only want to see the status of incidents that key customers raise and not other technical details of the incident. Similarly, the support teams might not want to view personal information about the customers, but only the technical details, if any, that can help them solve their incidents faster. 

When implementing a ServiceNow Salesforce integration, it is important to choose the right tool for your scenario. This can help you realize the benefits of your integration in a better manner. 

The Right Tool for Setting up a Salesforce ServiceNow Integration

It is crucial that your tool understands your integration scenario well and adapts to it seamlessly, as every integration case is unique.

Security is also an important aspect of information exchange. So look for tools that have inherent security mechanisms like encrypted file transfer, secure transfer protocols, role-based access controls, and the like. 

Tools supporting decentralized integration can help both sides of the integration control what they share with the other side and how to interpret information coming from the other side. This ensures that both sides have autonomy and can work independently.  

The integration tool must also be reliable to address issues related to downtimes and system failures without manual intervention. Changes must be queued and applied in the same order as their initiation, without the integrating parties noticing the outage. 

Decentralized integration

You might also want to integrate with your other partners, suppliers, customers, or vendors in the future. Having a tool that already integrates with the applications they use will make it easy for you to make the transition.  

Exalate has the flexibility to adapt to your unique integration case with the help of its scripting engine. It also presents you with a powerful AI Assist feature that complements the Groovy-based engine. 

So you don’t need to spend a lot of time configuring your tool to fit your case; you simply change the sync rules and get going. 

Additionally, it is also ISO 27001 certified.

Note: Want to learn all about Exalate’s security and architecture? Read this whitepaper.

Exalate supports a distributed integration, where each side controls what information you send and receive independently without any interference from the other side. 

It has a transactional synchronization engine that allows applying changes queued for synchronization in the same order as their initiation without manual intervention, even if there’s downtime, or your system is being upgraded or your firewall is being configured. 

It also comes with integrations for Jira (on-premise and cloud), Github, Zendesk, Azure DevOps, and Integration as a Service. So if these are the applications that the companies you want to integrate with use, then you can simply extend your Exalate network. 

This was just a head start. Let’s see how to configure a Salesforce ServiceNow integration.

How to set up a Salesforce ServiceNow Integration 

We’ll discuss the step-by-step process of this integration, but if you’re a video person, go ahead and watch this tutorial instead.

To set up a Salesforce ServiceNow integration, you need to first install Exalate on both sides. 

Request your free trial and start straight away by visiting the Exalate integrations page.

Once done, you can follow this guide to configure it and share the incoming and outgoing information on each side independently of one another.

After that, you can start your synchronization.  

Step 1: Install Exalate on Salesforce

To install Exalate on your Salesforce instance, you first need to request a trial. You can do that either from the Atlassian marketplace, Salesforce AppExchange, or the integrations page.

We will discuss the process from Salesforce AppExchange here.

Click the “Get it now” button and login if you still haven’t.

Decide where to install Salesforce: either “Install in This Org” or in a Sandbox org.

Let’s install it in this org.

Install Exalate on Salesforce org

After making your selection, scroll down to the bottom of the screen and agree to the terms and conditions. Then, simply press “Confirm and Install”.

Now, you’ll be asked to choose the users for whom you want to install Salesforce. You have the option to change this later if needed. In my case, I went with “Install for All Users” and clicked “Install”.

Exalate for users in Salesforce

Next, proceed to “Approve Third-party Access” and click “Continue” to move forward with the installation. Once the process is complete, click on “Done” to finalize everything.

Exalate installation on Salesforce

Now, go to your Salesforce instance and create a connected app.

Remember to save the “Consumer Secret” and “Consumer Key” that are provided during this setup. Afterward, go back to your Salesforce instance, navigate to “Apps,” and search for “Exalate”.

To request an Exalate node, enter the “Consumer Secret” and “Consumer Key” you saved earlier, and then click “Request Node”.

Request Exalate node in Salesforce

Now, head over to “Setup” and search for “Trusted URLs”. Then, click “Add new trusted URL”.

Type in the following information in the “Trusted URL information” section:

  • API name: free input string
  • URL: *.exalate.cloud

Remember to check all the boxes in the “CSP Directives” section and click “Save”.

Upon clicking “Allow,” you’ll grant access permissions to Exalate. Next, provide your details and click “Agree and Submit”. Now, simply wait for an email from the Exalate License Manager.

When you receive the email, click “Verify Exalate instance” to be redirected to the Exalate admin console.

Verify Exalate instance in Salesforce

If necessary, follow these steps to log in to your Exalate for Salesforce console.

Once done, you can start using Exalate right away! But if you still have to install it on ServiceNow, proceed to the next step.

Note: Exalate accesses Salesforce through APIs. Salesforce has its guidelines for API Access add-ons. For instance, API access is provided by default in Enterprise accounts, while it is not the case with other accounts like Professional. Visit this documentation page to learn about the different Salesforce editions Exalate supports. 

Step 2: Install Exalate on ServiceNow

You can request a ServiceNow instance by visiting the Exalate integrations page.

Enter your details and submit. The Exalate team will reach out to you with the node.

Alternatively, you can also install it from the Atlassian marketplace.

You also need to download an XML file. This file consists of information ServiceNow will need to access Exalate. Get it here

Next, log in to your ServiceNow account. In the left-hand menu, search for “System Update Sets”. Click on the “Filter navigator” search box if the list is too long and you cannot find it. Now expand the “System Update Sets” by clicking on it. In the entry, select “Retrieve Update Sets”.  

exalate for servicenow retrieved update sets

Under the “Related Links” heading, click on “Import Update Set from XML”. 

upload the xml file to servicenow

Choose the XML file that you have downloaded and click “Upload”. After a successful update, the XML file will appear on the list. Now click on the “Preview Update Set”. 

Click on “Commit Update Set” to finish the installation of Exalate on ServiceNow. 

You can now proceed to the next step. 

Step 3: Set up a Connection between Salesforce and ServiceNow

Before you can start synchronization with Exalate, you need to establish a connection between Salesforce and ServiceNow. The connection defines how your synchronization behaves, and it specifies your sync rules and scope. 

One side initiates the connection, and the other side accepts it. You can do this from either the Salesforce or the ServiceNow side. The Exalate UI is uniform across different platforms, so you can perform the remaining steps on either side. 

Let us start initiating the connection from the ServiceNow instance. 

To do this, in the Exalate left-side menu, click “Connections”. This screen has a list of all your connections. If it’s your first time, it will be empty. 

Start by clicking “Initiate connection”. 

Connections screen in Exalate

A pop-up will appear. Enter the destination URL in the text box. The destination means the other side you want to connect with. In our case, that’s ServiceNow. 

In case you don’t know the URL, you can navigate to the Exalate console on ServiceNow and click on “General Settings” in the left-hand menu. Copy the URL from there. 

After entering the URL, Exalate performs a quick check to see if it’s been installed on the other side. You will get appropriate status messages.  

Configuration modes in Exalate

You are then prompted to choose the mode of connection.

Exalate supports 2 modes: Basic and Script. The UI for both these modes is slightly different, so we will take a look at both of them in detail. 

Continue with the Basic Mode

The Basic mode is a no-code configuration UI. It comes with pre-defined sync rules and mappings that you cannot change. It’s suitable for your basic synchronization needs. But if you need some advanced customizations, you can upgrade to the script mode anytime! 

Note: Exalate also comes with a Forever Free plan. With this plan, you can have Basic mode connections with up to 1000 free syncs per month. Get started with the Free plan here

To continue with this mode, click “Yes, I have admin access” on the next screen if you have access to the ServiceNow instance. Click no if you don’t, and Exalate will generate an invitation code for you, which you can copy and paste on the ServiceNow side. You can refer to the details on how to go about this in the Script mode section. 

Either way, click “Initiate”. 

admin access for basic mode

After a quick verification, you will be redirected to the ServiceNow side. 

Here, you can start your first synchronization by entering the incident number and clicking  “Exalate”. 

accept Salesforce ServiceNow sync invitation

You can also choose to synchronize later by closing this window and creating triggers or using the “Bulk Connect” option. 

Note: At this point, you can even go to the Exalate console on the Salesforce side. You will see a similar screen there, asking you to enter the Case key to sync.  If you don’t see this screen, you can click on the 3 dots next to your connection name in the “Connections” tab and click “Exalate”. 

For fetching the URL of Salesforce entities you must click on that entity and copy the number from the URL, as shown in the image below. 

Case in Salesforce

Wait for some time.

A successful synchronization looks like this. You can click on the remote link to see the synced entity on the Salesforce side, or you can click on the incident number link to go to the incident on the ServiceNow side. 

successful Salesforce ServiceNow sync

To view the default mappings of the Basic mode connection, click on the edit connection icon next to the connection name under “Connections” in the Exalate console. 

exalate connection list

As seen, you cannot change these default mappings, but choose to upgrade for advanced integration use cases. 

salesforce servicenow basic sync rules

Continue with the Script Mode

If you have complex and advanced use cases, we recommend you use the Script mode. It gives you the ability to modify the sync rules and control what and how information is shared with the other side. 

To continue using the Script mode, you must generate an invitation code from one side and accept the code on the other side. 

We have already initiated the connection from the ServiceNow side. 

Select “Script” on the screen below and click “Next”. 

Configuration modes in Exalate

Name the connection now. 

For this, you must give a name to your local instance (Salesforce in our case) and also to the remote instance (ServiceNow). Exalate automatically generates a connection name for you by combining the local and remote instance names. But you can change it if you want. 

Also, give it a description, because it is extremely useful when you have a lot of connections and it becomes difficult to know why you created them in the first place. 

Whenever you are ready, click “Initiate”.

initiate ServiceNow Salesforce integration

An invitation code is generated. This is a unique string that Exalate generates for every connection you set up. It is a part of its security mechanism. 

Copy the code somewhere safe and click “Done”.

copy exalate invitation code

If you do this, the connection on the Salesforce side will appear as “Pending” and only when you finish setting it up on the ServiceNow instance, will the status become “Active”.

pending connection invitation

On the Salesforce side, under “Connections”, click the “Accept Invitation” button. 

Then paste the code you had copied and click “Next”.

paste exalate invitation code

After this, your connection has been successfully established and you can see the status as follows. You can now configure it to control what information goes to the other side. 

For this, click on the “Configure Sync” button and proceed to the next step. 

service salesforce connection

Step 4: Configure your connection to determine what information gets shared

If you don’t wish to configure the connection right away, you can do it later by clicking on the edit connection icon next to your connection name under the “Connections” tab. 

configure ServiceNow Salesforce connection

From here, you can choose to activate, deactivate, or delete the connection by clicking on the 3 dots. You can even go to the other side of the connection by clicking the remote antenna button. The status of your connection also appears here, apart from some other general information. 

Let’s proceed to the steps after you press the “Configure Sync” button. Editing the connection also has similar screens, so either way, there are 4 tabs displayed: “Rules”, “Triggers”, “Statistics” and “Info”. 

The “Statistics” tab gives an overview of synchronization-related information like the number of issues, comments, and attachments synced.  It also states the number of issues last synced, in addition to the date and time of the sync. 

The “Info” tab gives general information related to the connection, like its name, type, description, and destination URL. You can edit the description here if you want. 

We will discuss the “Rules” tab now and “Triggers” in step 6. 

Exalate has an “Outgoing sync” and “Incoming sync” written in Groovy scripting language. Both are rules that control what information is sent and received from the other side. 

The outgoing sync rules, as their name suggests, control what information must be sent to the destination side, while the incoming rules control how to interpret the information coming from the other side. 

Both these rules are present on either side of the connection i.e. Salesforce and ServiceNow. So you have complete autonomy in deciding what must be shared and what shouldn’t. You don’t need to configure or even inform the other side about the way you modify your script rules. So if you are in Salesforce, “Outgoing sync” specifies what information you send to ServiceNow, and the “Incoming sync” specifies how you receive information from ServiceNow. This holds for ServiceNow as well.

The rules on the Salesforce side look like this: 

Sync rules in Salesforce

You can edit the rules to control the information flow. 

For this, you can either delete a particular line to stop sharing information or add additional lines for syncing something extra like custom fields. 

For deletion, remove the particular line from the incoming or outgoing sync or simply add a comment. 

Add comments by adding “//” at the start of the line. If you need to comment a block of lines add “/*” at the start of the block and “*/” where the comment ends. 

For example, if we add a comment to the line replica.description = entity.description in the Outgoing sync section, then the description of the Case will not be shared with the ServiceNow instance. 

Any Salesforce entity can be synced by adding additional scripts relevant to that entity.  Refer to this document on how to do it. For the ServiceNow side, check out this one instead.

For example, if you want to sync Tasks in addition to Cases in Salesforce, then you add the following script in the Outgoing sync. 

if(entity.entityType == "Task") {
    replica.key        = entity.Id
    replica.summary    = entity.Subject
    replica.description = entity.Description
}

Accordingly, the subject and description of the Task will go over to the ServiceNow side. 

Once done, click “Publish”. The changes you have made will be saved and applied from the next sync onwards. 

Connections in Script Mode Using AI Assist

The Script Mode allows you to generate and optimize scripts using the AI Assist feature — which appears as a tab under both the incoming and outgoing sync rules.

How does it work?

Enter your sync requirements into the chat box, and AI Assist will generate scripts based on your input, existing configurations, and Exalate’s scripting API.

It is also important to note that AI is not perfect. So, you need precise and detailed prompts to ensure the best results. 

Let’s say you want the name of the assignee of a ServiceNow incident to appear in a Salesforce custom field; the prompt could look something like this: 

“I want the name of the assignee of the ServiceNow incident to appear in a designated custom field in a Salesforce case.”

AI assisted script mode

After a moment, the script will be generated, with suggested changes highlighted in green and red. The green scripts are suggested additions, while the red scripts are suggested deletions. 

If the new snippet works for you, click on “Insert Changes”. Otherwise, you can discard the suggested code. If needed, you can refine your prompt and, once satisfied, publish the changes.

Step 5: Create Automatic Synchronization Triggers 

You can use triggers to synchronize Salesforce and ServiceNow entities automatically. 

For creating triggers you need to add a query. When Exalate comes across entities that match the search query, they are automatically synchronized with the other side according to the sync rules you have set. 

To begin with, click on the “Triggers” tab on the above screen. You can also reach triggers by clicking on the left-hand “Triggers” menu of the Exalate console. If you do it this way, there is an extra step of selecting the connection you want to apply the trigger for. All the other steps are the same. 

On this screen, you will see all your triggers. To create a new one, click “Create trigger”. 

Create ServiceNow Salesforce sync triggers

An “Add trigger” pop-up will appear. 

You start by selecting the entity from a dropdown list to which the trigger is applied. 

There are many ServiceNow entities like Change Requests, Cases, Problems, etc. supported by Exalate. 

We have selected “Incident” for this example. 

Triggers in ServiceNow

The “If” section allows you to enter search queries specific to the platform. Since we are on the ServiceNow side, we have written the query “urgency=1”. So a trigger to sync Incidents with the highest priority is created. When such an incident is generated, it will be automatically synced. 

Note: Refer to this page if you want to know more about creating triggers. 

The same on the Salesforce side will allow you to select Salesforce entities from a drop-down list. There are many Salesforce entities supported by Exalate, but the most common ones are Account, Opportunity, Case, Task, and Product. Here, we have selected an “Opportunity”. 

Then either select conditions to filter the Opportunity by entering the details in the text boxes or toggle the switch to use the search query instead. For the search query on the Salesforce side, the Salesforce Object Query Language (SOQL) is used. 

ServiceNow Salesforce sync triggers

Learn more about how to add search queries in Salesforce here

There is an option to add “Notes” to the trigger. Add them to describe what the trigger does. 

You can also use the “Activate trigger” checkbox to activate or deactivate the trigger. This is useful when you don’t want to use the trigger right now, but also don’t want to go through the effort of creating it from scratch again. 

Click “Add” when you are done. 

Triggers screen in Exalate

You can see the trigger listed on the previous screen as shown above. There is a button to edit or delete the trigger. You also synchronize the existing entities that fulfill the trigger condition using the “Bulk exalate” option by clicking the 3 dots next to the trigger.  

After you are done making the changes, click “Publish”. 

Step 6: Start Synchronizing the Information 

For the Script mode

Adding or deleting scripts in sync rules means you control what is sent and received, but to start the synchronization, you either need to create triggers or sync existing Salesforce and ServiceNow entities in bulk using the “Bulk Connect” option. 

For the Basic mode:

You can simply sync entities by entering the Incident number or the Case number after creating a connection, as we saw in step number 3. 

Or by clicking on the 3 dots next to the connection name in the “Connections” tab either on the Salesforce or the ServiceNow side and then selecting “Exalate”. 

You can create a trigger or sync entities in bulk too. But you cannot add new ones or change the existing default mappings for advanced configurations like in the Script mode. 

Common Use Cases

Customer Support and Sales Teams 

Perhaps the most common scenario that comes to mind for a Salesforce ServiceNow integration is for your sales team to have an automatic update on the “Incident” status of key customers. 

So when an Incident of urgency =1 from a particular customer comes up in ServiceNow, it will automatically create a Case or a Task (depending on the trigger you set) on the Salesforce side, so that the sales team can keep track of it automatically thereon. 

Any updates or additional information requested by the customer for an Incident can be viewed in Salesforce and provided to the support team by the sales team if they have it with them. This can resolve Incidents faster and improve SLAs, leaving you with happier customers. 

The customer support agents can also review Cases, Accounts, or Opportunities in Salesforce to gather information relevant to their Incidents, helping them to resolve them faster. 

Customer Success Representatives and Sales Teams

You can also envision the customer success representatives having a complete overview of the customers in their ServiceNow by gathering information from Accounts, Opportunities, and Cases in Salesforce. 

They can then work on maintaining a low churn and help generate better revenues for the business. Sales teams can also proactively provide feedback, queries, or other relevant details to the customer success teams to help them with their responsibilities better. 

Development and Sales teams 

It’s possible that your development team practices agile development methodology and uses ServiceNow. Your sales team, on the other hand, uses Salesforce. Since the sales team is constantly in contact with customers and is well aware of their feedback, complaints, queries, or feature requests, it would be helpful if they could exchange this information with the development team.

This can in turn help the developers get an idea about what customers or end-users are looking for in a product or how they want to improve it. An integration between ServiceNow and Salesforce can help these teams share information and filter out unnecessary details. 

Discovery call with Exalate

Conclusion

A Salesforce ServiceNow integration can help teams close their information gaps and bring them to work towards a common goal of improving customer experience. 

For this, we saw how such an integration would be beneficial for teams working on different platforms like ServiceNow and Salesforce without them having to leave their familiar environment. 

We then got a glimpse of what the right integration tool must inherently support and chose Exalate as the tool for our integration because it supports the features we were looking for.

And then we finally saw how such an integration can be implemented through a step-by-step approach. We also saw common use cases that can benefit from such an integration. 

Frequently Asked Questions

Can Salesforce integrate with ServiceNow?

Salesforce can integrate with ServiceNow using native Salesforce integrations. You can also rely on standalone tools like Exalate, which you can find in the marketplace of both platforms. 

Why integrate ServiceNow and Salesforce?

Teams integrate ServiceNow with Salesforce to create a smooth data pipeline between support agents and sales teams. Besides, sending data over to Salesforce provides you with access to a myriad of analytical tools for better reporting.

Which is better, Salesforce or ServiceNow?

Salesforce and ServiceNow serve different purposes, that’s why it is difficult to say which one is better. Salesforce is a customer relationship management platform that covers sales, campaigns, and customer interactions. ServiceNow is an IT service management platform for organizing workflows and automating processes.

Recommended Reading:

The Definitive Guide to Cross-Company Integrations for IT Professionals

Cross-company integration for IT professionals

IT professionals such as Solutions Architects, Project Managers, DevOps Engineers, Sys Admins, Service Delivery Managers, and the like, all play an important role in every organization. They have their own contribution to a software project delivery lifecycle, right from understanding customer requirements to delivery of services to operations and support.

Though they have distinct responsibilities, they all need to work in tandem for the success of the end-to-end delivery of IT projects.

In this blog post, these different roles will be addressed as IT professionals, recognizing the fact that their expertise is highly valuable and relevant for IT projects. So, here’s how we acknowledge the current situation of these IT professionals.

The organizations they are a part of, often employ work management systems or issue tracking systems to manage their day-to-day operations effectively. However, to fulfill varying requirements, such organizations often use best-of-breed systems from separate vendors.

For instance, Project Managers, who handle the project and product deliveries, might use Jira for their tasks, while Solutions Architects, who oversee the design and architecture of technical solutions, might use ServiceNow for managing their tasks. As a result, negative symptoms of working in an environment where internal teams use disparate applications within the company become visible.

These symptoms are further manifested in a multi-sourced environment where customers, suppliers, and partners of such organizations have their own applications and information needs to be exchanged between
them.

This is because, when these disjunct organizations and teams try to exchange information through such applications, the lack of a standardized interface between them creates problems. Problems like inadvertent alteration of data, and lost or irrelevant information, resulting in delayed responses, further impact customers and business. The only way to mitigate this is by integrating these applications/ toolsets so teams can seamlessly collaborate and communicate with each other.

Welcome to this ultimate guide that rolls out a cross-company integration approach. It employs SIAM and ITIL 4 best practices, and its goal is to illustrate steps IT professionals take to develop this capability within their organization.

Note: If you prefer an ebook, then go ahead and download this free guide along with its worksheets.

However, embarking on a cross-company integration project is not always a walk in the park. There are quite a few potential risks and problems that we need to take into account.

Potential Risks and Problems

So, what are the potential problems and risks you might encounter when starting a cross-company integration project?

  1. If data mapping is not consistent and comprehensive, it can lead to potential bottlenecks. Cross-references of this data must be accurate between systems. Otherwise, it leads to incorrect or delayed information exchange (For instance: If the same task is called an issue in one system and an incident/ ticket in another, then it must be acknowledged at the onset that both mean the same).
  2. Dependencies on the APIs of 2 different companies often introduce a lag in the implementation cycle. (For example: If there is a problem with an API of one system, then the integration cannot proceed until it’s resolved). This creates a dependency between the companies involved in the integration process and delays it.
  3. Comprehensive testing needs to take place. If this testing is not adequate, it can cause issues in post-production. End-to-end scenario testing must be defined and executed. This will simplify the maintenance in the future whenever a change needs to be validated. The lack of such scenarios will lead to failing integrations and will reduce its usability.
  4. People often resist digital transformation. This can be a potential risk if different teams in a project need to collaborate and they are not ready to change their mindset. Following are 2 instances of this point.
    a. People lack the skills/ know-how to use and benefit from new technologies. In traditional companies, people do not understand the “big picture” and how new technologies might improve businesses and processes.
    b. Integrating one system with another could lead to risks of unauthorized disclosure or malicious tampering of data being exchanged. So, questions on integrity and confidentiality are of the utmost concern.

So how do we move forward, taking into account these challenges?
Here, we consider SIAM and ITIL 4 best practices to help mitigate the above problems and generate a well-structured cross-company integration project driven by IT professionals.

Introducing SIAM

Let’s understand why we chose SIAM and ITIL 4 best practices for our cross-company integration effort. Why are we using SIAM as a scaffold for building across-company integration?

A multi-sourced environment has a lot of challenges when it comes to managing interactions and collaborations between service providers. Here SIAM (Service Integration and Management) introduces the concept of a “service integrator” working with providers alongside customers to achieve the common goal of service improvement. Such a service integrator is a single, logical entity held accountable for the end-to-end delivery of services and business value that the customer receives.

The SIAM ecosystem has different layers: the customer, the service integrator, and the service providers.

These 3 roles include: 

  1. The customer(s): The customer(s) to whom the services are being provided. 
  2. The service providers: The suppliers/ vendors/ partners that provide the service. 
  3. The service integrator: A strong competent voice to make sure the customer and the providers are on the same page.

Also, SIAM supports the idea of an external and internal service integrator. An “external service integrator” entails a third-party organization/team playing the role of an integrator towards meeting end-to-end service levels, whereas in an “internal service integrator” framework the customer organization plays the integrator role in providing integration capabilities. Care must be taken to manage the service integrator roles and customer roles separately to avoid confusion over responsibilities.

A typical internal service integrator ecosystem in SIAM looks like this.

Why do we use ITIL 4 in cross-company integration?

Many organizations are already following ITIL v3, and have realized the benefits it brings to service delivery and management. ITIL 4 introduces the concept of “Service Value Systems” which it focuses on co-creating value for customers in a business ecosystem and proposes that IT service management and business requirements are always aligned. 

Let us also understand how ITIL and SIAM relate to each other here. 

ITIL 4 in a SIAM Ecosystem:

SIAM does not replace ITIL. It builds on top of it and extends it across the multi-sourced ecosystem. SIAM adapts to ITIL 4 concepts such as Service Value Systems, practices, and techniques to effectively work in a multi-service provider environment. 

This helps establish that SIAM and ITIL can go hand in hand.

So what’s your role in all this? 

Every organization has its own drivers while choosing to play the part of a service integrator. As IT Professionals, you can proactively showcase the benefits of such an opportunity to generate cross-company integration capability within your organization using SIAM and ITIL best practices. It can help structure and streamline your efforts to integrate disparate systems by establishing the concept of an internal service integrator (essentially your organization) with potential or existing customers. 

You can learn more about SIAM in this blog post. Also interested in ITIL 4 and service management? Then check out this article.

Note: Throughout this guide, adaptation to ITIL 4 and SIAM practices have been distinctly mentioned.

The Scenario

This case is used in the article to illustrate the concepts that are presented. A company, by the name of  Infinity Solutions, is confronted with challenges in managing multiple projects and collaborating with multiple teams, all using different work management systems.

Infinity Solutions specializes in the sales and distribution of clothing and has decided to digitalize its business. Now the users can order via their website, make payments for their purchases, and browse the collection on the online kiosk.

John, the Solutions Architect working with Infinity oversees the technical and architectural requirements of software solutions to align them with business objectives. He uses Jira for handling his tasks.

Elaine, the Project Manager with Infinity just got assigned the e-commerce project. She uses ServiceNow to manage her tasks.

Now, John and Elaine need to work together on this new project for which they need both their teams to collaborate and work with each other.

Also, Infinity decided to outsource its customer service to Mercuri Inc. It uses Zendesk to handle all incoming requests.

Infinity did not have the required resources/ expertise for the development and outsourced it to Global Pvt Ltd

The team at Global has David working as the DevOps engineer to bridge the gap between development and operations. Marco is a Sys Admin here to manage and support the IT Infrastructure. David uses Azure DevOps.

Cross company scenario

Infinity faces the following challenges in collaborating across its multi-sourced ecosystem:

  • Since both Elaine and John use different applications, the same issues handled by both teams cannot always remain consistent. This is because the issue-related information has to be passed back and forth manually between their teams. This results in delays and inconsistencies in resolving issues and has increased friction between them. 
  • They had to go through the pain of reaching out to Mercuri via email or phone calls if they wanted to access their tickets’ status in Zendesk. They could not keep any sort of archives either.
  • Whenever a development issue, network issue, or change request comes in, it needs to be handed over to Global for resolution, but since Global already uses AzureDevOps, Infinity cannot keep track of the issue in their Jira/ ServiceNow while Global is working on it. Also, David needs to assign network/ connectivity-related issues to Marco through emails. Marco, after working on them manually, sends the status back to David, who then updates it in his Azure DevOps. 

Evidently, every team in the above scenario is working in siloes and several problems have started to crop up when they try to communicate with each other. This has severely impacted Infinity’s incident resolution times and the customers are disgruntled even more. To resolve this, there arose a need for a cross-company integration solution that would help Infinity collaborate seamlessly within and outside its borders.

As a result, ITIL 4  and SIAM methodology were deliberately put together which enabled us to come up with a well-thought-out cross-company integration guide. Here are the steps Infinity carried out that co-created business value with its customers at the end of this journey.

Step 1: Identify the Business Pain Points

As an IT professional, you represent highly qualified leadership roles. You are not only experts in analyzing business requirements, designing and implementing them, but also supplying IT solutions end-to-end. So, what do you do when your internal or external teams are confronted with challenges introduced by a multi-sourced environment? You acknowledge them, step up, and take the lead on pressing issues like SLAs being missed, lacking accurate information, etc. because you have experienced them firsthand. 

A cross-company integration process can be a strategic decision here. By involving senior management, it will be possible to take a step back from the day-to-day business or operational views and think about the future such integration can bring to the organization. 

Adopting such a solution involves critical decision-making. The presence of a good strategy driven by the strategy team provides a clear vision of the future, confirms the purpose and values for your customers, defines objectives, clarifies threats and opportunities, determines methods to leverage strengths, and mitigates weaknesses (at a minimum).

Following is a comprehensive list of pain points that you can appreciate:

Business pain points

Gathering the above pain points within your organization is easy, but how can you accomplish it with your common customers, suppliers, or vendors? 

This can be achieved through a face-to-face interview, customer feedback, project feedback, performance reporting, business-level feedback, input to new products, incident reviews, and complaints. 

Working on getting such feedback helps tackle tougher questions that can be asked henceforth. Continual improvement can be proposed, and even service or system integration proposals can be explored.

The primary purpose of this step is to create a “to-be” vision. This will help with uncovering the business pain points gathered here and prioritize improvement suggestions in the next step. 

The Scenario

The “To-Be” Vision:  A frictionless and flexible collaboration across internal teams and outside company borders.

Infinity Solutions envisioned an environment where the systems are integrated in such a way that whenever a customer complains, it can be resolved by escalating a ticket directly from Mercuri while keeping track of this complaint in both ServiceNow and Jira used by the IT Professionals, John, and Elaine. 

Additionally, it also envisioned an environment where development or a network/ connectivity issue is directly forwarded to Global to be handled by the team under David (and Marco, if needed) using AzureDevops, keeping Infinity’s Jira/ ServiceNow in the loop. 

The increased efficiency has a direct impact on resolution times and customer satisfaction. If this works, the approach can then be applied to all their suppliers.

Note: Plan and Engage from ITIL v4 – Discovery and Strategy in SIAM

Step 2: Uncover the Business Requirements

In this step, business requirements are uncovered and described. Ideally, every requirement is formulated in a way that the integration can be validated. Typical questions that can help uncover these requirements are:

  • What are the business cases to cover? 
  • What are the current types of information being exchanged? 
  • Should the data that is exchanged be visible to all the necessary stakeholders and should it be useful to them?
  • What is the critical data, its accuracy, and who should have access to it?
  • What are the current workflows, how long does it take to process a typical event, and what are the current potential bottlenecks?
  • To check if any of the problems identified are affecting SLAs in resolving tasks. 

The Scenario

For Infinity identifying the pain points will mean the following:

Currently, when a ticket is raised in Mercuri (using Zendesk), the customer service representatives manually send an email or place a phone call to Infinity. They could even go so far as to copy and paste the relevant ticket information into a template and send it across. 

The project manager at Infinity, Elaine, receives the ticket and gathers the relevant/ additional information about it before sending it for initial investigation. After this, the ticket is passed on to the Solutions Architect, John, for checking if the problem is architecture/ design-related or not. 

If it is, then it needs to be worked on under John and Elaine, who use ServiceNow and Jira. If the issue is development-related, it needs to be forwarded to Global (using Azure DevOps). All this is done manually or through a pre-decided medium. 

Global upon receiving the ticket, manually updates its status in Azure DevOps. If the issue is development-related, it is assigned to the appropriate team member or is passed on to Marco, the SysAdmin, if it’s a connection or a network issue.

All this time, John and Elaine (in Infinity), using Jira and ServiceNow, manually update the ticket status on their applications by gathering feedback from Global through phone calls or emails. Such manual data entry mistakes are creating friction between their teams. 

Meanwhile, Mercuri is in the dark about the current location and status of the ticket and is unaware of what needs to be communicated to their customers. Once the issue has been resolved and approved, it needs to follow the reverse process and reach Mercuri for the final resolution from the customer. This has brought down Infinity’s SLA and has impacted its business hugely. 

So based on the pain points gathered, we uncover business requirements by prioritizing them as follows:  

  • Infinity wants to have a holistic view of information (e.g. tickets, issues, change requests) and must be able to track it end to end. This information entails data exchanged intra-company (within Infinity) or cross-company (outside its borders).
  • It wants to ensure autonomy while collaborating with all its suppliers/ stakeholders or between different departments. It means that whenever it decides to integrate disparate systems to exchange information, it must be done in such a way that neither collaborating parties lose control of what information is sent out and how incoming information is processed. Keeping the systems loosely coupled is essential to ensure scalability and maintainability.
  • It also wants to ensure consistent information across all the different work management systems so that each company and department remains on the same page. Hence, it needs to be synchronized in real time, and automation (in terms of triggers) must be in place for it to be transferred. 
  • To enable all collaborating parties to securely exchange information, encryption methods and access control mechanisms need to be present to ensure that no user from Infinity can have access to critical/ insider data from Mercuri/ Global or within different departments.  

Here, there is an obvious need for exchanging and synchronizing information between all the different work management systems used by these companies so that information can be tracked and monitored throughout its lifecycle. 

Cross-functional team collaborations

Based on this analysis, key performance indicators and critical success factors can be defined: 

  • How to measure improvements?
  • How to track and perform trend analysis?
  • Monthly service reviews to see how different services are holding up.
  • Customer feedback to see if there are any deviations in the service levels. 
  • What is the current baseline, against which system improvements can be defined?

The above points play a significant role in deciding a continual improvement framework for the collaborating companies opting to integrate their applications.

After the content and specifications of the system are initialized, it is the ideal moment to define how the different businesses will cooperate. The integrated solution will need maintenance as businesses evolve. Having the right governance organization in place to monitor the efficacy of the provided solution (along with the defined KPIs) and deciding on the prioritization of improvements is an essential part of ensuring a proper return on investment. 

Once the scope for continual improvement is acknowledged and agreed upon, it’s time to involve the right people in the integration process.

Note: Continual improvement from ITIL 4 and Improve from SIAM

Step 3: Involve the Right People

Most integration projects fail before they even start because they do not involve the right people in their team. For instance, they might not consider a data mapping expert, which leads to inaccurate or wrong mappings affecting the data synchronization. So the aim is to have a cross-functional, cross-process, cross-department, and cross-provider integration team designed to co-create value in a multi-sourced environment. 

Specific roles and responsibilities across the entire framework are identified and assigned. They can include the following subject matter experts: 

Roles and responsibilities

The Scenario

For the above roles, consider the following possible scenario:

  1. IT Professionals working as service integrators. They work with Infinity/ Global as Solutions Architects, Project Managers, DevOps Engineers, Service Delivery Managers, and the like. 
  2.  The SMEs (subject matter experts) mentioned in the table must be divided across the 3 companies based on the availability of expertise or service delivery capabilities. 

The basic aim is to have people involved from all the 3 companies and departments together to reduce friction between them and improve decision-making capabilities. 

To help map these roles and responsibilities in an organized manner, RACI charts can be used.

RACI chart (also known as responsibility assignment matrix, or RACI matrix) is used to map the tasks and deliverables to the roles assigned to team members. The obvious benefits are better decision-making capabilities and a proper understanding of the roles and responsibilities of each member of the team. 

RACI stands for:

  • Responsible – Person(s) responsible for doing work
  • Accountable – Person accountable for signing off the work (max 1)
  • Consulted – A Person consulted before and during the task
  • Informed – Person informed of work progress/ completion.

You can plan this RACI model well in advance so that when it comes to completing a task, everyone already knows who is responsible. Following is a simple example of a RACI chart with clearly defined roles and responsibilities. 

RACI matrix

RACI helps in streamlining communication between all team members, avoiding work overloads and silos, and setting clear expectations.

In the RACI matrix for Infinity’s integration project, the solutions architect, John, is the accountable person if anything goes wrong in the design of the architecture. So the people involved in the integration process must acknowledge and be informed about this at the onset to avoid situations like “Who to report to?”, “Whom to go to?” etc. They know John will be the one handling problems related to designing. This will help set and identify clear escalation paths. 

Monthly steering meetings can take place between these companies to keep track of the integration effort and help identify continual improvement imperatives. Weekly/ daily stand-up meetings can also be arranged to effectively handle and manage day-to-day operations. 

So, the right blend of a team involving all stakeholders is necessary to move forward for designing and engineering customer and technical requirements. 

Note: Identifying and assigning roles and responsibilities in the SIAM environment

Step 4: Design and Engineer System Requirements

Once the right kind of team is set up, it can be responsible for coming up with the detailed design of the integration. 

In this step, technical requirements and constraints need to have full attention. If the requirements are not designed end-to-end, it can lead to incorrect data mappings, wrong configurations, and the like. In turn, it will lead to customer dissatisfaction, and the benefits of such an integration solution will remain unrealized. 

To help you with your conversation, here is a sample set of questions you can ask. They are divided into different categories:

Infrastructure

  • What network layout is applicable between the different systems?
  • What to do in case of upgrades?
  • What are the APIs provided by these toolsets?

Information-flow 

  • What is the data that will be exchanged?
    Specify a Data Dictionary outlining the mapped fields – with samples and clearly defined semantics. 
    For instance, “short-description” in ServiceNow is typically the “summary” in Jira.
  • How is the data mapped to each other?
    • For instance, priorities in one instance are ‘Highest’, ‘High’, ‘Normal’, ‘Low’ while in the other instance ‘Severity’ is being used instead.
  • What are the rules that affect the way that information can be exchanged?
    • For instance, in one system it is not possible to add new information to closed tickets. 
  • What are the workflows, and how should they be orchestrated?
  • What information is exchanged at what events?

Security

  • What is the retry mechanism for resolving errors?
  • Is there any way to recover from failures and resume synchronization from the point of interruption?

Deployment related

  • What configuration management system will be used to ensure system traceability?

The Scenario

For effective workflow automation for Infinity, the following steps can be proposed:

Sync
  1. Suppose Mercuri’s Zendesk has received a ticket from the end user. This will automatically create an issue under the appropriate project in Infinity’s Jira used by the Project Manager Elaine. 
  2. Elaine then gathers the necessary information (what, where, and how) of the ticket in case it’s not provided. She might also need additional input from the customer. All this back and forth can be accomplished by automatic bi-directional syncs between Jira and Zendesk in the form of comments/ attachments/ any other custom fields. 
  3. After Elaine finishes her task, it moves to John, the Solutions Architect for the root cause analysis of the ticket. 
  4. This means identifying whether it’s a design/architecture issue or a change/ feature request affecting the design of the system, in which case John (using ServiceNow) handles it in collaboration with Elaine (using Jira). This collaboration between ServiceNow and Jira is achieved by bi-directional syncs between them. Once the design is worked on and finalized, the issue is then automatically updated under the correct status and assigned to Global’s development team using Azure DevOps. 
  5. If the issue is a small bug or an incident, it needs to be handed over to the appropriate team member, or if it’s a connection/network issue, it needs to be handed over to Sys Admin Marco. It’s important to note here that all issue-related information is already synced and sent over to Global’s Azure DevOps. 
Sync

Here, the UI fields must already be mapped from one system to the other, i.e, any issue or incident filed in Zendesk would translate as a project in ServiceNow, a task in Jira, and a work item in Azure DevOps

6. Here the synchronization process starts through automatic triggers: feature requests/ tickets.

7. A consistent and correct entry about the current status of the issue is made in ServiceNow (Infinity), Jira (Infinity), and Azure DevOps (Global) throughout. Any additional information is passed either as comments or attachments to help all the teams resolve the issue at the earliest. 

8. The issue status is also updated on Mercuri’s Zendesk so that the support agent on its side can view its current status and inform the customer if required. 

Infinity, Global, along with Mercuri, are able to monitor and track it throughout. 

9. For the development of the feature request, once implemented and testing successfully established, it needs to migrate towards production. The appropriate status for this is also updated in the respective issue trackers. 

10. After it’s successfully deployed on production and the proper status has been updated, feedback about the particular issue is provided to the end-user, with a go-ahead that it stands resolved.

Sync

For such a seamless workflow, the governance organization (involving people from all the communicating parties) recommended in step 2 should be able to monitor the incident across its entire lifecycle. 

The whole conversation needs to lead to a firm specification of the to-be system in the following categories.

User Stories

Identify the user stories posed by the IT Professionals or stakeholders and have them around to clarify if necessary. They form an important part of the design process to accumulate ever-changing requirements. For example: As a support representative of a company, I want to have visibility on the status of the issue ticket. So I can proactively provide feedback to my customers.

Use Cases

After an initial level of specific user stories, move ahead to conceptually design them in the form of use cases. This will help you identify how the users react to your systems. Example: You can diagrammatically show how bi-directional synchronization between 2 systems takes place.

Data Management

  • Entity mapping, issue type mapping, automated or manual synchronization, bi-directional or uni-directional synchronization are considered here. 
  • All the possible and valid data values that your systems will pass to each other are identified.
  • The data structure between the 2 systems needs to be accounted for. Because if 1 system has fields longer than another, data can be truncated.
  • You must know what information needs to be exchanged.
  • Address questions like “Do you need a fully integrated synchronization scenario or integration only at specific points”?

Data Security

How will integrity, confidentiality, and accessibility of the data be ensured? For this:

  • A role-based access control mechanism can be implemented. Here, read/ write/ full control in terms of an Identity Access Matrix document based on particular roles can be maintained, which can be referred to by the entire team in case there is any unclarity. Additionally, integrating an Identity Verification Service ensures that only authenticated users can access and modify sensitive data, further enhancing security and compliance.
  • Secure file transfer between companies: The data to be transferred is encrypted (HTTPS) with properly defined certificates. Furthermore, an unencrypted transfer between two computers is possible if the remote connection between two locations is encrypted as a Virtual Private Network (VPN)

Managing Different Versions of Systems

Sometimes you might need additional hardware or software to integrate a source application with its target. Sometimes older versions of 2 applications have been integrated, but newer versions haven’t. These different permutations of versions must be known and handled beforehand to ensure the solution is up-to-date with its correct versions. 

Customizing the Core Setup

Often different departments, customers, or partner systems have their own applications running in their local environments. Each application on both sides of the communication ecosystem has its own features and functions (e.g., custom fields), making it difficult for the integration solutions provider to give a definite solution. So often integration solution providers come up with generic “out-of-the-box” templates that allow the customers and service providers to set up easy-to-use, interactive connections between them.

Workflow Design/ Automation/ Orchestration

This refers to the arrangement and coordination of automated tasks resulting in a consolidated process or workflow. All this is to ensure that your data moves and lands in the right direction/ system.

QA/ QC Process

A cross-company integration QC is different from traditional QC processes. System and integration testing play an important role in an integration scenario and hence exhaustive test cases must be designed around them. The integrator must have knowledge about different service provider systems and customer systems under different scenarios. For instance: A proper test record of whether the data generated from the user end is synchronized correctly at the providers’ end must be prepared. This saves a lot of time and effort for everyone.

Rollback/ Deployment Plan

Deploying in live environments can happen as needed. Deployment between environments of testing to staging/ pre-acceptance for roll-backs needs to be designed. 

End-to-End Service Levels

Managing end-to-end service levels is necessary to deliver value. The presence of an SLA is to align the customer’s expectations with the service providers. As a service integrator, ensure that these end-to-end service levels are met. 

Examples of expected service levels can be: 

  • How reliable is the solution?
  • How fast is the performance of the solution?
  • What are the backup mechanisms in case of downtime/ failure?
  • Are the systems always connected and running?

Many times, these service levels end up being incidents and can cause errors in the system. Effectively handling these incidents with a “fix-first, argue-later” approach is very important in a multi-sourced environment.

A typical end-to-end service agreement in the above-stated examples can be:

  •  If data is lost in transition, then it needs to roll back to its previous state, thus ensuring reliability.   
  • Effective back-ups need to be present for every critical transaction. Downtimes are to be planned in advance and minimal system disruption is to be ensured. System failures need to be handled with faster resolution times without causing a major disturbance for the customers.
  • Systems can maintain agreed-upon downtime if they are always connected to ensure predictable service disruptions. 

Knowledge Base

For effective operations and support, there is a need to create a knowledge base outlining specific scenarios that can become potential risks/ raise query requests. It can serve to become an “operation hand-book” enlisting the steps to be followed for their workarounds and solutions proposed. This can definitely help in managing service requests in an organized and speedy manner, ensuring customer satisfaction.

Training

For the purpose of the upcoming integration setup, training requirements, and materials, they are to be identified. They must exist for all the business process levels – the customers (your organization in the SIAM ecosystem), the service providers, and the service integrators.

Now that you have the right people for your project, thoroughly designed and engineered requirements, specifications, and other technical considerations, you’re ready to help your customers pick the best solution. 

Note: Design and transition in ITIL 4. Entails change management, release management, project management, architecture management, knowledge management, information security management.

Plan and Build in SIAM Roadmap

Step 5: Know the Right Solution for Your Customer

While deciding whether to buy a COTS (Commercial-off-the-shelf) or build an in-house solution to address the integration needs of your organization, the essential output is to deliver value to them through service providers. This is pivotal to ensuring the setup is fit for purpose (utility) and fit for use (warranty). 

Before a company can accurately assess the advantages or disadvantages of a make or buy decision, they must clearly spell out the requirements for integration. We have successfully helped build a case from steps 1 to 5 outlining and designing these requirements for our integration setup. 

Now, let’s explore why developing an in-house integration solution might not always work in your favor.

Handling customization requirements: An integration solution often demands additional customization requests as business processes are fairly dynamic. Each request will get the solution to work a little better every time. If you have an in-house development team, customizations often need to be handled by them. Additionally, these teams work on many projects at the same time, and customization of data integration can end up being one of them. This will unnecessarily burden the in-house team and will slow down the entire integration process. 

Maintaining the integration solution: It’s already an established fact that the majority of software projects incur higher costs during maintenance. These costs run even higher for cross-company integrations. When underlying systems are upgraded, or completely replaced, the integration solution needs to adapt to this too. Moreover, documentation maintained on the original application must be rewritten and updated. Knowledge transfer needs to happen. And all this will be burning a hole in an already overworked pocket. Here, costs of maintenance can be significantly reduced by using the right commercial integration solution. This will allow the customers to use expertise in integrating applications seamlessly without the stress of maintenance costs rising rapidly. 

Ever-changing configurations: Businesses generally require a lot of changes to be accommodated. These constant changes have a pretty dramatic effect on any cross-company integration. For integration applications developed in-house, this adds additional overheads since they need to be applied to either side of the integration. Changes can include new workflows, permissions, data mapping, and the like. Unless a solid change management process is in place, these changes can cause significant delays if developed in-house. 

Every organization must consider its own drivers to achieve the necessary clarity for the anticipated business benefits. But with a cross-company integration solution, you can expect these critical benefits:

  • Unique synchronization feature retaining full control of your environment without intervention from the other side. This creates an IT security benefit for both customers and the organization. Keep control over what information needs to be retained by the customers and what needs to be passed between systems. This can make the information exchange more secure and can lower the risk of a data breach. It can allow the systems to be loosely coupled and independent of each other. 
  • The ease of use of the toolset leaves the users with more time to work on things that matter to them. 
  • An improvement in the visibility of the data throughout its lifecycle results in effective decision-making.
  • A robust synchronization tool can make it easier to troubleshoot known system errors and save a lot of time. 
  • A unified platform contributes to a more collaborative cultural shift in an integration ecosystem.
  • An integrated retry mechanism can help recover from failures and resume synchronization from the point of interruption.
  • For cross-functional teams, integration between toolsets saves time and resources and reduces the possibility of errors. It supports workflow automation and reduces the need to re-enter and translate data. There is less chance of information errors leading to friction between teams. 

Step 6: Implement Iteratively

How do you prototype and implement the cross-company integration solution? 

“Seeing is believing” holds true in this step. This is where you simulate the cross-company integration solution. Maybe even get a free trial, configure it and see how it works. To perform this activity, you can consider the most important use cases (identified from the pain points) relevant to your integration scenario. 

The Scenario

For Infinity, it can be to help them synchronize bi-directionally between Jira, ServiceNow, and Azure DevOps for issues of “High Priority”. Their team could then configure a version of the intended product and see how efficiently information gets exchanged and synchronized automatically between these work management systems. 

This exercise helps with establishing trust and customer confidence. It demonstrates the technical feasibility of the product too. Once confirmed, you can move towards building the solution iteratively managed by the implementation team. 

You can perform the actual installation of the newly-developed or acquired system. You can do this one work management system at a time, one service provider at a time, one practice at a time, or one process at a time (essentially following Agile practices). This approach helps to transition using small, effective, easily managed tasks/ iterations. It can significantly reduce the risks associated with the “big bang” approach. The idea is to ensure the delivery of existing services with minimal disruption. 

Another part of this step is verification and validation, both of which will help ensure the program’s successful completion.

Note: Obtain/ Build in ITIL 4. Entails Project Management.

Implement in SIAM Roadmap

Step 7: Deploy to Production

For smooth deployment of a project to production, there must be a clear and comprehensive release and deployment plan. It is important to ensure that any problems with new services like the built release, changes for new features, are installed and tested before deploying the package into production. This will reduce the possibility of facing problems in production.

Efficient roll-back mechanisms are to be considered as well. 

The Scenario

There is a synchronization request for change processing triggered from Mercuri (Zendesk) to Infinity (Jira), and the connectivity is lost during this transaction. Here, once the connectivity is up, all changes must be queued and applied automatically in the same order as the original event. Such an integrated retry mechanism will ensure that Mercuri and Infinity didn’t even notice the outage and were rest assured that things were handled effectively by the integration solution.

Training requirements are met here. Additionally, training efforts must also satisfy the training requirements of implementation engineers. After all, they are the key drivers to maintaining and operating the cross-company integration as improvements are constantly made.

Note: Release and Deployment Management in ITIL 4

Step 8: Operation and Support

How do you organize operations and support in a cross-company setting? 

The eighth and final phase involves maintenance and periodical updates. This step is when the system is fine-tuned based on end-user feedback to boost performance, add new capabilities or meet additional user requirements.

Any incident here is analyzed through its “root cause” by the maintenance and support team. The operation handbook proposed in step 4 can help identify if the solution to this incident is available or not. The solution, if available, is applied immediately and the incident is closed. This makes the resolution quicker, positively impacting the SLA and leaving you with happy customers.

However, if the incident is not present in the handbook, it needs to be categorized as either a: 

  • Bug/ Issue: e.g., A wrong report with inaccurate data or an end-user not being able to open a PDF report.
  • A service request, e.g., End-user not knowing how to view a particular PDF.
  • Change request, e.g.: Demanding a new feature such as a change in the UI/UX. Such a change needs a business head’s approval. The time required to resolve it is greater than a bug or a service request (as their SLAs are different). Once the change has been implemented, it needs to undergo change regression testing to see how it impacts other parts of the existing system. 

Here, there can be a category to map the relative importance of the incident based on its type. This can be stated under priority. It is based on the impact and urgency, and can be used to identify the required time for actions to be taken.

Incident priorities

The Scenario

For example, the SLA between Infinity and Mercuri may state that the priority 2 incidents must be resolved within 12 hours. So if such an incident occurs, then the average time for resolving the incident must be brought down to lower than 12 hours. 

The ultimate goal here: There needs to be a positive improvement in the SLA closure time. For instance, if the average time for resolving a priority 1 incident in the SLA is 2 hours, then you must be able to bring it down to 1.5 hours. 

Hence, the essence of this practice is to be able to identify, at the earliest, whether a particular incident is a bug, a service request, or a change and to assign the correct priority to it. Then hand it over to the responsible person/ department after routing it through the service integrator. And all this is taken care of in a shorter time. 

The confusion over incidents coming under the purview of the integration solution provider or being related to the information exchange mapping between companies needs to be acknowledged beforehand. If not, it creates “no ownership” of issues between the participating companies, leaving a huge impact on the customers. 

These practices are crucial for an effective operation and value co-creation activities for cross-company integration.

Note: Deliver and Support in ITIL 4. Entails incident management, change management, and service request management.

Run and Improve in SIAM Roadmap

Conclusion

Evidently, this guide offers you an approach to a powerful cross-company integration tool that co-creates value in multi-supplier ecosystems. It incorporates ITIL 4 and SIAM methodologies together. It also serves to illustrate clearly defined steps validated by industry leaders and practiced by IT Professionals. However, it is definitely not cast in stone as we realize that every organization is different, and every situation is novel. So there is no single “Do-It-Yourself” that applies to each and every situation. You need to formulate your own unique strategy taking into consideration the benefits accrued.

Special thanks to Claire Agutter from ITSM Zone, Alexander Schmidt from Value Insights, Aggelos Paraskevopoulos from Cententia, and Nirupama Dhaygude from IKS Health, who helped us validate each and every step in this guide.

Salesforce Zendesk Integration: The 2025 Guide (Step-by-Step)

Salesforce Zendesk integration

Sales and customer support teams can benefit a lot from a Salesforce Zendesk integration, as key customer data and tickets can be accessible to both sides for real-time updates. 

Such integration will allow data to flow seamlessly between teams so they can work in harmony to deliver a coherent customer experience. 

This guide highlights why you need a Salesforce to Zendesk integration and how it can benefit your teams. Then, we’ll show you how to choose the right technology for this integration and outline a step-by-step approach to implementing it.

Note: In this guide, we are using a software integration tool called Exalate. We will learn more about it as we go ahead. 

Get the Salesforce Zendesk Integration Guide

Learn how to achieve seamless integration between Zendesk and Salesforce, step-by-step.

What is Salesforce Zendesk Integration?

Salesforce to Zendesk integration is the process of using a third-party solution to connect both platforms so they can share data between them in the appropriate formats.

Zendesk is a popular customer support platform that many mid-sized and large companies use to improve customer relationships. Salesforce is a cloud-based CRM platform that provides a single and shared view of the customer for different departments in the organization. 

To get both systems to connect and share data, you need dedicated Salesforce to Zendesk solutions built in-house or made by a third-party provider.

What Are the Benefits of Salesforce Zendesk Integration?

Here are the benefits of Salesforce to Zendesk integrations:

  • When teams are working in different environments, it often leads to silos. But Salesforce and Zendesk integration breaks these silos and enables the sharing of information without any side having to leave their familiar platforms.  
  • Zendesk and Salesforce integration reduces the need for teams to manually copy-paste information from tickets, customer queries, and feedback between different platforms and then follow the updates through emails or phone calls. 
  • Teams can benefit from automatic, real-time information exchange. This will reduce errors and lead to a smooth information flow between them, leaving them free to work on improving the overall customer experience. 
  • Companies using Zendesk Salesforce integration can improve user experience by gaining access to essential data points and interactions at every stage of the customer’s journey.
  • Integrating data with a third-party solution improves collaboration between teams and organizations by ensuring that all parties have access to relevant information when needed.

A Salesforce Zendesk integration can help achieve all this. But before we see how to implement this integration, we need to learn how we can choose the right tool.

How to Choose the Right Salesforce Zendesk Integration

To ensure your integration delivers its purpose, consider a few points when choosing your integration solution. 

Decentralized Integration

A Zendesk Salesforce integration tool should allow you to work in your trusted environment without having to worry about the other side. You should be able to control what you send to the other side and how you want to deal with data coming from there.

exalate autonomy

In this case, a decentralized integration where each side has the autonomy to decide what information is part of the transfer will ensure you don’t send critical or insider information across by mistake.

Flexibility 

As your expectations from the integration mature, so must the tool. The data you initially wanted to share with your partner might change now or you might want to share something additional or filter some data out using advanced logic. 

The Salesforce and Zendesk integration tool must be able to support all these changing requirements with minimal time and effort. This might be in the form of an AI assistant generating scripts for non-technical users—or optimizing existing scripts to suit specific use cases.

Reliability 

Computer systems are vulnerable to breakdowns. Your synchronization may stop when this happens. The tool for Zendesk integration to Salesforce must then be able to resume without any manual intervention the next time your system is up and running.

exalate reliability

All the changes that need to be rolled out and the paused synchronizations that are pending must be applied in the same order as expected. 

Security

Security measures like encrypted file transfers and secure protocols for exchanging information are also important aspects to consider when choosing a Salesforce integration for Zendesk. 

Consider solutions that are ISO 27001 certified as well as compliant with data privacy and industry regulations.

I chose Exalate as the preferred tool because it fulfills the above requirements. 

Exalate supports decentralized integration through outgoing and incoming sync rules that control what information moves from each side. It comes with a scripting engine that allows you to implement complex and unique integration scenarios with minimal configuration. In case of downtimes or failures, the system will apply changes or updates automatically in the same order as their initiation. 

Note: You can learn more about Exalate’s security features in this whitepaper 

How to Set up a Salesforce Zendesk Integration: the Step-By-Step Approach

To set up the Salesforce and Zendesk integration, you must first install Exalate on both platforms and then establish a connection between them.

If you prefer a video tutorial, then go ahead and watch this short video instead:

Now I will walk you through all these steps one by one. 

Step 1 – Install Exalate on Salesforce

You can start installing Exalate on Salesforce via its integrations page.

Note: Exalate accesses Salesforce through APIs and has its own guidelines for API Access add-ons. For instance, API access is provided by default in Enterprise accounts, while it is not the case with other accounts like Professional. Learn more about the different Salesforce editions Exalate supports on this documentation page.

You can also install the app via the AppExchange marketplace.

You need to choose the installation destination for Salesforce: either “Install in This Org” or a Sandbox org. My preference was to install it in this org.

Install Exalate on Salesforce org

After selecting, fill in the required details, scroll down to the bottom of the screen, and agree to the terms and conditions. Once done, press “Confirm and Install”.

Confirm and install Exalate in Salesforce

Now, you need to specify the users for whom you want to install Salesforce. Remember, you have the flexibility to change this later on. In my case, I opted to “Install for All Users” and proceeded by clicking “Install”.

Install Exalate for users in Salesforce

Next, “Approve Third-party Access” and click “Continue” to move forward. Your installation process will now be complete. Simply click on “Done” to finalize the setup.

Exalate installation on Salesforce

Now, navigate to your Salesforce instance and create a connected app. Make sure to save the “Consumer Secret” and “Consumer Key” generated during this process. Once you have them, go back to your Salesforce instance, click “Apps,” and search for “Exalate”.

Exalate app in Salesforce

To request an Exalate node, provide the previously saved “Consumer Secret” and “Consumer Key”, and then click “Request Node”.

Request Exalate node for Salesforce

To grant access permissions to Exalate, click “Allow”.

Now, “Add new trusted URL” by going to “Setup” and searching “Trusted URLs”.

Fill it in with the following information:

  • API name: free input string
  • URL: *.exalate.cloud

Check all the checkboxes in the “CSP Directives” section. Click “Save”.

After this, you’ll be prompted to enter your details. Click “Agree and Submit”, then await an email from the Exalate License Manager.

Register Exalate node for Salesforce

Once you receive the email, click “Verify Exalate instance” to be redirected to the Exalate admin console.

In case you receive a prompt to log in to your Exalate console for Salesforce, follow these steps.

Now you need to install Exalate on Zendesk. 

Step 2 – Install Exalate on Zendesk 

You can install Exalate for Zendesk either from the integrations page or via the Zendesk marketplace.

Or log in to your Zendesk account and click on the cog icon on the left-hand menu. Under “Apps” select “Marketplace”. 

zendesk marketplace

Find Exalate by entering it in the search box. You will see an “Install” button next to the app. 

You will see a prompt to select an account. This is applicable in case you have multiple accounts. Select the account you want to install the app with. It can be an account from an existing user, or you can create a completely new one for Exalate. 

Click “Install” afterward. 

select account on zendesk

Now, you can change the title of the app, enable restrictions, or choose to go with the defaults. In either case, click “Install” when done. 

Select the Exalate icon from the left menu. Then click “Allow” to allow Exalate to access your Zendesk Account.

Allow Zendesk access

Fill in the pop-up that appears so that Exalate can verify your instance. Click “Agree and Submit,” and you will receive a verification email. 

In the email, click “Verify Exalate instance” and you will be redirected to the Zendesk portal. 

Step 3 – Establish a Connection Between Salesforce and Zendesk 

Now that we have installed Exalate on both Salesforce and Zendesk, we can establish a Salesforce Zendesk integration. To do so, one side initiates the connection, and the other side accepts it. Once the connection is ready, both sides can now share information according to the conditions specified. 

You can start initiating the connection from either Salesforce or Zendesk. For this guide, I’ll start with Zendesk. 

On the Exalate console in Zendesk, click the green “Initiate Connection” button. In case you are not on this screen, you can navigate to “Connections” in the left-hand menu. This tab lists all the connections you have set up. If it’s your first time, the list is empty. 

Connections screen in Exalate

On the next screen, enter the destination instance URL. Since I am initiating from the Zendesk side, the destination URL will be the Salesforce instance. 

Exalate will now perform a quick check to see if an instance exists on the destination side. If yes, then you get additional selection options. 

Configuration modes in Exalate

These include selecting the mode of connection. 

Exalate comes in Basic and Script modes. 

The Basic mode is suitable for simple synchronization use cases. It includes some predefined mappings and sync rules that you cannot modify. Also, this mode is available through a Free Plan (you can start here) that allows up to 1000 free syncs per month. So it’s useful to experience the way Exalate works firsthand with this plan. You can choose to upgrade to the Script mode anytime you want. 

The Script mode comes with advanced configuration features and sync rules that you can modify to suit complex or custom use cases. We recommend you use the Script mode since it is customizable for unique integration needs. You also get to work with the AI Assist feature to help you generate scripts faster.

We will cover both these modes one by one since they have different flows. 

Using the Basic Mode

After you select Basic mode, click “Next”. 

You will have to verify if you have admin access on the destination side, Zendesk in our case. Since I have access, I click “Yes, I have admin access”. In case you don’t, follow these steps

In either case, click “Initiate”.

exalate basic mode

After verification, you will be redirected to the Zendesk side. 

Here you need to enter the ticket key. This means the key specified will be immediately synchronized on the Salesforce instance. With this, you can start synchronizing Zendesk tickets or Salesforce entities right away.

You can also create triggers for synchronization such that when the condition is met, tickets or entities are automatically synchronized with the other side. If there are already several tickets or entities you want to synchronize, you can perform a “Bulk Connect” on them. If you want to sync individual tickets, you can use the Connect operation instead. 

Note: The connect operation is currently available only on Zendesk.

After entering the ticket key, click “Exalate”.

successful Salesforce Zendesk basic connection

The same screen on the Salesforce side looks like this. 

Synchronization of Case in Salesforce

You can enter the Case key and proceed to synchronize it on the Zendesk side. 

Here, you can fetch the Case key from the URL of the Case, as shown in the image below.

salesforce case URL

For the synchronization to happen, you need to wait for a few minutes. Upon successful synchronization, you will see the corresponding status. 

You can follow the new Case created on the Salesforce side by clicking on the remote link generated or even refer to the ticket on the Zendesk side by clicking on its link. 

successful sync in basic mode

Using the Script Mode

If you decide to go with the Script mode, select it and click “Next”.

Configuration modes in Exalate

Enter the connection details and give names to the local and the remote instances. The local instance in our case is Salesforce since we are initiating the connection from it and the remote one will be Zendesk. 

You can edit the name of the connection right away. Don’t forget to enter a relevant description. This is useful when you have a lot of connections. 

 Take your time and click “Initiate” once you are ready. 

Salesforce Zendesk sync connection details

Now Exalate will generate an invitation code. This is a unique code that you need to copy on the destination side to complete the connection. Click on “Copy invitation code” and save it somewhere. Then click “Done”.

copy exalate invitation code

Once you do that, you can still close the window, and your connection will appear in the “Connections” list with a status called “Pending”. This status will become “Active” once you finish setting up the connection on the Zendesk side. 

Go to the “Connections” screen on the Zendesk side. If you are not on this screen, you can still reach it on the left-side menu of Exalate. Over there, click “Accept Invitation”. 

This will open up a multi-line text box for you. Paste the invitation code you saved earlier here. Once done, click “Next”.

accept exalate invitation code

Now the connection is set. To configure the connection and control what information should go to the other side, click on the “Configure Sync” button shown below.

successful zendesk salesforce sync

Step 4 – Configure the connection to control what information is shared

As mentioned earlier, you can continue configuring the connection by clicking the “Configure Sync” button. 

But in case you don’t want to do it immediately, you can come back and configure it later. For this, go to the “Connections” tab on the left side menu, and you will see your latest connection with the status shown as “Active”. 

I am showing this on the Zendesk side, but you can also do the same thing on the Salesforce instance. Exalate has a uniform UI, so it won’t be a problem. 

Connections screen in Exalate

Right in front of the connection name, you can see an edit connection icon. Click that to begin your configuration. With the help of the three dots, you can either activate or deactivate your connection or even delete it if you don’t require it anymore. 

The edit connection screen consists of 4 tabs: “Rules”, “Triggers”, “Statistics” and “Info”.

We will see the rules tab in this step and the triggers tab next. 

The Statistics tab gives an overview of the sync statistics like the number of issues, comments, and attachments under synchronization.  It also mentions the number of the last issues synced and the date and time of it. 

The Info tab gives general information about the connection like its name, type, description, and destination URL. 

Let’s now see how the “Rules” tab works. 

Sync rules in Exalate

Exalate has two kinds of sync rules: incoming and outgoing, written in the Groovy Scripting language. They are simple to understand and follow. These rules exist on both sides of the connection.

The outgoing rules decide what information is sent from a particular platform to the other side. 

Incoming rules, on the other hand, decide how the information coming from the other side is interpreted. 

Having such rules on both sides of the connection provides autonomy so that each side can control the information it sends and receives independently. 

These rules can be edited as well. If there is certain information you do not wish to share with the other side, you can either delete that line from the respective sync rules or temporarily delete it with the help of comments. 

Comments given before the start of the line will allow that line to be ignored at the time of synchronization. For commenting a single line use “//”. For commenting a block of lines, put “/*” at the start of the block and “*/” wherever you want the comment to end. 

Suppose you don’t want to sync the description of a Case from Salesforce; you can simply add a comment as shown below. And you are all set! 

If, instead of deleting, you wish to add certain new information to be shared, you can add scripts to the rules. 

For this, let us consider the “Rules” tab on the Zendesk side. It looks like this.

Zendesk sync rules

Connections in Script Mode Using AI Assist

The Script Mode allows you to generate and optimize scripts using the AI Assist feature — which appears as a tab under both the incoming and outgoing sync rules.

How does it work?

Enter your sync requirements into the chat box, and AI Assist will generate scripts based on your input, existing configurations, and Exalate’s scripting API.

It is also important to note that AI is not perfect. So, you need precise and detailed prompts to ensure the best results. 

Let’s say you want to sync statuses between Zendesk and Salesforce; the prompt could look something like this: 

“I want to sync the status of my Zendesk ticket with the status of a Salesforce case.”

AI assist in Script mode

After a moment, the script will be generated, with suggested changes highlighted in green and red. The green scripts are suggested additions, while the red scripts are suggested deletions. 

If the new snippet works for you, click on “Insert Changes”. Otherwise, you can discard the suggested code. If needed, you can refine your prompt and, once satisfied, publish the changes.

Step 5 – Create triggers for the automatic flow of information 

If you are already done editing the sync rules, click on the “Triggers” tab to set conditions for automatic synchronization. Whenever the condition is met, synchronization takes place. 

To create triggers click on the “Triggers” tab that shows the list of triggers that are created. If this is your first time, then click the green “Create Trigger” button. 

Salesforce Zendesk Integration triggers

Note: Triggers can also be created by clicking “Triggers” on the left-hand menu of the Exalate console. The only difference in this approach is that while creating a trigger you need to select the connection to which the trigger is applied. All the other fields are the same. 

Once you click the button, an “Add trigger” screen will pop up. Here, you mention the entity type to which the trigger is applied.

Triggers in Zendesk

The “If” field here expects you to enter the condition under which the ticket is to be synchronized. This section is for entering the platform-specific search queries.

In the example shown above, according to the Zendesk search syntax, tickets that have an open status will be synchronized. 

The above trigger screen on the Salesforce side will look like this. 

Note: There are many Salesforce entities you can sync using Exalate, but the most common ones are Case, Opportunity, Product, Task, and Account. 

create triggers

There is an additional option of selecting specific conditions to filter Salesforce entities for synchronization. For instance, if we select “Opportunity” then we can enter the name, description, quantity, etc of the Opportunity and create a trigger condition.

Or we can simply toggle the “Use search query” button to enter a query using the Salesforce Object Query Language.

You can even add notes to describe what a particular trigger is used for. 

There is a checkbox that either enables or disables the trigger. This is useful when you don’t want to create the trigger all over again, so instead, you simply disable it. Remember to make it active if you want the trigger to work.

Click “Add” after making the changes. 

Once the trigger has been added, it can be viewed on the “Triggers” tab. There is an option to edit or delete the trigger from here. You also choose to “Bulk Exalate” existing tickets or Salesforce entities from here. Once done, click the “Publish” button and let the synchronization work on its own. 

exalate triggers tab

Step 6 – Start synchronization between Salesforce and Zendesk

After you’ve created your Salesforce Zendesk integration, synchronization automatically starts depending on the triggers and sync rules you have set. 

The newly created or updated tickets will be synced with the Salesforce entities or vice versa, according to the conditions you provide. You can even control the direction of the information flow and make it either uni or bi-directional. You can also sync the existing tickets or entities with the help of “Bulk Connect”. 

Zendesk Salesforce Integration Use Cases

Here are simple and advanced use cases for Zendesk integration with Salesforce:

Case 1: Replicate Zendesk Tickets in Salesforce

The support team can fetch customer data and replicate Zendesk tickets as Salesforce objects in real time in order to exchange data such as attachments, customer IDs, organization info, and other custom data. 

Case 2: Share Status Updates Between Salesforce and Zendesk

The sales team gets status updates of tickets related to key customers, where a ticket raised in Zendesk automatically reflects in Salesforce. 

Each time there is a status update on that particular ticket—say the ticket is closed or moved to in progress—it gets updated on Salesforce in real time.

Obtain notifications about customer updates. For example, when the sales rep updates the SLA status, the Zendesk admin can see that the level of customer support has changed.

Case 3: Prioritize Issues Based on Priority 

Salesforce to Zendesk integration allows for segmenting customers, prioritizing support efforts based on their deal size in Salesforce, and avoiding losing high-value customers. 

Your admin can map the priority of the outgoing Salesforce case to make sure the corresponding Zendesk ticket conveys the same level of priority on both sides.

Customer support agents using Zendesk can review cases in Salesforce and gather information from them, such as customer queries and feedback, to resolve tickets faster.

Case 4: Consolidate Related Tickets in Zendesk

Sync all the support tickets to the organization level so they would be an overview of all the tickets in a particular organization. This could involve sending all related tickets based on the assignee or label.

Customer success representatives can benefit from having a complete overview of Salesforce objects. 

What Are the Best Practices For a Zendesk Salesforce Integration?

To ensure Zendesk and Salesforce are correctly configured and integrated, follow these best practices:

  • Define objectives and responsibilities: Work with all sides of the Zendesk to Salesforce integration to determine what needs to be integrated as well as which team members have access to data and system configuration settings.
  • Look for custom integrations: No-code integration tools are easier to set up. But they have limited applicability. Script-based integrations provide more opportunities for users to customize systems to suit their specific use case.
  • Work with automation: Whether through the use of AI to generate custom scripts or the use of action triggers, you need a Zendesk Salesforce integration that can automate syncs.
  • Improve security: To make sure the data going between Salesforce and Zendesk stays protected in transit and at rest, you need to double up on security with firewalls, tokens, and encryption protocols. 
  • Train your team: Conduct regular seminars and training sessions for your team to refresh their knowledge of best practices for security and proper data management.
  • Monitor performance: Carry out regular assessments to determine if the integration solution is meeting the initial objectives and requirements. Track performance metrics such as uptime, ticket resolution speed, etc.
Discovery call with Exalate

Conclusion

In this Zendesk Salesforce integration guide, we saw that Information, if shared automatically and in real-time, can help deliver a consistent customer experience. 

For this, we chose Exalate, which provides the most flexible Salesforce Zendesk integration and supports key features like decentralized architecture and reliability. 

We also went over the steps to setting up a Salesforce integration with Zendesk and saw a few common use cases supported by such an integration afterward. 

If you are looking for a Zendesk Salesforce integration, book a demo with us.

Frequently Asked Questions

Why integrate Zendesk with Salesforce?

By integrating Salesforce and Zendesk, sales and support teams can collaborate effectively by gaining access to customer information and support activities. The integration allows you to view, edit, and create Zendesk tickets within Salesforce. The integration also enables the synchronization of customer information from Salesforce to Zendesk Support.

How do I link Zendesk to Salesforce?

There are two ways you can connect Zendesk and Salesforce. 

You can set up a centralized integration UI to set and manage the integration in the Zendesk Admin Center. The integration relies on Zendesk’s infrastructure using Salesforce open APIs. 

The other way is to use an easy code or no-code-based integration platform like Exalate

What data can I sync between Zendesk and Salesforce? 

You can pull any Salesforce data, including custom objects, and sync it with Zendesk customer support teams. For instance, the sales team can check if their Accounts have opened any tickets in Zendesk. You can also sync Zendesk tickets with Salesforce to create customized workflows and reports using data from both applications. 

How do I import Zendesk tickets into Salesforce? 

You can import Zendesk tickets into Salesforce using publicly available APIs. Native integrations or third-party plug-ins make this easier. You can view, create, or update Zendesk tickets on the Salesforce Account, Opportunity, Contact, and Lead pages. 

Can I automatically sync Zendesk tickets with Salesforce cases?

Yes, you can automatically sync Zendesk tickets with Salesforce using third-party automation or integration tools such as SnapLogic, Workato, or Exalate. With Exalate, you can also add granular controls in the form of triggers.

Can I sync Zendesk and Salesforce for free? 

Yes, you can natively integrate Zendesk and Salesforce. However, the integration use cases offered are limited in functionality and scope. Some plug-ins offer advanced, custom-made integrations between Zendesk and Salesforce at a reasonable price.

Recommended Reading: