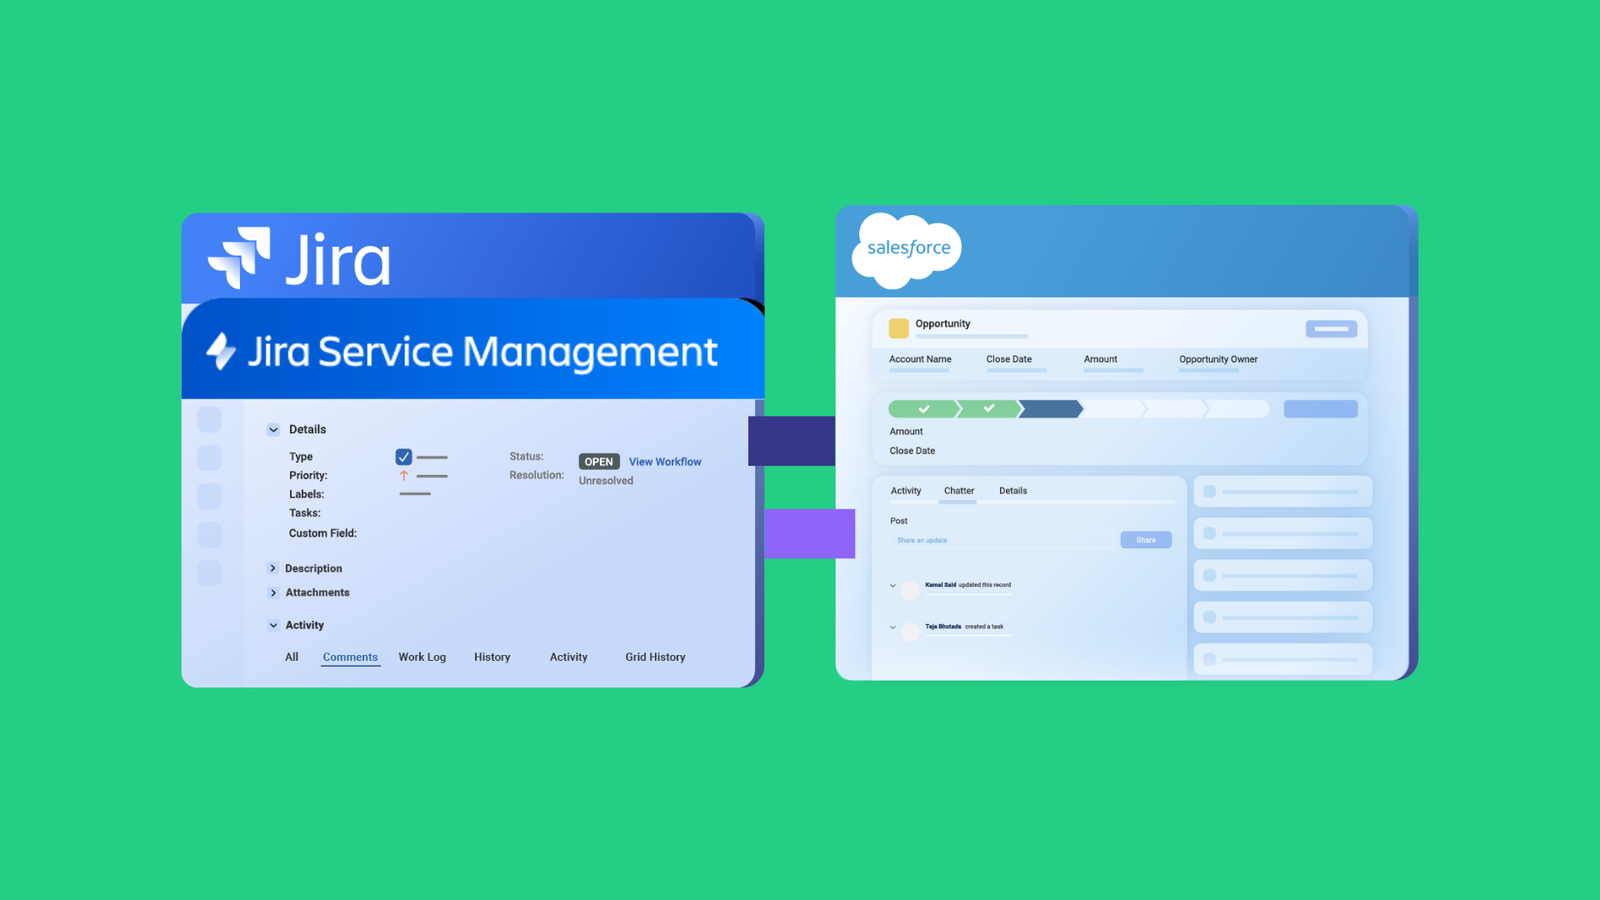
Sales and development teams benefit from automatically exchanging information through a Salesforce GitHub integration because it gives them access to consistent and up-to-date business data.
In this guide, we will examine how teams and organizations can benefit from GitHub Salesforce integration and consider factors to consider when choosing integration technology.
We’ll then study a step-by-step approach to implementing this integration and examine the most common use cases of Salesforce GitHub integration.
Note: For this guide, we are using an integration tool called Exalate. We will learn more about it as we proceed.
Get the GitHub Salesforce Integration Guide
Learn how to integrate GitHub and Salesforce, step-by-step.
Why Set up a Salesforce GitHub Integration in the First Place
Enhanced customer support and better query resolution are significant factors in keeping existing customers happy and maintaining low churn.
To achieve this common goal, teams in an organization strive hard to search for the information they need in different applications or ask other team members for it.
But this way of doing things is manual.
In the workplace, teams no longer need to ask for information via email, get in endless meetings, or spend time copy-pasting information by toggling between different applications.
This results in manual data entry mistakes, redundant, misplaced, or altered information, and, above all, a great deal of wasted productive time.
Automated information exchange with the help of a cross-company integration tool can help teams maintain a single, consistent view of business-critical information without having to leave their current platform of choice.
If your teams use Salesforce and GitHub, an automatic, real-time data exchange through a Salesforce GitHub integration can help them deliver a better customer experience and allow them to collaborate harmoniously.
Use Cases for GitHub Salesforce Integration
Let’s discuss some practical business applications for Salesforce to GitHub integration:
- Customer support and development collaboration: When a customer reports an issue via a Salesforce case, the key contents, such as description and assignee, should appear in the issue over on GitHub. Custom fields can also be integrated bi-directionally to accommodate more information.
- Share update bidirectionally: You can sync statuses between GitHub issues and Salesforce cases in order to provide the sales team with real-time progress updates about fixes coming from the development team’s repository. When a GitHub Issue is marked as “In Progress” or “Resolved,” automatically update the corresponding Salesforce case.
- Prioritize high-value cases and feature requests: Based on the SLA timelines and assigned priority, the incoming Salesforce case will head to the corresponding GitHub issue without the need for the admin to manually sort them according to urgency or priority. Triggers can also be used to map the automatic escalation of these entities from both sides.
- Speed up customer support: Automating the creation of GitHub issues from Salesforce cases and vice versa will help you avoid the duplication of bug reports. This also impacts resolution times and speeds up triage timelines.
- Improve analytics: Besides being able to track resolution speed and other analytical data, integrating GitHub and Salesforce makes it possible to access a unified dashboard for tracking data. This will help your organization to make better decisions in real time.
Other use cases are applicable if you have a customizable GitHub and Salesforce integration tool that you can configure to your liking.

Learn how an innovative Fintech startup uses Exalate to fine-tune collaboration between teams.
Choosing the Right Technology for a Salesforce GitHub Integration
Implementing a Salesforce GitHub integration requires researching different tools and technologies and choosing the right one based on your business needs.
Here are a few drivers to get you started.
Decentralized Integration
A tool having a decentralized integration must be your top choice because it will allow you the autonomy to work in your environment without consulting the other side. This lets you control what information you send and how you want to receive it.
So, each side of the Salesforce GitHub integration has independent control over the information exchange rules.
Security
Data is of paramount importance for any business. So when you want to exchange it, you must be careful to put the correct security measures in place.
The tool should also support encrypted file transfers, access control mechanisms, and secure transfer protocols like HTTPS.
Additionally, it’s a bonus to look for tools that are ISO 27001:2022 certified. Pay attention to industry data regulations. This will save you from a lot of compliance and security headaches.
Flexibility
Integrations mature and change with time, and so do your requirements for sending and receiving information. Sometimes, you want to share something extra, or you want to stop sharing some data.
You need to acknowledge beforehand how the GitHub Salesforce integration tool adapts to these changing requirements. The tool you choose must be able to accommodate unique and advanced business integration use cases with minimal configurations.
One other feature that extends flexibility to even non-technical users is AI-powered scripting. This feature will help admins generate scripts for specific synchronization use cases in seconds. They can now choose to optimize the output or use them without any changes.
Reliability
Computer systems are prone to downtimes and failures. In such situations, your Salesforce and GitHub integration tool must be able to withstand the downtime and apply the changes queued for synchronization in the same manner as they had originated.
All this should happen automatically so the integration parties don’t feel that there was anything wrong in the first place.
Number of Integrations Supported
We are discussing a Salesforce GitHub integration here, but it’s just one single possibility amongst many others. You might have partners, suppliers, customers, or MSPs who use different applications like Jira, Azure DevOps, ServiceNow, Zendesk, and the like. Adopting a tool that already supports these integrations is an added advantage.
For this article, I have chosen Exalate because it has a built-in decentralized integration architecture, ensured by sync rules on both sides. Plus, it uses security measures like encrypted file exchange and role-based access controls. Check this security whitepaper for further details.
Exalate also comes with a Groovy-based scripting mode and a low-code UI mode, which is suitable for both business and technical users. These features help you easily adapt it to your specific integration needs.
It has a transactional synchronization engine that queues all the applicable changes automatically and breaks them down into atomic steps to be retried in case of a failure, even when a system is being upgraded to a new version and/or a firewall is being reconfigured.
And last but not least, it supports integrations for a variety of applications like Jira (cloud and on-premise), ServiceNow, Azure DevOps, Zendesk, and others.
So let’s get to implementing a Salesforce GitHub integration.
How to Set up a Salesforce GitHub Integration: the Step-by-Step Process
To start setting up a Salesforce GitHub integration, you must first install Exalate on both GitHub and Salesforce. This ensures you have autonomy since the Exalate app on both sides allows you to configure each side separately and helps you control what to send and deliver.
After that, you can set up a connection, configure it, add automatic synchronization triggers, and experience 2-way sync to handle your synchronization needs effectively.
If you prefer to watch videos, you can always refer to our tutorial.
So let’s get started!
Step 1: Install Exalate on GitHub
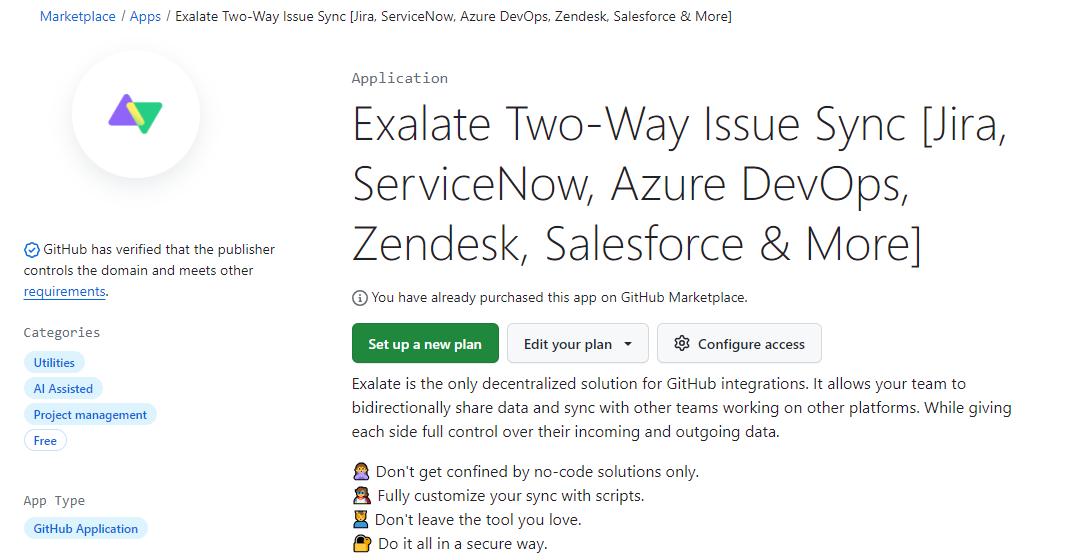
You can start installing Exalate on GitHub via its marketplace or the integrations page.
Note: Exalate is also available for GitHub Enterprise. For installing Exalate on GitHub Enterprise Cloud, check this article.
You can use Exalate on GitHub with the 30-day free trial.
If you’re trying Exalate out through the marketplace, click on the “Set up a plan” button. Then click the “Install it for free” box.
Then you will receive a prompt to permit Exalate to access your GitHub repositories. You can choose to give access to all of them or select specific ones only.
It is important to note here, that Exalate does not access the GitHub code, but only has access to metadata, issues, and pull requests.
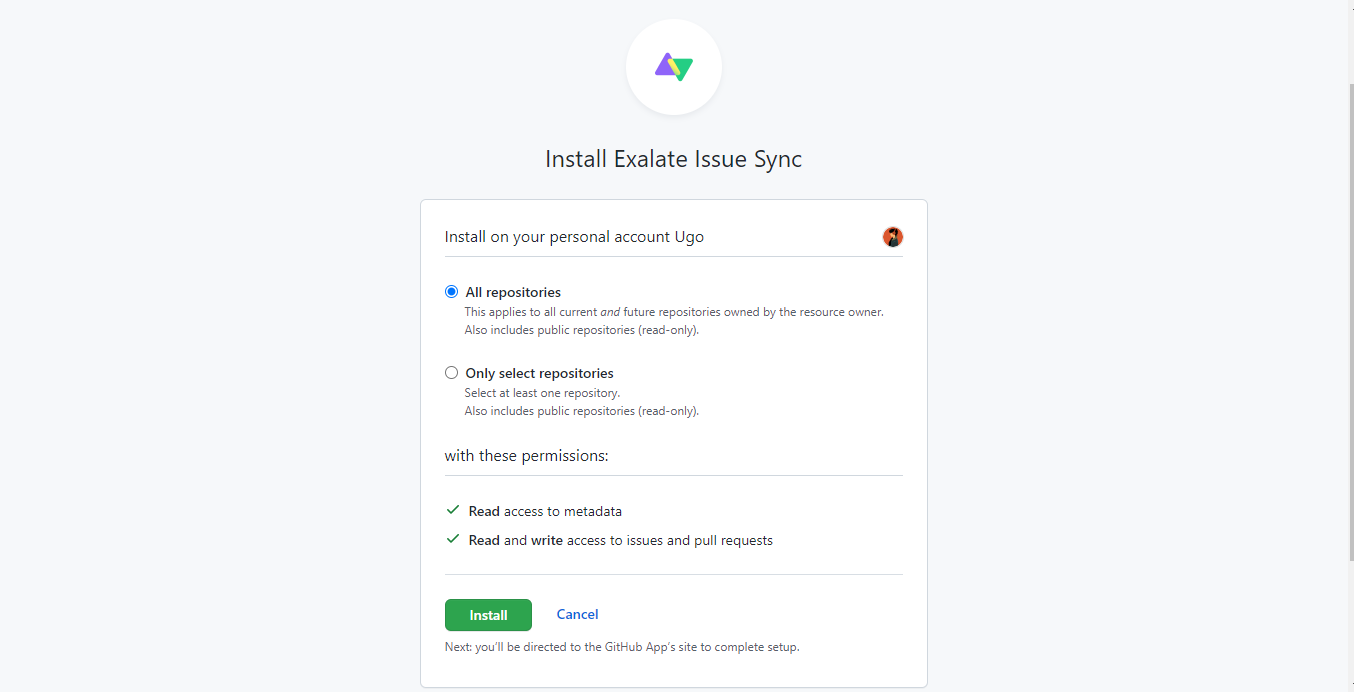
Select the permissions you want to give and click “Install”.
This installer will then redirect you to the Exalate site to accept the user agreement to continue.
Next, you need to select how Exalate accesses your GitHub account, either by an OAuth token or by entering your GitHub account username and password. In case you want to regenerate your OAuth token, follow these steps.
You will then need to request an evaluation license for using Exalate on GitHub. The steps for this are pretty straightforward.
Note: You will not be able to synchronize your issues without requesting the evaluation license.
Step 2: Install Exalate on Salesforce
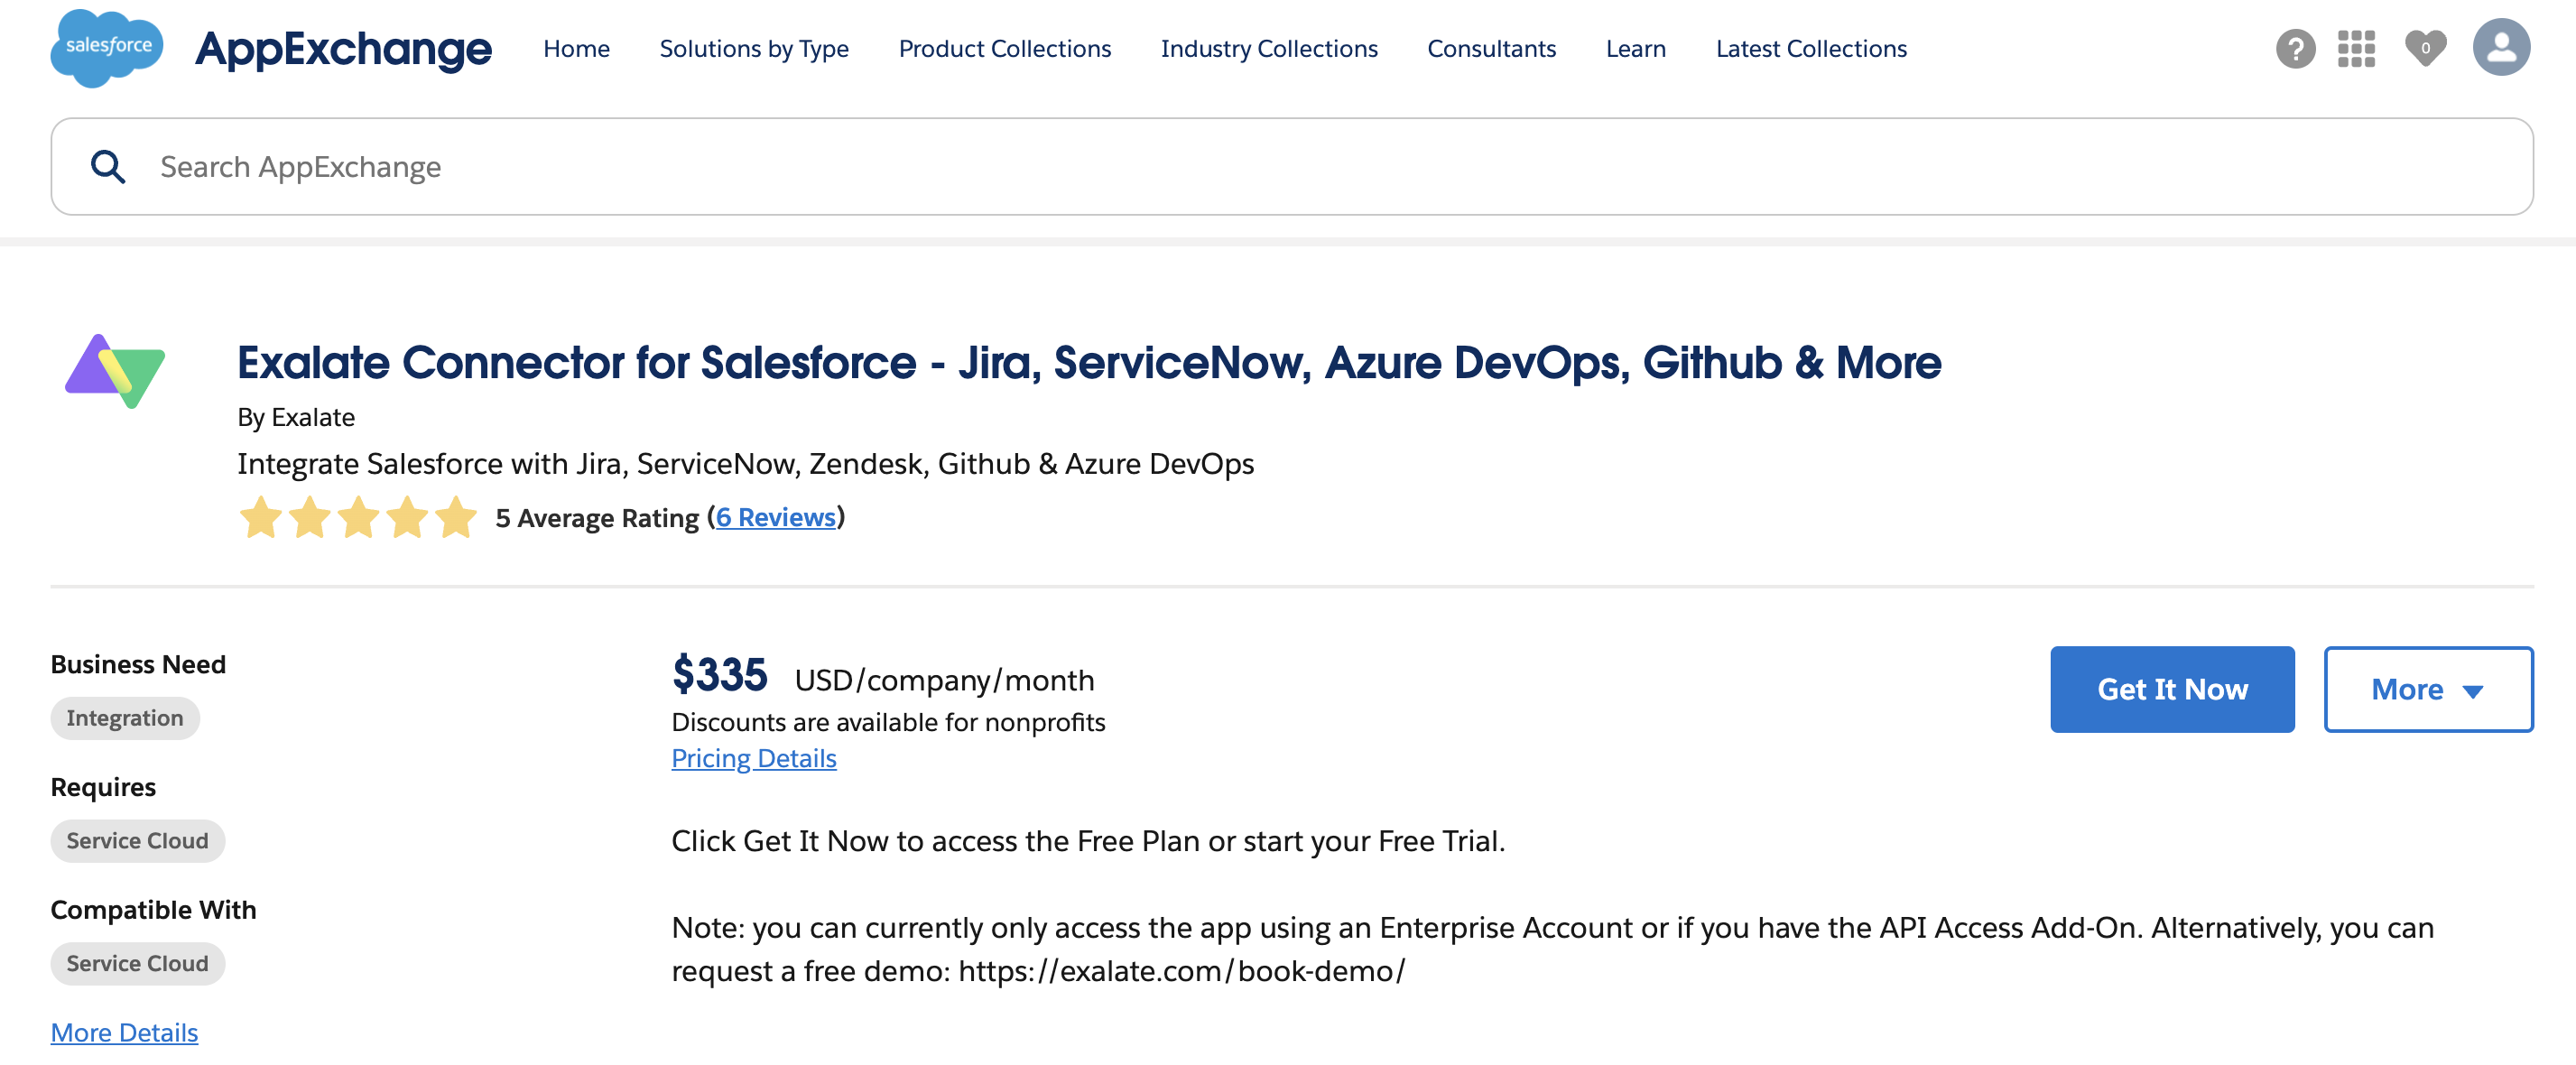
Start installing Exalate for your Salesforce instance via the integrations page.
Note: Exalate accesses Salesforce through APIs. Salesforce has its own guidelines for API Access add-ons. For instance, API access is provided by default in Enterprise accounts, but it’s not the case with other accounts like Professional. Visit this documentation page to learn about the different Salesforce editions Exalate supports.
You can also install the app through the Salesforce AppExchange. Once you find it, click the “Get it Now” button.
You will then need to choose where to install Salesforce: either “Install in This Org” or in a Sandbox org. I opted for the former.
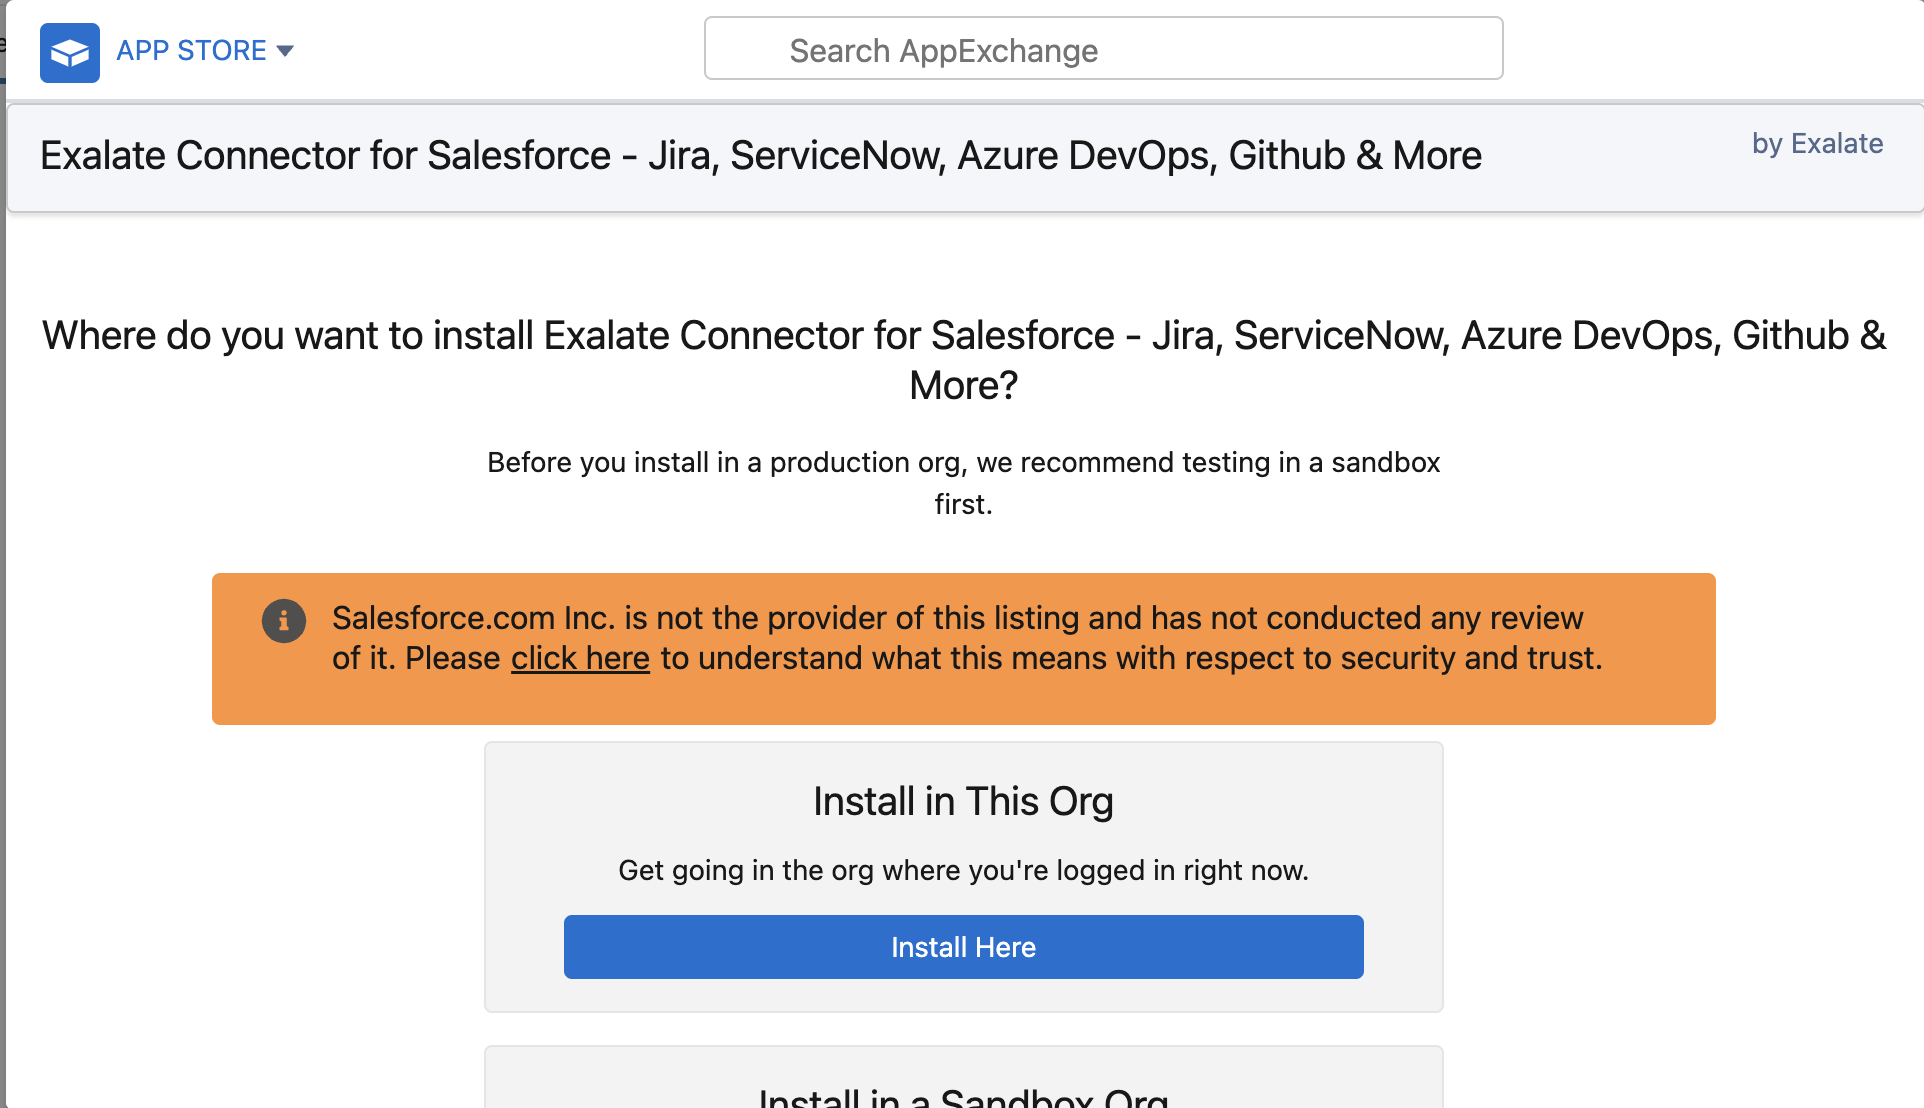
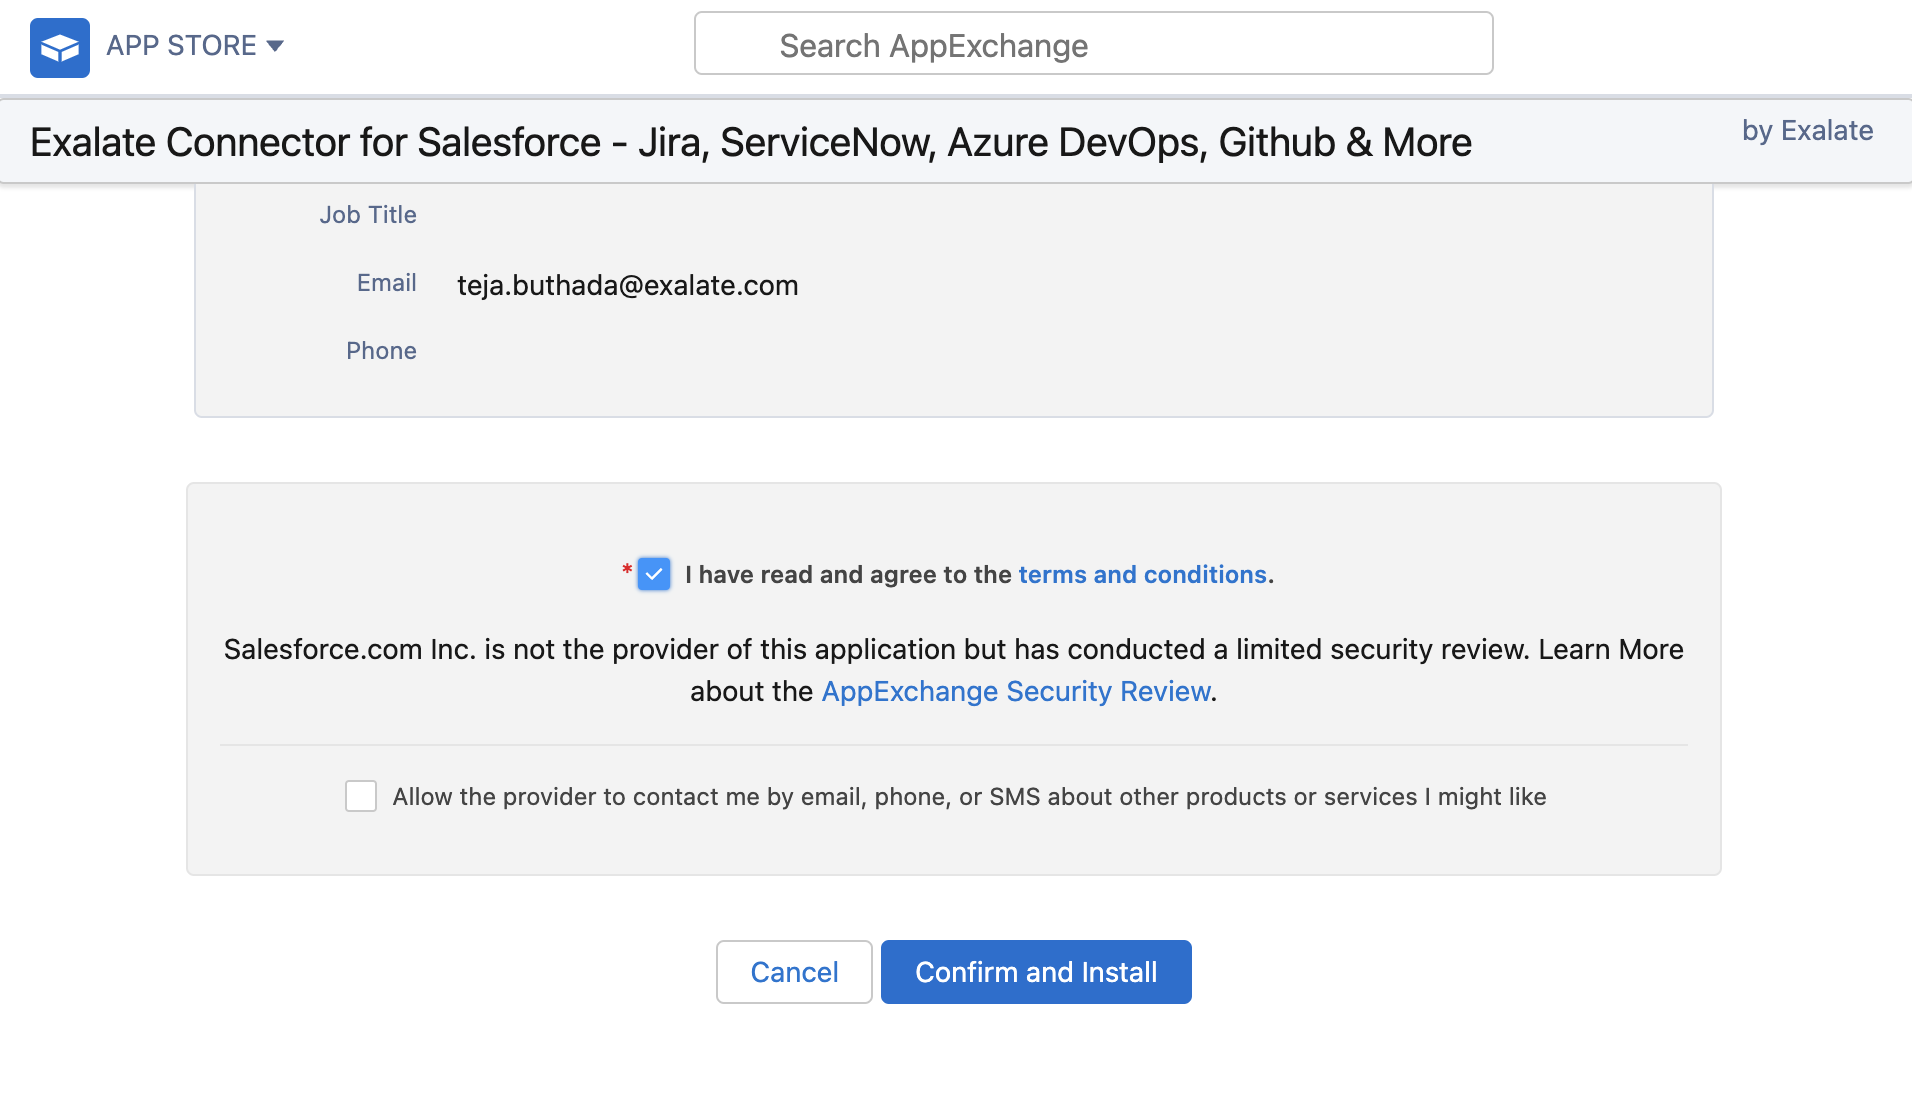
Scroll down to the bottom of the screen and agree to the terms and conditions, then press “Confirm and Install”.
Next, select the users for whom you want to install Salesforce; you can always modify this later. In my case, I chose “Install for All Users” and clicked “Install”.
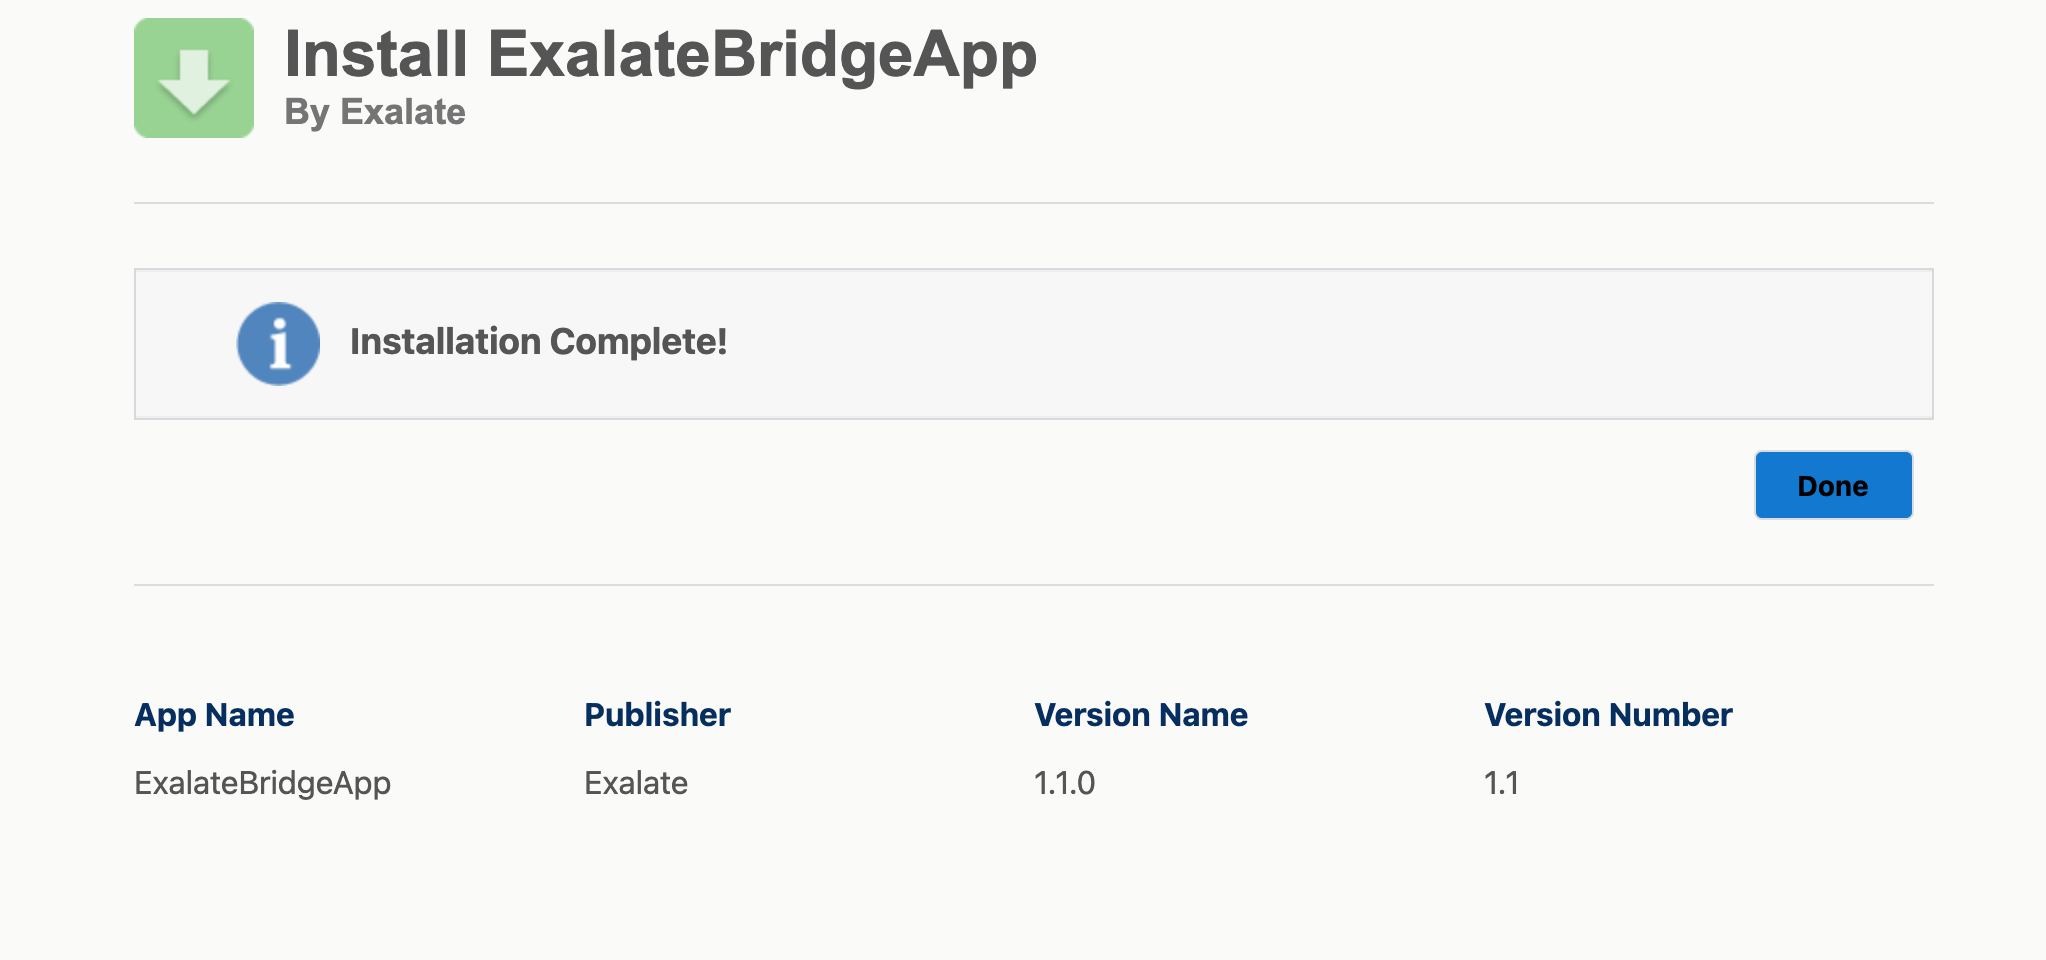
After that, “Approve Third-party Access” and click “Continue”. The installation process will be completed. To finish, click on “Done”.

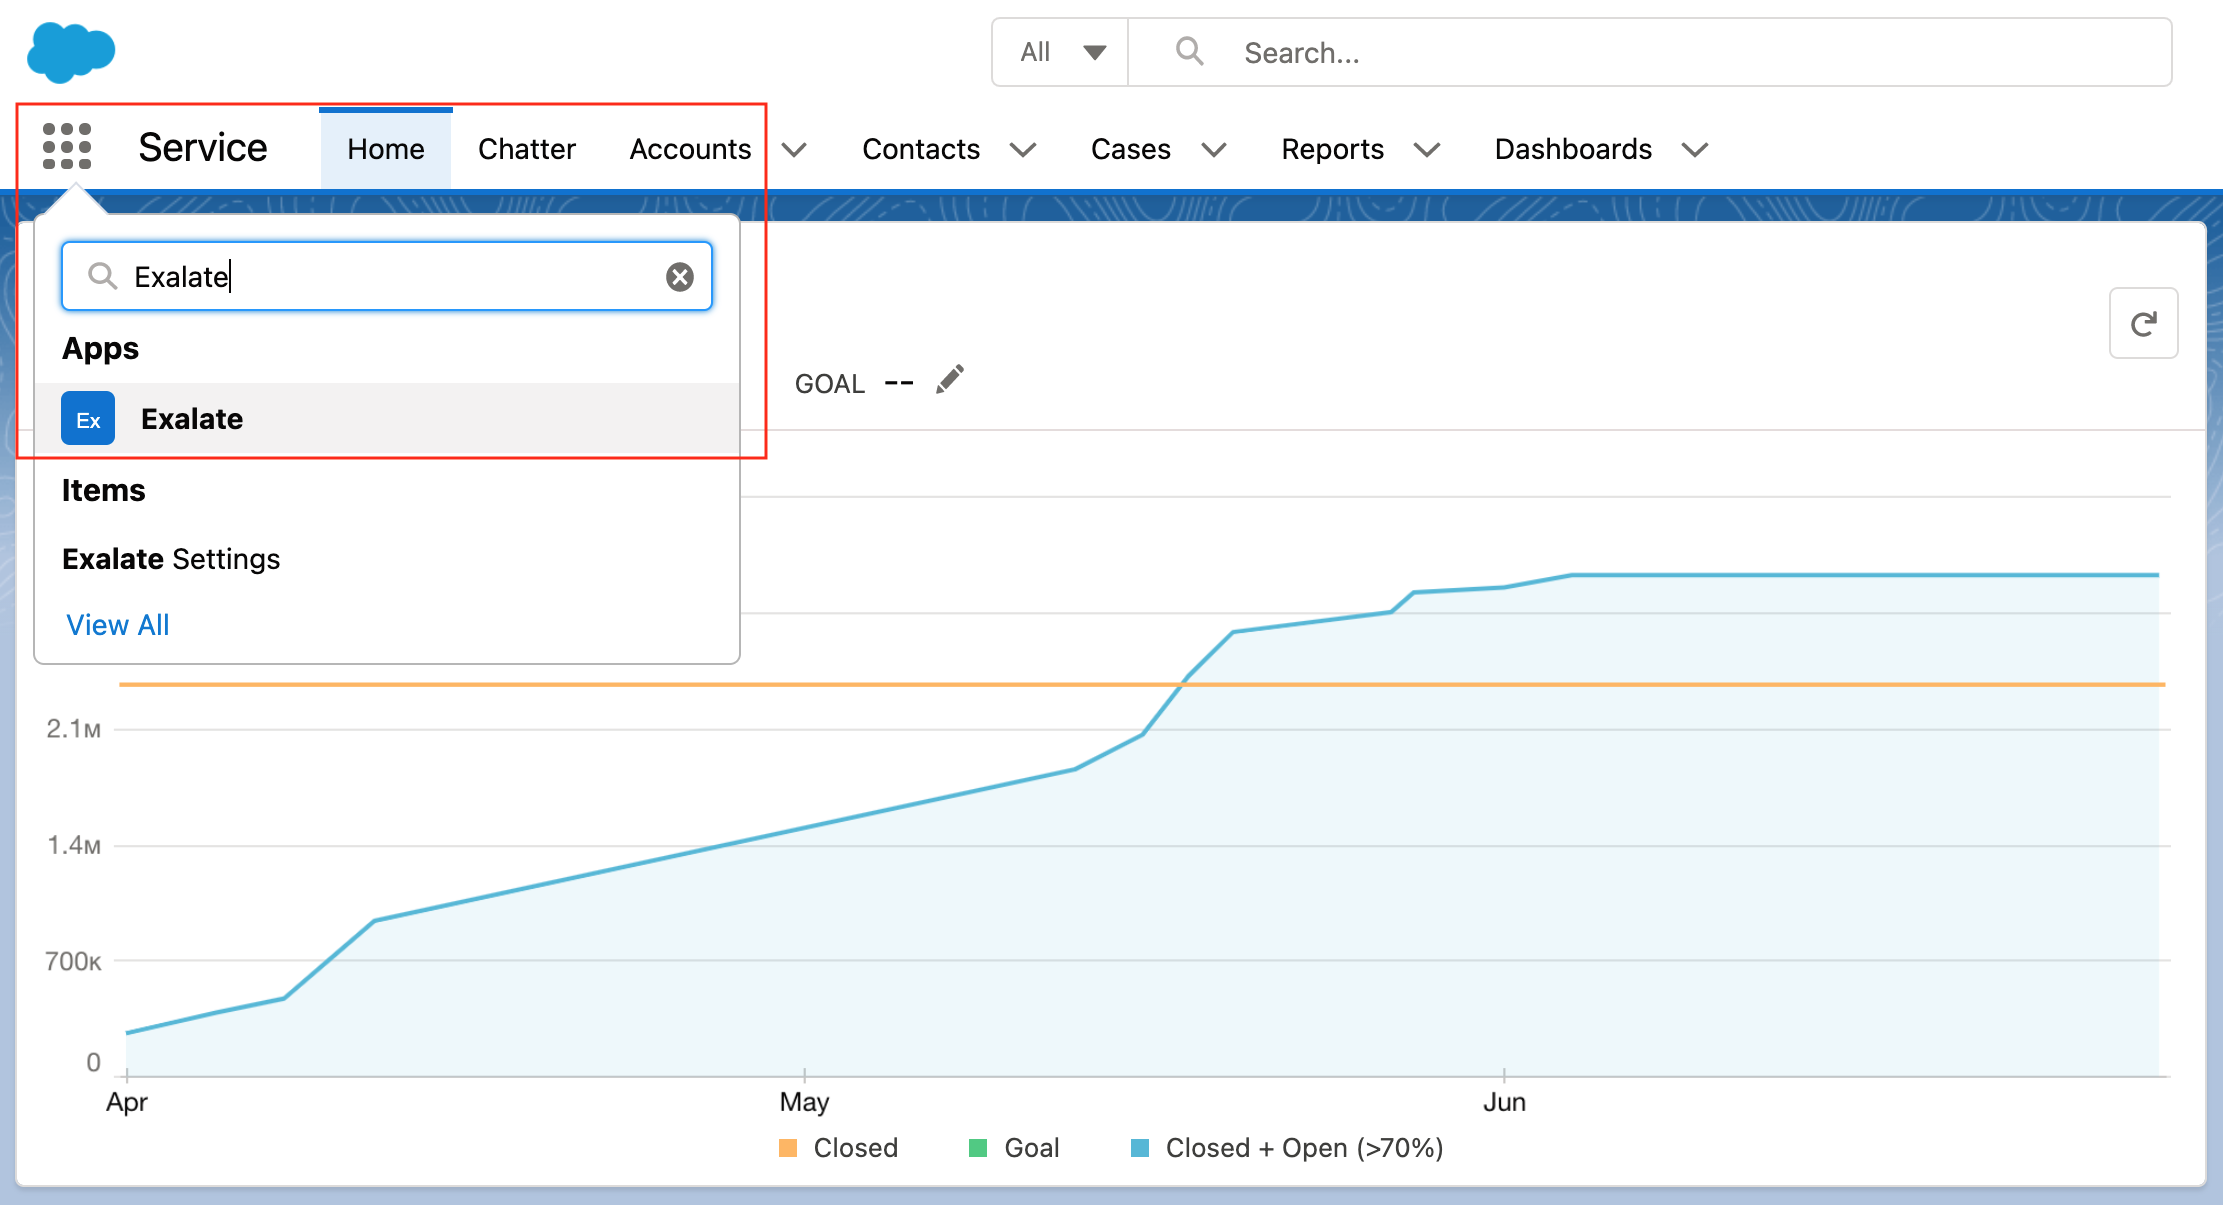
Now, navigate to your Salesforce instance and create a connected app. Make sure to save the “Consumer Secret” and “Consumer Key” provided. Then, within your Salesforce instance, locate “Apps” and search for “Exalate”.
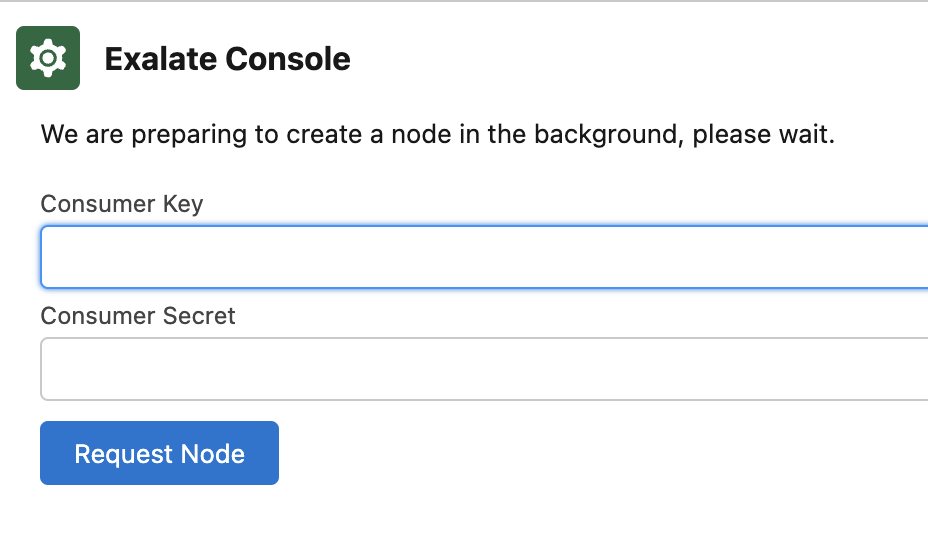
For requesting an Exalate node, enter the previously saved “Consumer Secret” and “Consumer Key” and click “Request Node”. You will receive a prompt to click “Allow” to grant access permissions to Exalate.
Go to the “Setup” page in Salesforce. Search for “Trusted URLs” and click “Add new trusted URLs”.
Fill in the following information section:
- API name: free input string
- URL: *.exalate.cloud
Check all the boxes in the “CSP Directives” section. Click “Save”.
Proceed by providing your personal details and click “Agree and Submit” to await an email from the Exalate License Manager.
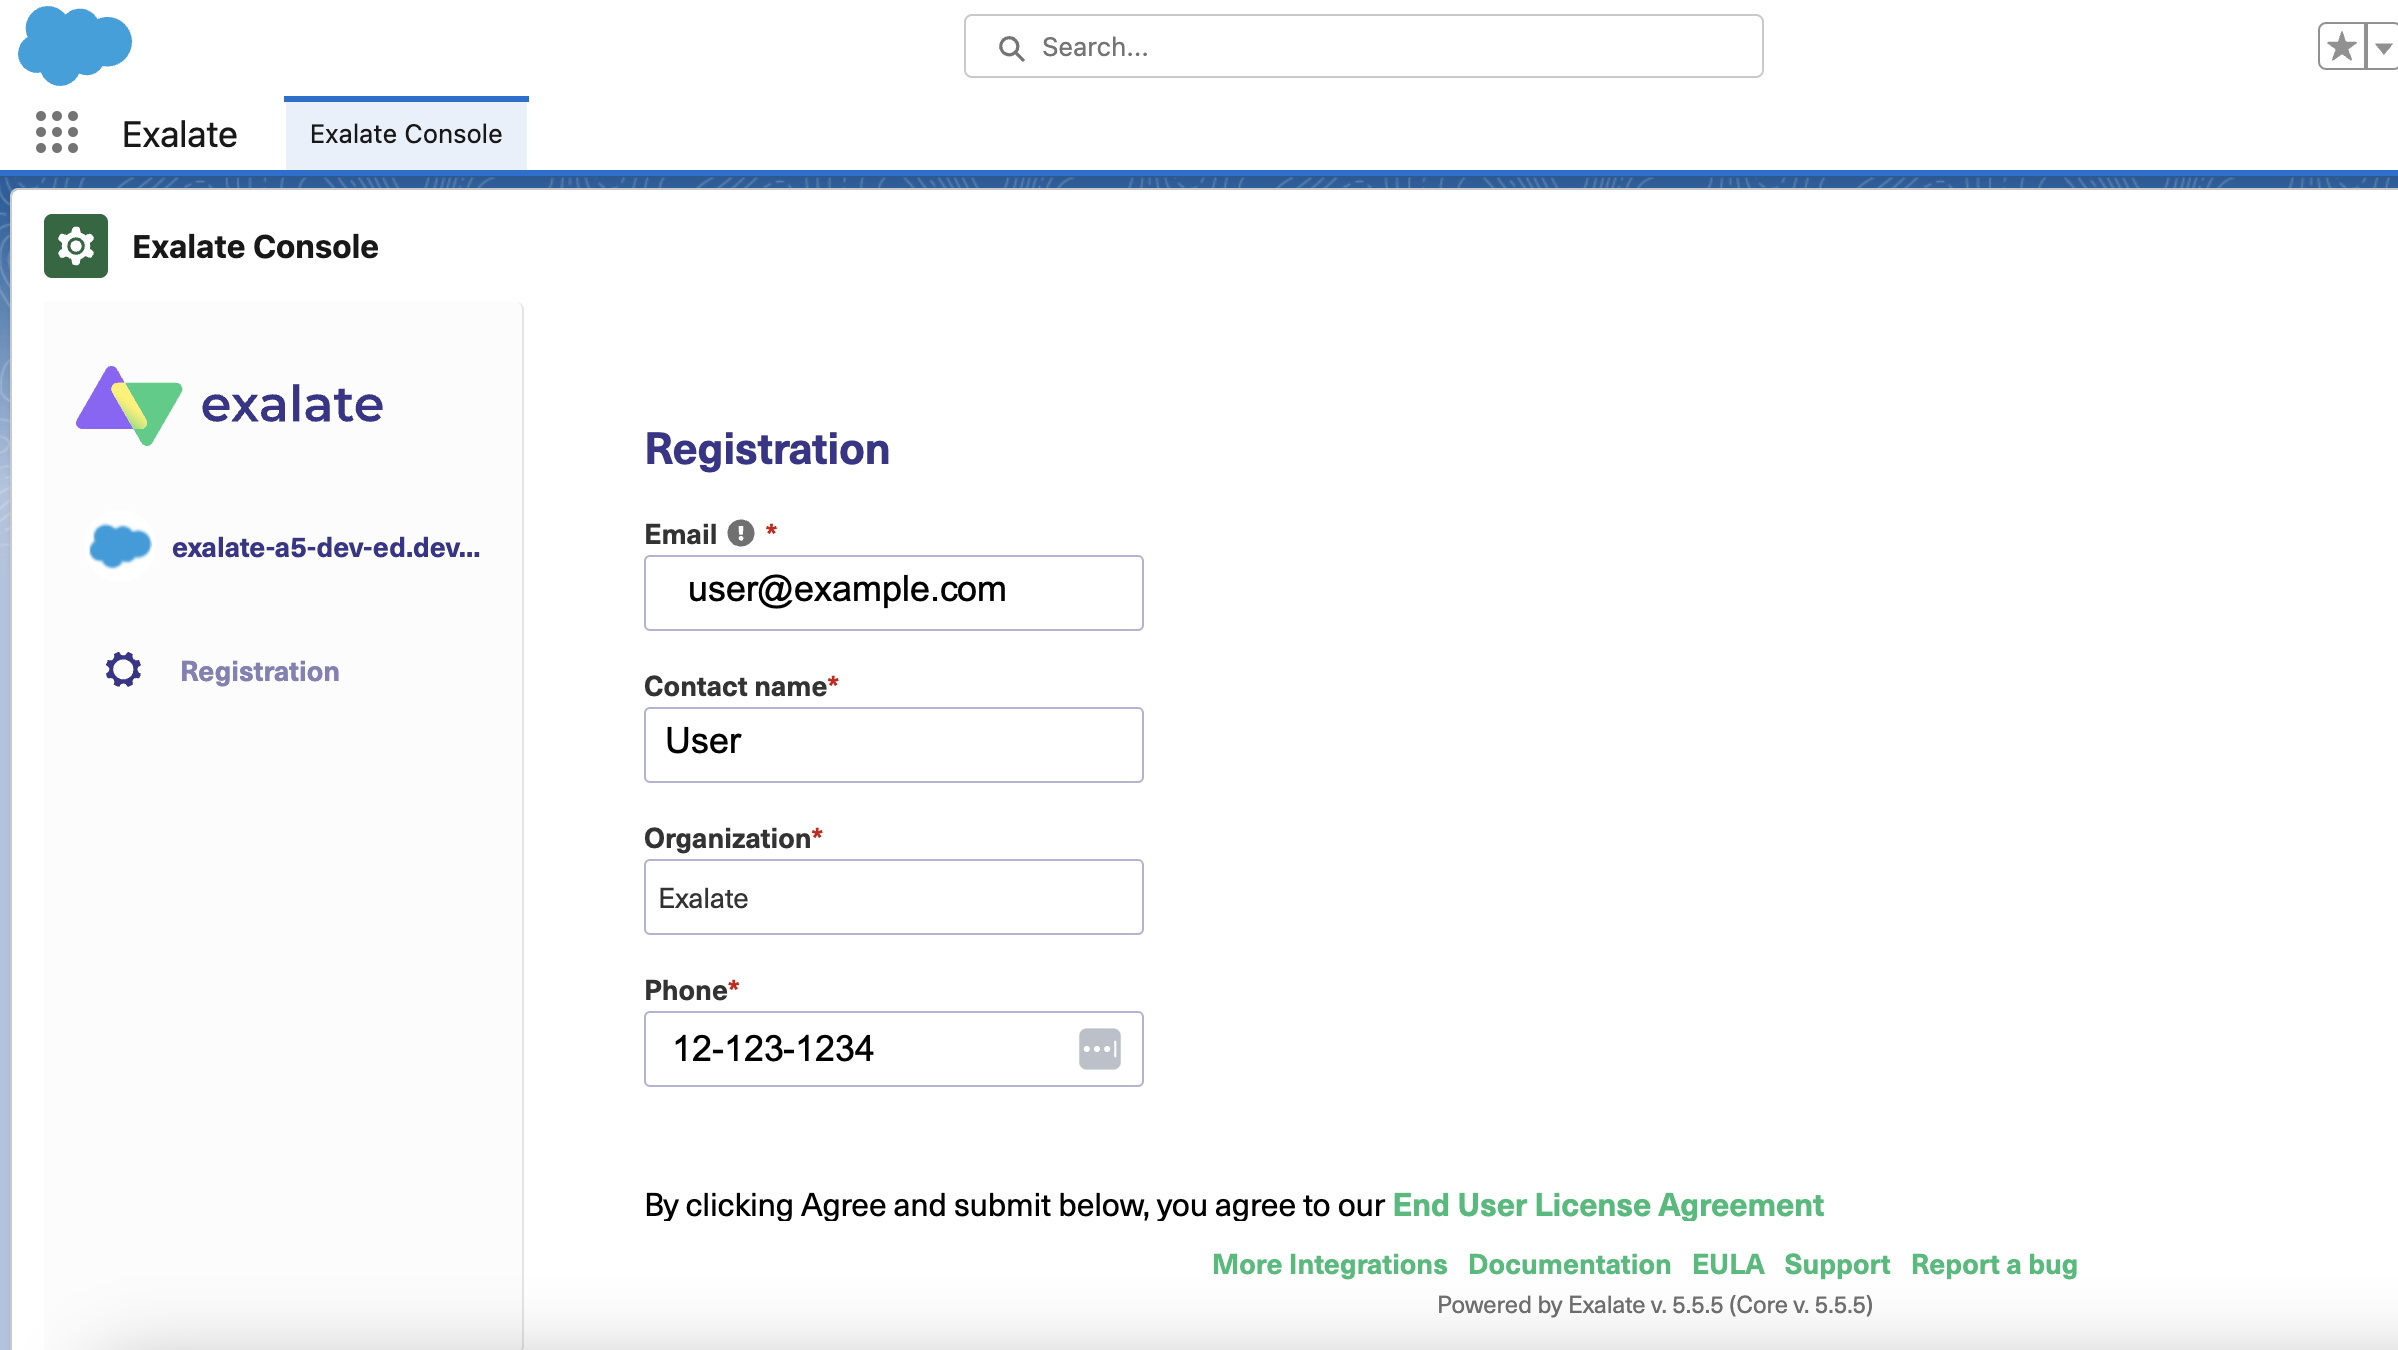
Once received, open the email and click “Verify Exalate instance”, which will redirect you to the Exalate admin console.
From this point, you can proceed to establish a connection between GitHub and Salesforce.
If you ever get logged out of your Salesforce instance, just follow these steps to log in again.
Step 3: Establish a Salesforce GitHub Connection
Now it’s time to set up your connection!
With Exalate, one side initiates the connection, and the other side accepts it. After setting up the connection, you can proceed with configuring it to start sending information back and forth.
This is an important first step if you want to start synchronizing GitHub issues and Salesforce entities.
Say you want Cases to fire up new Issues in GitHub. Or trigger dev issues/product updates directly from Salesforce to GitHub. Whatever the case is, we will see how to do that in the next few steps.
After installing the Exalate app, you should be redirected to a welcome screen.
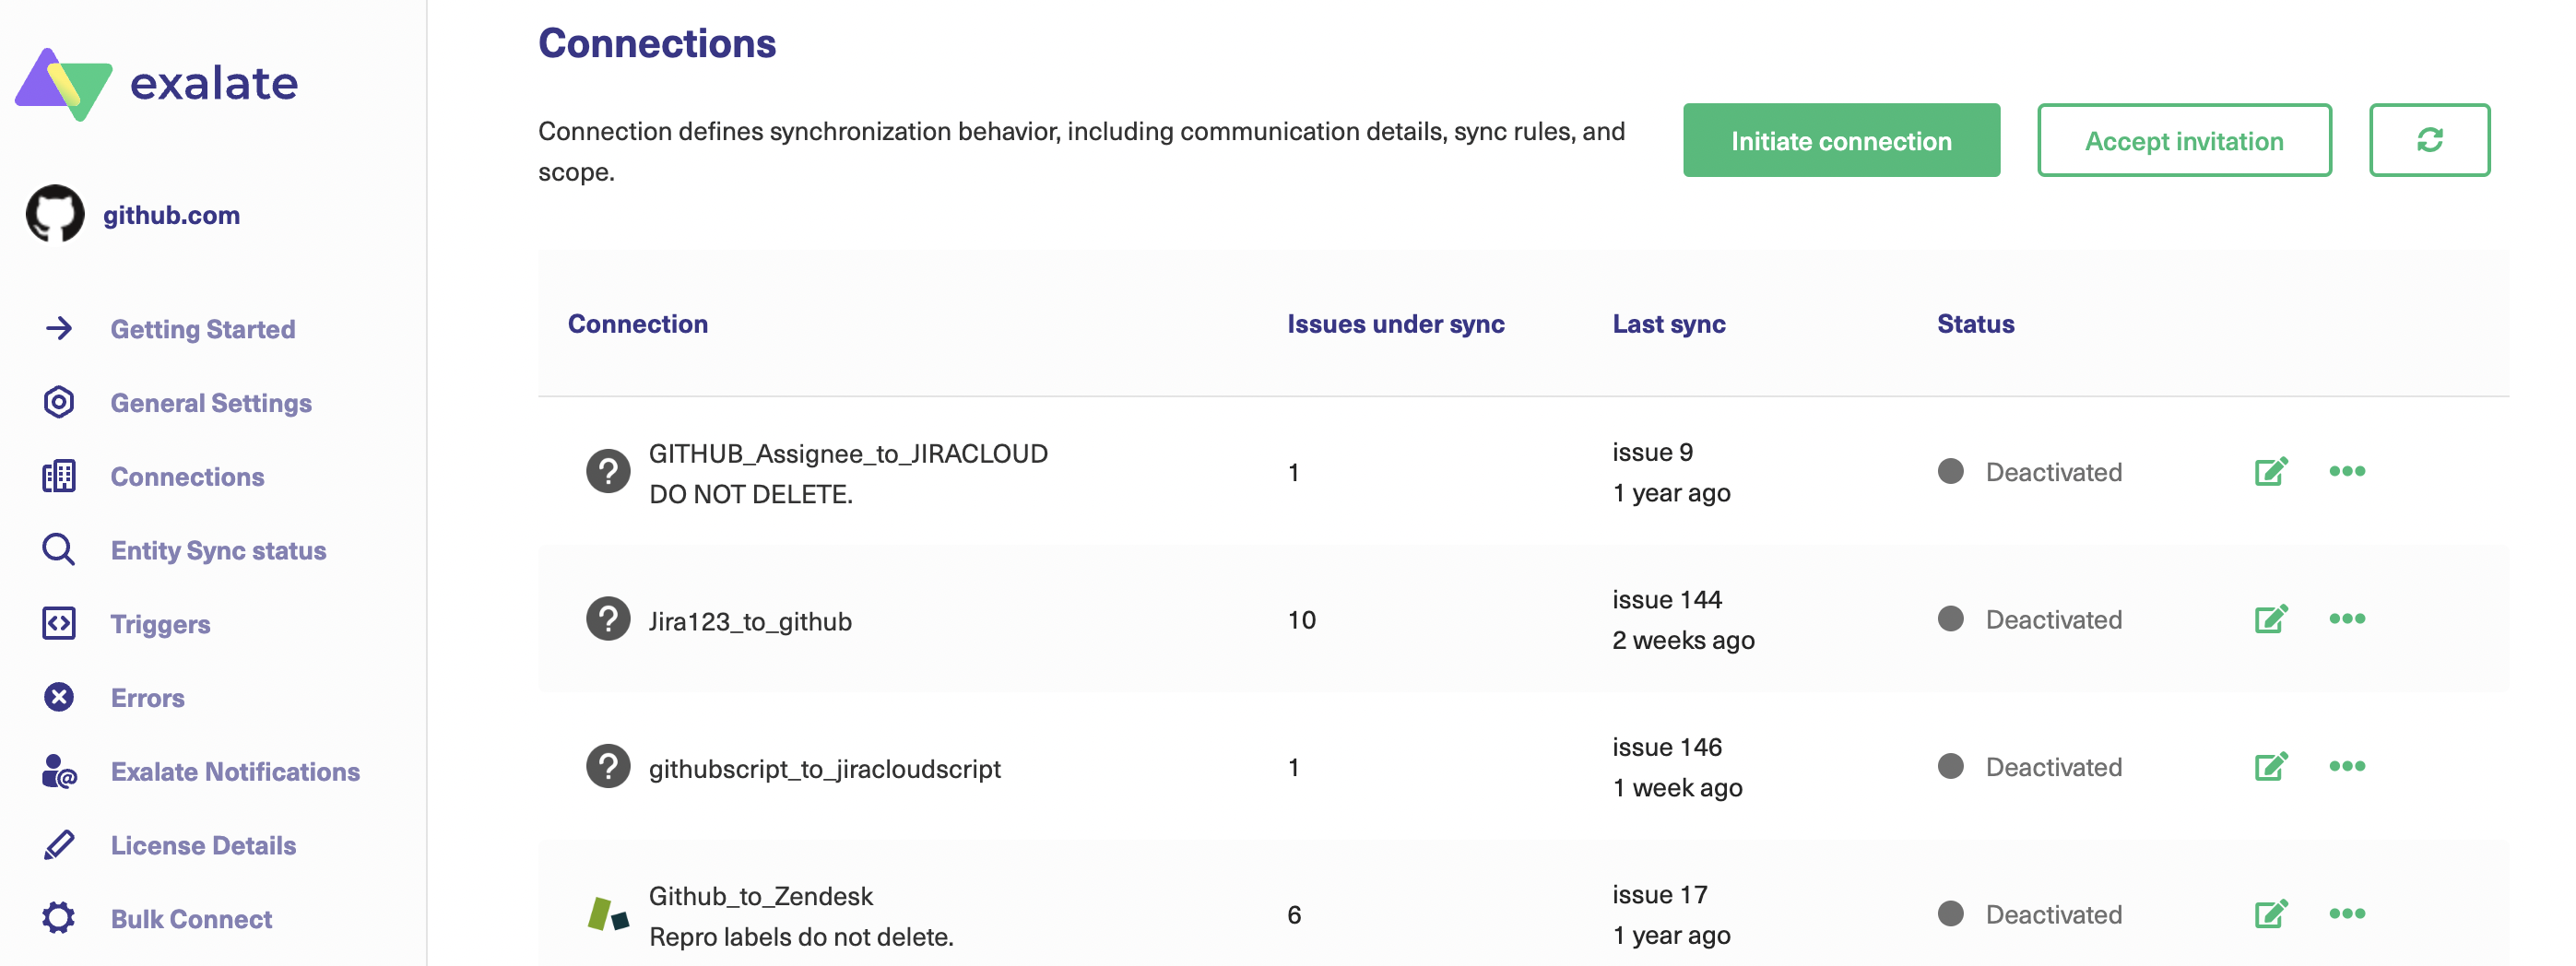
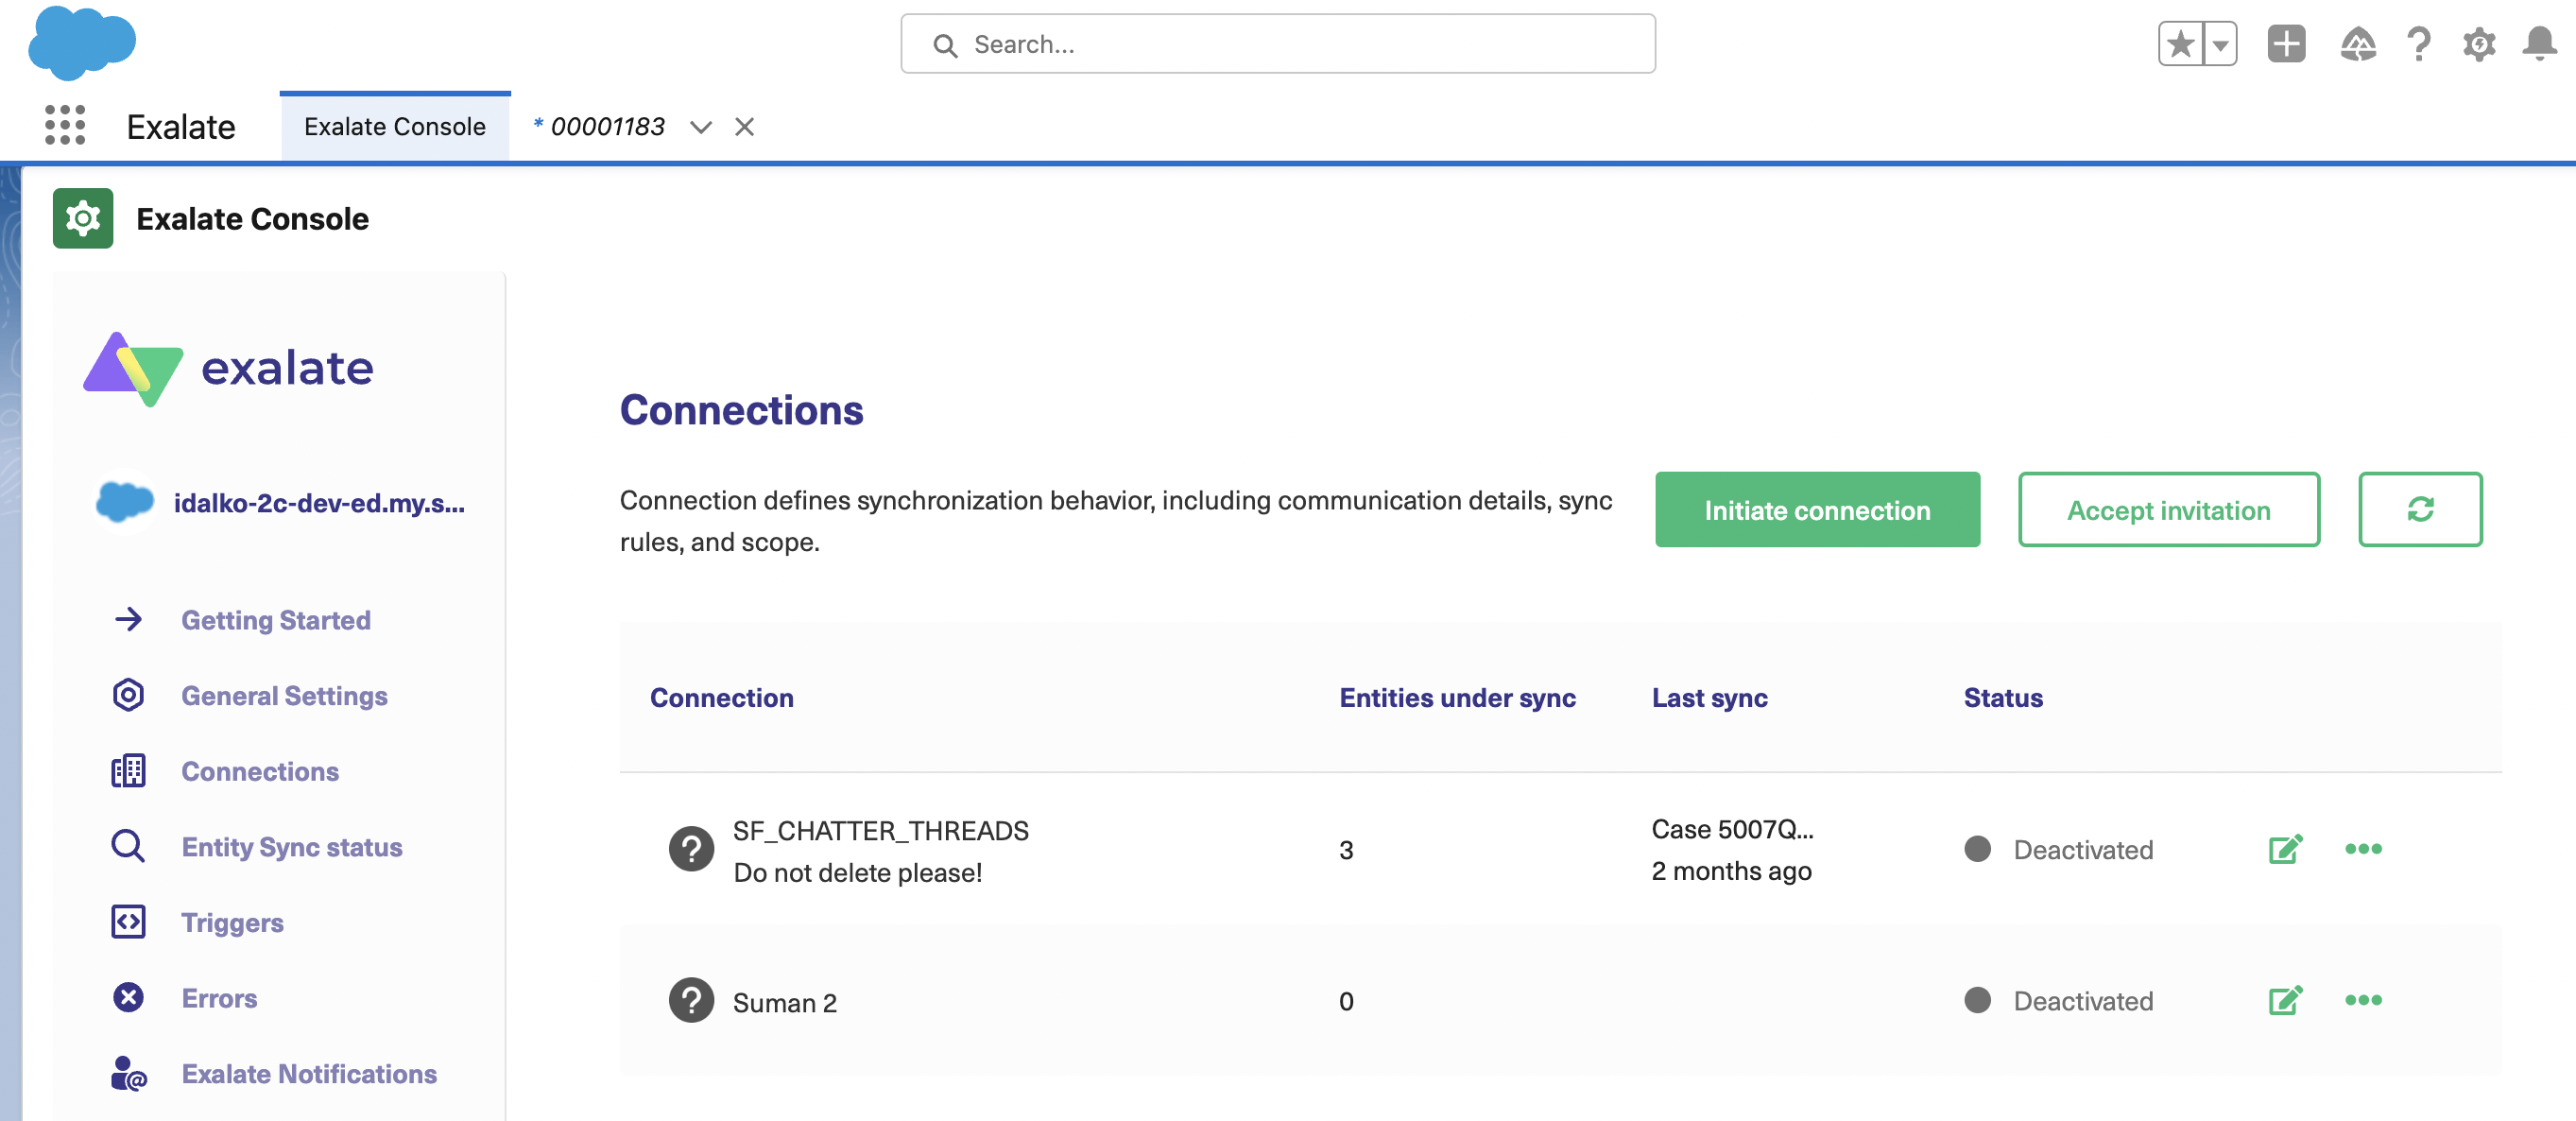
From there, you can navigate to the “Connections” tab in the left-hand menu.
Connections in Exalate define how your synchronization behaves. It includes what information you want to send and receive and includes other configuration details.
With Exalate, you can initiate the connection from either the GitHub side or the Salesforce side. The UI for all the Exalate screens is the same, so it doesn’t matter which side you start with.
For this guide, let’s start from the GitHub side.
Click the green “Initiate Connection” button to start setting up the connection process.
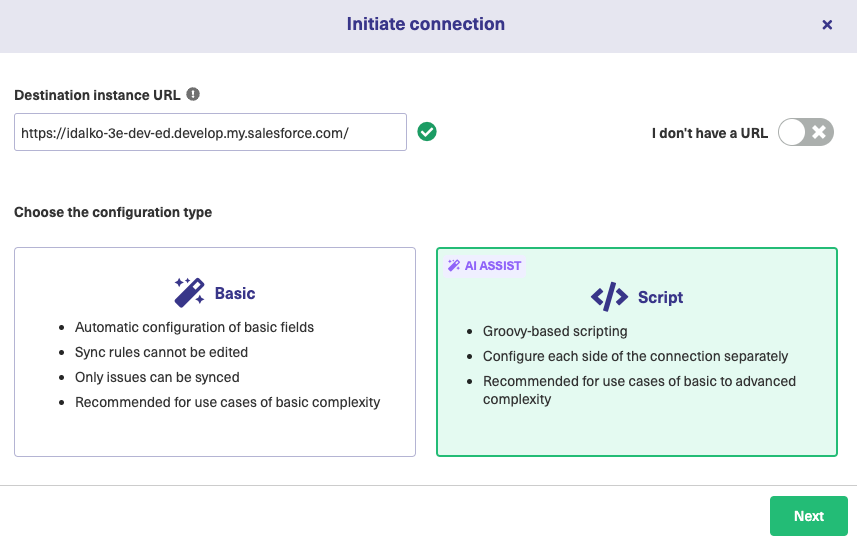
Then, you will need to enter the destination URL — your Salesforce URL. You can copy it by going to “Getting Started” on the left-hand Exalate menu.
After this, Exalate performs a quick check to see if it is installed on the destination instance or not. It will send appropriate messages while it does this.
More fields will appear, asking you to choose the configuration mode you want for the connection.
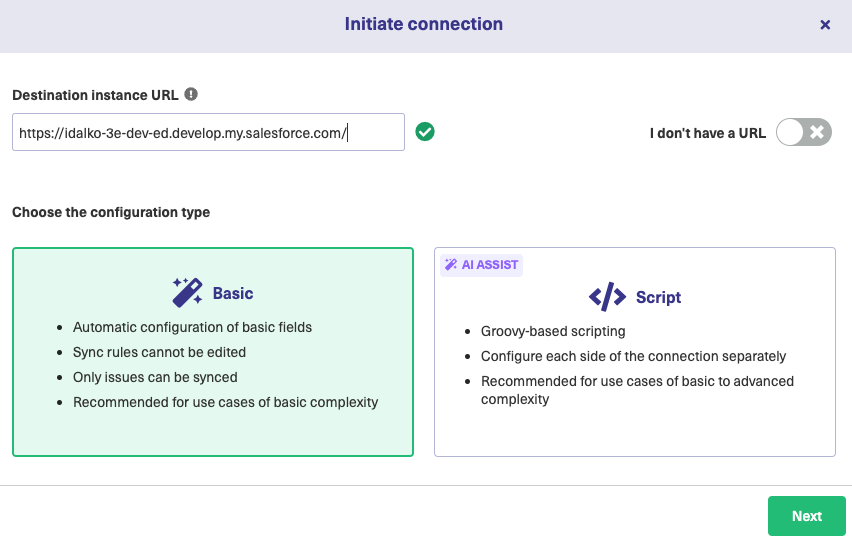
Exalate provides 2 such modes: the Basic mode and the Script mode.
The Basic mode has default mappings of different Salesforce entities and Github issues. You can’t change them. It has an intuitive UI and you can start your synchronization immediately with this mode. It is suitable for use cases of basic complexity.
Note: With the Free Plan, you can set up a connection in the Basic mode, allowing you up to 1000 free syncs per month. You can get started here.
The Script mode has AI-powered advanced configurations, customizable mappings, and features. With this mode, you can change the existing mappings, configure new ones, and control what and how you want the information to go over to the other side. It allows you to sync almost any Salesforce entity with GitHub issues, the way you want to. This kind of customization allows you to adapt Exalate to use cases of advanced complexity.
We recommend you try this mode since it allows you to customize your synchronization and use Exalate’s full functionality.
You can choose to upgrade the Basic connection in Salesforce or Github and move to the script mode anytime you want.
We will have a look at both modes one by one.
Continue with the Basic mode
Once you select “Basic” on the screen above, click “Next”.
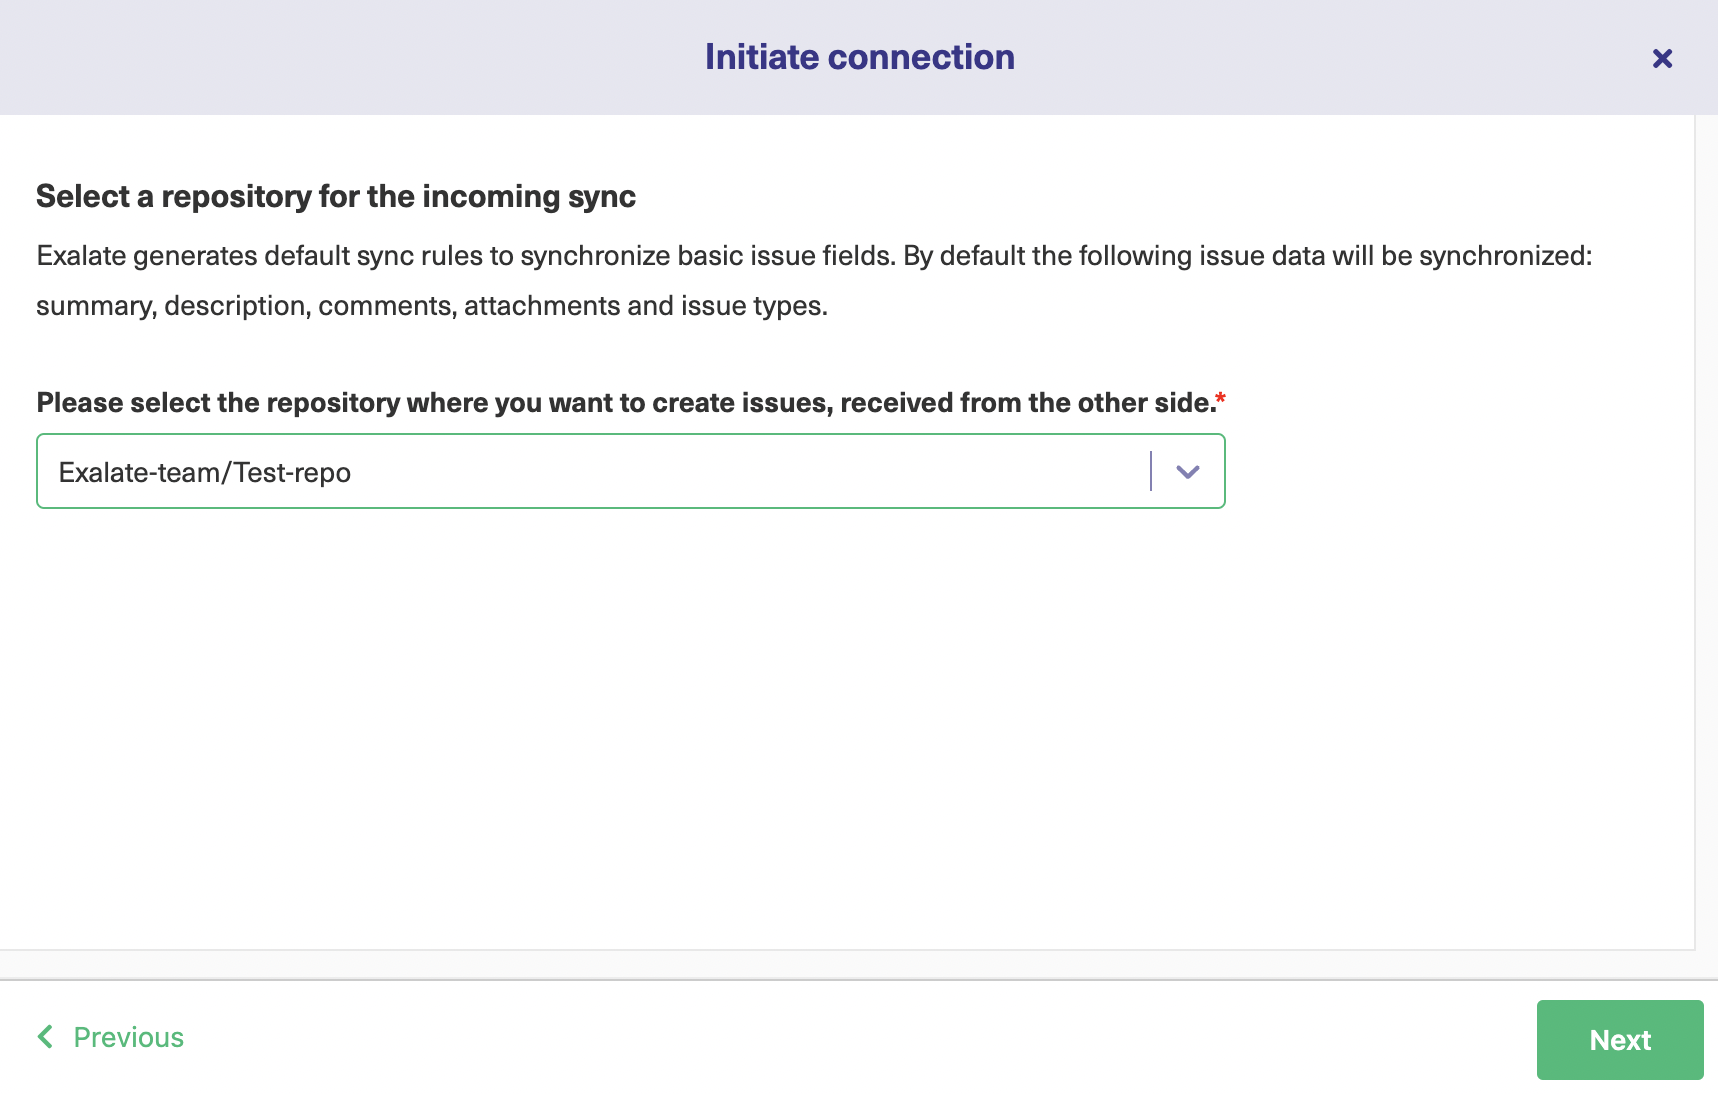
You need to select the repository whose issues you want to sync on the Salesforce side. Select one from the dropdown list. Click “Next” when you are ready.
You will then be asked to verify admin access to the destination instance. In our case, that’s Salesforce. Click “Yes, I have admin access” if you have it, otherwise click on “No, I don’t have admin access”. The latter approach will generate an invitation code that you will need to copy and paste on the other instance.
Since I have access, I click on yes and hit “Initiate”.
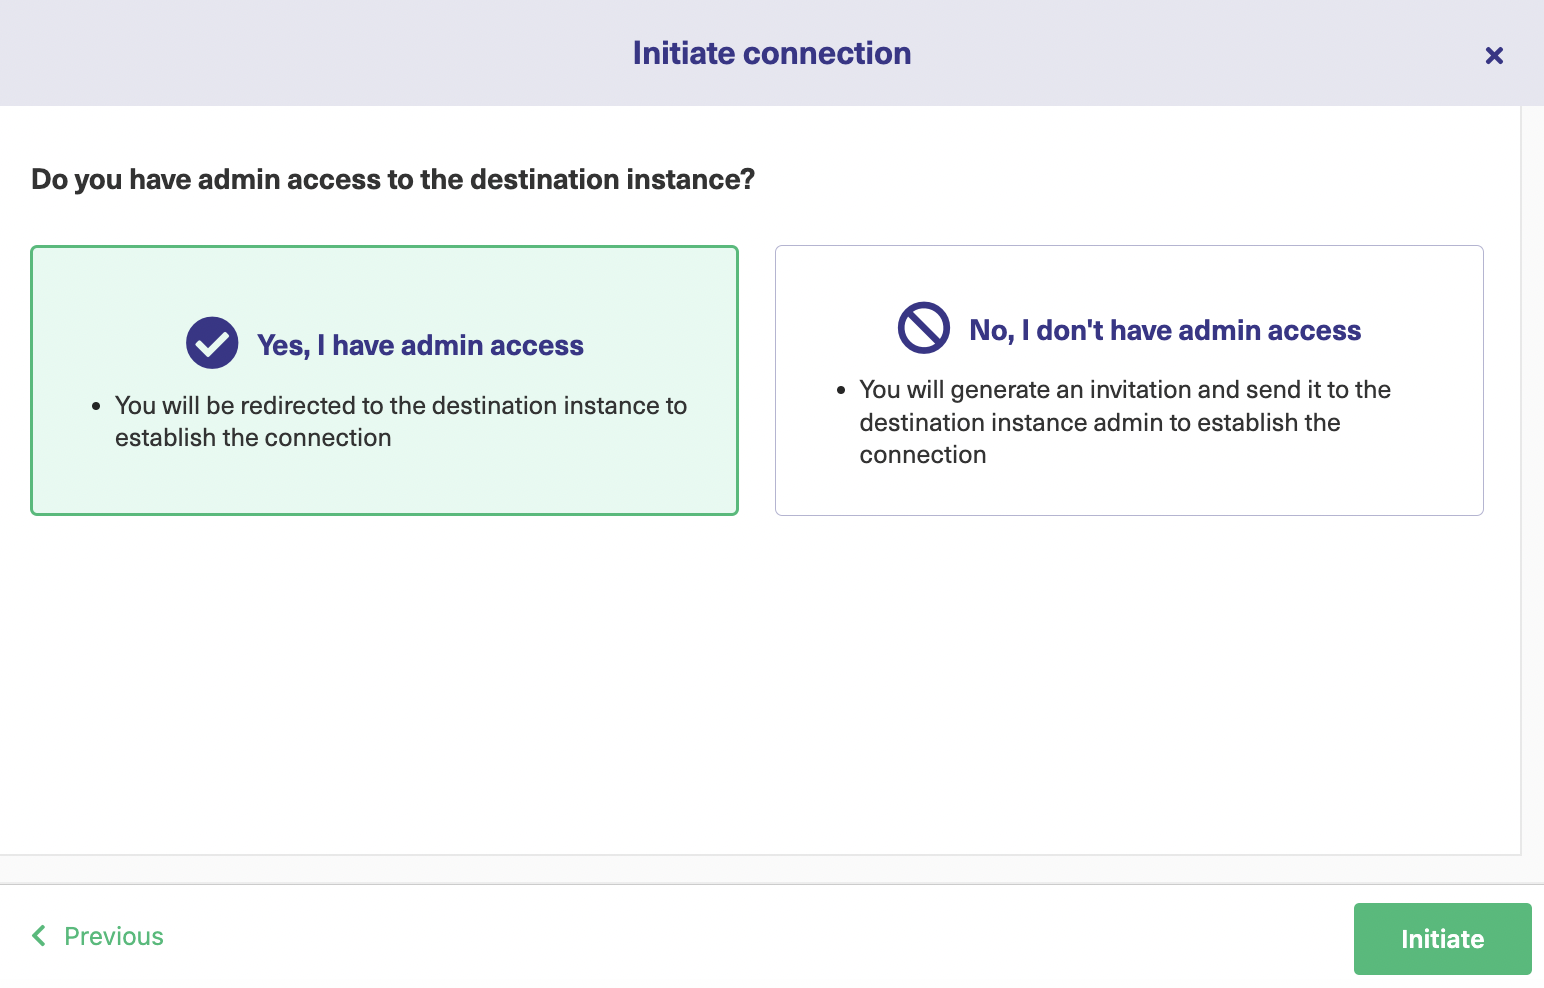
After a quick verification, you will be redirected to the destination side (Salesforce).
The Basic connection allows you to start synchronization immediately. You can enter the Case key you want to sync, hit “Exalate”, and you are good to go.
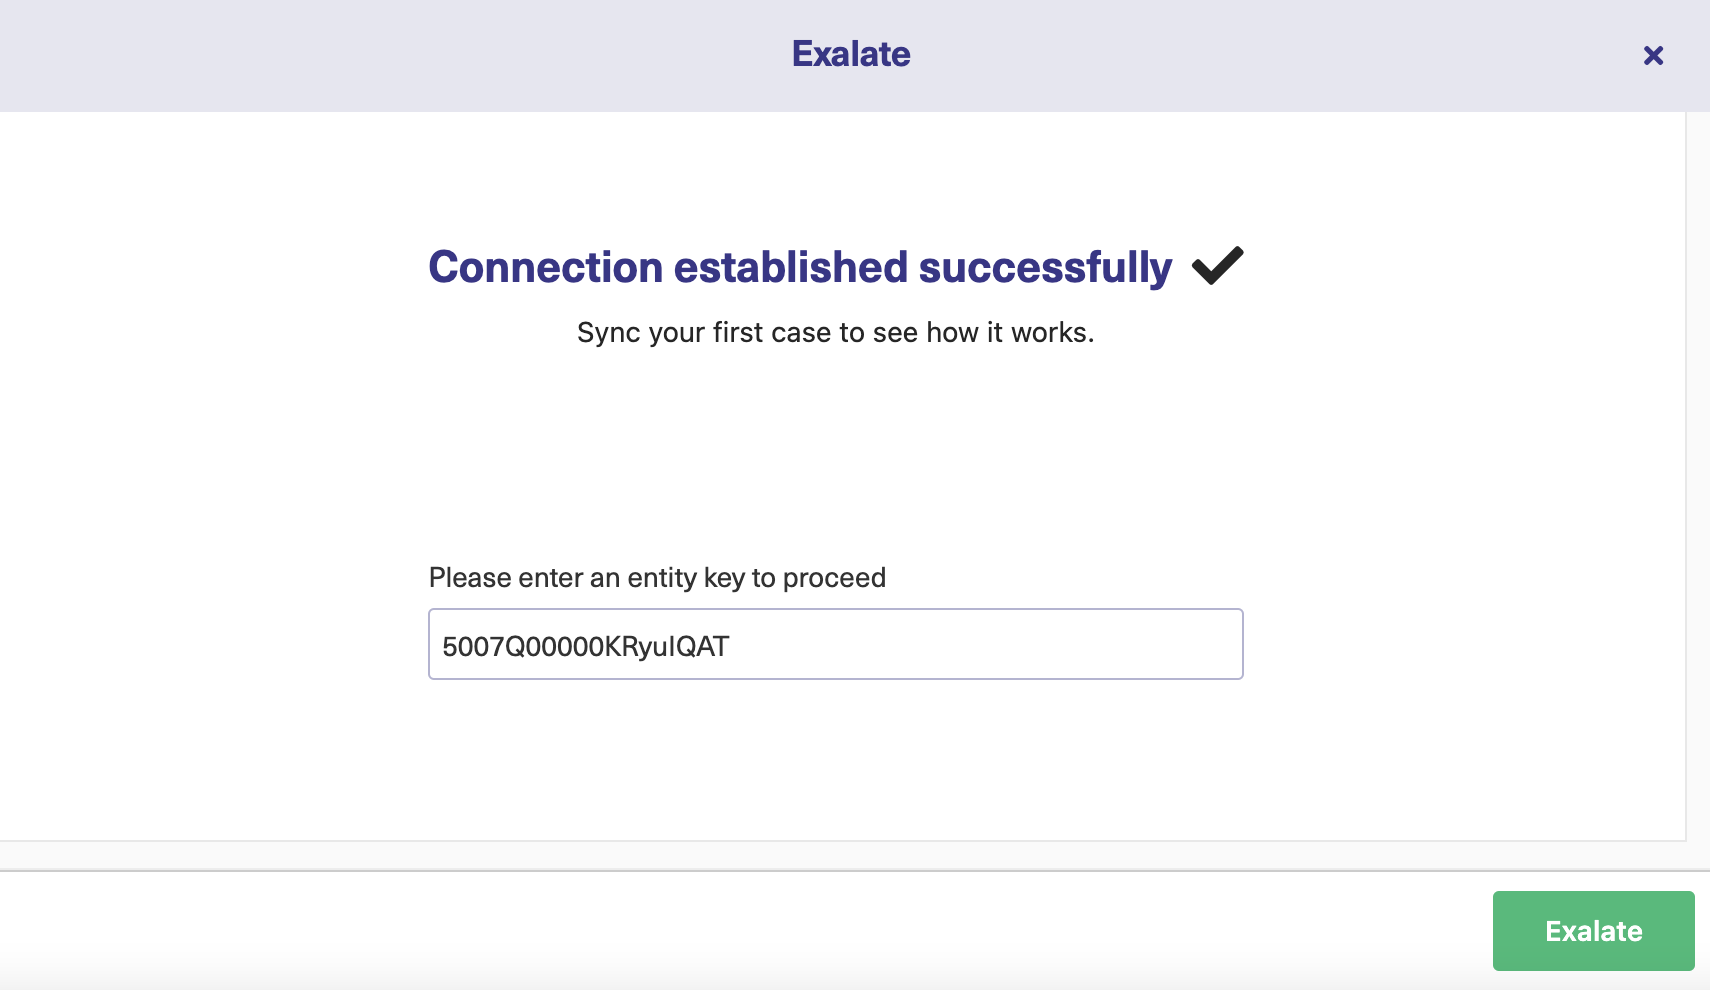
Note: The Case number entered above comes from the URL of the Case you want to sync as shown in the image below.

On the GitHub side, the same Exalate screen will prompt you to enter the issue key.
Note: On the GitHub side, the same screens will be displayed but will be specific to issues.
In case you don’t want to “Exalate” your Case immediately, you can choose to press the close button on the screen above and use the trigger option to create automatic syncs to the other side or use the ”Bulk Connect” option to sync Cases in bulk.
We will cover how to create triggers in step 5. Meanwhile, you can learn more about “Bulk Connect”.
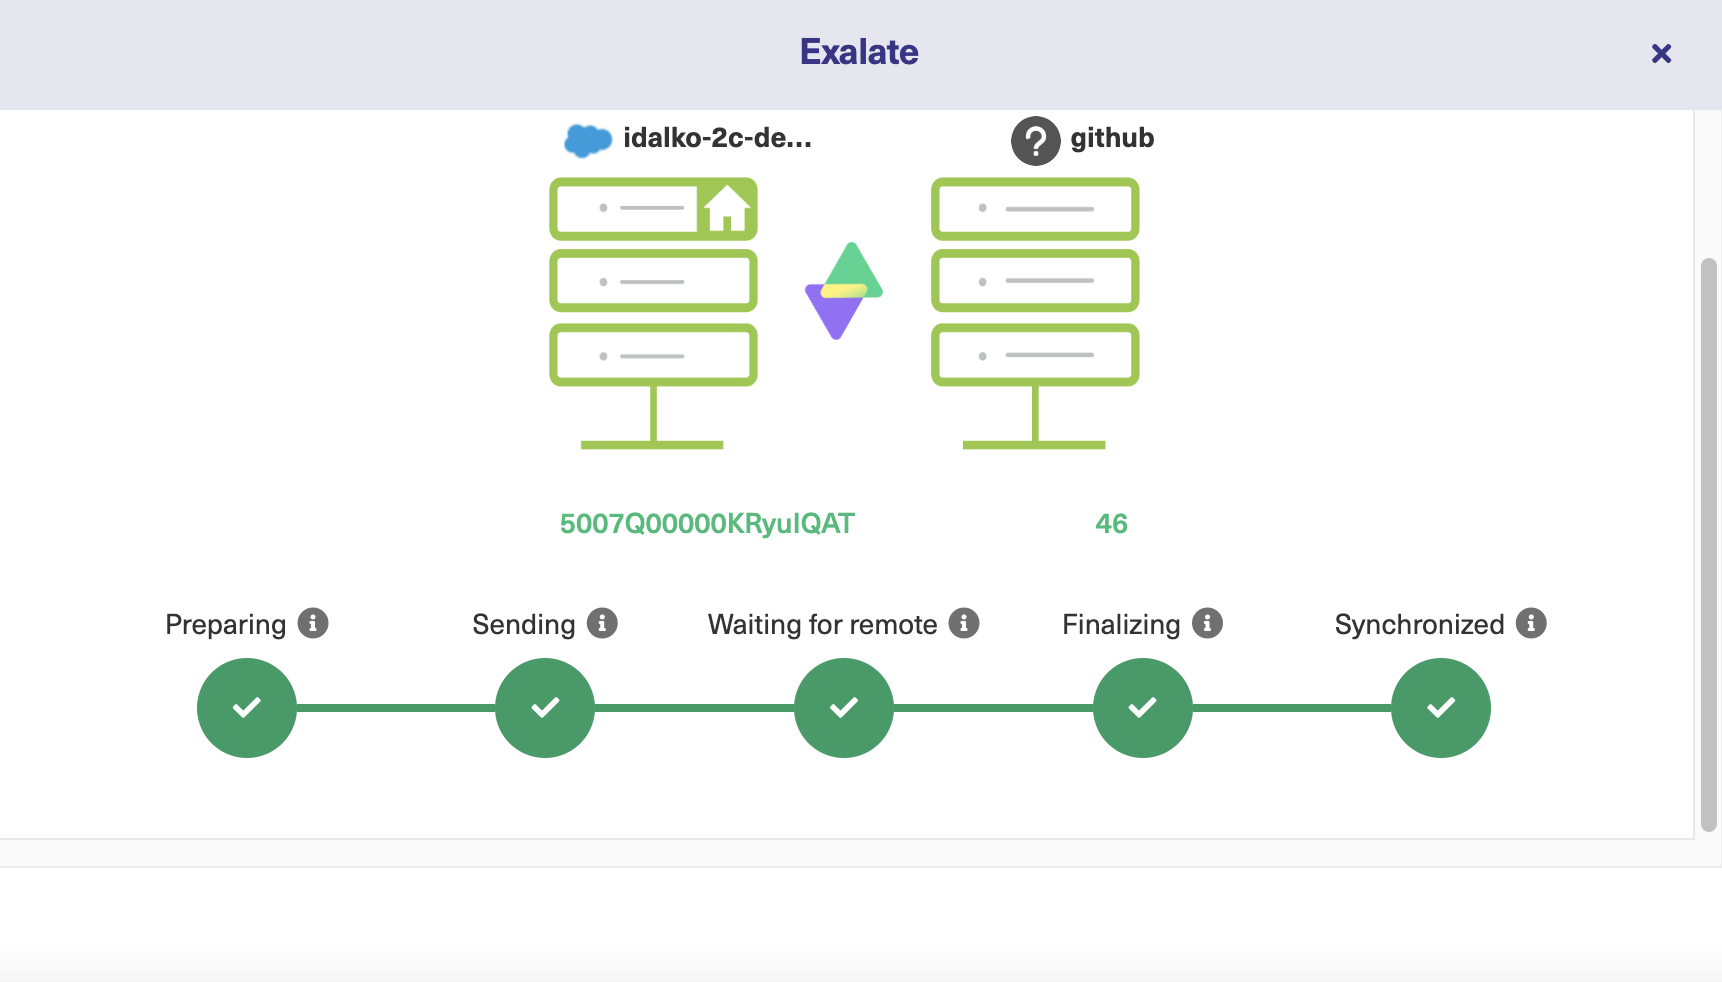
Once you Exalate the Case, it takes a while for the sync to complete.
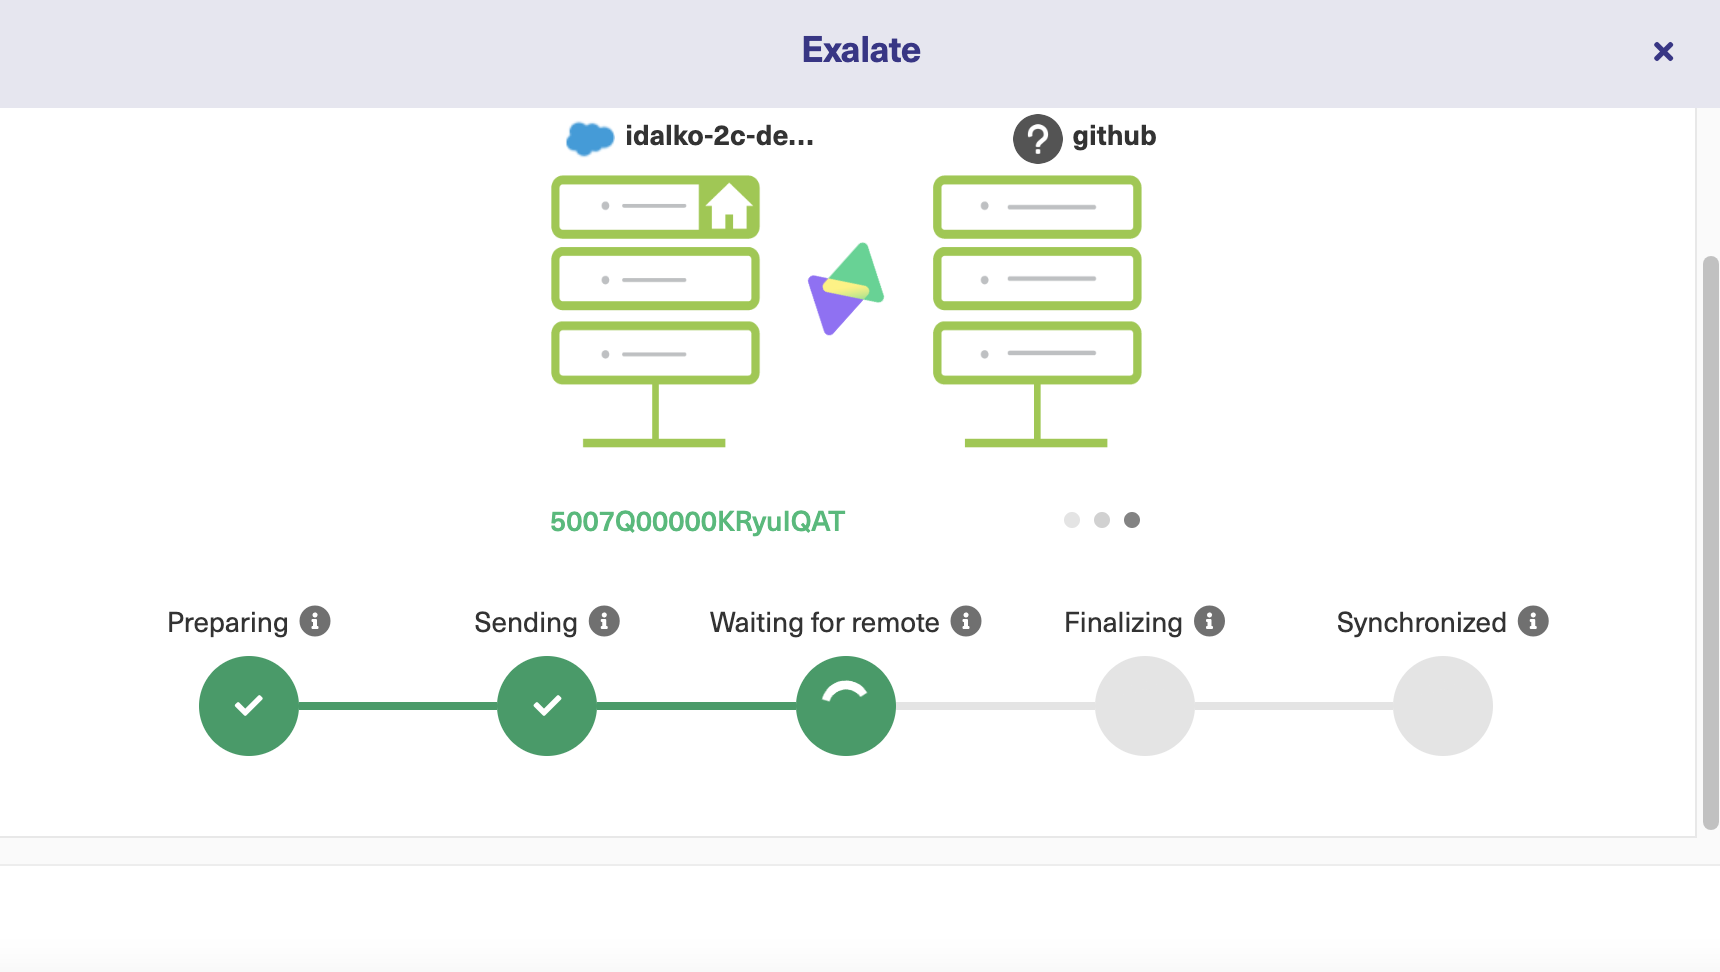
And finally! You’ve synced your first case. You can also sync the subject, comments, status, and description for this Case automatically.
To go to the remote issue created on the GitHub side, click on the link generated for the issue (8 in our case). To refer to the Salesforce Case, click on the link below.
Continue with the Script mode
Moving to the Script mode, press “Next” on the screen after you select “Script”.
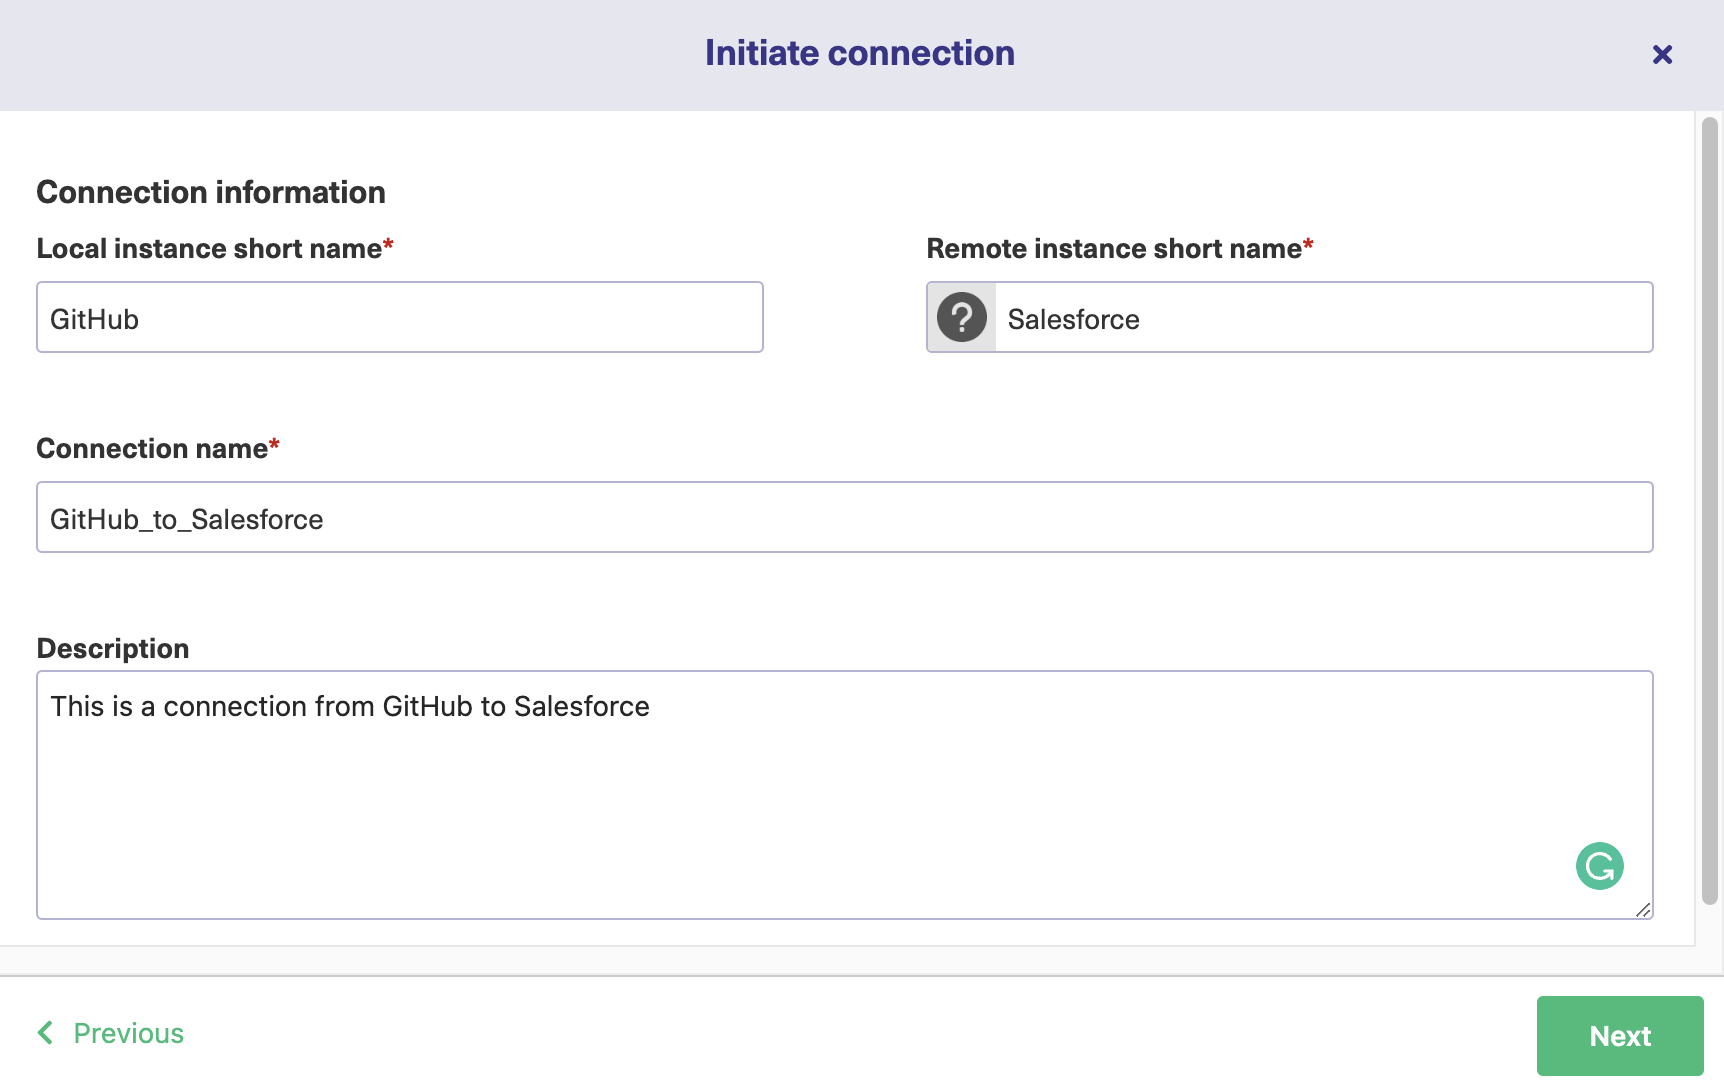
You now need to name the connection.
For this, enter the local instance name (GitHub). This is the side you initiate the connection from. Then enter the remote instance name (Salesforce). This is the destination side name.
Exalate then generates an automatic connection name for you. But you can edit it if you want.
Give your connection a description as well. This will be helpful when you have a list of them.
After finalizing all this, click “Next”.
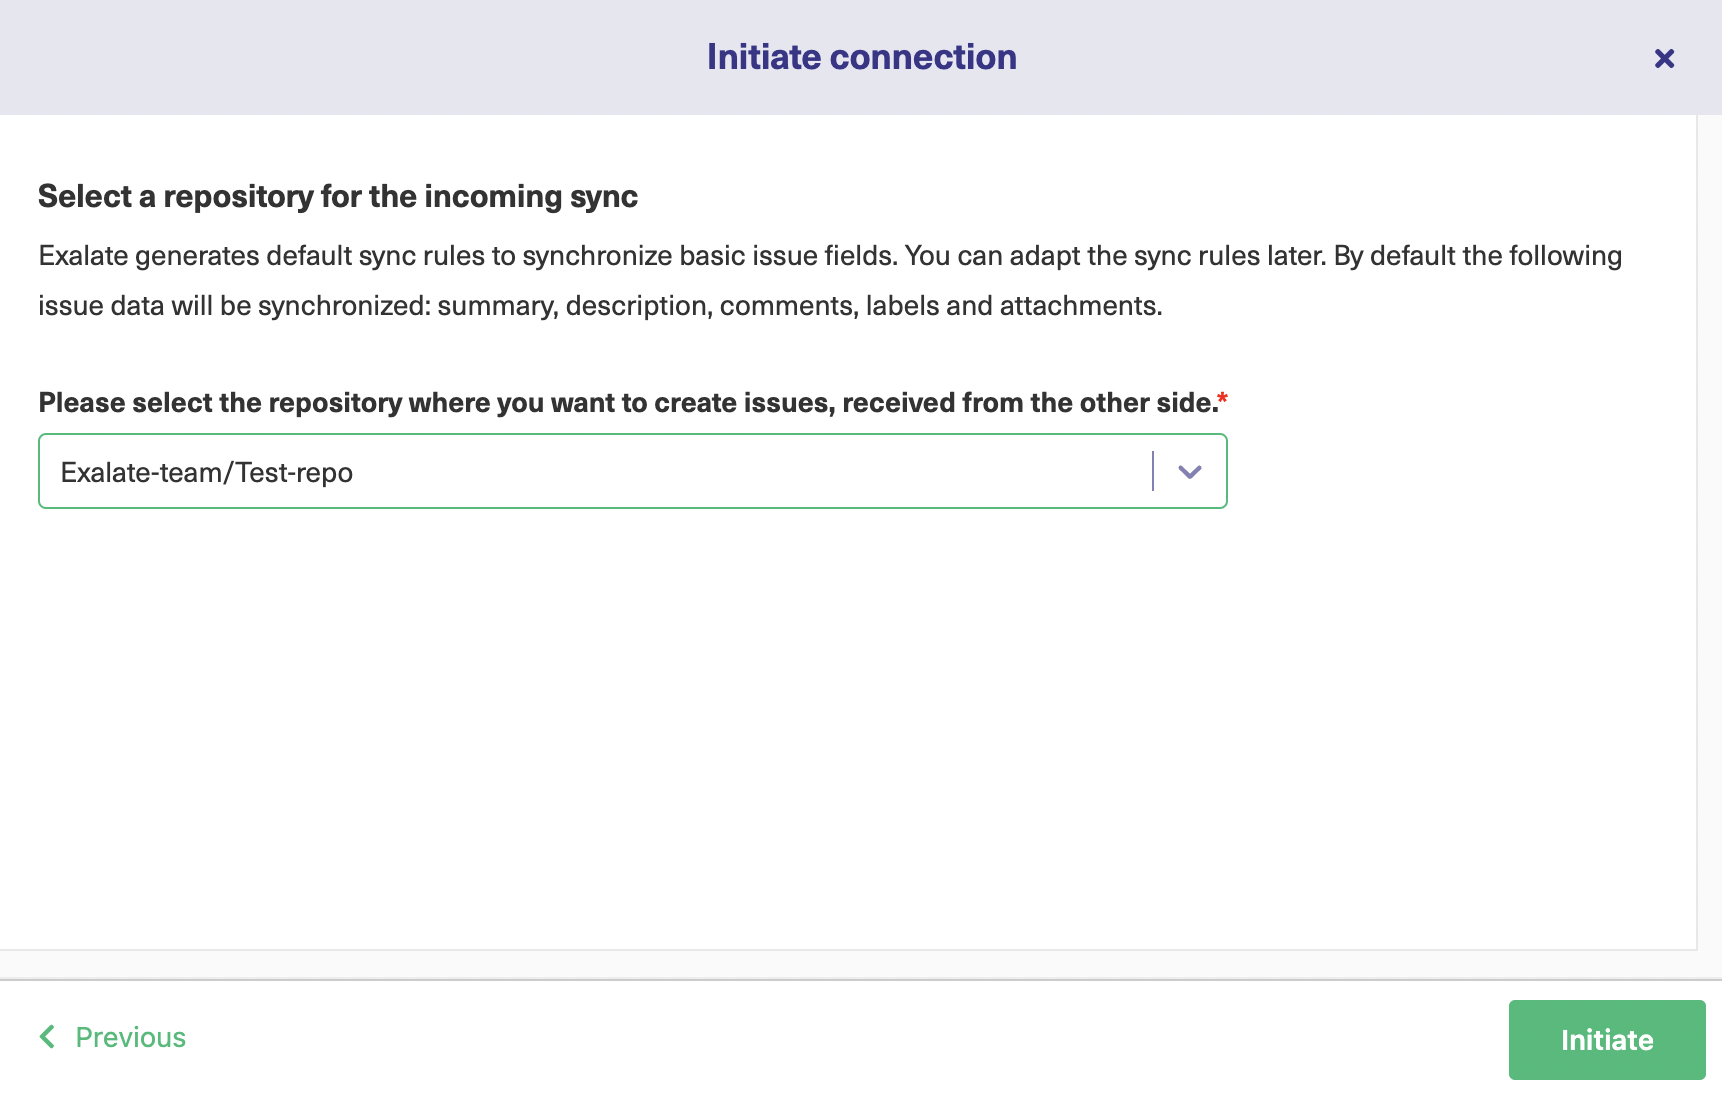
Choose the repository you need to sync issues from the GitHub instance. Select the correct one from the drop-down list. Click “Initiate”.
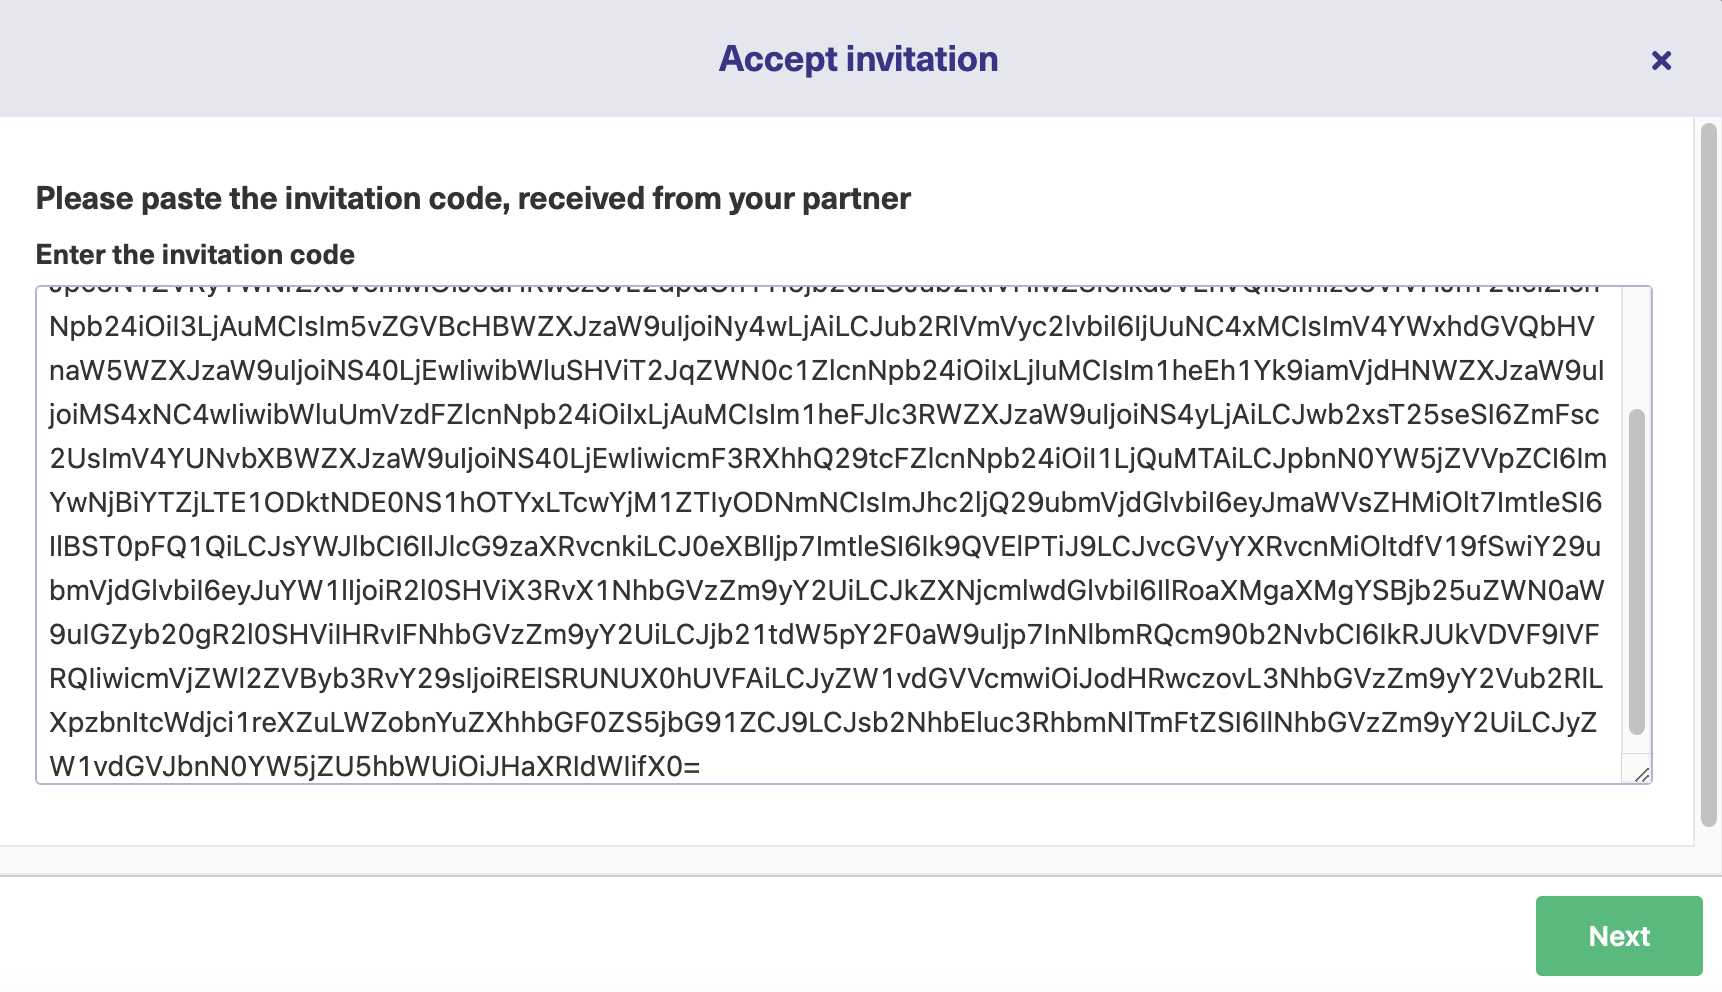
Now an invitation code appears.
This code is a unique secret that allows you to form a connection with the other side. You simply need to copy and paste it.
So click on “Copy invitation code” and save the copied code somewhere handy.
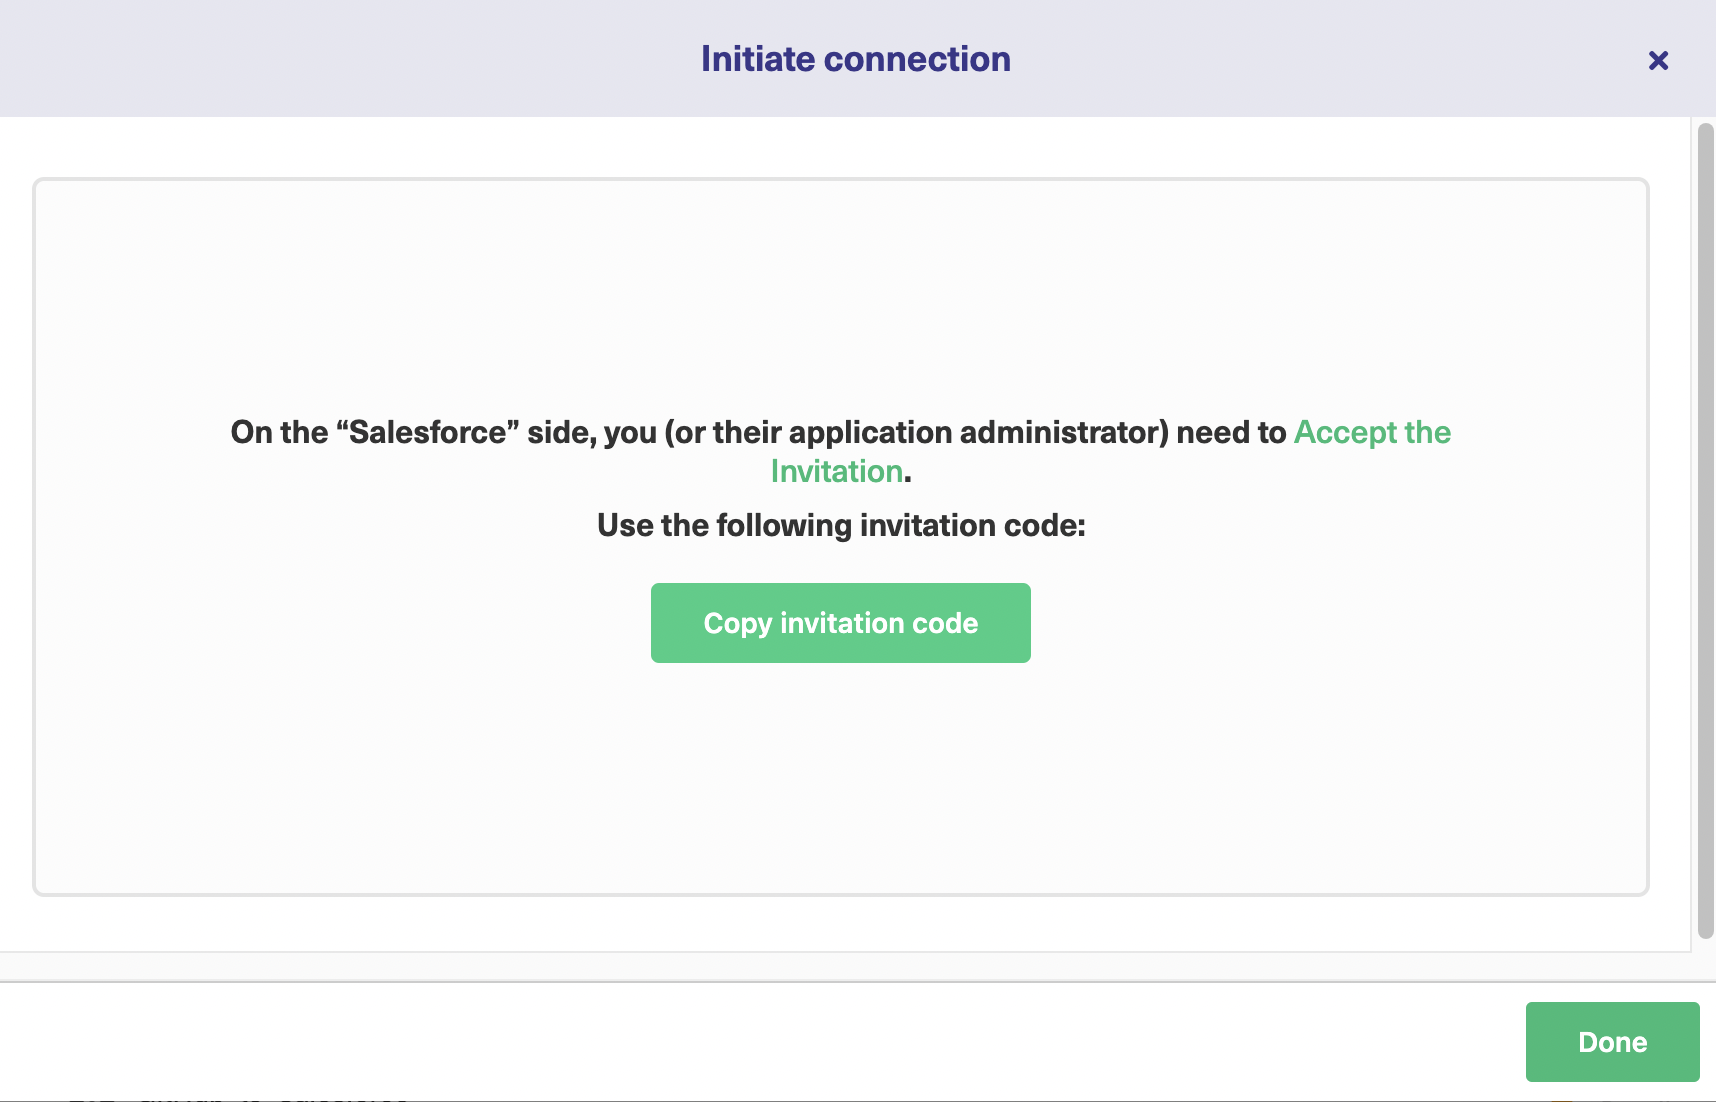
Your work on the GitHub side is over for now. Then open your Exalate console on Salesforce.
Navigate to the “Connections” tab on the left side and click on the “Accept Invitation” button.
The code you had copied, now needs to go in the text box. After pasting it, click “Next”.
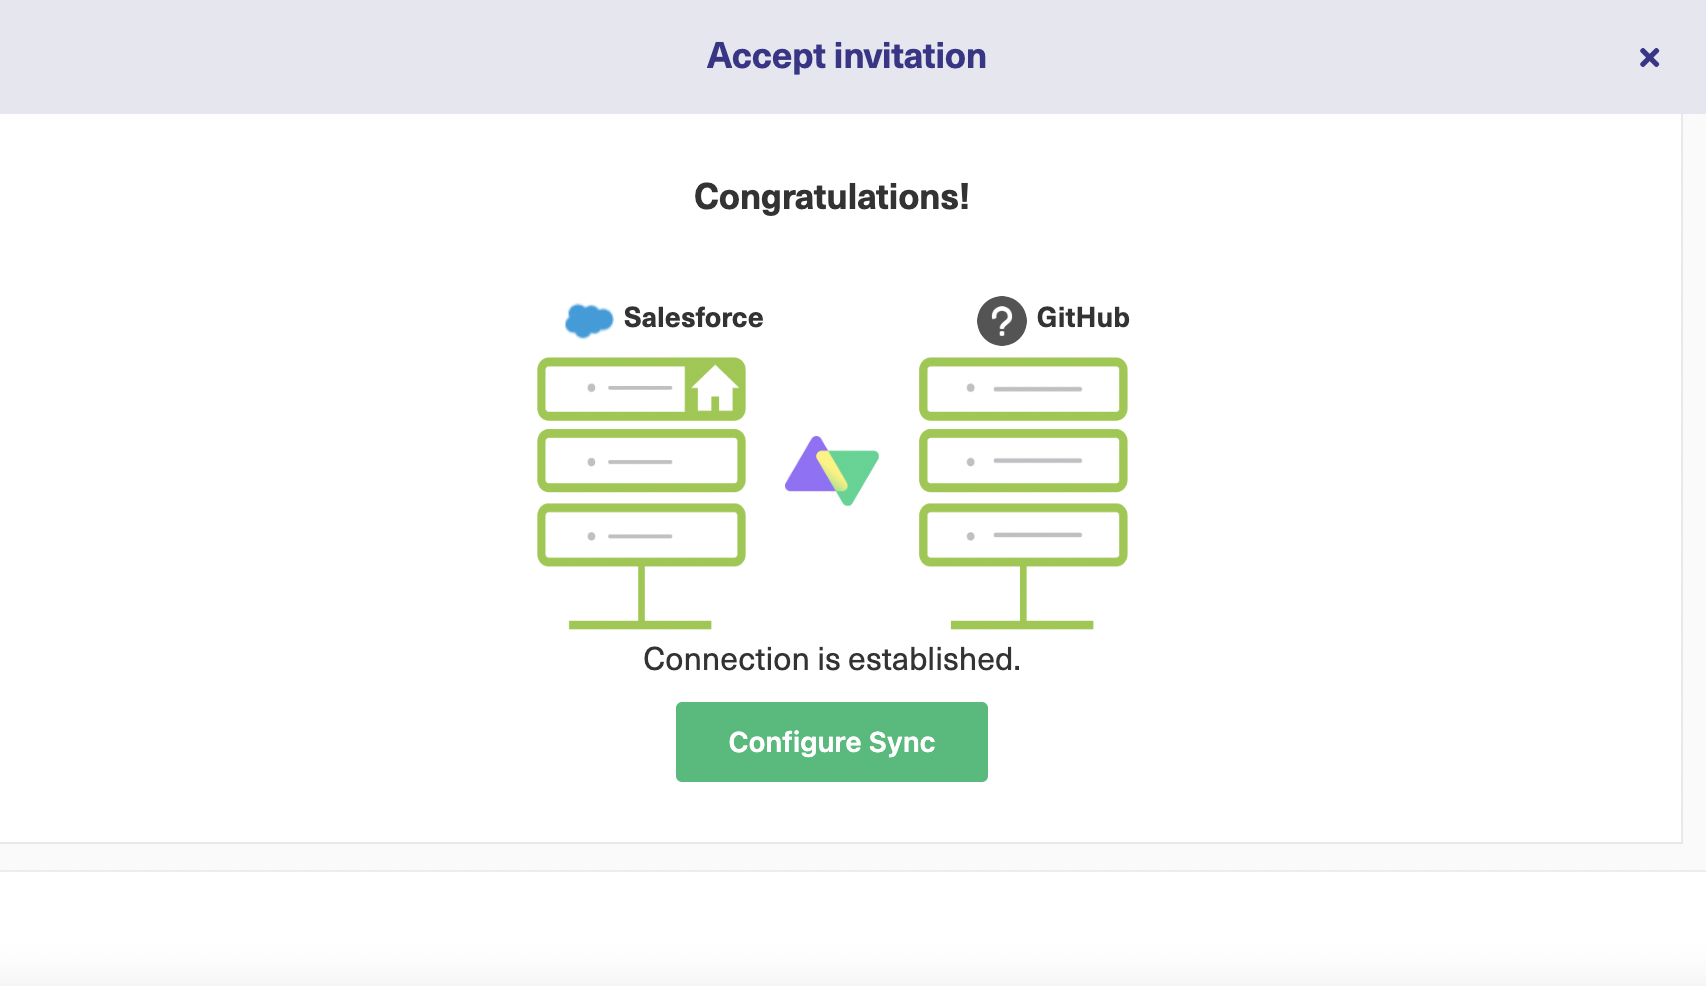
Now you’ve successfully established a GitHub Salesforce connection. You can continue to configure your connection next.
You can do this in two ways: either by clicking the “Configure Sync” button shown on the screen below or by editing the connection to configure it. We will see how to do this in detail in step 4.
Step 4: Configure the Connection to Decide What Information is Shared
If you have followed the steps sequentially, you will now be redirected to the following screen.
This screen allows you to configure the connection to control what information is shared with the other side and how you want to interpret the incoming information. Maybe you want to map the issue summary in GitHub as an internal comment under a Case in Salesforce or you may want to sync all open issues on GitHub to Cases in Salesforce.
All of this can be done by configuring the connection. We will get to a detailed explanation of this screen shortly.
Meanwhile, as I mentioned earlier, you can configure the connection by clicking on the edit connection button as well. The connection you created earlier can be viewed under the “Connections” tab.
This tab specifies all the connections you have created as a list, with different options for each connection given next to their names. Every connection has a status that shows the connection being “Active”, “Pending”, “Error” or “Deactivated”.
You can also see the number of issues under sync and the last synced time here.
The edit connection button shown in the image below allows you to configure the connection
There is a remote antenna button that takes you to the other side. Clicking the 3 dots allows you to activate, deactivate, or delete the connection. You can even “Exalate” a single issue or a Case here.

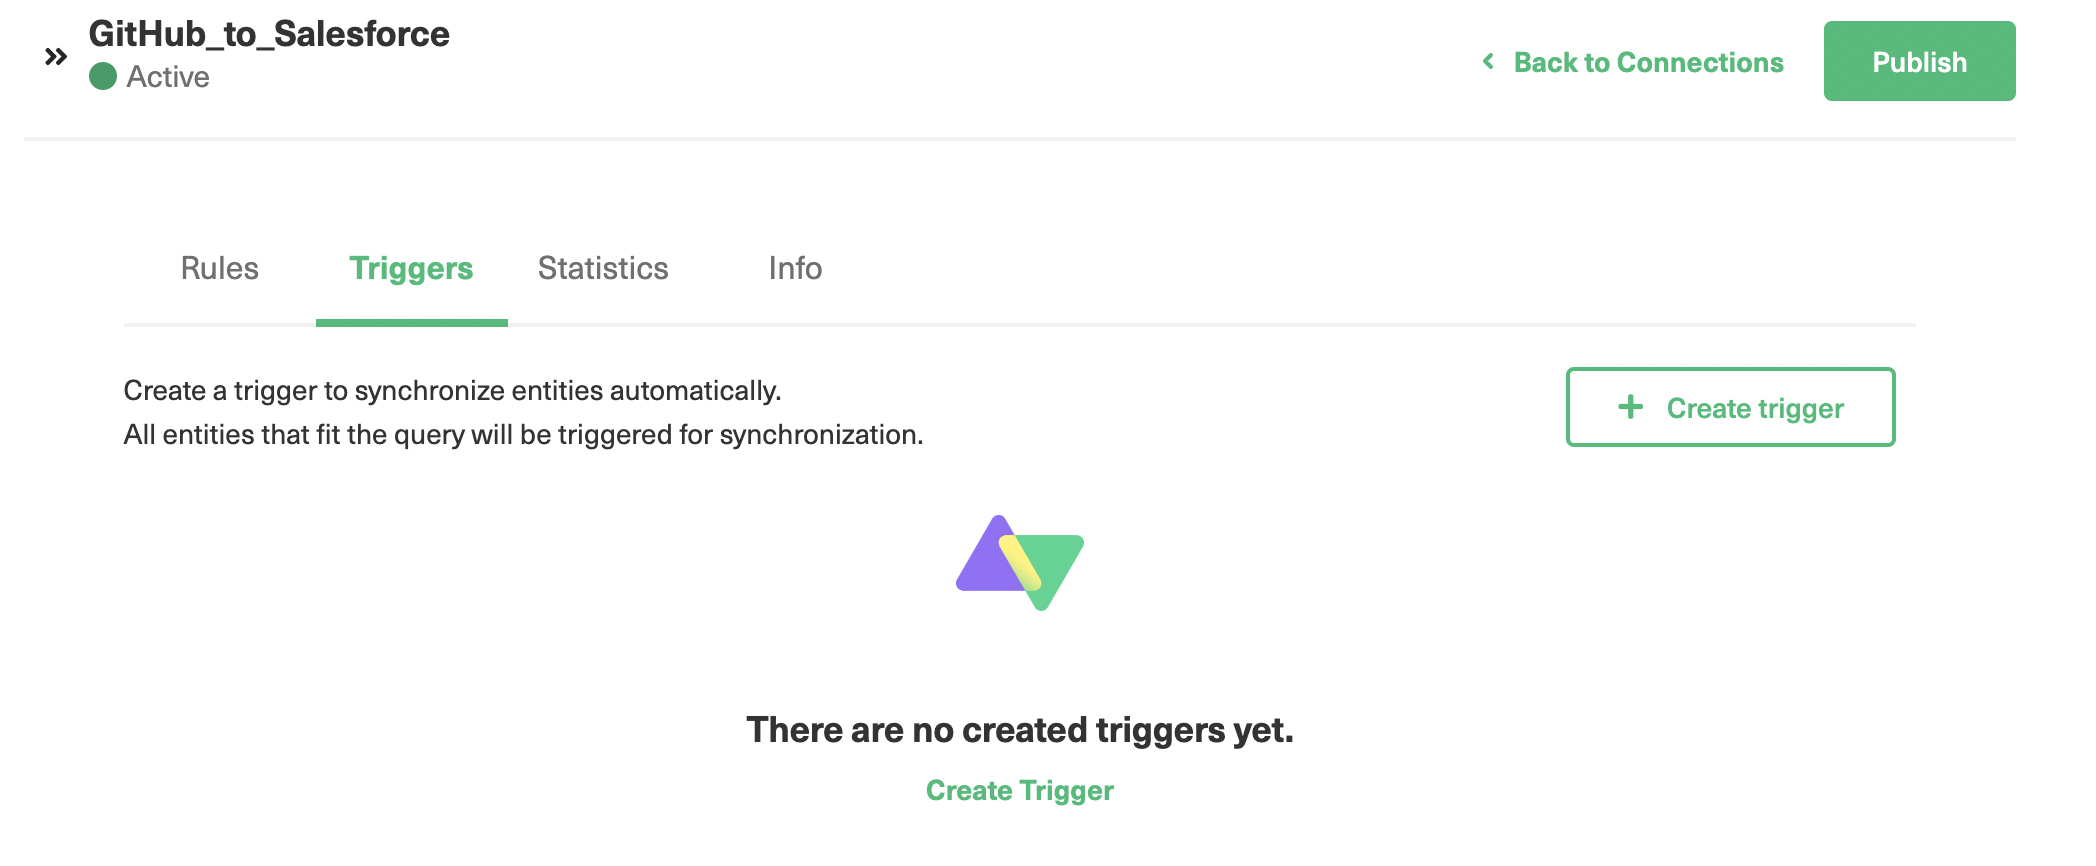
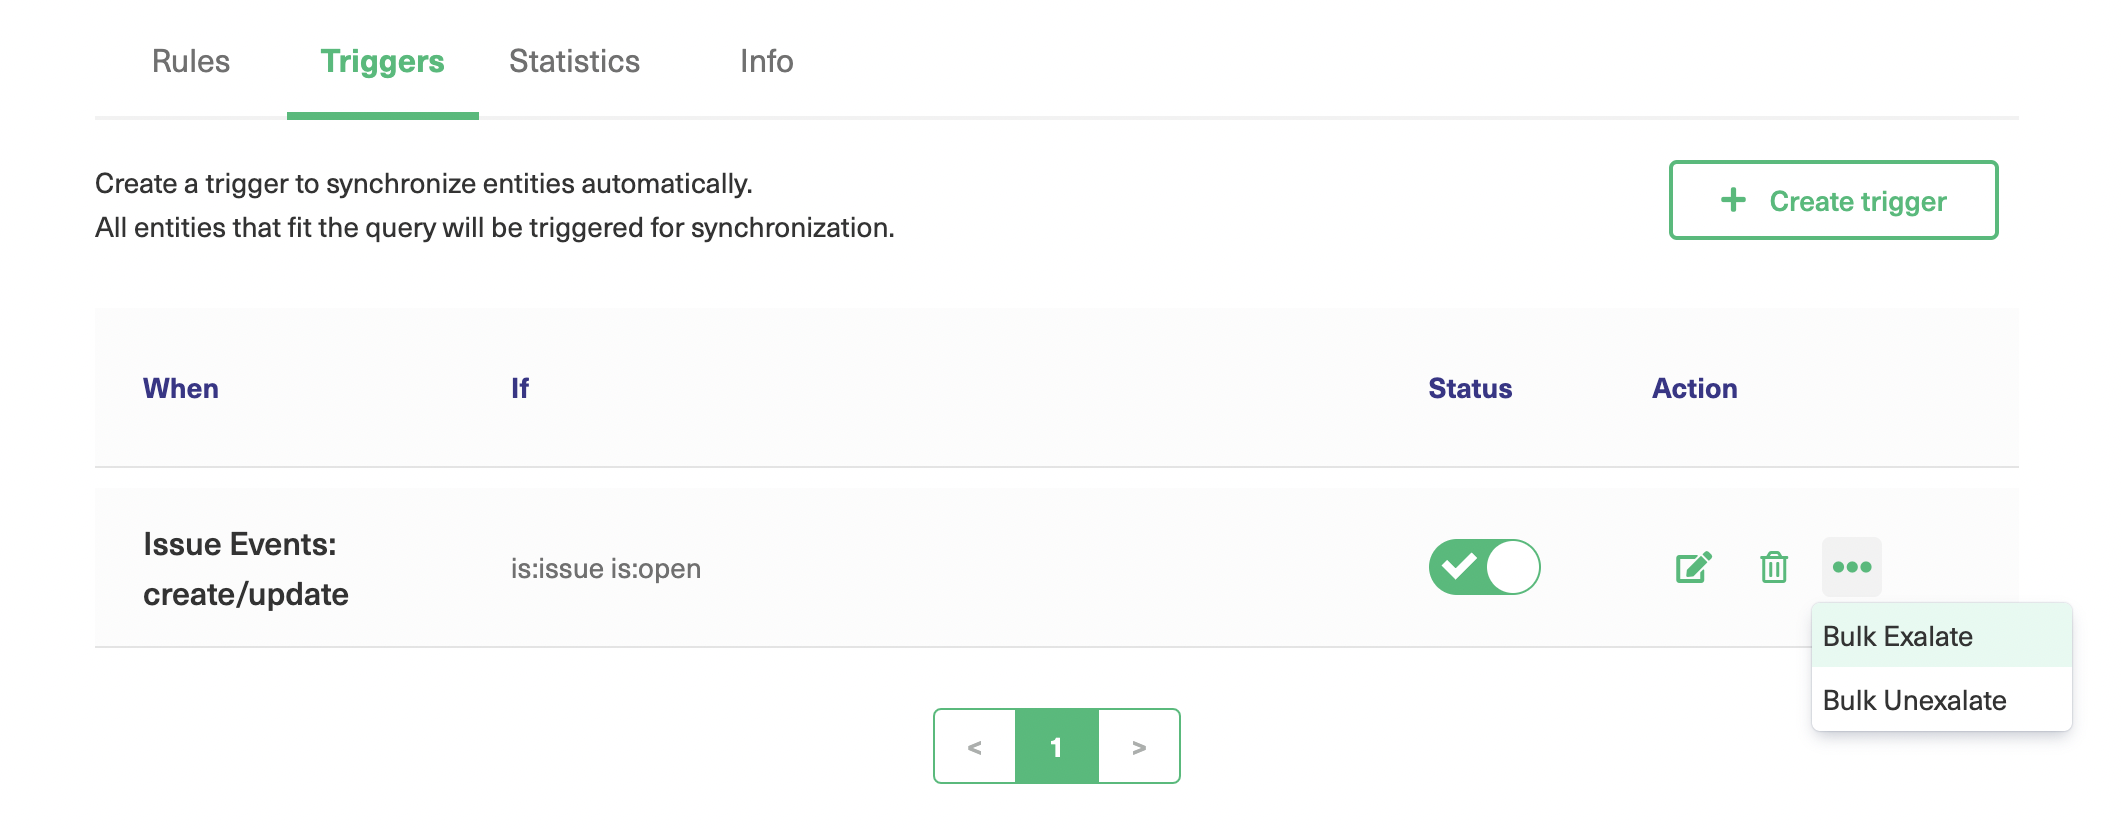
The screen has 4 tabs: “Rules”, “Triggers”, “Statistics” and “Info”.
We will cover “Triggers” in step 5.
The “Statistics” tab gives an overview of the synchronization information about the number of issues under synchronization, the last sync date, etc.
The “Info” tab provides a general description of the connection, stating its name, destination URL, description, and type.
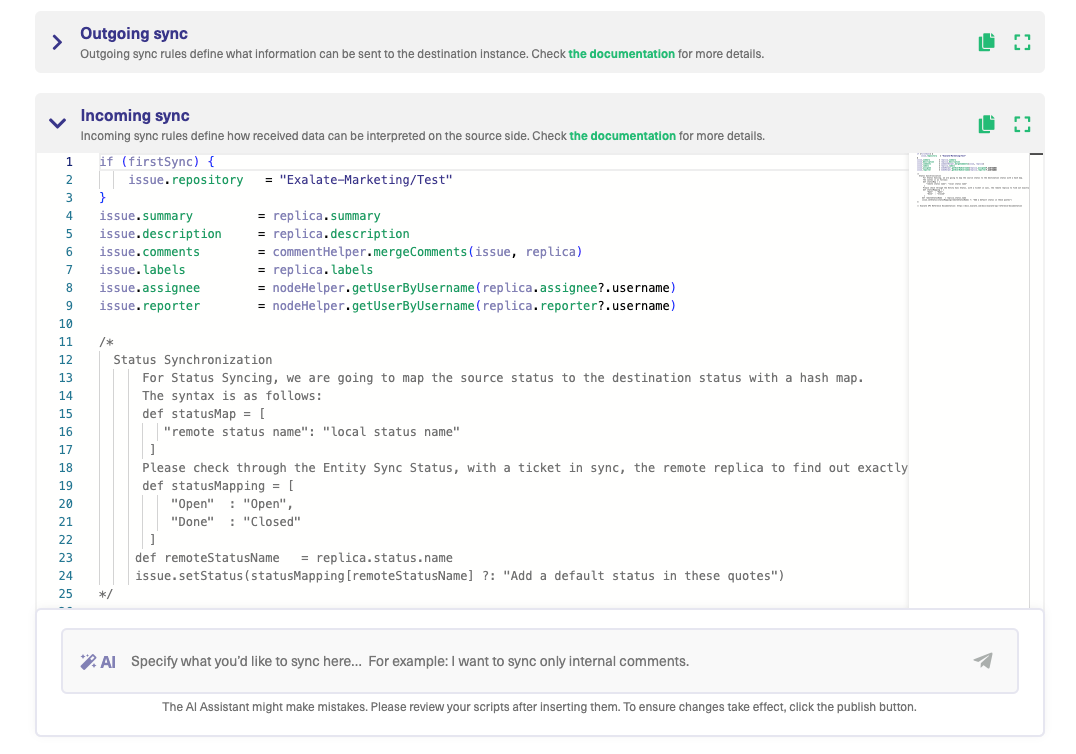
The “Rules” tab has scripts written in Groovy Scripting language. These are sync rules that specify what information should be sent to the other side in the “Outgoing sync” rules, and map the information coming from the other side in the “Incoming sync” rules.
Both the outgoing and incoming sync rules are present on the Salesforce and GitHub sides as shown above.
You can alter the sync rules using scripts anytime you want. Alteration means editing the
- outgoing sync rules by
- not sending existing information anymore by deleting the rule
- sending new information by adding scripts
- incoming sync rules by
- not receiving some information anymore by deleting the rule
- receiving new information by adding scripts
You can decide to not send or receive certain information by deleting or commenting on a particular line (read the rule) from the text box shown above.
Commenting means the particular line will be ignored at the time of synchronization. To comment, simply add a “//” at the start of the line. To remove multiple rules, add “/*” at the start of the block of lines and then “*/” whenever you want to end.
For instance, if you don’t want to send a description of the Case from Salesforce to Github, you add “//” as follows: //replica.description = entity.Description.
Sometimes you want to send or receive additional information. This is when you add new scripts in the outgoing and incoming syncs.
For instance, if you want to sync “Task” in Salesforce in addition to “Case”, you add the following script in the outgoing sync box.
if(entity.entityType == "Task") {
    replica.key        = entity.Id
    replica.summary    = entity.Subject
    replica.description = entity.Description
}Code language: JavaScript (javascript)
Connections in Script Mode Using AI Assist
The Script Mode allows you to generate and optimize scripts using the AI Assist feature — which appears as a tab under both the incoming and outgoing sync rules.
How does it work?
Enter your sync requirements into the chat box, and AI Assist will generate scripts based on your input, existing configurations, and Exalate’s scripting API.
It is also important to note that AI is not perfect. So, you need precise and detailed prompts to ensure the best results.
Let’s say you want to sync statuses between GitHub and Salesforce; the prompt could look something like this:
“I want to sync the status of my GitHub issue with the status of a Salesforce case.”
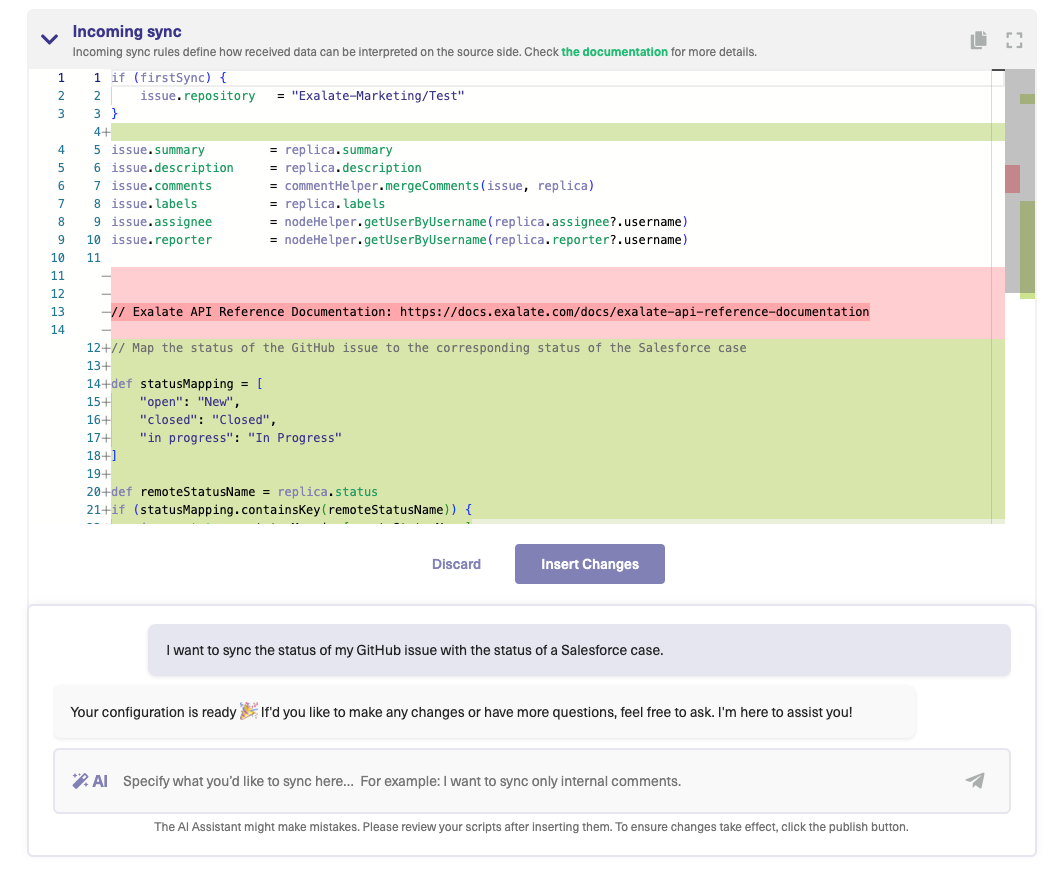
After a moment, the script will be generated, with suggested changes highlighted in green and red. The green scripts are suggested additions, while the red scripts are suggested deletions.
If the new snippet works for you, click on “Insert Changes”. Otherwise, you can discard the suggested code. If needed, you can refine your prompt and, once satisfied, publish the changes.
There are countless possibilities in the way you can edit these script rules to suit your specific use case. So experiment as much as you want!
You can always refer to Exalate docs for GitHub and Salesforce to learn more about how to work with them.
Move on to creating triggers.
Step 5: Set up Automatic Synchronization Triggers to Share Information
Rules define what you want to send to or receive from the other side, but triggers define how you want to start the synchronization process.
They allow you to specify under what conditions you want the synchronization to happen.
For instance, when the sales team logs a feature request raised by an important customer under a Case in Salesforce, an issue is automatically created in GitHub.
Such and many other conditions can be set under the search query, and if the condition is met then the trigger automatically starts synchronization based on the outgoing and incoming sync rules you have set.
For this, click the “Triggers” tab.
This tab shows a list of all the triggers you have created.
If this is your first time, the list is empty. Click “Create trigger”.
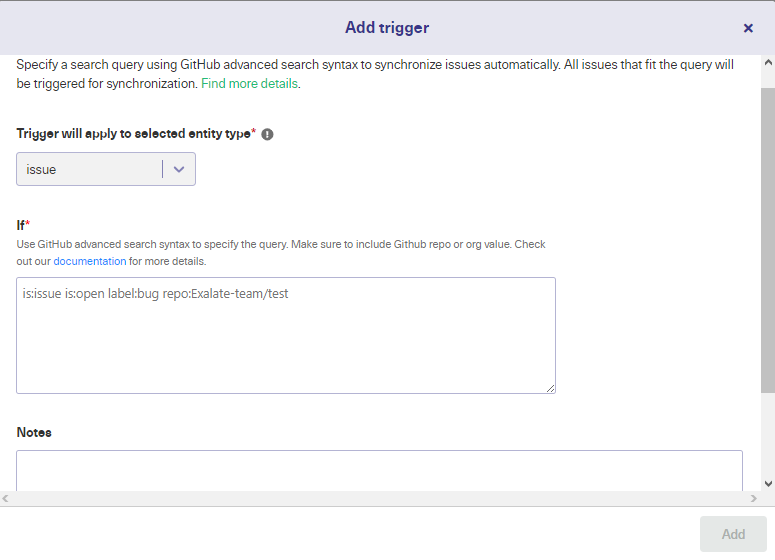
An “Add trigger” screen pops up.
Note: You can also create triggers by clicking on the “Triggers” tab in the left-hand Exalate menu. When you choose this option, you need to additionally choose the connection name you want to execute the trigger for.
The “Add trigger” screen first asks you to select an entity type. I have selected an “issue” type here since the screen is for GitHub. We will see how the Salesforce screen looks, shortly.
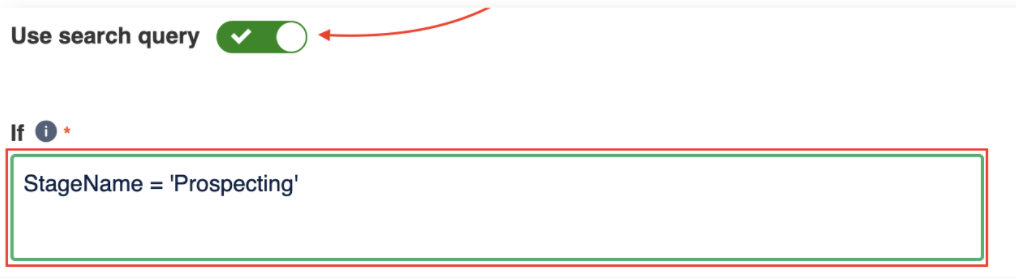
Under the “If” section, enter the search query.
These search queries are platform-specific. Here, we are syncing all the issues with the status as open.
To know more about GitHub search queries visit this page. For Salesforce, Exalate uses the SOQL (Salesforce Object Query Language) syntax. Learn more about it here.
Add appropriate notes to help you understand why you have created this trigger.
Click the “Activate trigger” checkbox to activate or deactivate the trigger. This saves you time when you don’t want to create a trigger from scratch but don’t need to use it right now.
Click “Add” once you are done.
On the Salesforce side, let’s have a glimpse of what the add triggers screen looks like.
There are many entity types supported by Exalate. But the most popular ones are Opportunity, Product, Account, Case, and Task.
After you select Opportunity as the Salesforce entity type, you select conditions to filter entities for setting the trigger.
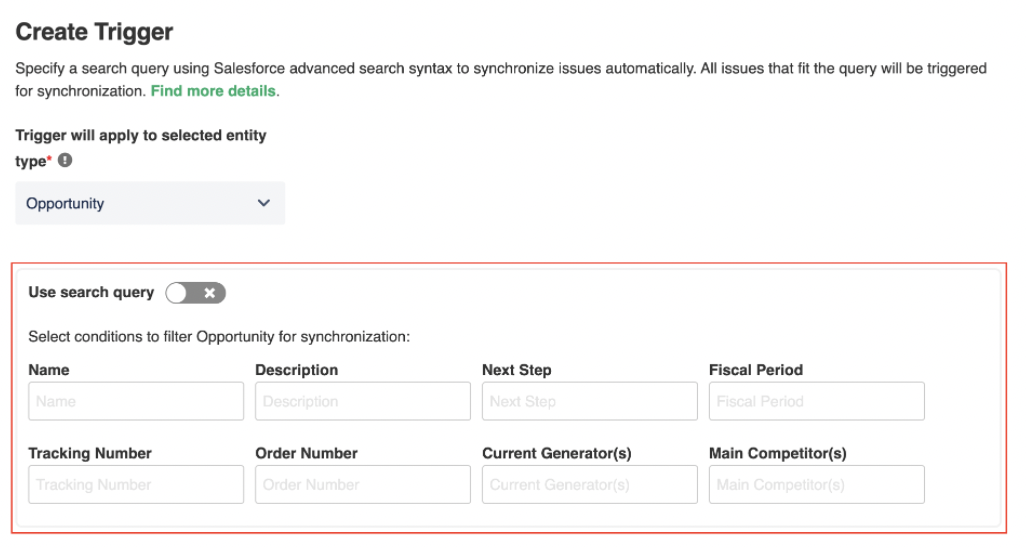
Enter the search query with the toggle button as shown below.
You can learn more about how this is done on the Salesforce and the GitHub side if you want.
You can see the created trigger listed as follows. If you want, you can choose to edit or delete the trigger from here.
By clicking the 3 dots next to the trigger you can choose to “Bulk Exalate” all the current issues or entities fitting the search criteria.
Don’t forget to click “Publish” when you have finished making the changes.
Common Use Cases
The most plausible use case that can be supported by a GitHub Salesforce integration is enabling seamless collaboration between sales and development teams.
Sales teams get a lot of customer queries, feedback, and new feature requests. An integration solution like Exalate can allow them to fire these customer concerns into GitHub right from within Salesforce. This will create an issue in GitHub. The issue progress and the appropriate status updates can then be viewed by the sales team from the Salesforce UI. And they are in a better position to update their customers on the status of the issue.
Important product updates or feature request issues undertaken by the development teams in GitHub can be automated and synchronized with Salesforce entities. So the sales team always has the most recent and up-to-date product information ready to be taken up with their customers who have been waiting for exactly that update or feature.

Conclusion
We saw how a Salesforce GitHub integration can help sales and development teams collaborate and share business-critical information to help them enhance customer experience.
We also discussed how choosing the right technology for your integration can manifold the benefits such integration can bring along. Every organization has its drivers for choosing an integration tool, but we chose Exalate since it checks most of our criteria.
Finally, we covered a step-by-step approach to implementing a Salesforce GitHub integration to ensure that the integration is handled systematically.
Frequently Asked Questions
What is a Salesforce GitHub integration?
A Salesforce GitHub integration is a way to connect your GitHub repository with a Salesforce Org. Such an integration will enable seamless collaboration between the business teams using Salesforce and the developers using GitHub.
How does Salesforce integrate with GitHub?
Salesforce can integrate with GitHub by providing a version control and collaboration platform on Salesforce projects. You can connect your Salesforce Org to a GitHub repository and use Git to manage changes to Salesforce metadata and code.
How do I deploy changes from Salesforce to GitHub?
You can use tools like Salesforce CLI or third-party integration solutions like Exalate to facilitate the deployment process from your GitHub repository to Salesforce.
What tool can I use to integrate GitHub and Salesforce?
You can use third-party tools like Exalate to integrate GitHub and Salesforce. This solution allows you to create custom scripts to tailor the integration to your specific requirements. So you can integrate any Salesforce objects into GitHub repositories.
Can I integrate Salesforce and GitHub for free?
Yes, you can integrate GitHub and Salesforce for free. Both these platforms offer free plans to connect. But only the core integration with basic features is free. Additional integration requirements may have associated costs. You can try other third-party tools that have various integration options at a fair price.
Recommended Reads:
- How to set up a Jira Salesforce Integration
- Salesforce to Salesforce Integration: Sync Multiple Salesforce Instances Bidirectionally
- How to Set up a Jira GitHub Integration
- Salesforce Zendesk Integration
- How to Set up a ServiceNow GitHub Integration
- How to Set Up a Salesforce ServiceNow Integration
- How to Set up an Azure DevOps GitHub Integration
- How to Set up a Zendesk GitHub Integration