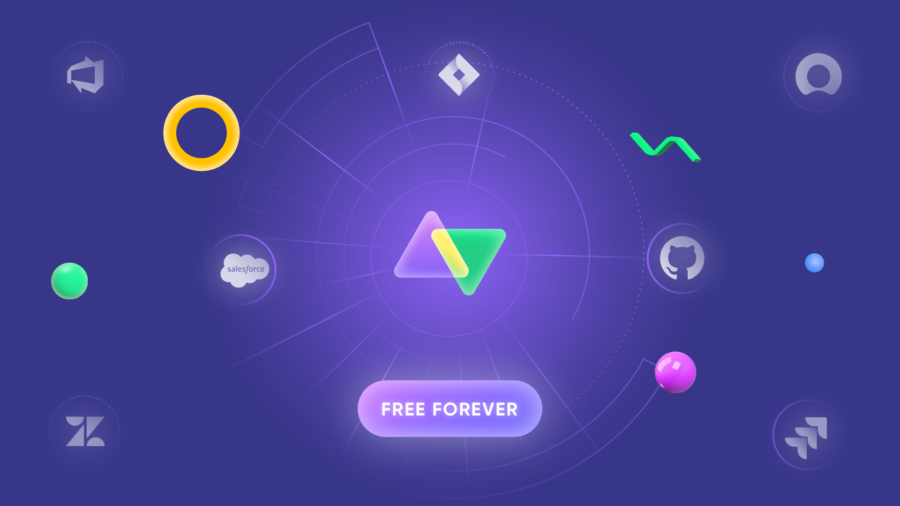
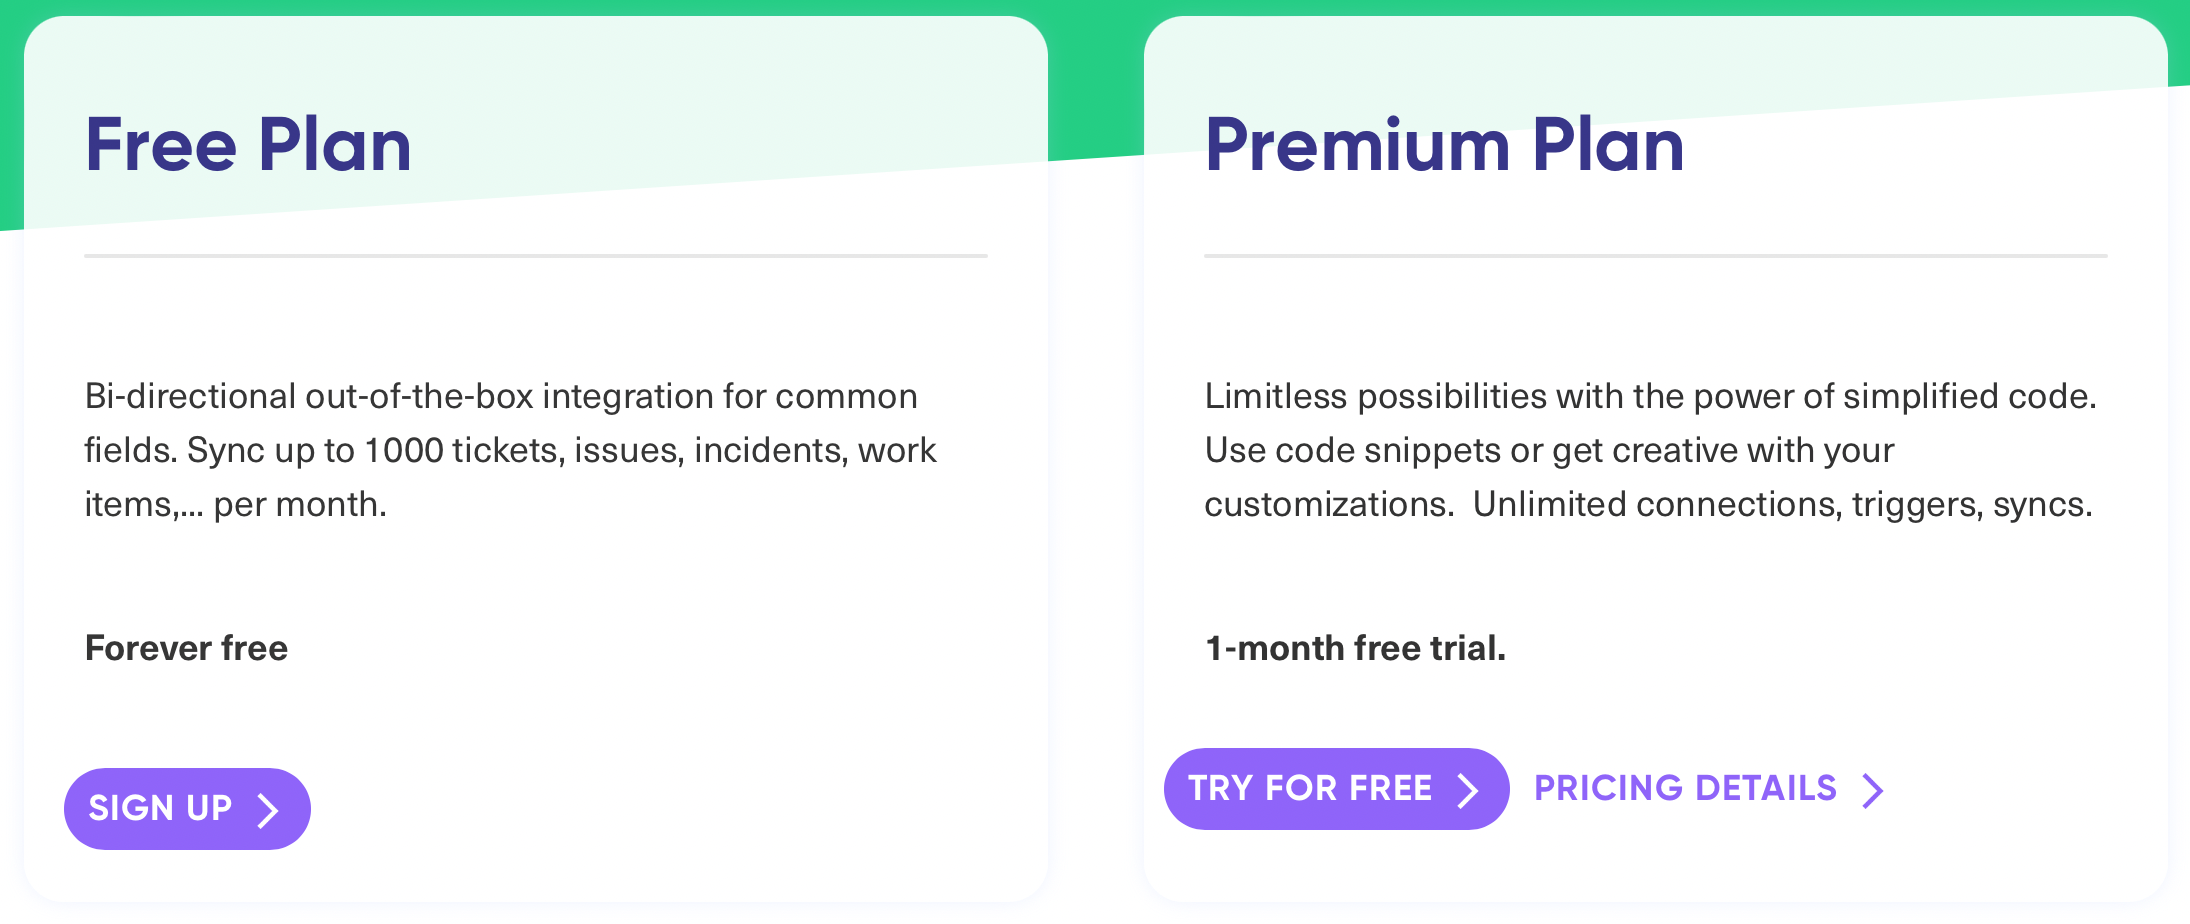
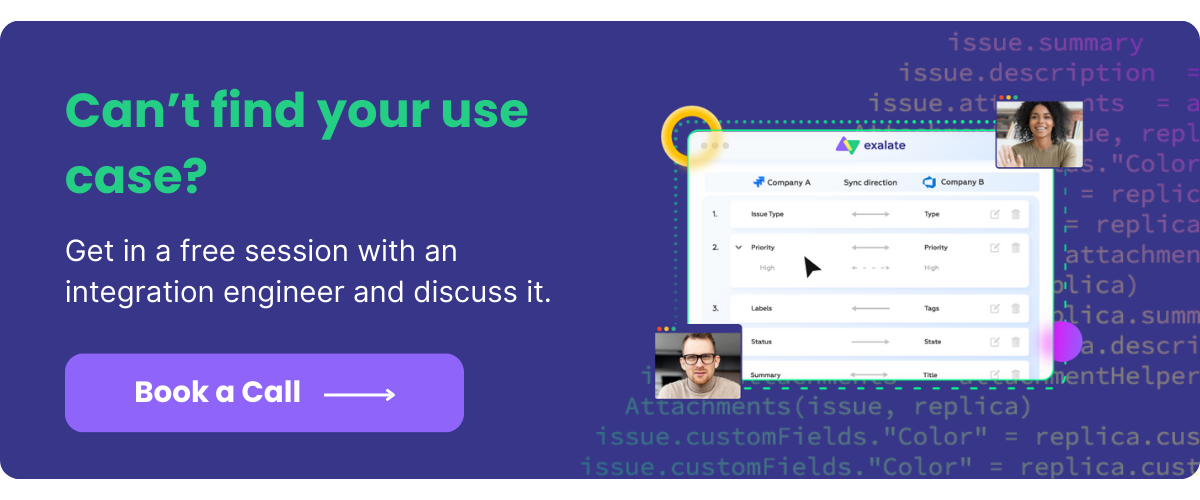
It’s happening! We have just launched the Exalate Free Plan. With this plan, you can expect the benefits of Exalate absolutely for free.
Exalate allows for real-time, two-way synchronization between different task management tools.
And now with the Free Plan, Exalate can cater to your basic synchronization needs:
synchronize up to 1000 work items or issues or tickets per month
automate your syncs using the trigger functionality
generate default sync rules like summary, description, comments, and attachments
perform bulk synchronization for large sets of issues
execute clean-up tools that enable you to stop the issue synchronization.
It is now available for Jira Cloud, Zendesk, Azure DevOps, ServiceNow, Jira Server, Jira Data Center, GitHub, and GitHub Enterprise Cloud.
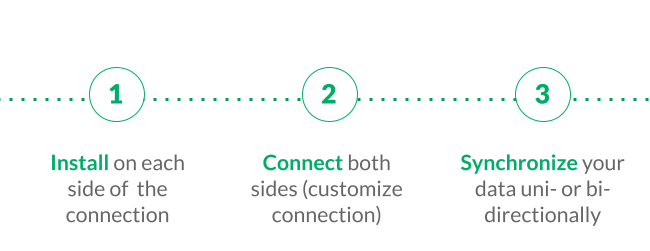
Connect and Synchronize Tasks in 1, 2, 3
Ready to establish your first connection and sync your first issues?
Once the connection is established, you can instantly sync your first issues. Spend less time configuring and more time experimenting with the synchronization.
With the free version, we aim to:
have a faster turnaround time due to a simplified integration workflow.
enable you to explore and understand the product in detail with easy-to-navigate screens.
promote efficiency by allowing you to save your energy from doing configuration efforts and experiencing shortened navigation procedures.
increase your productivity, so you focus more on value-added tasks like report analytics, prescribing solutions to customers and their needs, and improving SLAs.
Exalate is now accessible to a gamut of technical and business users like Product Managers, Sales and Marketing personnel, Quality Assurance experts, developers, and the Operations team.
How does the Free Plan work
The Freemium version is available for customers who are currently on their Evaluation (30-day Free trial) or Paid Licenses. So if you are new to Exalate, you can switch to the Free License only after your Evaluation License expires.
Jira Users on the Exalate Evaluation Licence
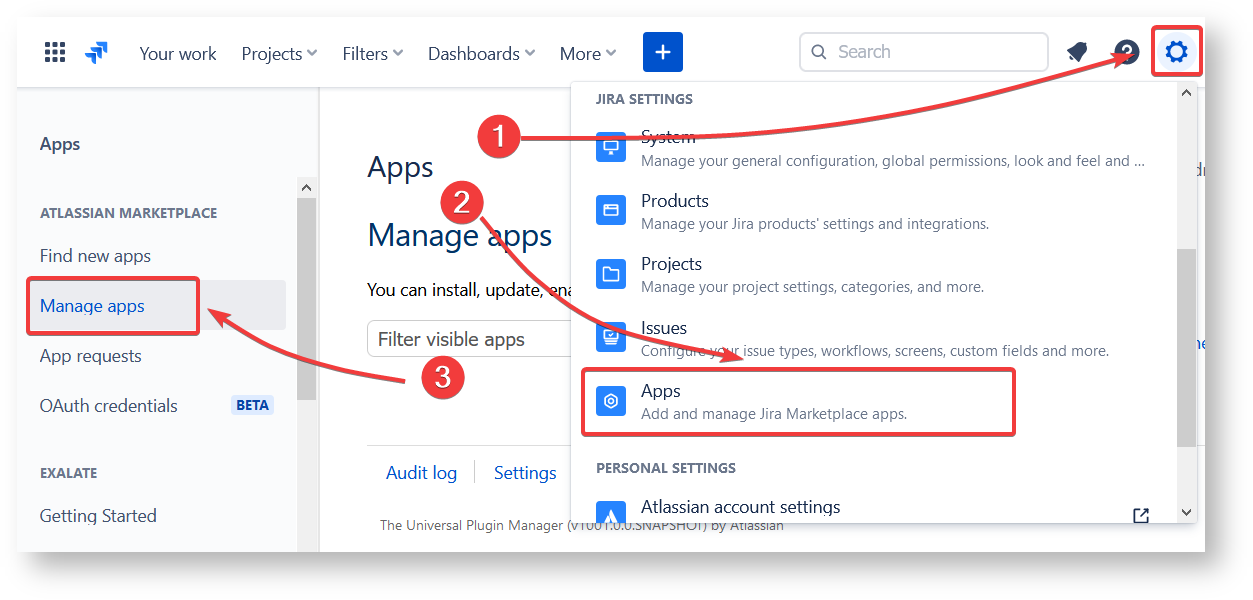
If you are a Jira customer on an Evaluation license (30-day free trial) and want to switch to the Free Plan, you need to follow these steps:
Stop/ unsubscribe from the Evaluation license.
For stopping or unsubscribing from the Evaluation License, you need to
Navigate to Settings in Jira, click on Apps and go to Manage Apps
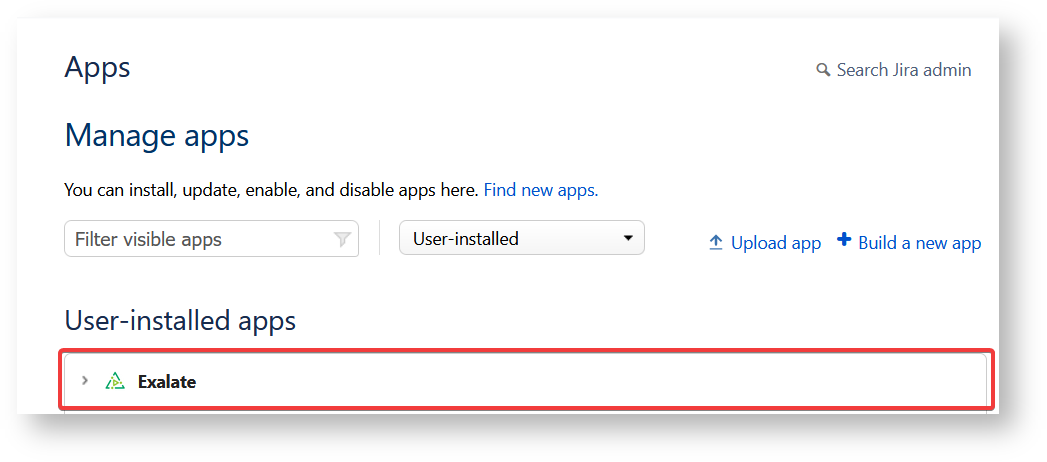
Select Exalate from the user installed list of Apps
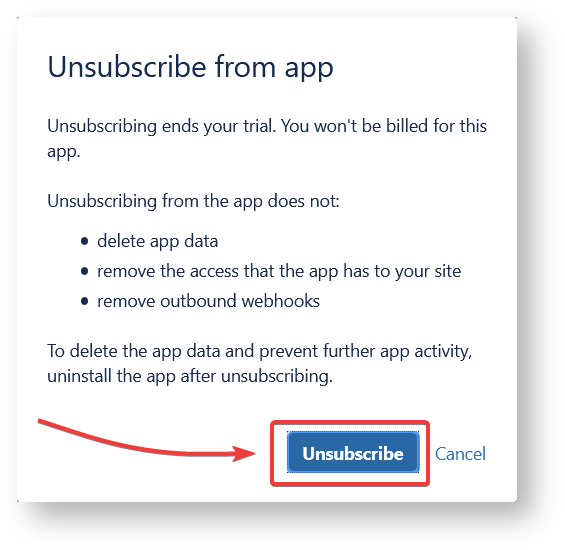
Once you click on “Unsubscribe”, the Free Plan is automatically activated. You can see it in the “License Details” tab under “Manage Apps”.
Note that you can use only the Basic connection when on the free version. You can also learn how to initiate a Basic connection in this blog post.
Note: Visual and Script connections are available in the 30-day Free Trial and the Premium Plan only.
Existing Exalate Customers on the Evaluation License (Zendesk, Github, Azure DevOps, or ServiceNow)
For the above-stated issue trackers, there is no need to unsubscribe from the Evaluation License. The Free version is automatically activated once the Evaluation expires.
You can check this by looking at the license type in Exalate admin under the “License Details” tab. This tab clearly specifies the type of license that has expired and also states the current one the user is on.
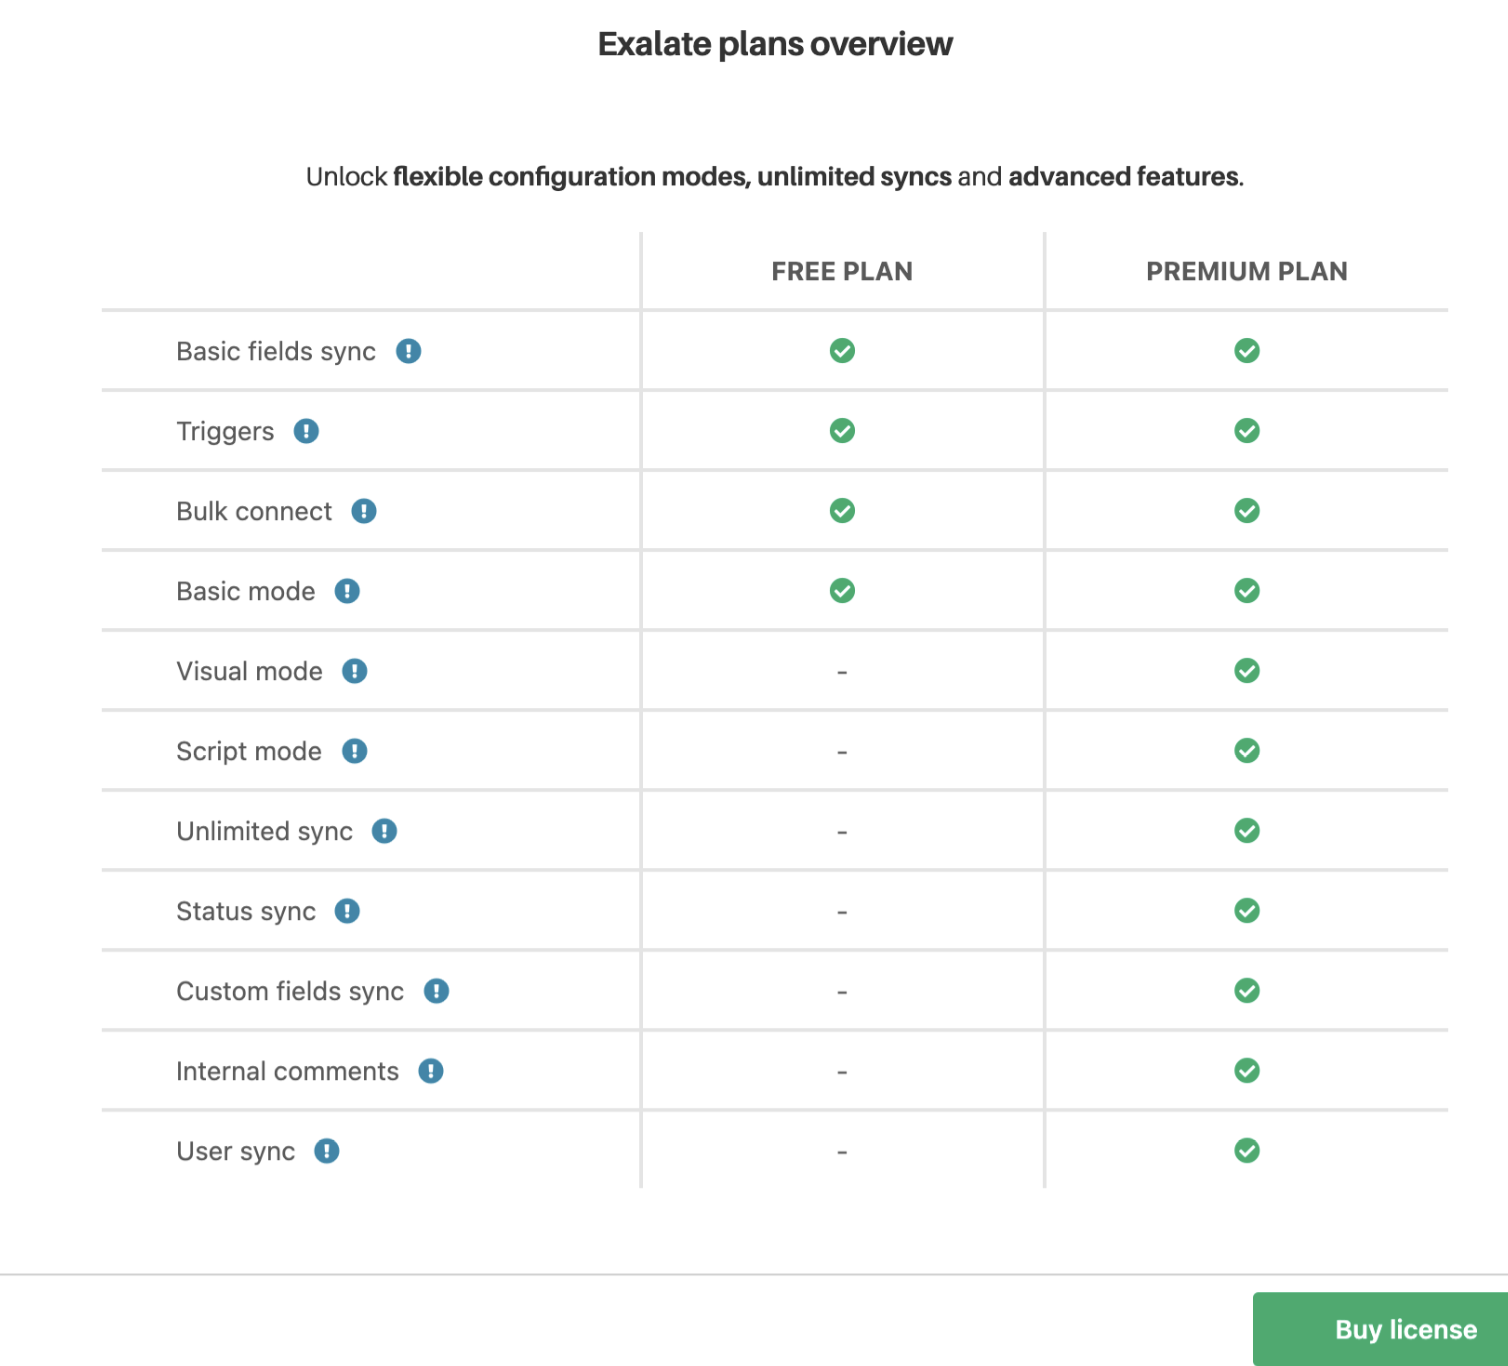
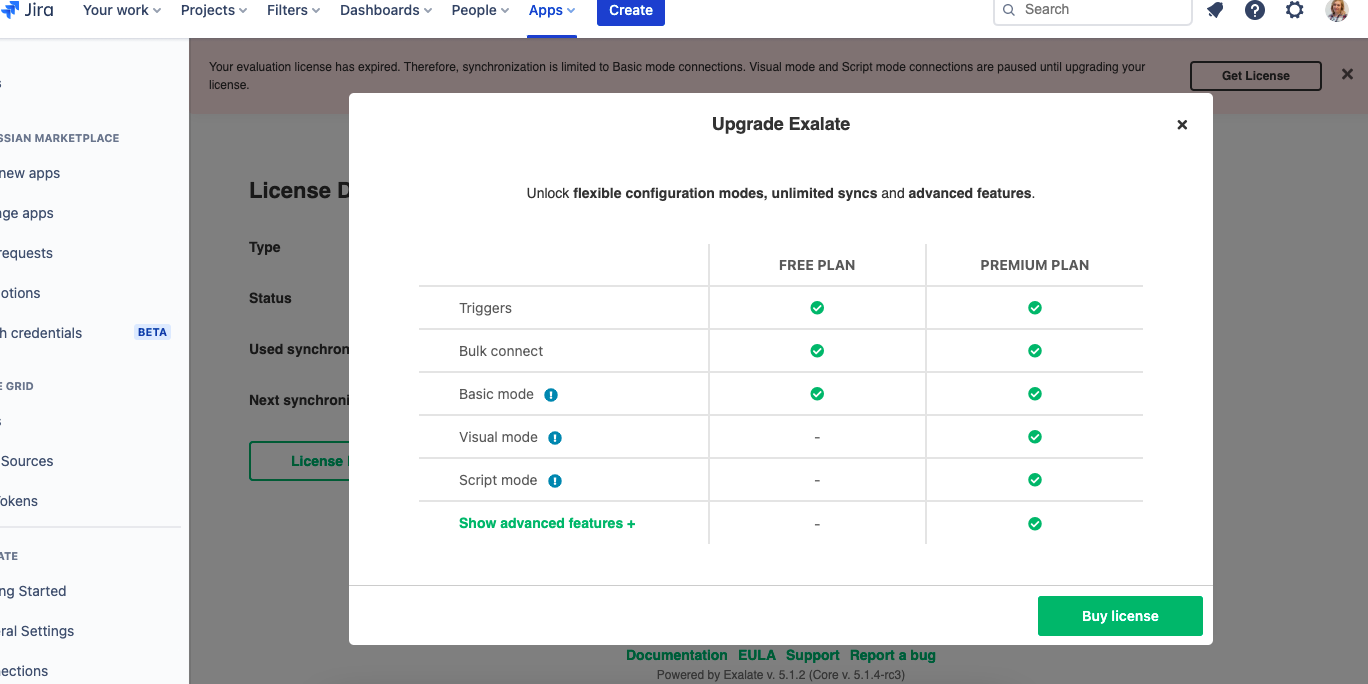
Note: You can unlock the full functionality of Exalate with the most advanced features and configuration modes with its Premium Plan. You can then experience unlimited syncs and connections and even get a free trial for 30 days.
Upgrade to the Premium Plan
To unlock the full potential of Exalate, you can always upgrade to the Premium Plan. Experience different configuration modes – Visual and Script – along with advanced features.
Here’s the difference between the 2 versions:
For upgrading to the Premium plan in:
Jira
Navigate to Settings – Apps – Manage Apps
Select the “License Details” tab on the left sidebar menu. This screen shows you the current plan you are in and other license details.
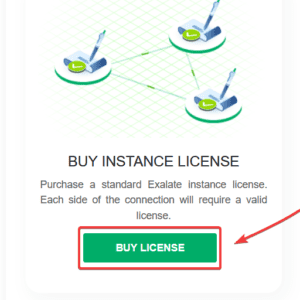
Click on Buy License to upgrade from the Free Plan and move to the Premium Plan.
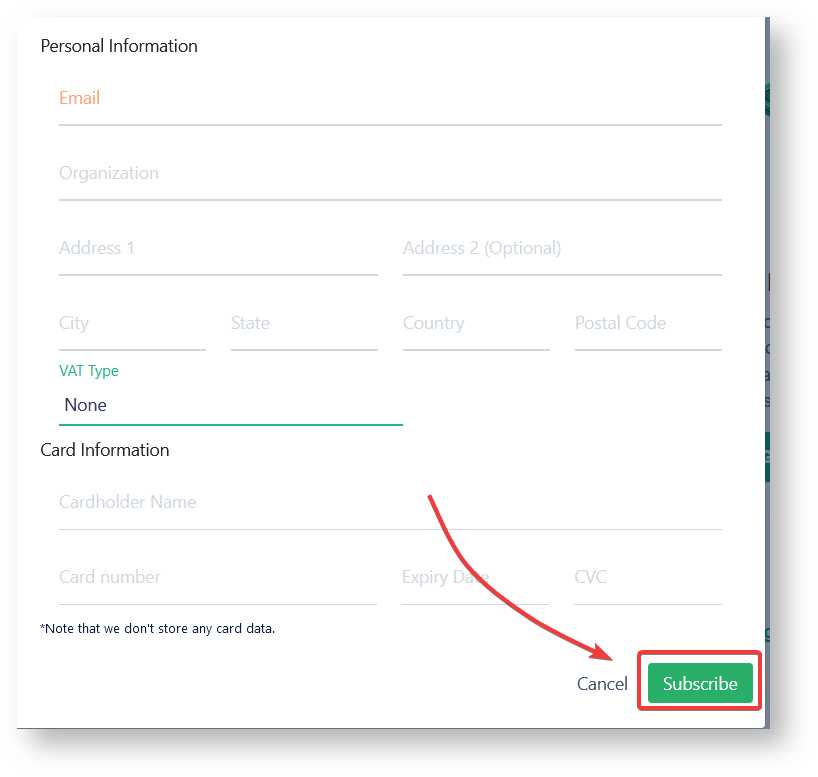
Enter the payment details and click Subscribe
Zendesk, Azure DevOps, ServiceNow, and Github
The steps for this in Zendesk, Azure DevOps, ServiceNow, and Github are similar to the steps shown for Jira.
Upgrade from the Evaluation License to the Premium Plan
The Evaluation License (30-day free trial) comes with the full Exalate functionality, but the number of synchronizations is limited to 1000. So if you need to use the advanced features of Exalate along with unlimited synchronizations and connections, then it’s better to upgrade to the Premium Plan. Check the pricing and licensing page to get a better understanding of these plans.
For upgrading from an Evaluation License to the Premium License:
Exalate users in the 30-day free trial are notified when their Evaluation license is about to expire.
Once the Evaluation License expires, you can opt to stay on the Free Plan or can upgrade to the Premium version by clicking the “Get License” button.
The “Get License” button will redirect you to “Buy License” depending on the type of work management system (Jira, Zendesk, Azure DevOps, ServiceNow, and Github) you have. You can then subscribe to the Premium Plan.
For instance, if you click “Get License” in Jira, you will be redirected to the following screen. After clicking “Buy License” here, you will be redirected to the “Manage Apps” section in your Jira from where you can get started.
At Exalate, we have always believed in innovating and adapting to customer needs. So we have come up with great plans for you: the Free Plan, for your basic synchronization needs and the Premium Plan, which has different configuration modes and advanced features for your customized and complex use cases.
The Free Plan is a great way to experience the benefits of Exalate firsthand. It comes with your favorite issue trackers like Jira Cloud, Zendesk, Azure DevOps, ServiceNow, Jira Server, Jira Data Center, GitHub, and GitHub Enterprise Cloud. And you can upgrade to the Premium Plan anytime you wish!
In this episode of Integration Talks, a podcast on everything integration, Francis hosts Steve Morgan from Syniad IT to discuss the challenges of integration.
Steve specializes in the assessment, design, build, and implementation of IT Operating Models, using frameworks such as Service Management (ITSM) and Service Integration & Management (SIAM) in organizations to optimize their technology teams, improve processes, and manage complex multi-vendor eco-systems.
About this episode:
Why is categorization important?
The benefits of SIAM implementation
How to manage cultural change
and more
Not a fan of watching videos? Then listen to this episode on:
Francis Martens: Welcome to the “Integration talks” new episode about system integrations, especially focused on multi-vendor or cross-company integrations itself. Today I’m welcoming Steve Morgan from Syniad IT. And welcome Steve how are you doing?
Steve Morgan: Hi yeah I’m good. I’m really pleased to be here thanks for having me along. Be really keen to chat with you today and we can work through some of these service integration challenges that you’re gonna post so pleased to be here. Thanks, Francis.
Francis: So what’s Syniad IT. What’s your company doing?
Steven: So, uh we’re based in the UK, we work with clients across the globe, not just in the UK but across Europe, North America as well. The primary aim of the organization is to help IT leaders improve their IT operations, the specialism is around IT Service Management so things like ITIL.
And then in the last five or six years, we’ve been turning our attention to Service Integration and Management or SIAM depending on where you are in the world. And as an organization, we’ve been involved both, on the one hand in the development of collateral around SIAM, so there are some books that we’ve been involved in developing and on the other hand, delivering real projects, real-world SIAM projects for our clients. From design through to build, implementation and we cover that whole gamut. So yeah, relatively small organization but very nimble, very flexible, and able to help customers, kind of whatever the challenge is, be it large or small really.
So yeah, that’s what we’re doing. And we’ve found ourselves in a position where we’re quite widely regarded as being experts in the field. So, it’s really a strong place to be.
Francis: It’s getting more and more interesting an environment to be in, right? With this, we would need to have more effective cooperation with your suppliers right?
Steven: Yes, absolutely I think the tides are changing, aren’t they? The culture that we used to have where we’d have one supplier who would deliver everything in a monolithic contract for us and we would kind of beat that supplier up with a big stick!
And, you know work harder, work better, you know, work more reliably. I think those days are gone and I think the organizations are looking for more of a partnership model with their suppliers and suppliers are more able to really add value to the business of their customers rather than just be seen as a commodity provider like a telephony provider or the guy who provides the photocopiers or you know that kind of thing. You know it’s more than a commodity. There’s some real business value to be added there, I think.
Francis: Yeah, so IT systems are much more than only like a connection to your telephone system right?
As more and more information flows through organizations, teams working on different platforms can benefit from sharing this data. Once you pick the right Zendesk Azure DevOps integration solution, you can make these systems interact seamlessly according to your specific use case.
In this blog post, we’re going to show you how to set up a Zendesk Azure DevOps integration between teams that work together seamlessly.
If you want a practical guide on how to integrate data between both platforms, hang around till the end.
What is Zendesk Azure DevOps Integration?
Zendesk Azure DevOps integration refers to the process of connecting both systems with a third-party application in order to get them to share data and vital updates.
This integration usually involves developers or engineers using Azure DevOps collaborating with customer support staff who work on tickets on Zendesk.
Here is a common scenario in tech companies:
A development team using Azure DevOps can benefit from customer feedback collected by a team using Zendesk. The customer support team can also benefit from talking to developers to help solve customer issues.
With the correct setup, you can help your teams make the best use of the data available within the organization. Once an automated system is in place, it can automate the data exchange, debugging, and analysis.
A trigger or automation can dictate when this data exchange occurs. You can also write scripts or use no-code mapping to say how entities map to each other between Zendesk and Azure DevOps.
What Can I Sync Between Zendesk and Azure DevOps?
When implementing integration between Zendesk and Azure DevOps, you can sync several fields and entities within work items, including ID, Description, CreatedBy, CreatedDate, Attachments, Comments, etc.
Zendesk users can sync entities and fields in tickets, including data from Subject, Email, Description, Status, Type, Priority, Group, Assignee, Tags, and custom fields.
In general, you can explore several syncing capabilities with the help of Exalate’s AI-powered Groovy scripting engine. Just get the functions and expressions right, and you are good to go.
More on that later.
What are Some Azure DevOps to Zendesk Integration Use Cases?
Speaking of entities you can sync between Zendesk and Azure DevOps, let’s go through some business and technical use cases.
#1 – Share Customer Support Tickets with Developers
When tickets come into Zendesk, the agent in charge can decide whether they require attention from the development team.
Tickets for the development team will be escalated instantly, and all the details contained in the ticket will appear in the assigned fields for the corresponding Azure DevOps work item.
The synchronization will be selective and only pass on the info developers need to work on the problem.
Also, any update from the development team will be reflected in the ticket for the customer to see.
Say the Azure DevOps instance contains a custom field named “Critical Level” to reflect the amount of work that needs to be done. The details could be mapped to appear as a comment or another custom field within the Zendesk ticket.
#2 – Notify Support Staff about New Releases and Fixes
When developers release new fixes for a known issue or bug, they can communicate the status with the support team.
For instance, the development team can set the status of the Azure DevOps work item to change the status of the Zendesk ticket.
If this integration is cross-company, with multiple users interfacing with the client, you can impersonate comments to appear from a designated user.
#3 – Maintain Priority Across Zendesk and Azure DevOps
Admins want every incoming Zendesk ticket to bear a priority so they’ll be able to sort and assign them appropriately.
When the ticket is escalated to the engineers, the priority should also be reflected in the work item so that the development team can determine how to schedule and assign it.
#4 – Sync SLA Details for Better Support
Depending on the condition of the SLA, the Zendesk ticket might need urgent attention within a specific time frame. So, the work item should reflect the details of the ongoing SLA with the customer.
Now, if the SLA limits the available support time, the work item in Azure DevOps should help you allocate ample time to resolve the ticket in a timely manner.
#5 – Link Related Zendesk Tickets to a Single Azure DevOps Work Item
When a bug or issue affects your product, and customers are complaining about it, these tickets should all go to a single destination.
How would this work? For starters, the Zendesk agent in charge should create a mapping to ensure tickets with a certain label or priority go to a Bug or Epic in Azure DevOps.
That way, all the tickets will receive progress updates at the same time without having to reply to each one separately.
Why Integrate Zendesk and Azure DevOps?
Here are some reasons to explore Azure DevOps Zendesk integration for your organization.
Enhance collaborations: All stakeholders can stay updated about the status of tickets and work items integrated into the sync. This increases visibility for team members working on a similar initiative but from different platforms.
Automate workflows: With triggers and automation, admins can set up two-way and one-way synchronizations between Zendesk and Azure DevOps.
Reduce errors: Instead of relying on human data input and risking errors, integrating both systems with a third-party app ensures that only specific actions can trigger exchanges.
Maintain a single source of truth: Integrating Azure DevOps with Zendesk allows teams working on a specific issue—say, providing customer support or handling bug reports—access to a singular information source for accurate decision-making.
Save money: Both teams in the synchronization will stay in their own system without having to onboard an entirely new platform.
How Can You Choose the Right Tool for Zendesk Azure DevOps Integration?
There are a few criteria you should take into consideration when picking an integration solution.
Decentralization: Teams will benefit from decentralized integration and gain complete control over what data they want to share with the other side without having to leave their familiar environment.
Advanced security features: The solution must have advanced integration security mechanisms, such as token-based authentication and data encryption. These are important for maintaining the integrity of the data at rest and in transit. Opt for ISO-certified solutions.
Reliability: Downtime will sometimes occur, and in such cases, the system should be robust enough to recover. Errors on either end should not cause problems on the other.
Flexibility: Teams should be able to define how they want to share data and set the conditions that trigger data exchange. This flexibility extends to using AI-powered scripting assistance to extend the scope of applicability.
Scalability: The Azure DevOps Zendesk integration should have the capacity to scale operations significantly without breaking down completely.
The solution we use for the Zendesk Azure DevOps integration here is Exalate because it provides flexible, custom synchronizations between teams across companies.
It allows users to speed up scripting and field mapping using the AI Assist feature. Once set up, it can work in the background.
How to Set up a Zendesk Azure DevOps Integration (the Step-by-Step Process)
Now, let’s set up the integration. You’ll start by installing Exalate on both platforms. Then, you’ll create a connection. Finally, you’ll configure the connection to share what you want and decide on the conditions that trigger sharing.
Note: You can refer to the Getting Started Guide on Exalate documentation for a step-by-step procedure to set up a connection between other applications it supports. You can also refer to the Exalate academy videos.
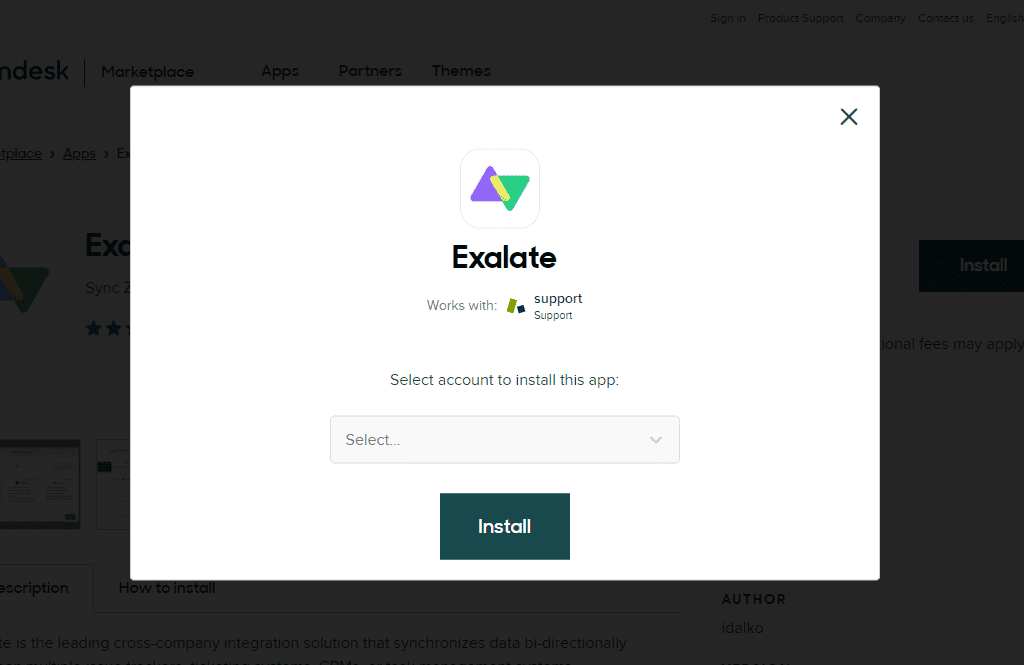
Click on the icon, then click the install button on the next screen.
You’ll see a popup asking you to enter your Zendesk instance URL. Do so, then click “Install”.
Next, you’ll be taken back to your Zendesk account. You can change the app title, and enable restrictions if necessary, or you can just accept the defaults.
Either way, click the blue “Install” button to continue. After Exalate installs, you’ll see its icon in the left-side menu at the bottom. Click the icon now.
When you first use Exalate, you need to grant it permission to access your data. Click “Allow” to do so.
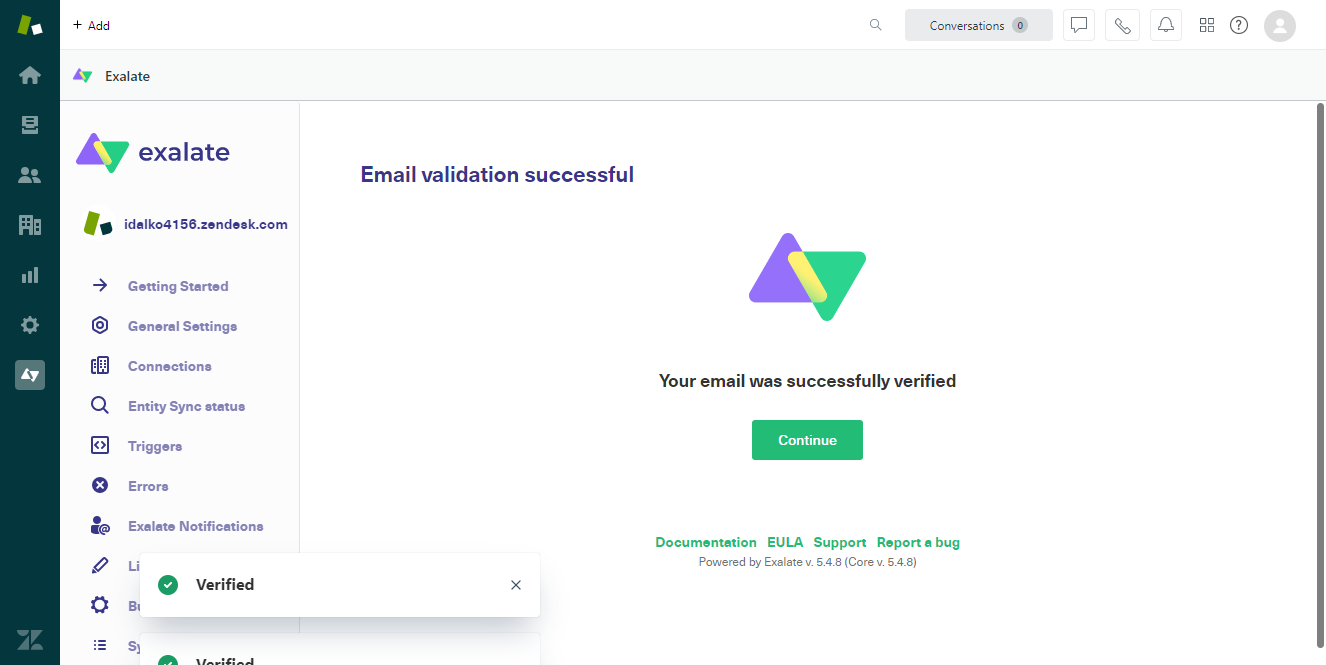
After that, there’s a registration screen where you need to enter your email address and other details. After clicking the button to submit them, you’ll be sent a verification mail. Click the link in it.
You’ll be taken back to Zendesk and should now be successfully verified. You’re free to use Exalate for 30 days before deciding whether to continue with it.
Note: It is also possible to install Exalate via docker, so please check out the documentation if you prefer to do that.
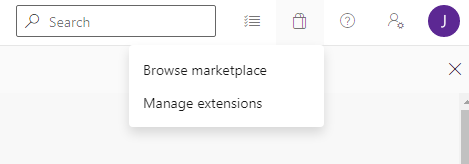
Log in to Azure as an admin, then look at the icons at the top right of the screen.
In the marketplace search for “Exalate”.
Click the app when it appears, then click “Get”. On the next screen, confirm your organization is listed correctly, then click the blue “Install” button. When it’s ready, click “Proceed to organization”.
You can now reach Exalate from within Azure DevOps by clicking the marketplace icon, and selecting “Manage extensions”.
You’ll see Exalate listed in the left-hand menu towards the bottom.
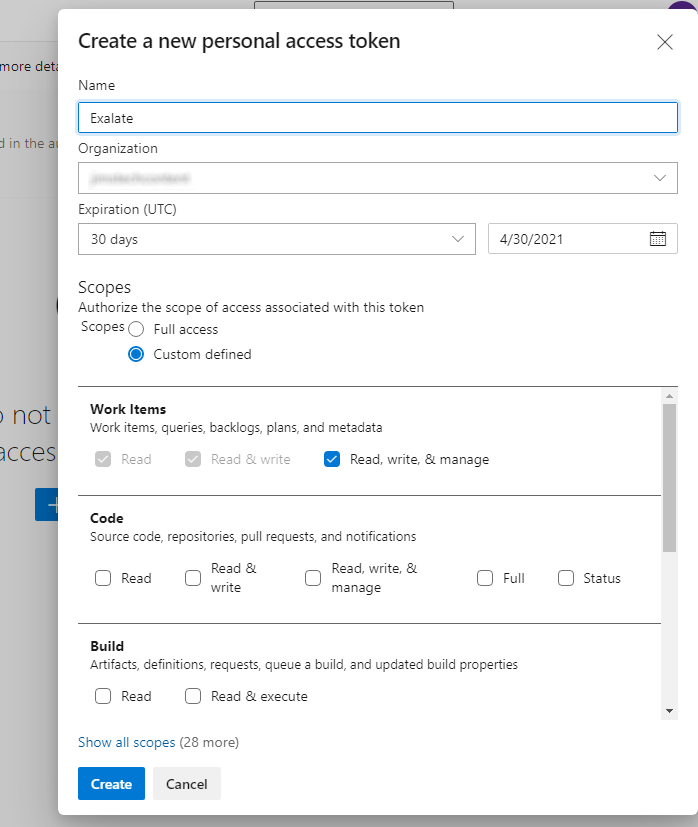
The first time you access Exalate, you need to provide a personal access token. To create one, open the settings menu at the top right and click “Personal access tokens”.
Click the “New Token” button.
On the form that appears, you need to make sure “Read, write & manage” in the “Work items” section is ticked. It should be by default. You might want to extend the expiration date too, otherwise, you’ll have to create a new token every 30 days.
Click the “Create” button. When the token is created, you need to copy and paste it somewhere straight away, as there is no way to access it if you don’t. Click “Close” after doing so.
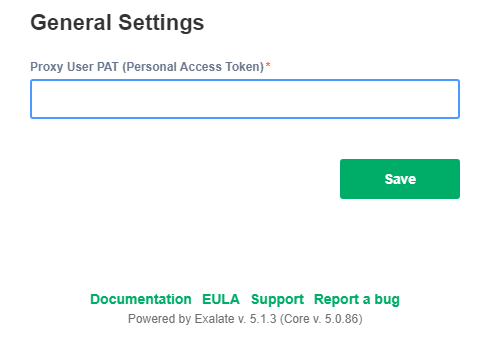
Now, back in the Exalate screen, paste in your token. As with Zendesk, enter your email and other details, click the “Agree and submit” button, and wait until you receive an email.
Click the verification link to set things up in Azure DevOps.
Step 3: Connect Zendesk and Azure DevOps
Now that you have Exalate on both platforms, you can create a connection between them. You can do this from either side. I’ll use Zendesk in this guide.
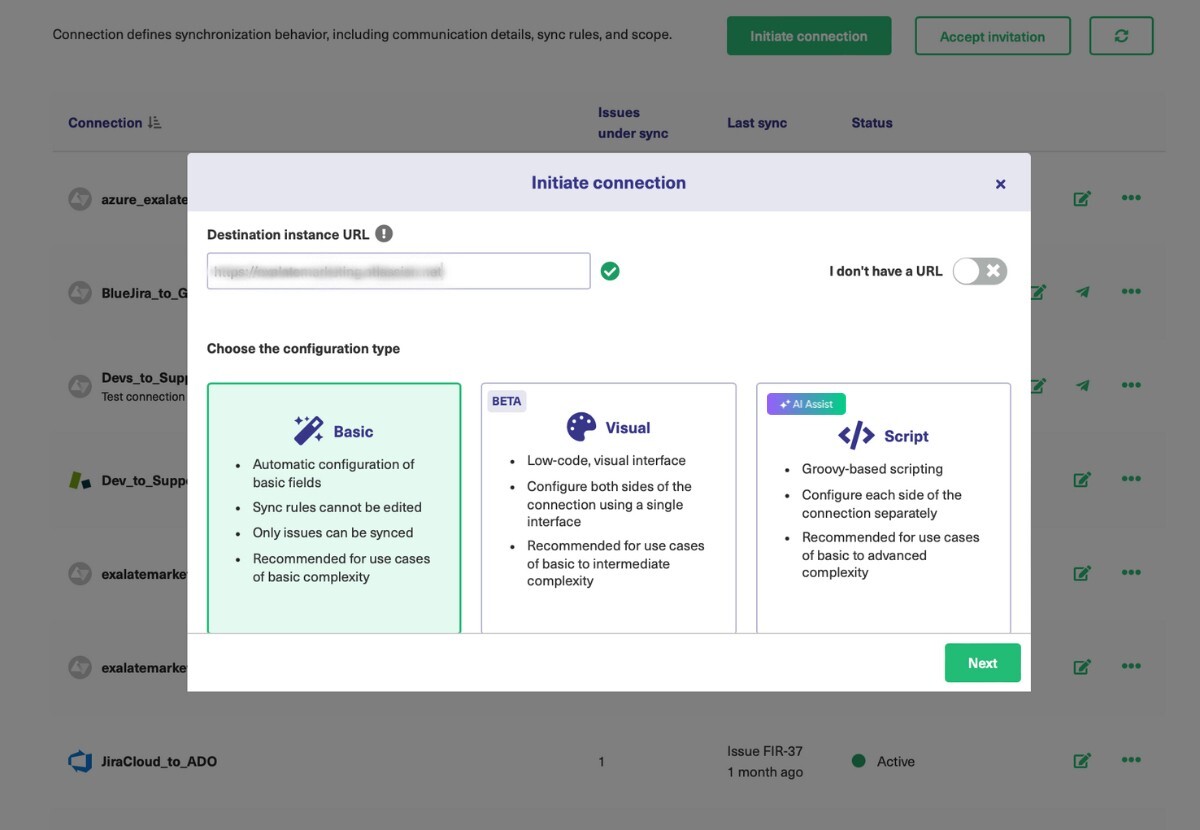
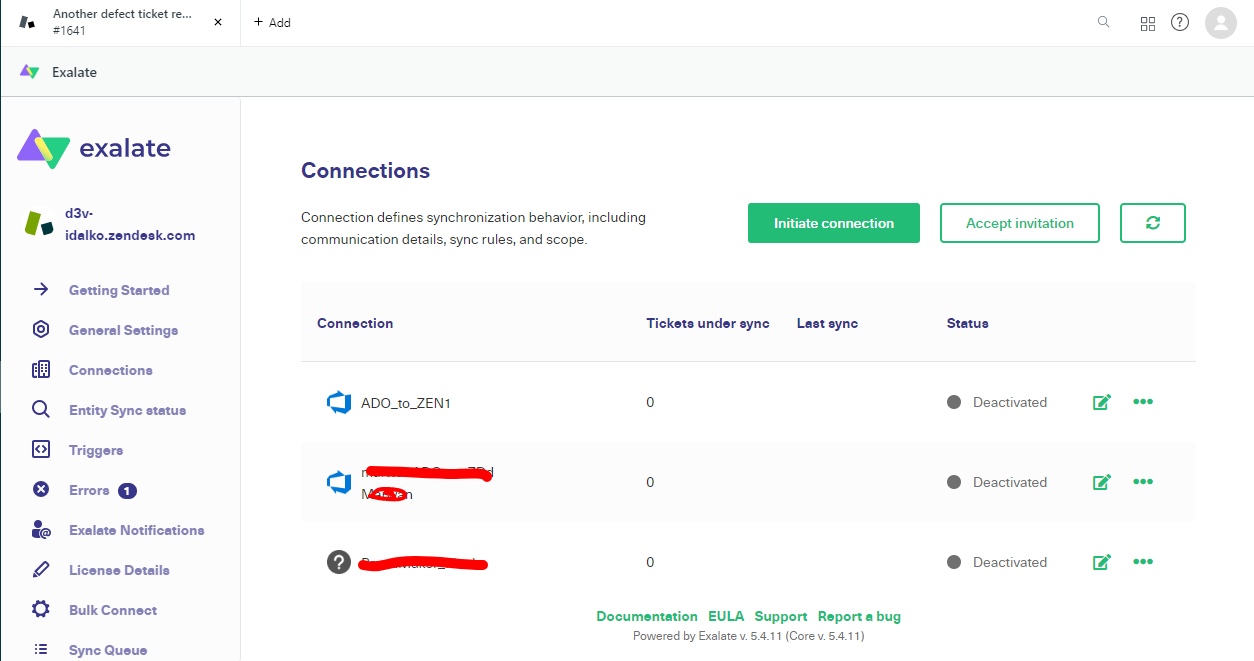
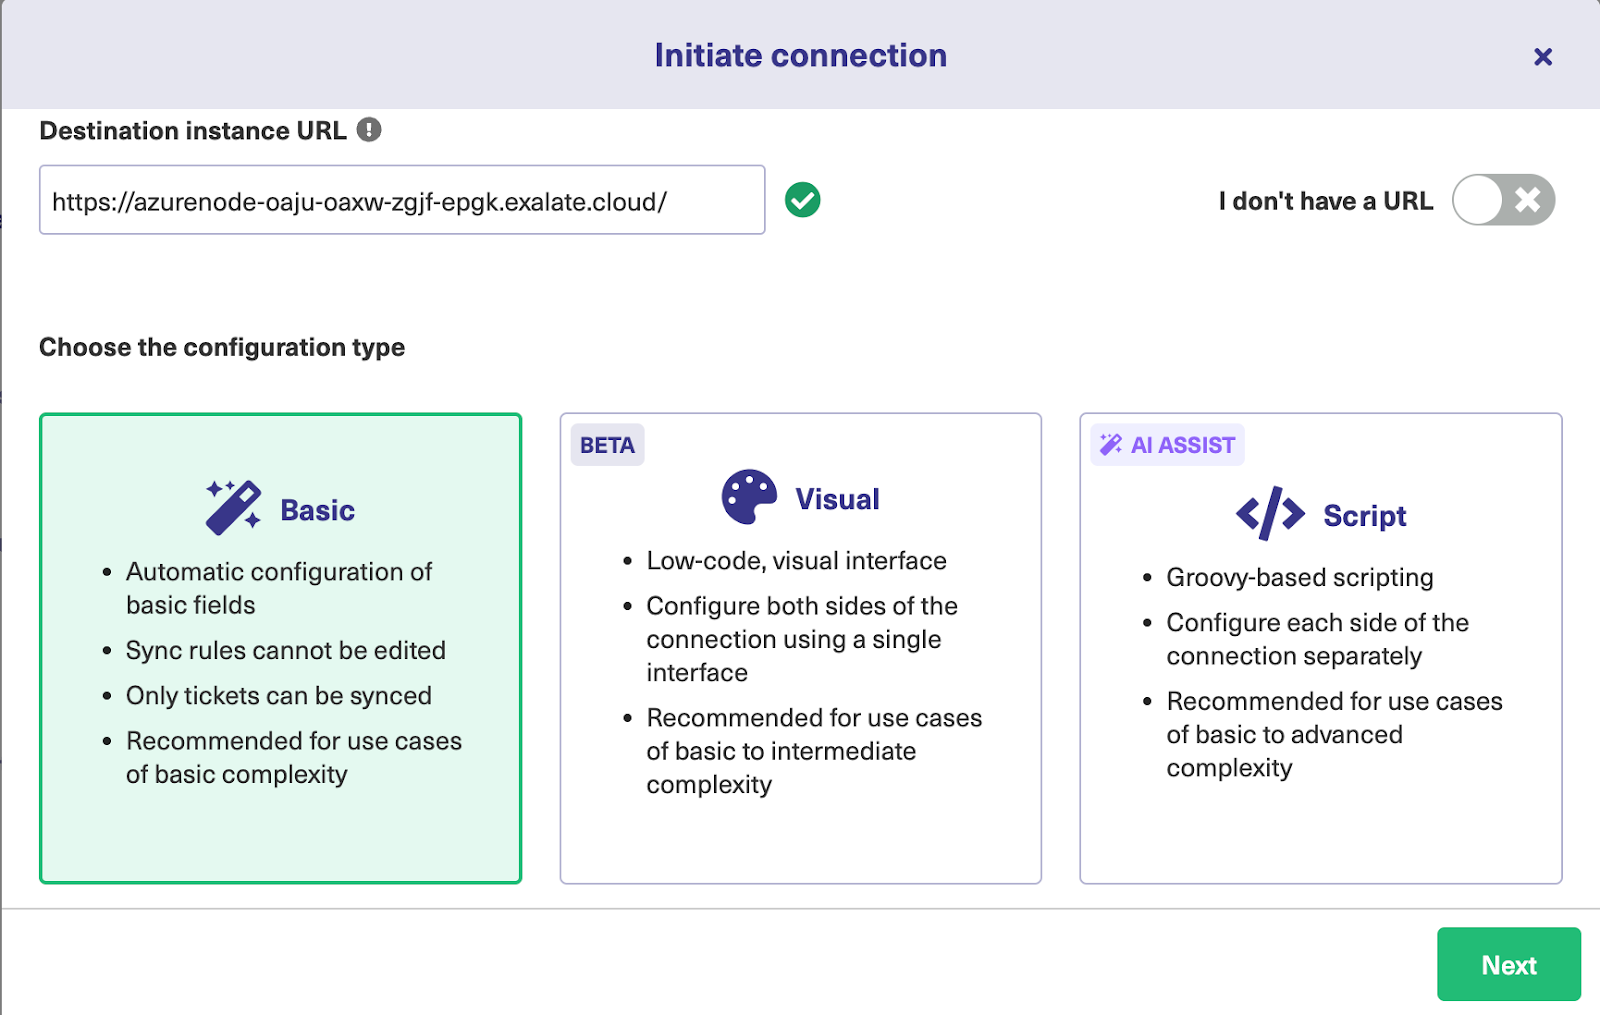
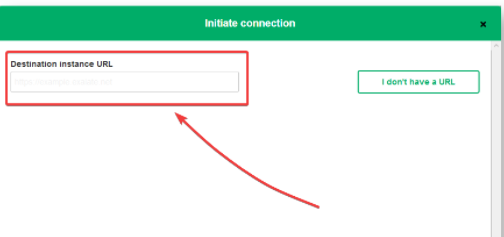
Click “Connections” in Exalate’s left-side menu. Then click the green “Initiate connection” button.
On the next screen, enter your destination instance’s URL in the text field. Since I’m using Zendesk, that’s the URL of my Azure DevOps instance. After you enter the URL, Exalate will check that it can reach the destination instance. If it can, more fields will appear.
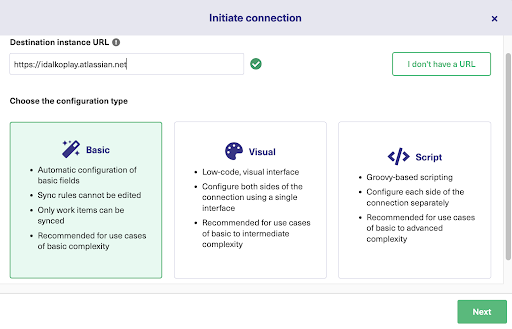
Now you need to decide whether to set up the connection with basic, visual, or scripting mode. Basic mode allows you to set up a connection easily and is useful for basic synchronization needs.
Visual mode allows you to easily configure the connection using a drag-and-drop interface. Scripting mode is more advanced and needs you to work with the ‘Groovy’ scripting language, but it allows you more control.
Choose the mode and then look at steps 4 and 5 to see how you can configure what your connection shares and when synchronization happens.
Continue with the Basic Mode
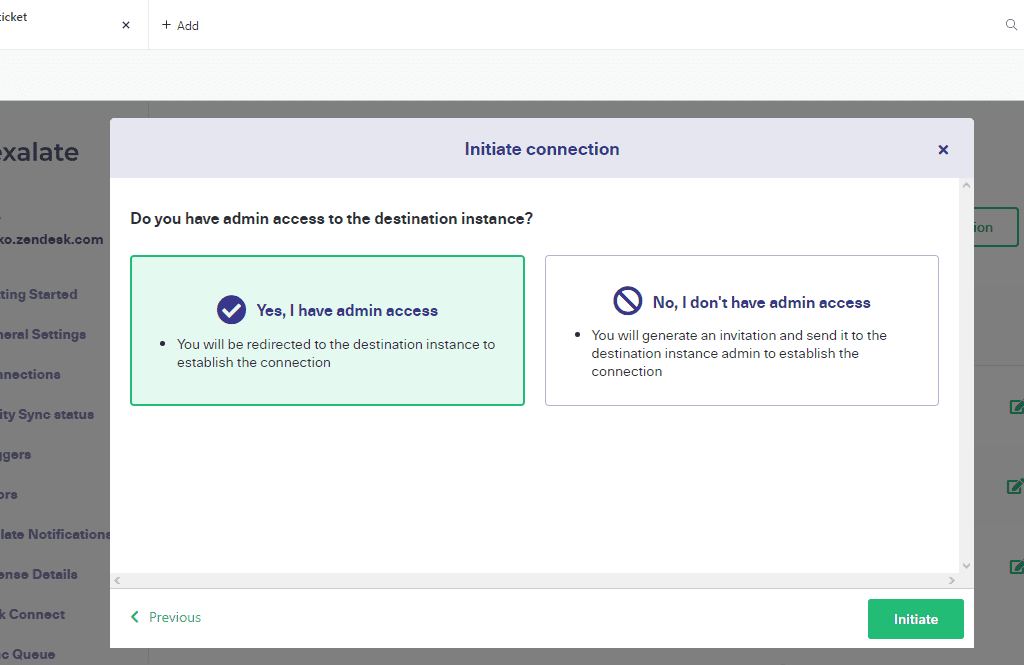
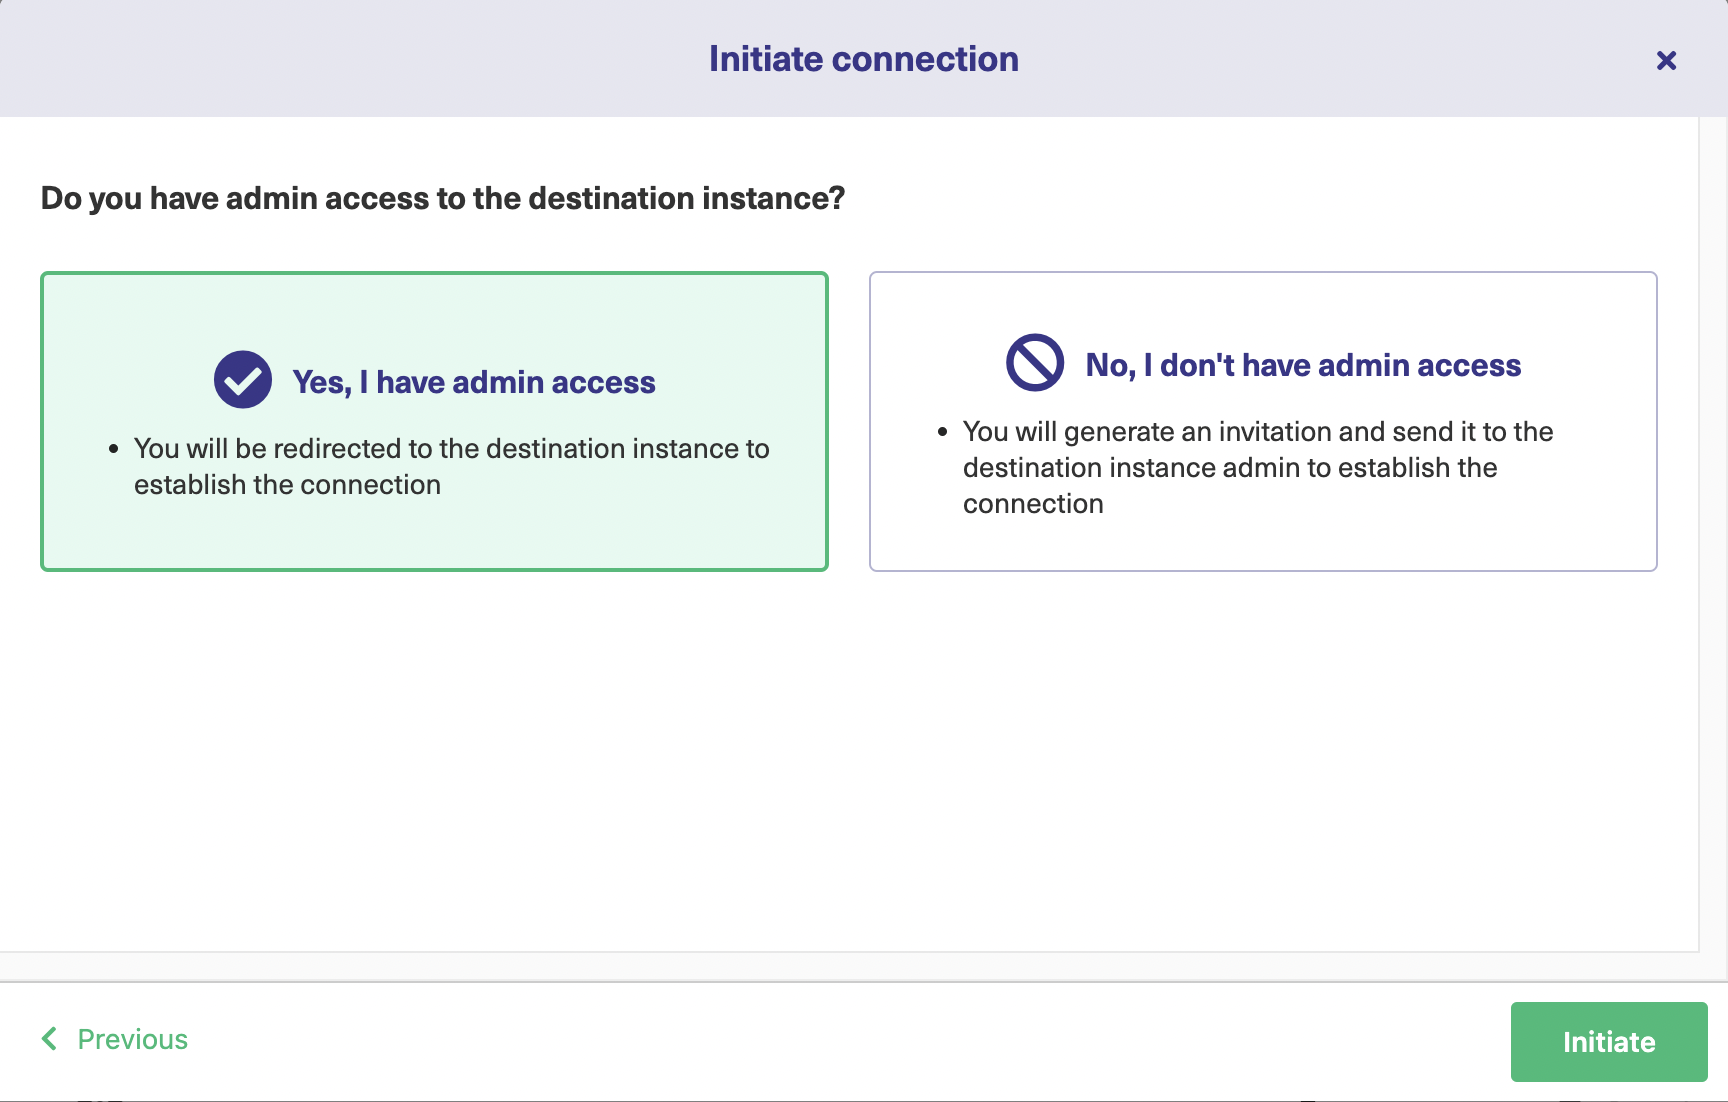
Click “Next”. You will now need to verify if you have admin access on the Azure DevOps side.
Click “Yes, I have admin access” since we already have access. If you don’t have access, you will receive a prompt to manually copy-paste a code on the Zendesk side.
After this, click “Initiate”. This will redirect you to the Azure DevOps side automatically.
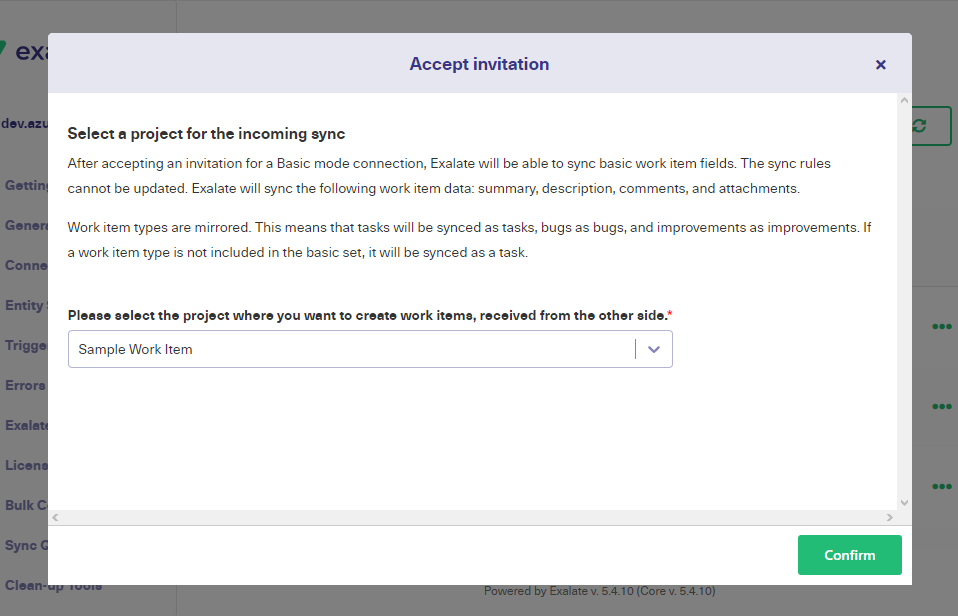
You will be asked to select the project from a drop-down list. This will be a project on the Azure DevOps side.
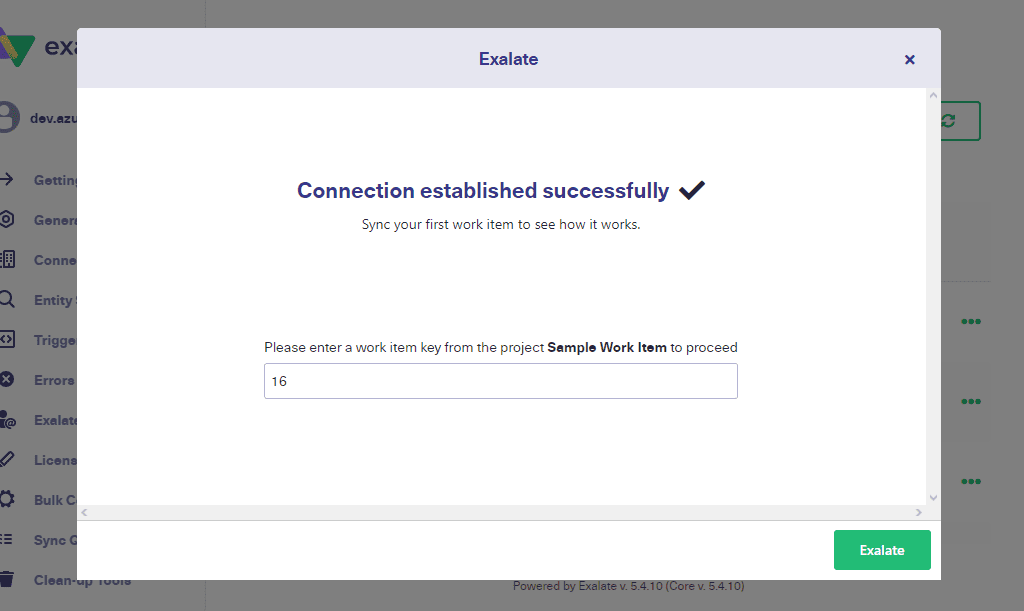
Your connection is now ready, and you can start syncing your first ticket right away.
Enter the work item key and click “Exalate”.
It takes a while for the work item to sync. Once done, you will see the status of your synchronization as “synchronized”.
For the basic mode, you can continue to sync tickets or work items as shown above, or you can create triggers to enable automatic synchronization or even sync tickets/ work items in bulk.
Continue with the Visual Mode
For the visual mode, we start initiating the connection from the Azure DevOps instance. Click the “Initiate Connection” button under the “Connections” tab in the Exalate console.
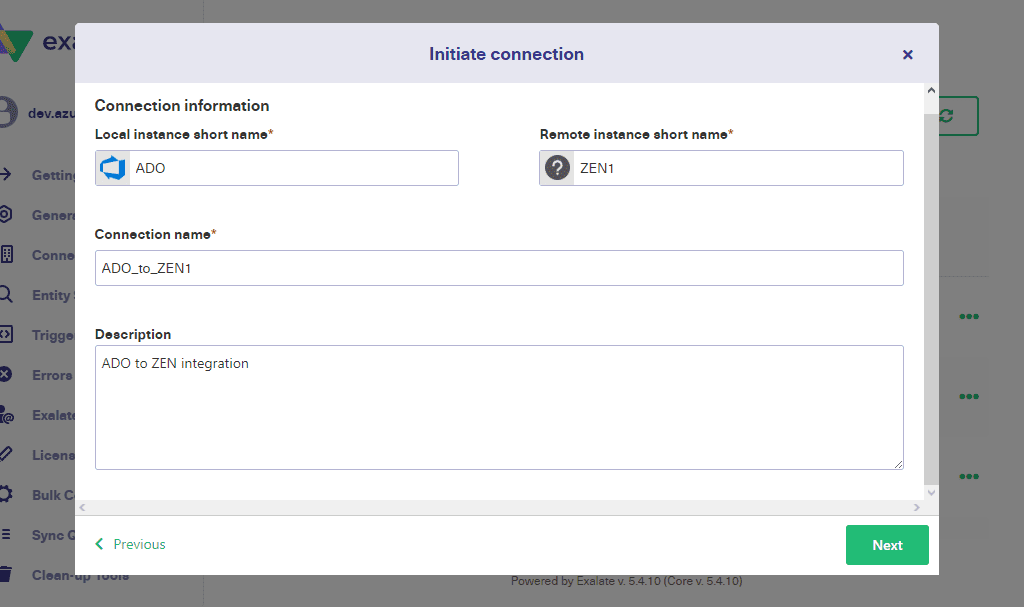
After clicking “Next” for the visual mode, you can name each side of the connection. Exalate will combine the names into an overall connection name that you can optionally edit. You can also add a description. It’s a very good idea to do, as it will help your team keep track of things if they create multiple connections.
Click “Next” and then “Verify admin access” to ensure Exalate can access the other side.
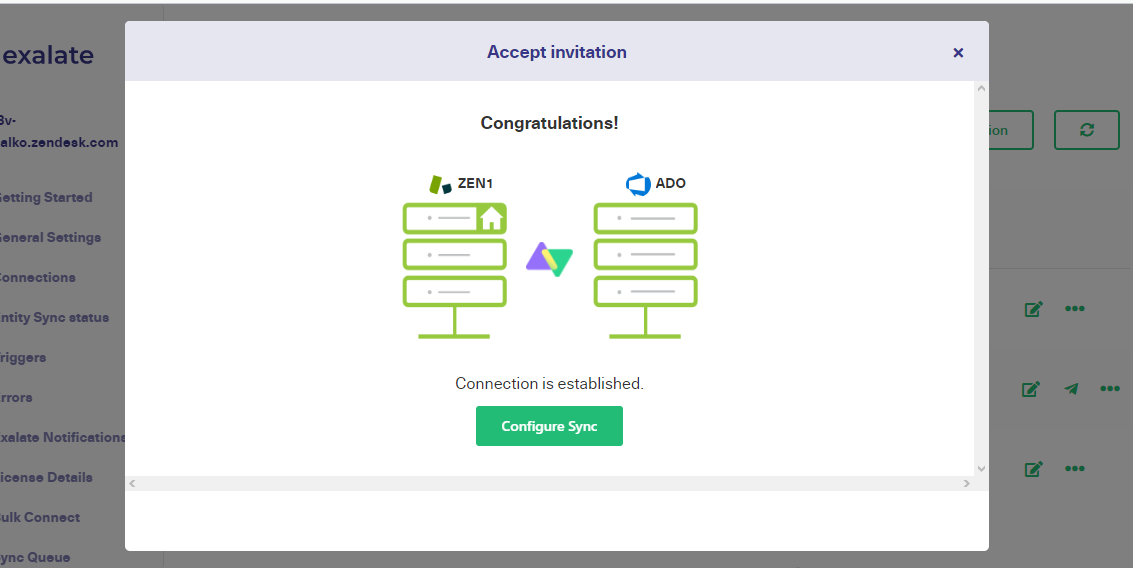
Now that the connection has been successfully established, you can start to configure the connection directly by clicking on the “Configure Sync” button or by editing the connection later.
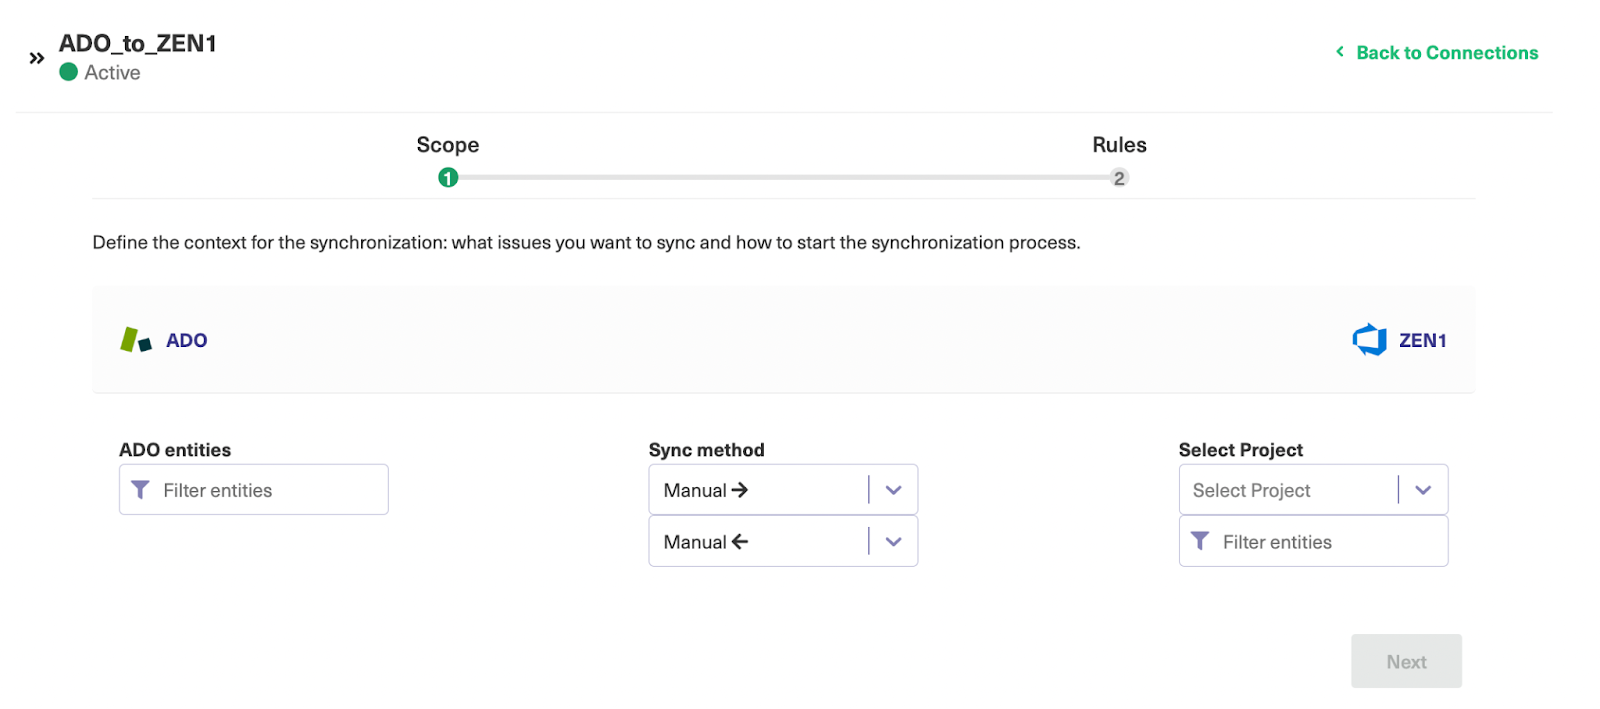
After clicking the button, you’ll see the “Scope” screen. Here you can choose the project for synchronization on Azure DevOps.
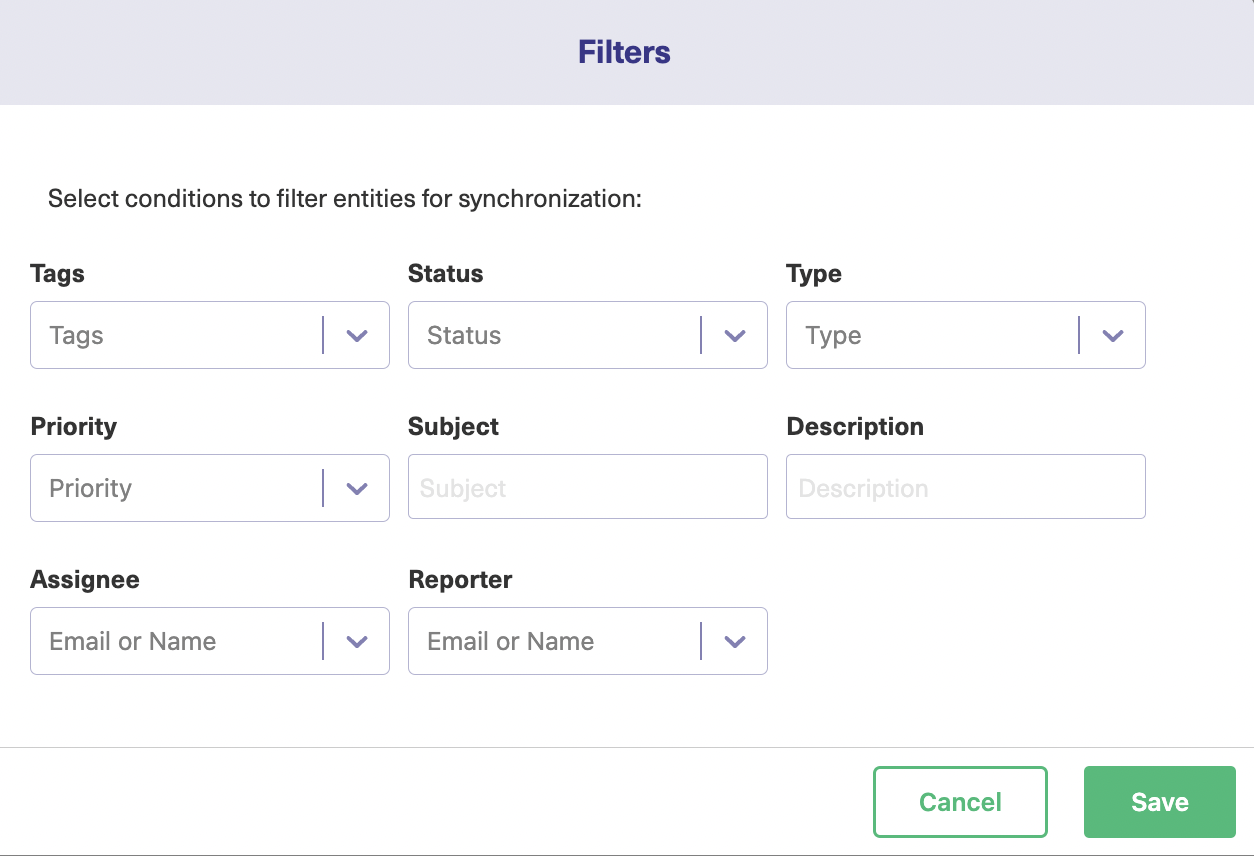
Here you can also choose which entities are synced. If you click on the filter buttons on either side of the connection, another popup will appear. The above screen is for Zendesk. You will see a similar screen for Azure DevOps.
On this popup, you can specify the properties of items you want to synchronize. These include tags, status, type, priority, and many more. Click “Save” when you’re ready.
You can also choose the “Sync method” in each direction using the drop-down boxes in the middle of the popup. Synchronization can be manual, automatic, or disabled. That lets you make the connection uni- or bi-directional.
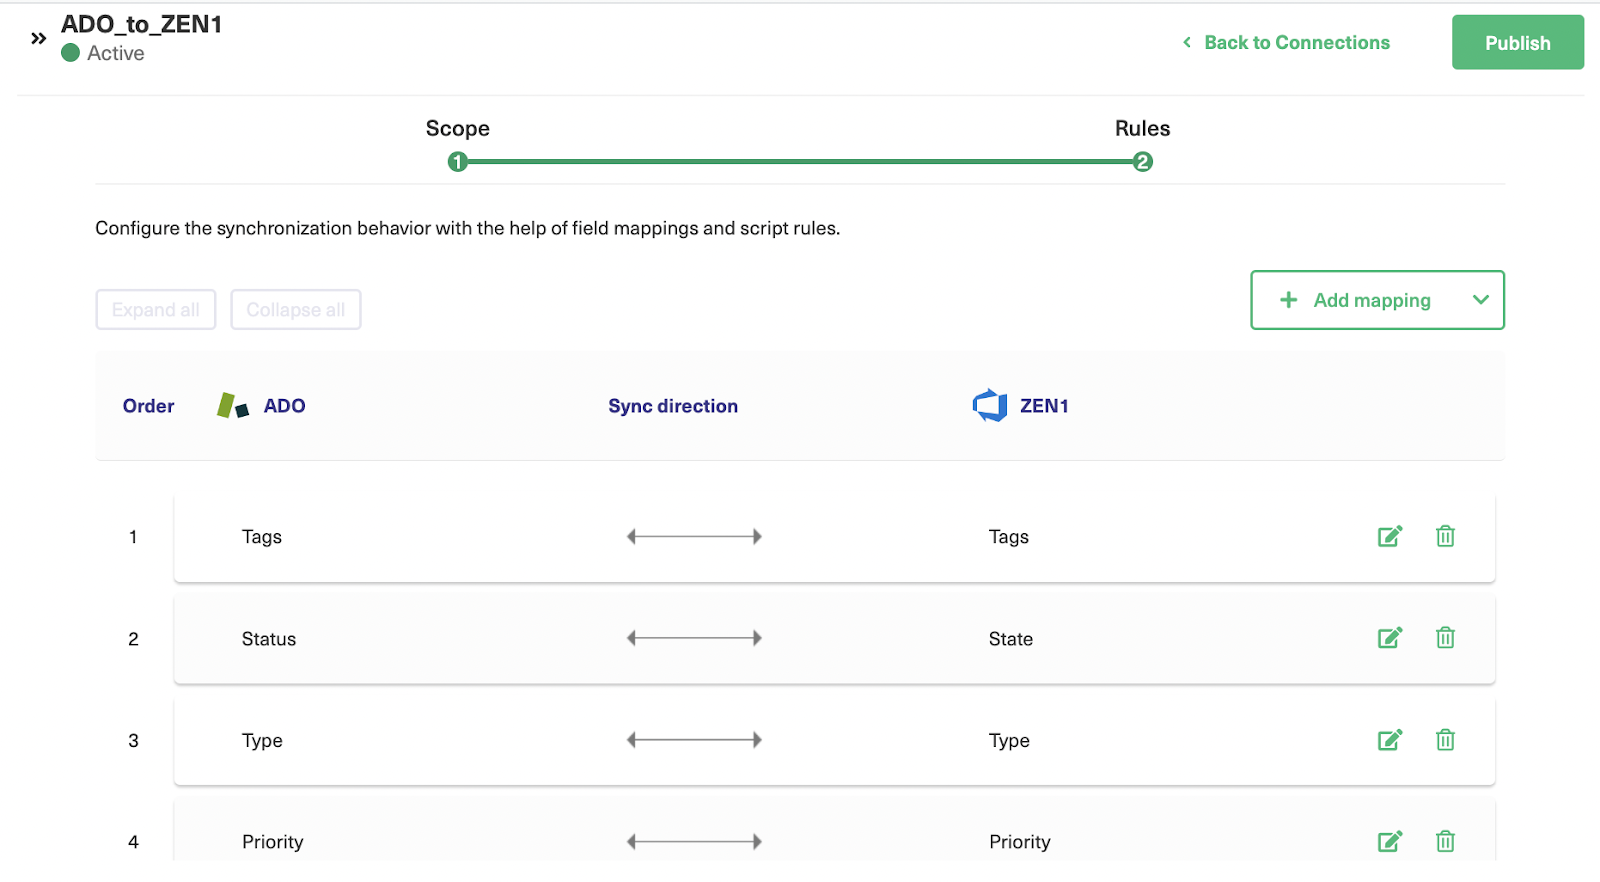
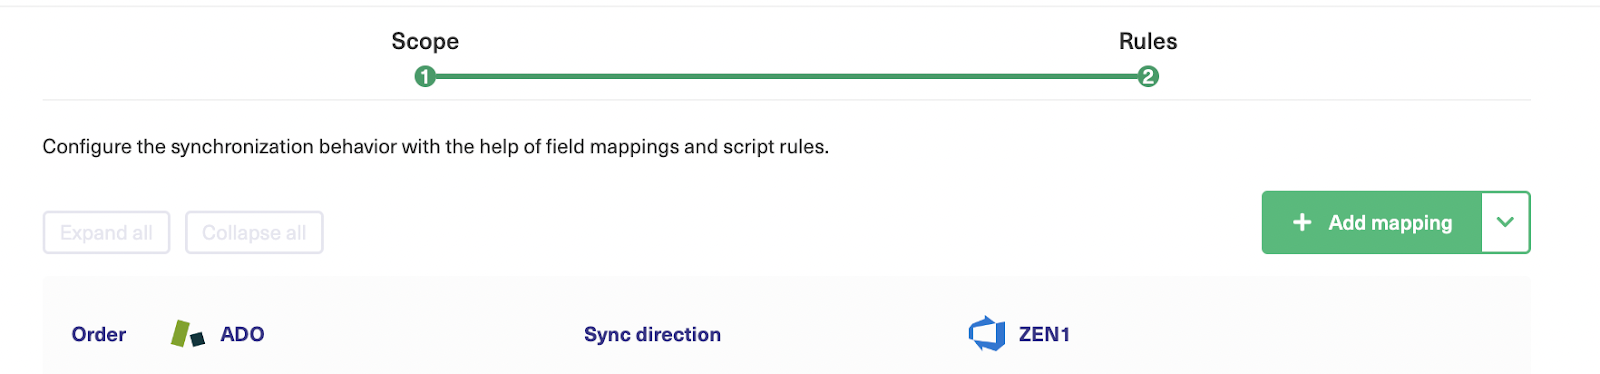
Click “Next” when you’re finished and you’ll be taken to the “Rules” screen. Here you can see how various attributes on synced entities map to each other. If you don’t want an attribute mapped, click its delete icon, and that mapping will be removed. You can also click the edit icon to change which attributes are mapped to each other.
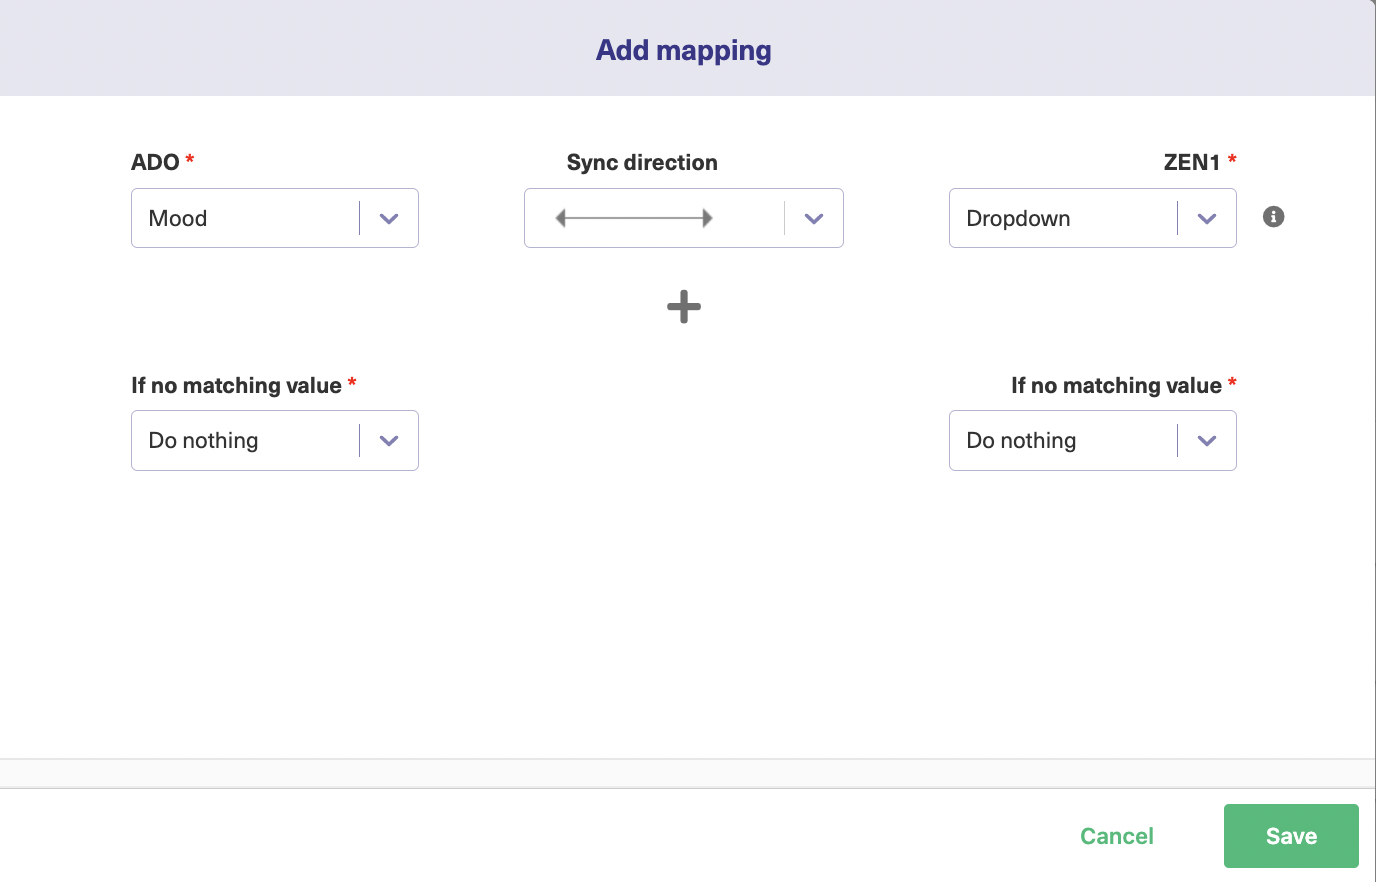
You can also create a new mapping for the attributes. Click the “Add mapping” button, select the fields on both sides, give additional information if needed, and click “Add”.
You will be able to see the new mapping on the “Rules” screen.
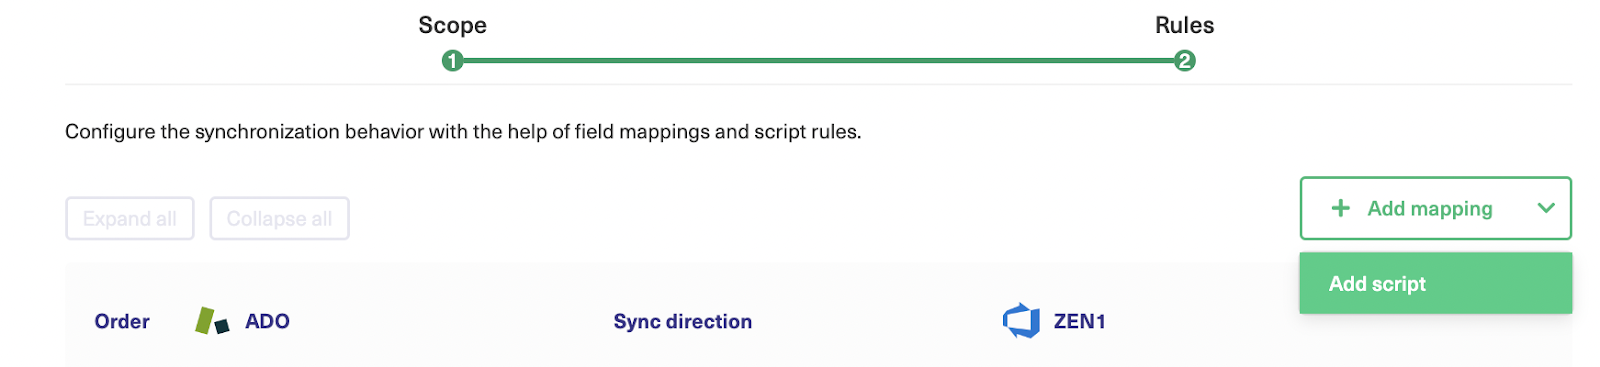
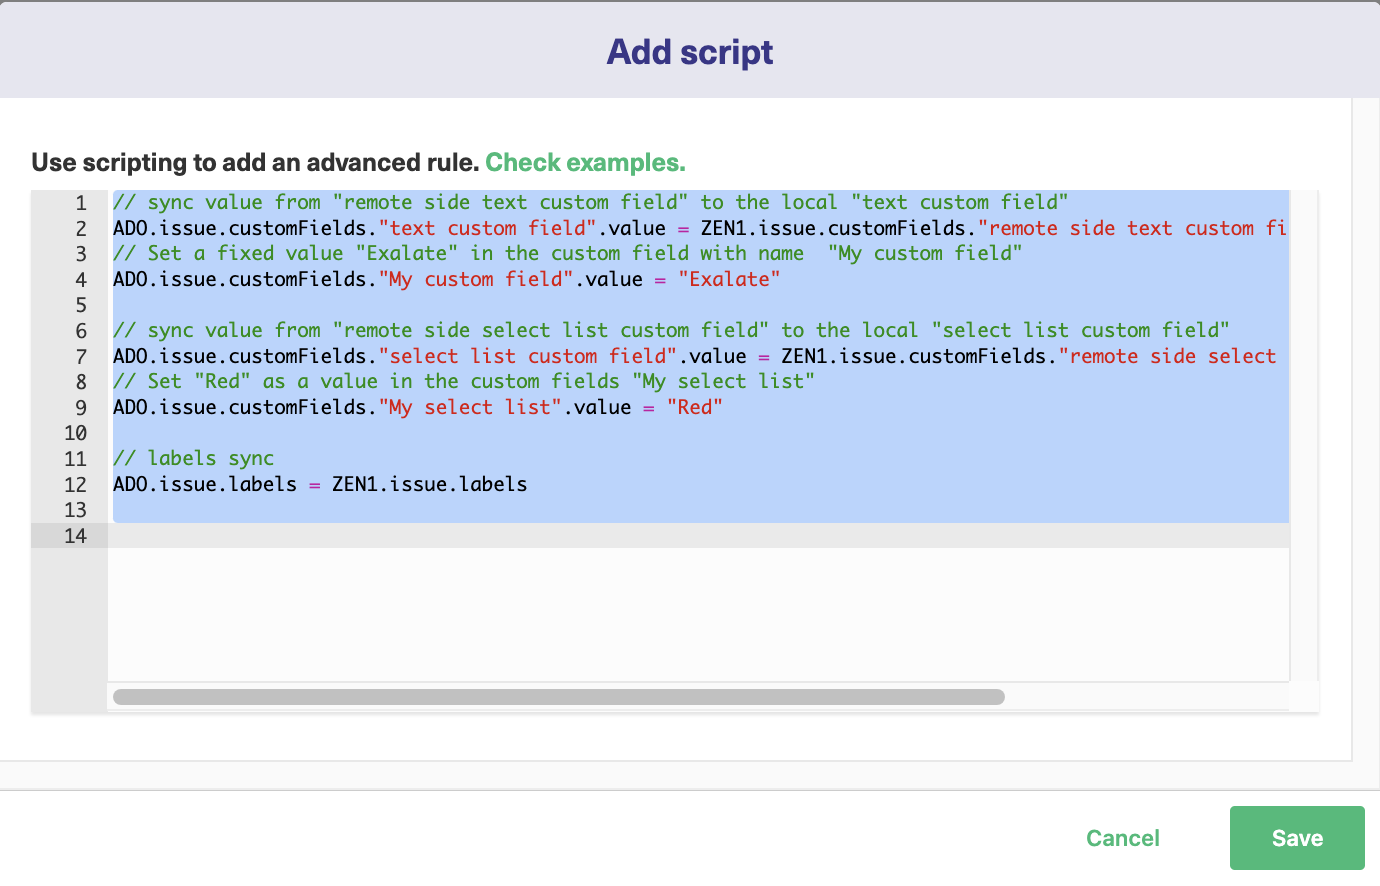
Sometimes for complex use cases, you might need more than the default mappings. You can handle such cases with the help of scripts. Click the arrow next to the “Add mapping” button and then hit the “Add script” button.
There is a sample script already present for you but you can change it according to your synchronization requirement.
When you’ve finished here, click “Publish”. You’ll see your new connection listed on the connections screen.
Continue with the Script Mode
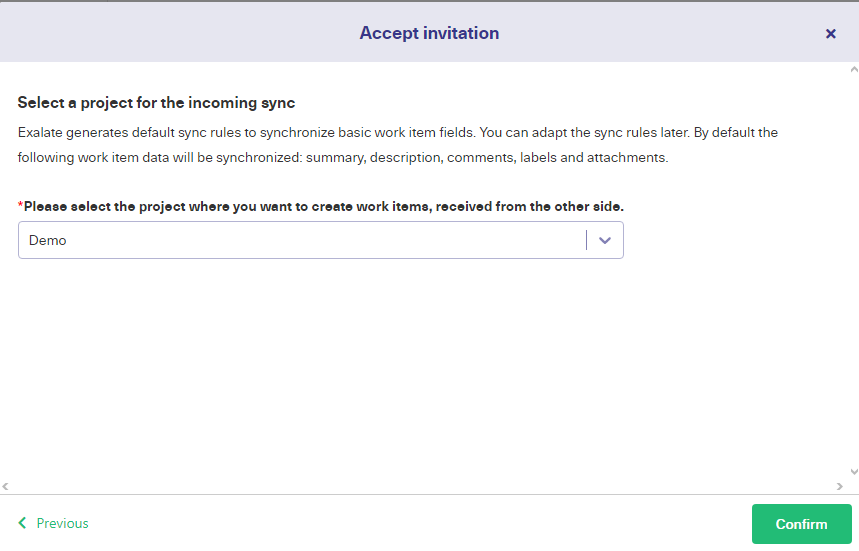
If you choose the Script mode rather than the Visual mode, then the first thing you need to do is give a name to the connection just like you did for the Visual mode. After that, select the project on the Azure DevOps side from the drop-down list.
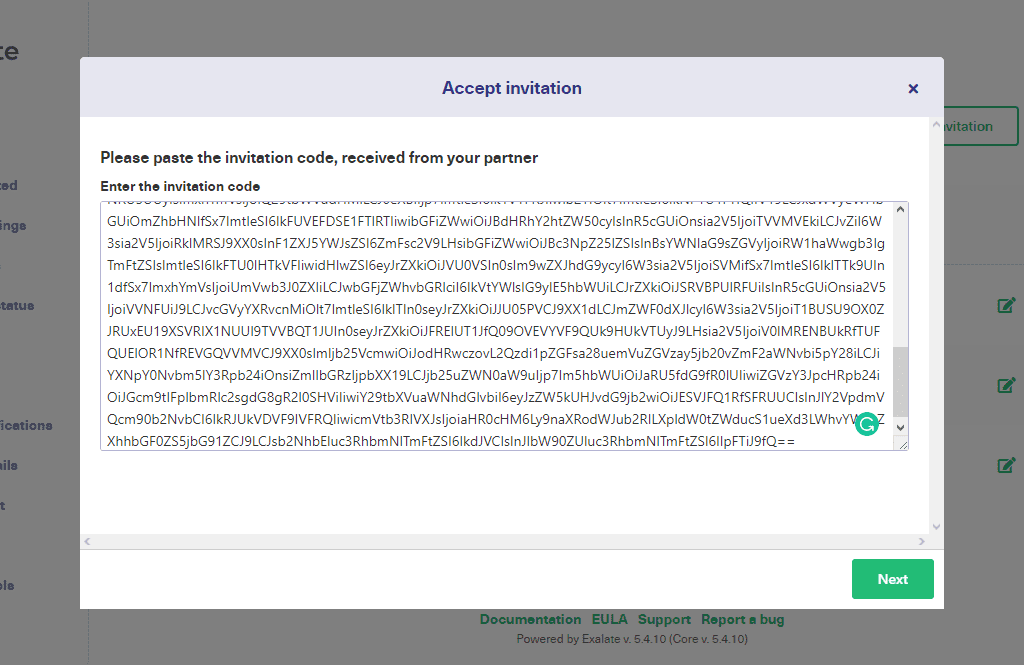
After you click “Initiate”, Exalate will generate an invitation code.
Click the “Copy invitation code” button to copy it to your clipboard and paste it somewhere safe. Then, click the “Done” button.
In Zendesk, click the “Accept invitation” button, then paste the code into the field provided and click “Next”.
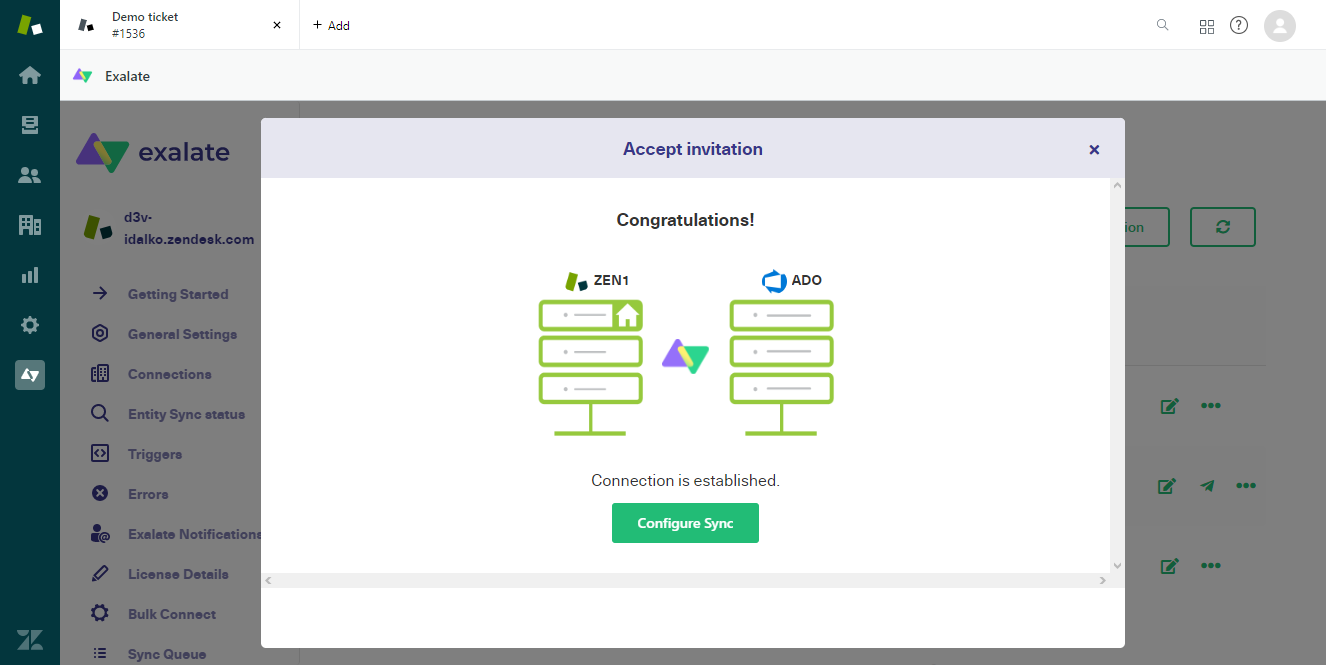
The connection will now be created. You can click the “Configure Sync” button to proceed to the next steps or edit the connection later.
Step 4: Configure Your Connection to Determine What Information Gets Shared
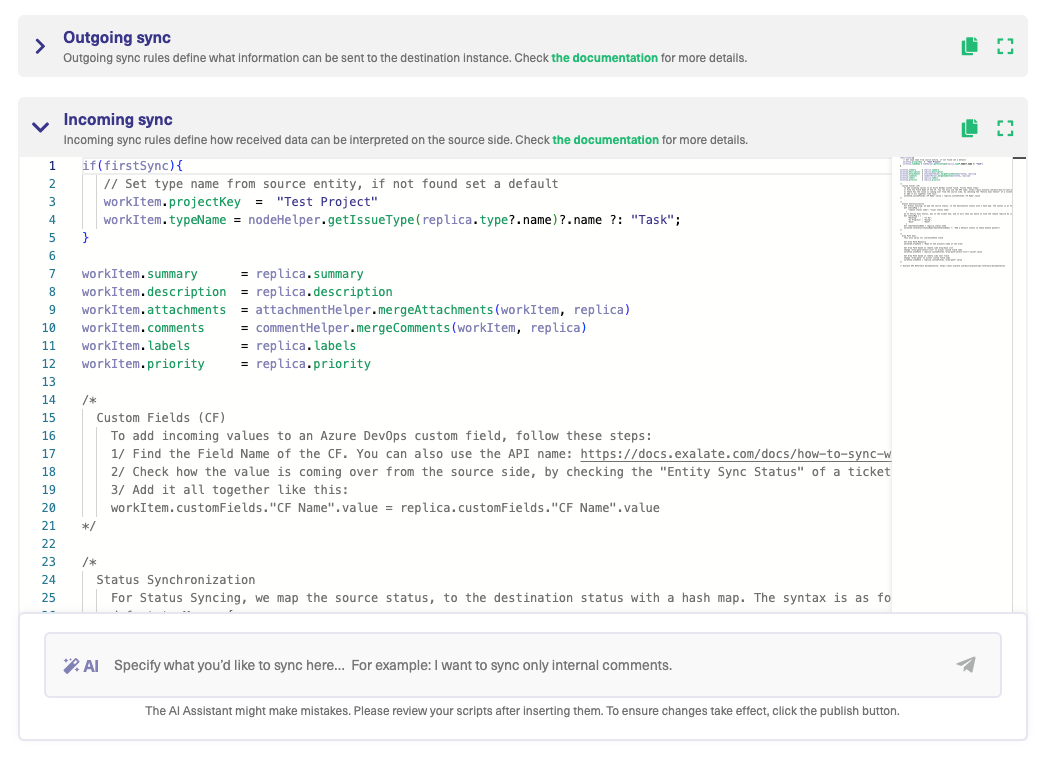
To edit a connection, click the edit button on its entry in the connections list. You’re then taken to the “Rules” screen. There you’ll see a list of incoming and outgoing sync rules.
These define what fields are mapped to one another when items are synchronized. If you don’t want to sync a particular field, just delete its line. You can also edit these lines to route fields differently, for example, you might want the ‘type’ in Azure DevOps to match the status in Zendesk.
You can also set specific values for fields. For example, the description could be set as issue.description = “Synced from Zendesk”.
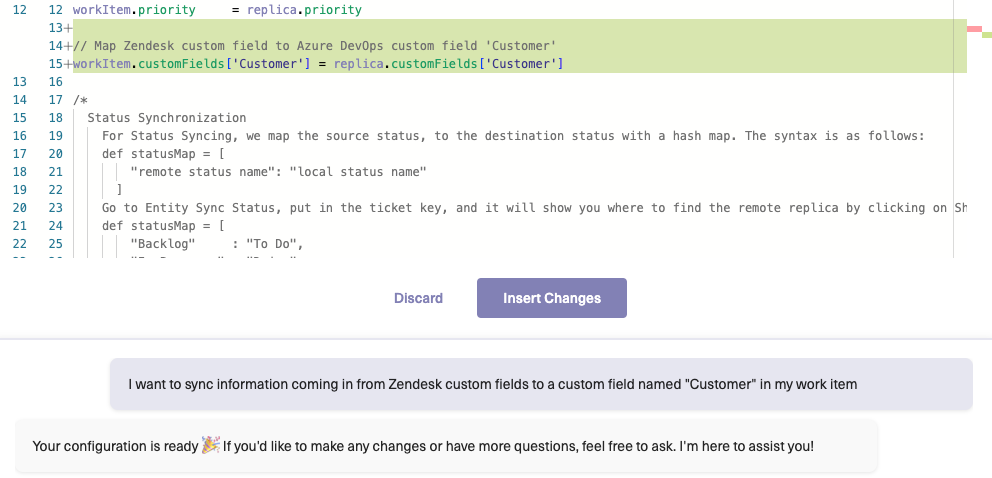
Connections in Script Mode Using AI Assist
The Script Mode allows you to generate and optimize scripts using the AI Assist feature — which appears as a tab under both the incoming and outgoing sync rules.
How does it work?
Enter your sync requirements into the chat box, and AI Assist will generate scripts based on your input, existing configurations, and Exalate’s scripting API.
It is also important to note that AI is not perfect. So, you need precise and detailed prompts to ensure the best results.
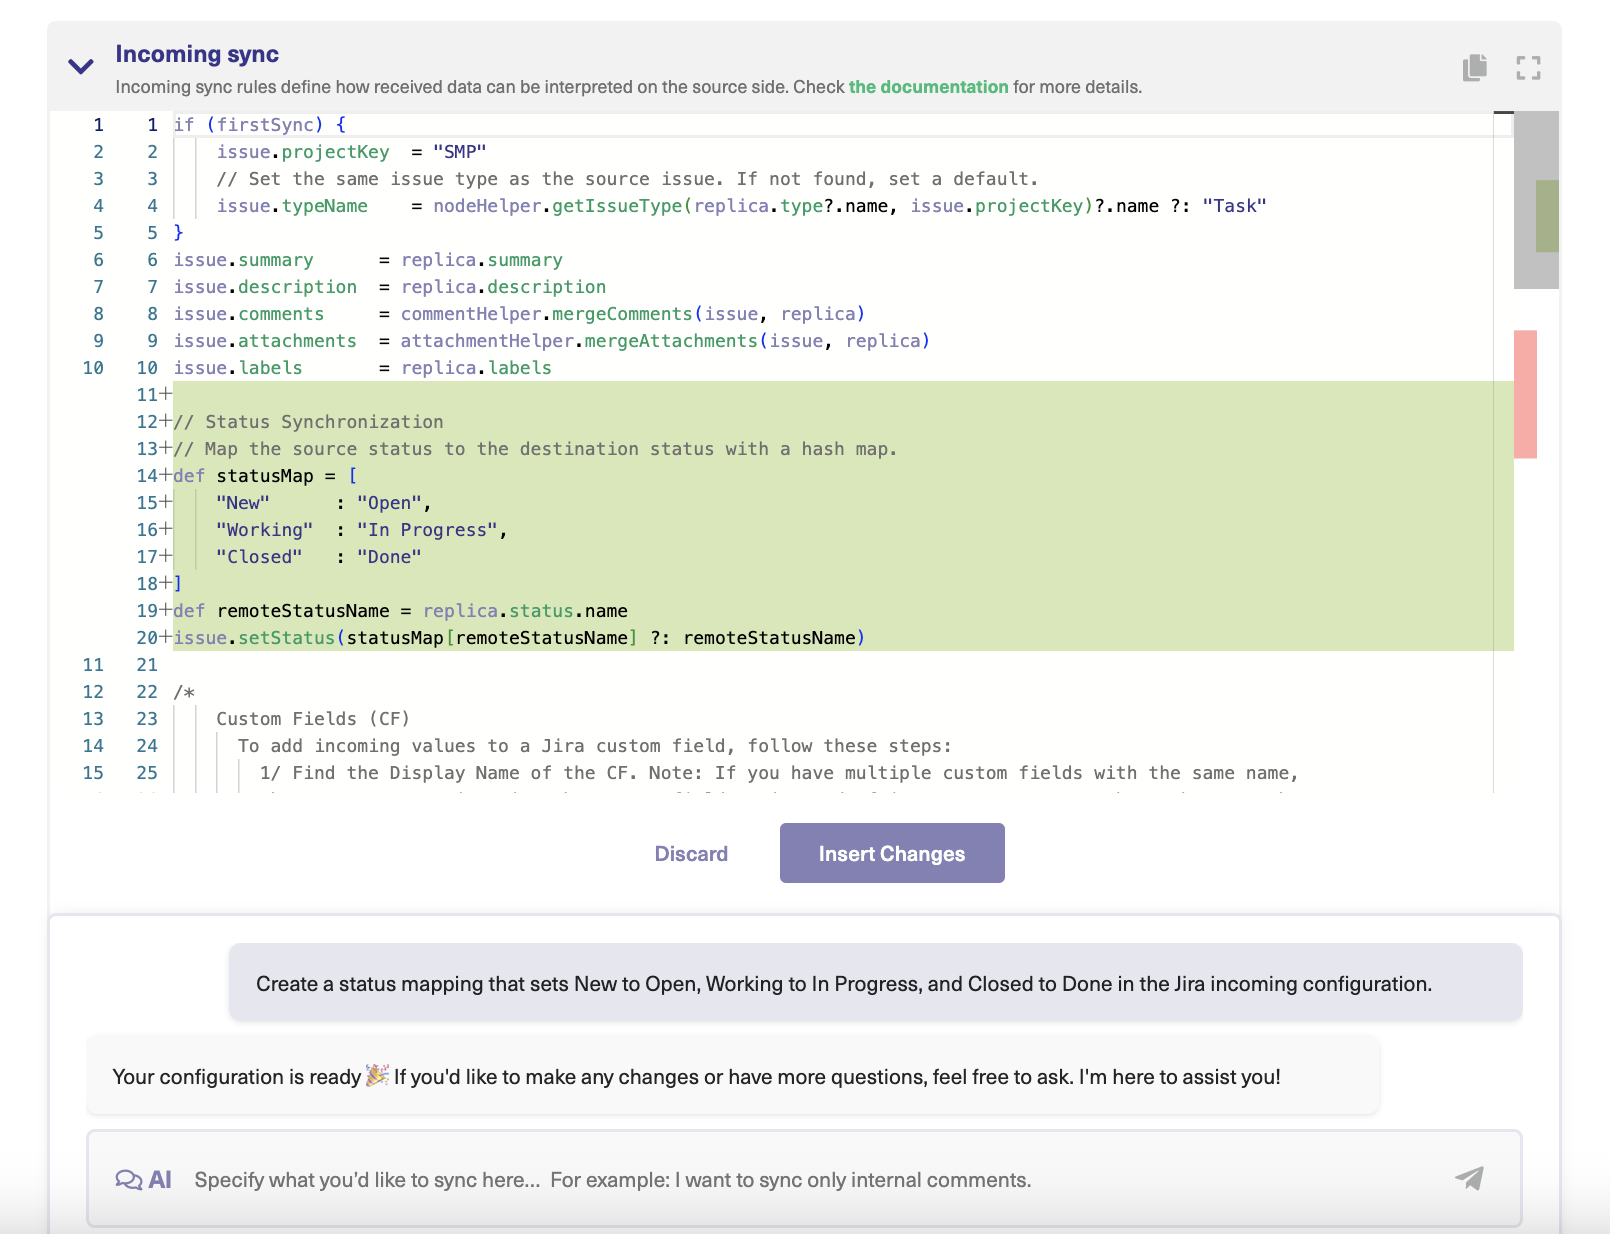
Let’s say you want to sync custom fields between Azure DevOps and Zendesk; the prompt could look something like this:
“I want to sync information coming in from Zendesk custom fields to a custom field named “Customer” in my work item.”
After a moment, the script will be generated, with suggested changes highlighted in green and red. The green scripts are suggested additions, while the red scripts are suggested deletions.
If the new snippet works for you, click on “Insert Changes”. Otherwise, you can discard the suggested code. If needed, you can refine your prompt and, once satisfied, publish the changes.
Step 5: Set Up Automated Synchronization Triggers
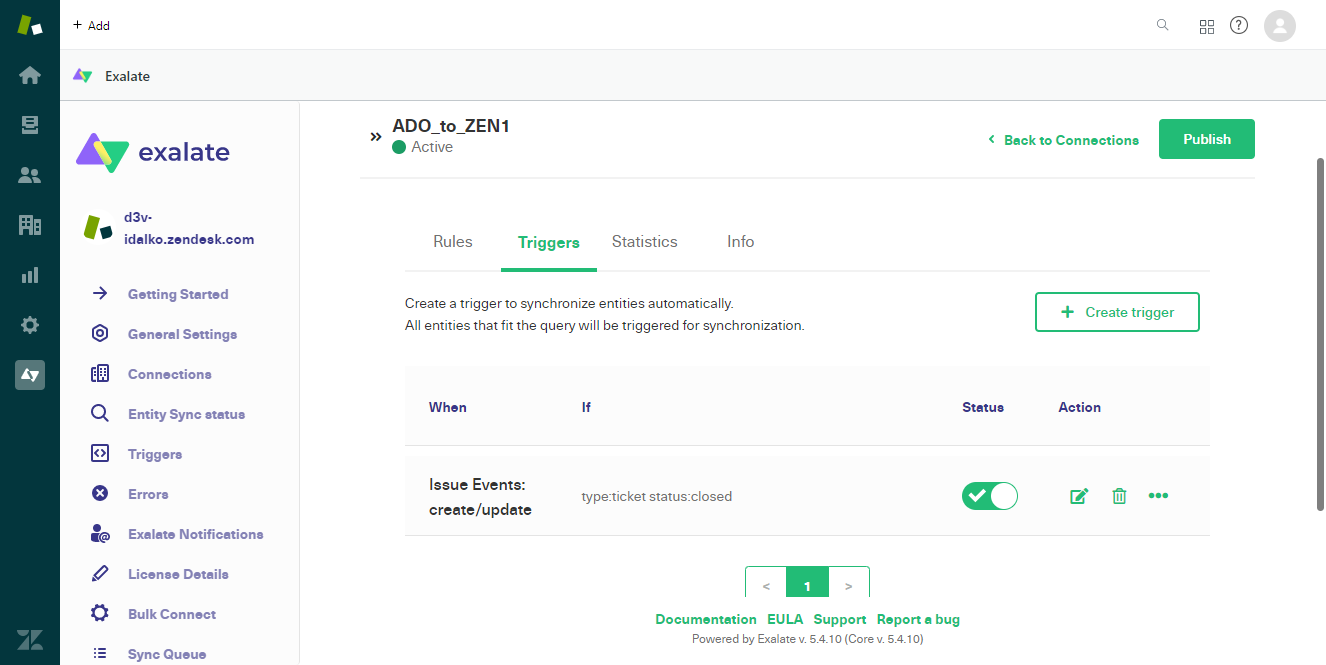
From the edit connection screen, click the “Triggers” heading. Here, you can set the conditions for synchronization. Items that match these rules are copied between platforms.
You can also create triggers by navigating to the “Triggers” tab in the left-hand Exalate menu. But in this approach, you will need to select the name of the connection you want to create the trigger for. We will follow this approach in the below section.
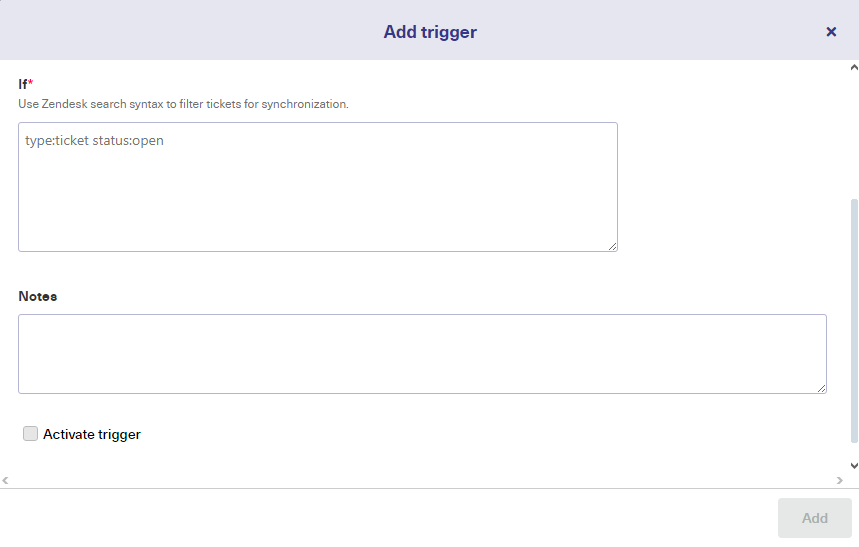
Click the “Create trigger” button to get started. You’ll see the “Add trigger” screen. There’s a drop-down box at the top to choose the entity type the trigger applies to. Below that is the query field. This is the important bit. You need to write a query that picks out the entities you want.
Both Zendesk and Azure DevOps have their own version of the search syntax that we add as trigger queries. Also select the connection you want to set the trigger for.
In the “Notes” box, you can write text describing what your trigger does and why. That can be a big help if there are lots of connections and triggers in your setup.
There’s also a switch at the bottom, which you’ll need to set to active for the connection to work. That helps you switch triggers on and off as needed. Click the “Add” button when you’re ready.
The trigger is now listed and can be edited, deleted, or switched on and off easily.
Step 6: Start Synchronizing Tickets
Now that your connection is ready, you can sit back and wait for tickets to start syncing. Synchronization happens regularly, but not immediately, so make a coffee and wait before checking back in.
What are The Best Practices for Integrating Zendesk and Azure DevOps?
Here are some tips to ensure that your Azure DevOps to Zendesk synchronization goes smoothly:
Document everything in a coherent structure to make sure the names and descriptions are correct and properly labeled.
Carry out multiple rounds of architecture evaluation to ensure that the integration solutions provider has all the necessary compliance and security features.
Enforce strict data management and handling practices to ensure the user or business data stays safe.
Choose a third-party solution that is compatible with both Azure DevOps and Zendesk. Make sure it supports syncing the fields and entities.
Your admin should establish permissions with specific roles and accesses for individuals based on their clearance level.
Choose integration solutions that offer customizability in the form of pre-configured templates and drag-and-drop features.
For advanced use cases, save time by choosing an AI-enabled, script-based solution like Exalate to get access to a scripting engine that you can customize.
Reduce notifications and updates to essentials in order to avoid clogging the systems and drowning out important information.
Conclusion
In this blog post, we discussed the steps to set up a Zendesk Azure DevOps integration and some practical use cases for implementing this sync.
Now that your platforms are in sync, you can enjoy the benefits of information sharing without further work. If either of your teams wants to make a change, they can do so quickly and easily. You can also edit and refine the synchronization further and create more connections for different tasks if needed. Want to implement a Zendesk Azure DevOps integration? Book a demo with us right away.
Frequently Asked Questions
Why Integrate Azure DevOps and Zendesk?
Integrating Azure DevOps and Zendesk enables development teams to track and manage customer issues in Zendesk directly within their development workflow in Azure DevOps. The support team will also have full visibility of important customer tickets, improving transparency and cross-team collaboration.
Can I connect Zendesk and Azure DevOps?
Yes, you can connect Zendesk and Azure DevOps to automate information exchange. Connectors that third-party plugins offer can help you connect Zendesk with Azure DevOps. You can explore the options on their respective marketplaces.
Exalate is an integration solution that allows you to connect Zendesk with Azure DevOps in a flexible manner.
Does Azure DevOps have a service desk?
No, Azure DevOps does not have a service desk feature. That’s why you need to integrate it with a customer service desk platform like Zendesk.
Is Azure DevOps similar to Zendesk?
Azure DevOps is not similar to Zendesk. Despite both being work management systems, Azure DevOps provides a functioning DevOps ecosystem, while Zendesk focuses on service and customer experience.
What can I sync between Azure DevOps and Zendesk?
You can sync the following between Zendesk and Azure DevOps:
Sync comments and updates between these platforms to get the progress on tickets or workflows.
Keep the status and assignee information consistent between Azure DevOps and Zendesk.
Sync attachments to enable teams to share relevant files, screenshots, or logs associated with tickets or work items.
Create, update, or link work items in Azure DevOps based on ticket events in Zendesk.
Send notifications or alerts from Azure DevOps to Zendesk or vice versa to keep the team members informed about important changes or updates.
Map and sync custom fields tailored to your workflow and requirements.
Can I integrate Azure DevOps and Zendesk for free with Exalate?
No, integrating Azure DevOps and Zendesk requires a paid plan or subscription for both platforms. Free plans may offer limited functionality and might not include the necessary (or customized features you’re looking for).
It’s better to review pricing and feature details of third-party integration solutions to determine the costs associated with integrating the two systems.
In this episode of Integration Talks, a podcast on everything integration, Francis hosts Jeffrey Tefertiller to discuss ITIL and cross-company integration.
Jeffrey founded Service Management Leadership to help organizations, large and small, achieve their Service Management and Business Continuity goals and aspirations. He is an ITIL Expert (v3) and leader in the Enterprise Service Management (ESM)/ IT Service Management (ITSM) community. Jeffrey brings 26 years of leading Service Management initiatives to Service Management Leadership with expert-level understanding and practice of how to adapt the methodologies to any organization and its unique culture.
About this episode:
Key ITIL concepts applicable to cross-company integration
IT leadership and its challenges
B2B and Cross Company integration: differences and similarities
and more…
Not a fan of watching videos? Then listen to this episode on:
Simplicity is one of Exalate’s core features. So we decided to take it up a notch and are coming back to you with a new configuration mode for all business users: the Basic Connection Feature.
What is Basic Connection
The basic connection feature is the newest and the most simplified configuration mode that allows you to seamlessly synchronize issues across multiple work management systems – instantaneously, bidirectionally, and without any configuration efforts. It’s perfect for use cases with basic complexity.
Feature Offerings
Set up the whole integration process in 3 simple steps:
So it has fewer navigation screens to get your issues synchronized in 2 mins or less.
Instantly sync the first issue once the connection has been established.
Enjoy a secure, automatic, unidirectional or bidirectional synchronization.
Synchronize 1000 work items, issues or tickets per month
Automatically generate default sync rules like summary, description, comments, attachments
Allows bulk synchronization for a larger number of issues
Allows automatic trigger synchronization for specific search queries
Supports clean-up tools that help stop issue synchronization and remove synchronization related metadata on both sides
Basic Mode is currently available for Jira, Salesforce, GitHub and GitHub Enterprise Cloud, Zendesk, Azure DevOps, and ServiceNow.
A Zero-Configuration Mode for Business Users
As a business user, we understand you don’t want to spend a lot of effort configuring your connection and setting it up, so now you can have things up and running almost instantly. We heard you.
The basic connection feature allows you to focus your energy on more value-added tasks and leaves configuration efforts to us. With shortened navigation procedures expect increased productivity and efficiency and make your customers happier.
So what makes the basic connection so different?
Zero configuration
Faster turnaround time due to a more simplified integration flow
Instantaneous sync of first issue once the connection is established
Easy to navigate, so users are more likely to explore, learn and understand the product
The feature will cater to most business users from different departments such as Product Management, Project Management, Sales and Marketing, Quality Assurance and Developers, Customer Success, and Operations because of its simple and minimalistic design.
How to get started with Basic Connection
In Exalate, connections have a set of sync rules to determine what to sync. Basic connections have a set of these rules, generated by Exalate. They help in syncing a basic set of fields like summary, description, comments, and attachments. But note that they cannot be edited.
Want to edit them? Don’t worry! There is more. Exalate gives you the flexibility to aspire for more issue fields to be synchronized by upgrading from Basic to a Visual or a Scripted connection with your Zendesk, Jira, or Azure DevOps work management systems. Click on each to learn more.
To get started with the Basic connection:
Navigate to the “Connections” tab in Exalate and click on “Initiate Connection”
Specify the link to the destination instance.
Note: If you don’t have the URL you will be suggested to create a Scripted connection and you cannot proceed with the Basic anymore. To learn more about this, click here.
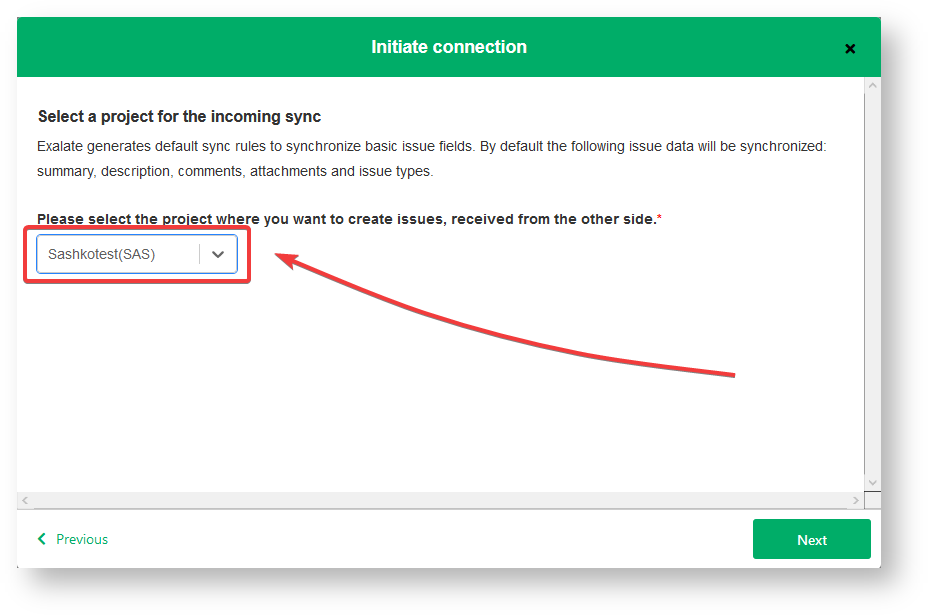
Select the project you want to sync issues in. This is the project on the side initiating the connection.
And then click on “Basic” and “Next”
Note that you then need to confirm if you have admin access to the destination instance.
Select “Yes” if you have access and you will be redirected to the destination instance to establish the connection. In case you do not have admin access on the other side, you will generate an invitation for the destination instance admin so they could establish a connection on their end. Once done, click on “Initiate”
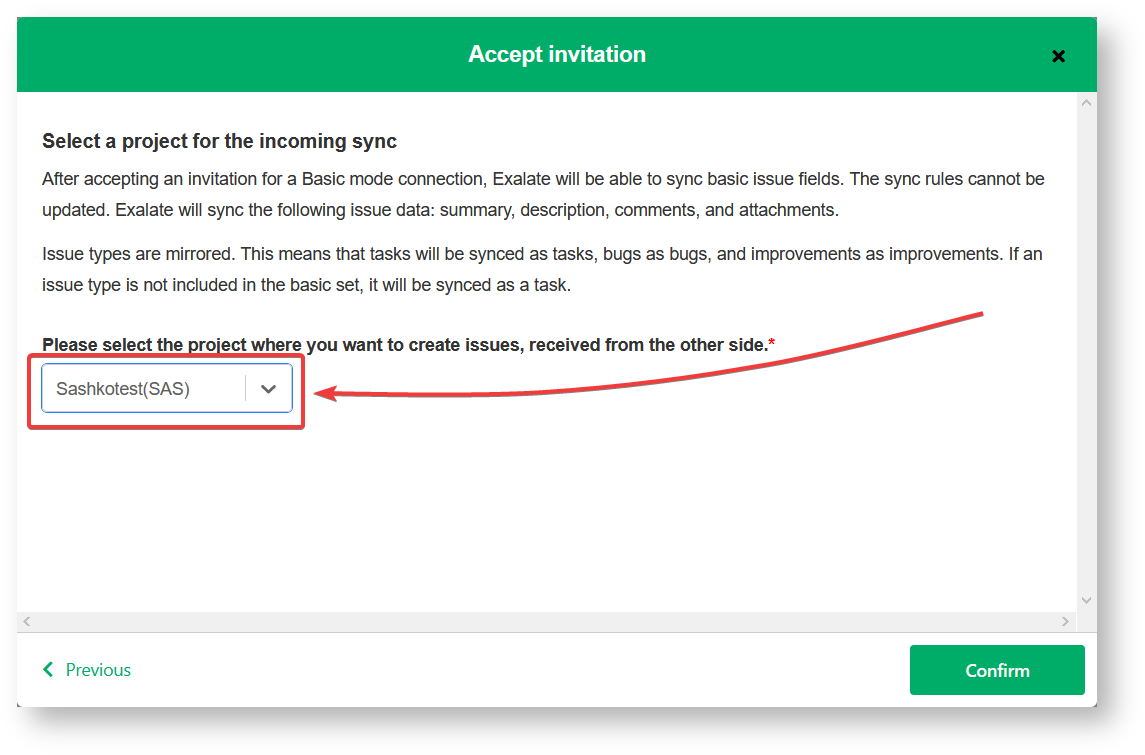
Select the project where you want to sync the issues on the destination instance as well and click “Confirm”
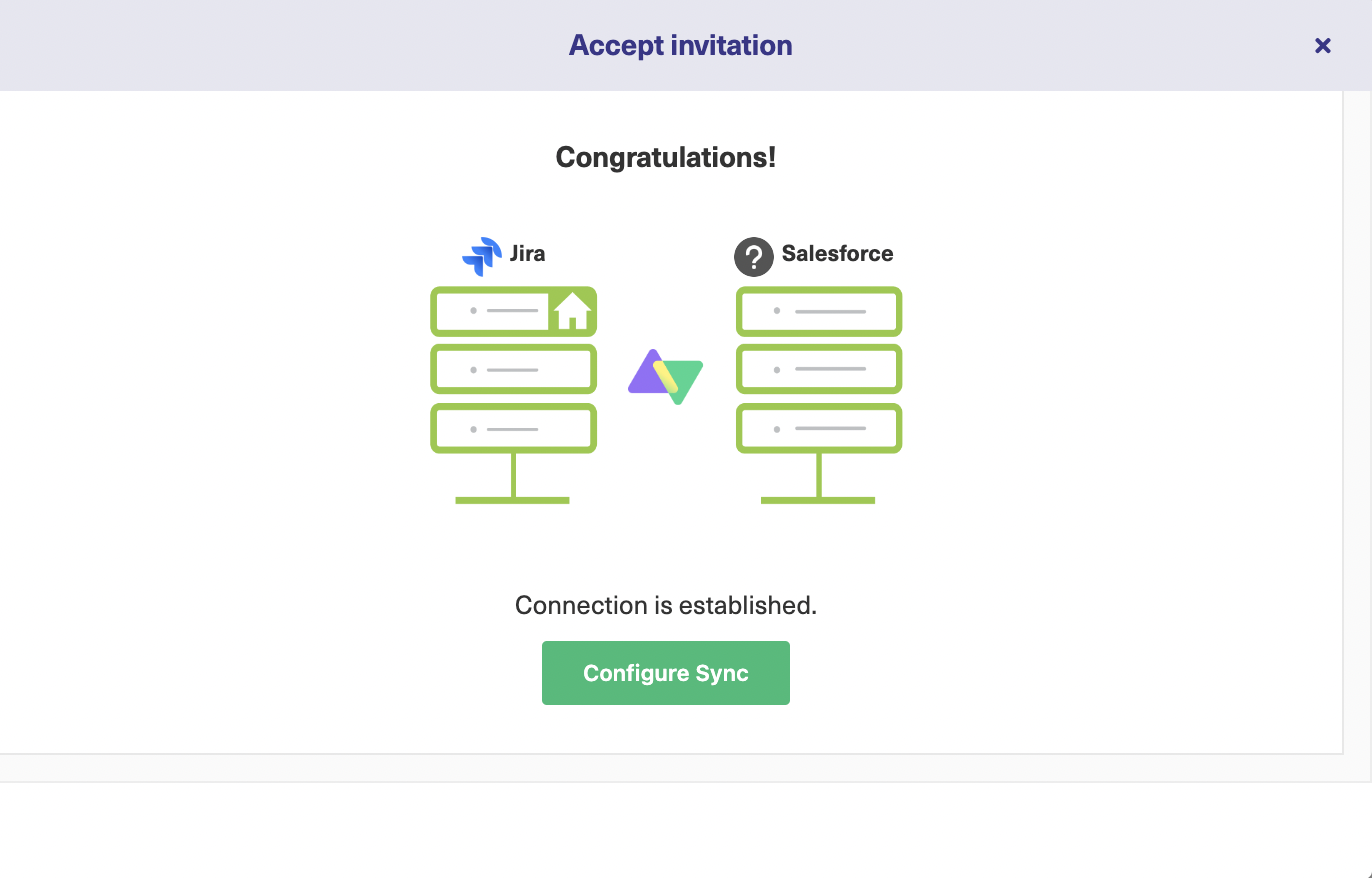
And Voila! You have established your first connection. After this, you can sync your first issue in Exalate to see how it works.
When syncing your first issue, you will see the status of your sync like this.
Next up
At the moment Basic Connection is available for Jira, Salesforce, GitHub and GitHub Enterprise Cloud, Zendesk, Azure DevOps, and ServiceNow.
In this episode of Integration Talks, a podcast on everything integration, Francis hosts Rob Akershoek to discuss ITIL 4 and agile integration.
Rob is an IT Management Consultant with expertise in a wide range of topics: DevOps, IT4IT, IT Service Management (ITIL), Continuous Integration / Continuous Delivery (CI/CD), Enterprise Architecture (TOGAF) and Scaled Agile Framework (SAFe), AIOps, Agile development, Service Integration and Management (SIAM), Cloud Management, and Value Stream Management.
About this episode:
Where Agile and ITIL 4 meet
Agile processes in a product development context involving multiple companies
Deploying ITIL 4 processes
and more
Not a fan of watching videos? Then listen to this episode on:
Francis Martens: Good afternoon and welcome to the Integration Talks! I am Francis Martens, your host today. Integration Talks is all about system integrations, internal and cross-company. It’s not only about technology but also processes, how-tos, practices, everything which is useful to make your integration projects successful. Today we’re welcoming Rob, Rob Akershoek, and we’re going to talk about agile processes.
Hey Rob! Can you tell us a bit about who you are and what your background?
Rob Akershoek: Sure! My name’s Rob Akershoek and I’m typically involved in larger organizations helping them in the digital journey, it’s really about IT management, so I am helping them set up an operating model, with the tooling, the processes, and the right date, we manage the digital delivery. Let’s say, from idea to production, so end to end. So it includes, as you said, agile development, DevOps, IT service management, ITIL So it is how you create a more integrated, streamlined IT management organization.
So I’m a consultant there working with the CIO office. My background, I started as a software engineer or developer, right? My combination is business and IT at university and I ran into the development space and then over the years, I moved to the IT management space that I am in now. It’s typically a combination of things like DevOps, IT service management, and anything you need to manage IT. We’ll come to that later during this session.
Francis: It reminds me a bit of the Software Factories. Is that the term that you intend to use?
Rob: It is Software Factory. Nowadays we call it maybe value streams or software engineering value streams but it’s indeed like a factory model or how do you manage your IT, let’s say from an idea to get something in production. It’s typically how manufacturing is doing it, right? To put the idea to market, or continuously improving it. So a lot of things are related to that concept of lean manufacturing as well indeed.
But software is different than a manufacturing organization, I guess. But there are a lot of similarities but the value streams are different. In software, we can fix things once we deploy them, and if you’re producing cars, you need to come back for repair, so that’s a different model, right?
Francis: Yeah, there’s a big difference and it might be a learning experience to know how this ITIL and ITSM can apply in such an environment. So you’re writing quite some articles, …
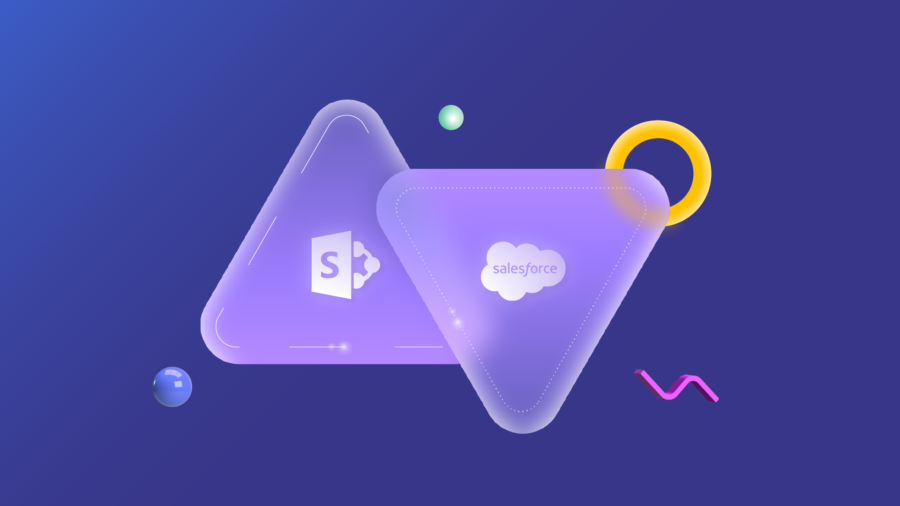
Your company uses Salesforce, and you heard some companies use it together with Microsoft SharePoint. It made you wonder about the benefits of this. Can there be a real synergy to a Salesforce SharePoint integration?
This guide will cover what you can achieve with this integration and make you aware of the potential pitfalls. It also explains the step-by-step process you need to follow to get the integration working.
The Benefits of a SharePoint Salesforce Integration
What is SharePoint?
Depending on whom you ask this question to, you might get SharePoint described as a Document Management System (DMS), an intranet service, or a collaboration and productivity platform. In fact, SharePoint is a collection of services bundled together and, depending on who is accessing SharePoint, it can act as a simple team site offering shared storage for documents (typically Office files, namely Word and Excel documents), a messaging board, a blog, and a place to store internal organizational data such as software licensing information or employee contact information.
Most companies today use SharePoint Online, but on-premises versions of SharePoint are still available and used.
What is Salesforce?
We could define Salesforce as a Software as a Service (SaaS) Customer Relationship Management (CRM), but this feels a bit reductive nowadays. Salesforce started off as a CRM – software meant to help manage customer relationships (primarily in terms of sales and service processes).
Today, Salesforce is still a CRM at heart, but it has grown immensely as Salesforce acquired other companies, making Salesforce feel more like a cloud ecosystem based on that CRM.
Why should I Integrate SharePoint and Salesforce?
SharePoint and Salesforce are both business software that can cater to different types of organizations. The main reason you go for a SharePoint Salesforce integration is that you want to use SharePoint as the Document Management System for all of your organization’s documents and benefit both in terms of features and in terms of costs.
In terms of features, you gain by having the documents in SharePoint because you make team collaboration easier, and you enable version control. Many companies feel they need a document management solution for Salesforce, often in an early adoption stage in terms of Salesforce.
The possibility to share documents with non-CRM users or externally (e.g., for contract changes) is also a nice feature that integrating SharePoint and Salesforce adds.
In terms of cost, the truth is that not only is storage cheaper on the SharePoint side, but you can also save if the Office 365 / Microsoft 365 license that your organization has already included SharePoint.
What to look for in a SharePoint Salesforce Integration
It is important to keep in mind the main features you want to ensure your integration delivers its best. You want your SharePoint Salesforce integration to be:
Seamless
While there are advantages to having the documents in SharePoint, you still want the users to be able to access the documents in Salesforce as if they were right there. This means the user workflow should be the same, and the user experience should not be affected. When the integration is in place and the documents are in SharePoint, it should make no difference for the user when he is in Salesforce trying to get that document. Pay special attention to whether you can still search for a document on the Salesforce side.
Automatic
The purpose of your integration is to have the documents moved automatically. Make sure the integration does not require any input from the user. It should work independently from them and detect new files in a timely manner. Solutions that involve periodic batch sync can become a blocker as these can lead to confusion among the end-users.
Complete
You would also want the integration to cover all the scenarios you need. The scenarios will be unique for your company, but here are two examples:
Example Scenario 1
Example Scenario 2
Someone creates a quote in Word format in Salesforce. With the integration working, this document should appear in SharePoint. Questions: What happens if someone else sees the quote in SharePoint, prints it, gets it signed, and uploads a scanned version of it to the same folder in SharePoint? Will both be available for Salesforce users?
You have many existing documents in Salesforce but don’t want all of them to go to SharePoint. Questions: Is it possible to only move and create a link for those that were uploaded in the last month, for example?
Reliable
As your integration deals with two different platforms, Salesforce and SharePoint, it should be able to deal with any issues on either side, as well as general failures in the connection between them.
When one side is not available or not able to connect, your integration should handle the problem gracefully. It should resume as soon as possible. Very importantly, it should do so with no user interaction, although there should be a way for the system administrator to be notified.
How to Integrate SharePoint and Salesforce in 5 Steps
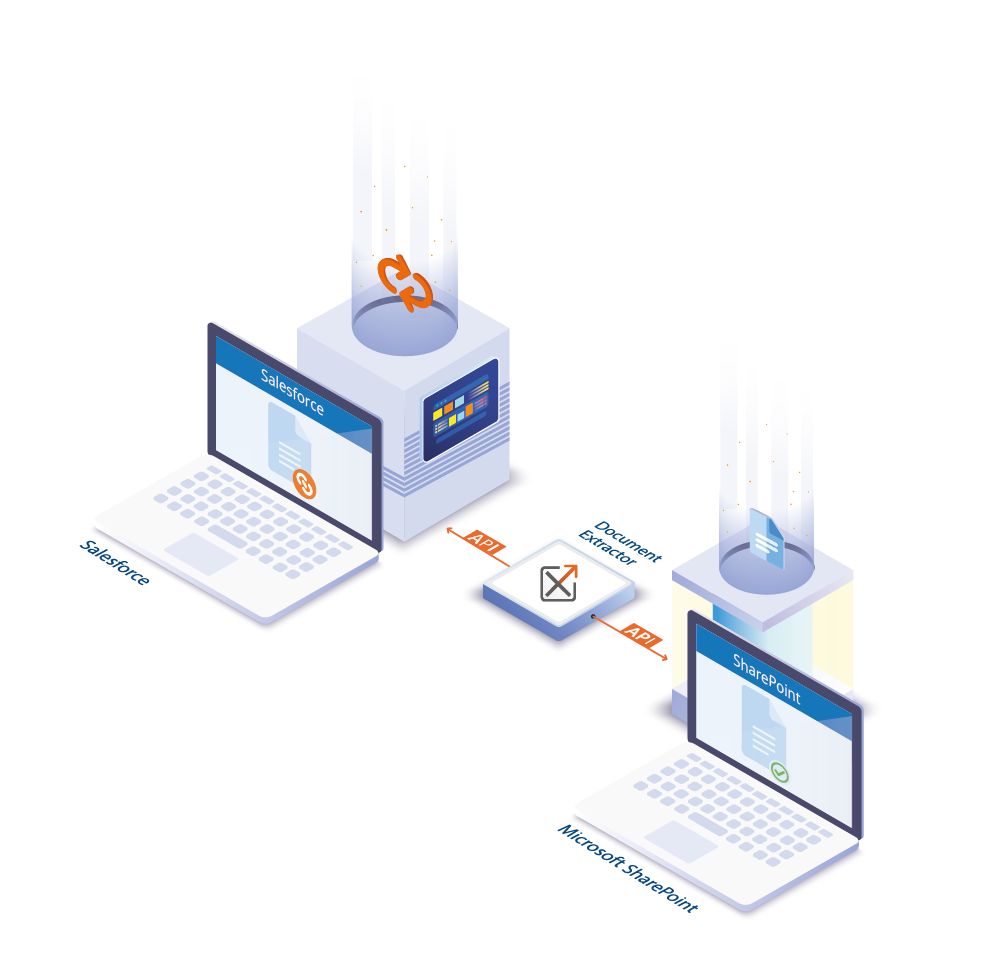
Let’s say you decide to go for the SharePoint Salesforce Integration and want to get it working in the most straightforward way possible. In that case, the way to go is a third-party tool called Document Extractor. You might feel tempted to go with Files Connect, provided by Salesforce, but if you browse through the forums, you will find this integration is not as easy as you might think, and it has its own pitfalls.
This tutorial, therefore, uses a paid third-party tool called Document Extractor. This tool detects the document in Salesforce and moves it to SharePoint. It leaves a link to the document in the original location. This move to SharePoint is referred to as “stubbing the file”.
To use this very convenient tool, you should first check if the Salesforce and SharePoint versions you would be integrated with are supported:
Salesforce Professional, Enterprise, Unlimited, Force.com, and Developer – both Classic and Lightning Experience
SharePoint 2010, 2013, 2016, 2019 and Online, Office 365
To start the Document Extractor’s installation, we’ll start by downloading the tool. Then we’ll go for the actual install and activate the free trial on our sandbox.
Once you have run the necessary tests on your sandbox, the move to production is straightforward, and from then on, the integration is fully automatic.
Let’s get started!
Step 1 – Download Document Extractor
We will start by getting the tool from Connecting Software’s website. You can also get it from Salesforces’ AppExchange.
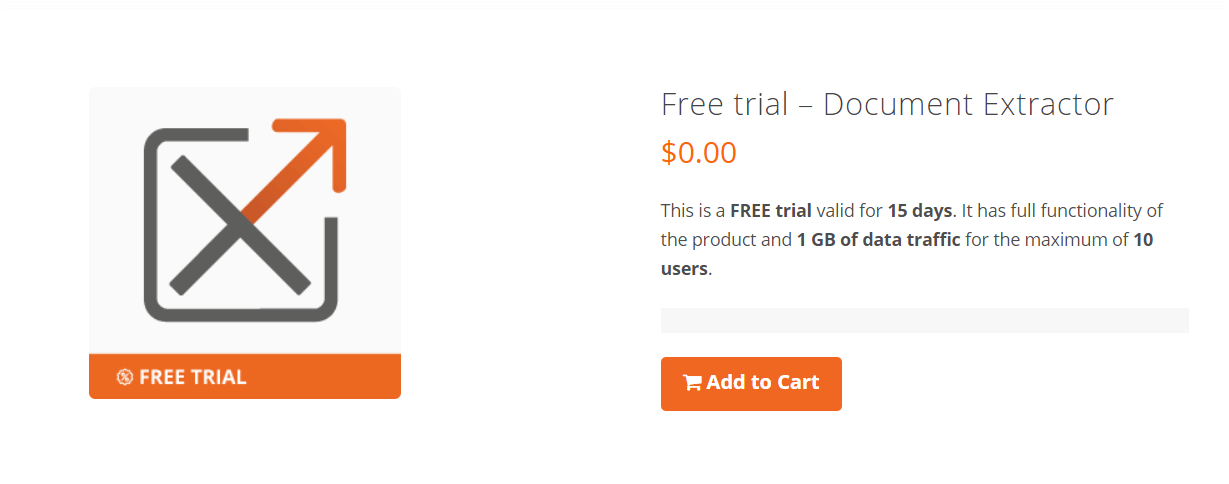
For this tutorial, we will use the SaaS version of the tool, so we will start by getting that version as a free trial. There is also a self-hosted version available.
Note that although the trial is free, you do have to follow a normal shopping cart procedure and place an order at the cost of $0.00. Once you do that, you’ll receive an email with instructions.
Step 2 – Install, Activate, and Configure the Free Trial on Your Sandbox
Next, you need to click on Complete Your Registration on the instructions email.
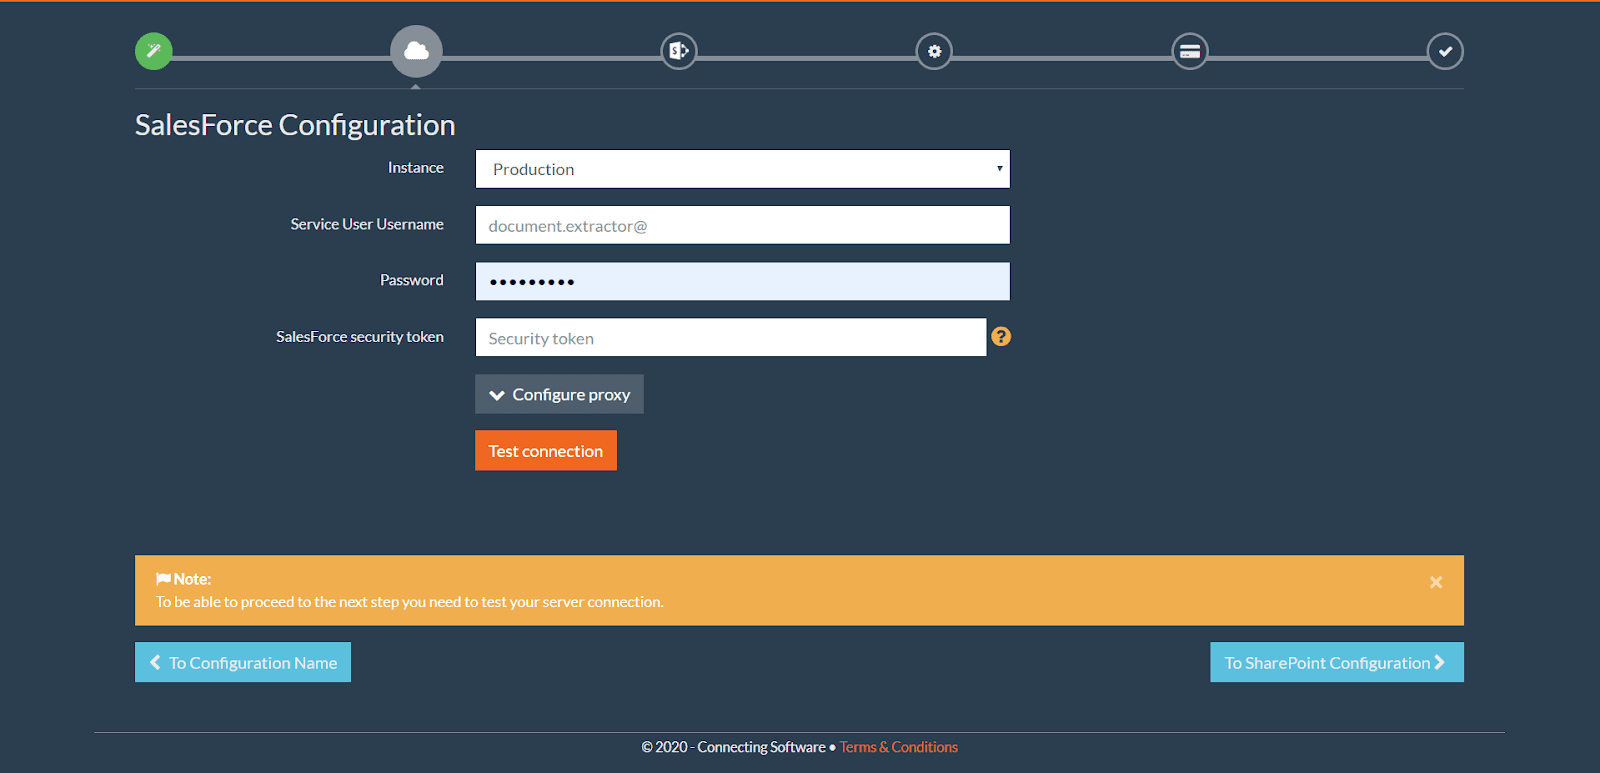
From there, it is quite straightforward to get the product installed. We always recommend that you start by installing Document Extractor on your sandbox, and then you can move it to production. You should therefore use Test/Sandbox on the Instance field rather than Production for now.
When you choose Test/Sandbox, you’ll need to type your sandbox service username. This is simply a dedicated system administrator. This user should be granted elevated access rights to allow modifications of the system. Please also make sure this account is not used to access your Salesforce by anyone else. You’ll need the service user password and the security token so that you can test the connection.
If you want to see how the configuration is done in further detail, check out this tutorial installation video.
Document Extractor uses the help of a managed package with a set of Apex classes and triggers to stub your documents from Salesforce to SharePoint. Once installed, you’ll see the package listed in the list of installed packages.
Next, you’ll need to provide your SharePoint settings. You need to have a user with enough permissions to read and write documents to the document library where documents will be stored.
Document Extractor uses “Push notifications”, which means that the service detects new documents uploaded to Salesforce. The service also uses “Full Scan Polling” as a backup mechanism to ensure that all files are stubbed. We recommend you increase the interval of the “Full Scan Polling” to optimize your API call consumption.
Step 3 – Test it out
When you’ve got everything set up, you can see the stubbing in action. Each document is stored in a folder in SharePoint that has the name of the entity it is related to in Salesforce. There is also a default folder to store documents that are not related to any entity.
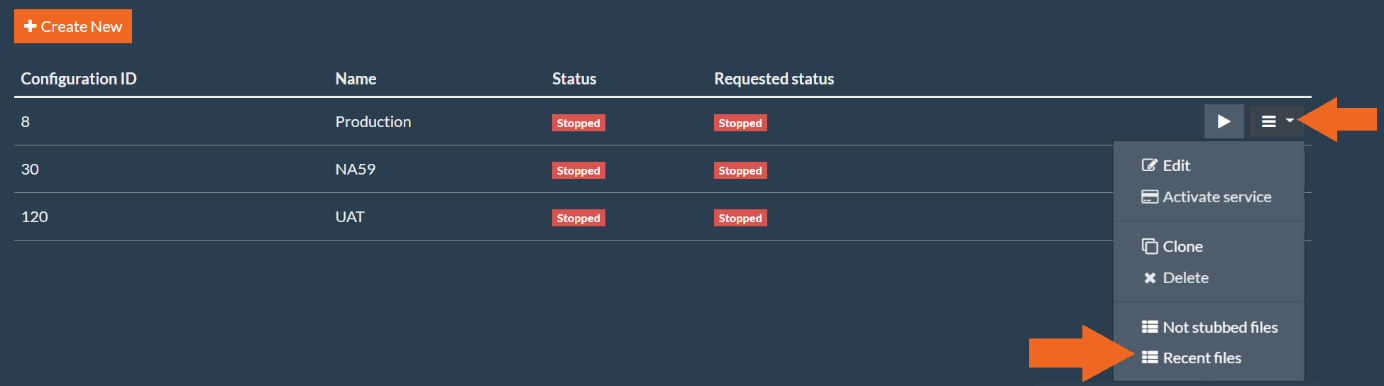
Check out if all the files are where you expect them to be. Good options that are worth checking are the Recent files and the Not stubbed files.
If you activated the file deletion option when configuring, that is something you should check out at this stage as well. You should see that when a link is deleted from Salesforce, the corresponding file is deleted from SharePoint.
In the next steps, you’ll learn how to switch to production.
Step 4 – Switch to production
In this step, you’ll switch your installation to production. Again, this is the same procedure that is described in the tutorial video.
Make sure you stop the service before you start the move. Then change the name of the configuration, choose Production instead of Sandbox, remove the sandbox postfix from the username, fill in the correct password and security token, and test the connection.
Install the required package again, but this time to production as we did before with the sandbox. Test the connection again to get the “Success” message. Change your SharePoint to the production one or choose a different Document Library, to make it suitable for production. Make sure you also change any settings you want different in production.
Once done, click Save. That’s it!
Step 5 – Start Synchronizing
To start stubbing documents, you simply have to go to the configurations list and start the one you want.
If you followed this step-by-step procedure, you probably only have one item on that list, so the only thing you need to do is locate the Start/Stop button – it is the one on the right-hand side, with a triangular shape. To start synchronizing and stubbing the documents, simply click on that button.
The results will be similar to what you got on step 3, but now it is happening in production. Yey, it’s now time to celebrate!
Other Types of Integration
You can actually integrate Salesforce in different ways if you want. For this, the Database to Salesforce Sync solution is the way to go.
You can connect Salesforce to any local database management system (DBMS) such as Microsoft SQL Server, ORACLE, MySQL, SAP HANA, or MariaDB. You can either get data from Salesforce into the local database or get data from the database into Salesforce.
The same goes for any legacy software, as long as you have access to either the source code or the database.
This means you can create all kinds of flexible solutions and adjust them perfectly to your data integration needs, as you can connect to any database that you already have. It is an excellent way of maximizing what you can take out of a Salesforce integration. All in all, much more flexibility, without the typical hassle and problems of a custom solution.
Conclusion
There are many benefits to a SharePoint Salesforce integration. You can move your documents from Salesforce to SharePoint and, by doing so, reduce costs and increase your team’s productivity. They can either use the documents from Salesforce as they always did (they will no longer be in Salesforce, but no one will notice) or get them from SharePoint if they prefer with all the version control and team collaboration features.
You can even take the integration one step further and use Database to Salesforce Sync to integrate with legacy software and databases.
This is another episode of Integration Talks, a podcast where we discuss everything software integration with thought leaders and experts across industries.
In this episode, Francis hosts Claire Agutter to discuss Service Integration and Management (SIAM).
Claire is a service management trainer, consultant, and author. She is the director at ITSM Zone, providing accredited eLearning in ITIL, DevOps, BRM, and more. She’s also the director of Scopism, the publisher of the SIAM Foundation and Professional BoKs.
In 2018, 19, and 20 she was recognized by Computer Weekly as one of the 50 most influential women in tech, and in 2017, 18, and 19 She was recognized by HDI as one of the top thought leaders. She is also the host of the popular ITSM Crowd YouTube channel and the Chief Architect of VeriSM.
About this episode:
What is SIAM?
Combining SIAM with ITIL4, possibilities, and outcomes
Getting started with SIAM
Average deployment time of SIAM
and more
Not a fan of watching videos? Then listen to this episode on:
Francis Martens: Hi! Welcome to the Integration talks! I’m Francis and I will be your host today. Integration Talks is about everything around system integration and then we both speak about internal integration and cross-company integrations. And it’s not only about the technology but also processes, how tools, and good practices to get the integration projects up and running.
And today we are welcoming Claire, Claire Agutter, I hope I got your name right? And today we are going to talk about SIAM and that will be our focus. So before we dive into the detail, Claire can you tell a bit about your background, about yourself?
Claire Agutter: Yeah of course! Thank you for inviting me to the podcast. So like you said, my name’s Claire, I’m based in the UK and my entire career really has been service management so more than 20 years now which is quite frightening when I think about it like that.
But I started working on service desks in end-user support and then took some early ITIL qualifications it was ITIL v2 when I was doing my training and from there kind of found I felt like I’d found my home so progress through interchange management roles, general service management adoption roles, consultancy training and for the last 13 years, I’ve been the director at ITSM zone, which is an e-learning business for service management, and then 4 years ago as well started Scopism, which is kind of more focused on content, you know, it’s very obvious looking at the service management market that things are changing very quickly there are lots of new ways of working, new procedures, new practices coming through so Scopism is kind of more aimed at that side of the market we provide content, consultancy, we run conferences and that was where we kind of worked on the service integration and management body of knowledge that lives under the Scopism brand.
Francis: Okay, well that’s the acronym is SIAM is services integration and management. I have seen you you joined broad research?
Claire: Yes! What’s a navigator? So Blur research is an analyst company based in the UK with a strong focus on technology but also the kind of the future of work and it’s the future of work practice that I sit within. What Blur are trying to do with the navigators is kind of reach out to people who they can see are doing work in a particular space and asking them to bring in their industry expertise so it sounds trying to say this in a way that doesn’t make me sound massively big-headed, but they’d kind of seen some of the work that we’ve been doing with the content creation they’d seen me present a couple of events so as part of that future of work practice, I get to work with the other Blur analysts who are all fabulously intelligent people just speaking to them is an education and we’re kind of creating content to support organizations because one of the massive things about the curvy pandemic has been an impact on organizational…
Tracking and managing projects using commercial software solutions like Jira, Azure DevOps, or ServiceNow is not new. Such tools make the life of project managers easier and hassle-free.
An organization might have suppliers, customers, and partners that probably work on their systems. In order to collaborate with them in a seamless way, you need these different systems to communicate with each other without any mistakes.
Thankfully, software integration tools like TFS4JIRA and Exalate can save time, money, and above all sanity. They integrate different systems by synchronizing data between them. This is especially useful when you want to share data outside your organization.
Here is your complete comparison between TFS4JIRA and Exalate, where we compare features, functionality, and pricing in detail. You can then determine the solution best suited for your business scenario.
What is TFS4Jira?
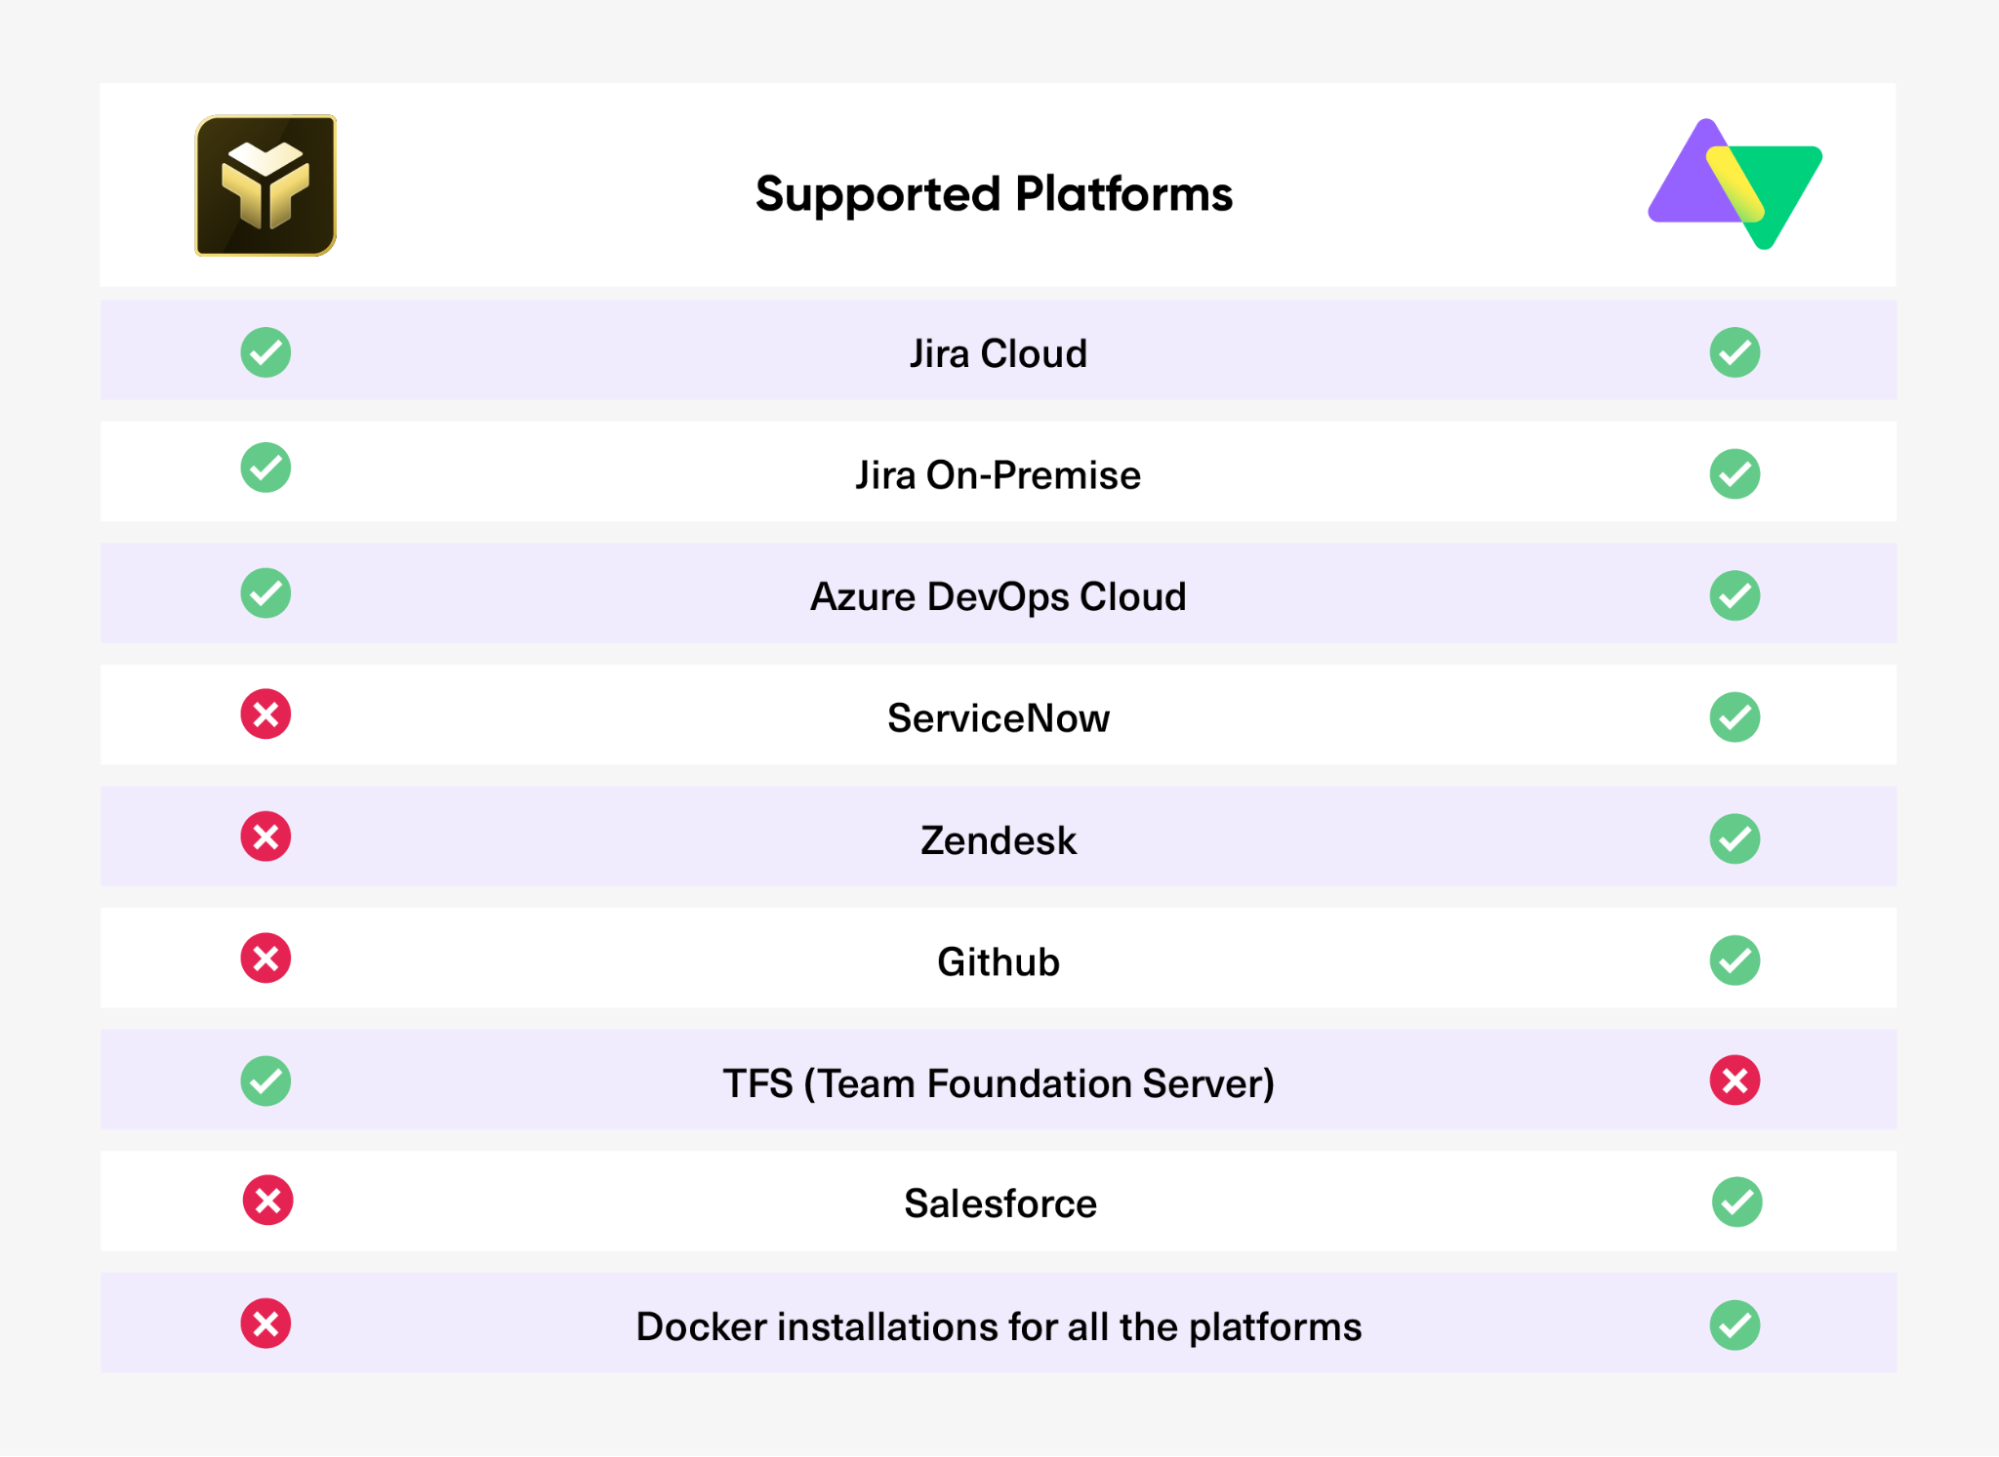
TFS4JIRA is an integration and migration plugin to connect two solutions: Jira (Cloud and on-premise) and Azure DevOps/TFS. It helps to integrate and synchronize changes made to the issues and work items between Jira and TFS/Azure DevOps platforms.
What is Exalate?
Exalate is an integration solution that synchronizes various entities bi-directionally between multiple applications like Jira (Cloud and on-premise), Azure DevOps, ServiceNow, Salesforce, Zendesk, GitHub, etc.
TFS4JIRA vs Exalate: The Complete Comparison
TFS4JIRA Vs. Exalate: User Friendliness
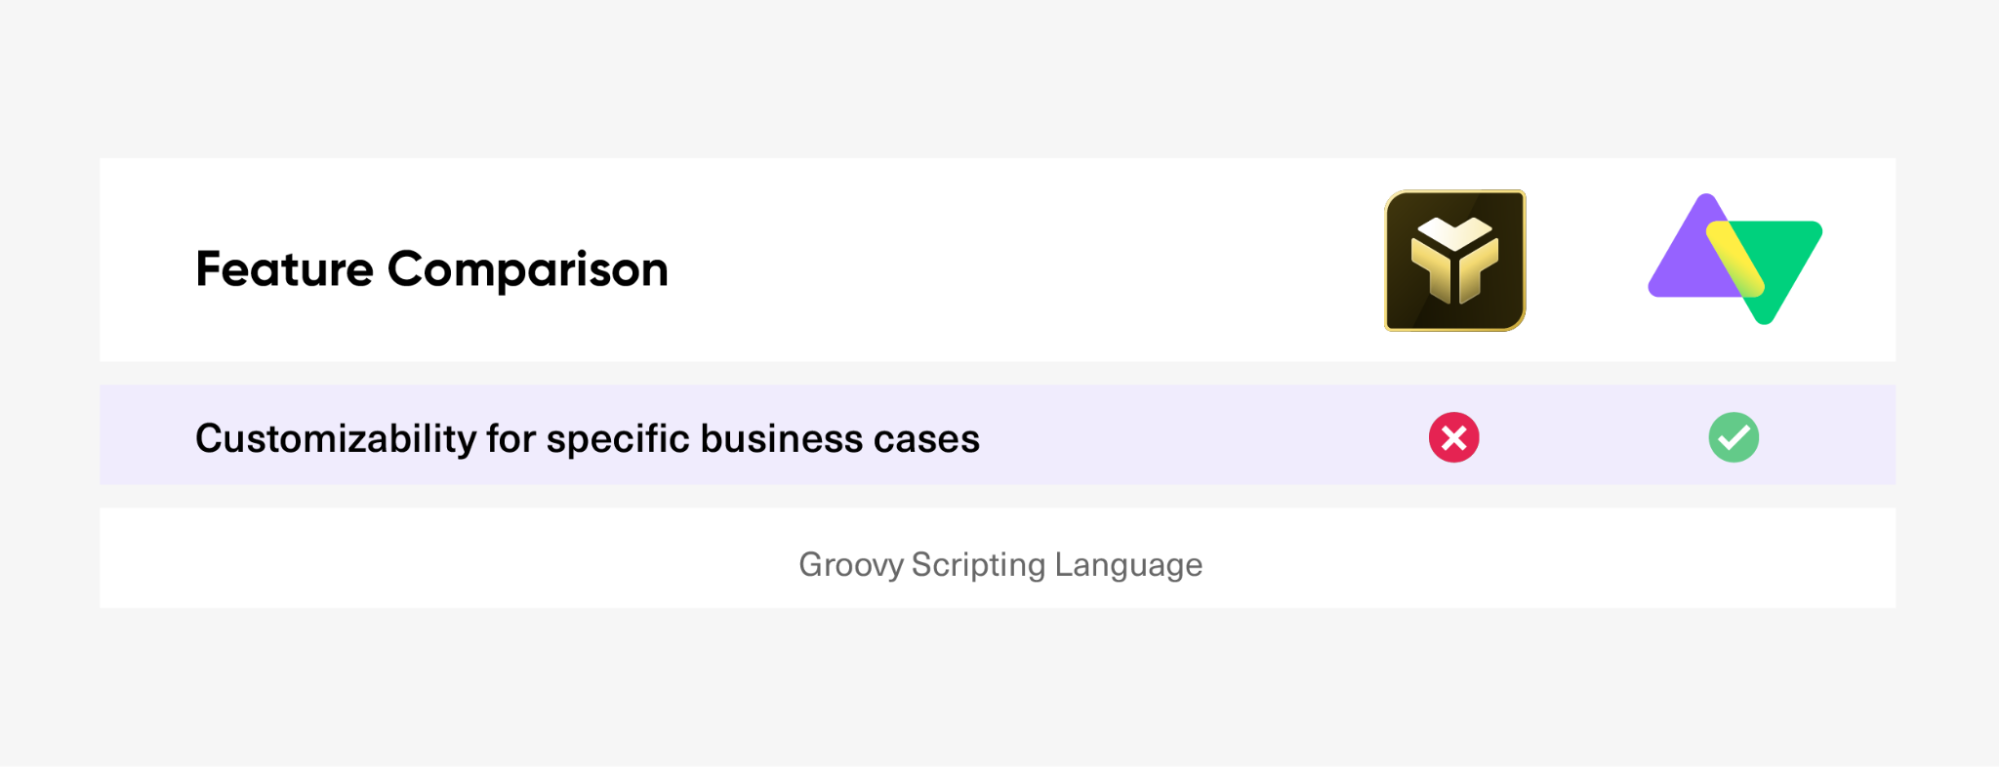
Exalate supports a drag-and-drop interface (Basic mode and Visual mode) that provides pre-defined mappings between fields like status, issue types, description, etc. It also has a scripting interface (Script mode) that helps customize the sync according to specific business use cases.
These modes make Exalate easy to use for both technical and business users.
TFS4Jira has a no-code interface called synchronization profiles. Once you create a synchronization profile between Jira and Azure DevOps/ TFS, information can flow automatically between both platforms.
TFS4JIRA Vs. Exalate: Data Sync Coverage (Product Scope)
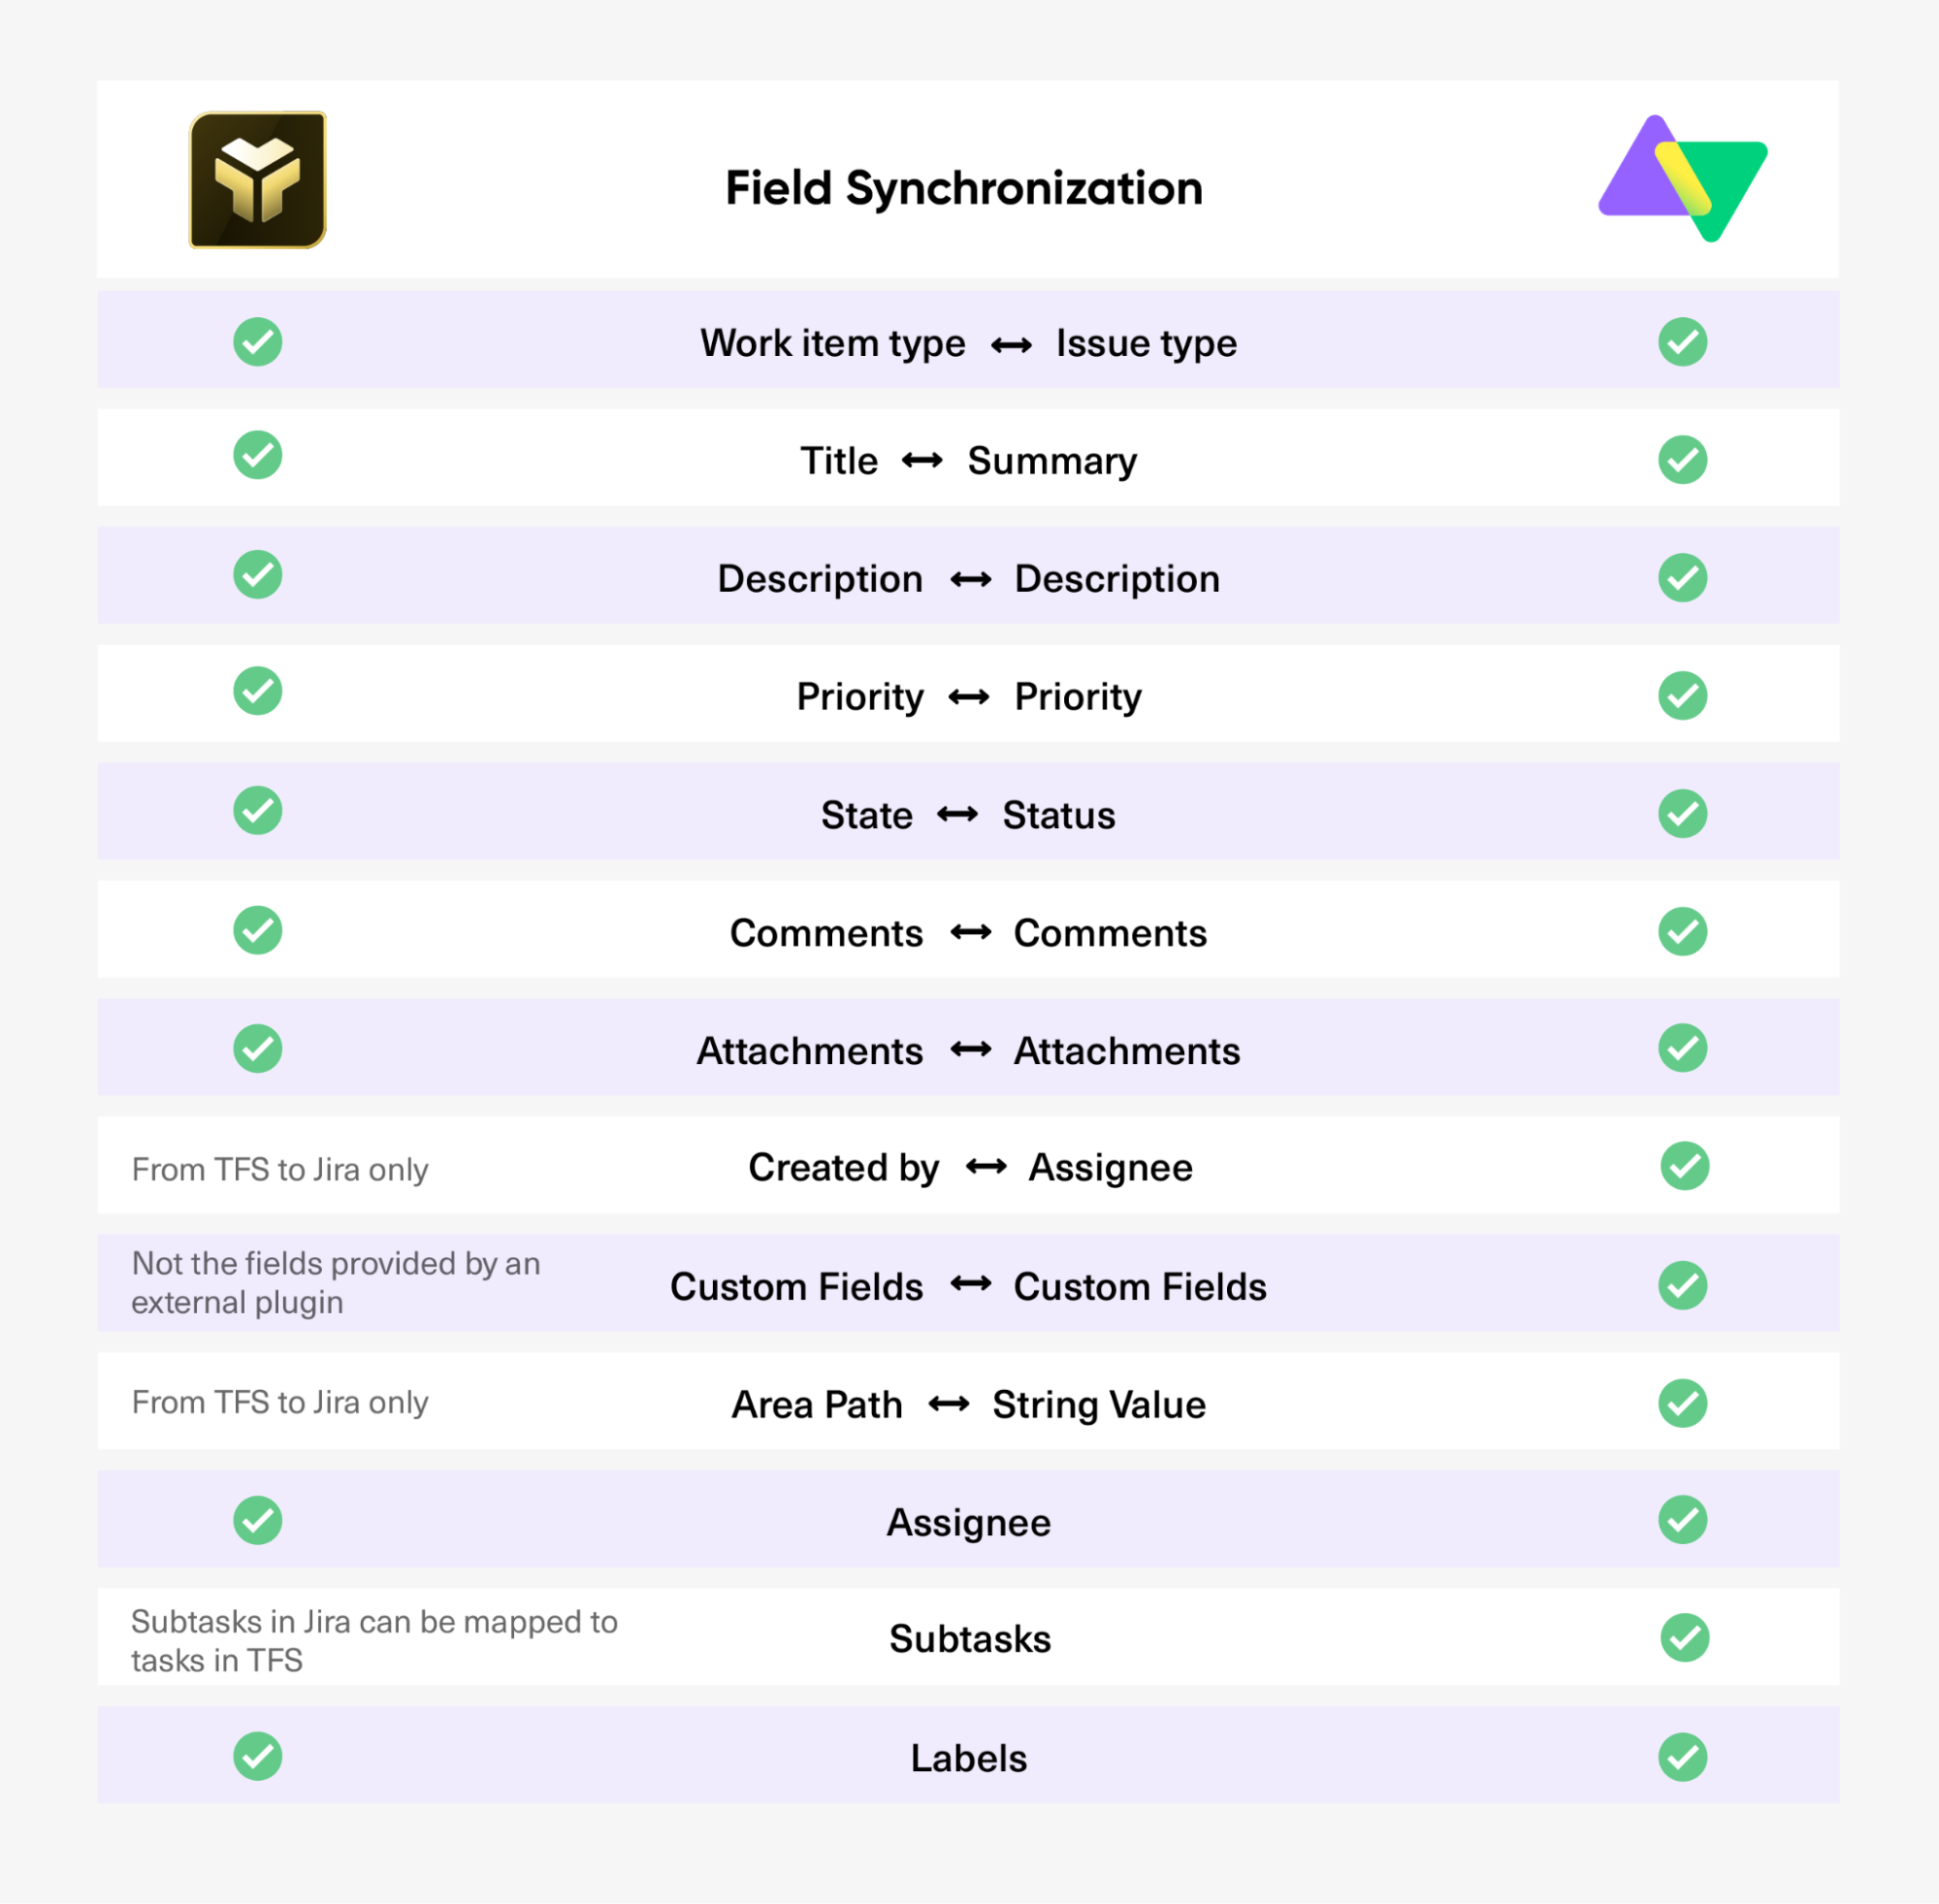
TFS4Jira and Exalate are both one-way or two-way synchronization apps with similar capabilities. In Jira, you can sync issue fields like summary, description, attachments, status, priority, assignee, etc.
You can also sync and maintain issue links and hierarchies, sub-tasks, etc.
On the Azure DevOps side, you can sync work items, descriptions, priorities, states, comments, etc.
Both support connecting multiple Azure DevOps instances, but Exalate also supports connecting multiple Jira instances.
Exalate’s powerful Groovy-based scripting engine gives unlimited flexibility in defining mapping and sync rules logic. So you can perform deep integrations between different platforms. For instance, you can map the data coming from a single Jira issue under two different Azure DevOps projects.
sync a variety of custom fields created by add-ons such as syncing Insights fields and tempo work logs.
➜ Data Sync Coverage Winner: Exalate
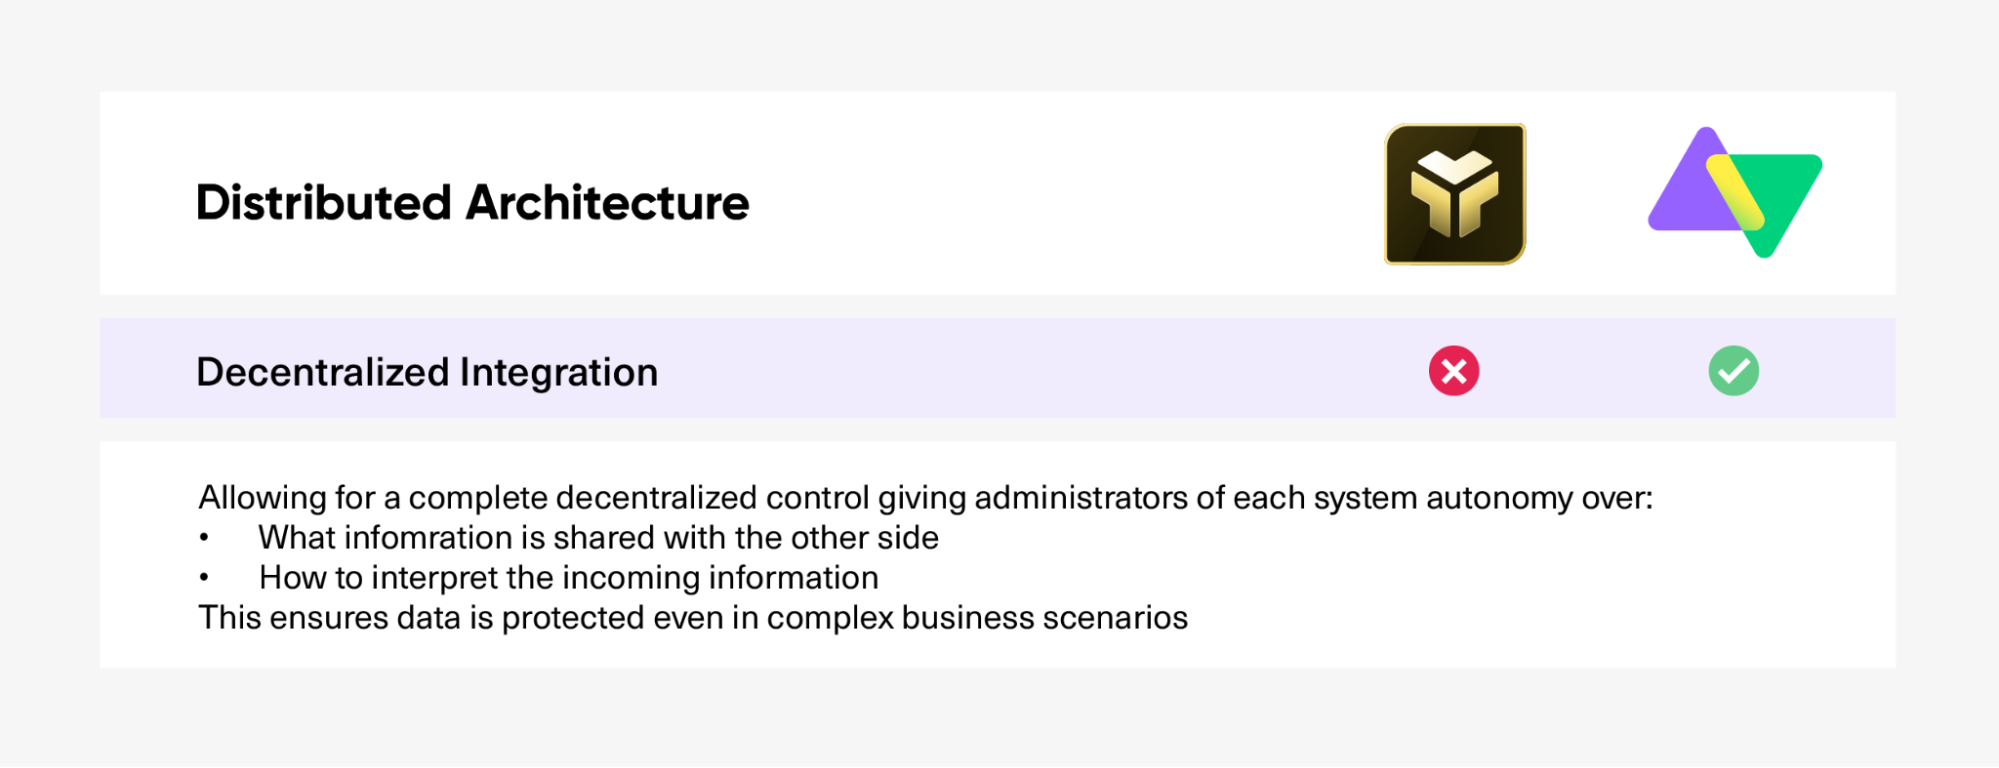
TFS4JIRA Vs. Exalate: Centralized or Decentralized Integration
Exalate supports decentralized integration that allows you to retain full control of your environment by specifying what information needs to remain with you and what needs to be passed between systems. It allows the systems to be loosely coupled and independent of each other, increasing scalability, maintainability, and security.
Using Exalate, you can configure the incoming and outgoing syncs using sync rules on either side without the other party knowing about it. This allows you to have more control over the data being synchronized. This is possible only with a distributed architecture.
TFS4JIRA has a centralized architecture where the TFS4JIRA Synchronizer works as a centralized entity through which all synchronization requests have to pass through. So either of the collaborating parties can make changes to the synchronization profiles, but those changes need to be updated on the synchronizer as well. You also need admin access to both systems in order to set up a sync.
➜ Decentralized Integration Winner: Exalate
TFS4JIRA Vs. Exalate: Use Cases
Both TFS4Jira and Exalate support a wide variety of use cases that are similar in nature.
Bi-directional Issue sync: Often, teams need to raise a bug, blocker, issue, or request with another responsible team without the need for manual follow-ups. Such teams can be within the same company or belong to different companies. For example, a support team using Jira may need to escalate tickets to the development team using Azure DevOps without the need for additional communication channels like Slack or emails. Similarly, customer success executives can raise customer issues to be addressed by the product team and prioritized on the product roadmap.
Unified reporting and metrics: Top management needs information gathered and centralized from multiple sources to facilitate efficient decision-making. For example, developers commonly use Azure DevOps. Providing clear visibility of issue statuses and blockers to the project managers using Jira, enabling them to prioritize the backlog, align issues for releases or sprints, and make informed decisions.
Custom-field mapping and sync: You can map custom fields and synchronize workflows of Azure DevOps and Jira such that the unique requirements and processes of each platform are respected and maintained during the sync process. For instance, development (or engineering) teams using Azure DevOps have their own workflow with custom fields suitable to their project. Similarly, the QA team working in Jira has its own set of workflows and custom fields. These workflows and custom fields must be mapped correctly and the required information be synced automatically to ensure every team has visibility and status updates.
The real difference between the tools becomes evident if the use case gets customized and complex. With Exalate’s intuitive scripting engine, you have a lot of power to control every aspect of your integration at a very granular level. On the other hand, TFS4Jira’s central, no-code configuration confines the use cases to the mapping provided by its UI.
Let’s look at a few examples of how Exalate can be used for advanced use cases:
It is an excellent choice for cross-company integrations due to its distributed architecture. It provides a flexible integration platform to connect and synchronize data between multiple ITSM tools like Jira, Salesforce, ServiceNow, and Zendesk. It also offers a special plan, Exalate for Service Providers, which assists in setting up and deploying the Exalate network. This plan simplifies the consolidation of service providers and customers, relieving you of integration complexities and maintenance. The integration experts at Exalate will handle the custom connectors required for any system used by your partners, suppliers, or customers.
➜ Use Cases winner: Exalate
TFS4JIRA Vs. Exalate: Security and Compliances
Exalate has the usual security measures in place like JWT-based tokens, data encryption at rest and in transit, use of HTTPS traffic between the Exalate node and the instance, OAuth, or token-based authentication mechanisms wherever applicable.
It also has a few other distinct security measures:
It has a single-tenant architecture so that each Exalate node and its corresponding instance share a unique file, network, and process space. This protects your company data from unauthorized access.
It provides decentralized integration such that each side independently decides what information must be sent or received. Such independent control over information exchange reduces the dependency on updating a central UI every time your integration needs change. It also increases the scalability and maintainability of your integration.
It has a dedicated security team that ensures all best practices in the data protection industry and strict quality controls are followed during the development stage (vulnerability scans) and post-release.
Periodic penetration tests are performed as a part of the Bug Bounty program.
It is ISO 27001:2002 certified.
It is GDPR-compliant.
All security measures in TFS4Jira, like JWT-based tokens, are on the “norm” level. Only security measures enforced by Atlassian are in place.
They have updated their latest data policy changes of Canned Responses Pro for the Jira app. According to these changes, GCP stores application access logs and stores customer data containing user IP, key, etc for 30 days after which they are purged. You can find more details about this change here.
In some scenarios, it’s possible to deploy TFS4Jira Synchronizer without HTTPS, which is a huge security risk.
The encryption for credentials was introduced only in version 7.1.2.
➜ Security and Compliances Winner: Exalate
TFS4JIRA Vs. Exalate: Migration Or Integration?
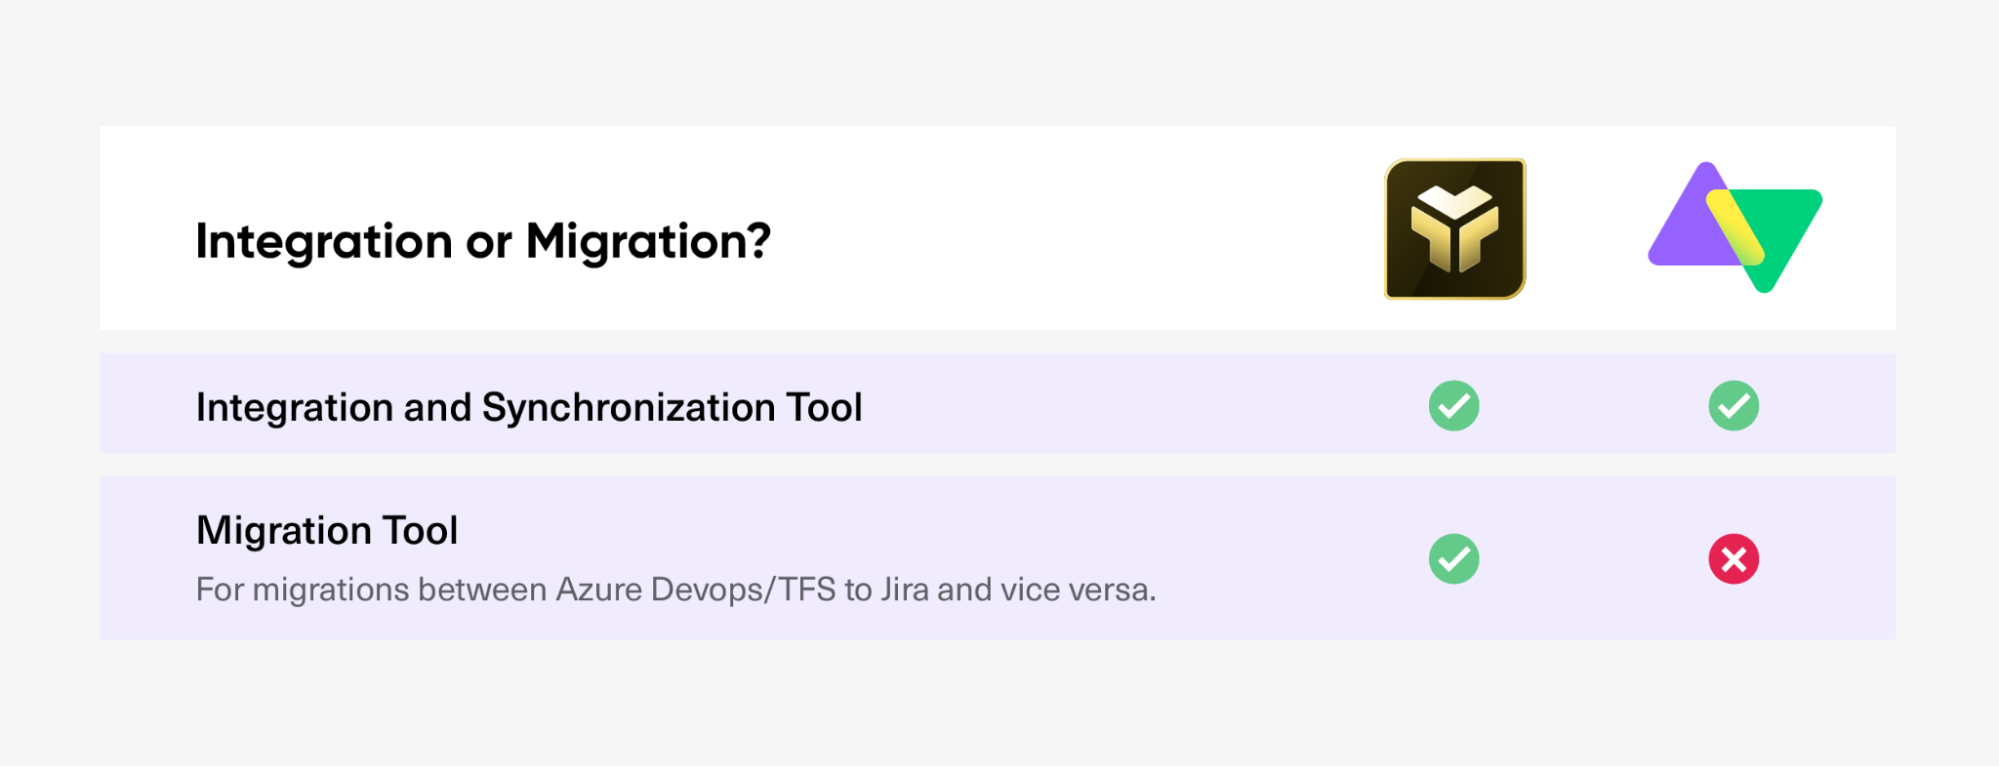
Though integration tools can be used for migration and may work similarly, there is a difference between them. Integration tools are meant for ongoing uni or bi-directional sync between multiple platforms, over an extended period of time. Migration tools require an enterprise-wide large number of sync requests concurrently, probably only till the migration is successful.
Both Exalate and TFS4Jira support integration.
But when it comes to migration, TFS4JIRA is the better option. It allows migration from Jira to AzureDevOps/ TFS and vice versa. The Exalate platform was simply not built for migration. Even though you can still use it for migration, you need to evaluate if it is the best way forward in such cases.
➜ Migration tool Winner: TFS4JIRA
TFS4JIRA Vs. Exalate: Pricing and Licensing
Both TFS4Jira and Exalate offer a 30-day free trial.
The Exalate admin on each side has independent control over the information going out of and coming into the system they use. So for Exalate, you must buy licenses on both the integrating sides. You can check the Exalate for Jira price on the Atlassian marketplace.
TFS4Jira is priced via the Atlassian marketplace only for the Jira side, meaning it would be based on the user tiers. Considering 100 Jira Cloud users, you’d need to pay $4200 annually. You can learn more about the pricing here.
Exalate has a Free Plan that supports simple sync through its Basic mode. It has an out-of-the-box configuration for syncing issue types, summaries, descriptions, comments, and attachments. With this plan, you can sync up to 1,000 entities per month for free.
The Premium plan (fully customizable with all feature sets) unlocks the full potential of Exalate with all three modes: the Basic mode, the Visual mode, and the powerful Script mode. You can purchase this plan after the free trial. To know more about the pricing for other platforms that Exalate supports, you can visit the pricing page.
➜ Cost-effectiveness Winner: Exalate
TFS4JIRA Vs. Exalate: Support and Documentation
Good support and extensive documentation go a long way in deciding the maturity of a product.
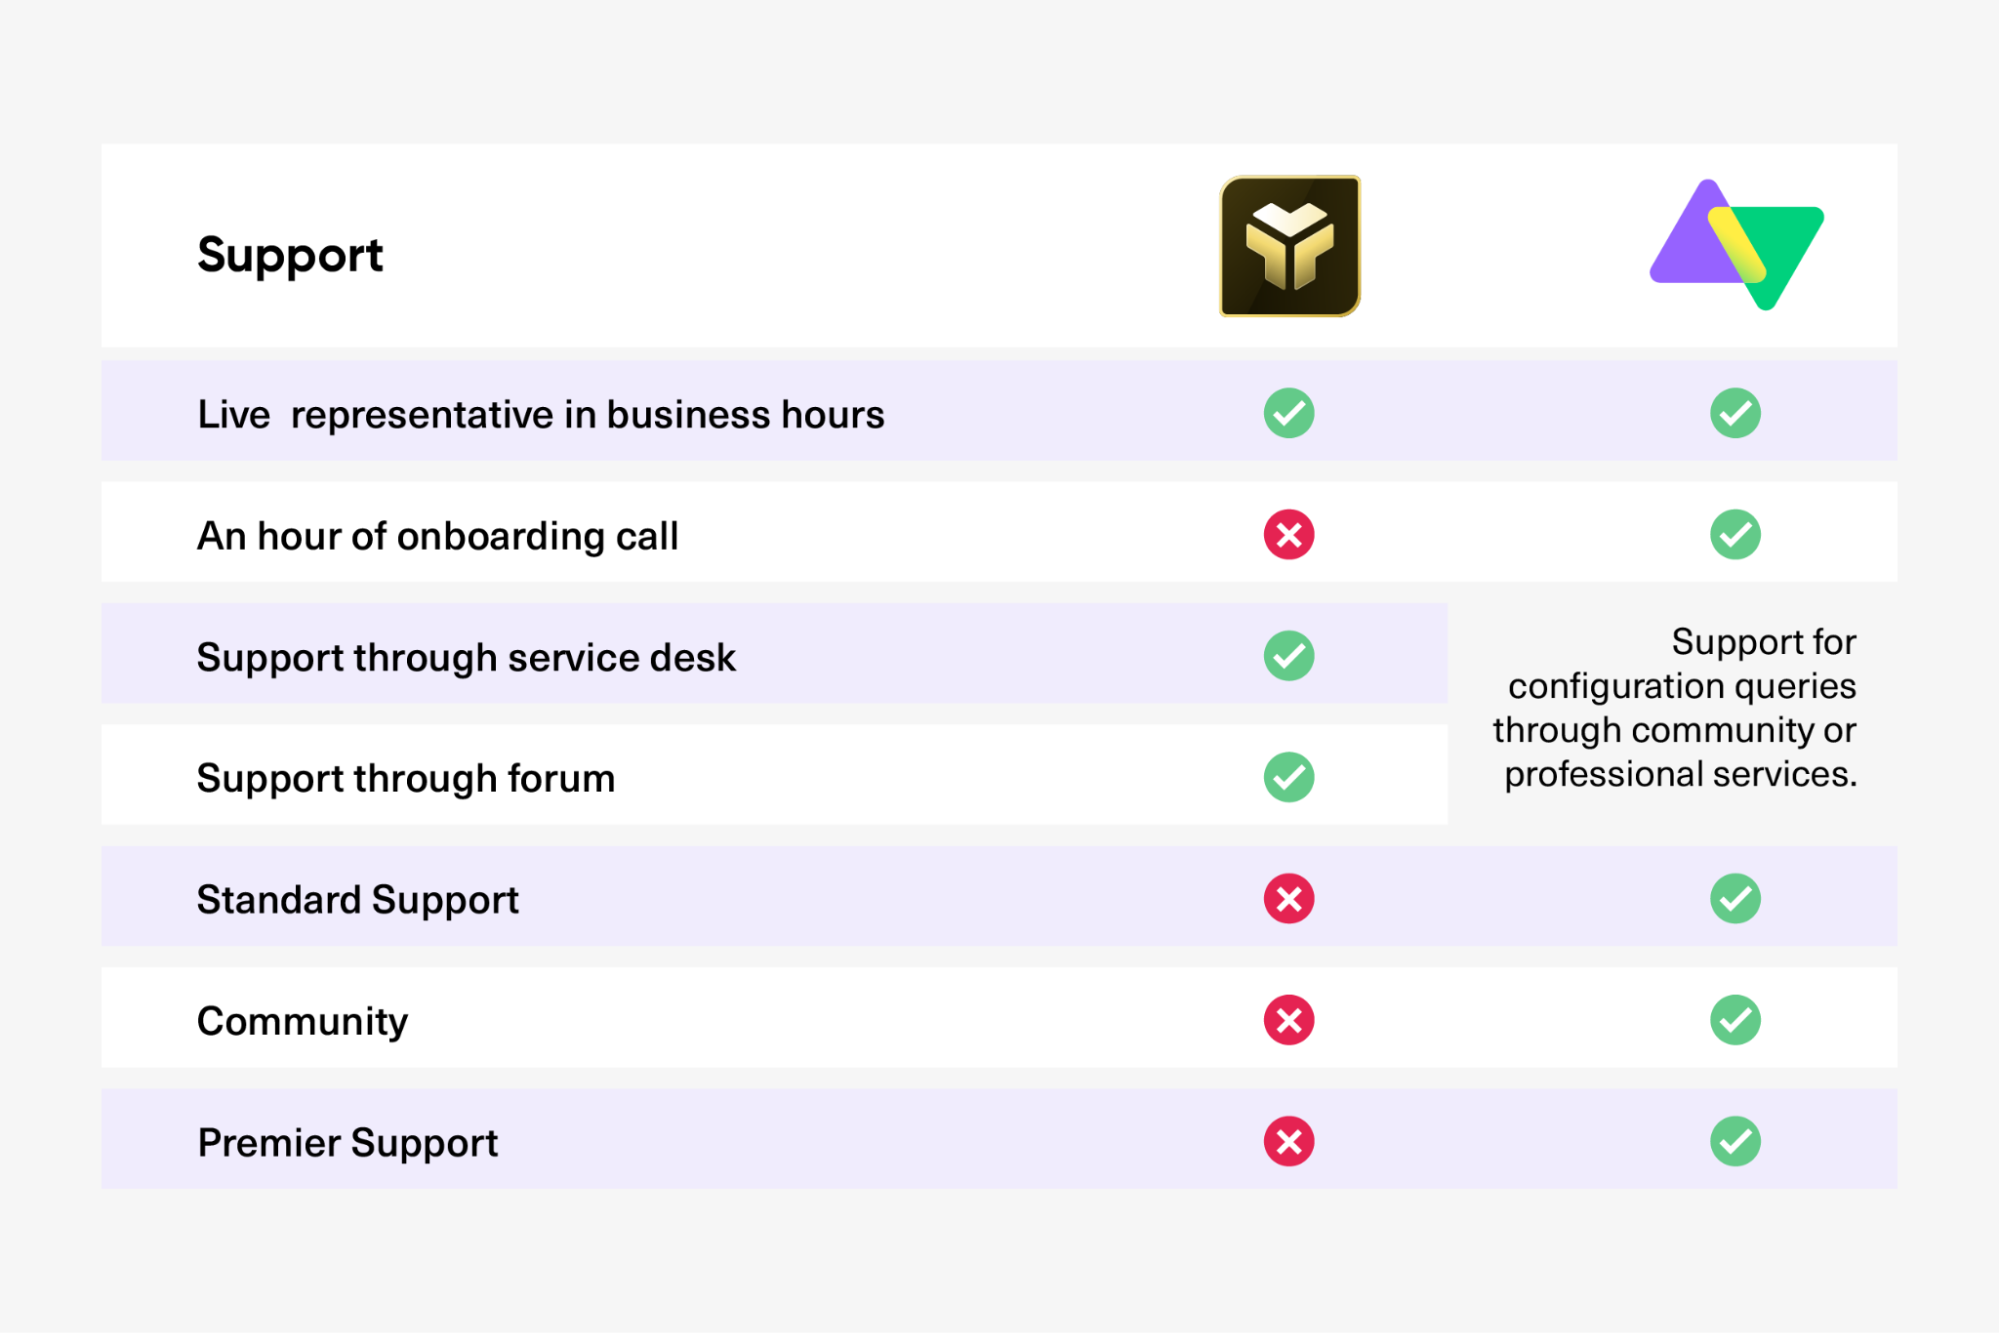
Exalate provides two support options for its users.
1. Standard support: This option assists with installation issues, troubleshooting, and workarounds for synchronization problems.
2. Premier support: This advanced support option offers higher service level agreements (SLAs), assigns a dedicated support engineer, and provides configuration assistance.
Additionally, you can purchase cloud enhancements for your Exalate nodes. These enhancements include a three-fold infrastructure on Exalate cloud, proactive monitoring and alerting, enhanced resource profiles, and other benefits.
Furthermore, Exalate has an active community presence where you can find answers to your questions, including configuration-related inquiries.
TFS4Jira documentation is pretty basic, with a lot of scope for improvement. You can handle your queries only by reaching out to support. We couldn’t find any information on their SLAs either.
➜ Support and Documentation Winner: Exalate
TFS4Jira Vs. Exalate: AI-assisted Integration
Exalate’s Script mode is now available with AI. The AI Assist feature generates sync scripts based on human-based prompts. It is available as a separate chat window for both the incoming and outgoing rules window.
Specify clearly what you want to sync and what you don’t. Review the prompts before publishing them. You can always refine them if required.
TFS4Jira does not have any AI capabilities at the time of publishing this blog.
Final Scorecard: TFS4Jira Vs. Exalate?
Choosing the right software integration solution can save money, time, and resources. At the same time, you can enjoy increased collaboration between internal and external teams without tracking everything manually. This leads to seamless integration and increased productivity.
So, choose a tool that checks all your requirement boxes and still allows you the flexibility to do something extra every time.
Türkiye Sigorta – Türkiye Hayat Emeklilik is a pension and life insurance company that was previously merged with 3 public governmental companies to become the biggest pension and life insurance company in Turkey.
With 38 regional directorates, approximately 3.000 agencies, expert staff serving at about 5.000 bank branches, and robust technological infrastructure, Türkiye Sigorta and Türkiye Hayat Emeklilik ranks as one of the leaders of the industry. They are incorporated by gathering the public insurance and pension companies of Turkey and have undertaken to provide service by satisfying the expectations of their insureds at the highest level.
Having adopted an agile, innovative, and sensitive approach, they offer a competitive insurance product by providing royal treatment for their insureds and participants.
Türkiye Sigorta and Türkiye Hayat Emeklilik provide services throughout the country by adopting a sense of use for goodness and developing innovative solutions by providing their insureds and participants, covering approximately 16 million people, with a rich product portfolio and a wide service network.
Türkiye Sigorta IT, in charge of the SDSS and ITSM processes, recounts their story about the challenges they were facing before adopting Exalate and how Exalate has helped them maintain a seamless flexible synchronization between different Jira instances. Onuralp Öznalbant, the information security officer from TS IT, tells us all about it.
Why Exalate? • Full control over what’s shared and how it’s shared • Flexible and autonomous sync between internal systems and the supplier’s • Seamless integration between Jira instances and other internal systems • Helpful support
Tackling the Challenge
Turkiye Hayat Emeklilik’s core system had been developed by a supplier and they had been using their supplier’s Jira too, as they did not have an in-house/ SDSS software before acquiring their own Jira Software.
As a result, they faced some challenges when integrating data between different teams:
They were completely dependent on their supplier when it came to development and improvements of the software.
They had to go through the whole process of reaching out to their supplier if they wanted to access their tickets’ history. They could not keep any sort of archives either.
They didn’t have any flexibility as they were not allowed to modify anything on their Jira to adjust it to their changing requirements.
Aside from their core system, they also used some side systems like CRM and web development, and these systems were not seamlessly integrated, neither had they full control over their ticketing system or the shared data.
To overcome these challenges, they began considering developing their own in-house integration solution, to integrate with the supplier and follow up on their tickets autonomously. They were also going over a couple of off-the-shelf solutions among which Exalate won as the best candidate when proposed by a partner.
Before adopting Exalate, Turkiye Hayat Emeklilik IT did some tests and tried it out to see if it worked for their specific use case. They wanted to evaluate the solution to see if the tickets were synchronized flexibly between the systems the way we wanted. They had to make sure if we could control how tickets were sent out and received as it was the main criteria they were looking for in a solution.
And that’s where Exalate came into the picture to enable a seamless integration between their Jira instances.
Exalate checked all the boxes for the company enabling the team to integrate their systems in the best way possible for their specific use case.
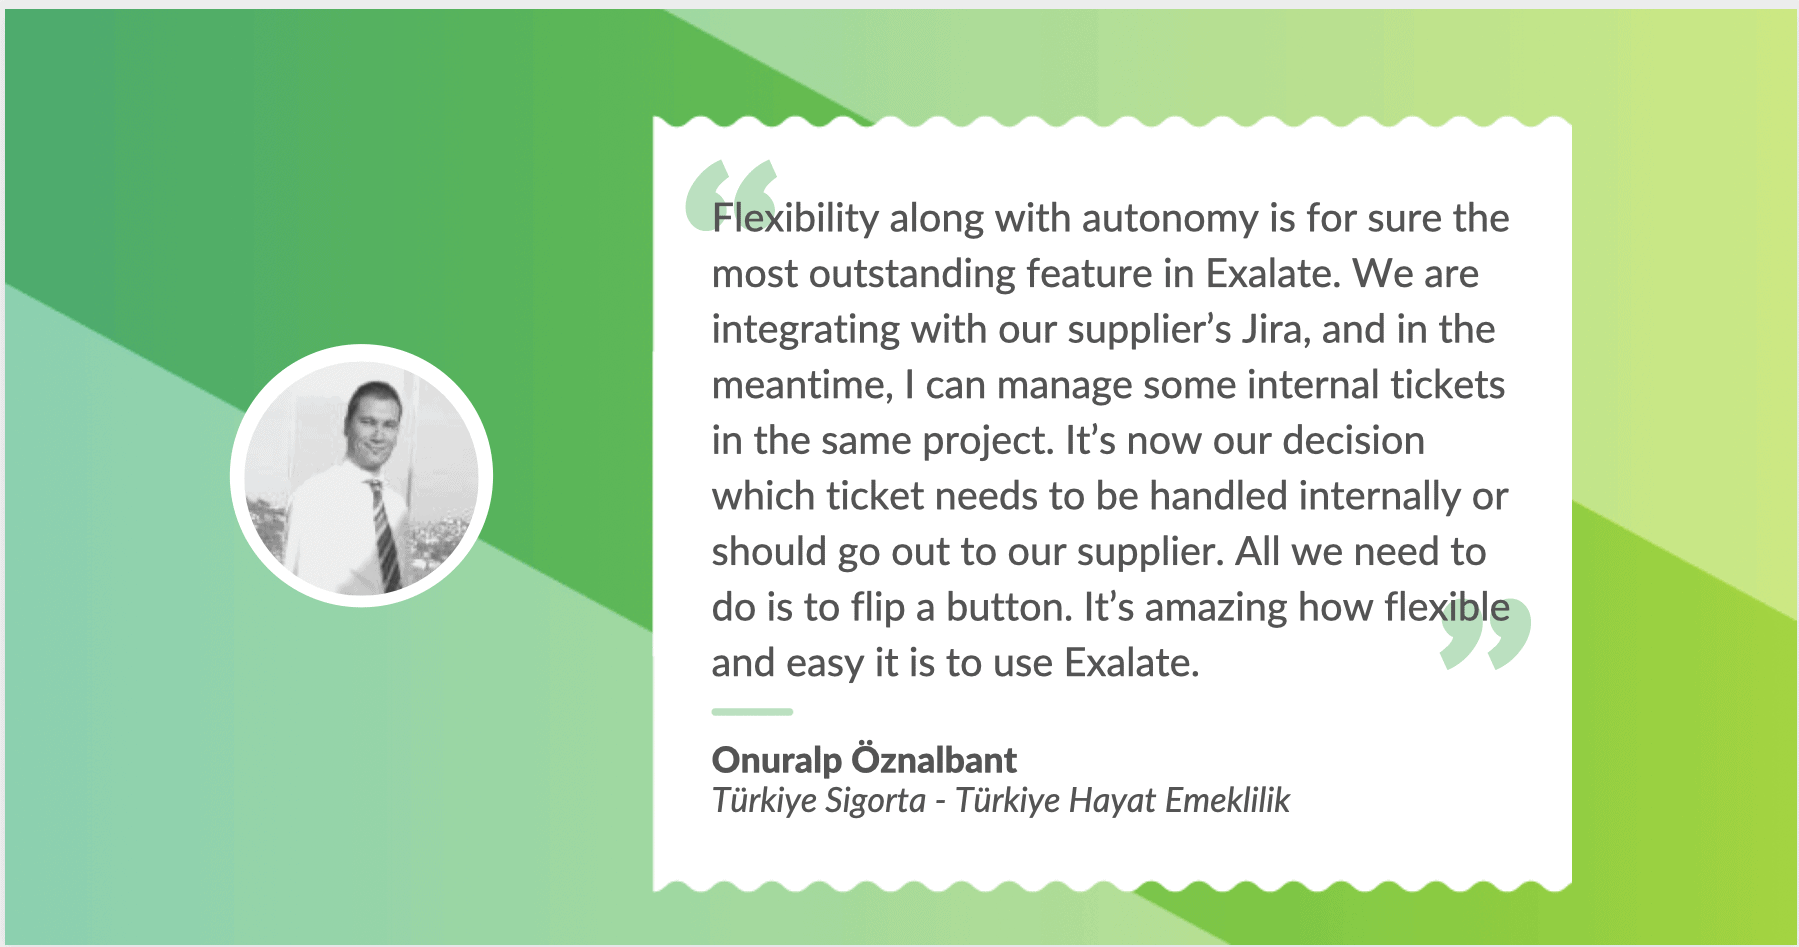
“It was very important for us to assess the solution’s flexibility to see if we could improve or develop a better sync with our supplier. Exalate met all our requirements and during the past 4 years, it has even been supporting us in many other ways. There have also been a lot of bugs and problems in the systems that were resolved thanks to the Exalate support.”
Adds Onuralp.
Turkiye Hayat Emeklilik has also managed to save a lot of time as there is no need to manage two different software but only one, so they can have full control over what is shared and how. Exalate has solved the remaining problems for them connecting them to the other Jira and handling all the data between the systems in a secure yet autonomous way.
So we asked Onuralp about Exalate’s most prominent feature that has helped their team work more efficiently:
Expanding the Exalate Network
Turkiye Sigorta’s IT department is a shared department between the two parties, so they will support both insurance and pension and life companies.
The insurance side, however, uses another core system provided by a supplier and they also have their own ticket management system. Onuralp explained that they’re already working on an API or a web service to connect to their system.
So they’re looking forward to using Exalate to integrate their systems.
Results Recap
Taking advantage of the solution’s autonomy to fully control tickets and data sharing
Intuitive ticket handling
Saving a lot of time and effort
As companies grow bigger and their collaboration goes cross company, their need to adopt a seamless integration becomes more and more inevitable. You can save time, money, and resources with the right solution and of course enjoy the ease of communication without having to handle everything manually.
Become an Exalate user and experience a seamless integration and an optimized workflow. It’s flexible enough for any sync use case.