In today’s fast-paced business world, managing tasks across different platforms is quite a challenge. Imagine you’re in Jira, and you need to sync seamlessly with a partner or a client using GitHub. That’s where a Jira GitHub integration comes in handy.
Jira and GitHub are both excellent tools for managing projects, but they have different feature sets, strengths, and weaknesses. Connecting them will enable teams to work in harmony and optimize their workflows without tampering with each other’s autonomy or security.
By connecting these platforms, you create a shared space where teams can collaborate efficiently. But before diving in, let’s explore the benefits and potential challenges. We’ll then go ahead to choose the right integration GitHub Jira solution and implement it smoothly.

Get the Jira GitHub Integration Guide
Learn how to achieve seamless integration between Jira and GitHub, step-by-step.
Why Integrate Jira and GitHub?
A Jira GitHub integration that filters and sorts the shared data can present it to each team in a form most useful to them. Data they need is shared, but fields they don’t need can be removed from their copy. That means they can function autonomously and more effectively.
Teams using GitHub and Jira will likely make use of whichever features are the best fit for their needs. Using them both together means your teams will be able to take advantage of all the positive features while mitigating the drawbacks either platform may have.
They are both widely used in software development, so those of you working in that field will likely be familiar with them.
Choosing the Right Technology for a Jira GitHub Integration
To get the most out of your integration you need to consider the potential issues that could arise with it. Problems are always easier to handle if you think about them in advance. With that in mind, choosing a platform that can handle these issues effectively will make life easier for your teams and allow them to focus on what they do best.
Decentralized Integration
The items you share in Jira and GitHub consist of multiple fields containing different types of data. If you look at incoming items from the other team, you will find that some are useful, but others aren’t. You need a system that can give you fine control over what is shared and allow you to pick exactly what fields are stored.

You don’t necessarily want to have a meeting every time you need to make a change in the system. Being able to change things independently without having to involve the other team and having control over what is shared and what is not will make things faster and easier. Decentralized integration for each end of the system is a clear goal.
Flexibility
You might also want to customize fields and give them specific values as well as assign specific kinds of items to specific people. Being able to identify and filter incoming data will help you here.
Each team may want to make changes to the way they use information as their needs evolve and their understanding of how they can use the synchronization deepens. You may want to add or remove data provided to the other team.
In addition to controlling what is shared, you also need to control the conditions that trigger information exchange. Being able to create and combine rules to do this can give you the flexibility you need to make your integration effective.
Reliability
In an ideal world, your GitHub and Jira integration would work perfectly when set up without any further intervention from you. In reality, these systems usually suffer downtime. Connections are dropped, servers need maintenance and software needs updates.
When this happens on one end of your integration, you need to be confident the whole system won’t break down. It needs to be able to handle outages to either side and recover gracefully when things are working again.

Your system should be able to handle whatever the world throws at it, and get up, brush itself down, and continue to work as before.
I’ve chosen Exalate to set up the Jira GitHub integration as it is designed with these three specific features in mind. It promises to deliver autonomy, flexibility, and reliability and is simple to set up and configure.
How to Set up a Jira GitHub Integration in 6 Steps
To set up your GitHub Jira integration, you need to install Exalate on both platforms and then create a connection between them.
After that you can configure the connection to meet your integration needs, controlling what is exchanged, and setting the conditions under which exchange takes place.
But before we dive in, would you rather watch a tutorial than read a guide? Then check out this video:
For more information on any of these steps, have a look at Exalate’s documentation.
Note: You can also use Exalate to set up a GitHub Enterprise Jira integration. The steps are the same, but the installation step might be a bit different.
You can do these first two steps in either order, but I’ll start with Jira.
Step 1 – Install Exalate on Jira
The exact process depends on which version of Jira you are using. This guide is for Jira Cloud. You can read more about that here.
If you are using Jira Server or Data Center, have a look at this guide instead. And if you want to connect multiple Jira instances read this guide.
After logging in to your Jira Cloud instance, click on the cog in the top right to open the settings menu. Click on “Apps”, which should take you straight to the “Find new apps” section of the Atlassian Marketplace.
Click the search box and type, “Exalate”. Press enter and several Exalate apps will appear.

The one we want, “Jira Issue Sync & more”, should be listed first. Click it. You’ll be taken to Exalate’s marketplace page where you can read more about it.
Click the “Try it free” button in the top right, and then, on the pop-up that appears, click “Start free trial”.
After a brief wait, Exalate will be installed and a pop-up will appear to tell you when it is ready. You can click “Get started” to have a look around.

It should also appear listed in the left-hand menu on Jira’s “Apps” screen.
Step 2 – Install Exalate on GitHub
You can either get Exalate’s GitHub Connector for Jira on the Atlassian Marketplace.
Or just go to your GitHub instance, click “Marketplace”, and then type “Exalate” into the search field.
Note: For installing Exalate on GitHub Enterprise Cloud, check this article.
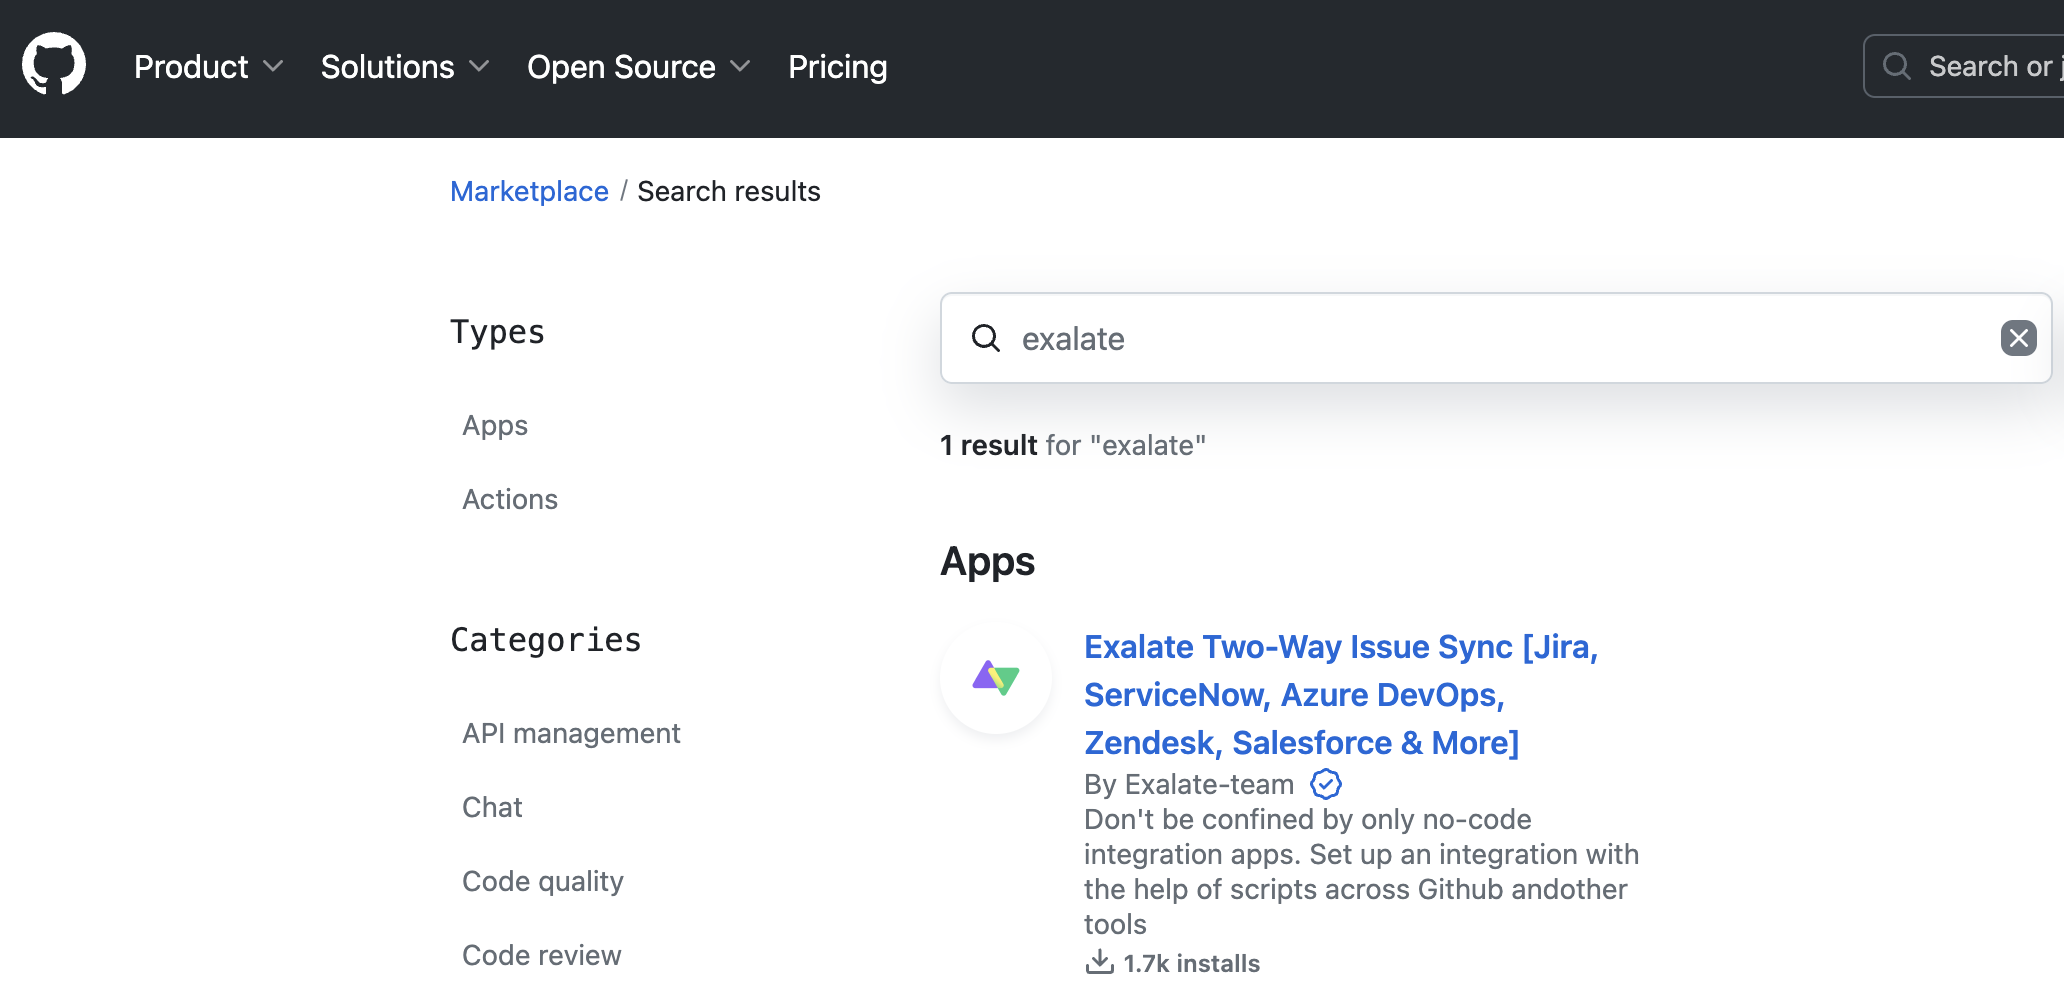
“Exalate Issue Sync” should appear, so click it to continue. Click on the “Set up a plan” button. Choose “Install it for free”, and Exalate will be available on your GitHub account.
You need to choose which of your repositories to grant Exalate access to. You can allow it to access all of them, or pick specific ones if you prefer.
When you install Exalate, it gets access to the data it needs to exchange over your connection. Code access isn’t necessary, but Exalate needs access to metadata, issues, and pull requests.
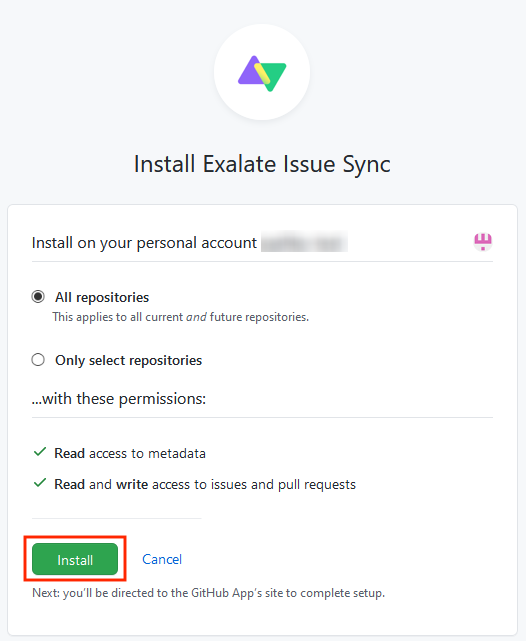
Give it access to these and then click the “Install” button. You’ll need to either set up an OAuth token or allow Exalate to use your username and password to access GitHub.
Finally, you need to get an evaluation license for GitHub. Exalate is a paid app but is free to try, so there’s no need to pay for now. Click “License Details” in Exalate’s left-side menu. Then click the area at the top that says “30-Day Trial”.
Enter your email in the popup that appears. When the license email arrives in your inbox, copy the evaluation key to your clipboard.
Back in GitHub, click the green “License Key” button at the bottom left of the “License Details” screen. Paste your license key from the email into the field that appears. Then click the “Update” button. Your license will now be installed and Exalate is ready to be used on GitHub.

Step 3 – Connect Your Jira and GitHub Instances
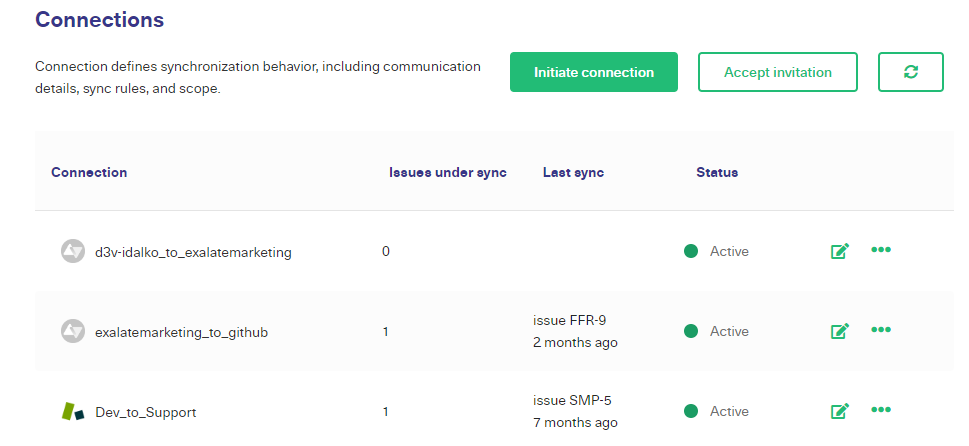
Exalate is now installed on both Jira and GitHub, but your instances are not yet connected. To create a connection, you need to “Initiate connection” from one side and “Accept invitation” on the other.
You can start from either side. Exalate’s interface is consistent across platforms, so once you’ve set it up, you can repeat the process easily.
I’ll start from the Jira side.
On Jira, click “Apps” and then look for “Exalate” in the left-hand menu. Click “Connections”. Connections you create will be added here. Click on the “Initiate Connection” button.
You’ll be taken through several screens that let you configure your connection.
On the first screen after clicking “Initiate Connection”, you need to let Exalate know where your other instance is. Since we’re in Jira, enter your GitHub instance URL in the field provided. If you were in GitHub, you’d enter your Jira address instead.
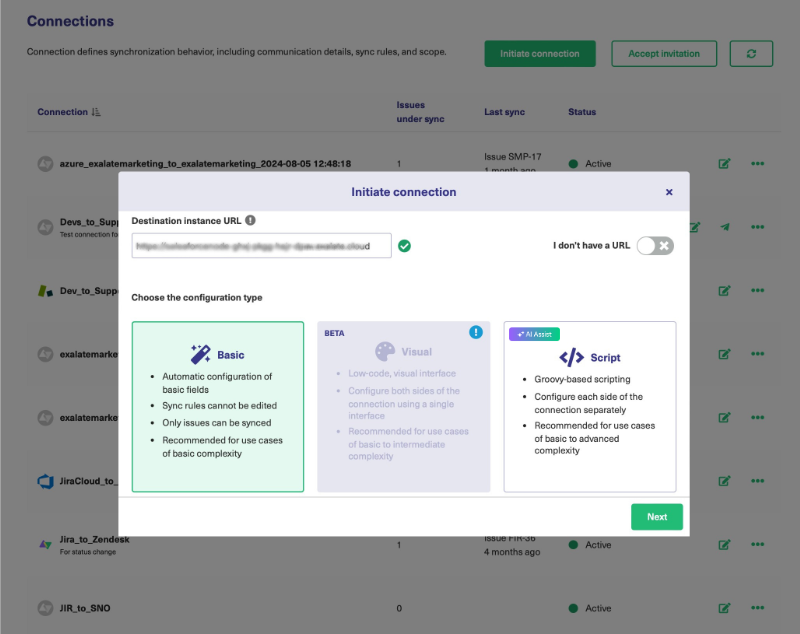
After Exalate finds your GitHub instance, you will be asked to choose the configuration type. It supports 2 modes: the Basic Mode and the Script Mode.
You can learn more about the Free Plan supporting the Basic connection here.
Note: The Visual Mode is a low-code interface for setting up connections between issue trackers. However, it is not available for Jira integration with GitHub.
The connections in Exalate use a set of sync rules to determine what to sync. The Basic mode has a set of predefined sync rules that allow syncing issue fields like summary, description, and comments. But they cannot be updated in this mode.
To unlock Exalate’s full potential with advanced features and configurations, it’s better to use the Script mode instead. It gives you the flexibility of choosing what you want to sync between the 2 sides with the help of sync rules, ensuring complete autonomy. It is also possible to use AI with Script mode. We will learn more about it in the coming section.
We will go through both configuration modes in this section.
Continue with the Basic Mode
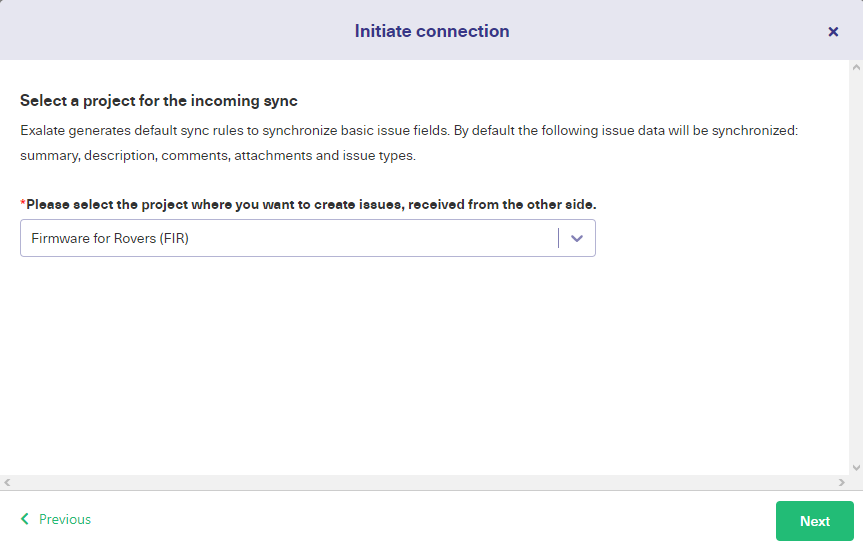
After selecting “Basic” on the screen above, click “Next”. This will redirect you to selecting a project on the Jira side. It’s the project in which you want to synchronize issues from Jira. Choose the appropriate one from a dropdown list.
After clicking “Next”, you need to verify if you have admin access to the GitHub side. If you don’t have admin access, you will be redirected to the GitHub side to paste an invitation code.
For now, we click on “Yes, I have admin access” and then “Initiate” since we already have access to GitHub.
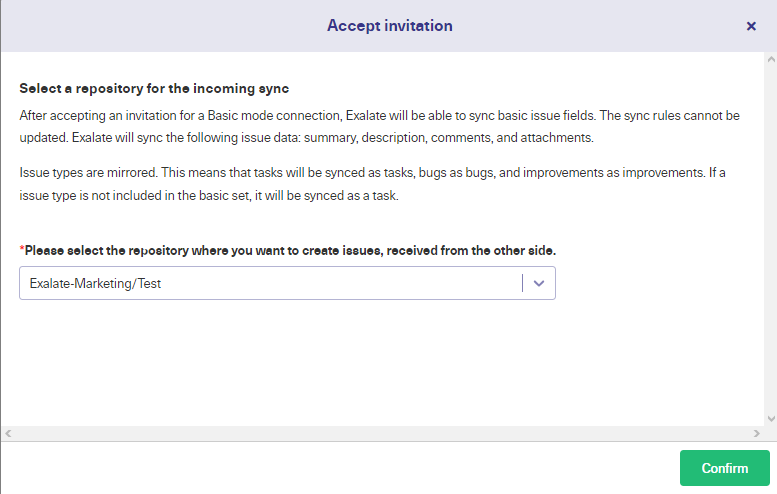
Select the repository you want to synchronize on the GitHub side and click “Confirm”.
Once the connection has been successfully established, you move ahead to syncing your first issue. The best thing about the Basic mode is that you can start directly with syncing specific issues, or you can always create triggers or sync issues in bulk.
Enter the issue key from the repository and press “Exalate”. Wait for some time before the issue successfully synchronizes.
Continue with the Script Mode
To continue with this mode, click “Next” after selecting “Script” from the screen displaying the configuration types. Some more fields will appear allowing you to name each side of your connection. You might just want to call them Jira and GitHub, but alternatively, you could give them a name that reflects their role, or the team using them.
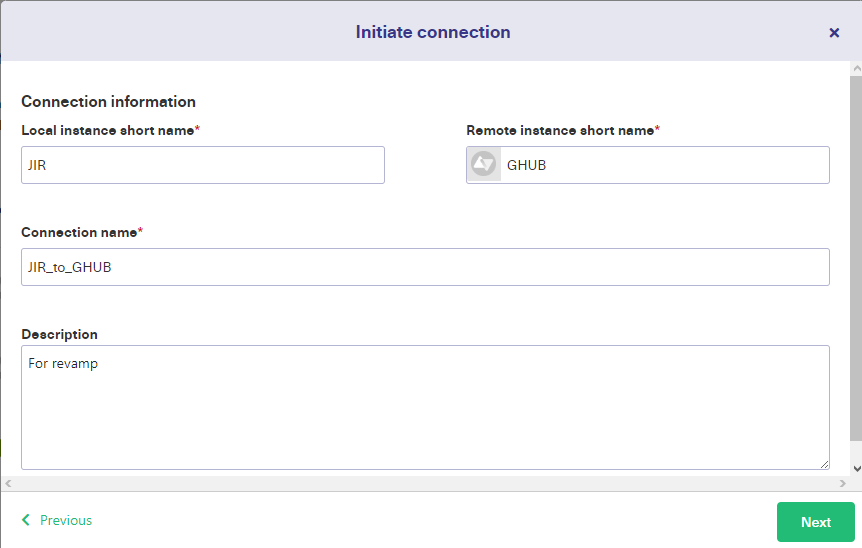
For instance here, we have made connections between the software development team using Github and the UI Design team using Jira.
Exalate will create a connection name using the instance names you used for each side. You can change this too if you like.
There’s also an optional description field in case you forget what the connection is for later, or if someone else needs to check it. If you end up with lots of connections, this will also help you figure out what each one does.
Click “Next” when you’re happy with the description.
Now select the project on the Jira side and click “Initiate”. Exalate will now generate an invitation code for you. Click the green button to copy it to your clipboard. You should paste it somewhere safe.
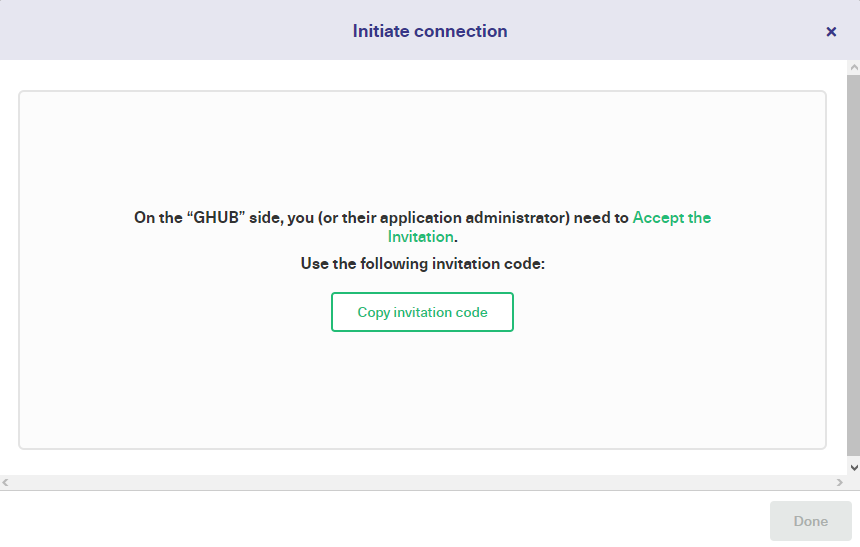
Now we need to go to GitHub (you can do this by clicking “Go to remote”) and use our code to activate the connection. In the left-hand Exalate menu, click “Connections”. Then click the “Accept Invitation” button.
Paste the invitation code into the field that appears and click “Next”.
You’ll go through a process similar to the one you used when you created the invitation in Jira. As before, choose the repository name from the drop-down list.
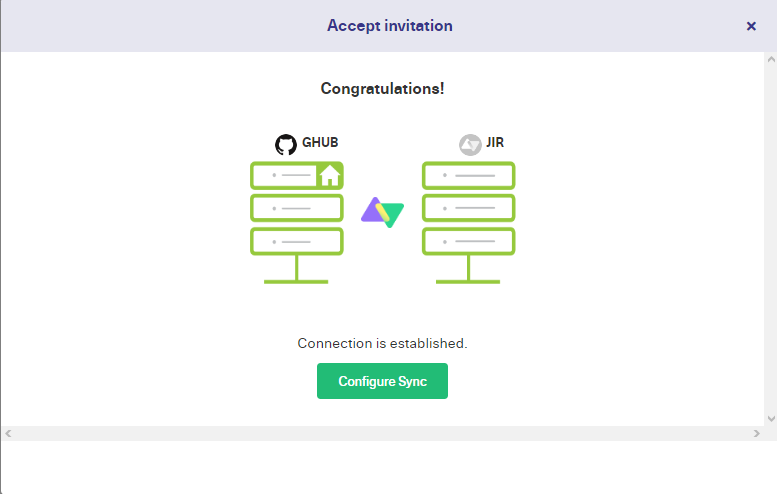
Click the green “Confirm” button.
After that, your connection is ready and you can move on to configuring it.
Step 4 – Configure Your Connection to Determine What Gets Shared
In this step, you’ll take control over what your connection shares, and learn how to map data for Jira GitHub issues integration. You can do this step in either Jira or GitHub, the process is the same for each one.
The configuration can be done after pressing the “Configure Sync” button on the above screen or by the “Edit Connection” under the “Connections” tab. The difference between them is that the first approach allows for configuration to happen for the first time when the connection is being created while the latter allows editing the connection after it’s active.
In this guide, I’ll use Jira, so take a look at the Jira connections screen and move your mouse over the connection you just created.
Several icons will appear. There’s an “Edit” icon that lets you edit your connection, a radio signal icon that takes you to the other side of your connection, and three dots that let you activate or delete your connection.

Click the “Edit connection” icon. You’ll see a screen with four tabs. In the next step, you’ll learn about the “Triggers” tab, and in a second, I’ll tell you about the “Rules” tab, but it’s worth knowing about the other two.
The “Statistics” tab gives you information on how many issues are being shared and lets you know when items were last synced. On the “Info” tab, you can see the URL for the other end of the connection and some other data.

For now, click on the “Rules” tab. Here you can see two sets of rules. At the top, the outgoing sync rules control how data in Jira issues are sent out to GitHub. Below that, the incoming sync rules show how data Exalate fetches from GitHub are interpreted by Jira.
Rules are written in the Groovy scripting language. Each line handles a specific field. You can also see comments, which start with “//” for single-line comments or are surrounded by “/*” and “*/” for multiple-line comments.
Comments are just there to tell you how things work, but you can also use them to temporarily disable anything you don’t want to sync. To do that just put “//” at the start of the line. You can remove it again to reactivate it.
If there is information you don’t want to share, then comment that line out in the outgoing sync rules and Exalate won’t send it from Jira to GitHub.
You can also change the value Exalate copies to a particular field. To change it to a specific value, just replace the incoming value with the value you want to use, in quotes.
For example in the incoming sync rules, you can see the line issue.summary = replica.summary. You could change that to issue.summary = “from GitHub”. Doing that would mean all synced issues would have “from GitHub” as their summary value. You could also add a line, for instance, issue.assignee = “Kevin” to assign incoming issues to a specific person.
If you’re comfortable with core programming concepts, you can use conditional statements to give you even more control over what happens. An if statement can let you sync items that meet the conditions you specify.
You could write if( replica.assignee == “Sally” ) { issue.priority = “Critical” }to ensure issues from Sally are given the urgency they deserve.
You can no doubt think of other ways to route the information. As you use the synchronization more, you will learn which information is useful to you. You can then adjust it to meet your requirements.
To learn more about sync rules, take a look at the documentation.
Use AI Assist with Script Mode
Exalate’s Script mode is now AI-assisted, with AI Assist available as a chat window within both your incoming and outgoing Sync rules tabs. Simply type in your sync requirements, and AI Assist will generate the scripts for you.
These scripts are generated based on your input, current configurations, and Exalate’s scripting API.
However, like any AI, AI Assist isn’t perfect, so it’s crucial to be as clear and detailed as possible with your instructions.
Here’s an example of how to use AI Assist:
Suppose you want to sync issue statuses from GitHub with issue statuses in Jira. In the AI chat, you could input:
For incoming sync (Jira): “Map GitHub status ‘open’ to Jira’s ‘Open,’ and ‘closed’ to ‘Done’ in the GitHub incoming configuration”

Give it a moment to generate the script.
Changes will be highlighted: red lines represent deletions, while green lines show new additions. You can choose to accept or reject these suggestions. If necessary, adjust your prompt. Once satisfied, don’t forget to publish your changes.
Step 5 – Set Up Automated Synchronization Triggers
In the previous step, you defined what to share between Jira integration with GitHub, and how they map it onto items. Now you’ll define the conditions that trigger information exchange. On the edit connection screen (see the previous step), click the “Triggers” tab.
There’s also a “Triggers” item in the left-hand menu which works similarly. If you use that, you’ll see a list of triggers with an entry showing what connection they are for, and can pick one to edit. If you create a new trigger from this screen the only difference is you’ll need to choose which connection it applies to.
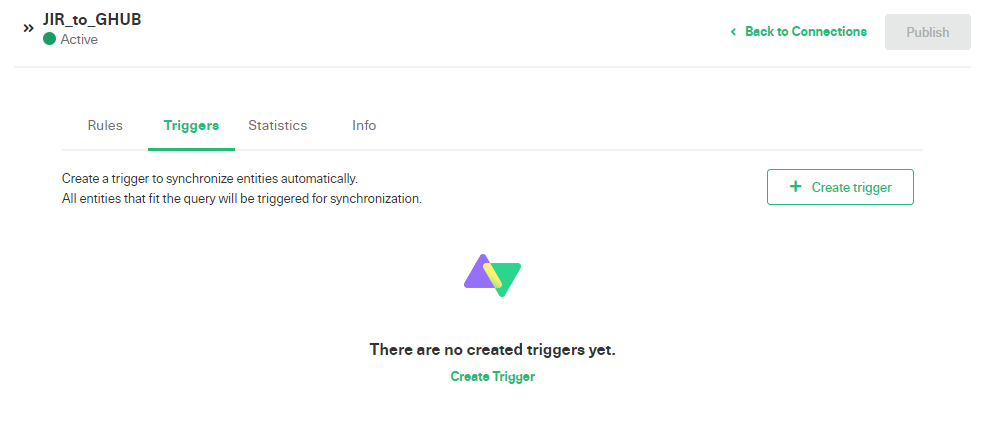
To create your first trigger, click the white “Create trigger” button. The “Add trigger” pop-up will appear. The first field, at the top, is a drop-down menu letting you pick the kind of item that the trigger applies to. In the screenshot, I’ve selected “issue”, but you can pick whatever you like.
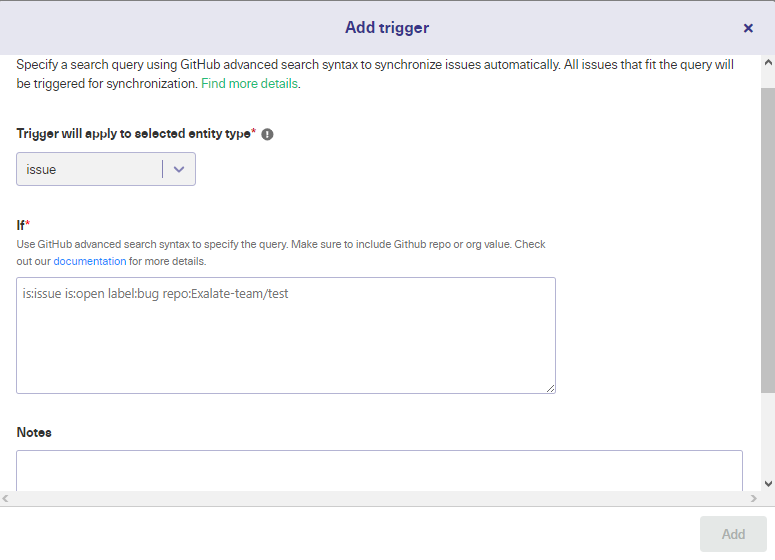
Below that is a conditional field. This is where you set the rules that apply to the type of entity specified in the drop-down menu.
GitHub triggers can be created using its advanced search syntax. Jira’s triggers use the JQL query language. Using it, you can create simple conditional statements to select specific entities, and also combine them using logical operators like “AND” and “OR”.
Read more about JQL triggers in the documentation.
If you wanted to synchronize open GitHub issues that have a label:bug. If you wanted to pick out these issues from a particular repo, you could add repo:Exalate-team/test. To synchronize issues that meet all these conditions simultaneously, you could use is:issue is:open label:bug repo:Exalate-team/test.
There is also a notes field, where you can describe what you’ve done. The more detail you add here, the easier it will be to work with later. This is especially useful if you have multiple triggers, or if other people are going to be using the synchronization.
Under the notes field is a switch that lets you activate the trigger. It won’t work if you don’t activate it! Triggers can be turned on and off easily, so instead of deleting them when you don’t need them, you can disable them, and quickly reactivate them later if you need to.
When you’re ready, click the “Add” button and the trigger will appear in your list. If there are tickets that match it, Exalate will start syncing them.
Step 6 – Start Synchronizing Tasks
Now that Jira and GitHub are connected you can start sharing tasks between them. Exalate can take a few minutes to synchronize everything, so don’t panic if they don’t get shared immediately.
If you wait a few minutes and check your connection statistics, you should see that items have been shared. If not, take a look at your rules and make sure there are some items they apply to. It might be worth creating an item that meets your conditions to test if the connection is working.
Common Use Cases
Teams are using Jira and GitHub in many different scenarios and there are all sorts of Jira GitHub integration benefits. To give you a few ideas on what you can do with integration, here are some example situations.
Software Project with Code on a Public Git Repository
If your developers have publicly available code, they may want to take advantage of GitHub’s project management and issue reporting features and bring data into their private system. With an integration that is easy to do.
You can have items pulled into Jira from GitHub letting you track the public discussion while keeping your own team’s comments private. Issues on the public codebase can be assigned to someone specific, who can decide if the team needs to take further action on them.

You can then have fields that you want to share synced back to GitHub from Jira. That allows you to work with the open-source community while keeping internal discussion private and gives you the best of both worlds.
Customer Service Team and Engineering Team
Your customer service team has to deal with problems reported by your customers, and they record them as issues in Jira. They can handle many of those themselves, but sometimes they will need to pass them on to engineers.
Instead of doing this manually, you can set up a GitHub integration with Jira that automatically copies relevant fields from flagged tickets into GitHub. The Engineering team can then deal with these how they like and when resolved, the integration passes specific details back into Jira.
That way any solutions or suggestions from engineering are sent back to customer support, who can pass them on to customers.
Product Development and Quality Control
Your quality control team needs to ensure your product meets legal requirements in every market where it is available. They need a system for tracking legal issues and figuring out how to handle them. They also need to monitor the product for potential issues.

Your development team needs to be aware of these requirements and respond to them. A GitHub to Jira integration can automatically send issues that require changes over to the development issue tracking system in GitHub. The developers can then work on these as part of their normal workflow.
When issues are resolved, quality control is informed automatically, as the integration copies that information to their system.

Conclusion
Integrating your systems can give your teams a crucial edge over the competition. As you’ve seen, the technology is out there to connect platforms like Jira and GitHub seamlessly and help you solve the challenges involved.
A flexible autonomous Jira and GitHub integration can help teams on both sides of the connection continue working in the familiarity of their environment without worrying about the security or duplication of their data.
Frequently Asked Questions
How can I connect Jira with GitHub?
You can connect Jira with GitHub using third-party applications from the GitHub Marketplace. These tools allow organizations to sync their GitHub repositories with their Jira workspace. If you follow the best Jira GitHub integration best practices, you will be able to sync and share information between teams.
Why do I need to integrate Jira and GitHub?
You need to integrate Jira and GitHub to share information between both platforms. Updates to your GitHub repo will reflect automatically within your Jira issue, epic, or story. This makes it easier for teams to collaborate.
Can I sync my GitHub repo with my Jira project?
Yes, you can sync your GitHub repo with your Jira project. You can map fields like issues, comments, pull requests, and updates. Follow this Jira & GitHub integration guide to figure out how to do so from scratch.
What tool can I use to automate Jira and GitHub sync?
You can automate your Jira to GitHub syncs using a third-party solution called Exalate. This solution allows you to set triggers and write custom scripts for your connection instead of having to move everything manually.
How do I sync comments between Jira and GitHub?
You can sync comments between Jira and GitHub by mapping the comment field in your repository to a specific Jira epic. Tools like Jira Software for GitHub and Exalate can help you choose what to sync.
Recommended Reading:
- Jira to Jira Integration: The Comprehensive Guide to Jira Sync
- Jira ServiceNow Integration: How to Set up an Integration in 6 Steps
- Jira Azure DevOps Integration
- How to Set up an Azure DevOps GitHub Integration
- How to Set up a Zendesk GitHub Integration
- Jira Integrations: Integrate Jira and Other Systems Bidirectionally