Connecting your sales and development teams shouldn’t require constant back-and-forth emails or duplicate data entry. A Jira Salesforce integration bridges the gap between your CRM and project management workflows, letting teams collaborate seamlessly while working in their preferred tools.
This guide walks you through everything you need to know about integrating Jira with Salesforce, from understanding different integration methods to implementing a production-ready sync that scales with your business.
Key Takeaways
- Jira Salesforce integration eliminates manual data entry and keeps sales, support, and development teams synchronized in real-time
- Four main integration approaches exist: native integrations (MuleSoft), custom API development, template-based sync tools, and third-party scripted integration platforms like Exalate.
- Common use cases include syncing Salesforce Cases to Jira work items, Opportunities to Epics, and bidirectional status updates
- Security features like ISO 27001 certification, RBAC, and encryption in transit and at rest are essential for enterprise-ready integrations
- Using AI-assisted configuration tools to support your integration can reduce setup time from days to hours while maintaining full control over sync logic
Note: Jira has updated its terminology. What were previously called “issues” are now referred to as “work items.” This guide uses current Jira terminology throughout.

What Is Jira Salesforce Integration?
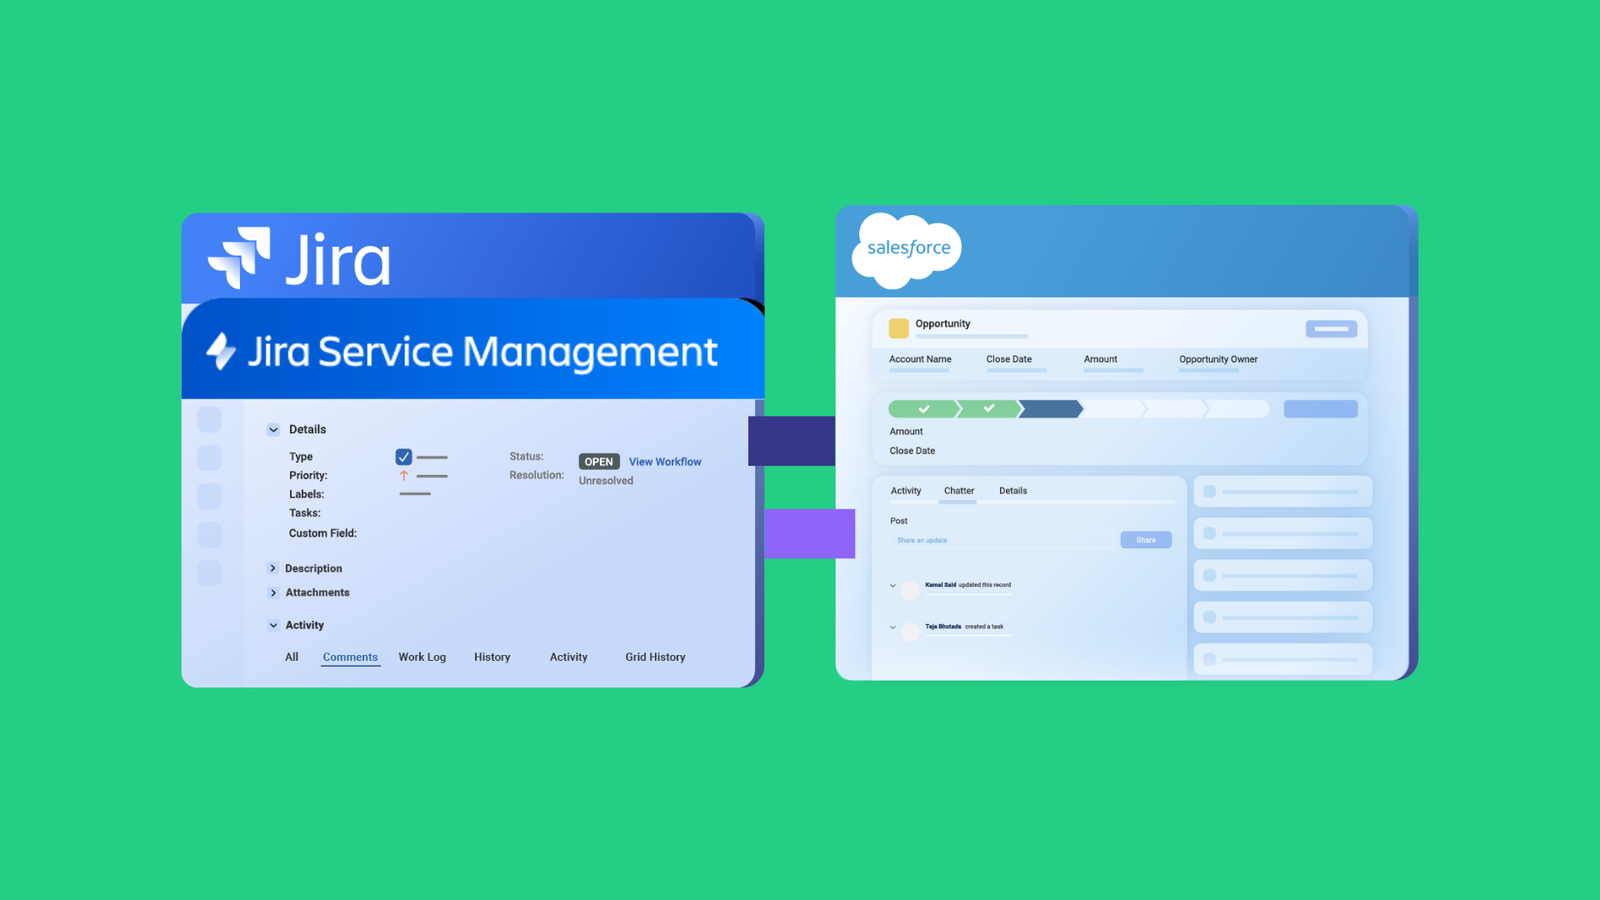
Jira Salesforce integration is the process of connecting Jira and Salesforce to enable automatic data exchange between your project management workflows and CRM system. This connection can be unidirectional (one-way sync) or bidirectional (two-way sync), depending on your business needs.
By default, Jira and Salesforce are not compatible. An integration solution bridges the communication gap by fetching and sending data to REST API endpoints on both systems, transforming data formats to ensure compatibility.
How It Works:
When you integrate Jira and Salesforce, data like work item statuses, comments, and attachments in Jira sync with Salesforce Cases, Opportunities, and Accounts. Updates made in one system automatically reflect in the other, keeping teams informed about the latest developments without manual data entry.
For example, a customer support team in Salesforce can create a Jira work item directly from a Case. As developers work on the item in Jira, status updates flow back to Salesforce automatically, keeping the support team informed about resolution progress.
Why Integrate Jira and Salesforce?
A Jira Salesforce integration delivers tangible benefits across sales, support, and development teams:
Improved Collaboration: Sales teams can log customer work items and feature requests in Salesforce, which automatically flow to Jira for development teams to prioritize and execute. Both teams stay aligned on customer needs without switching platforms.
Streamlined Workflows: Integration automates information flow between systems, reducing manual data entry and potential errors. Data remains consistent across teams, eliminating discrepancies from duplicate entry or outdated information.
Better Reporting and Analytics: Generate comprehensive reports combining CRM data with project metrics. Understand the connection between customer requests, development velocity, and revenue impact. These insights lead to informed business decisions backed by complete data.
Real-Time Updates: Changes made in one system reflect in the other within seconds. When a developer marks a work item as “Done” in Jira, the corresponding Salesforce Case automatically updates, allowing support teams to notify customers immediately.
Increased Efficiency: Eliminate duplicate data entry and reduce administrative overhead. Teams focus on core competencies, sales teams sell, developers build, rather than spending time copying information between systems.
Faster Response to Customer Needs: Developers can quickly address customer work items, feedback, and escalations because they have complete context from Salesforce. Resolution times decrease, improving customer satisfaction and retention.
Controlled Data Sharing: Each team defines what data they share and receive. Development teams don’t need access to sensitive customer financial data, while sales teams don’t need to see internal development notes. Granular control maintains security and privacy.
Deeper Business Insights: Merging Jira and Salesforce data reveals patterns invisible when systems operate in isolation. Track which features drive the most revenue, identify which customer segments generate the most work items, and prioritize development accordingly.
What Data Can You Sync Between Jira and Salesforce?
Jira Salesforce integration allows you to sync data from standard and custom entities across both platforms.
Salesforce Objects You Can Sync:
- Cases
- Opportunities
- Accounts
- Tasks
- Contacts
- Products
- Leads
- Campaigns and more
- Custom Objects
Jira Entities You Can Sync:
- Work items (Stories, Bugs, Tasks, etc.)
- Epics
- Sprints
- Service Requests
- Incidents
- Change Requests
- Custom work item types
Common Fields Available for Sync:
- Summary/Subject
- Description
- Status and workflow states
- Priority and urgency
- Assignee and reporter
- Comments and internal notes
- Attachments
- Created date, due date, resolution date
- Custom fields (both platforms)
- SLA information and breach times
- Time tracking data
- Labels and tags
- Parent-child relationships
Advanced Synchronization Options:
With flexible integration tools like Exalate, you can sync virtually any field accessible via REST API.
The flexibility to map any standard or custom field means your integration adapts to your specific business processes rather than forcing you to change workflows to fit integration limitations.
Four Ways to Integrate Jira and Salesforce
Teams have four main approaches to integrating Jira with Salesforce. Each method offers different trade-offs between ease of setup, customization capabilities, and ongoing maintenance requirements.
Comparison of Integration Methods
| Method | Best For | Setup Time | Flexibility | Maintenance | Cost |
|---|---|---|---|---|---|
| Native Integrations (MuleSoft, Atlassian) | Salesforce-centric workflows, basic sync needs | Medium | Limited | Low | Medium-High |
| Template-based connectors | Quick deployment, standard use cases | Fast (1-2 hours) | Template-based | Low | Low-Medium |
| Custom API Development | Full control, unique workflows | Slow (weeks) | Unlimited | High | High |
| Script-based Integration Platforms | Flexibility + scalability, complex workflows | Fast-Medium | High | Low-Medium | Medium |
1. Native Integrations
MuleSoft: Salesforce’s recommended solution provides a Jira connector that tracks work items within Salesforce. Works well for Salesforce-centric organizations already invested in the MuleSoft ecosystem.
Pros:
- Official support from platform vendors
- Secure, enterprise-grade infrastructure
- Pre-built for common use cases
Cons:
- Limited customization options
- Additional licensing costs
- Salesforce-centric (limited Jira-side autonomy)
- May not support all Salesforce objects or Jira work item types
Best For: Organizations with straightforward sync requirements and existing Mulesoft investments.
2. Template-based Connectors
Pre-built solutions that offer quick deployment with minimal technical effort, for instance, Appfire.
Pros:
- Quick setup
- No coding required
- Pre-configured for common scenarios
- Lower cost than native enterprise solutions
Cons:
- Template-based limitations
- Less flexibility for complex workflows
- May not support all custom objects
- Limited control over sync logic
Best For: Teams needing rapid deployment with standard sync requirements.
3. Custom API Development
Building a custom integration using Jira and Salesforce REST APIs provides maximum flexibility at the cost of significant development investment.
Pros:
- Unlimited customization
- Complete control over data flow
- No per-user or transaction fees (after development)
- Tailored exactly to your workflows
Cons:
- Requires developer resources (50-200+ hours)
- Ongoing maintenance burden
- Must handle error handling, retry logic, and security
- Difficult to scale as requirements evolve
- No built-in monitoring or troubleshooting tools
Best For: Organizations with dedicated integration teams, stable requirements, and highly unique workflows that off-the-shelf solutions can’t support.
For most organizations, the build vs. buy decision favors purchasing a proven solution. Calculate the true cost of building with our Build vs. Buy Calculator →.
4. Third-Party Integration Platforms
Integration solutions that balance flexibility with ease of use, offering script-based or AI-assisted configuration, are the best option.
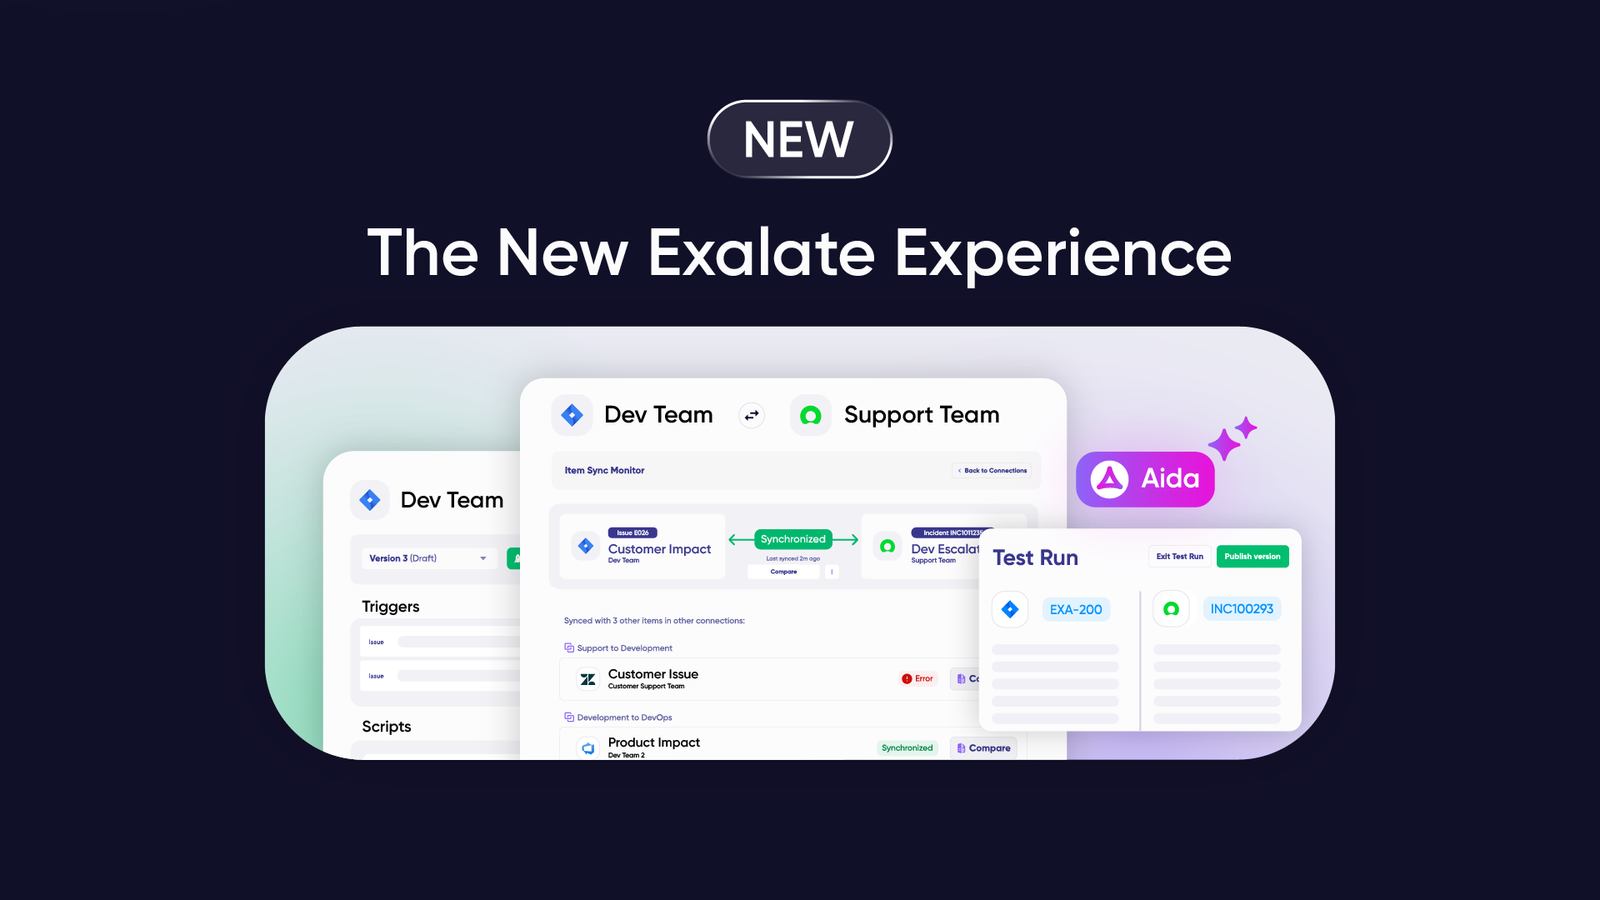
Exalate: A customizable integration platform with AI-assisted configuration (Aida). Supports complex bidirectional sync with full operational control.
Pros:
- Faster deployment than custom development
- More flexible than native or template-based connectors
- AI-Assisted scripting and troubleshooting
- Scalable across multiple instances and platforms
- Built-in error handling and monitoring
- Regular updates and improvements
Cons:
- Subscription costs (varies by platform)
- Learning curve for advanced features
Best For: Organizations needing flexible, scalable integration that grows with their business. Ideal when requirements evolve or involve multiple systems.
What Are Some Jira Salesforce Integration Use Cases?
Integrating Jira with Salesforce solves real business challenges across sales, support, and development workflows. Here are practical applications teams implement daily:
1. Customer Support Escalation to Development
Scenario: A critical customer issue requires engineering attention.
Current Challenge: Support agents in Salesforce manually copy issue details into emails or Slack messages. Developers lack complete context, leading to back-and-forth clarification requests.
Solution: When a Salesforce Case meets escalation criteria (Priority = “High” AND Status = “Escalated”), a corresponding Jira work item is automatically created with:
- Complete Case history
- Customer account information
- SLA timeline and breach warnings
- All attachments and communication history
- Priority mapping (Critical → Highest, Urgent → High)
As developers investigate and resolve the work item in Jira, status updates flow back to Salesforce. Support agents see real-time progress without leaving their CRM.
Outcome: Resolution time decreases by 40-60%. Support agents spend less time chasing updates, developers have complete context from the start, and customers receive faster resolution.
2. Sales-to-Development Opportunity Handoff
Scenario: Sales closes deals, but delivery teams need to start planning immediately.
Current Challenge: Someone manually creates Jira Epics after opportunities reach “Proposal” or “Closed Won” stages. Handoff delays mean delivery teams start planning days late.
Solution: Automatic Jira Epic creation when Salesforce Opportunities reach specific stages:
- Opportunity Name → Epic Summary
- Expected Revenue → Custom field for prioritization
- Account details → Epic Description
- Close Date → Epic Due Date
Bidirectional updates keep both teams synchronized. When delivery marks the Epic as “In Progress,” the Opportunity’s custom field updates, giving sales visibility into delivery status.
Outcome: Delivery teams start planning immediately. Sales has real-time visibility into delivery progress without requesting updates. Revenue recognition accelerates because delivery begins faster.
3. Intelligent Case Routing Based on Attributes
Scenario: Not all Salesforce Cases represent the same type of work.
Current Challenge: Cases flow into a single Jira queue. Support requests, bugs, and feature requests mix together, making prioritization chaotic.
Solution: Route cases to different Jira work item types based on Case attributes:
- Case Type = “Bug” → Creates Jira Bug in Engineering project
- Case Type = “How-To Question” → Creates Service Request in Support project
- Case Type = “Feature Request” → Creates Story in Product project
- Case Priority = “Critical” → Automatically assigns to on-call team
Each work item type follows its appropriate workflow, ensuring the right team handles each case with the right process.
Outcome: Teams work on relevant work items. Feature requests reach product managers instead of getting stuck in support queues. Bugs escalate directly to engineering with proper severity levels.
4. MSP Multi-Tenant Operations
Scenario: Managed Service Providers (MSPs) serve multiple clients, each using their own Jira instances.
Current Challenge: The MSP uses a centralized Salesforce org for all client work items. Clients need visibility into their cases, but shouldn’t see other clients’ data.
Solution: The MSP’s single Salesforce instance connects to multiple client Jira instances with secure, segregated sync:
- Each client sees only their data
- Role-based access controls maintain separation
- Data encryption ensures compliance
- Different sync rules per client based on SLA requirements
Outcome: Clients work in their preferred tools without Salesforce access. The MSP maintains centralized oversight while ensuring data isolation. Transparency improves without compromising security.
5. Critical Incident Alerting
Scenario: High-severity Salesforce Cases need immediate technical response.
Current Challenge: Critical cases arrive overnight, but the on-call team doesn’t monitor Salesforce. By morning, customer dissatisfaction has escalated.
Solution: Integration between Salesforce and Jira Service Management automatically triggers alerts:
- Case Priority = “Critical” + Status = “New” → Creates alert in JSM
- Alert pages on-call engineer via phone, SMS, or push notification
- When the engineer marks the alert “Acknowledged,” the Case status updates in Salesforce
- Resolution in JSM automatically closes the Case with resolution notes
Outcome: Critical cases receive immediate attention. On-call teams respond within minutes instead of hours. SLA compliance improves dramatically.
6. Feature Release Coordination
Scenario: Product development releases features, but sales teams learn about them days later.
Current Challenge: By the time sales know about new capabilities, they’ve already had customer conversations where they could have mentioned them.
Solution: When developers mark features “Released” in Jira, the integration automatically:
- Updates related to Salesforce Opportunities with feature availability
- Creates tasks for account managers to notify relevant customers
- Syncs release notes and feature descriptions to Salesforce
- Tags opportunities where customers requested this feature
Outcome: Sales has timely information about new capabilities. Account managers can proactively reach out to customers who requested features. Revenue opportunities from upsells increase.
What to Consider When Choosing an Integration Solution
Selecting the right Jira Salesforce integration solution determines whether your integration becomes a productivity multiplier or a maintenance headache.
Focus on these critical capabilities.
Note: We will discuss Exalate as the integration solution in this article.
Security & Compliance
Your integration handles sensitive operational data: customer information, financial details, internal work notes, and SLA commitments. Security isn’t optional.
What to Look For:
Compliance Certifications: ISO 27001, GDPR compliance, HIPAA compatibility (if applicable). These certifications demonstrate that the vendor follows industry-standard security practices.
Data Encryption: In transit: TLS 1.2/1.3 minimum, at rest: AES-256 encryption or equivalent end-to-end encryption for sensitive fields
Access Control:
- Role-Based Access Control (RBAC) that separates integration management from system access
- Granular permissions for who can configure, view, and execute integrations
- Audit trails showing who made what changes and when
Authentication Options: Basic or OAuth for secure authorization, API keys with proper rotation policies, Personal Access Tokens (no shared credentials), or support for Single Sign-On (SSO)
Why It Matters: A security breach through your integration could expose customer data, violate compliance requirements (resulting in fines), and damage customer trust. Choosing a certified platform with public security documentation reduces risk and satisfies audit requirements.
Look for platforms with public Trust Centers where you can review security documentation, penetration test results, and compliance certificates.
Exalate Security Features:
- ISO 27001 certified
- GDPR compliant
- SentinelOne EDR for advanced endpoint protection
- Data encrypted in transit (TLS 1.3) and at rest
- Role-based access control (RBAC)
Visit the Exalate Trust Center for complete security documentation.
Real-Time Synchronization
Delays between systems create confusion and lead to decisions based on outdated information.
If a Salesforce Case shows “In Progress” while Jira shows “Resolved,” which is correct? Stale information leads to duplicate work, missed SLAs, and frustrated customers. Real-time sync eliminates ambiguity, and both teams always see the same current state.
Flexibility and Customization
Template-based integrations work until they don’t. Your business processes evolved over the years, forcing them into rigid templates means either changing workflows (expensive, disruptive) or accepting incomplete sync (defeats the purpose).
What to Look For:
Script-Based Configuration: Exalate has the ability to add custom logic, conditional flows, and data transformations. If you can describe the rule in plain language, the platform should support it.
Advanced Data Mapping:
- Map any field to any field
- Transform data formats (dates, currencies, picklists)
- Apply conditional logic (“if priority is Critical, then…”)
- Aggregate data (sum time logs, concatenate comments)
Support for Complex Scenarios:
- Multi-instance connections
- Hierarchical relationships (Opportunity → multiple Cases → multiple Jira work items)
- Bulk operations for historical data migration
- Cross-platform workflows (Jira → Salesforce → Azure DevOps)
Why It Matters: Requirements evolve. A solution that handles today’s needs but can’t adapt to tomorrow’s requirements means costly migration later: re-implementing integrations, retraining teams, and disrupting workflows.
AI-Assisted Configuration
Traditional integration setup requires developers who understand both platforms’ APIs, data models, and scripting languages. AI changes this equation.
What to Look For:
Natural Language Script Generation: Describe what you want in plain English: “Sync all high-priority Cases to Jira as Bugs.” The AI generates working code.
Error Explanations: When sync fails, AI translates cryptic error messages into plain language with specific fix suggestions.
Why It Matters: Reduces implementation time from days to hours. Non-developers can configure complex sync rules. Troubleshooting becomes faster when errors come with clear explanations instead of stack traces.
Example with Aida (Exalate’s AI Assistant):
Instead of writing Groovy code manually, you type: “Map Salesforce status ‘New’ to Jira ‘Open,’ ‘Working’ to ‘In Progress,’ and ‘Escalated’ to ‘Done.'”
Aida generates the complete script with proper syntax. You review, adjust if needed, and deploy.
Scalability
You might start with one Jira project syncing to one Salesforce queue. Six months later, you need:
- Five Jira instances connected to Salesforce
- Azure DevOps for development teams
- Zendesk for customer support
- GitHub for engineering
What to Look For:
- Multi-instance support (hub-and-spoke architecture)
- Support for other platforms beyond Jira and Salesforce
- Network visualization showing all your connections
- Bulk operations (update multiple connections at once)
- Performance that doesn’t degrade with scale
Reliability and Error Handling
Downtimes happen. The question isn’t whether sync will fail, but how gracefully the integration handles failures.
Exalate provides the following features:
Automatic Retry Logic: Failed sync attempts retry automatically with exponential backoff. Transient network errors resolve without manual intervention.
Rollback Capability: If a configuration change breaks sync, revert to the previous working version instantly.
Safe Testing: Testing capability or sandbox environments to validate configuration changes before production deployment.
Transaction Integrity: If sync is interrupted mid-transaction, the system should either complete it or roll back cleanly, no partial syncs that corrupt data.
Why It Matters: A broken integration is worse than no integration. Teams see outdated data, make decisions on false information, and lose trust in the system. Reliability features minimize downtime and provide safety nets.
Operational Control
For complex workflows, you need full control over sync logic on your side without affecting how the other team operates.
Exalate provides:
Independent Configuration: Each side of the integration controls its own sync rules. Your changes don’t require approval or break the other side’s configuration.
Script Versioning: Every published script creates a new version. Complete audit trail of who changed what and when, with rollback capability.
Side-by-Side View: See both sides of the connection on one screen to understand how data transforms.
Visibility Features:
- Real-time sync queue monitoring
- Complete work item history
- Error logs with context
Why It Matters: Operational control means your integration adapts as your business changes. You don’t need to submit change requests to the other team or wait for vendor updates. In cross-company scenarios, it ensures both parties maintain autonomy.
Pricing Model Transparency
Integration pricing varies wildly. Understanding the model prevents budget surprises and helps you estimate costs accurately.
Common Pricing Models:
Per-User Licensing: You pay based on how many people have access to Jira or Salesforce. Problem: Integration users often don’t need full platform access, but you’re forced to pay for licenses.
Flat Rate: Fixed monthly/annual fee per connection or per platform. Predictable but may not scale economically.
Per-Transaction (Usage-Based): You pay per API call or sync event. Problem: Creates unpredictable bills and punishes you for using real-time sync.
Per-Connection: You pay per integration pair (Jira ↔ Salesforce). Problem: Costs escalate quickly with multiple connections.
Outcome-Based (Active Sync Pairs): You pay for the number of items actively synchronized at any given time, not cumulative transactions or historical volume. Cost per item decreases as scale increases.
Why Outcome-Based Pricing Makes Sense: You only pay for actual value delivered (work items in sync). Costs scale with business value, not arbitrary metrics like user count.
Look for solutions that are transparent in pricing.
Exalate uses outcome-based pricing. Estimate your integration cost with the Exalate Pricing Calculator →.
How to Integrate Jira and Salesforce with Exalate: Step-by-Step Guide
This section walks through setting up a Jira Salesforce integration using Exalate.
Prerequisites
Before starting, ensure you have:
- An active Exalate account (or sign up for a 30-day free trial)
- Admin access to both Jira and Salesforce instances
- System credentials for Jira (OAuth) and Salesforce (API token)
- Clear understanding of what data you want to sync (Cases → work items, Opportunities → Epics, etc.)
Step 1: Create an Exalate Account
Navigate to the Exalate app.
For new users:
- Click “Sign Up”
- Register using email (with verification) or sign up with Google
- Complete account creation
For existing users: Log in directly with your credentials.
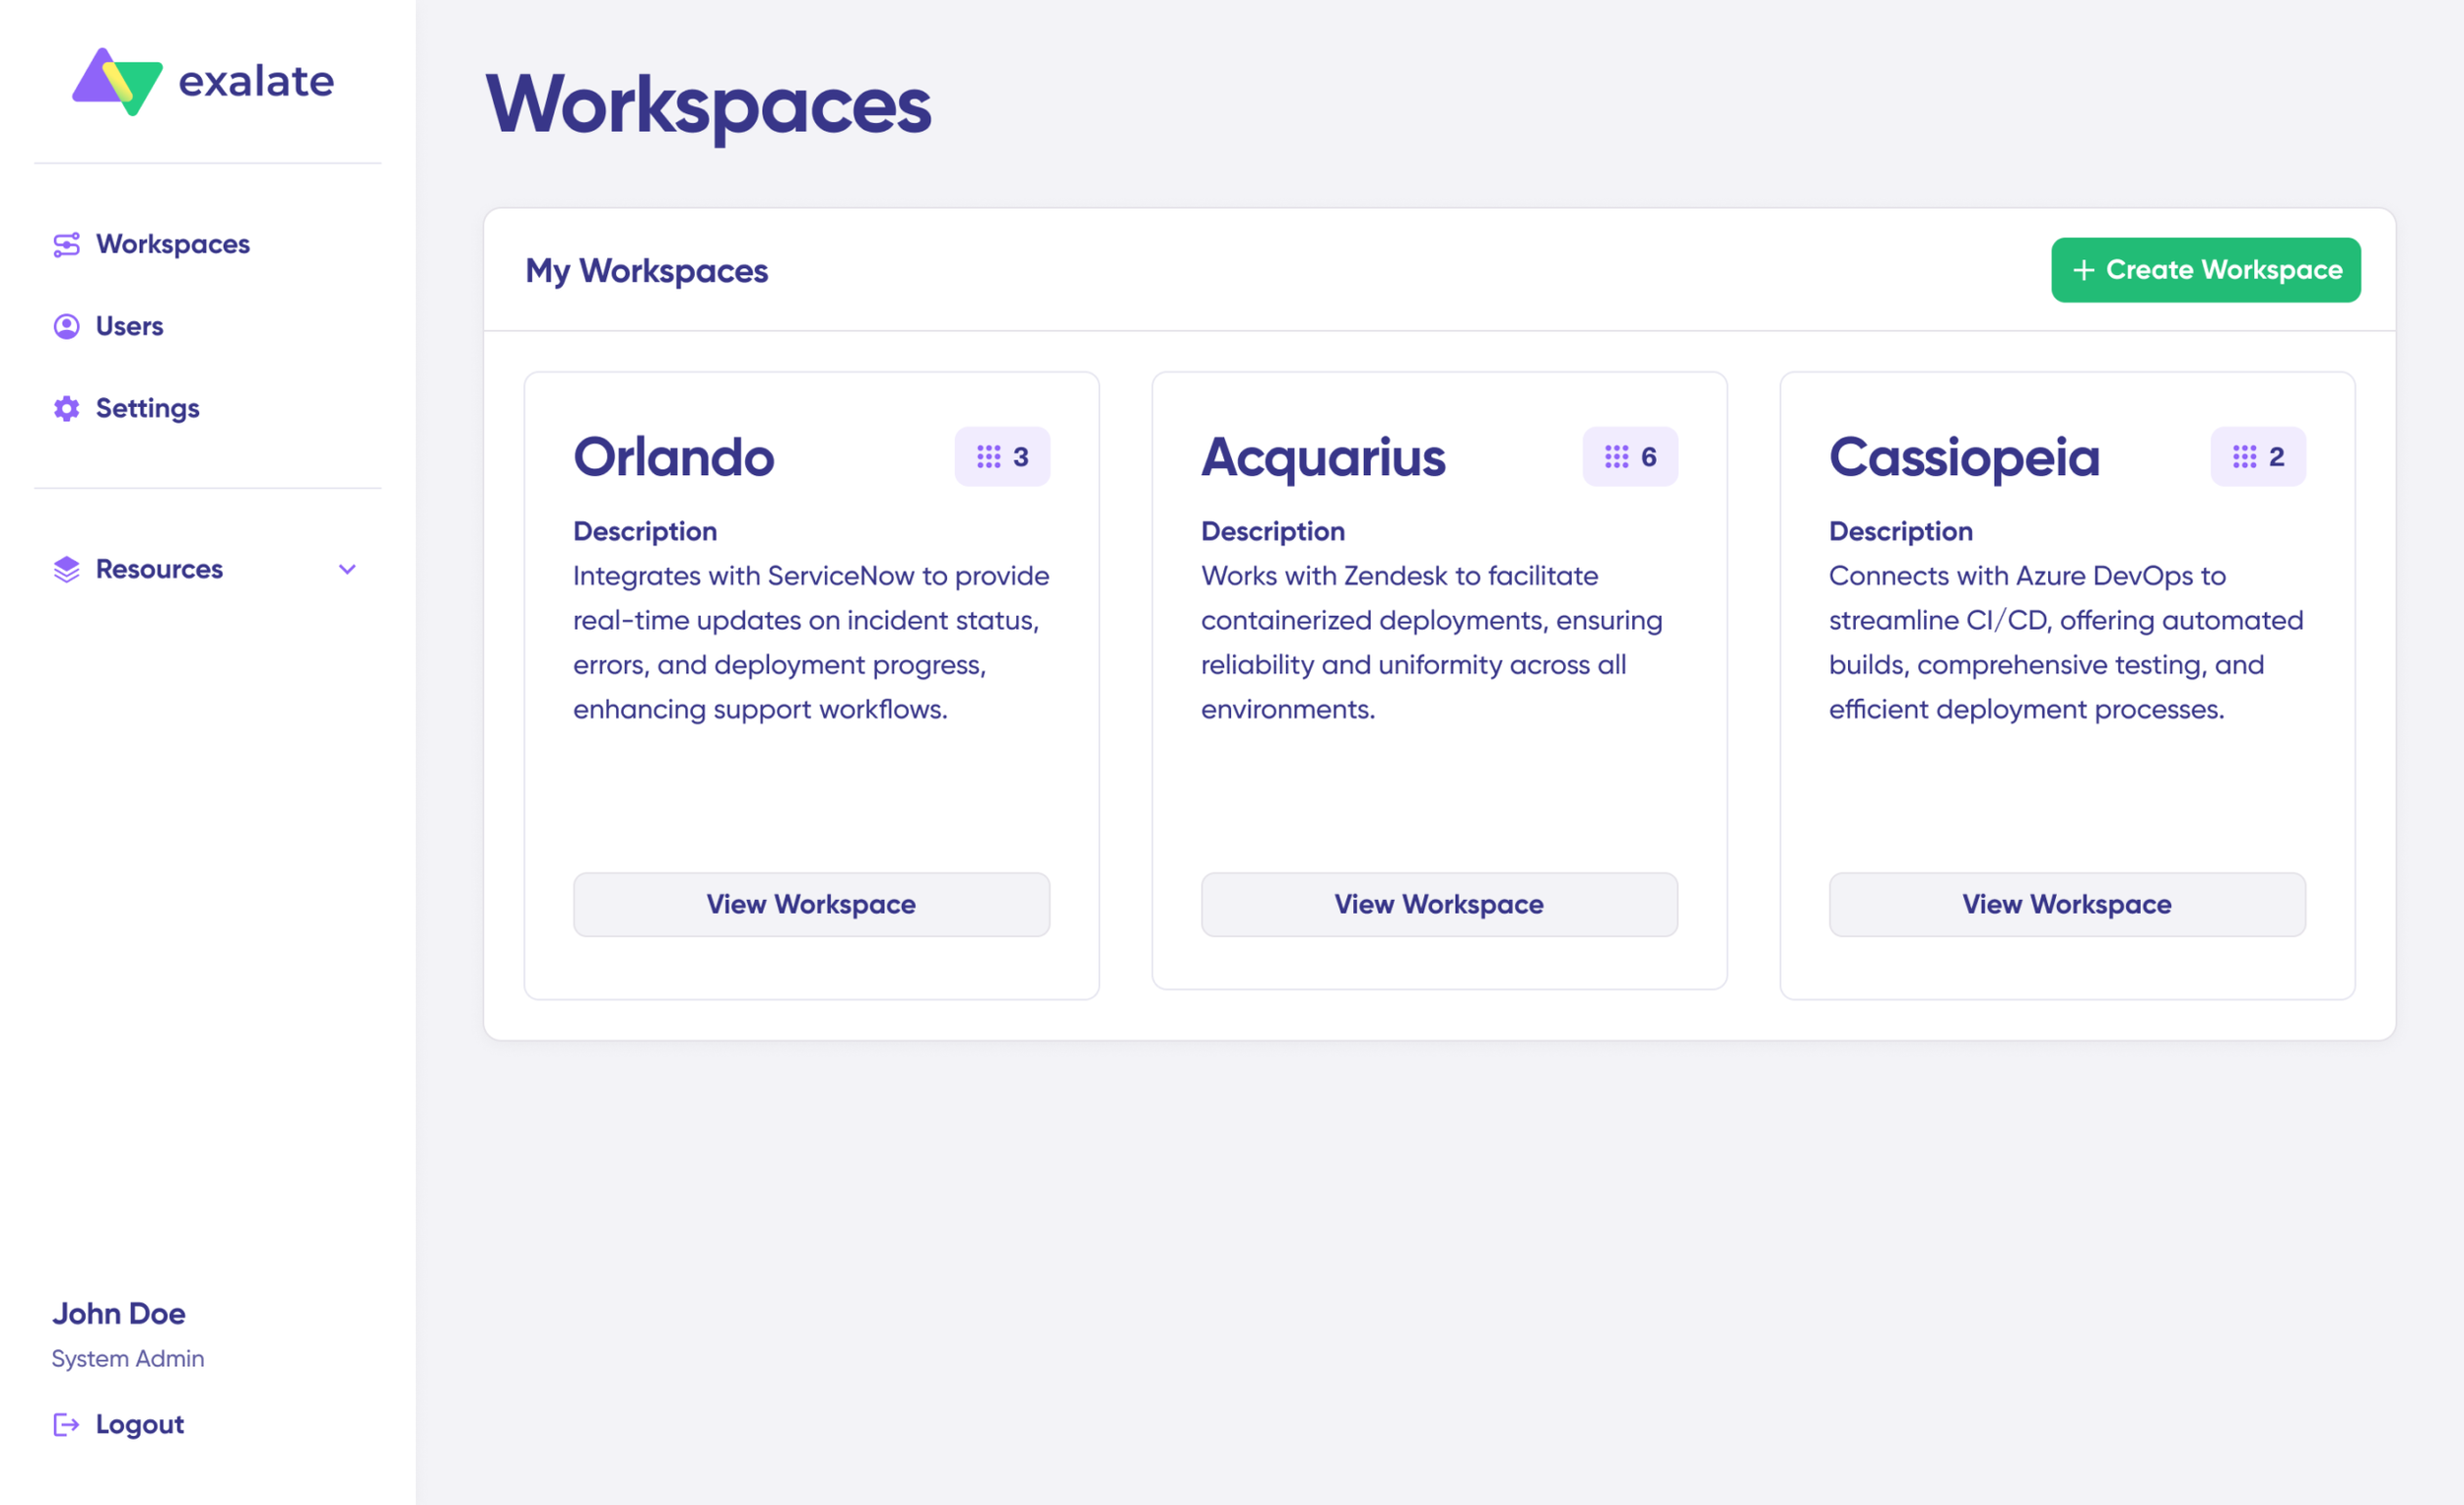
Step 2: Create Your First Workspace
Workspaces organize and manage your integrations and connections in a single location.
- After logging in, click “+ Create Workspace”
- Enter a descriptive name (e.g., “Sales-Dev Integration”)
- Add an optional description explaining the workspace purpose
- Click “Create workspace” to confirm
You’ll see your new workspace in the Workspaces tab. All subsequent connections will be organized under this workspace.
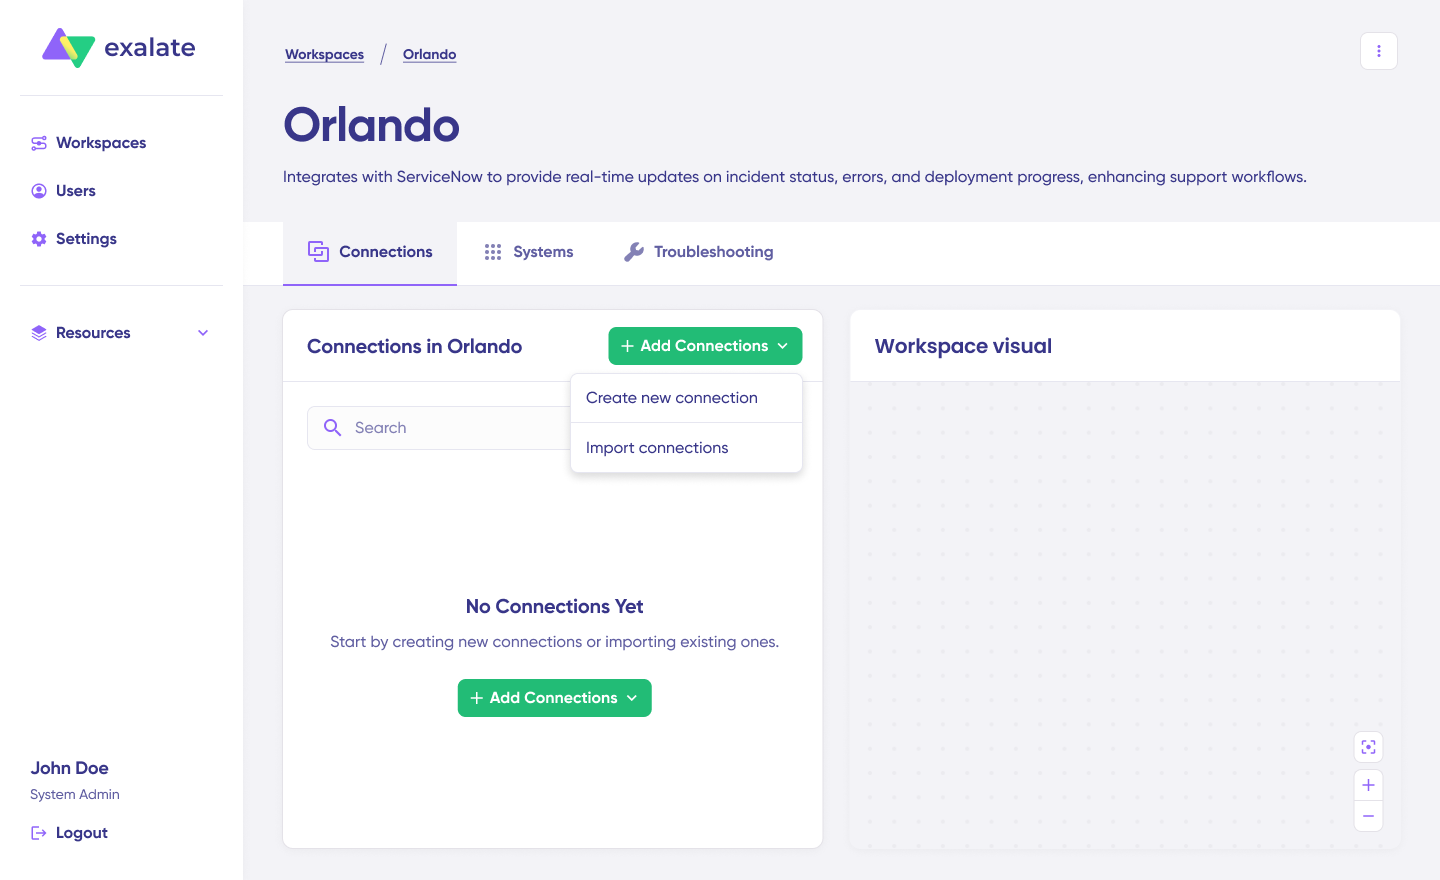
Step 3: Create Your First Connection
A connection defines the link between your Jira and Salesforce instances.
- Navigate to your workspace
- Click “+ Add connections” > “Create new connection”
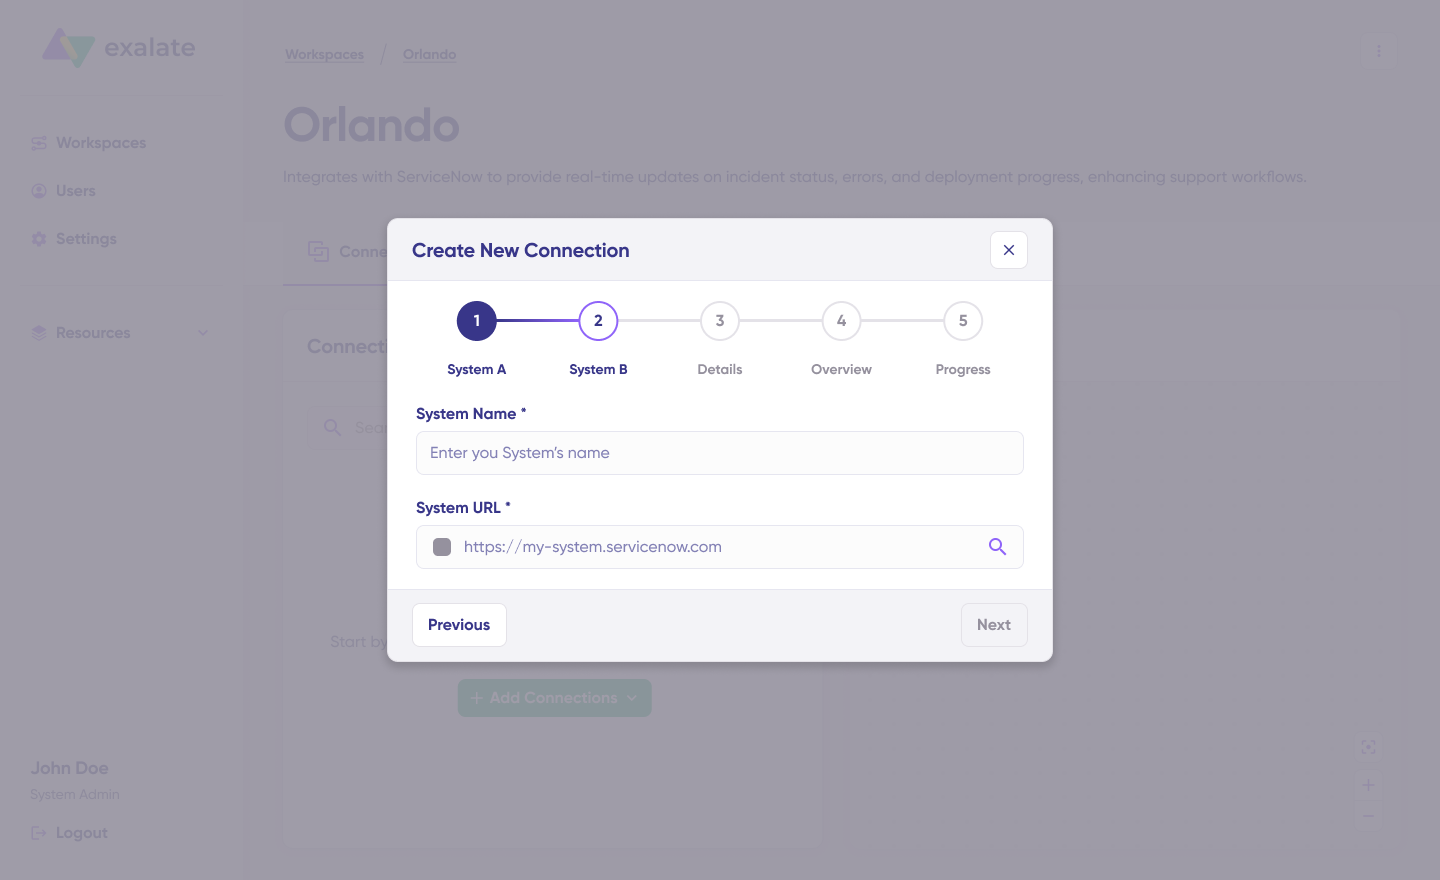
- Configure System A (you can start with either Jira or Salesforce):
- Enter a descriptive system name (e.g., “Salesforce Production”)
- Enter the system URL
- Authentication:
- For Salesforce: Enter the API token.
- For Jira: Authorize via OAuth by following the on-screen prompts
- Repeat the process for System B (the other platform)
- Name Your Connection:
- Enter a clear connection name (e.g., “Support Cases to Dev Team”)
- Add an optional description explaining the connection purpose
- Click “Next”
- Review Details.
- Click “Create connection“
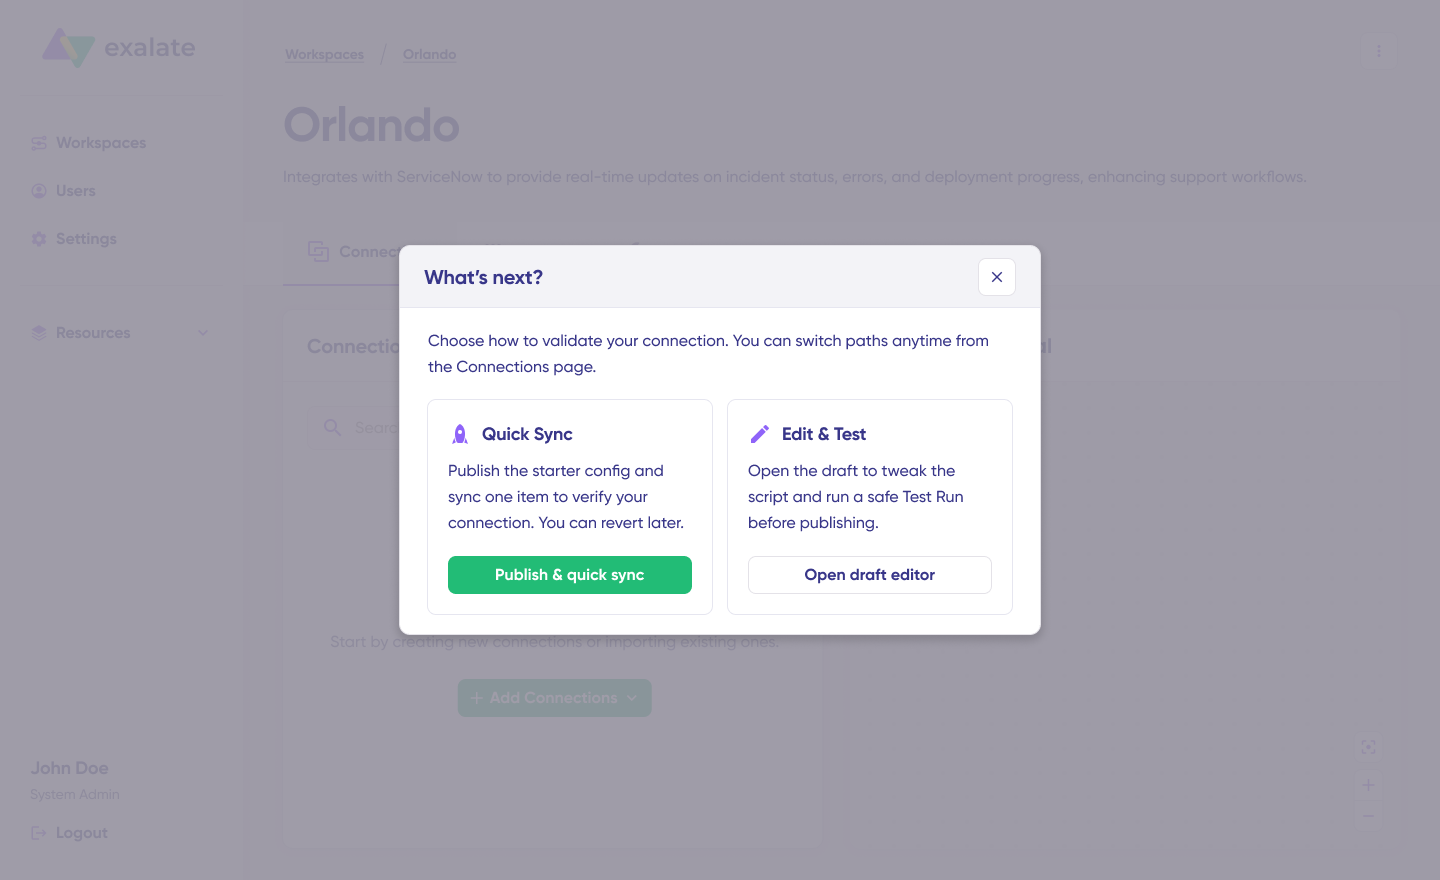
The system establishes the connection and shows a success message. You’ll then see two configuration options: “Quick Sync” and “Edit & Test”.
Step 4: Choose Configuration Approach
Option A: Quick Sync (Recommended for Testing)
Quick Sync allows you to sync one item between Jira and Salesforce to verify your connection works properly.
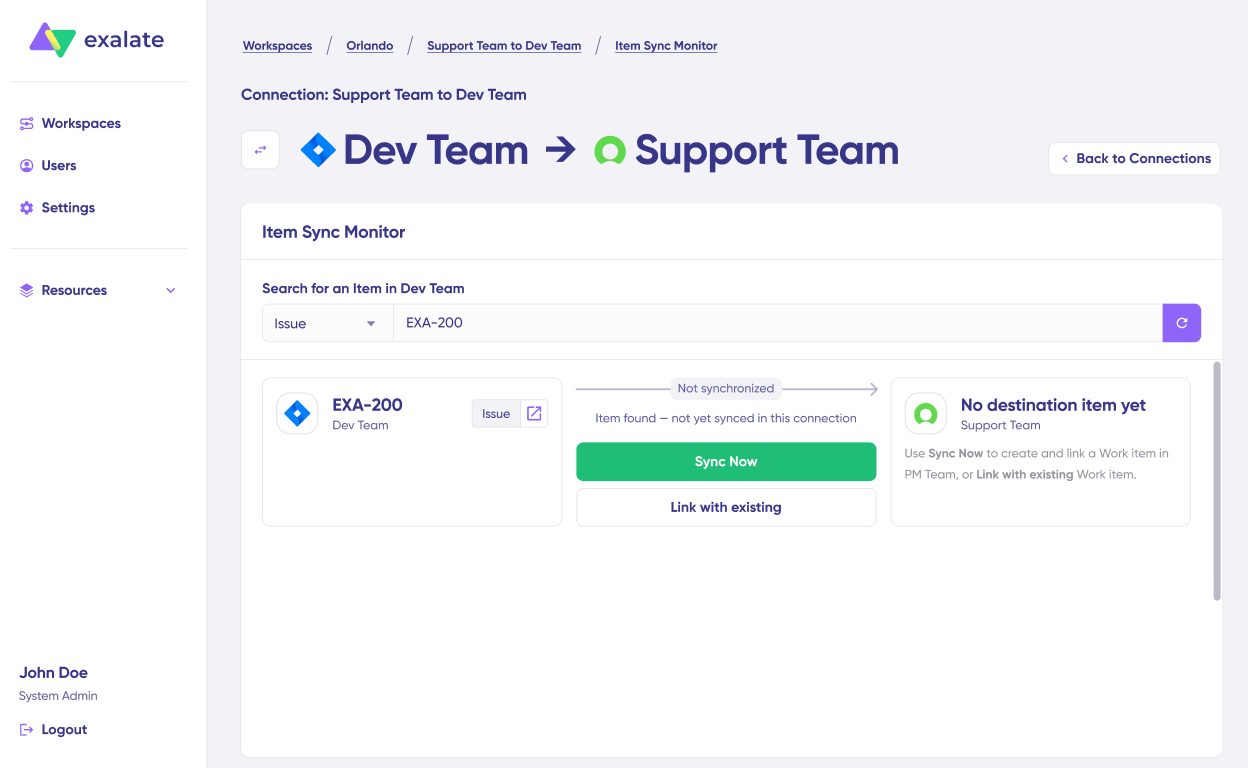
- Under “Item sync monitor,” enter:
- Jira work item key (e.g., “SUP-123”), OR
- Salesforce Case number
- Choose sync method:
- “Sync Now”: Creates the corresponding item on the other side
- “Link with Existing”: Links two already-existing items
- Click your chosen action
- Monitor sync status in real-time
- Once complete, click “Compare” to see how the synced items appear on both sides

This validates your connection before configuring comprehensive sync rules.
Option B: Edit & Test (For Production Setup)

For production deployment, configure detailed sync rules and triggers.
- Click “Open draft editor” or “Create a new version”
This ensures you don’t accidentally modify any existing configuration. Changes in draft mode save automatically.
- Click “Edit” to open the script editor
Step 5: Understanding and Configuring Sync Rules
Sync rules define what data flows between systems and how it transforms during transit.
Sync Direction
Change sync direction by clicking the arrows between system names at the top of the configuration screen.
Example: If direction is Jira → Salesforce:
- Outgoing script (Jira side): Defines what data leaves Jira
- Incoming script (Salesforce side): Defines how Jira data maps to Salesforce fields
If you reverse the direction to Salesforce → Jira, the scripts swap roles.
Understanding Replica
The replica object is the message payload carrying data between systems. It exists in JSON format and holds values passed between synced entities.
To sync new values, you can enter the sync script yourself if you are familiar with Groovy.
To stop something from syncing (for instance, attachments from Jira to ServiceNow), simply remove that script line from the corresponding script.
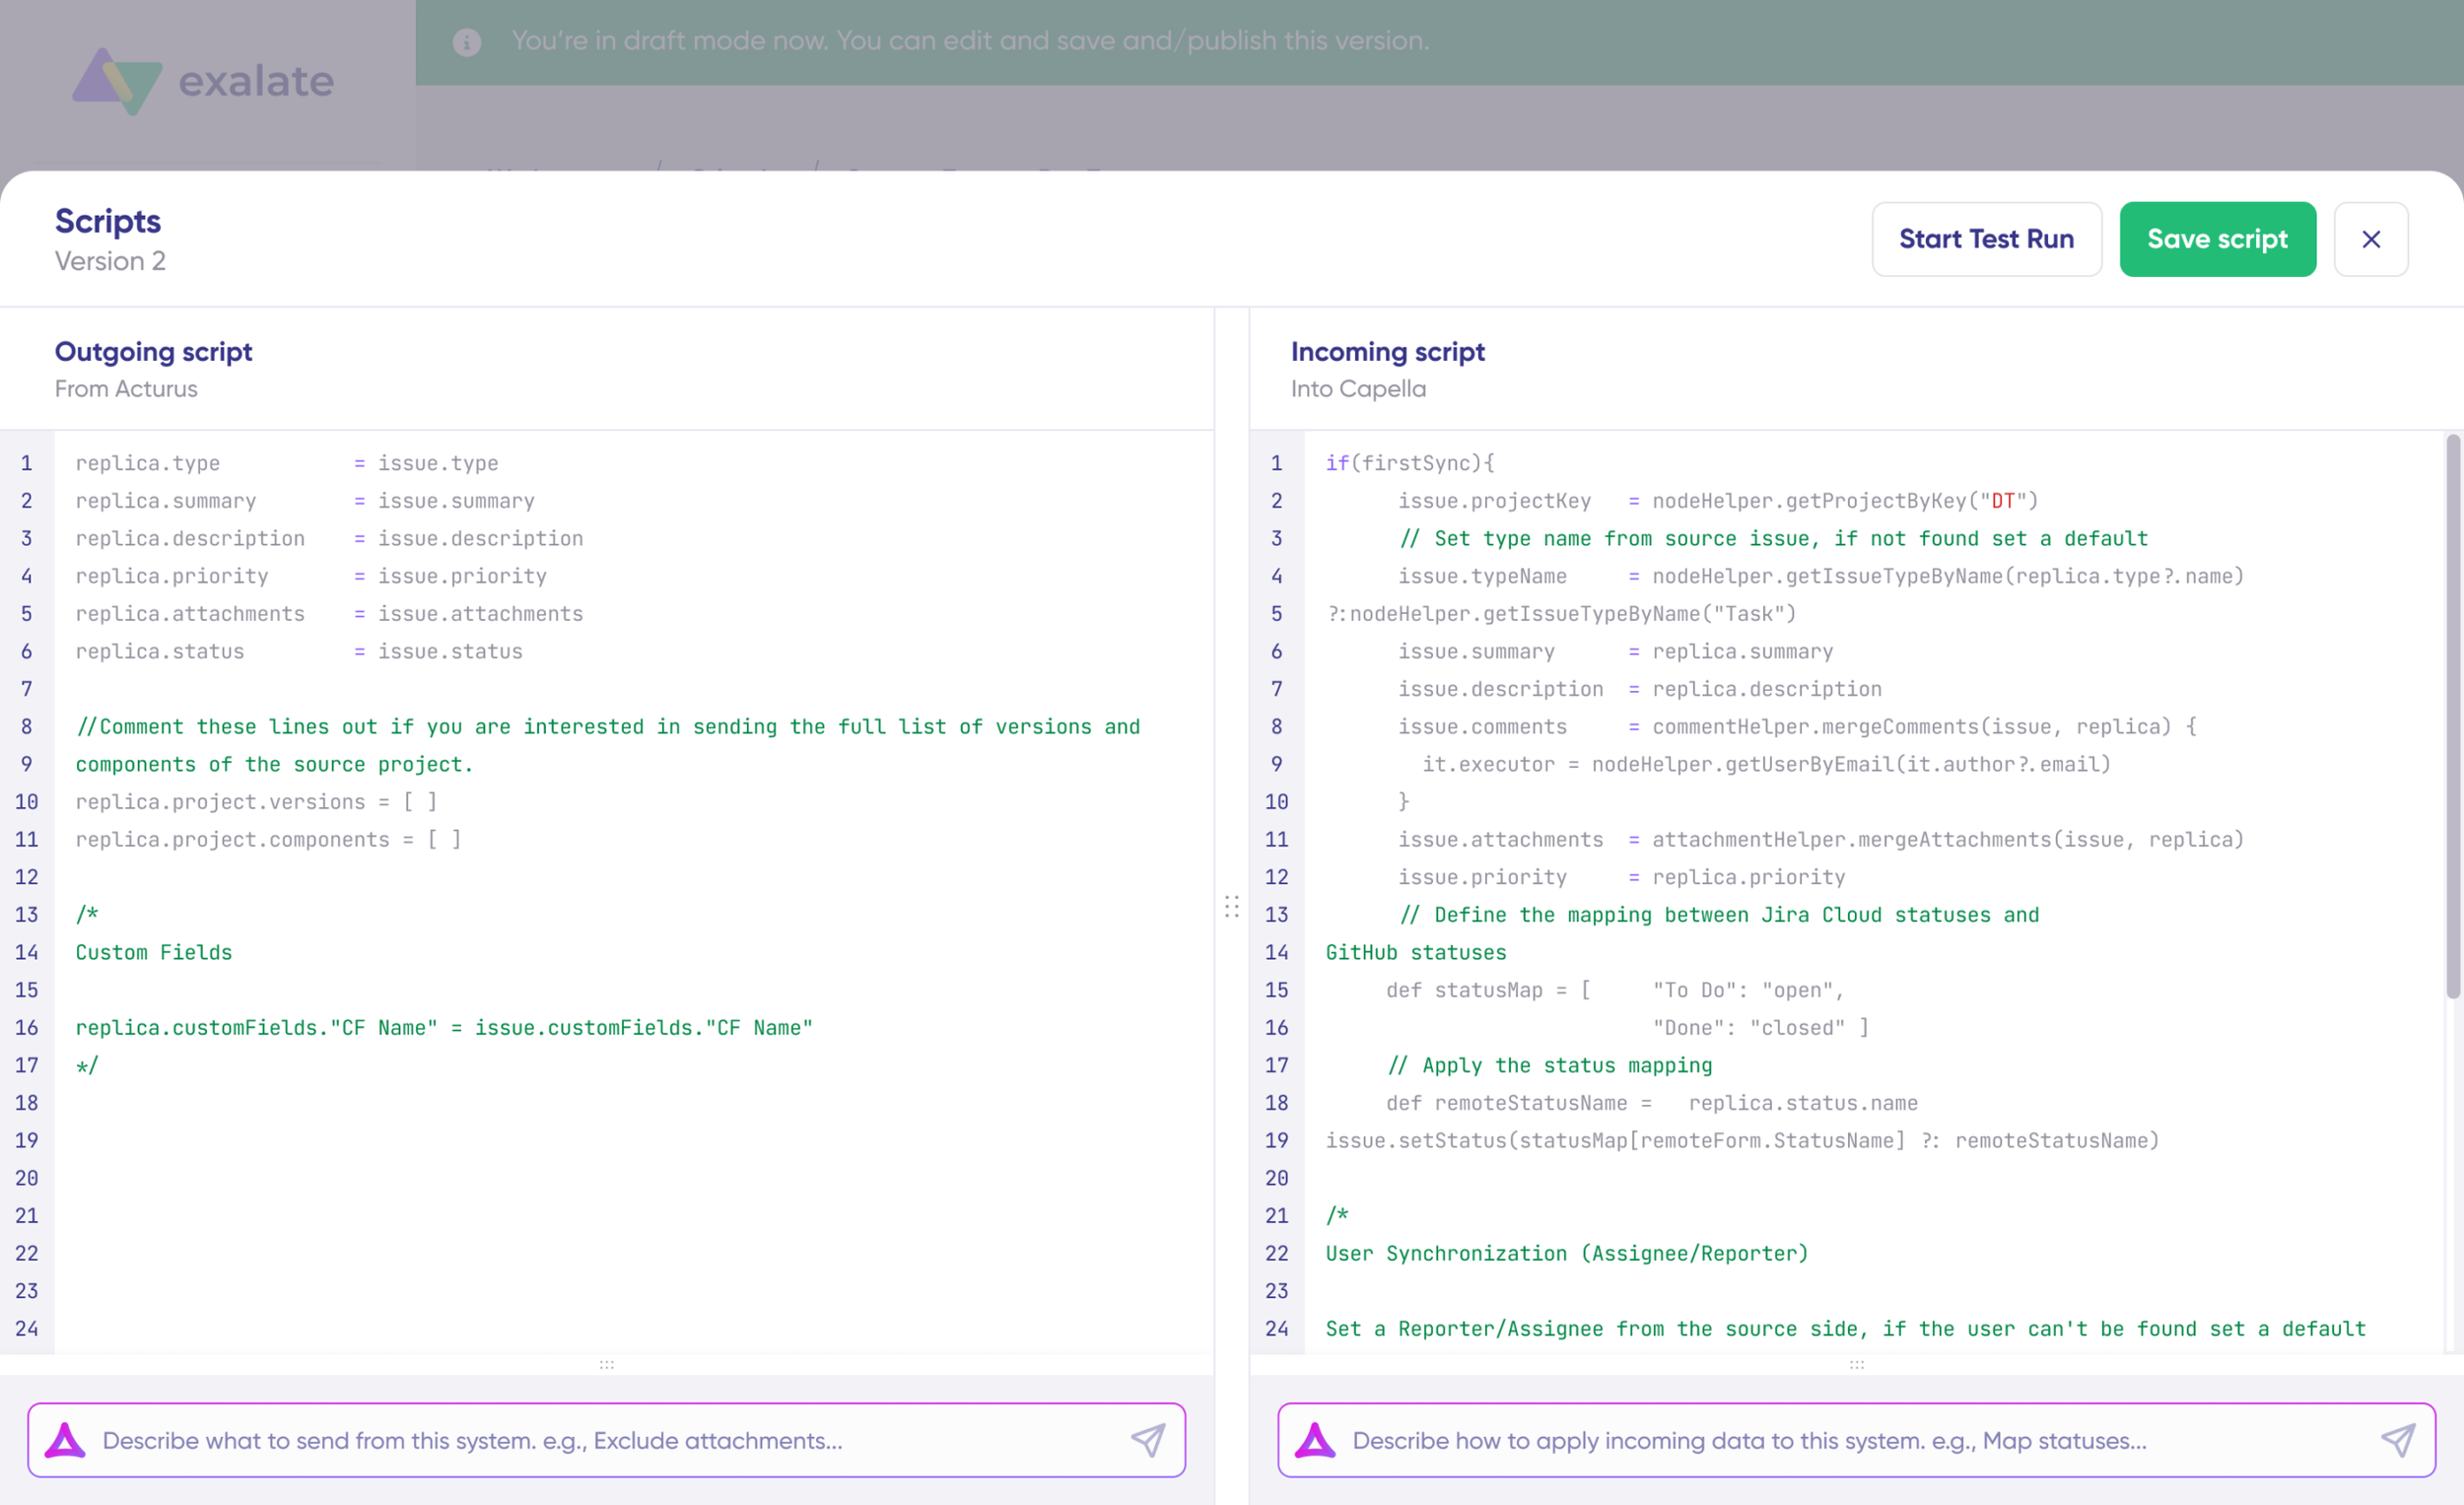
Step 6: Using AI-Assisted Configuration with Aida
Rather than writing Groovy scripts manually, use Aida to generate sync rules from natural language prompts.
Aida appears in both the Outgoing script and Incoming script sections as a chat interface at the bottom of the editor.
You can prompt something like this to Aida:
- “Exclude attachments from sync”
- “Only sync high-priority work items”
- “Send summary, description, priority, and status”
After Aida generates code:
- Green highlights: New lines that will be added
- Red highlights: Lines that will be removed
- Review the suggestions carefully (AI can make mistakes)
- Choose “Insert” to accept or “Discard” to reject
- Refine your prompt if needed and regenerate
Important Notes:
- Outgoing and incoming scripts work independently
- Maintain a separate context for each prompt
- Always review generated code before deployment
- Test in a safe environment first (see Step 7)
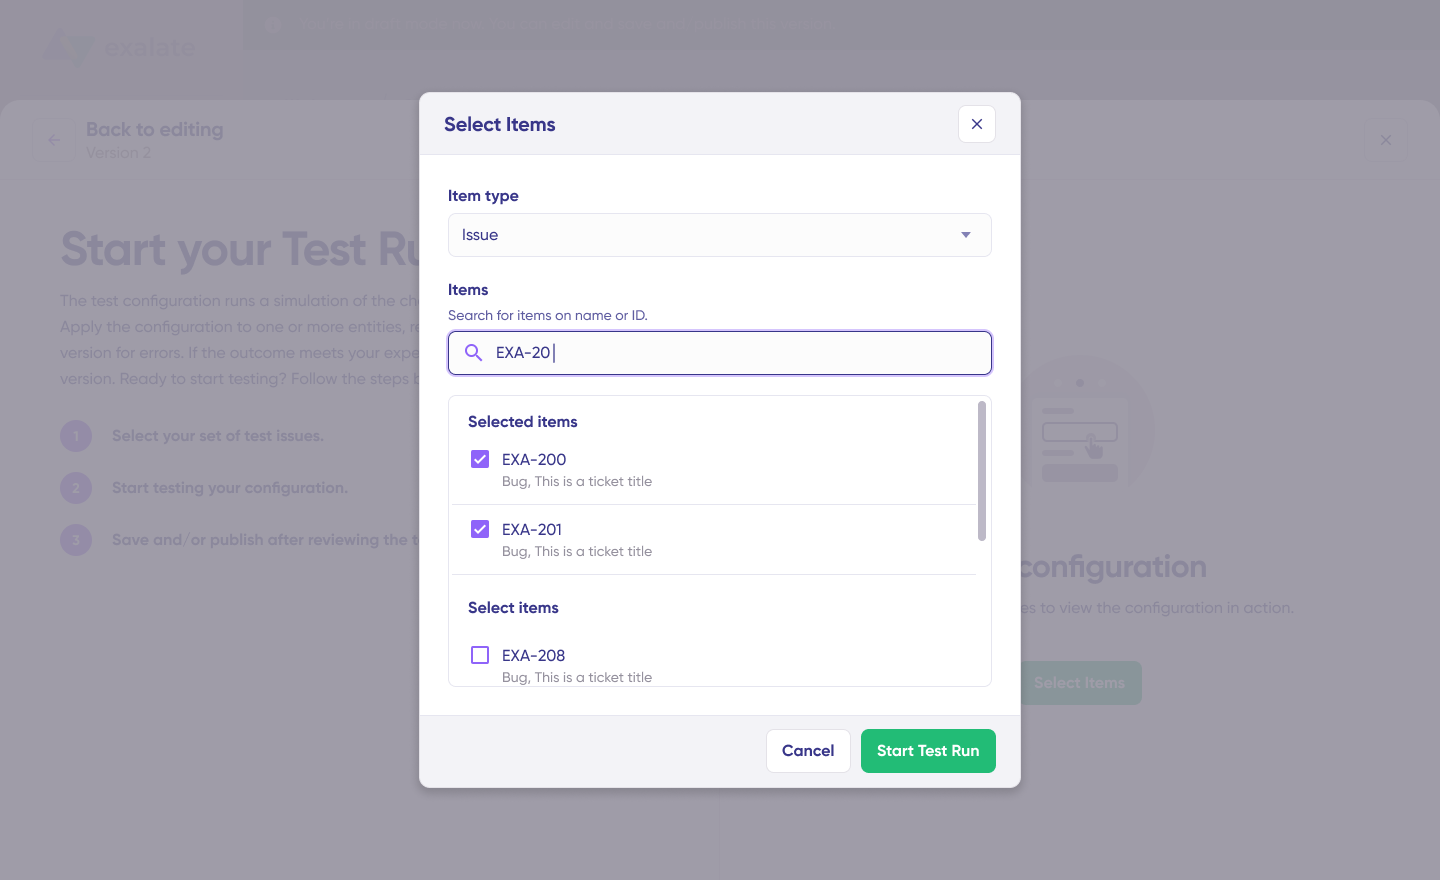
Step 7: Test Run – Validate Before Production
Test Run allows you to test sync configuration without affecting live data.

- After configuring scripts, click “Start Test Run” (do not click “Save script” yet)
- Select Test Items:
- Choose one or more existing work items from Jira or Cases from Salesforce
- Select items that represent realistic scenarios
- Click “Start Test Run”
- Review Results:
- View outgoing replicas (what data is being sent)
- View incoming replicas (how data will be received)
- Check field mappings are correct
- Verify transformations work as expected

- Iterate if Needed:
- If mappings are incorrect, go back to scripts
- Adjust code or refine Aida prompts
- Run Test Run again
- Deploy Only When Confident:
- Test Run prevents errors from affecting live data
- Only publish when all field mappings validate correctly
Step 8: Adding Triggers
Triggers define when items synchronize automatically. Without triggers, you must manually initiate sync for each item.
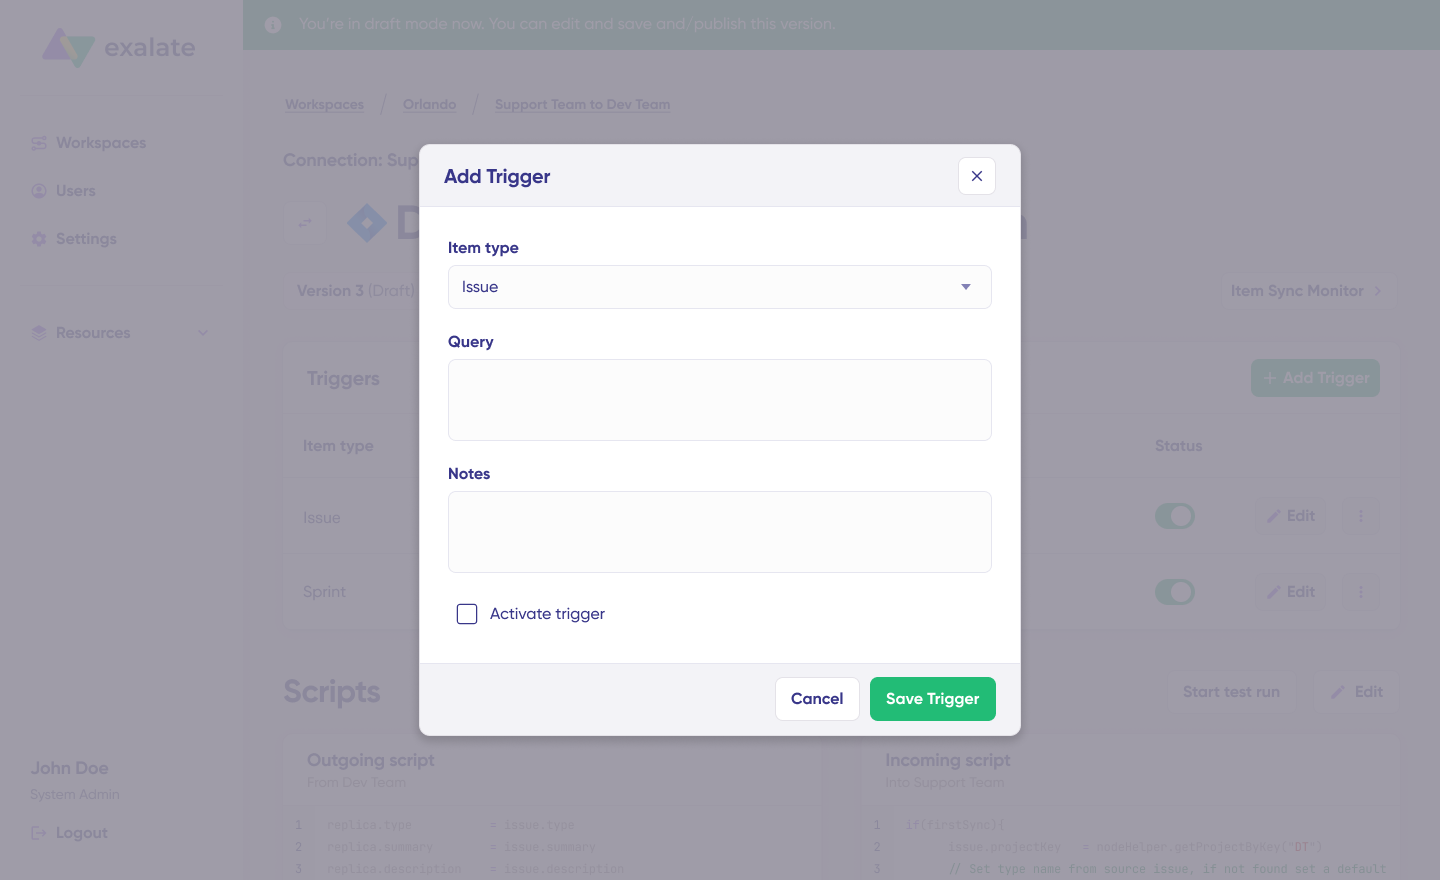
- Navigate to the “Triggers” tab in your connection editor
- Click “+ Add Trigger”
- Configure Trigger Parameters:
For Jira (using JQL):
- Item type: Select work item type (Work item, Epic, Sprint, etc.)
- Query: Enter JQL to filter which items trigger sync
Example JQL triggers:
project = SUPPORT AND priority in (High, Highest)project = ENGINEERING AND labels = "customer-facing"Code language: JavaScript (javascript)type = Bug AND status = "To Do"Code language: JavaScript (javascript)For Salesforce (using SOQL):
- Item type: Select object type (Case, Opportunity, etc.)
- Query: Enter SOQL to filter which items trigger sync
Example SOQL triggers:
Priority = '1' AND Status = 'New'Code language: JavaScript (javascript)Type = 'Problem' AND AccountId != nullCode language: JavaScript (javascript)Stage = 'Closed Won' AND Amount > 10000Code language: JavaScript (javascript)- Optional: Add notes explaining the trigger purpose
- Activate Trigger: Toggle the status to “Active”
- Click “Save Trigger”
You can create multiple triggers per connection. For example:
- Trigger 1: High-priority Cases → Bugs
- Trigger 2: Medium-priority Cases → Tasks
- Trigger 3: Feature Requests → Stories
Step 9: Script Versioning and Publishing
Every time you publish changes, Exalate creates a new script version.
Benefits of Versioning:
- Complete audit trail (who changed what and when)
- Rollback capability if new version causes problems
- Work on drafts without affecting production
- Compare versions to see what changed
To Publish Your Configuration:
- Review your scripts and triggers one final time
- Click “Publish Version”
- The new version becomes active immediately
- Previous versions remain available in the version dropdown
Version Management:
- Active: Currently running in production
- Draft: Editable, not yet published
- Archived: Previous versions available for rollback
Step 10: Deploy and Monitor
After publishing, your integration runs automatically based on configured triggers.
What are the Best Practices for Jira Salesforce Integration?
Use these tips to improve the connection between Jira and Salesforce.
- Set clear objectives: Consult both admins of the teams using both platforms to determine what should be synced or left out. Find out whether the use case requires syncing entire objects or just specific fields. Also, discuss whether the sync should be one-way or two-way.
- Choose the right integration solution: Conduct a cost-value analysis to determine which Jira to Salesforce integration tool works best for you. Consider adding custom connectors to your library if the budget and personnel allow for it.
- Manage permissions and security: Use role-based access controls to specify who can access or even configure the integration solution or instance. Add extra security measures to protect sensitive data in transit.
- Use automation: Whether with the help of AI scripting or triggered connections, you need to reduce manual inputs or users. This will increase the accuracy of your syncs and improve your team’s productivity.
- Test your integration: Before deploying the integration on a broad scale, test it out in a sandbox environment. For instance, you want to make sure the Jira to Salesforce integration solution can transform data in the correct formats before diving in.
- Prepare your team: Invest in training manuals and seminars to educate your team members on how to use, configure, and troubleshoot the integration solution. This will save you time and declutter your network pipelines when minor outages occur.
- Turn on notifications: Stay ahead of outages, updates, and other time-sensitive events by turning on automatic notifications.

Jira Salesforce Integration use cases: Explore some advanced integration scenarios.
Frequently Asked Questions
Why should I integrate Jira and Salesforce?
Integration eliminates manual data entry, improves collaboration between sales and development teams, provides real-time visibility into customer work items, and enables better decision-making through unified reporting. Teams work faster when they don’t need to switch between systems or chase updates via email.
What’s the difference between Exalate and MuleSoft?
Mulesoft is Salesforce’s native integration solution, optimized for Salesforce-centric workflows.
Exalate offers:
- True bidirectional sync with equal control on both sides
- Full customization through Groovy scripting
- AI-assisted configuration (Aida)
- Multi-instance hub-and-spoke architecture
- Support for 15+ platforms beyond Jira and Salesforce
- Outcome-based pricing (not user-based)
Mulesoft works well for organizations heavily invested in the Salesforce ecosystem. Exalate excels for complex workflows requiring flexibility and scalability.
Can I sync Salesforce Cases to Jira work items automatically?
Yes. Set up triggers using SOQL (Salesforce Query Language) and JQL (Jira Query Language) to automatically create work items when Cases meet specific criteria.
Example: Automatically sync all Priority 1 Cases: Salesforce trigger: Priority = ‘1’ AND Status = ‘New’
When a Case matches this criteria, Exalate creates a corresponding Jira work item with all relevant fields mapped.
How do I map Salesforce Opportunities to Jira Epics?
Use Exalate’s field mapping to connect Salesforce Opportunity fields to Jira Epic fields:
Salesforce to Jira:
- Opportunity Name to Epic Summary
- Stage to Epic Status (with mapping)
- Amount to Custom field “Expected Revenue”
- Close Date to Epic Due Date
- Description to Epic Description
Configure this in your sync scripts or use Aida to generate the mapping from a natural language description.
Can I connect multiple Jira instances to one Salesforce org?
Yes. Exalate supports one-to-many or many-to-one architectures for MSPs and enterprises with multiple instances. One Salesforce org can connect to 5, 10, or more Jira instances, each with independent sync rules. All connections are managed from a unified console with network visualization.
How much does Exalate cost?
Exalate uses outcome-based pricing. You pay for active work items currently synchronized, not user seats or transaction volumes. Each integration is billed independently, so you can mix plan tiers (Starter for simple syncs, Pro for complex ones).
Cost per item decreases as scale increases, aligning our incentive with yours.
View detailed pricing or estimate the correct plan for your team with our plan calculator.
Can I sync custom fields and objects?
Yes. Exalate syncs any field accessible via the REST API, including:
- Standard fields on both platforms
- Custom fields (text, picklist, date, number, etc.)
- Custom objects in Salesforce
- Custom work item types in Jira
You have full control over field mapping and transformations.
What if I have unique workflows that templates don’t support?
Exalate’s script-based engine handles any custom workflow. If you can describe the logic in plain language, it can be implemented:
- Conditional data flow (“only sync if priority is High”)
- Data transformations (format conversions, calculations)
- Multi-step workflows (Opportunity to Epic to multiple Stories)
- Complex business rules
Use Aida to generate scripts from descriptions, then refine as needed.
How long does implementation take?
Basic setup: 30-60 minutes for your first connection
Production-ready with testing: 1-2 days for standard use cases
Complex enterprise implementations: 1-2 weeks, including custom workflows, multi-instance setup, and UAT
Exalate offers implementation assistance ranging from self-service documentation to full white-glove implementation.
Can I try before committing?
Yes. Exalate offers a 30-day free trial with full functionality. No credit card required to start. Test with your actual Jira and Salesforce instances to validate the integration meets your needs.

Can Exalate integrate with other tools besides Jira and Salesforce?
Yes. Exalate supports 15+ platforms including:
- ITSM: ServiceNow, Freshservice, ServiceDesk Plus, Freshdesk, Zendesk
- Project Management: Azure DevOps, Asana
- Development: GitHub
- Other exotic systems like Ivanti, Xurrent, etc.
- Multiple Jira instances
You can create integration networks spanning multiple platforms (e.g., Salesforce to Jira to Azure DevOps).
How do I handle data conflicts (same item updated on both sides simultaneously)?
Exalate uses last-write-wins conflict resolution by default. If the same field is updated simultaneously on both sides, the most recent change takes precedence.
For critical fields, implement custom conflict resolution in your scripts to keep local changes or notify the remote side about priority conflicts.
Can I sync historical data or only new items?
Both. When setting up a new integration:
- New items: Automatically sync based on triggers
- Historical items: Use Bulk Sync to sync existing items that match triggers or link any two existing items in your system.
This prevents duplicate items while bringing historical data into sync.
What types of Salesforce objects can I sync with Jira?
Exalate can sync any Salesforce object accessible via the REST API, including:
- Standard objects: Cases, Opportunities, Accounts, Contacts, Leads, Tasks, Products, Campaigns
- Custom objects: Any object you’ve created with the __c suffix
- Related objects: You can sync multiple related objects to a single Jira work item (e.g., Account + Contact + Case)
Can I filter which comments sync between systems?
Yes. You have complete control over comment synchronization:
- Sync all comments bidirectionally
- Sync comment threads and user mentions
- Sync only public comments (hide internal notes)
- Filter comments by content (exclude those containing “[INTERNAL]”)
- Transform visibility (Salesforce work notes to Jira internal comments)
Use conditional logic in your sync scripts to implement any comment filtering rules.
How does Exalate compare to Zapier for Jira Salesforce integration?
Key differences:
Exalate:
- True bidirectional sync with full control on both sides
- Script-based for complex workflows
- Real-time synchronization
- Multi-instance support
- Outcome-based pricing
Zapier:
- One-way triggers and actions
- No-code automation
- Limited bidirectional capability
- Per-task pricing
Zapier works well for simple automations. Exalate excels for complex, enterprise-grade bidirectional synchronization.
Can I create different sync rules for different types of Salesforce Cases?
Yes. Create multiple triggers within one connection, each with its own sync rules:
Trigger 1: Priority = ‘1’ creates Jira Bugs Trigger 2: Type = ‘Feature Request’ creates Jira Stories Trigger 3: Type = ‘Question’ creates Jira Service Requests
Each trigger can have completely different field mappings, status transformations, and business logic.
Ready to Connect Your Teams?
Jira Salesforce integration eliminates information silos, reduces manual work, and keeps sales and development teams aligned in real-time.
With Exalate, you get:
✅ Unified Visibility: Manage all integrations from a single console
✅ Operational Control: Full Groovy scripting flexibility with AI-assisted configuration (Aida)
✅ Safe Deployment: Test Run validates changes before production, script versioning enables instant rollback
✅ Real-Time Sync: Activity Dashboard monitors sync status across all connections
✅ Enterprise Security: ISO 27001 certified, RBAC, encryption in transit and at rest, SentinelOne EDR
✅ Outcome-Based Pricing: Pay for active work items in sync, not user seats or transactions
✅ Scalability: Hub-and-spoke architecture connects multiple instances as your needs grow
Recommended Reads:
- Jira to Jira Integration
- Salesforce to Salesforce Integration: Sync Multiple Salesforce Instances Bidirectionally
- Jira ServiceNow Integration: How to Set up an Integration in 6 Steps
- Jira Integrations: Integrate Jira and Other Systems Bidirectionally
- Salesforce Integrations: Integrate Salesforce and other Tools
- Jira Azure DevOps Integration
- How to Set up a Jira GitHub Integration
- Jira Zendesk Integration: The Complete Guide