Then, you can also choose to build a Jira ServiceNow integration with custom code. Again, it has its pros and cons.
Teams within your organization usually use different platforms (let’s say Jira and ServiceNow) to handle business-critical or user-centered information. You might also want to share some data with other companies you do business with. To this end, you’ll need a Jira ServiceNow integration to connect internal and external teams.
With the integration in place, you’ll be able to boost your productivity and save yourself time if you understand how to set up a Jira ServiceNow integration with the least fuss possible.
So in this step-by-step guide, you’ll learn how to integrate Jira with ServiceNow.
ServiceNow Jira Integration Guide
Learn how to achieve a seamless Jira ServiceNow integration step-by-step.
What are the Benefits of a ServiceNow Jira Integration?
ServiceNow is often the primary choice for CIOs and heads of IT departments. Why so?
You can track user requests related to all your support incidents in one place using ServiceNow, allowing the customer support teams to remain up-to-date. While incidents form the basis of ServiceNow, it’s also designed around workflows and is particularly useful for services, operations, and business management.
When we talk about Jira, Agile instantly springs to our mind. Atlassian’s Jira is excellent for managing issues and projects for software development teams. It can be hosted either on the cloud or on-premise.
Teams using Jira and ServiceNow can benefit by collecting, organizing, and exchanging data between these platforms.
Let’s discuss a Jira Service Management (JSM) integration with ServiceNow use case:
A customer logs an incident in Jira Service Management (e.g., “System Outage”) with fields like Summary, Description, Priority, and Attachments.
These fields flow into ServiceNow as Short Description, Work Notes, Urgency, and Attachments, with correct transformations applied (e.g., JSM’s “High” Priority maps to ServiceNow’s “Critical” Urgency, and so on).
Any updates—such as a status change in JSM to “In Progress”—sync to ServiceNow as “Work in Progress.” Similarly, updates in ServiceNow sync back to JSM with proper field mappings.
Comments sync bidirectionally, but visibility rules ensure customer-facing comments in JSM remain internal notes in ServiceNow.
If the incident is marked “Critical,” additional fields like Service Owner and Resolution SLA synchronize in real time.
Once the incident is resolved in JSM, resolution code, and resolution notes are automatically assigned to the incident based on the selection the agent makes.
This triggers the status change in the ServiceNow instance. The resolution code and resolution notes for the incident are automatically filled. The incident is now ‘Resolved’.
This use case is just the tip of the iceberg. You can implement any kind of advanced workflow orchestration by connecting Jira and ServiceNow.
As you might have noticed, setting up a ServiceNow Jira integration allows you to share data automatically based on specific events and control how that data is exchanged. You don’t need to use manual means to pass information between these platforms.
Let’s see how we can actually implement such an integration.
But before that, let’s see a few practical use cases. If you don’t find what you’re looking for here you can always set up a call with our integration engineers to discuss further.
You can streamline the incident management process by automating it for the customer support agents. We just saw an example of this. Having these systems connected will reduce the need for manual updates and all teams will have real-time information within the tools they use. Also, alerts set up during integration would notify the right people and escalate unresolved issues automatically.
Cross-team Collaboration (Vendors/ Clients)
For Managed Service Providers (MSPs) it’s not uncommon that their clients or vendors use different tools like ServiceNow, Jira, etc. A Jira ServiceNow integration will ensure all the daily tasks are synced between different teams using these systems, increasing transparency and trust. It will also simplify reporting by keeping both teams aligned.
The moment the ticket enters the help desk in ServiceNow, Exalate routes it to my team working in Jira. My team then provides feedback, which is immediately reflected in ServiceNow.
– Ms. TEO TEAM LEAD, LF LOGISTICS
Customer Support to Development Escalation
Often customer support agents perform the root cause analysis of tickets and conclude that the ticket needs to be passed to the development guys.
When such a ticket originates in ServiceNow, it can then be mapped and synced to Jira with the correct SLA information so the dev guys are updated on the timelines.
While the ticket is being worked on in Jira, the customer support agents would have visibility over its status, improving the overall customer experience and resolving tickets in a timely manner.
Kickstarting Your Jira ServiceNow Integration
Before you jump right into the integration it’s important to understand what are the ways in which you can integrate Jira and ServiceNow.
Native Jira ServiceNow Integration Methods
ServiceNow provides a native method called IntegrationHub to integrate Jira and ServiceNow. However, it’s not the best option if you want to set up a fully functional bidirectional integration because it is limited in scope. It’s also costly to implement as it comes with an additional package.
We have a detailed guide to help you understand why IntegrationHub is not the most feasible choice.
Then, you can also choose to build a Jira ServiceNow integration with custom code. Again, it has its pros and cons.
Build an Integration vs. Buy Third-Party Integration Solutions
I have often observed that ServiceNow users prefer to build their integration from scratch. Honestly, ServiceNow APIs do make the task easy but this option isn’t always cost-effective. It also leads to significant maintenance costs and difficulty scaling your integration requirements.
We have an elaborate guide explaining the A-Z of building vs. buying an integration. Check it out to get the necessary answers.
From my experience, I have observed that companies try to build their own solution initially but then eventually switch to a third-party solution.
Also, when it comes to third-party solutions, you will see a lot of no-code, template-based tools to integrate Jira with ServiceNow. They may work for simple use cases but cannot be used to implement advanced integration scenarios.
So, how do you start integrating Jira with ServiceNow? What things should you take into account?
Consider your Jira ServiceNow integration as a project in itself.
Define your integration goals by identifying their purpose: issue tracking, incident management, or workflow automation, or something else.
Define the scope of your Jira ServiceNow integration, i.e what data you want to sync. Issues, comments, custom fields, work notes? Plus, mention the sync direction: unidirectional or bidirectional.
Choose an integration method. There are many ways you can implement a ServiceNow to Jira integration. Evaluate various options available in the market, consider PoCs, and ensure you have a robust and scalable integration.
Prepare both platforms for the integration. Set up the required admin accesses to both instances and identify modules and fields to be integrated (e.g. incident, problem, change requests, etc.)
Set up the integration tool: install the plugin, connect the instances, configure the endpoints, etc.
Configure the sync rules in the tool of your choice. Define the field mappings, like map Jira summary, description, and custom field called SNOW ID to ServiceNow incident’s short-description, description, and correlation ID.
Test the integration. Validate field mappings, data flow, and conflict handling. Verify if everything works according to your needs.
GO LIVE!
Monitor and optimize the integration. Periodically review integration rules to ensure they align with evolving workflows.
There are a lot of third-party Jira ServiceNow integration solutions available in the market with flexible license plans, various deployment models, extensive documentation, and other custom-made features. With such solutions, you can get your integration project up and running in no time.
However, it’s a good practice to consider some factors while choosing the solution.
How to Choose the Right Tool for Setting up Your ServiceNow Jira Integration
To get the best out of your integration, think carefully about various factors like ease of use, security, etc.
Sharing data between your teams sounds simple, but there are many ways to do it, and getting the details right will make sure the right information is shared and presented to those who need it.
Flexibility: Many companies look for integration solutions that can support complex or advanced use cases. Using predefined integration templates doesn’t always work. Look for solutions that offer support for complex integration use scenarios with minimum hassle. Adding conditional logic, advanced data mappings should be included as a default. The solution must also support historical data exchange or legacy system integration.
Security and Decentralized Integration Architecture: When each integrating platform has independent and complete control over information exchange, there is less chance of unauthorized information getting accidentally sent over. This kind of setup can be achieved with a distributed integration architecture. It inherently increases the security of your integration. Additionally, the solution must implement various security measures like RBAC, encryption, etc. It helps if it’s ISO certified too.
Reliability: Downtimes are hard-hitting. It’s important to consider solutions that offer an integrated retry mechanism that doesn’t need manual intervention. Also, the two-way synchronization must resume from the point of interruption without having to worry about data being lost during system failures.
While considering a Jira ServiceNow integration solution, ServiceNow’s native offering, IntegrationHub often comes to the forefront. Using its Jira Spoke, you can connect ServiceNow with Jira. However, it might not always be a feasible option. It has a longer onboarding journey, is costly, and is ideal for simple integration use cases.
Also, setting up a fully functional ongoing bidirectional Jira Salesforce sync is difficult with IntegrationHub. Additionally, ServiceNow is in the driving seat of such an integration.
Let’s consider another tool called Exalate and study the step-by-step process of setting up a ServiceNow Jira sync.
Note: You can also have a look at the complete comparison between IntegrationHub and Exalate if you prefer.
How to Set up a Jira ServiceNow Integration in 5 Steps
In order for Exalate to work, you need to install it as an app on both sides. It doesn’t matter which side you start from. I will start from the ServiceNow side in this guide.
If you prefer watching videos, you can also view our tutorial.
The Exalate team will reach out to you with your Exalate node.
Once you get your ServiceNow node URL, you can follow the following steps to access your Exalate node.
Download the XML file from the documentation page that contains the information ServiceNow needs to access your Exalate node.
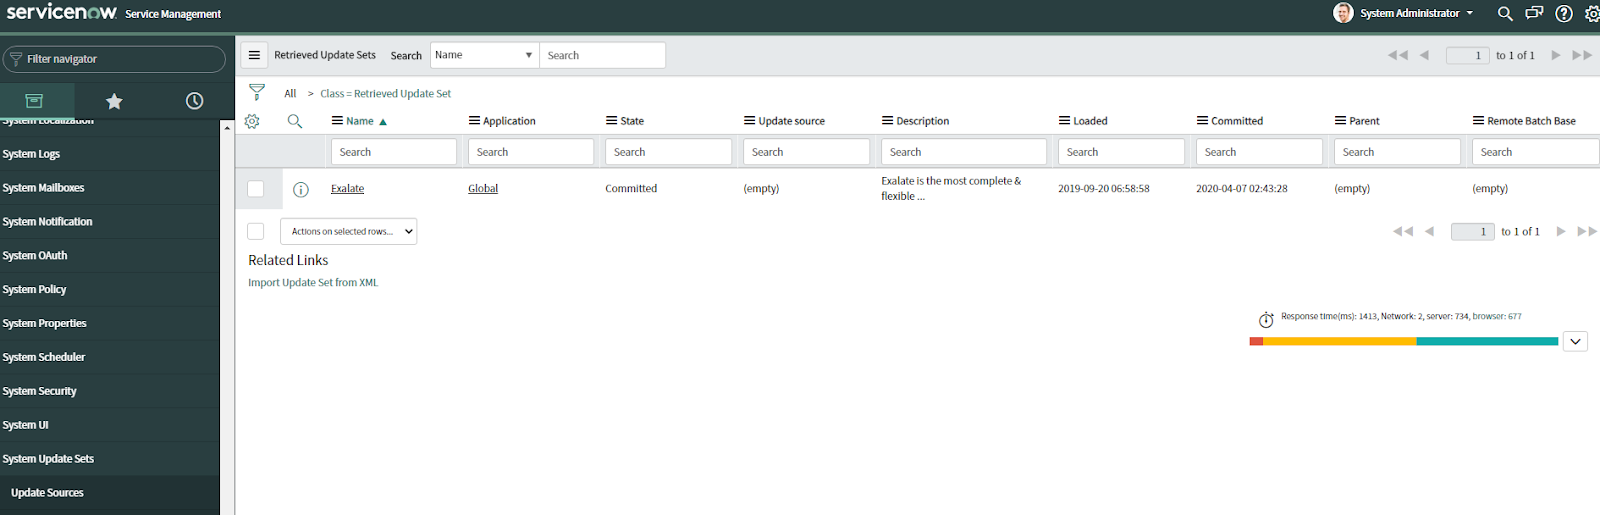
Now, log in to your ServiceNow account. In the left-hand menu, look for “System Update Sets”. You can search for it by typing it into the “Filter navigator” search field.
Click the “System Update Sets” entry to expand it, and then click “Retrieved Update Sets”.
On this screen, look under the “Related Links” heading and click the text that says, “Import Update Set from XML”.
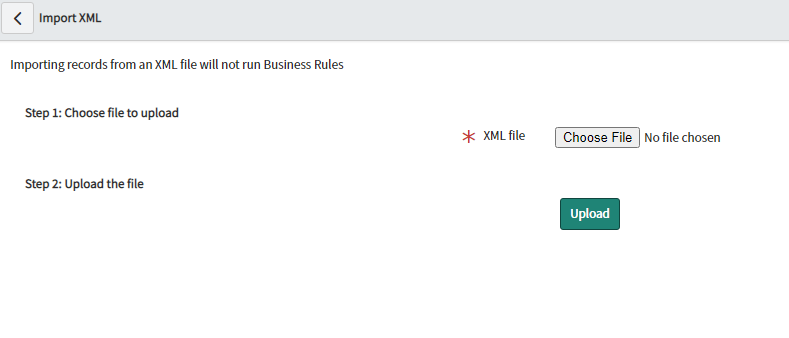
On the next screen, click the “Choose File” button and then navigate to the XML file you downloaded earlier.
After selecting it, click the “Upload” button.
Once the XML file uploads, you’ll see it listed. Click on it, followed by the “Preview Update Set”.
You might need to do an update, so if asked to do so, click “Accept remote update”.
Next, click “Commit Update Set” to finish the ServiceNow installation. Exalate is now ready on ServiceNow. From here, you can set up a connection between the platforms.
Note: You can also install Exalate on your ServiceNow instance via the Atlassian Marketplace to connect Jira and ServiceNow.
You can also request a trial for ServiceNow Jira integration from the integrations page.
Step 3: Connect Jira and ServiceNow
To connect Jira and ServiceNow, start creating a connection. One side initiates the connection and the other side accepts the connection invitation. I’ll start from ServiceNow.
Click the “Initiate connection” button in the “Connections” panel.
All of your connections will be listed here. However, it will be empty if it’s your first connection.
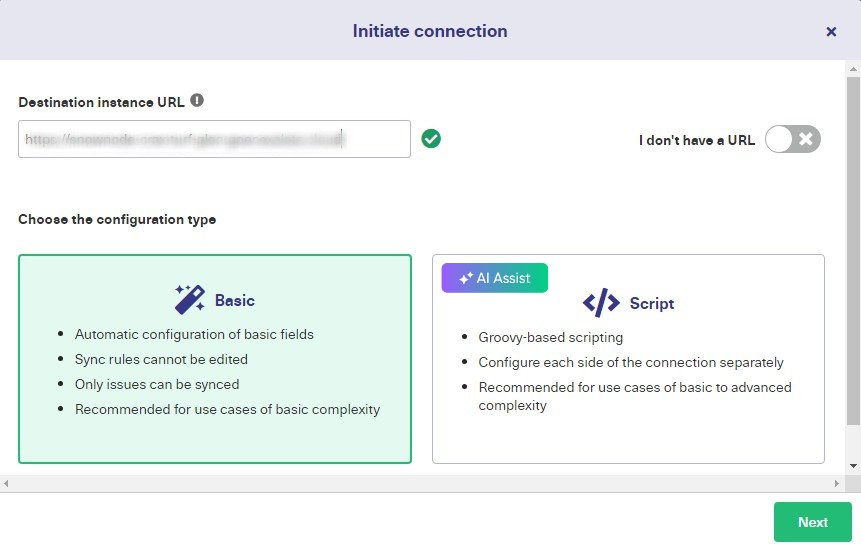
Enter the destination instance URL, Jira in our case.
After a quick check, you’ll be prompted to choose between two configuration modes: the Basic mode and the Script mode.
The Basic mode is used for simple synchronization use cases and consists of predefined sync rules. Using this mode, you can sync only incidents and issues.
The Script mode allows you to use Exalate’s full functionality. You can add advanced mappings, set conditional logic, and do much more using Groovy-based scripts. This mode is also AI-assisted. We will study more about it in the coming section.
We’ll have a look at both these modes.
The Basic Mode
Once you select “Basic” on the screen above and click “Next”, you need to verify admin access to the remote instance. Select “Yes, I have admin access” if you have the access already and hit “Initiate”
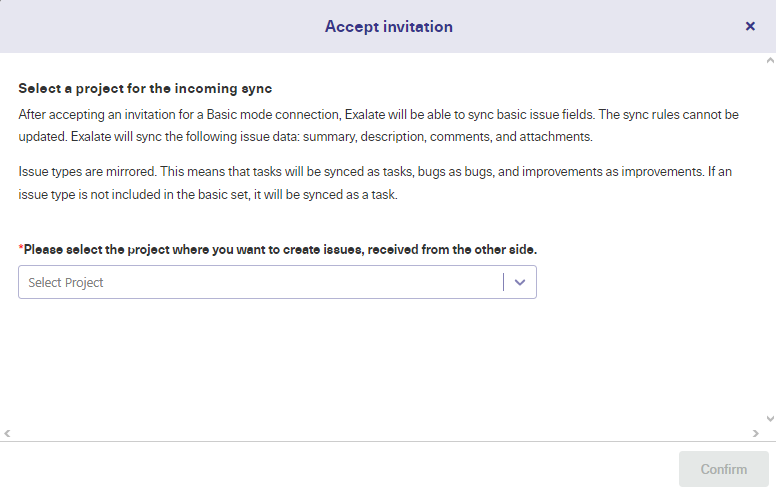
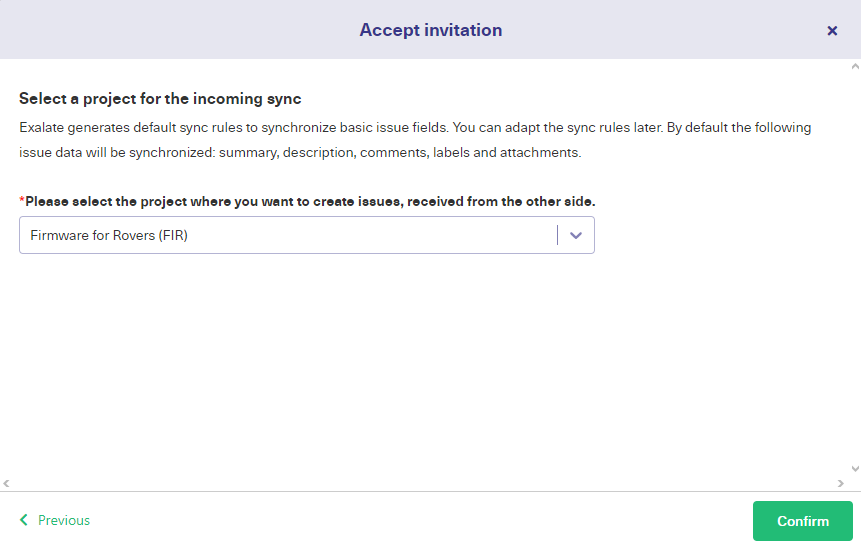
After a successful verification, you’ll be redirected to the Jira remote instance. Select a Jira project you want the incidents coming from ServiceNow to be synced. Then click “Confirm”.
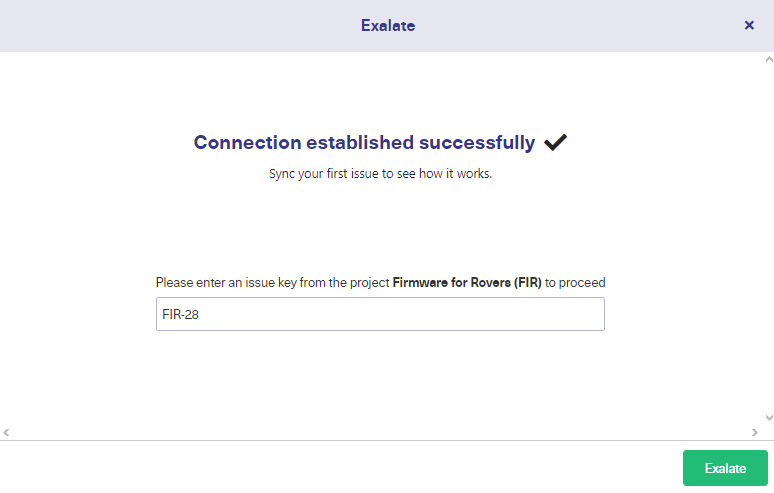
Enter the issue key or the incident number to start your sync by clicking the “Exalate” button.
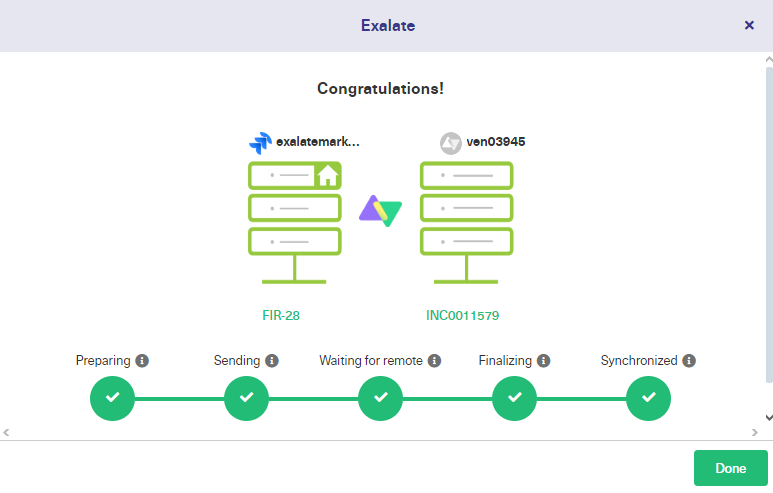
It’ll take a few seconds for the sync to be successful.
There are direct links to the synced entities that you can click to go to the right issue or incident.
In the Basic mode, you can even create triggers or sync issues or incidents in bulk using the “Bulk Connect” option.
Moving on to the Script mode.
Continue with the Script Mode
You can create a connection in the Script mode using an invitation code generated by one side, which is copy pasted at the remote end.
Select the “Script” mode on the modal that prompts you to choose the modes and click “Next”.
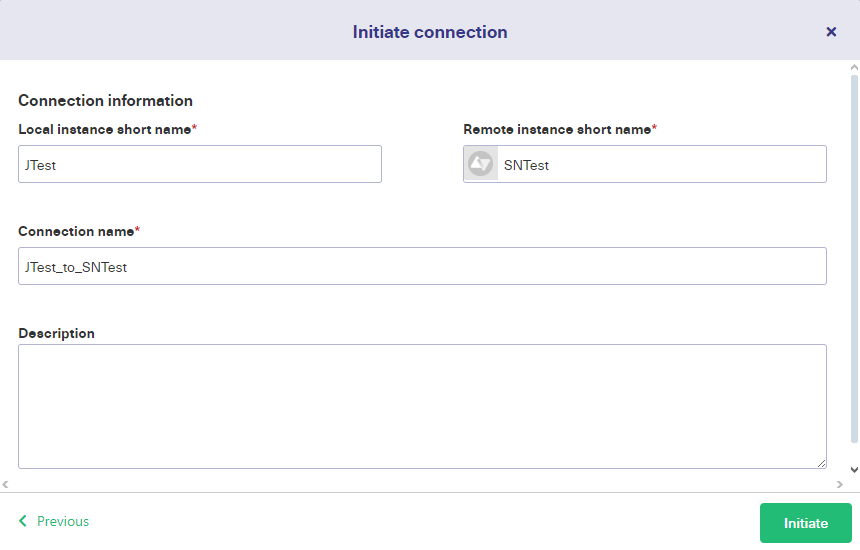
On the Connection details screen give a name to the Jira and the ServiceNow instances. A Connection name is automatically generated but you can modify it if you want.
Add a description to understand how you plan to use the connection and click “Initiate”.
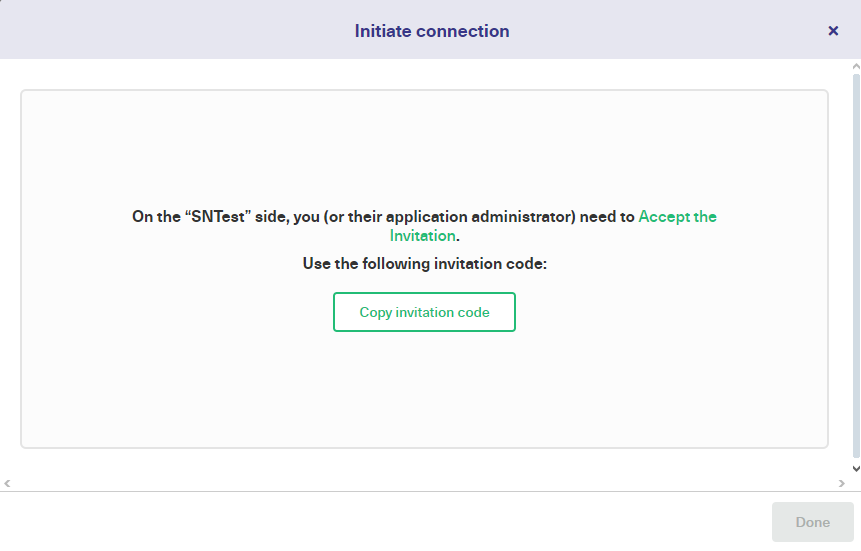
Copy the generated invitation code, click “Done” and go to the Jira instance.
Take that code you just generated and use it to accept the invitation on the other side. Head over to your Jira instance, navigate to ‘Connections’ in the Exalate console, and click ‘Accept Invitation’.
Then, paste the code in the designated field.
The code will be validated automatically when you click ‘Next’. Exalate will determine your connection type based on the invitation. Select the project on the Jira side, as you did in Basic mode, and then click ‘Confirm’ to proceed.
You can configure the sync rules for each side independently from the other side. This is intentional, allowing each side to maintain its autonomy.
You can configure it right away by clicking ‘Configure Sync,’ or you can do it later in Step 4.
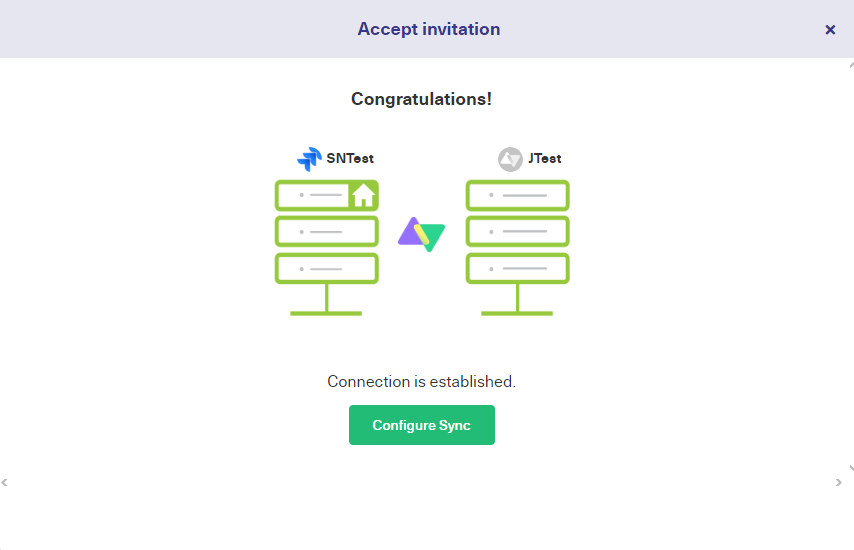
Once you’ve accepted the invitation and the connection is established, we can proceed to configure the connection.
Step 4: Configure your Sync Rules
Once you connect Jira to ServiceNow, it’s time to decide what information you want to exchange between the platforms. Start doing that by clicking on the ‘Configure Sync’ button.
This information exchange is divided into two categories of sync rules in Exalate. The ‘Outgoing sync’ decides what information is sent from Jira to ServiceNow. The ‘Incoming sync’ rules decide how the information coming from ServiceNow is interpreted in Jira.
These rules exist on both sides with their roles reversed.
The ‘Outgoing sync’ in Jira looks like this:
replica.<attributes> is the actual message payload.
entity.<attribute> represents the local fields on the underlying instance.
You can edit these mappings the way you want. Refer to the Exalate Script Helpers if required.
Exalate provides a number of script helpers to reduce the effort of scripting yourself.
Note: The Incoming sync on the Jira side represents how to interpret information received from the ServiceNow side.
Just like with outgoing sync rules, you can script more complex mappings.
Configure Scripts Using AI Assist
You can also use Exalate’s Script mode with AI. It’s called AI Assist and it appears as a chat window in both your incoming and outgoing sync rules tabs. Just type your sync requirements into the chat and let AI Assist generate the scripts for you.
The scripts are based on your input, existing configurations, and Exalate’s scripting API.
Note that AI Assist, just like any other AI, can make mistakes. So try to be as precise and detailed as you can with your prompts.
Here’s an example of how to use AI Assist:
Let’s say you want to map and sync statuses between Jira and ServiceNow. You can enter something like this into the AI chat:
For incoming sync (Jira): “Create a status mapping that sets New to Open, Working to In Progress, and Closed to Done in the Jira incoming configuration.”
Give it a moment to generate the script.
Red script rules indicate lines that will be deleted from the existing scripts, while green ones show new lines to be added. You can accept or reject the AI’s suggestions. If needed, refine your prompt. Once everything looks right, be sure to publish your changes.
This video gives you a hands-on view of how to use AI Assist to map and sync custom fields between Jira and ServiceNow.
Note: You can also refer to the Getting Started guide on Exalate documentation for a step-by-step process of setting up a ServiceNow Jira integration.
Step 5: Configure Triggers to Set Up an Automated Sync
Now it’s time to create automated sync triggers. You can create triggers for specific conditions you want the information exchange to occur. For instance, when an incident belonging to a particular assignment group is created in ServiceNow, a new issue in Jira is created. Triggers will filter all the issues or incidents that satisfy the trigger condition and sync according to the rules you’ve set up in Step 4. Triggers are present on both the Jira and the ServiceNow side.
To create triggers, click the “Triggers” tab. If there are any existing triggers, they will be listed here, but the first time you use them, they will be blank.
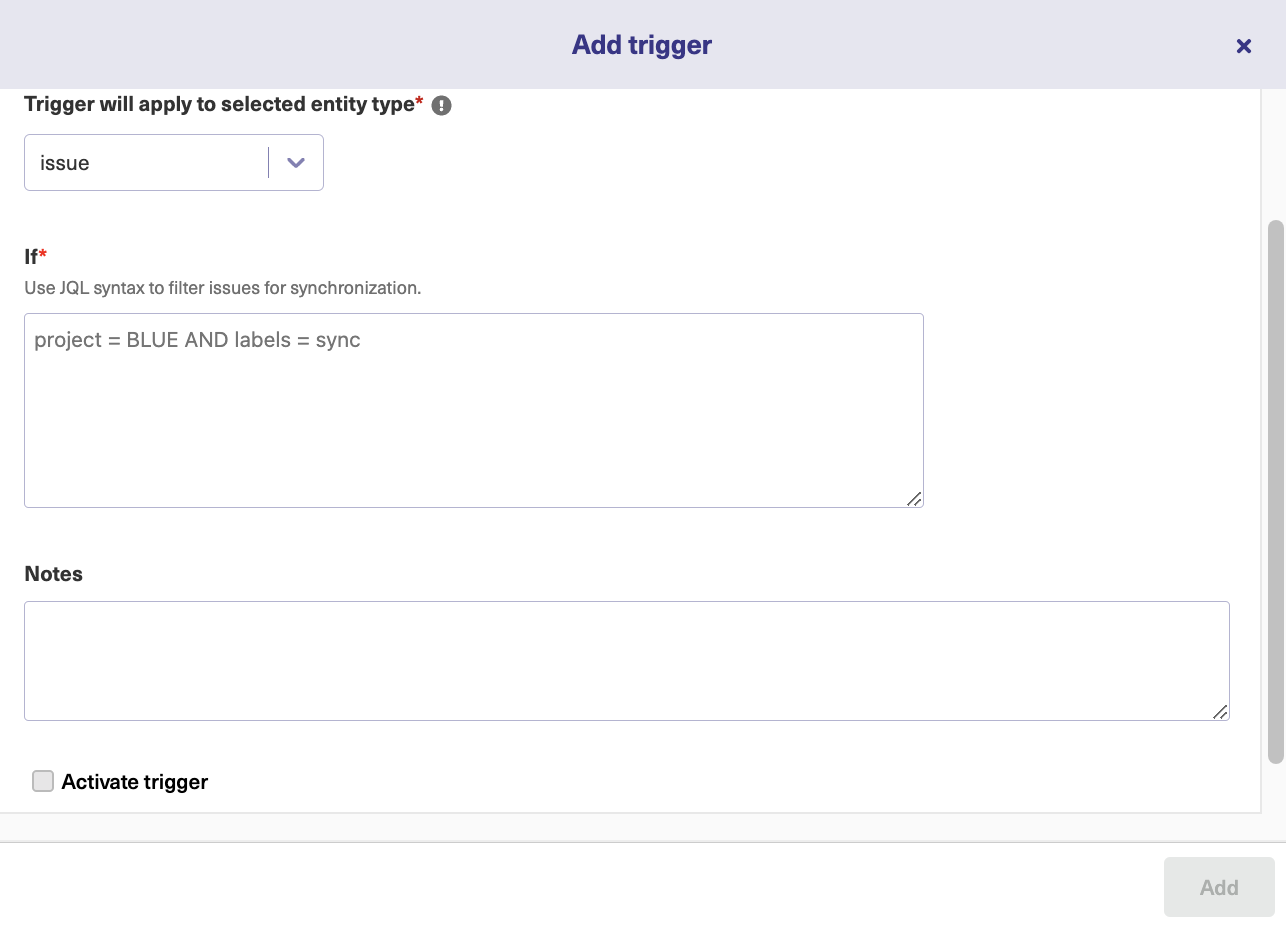
To create a new trigger, click the “Create trigger” button. The “Add trigger” pop-up is where you create all your triggers.
First, select the entity to which you want to apply the trigger. For instance, you can choose between the numerous ServiceNow entities, like incidents, problems, change requests, etc. On the Jira side, you will be prompted to select issues or sprints.
Then in the “If” section, write the actual trigger condition in the platform-specific search language. Use JQL for Jira and ServiceNow search syntax for ServiceNow to create these triggers.
Click the checkbox to “Activate the trigger”.
Note: Incidents, Problems, Change Requests, RITMs, Cases, and Catalog Tasks are the most commonly synced ServiceNow entities with Exalate. However, you can sync any entity in ServiceNow using Exalate’s intuitive scripting engine.
Exalate: a Deep Dive
Let’s deep dive into Exalate and understand its features.
Decentralized Integration
Exalate must be installed on both integrating platforms since it’s based on a distributed architecture. `
Let’s assume you have it installed on the ServiceNow (Purple) instance and the Jira (Green) Cloud or on-premise instance. You can also install it on docker.
As shown in the picture, both the Purple and the Green instances will have a separate dedicated Exalate agent. The letters A-F depict the information flow. So, information going out of ServiceNow is controlled by its Exalate agent that interacts directly with the Exalate agent on the Jira side which then transfers it to the Green Jira instance. The flow back from Jira to ServiceNow follows the D,E,F pattern.
This decentralized setup ensures you have the autonomy of what information you want to send and how you want to map information coming from the other side.
Security
Exalate has in place all the required security mechanisms like encryption, RBAC, HTTPs, etc. It’s also based on a single-tenant architecture allowing your Exalate node to be more secure. It’s ISO 27001 certified.
Note: You can find our entire security landscape and architecture in this free whitepaper.
Deployment Models
Exalate supports various deployment models, so you can install it either on the cloud, on-premise, or via docker.
The image shown below will give you an idea.
Advanced Jira ServiceNow Integration Use Cases using Exalate
Exalate gives you the flexibility to adapt and adjust your synchronization to handle different kinds of Jira ServiceNow integration use cases. We’ll discuss a few integration scenarios that are quite popularly implemented using Exalate.
To ensure critical incidents are always handled with priority and within their SLAs, you can sync the SLA records and maintain state updates between Jira and ServiceNow. Imagine, a priority 1 incident is raised and the customer support agent identifies it as a dev issue to be passed to the dev team working in Jira. Alongwith the SLA and time-related information, if the incident status is also synced, the agents would always have visibility over it at all times and the dev team would know the SLAs and time constraints they must adhere to beforehand. So, when the issue is marked resolved in Jira then the corresponding state is updated in ServiceNow with specific comments left as resolution notes.
Sometimes, internal teams working on specific problems or incidents must pass important information from ServiceNow to Jira, for instance, leaving notes for the dev team to help them with the issue. In such a case, private comments must be kept private and synced between the two systems. It’s possible to do that with simple code. Share only ServiceNow work notes to Jira such that the dev team has all the required information handy.
You can also sync different entity or issue types between Jira and ServiceNow for better visibility and streamlined business operations. For instance, sync ServiceNow customer case to a Jira epic. You can also sync incidents, CMDB, change requests, problems, custom fields, and almost any field available via REST APIs.
Case Study: Learn how Maersk uses Jira ServiceNow integration to streamline processes between their call center and support teams.
Jira and ServiceNow are both excellent platforms that offer different features to their users. A flexible Jira ServiceNow integration can help teams work together more efficiently, and using the right tool can make the integration as effective as possible.
As you’ve seen, there are challenges to overcome when synchronizing environments. So by using the most reliable solution, you can guarantee that the integration delivers the results you require.
With the technology doing the work, your teams are free to concentrate on other things, whether that is looking after customers or designing your latest product. Everyone can focus on what they do best.
Frequently Asked Questions
Why integrate Jira and ServiceNow?
Integrating Jira and ServiceNow can help teams reduce information silos. It reduces manual errors like misplaced statuses, wrong escalations, etc. You can ensure data is exchanged automatically and is accessible to the right stakeholders when they need it. You can also control exactly how much data to share.
How do I connect Jira with ServiceNow?
There are native and non-native ways to connect Jira and ServiceNow.
ServiceNow offers integrations in the form of IntegrationHub (Jira Spoke). But it’s costly and not meant for ongoing bi-directional synchronizations. ServiceNow developers also prefer developing their own integration solution in-house. However, doing so hinders the scalability and maintainability of the integration as requirements change over time.
Third-party integration solutions like Exalate can be an excellent alternative for the hassles of an in-house solution or limited scope of integration use cases offered by the native approach.
What can I sync between Jira and ServiceNow?
In ServiceNow, you can sync Incidents, Problems, Change Requests, RITM (RequestItems), Catalog Tasks, etc. In Jira, you can sync any issue information like summary, description, status, labels, comments, attachments, priority, user-defined fields, etc. You can even sync epics, story points while maintaining the parent-child relationship.
If the fields you want to sync do not exist, you can use the httpClient method to do so.
Can I integrate Jira and ServiceNow for free?
No, you cannot integrate Jira and ServiceNow for free. Integrating these platforms typically requires some level of configuration and development work and might not be available for free. You might also require interacting with their respective APIs and creating custom scripts or middleware to allow communication between them. It’s always better to check for the options available on their respective marketplaces and compare prices, features, and functionalities to make an informed decision.