If you’re a Jira user and you want to share some data with a user working in another Jira, you’ll need a Jira to Jira integration to ensure smooth collaboration.
This software shouldn’t just help individual teams work flawlessly on their own, it should also help them connect and integrate.
In this article, you’ll see why connecting multiple Jira instances together is useful and what technology is available to synchronize them effectively. After that, you’ll go through a step-by-step guide explaining how to set up a connection between two Jira nodes.
I’ll show you how you can customize the connection and synchronization. You’ll also find some use cases to show you what a Jira to Jira integration can do to help improve your workflows and keep your teams connected and your data intact.

Get the Jira to Jira Sync Guide
Learn how to achieve seamless step-by-step integration between multiple Jira instances.
Why you Need a Jira to Jira Integration
Teams performing different roles very often overlap in the information they track. For example, customer feedback is useful to the customer support team, who will be the ones directly handling it.
It is also useful to the engineering team. However, engineers will want to know about bugs or issues with their user interface. They will also want to know what features customers want to see.
On the other hand, marketing teams will want to have a view of the people who are using their product, and what they like and dislike about it.

These teams will want to share information, but they don’t necessarily want to share all of it. Engineers might not be interested in a customer’s contact information but will want to know about pressing issues.
To solve these problems, you need to synchronize the information that is useful to both teams. It is possible to share data by email, but this is slow, laborious, and error-prone. So if you manage to do it automatically, you can save everyone time and money, and keep the data intact along the way.
When teams collect information themselves, they can run into an issue known as siloing. Teams can collect data effectively, but they keep it on internal systems. That wouldn’t help the wider organization, especially when going outside the borders.
Providing information to other groups is obviously important, but it is rarely a priority for people on a day-to-day basis. But you can solve this problem by using software to automate the process of information synchronization.
How to Choose the Right Technology for a Jira to Jira Integration
When setting up your integration, you need to consider potential problems and ensure that your solution can handle them. The tool I’ve chosen, Exalate, meets three specific software integration requirements.
Decentralized Integration (Autonomy)
First, you want your teams to be able to make changes independently while working in their familiar environment.
Setting up the sync will likely involve extensive consultation, and after that, they need to be able to make changes without consulting each other. This is the essence of a decentralized Jira to Jira integration setup.
Teams must be able to control what enters through Exalate and ensure that confidential data doesn’t cross over to the other side without permission and proper security.
Flexibility
Your multi-Jira integration needs are likely to change over time. You might want to change what data is synchronized or the synchronization criteria. Exalate offers a flexible system for controlling the shared data, as well as when the sharing happens.
Its advanced scripting engine lets you define precisely how you want to integrate data. This flexibility allows you to adapt it to any use case required.
You can alter connections at any time by switching them on and off with a single button. Controlling and adapting the integration as your projects evolve is as straightforward as possible.
You can even use AI to generate your integration scripts in Exalate’s Script mode. We will learn more about it in the next section.
Security
Another key consideration when choosing the right solution for Jira to Jira integration is platform security.

When choosing an integration tool, always check out the features for protecting user data. Review their infrastructure to see how they handle data storage and transfer.
Since both sides intend to share and store sensitive information, you must invest in extra security features such as firewalls, encryptions, and others.
Reliability
You need software that works as close to 100% of the time as possible. It also needs to handle problems gracefully. That means that if one of your systems has some downtime, the integration software is able to handle the outage and resume operations when the systems are back up again.
The solution should be able to get the systems back in sync as soon as possible without you having to spend time resetting it or tweaking the settings.
Ideally, once you have set the system up, you should be able to forget about it. Synchronization should happen without you needing to do anything else.
Exalate is also convenient and easy to work with. It has a free trial, and you can test it without having to enter payment information. Also, it doesn’t take long to install and set up. I’ll run you through the process of doing that next.

Our customers wanted to work on security tickets within their own service desks and didn’t particularly want to work in multiple vendor portals.
– MICHAEL FOWLER
ENGINEERING LEAD AT QUORUM CYBER
How to Set up a Jira to Jira Integration (the Step-by-Step Process)
There are several deployment models of Jira, and you need to know which you have before you start. You have Jira Cloud and Jira Server, along with Jira Data Center, which is essentially a scaled-up version of Jira Server for Enterprise organizations.
To read more about the deployment models, check out this article.
Jira hosts Jira Cloud on its own servers as a subscription-based service, while users can host Jira Server and Data Center on their own machines.
Let’s get down to setting up the Jira to Jira integration, step by step.
You might be a fan of video tutorials, so watch this instead:
Step 1: Install Exalate on Jira
Firstly, log in to one of your Jira Cloud instances. Find Exalate Jira Issue Sync & more in the Atlassian Marketplace. To find it, click the cog-shaped settings button in the top-right of the screen and then click “Apps” in the menu that appears.
Note: The installation process depends on the version. I’m focussing on Jira Cloud here, and there’s a further guide to it in the Exalate documentation. If you’re using Jira Server or Data Center, please look at this guide instead.
In the marketplace search field, type “Exalate”. You’ll see several versions of Exalate appear, corresponding to the platforms Exalate supports.

Select “Exalate Jira Issue Sync & more”. Click “Try it free” on the next page.

A pop-up asking you to “Add to Jira” will appear. You can view the app details from here if you want. Then click “Start free trial”.
Wait for some time while the app loads.
You’ll be redirected back to Jira, where you’ll see a pop-up telling you that the app has been added. Click the “Get started” button.
Alright, your installation is complete.
Next, you need to repeat the same process on your other instance.
If your other instance is Jira Cloud, use the steps above, otherwise, check the links for details on the Jira Server or Data Center installation process.
Step 2: Connect your Jira Instances
Now that you’ve installed Exalate on both Jira instances, you need to create a connection between them. The way to do that is to set up a connection from either instance.
One side actually invites the other side to connect and the other side accepts.
During the connection setup, there are several screens that let you configure exactly how Exalate behaves. In some cases, I’ll pick the defaults, but look in more detail at those areas in steps 3 and 4. Exalate will pick sensible default settings, exchanging data between identical or equivalent fields.
So in the later steps, I’ll look at how to adjust the established connection.
First, let’s set it up.
On one of your Jira instances, click “Apps” in the top menu, and then select “Manage your apps”. If Exalate is present, you’ll see it listed as a heading in the left-side menu.
Click “Connections”.
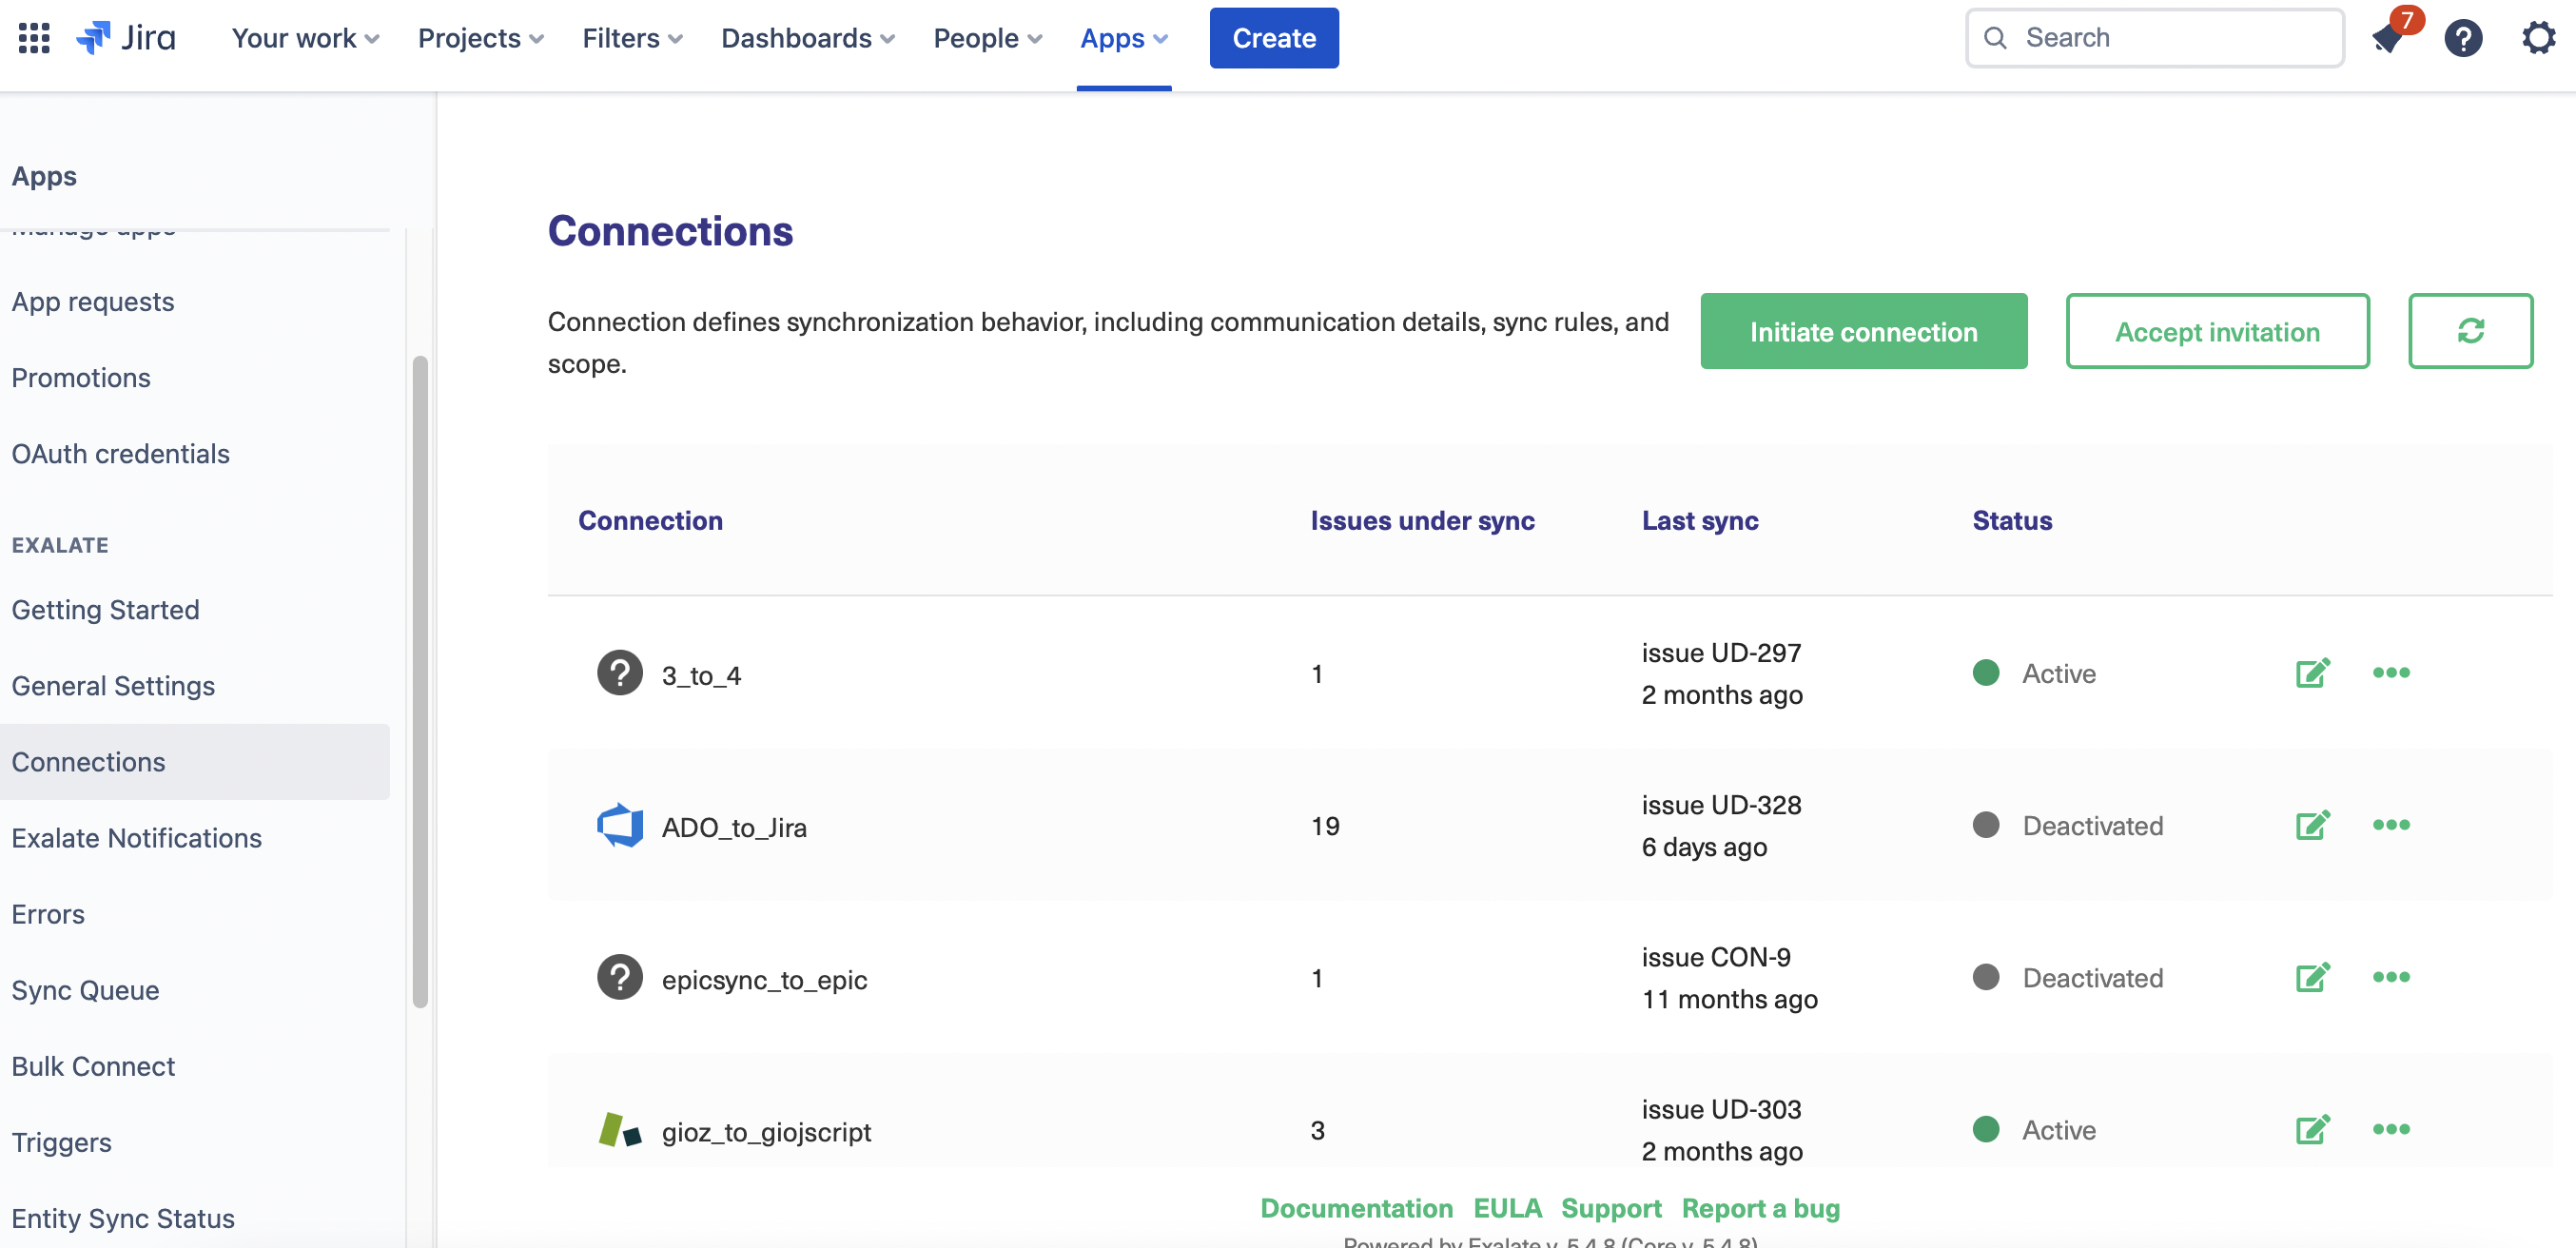
If you’ve created any connections before, you’ll see them listed here.
If not, you’ll see a message saying that none have been created yet. Either way, click the green “Initiate connection” button.
On the next screen, enter the URL of the other instance.
After entering the URL you will be redirected to a screen that will allow you to choose between 3 configuration modes: Basic, Visual, or Script Mode.
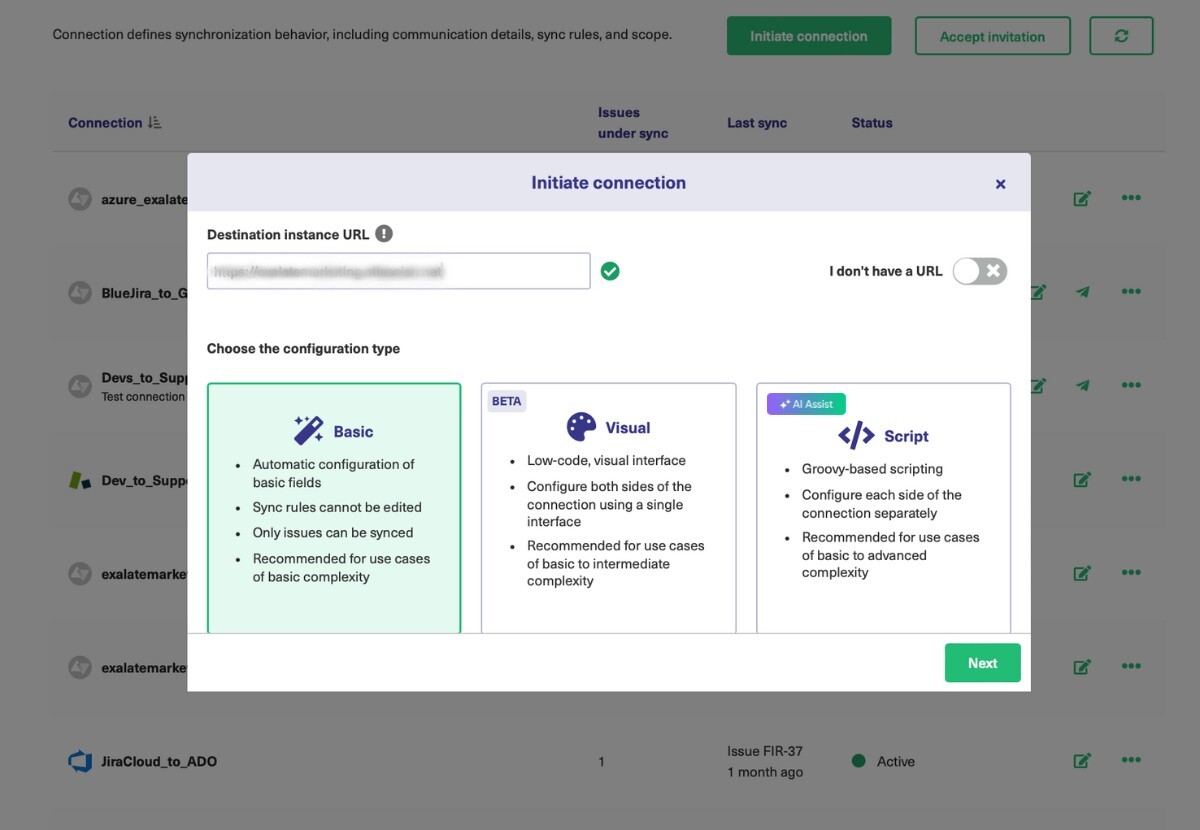
Continue with the Basic Mode
This is the newest addition to the type of connections provided by Exalate. Basic connections have a set of predefined sync rules to help you sync basic issue fields like summary, description, comments, attachments, and issue types. You cannot modify these sync rules. This type of connection works best for basic synchronization needs.
Note: Exalate also has an option where not only Global administrators but also Project administrators can set up Basic connections from the Project settings. This helps establish the connection on a project level. Visit this page to learn more about how to do it.
The above screen redirects you to select the project on the side that initiated the connection.
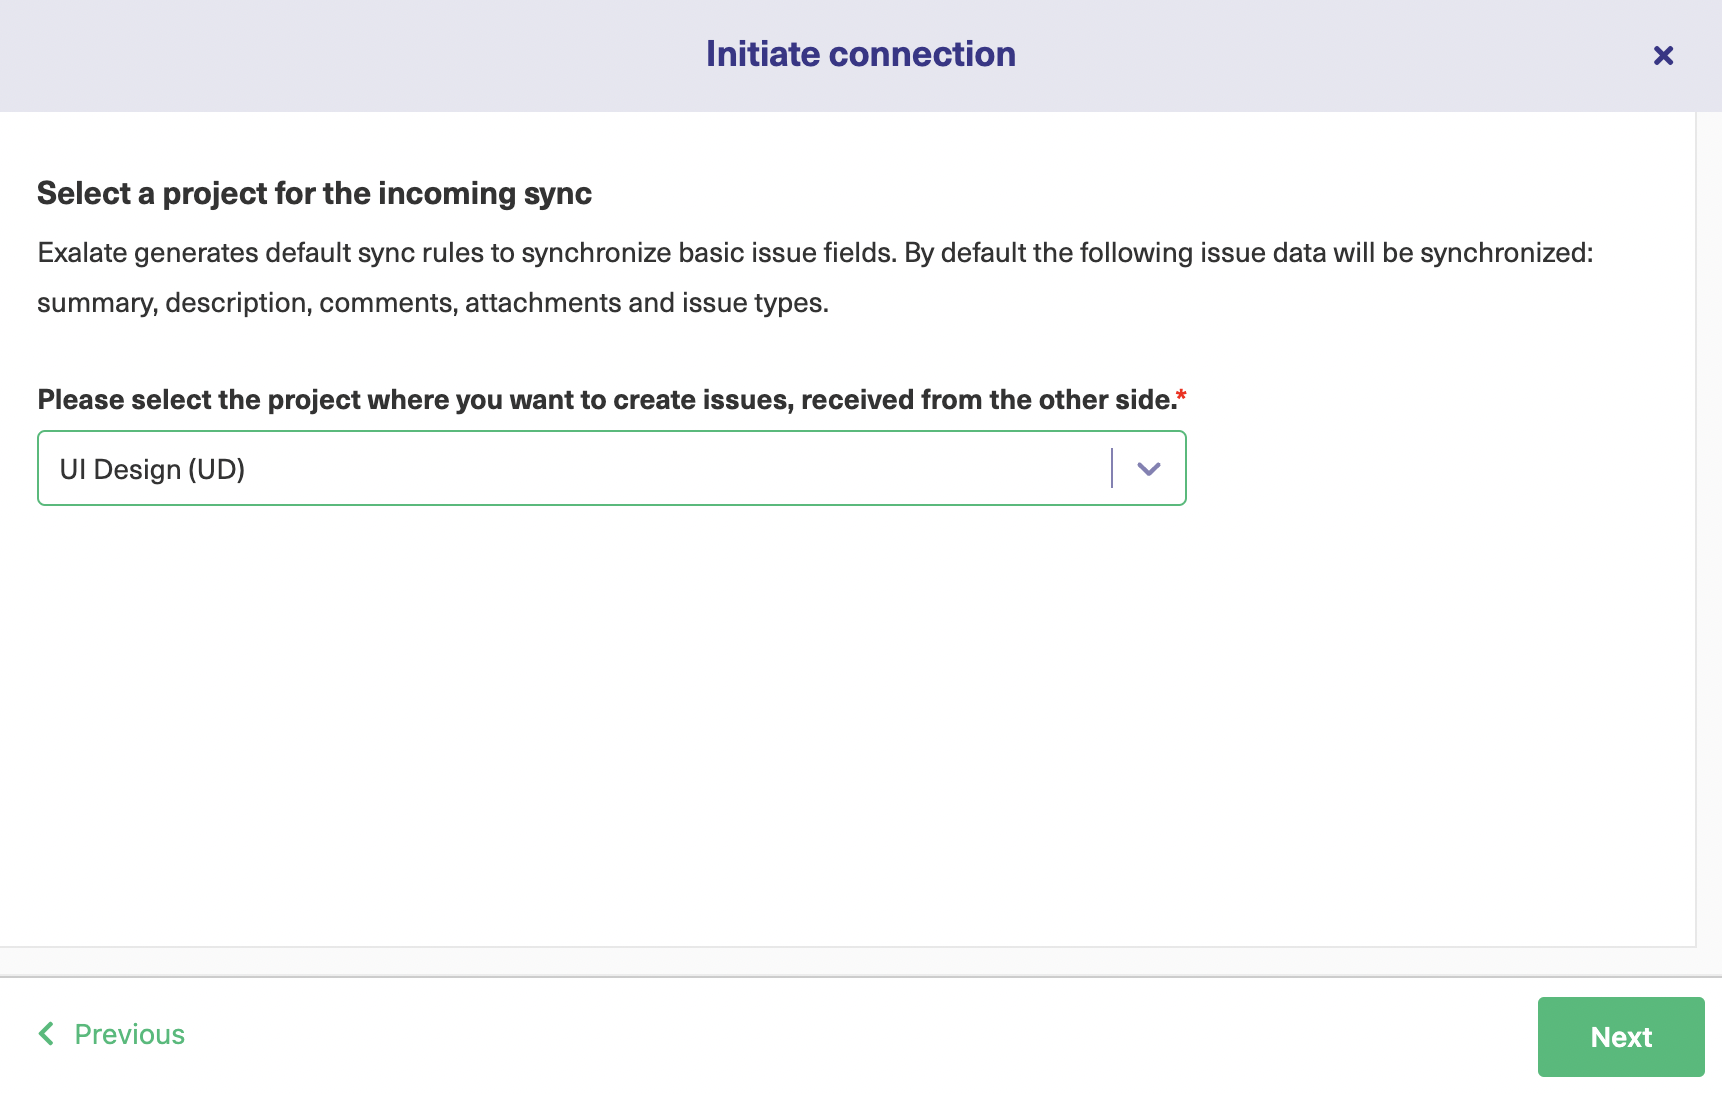
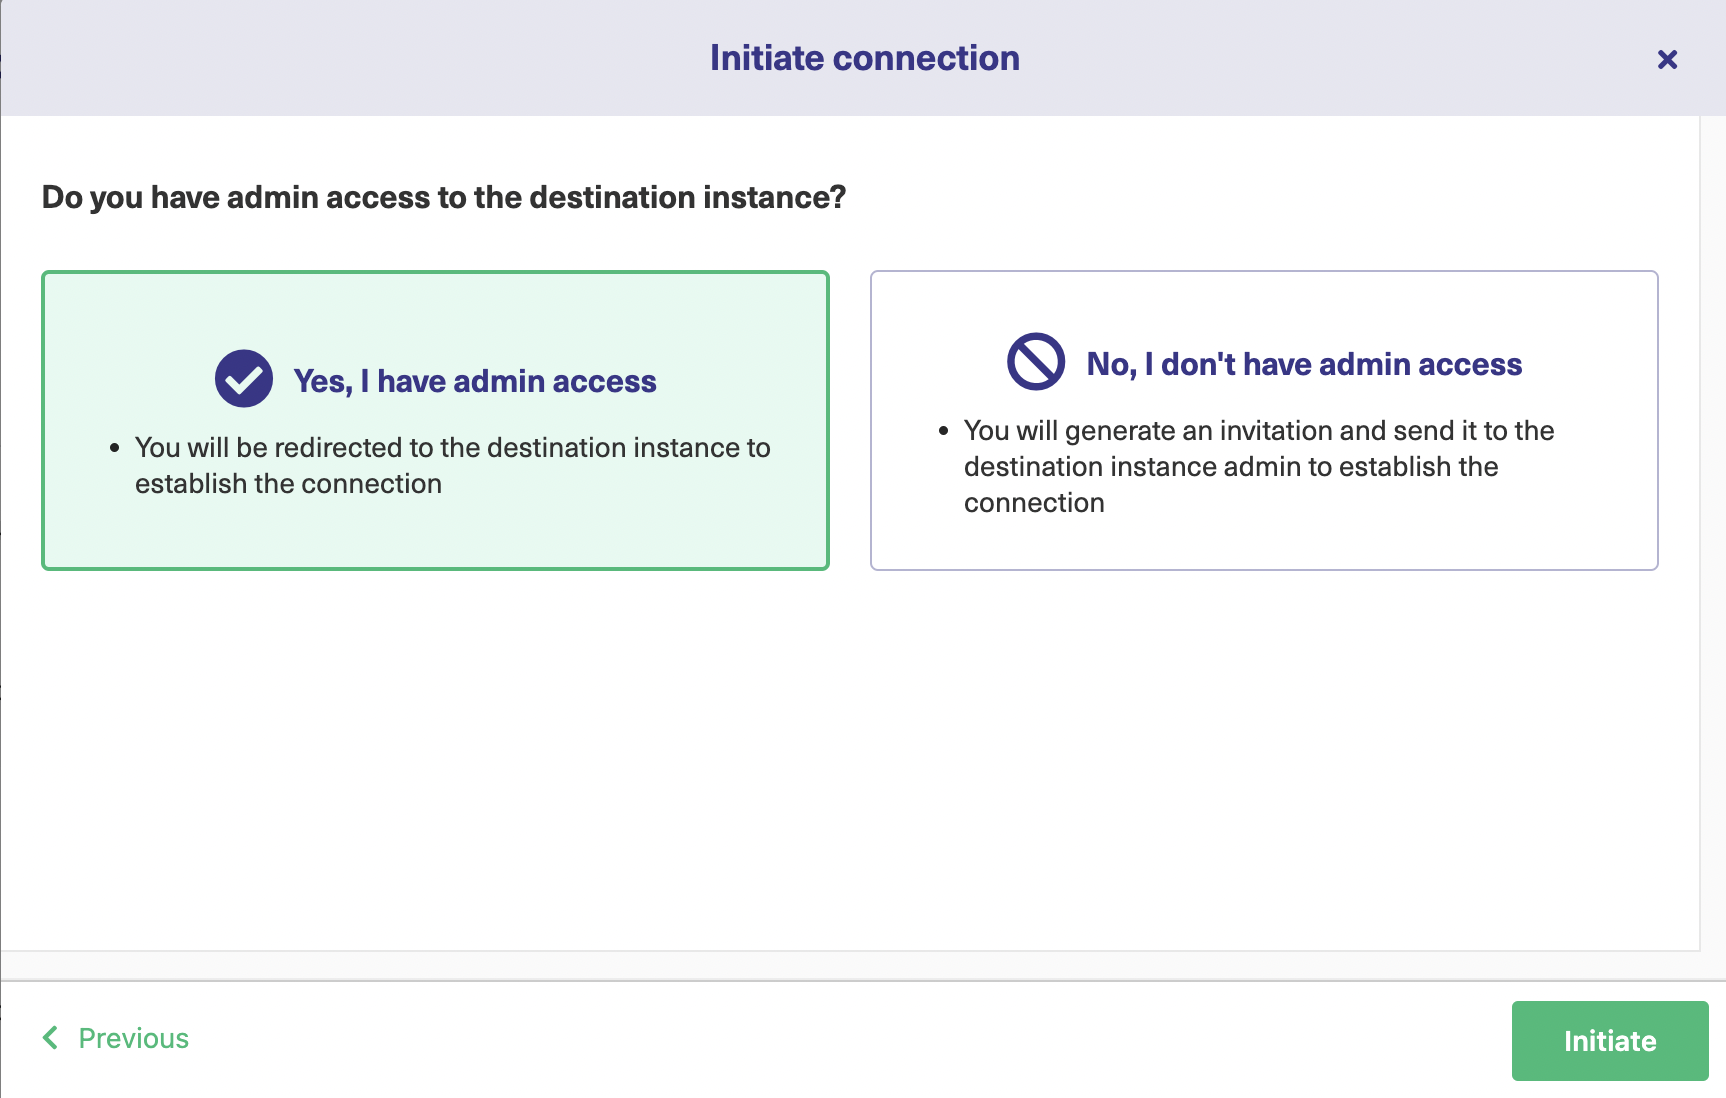
Hit “Next” and then you will need to confirm whether you have admin access to the destination Jira instance or not. Click “Initiate” if you have access or else follow these steps.
On the destination instance, select the project and then click “Confirm”. After establishing the connection, you can sync your first issue in Exalate to see how it works: by entering the issue key and clicking on Exalate as shown below, by using the connect operation, or by syncing issues in bulk or creating a trigger.
While syncing your first issue you can also see the status of your sync as “synchronized”.
Continue with the Visual Mode
In this mode, you can give names to your local instance and destination instance. The form will use these to create a name for the connection, which you can modify if you like.
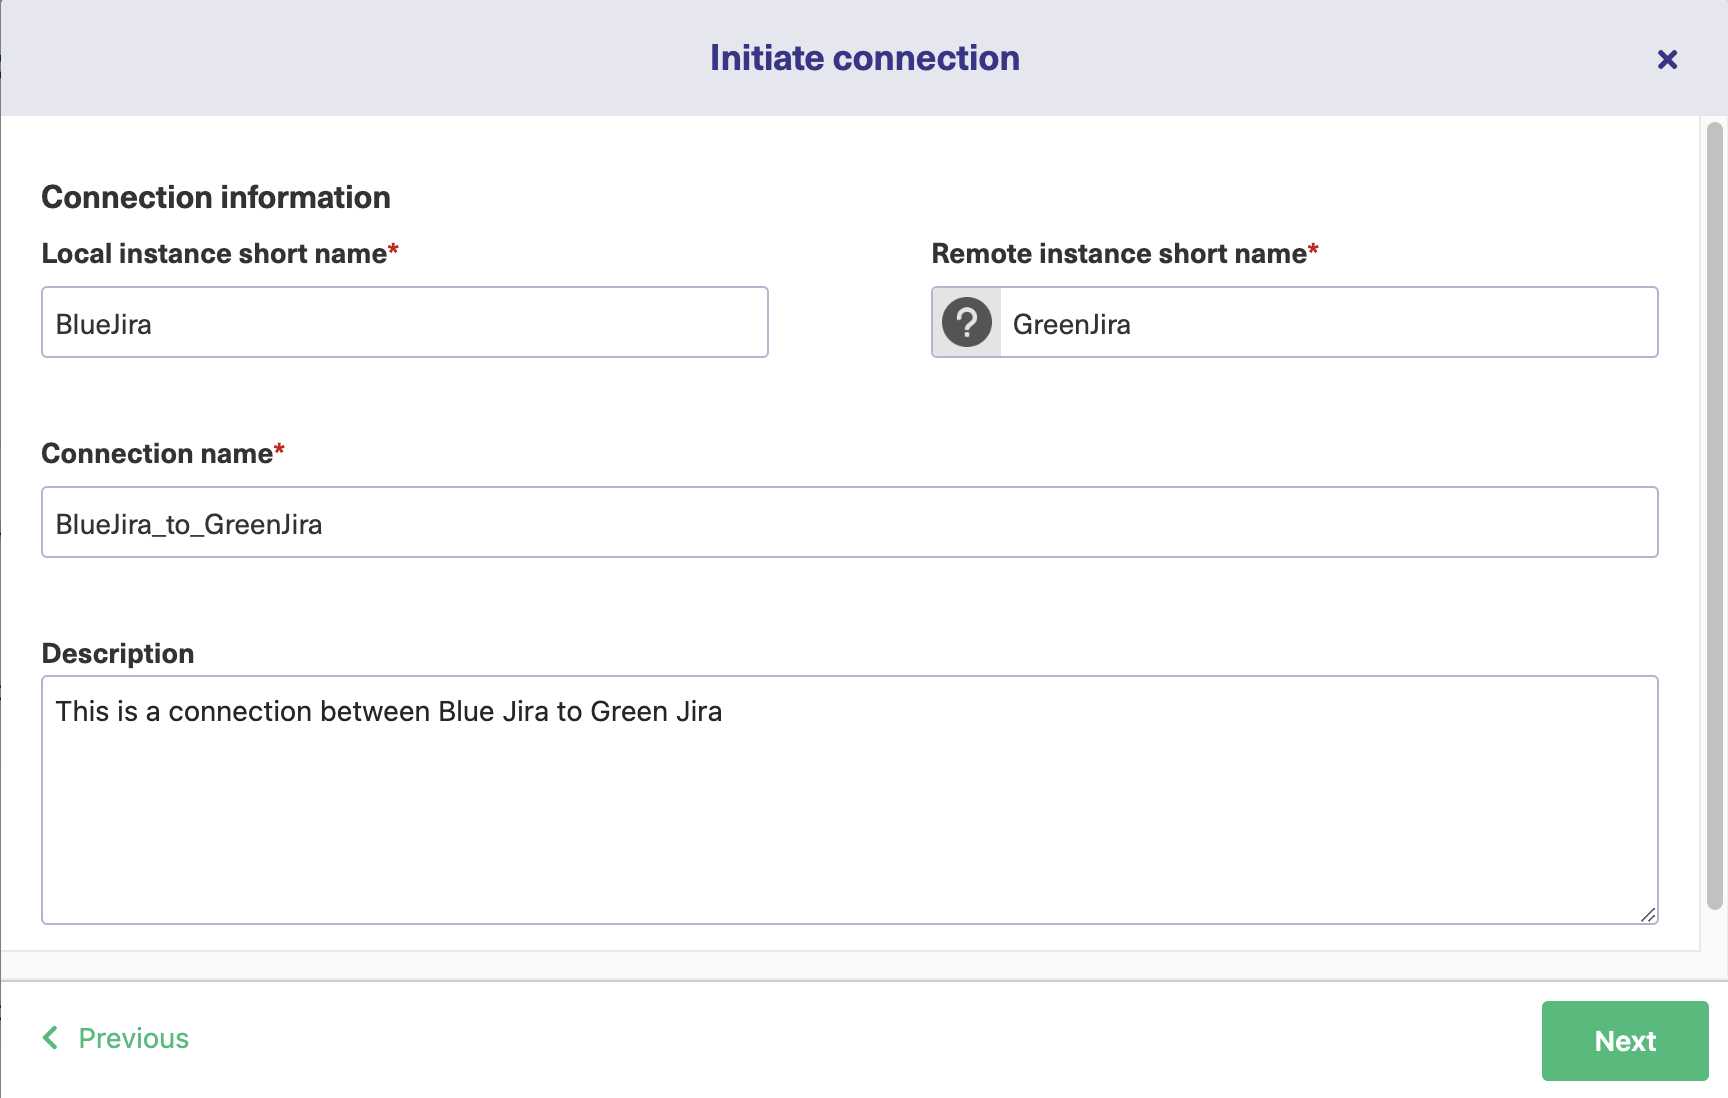
There’s also an optional description field. The more information you enter here, the more easily you’ll be able to identify and work with your connection later on. This is especially important when you have multiple connections and different people working with them. Adding enough detail here can save you work later on.
When you’re ready, click “Next”.
For using Visual Mode, you need admin access on both sides of your Jira instance. So when you click “Next” on the screen above, you will be redirected to a screen that asks you to confirm the admin access.
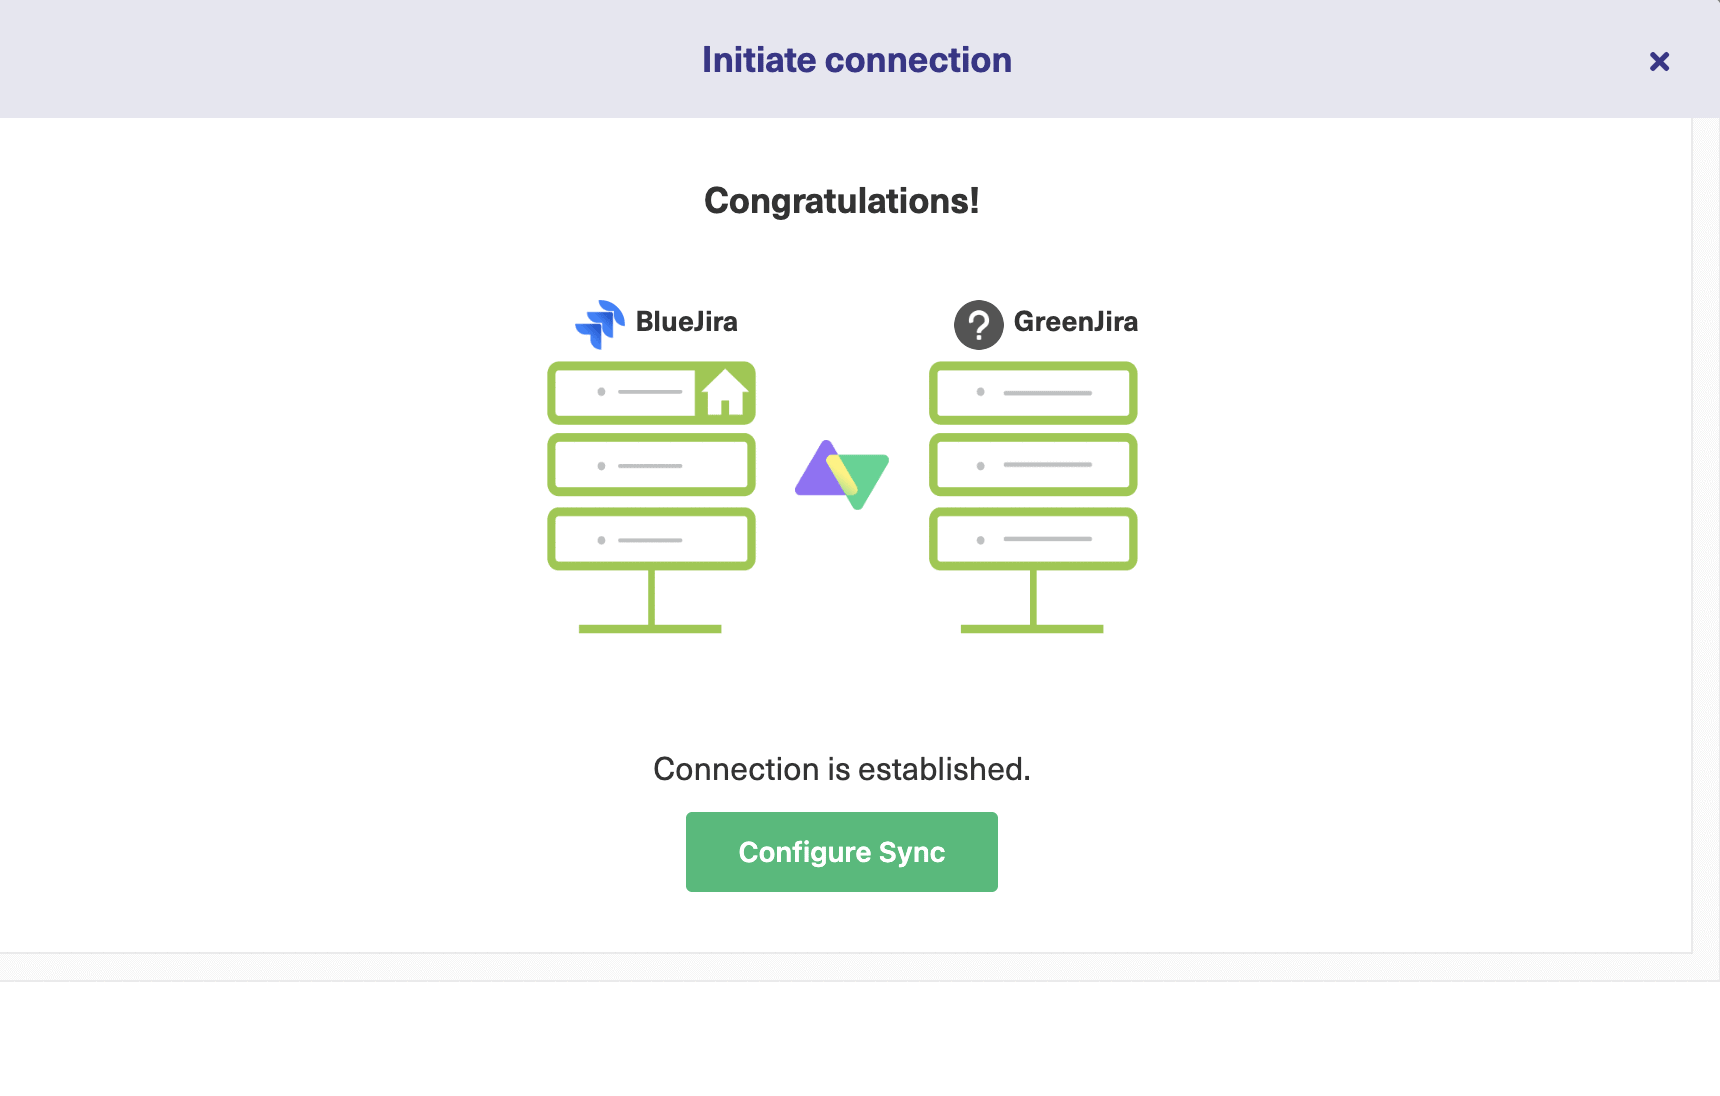
Firstly, Exalate will try to establish a connection between your nodes. That might take a few seconds.
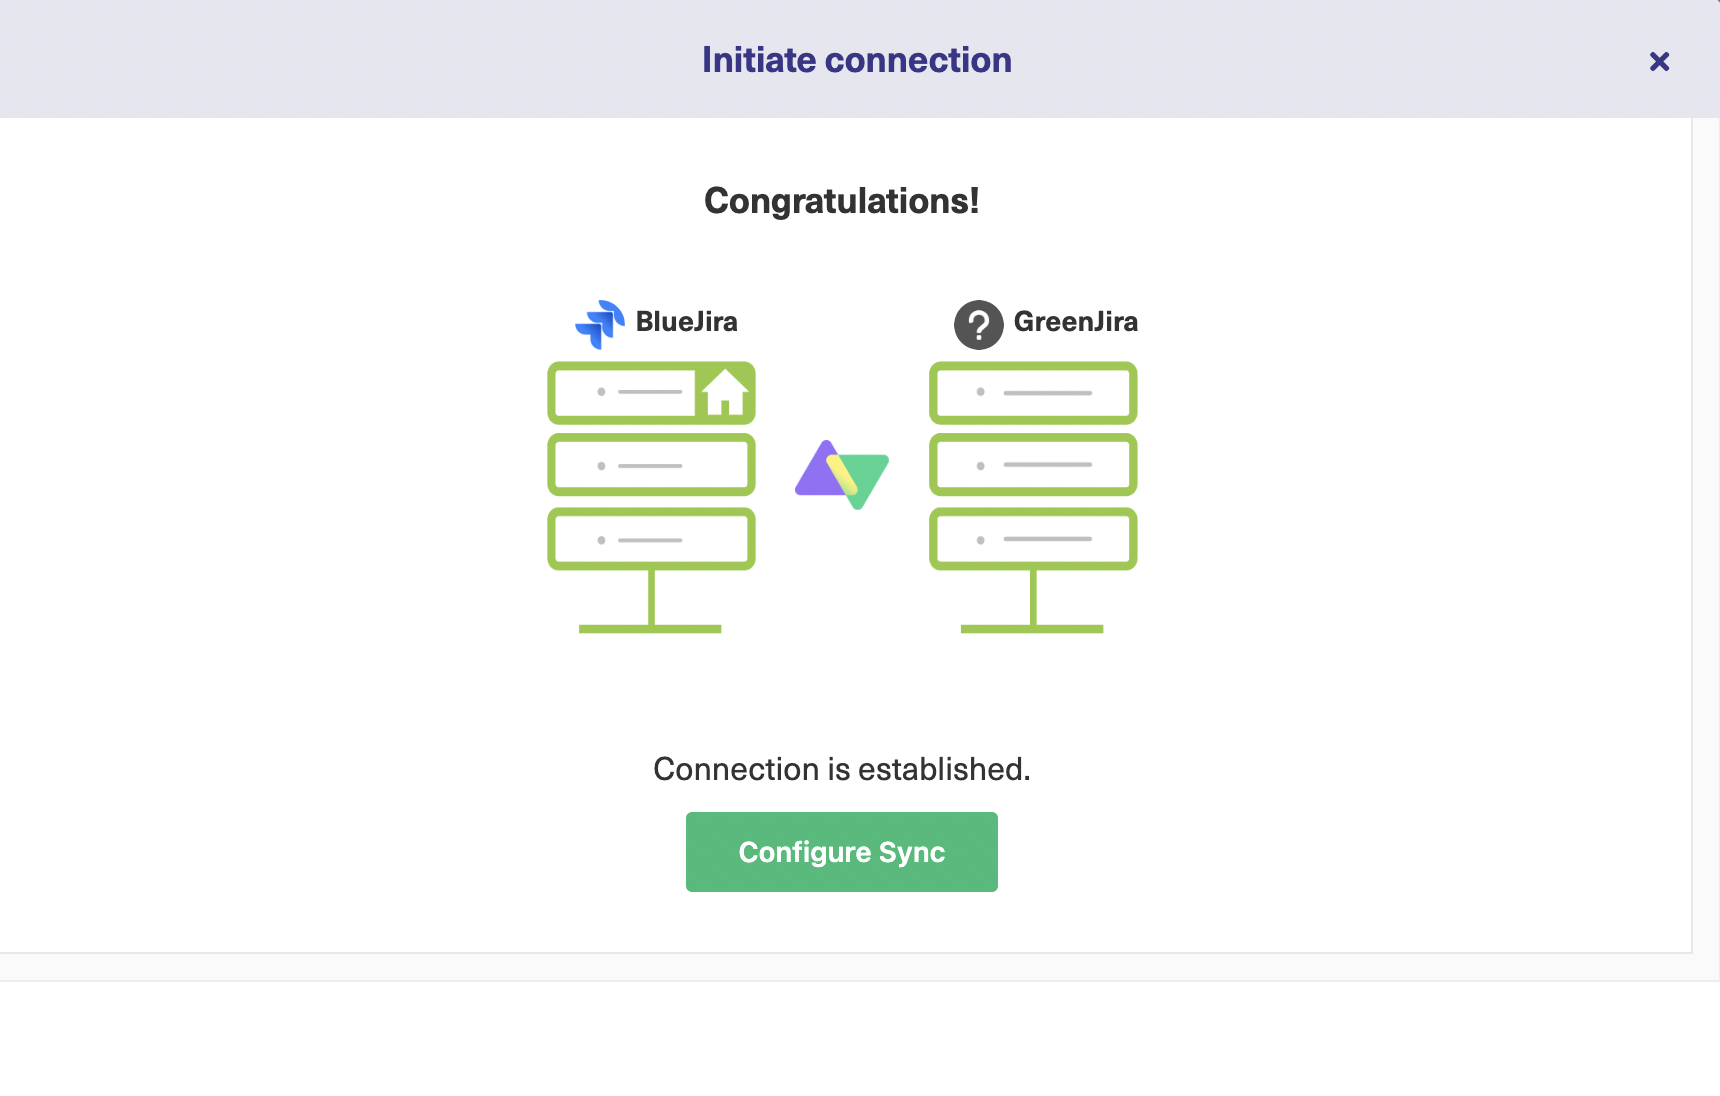
When it’s ready, click the green “Configure sync” button to proceed.
On the next screen, you have several options to control how you integrate your Jira projects.
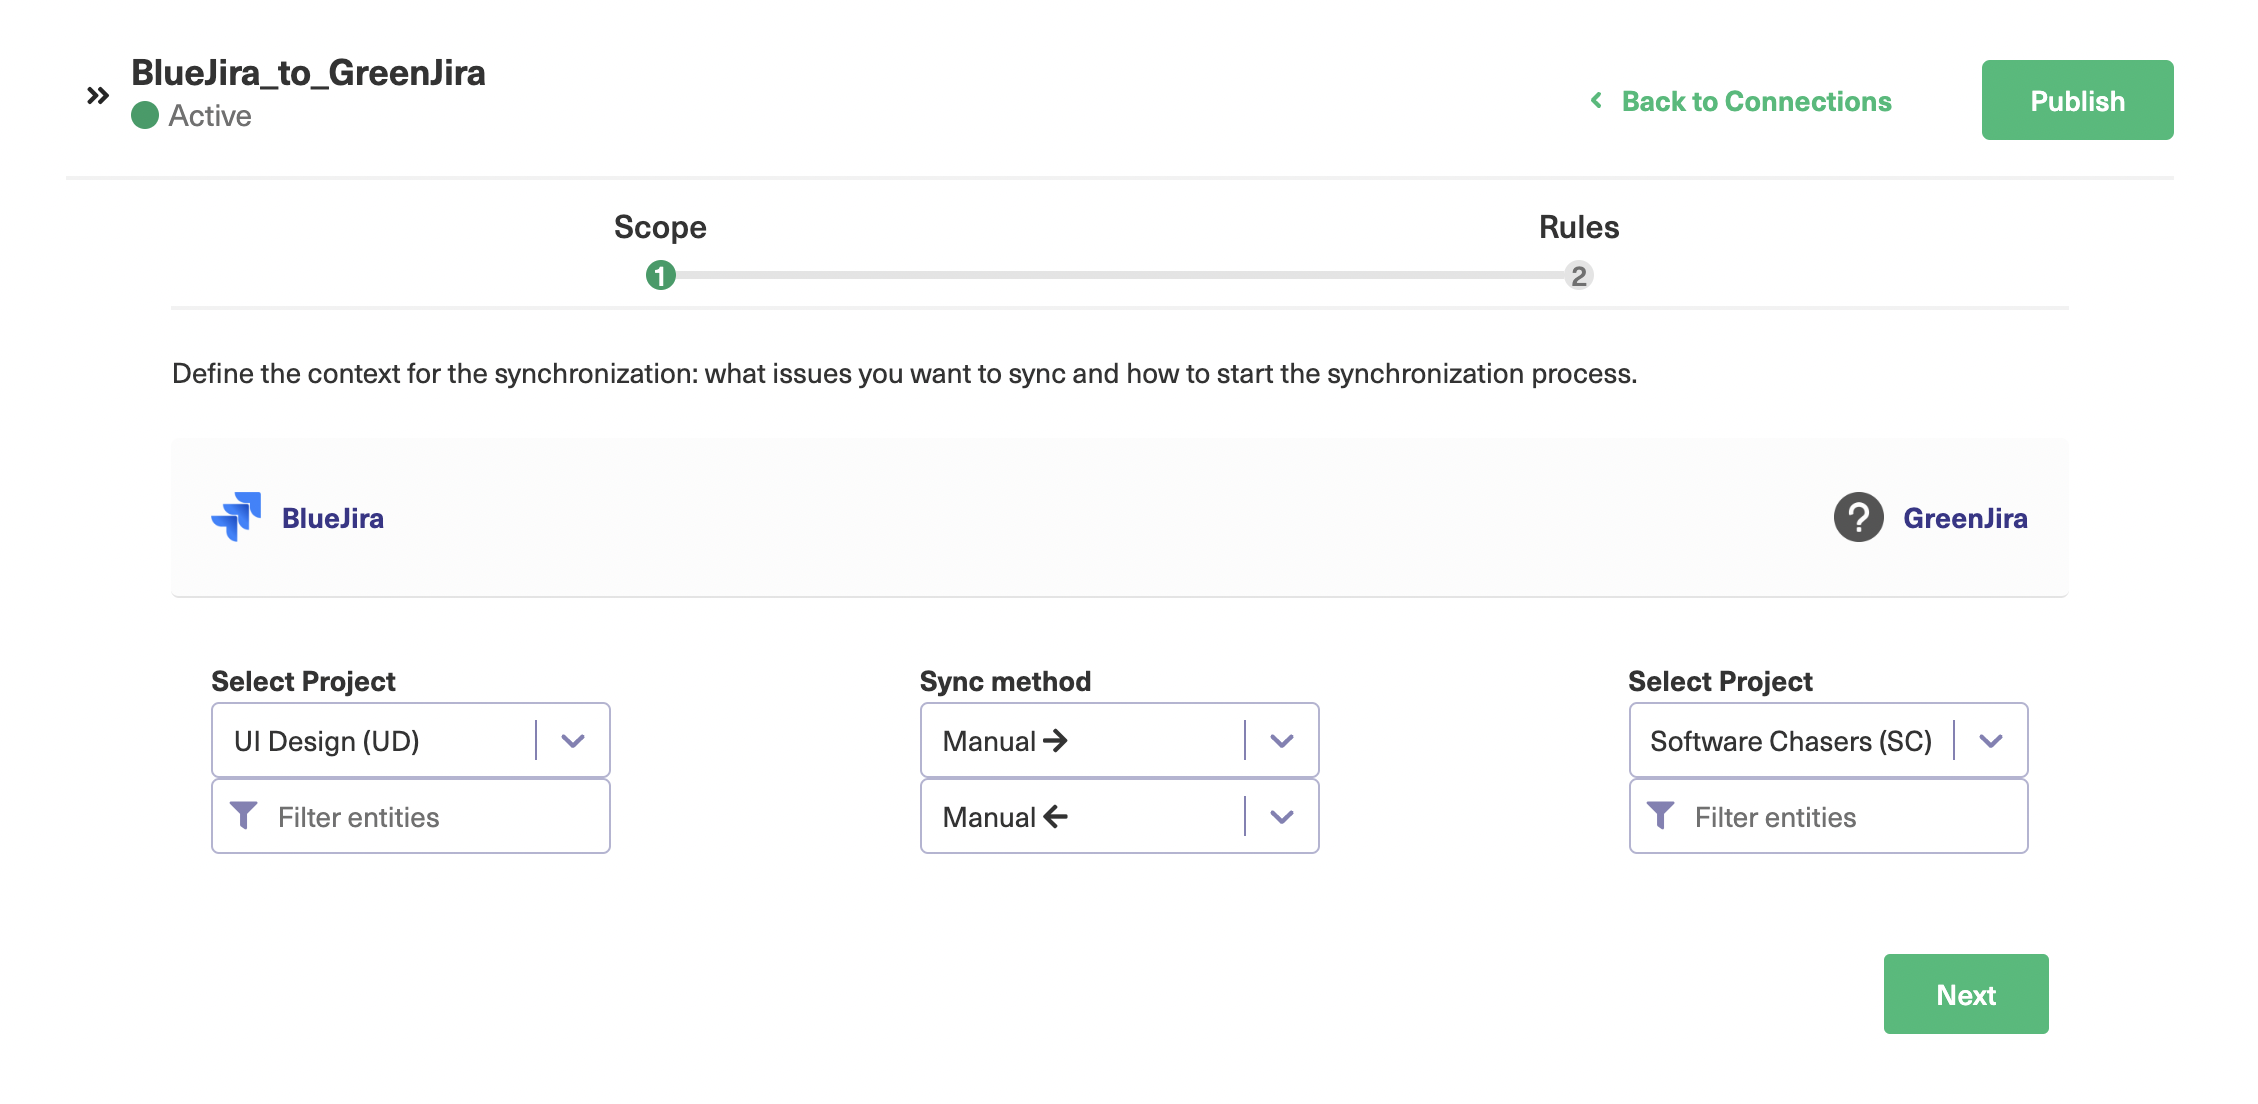
The connection names appear, and under each of them is a drop-down menu where you can pick which project is used for synchronization. The filter issues screen takes you to a further screen, where you can configure what goes over to the other side.
In the middle, the “Sync method” drop-down lets us pick whether synchronization is done manually or automatically, or whether it is disabled entirely.
We can make this choice for both synchronization directions, so if you just want to copy issues one way, you can do so.
You could also have synchronization occur manually in one direction and automatically in the other, it’s up to you.
Let’s look in more detail at the screen that appears when you click the “Filter entities” button.
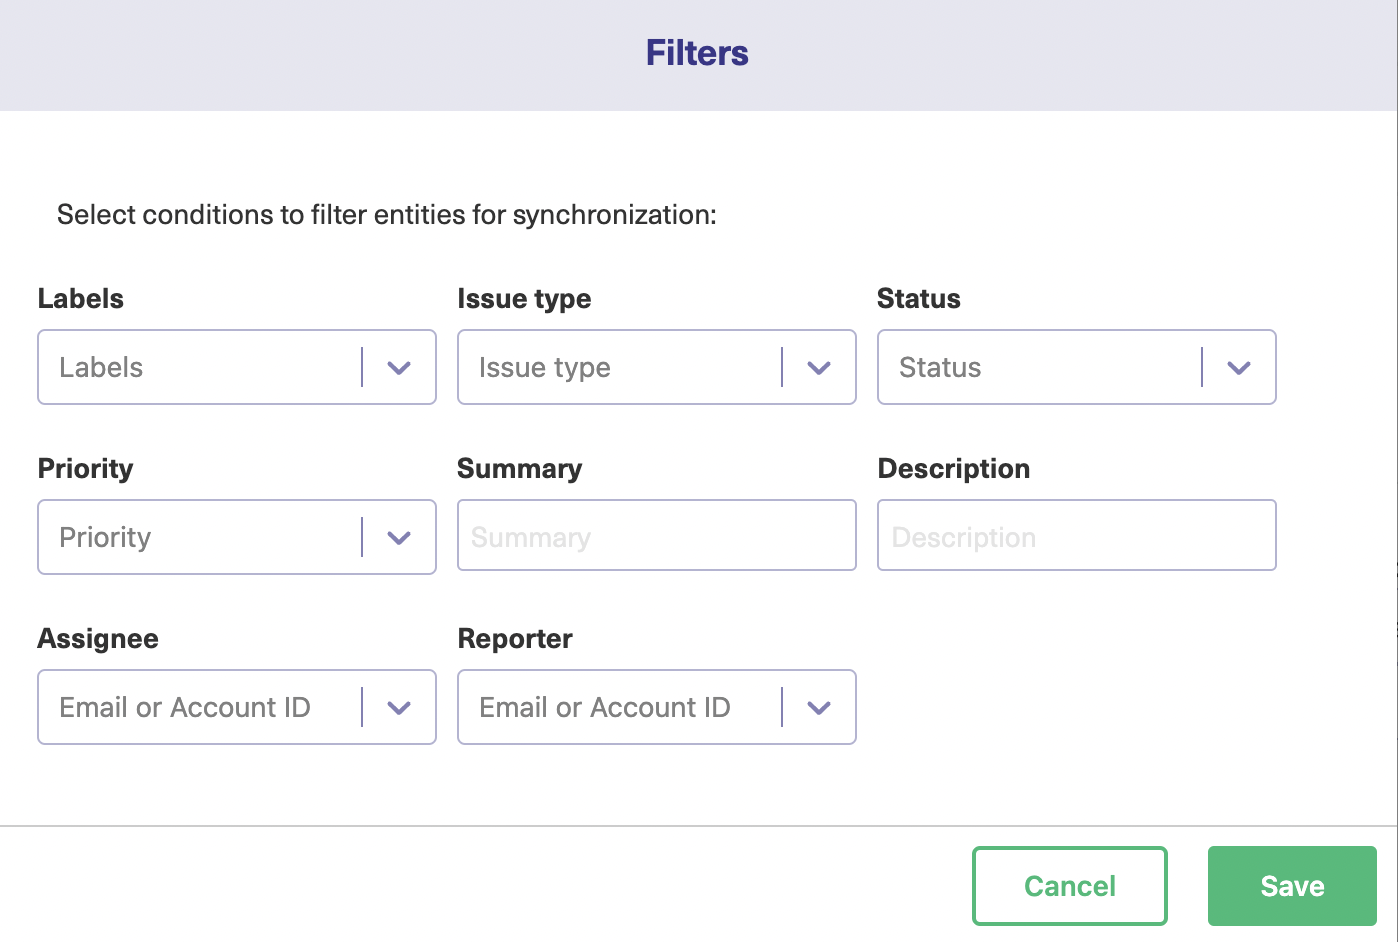
There are various filters you can set to choose which issues to synchronize. If you want to sync all of them, just leave these fields blank. You can choose to filter issues of a specific type, or you can select a status, priority, or which labels to use.
If you click the “More” button, a few more fields will appear allowing you to specify the Assignee or Reporter.
You can also add a specific description, or summary, which will select matching items.
Click the “Save” button when you’ve made your selections.
Back on the main scope screen, click “Next”, to move on to the next step.
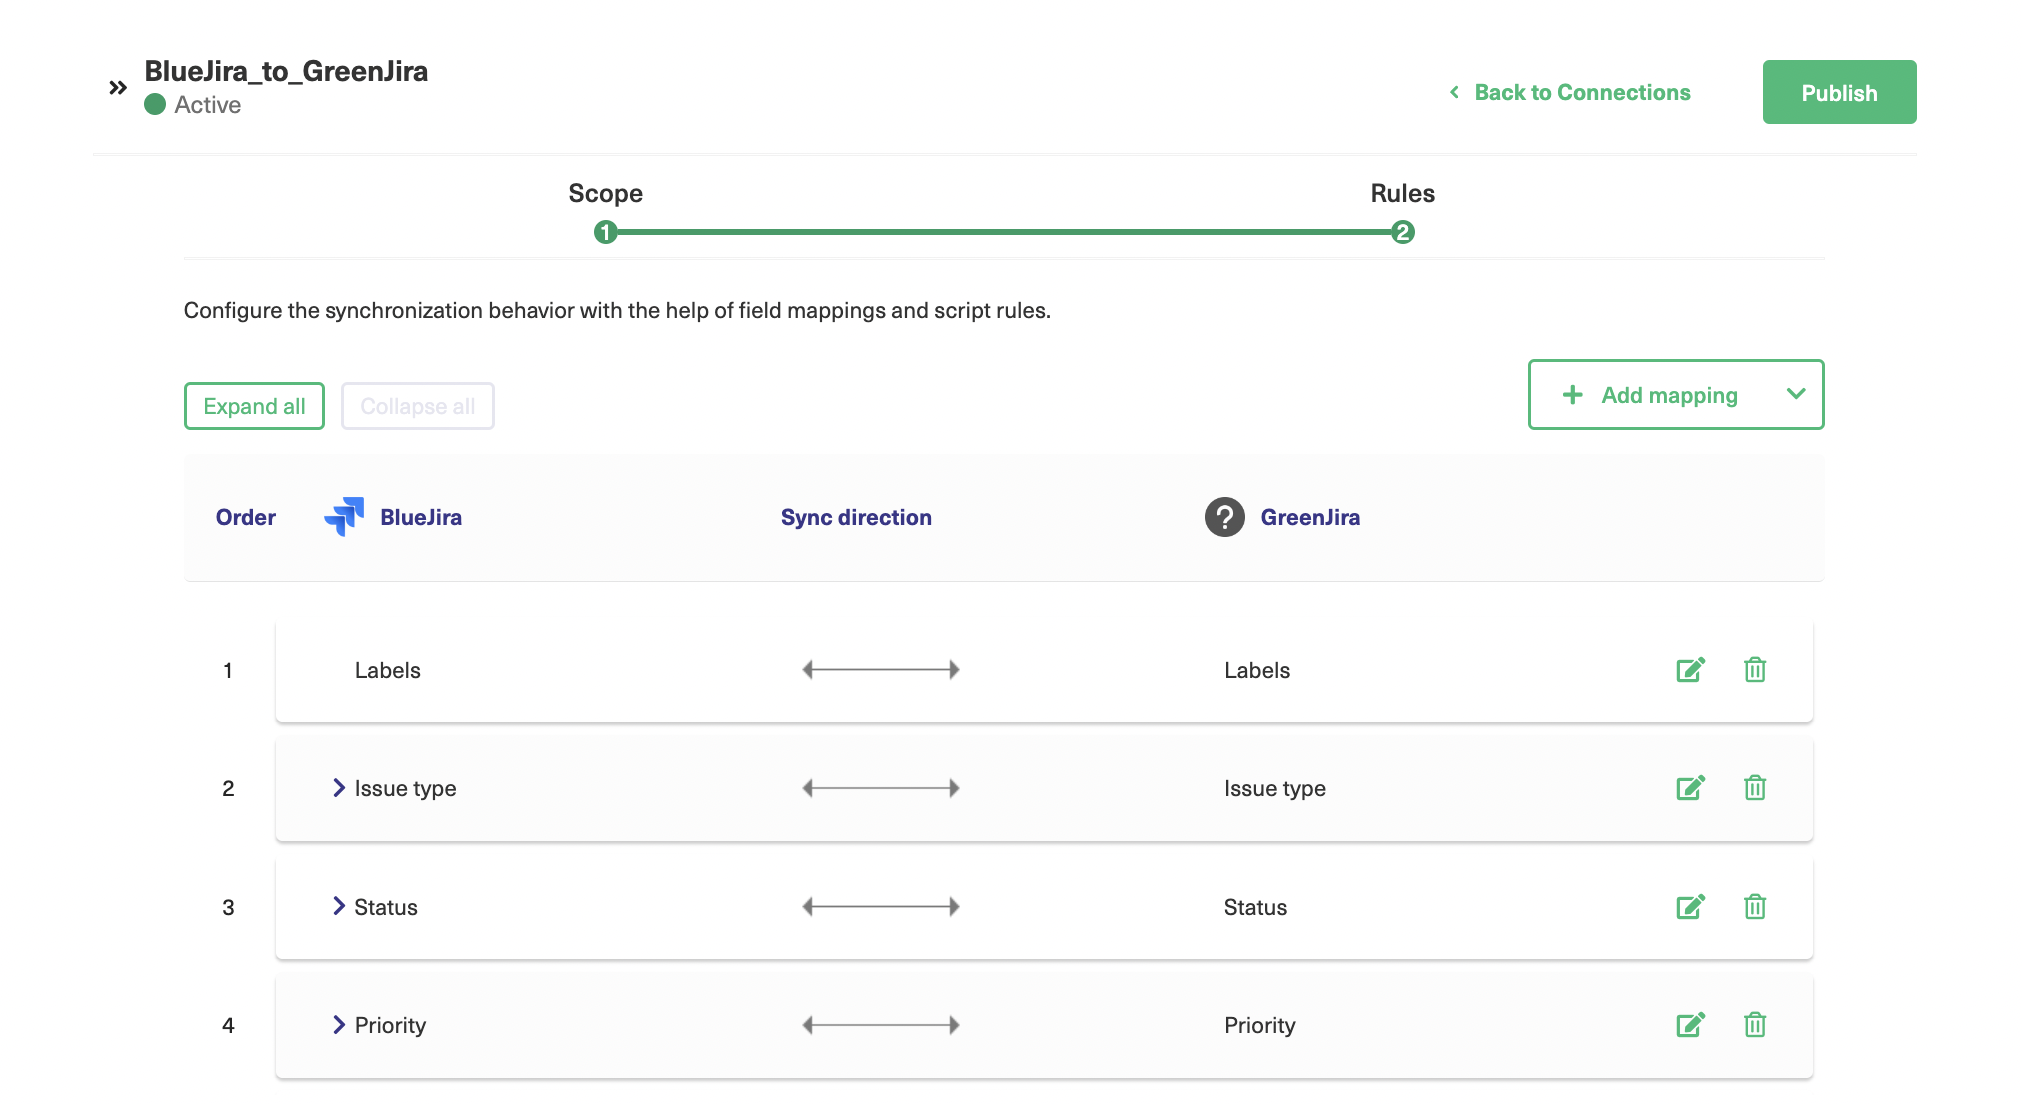
On the “Rules” screen, you specify which fields should map onto each other. Since the integration uses two Jira instances, fields are mapped one-to-one with identically named fields.
If you’re using Jira with another platform, such as a Jira Zendesk integration or a Jira Azure DevOps integration, similar fields may have different names.
You can drag the fields up and down to re-order them. You can also expand them to reveal further options. The “priority” field, for example, lets you choose how priorities map to each other.
The “Expand all”, and “Collapse all” buttons at the top left let you show or hide all the extra fields at once, which is useful if you want to check everything quickly.
If you want to create a new mapping, click the “Add mapping” button. Here you can select further fields for mapping. Your 2 instance names are on the left and right sides, and you can choose the fields for mapping from the drop-down boxes under their titles.
The sync direction field in the middle lets you choose whether the synchronization goes in both directions or in a single direction.
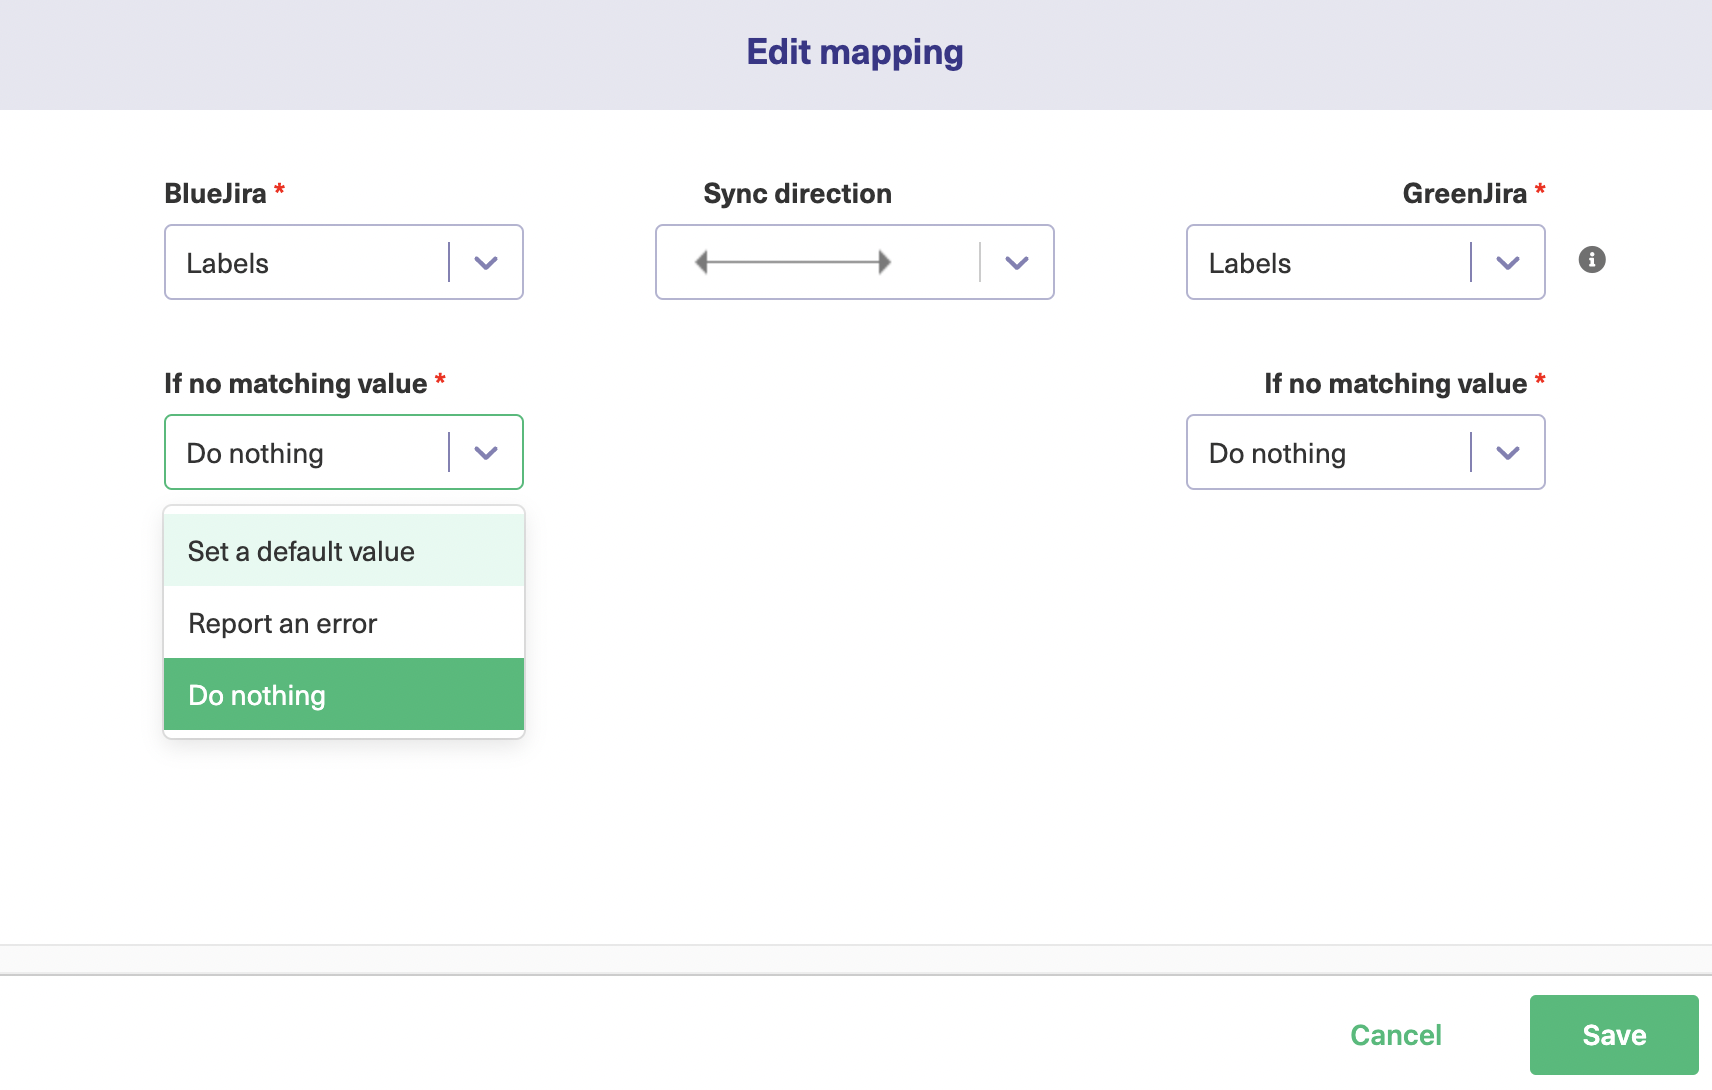
There are further drop-downs letting you choose what happens if there is no matching value in the field.
In this case, Exalate can set a default value, which you select with another drop-down box. Alternatively, it can report an error, or do nothing. This behavior is unique on each side of the connection, so it doesn’t have to be identical.
If you click the plus button, you can map specific values for the field to one another. This is especially useful if you are using different platforms.
But even with 2 Jira instances, you may have teams that use different terminology, so this feature can be useful there. There’s a small delete icon next to each entry you can click if you want to remove it.
When you’ve finished on this screen, click the “Save” button if you want to keep your changes, or the “Cancel” button if not.
If you click the small arrow at the side of the “Add mapping” button, you’ll see an “Add script” option. If you click that, a new screen will open.
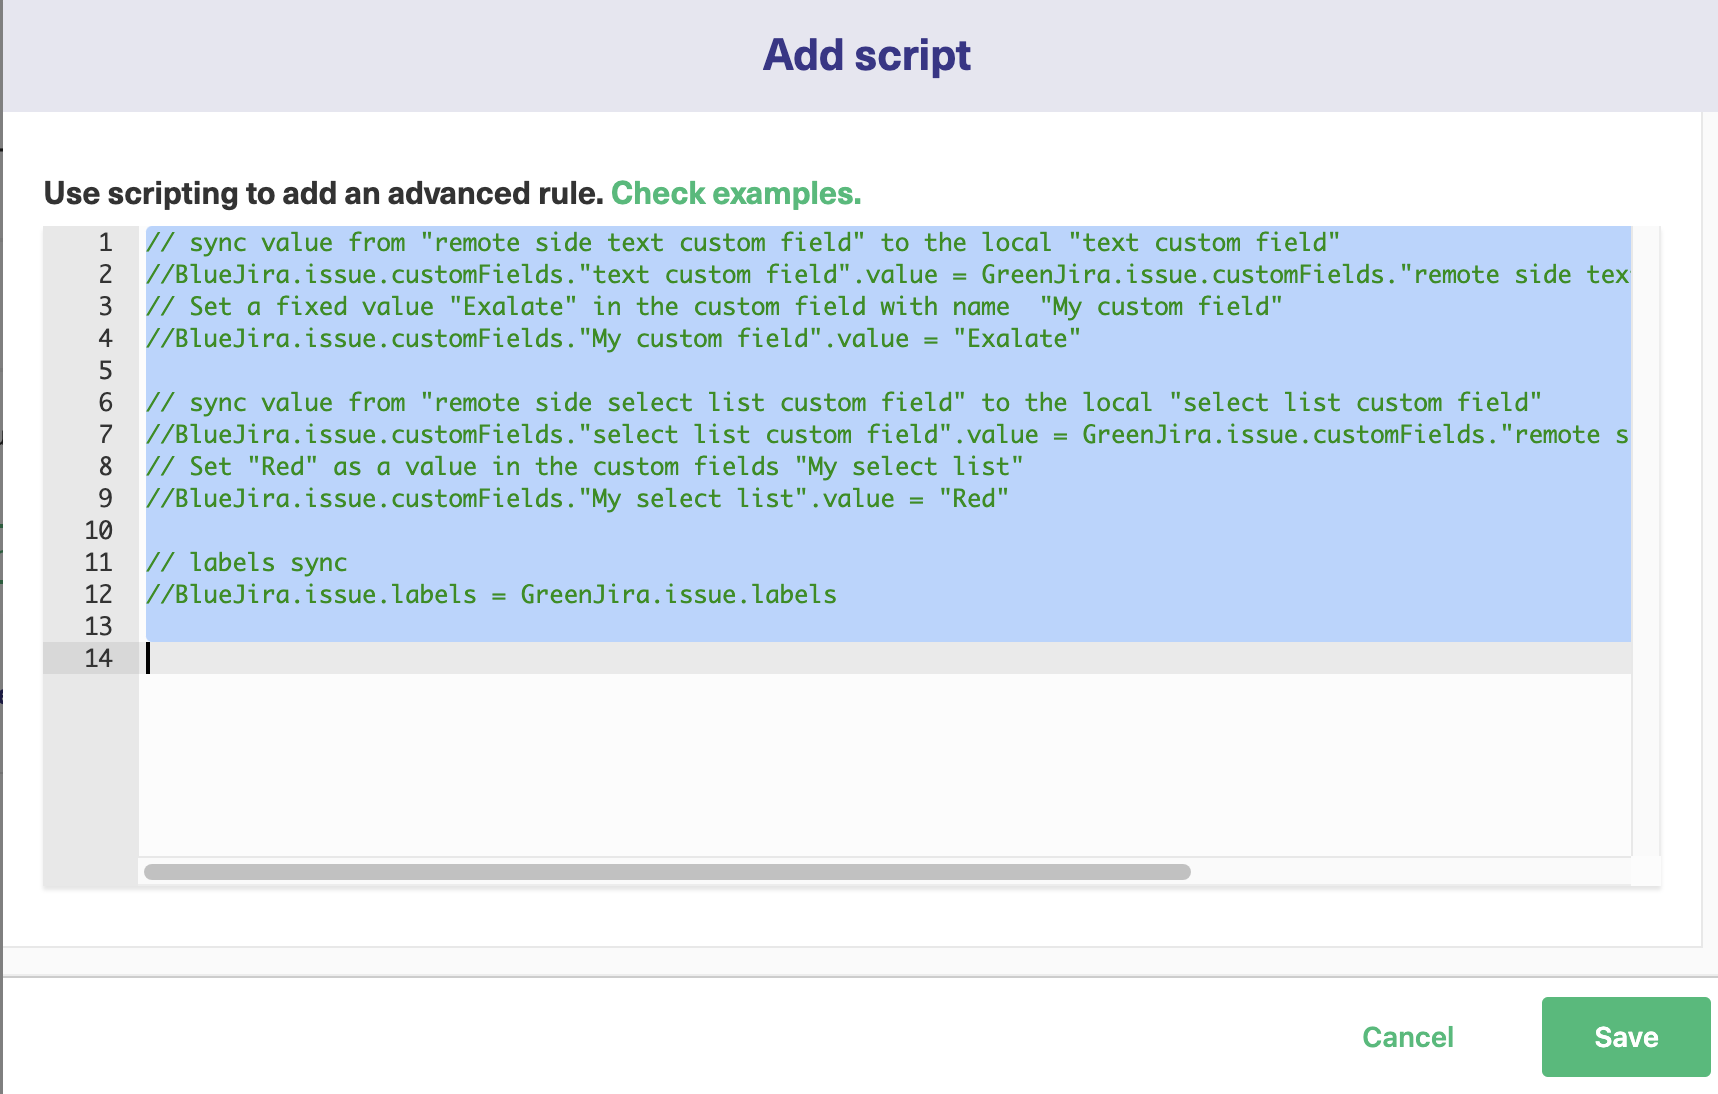
Here you can add lines of code that control your mappings in more detail. The lines of code there already show how you can set specific fields to specific values, or map them onto other values.
Script rules can be confusing, but they are very powerful if you learn how to use them. To learn more, click the “Check examples” text in Exalate to read some script rules examples.
When you’ve finished, click “Save” to keep your changes, or “Cancel” to discard them.
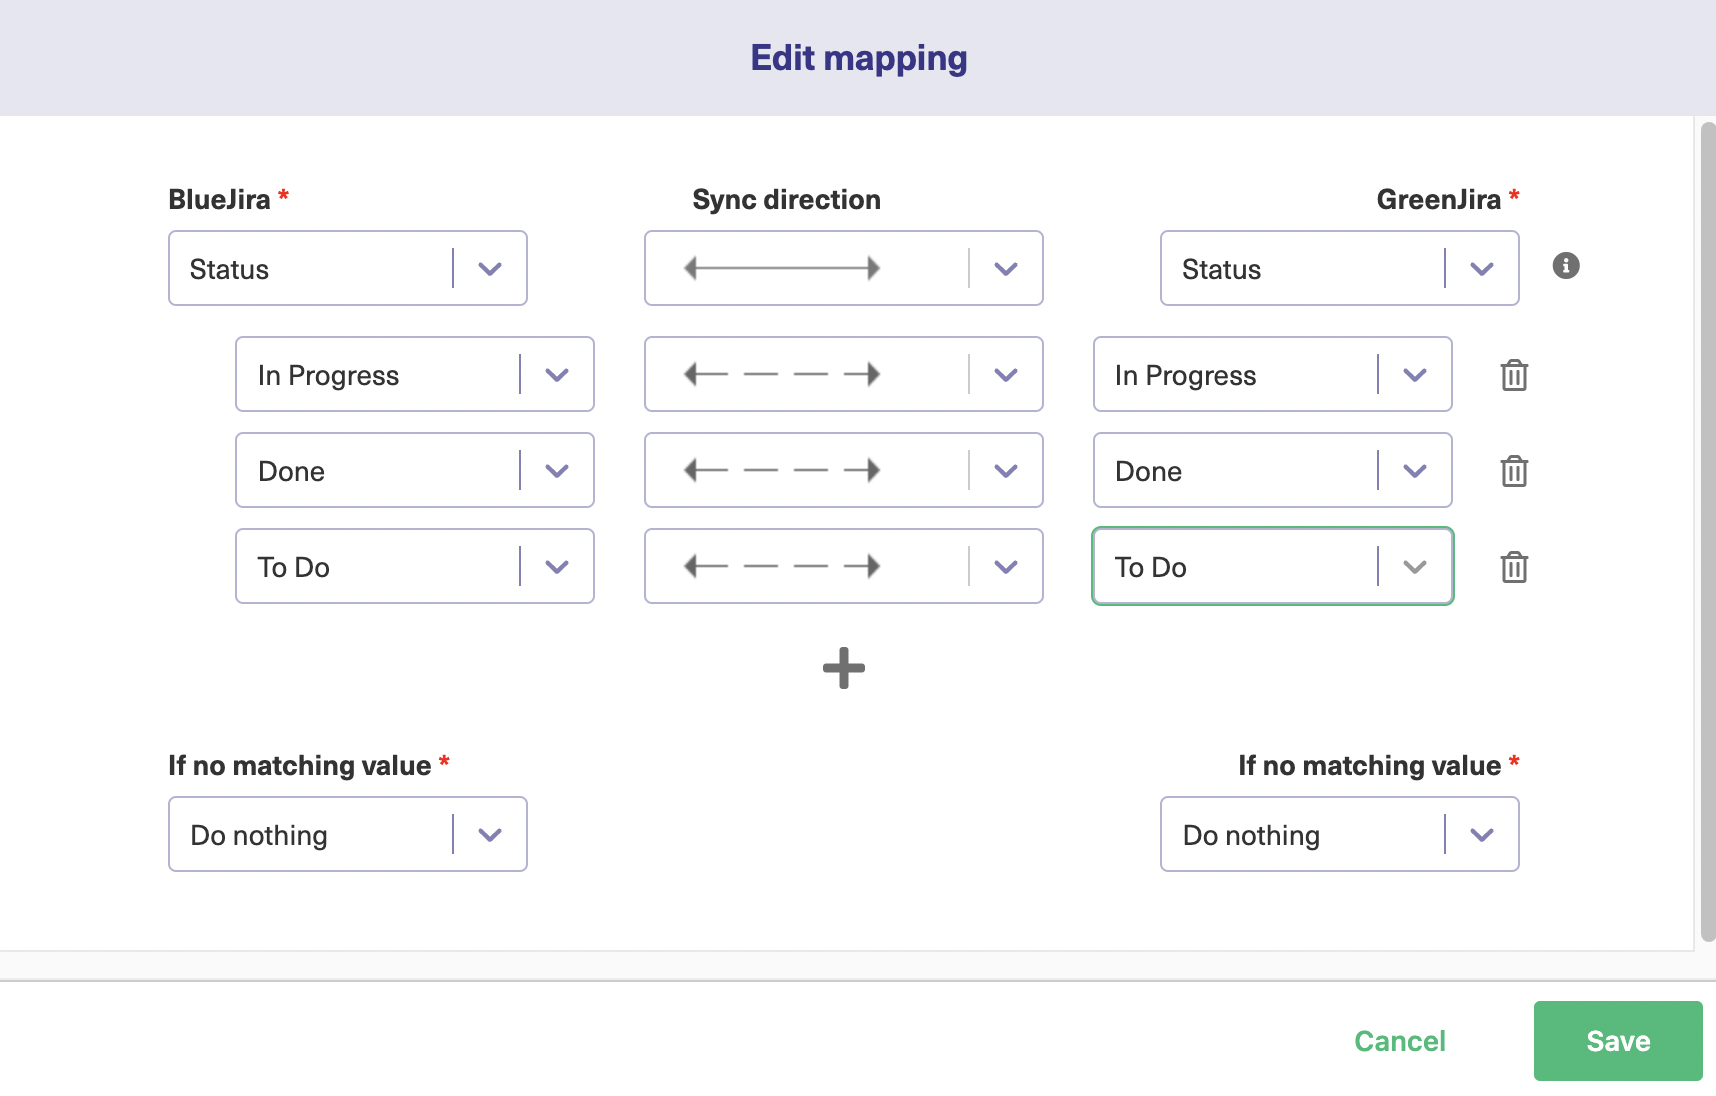
If you want to edit any of the fields that are there, hover over it and click the “Edit mapping” icon next to the delete icon. The “Edit mapping” screen works the same way as the “Add mapping” screen.
You might not want to map all the fields by default, so delete any you don’t want by clicking the “Delete mapping” icon, on the right of each one.
When you have everything set up to your liking, click “Publish”, to finalize your choices.
Continue with the Advanced Script Mode
If you want to customize your Jira sync how you want, then the Script mode is your way to go. It uses the Groovy scripting engine, which allows for utmost control over your data exchange. You can also use AI with this mode.
The methods offered on the wizard here are the same as I’ll cover in later sections, so you can mostly just accept the defaults when installing Exalate.
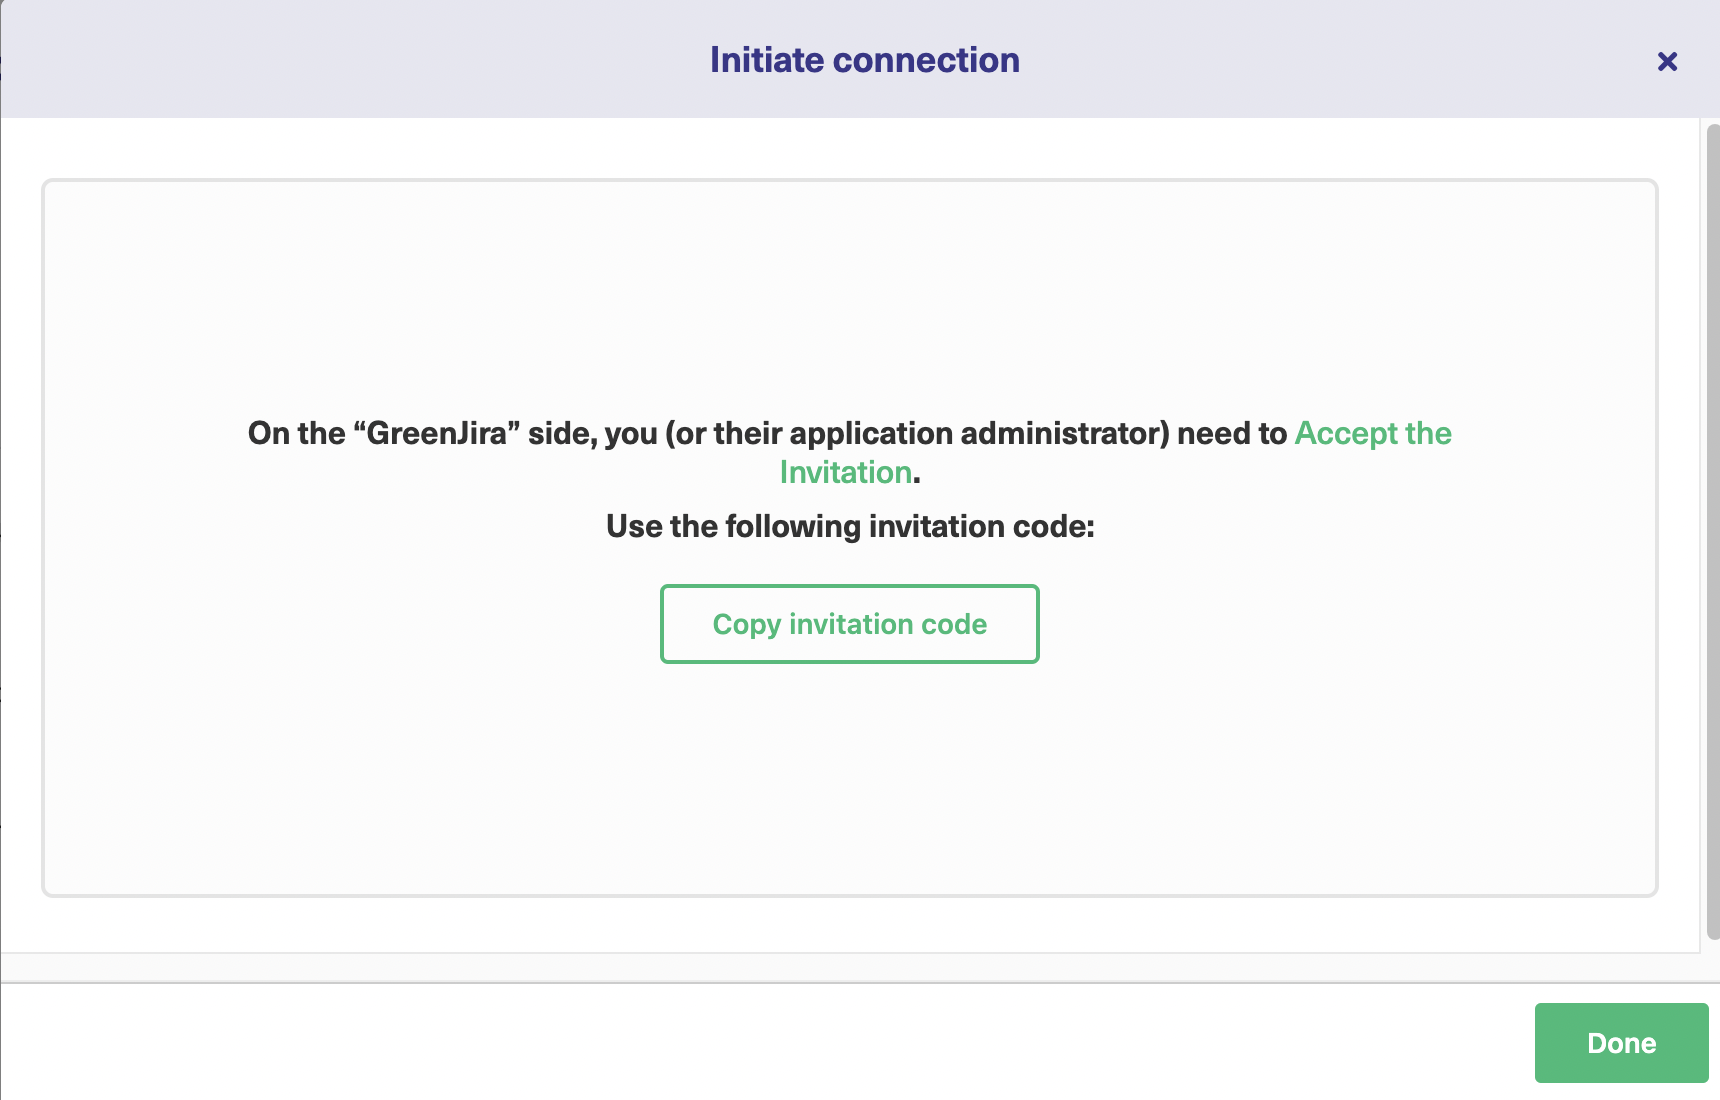
To start with, after selecting “Script Mode”, you will see a screen that will allow you to enter the details of the connection.
Once you enter the details and click “Next”, you have to choose a project at the Jira instance to initiate the connection. Select one from the drop-down list and click the “Initiate” button.
Lastly, the system will generate an invitation code, which you need to copy and paste into the other Jira instance. Click the “Copy invitation code” button. Paste this somewhere safe, such as a text file, and save it for later.
Next, log in to your other Jira instance. Look for the Exalate connections screen in the same way as before. This time, click the “Accept invitation” button.
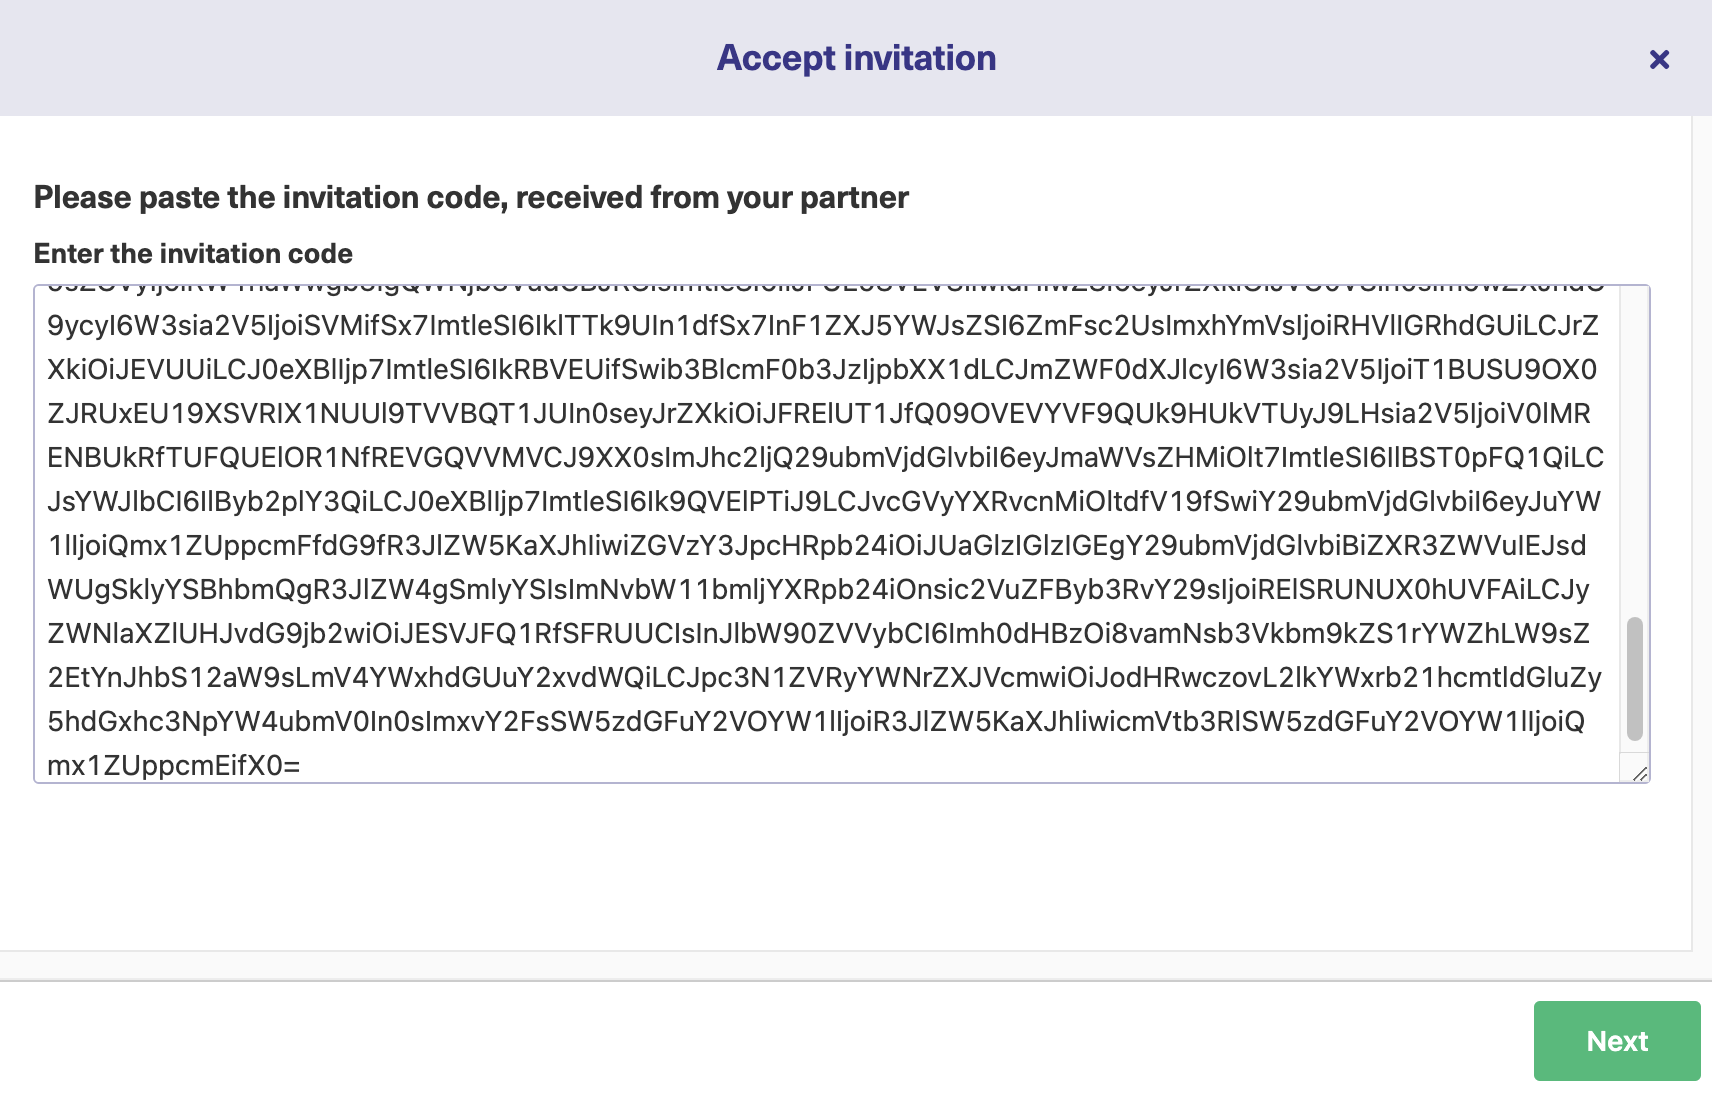
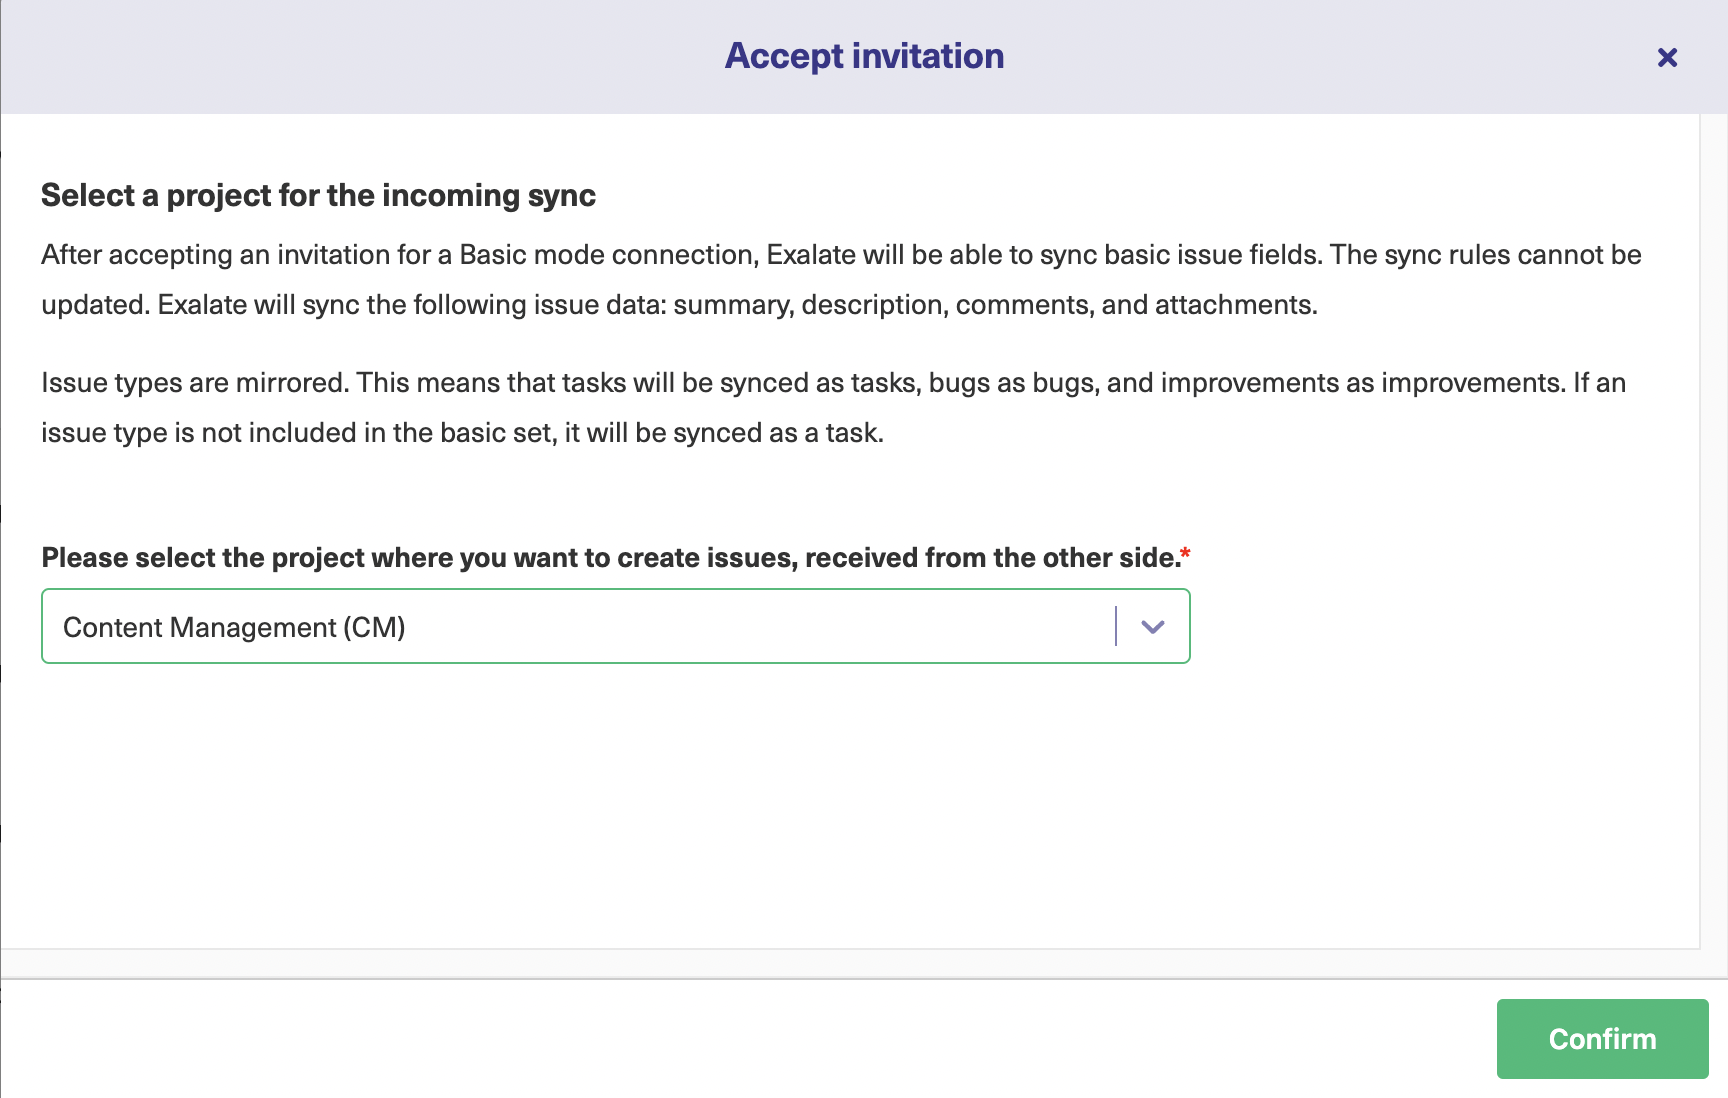
Paste the invitation code into the field provided, then click “Next”.
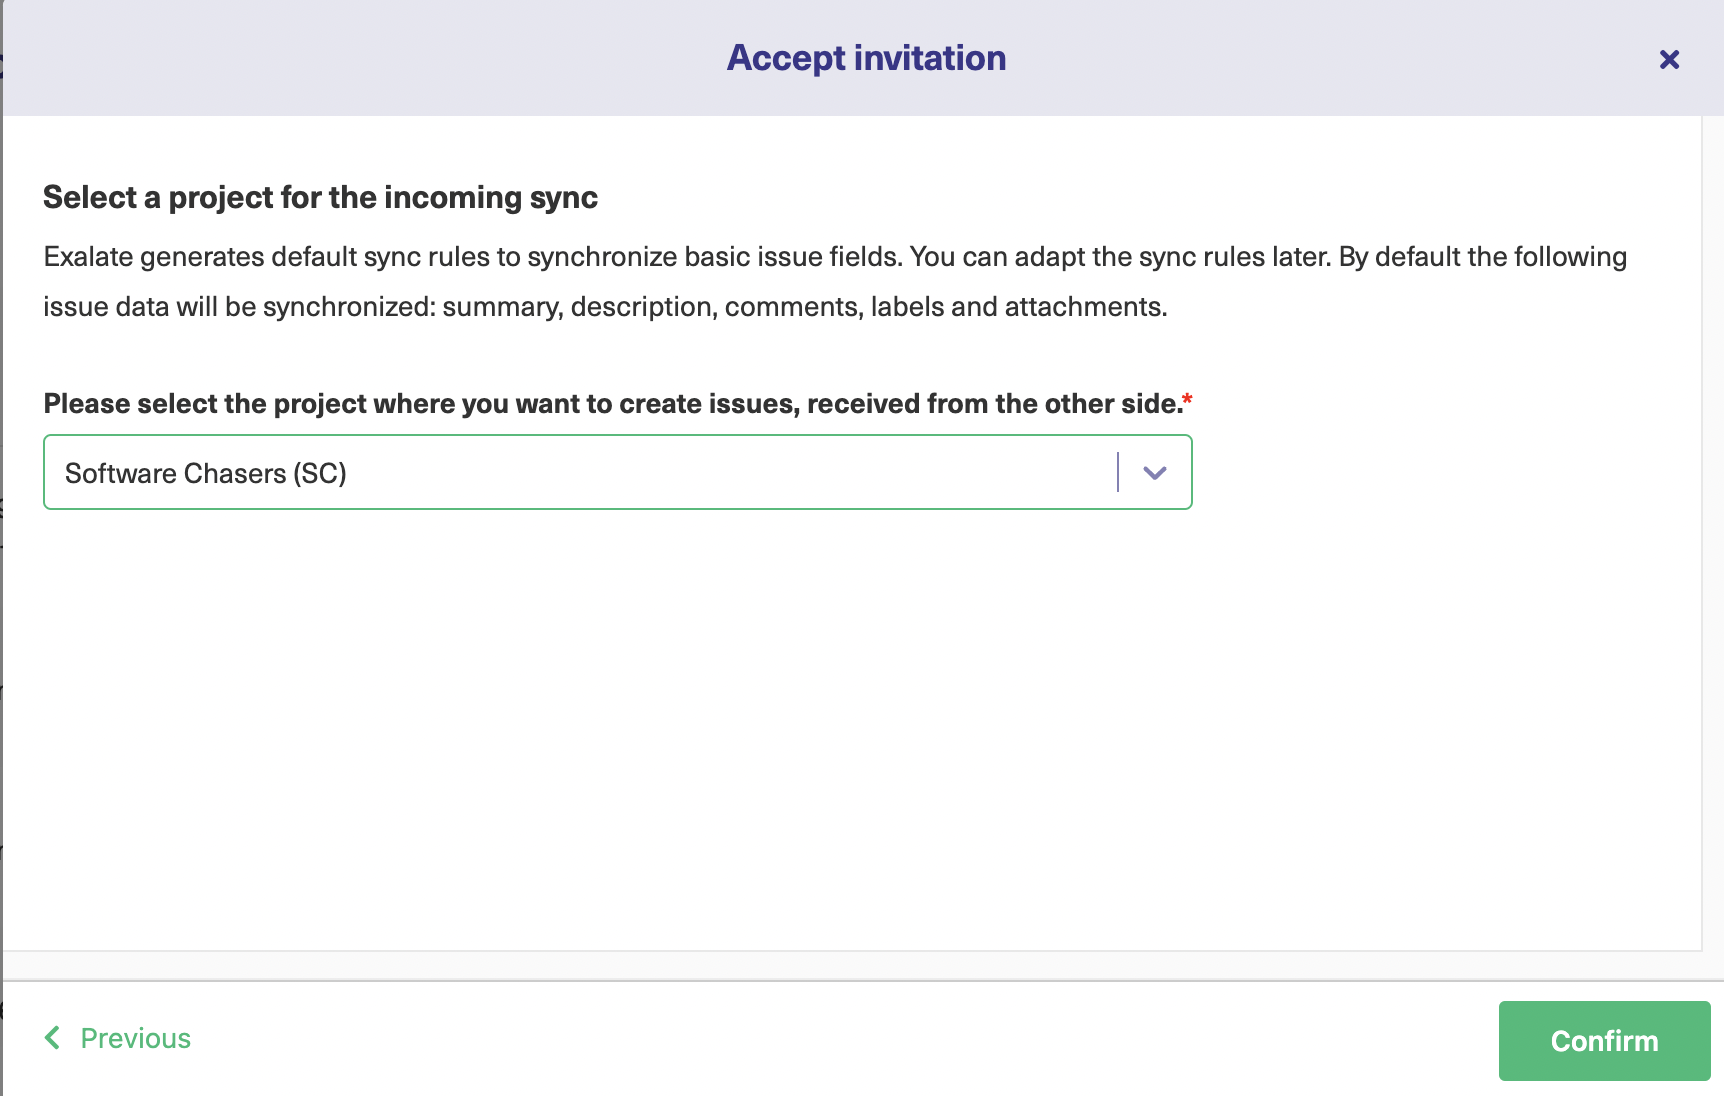
When accepting the connection invitation, you choose the project on this side that you want to synchronize with the other side.
After you’ve made your choices, you’ll see this connection listed among any others you created before.
Now you’ve connected both Jira instances, let’s look at some of the things you can do with the connection.
Step 3: Configure Your Connection to Determine What Information Gets Shared
As mentioned, Exalate will use common defaults when creating your connection. You can edit these at any time. For this, click the “Configure sync” button immediately after establishing the connection.

You can even find your connection in the list, move the mouse over it, and click the “Edit connection” icon that appears. Click on the “Rules” tab in the connection screen.

The rules use the Groovy language, so if you already have some experience, all the better. Anyone familiar with core programming concepts should be able to adapt to them fairly easily.
Note: New to Groovy? Then check out chapter 4 of the Exalate Academy or refer to our Groovy scripting guide.
Each rule shows how fields are mapped onto each other. As this is a Jira to Jira connection, the field names are identical, such as replica.labels = issue.labels.
There are also some helper functions that, for example, can map lists of comments or attachments from one instance to the other, such as issue.comments = commentHelper.mergeComments(issue, replica).
You can adjust these lines to change anything you like. If there are fields you don’t want to sync, delete them. And if you want to map fields to other fields, adjust them.
If you want to give a specific value to a field, change it to do that, for example, you might want to change replica.labels = issue.labels to replica.labels = ‘synced from Jira Server’.
You can use conditional statements and logical operators to give you different behavior in different situations. You can have specific types of items ignored when synchronizing, and you can combine operators to change their behavior for combinations of field values too.
Read more about the sync rules here.
When you’re done, click the green “Publish” button to save your changes.
Use the AI-powered Script Mode
You can do all of this we discussed here and much more using AI with the Script mode.
Exalate’s Sript mode also comes with AI Assist, which appears as a chat window in both your incoming and outgoing sync rules tabs.
Just tell AI Assist what you need, and it will generate the scripts for you.
The scripts are based on your input, your current configurations, and Exalate’s scripting API.
Keep in mind that AI Assist isn’t perfect, so it’s important to be clear and specific with your instructions.
Here’s an example of how it works:
If you want to map and sync issue types between the two Jira instances, you could enter something like this in the AI chat.
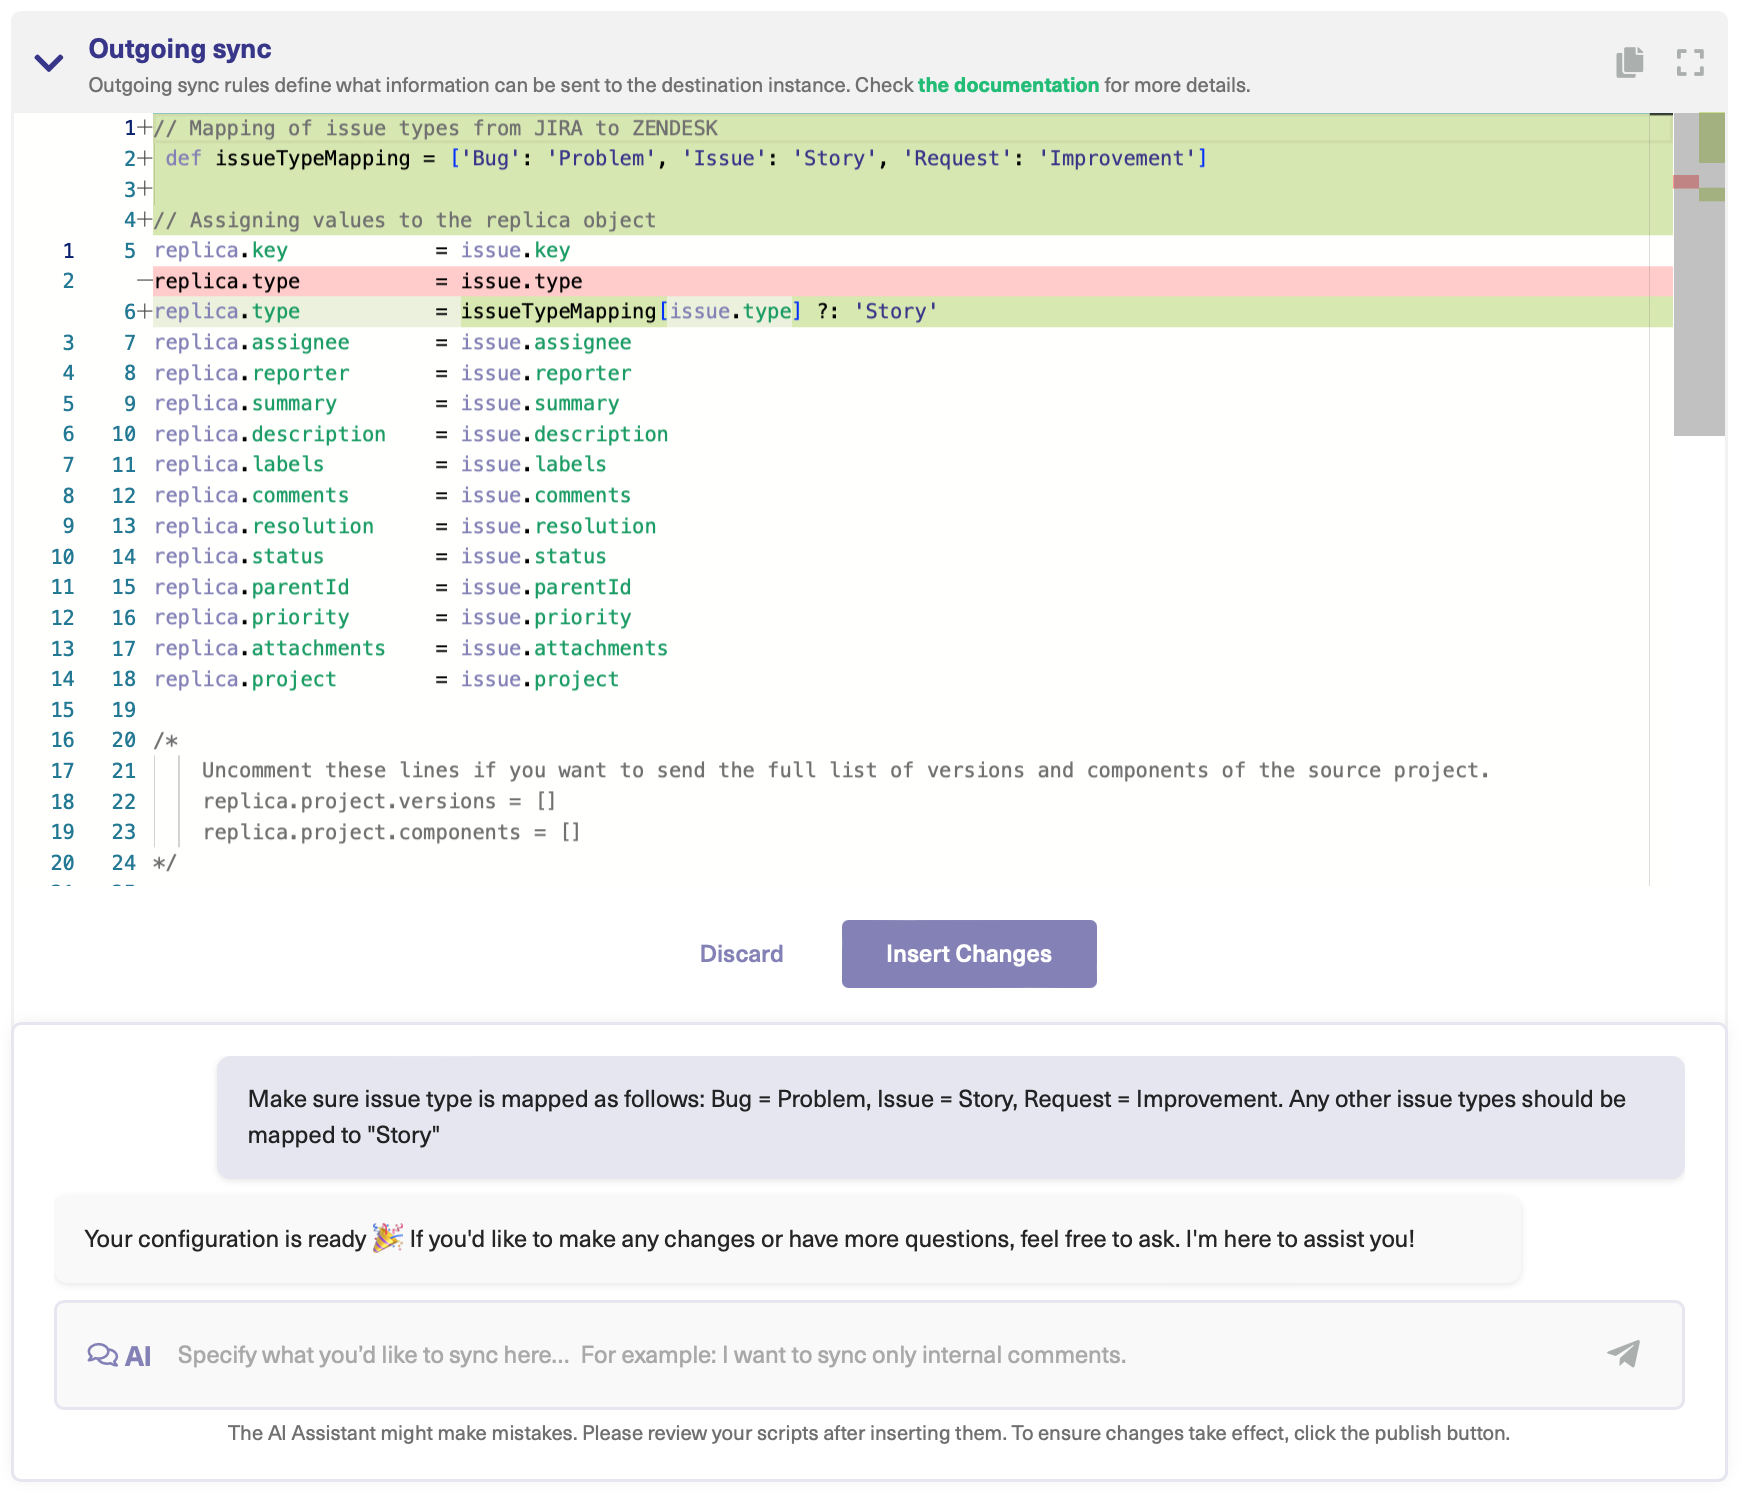
Your scripts will be ready in some time.
Red highlights show lines that will be removed, while green ones mark new additions. You can accept or reject what AI generates. If necessary, tweak your prompt until you’re happy. Once it’s all set, don’t forget to publish your changes.
Step 4: Set Up Automated Synchronization Triggers
Triggers define the synchronization conditions. As with the sync rules, you can use code to control these conditions. The sync rules determine the specifics of what is shared under synchronization, the triggers determine if specific items are synchronized or not.
If you click the “Triggers” tab in the edit connection screen, you can access the automated synchronization triggers.
You can also find a summary of all of your active triggers, by clicking “Triggers” in the left-hand menu.
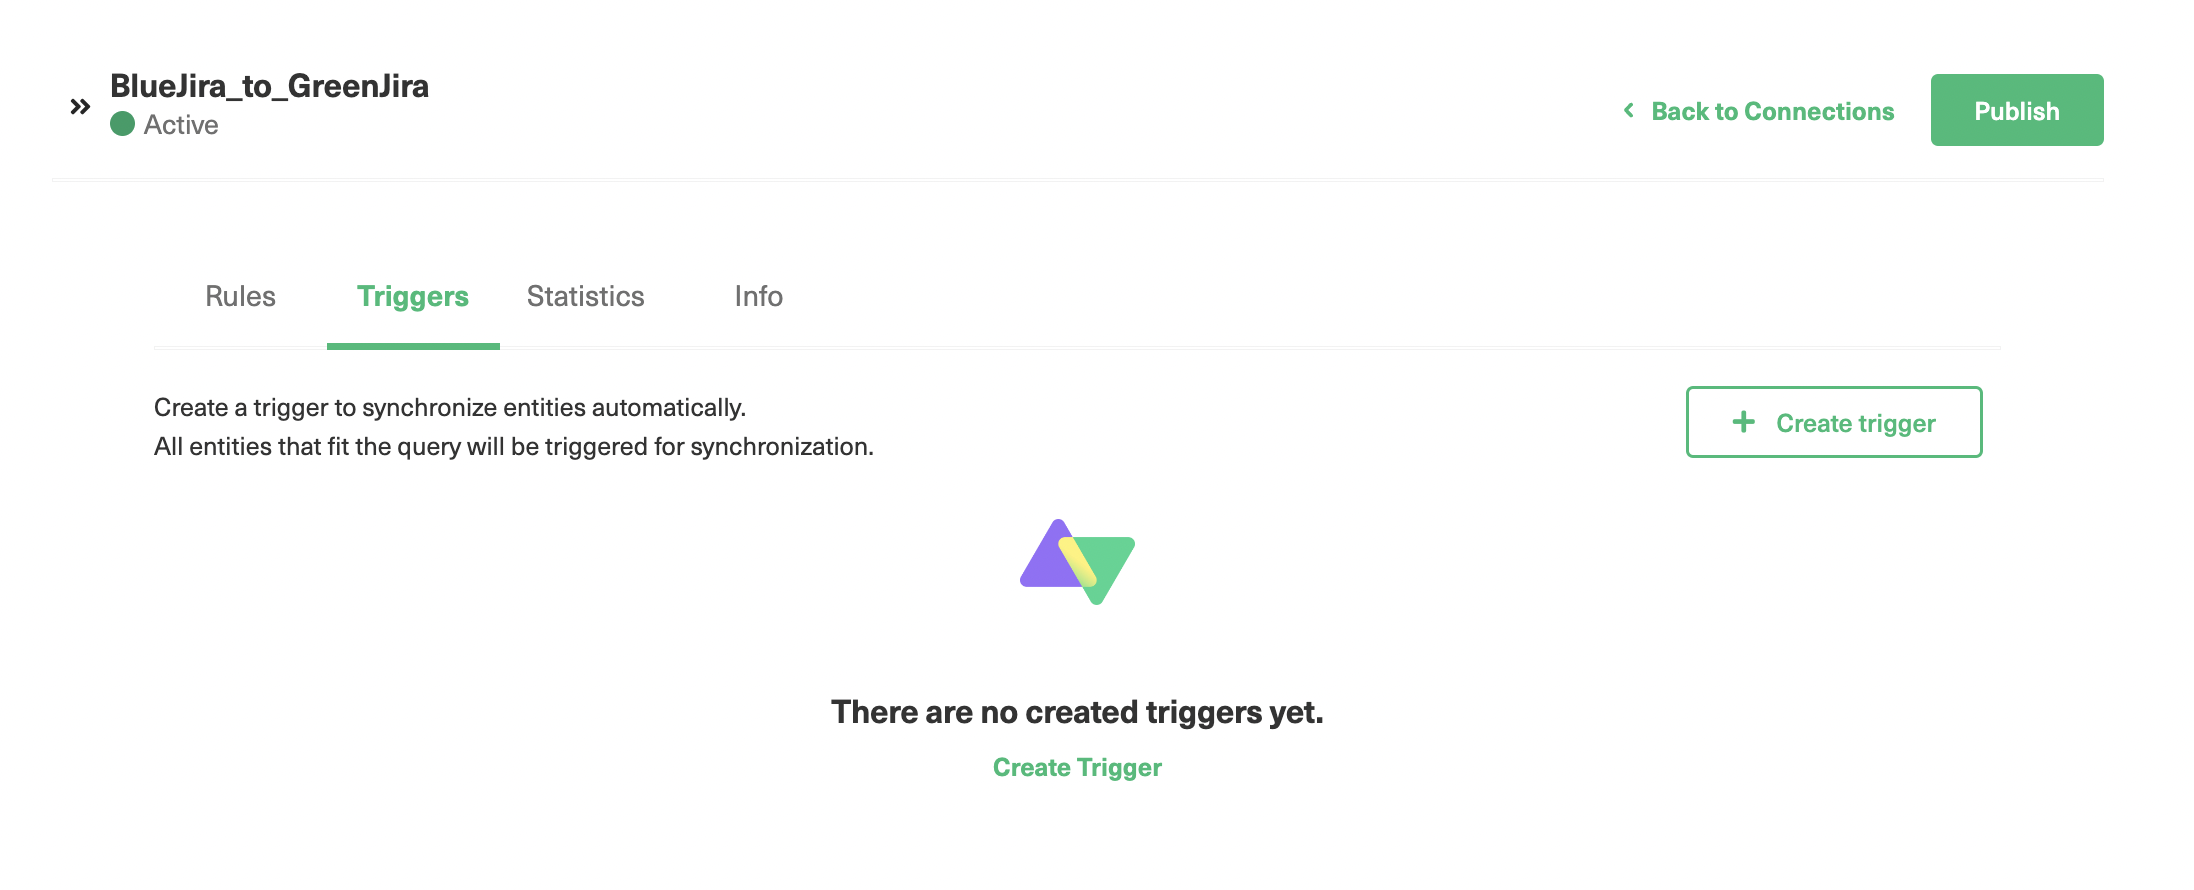
If you follow the first method and want to create a new trigger, click the “Create trigger” button at the top right.
Triggers are written in a different language depending on the platform. Jira uses its own query language, JQL. Note that this is different from the “Groovy” language I used for the synchronization rules. Read more about it in the documentation.
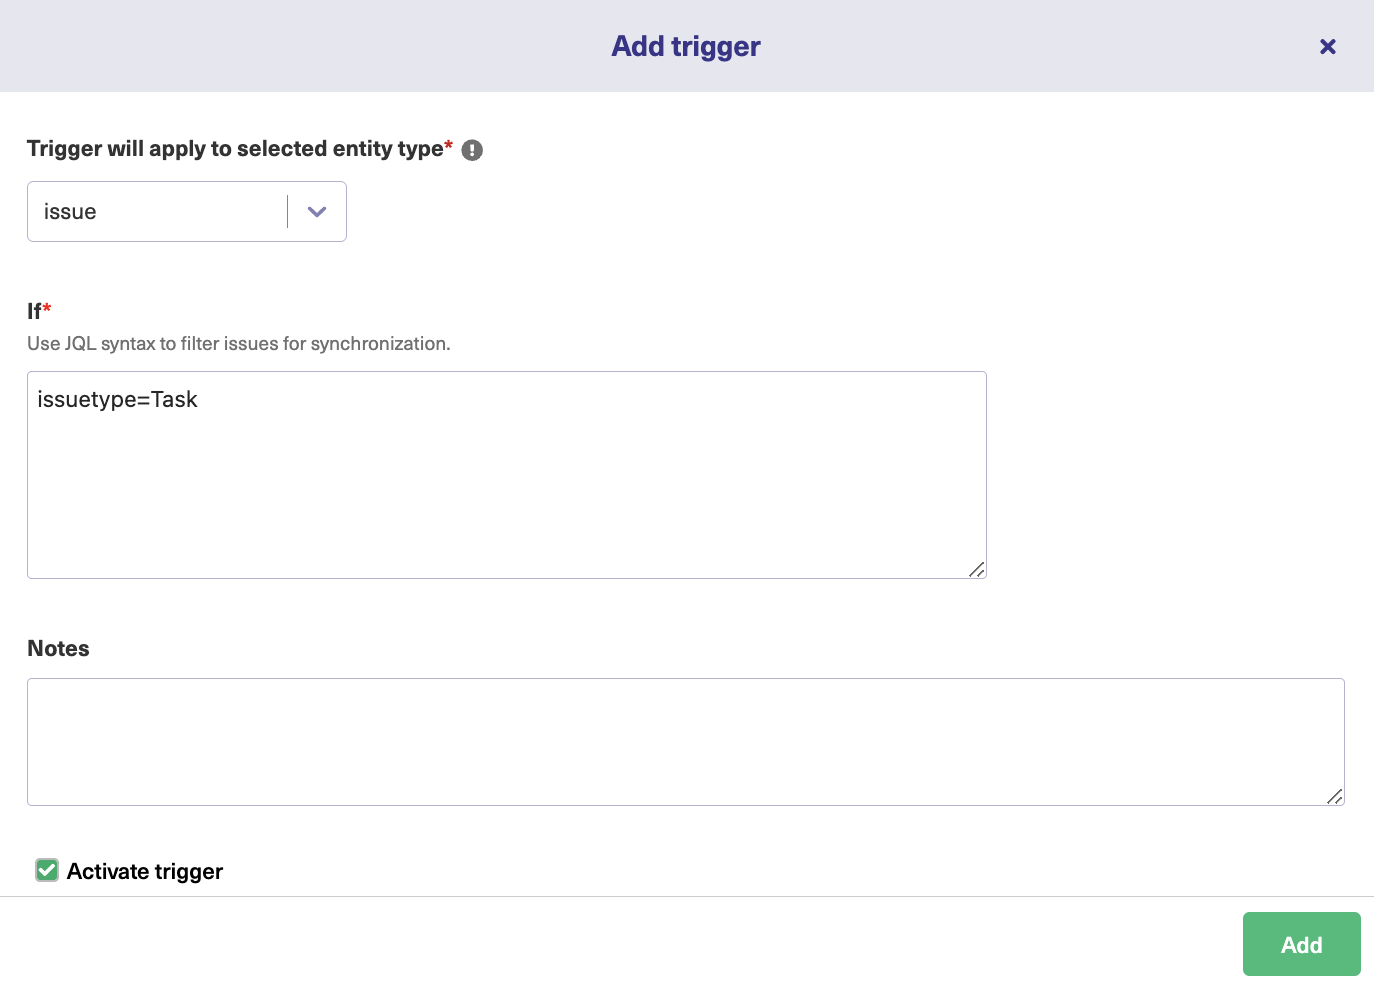
On the “Add trigger” screen, there’s a drop-down box at the top where you can select what kind of entity the trigger applies to. I’ve selected “issue” in this case. In the next box, below the “If”, you enter your query. Here, I’ve chosen to sync issues where the type is “Task”.
I’ve also added a note, describing what the trigger does, and set the trigger to “Active”. If you don’t do that, it won’t work! Finally, click the “Add” button at the bottom.
Back in the trigger list, you can see the entry you just created. Now, items that match the condition will be synced automatically.
You can edit or delete these triggers by clicking the respective icons in the list, under the “Action” heading. If you click the three dots, you also get the option to “Bulk Exalate” and “Unbulk Exalate”.
Step 5: Start Synchronizing Tasks
Now your connection is ready, you can start creating tasks, and if they match the criteria, they will be shared between platforms. Exalate checks for new tasks every few minutes, so please wait for a little while if you don’t see them transferred immediately.
If you don’t see anything after a while, take a look at the rules and make sure they exactly match the items and fields you want to exchange.

Common Use Cases for Jira to Jira Integration
Let’s review a few practical examples of Jira-to-Jira integration.
Case 1: Connect Customer Support and Development Teams
Customer support teams receive a lot of feedback from customers, from technical problems to areas where the user interface isn’t clear to suggestions for new features. Developers will want to know if something doesn’t work and why, and they will be open to new suggestions.
However, they won’t necessarily want all the details, and they won’t need to see all the discussions between customers and the support team.
You can set the sync rules to send the developers the information they need. Then, any solution to the problem will go back to the support team. Perhaps you could also have a time limit field or comments that support can relay to the customer.
The Gantner Group used Exalate to establish a frictionless collaboration ecosystem between developers and support staff, which increased resolution speed by 50 times.
Case 2: Connect Marketers and Designers
The marketing team keeps track of features that are popular in competitor products or that consumers respond to in campaigns. The design team analyzes these and sees whether they would be a good fit for the team’s product.
If you create a label that corresponds to these features, perhaps called ‘new-features’, you can then create a trigger that says label = new-features. This should be a one-way synchronization, as the marketing team won’t need to see the design team’s work.
Vodafone leveraged Exalate’s multi-Jira integration solution to optimize the efficiency of all internal and external collaborations. This helped them achieve data consistency and visibility across multiple instances.
Case 3: Connect with Multiple Suppliers
If you have multiple suppliers, you might want to connect your systems with theirs, while keeping the suppliers’ information separate from each other and providing each end with the maximum autonomy possible.
With a cross-company integration solution like Exalate, you can make sure you exchange information safely with each supplier, letting you collate the information without leaking suppliers’ data to each other.

Case 4: Help Managed Services Provider with Customer Handling
It allows you to comment on or add to the information, and control which of it you share. In this way, you can create “safe islands”, where you can work with the data you need while being confident you aren’t going to breach customer confidentiality.
Insurance company Turkiye Sigorta was able to regain control and connect with multiple suppliers using Exalate’s third-party iPaaS solution.
A managed services provider, or MSP, needs to handle issues with its customers. The businesses it deals with may have different contracts and expectations.
If an MSP has a small number of large clients, they might well have specific people assigned to handle each one, and Exalate can make sure relevant issues are assigned to the correct person.
It can also share information between systems while keeping some information internal to the MSP. What is shared and what isn’t can be defined for each specific client, depending on the business relationship.
Case 5: Onboarding Staff Members
Exalate can help new staff members learn the ropes. You can set Exalate up to copy tickets created by newcomers to another system so managers can check their progress and ensure they are responding to issues correctly.
To do this, create a synchronization trigger that looks like assignee = team-member-name and then set the sync rules to copy over whatever management wants to check up on. When the new team member is up to speed, you can delete or deactivate the trigger.
For example, Netguru implemented Exalate’s Jira connector to link the ITSM and business teams. This reduced licensing costs and established harmony between the teams.
Case 6: Connects Companies with Outsourcing Partners
If your organization outsources services such as customer support or web development, Exalate has the perfect solution to help you integrate Jira Service Management and Software instances smoothly.
So, by using Exalate, both sides can separate their instances and have the autonomy to guarantee that only essential information is shared with the partners. This will also make it easier to de-couple if the collaboration ends.
Quorum Cyber has implemented this model to enhance cybersecurity operations and improve the average response time.
Case 7: Create a Network of Systems
We can see the application of this use case in the way SPK leverages Exalate to streamline operations in order to save each engineer 5 hours weekly.
Teams can explore multi-platform integration using Exalate’s AI-powered scripting engine.
So, let’s say a company is using Jira Software and is in sync with another company whose developers are using Jira Service Management. If they want to onboard a third party working with Jira On-premise, they’d definitely need a solution for that.
To make sure all three sides are on the same page, a solution like Exalate can serve as the three-way bridge between them. So your organization and partner organization should only see the tickets that either of them chose to sync with the other.

Conclusion
As you’ve seen, it’s easier than ever to get your teams working together more effectively. If you set up an effective Jira to Jira integration, you’ll boost your team’s productivity and enable them to benefit from the information captured and processed by different departments.
You also know how to install an integration solution like Exalate and set it up to exchange data between your Jira systems. You can also tune the connection to match your needs and make sure each system gets exactly the information it requires.
Looking to connect multiple Jira instances without much stress? Book a demo with our engineers to get started.
Frequently Asked Questions
What is Jira to Jira integration?
Jira to Jira integration is the process of connecting two separate Jira instances in order to share information. With Jira to Jira integration tools, you can sync comments, attachments, and custom fields within one organization or externally.
How can I integrate two Jira instances?
You can integrate two Jira instances using a connector. This connector could be a native app from the Atlassian marketplace or a standalone third-party solution.
Is it possible to sync Jira Cloud with Jira Server?
Yes, it is possible to sync Jira Cloud with Jira Server. Despite the disparity in infrastructure, you can configure your integration solution to share data between your cloud or on-premise versions.
Is real-time sync possible between two Jira projects?
Yes, you can sync data between two Jira projects in real time instead of copying the data manually. With an integration solution like Exalate, you can sync two Jira projects — whether it is between internal teams or different organizations.
Do I need a tool to connect two Jira instances?
Yes, you need an integration solution to connect two Jira instances. Exalate is an excellent option if you are looking for a decentralized integration solution that supports bi-directional synchronization.
Recommended Reading:
- Jira Integrations: Integrate Jira and Other Systems Bidirectionally
- How to set up a Jira Salesforce Integration
- Jira Azure DevOps Integration: The Complete Step-by-Step Guide
- How to Set up a Jira GitHub Integration
- Jira Zendesk Integration: The Step-by-Step Guide
- Jira ServiceNow Integration: How to Set up an Integration in 6 Steps