Using Salesforce to handle your company’s data gives you access to multiple tools and integrations to harness this data.
At the same time, Salesforce data integration with a third-party application can endanger your company’s sensitive data if you don’t follow the appropriate precautions.
Since your business’s success and growth depend heavily on data, you need to nail every stage of the integration process.
So, this article will cover the best practices for smooth Salesforce data integration. I’ll also cover how to set up a successful Salesforce third-party integration using a solution called Exalate.
What is Salesforce Data Integration?
Salesforce data integration involves assembling and arranging all the existing data from all Salesforce tools, as well as from other third-party apps, to obtain a central view.
In the same vein, data integration in Salesforce is straightforward because you only need to monitor the incoming and outgoing data. Besides, some integrations use automated no-code triggers to sync your data without manual entries.
Salesforce data integration usually involves one or all of the following:
- Importing and storing customer contact information
- Importing, storing, and updating payment details
- Importing and saving support service data
- Updating and accessing Salesforce data records.
- Exchanging data between Salesforce and other tools.
The ability of any data-driven company to successfully implement these tasks depends on the integration plan as well as the software solution facilitating the exchange.
Salesforce Data Integration Use Cases
The use cases for data integration are limitless since you can map Salesforce orgs together as well as Salesforce with other systems. Some common use cases include:
- Constant record updates: When an Account record changes in one Salesforce org, the Account records in the related Salesforce org change as well.
- Automated lead scoring: Admins can configure Account records to update depending on the potential or actual value of the lead. It is possible to assign specific scores to leads automatically based on SLAs and other factors.
- Lead routing: Salesforce admins can set up triggers to make sure the Salesforce Account is routed to the direct segment or user pool in order to increase accuracy.
- Inventory management: E-commerce stores can configure their Salesforce inventory to detect spikes in demand or diminishing stocks of goods.
- Activity tracking: Authorized users can sync comment threads and user mentions to make their communication visible across systems and organizations.
With the right solution, you can configure systems to deliver on specific business requirements while prioritizing customer experience.
How to Natively Implement Salesforce Data Integration
Salesforce allows multiple methods of natively syncing, sharing, and integrating data with external systems. These data exchange methods allow Salesforce users to integrate their data with the CRM platform without needing 3rd-party tools.
Some native Salesforce data integration tools include:
- Apex Actions
- Change Data Capture
- Custom Apex (REST and SOAP Web Services)
- External Services
- Generic Events
- MuleSoft Composer
- OmniStudio Integration Procedure
- Platform Events
- Salesforce Connect/External Objects
- Heroku Connect
- MuleSoft Anypoint
However, these data transfer protocols come with several drawbacks that could affect the quality and completion of the data transfer.

For instance, Apex is bound by governor limits, which hampers its integration capabilities. Besides, these native tools offer little security, necessitating the addition of 3rd-party integrations for better data integration security and reliability.
Salesforce Third-Party Integrations
Salesforce seamlessly integrates data with third-party apps, using inbound and outbound messages. This process follows the ETL (Extract, Transform, Load) protocol in AppExchange tools like Lightning Web Components, Data Import Wizard and Data Loader, Dataloader.io, and Skyvia.
Dataloader.io is a tool that helps maintain historical context and improve the accuracy of the process.
The drawback, though, is that it only works when you already have a Salesforce account. Besides, this ETL tool might be complicated to implement.
If you’re a fan of no-code cloud platforms, tools like Skyvia provide flexible data integration for Salesforce CRM for scenarios like:
- CSV data import and export automation (with support for file storage)
- 1-way and 2-way data synchronization
- Replication into relational databases and Reverse ETL scenario
- Exposing data as Odata endpoints to use in Salesforce Connect
And if you’re looking for tailor-made data integration tools for Salesforce for a variety of scenarios (including more complex use cases requiring deep ticket integration), then Exalate is probably your go-to app.
It can support a wide range of use cases because:
- Exalate’s Groovy-based Script mode allows for basic to advanced integration scenarios.
For example, you can sync comment threads and user mentions in comments between Jira and Salesforce. - You can set up one-way or two-way synchronization with granular and independent control at both integrating sides.
- It syncs any objects along with their fields (and custom fields) from the Salesforce database.
- It allows for the syncing and maintenance of multiple object dependencies between Salesforce and other platforms.
- It uses httpClient to sync any data available via REST APIs
- It allows entities to be synced in bulk through CSV files.
- It offers other complex customizations upon request.
How to Integrate Your Data in Salesforce Using Exalate
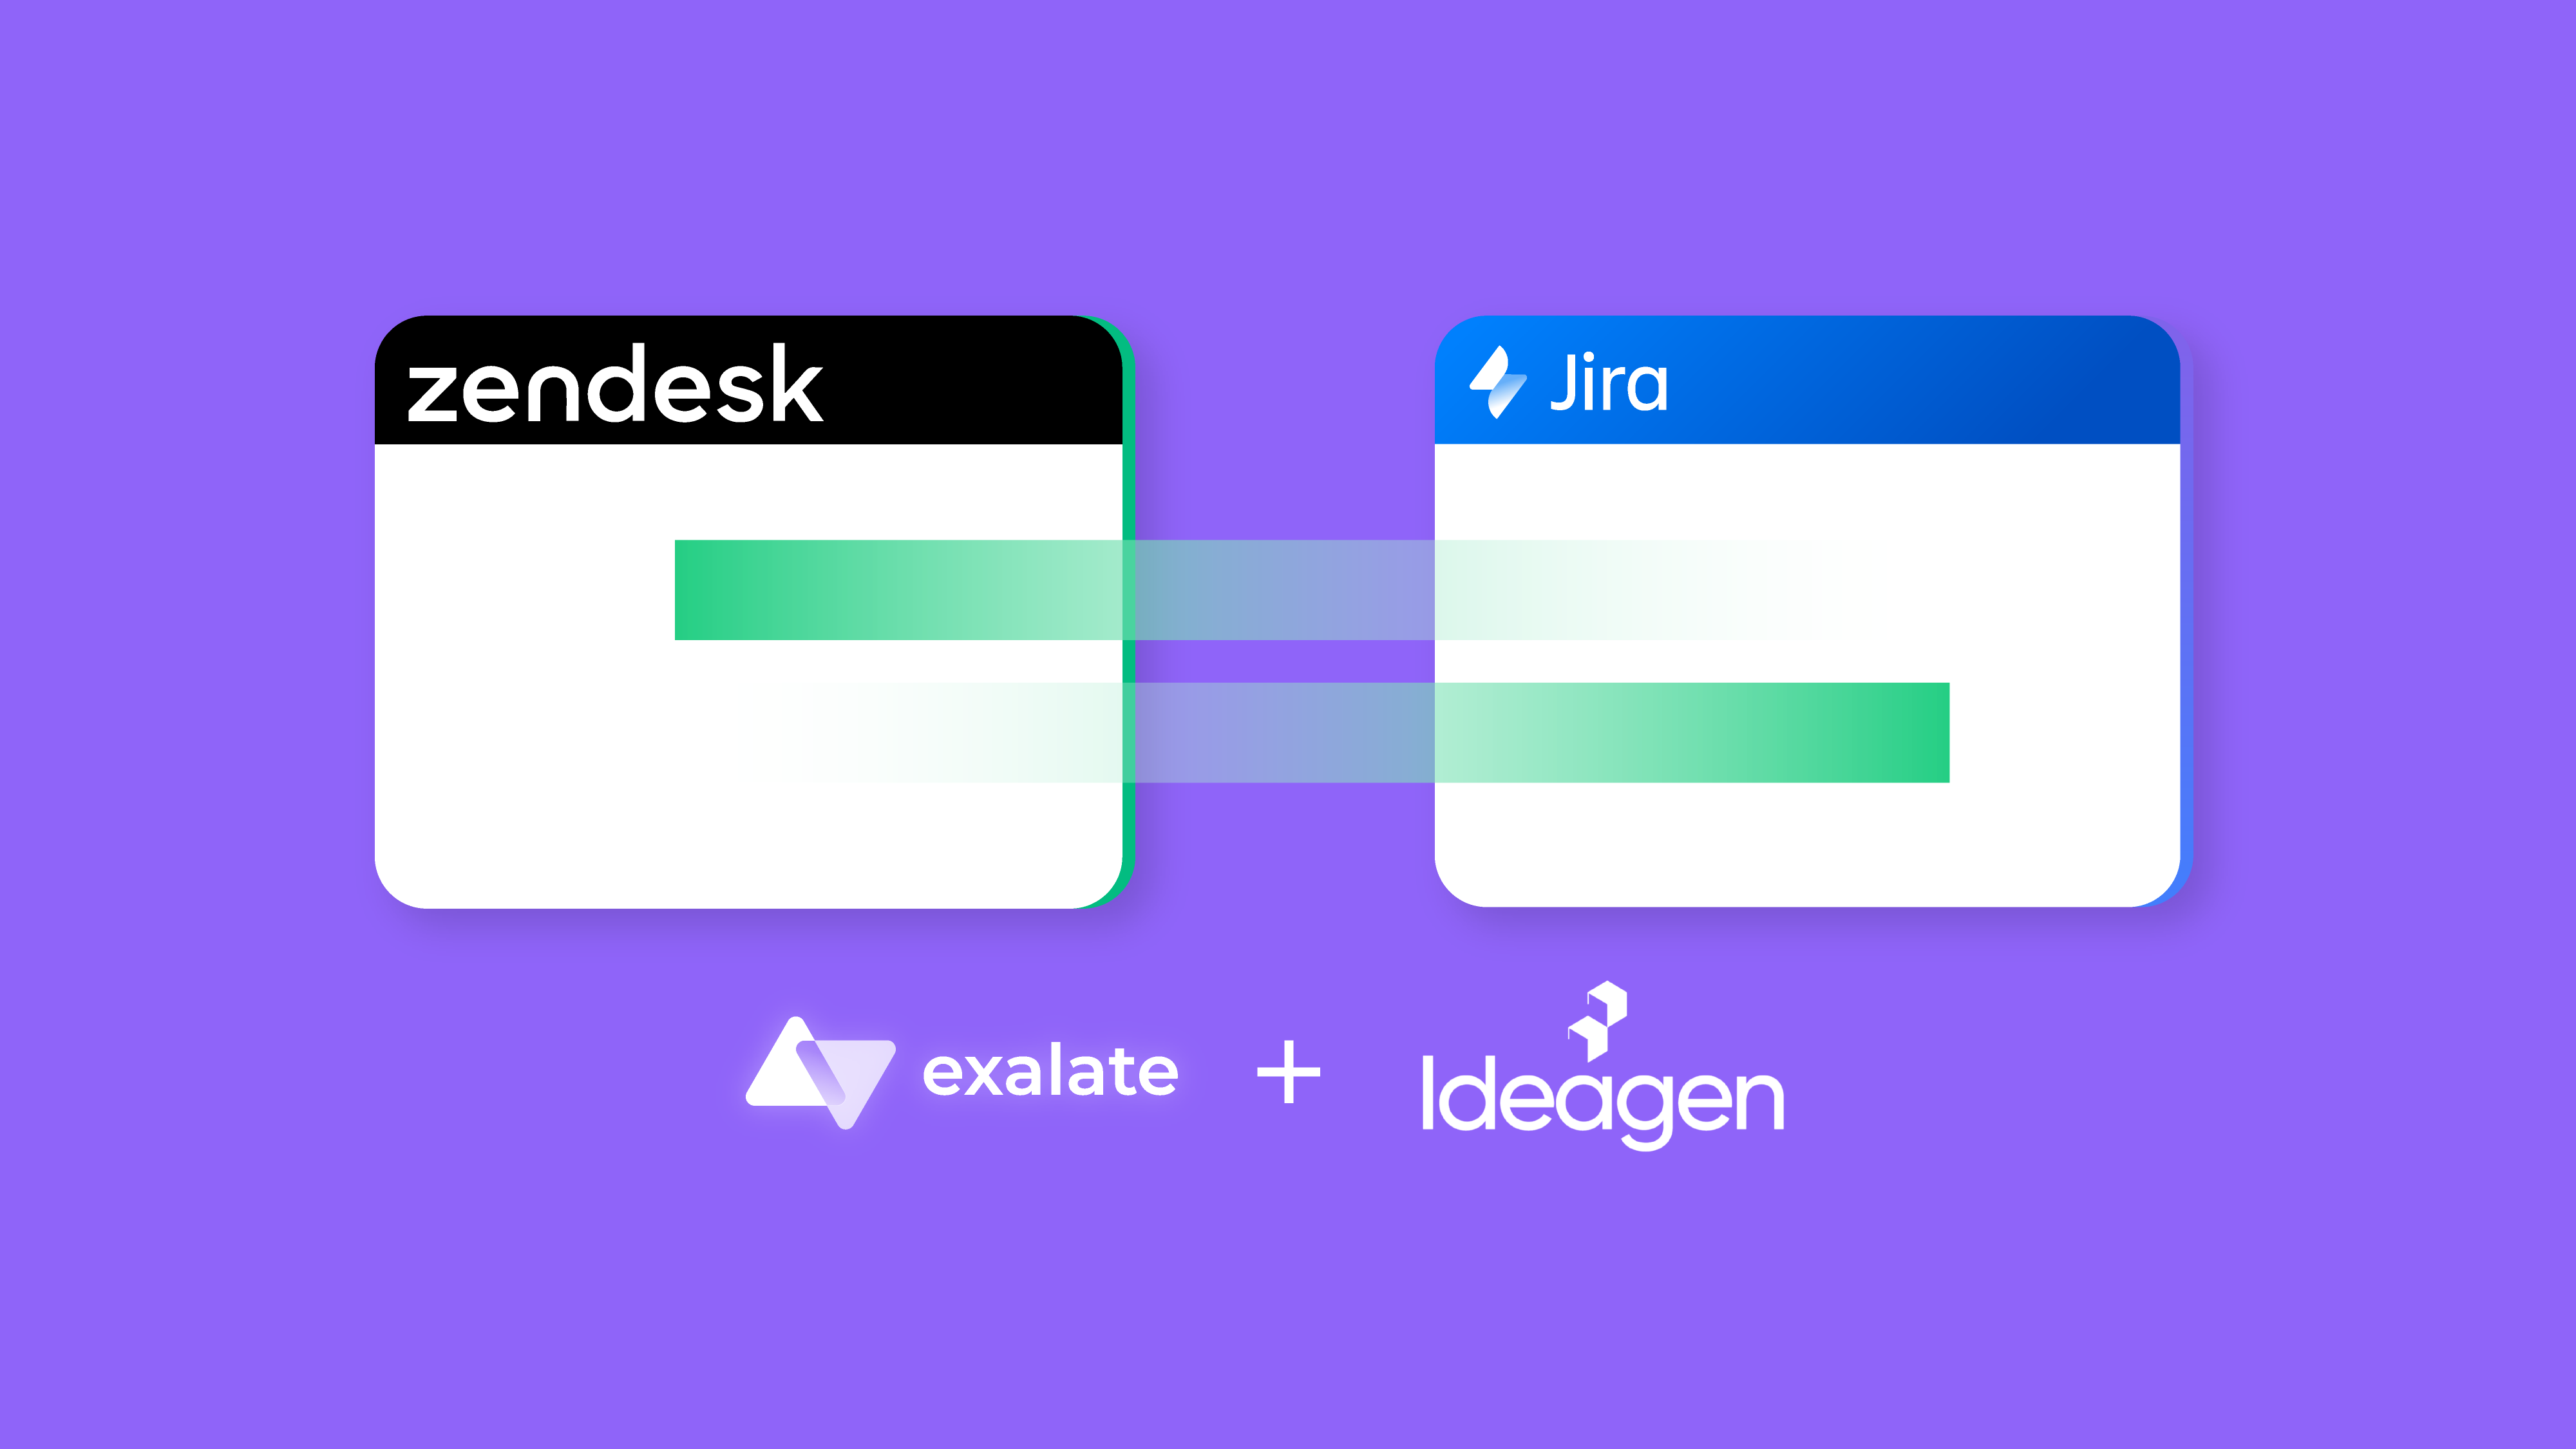
We can integrate data between apps like GitHub, Zendesk, and Jira with Salesforce using Exalate. It is a decentralized integration solution that gives you full control over your data (both incoming and outgoing).
Alright, let’s get right to it.
Exalate Installation
Exalate must be installed as a dedicated app on both Jira and Salesforce instances. You can start the installation process via its integrations page or follow the steps given below.
- Visit Salesforce AppExchange and search for “Exalate”. click the “Get it Now” button.
- Decide where to install Salesforce: “Install in This Org” or a Sandbox org. For my installation, I opted to install it in the current org.
- After selecting your preferred installation destination, scroll down to the bottom of the screen and review the terms and conditions. Once happy, click “Confirm and Install” to begin the installation process.
- Specify the users for whom you want to install Salesforce. Keep in mind that you can modify this later. In my case, I chose “Install for All Users” and clicked “Install”.
- “Approve Third-party Access” by clicking “Continue”. This step grants Exalate access to the necessary data. Once the approval is given, the installation process will be completed. Click “Done” to finalize the setup.
- Navigate to your Salesforce instance and proceed to create a connected app. It is crucial to save the “Consumer Secret” and “Consumer Key” that are generated during this process. Afterward, go to your Salesforce instance, access “Apps,” and search for “Exalate”.
- To request an Exalate node, provide the “Consumer Secret” and “Consumer Key” you saved earlier, and then click “Request Node”.
- Grant access permissions to Exalate, click on “Allow”.
- Enter your personal details and click “Agree and Submit”. Now, you’ll need to wait for an email from the Exalate License Manager.
- Click on “Verify Exalate instance” to be redirected to the Exalate admin console.
Once Exalate is installed on Salesforce, you can install it on Jira.
- On the toolbar in Jira, click “Apps” > Click on “Explore More Apps.”
- Type “Exalate” in the search bar.
- Select the “Exalate Jira Issue Sync & more” option.
- Click on “Try it free” and add it to Jira.
And that’s it! You’ve installed Exalate on Jira.
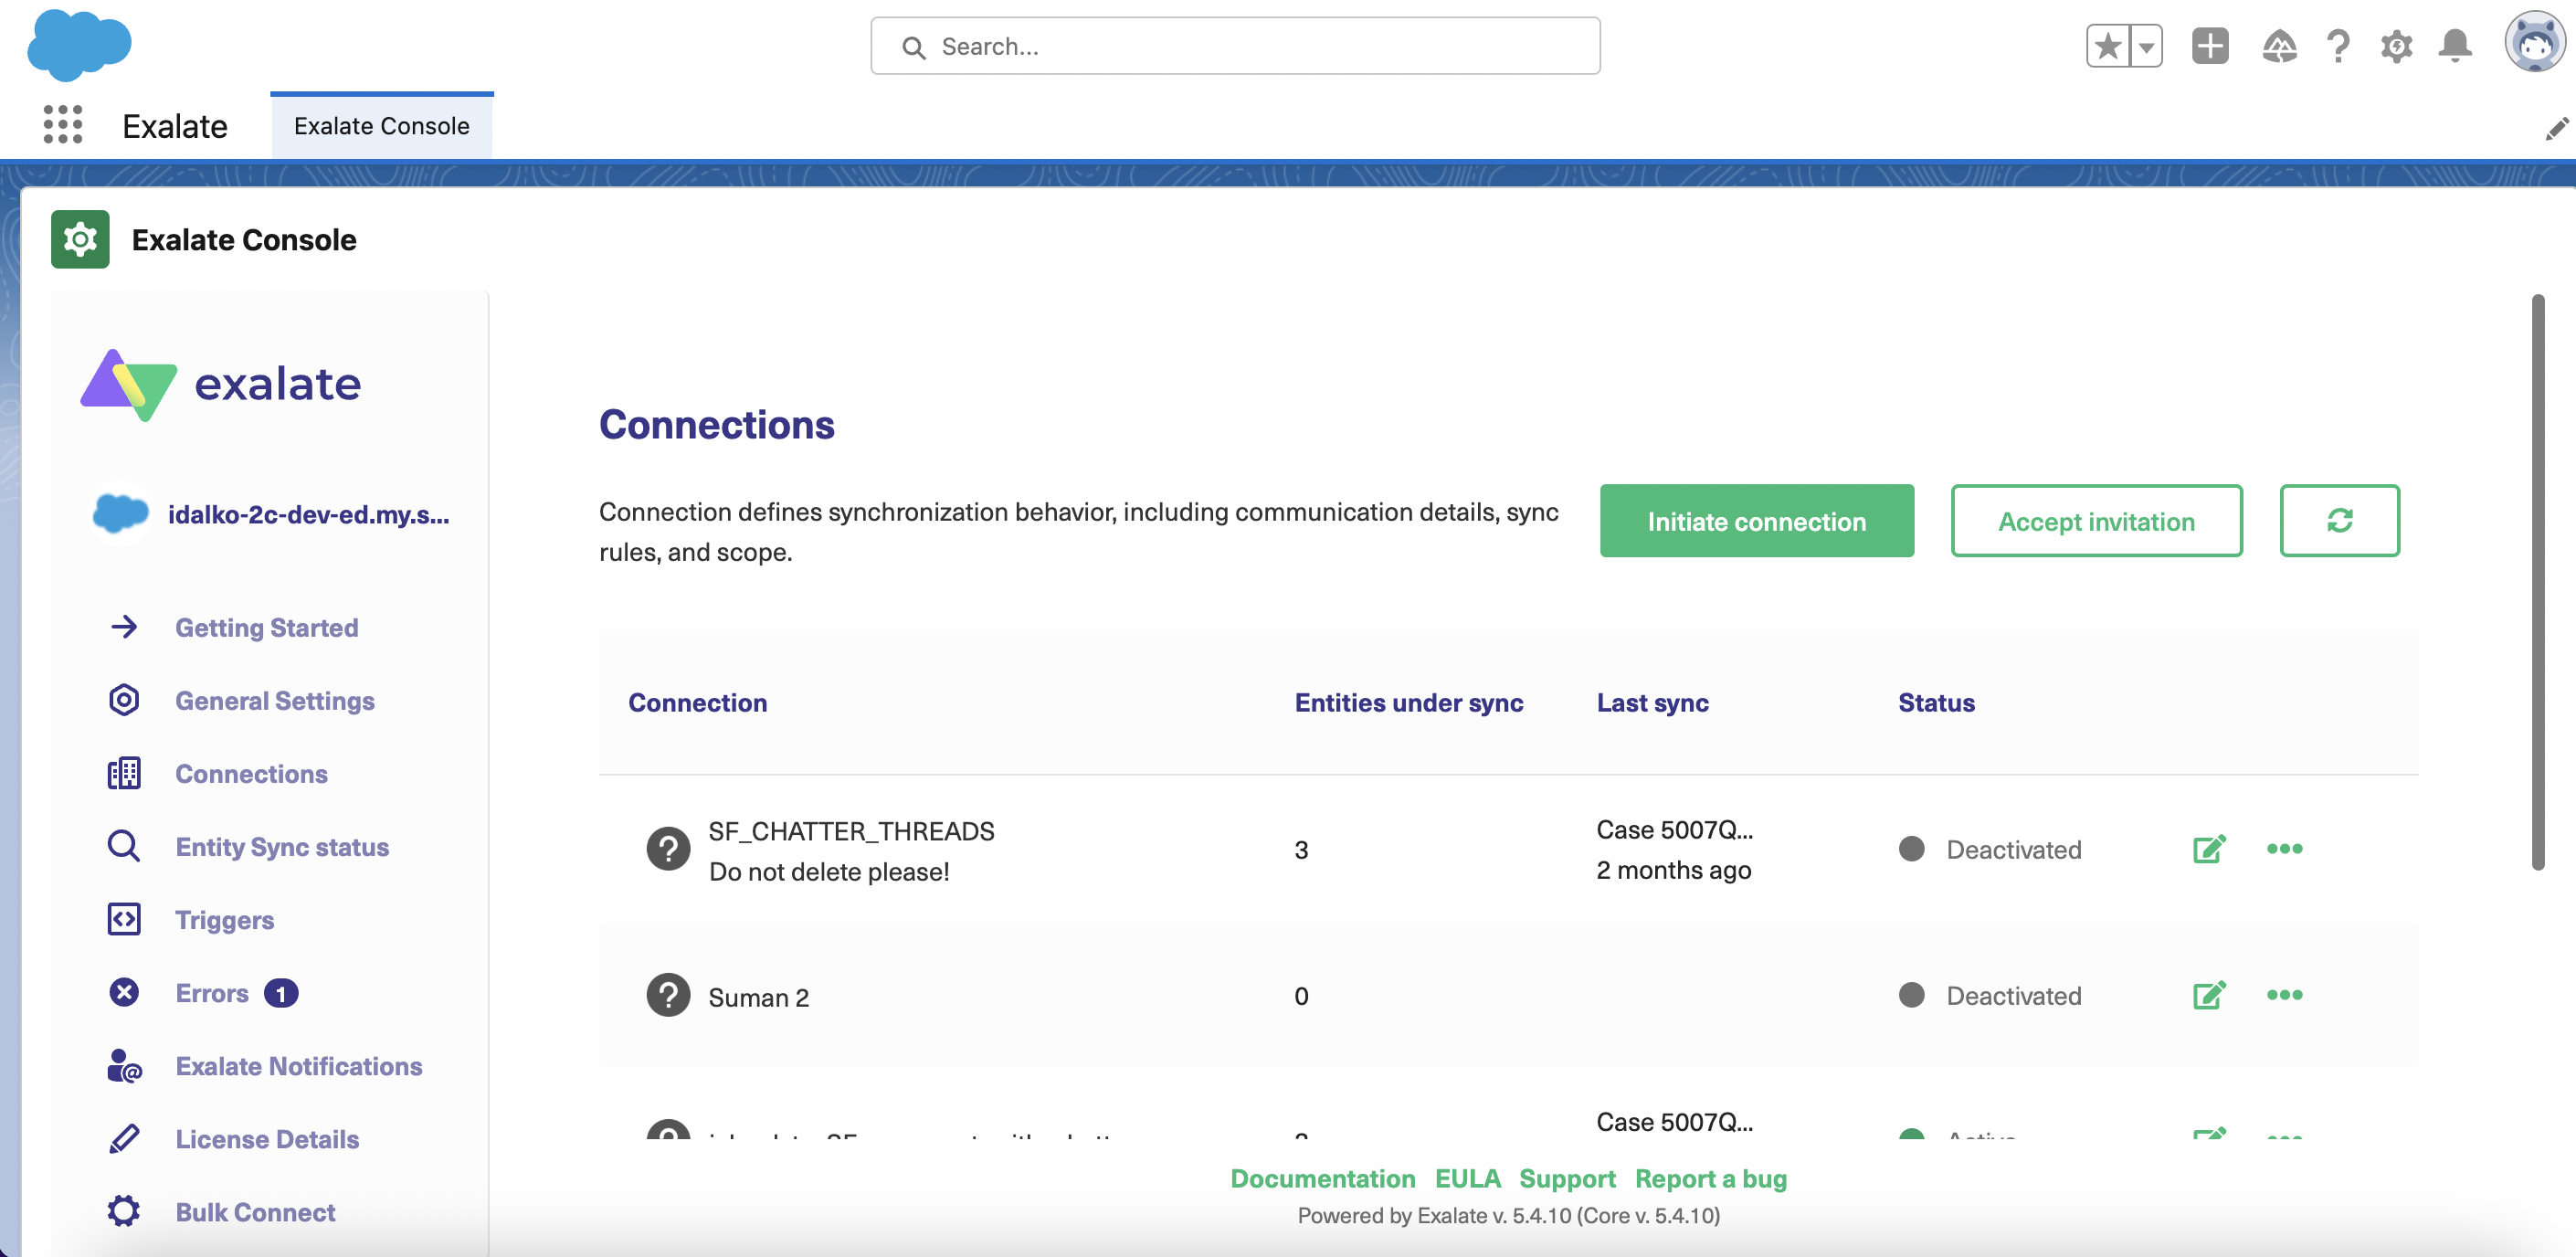
Exalate Connection
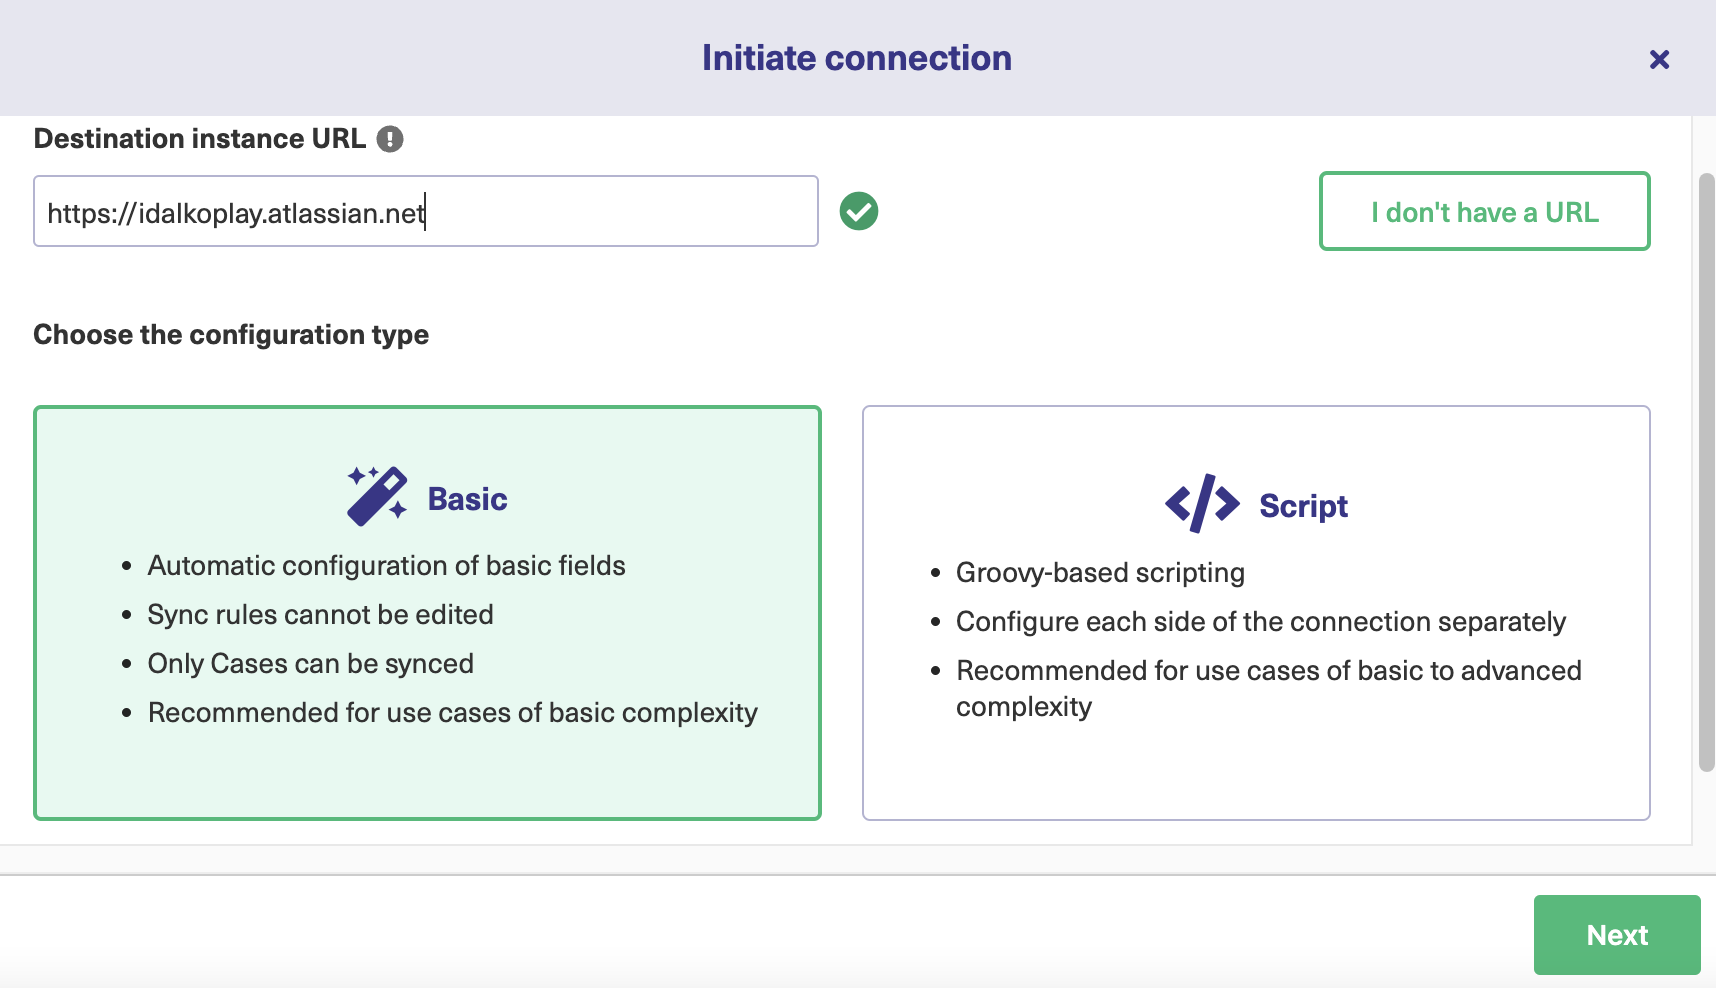
Now let’s connect Jira to Salesforce. You can initiate the connection on either instance, I will start from the Salesforce side.
- Open the Exalate Console from Salesforce.
- Click “Initiate connection.”
- Enter a Destination Instance URL in the search bar that appears.
- Select the Basic mode or Script mode. We have selected the Basic mode here.
- Click “Next” to continue.
- A prompt will ask for your admin access to the destination instance. Click “Yes, I have admin access” > Click “Initiate.”
- You’ll be redirected to choose the project you want to create issues for. Select the project and click “Confirm.”
- Click “Exalate” to sync your first case or issue,
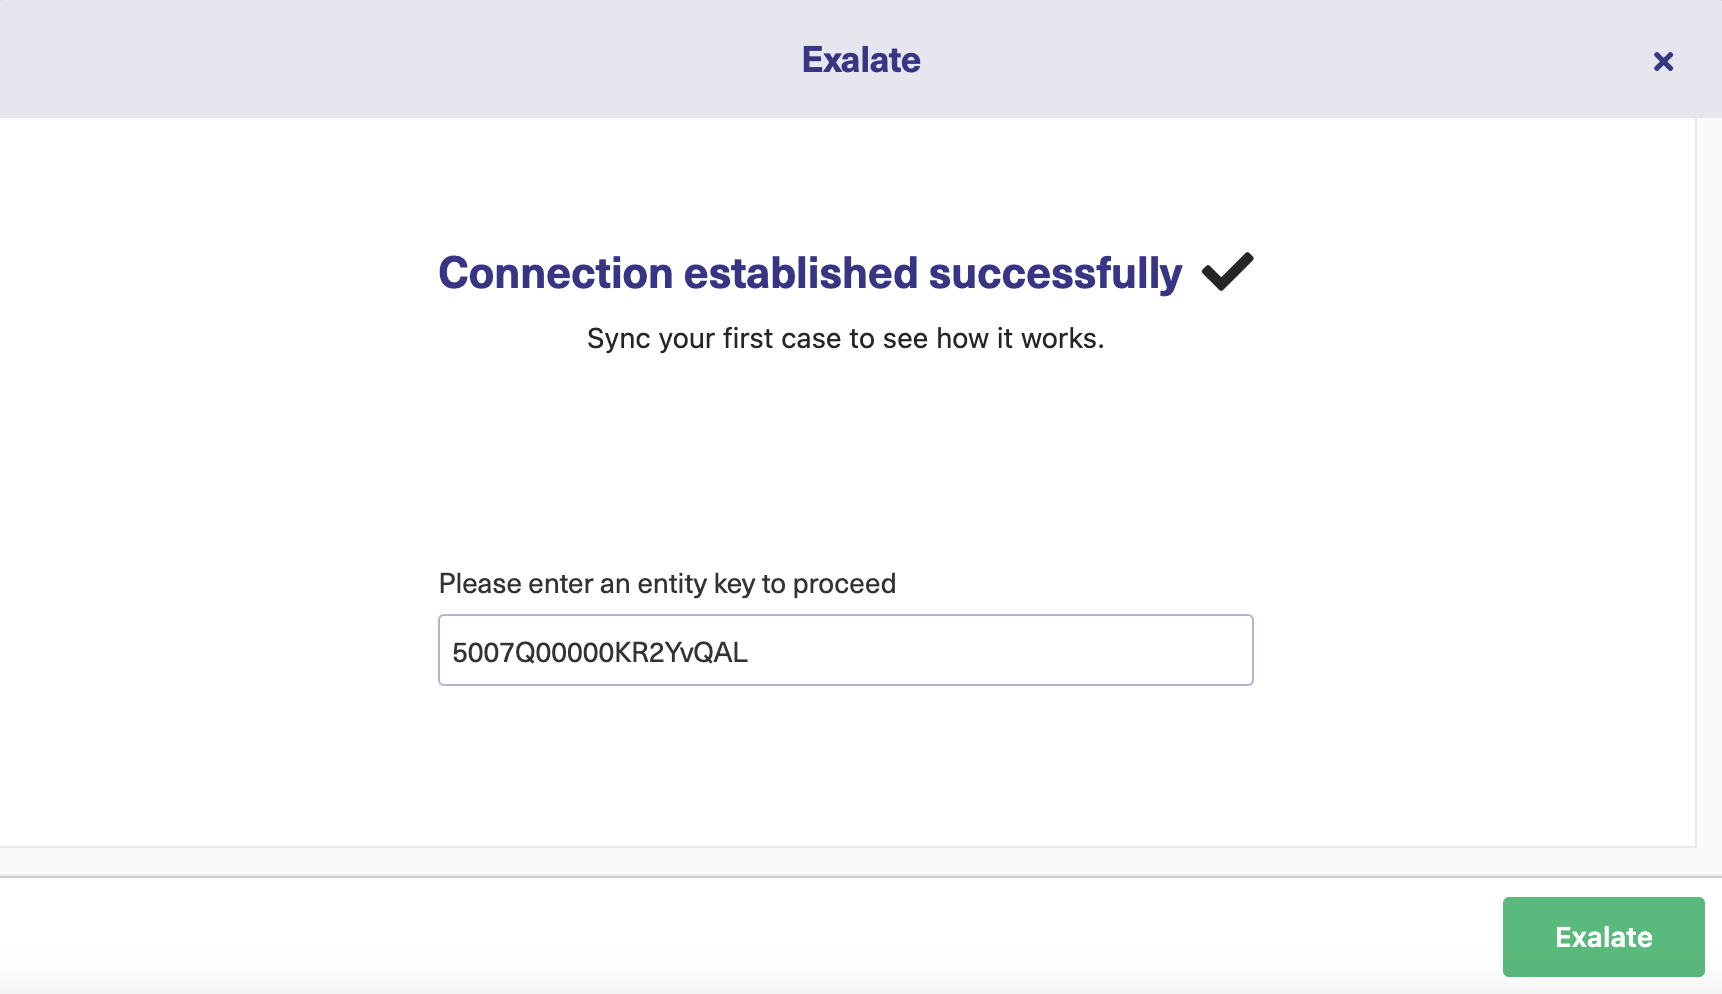
- After a few minutes, the sync will be completed.
Congratulations! You’ve just synced your data from Jira with Salesforce using the Exalate Basic Mode.
If you want more control over your data—with custom configurations like triggers, rules, and statistics—consider using the advanced Script Mode.
Follow the steps in this detailed Jira Salesforce integration guide for a buttery smooth integration using the Exalate Script Mode. Or watch this video tutorial to learn all about it.
You can also use Exalate’s Script mode with AI Assist, which appears as a chat window in both your incoming and outgoing sync rules tabs.
Just type your sync requirements into the chat, and AI Assist will generate scripts based on your input, existing configurations, and Exalate’s scripting API.
Let’s say you want to map and sync statuses between Jira and Salesforce. You can use the following prompt:
“I want to add incoming values to a Jira custom field to a custom field in a Salesforce case.”
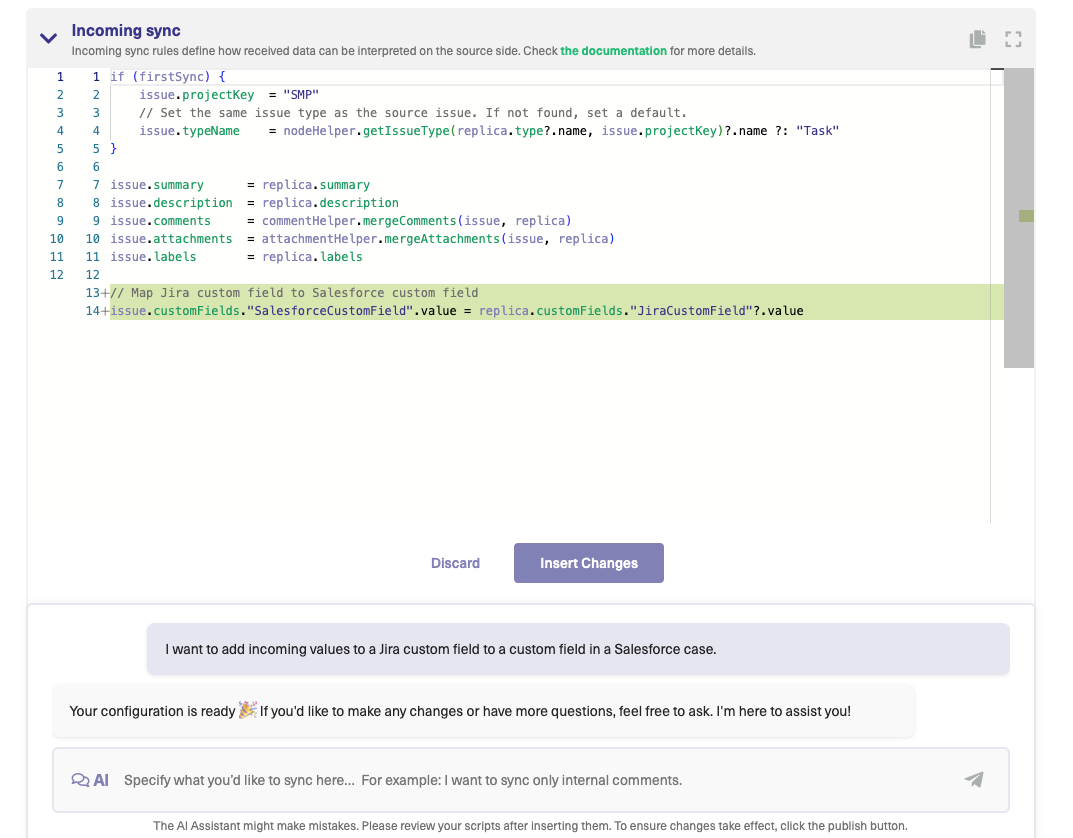
The generated script will be highlighted in green and red. Green indicates suggestions to include, while red indicates suggestions to delete.
You can accept or reject these suggestions—or continue working to refine the prompt. Once everything looks correct, publish your changes.
Note: The AI assistant is not perfect. So make sure to review the changes and test the connection before implementing it.
Benefits of Salesforce Data Integration
Merging your data with Salesforce comes with the following benefits for your business:
- Salesforce data integration rules allow you to sync all forms of data, including fields, attachments, descriptions, comments, and custom fields. This will help your business to fill in knowledge gaps and improve customer experience.
- Your business will gain control over all incoming, outgoing, and in-processing data. You can manage and visualize your data directly from the Salesforce CRM.
- Salesforce provides strict admin controls, which offer maximum security when sharing data between systems. The exchange portal also has fail-safe mechanisms to protect your data if the integration is unsuccessful.
- Businesses can use data integration tools for Salesforce to connect an unlimited number of instances from multiple sources. This will help your business dismantle silos and form a centralized data platform to improve decision-making and serve as a single source of truth (SSOT).
- Real-time data integration with Salesforce makes it easier to visualize your company’s data on a single interface using tools like Tableau CRM and Einstein Discovery.
- Salesforce reflects changes quickly—which will benefit businesses that rely on real-time, fast-paced data processing to maximize sales and boost customer satisfaction.
Challenges of Salesforce Data Integration
Common challenges encountered before, during, and after Salesforce data integration include:
Data Quality and Consistency
Your organization can only deem the data integration effort successful if the data quality is consistent across multiple iterations and systems.
You also need to avoid duplication, disorganization, and inaccuracies, which affect the insights and reports generated as well as the decisions.
System Compatibility and API Limitations
If you integrate Salesforce with other systems, you must ensure compatibility. This involves filtering and transforming data formats and licensing. When writing custom code, you must consider all these issues.
Pay attention to API limits and other hurdles. For example, Salesforce enforces several hard and soft limits on the number of requests available within a specific duration. Other systems also have similar limits.
Continuous Maintenance
For custom Salesforce data integration, your team needs to conduct regular maintenance checks to ensure the solution is checking all the boxes.
This often takes time and extra resources that could be channeled to pressing business needs. Unfortunately, ignoring maintenance and updates will only kick the can down the road paved with compliance thorns.
Salesforce Data Integration Best Practices
Merging your data in Salesforce can lead to permanent data loss or misplacement, which will harm business decisions.
To protect your business and customers’ data, here are best practices for Salesforce data integration.
Tidy your Data

Before you start any integration, you need to arrange your data. By doing so, your information will remain intact when it enters the Salesforce environment or vice versa. Otherwise, you will end up with jumbled-up data that will be of no use to your users.
Specify the Scope of the Integration
You have to determine if you want to integrate your entire data pool or if you only want to sync a subset of the existing data with Salesforce.
Since data integration takes a lot of time and effort, Salesforce data integration options ensure you stay within your budget—and your team members won’t waste their time and efforts.

Focus on improving data visibility and transparency across all projects and interdependent teams in order to facilitate a free flow of information. This will give your business a 360 customer view.
Create Integration Plan
The integration plan should detail how your company wants to organize the data, who is in charge of validating specific data sets, as well as the preferred storage environment.
You should also decide if you want to store your data on-site or in the cloud. Salesforce offers cloud tools for data storage, but you can also adopt a hybrid strategy to be on the safe side during synchronization.
Implement Layered Security
The only path to success for any Salesforce data integration is to invest in data security. Why? Because you need to shore up all potential leaks when handling sensitive customer or business information.
This involves the use of secure architecture, proper field configuration, tokenization, encryption, authorization, and edge protection.
Monitor Your Network
You need to establish a mechanism for monitoring the network to detect issues or potential vulnerabilities early. Pay attention to indicators and metrics such as latency, uptime, server response time, etc., to guarantee that Salesforce data integration is working as intended.
Conclusion
Salesforce data integration often goes smoothly when you have a clear scope, a foolproof integration plan, and a robust backup strategy. When it goes right, you can move all your data from platforms like Jira to the Salesforce CRM to obtain a 360 customer view.
Always sync your data using only trusted third-party applications to keep your sensitive information safe. For this guide, we used a Salesforce third-party integration solution called Exalate.
Ultimately, if you follow the best practices for Salesforce data integration, everything will go smoothly, and your business will make better data-driven decisions.
Recommended Reads:
- Salesforce Integrations: Integrate Salesforce and other Tools
- Advanced Integration Use Cases
- Salesforce Third-Party Integration: Set up a Bidirectional Sync between Salesforce and Other Tools
- Jira Salesforce Integration: How to Set up a Two-Way Sync between Different Teams
- Salesforce to Salesforce Integration: Sync Multiple Salesforce Instances Bidirectionally
- How to Set up an Azure DevOps Salesforce Integration
- How to Guides for Setting Up Bidirectional Integrations
- How to Set up a Salesforce ServiceNow Integration