If your teams use powerful platforms like Salesforce and ServiceNow to increase productivity and efficiency, a Salesforce ServiceNow integration can help them gather and collate their ever-increasing information in a better manner. It will help them share important and accurate information with each other, automatically and with the least fuss.
You can allow teams to stay on their own platform and, at the same time, share data bi-directionally with other teams. This guide walks you through why a Salesforce ServiceNow integration can be beneficial and how you can choose the right tool for achieving it. Then it goes on to discuss how to configure and implement such an integration end-to-end.
So let’s begin!
Get the Salesforce ServiceNow Integration Guide
Learn how to integrate Salesforce and ServiceNow, step-by-step.
Why Integrate Salesforce and ServiceNow
Salesforce is a leading CRM (Customer Relationship Management) platform that bridges the gap between customers and companies.
It provides a range of services and apps to different departments in the company, like sales, marketing, IT, and the like to help them enrich and enhance their relationships with customers.
ServiceNow is a cloud-based platform that automates workflows. It helps streamline routine work tasks, reducing the time spent on administrative work. ServiceNow also assigns and prioritizes incidents raised based on agent availability and skill level. It has its roots in ITSM (IT Service Management).
Why Do You Need a Salesforce ServiceNow Integration?
Both these platforms are capable of handling huge amounts of information, which is beneficial for the teams to do their tasks effectively.
This information, if shared between them, can help them enhance their overall business objectives. Customer service teams using ServiceNow can benefit from customer overviews, feedback, and queries from Salesforce. And the sales team using Salesforce can keep track of incidents reported by important customers.
Sometimes the same information both teams need exists on different platforms, leading to duplication and inefficiency.
So sharing this information will help different teams gather and collate important information within their own platforms. However, if done manually, it can be time-consuming, error-prone, and can even lead to incorrect or duplicate information.
If this is all done automatically and in real-time, it can help teams deliver better customer service and an end-to-end enhanced customer experience. The teams won’t even have to leave their platforms or switch between applications to exchange information. A Salesforce-ServiceNow integration can help teams achieve all this with the least possible fuss.

With such integration in place, teams can share relevant information between themselves. For instance, a sales team might only want to see the status of incidents that key customers raise and not other technical details of the incident. Similarly, the support teams might not want to view personal information about the customers, but only the technical details, if any, that can help them solve their incidents faster.
When implementing a ServiceNow Salesforce integration, it is important to choose the right tool for your scenario. This can help you realize the benefits of your integration in a better manner.
The Right Tool for Setting up a Salesforce ServiceNow Integration
It is crucial that your tool understands your integration scenario well and adapts to it seamlessly, as every integration case is unique.
Security is also an important aspect of information exchange. So look for tools that have inherent security mechanisms like encrypted file transfer, secure transfer protocols, role-based access controls, and the like.
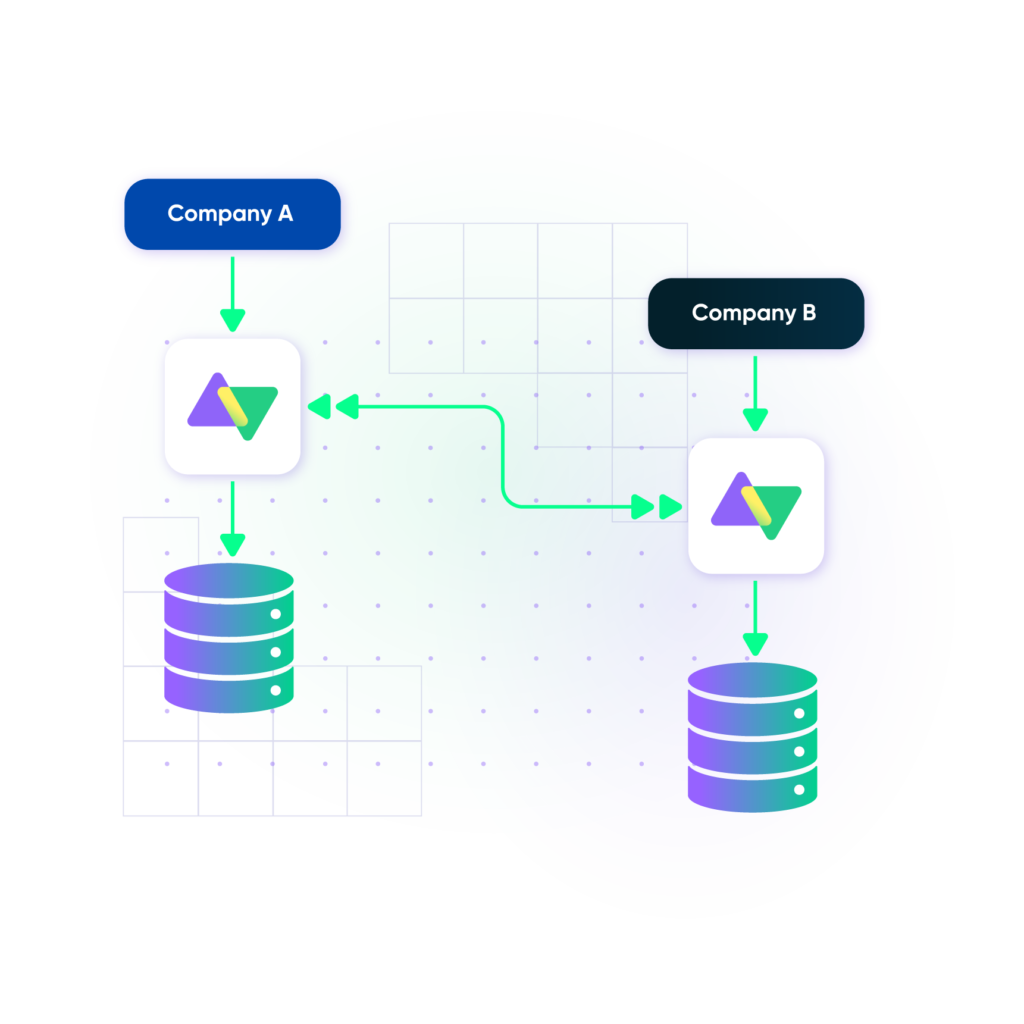
Tools supporting decentralized integration can help both sides of the integration control what they share with the other side and how to interpret information coming from the other side. This ensures that both sides have autonomy and can work independently.
The integration tool must also be reliable to address issues related to downtimes and system failures without manual intervention. Changes must be queued and applied in the same order as their initiation, without the integrating parties noticing the outage.
You might also want to integrate with your other partners, suppliers, customers, or vendors in the future. Having a tool that already integrates with the applications they use will make it easy for you to make the transition.
Exalate has the flexibility to adapt to your unique integration case with the help of its scripting engine. It also presents you with a powerful AI Assist feature that complements the Groovy-based engine.
So you don’t need to spend a lot of time configuring your tool to fit your case; you simply change the sync rules and get going.
Additionally, it is also ISO 27001 certified.
Note: Want to learn all about Exalate’s security and architecture? Read this whitepaper.
Exalate supports a distributed integration, where each side controls what information you send and receive independently without any interference from the other side.
It has a transactional synchronization engine that allows applying changes queued for synchronization in the same order as their initiation without manual intervention, even if there’s downtime, or your system is being upgraded or your firewall is being configured.
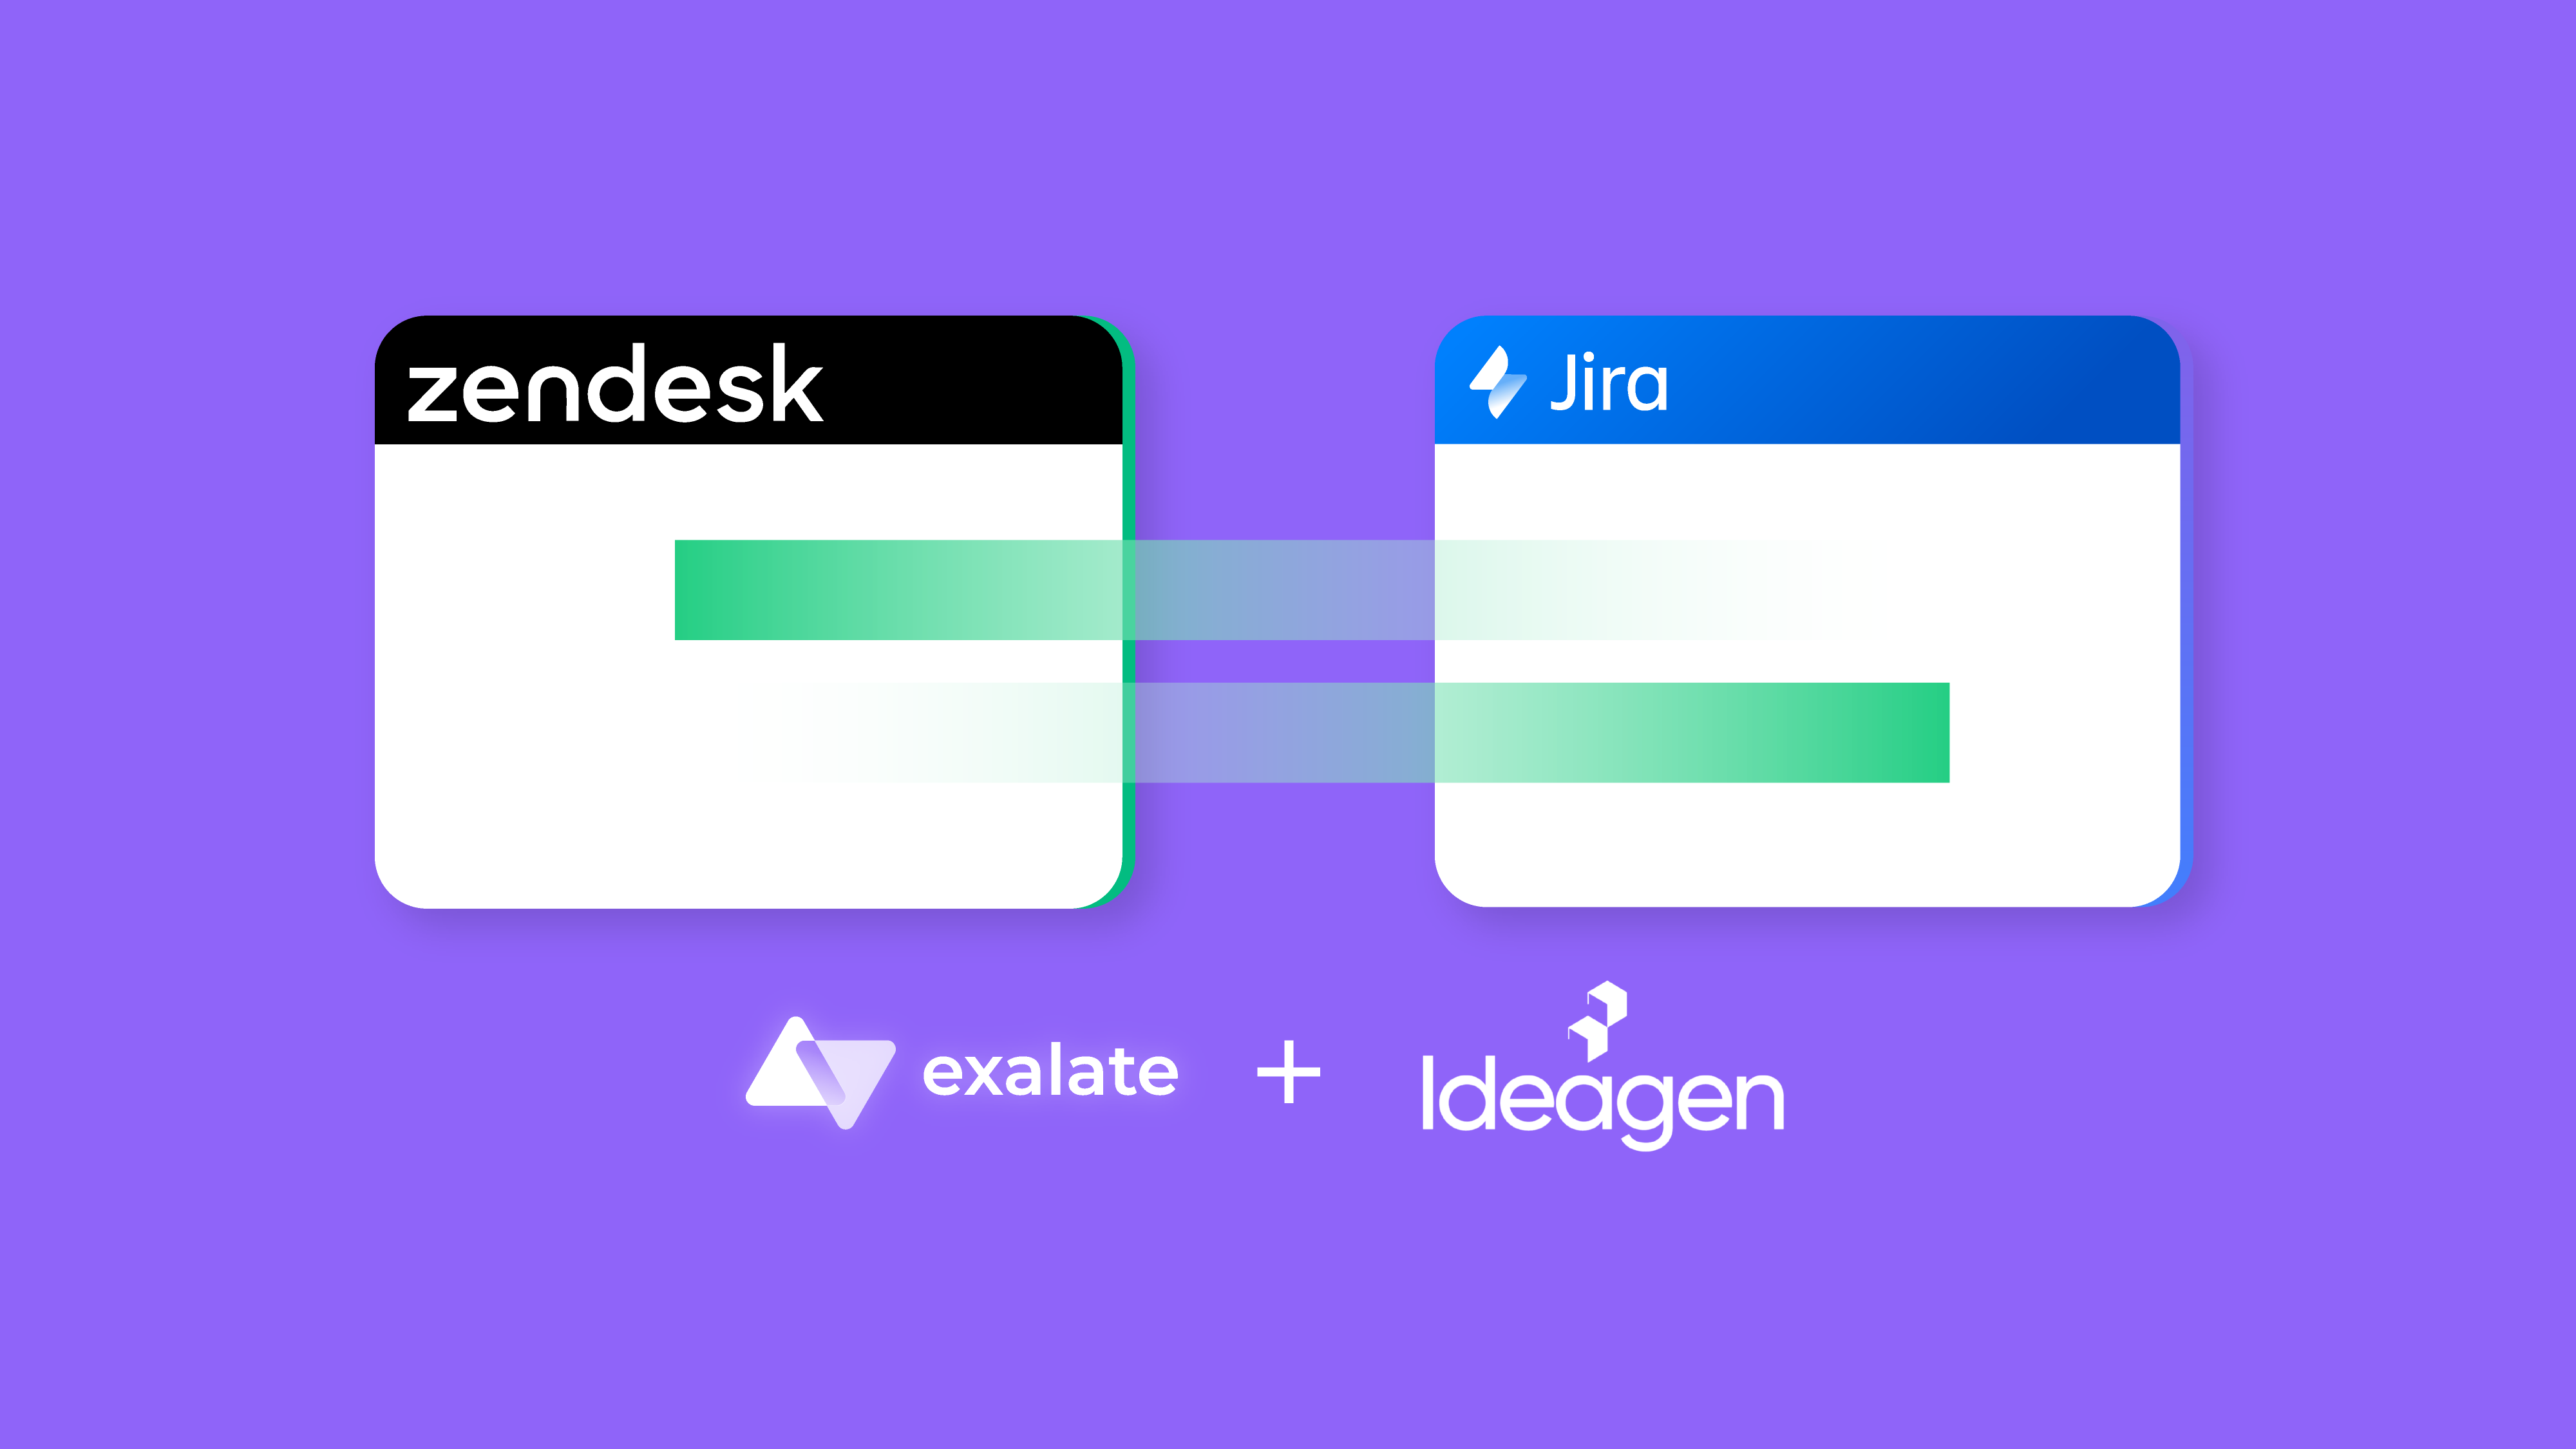
It also comes with integrations for Jira (on-premise and cloud), Github, Zendesk, Azure DevOps, and Integration as a Service. So if these are the applications that the companies you want to integrate with use, then you can simply extend your Exalate network.
This was just a head start. Let’s see how to configure a Salesforce ServiceNow integration.
How to set up a Salesforce ServiceNow Integration
We’ll discuss the step-by-step process of this integration, but if you’re a video person, go ahead and watch this tutorial instead.
To set up a Salesforce ServiceNow integration, you need to first install Exalate on both sides.
Request your free trial and start straight away by visiting the Exalate integrations page.
Once done, you can follow this guide to configure it and share the incoming and outgoing information on each side independently of one another.
After that, you can start your synchronization.
Step 1: Install Exalate on Salesforce
To install Exalate on your Salesforce instance, you first need to request a trial. You can do that either from the Atlassian marketplace, Salesforce AppExchange, or the integrations page.
We will discuss the process from Salesforce AppExchange here.
Click the “Get it now” button and login if you still haven’t.
Decide where to install Salesforce: either “Install in This Org” or in a Sandbox org.
Let’s install it in this org.
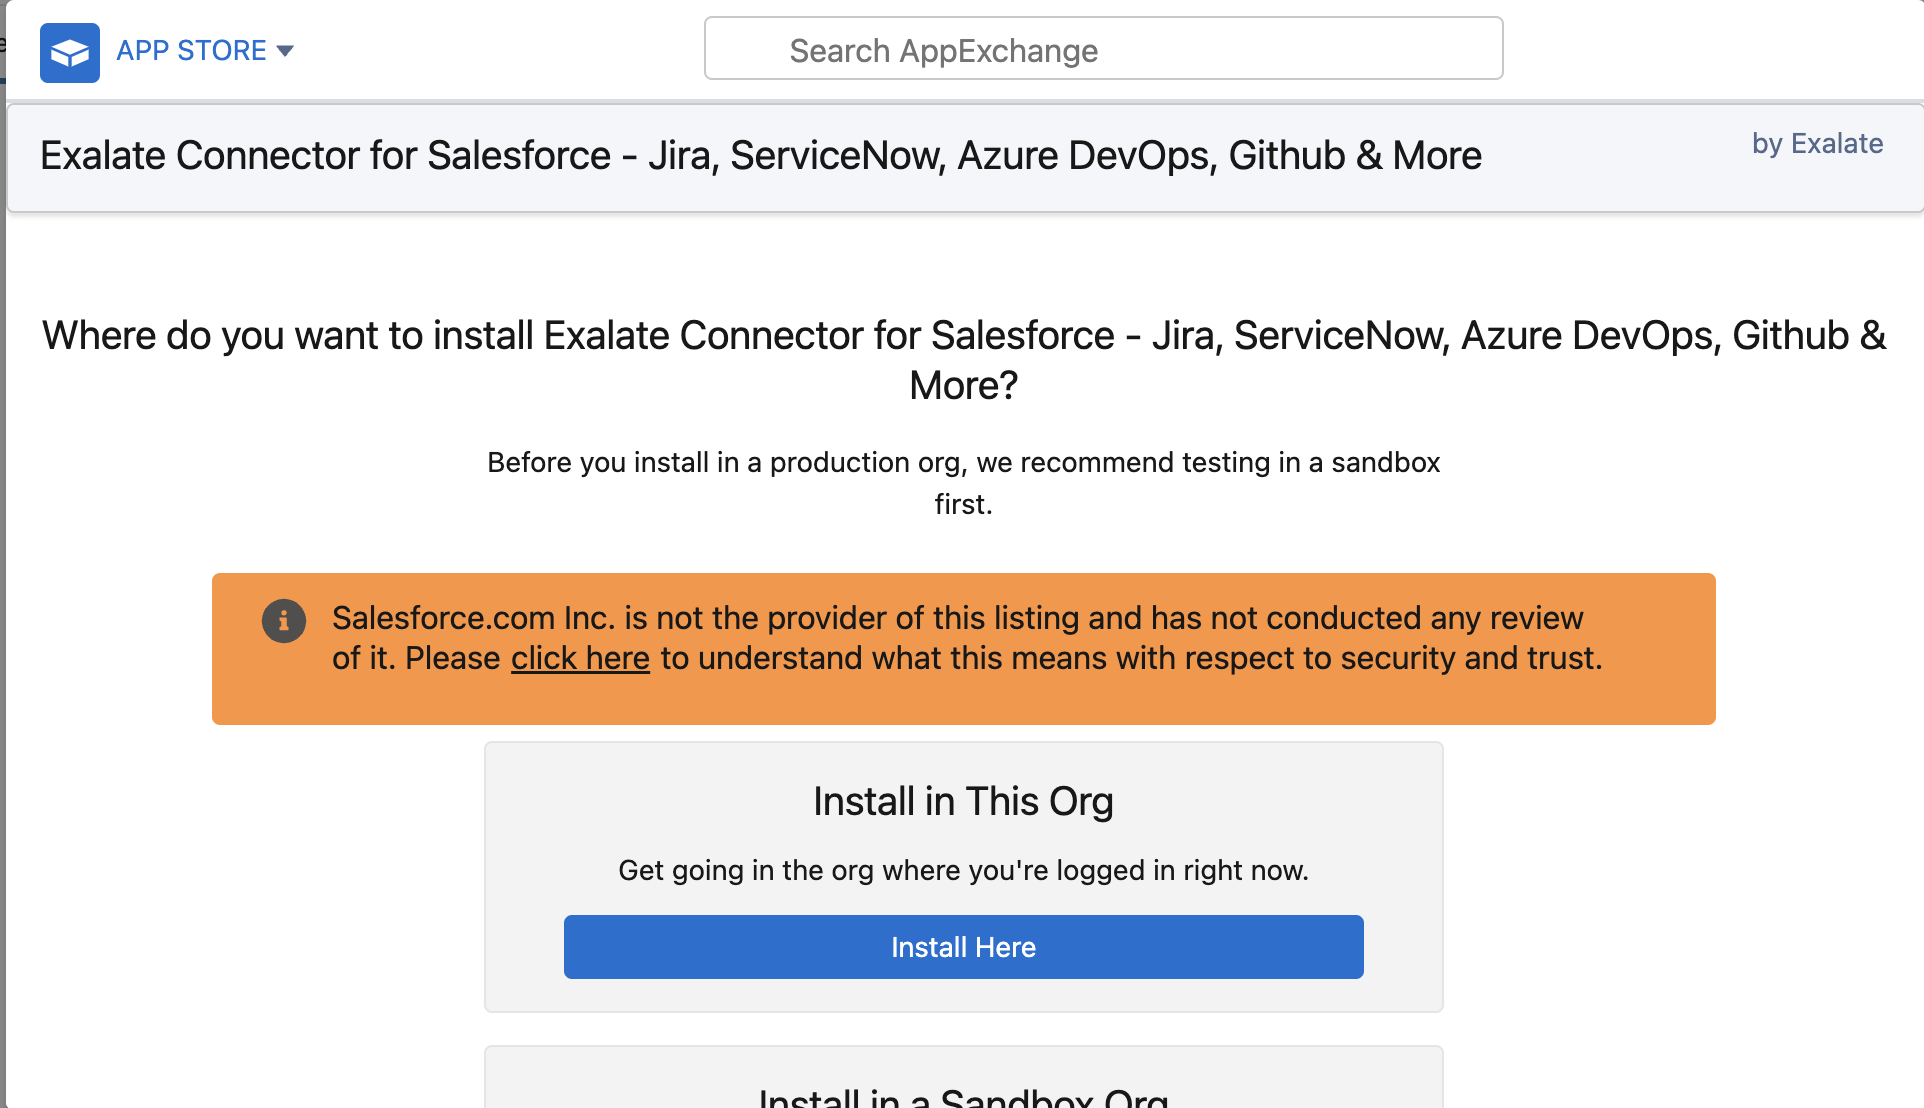
After making your selection, scroll down to the bottom of the screen and agree to the terms and conditions. Then, simply press “Confirm and Install”.
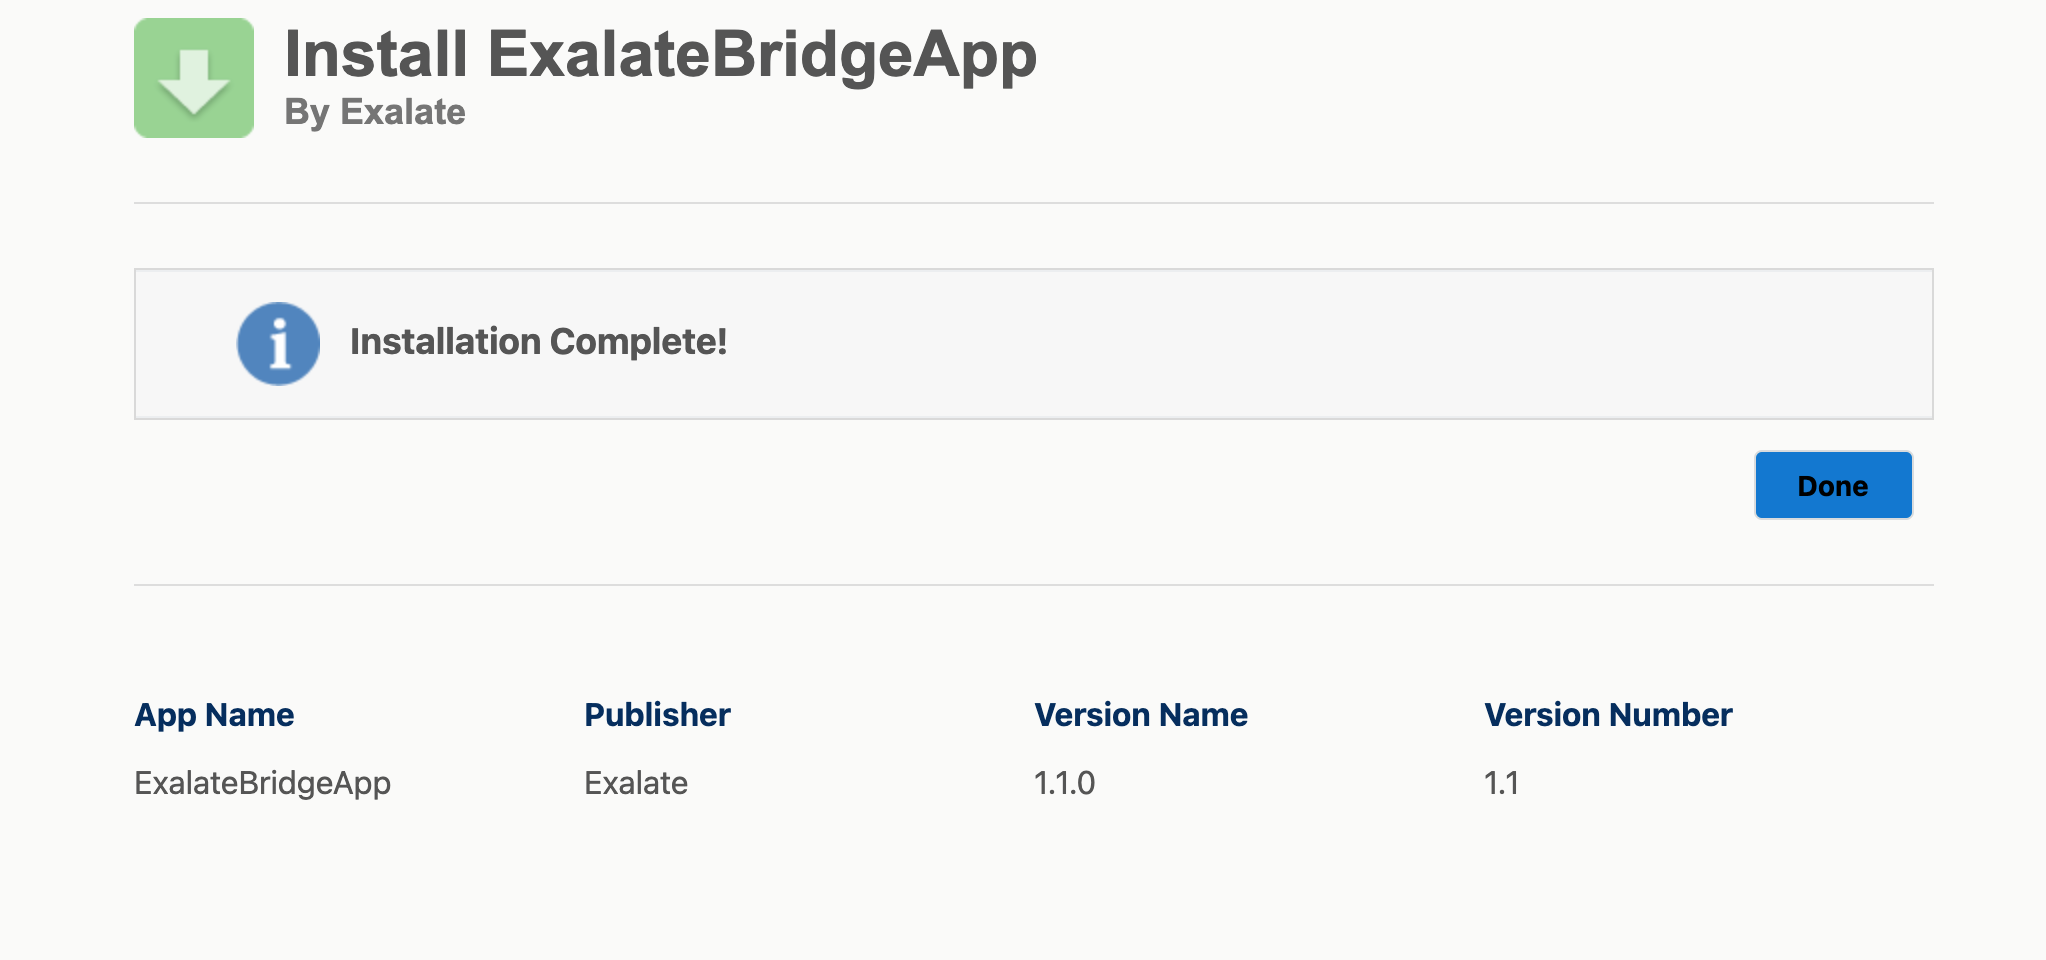
Now, you’ll be asked to choose the users for whom you want to install Salesforce. You have the option to change this later if needed. In my case, I went with “Install for All Users” and clicked “Install”.

Next, proceed to “Approve Third-party Access” and click “Continue” to move forward with the installation. Once the process is complete, click on “Done” to finalize everything.
Now, go to your Salesforce instance and create a connected app.
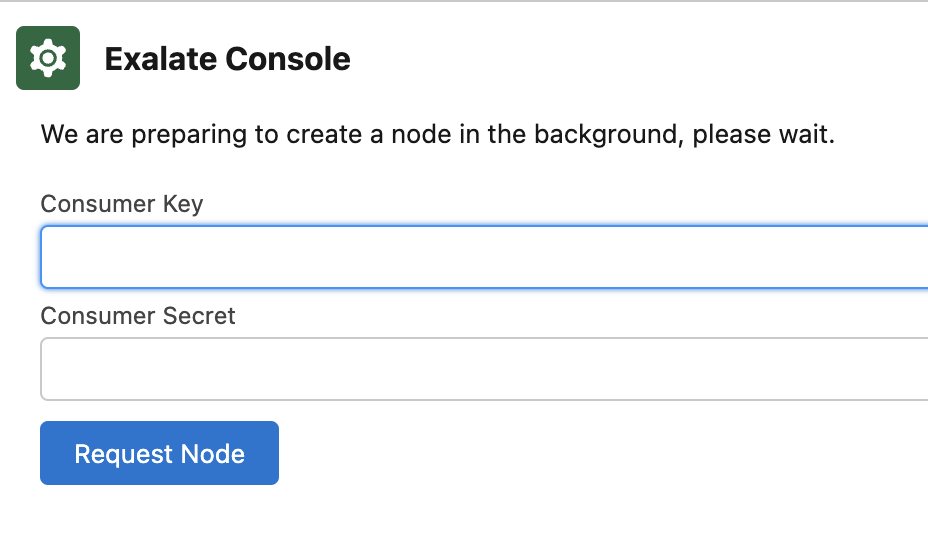
Remember to save the “Consumer Secret” and “Consumer Key” that are provided during this setup. Afterward, go back to your Salesforce instance, navigate to “Apps,” and search for “Exalate”.
To request an Exalate node, enter the “Consumer Secret” and “Consumer Key” you saved earlier, and then click “Request Node”.
Now, head over to “Setup” and search for “Trusted URLs”. Then, click “Add new trusted URL”.
Type in the following information in the “Trusted URL information” section:
- API name: free input string
- URL: *.exalate.cloud
Remember to check all the boxes in the “CSP Directives” section and click “Save”.
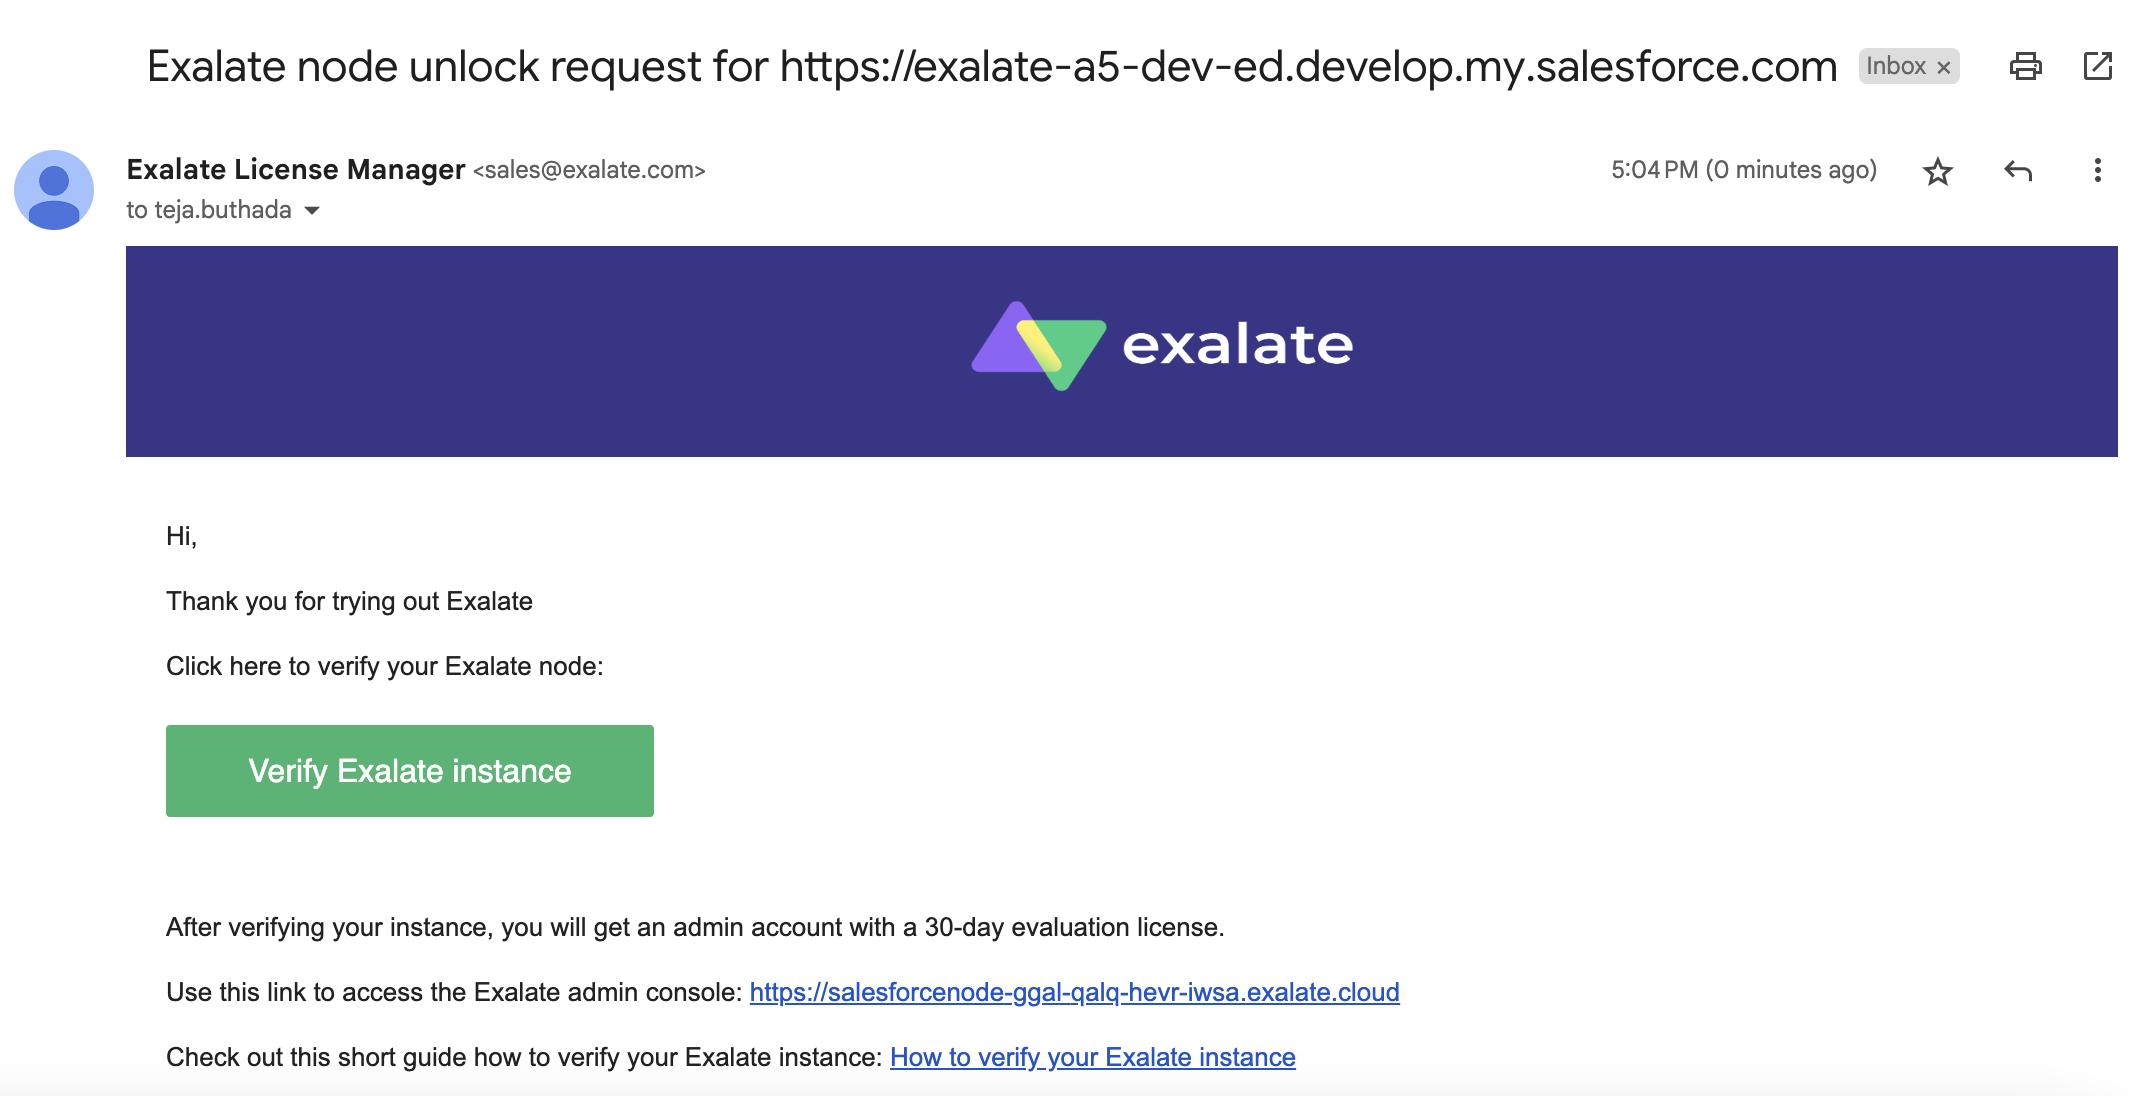
Upon clicking “Allow,” you’ll grant access permissions to Exalate. Next, provide your details and click “Agree and Submit”. Now, simply wait for an email from the Exalate License Manager.
When you receive the email, click “Verify Exalate instance” to be redirected to the Exalate admin console.
If necessary, follow these steps to log in to your Exalate for Salesforce console.
Once done, you can start using Exalate right away! But if you still have to install it on ServiceNow, proceed to the next step.
Note: Exalate accesses Salesforce through APIs. Salesforce has its guidelines for API Access add-ons. For instance, API access is provided by default in Enterprise accounts, while it is not the case with other accounts like Professional. Visit this documentation page to learn about the different Salesforce editions Exalate supports.
Step 2: Install Exalate on ServiceNow
You can request a ServiceNow instance by visiting the Exalate integrations page.
Enter your details and submit. The Exalate team will reach out to you with the node.
Alternatively, you can also install it from the Atlassian marketplace.
You also need to download an XML file. This file consists of information ServiceNow will need to access Exalate. Get it here.
Next, log in to your ServiceNow account. In the left-hand menu, search for “System Update Sets”. Click on the “Filter navigator” search box if the list is too long and you cannot find it. Now expand the “System Update Sets” by clicking on it. In the entry, select “Retrieve Update Sets”.

Under the “Related Links” heading, click on “Import Update Set from XML”.
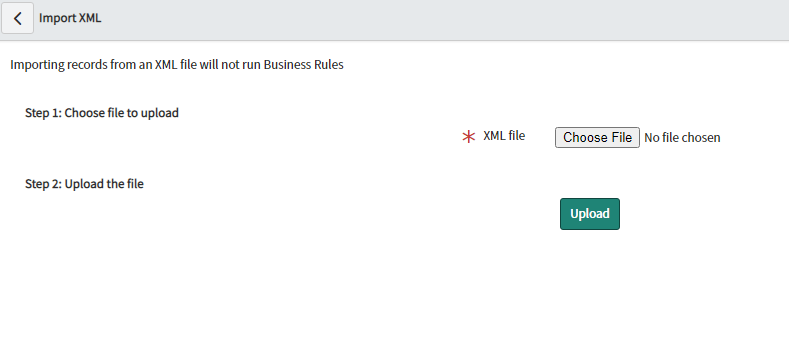
Choose the XML file that you have downloaded and click “Upload”. After a successful update, the XML file will appear on the list. Now click on the “Preview Update Set”.
Click on “Commit Update Set” to finish the installation of Exalate on ServiceNow.
You can now proceed to the next step.
Step 3: Set up a Connection between Salesforce and ServiceNow
Before you can start synchronization with Exalate, you need to establish a connection between Salesforce and ServiceNow. The connection defines how your synchronization behaves, and it specifies your sync rules and scope.
One side initiates the connection, and the other side accepts it. You can do this from either the Salesforce or the ServiceNow side. The Exalate UI is uniform across different platforms, so you can perform the remaining steps on either side.
Let us start initiating the connection from the ServiceNow instance.
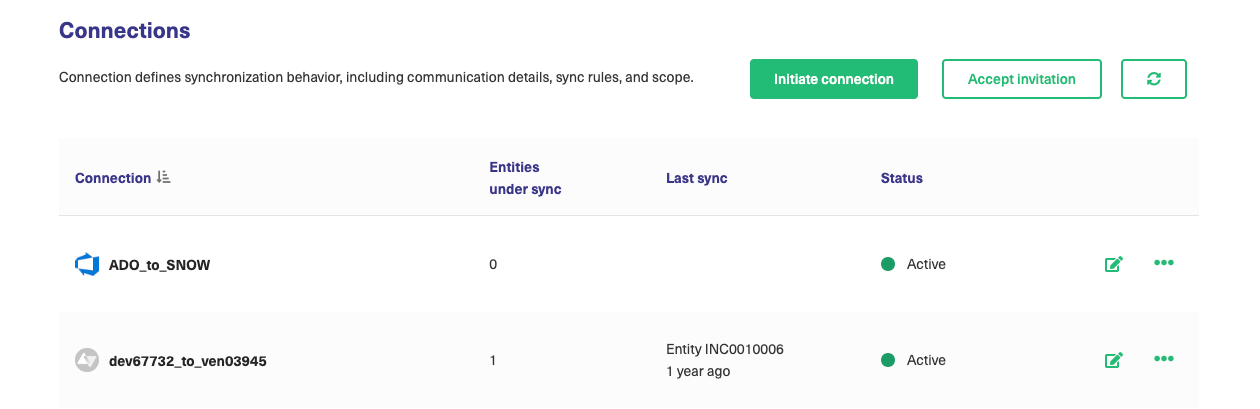
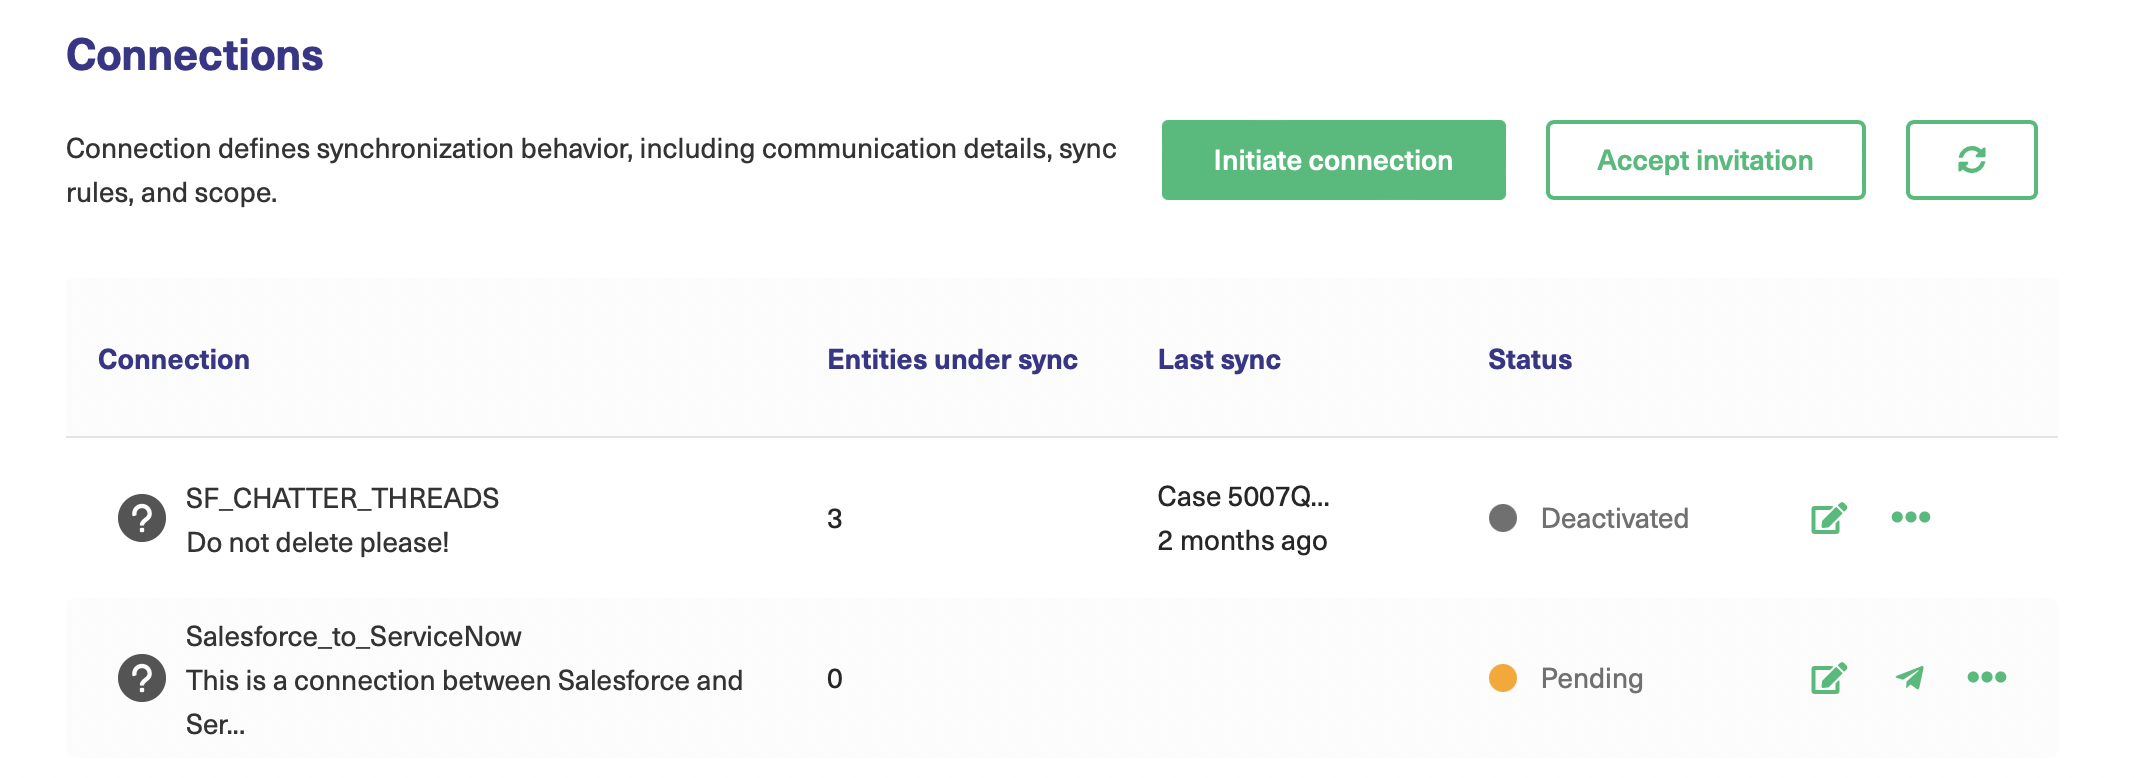
To do this, in the Exalate left-side menu, click “Connections”. This screen has a list of all your connections. If it’s your first time, it will be empty.
Start by clicking “Initiate connection”.
A pop-up will appear. Enter the destination URL in the text box. The destination means the other side you want to connect with. In our case, that’s ServiceNow.
In case you don’t know the URL, you can navigate to the Exalate console on ServiceNow and click on “General Settings” in the left-hand menu. Copy the URL from there.
After entering the URL, Exalate performs a quick check to see if it’s been installed on the other side. You will get appropriate status messages.

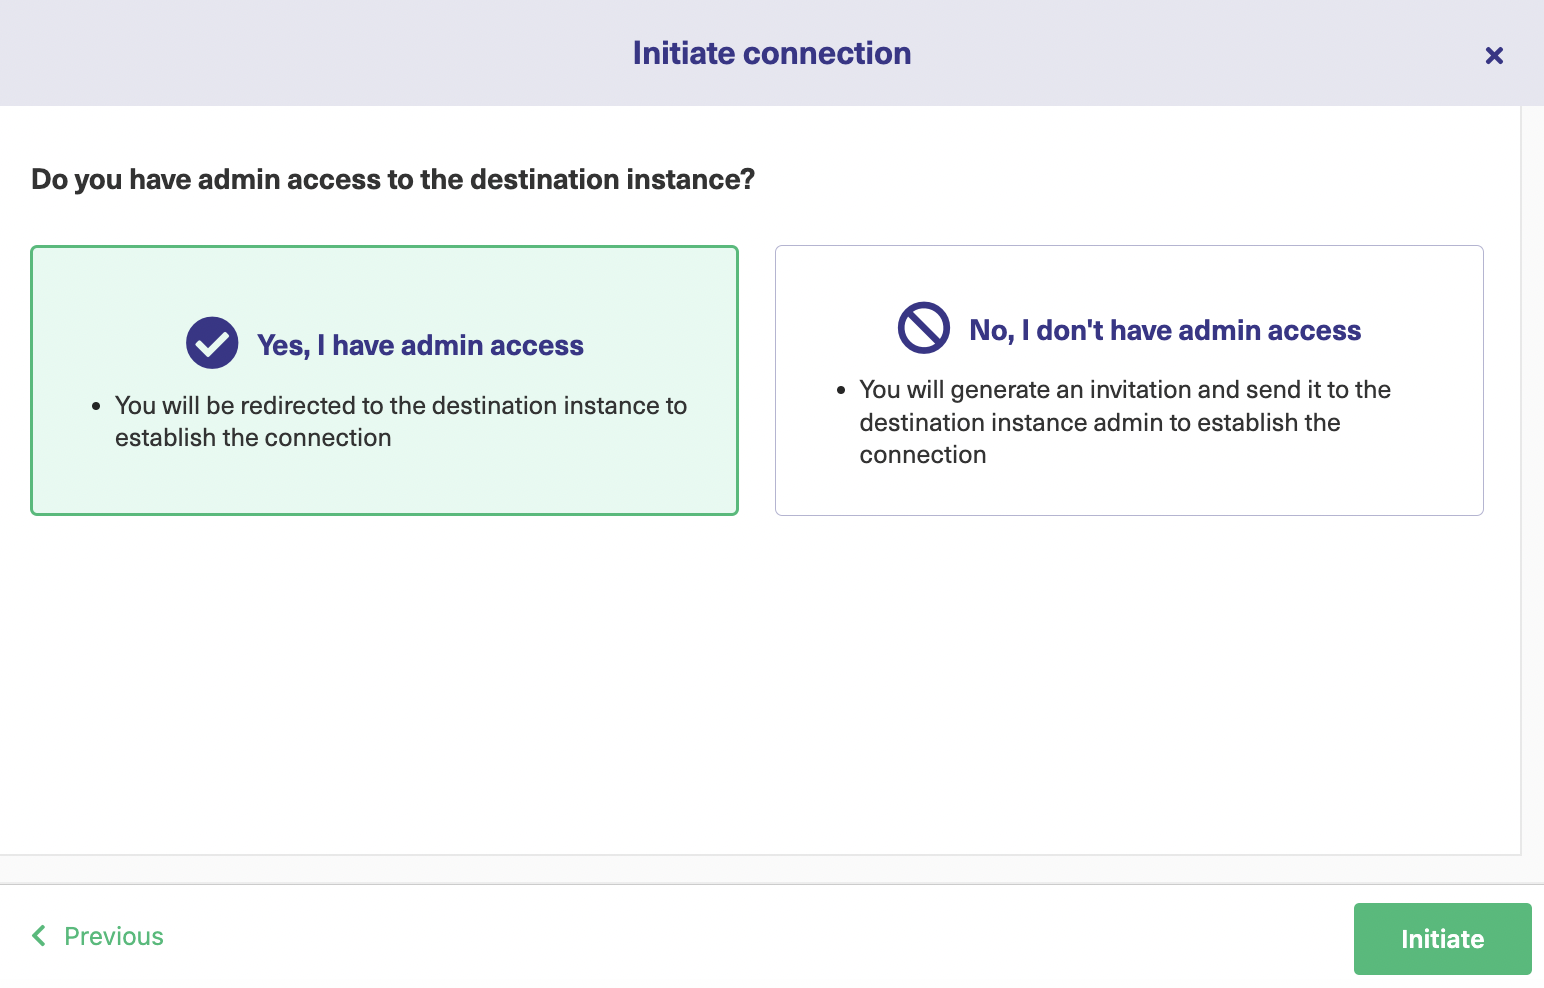
You are then prompted to choose the mode of connection.
Exalate supports 2 modes: Basic and Script. The UI for both these modes is slightly different, so we will take a look at both of them in detail.
Continue with the Basic Mode
The Basic mode is a no-code configuration UI. It comes with pre-defined sync rules and mappings that you cannot change. It’s suitable for your basic synchronization needs. But if you need some advanced customizations, you can upgrade to the script mode anytime!
Note: Exalate also comes with a Forever Free plan. With this plan, you can have Basic mode connections with up to 1000 free syncs per month. Get started with the Free plan here.
To continue with this mode, click “Yes, I have admin access” on the next screen if you have access to the ServiceNow instance. Click no if you don’t, and Exalate will generate an invitation code for you, which you can copy and paste on the ServiceNow side. You can refer to the details on how to go about this in the Script mode section.
Either way, click “Initiate”.
After a quick verification, you will be redirected to the ServiceNow side.
Here, you can start your first synchronization by entering the incident number and clicking “Exalate”.
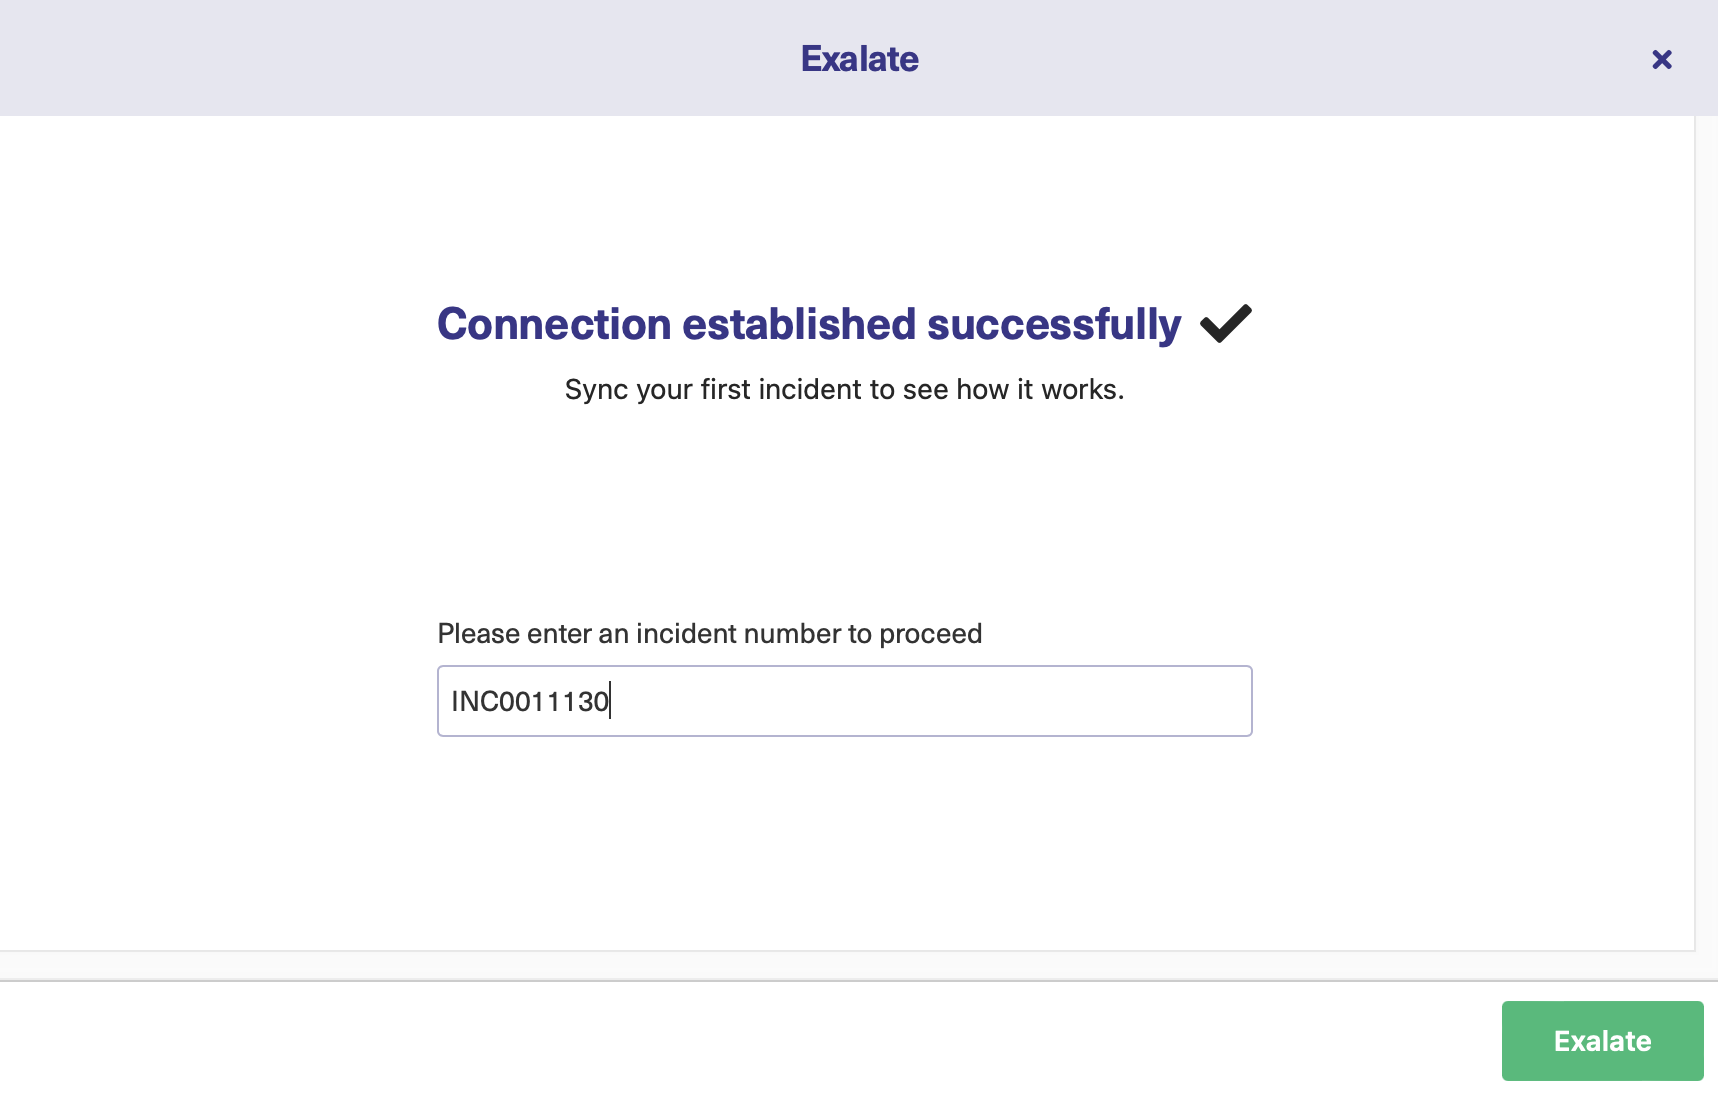
You can also choose to synchronize later by closing this window and creating triggers or using the “Bulk Connect” option.
Note: At this point, you can even go to the Exalate console on the Salesforce side. You will see a similar screen there, asking you to enter the Case key to sync. If you don’t see this screen, you can click on the 3 dots next to your connection name in the “Connections” tab and click “Exalate”.
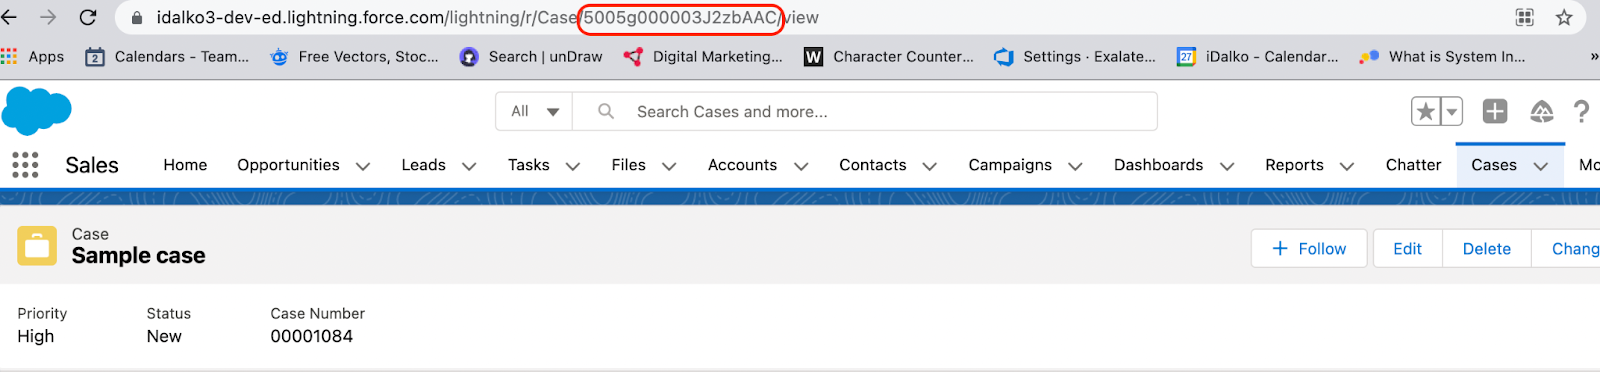
For fetching the URL of Salesforce entities you must click on that entity and copy the number from the URL, as shown in the image below.
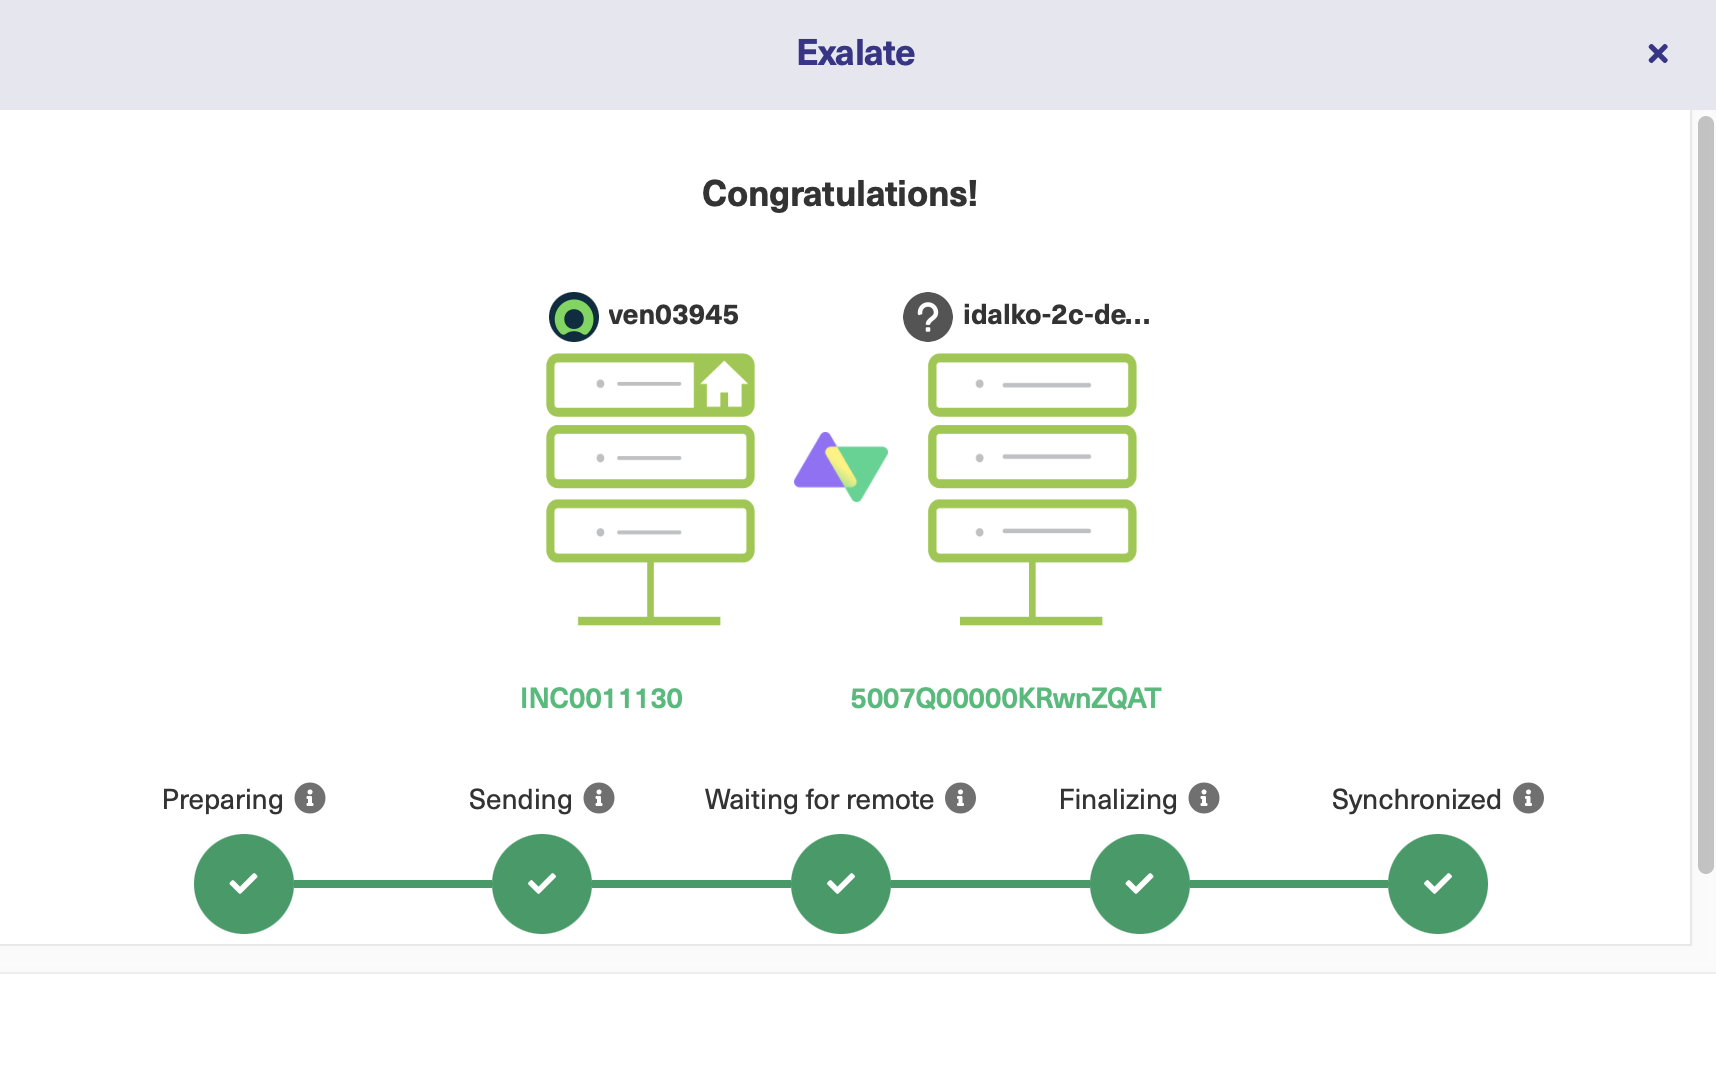
Wait for some time.
A successful synchronization looks like this. You can click on the remote link to see the synced entity on the Salesforce side, or you can click on the incident number link to go to the incident on the ServiceNow side.
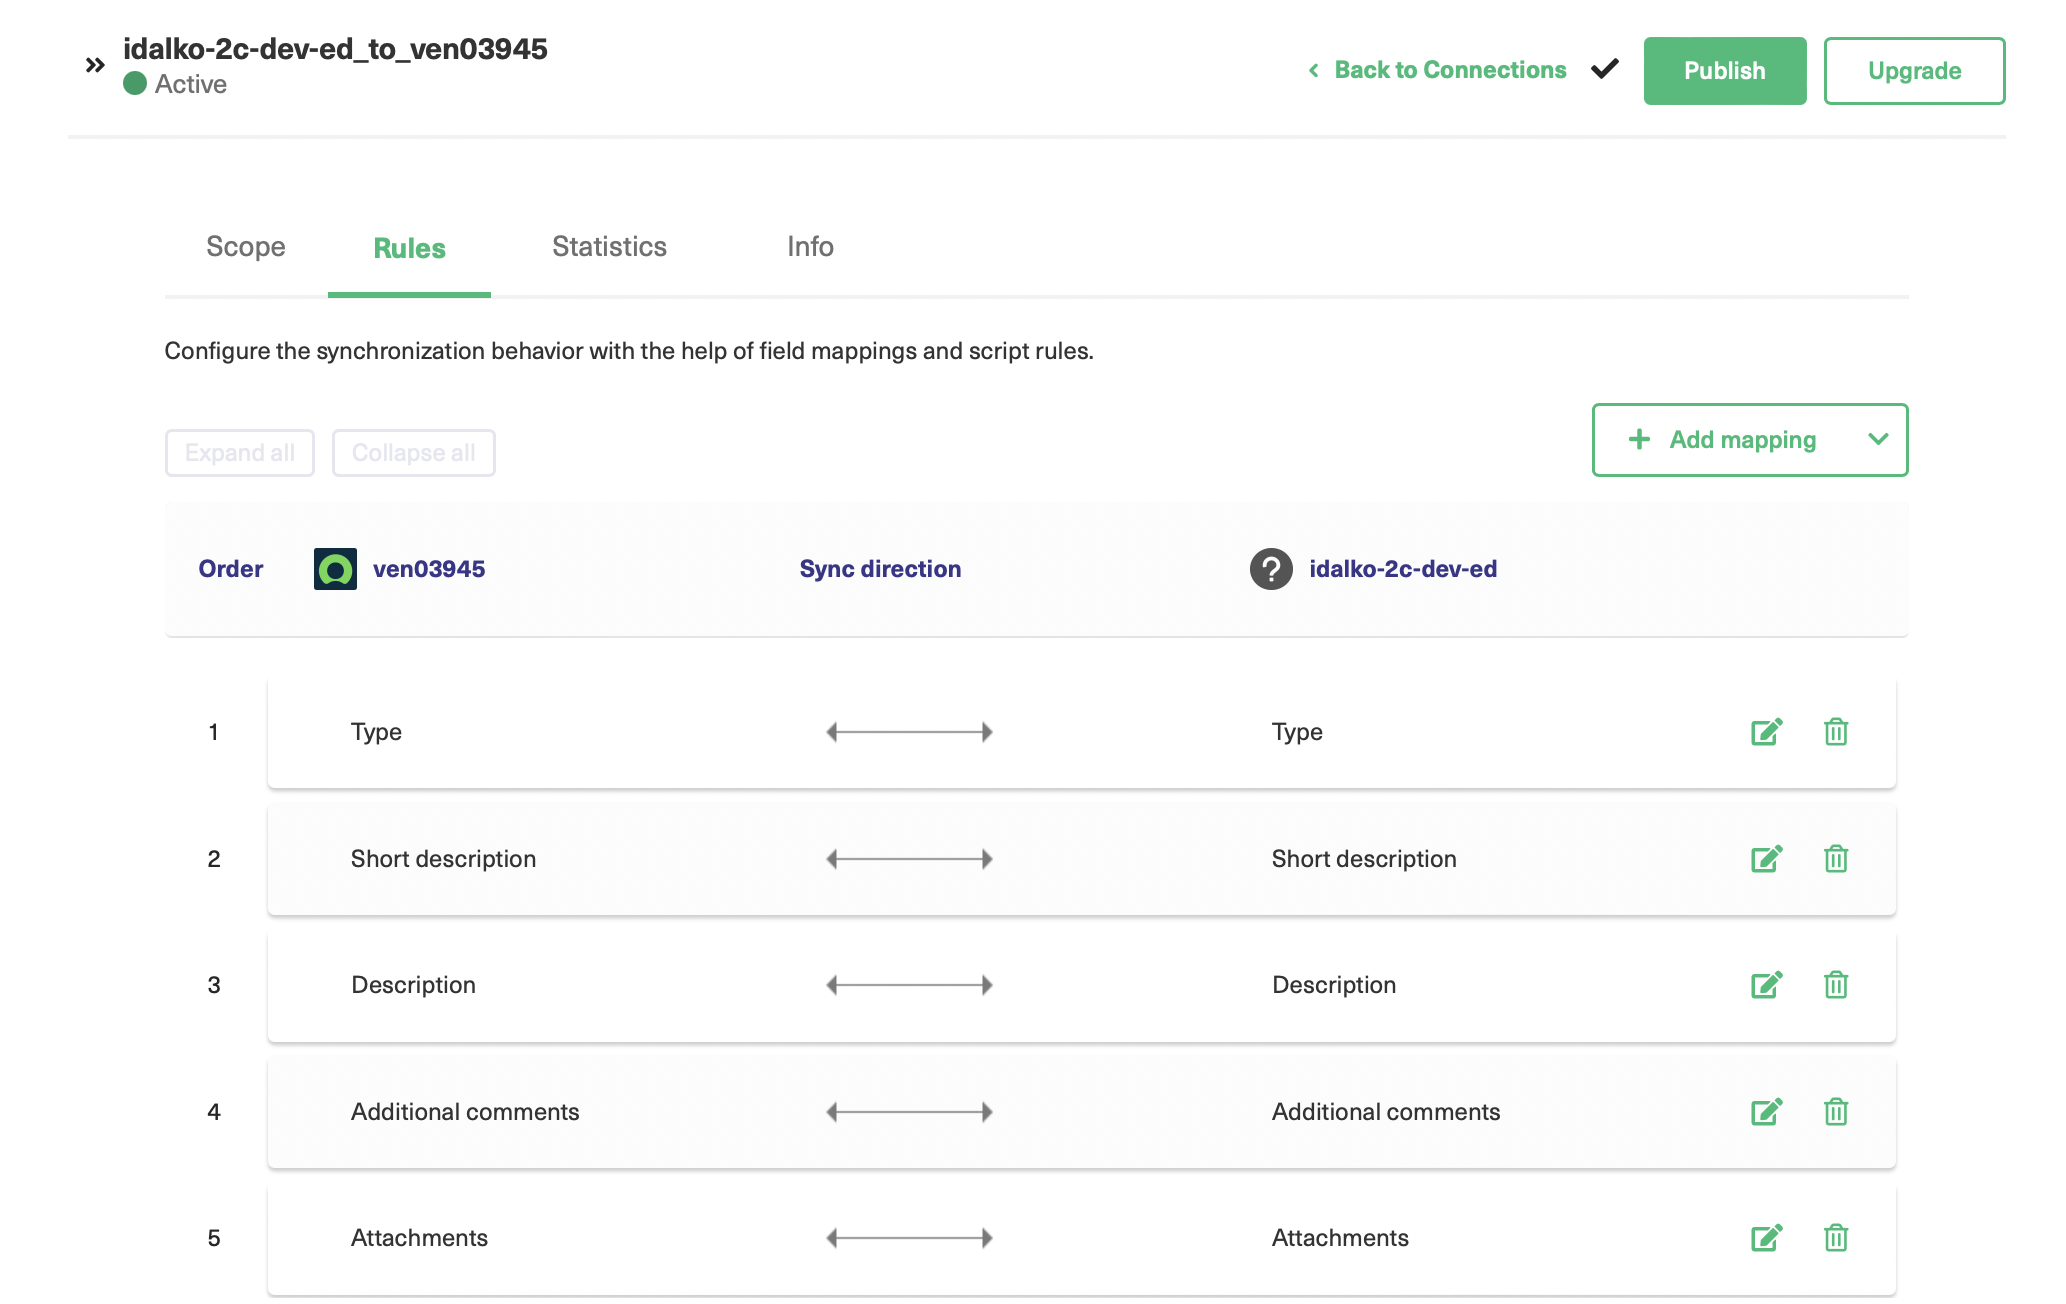
To view the default mappings of the Basic mode connection, click on the edit connection icon next to the connection name under “Connections” in the Exalate console.

As seen, you cannot change these default mappings, but choose to upgrade for advanced integration use cases.
Continue with the Script Mode
If you have complex and advanced use cases, we recommend you use the Script mode. It gives you the ability to modify the sync rules and control what and how information is shared with the other side.
To continue using the Script mode, you must generate an invitation code from one side and accept the code on the other side.
We have already initiated the connection from the ServiceNow side.
Select “Script” on the screen below and click “Next”.
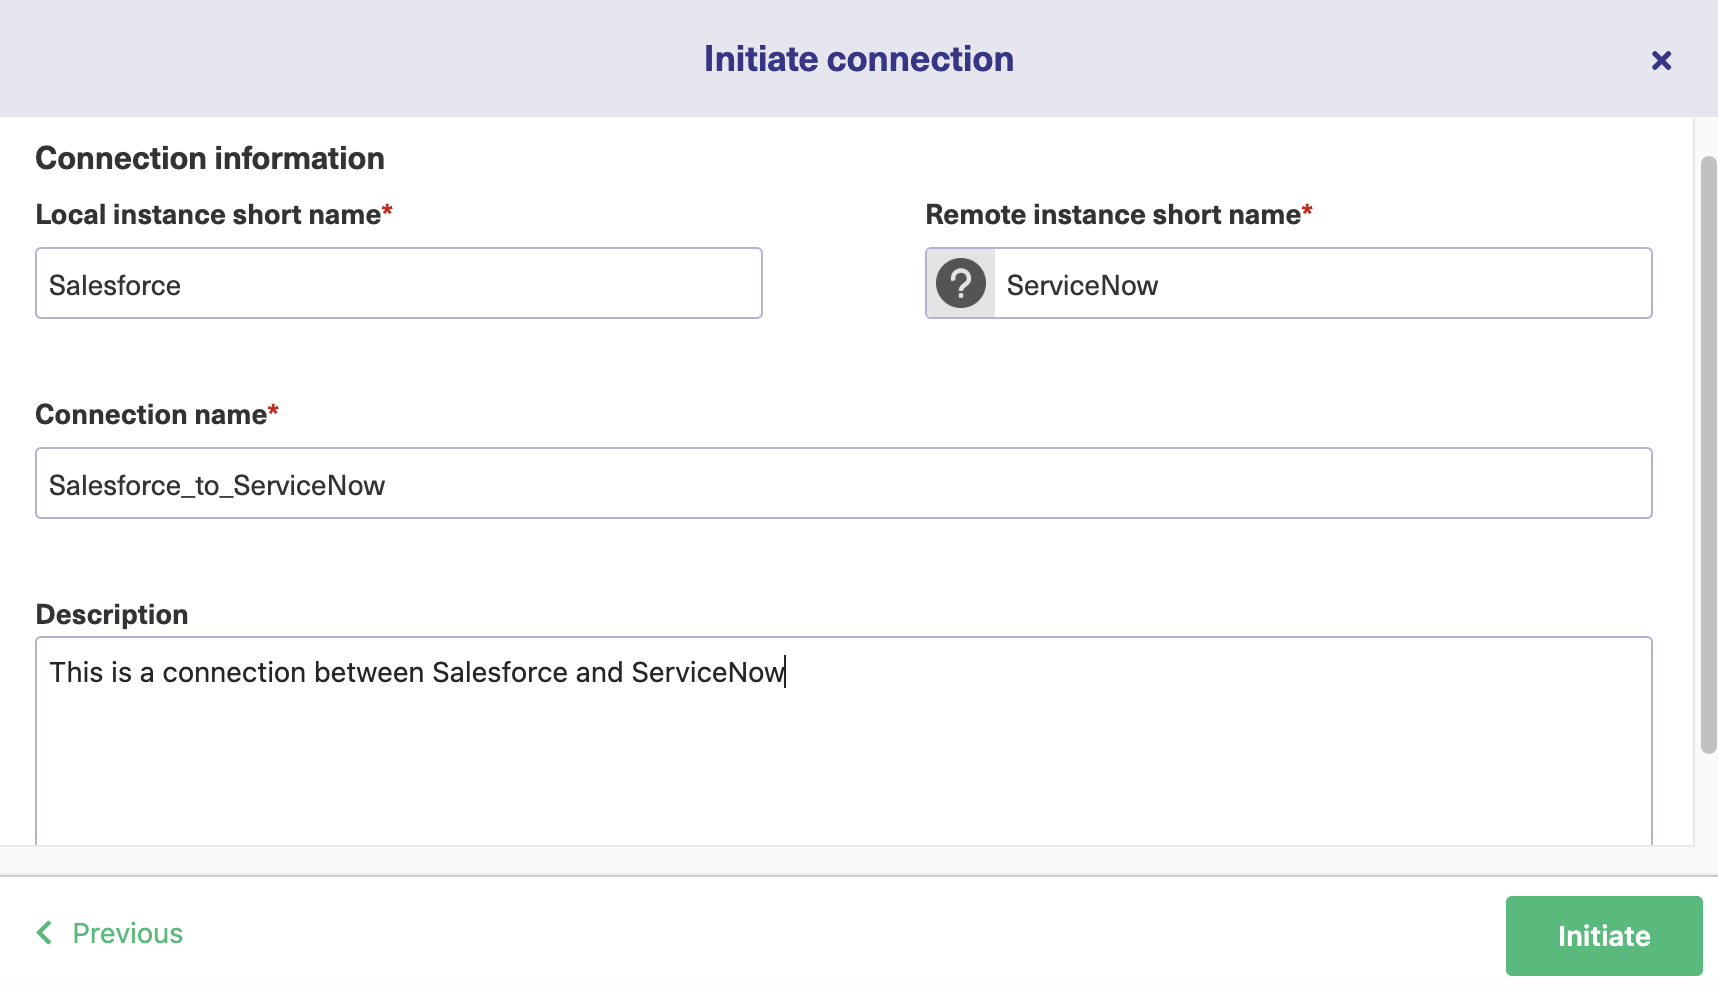
Name the connection now.
For this, you must give a name to your local instance (Salesforce in our case) and also to the remote instance (ServiceNow). Exalate automatically generates a connection name for you by combining the local and remote instance names. But you can change it if you want.
Also, give it a description, because it is extremely useful when you have a lot of connections and it becomes difficult to know why you created them in the first place.
Whenever you are ready, click “Initiate”.
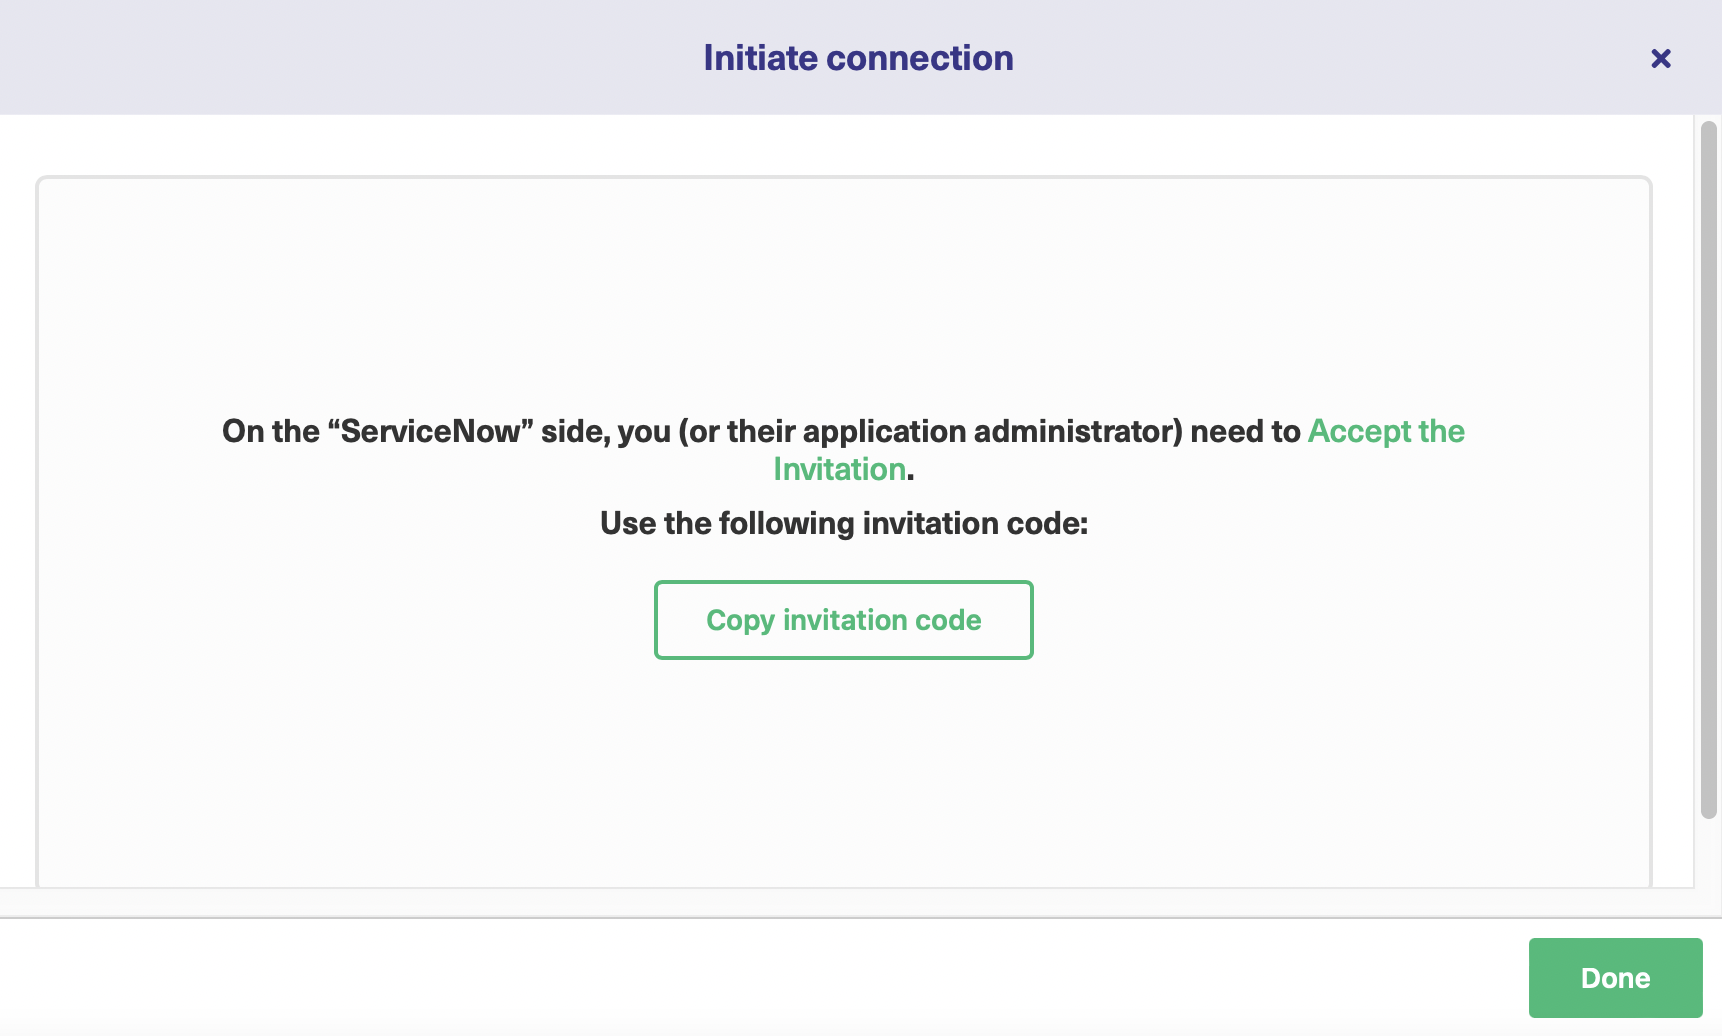
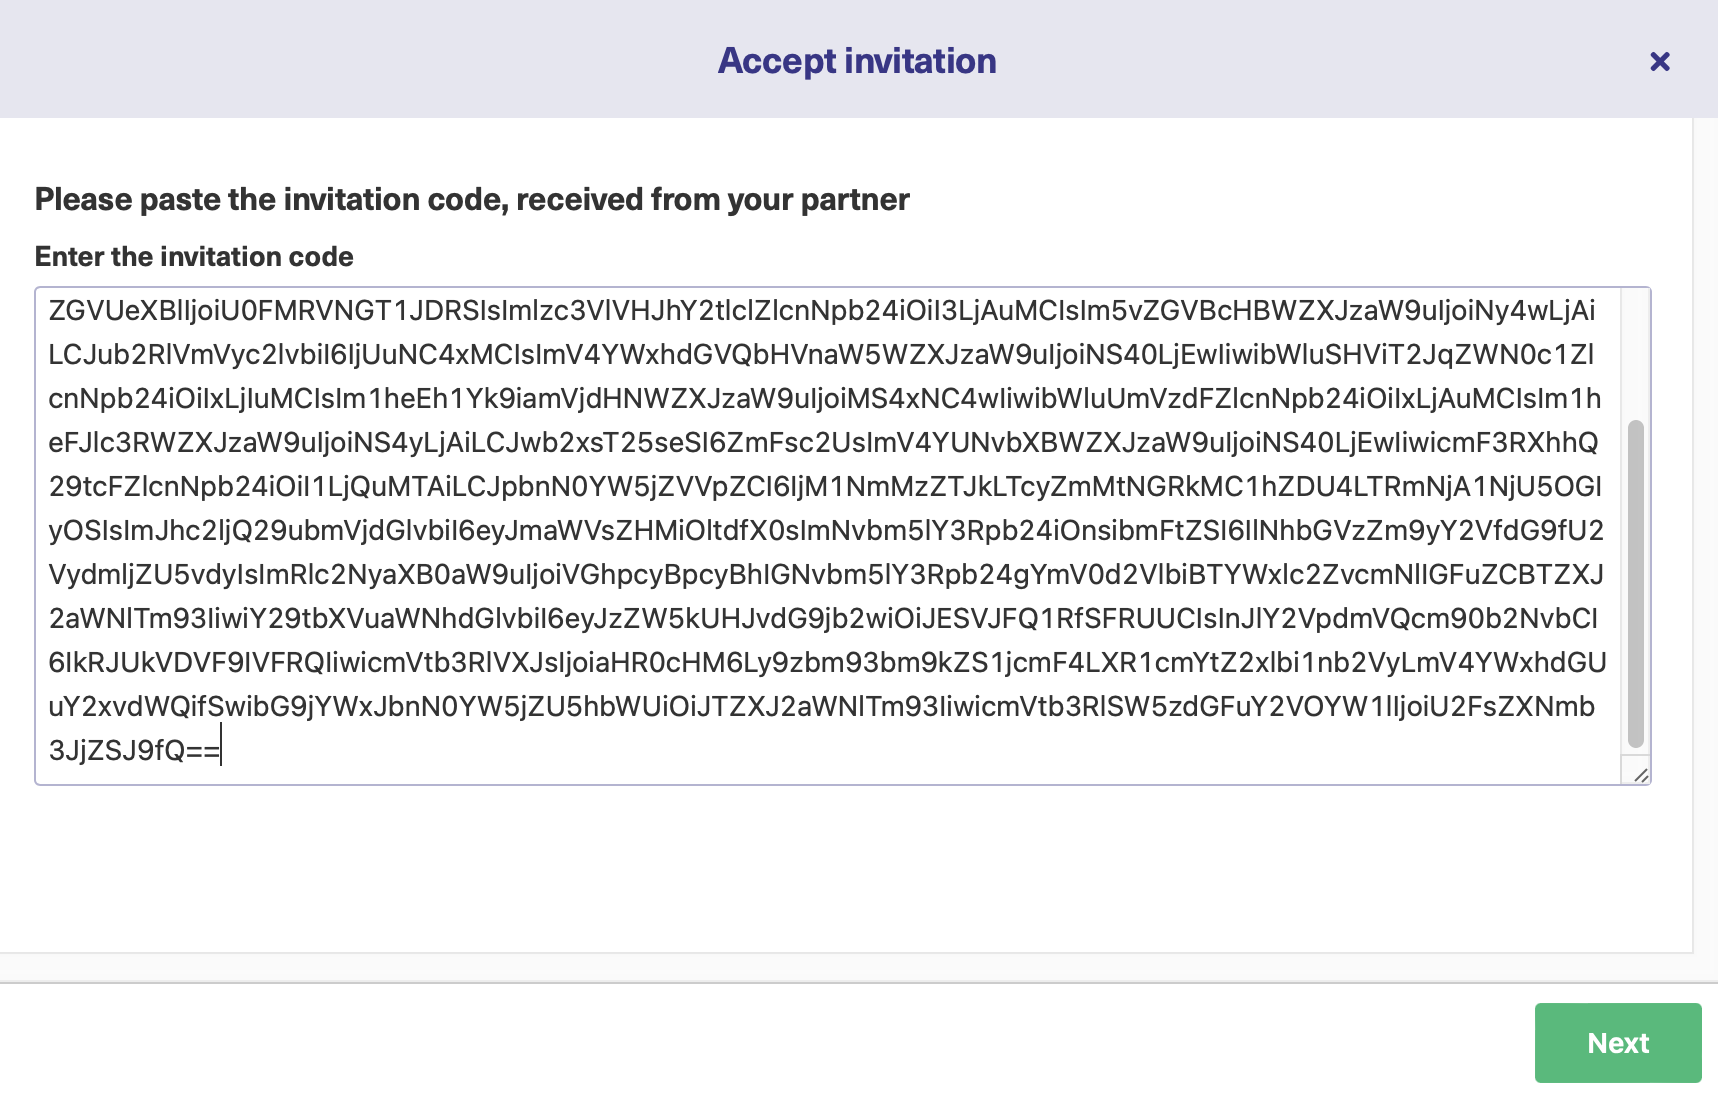
An invitation code is generated. This is a unique string that Exalate generates for every connection you set up. It is a part of its security mechanism.
Copy the code somewhere safe and click “Done”.
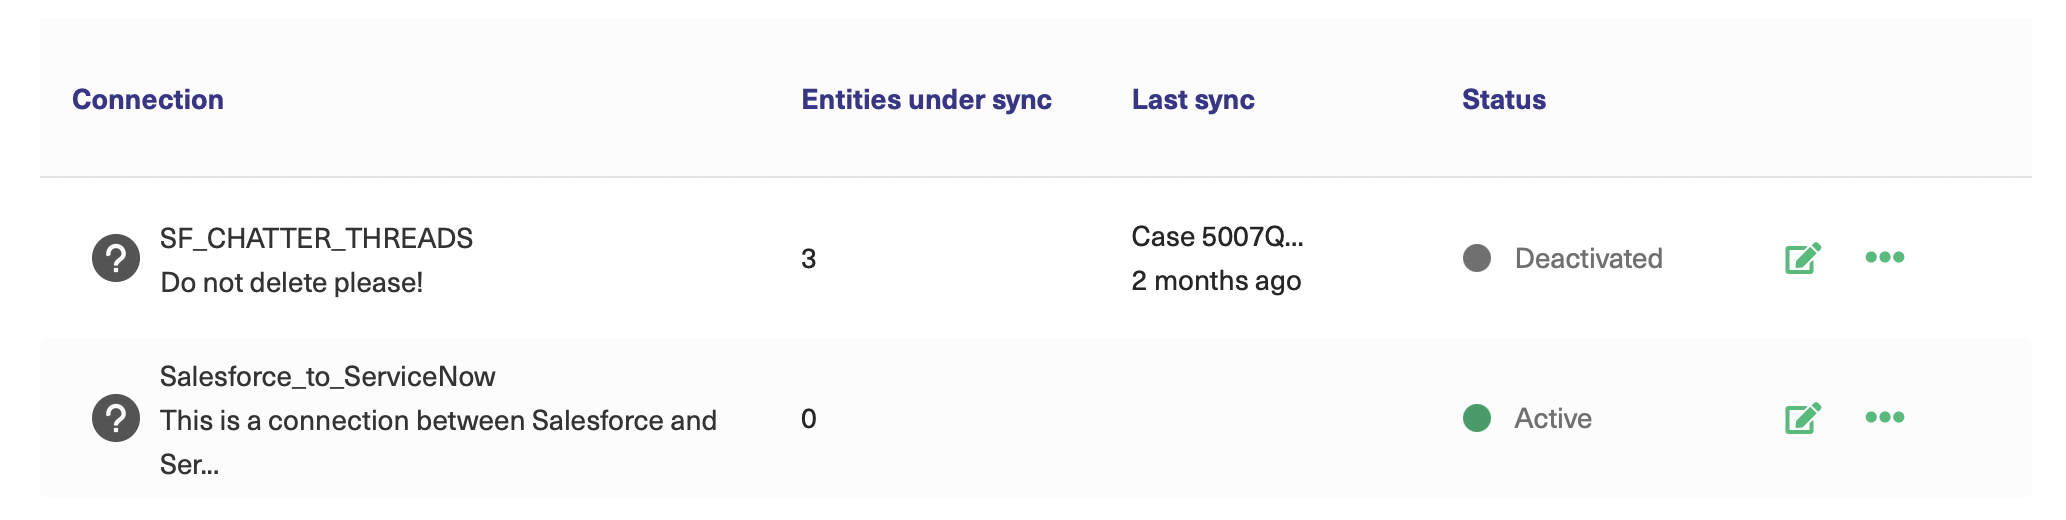
If you do this, the connection on the Salesforce side will appear as “Pending” and only when you finish setting it up on the ServiceNow instance, will the status become “Active”.
On the Salesforce side, under “Connections”, click the “Accept Invitation” button.
Then paste the code you had copied and click “Next”.
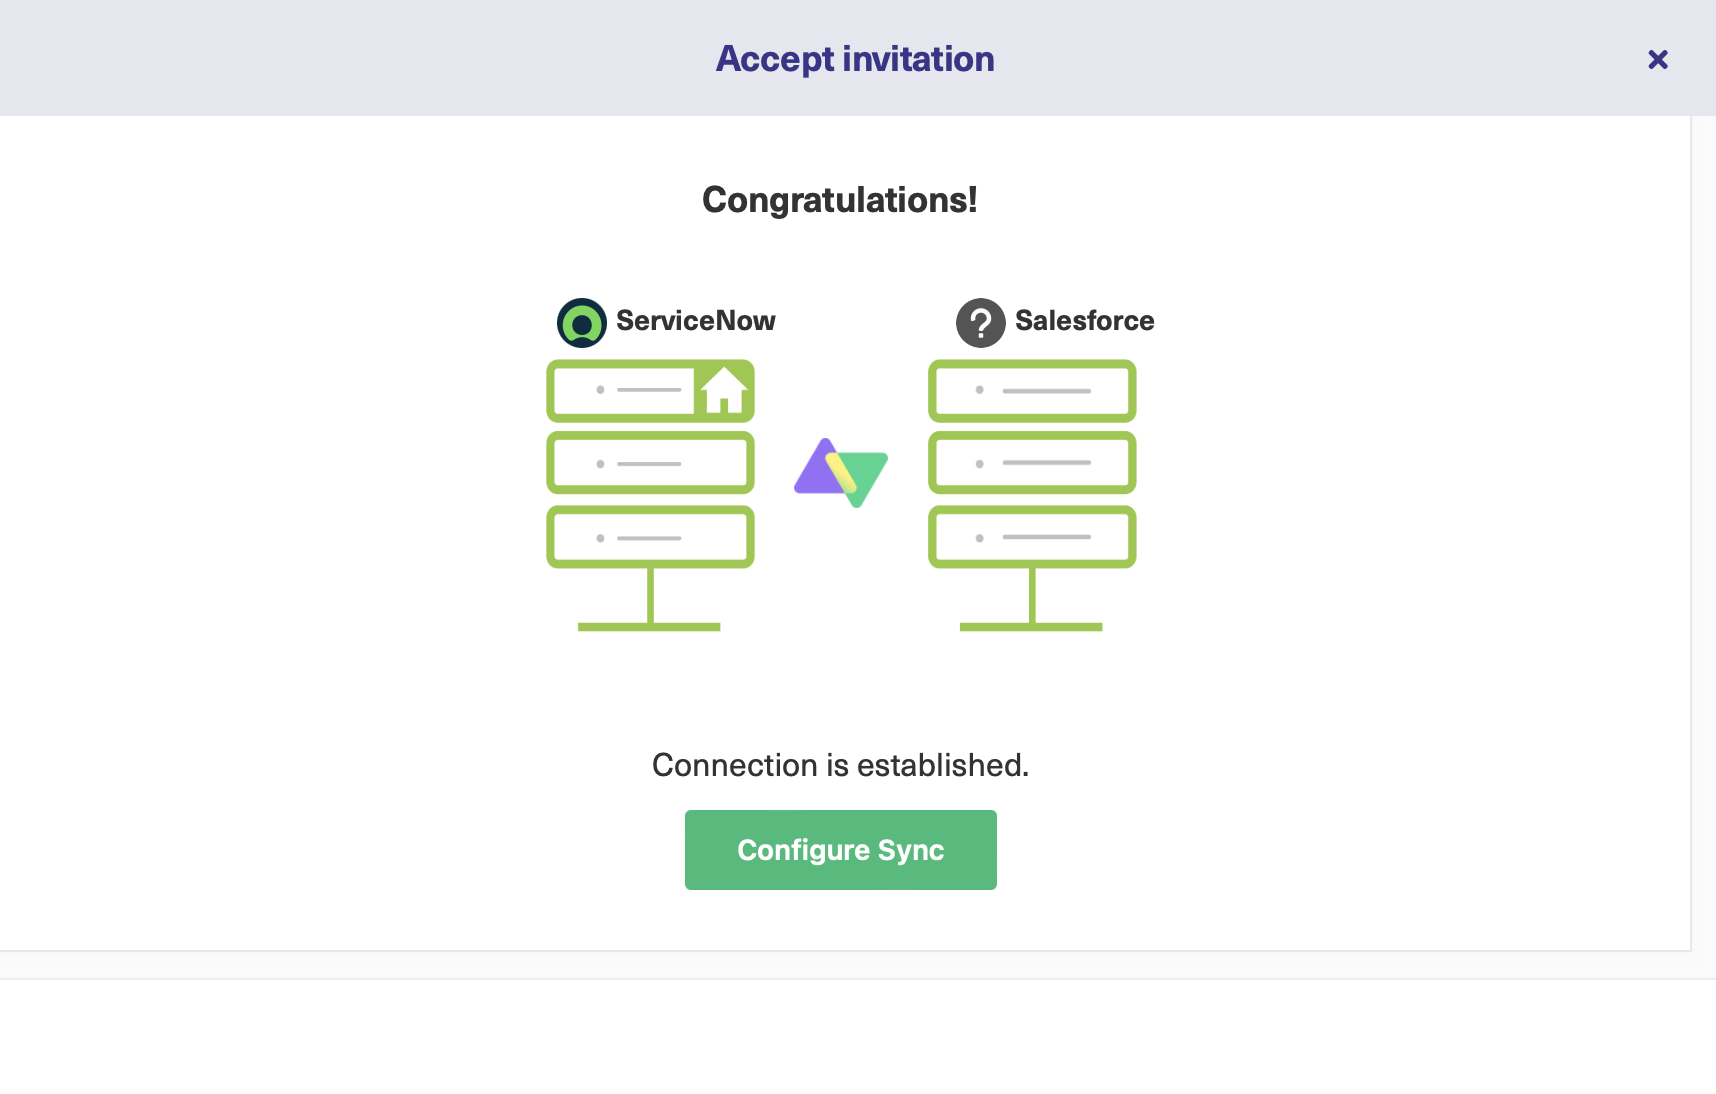
After this, your connection has been successfully established and you can see the status as follows. You can now configure it to control what information goes to the other side.
For this, click on the “Configure Sync” button and proceed to the next step.
Step 4: Configure your connection to determine what information gets shared
If you don’t wish to configure the connection right away, you can do it later by clicking on the edit connection icon next to your connection name under the “Connections” tab.
From here, you can choose to activate, deactivate, or delete the connection by clicking on the 3 dots. You can even go to the other side of the connection by clicking the remote antenna button. The status of your connection also appears here, apart from some other general information.
Let’s proceed to the steps after you press the “Configure Sync” button. Editing the connection also has similar screens, so either way, there are 4 tabs displayed: “Rules”, “Triggers”, “Statistics” and “Info”.
The “Statistics” tab gives an overview of synchronization-related information like the number of issues, comments, and attachments synced. It also states the number of issues last synced, in addition to the date and time of the sync.
The “Info” tab gives general information related to the connection, like its name, type, description, and destination URL. You can edit the description here if you want.
We will discuss the “Rules” tab now and “Triggers” in step 6.
Exalate has an “Outgoing sync” and “Incoming sync” written in Groovy scripting language. Both are rules that control what information is sent and received from the other side.
The outgoing sync rules, as their name suggests, control what information must be sent to the destination side, while the incoming rules control how to interpret the information coming from the other side.
Both these rules are present on either side of the connection i.e. Salesforce and ServiceNow. So you have complete autonomy in deciding what must be shared and what shouldn’t. You don’t need to configure or even inform the other side about the way you modify your script rules. So if you are in Salesforce, “Outgoing sync” specifies what information you send to ServiceNow, and the “Incoming sync” specifies how you receive information from ServiceNow. This holds for ServiceNow as well.
The rules on the Salesforce side look like this:
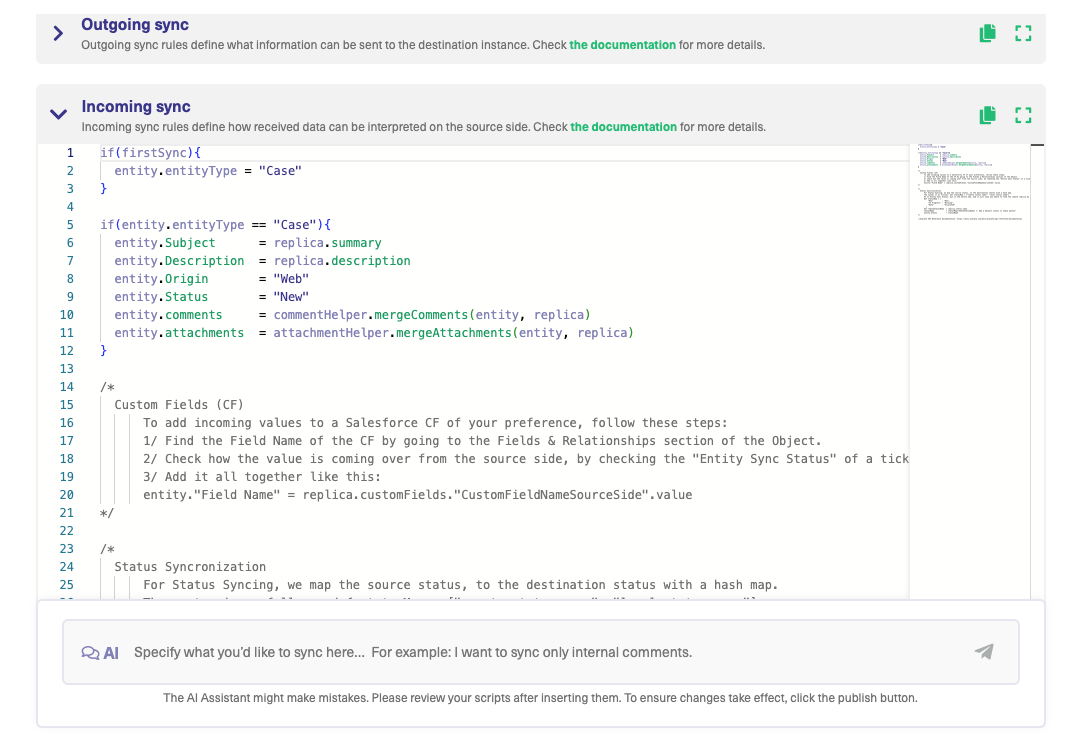
You can edit the rules to control the information flow.
For this, you can either delete a particular line to stop sharing information or add additional lines for syncing something extra like custom fields.
For deletion, remove the particular line from the incoming or outgoing sync or simply add a comment.
Add comments by adding “//” at the start of the line. If you need to comment a block of lines add “/*” at the start of the block and “*/” where the comment ends.
For example, if we add a comment to the line replica.description = entity.description in the Outgoing sync section, then the description of the Case will not be shared with the ServiceNow instance.
Any Salesforce entity can be synced by adding additional scripts relevant to that entity. Refer to this document on how to do it. For the ServiceNow side, check out this one instead.
For example, if you want to sync Tasks in addition to Cases in Salesforce, then you add the following script in the Outgoing sync.
if(entity.entityType == "Task") {
    replica.key        = entity.Id
    replica.summary    = entity.Subject
    replica.description = entity.Description
}
Accordingly, the subject and description of the Task will go over to the ServiceNow side.
Once done, click “Publish”. The changes you have made will be saved and applied from the next sync onwards.
Connections in Script Mode Using AI Assist
The Script Mode allows you to generate and optimize scripts using the AI Assist feature — which appears as a tab under both the incoming and outgoing sync rules.
How does it work?
Enter your sync requirements into the chat box, and AI Assist will generate scripts based on your input, existing configurations, and Exalate’s scripting API.
It is also important to note that AI is not perfect. So, you need precise and detailed prompts to ensure the best results.
Let’s say you want the name of the assignee of a ServiceNow incident to appear in a Salesforce custom field; the prompt could look something like this:
“I want the name of the assignee of the ServiceNow incident to appear in a designated custom field in a Salesforce case.”
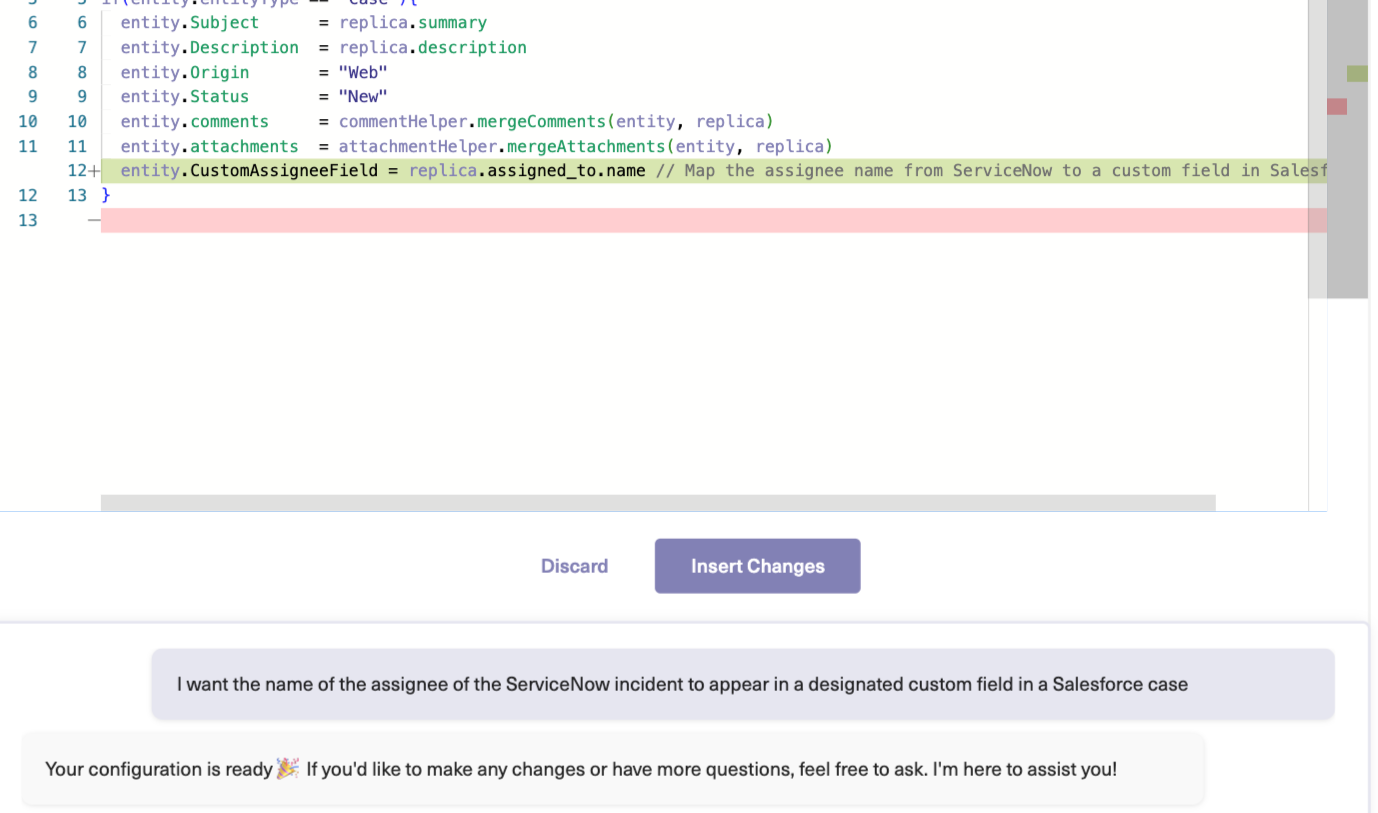
After a moment, the script will be generated, with suggested changes highlighted in green and red. The green scripts are suggested additions, while the red scripts are suggested deletions.
If the new snippet works for you, click on “Insert Changes”. Otherwise, you can discard the suggested code. If needed, you can refine your prompt and, once satisfied, publish the changes.
Step 5: Create Automatic Synchronization Triggers
You can use triggers to synchronize Salesforce and ServiceNow entities automatically.
For creating triggers you need to add a query. When Exalate comes across entities that match the search query, they are automatically synchronized with the other side according to the sync rules you have set.
To begin with, click on the “Triggers” tab on the above screen. You can also reach triggers by clicking on the left-hand “Triggers” menu of the Exalate console. If you do it this way, there is an extra step of selecting the connection you want to apply the trigger for. All the other steps are the same.
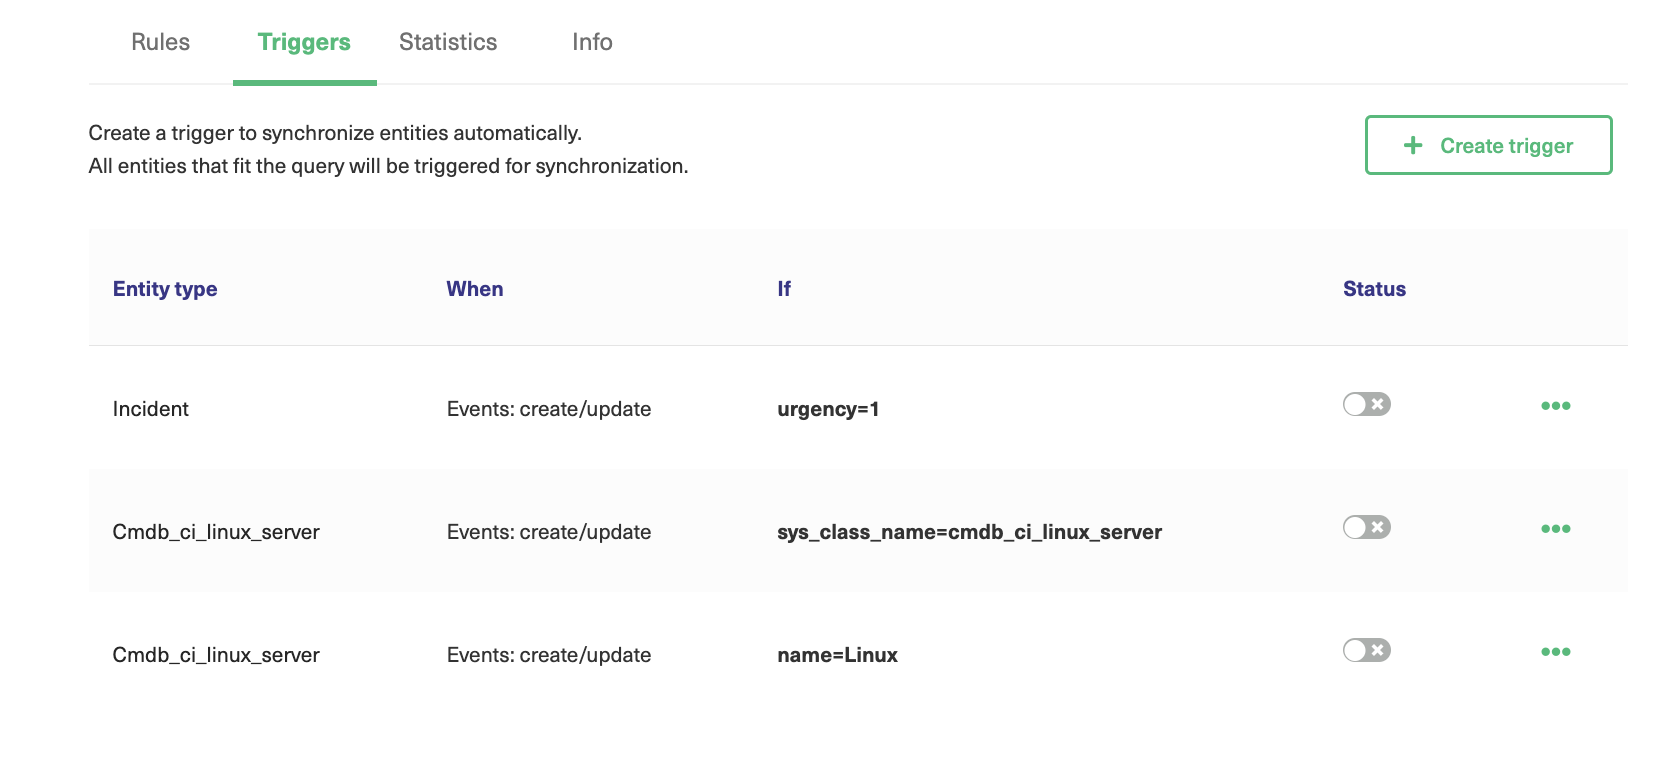
On this screen, you will see all your triggers. To create a new one, click “Create trigger”.

An “Add trigger” pop-up will appear.
You start by selecting the entity from a dropdown list to which the trigger is applied.
There are many ServiceNow entities like Change Requests, Cases, Problems, etc. supported by Exalate.
We have selected “Incident” for this example.
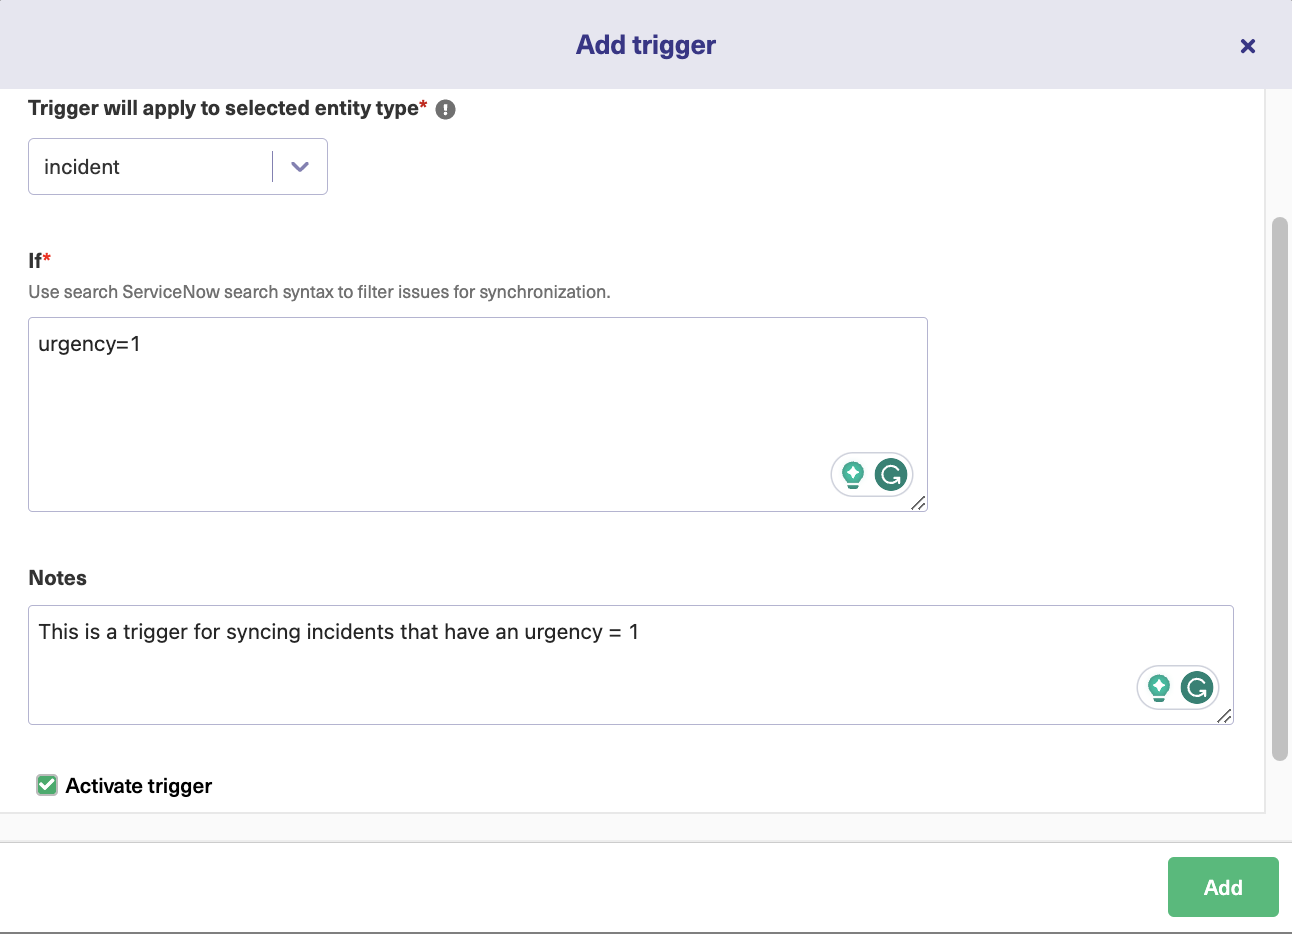
The “If” section allows you to enter search queries specific to the platform. Since we are on the ServiceNow side, we have written the query “urgency=1”. So a trigger to sync Incidents with the highest priority is created. When such an incident is generated, it will be automatically synced.
Note: Refer to this page if you want to know more about creating triggers.
The same on the Salesforce side will allow you to select Salesforce entities from a drop-down list. There are many Salesforce entities supported by Exalate, but the most common ones are Account, Opportunity, Case, Task, and Product. Here, we have selected an “Opportunity”.
Then either select conditions to filter the Opportunity by entering the details in the text boxes or toggle the switch to use the search query instead. For the search query on the Salesforce side, the Salesforce Object Query Language (SOQL) is used.
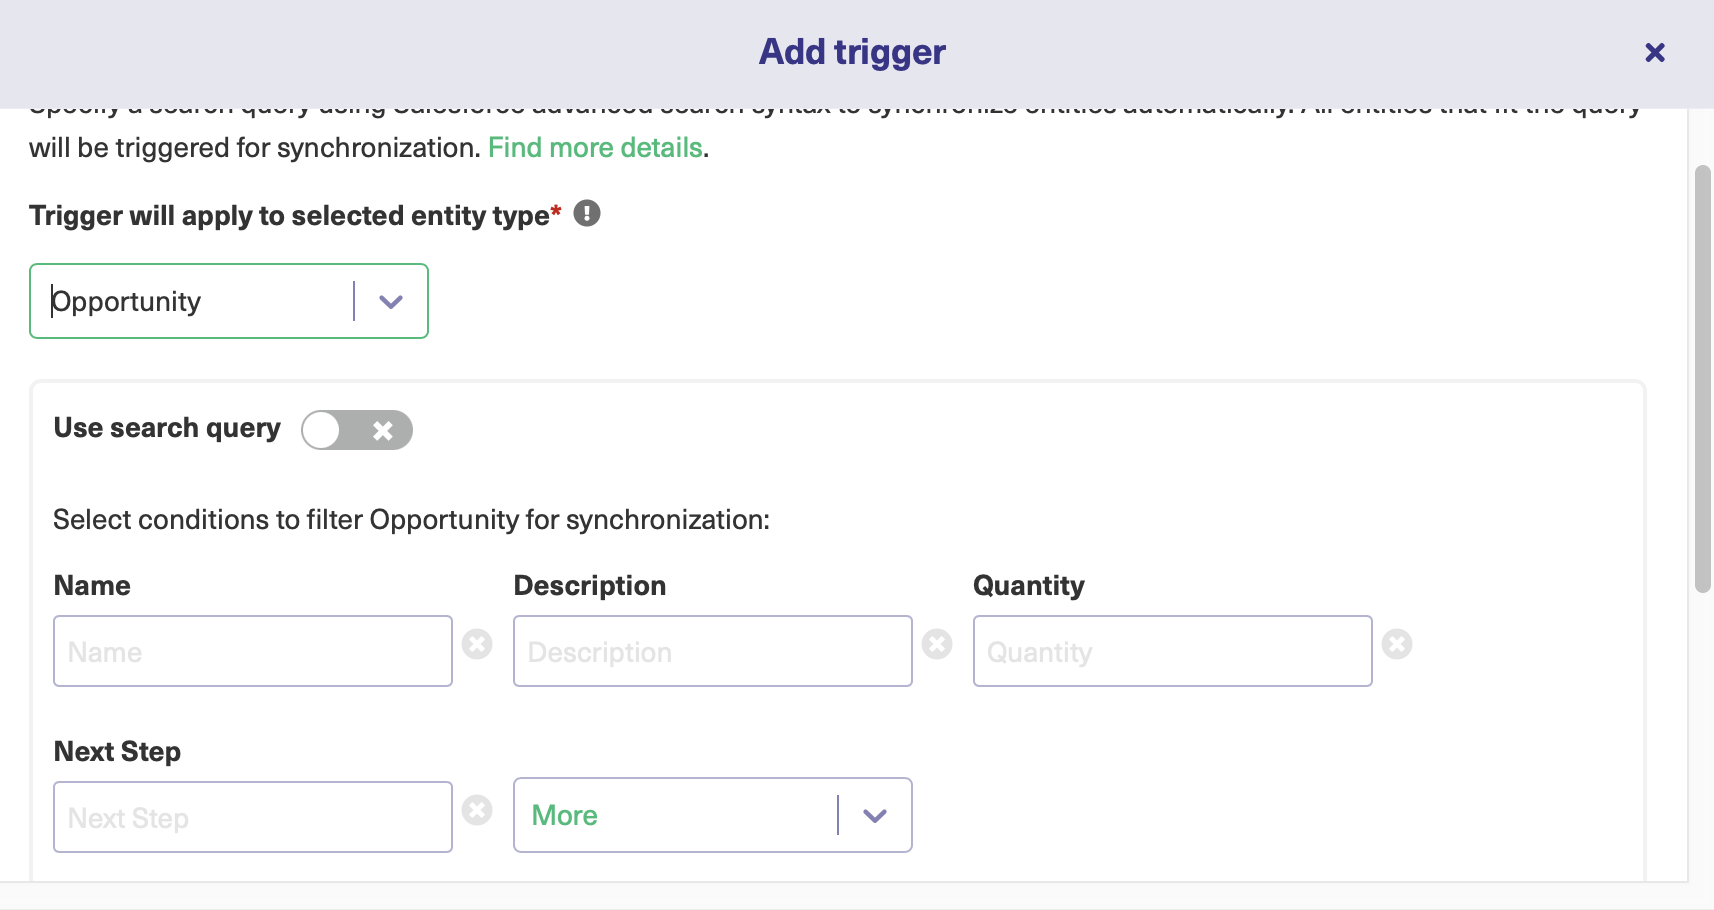
Learn more about how to add search queries in Salesforce here.
There is an option to add “Notes” to the trigger. Add them to describe what the trigger does.
You can also use the “Activate trigger” checkbox to activate or deactivate the trigger. This is useful when you don’t want to use the trigger right now, but also don’t want to go through the effort of creating it from scratch again.
Click “Add” when you are done.
You can see the trigger listed on the previous screen as shown above. There is a button to edit or delete the trigger. You also synchronize the existing entities that fulfill the trigger condition using the “Bulk exalate” option by clicking the 3 dots next to the trigger.
After you are done making the changes, click “Publish”.
Step 6: Start Synchronizing the Information
For the Script mode:
Adding or deleting scripts in sync rules means you control what is sent and received, but to start the synchronization, you either need to create triggers or sync existing Salesforce and ServiceNow entities in bulk using the “Bulk Connect” option.
For the Basic mode:
You can simply sync entities by entering the Incident number or the Case number after creating a connection, as we saw in step number 3.
Or by clicking on the 3 dots next to the connection name in the “Connections” tab either on the Salesforce or the ServiceNow side and then selecting “Exalate”.
You can create a trigger or sync entities in bulk too. But you cannot add new ones or change the existing default mappings for advanced configurations like in the Script mode.
Common Use Cases
Customer Support and Sales Teams
Perhaps the most common scenario that comes to mind for a Salesforce ServiceNow integration is for your sales team to have an automatic update on the “Incident” status of key customers.
So when an Incident of urgency =1 from a particular customer comes up in ServiceNow, it will automatically create a Case or a Task (depending on the trigger you set) on the Salesforce side, so that the sales team can keep track of it automatically thereon.
Any updates or additional information requested by the customer for an Incident can be viewed in Salesforce and provided to the support team by the sales team if they have it with them. This can resolve Incidents faster and improve SLAs, leaving you with happier customers.
The customer support agents can also review Cases, Accounts, or Opportunities in Salesforce to gather information relevant to their Incidents, helping them to resolve them faster.
Customer Success Representatives and Sales Teams
You can also envision the customer success representatives having a complete overview of the customers in their ServiceNow by gathering information from Accounts, Opportunities, and Cases in Salesforce.
They can then work on maintaining a low churn and help generate better revenues for the business. Sales teams can also proactively provide feedback, queries, or other relevant details to the customer success teams to help them with their responsibilities better.
Development and Sales teams
It’s possible that your development team practices agile development methodology and uses ServiceNow. Your sales team, on the other hand, uses Salesforce. Since the sales team is constantly in contact with customers and is well aware of their feedback, complaints, queries, or feature requests, it would be helpful if they could exchange this information with the development team.
This can in turn help the developers get an idea about what customers or end-users are looking for in a product or how they want to improve it. An integration between ServiceNow and Salesforce can help these teams share information and filter out unnecessary details.

Conclusion
A Salesforce ServiceNow integration can help teams close their information gaps and bring them to work towards a common goal of improving customer experience.
For this, we saw how such an integration would be beneficial for teams working on different platforms like ServiceNow and Salesforce without them having to leave their familiar environment.
We then got a glimpse of what the right integration tool must inherently support and chose Exalate as the tool for our integration because it supports the features we were looking for.
And then we finally saw how such an integration can be implemented through a step-by-step approach. We also saw common use cases that can benefit from such an integration.
Frequently Asked Questions
Can Salesforce integrate with ServiceNow?
Salesforce can integrate with ServiceNow using native Salesforce integrations. You can also rely on standalone tools like Exalate, which you can find in the marketplace of both platforms.
Why integrate ServiceNow and Salesforce?
Teams integrate ServiceNow with Salesforce to create a smooth data pipeline between support agents and sales teams. Besides, sending data over to Salesforce provides you with access to a myriad of analytical tools for better reporting.
Which is better, Salesforce or ServiceNow?
Salesforce and ServiceNow serve different purposes, that’s why it is difficult to say which one is better. Salesforce is a customer relationship management platform that covers sales, campaigns, and customer interactions. ServiceNow is an IT service management platform for organizing workflows and automating processes.
Recommended Reading:
- How to set up a Jira Salesforce Integration
- ServiceNow to ServiceNow Integration: The Step-by-Step Guide to Setting up a Two-Way Sync
- Salesforce to Salesforce Integration: Sync Multiple Salesforce Instances Bidirectionally
- Jira ServiceNow Integration: How to Set up an Integration in 6 Steps
- Salesforce Zendesk Integration
- Zendesk ServiceNow Integration
- How to Set up a ServiceNow GitHub Integration
- How to Set Up an Azure DevOps ServiceNow Integration