Over the years, CRM and Salesforce have become inseparable and tightly bonded. That’s why companies looking to share CRM data are exploring Salesforce to Salesforce integration.
Such integration would allow data sharing (for instance, Leads and Opportunities) and updates between different Salesforce instances. This will help achieve close collaboration with different partners or businesses, helping you improve your customer experience.
So in this article, I’ll use some Salesforce to Salesforce integration examples to highlight the benefits of connecting CRMs. I’ll then show you how to set up your own connection using robust Salesforce integration solutions.
Why Integrate Multiple Salesforce Instances?
Data is gold and, if mined correctly, can help teams share expertise and grow together steadily.
But when this information is passed manually between teams, it leads to discrepancies and errors.
Plus, you need to filter the exchanged data, as you don’t want to send all the information in compliance with security or data regulatory requirements.
When filtering is done manually, it can lead to friction between team members or collaborating partners in different organizations.
To avoid that, a two-way Salesforce CRM integration is the way out.

It will deal with all the above problems like a cakewalk, providing a few extra toppings like secure, automatic, filtered, reliable, and real-time bi-directional information exchange.
This gives the other party the most accurate representation of the information it needs to see without exposing any confidential information.
To elaborate a little on how exactly it will be beneficial, let’s have a look at a few scenarios where exchanging information between multiple Salesforce instances can help companies collaborate and communicate effectively.
Salesforce to Salesforce Integration: Common Use Cases
Connecting Sales and Marketing Teams
Sales and marketing teams use Salesforce day in and day out. But what these teams probably lack is collaboration on common customer enhancement goals, as they might be stuck in their respective Salesforce instances.

In this Salesforce to Salesforce integration example, organizations and managers share customer information in the form of Accounts, Opportunities, Leads, etc., and design campaigns or other marketing initiatives around them.
Both sides can explore the treasure house of information within individual Salesforce instances to open up new avenues for fulfilling customer experience goals.
Improving the Efficiency of Sales and Customer Service Teams
To enrich and nurture your relationship further with your customers, the sales and customer service teams can use point-to-point integration between Salesforce instances.
Cases, Tasks, and Opportunities always have valuable insights into customer behavior, feedback, problems, and queries. So getting early access to such information and proactively dealing with it can improve your sales metrics.
Growing and Diversifying your Connections with Partners and Businesses
Allowing multiple Salesforce organizations (instances) to integrate expands your partnerships with newer business interests, in turn targeting a broader customer base and increasing the services to offer.

This also allows vendors to diversify their business operations, wherein such different partners could bring in their expertise to provide a package of services to their customers.

This brings us to the point of actually implementing Salesforce integration end-to-end.
2 Ways to Integrate Multiple Salesforce Instances
Using The Native Salesforce Functionality
The platform provides a native integration called “Salesforce to Salesforce” which allows users to exchange records and stay updated.
But to use this feature, you must consider Salesforce to Salesforce integration limitations, such as the ability to share a maximum of 100 tasks per related Salesforce record.
To understand more about rest API integration in Salesforce, check out the guidelines here.
If you have simple out-of-the-box use cases, this standard Salesforce to Salesforce rest API integration is the sure option.
But if you have custom or advanced integration needs, then you can use Apex.
Here lies the real challenge:
Apex is a powerful medium that allows you to extend the native capabilities of Salesforce to include custom and advanced business logic. Still, it boils down to implementing an integration, which is too much work.
Also, Apex isn’t designed for the complex integration processing that is expected from typical Salesforce integration tools; it is also subject to governor limits defined by Salesforce.
In lieu of this, AppExchange has ready-made apps that allow you to integrate multiple Salesforce instances easily. So here is a tool that can checkmark almost all your integration needs.
Using the Exalate App for a Salesforce to Salesforce Integration
Exalate is a Salesforce integration software that allows you to bidirectionally sync information in real time between two (or more) Salesforce instances.
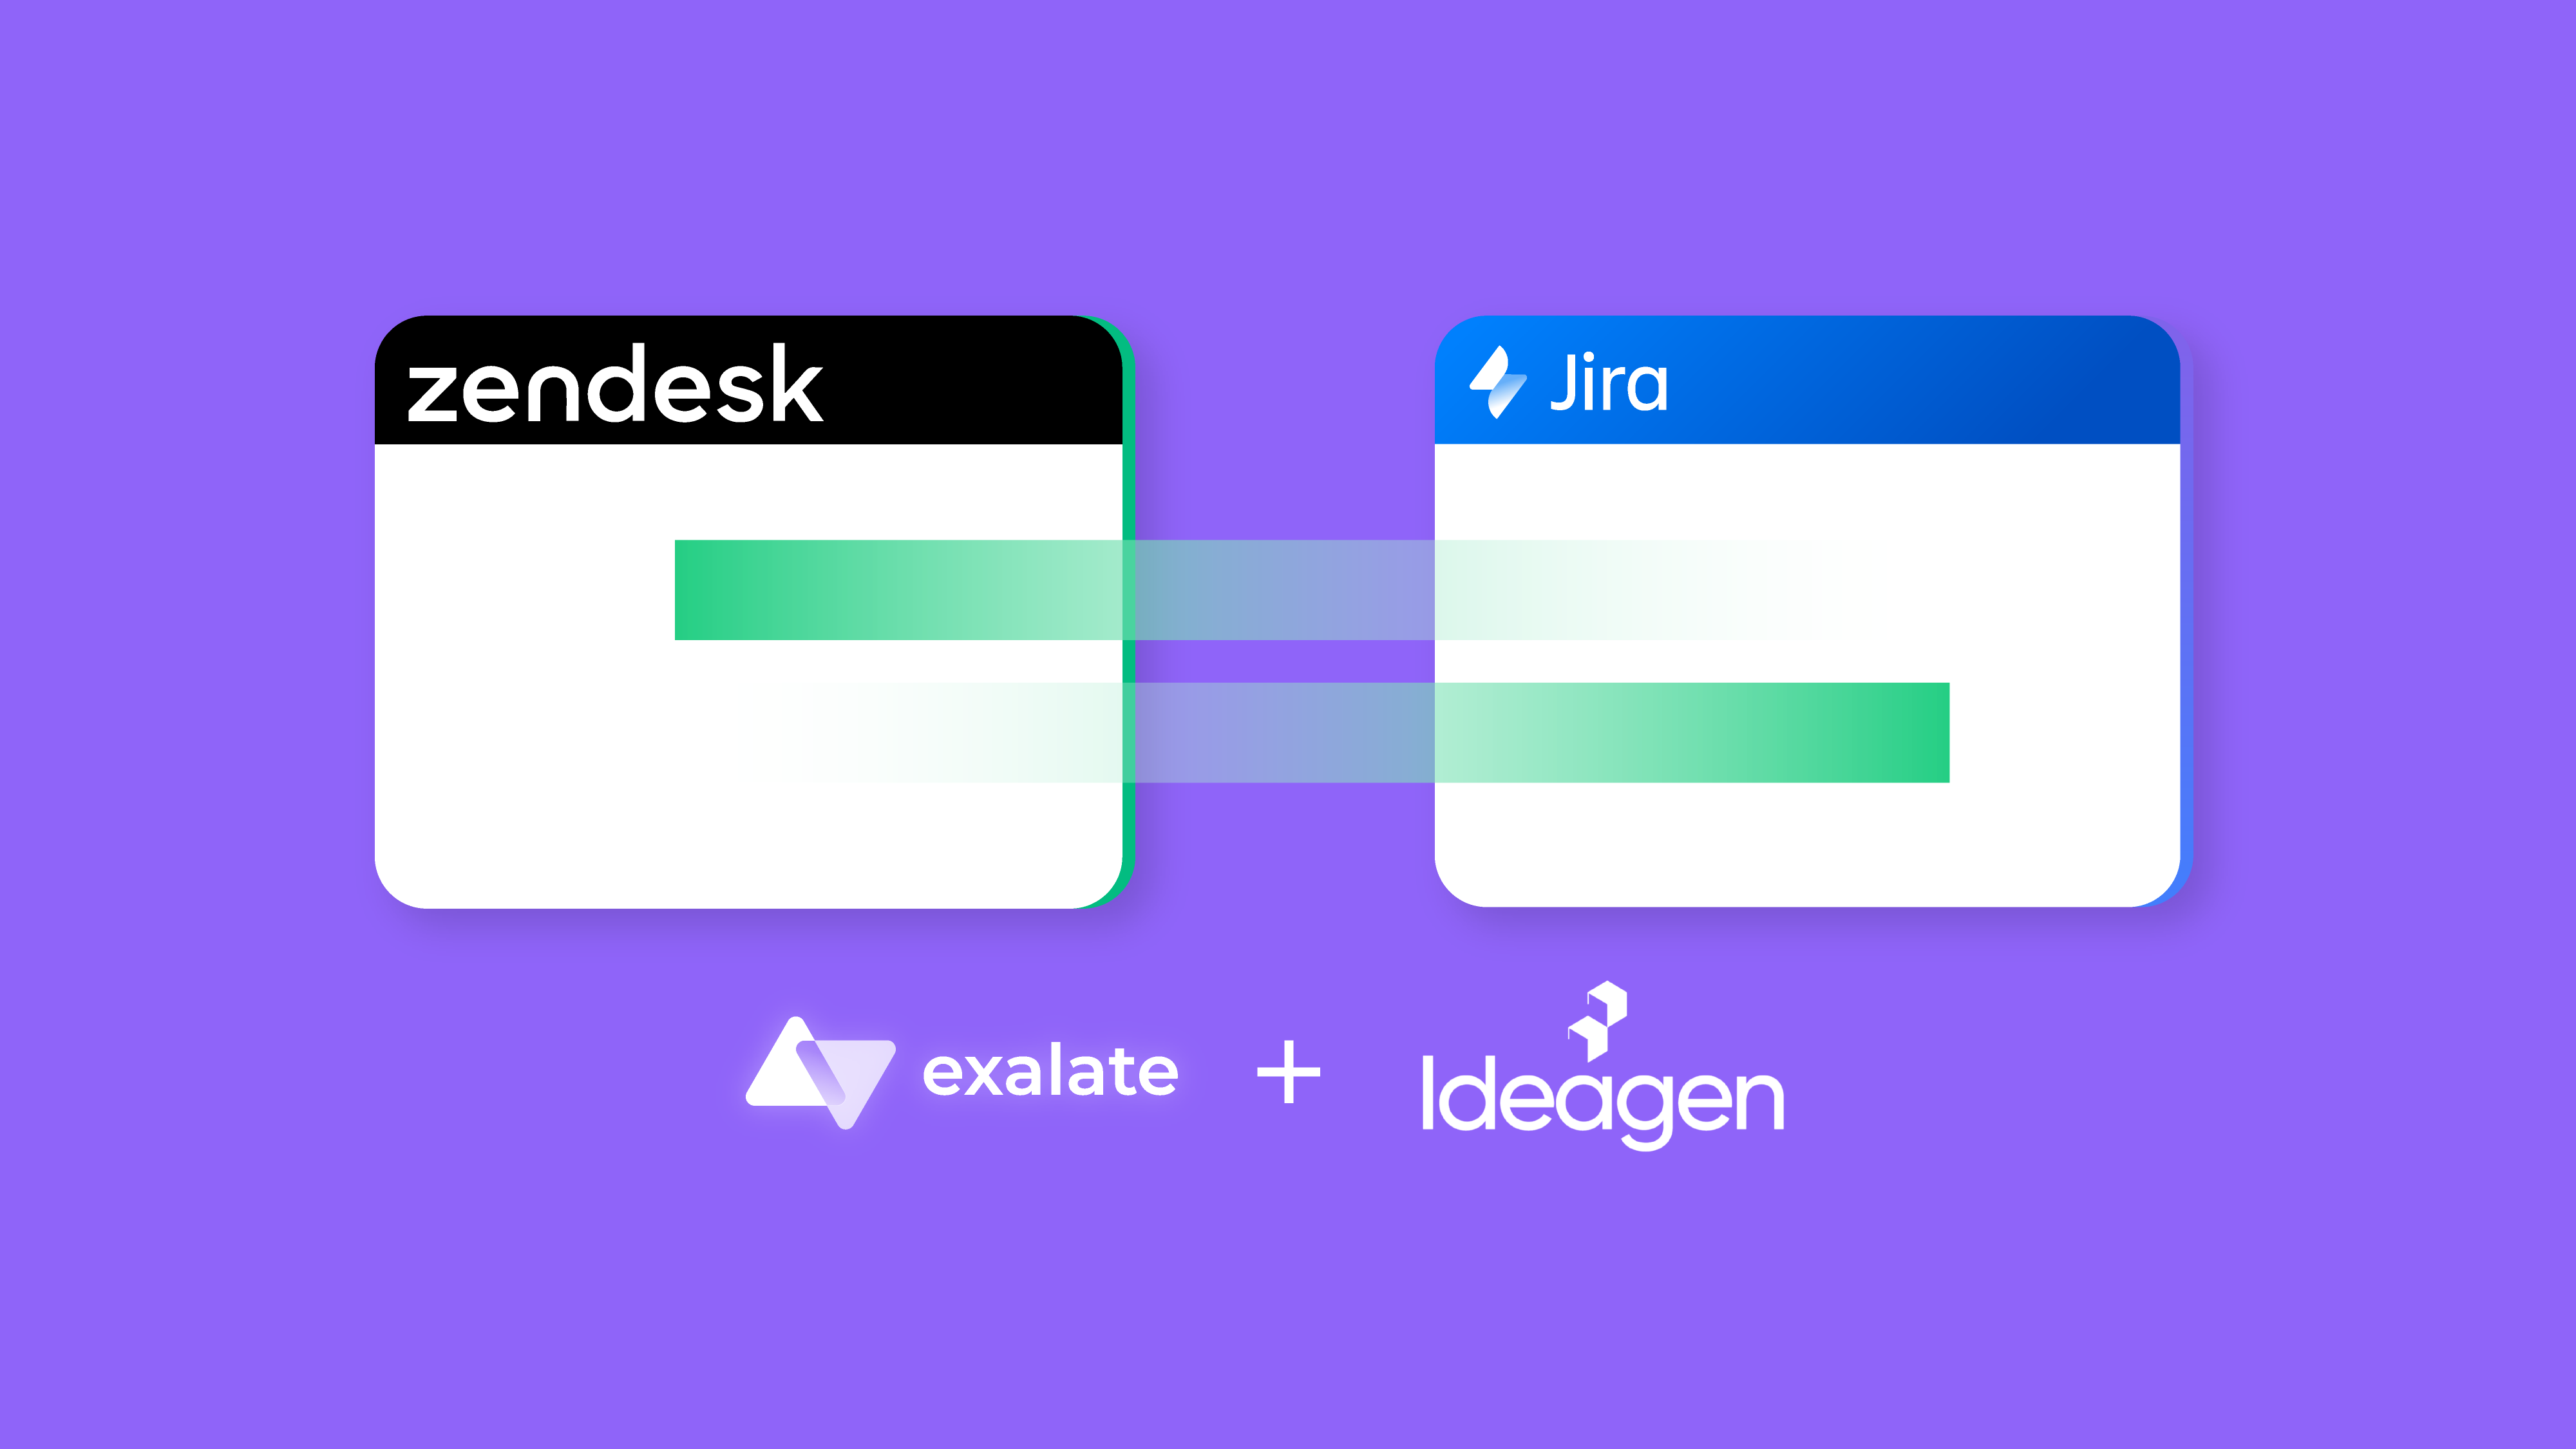
You can also use it to sync data between Salesforce and other applications like Jira, GitHub, ServiceNow, Zendesk, and more. Check out Exalate’s integrations page for more info.
Let’s see why Exalate is the right choice to handle a complex Salesforce to Salesforce integration:
- It provides secure information exchange through role-based access controls, encrypted information exchange, use of HTTPS, etc. You can learn more about its security features in this whitepaper.
- It has an intuitive Groovy scripting engine that allows you to configure advanced or complex integration use cases. So, in this way, it is flexible. You can also use AI along with the Script mode to simplify the script generation process.
- You don’t have to worry about downtimes or outages with Exalate in place. This app resumes operations in case of breakdowns and ensures uninterrupted information flow without the need for manual intervention.
But the question remains: how do you achieve such a Salesforce to Salesforce integration using Exalate?
So let’s see how!
How to Set up a Salesforce to Salesforce Integration in 5 Steps
If you’re a video person, watch this step-by-step Salesforce to Salesforce integration video that talks about syncing custom objects, syncing statuses, and much more.
Step 1: Install Exalate on Salesforce
The first step is to install Exalate on Salesforce. Since we are integrating two Salesforce instances, you would need to install it on the other instance as well.
To begin, request your free trial by clicking on the button below.
You will then need to decide where you want to install Salesforce: either “Install in This Org” or in a Sandbox org. My preference was to install it in the current org.
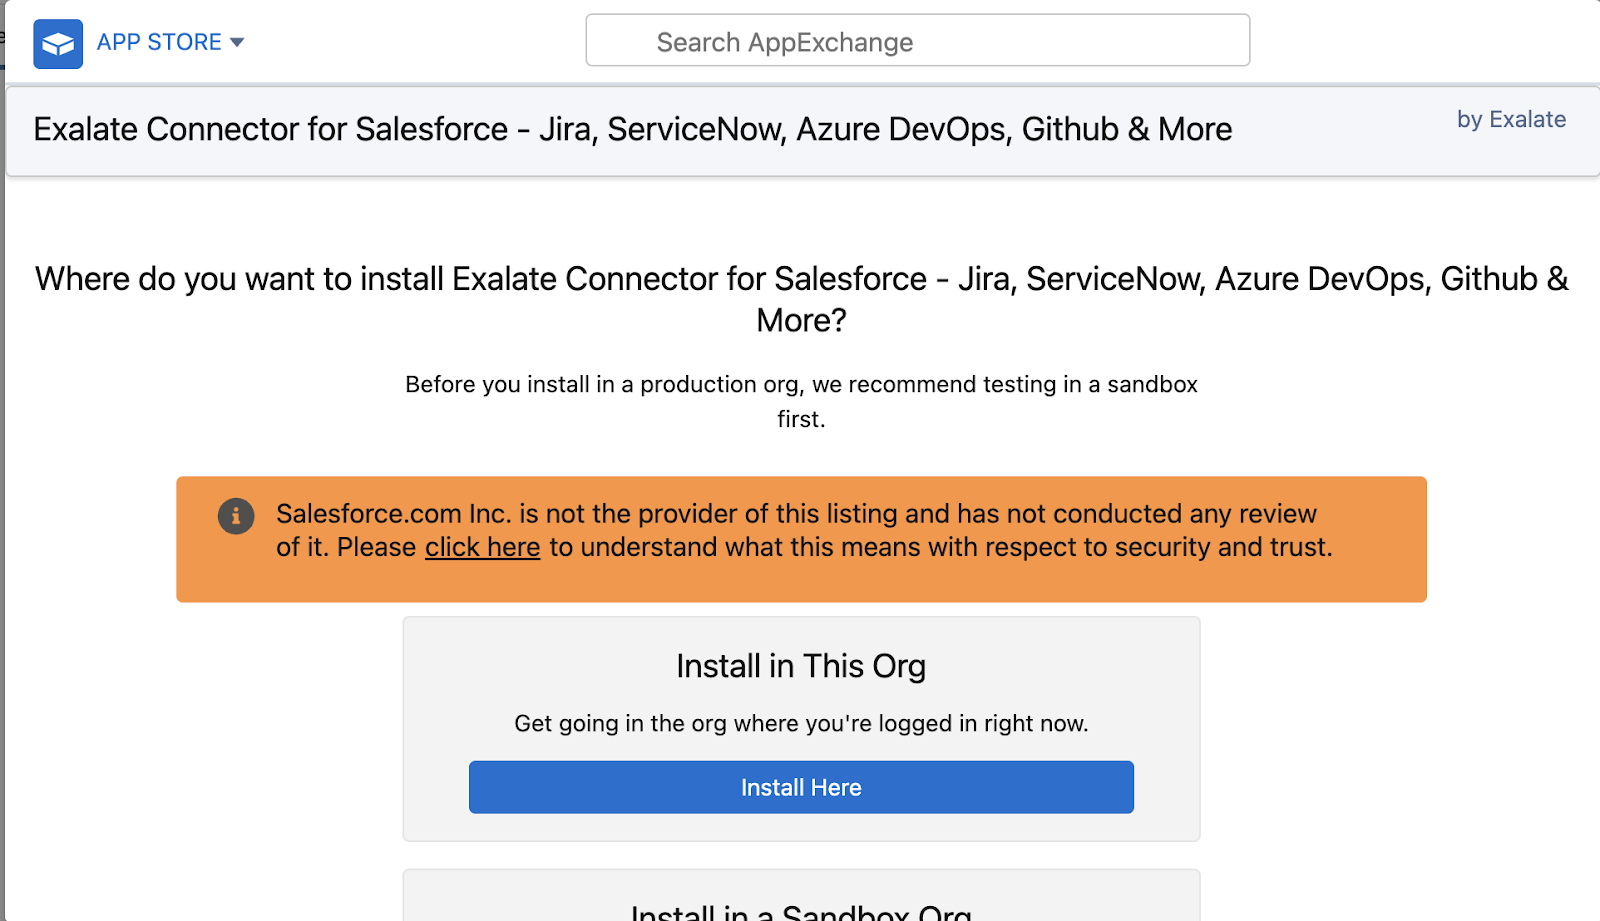
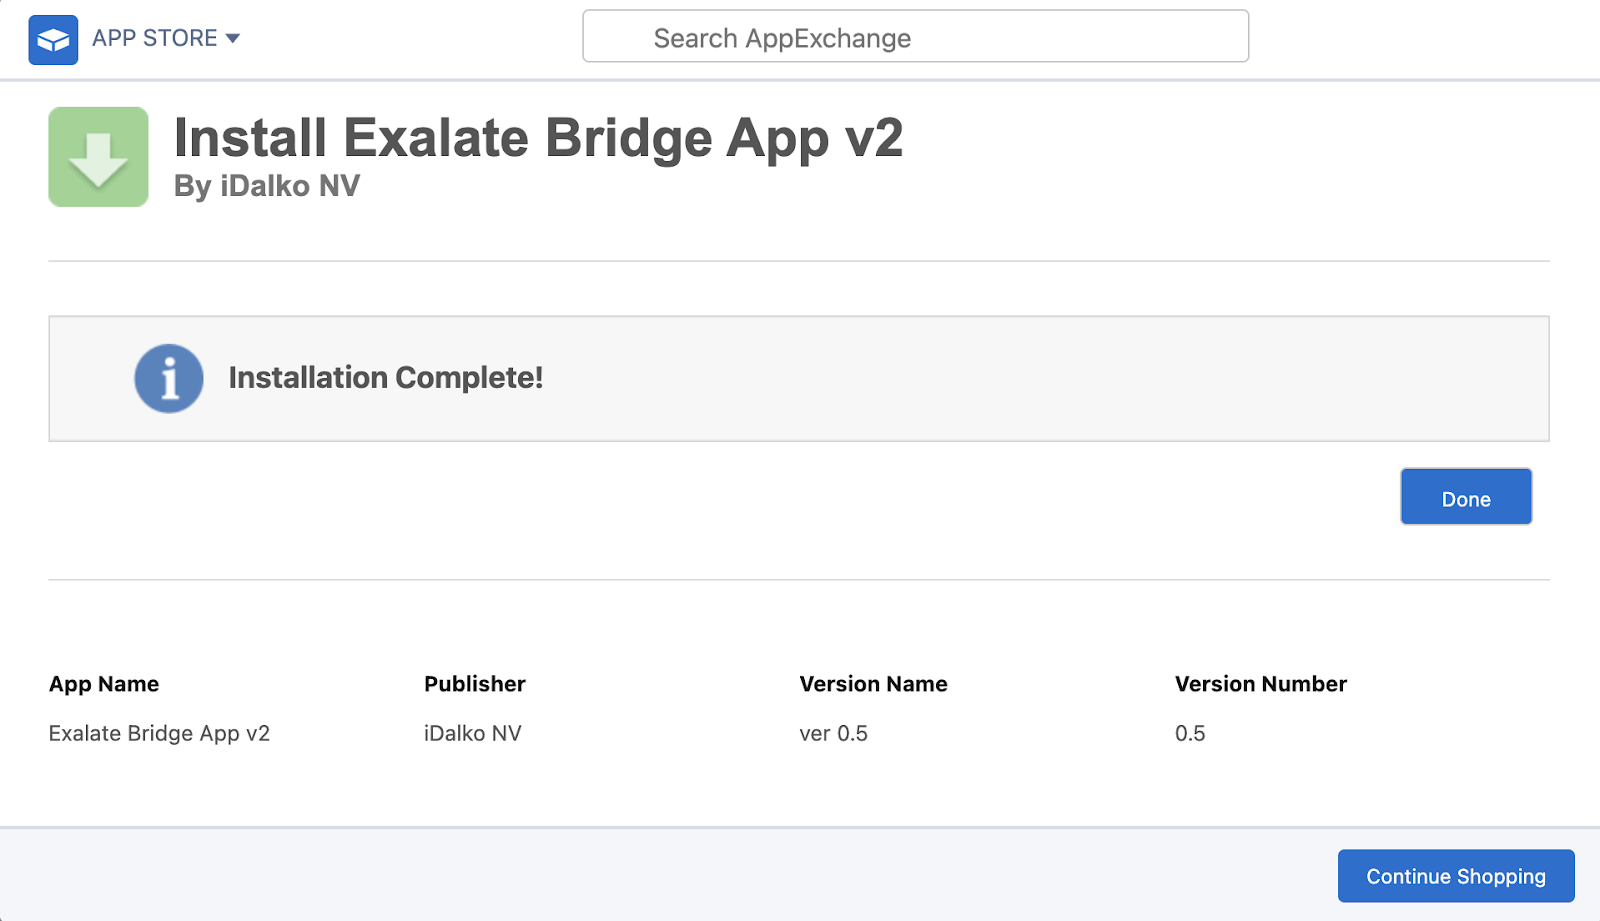
After making your selection, scroll down to the bottom of the screen and carefully review the terms and conditions. Once you are ready, click on “Confirm and Install” to initiate the installation process.
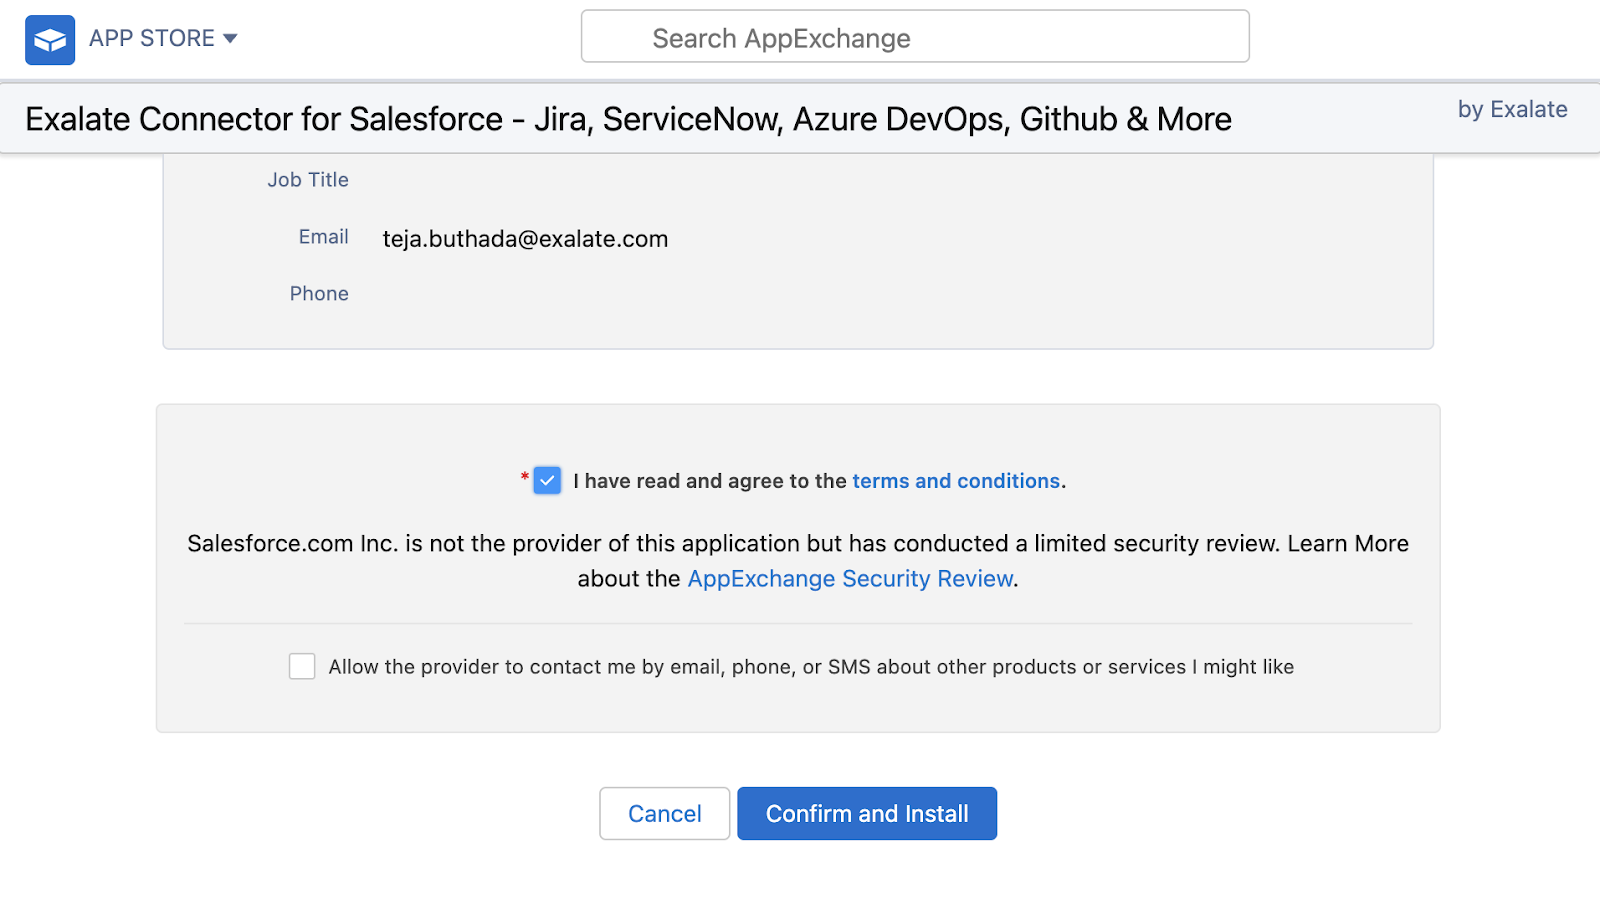
Next, you’ll be prompted to choose the users for whom you want to install Salesforce. Keep in mind that you can always adjust this later on. In my case, I opted for “Install for All Users” and clicked on “Install”.

Now, you’ll need to “Approve Third-party Access” by clicking on “Continue”. This step allows Exalate to access necessary data. Once the approval is given, the installation process will be completed. Click on “Done” to finalize the setup.
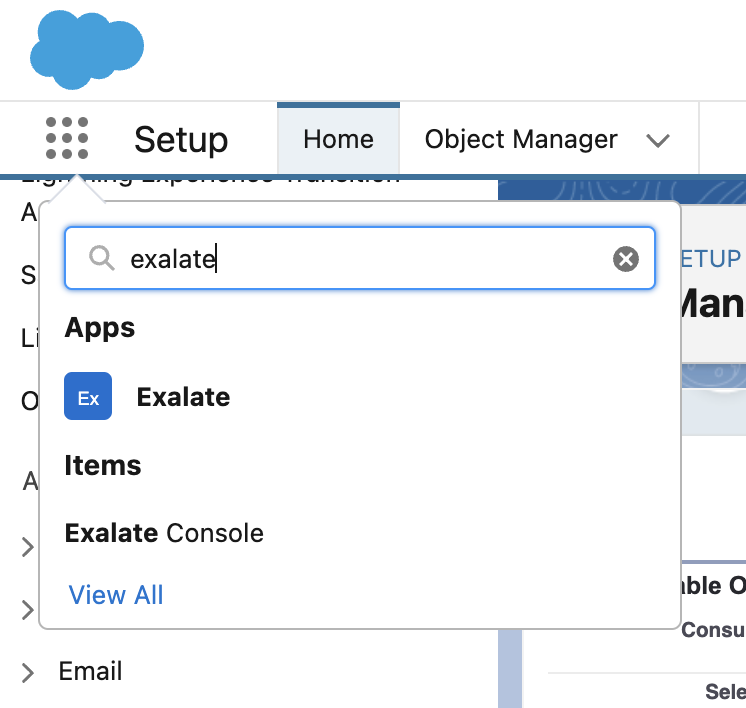
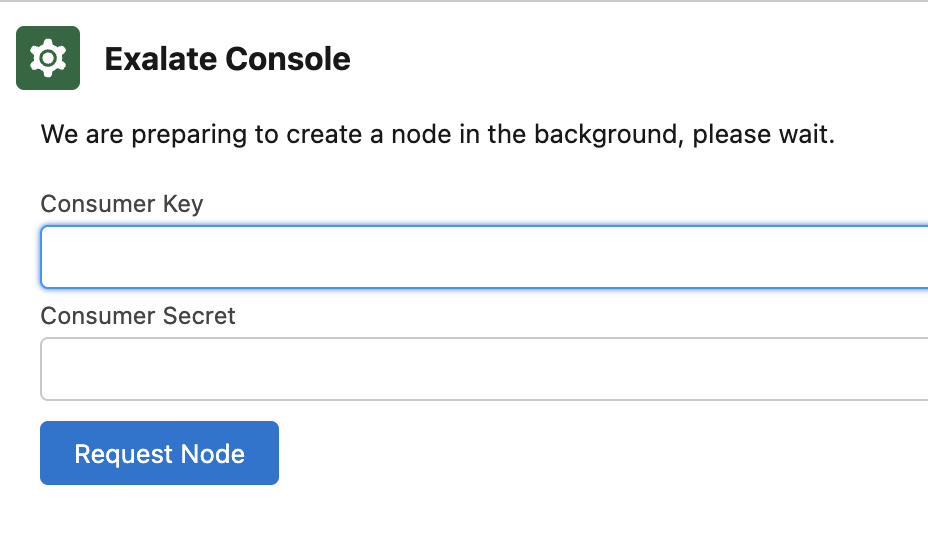
Next, navigate to your Salesforce instance and proceed to create a connected app. Remember to save the “Consumer Secret” and “Consumer Key” generated during this process. Then, within your instance, go to “Apps” and search for “Exalate”.
To request an Exalate node, provide the previously saved “Consumer Secret” and “Consumer Key”, and then click on “Request Node”.
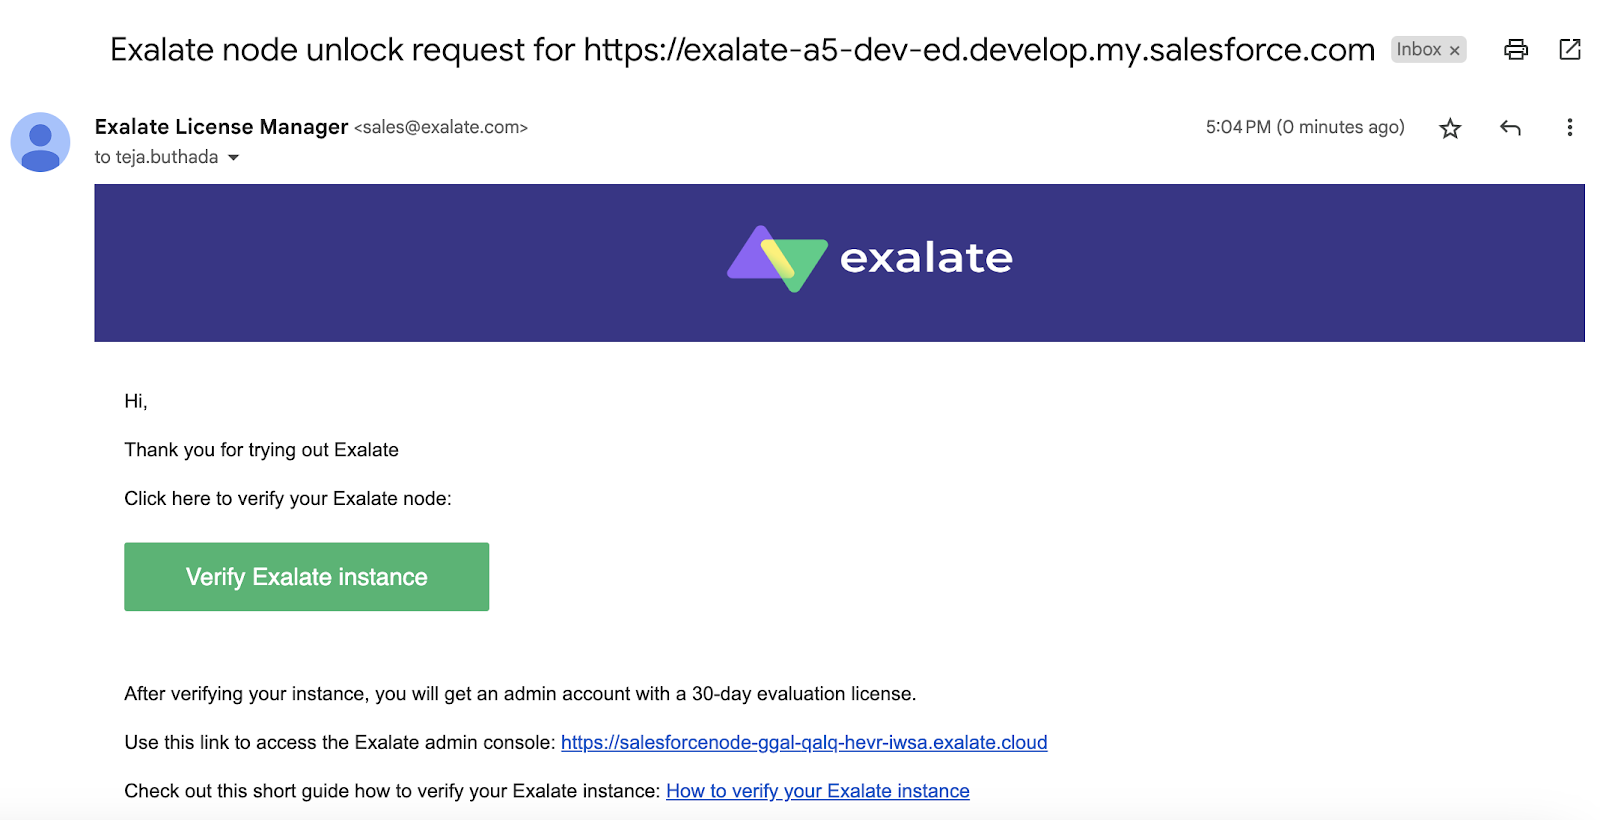
You’ll be prompted to click on “Allow” to grant access permissions to Exalate. Afterward, enter your personal details and click on “Agree and Submit”. Now, simply wait for an email from the Exalate License Manager.
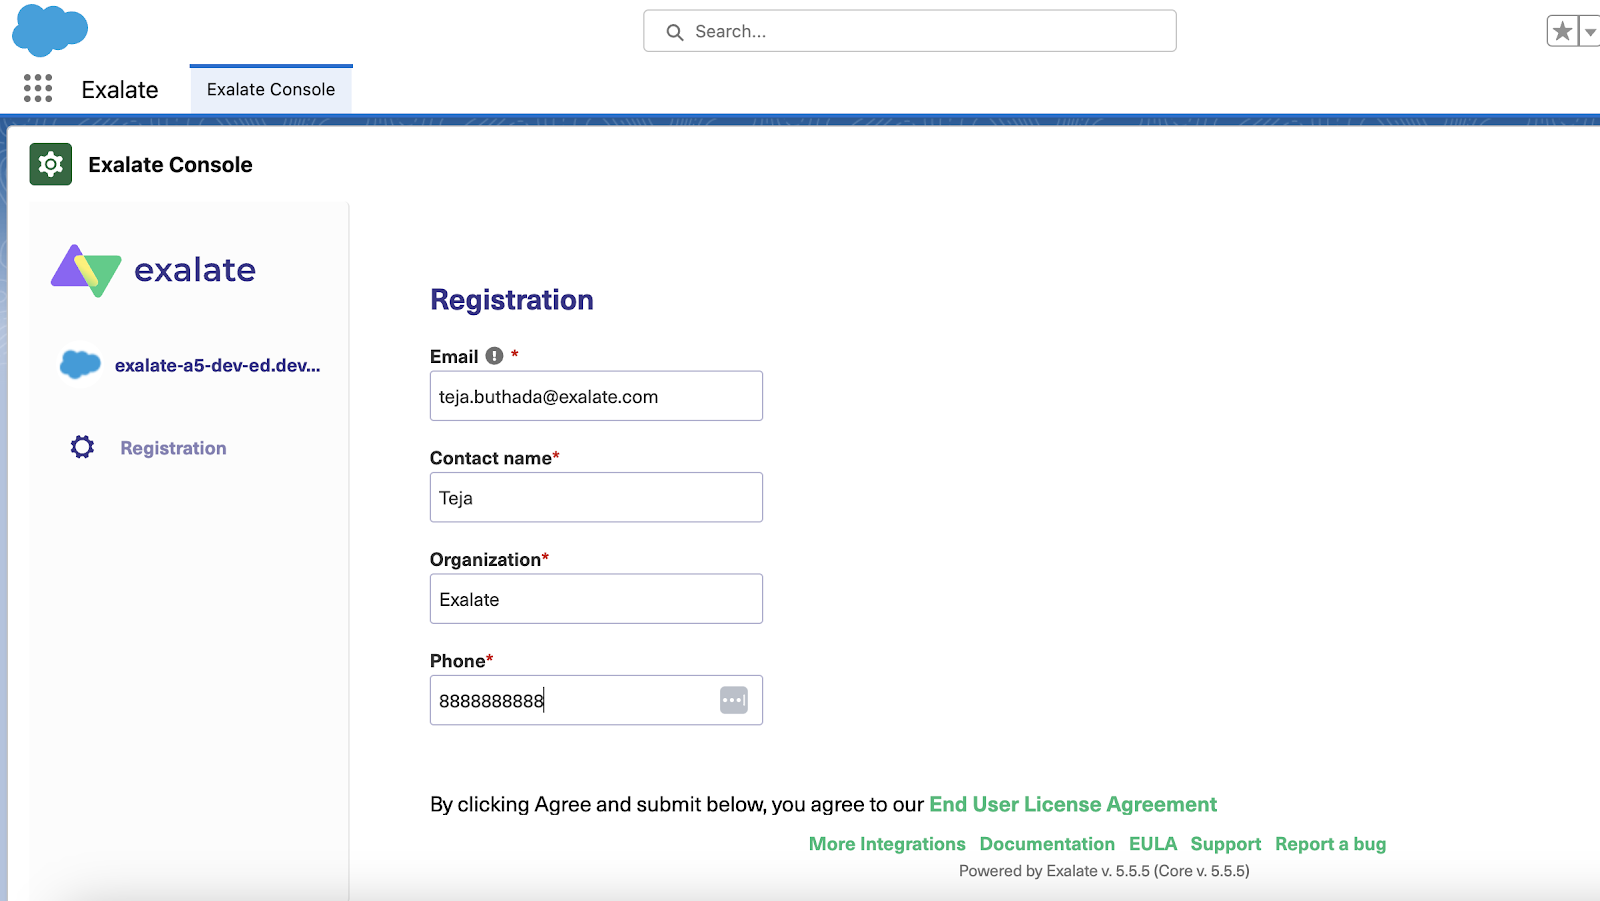
Once you receive the email, click on “Verify Exalate instance” to be redirected to the Exalate admin console.
From this point on, you can proceed to establish a connection between your instances.
Note: Exalate accesses Salesforce through APIs. Salesforce has its guidelines for API Access add-ons.
For example, API access is accessible by default in Enterprise accounts, but it is not the case with other accounts like Professional. Learn more about the different Salesforce editions Exalate supports on this documentation page.
Note: To log in to your Salesforce Exalate node, follow this process.
Let’s proceed to the next step.
Step 2: Connect Your Salesforce Instances
Go to the “Connections” tab in the left-hand menu of the Exalate console on any one of the Salesforce instances. It doesn’t matter which instance you start from; Exalate has a uniform interface on all applications.
Then click on “Initiate Connection”.

Enter the destination instance URL. This will be the URL of the other Salesforce instance. Copy it from the address bar and paste it into the text box shown in the image below.
After Exalate performs a check of whether the app is available on the destination instance or not, it will give you further options to proceed. These options include choosing the configuration mode.
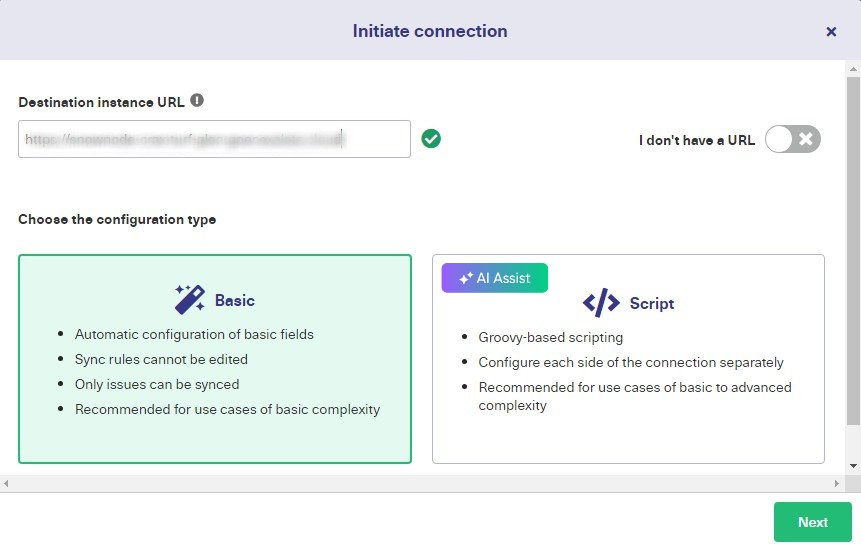
Exalate supports 2 configuration modes: Basic and Script.
The Basic mode is free and is configured automatically for you. It works well for basic sync use cases and is quite suitable for testing the connection you have just established.
You can sync only “Cases” with the Basic mode. It also comes with a Free Plan that allows you up to 1000 free syncs per month.
The Script mode is what makes Exalate compatible with almost any scenario. It is more advanced and lets you decide what you want to share with the other side and how you want to map the information coming from the other side. It is also powered by AI. We will learn more about it in the coming section.
It comes in Groovy scripting language, which is not very difficult for non-technical users to understand. There is also elaborate documentation on sample scripts that can come in handy when you get stuck.
We will cover this mode in a while. Let’s continue with the Basic mode for now.
Connections with the Basic Mode
Once you select “Basic”, click “Next”.
You then need to verify if you have admin access to the other Salesforce instance. Don’t worry if you don’t. An invitation code will be generated. You can copy and paste it on the other side in this case.
If you have access, click “Yes, I have admin access”. Then, you will be redirected to the other instance to verify the access and establish the connection.
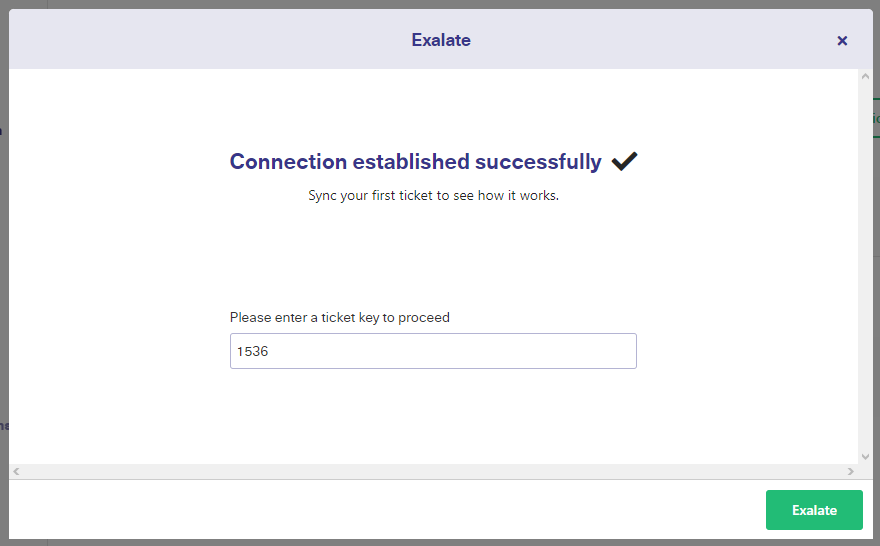
On the next screen, you can test the connection you have just created by entering the Case number in the text box given and then clicking “Exalate”.
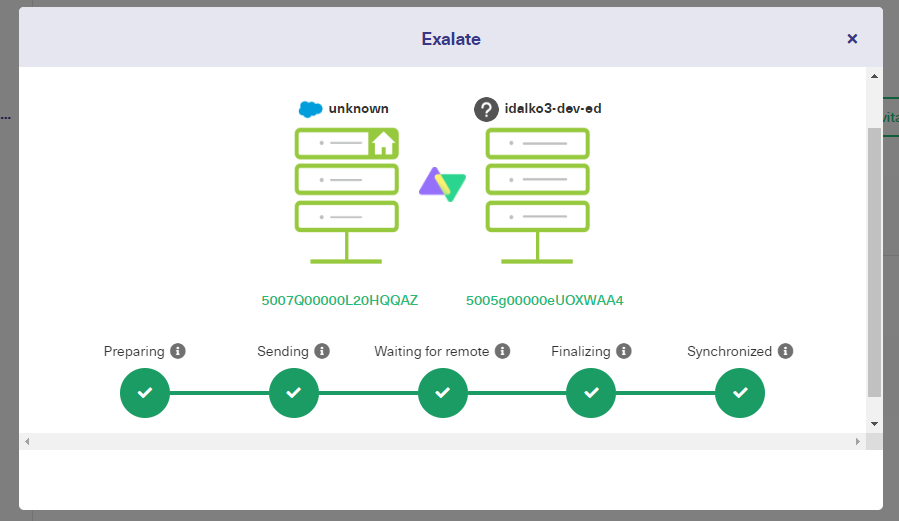
After a brief pause, you can see the Case getting synced to the other side. As shown in the image below, you can even click on the respective links and head over directly to the particular Case.
Now let’s move ahead with the Script mode.
Connections with the Script Mode
Initiate the connection in the same manner as you just did. But now, instead of choosing “Basic”, choose “Script”. And then click “Next”.
Now you need to enter a name for your local Salesforce instance and one for the remote instance. A connection name by combining both of these names will be auto-generated, but you can change it if you want.
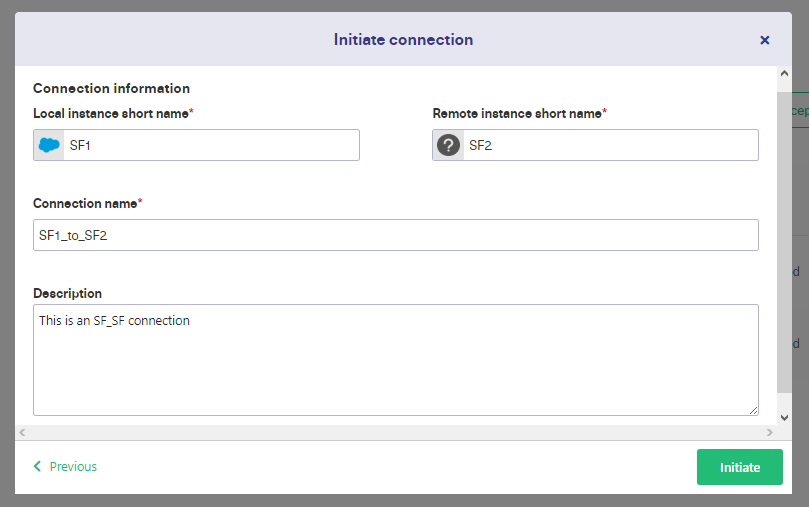
Don’t forget to add a description. It will help you identify your connection amongst a long list. Click on “Initiate” once you have entered all the details on this page.
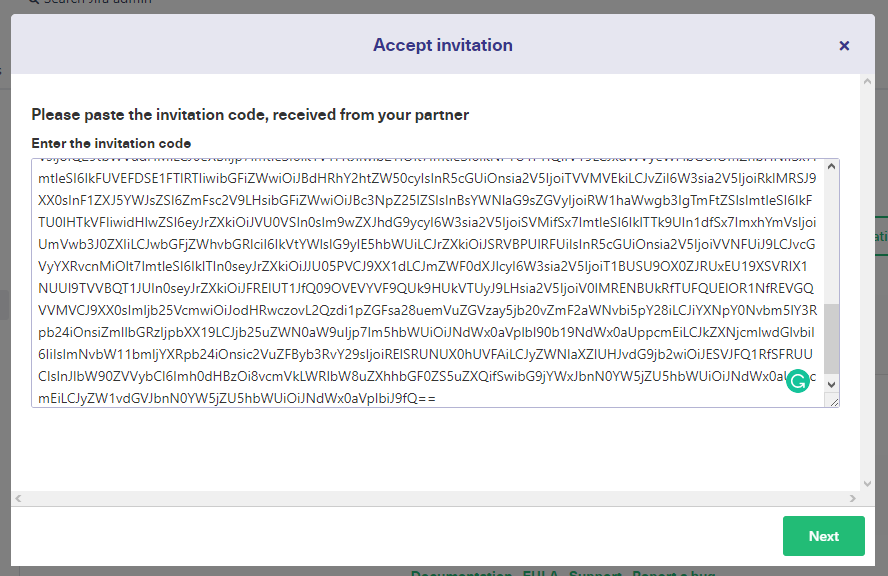
Now an invitation code is generated. This is a unique secret code to authenticate both instances. “Copy invitation code” and make sure to paste it somewhere safe. Once you copied it, click “Done”.
Then go to the other Salesforce instance. On the “Connections” tab, click the “Accept invitation” button this time. On the text box, paste the code you have just copied and click “Next”.
In a few seconds, the connection is successfully created.
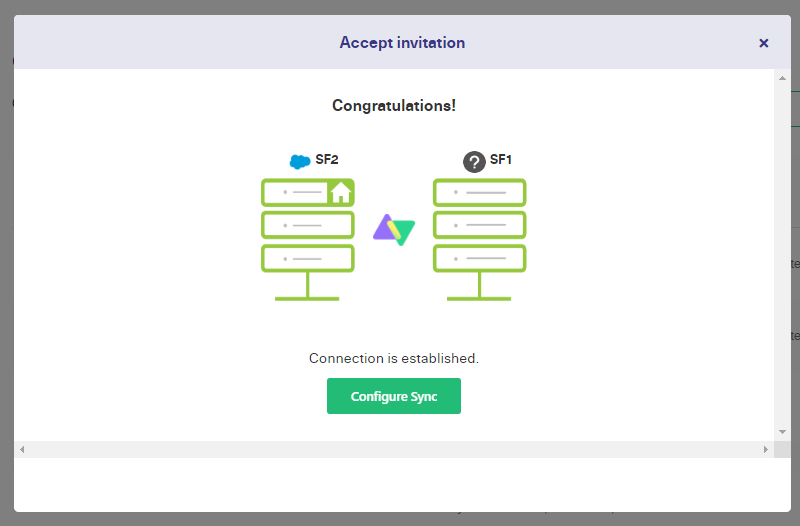
You can now configure it to decide what and how you want to send and receive information.
Step 3: Configure the Connection to Share Data
You can continue to configure the sync by clicking the “Configure Sync” button on the screen above.
If you don’t choose to do it immediately, you can go back to your “Connections” anytime and click on the edit connection button in front of your connection name.
Both approaches will redirect you to a page that shows 4 tabs:
- Rules
- Triggers
- Statistics
- Info

Statistics show how many items you are sharing and the details of when you have last synced them.
The Info tab gives information about the type of connection. You can find the destination instance URL here. You can edit the description of the connection here, too.
The Rules tab has two sections: The “Outgoing Sync” decides what information should be sent and the “Incoming Sync” decides how you want to map the information coming from the other side.
Each line corresponds to a field you want to sync. For instance, replica.description = entity.Description in the Outgoing sync would mean that the description of the case is sent over to the other side. Replica acts like an empty placeholder to dump information you want to send to the other side.
Likewise, in the incoming sync, you take contents from the replica and place it under the appropriate fields, i.e., entity.Description = replica.description, meaning that the replica’s description is copied to the description of the Salesforce entity.
Note that these rules exist at either end, so each side can decide what it needs to send and receive. The syncs are written in Groovy scripting language.
To stop sending or receiving certain information, you can simply choose to comment or delete that particular line. So if you delete replica.description = entity.Description in the outgoing sync section means the description won’t be synced to the other side.
You can even choose to have a fixed field description, for instance, replica.description = ‘synced from the sales team’.
You can also add some text at the beginning of the description, for instance,
replica.description = ‘synced from the sales team’ + entity.Description.
To send additional information, you can add scripts in the existing sync rules section.
For instance, if you want to send Tasks in addition to Cases from one Salesforce instance to the other, you can add the following script in the “Outgoing sync”:
if(entity.entityType == "Case") {
replica.key            = entity.Id
replica.summary        = entity.Subject
replica.description    = entity.Description
replica.comments       = entity.comments
replica.attachments    = entity.attachments
replica.Status         = entity.Status
}

if(entity.entityType == "Task") {
replica.key            = entity.Id
replica.summary        = entity.Subject
replica.description    = entity.Description
replica.Status         = entity.Status
}
Don’t forget to map the corresponding Task details in the “Incoming sync” of the other Salesforce instance here. This way, you can even set up the most advanced configuration between the instances.
There is no need to get bogged down by so much code. There are a lot of script helpers that can help you with advanced processing.
Use AI Assist with Script Mode
Exalate’s script mode now comes with AI Assist, available as a chat window in both the incoming and outgoing sync rules tabs. Just describe your sync requirements in the chat, and AI Assist will generate the necessary scripts for you.
These scripts are created based on your input, existing configurations, and Exalate’s scripting API.
Remember, like any AI, AI Assist isn’t perfect and may occasionally make mistakes. So, be as clear and specific as possible with your prompts.
Here’s an example of how you can use it:
Let’s say you need to map case statuses between multiple Salesforce instances. You can type something like this in the AI chat:
For incoming sync: “Create a status mapping that sets New to Open, Working to In Progress, and Escalated to Done in the Jira incoming configuration.”

The AI will generate the script in a few moments.
Lines in red show what will be removed from the current script, while green lines represent the new additions. You can accept or reject the changes, and if needed, adjust your prompt. Once everything looks good, publish your changes.
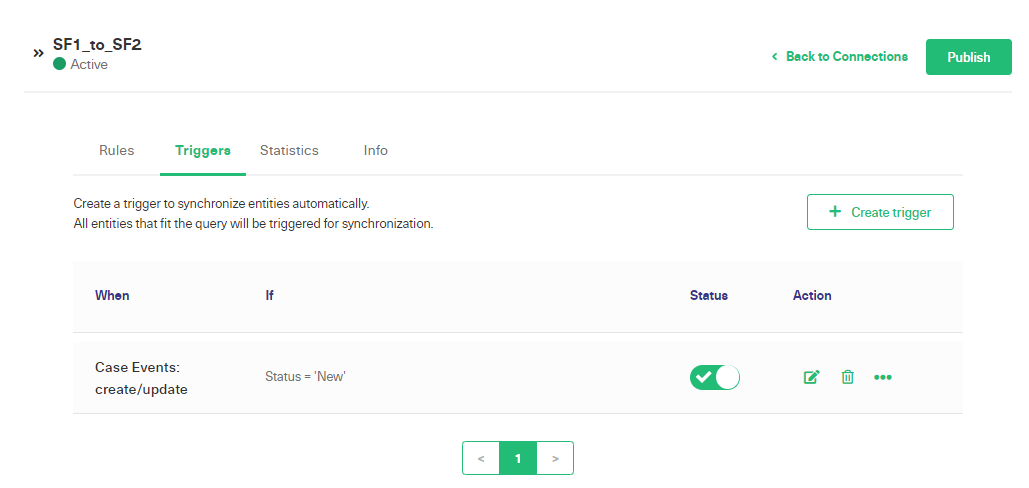
Step 4: Create Automated Sync Triggers
One benefit of modern Salesforce integration software is that it allows users to automate connections using triggers.
To create triggers on Exalate, click the “Triggers” tab. If you don’t have any triggers yet, the screen will be empty. So start creating a new trigger by clicking “Create trigger”.

Select the Salesforce entities to which the trigger will apply, for instance, Case, Account, Product, Opportunity, etc.
Then in the next section, you can enter the details of the Case in the fields provided to create a trigger. There are a lot of options in the “More” section as well.
For instance, you can choose to sync Cases belonging to a particular company, in which case you need to write the name of the company in the provided text box.
You can even create it by toggling the search query option, which will allow you to write a trigger in the Salesforce Object Query Language (SOQL).
Once you write your query, scroll down and fill in some notes for the trigger. This will help you identify the purpose of your trigger.
And then activate the trigger by clicking on the “Activate trigger” checkbox
On the previous screen, you will be able to see your trigger listed. You can choose to edit or delete it from this screen. You can even choose to sync existing Salesforce objects, fulfilling the condition of the trigger by clicking the three dots next to its name and selecting “Bulk Exalate”.
Finally, publish the changes you have made so they can be reflected in your sync.
Step 5: Start the Synchronization
There are various ways you can start your synchronization with Exalate.
- You can use the Basic mode to sync, as shown in step 2.
- You can create triggers, as shown in step 4.
- You can “Bulk Exalate” Salesforce entities satisfying the trigger conditions.
- Or you can manually sync a particular entity by clicking on the “Exalate” sync panel on the Salesforce object page. You just need to select the connection name through which you want to sync and click “Exalate”. This panel will also show you the status of your synchronization.
- Another way to sync is using the “Bulk Connect” option that allows you to sync existing Salesforce records present in both instances.
This is all you need to know about how Exalate can help you achieve your integration.
Things to Consider When Using Exalate
If you want to choose the best Salesforce integration, here are things to consider.
Defined User Roles and Responsibilities
It is important to define user roles and responsibilities, especially in an integration setup. Such a filter is necessary to avoid friction between team members.
As an appropriate measure, you can label the items correctly and clearly so everyone on the team stays on the same page and is aware of what needs to be done in case of a discrepancy or error.

With Exalate, admins can filter items to even the most granular level. For instance, you can filter them according to the username field so things can be handled differently for teams or individuals.
Access to the Exalate app
You need proper access control mechanisms to ensure authorized people have access to the Exalate app. This requirement is important in an integration setup to ensure your information does not end up in the wrong hands or to avoid regulatory violations.
Such permissions are already set up while during, but you can change them later if needed.
Notification Handling
When dealing with newer integration apps like this, it is tempting to overload users with every little sync. But the trick is to keep it simple at first and then layer on complexities over time.

A plan must be in place so that only the required and minimum number of users are notified in case something goes wrong or to have updates about necessary syncs. This will ensure no one misses important notifications.
What are the Common Salesforce to Salesforce Integration Mistakes?
Some mistakes to avoid during Salesforce integration across companies and teams include the following:
- Propagating bad data practices
- Lack of comprehensive documentation
- Not training your staff to use the integration solution.
- Ignoring data rate and API limits, and other regulations
- Not testing the endpoints before you start exchanging data
- Improper data mapping between fields, objects, and projects
- Inadequate communication with partners, vendors, MSPs, etc.
- Limiting your sync to template connectors and default mappings
- Ignoring performance analytics instead of drawing insights from them
- Not cleaning your data before integrating with other teams and organizations.
Conclusion
Data integration in Salesforce is a tricky subject that can lead to disaster. But if handled carefully and with proper planning, Salesforce data integration tools can make your life a lot easier.
We saw how this could be true for a Salesforce to Salesforce integration where you can expand your business to include newer partners and your business teams to work towards common customer goals.
We covered the native Salesforce integration API. Then, we moved on to see how to get your integration to work using a cross-company Salesforce integration partner called Exalate.
And lastly, we saw how Exalate can integrate multiple Salesforce instances in 5 easy steps and pointed out a few things that can make your integration path a smoother one.
Looking for Salesforce integration consulting? Book a demo with our Exalate engineers right away.
Frequently Asked Questions
Why integrate multiple Salesforce orgs?
By integrating multiple Salesforce orgs, your business teams can experience a seamless and error-free data exchange across different departments. Through ERP integration with Salesforce, you can extend Salesforce beyond its default capabilities.
How do I integrate Salesforce with Salesforce?
You can integrate multiple Salesforce instances using the “Salesforce to Salesforce” default functionality. You can also use third-party integration solutions like Exalate to set up custom-made one-way or two-way automatic syncs between two Salesforce instances.
Can I migrate data from one Salesforce org to another?
Yes, you can migrate data between two Salesforce orgs. You can sync all the related data and records and maintain the relationships between them. There are a lot of third-party Salesforce integrations available in the market to perform this operation.
Can I set up a bi-directional integration between Salesforce and other tools?
Yes, you can set up uni or bi-directional sync between Salesforce and other applications. You can sync any Salesforce records (even custom ones) and their related records and set up automatic sync triggers to start the information exchange.
What is an example of Salesforce to Salesforce integration?
If you have multiple sales teams working remotely, you can integrate data under the Salesforce integration cloud. This way, you can get useful insights about customer behavior. You can also understand how different teams interact with customers.
How do I connect Salesforce to Salesforce using REST API?
To use REST APIs to connect multiple Salesforce instances, you can make HTTP requests to the Salesforce REST API endpoints and interact with its data and functionalities. This allows you to perform operations such as querying, creating, updating, and deleting records, as well as executing custom Apex REST services. However, this needs a lot of technical expertise and work. So it’s advisable to use third-party integration tools or hire a Salesforce integration architect.
Recommended Reads: