Sales and customer support teams can benefit a lot from a Salesforce Zendesk integration, as key customer data and tickets can be accessible to both sides for real-time updates.
Such integration will allow data to flow seamlessly between teams so they can work in harmony to deliver a coherent customer experience.
This guide highlights why you need a Salesforce to Zendesk integration and how it can benefit your teams. Then, we’ll show you how to choose the right technology for this integration and outline a step-by-step approach to implementing it.
Note: In this guide, we are using a software integration tool called Exalate. We will learn more about it as we go ahead.
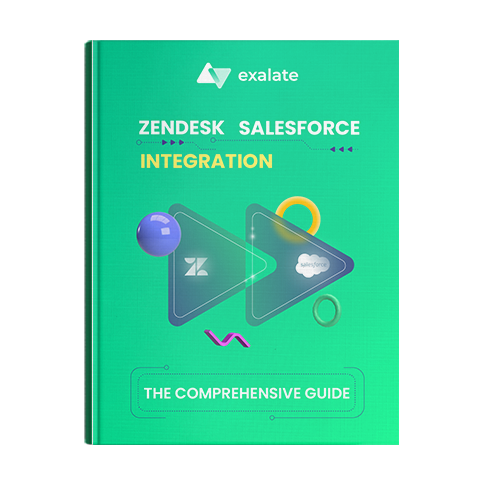
Get the Salesforce Zendesk Integration Guide
Learn how to achieve seamless integration between Zendesk and Salesforce, step-by-step.
What is Salesforce Zendesk Integration?
Salesforce to Zendesk integration is the process of using a third-party solution to connect both platforms so they can share data between them in the appropriate formats.
Zendesk is a popular customer support platform that many mid-sized and large companies use to improve customer relationships. Salesforce is a cloud-based CRM platform that provides a single and shared view of the customer for different departments in the organization.
To get both systems to connect and share data, you need dedicated Salesforce to Zendesk solutions built in-house or made by a third-party provider.
What Are the Benefits of Salesforce Zendesk Integration?
Here are the benefits of Salesforce to Zendesk integrations:
- When teams are working in different environments, it often leads to silos. But Salesforce and Zendesk integration breaks these silos and enables the sharing of information without any side having to leave their familiar platforms.
- Zendesk and Salesforce integration reduces the need for teams to manually copy-paste information from tickets, customer queries, and feedback between different platforms and then follow the updates through emails or phone calls.
- Teams can benefit from automatic, real-time information exchange. This will reduce errors and lead to a smooth information flow between them, leaving them free to work on improving the overall customer experience.
- Companies using Zendesk Salesforce integration can improve user experience by gaining access to essential data points and interactions at every stage of the customer’s journey.
- Integrating data with a third-party solution improves collaboration between teams and organizations by ensuring that all parties have access to relevant information when needed.
A Salesforce Zendesk integration can help achieve all this. But before we see how to implement this integration, we need to learn how we can choose the right tool.

Discover the ways Exalate can help your organization or MSP consolidate data from multiple platforms.
How to Choose the Right Salesforce Zendesk Integration
To ensure your integration delivers its purpose, consider a few points when choosing your integration solution.
Decentralized Integration
A Zendesk Salesforce integration tool should allow you to work in your trusted environment without having to worry about the other side. You should be able to control what you send to the other side and how you want to deal with data coming from there.

In this case, a decentralized integration where each side has the autonomy to decide what information is part of the transfer will ensure you don’t send critical or insider information across by mistake.
Flexibility
As your expectations from the integration mature, so must the tool. The data you initially wanted to share with your partner might change now or you might want to share something additional or filter some data out using advanced logic.
The Salesforce and Zendesk integration tool must be able to support all these changing requirements with minimal time and effort. This might be in the form of an AI assistant generating scripts for non-technical users—or optimizing existing scripts to suit specific use cases.
Reliability
Computer systems are vulnerable to breakdowns. Your synchronization may stop when this happens. The tool for Zendesk integration to Salesforce must then be able to resume without any manual intervention the next time your system is up and running.

All the changes that need to be rolled out and the paused synchronizations that are pending must be applied in the same order as expected.
Security
Security measures like encrypted file transfers and secure protocols for exchanging information are also important aspects to consider when choosing a Salesforce integration for Zendesk.
Consider solutions that are ISO 27001 certified as well as compliant with data privacy and industry regulations.
I chose Exalate as the preferred tool because it fulfills the above requirements.
Exalate supports decentralized integration through outgoing and incoming sync rules that control what information moves from each side. It comes with a scripting engine that allows you to implement complex and unique integration scenarios with minimal configuration. In case of downtimes or failures, the system will apply changes or updates automatically in the same order as their initiation.
Note: You can learn more about Exalate’s security features in this whitepaper.
How to Set up a Salesforce Zendesk Integration: the Step-By-Step Approach
To set up the Salesforce and Zendesk integration, you must first install Exalate on both platforms and then establish a connection between them.
If you prefer a video tutorial, then go ahead and watch this short video instead:
Now I will walk you through all these steps one by one.
Step 1 – Install Exalate on Salesforce
You can start installing Exalate on Salesforce via its integrations page.
Note: Exalate accesses Salesforce through APIs and has its own guidelines for API Access add-ons. For instance, API access is provided by default in Enterprise accounts, while it is not the case with other accounts like Professional. Learn more about the different Salesforce editions Exalate supports on this documentation page.
You can also install the app via the AppExchange marketplace.
You need to choose the installation destination for Salesforce: either “Install in This Org” or a Sandbox org. My preference was to install it in this org.
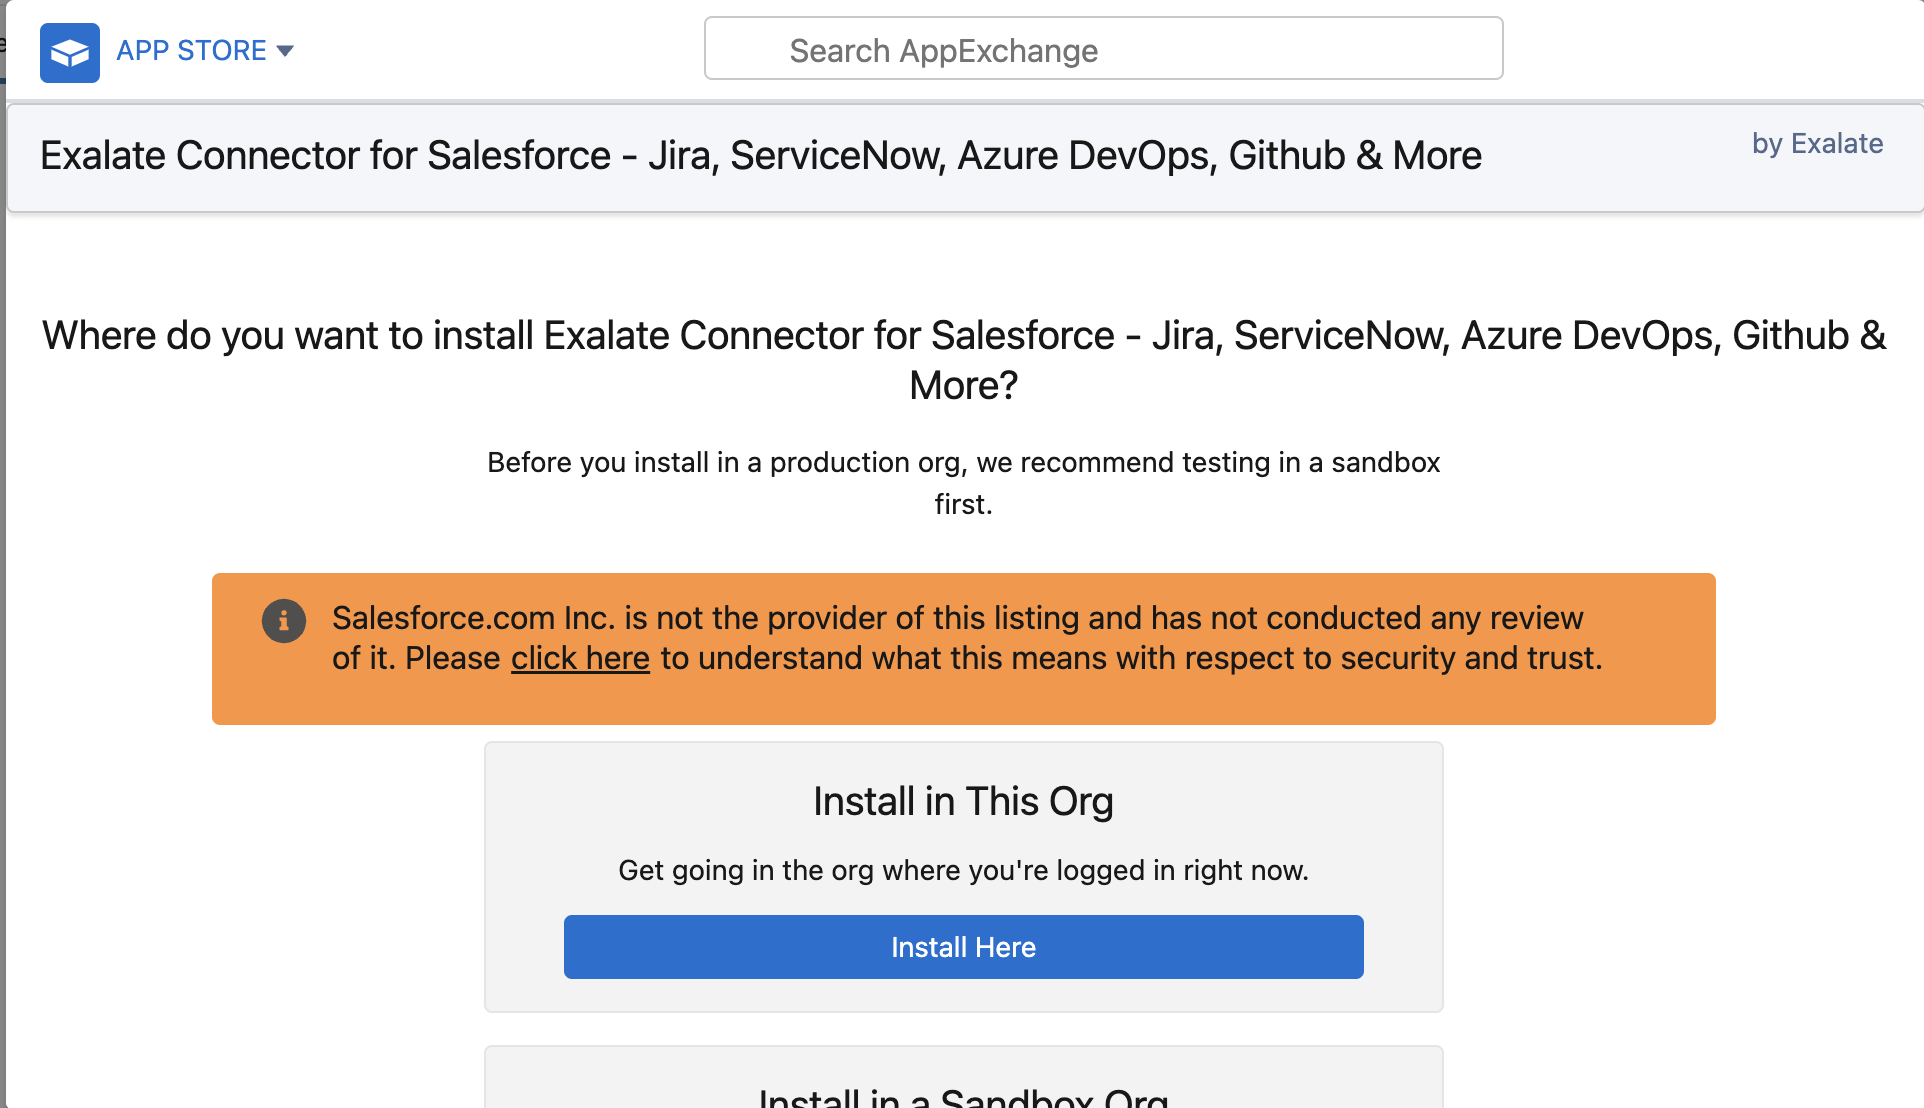
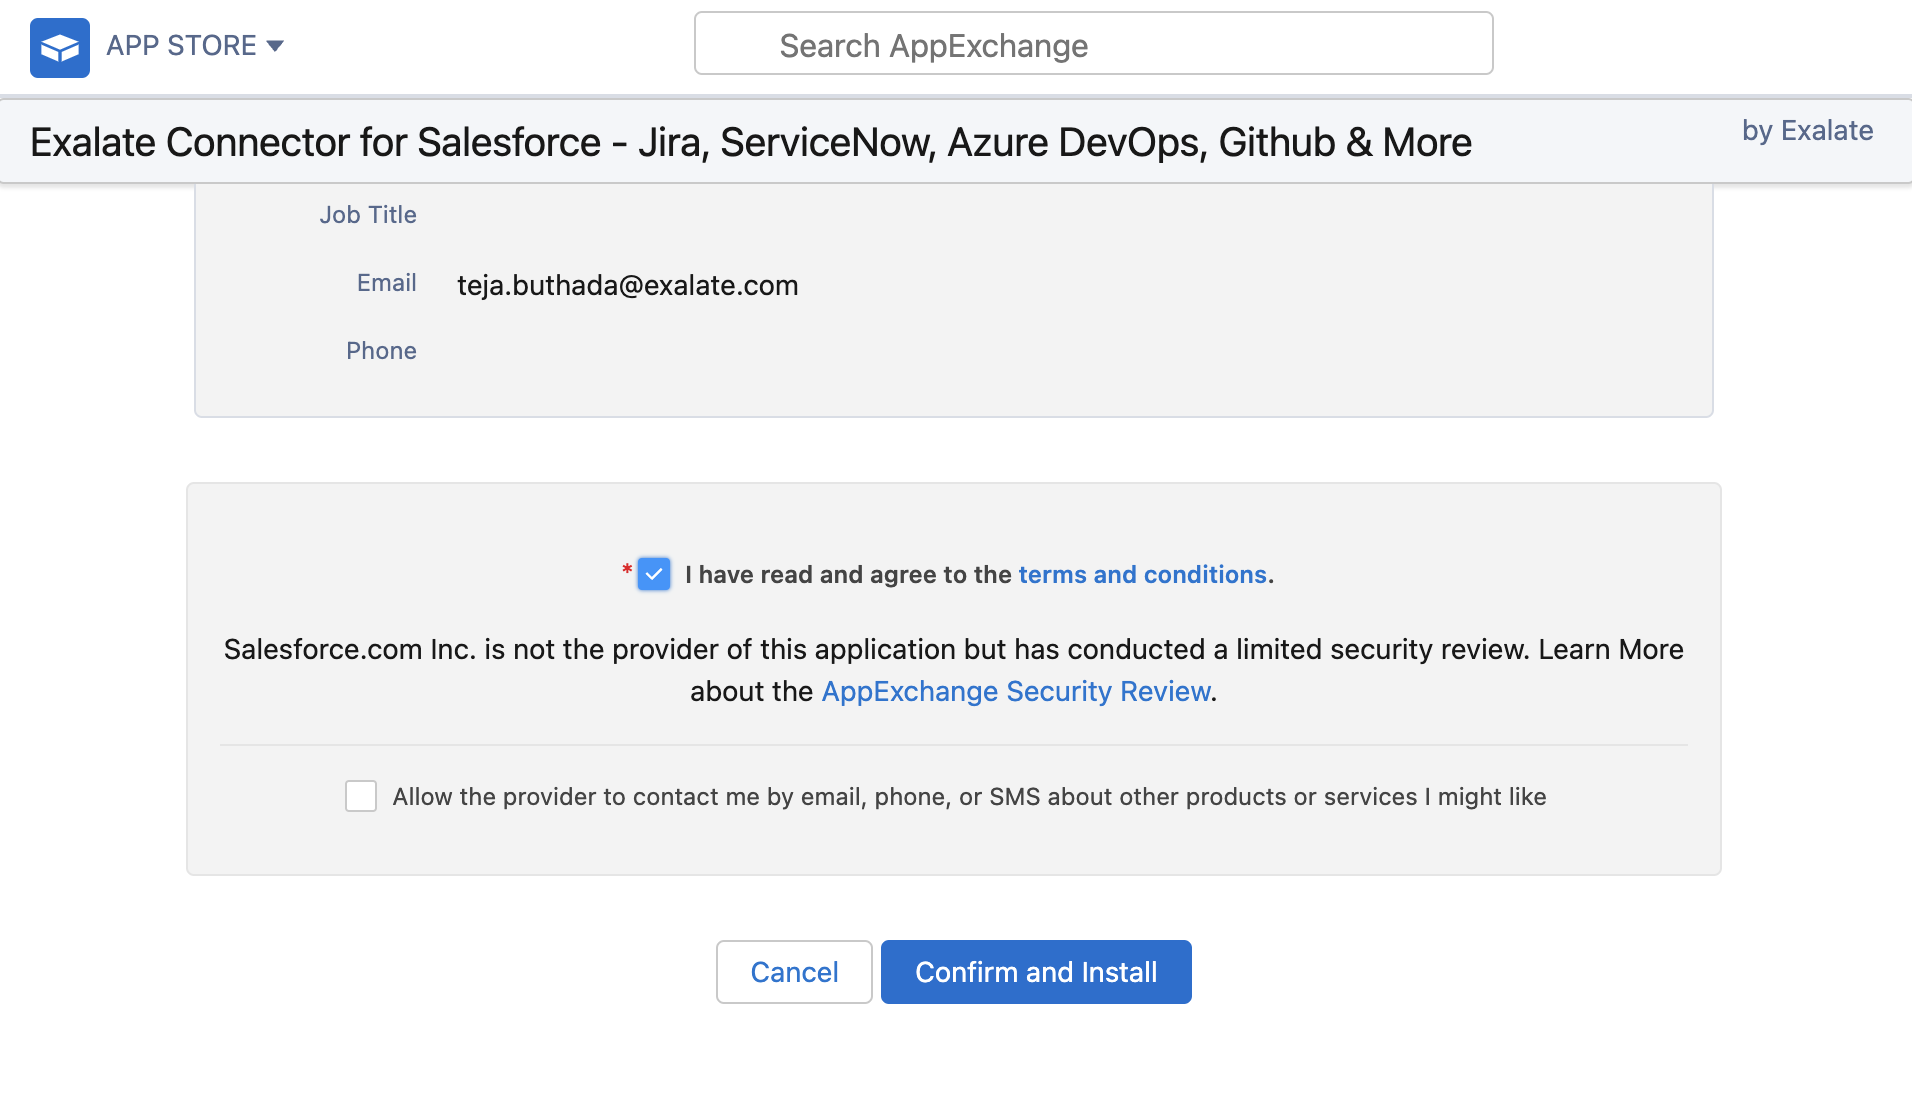
After selecting, fill in the required details, scroll down to the bottom of the screen, and agree to the terms and conditions. Once done, press “Confirm and Install”.
Now, you need to specify the users for whom you want to install Salesforce. Remember, you have the flexibility to change this later on. In my case, I opted to “Install for All Users” and proceeded by clicking “Install”.

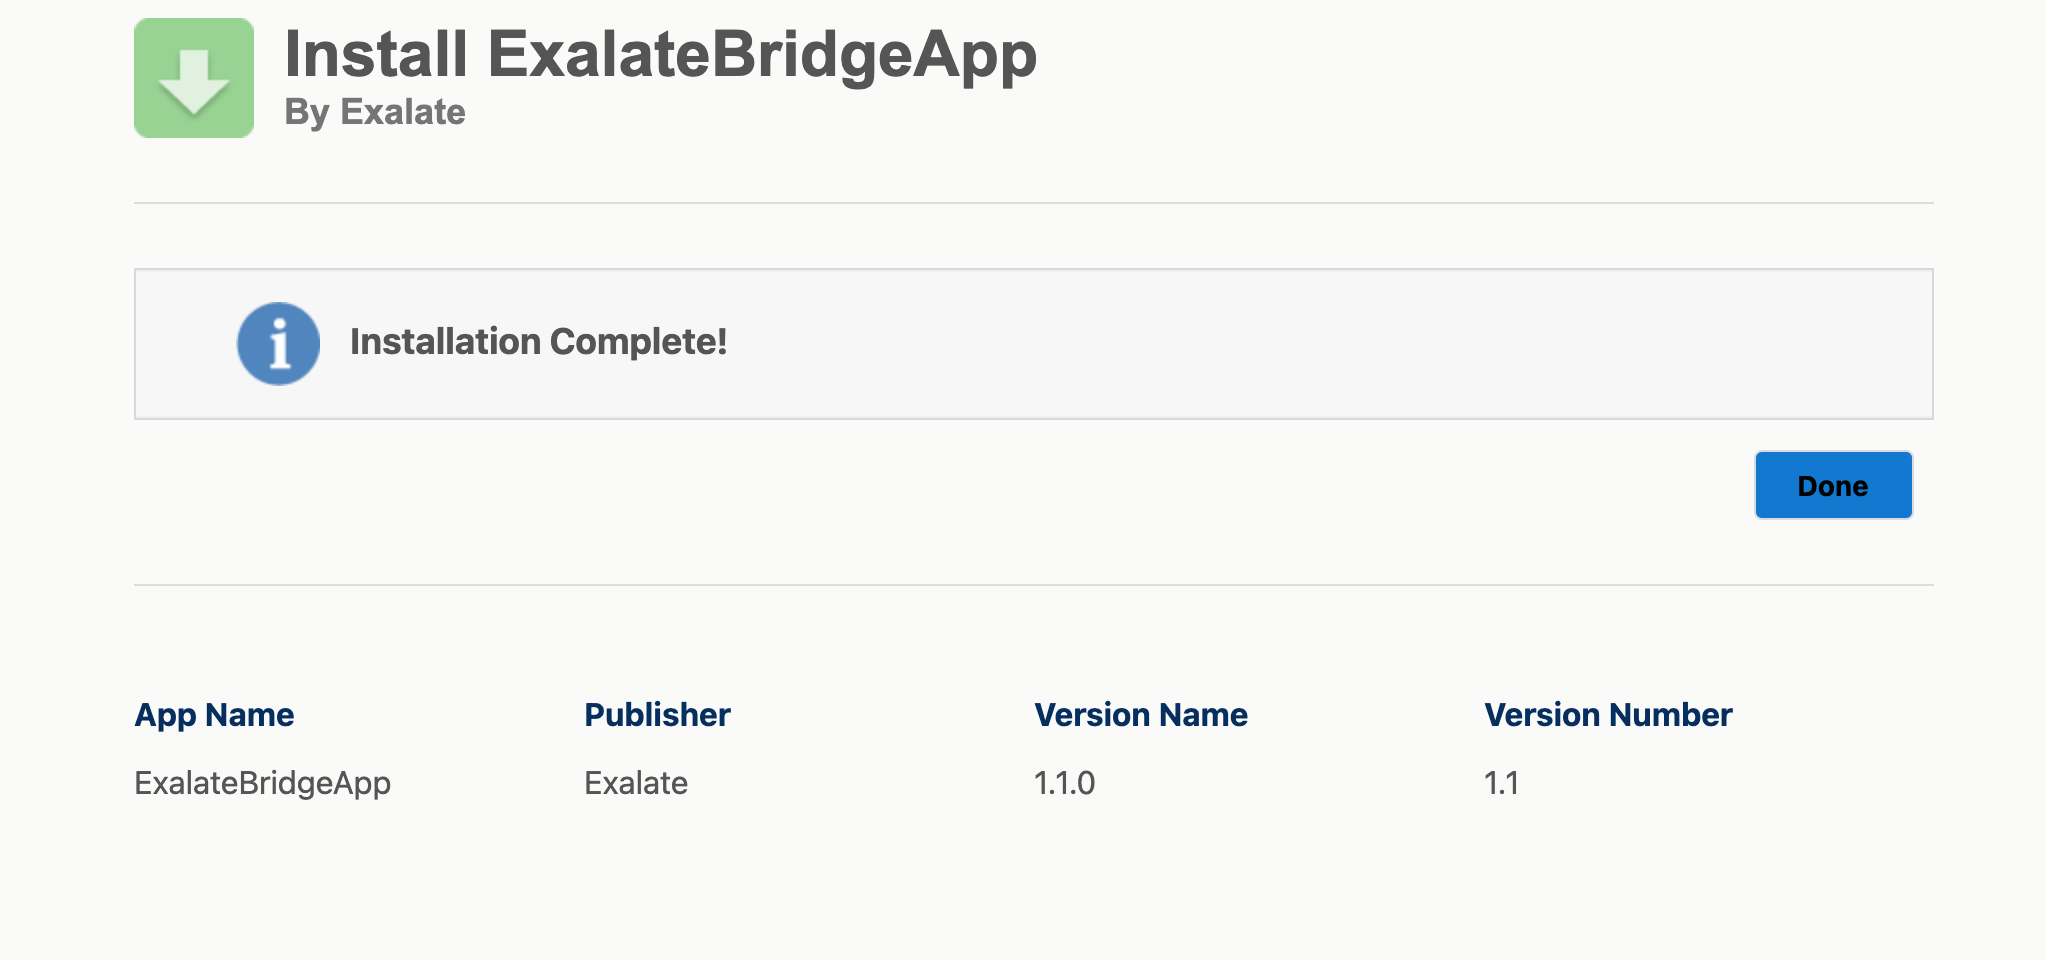
Next, “Approve Third-party Access” and click “Continue” to move forward. Your installation process will now be complete. Simply click on “Done” to finalize the setup.
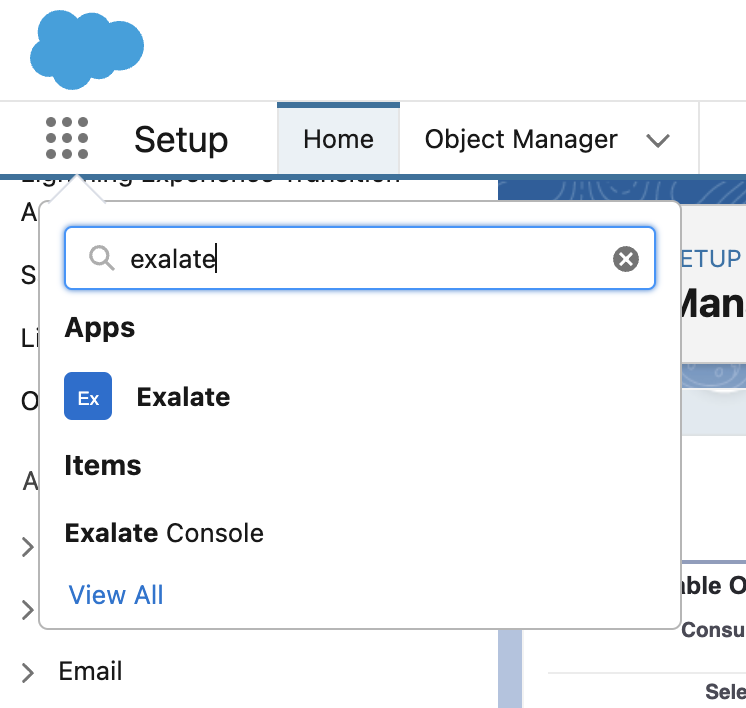
Now, navigate to your Salesforce instance and create a connected app. Make sure to save the “Consumer Secret” and “Consumer Key” generated during this process. Once you have them, go back to your Salesforce instance, click “Apps,” and search for “Exalate”.
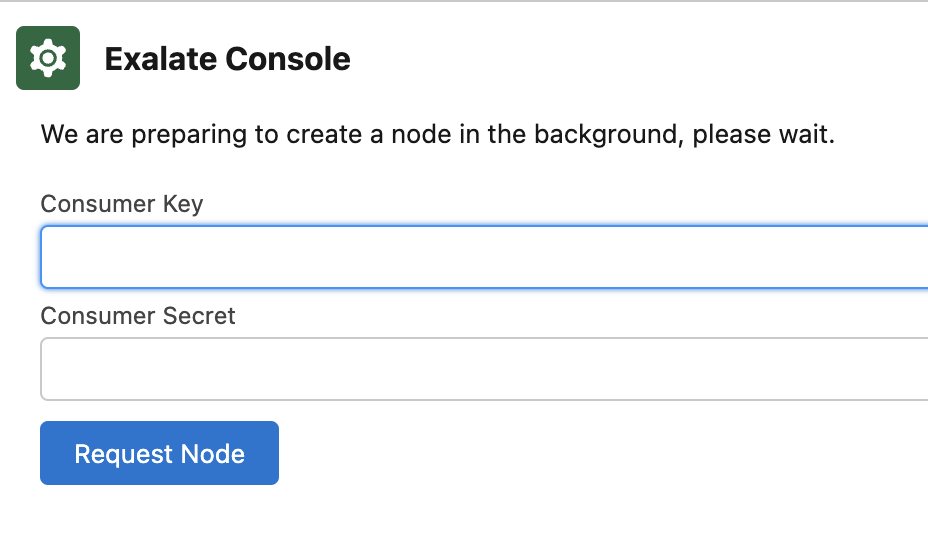
To request an Exalate node, provide the previously saved “Consumer Secret” and “Consumer Key”, and then click “Request Node”.
To grant access permissions to Exalate, click “Allow”.
Now, “Add new trusted URL” by going to “Setup” and searching “Trusted URLs”.
Fill it in with the following information:
- API name: free input string
- URL: *.exalate.cloud
Check all the checkboxes in the “CSP Directives” section. Click “Save”.
After this, you’ll be prompted to enter your details. Click “Agree and Submit”, then await an email from the Exalate License Manager.
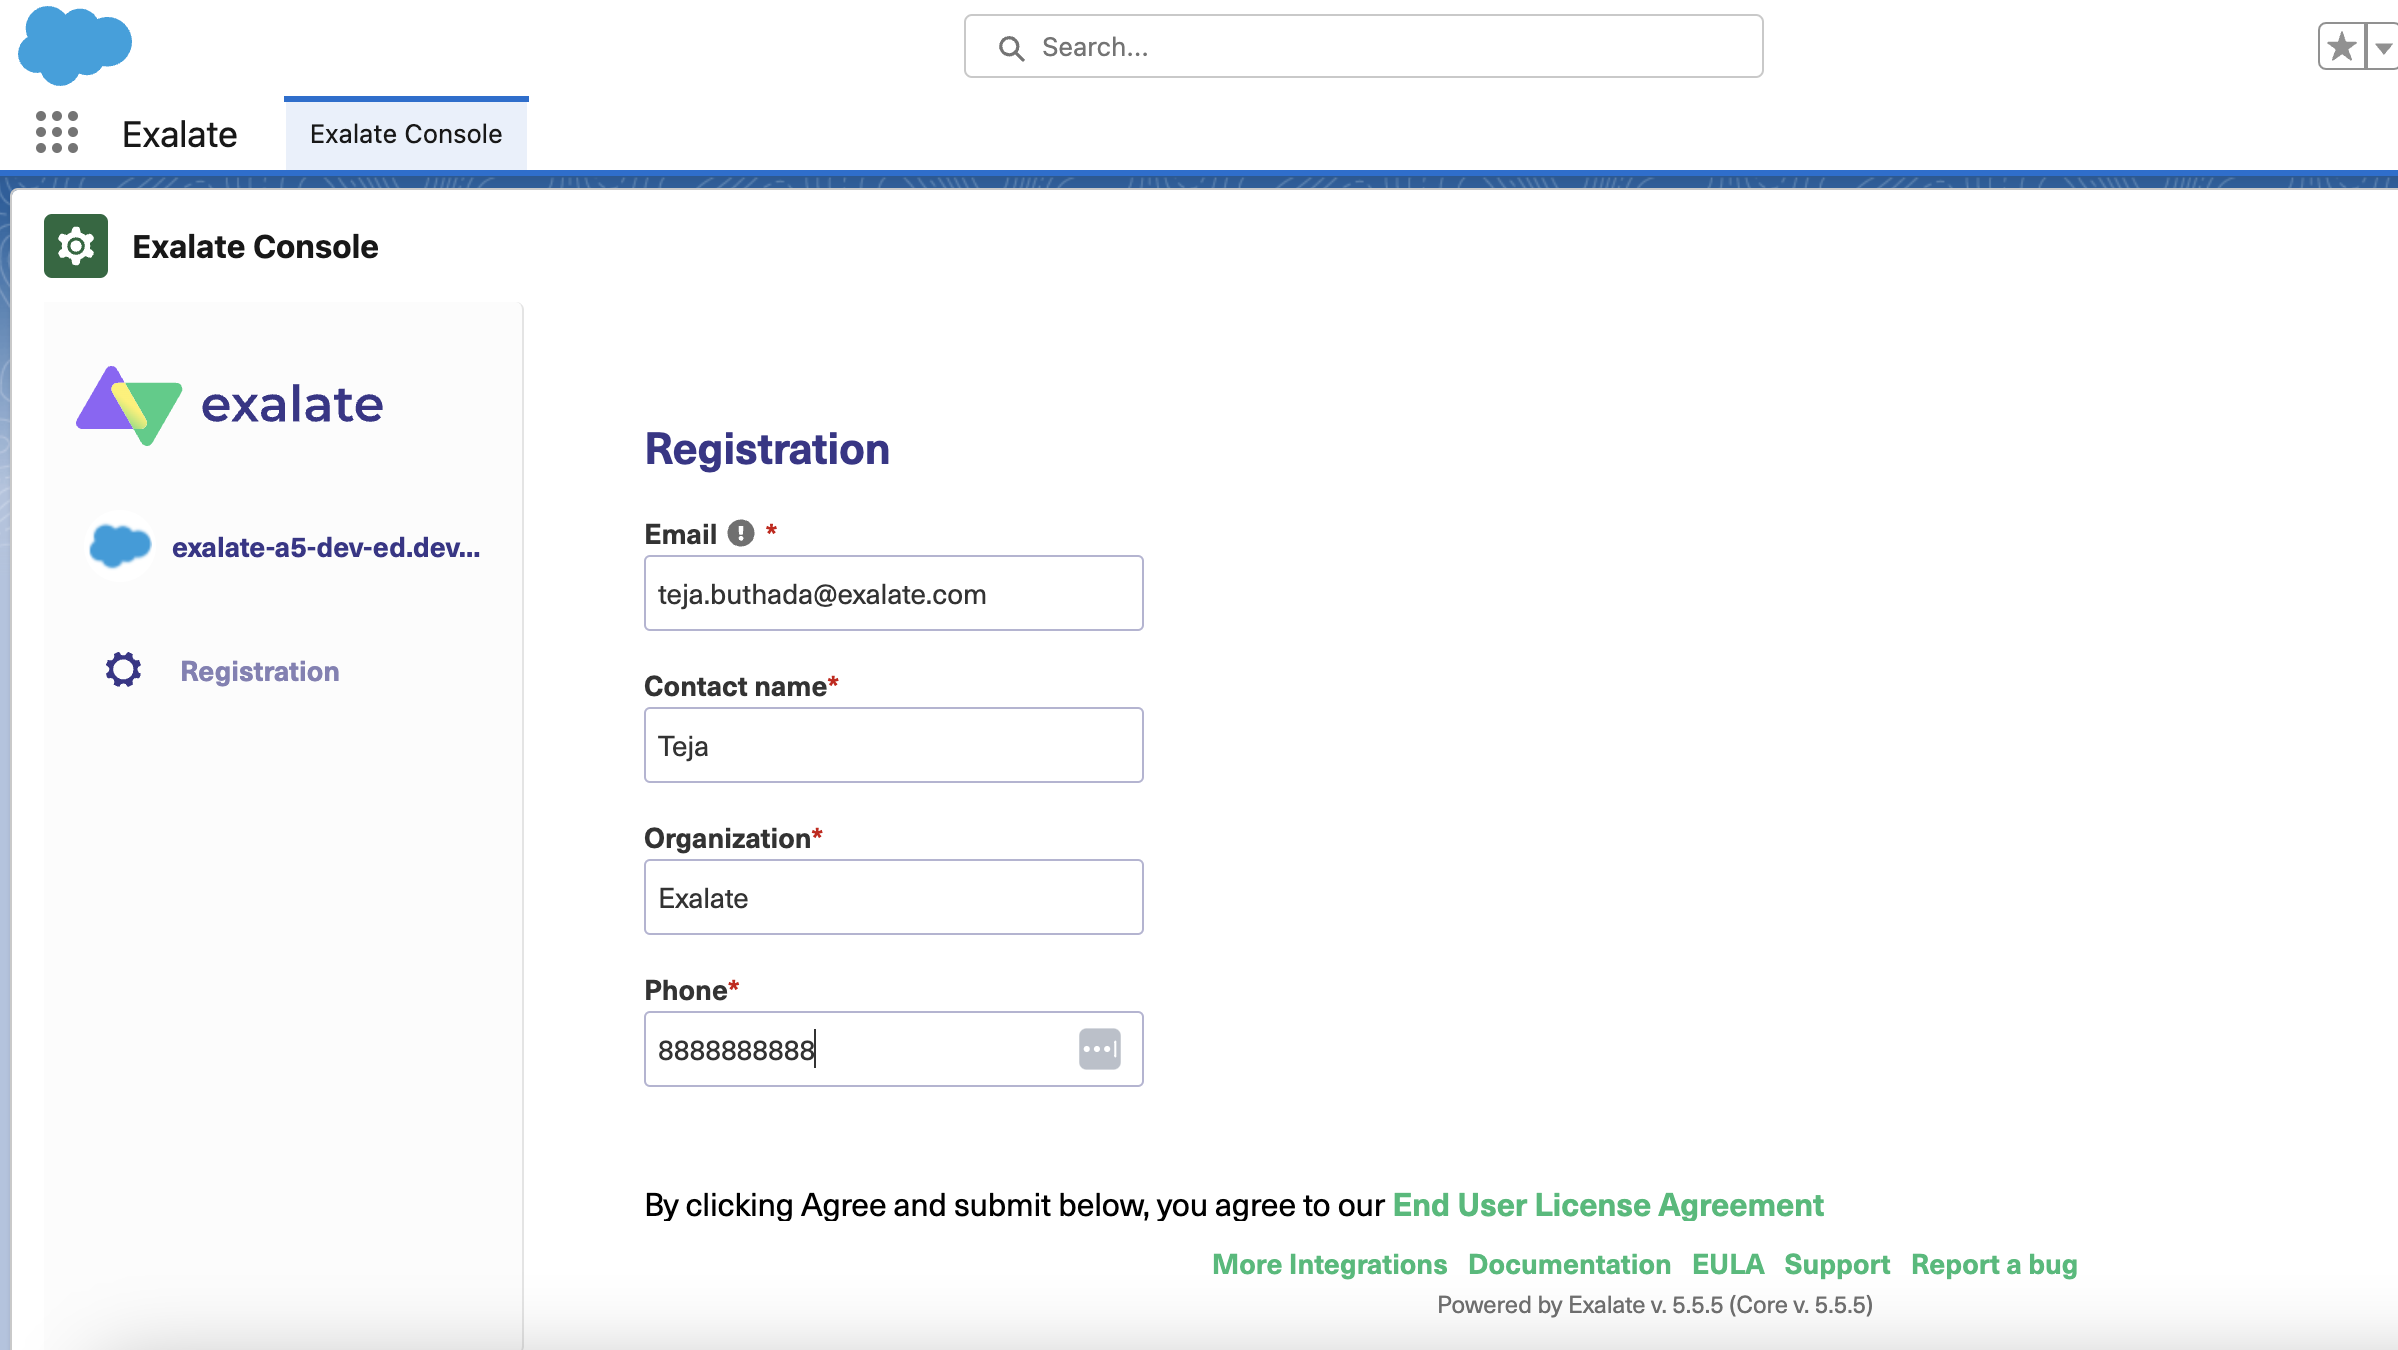
Once you receive the email, click “Verify Exalate instance” to be redirected to the Exalate admin console.
In case you receive a prompt to log in to your Exalate console for Salesforce, follow these steps.
Now you need to install Exalate on Zendesk.
Step 2 – Install Exalate on Zendesk
You can install Exalate for Zendesk either from the integrations page or via the Zendesk marketplace.
Or log in to your Zendesk account and click on the cog icon on the left-hand menu. Under “Apps” select “Marketplace”.
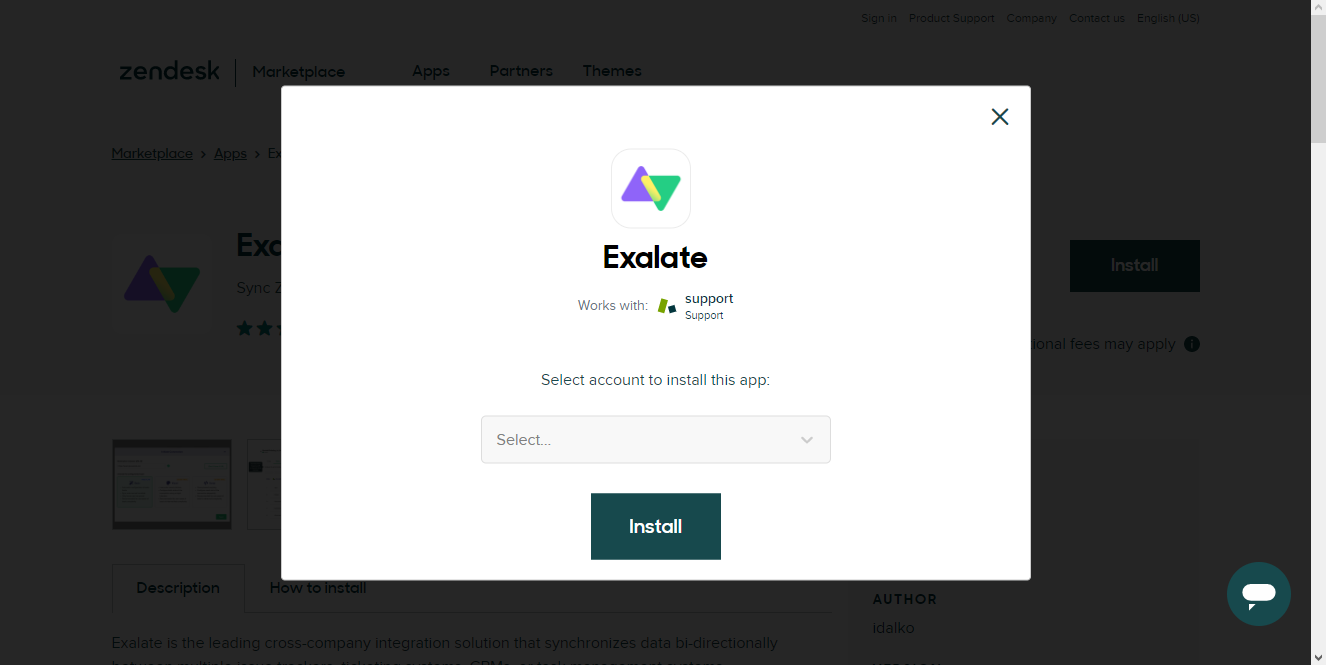
Find Exalate by entering it in the search box. You will see an “Install” button next to the app.
You will see a prompt to select an account. This is applicable in case you have multiple accounts. Select the account you want to install the app with. It can be an account from an existing user, or you can create a completely new one for Exalate.
Click “Install” afterward.
Now, you can change the title of the app, enable restrictions, or choose to go with the defaults. In either case, click “Install” when done.
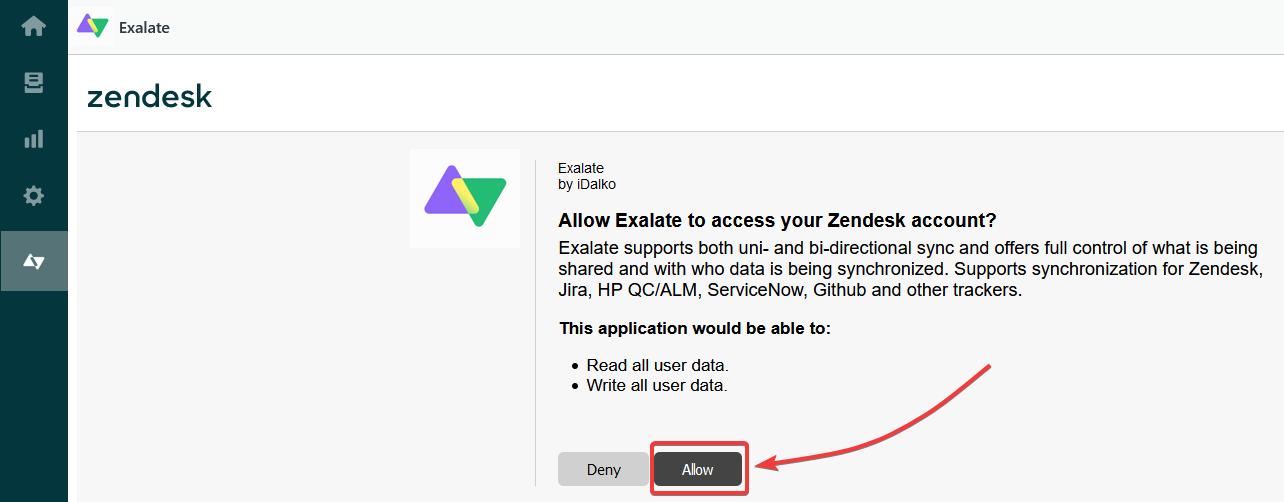
Select the Exalate icon from the left menu. Then click “Allow” to allow Exalate to access your Zendesk Account.
Fill in the pop-up that appears so that Exalate can verify your instance. Click “Agree and Submit,” and you will receive a verification email.
In the email, click “Verify Exalate instance” and you will be redirected to the Zendesk portal.
Step 3 – Establish a Connection Between Salesforce and Zendesk
Now that we have installed Exalate on both Salesforce and Zendesk, we can establish a Salesforce Zendesk integration. To do so, one side initiates the connection, and the other side accepts it. Once the connection is ready, both sides can now share information according to the conditions specified.
You can start initiating the connection from either Salesforce or Zendesk. For this guide, I’ll start with Zendesk.
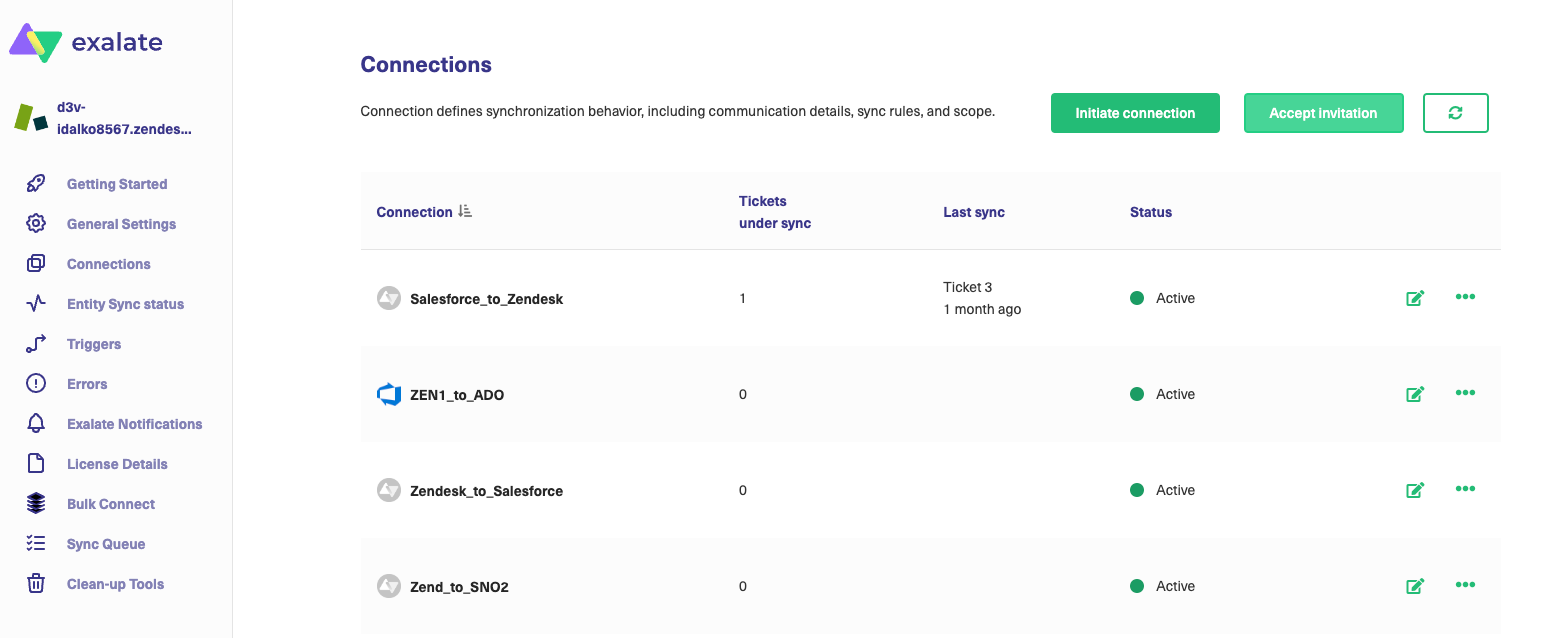
On the Exalate console in Zendesk, click the green “Initiate Connection” button. In case you are not on this screen, you can navigate to “Connections” in the left-hand menu. This tab lists all the connections you have set up. If it’s your first time, the list is empty.
On the next screen, enter the destination instance URL. Since I am initiating from the Zendesk side, the destination URL will be the Salesforce instance.
Exalate will now perform a quick check to see if an instance exists on the destination side. If yes, then you get additional selection options.

These include selecting the mode of connection.
Exalate comes in Basic and Script modes.
The Basic mode is suitable for simple synchronization use cases. It includes some predefined mappings and sync rules that you cannot modify. Also, this mode is available through a Free Plan (you can start here) that allows up to 1000 free syncs per month. So it’s useful to experience the way Exalate works firsthand with this plan. You can choose to upgrade to the Script mode anytime you want.
The Script mode comes with advanced configuration features and sync rules that you can modify to suit complex or custom use cases. We recommend you use the Script mode since it is customizable for unique integration needs. You also get to work with the AI Assist feature to help you generate scripts faster.
We will cover both these modes one by one since they have different flows.
Using the Basic Mode
After you select Basic mode, click “Next”.
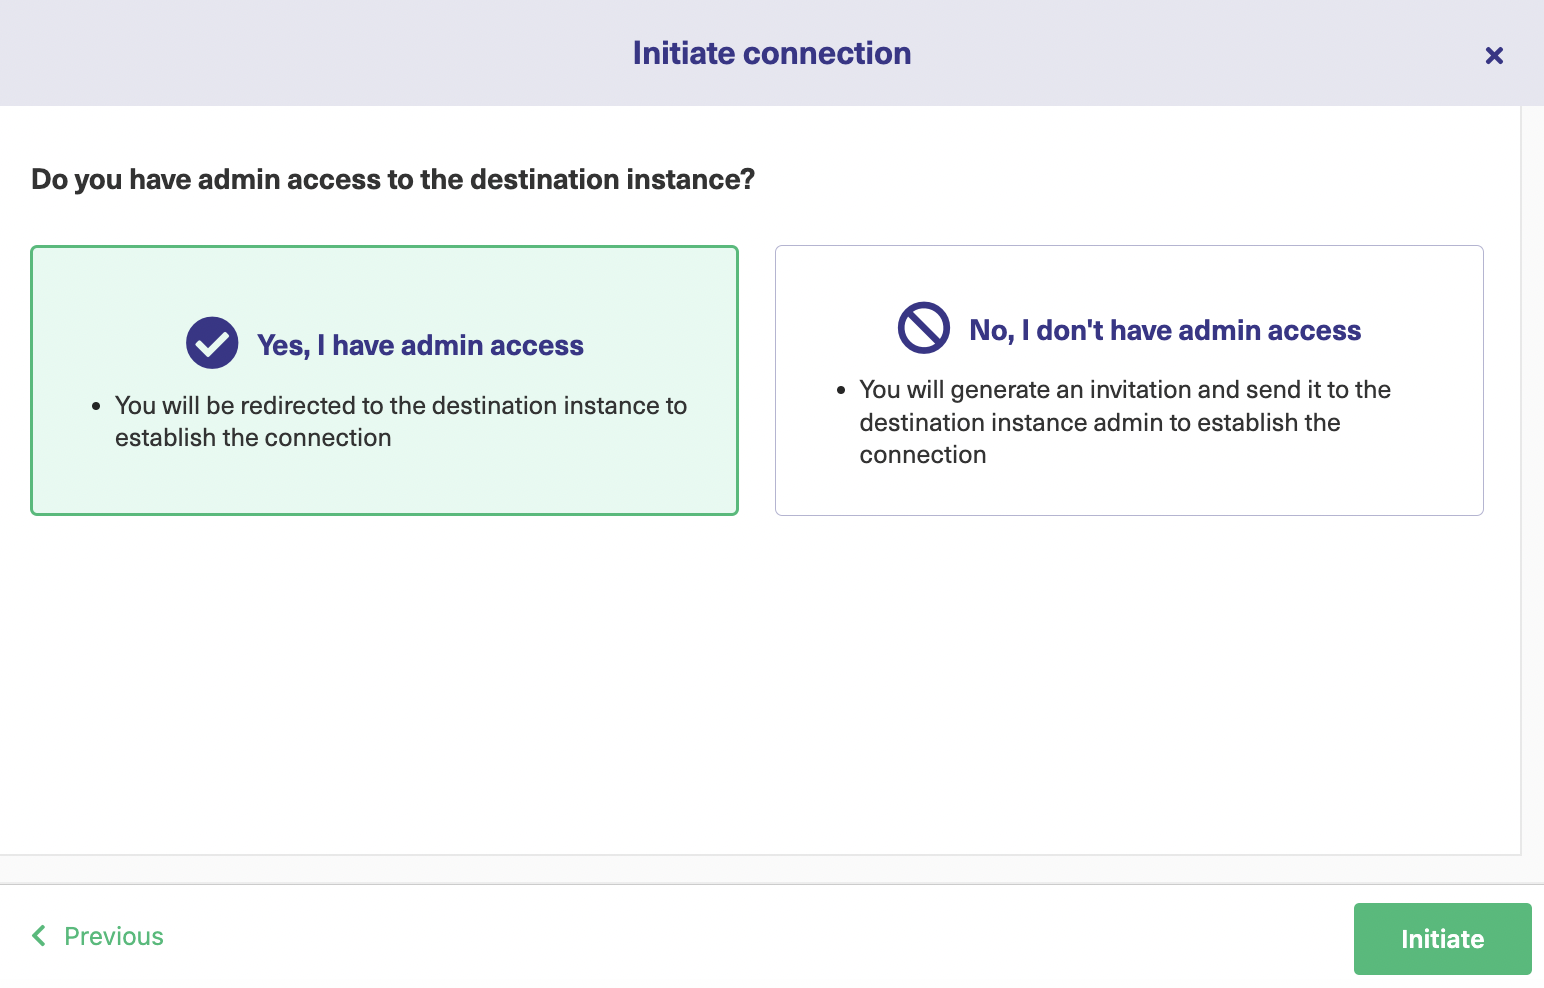
You will have to verify if you have admin access on the destination side, Zendesk in our case. Since I have access, I click “Yes, I have admin access”. In case you don’t, follow these steps.
In either case, click “Initiate”.
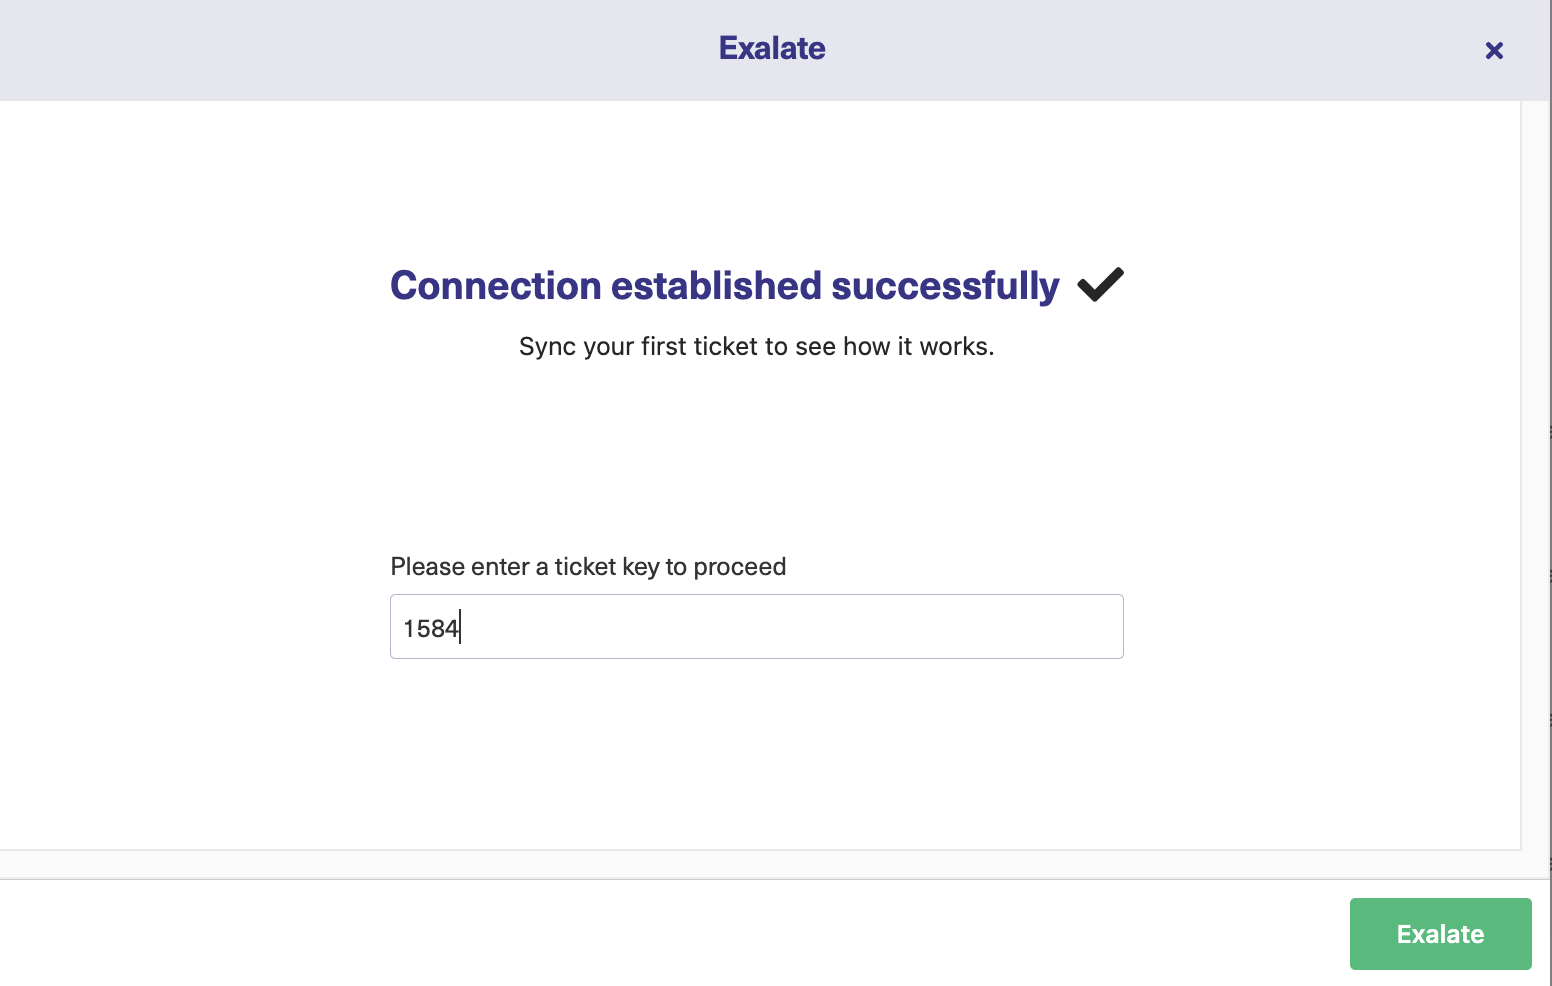
After verification, you will be redirected to the Zendesk side.
Here you need to enter the ticket key. This means the key specified will be immediately synchronized on the Salesforce instance. With this, you can start synchronizing Zendesk tickets or Salesforce entities right away.
You can also create triggers for synchronization such that when the condition is met, tickets or entities are automatically synchronized with the other side. If there are already several tickets or entities you want to synchronize, you can perform a “Bulk Connect” on them. If you want to sync individual tickets, you can use the Connect operation instead.
Note: The connect operation is currently available only on Zendesk.
After entering the ticket key, click “Exalate”.
The same screen on the Salesforce side looks like this.
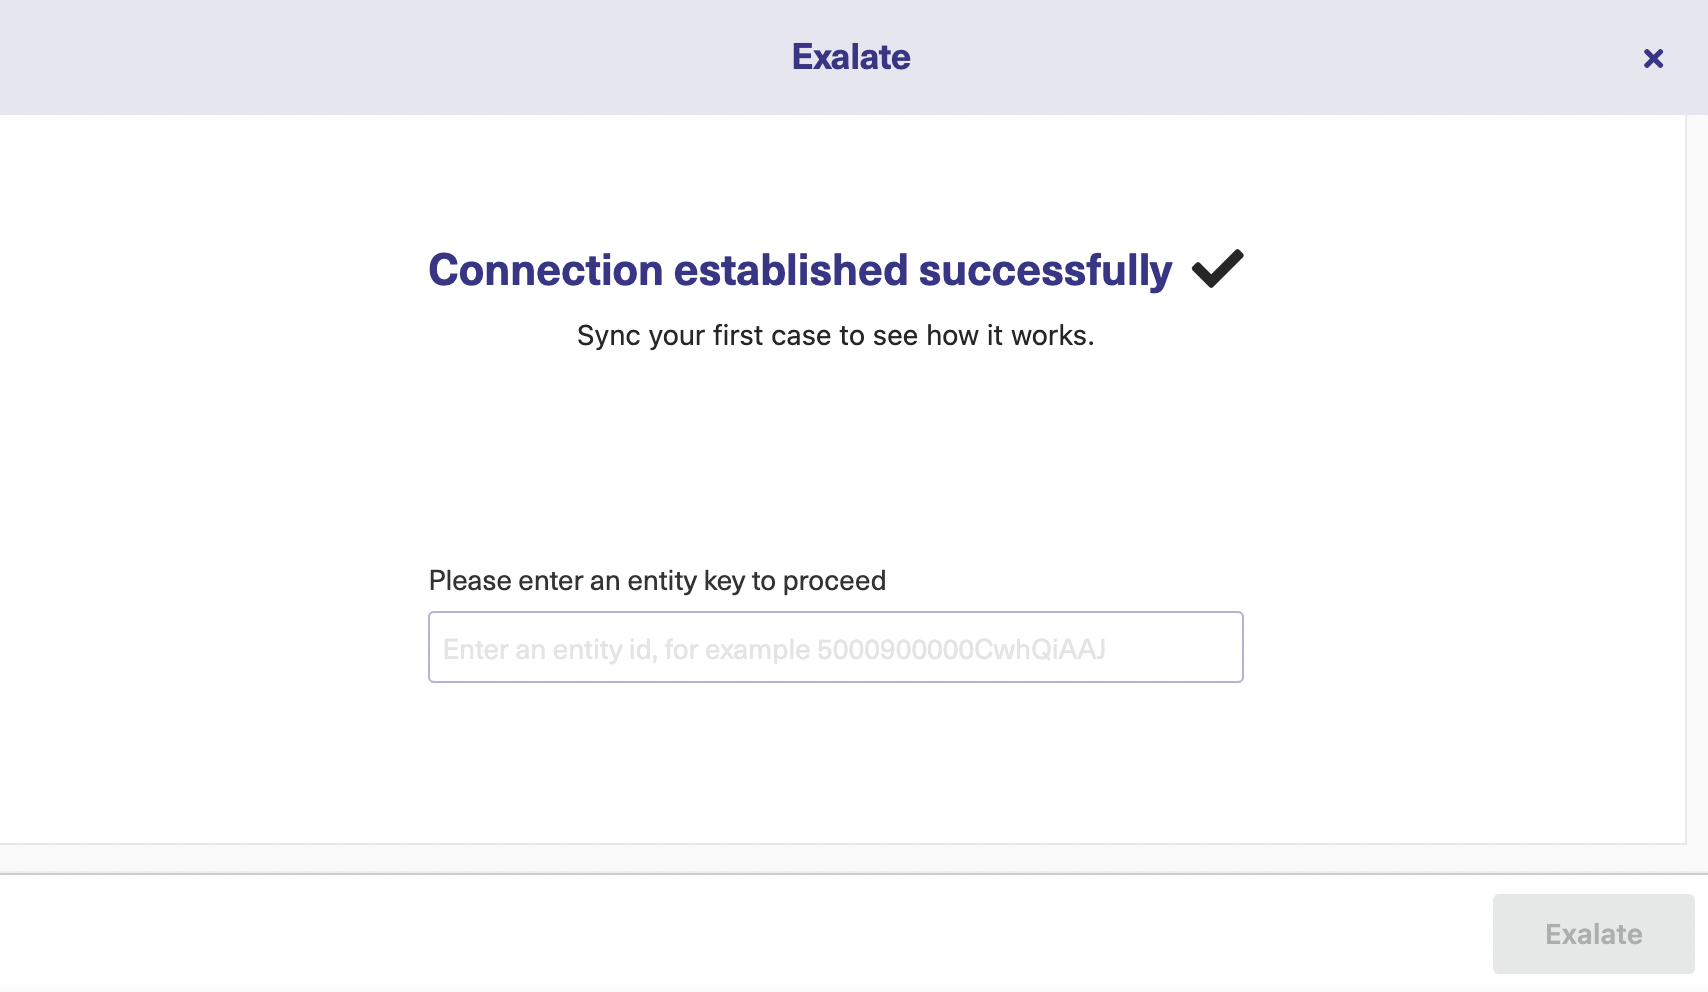
You can enter the Case key and proceed to synchronize it on the Zendesk side.
Here, you can fetch the Case key from the URL of the Case, as shown in the image below.

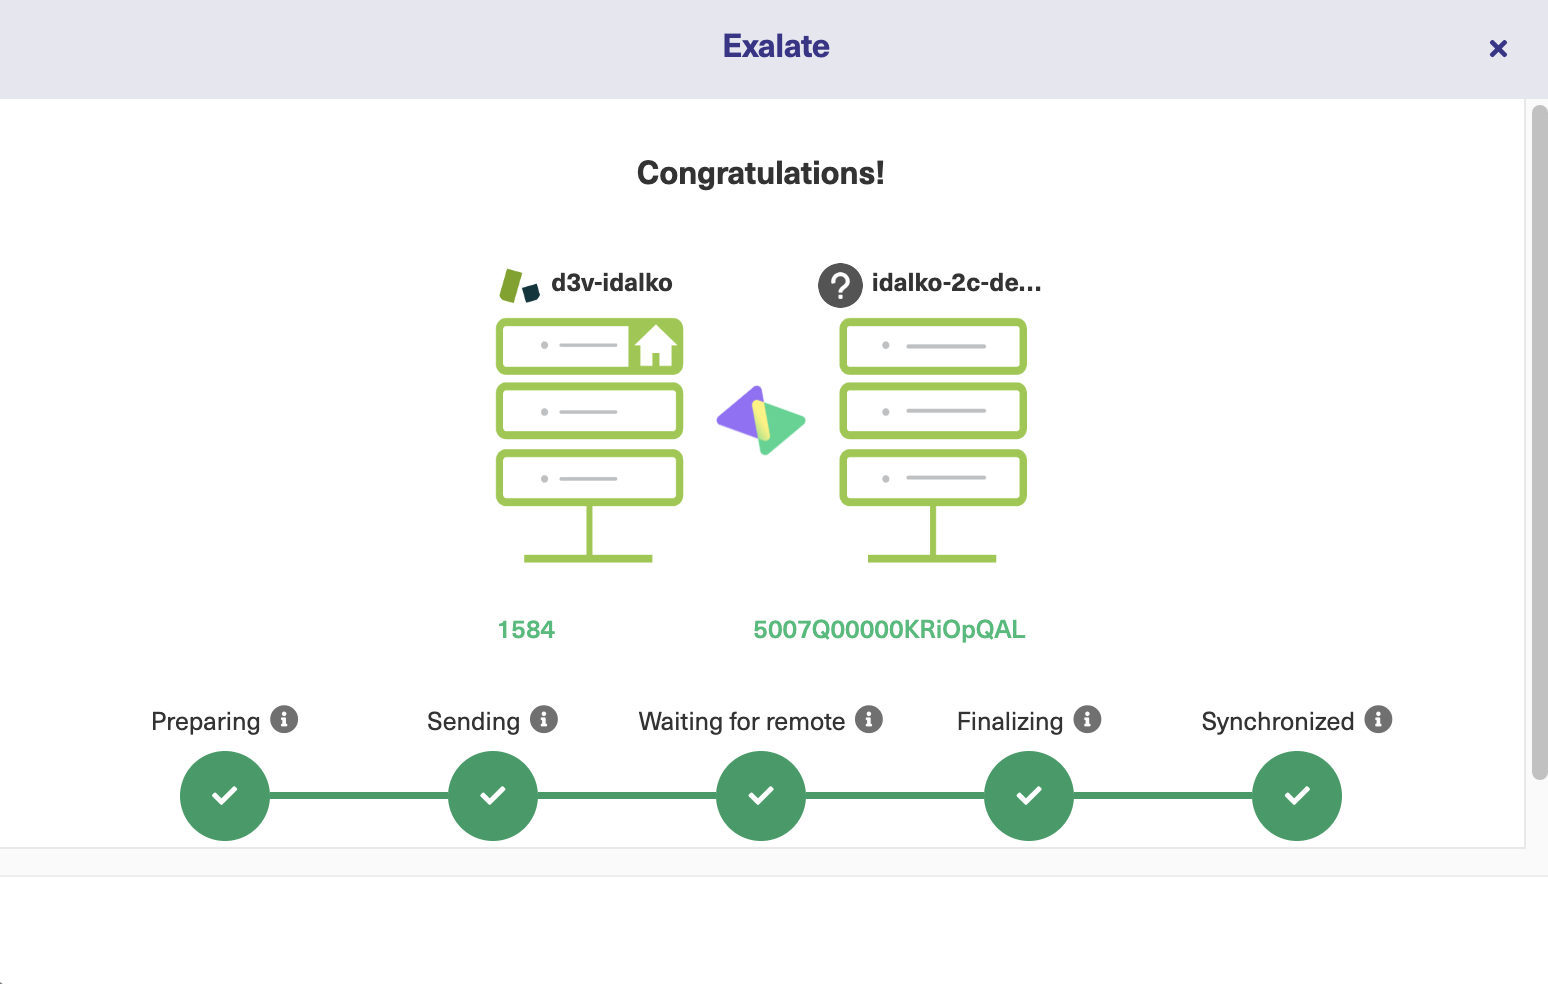
For the synchronization to happen, you need to wait for a few minutes. Upon successful synchronization, you will see the corresponding status.
You can follow the new Case created on the Salesforce side by clicking on the remote link generated or even refer to the ticket on the Zendesk side by clicking on its link.
Using the Script Mode
If you decide to go with the Script mode, select it and click “Next”.

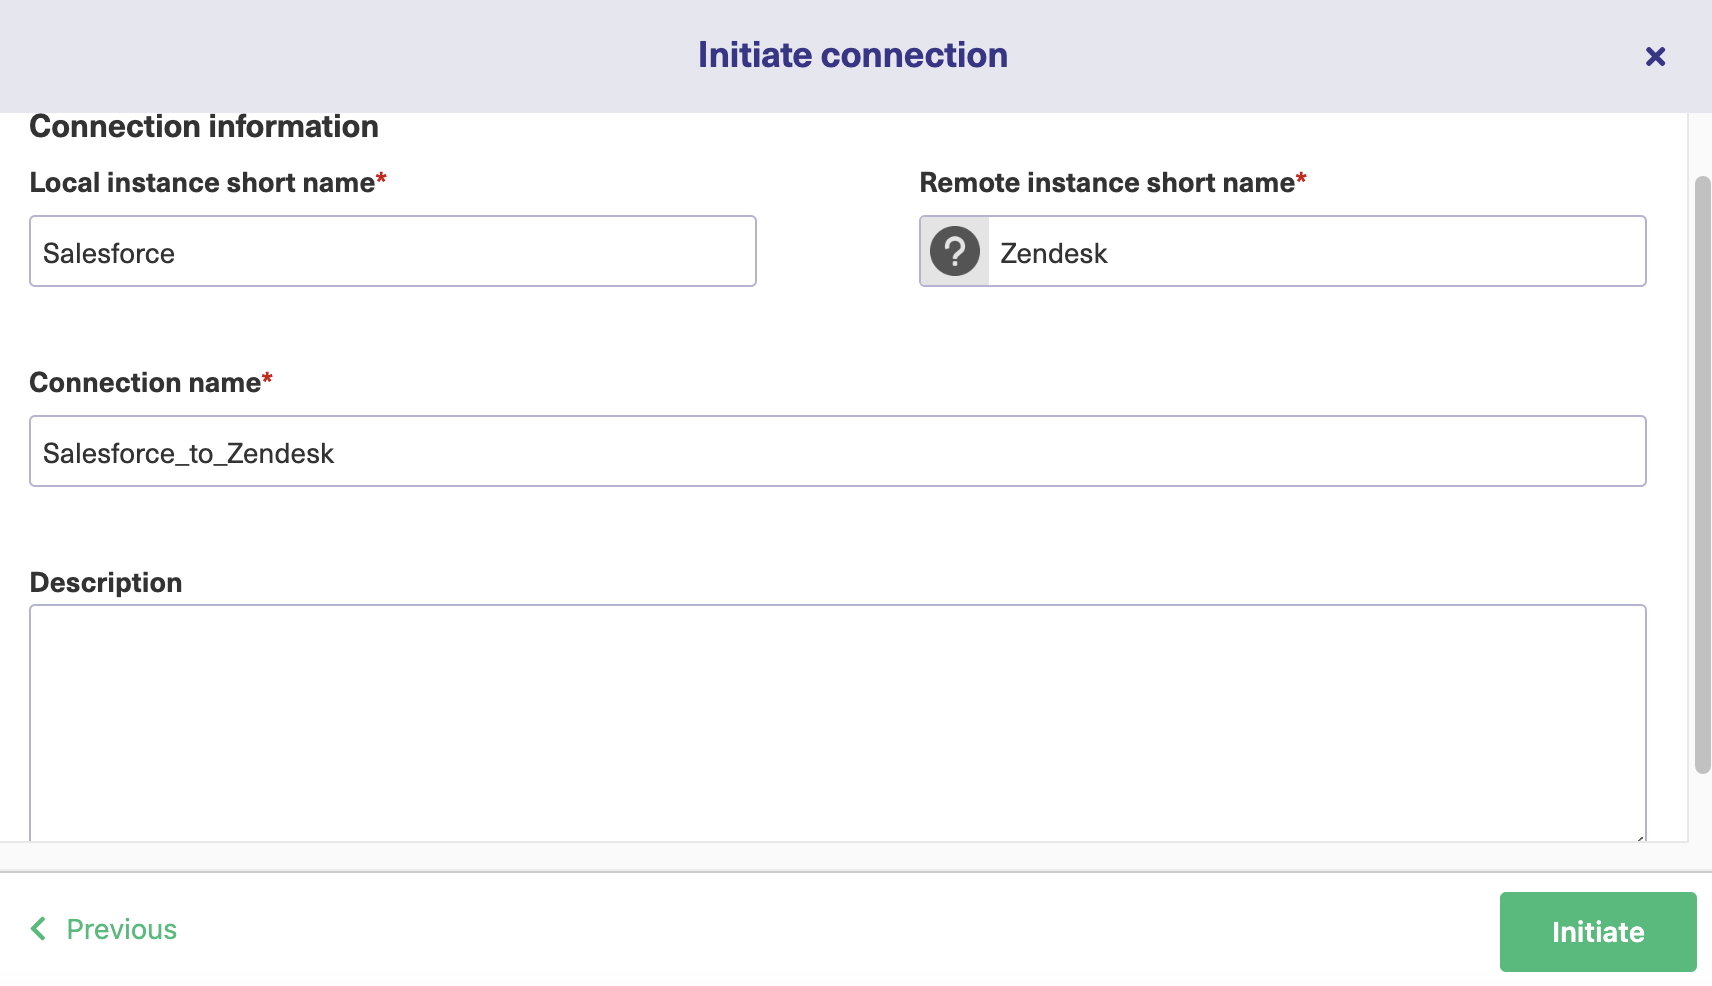
Enter the connection details and give names to the local and the remote instances. The local instance in our case is Salesforce since we are initiating the connection from it and the remote one will be Zendesk.
You can edit the name of the connection right away. Don’t forget to enter a relevant description. This is useful when you have a lot of connections.
Take your time and click “Initiate” once you are ready.
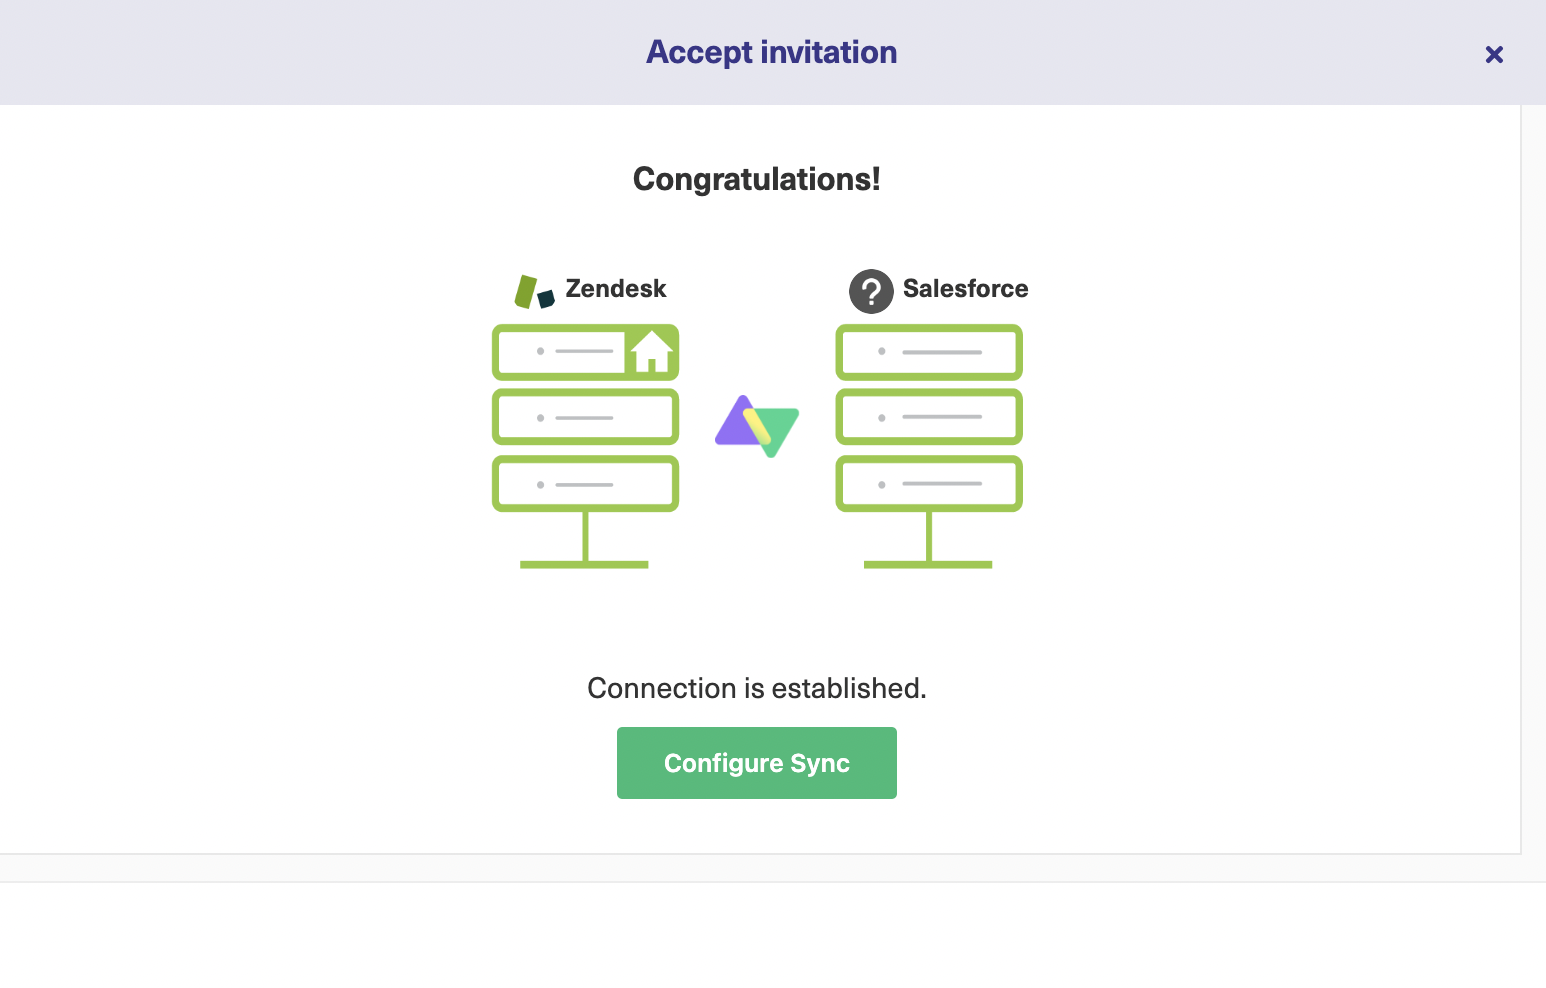
Now Exalate will generate an invitation code. This is a unique code that you need to copy on the destination side to complete the connection. Click on “Copy invitation code” and save it somewhere. Then click “Done”.
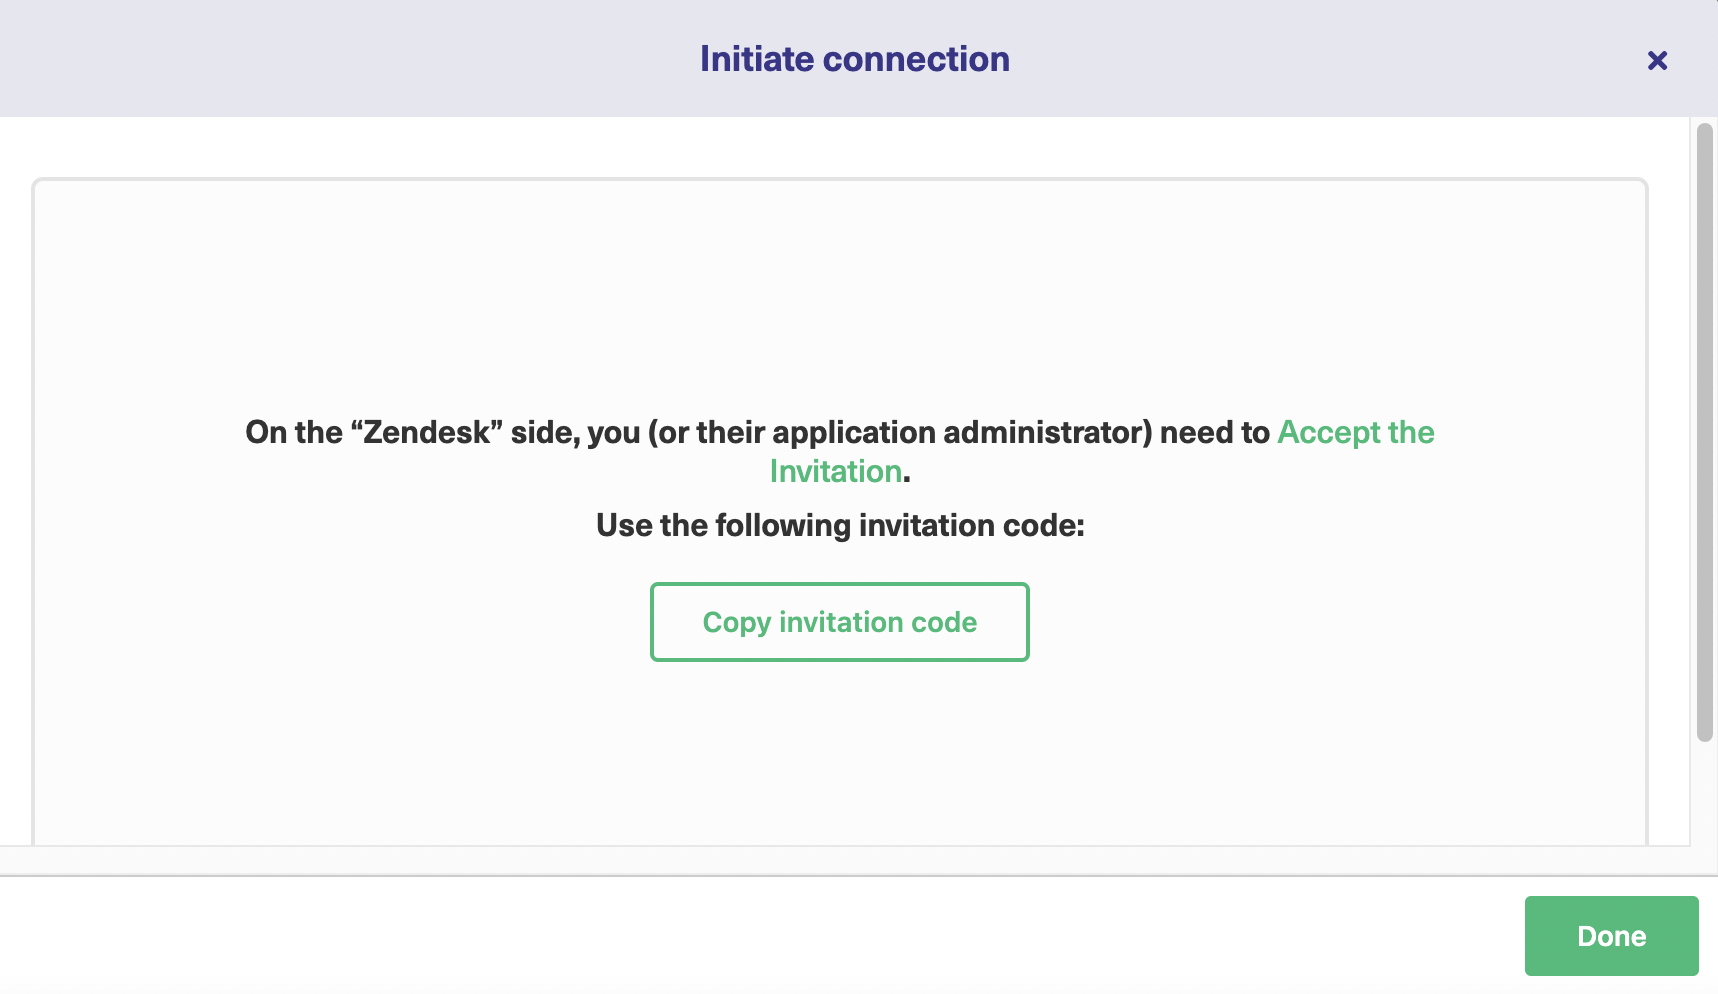
Once you do that, you can still close the window, and your connection will appear in the “Connections” list with a status called “Pending”. This status will become “Active” once you finish setting up the connection on the Zendesk side.
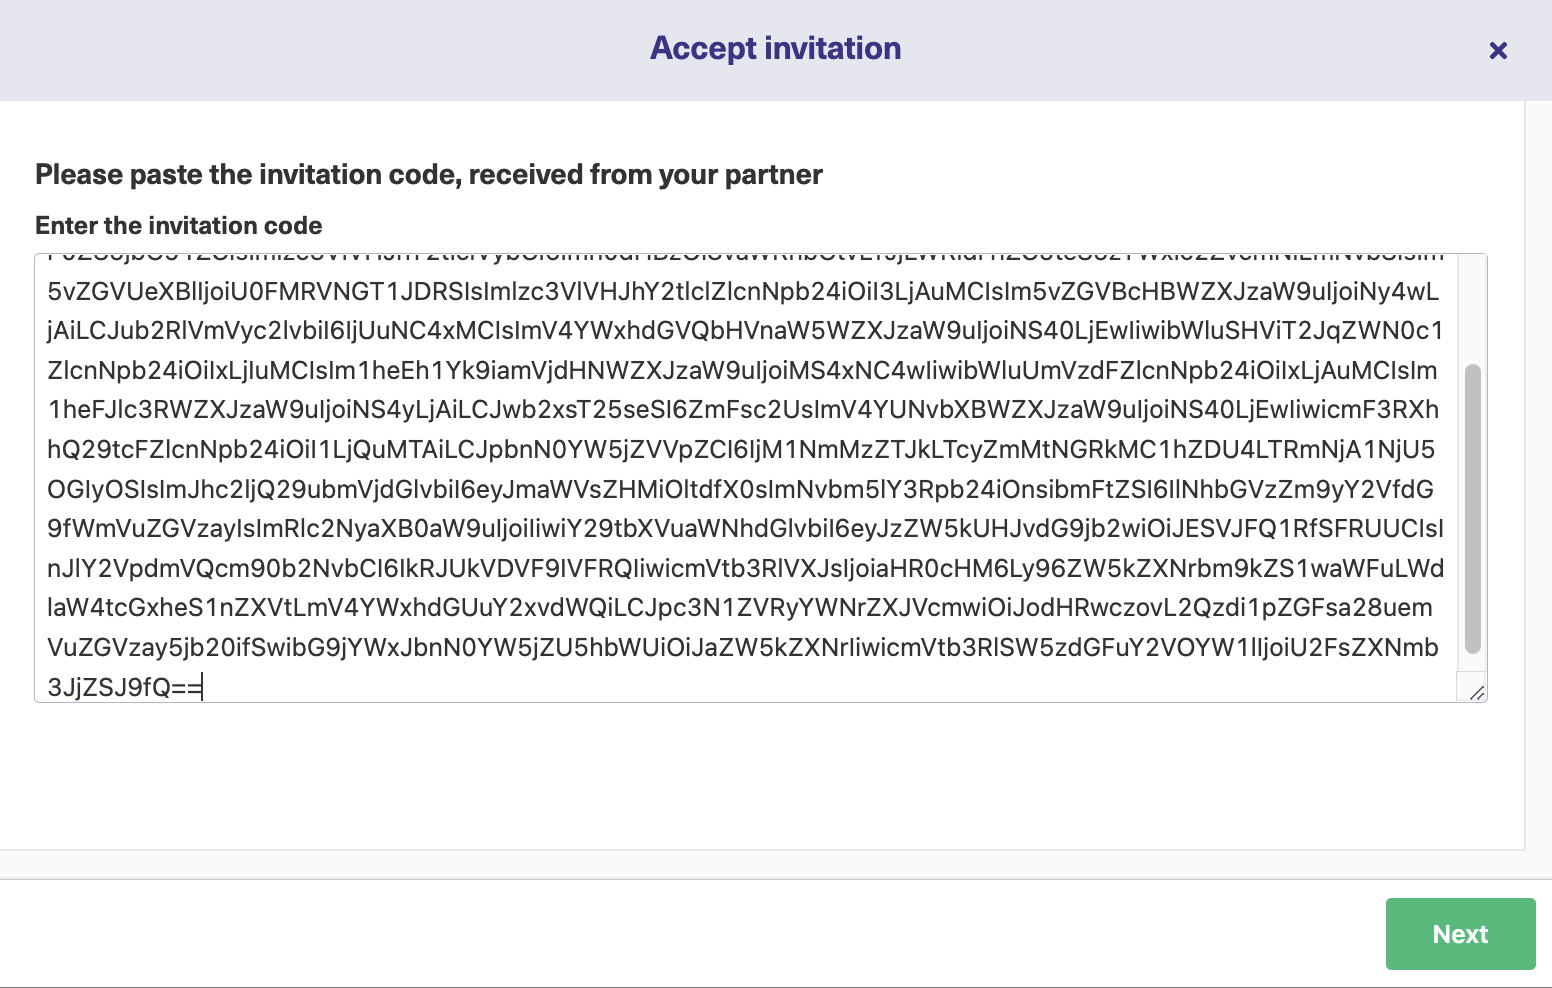
Go to the “Connections” screen on the Zendesk side. If you are not on this screen, you can still reach it on the left-side menu of Exalate. Over there, click “Accept Invitation”.
This will open up a multi-line text box for you. Paste the invitation code you saved earlier here. Once done, click “Next”.
Now the connection is set. To configure the connection and control what information should go to the other side, click on the “Configure Sync” button shown below.
Step 4 – Configure the connection to control what information is shared
As mentioned earlier, you can continue configuring the connection by clicking the “Configure Sync” button.
But in case you don’t want to do it immediately, you can come back and configure it later. For this, go to the “Connections” tab on the left side menu, and you will see your latest connection with the status shown as “Active”.
I am showing this on the Zendesk side, but you can also do the same thing on the Salesforce instance. Exalate has a uniform UI, so it won’t be a problem.

Right in front of the connection name, you can see an edit connection icon. Click that to begin your configuration. With the help of the three dots, you can either activate or deactivate your connection or even delete it if you don’t require it anymore.
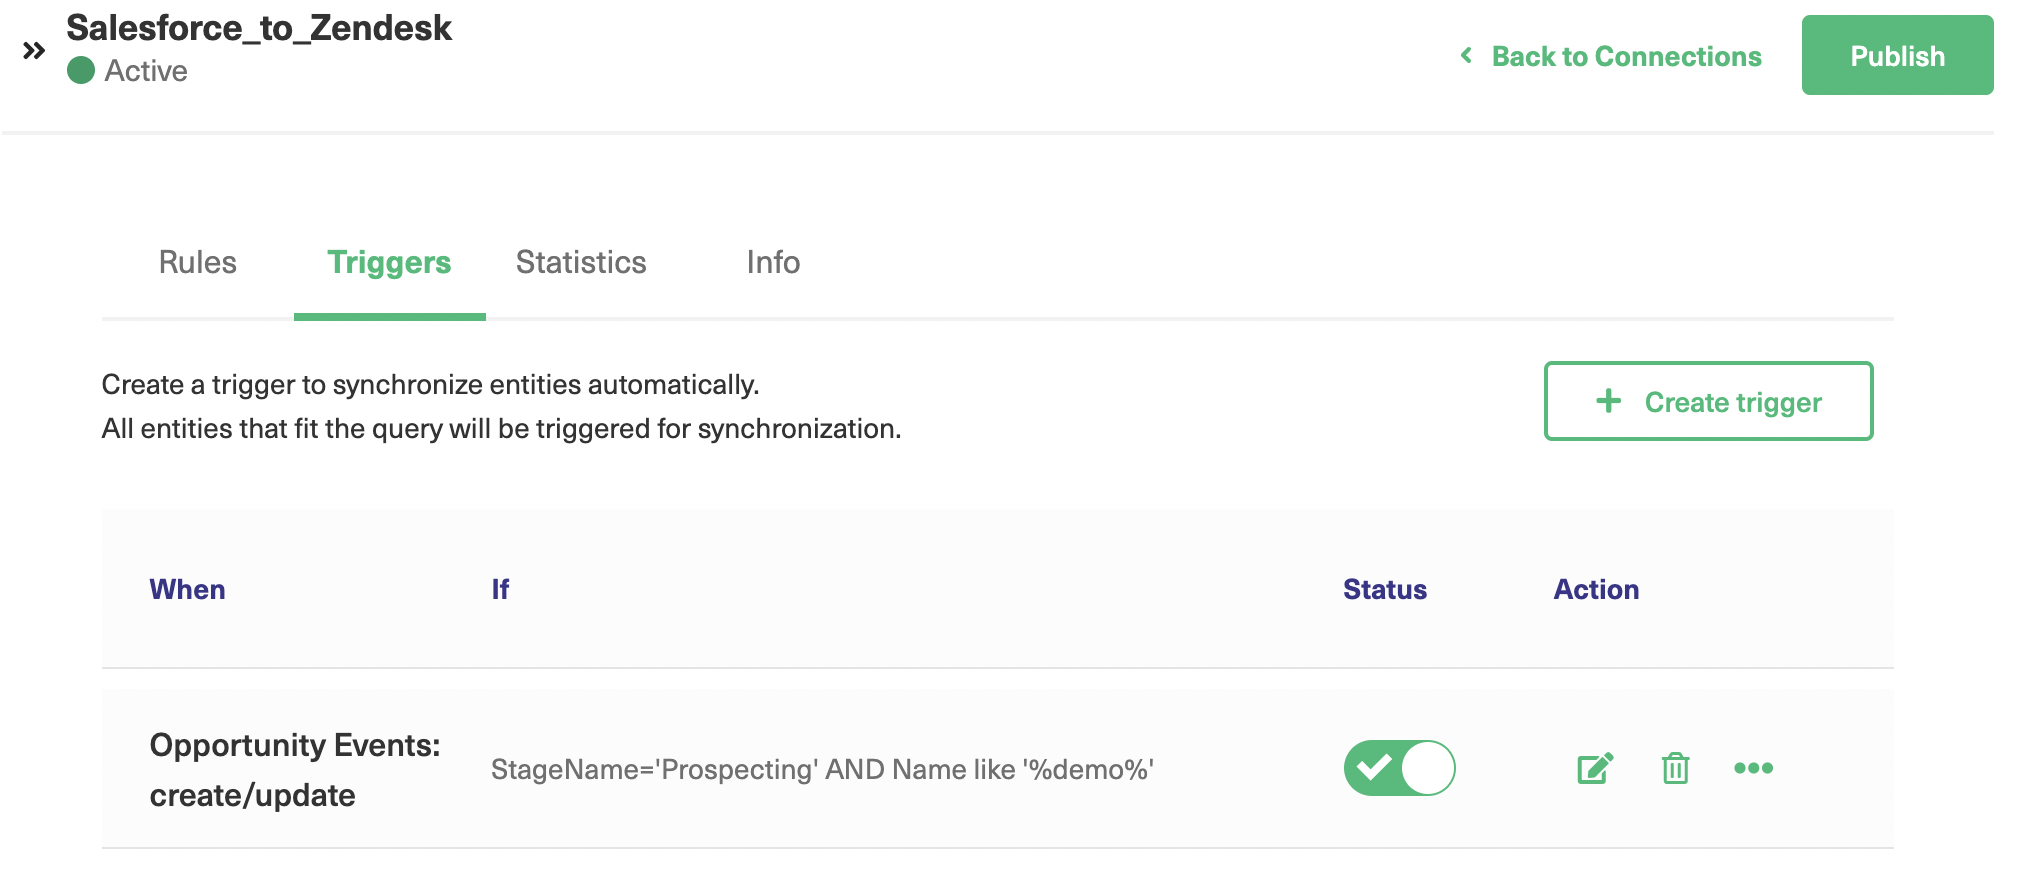
The edit connection screen consists of 4 tabs: “Rules”, “Triggers”, “Statistics” and “Info”.
We will see the rules tab in this step and the triggers tab next.
The Statistics tab gives an overview of the sync statistics like the number of issues, comments, and attachments under synchronization. It also mentions the number of the last issues synced and the date and time of it.
The Info tab gives general information about the connection like its name, type, description, and destination URL.
Let’s now see how the “Rules” tab works.

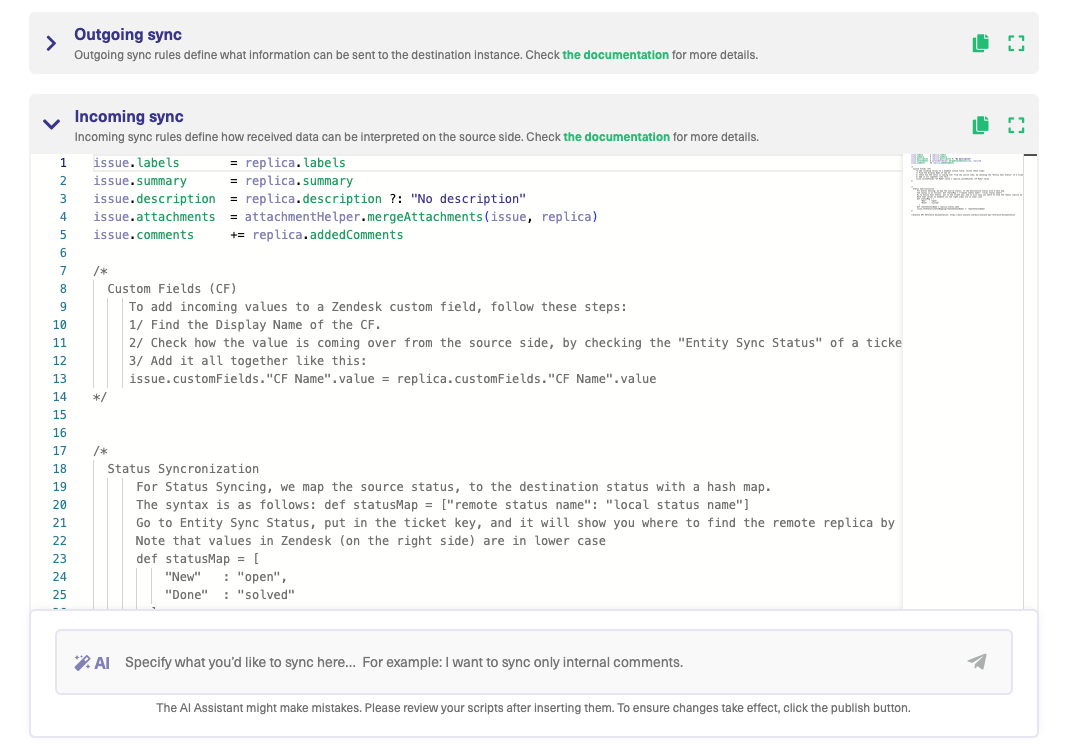
Exalate has two kinds of sync rules: incoming and outgoing, written in the Groovy Scripting language. They are simple to understand and follow. These rules exist on both sides of the connection.
The outgoing rules decide what information is sent from a particular platform to the other side.
Incoming rules, on the other hand, decide how the information coming from the other side is interpreted.
Having such rules on both sides of the connection provides autonomy so that each side can control the information it sends and receives independently.
These rules can be edited as well. If there is certain information you do not wish to share with the other side, you can either delete that line from the respective sync rules or temporarily delete it with the help of comments.
Comments given before the start of the line will allow that line to be ignored at the time of synchronization. For commenting a single line use “//”. For commenting a block of lines, put “/*” at the start of the block and “*/” wherever you want the comment to end.
Suppose you don’t want to sync the description of a Case from Salesforce; you can simply add a comment as shown below. And you are all set!
If, instead of deleting, you wish to add certain new information to be shared, you can add scripts to the rules.
For this, let us consider the “Rules” tab on the Zendesk side. It looks like this.
Connections in Script Mode Using AI Assist
The Script Mode allows you to generate and optimize scripts using the AI Assist feature — which appears as a tab under both the incoming and outgoing sync rules.
How does it work?
Enter your sync requirements into the chat box, and AI Assist will generate scripts based on your input, existing configurations, and Exalate’s scripting API.
It is also important to note that AI is not perfect. So, you need precise and detailed prompts to ensure the best results.
Let’s say you want to sync statuses between Zendesk and Salesforce; the prompt could look something like this:
“I want to sync the status of my Zendesk ticket with the status of a Salesforce case.”

After a moment, the script will be generated, with suggested changes highlighted in green and red. The green scripts are suggested additions, while the red scripts are suggested deletions.
If the new snippet works for you, click on “Insert Changes”. Otherwise, you can discard the suggested code. If needed, you can refine your prompt and, once satisfied, publish the changes.
Step 5 – Create triggers for the automatic flow of information
If you are already done editing the sync rules, click on the “Triggers” tab to set conditions for automatic synchronization. Whenever the condition is met, synchronization takes place.
To create triggers click on the “Triggers” tab that shows the list of triggers that are created. If this is your first time, then click the green “Create Trigger” button.
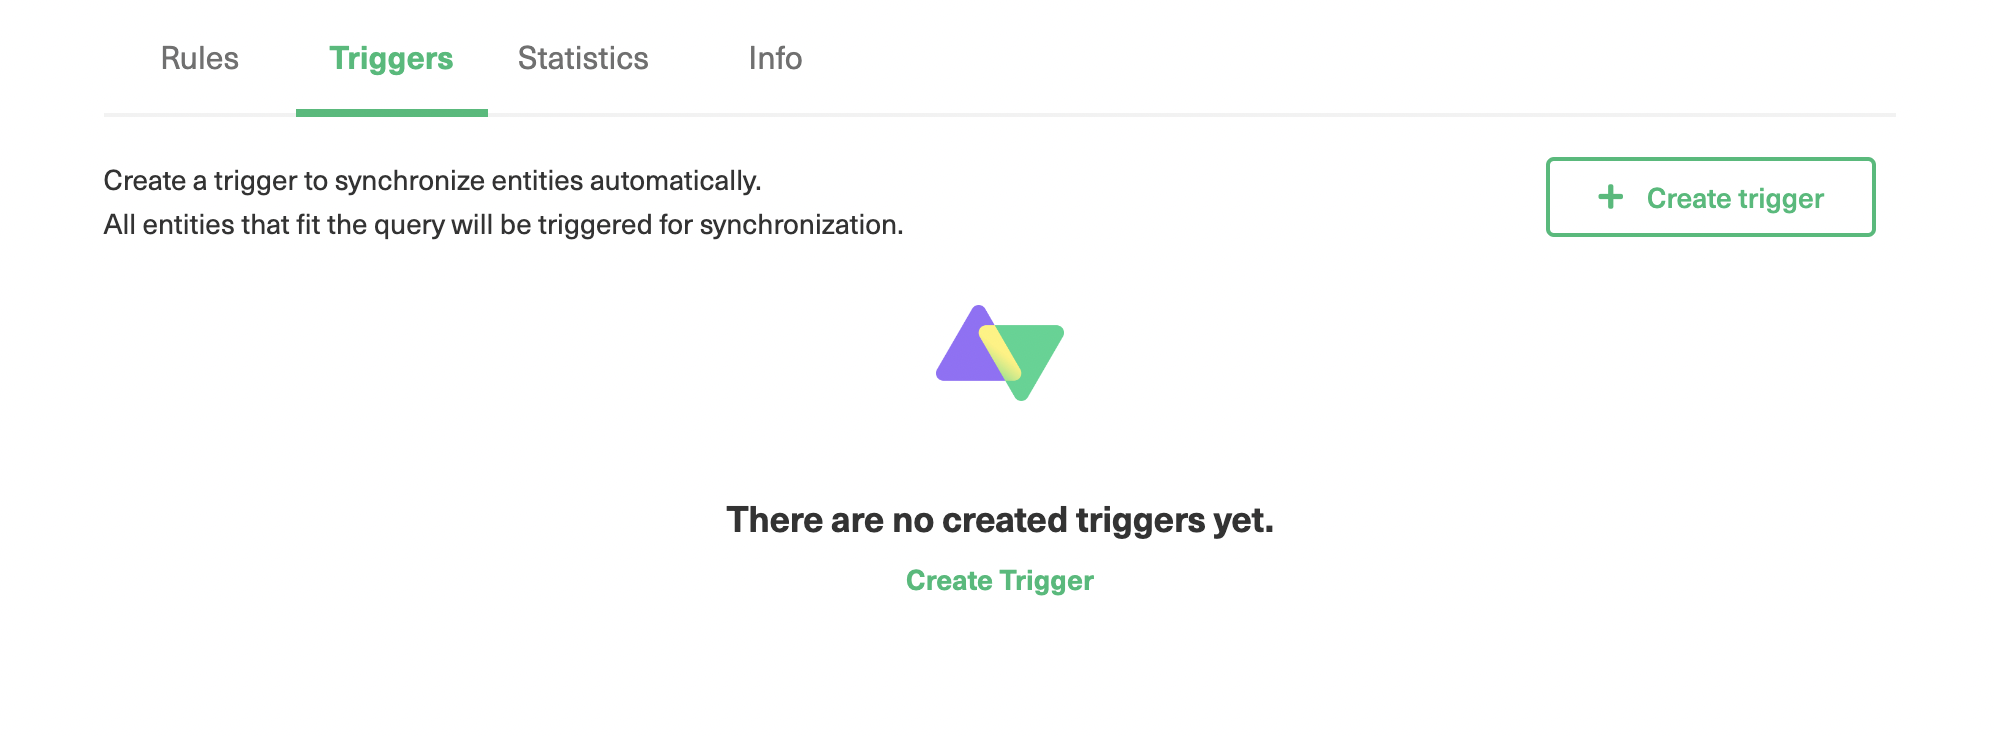
Note: Triggers can also be created by clicking “Triggers” on the left-hand menu of the Exalate console. The only difference in this approach is that while creating a trigger you need to select the connection to which the trigger is applied. All the other fields are the same.
Once you click the button, an “Add trigger” screen will pop up. Here, you mention the entity type to which the trigger is applied.
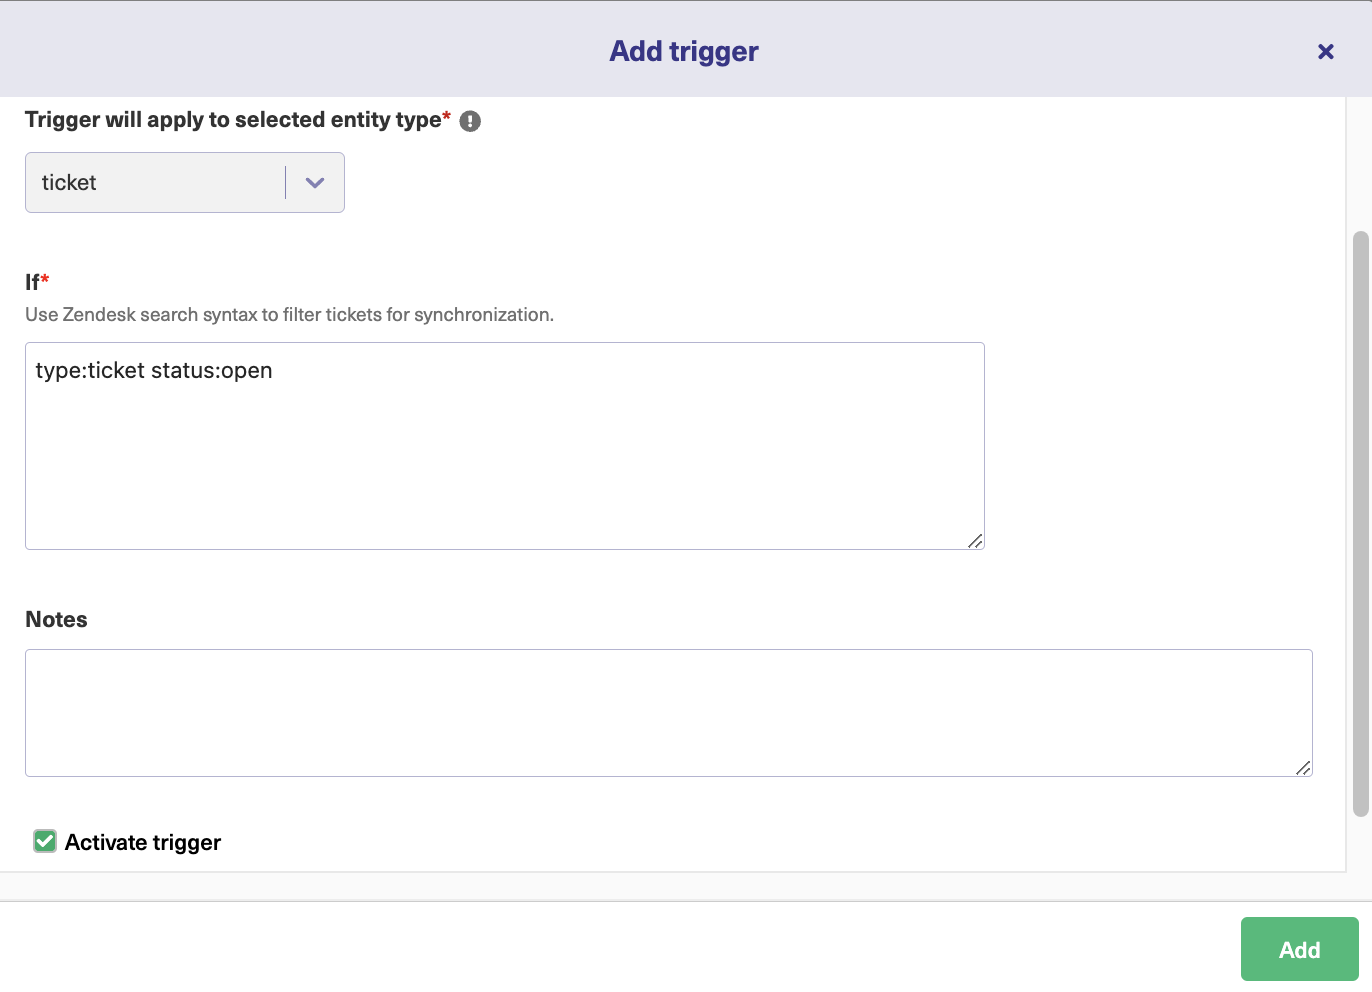
The “If” field here expects you to enter the condition under which the ticket is to be synchronized. This section is for entering the platform-specific search queries.
In the example shown above, according to the Zendesk search syntax, tickets that have an open status will be synchronized.
The above trigger screen on the Salesforce side will look like this.
Note: There are many Salesforce entities you can sync using Exalate, but the most common ones are Case, Opportunity, Product, Task, and Account.
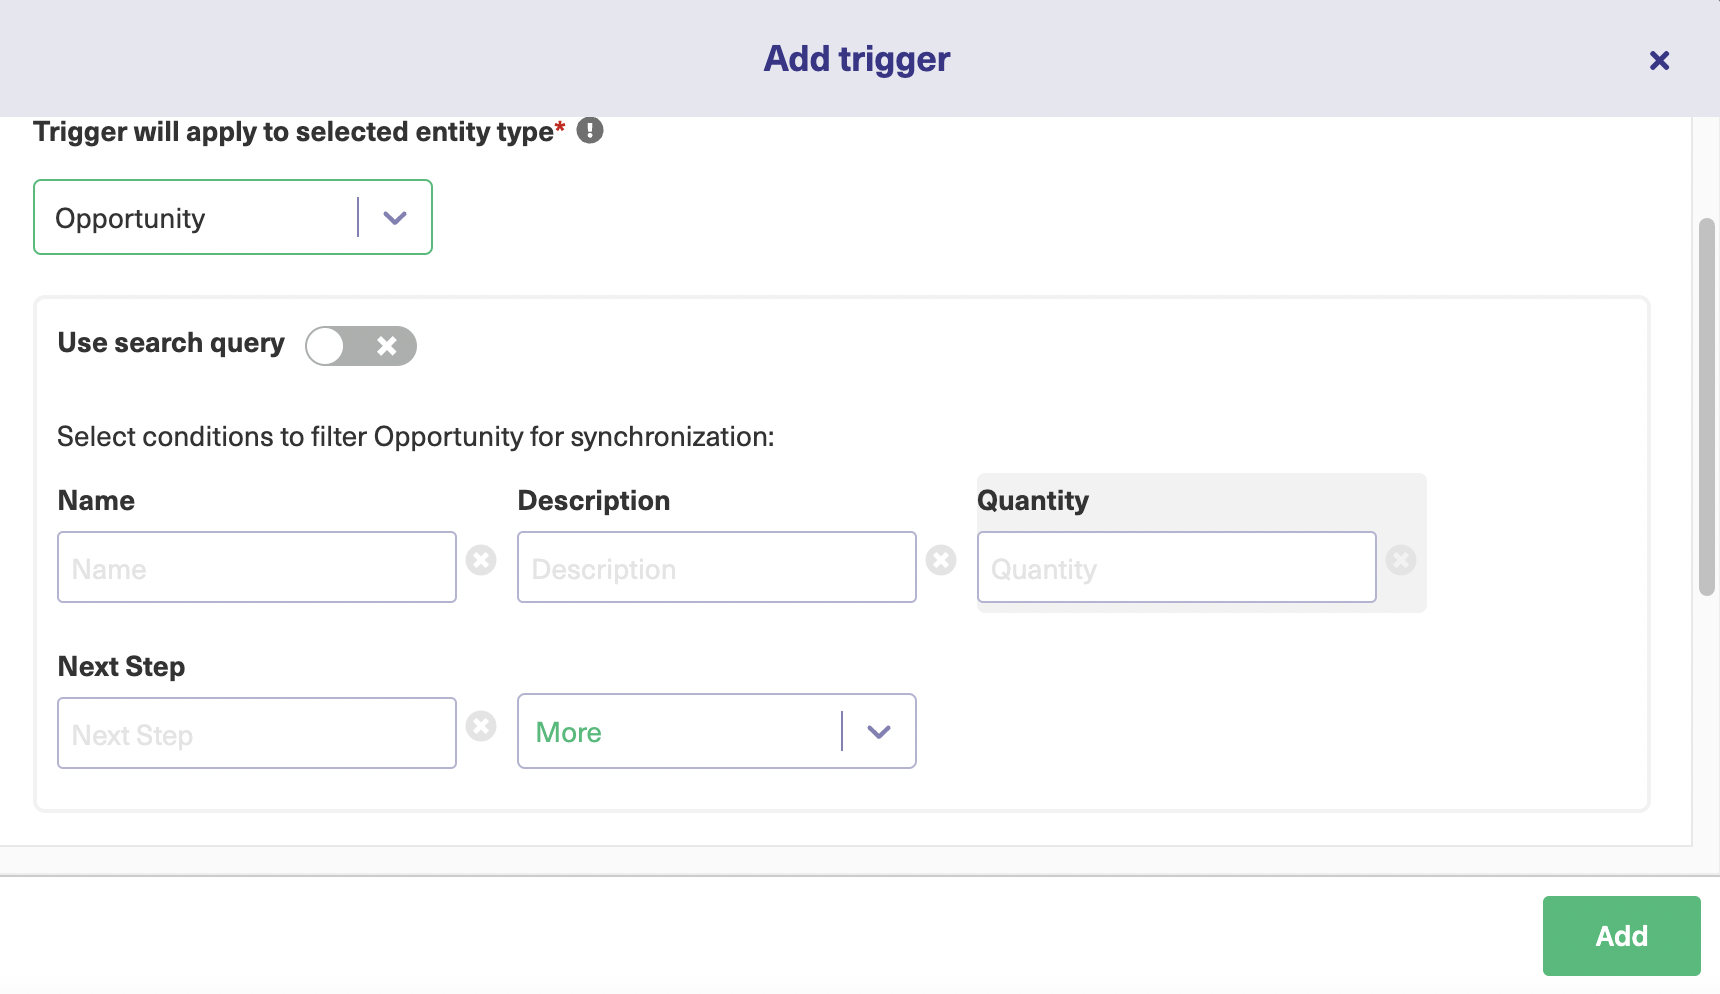
There is an additional option of selecting specific conditions to filter Salesforce entities for synchronization. For instance, if we select “Opportunity” then we can enter the name, description, quantity, etc of the Opportunity and create a trigger condition.
Or we can simply toggle the “Use search query” button to enter a query using the Salesforce Object Query Language.
You can even add notes to describe what a particular trigger is used for.
There is a checkbox that either enables or disables the trigger. This is useful when you don’t want to create the trigger all over again, so instead, you simply disable it. Remember to make it active if you want the trigger to work.
Click “Add” after making the changes.
Once the trigger has been added, it can be viewed on the “Triggers” tab. There is an option to edit or delete the trigger from here. You also choose to “Bulk Exalate” existing tickets or Salesforce entities from here. Once done, click the “Publish” button and let the synchronization work on its own.
Step 6 – Start synchronization between Salesforce and Zendesk
After you’ve created your Salesforce Zendesk integration, synchronization automatically starts depending on the triggers and sync rules you have set.
The newly created or updated tickets will be synced with the Salesforce entities or vice versa, according to the conditions you provide. You can even control the direction of the information flow and make it either uni or bi-directional. You can also sync the existing tickets or entities with the help of “Bulk Connect”.
Zendesk Salesforce Integration Use Cases
Here are simple and advanced use cases for Zendesk integration with Salesforce:
Case 1: Replicate Zendesk Tickets in Salesforce
The support team can fetch customer data and replicate Zendesk tickets as Salesforce objects in real time in order to exchange data such as attachments, customer IDs, organization info, and other custom data.
Case 2: Share Status Updates Between Salesforce and Zendesk
The sales team gets status updates of tickets related to key customers, where a ticket raised in Zendesk automatically reflects in Salesforce.
Each time there is a status update on that particular ticket—say the ticket is closed or moved to in progress—it gets updated on Salesforce in real time.
Obtain notifications about customer updates. For example, when the sales rep updates the SLA status, the Zendesk admin can see that the level of customer support has changed.
Case 3: Prioritize Issues Based on Priority
Salesforce to Zendesk integration allows for segmenting customers, prioritizing support efforts based on their deal size in Salesforce, and avoiding losing high-value customers.
Your admin can map the priority of the outgoing Salesforce case to make sure the corresponding Zendesk ticket conveys the same level of priority on both sides.
Customer support agents using Zendesk can review cases in Salesforce and gather information from them, such as customer queries and feedback, to resolve tickets faster.
Case 4: Consolidate Related Tickets in Zendesk
Sync all the support tickets to the organization level so they would be an overview of all the tickets in a particular organization. This could involve sending all related tickets based on the assignee or label.
Customer success representatives can benefit from having a complete overview of Salesforce objects.
Find out other technical and business use cases that you can set up and customize using Exalate.
What Are the Best Practices For a Zendesk Salesforce Integration?
To ensure Zendesk and Salesforce are correctly configured and integrated, follow these best practices:
- Define objectives and responsibilities: Work with all sides of the Zendesk to Salesforce integration to determine what needs to be integrated as well as which team members have access to data and system configuration settings.
- Look for custom integrations: No-code integration tools are easier to set up. But they have limited applicability. Script-based integrations provide more opportunities for users to customize systems to suit their specific use case.
- Work with automation: Whether through the use of AI to generate custom scripts or the use of action triggers, you need a Zendesk Salesforce integration that can automate syncs.
- Improve security: To make sure the data going between Salesforce and Zendesk stays protected in transit and at rest, you need to double up on security with firewalls, tokens, and encryption protocols.
- Train your team: Conduct regular seminars and training sessions for your team to refresh their knowledge of best practices for security and proper data management.
- Monitor performance: Carry out regular assessments to determine if the integration solution is meeting the initial objectives and requirements. Track performance metrics such as uptime, ticket resolution speed, etc.

Conclusion
In this Zendesk Salesforce integration guide, we saw that Information, if shared automatically and in real-time, can help deliver a consistent customer experience.
For this, we chose Exalate, which provides the most flexible Salesforce Zendesk integration and supports key features like decentralized architecture and reliability.
We also went over the steps to setting up a Salesforce integration with Zendesk and saw a few common use cases supported by such an integration afterward.
If you are looking for a Zendesk Salesforce integration, book a demo with us.
Frequently Asked Questions
Why integrate Zendesk with Salesforce?
By integrating Salesforce and Zendesk, sales and support teams can collaborate effectively by gaining access to customer information and support activities. The integration allows you to view, edit, and create Zendesk tickets within Salesforce. The integration also enables the synchronization of customer information from Salesforce to Zendesk Support.
How do I link Zendesk to Salesforce?
There are two ways you can connect Zendesk and Salesforce.
You can set up a centralized integration UI to set and manage the integration in the Zendesk Admin Center. The integration relies on Zendesk’s infrastructure using Salesforce open APIs.
The other way is to use an easy code or no-code-based integration platform like Exalate.
What data can I sync between Zendesk and Salesforce?
You can pull any Salesforce data, including custom objects, and sync it with Zendesk customer support teams. For instance, the sales team can check if their Accounts have opened any tickets in Zendesk. You can also sync Zendesk tickets with Salesforce to create customized workflows and reports using data from both applications.
How do I import Zendesk tickets into Salesforce?
You can import Zendesk tickets into Salesforce using publicly available APIs. Native integrations or third-party plug-ins make this easier. You can view, create, or update Zendesk tickets on the Salesforce Account, Opportunity, Contact, and Lead pages.
Can I automatically sync Zendesk tickets with Salesforce cases?
Yes, you can automatically sync Zendesk tickets with Salesforce using third-party automation or integration tools such as SnapLogic, Workato, or Exalate. With Exalate, you can also add granular controls in the form of triggers.
Can I sync Zendesk and Salesforce for free?
Yes, you can natively integrate Zendesk and Salesforce. However, the integration use cases offered are limited in functionality and scope. Some plug-ins offer advanced, custom-made integrations between Zendesk and Salesforce at a reasonable price.
Recommended Reading: