This article was written by Connecting Software, experts in software integration challenges.
Your company uses Salesforce, and you heard some companies use it together with Microsoft SharePoint. It made you wonder about the benefits of this. Can there be a real synergy to a Salesforce SharePoint integration?
This guide will cover what you can achieve with this integration and make you aware of the potential pitfalls. It also explains the step-by-step process you need to follow to get the integration working.
The Benefits of a SharePoint Salesforce Integration
What is SharePoint?
Depending on whom you ask this question to, you might get SharePoint described as a Document Management System (DMS), an intranet service, or a collaboration and productivity platform. In fact, SharePoint is a collection of services bundled together and, depending on who is accessing SharePoint, it can act as a simple team site offering shared storage for documents (typically Office files, namely Word and Excel documents), a messaging board, a blog, and a place to store internal organizational data such as software licensing information or employee contact information.

Most companies today use SharePoint Online, but on-premises versions of SharePoint are still available and used.
What is Salesforce?
We could define Salesforce as a Software as a Service (SaaS) Customer Relationship Management (CRM), but this feels a bit reductive nowadays. Salesforce started off as a CRM – software meant to help manage customer relationships (primarily in terms of sales and service processes).
Today, Salesforce is still a CRM at heart, but it has grown immensely as Salesforce acquired other companies, making Salesforce feel more like a cloud ecosystem based on that CRM.
Why should I Integrate SharePoint and Salesforce?
SharePoint and Salesforce are both business software that can cater to different types of organizations. The main reason you go for a SharePoint Salesforce integration is that you want to use SharePoint as the Document Management System for all of your organization’s documents and benefit both in terms of features and in terms of costs.
In terms of features, you gain by having the documents in SharePoint because you make team collaboration easier, and you enable version control. Many companies feel they need a document management solution for Salesforce, often in an early adoption stage in terms of Salesforce.
The possibility to share documents with non-CRM users or externally (e.g., for contract changes) is also a nice feature that integrating SharePoint and Salesforce adds.
In terms of cost, the truth is that not only is storage cheaper on the SharePoint side, but you can also save if the Office 365 / Microsoft 365 license that your organization has already included SharePoint.
What to look for in a SharePoint Salesforce Integration
It is important to keep in mind the main features you want to ensure your integration delivers its best. You want your SharePoint Salesforce integration to be:
Seamless
While there are advantages to having the documents in SharePoint, you still want the users to be able to access the documents in Salesforce as if they were right there. This means the user workflow should be the same, and the user experience should not be affected. When the integration is in place and the documents are in SharePoint, it should make no difference for the user when he is in Salesforce trying to get that document. Pay special attention to whether you can still search for a document on the Salesforce side.
Automatic
The purpose of your integration is to have the documents moved automatically. Make sure the integration does not require any input from the user. It should work independently from them and detect new files in a timely manner. Solutions that involve periodic batch sync can become a blocker as these can lead to confusion among the end-users.
Complete
You would also want the integration to cover all the scenarios you need. The scenarios will be unique for your company, but here are two examples:
| Example Scenario 1 | Example Scenario 2 |
| Someone creates a quote in Word format in Salesforce. With the integration working, this document should appear in SharePoint. Questions: What happens if someone else sees the quote in SharePoint, prints it, gets it signed, and uploads a scanned version of it to the same folder in SharePoint? Will both be available for Salesforce users? | You have many existing documents in Salesforce but don’t want all of them to go to SharePoint. Questions: Is it possible to only move and create a link for those that were uploaded in the last month, for example? |
Reliable
As your integration deals with two different platforms, Salesforce and SharePoint, it should be able to deal with any issues on either side, as well as general failures in the connection between them.
When one side is not available or not able to connect, your integration should handle the problem gracefully. It should resume as soon as possible. Very importantly, it should do so with no user interaction, although there should be a way for the system administrator to be notified.
How to Integrate SharePoint and Salesforce in 5 Steps
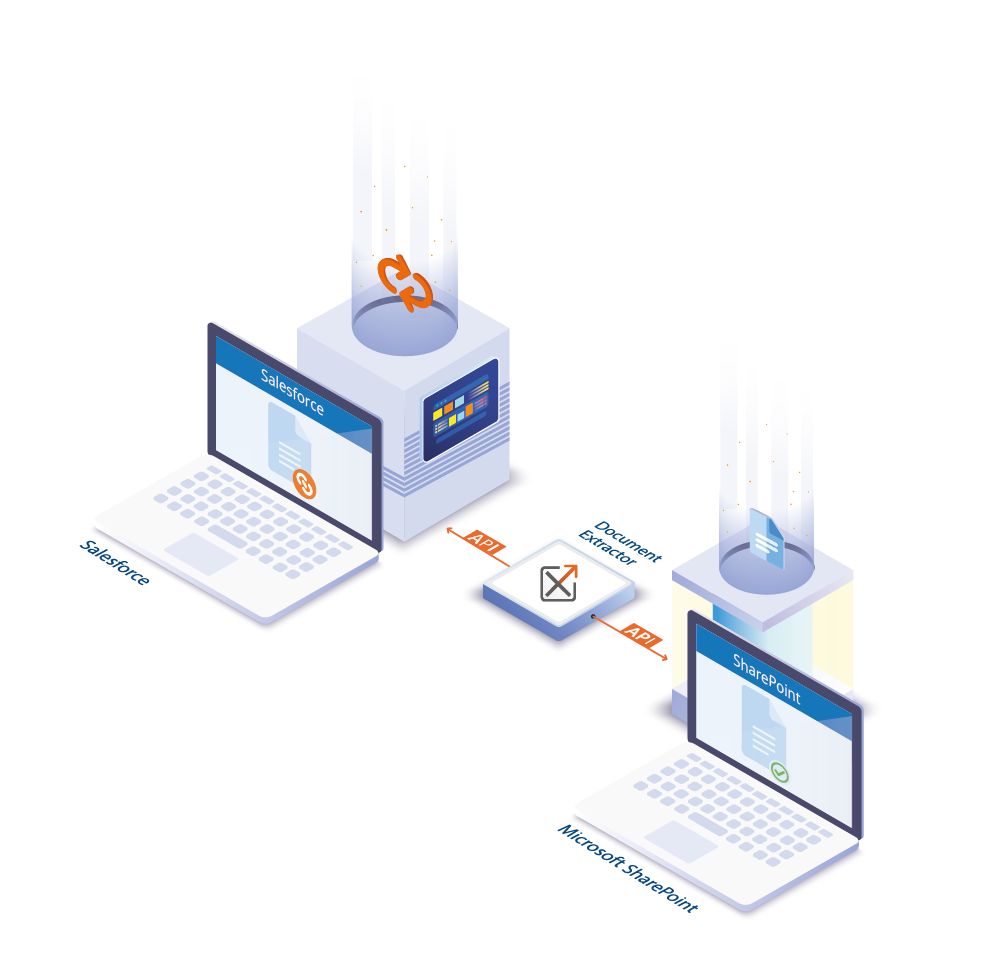
Let’s say you decide to go for the SharePoint Salesforce Integration and want to get it working in the most straightforward way possible. In that case, the way to go is a third-party tool called Document Extractor. You might feel tempted to go with Files Connect, provided by Salesforce, but if you browse through the forums, you will find this integration is not as easy as you might think, and it has its own pitfalls.
This tutorial, therefore, uses a paid third-party tool called Document Extractor. This tool detects the document in Salesforce and moves it to SharePoint. It leaves a link to the document in the original location. This move to SharePoint is referred to as “stubbing the file”.
To use this very convenient tool, you should first check if the Salesforce and SharePoint versions you would be integrated with are supported:
- Salesforce Professional, Enterprise, Unlimited, Force.com, and Developer – both Classic and Lightning Experience
- SharePoint 2010, 2013, 2016, 2019 and Online, Office 365
To start the Document Extractor’s installation, we’ll start by downloading the tool. Then we’ll go for the actual install and activate the free trial on our sandbox.
Once you have run the necessary tests on your sandbox, the move to production is straightforward, and from then on, the integration is fully automatic.
Let’s get started!
Step 1 – Download Document Extractor
We will start by getting the tool from Connecting Software’s website. You can also get it from Salesforces’ AppExchange.
For this tutorial, we will use the SaaS version of the tool, so we will start by getting that version as a free trial. There is also a self-hosted version available.
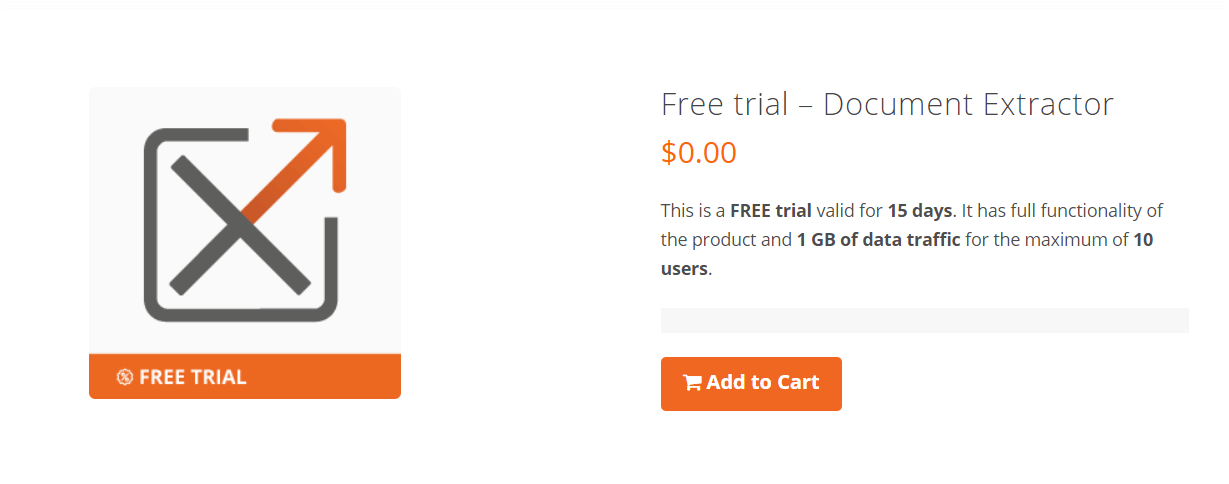
Note that although the trial is free, you do have to follow a normal shopping cart procedure and place an order at the cost of $0.00. Once you do that, you’ll receive an email with instructions.
Step 2 – Install, Activate, and Configure the Free Trial on Your Sandbox
Next, you need to click on Complete Your Registration on the instructions email.
From there, it is quite straightforward to get the product installed. We always recommend that you start by installing Document Extractor on your sandbox, and then you can move it to production. You should therefore use Test/Sandbox on the Instance field rather than Production for now.
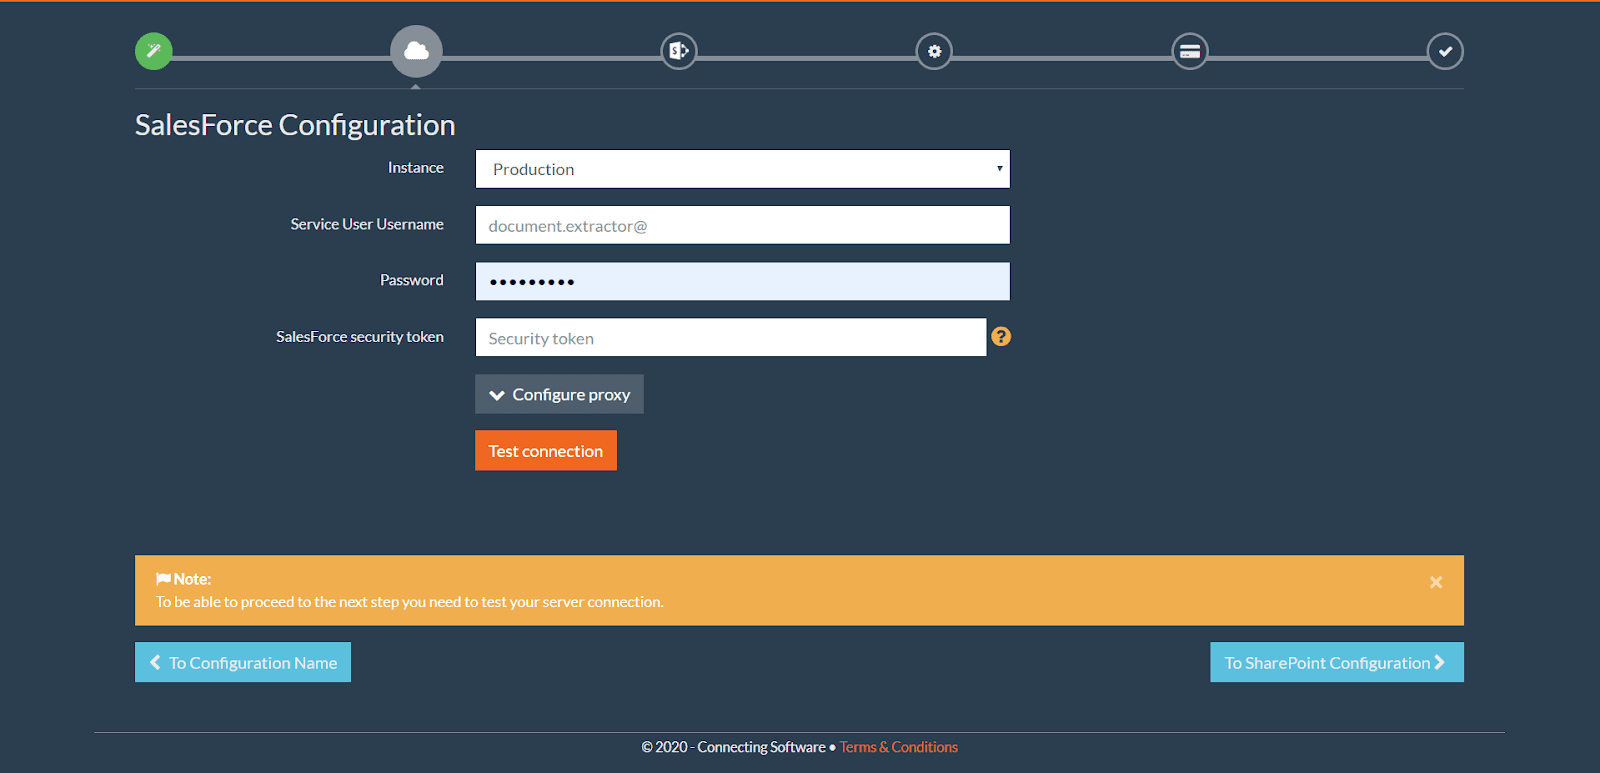
When you choose Test/Sandbox, you’ll need to type your sandbox service username. This is simply a dedicated system administrator. This user should be granted elevated access rights to allow modifications of the system. Please also make sure this account is not used to access your Salesforce by anyone else. You’ll need the service user password and the security token so that you can test the connection.
If you want to see how the configuration is done in further detail, check out this tutorial installation video.
Document Extractor uses the help of a managed package with a set of Apex classes and triggers to stub your documents from Salesforce to SharePoint. Once installed, you’ll see the package listed in the list of installed packages.
Next, you’ll need to provide your SharePoint settings. You need to have a user with enough permissions to read and write documents to the document library where documents will be stored.
Document Extractor uses “Push notifications”, which means that the service detects new documents uploaded to Salesforce. The service also uses “Full Scan Polling” as a backup mechanism to ensure that all files are stubbed. We recommend you increase the interval of the “Full Scan Polling” to optimize your API call consumption.
Step 3 – Test it out
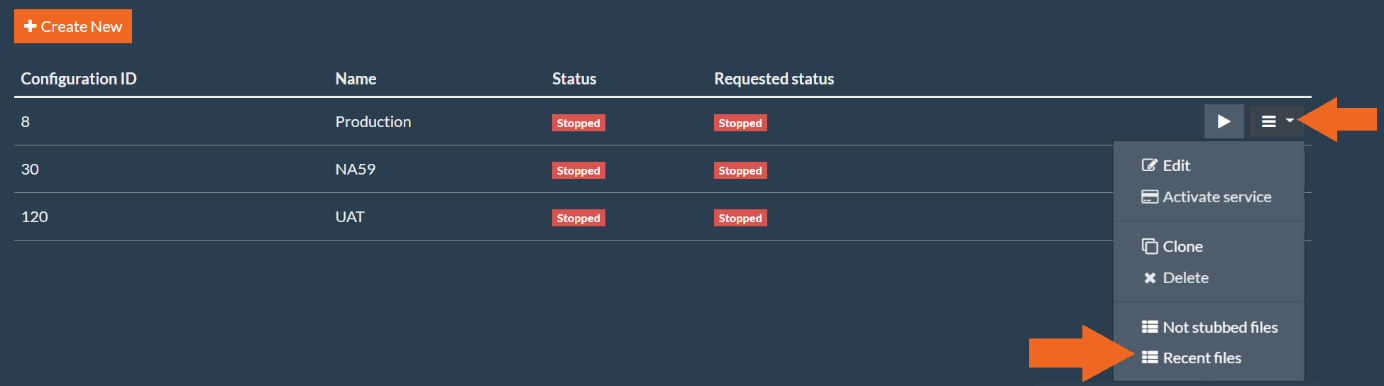
When you’ve got everything set up, you can see the stubbing in action. Each document is stored in a folder in SharePoint that has the name of the entity it is related to in Salesforce. There is also a default folder to store documents that are not related to any entity.
Check out if all the files are where you expect them to be. Good options that are worth checking are the Recent files and the Not stubbed files.
If you activated the file deletion option when configuring, that is something you should check out at this stage as well. You should see that when a link is deleted from Salesforce, the corresponding file is deleted from SharePoint.
In the next steps, you’ll learn how to switch to production.
Step 4 – Switch to production
In this step, you’ll switch your installation to production. Again, this is the same procedure that is described in the tutorial video.
Make sure you stop the service before you start the move. Then change the name of the configuration, choose Production instead of Sandbox, remove the sandbox postfix from the username, fill in the correct password and security token, and test the connection.
Install the required package again, but this time to production as we did before with the sandbox. Test the connection again to get the “Success” message. Change your SharePoint to the production one or choose a different Document Library, to make it suitable for production. Make sure you also change any settings you want different in production.
Once done, click Save. That’s it!
Step 5 – Start Synchronizing
To start stubbing documents, you simply have to go to the configurations list and start the one you want.

If you followed this step-by-step procedure, you probably only have one item on that list, so the only thing you need to do is locate the Start/Stop button – it is the one on the right-hand side, with a triangular shape. To start synchronizing and stubbing the documents, simply click on that button.
The results will be similar to what you got on step 3, but now it is happening in production. Yey, it’s now time to celebrate!
Other Types of Integration
You can actually integrate Salesforce in different ways if you want. For this, the Database to Salesforce Sync solution is the way to go.
You can connect Salesforce to any local database management system (DBMS) such as Microsoft SQL Server, ORACLE, MySQL, SAP HANA, or MariaDB. You can either get data from Salesforce into the local database or get data from the database into Salesforce.
The same goes for any legacy software, as long as you have access to either the source code or the database.
This means you can create all kinds of flexible solutions and adjust them perfectly to your data integration needs, as you can connect to any database that you already have. It is an excellent way of maximizing what you can take out of a Salesforce integration. All in all, much more flexibility, without the typical hassle and problems of a custom solution.
Conclusion
There are many benefits to a SharePoint Salesforce integration. You can move your documents from Salesforce to SharePoint and, by doing so, reduce costs and increase your team’s productivity. They can either use the documents from Salesforce as they always did (they will no longer be in Salesforce, but no one will notice) or get them from SharePoint if they prefer with all the version control and team collaboration features.
You can even take the integration one step further and use Database to Salesforce Sync to integrate with legacy software and databases.
Recommended Reads:
- Salesforce to Salesforce Integration: Sync Multiple Salesforce Instances Bidirectionally
- How to set up a Jira Salesforce Integration
- Salesforce Zendesk Integration
- How to Set Up a Salesforce ServiceNow Integration
- GitHub Salesforce Integration: How to Set up a Sync in 6 Steps
- How to Set up an Azure DevOps Salesforce Integration