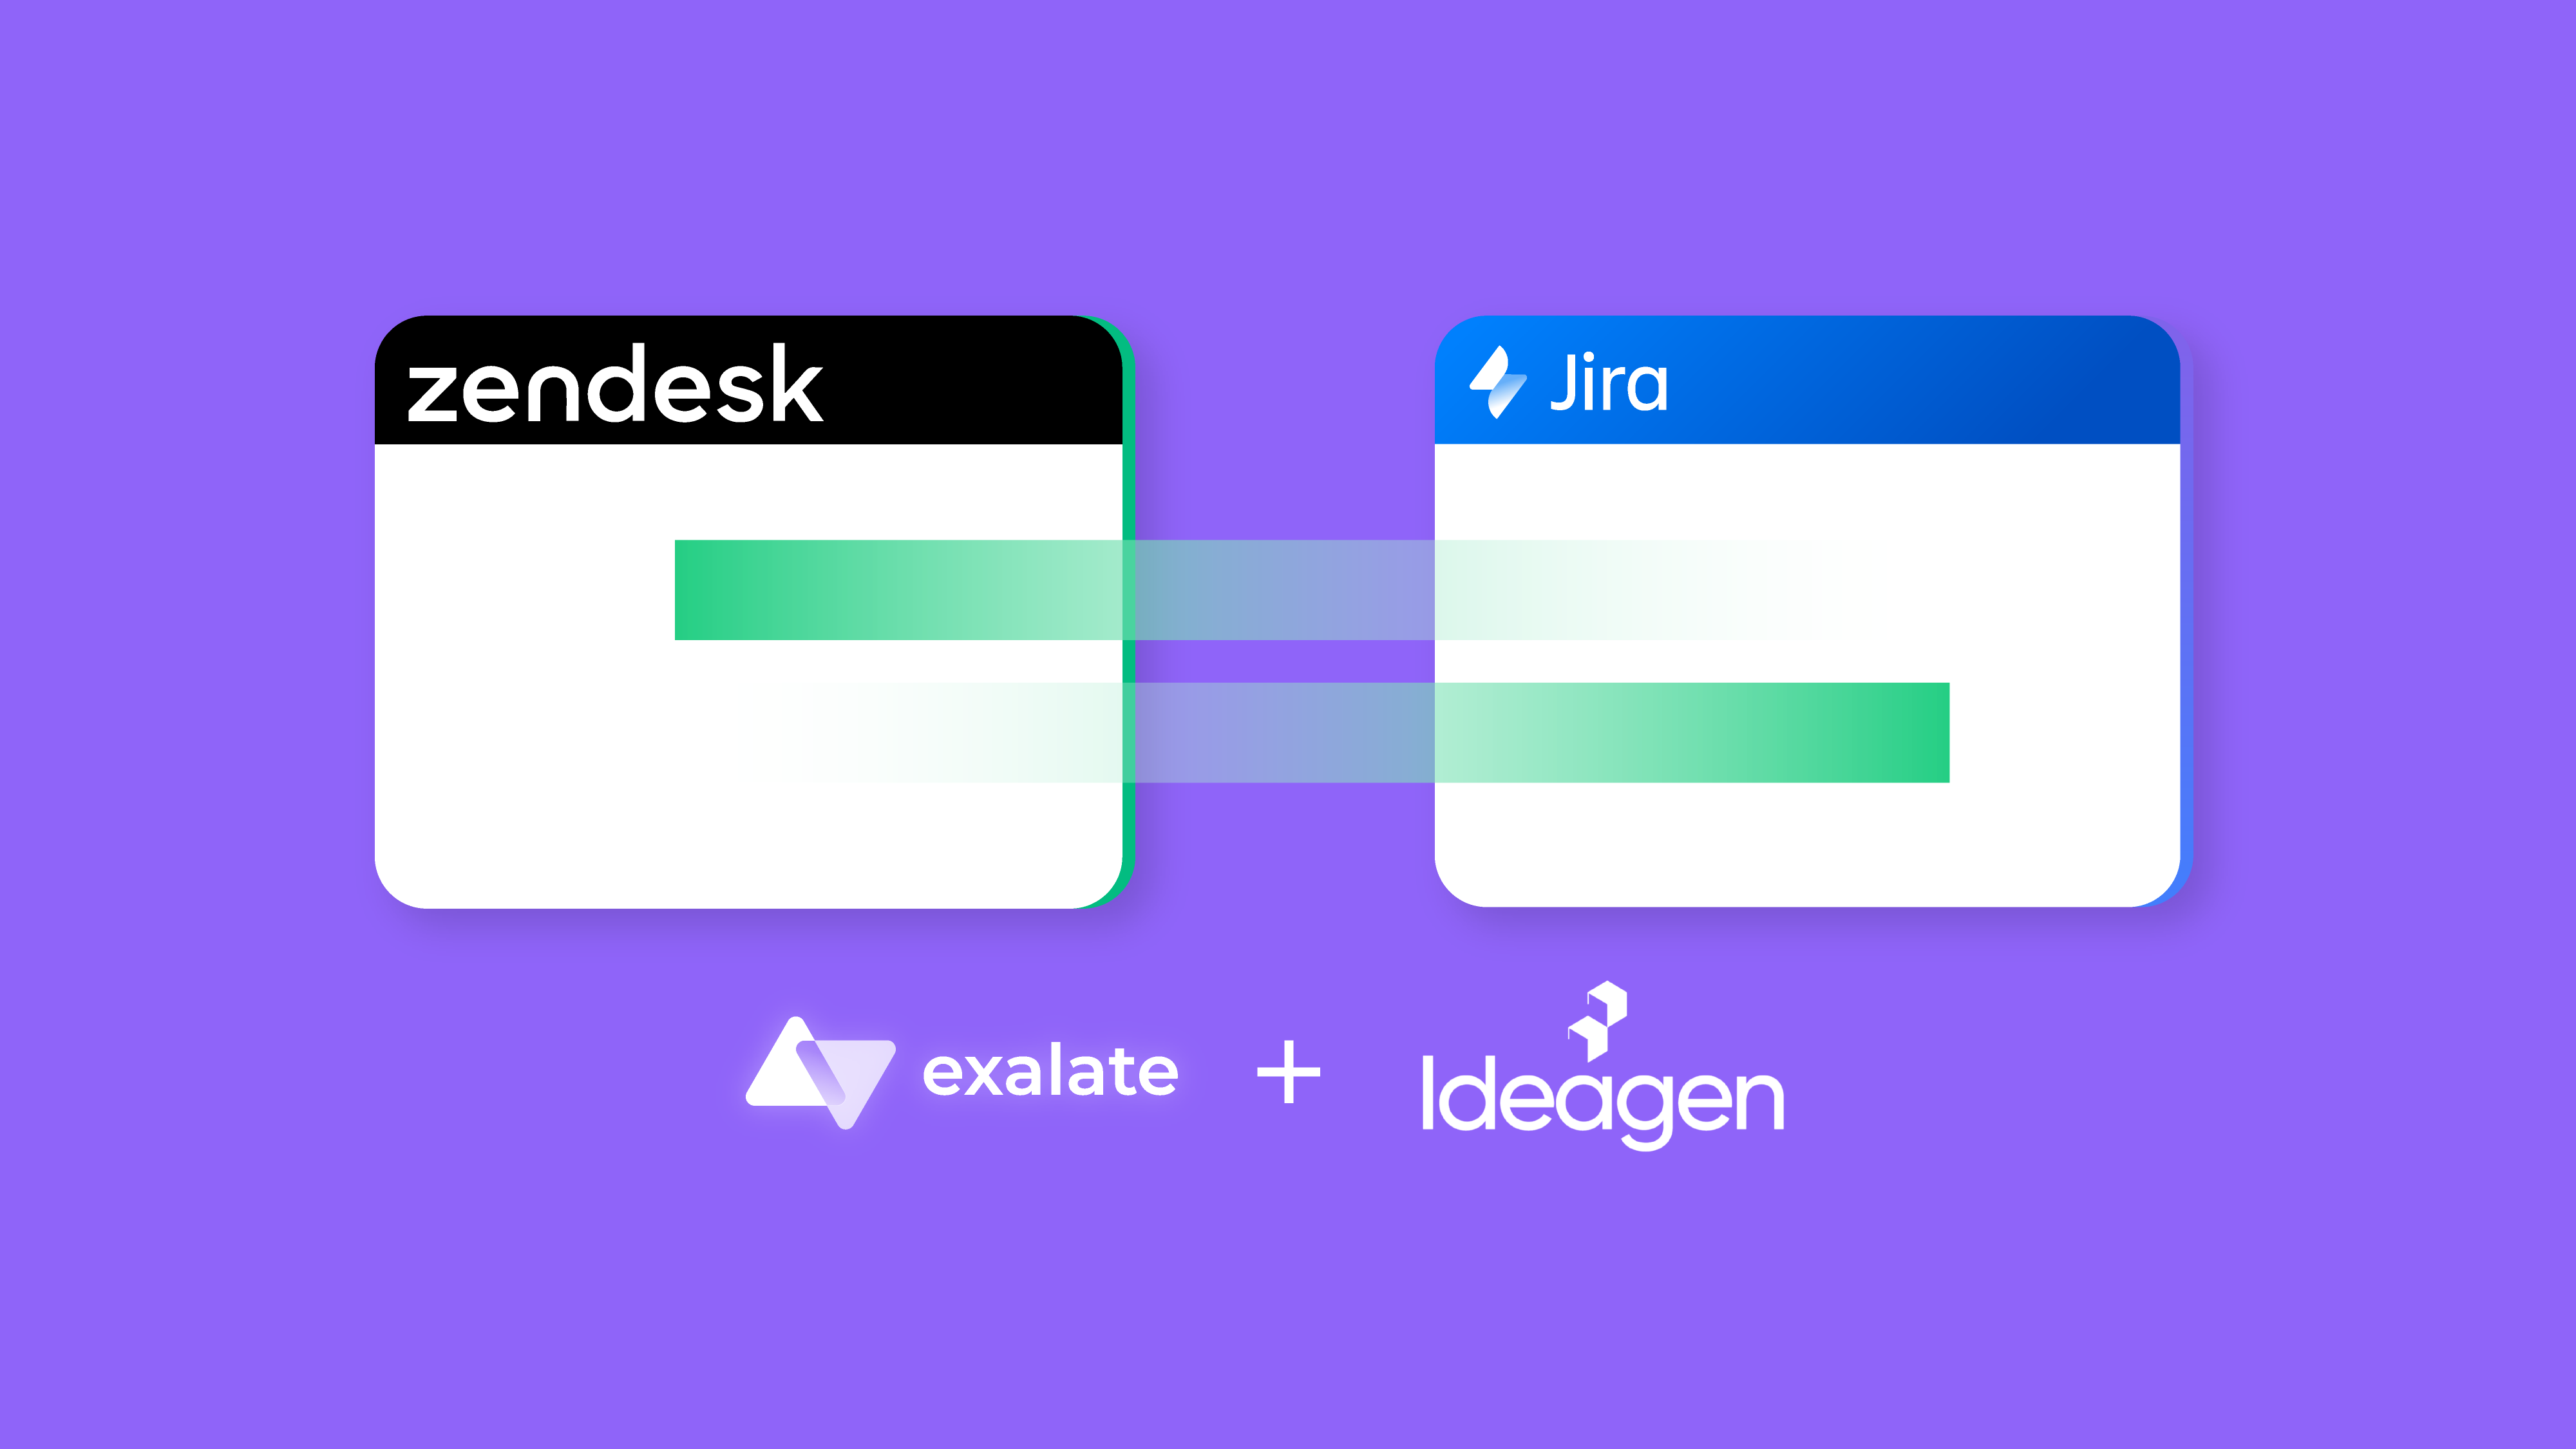
As more and more information flows through organizations, teams working on different platforms can benefit from sharing this data. Once you pick the right Zendesk Azure DevOps integration solution, you can make these systems interact seamlessly according to your specific use case.
In this blog post, we’re going to show you how to set up a Zendesk Azure DevOps integration between teams that work together seamlessly.
If you want a practical guide on how to integrate data between both platforms, hang around till the end.
What is Zendesk Azure DevOps Integration?
Zendesk Azure DevOps integration refers to the process of connecting both systems with a third-party application in order to get them to share data and vital updates.
This integration usually involves developers or engineers using Azure DevOps collaborating with customer support staff who work on tickets on Zendesk.
Here is a common scenario in tech companies:
A development team using Azure DevOps can benefit from customer feedback collected by a team using Zendesk. The customer support team can also benefit from talking to developers to help solve customer issues.
With the correct setup, you can help your teams make the best use of the data available within the organization. Once an automated system is in place, it can automate the data exchange, debugging, and analysis.
A trigger or automation can dictate when this data exchange occurs. You can also write scripts or use no-code mapping to say how entities map to each other between Zendesk and Azure DevOps.
What Can I Sync Between Zendesk and Azure DevOps?
When implementing integration between Zendesk and Azure DevOps, you can sync several fields and entities within work items, including ID, Description, CreatedBy, CreatedDate, Attachments, Comments, etc.
Zendesk users can sync entities and fields in tickets, including data from Subject, Email, Description, Status, Type, Priority, Group, Assignee, Tags, and custom fields.
In general, you can explore several syncing capabilities with the help of Exalate’s AI-powered Groovy scripting engine. Just get the functions and expressions right, and you are good to go.
More on that later.
What are Some Azure DevOps to Zendesk Integration Use Cases?
Speaking of entities you can sync between Zendesk and Azure DevOps, let’s go through some business and technical use cases.
#1 – Share Customer Support Tickets with Developers
When tickets come into Zendesk, the agent in charge can decide whether they require attention from the development team.
Tickets for the development team will be escalated instantly, and all the details contained in the ticket will appear in the assigned fields for the corresponding Azure DevOps work item.
The synchronization will be selective and only pass on the info developers need to work on the problem.
Also, any update from the development team will be reflected in the ticket for the customer to see.
Say the Azure DevOps instance contains a custom field named “Critical Level” to reflect the amount of work that needs to be done. The details could be mapped to appear as a comment or another custom field within the Zendesk ticket.
#2 – Notify Support Staff about New Releases and Fixes
When developers release new fixes for a known issue or bug, they can communicate the status with the support team.
For instance, the development team can set the status of the Azure DevOps work item to change the status of the Zendesk ticket.
If this integration is cross-company, with multiple users interfacing with the client, you can impersonate comments to appear from a designated user.
#3 – Maintain Priority Across Zendesk and Azure DevOps
Admins want every incoming Zendesk ticket to bear a priority so they’ll be able to sort and assign them appropriately.
When the ticket is escalated to the engineers, the priority should also be reflected in the work item so that the development team can determine how to schedule and assign it.
#4 – Sync SLA Details for Better Support
Depending on the condition of the SLA, the Zendesk ticket might need urgent attention within a specific time frame. So, the work item should reflect the details of the ongoing SLA with the customer.
Now, if the SLA limits the available support time, the work item in Azure DevOps should help you allocate ample time to resolve the ticket in a timely manner.
#5 – Link Related Zendesk Tickets to a Single Azure DevOps Work Item
When a bug or issue affects your product, and customers are complaining about it, these tickets should all go to a single destination.
How would this work? For starters, the Zendesk agent in charge should create a mapping to ensure tickets with a certain label or priority go to a Bug or Epic in Azure DevOps.
That way, all the tickets will receive progress updates at the same time without having to reply to each one separately.
Why Integrate Zendesk and Azure DevOps?
Here are some reasons to explore Azure DevOps Zendesk integration for your organization.
- Enhance collaborations: All stakeholders can stay updated about the status of tickets and work items integrated into the sync. This increases visibility for team members working on a similar initiative but from different platforms.
- Automate workflows: With triggers and automation, admins can set up two-way and one-way synchronizations between Zendesk and Azure DevOps.
- Reduce errors: Instead of relying on human data input and risking errors, integrating both systems with a third-party app ensures that only specific actions can trigger exchanges.
- Maintain a single source of truth: Integrating Azure DevOps with Zendesk allows teams working on a specific issue—say, providing customer support or handling bug reports—access to a singular information source for accurate decision-making.
- Save money: Both teams in the synchronization will stay in their own system without having to onboard an entirely new platform.
How Can You Choose the Right Tool for Zendesk Azure DevOps Integration?
There are a few criteria you should take into consideration when picking an integration solution.
- Decentralization: Teams will benefit from decentralized integration and gain complete control over what data they want to share with the other side without having to leave their familiar environment.
- Advanced security features: The solution must have advanced integration security mechanisms, such as token-based authentication and data encryption. These are important for maintaining the integrity of the data at rest and in transit. Opt for ISO-certified solutions.
- Reliability: Downtime will sometimes occur, and in such cases, the system should be robust enough to recover. Errors on either end should not cause problems on the other.
- Flexibility: Teams should be able to define how they want to share data and set the conditions that trigger data exchange. This flexibility extends to using AI-powered scripting assistance to extend the scope of applicability.
- Scalability: The Azure DevOps Zendesk integration should have the capacity to scale operations significantly without breaking down completely.
The solution we use for the Zendesk Azure DevOps integration here is Exalate because it provides flexible, custom synchronizations between teams across companies.
It allows users to speed up scripting and field mapping using the AI Assist feature. Once set up, it can work in the background.
How to Set up a Zendesk Azure DevOps Integration (the Step-by-Step Process)
Now, let’s set up the integration. You’ll start by installing Exalate on both platforms. Then, you’ll create a connection. Finally, you’ll configure the connection to share what you want and decide on the conditions that trigger sharing.
Note: You can refer to the Getting Started Guide on Exalate documentation for a step-by-step procedure to set up a connection between other applications it supports. You can also refer to the Exalate academy videos.
Step 1: Install Exalate on Zendesk
You can install Exalate on your Zendesk instance by visiting the integrations page. You can also get the app through the Zendesk marketplace.
Click on the icon, then click the install button on the next screen.
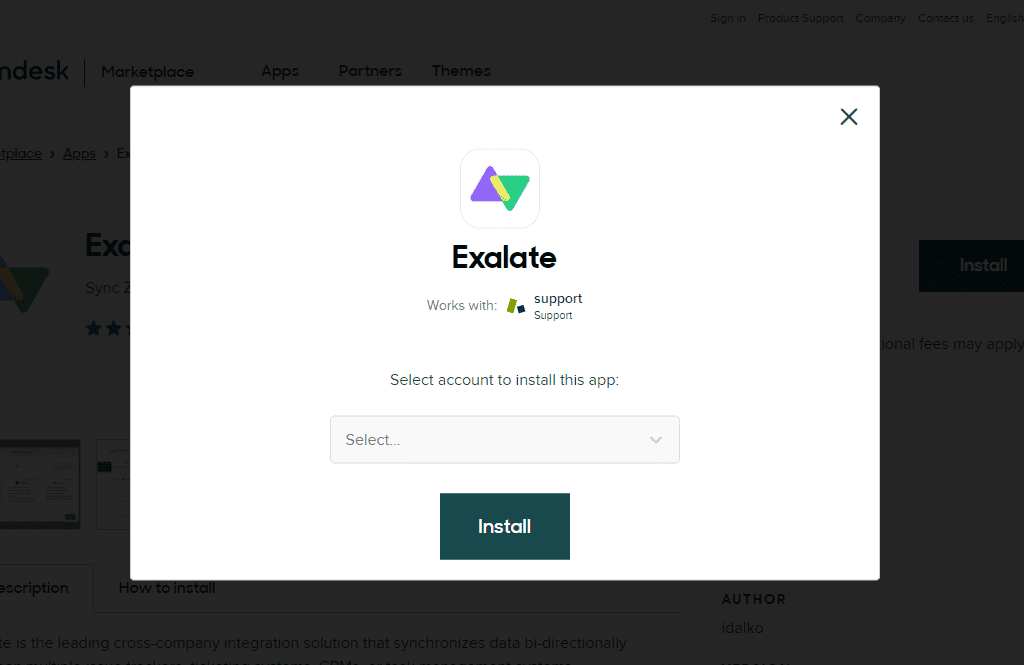
You’ll see a popup asking you to enter your Zendesk instance URL. Do so, then click “Install”.
Next, you’ll be taken back to your Zendesk account. You can change the app title, and enable restrictions if necessary, or you can just accept the defaults.
Either way, click the blue “Install” button to continue. After Exalate installs, you’ll see its icon in the left-side menu at the bottom. Click the icon now.
When you first use Exalate, you need to grant it permission to access your data. Click “Allow” to do so.
After that, there’s a registration screen where you need to enter your email address and other details. After clicking the button to submit them, you’ll be sent a verification mail. Click the link in it.
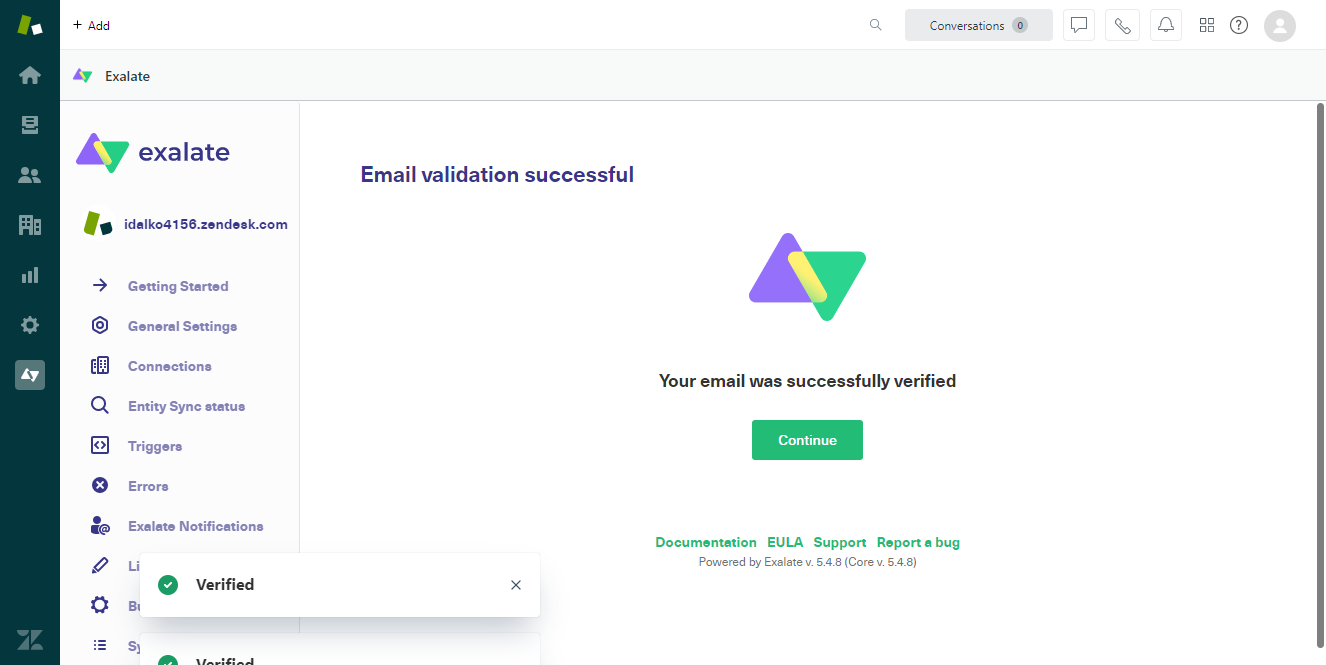
You’ll be taken back to Zendesk and should now be successfully verified. You’re free to use Exalate for 30 days before deciding whether to continue with it.
Click “Continue”, and you’re done.
Step 2: Install Exalate on Azure DevOps
The same goes for Azure DevOps. Install Exalate via the integrations page or visit the Azure DevOps marketplace.
Note: It is also possible to install Exalate via docker, so please check out the documentation if you prefer to do that.
Log in to Azure as an admin, then look at the icons at the top right of the screen.
In the marketplace search for “Exalate”.
Click the app when it appears, then click “Get”. On the next screen, confirm your organization is listed correctly, then click the blue “Install” button. When it’s ready, click “Proceed to organization”.
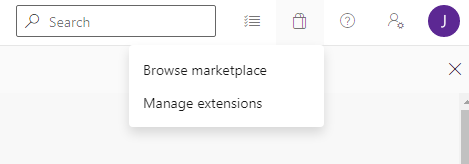
You can now reach Exalate from within Azure DevOps by clicking the marketplace icon, and selecting “Manage extensions”.
You’ll see Exalate listed in the left-hand menu towards the bottom.
The first time you access Exalate, you need to provide a personal access token. To create one, open the settings menu at the top right and click “Personal access tokens”.
Click the “New Token” button.
On the form that appears, you need to make sure “Read, write & manage” in the “Work items” section is ticked. It should be by default. You might want to extend the expiration date too, otherwise, you’ll have to create a new token every 30 days.
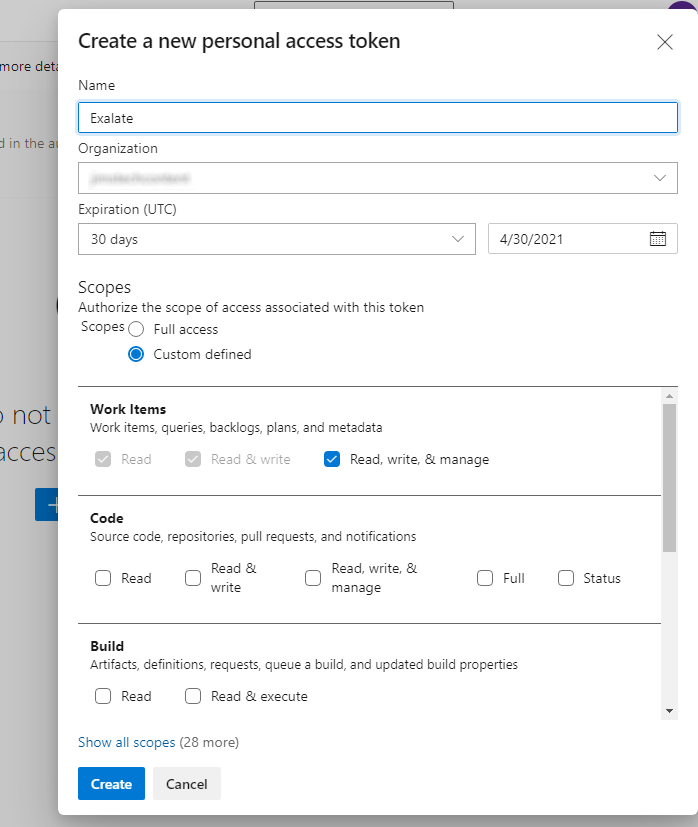
Click the “Create” button. When the token is created, you need to copy and paste it somewhere straight away, as there is no way to access it if you don’t. Click “Close” after doing so.
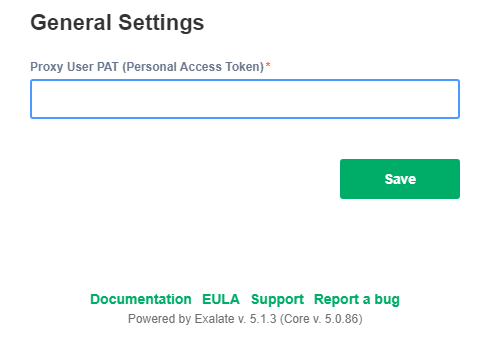
Now, back in the Exalate screen, paste in your token. As with Zendesk, enter your email and other details, click the “Agree and submit” button, and wait until you receive an email.
Click the verification link to set things up in Azure DevOps.

Step 3: Connect Zendesk and Azure DevOps
Now that you have Exalate on both platforms, you can create a connection between them. You can do this from either side. I’ll use Zendesk in this guide.
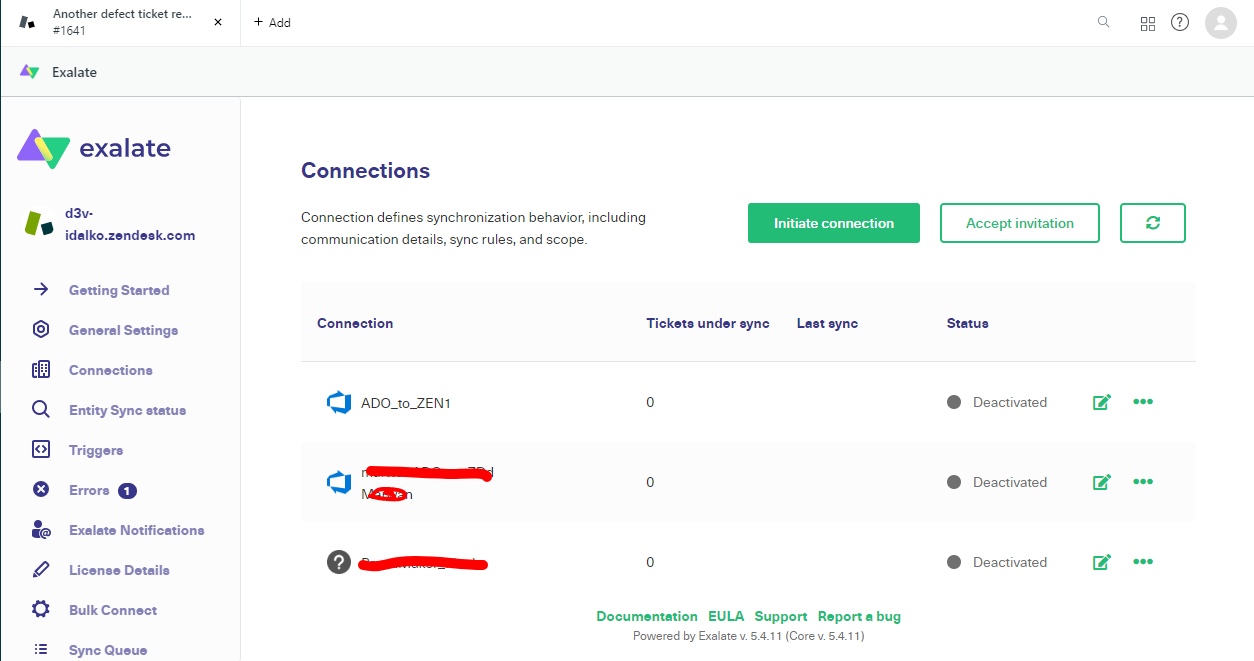
Click “Connections” in Exalate’s left-side menu. Then click the green “Initiate connection” button.
On the next screen, enter your destination instance’s URL in the text field. Since I’m using Zendesk, that’s the URL of my Azure DevOps instance. After you enter the URL, Exalate will check that it can reach the destination instance. If it can, more fields will appear.
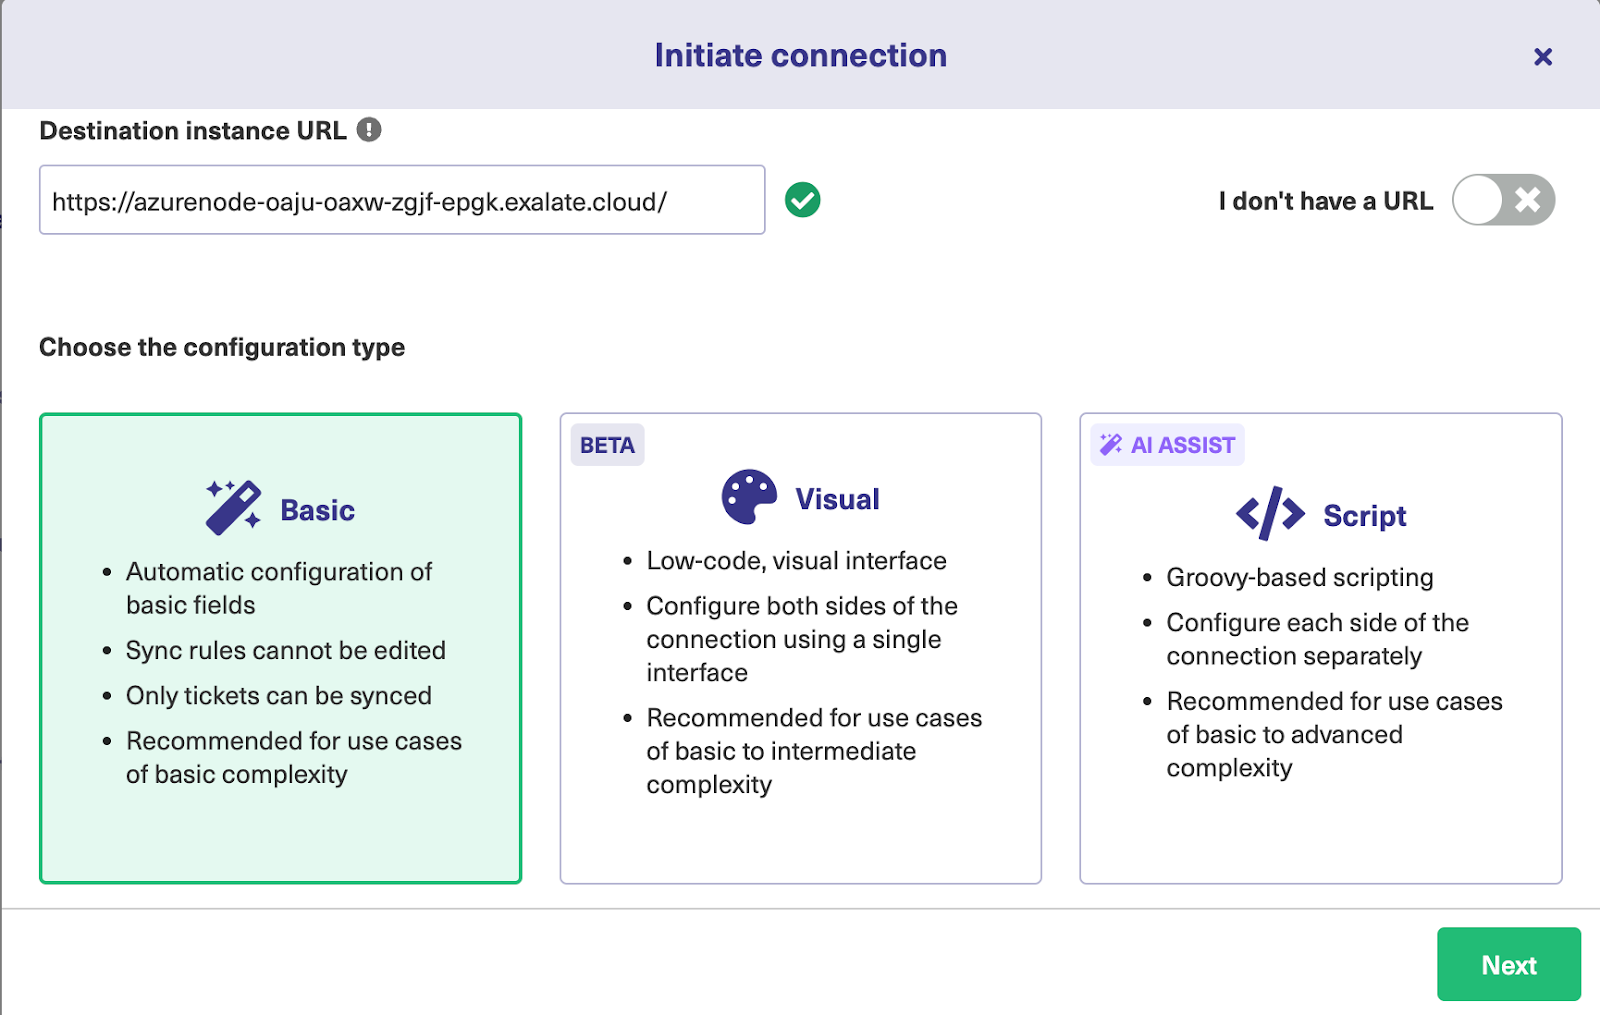
Now you need to decide whether to set up the connection with basic, visual, or scripting mode. Basic mode allows you to set up a connection easily and is useful for basic synchronization needs.
Visual mode allows you to easily configure the connection using a drag-and-drop interface. Scripting mode is more advanced and needs you to work with the ‘Groovy’ scripting language, but it allows you more control.
Choose the mode and then look at steps 4 and 5 to see how you can configure what your connection shares and when synchronization happens.
Continue with the Basic Mode
Click “Next”. You will now need to verify if you have admin access on the Azure DevOps side.
Click “Yes, I have admin access” since we already have access. If you don’t have access, you will receive a prompt to manually copy-paste a code on the Zendesk side.
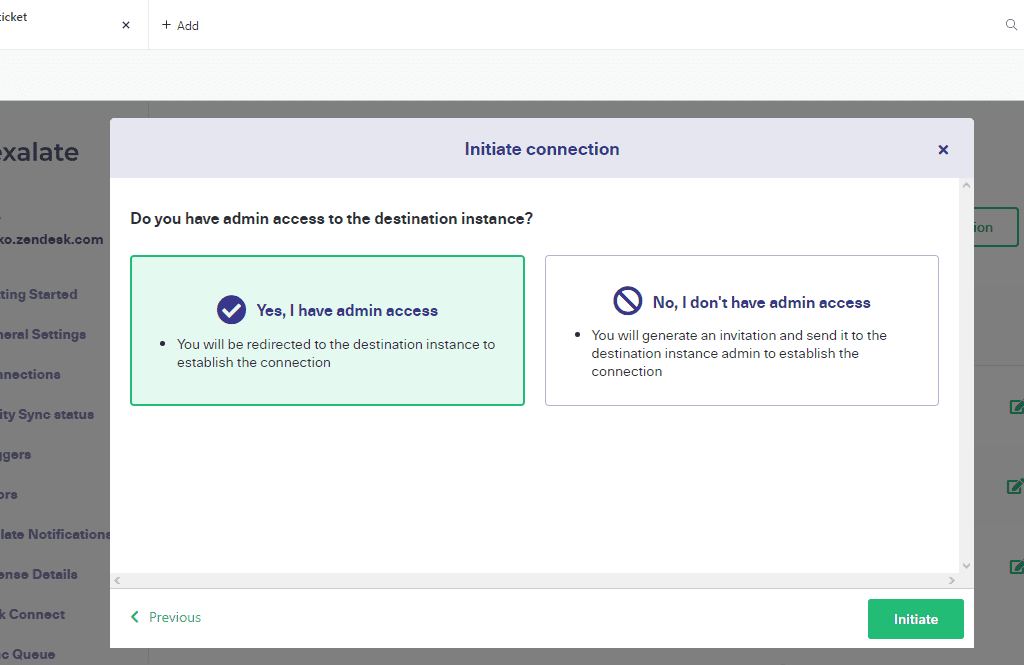
After this, click “Initiate”. This will redirect you to the Azure DevOps side automatically.
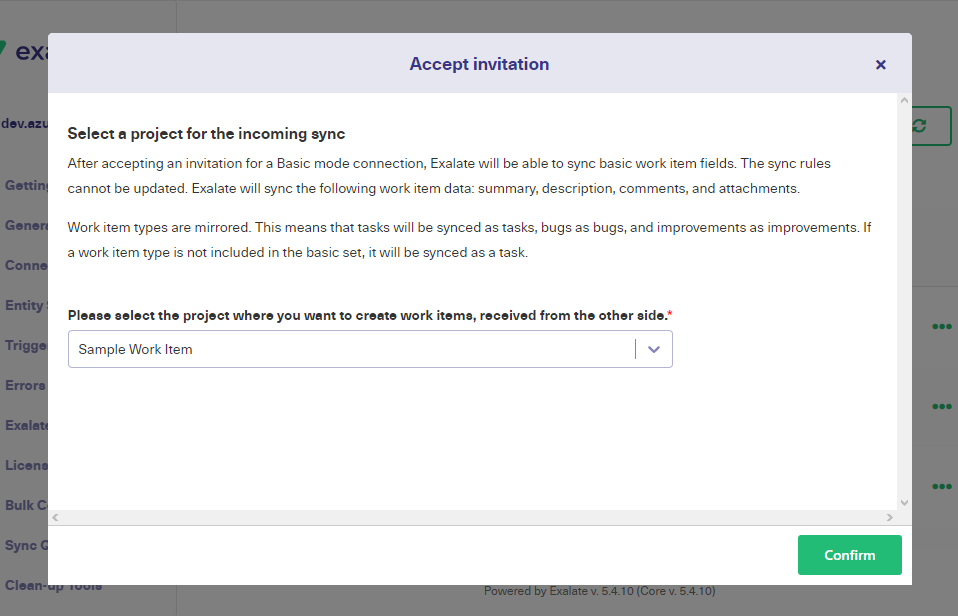
You will be asked to select the project from a drop-down list. This will be a project on the Azure DevOps side.
Your connection is now ready, and you can start syncing your first ticket right away.
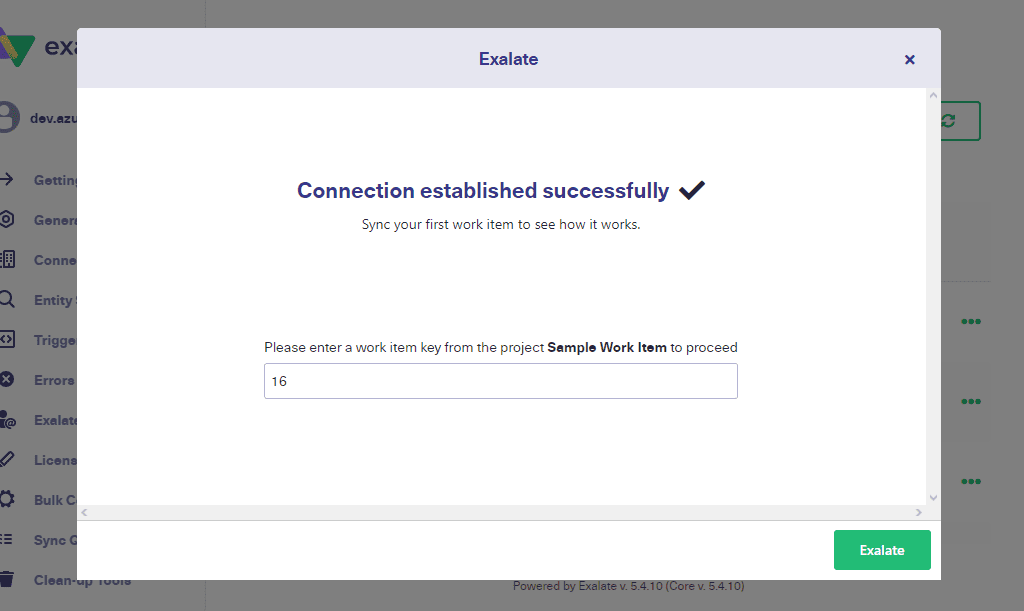
Enter the work item key and click “Exalate”.
It takes a while for the work item to sync. Once done, you will see the status of your synchronization as “synchronized”.
For the basic mode, you can continue to sync tickets or work items as shown above, or you can create triggers to enable automatic synchronization or even sync tickets/ work items in bulk.
Continue with the Visual Mode
For the visual mode, we start initiating the connection from the Azure DevOps instance. Click the “Initiate Connection” button under the “Connections” tab in the Exalate console.
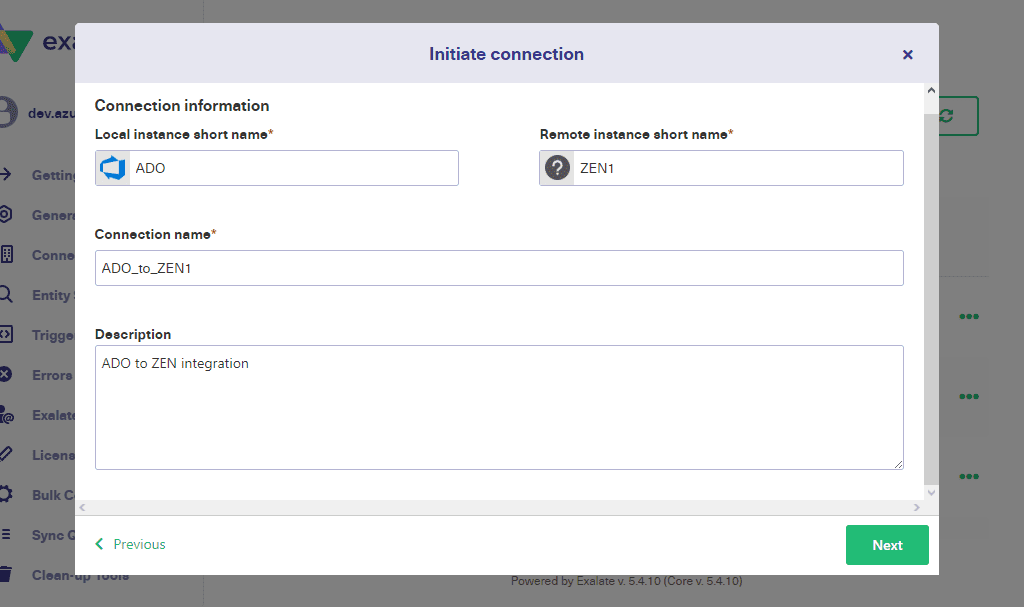
After clicking “Next” for the visual mode, you can name each side of the connection. Exalate will combine the names into an overall connection name that you can optionally edit. You can also add a description. It’s a very good idea to do, as it will help your team keep track of things if they create multiple connections.
Click “Next” and then “Verify admin access” to ensure Exalate can access the other side.
Now that the connection has been successfully established, you can start to configure the connection directly by clicking on the “Configure Sync” button or by editing the connection later.
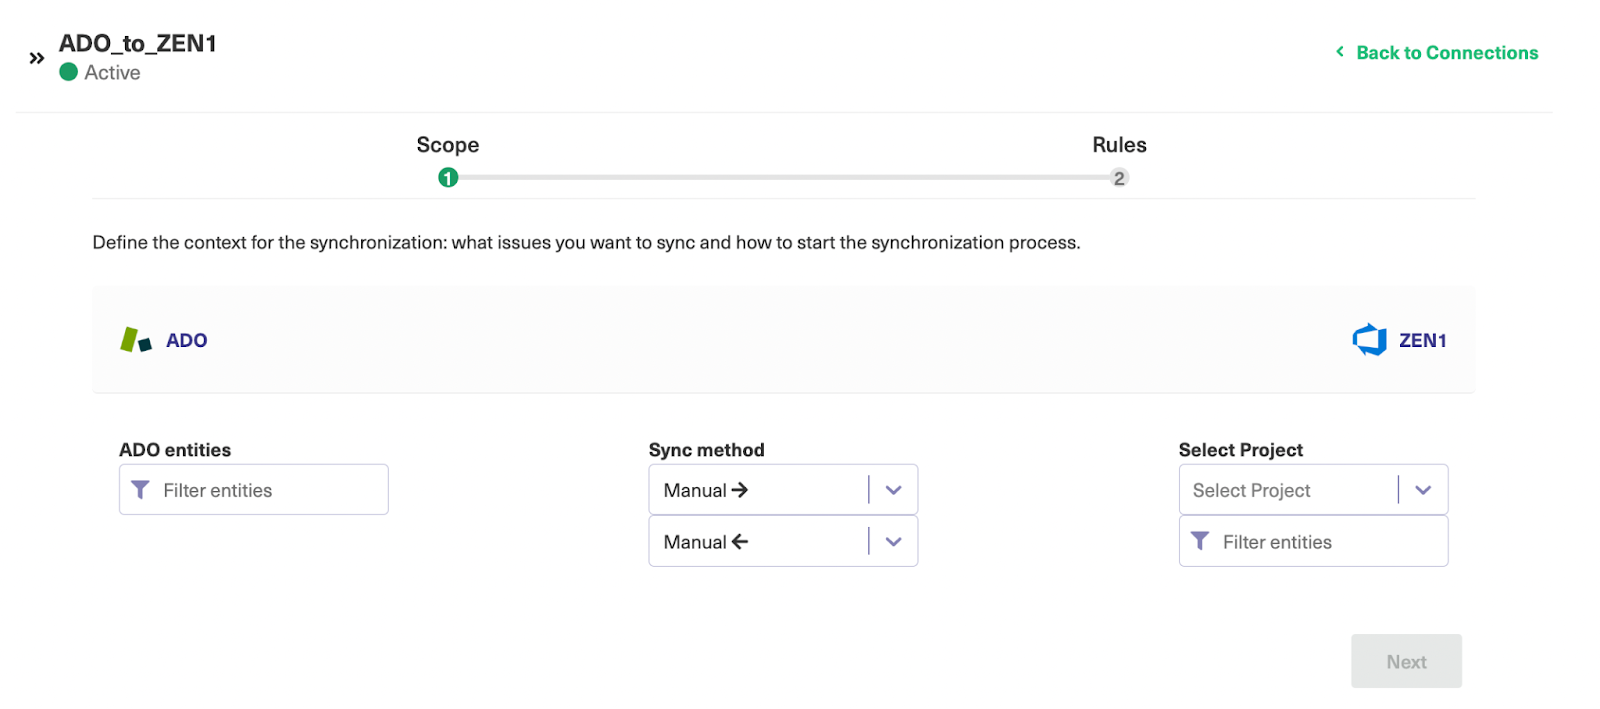
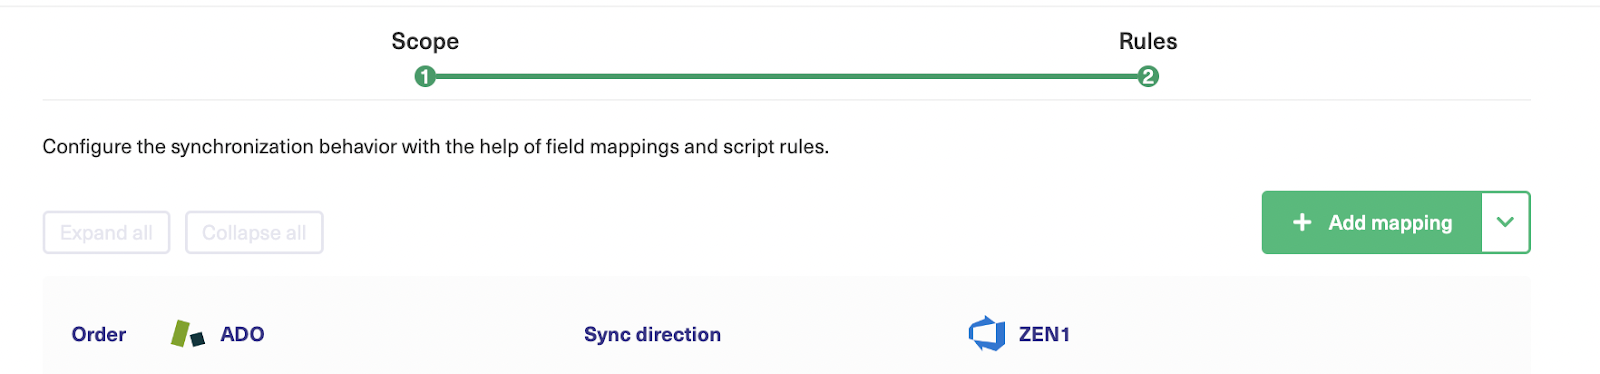
After clicking the button, you’ll see the “Scope” screen. Here you can choose the project for synchronization on Azure DevOps.
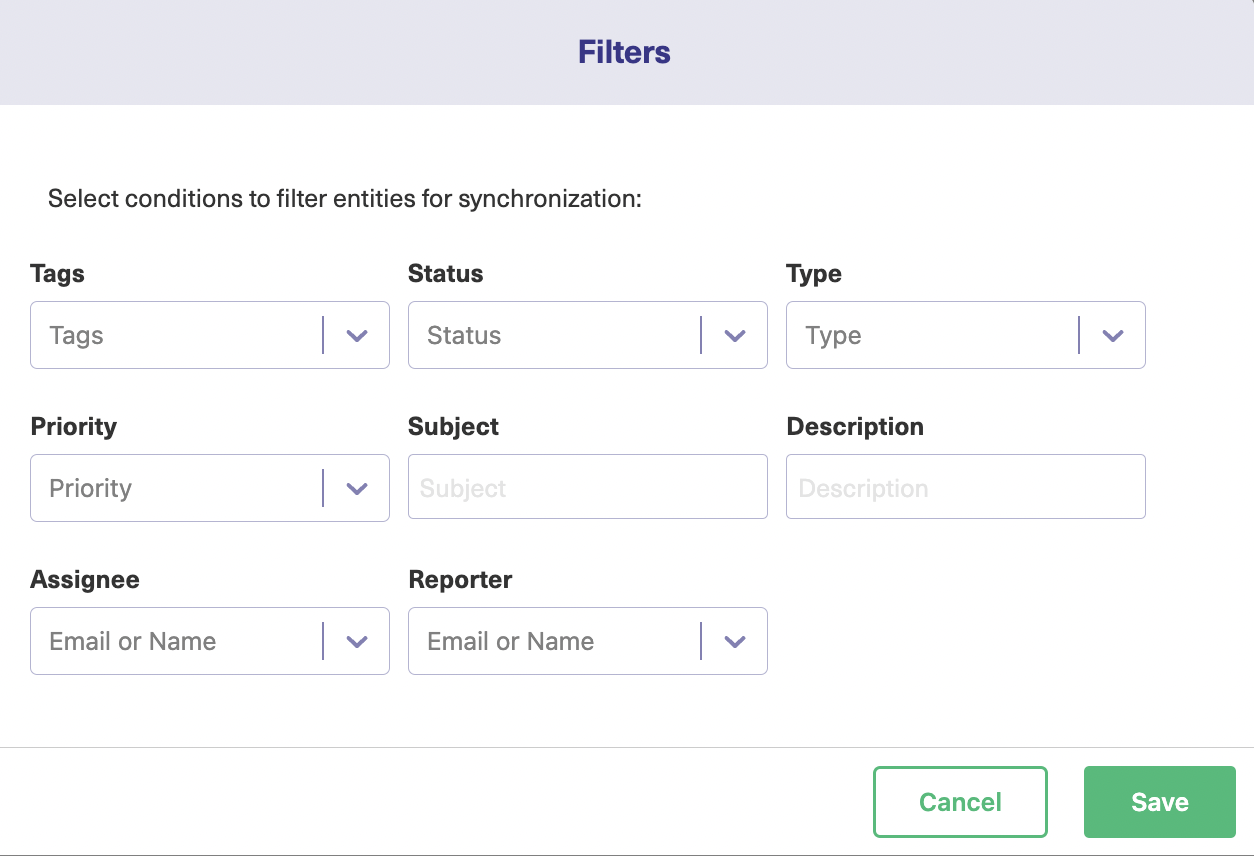
Here you can also choose which entities are synced. If you click on the filter buttons on either side of the connection, another popup will appear. The above screen is for Zendesk. You will see a similar screen for Azure DevOps.
On this popup, you can specify the properties of items you want to synchronize. These include tags, status, type, priority, and many more. Click “Save” when you’re ready.
You can also choose the “Sync method” in each direction using the drop-down boxes in the middle of the popup. Synchronization can be manual, automatic, or disabled. That lets you make the connection uni- or bi-directional.
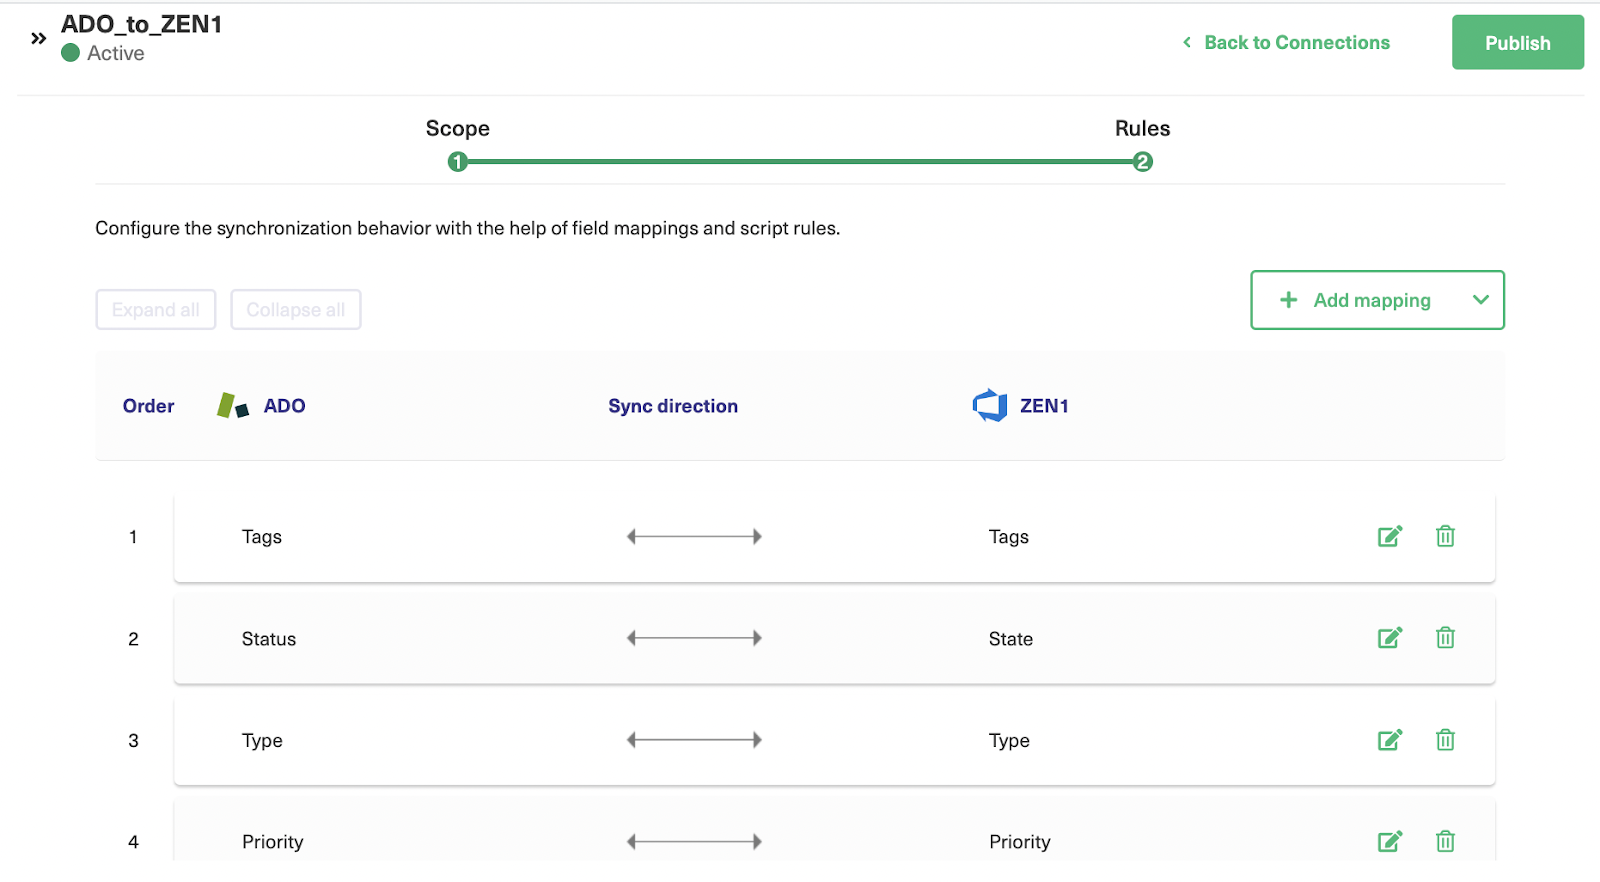
Click “Next” when you’re finished and you’ll be taken to the “Rules” screen. Here you can see how various attributes on synced entities map to each other. If you don’t want an attribute mapped, click its delete icon, and that mapping will be removed. You can also click the edit icon to change which attributes are mapped to each other.
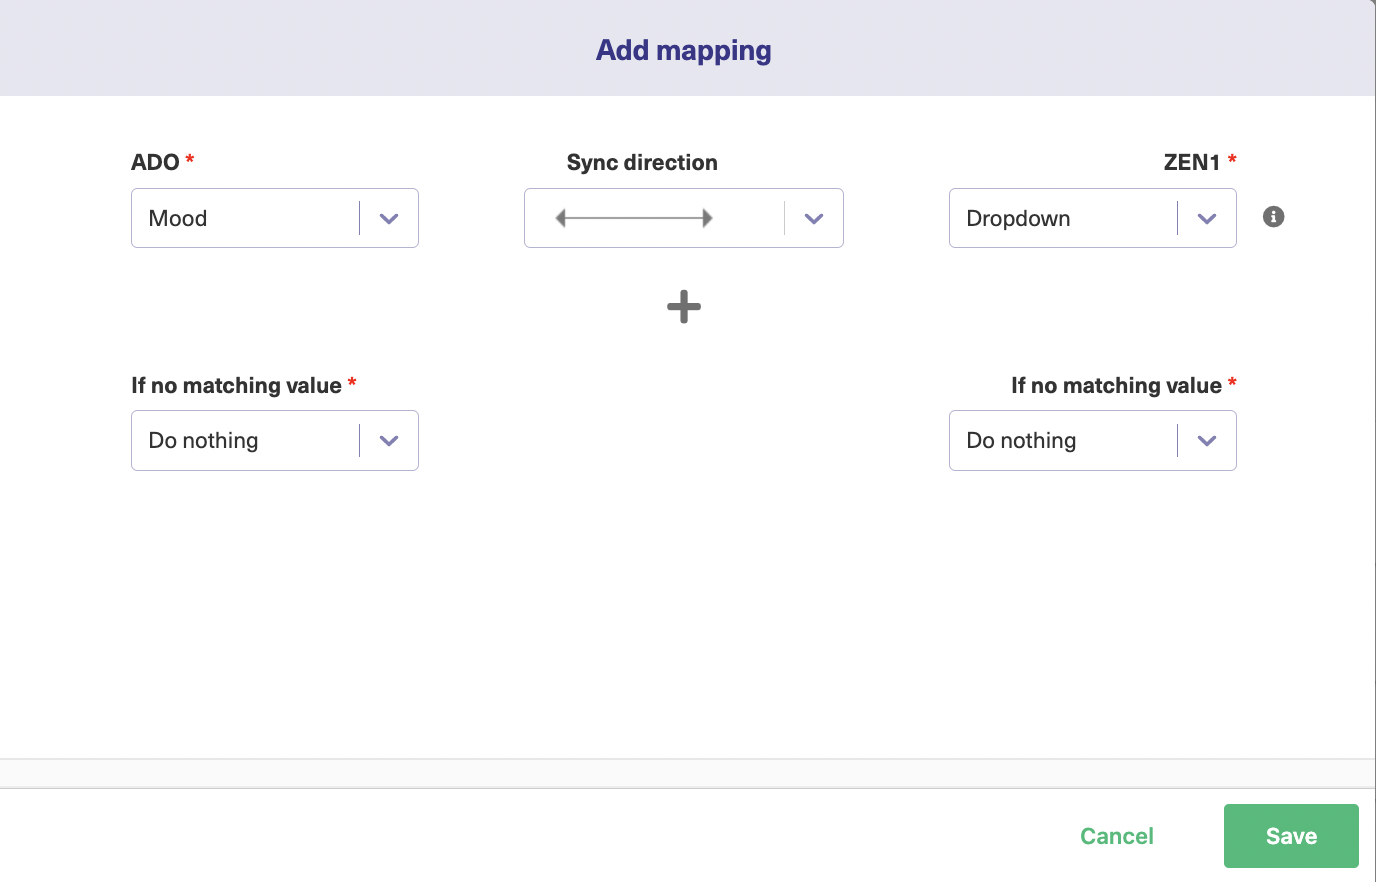
You can also create a new mapping for the attributes. Click the “Add mapping” button, select the fields on both sides, give additional information if needed, and click “Add”.
You will be able to see the new mapping on the “Rules” screen.
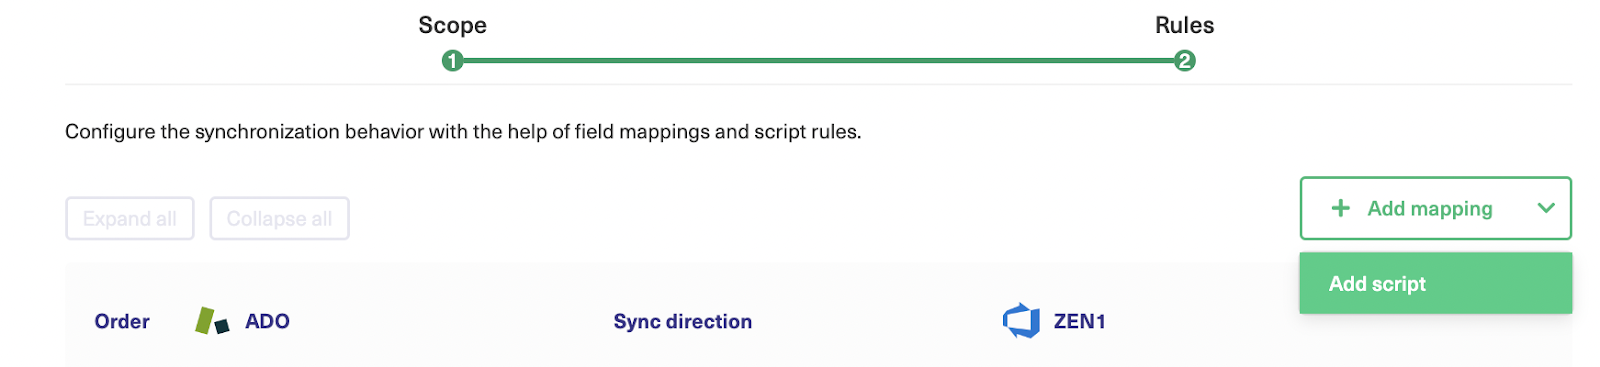
Sometimes for complex use cases, you might need more than the default mappings. You can handle such cases with the help of scripts. Click the arrow next to the “Add mapping” button and then hit the “Add script” button.
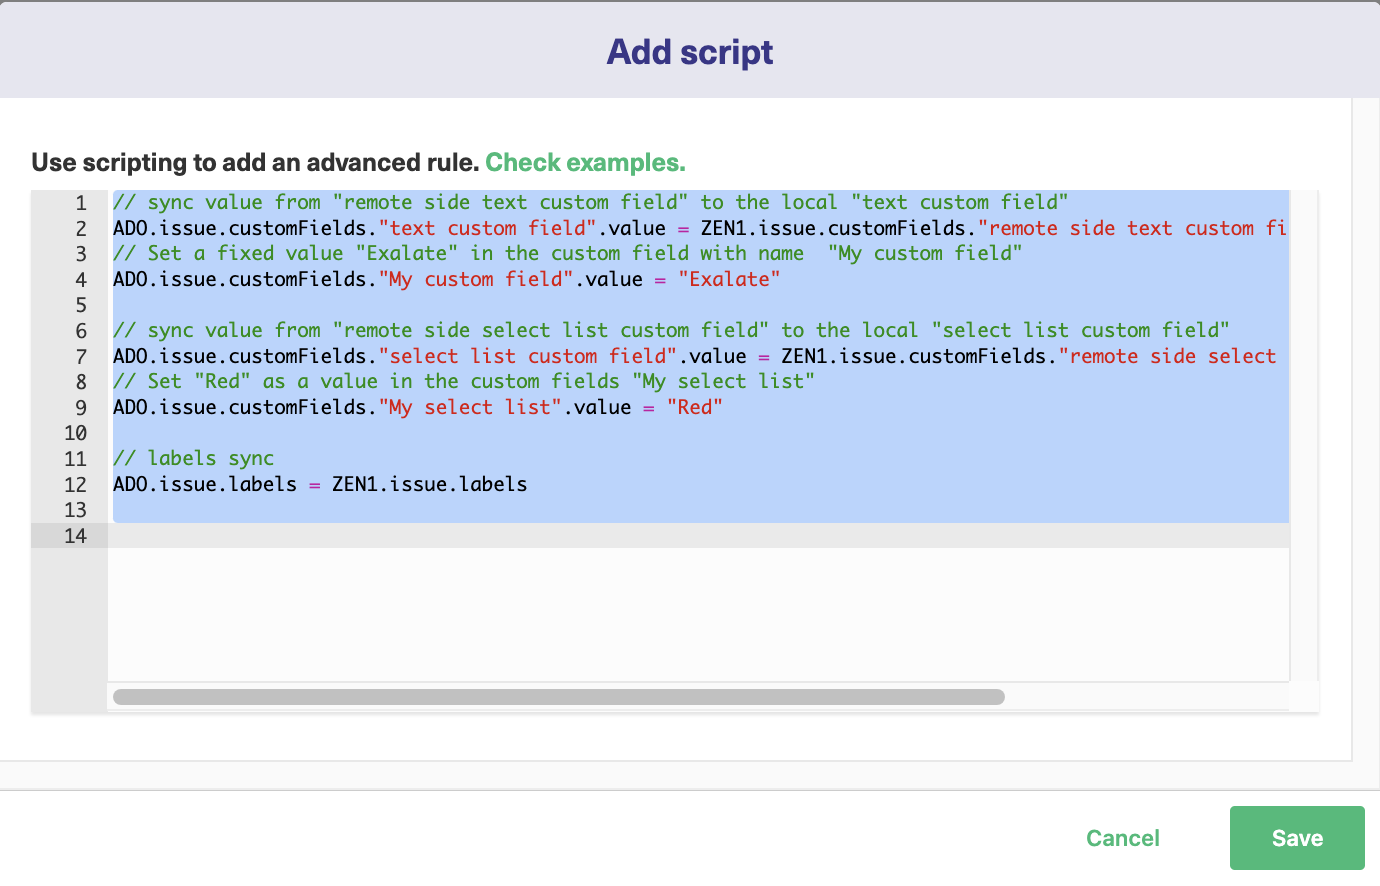
There is a sample script already present for you but you can change it according to your synchronization requirement.
When you’ve finished here, click “Publish”. You’ll see your new connection listed on the connections screen.
Continue with the Script Mode
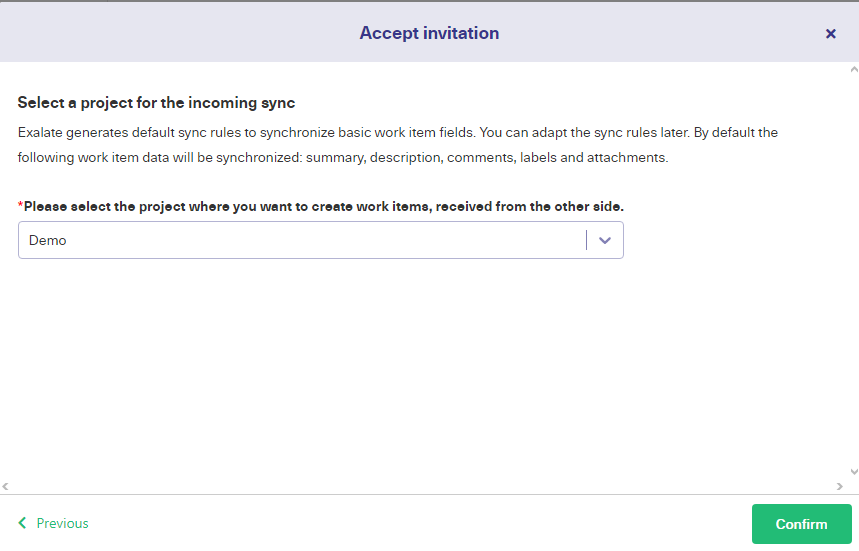
If you choose the Script mode rather than the Visual mode, then the first thing you need to do is give a name to the connection just like you did for the Visual mode. After that, select the project on the Azure DevOps side from the drop-down list.
After you click “Initiate”, Exalate will generate an invitation code.
Click the “Copy invitation code” button to copy it to your clipboard and paste it somewhere safe. Then, click the “Done” button.
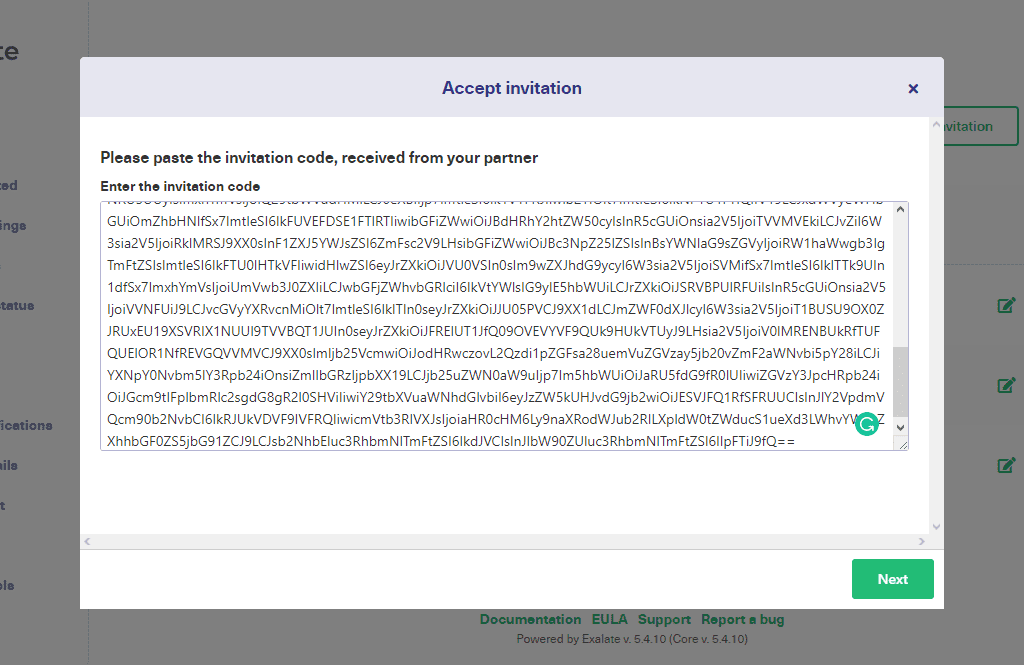
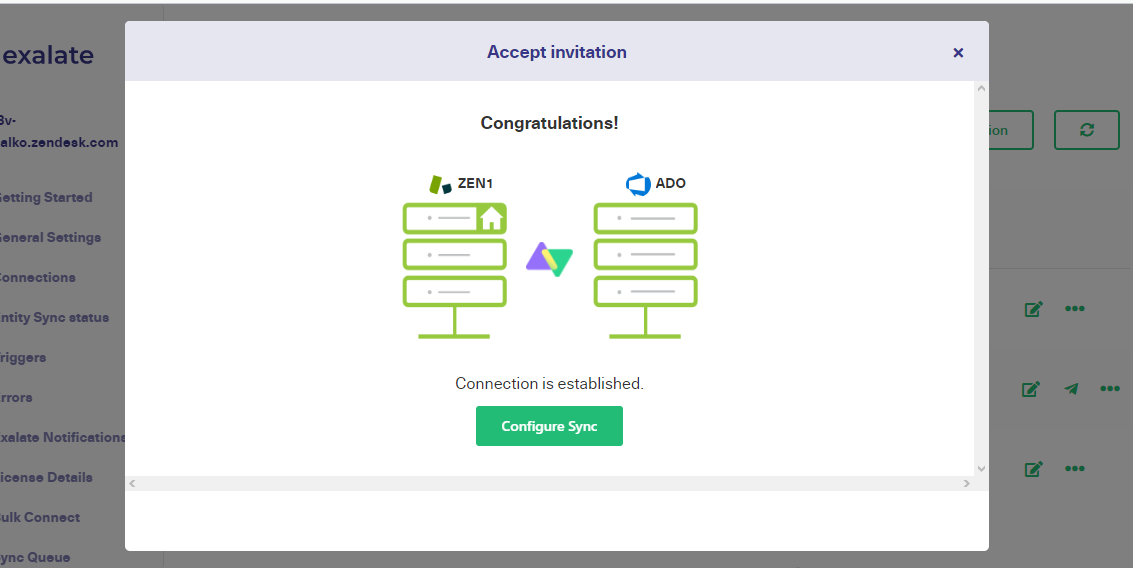
In Zendesk, click the “Accept invitation” button, then paste the code into the field provided and click “Next”.
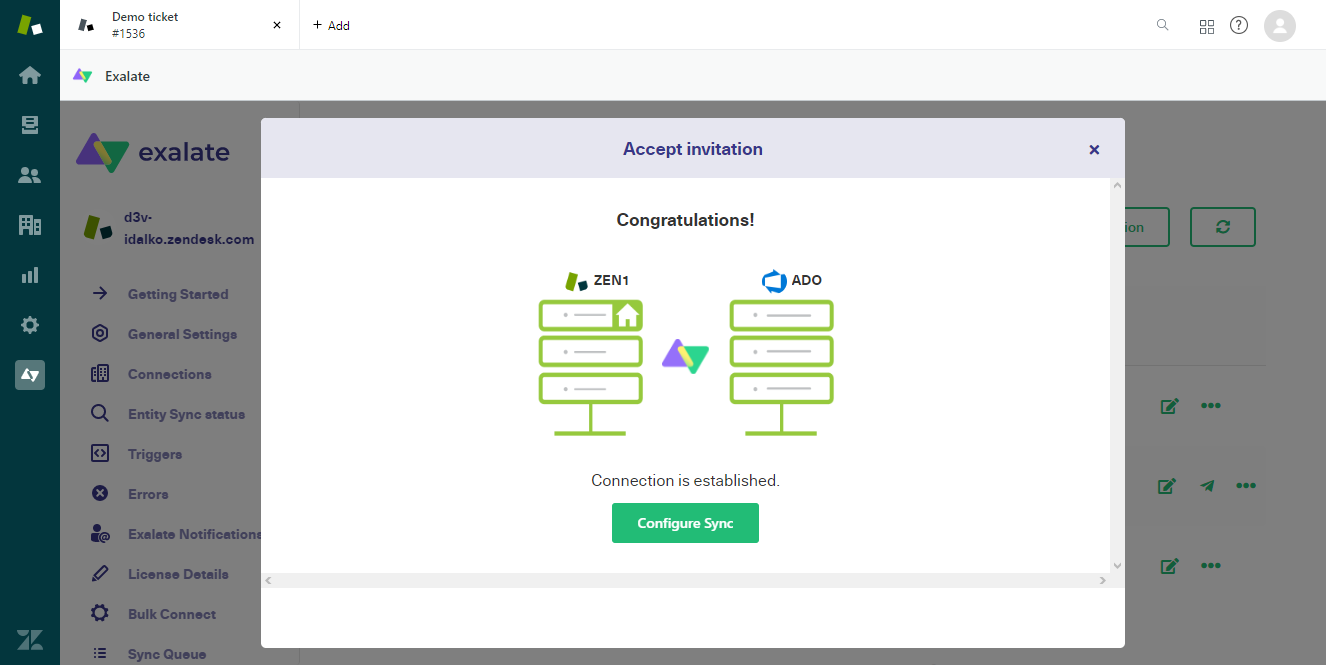
The connection will now be created. You can click the “Configure Sync” button to proceed to the next steps or edit the connection later.
Step 4: Configure Your Connection to Determine What Information Gets Shared
To edit a connection, click the edit button on its entry in the connections list. You’re then taken to the “Rules” screen. There you’ll see a list of incoming and outgoing sync rules.
These define what fields are mapped to one another when items are synchronized. If you don’t want to sync a particular field, just delete its line. You can also edit these lines to route fields differently, for example, you might want the ‘type’ in Azure DevOps to match the status in Zendesk.
You can also set specific values for fields. For example, the description could be set as issue.description = “Synced from Zendesk”.
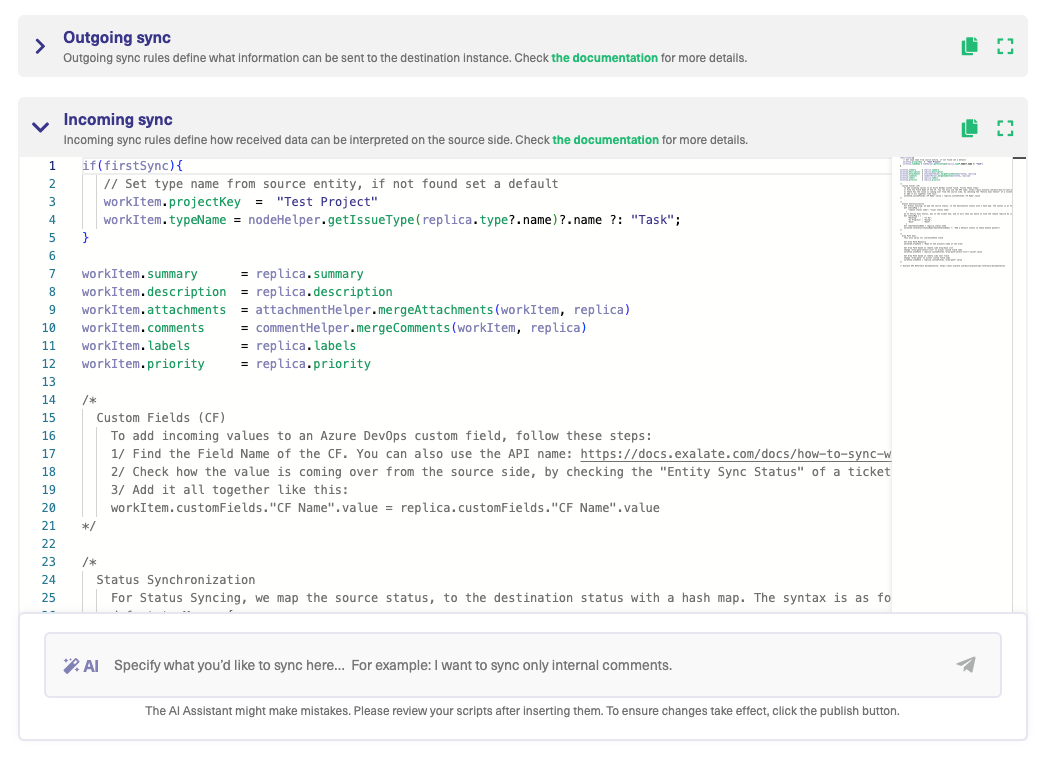
Connections in Script Mode Using AI Assist
The Script Mode allows you to generate and optimize scripts using the AI Assist feature — which appears as a tab under both the incoming and outgoing sync rules.
How does it work?
Enter your sync requirements into the chat box, and AI Assist will generate scripts based on your input, existing configurations, and Exalate’s scripting API.
It is also important to note that AI is not perfect. So, you need precise and detailed prompts to ensure the best results.
Let’s say you want to sync custom fields between Azure DevOps and Zendesk; the prompt could look something like this:
“I want to sync information coming in from Zendesk custom fields to a custom field named “Customer” in my work item.”
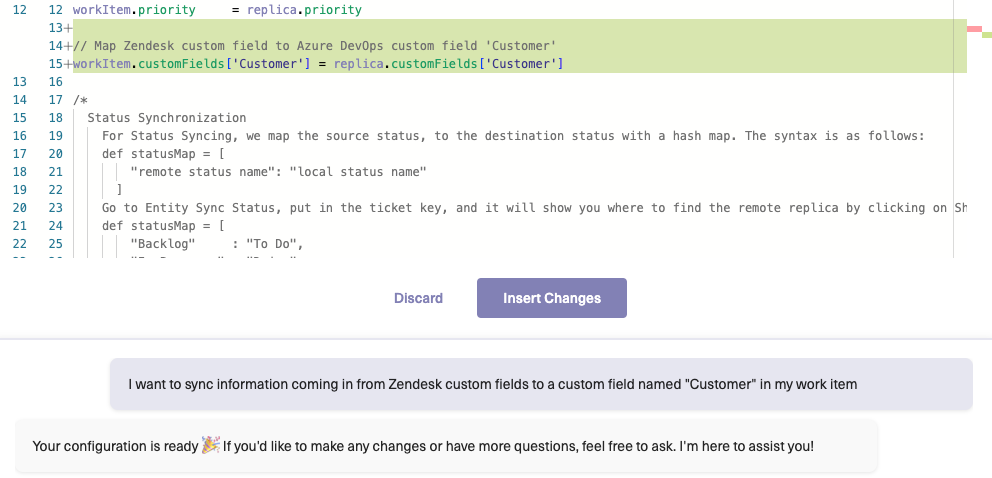
After a moment, the script will be generated, with suggested changes highlighted in green and red. The green scripts are suggested additions, while the red scripts are suggested deletions.
If the new snippet works for you, click on “Insert Changes”. Otherwise, you can discard the suggested code. If needed, you can refine your prompt and, once satisfied, publish the changes.
Step 5: Set Up Automated Synchronization Triggers
From the edit connection screen, click the “Triggers” heading. Here, you can set the conditions for synchronization. Items that match these rules are copied between platforms.
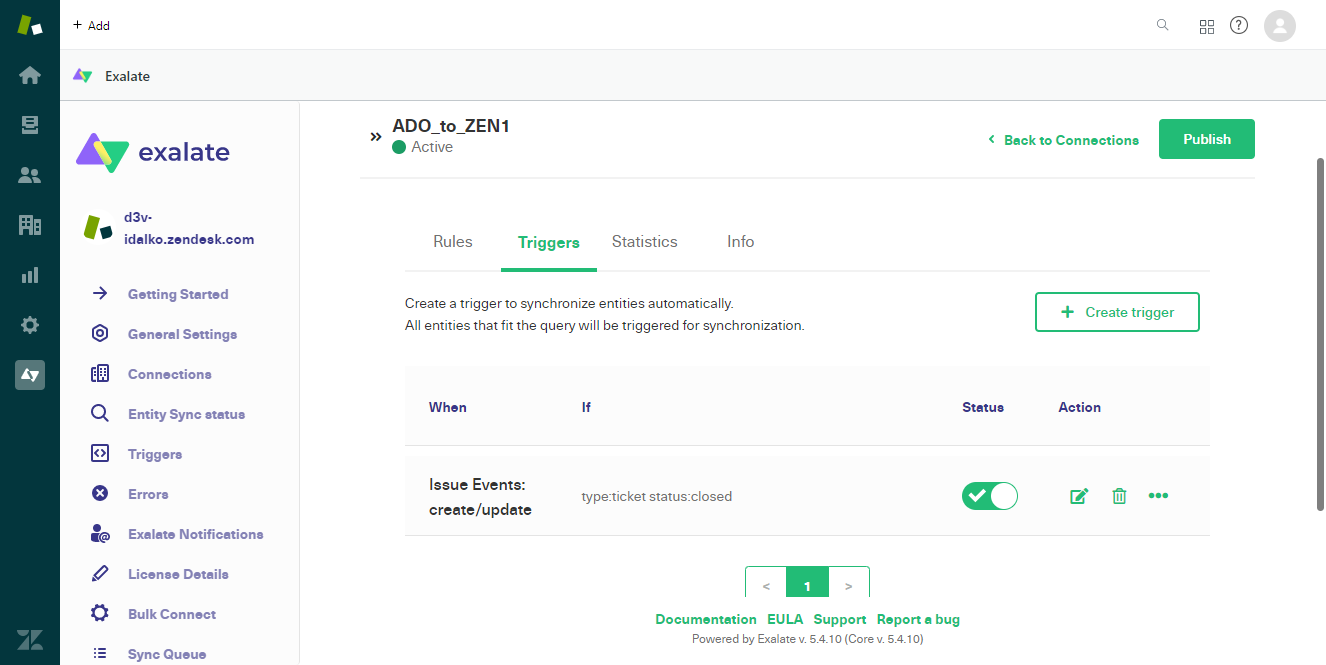
You can also create triggers by navigating to the “Triggers” tab in the left-hand Exalate menu. But in this approach, you will need to select the name of the connection you want to create the trigger for. We will follow this approach in the below section.
Click the “Create trigger” button to get started. You’ll see the “Add trigger” screen. There’s a drop-down box at the top to choose the entity type the trigger applies to. Below that is the query field. This is the important bit. You need to write a query that picks out the entities you want.
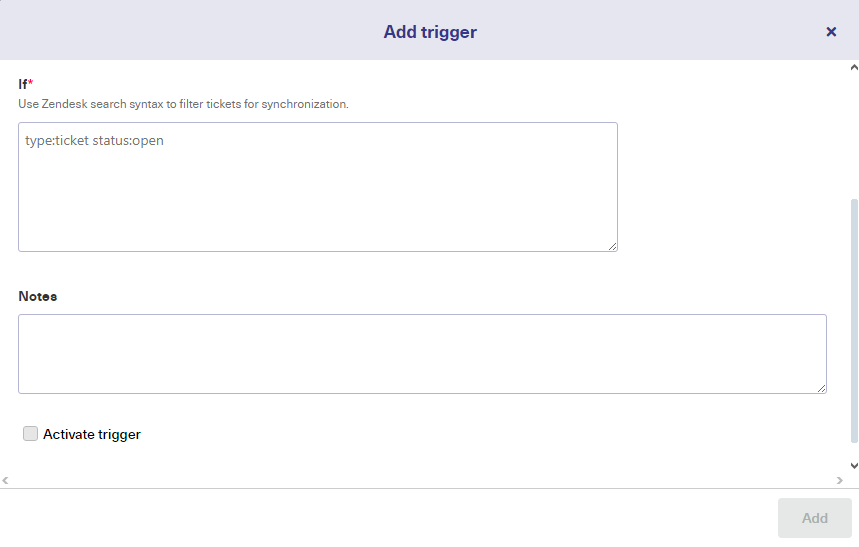
Both Zendesk and Azure DevOps have their own version of the search syntax that we add as trigger queries. Also select the connection you want to set the trigger for.
In the “Notes” box, you can write text describing what your trigger does and why. That can be a big help if there are lots of connections and triggers in your setup.
There’s also a switch at the bottom, which you’ll need to set to active for the connection to work. That helps you switch triggers on and off as needed. Click the “Add” button when you’re ready.

The trigger is now listed and can be edited, deleted, or switched on and off easily.
Step 6: Start Synchronizing Tickets
Now that your connection is ready, you can sit back and wait for tickets to start syncing. Synchronization happens regularly, but not immediately, so make a coffee and wait before checking back in.
What are The Best Practices for Integrating Zendesk and Azure DevOps?
Here are some tips to ensure that your Azure DevOps to Zendesk synchronization goes smoothly:
- Document everything in a coherent structure to make sure the names and descriptions are correct and properly labeled.
- Carry out multiple rounds of architecture evaluation to ensure that the integration solutions provider has all the necessary compliance and security features.
- Enforce strict data management and handling practices to ensure the user or business data stays safe.
- Choose a third-party solution that is compatible with both Azure DevOps and Zendesk. Make sure it supports syncing the fields and entities.
- Your admin should establish permissions with specific roles and accesses for individuals based on their clearance level.
- Choose integration solutions that offer customizability in the form of pre-configured templates and drag-and-drop features.
- For advanced use cases, save time by choosing an AI-enabled, script-based solution like Exalate to get access to a scripting engine that you can customize.
- Reduce notifications and updates to essentials in order to avoid clogging the systems and drowning out important information.
Conclusion
In this blog post, we discussed the steps to set up a Zendesk Azure DevOps integration and some practical use cases for implementing this sync.
Now that your platforms are in sync, you can enjoy the benefits of information sharing without further work. If either of your teams wants to make a change, they can do so quickly and easily. You can also edit and refine the synchronization further and create more connections for different tasks if needed.
Want to implement a Zendesk Azure DevOps integration? Book a demo with us right away.
Frequently Asked Questions
Why Integrate Azure DevOps and Zendesk?
Integrating Azure DevOps and Zendesk enables development teams to track and manage customer issues in Zendesk directly within their development workflow in Azure DevOps. The support team will also have full visibility of important customer tickets, improving transparency and cross-team collaboration.
Can I connect Zendesk and Azure DevOps?
Yes, you can connect Zendesk and Azure DevOps to automate information exchange. Connectors that third-party plugins offer can help you connect Zendesk with Azure DevOps. You can explore the options on their respective marketplaces.
Exalate is an integration solution that allows you to connect Zendesk with Azure DevOps in a flexible manner.
Does Azure DevOps have a service desk?
No, Azure DevOps does not have a service desk feature. That’s why you need to integrate it with a customer service desk platform like Zendesk.
Is Azure DevOps similar to Zendesk?
Azure DevOps is not similar to Zendesk. Despite both being work management systems, Azure DevOps provides a functioning DevOps ecosystem, while Zendesk focuses on service and customer experience.
What can I sync between Azure DevOps and Zendesk?
You can sync the following between Zendesk and Azure DevOps:
- Sync comments and updates between these platforms to get the progress on tickets or workflows.
- Keep the status and assignee information consistent between Azure DevOps and Zendesk.
- Sync attachments to enable teams to share relevant files, screenshots, or logs associated with tickets or work items.
- Create, update, or link work items in Azure DevOps based on ticket events in Zendesk.
- Send notifications or alerts from Azure DevOps to Zendesk or vice versa to keep the team members informed about important changes or updates.
- Map and sync custom fields tailored to your workflow and requirements.
Can I integrate Azure DevOps and Zendesk for free with Exalate?
No, integrating Azure DevOps and Zendesk requires a paid plan or subscription for both platforms. Free plans may offer limited functionality and might not include the necessary (or customized features you’re looking for).
It’s better to review pricing and feature details of third-party integration solutions to determine the costs associated with integrating the two systems.
Recommended Reading: