Platforms like Zendesk and ServiceNow can manage entire areas of your organization and help you with various tasks.
Zendesk can serve as a ticket management system for the support team, while ServiceNow can be the central solution for the IT and operations teams.
Since both teams often collaborate internally or even across companies, the best course of action is to align them with a Zendesk ServiceNow integration.
If you prefer staying in your own environment while sharing data bidirectionally with another team on another platform, then this article is just for you.
I’ll explain the reasons for needing Zendesk ServiceNow integration, the use cases, and how to configure your instance for cross-platform synchronization.
Why Do You Need a Zendesk ServiceNow Integration?
Zendesk is a customer relationship management platform offering a full suite of tools for helpdesk and customer support. In addition to ticketing, it offers a range of communication and reporting features.

ServiceNow, on the other hand, is a cloud platform used for IT service and workflow management. Boasting revenues of over $3 billion per year, it has thousands of customers and offers many features and extensions.
So why integrate them?
Let’s go through the reasons why.
- Get teams to use both platforms seamlessly to collaborate and share data. If your teams work on these platforms, the information they store often overlaps, so they need to have access to all the essential data.
- Integrating Zendesk and ServiceNow can help your organization avoid errors associated with manually requesting and sharing data. The integration solution will handle data transformation between both APIs to ensure a standardized and contextually accurate format.
- Improve the efficiency of processes that involve the support team and IT. Using the right solution to connect their work can improve your organization’s productivity and workflow efficiency. Team members no longer have to request information manually using spreadsheets and direct messaging.
- Integrating ServiceNow and Zendesk allows both sides to scale operations at will. With an integration solution bridging the gap between either platform, you can scale operations on your end to accommodate system changes.
- It helps organizations save costs and optimize their spending on SaaS applications and cloud platforms. Zendesk users can stay in their instance instead of paying licensing fees, and vice versa, which also saves costs.
In general, Zendesk to ServiceNow integrations improve transparency and accountability needed for fruitful inter-team and inter-company collaborations.
How to Choose the Right Integration Solution for Connecting Zendesk and ServiceNow
There are a few requirements you need to meet when integrating software platforms. Let’s go through them in detail:
- The right solution enables both sides of the connection to retain decentralized integration, allowing them to keep control of their data and make changes without causing problems for the other side.
- The solution needs to be reliable, meaning that it stays up and can be restored quickly if there’s an outage. Retries and reconnections should happen automatically.
- It should also be flexible and scalable enough to provide the possibility of tailoring the connection to your specific needs and defining how data is shared. That means you can use it for a wide range of use cases.
- The integration tool for connecting Zendesk and ServiceNow should not exceed the company’s original budget. The value you get for your money should be worth it.
The integration solution used in this guide is called Exalate. It was built with these core concepts in mind, allowing both teams to control their own side of the connection while collaborating flexibly with one another.
Exalate also speeds up script generation for connections by using AI Assist, an AI-powered scripting assistant. It also provides a documentation assistant to help with technical configurations.
Now, let’s see how to implement a Zendesk ServiceNow integration.
How to Set up a Zendesk ServiceNow Integration (The Step-by-Step Process)
First, you need to install Exalate on each side, then connect the two sides. You’ll then see how to configure the sync afterward.
Note: You can also request a trial for Zendesk ServiceNow integration by clicking on the button below and filling in the form.
You can also refer to a step-by-step connection process on its documentation site to get started with Exalate. If you prefer, you can also watch our YouTube tutorial here.
Step 1 – Install Exalate on Zendesk
You can install Exalate on your Zendesk instance by navigating to any of the following pages:
We will discuss the third option here but would directly access the marketplace from within your Zendesk instance.
Log in to your Zendesk account. Access the admin screen by clicking the cog at the bottom of the left-side menu.
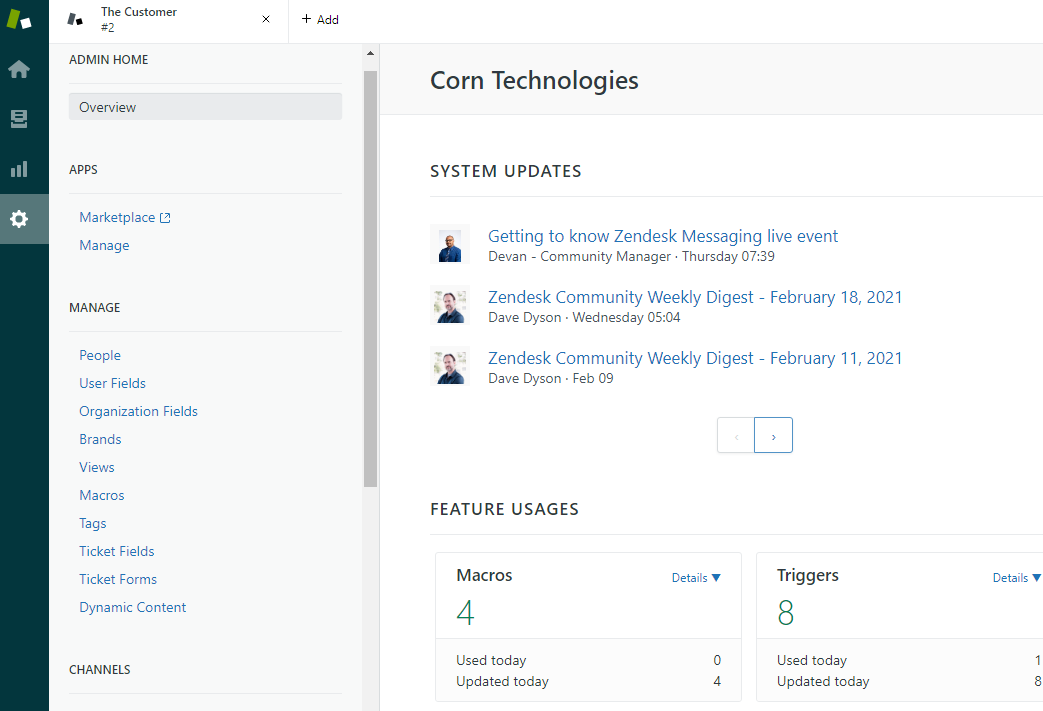
In the admin menu, click “Marketplace”.
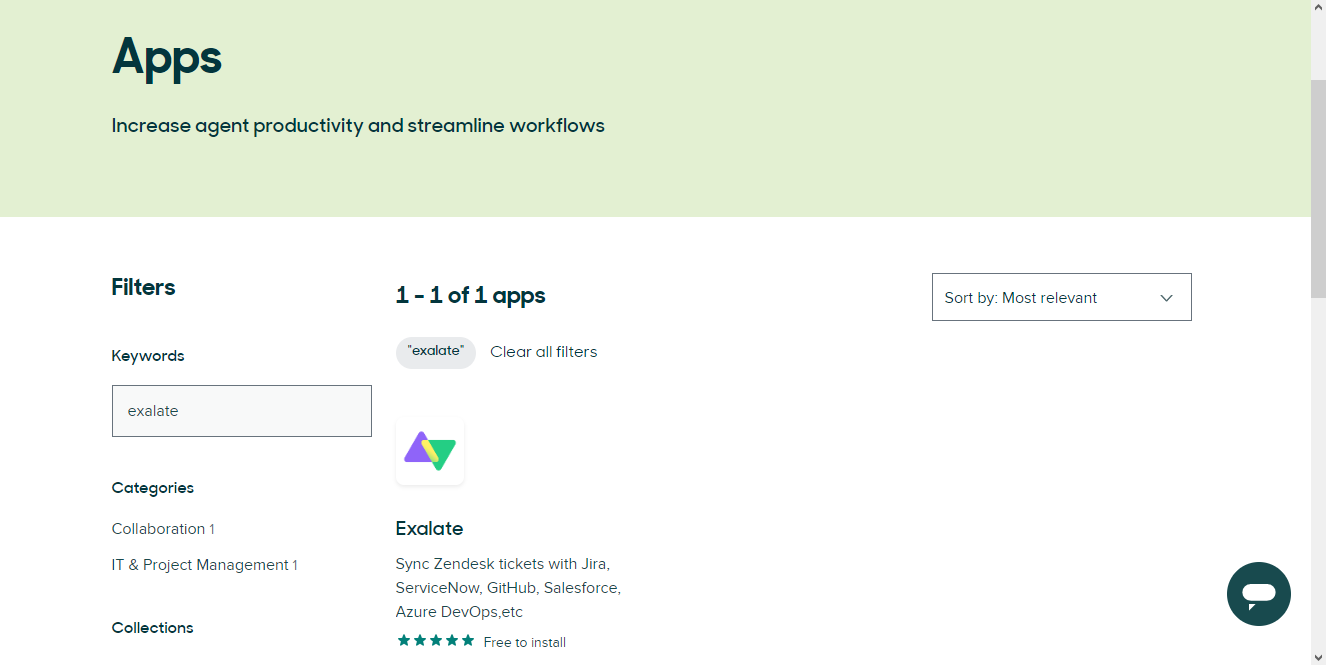
Next, search for Exalate in the marketplace and click its icon when it appears.
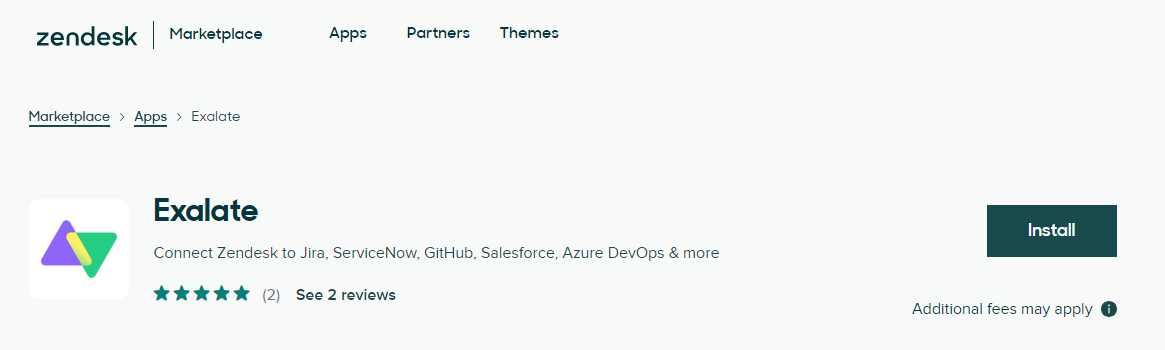
Click the install button, then select your account from the drop-down list. Click “Install” again. You’ll be taken back to your Zendesk account and can see a few options. Accept the defaults for now and click “Install”.
You’ll now see Exalate’s icon in the left-hand menu. You’ll be asked for permission to access your account data. Click “Allow”.
Next, there’s a registration screen where you’ll need to fill out your details. Complete this and click “Agree and submit”. You’ll receive a verification mail. Click the green “Verify Exalate Instance” button in the email, and back in Zendesk, click the “Continue” button to complete your installation.
For a more detailed guide to installing Exalate in Zendesk, read this documentation.
Step 2- Install Exalate on ServiceNow
You can install Exalate on ServiceNow in two ways.
You can either use Docker to set it up on an existing instance, or you can ask Exalate to provide you with a separate node via its integrations page.
Fill in your details in the form that pops up and wait for Exalate to get in contact with you.
When you get a message in your inbox, open it and click the link to access your new node. There’s also an evaluation key to use.
Go back to your own ServiceNow. You’ll need to create a proxy account with the correct permissions, that can be used by the Exalate node.
Now, in the node provided by Exalate, click “General Settings”. Fill in your details, including your node URL and account details.
You’re now set up and can move on to the next steps.
Note: You can also install Exalate on your ServiceNow instance via the Atlassian marketplace to connect Zendesk and ServiceNow.
Step 3 – Connect Your Zendesk and ServiceNow Instances
In this step, you’ll connect your instances together. You can start from either Zendesk or ServiceNow. This guide uses Zendesk. Either way, the process is the same.

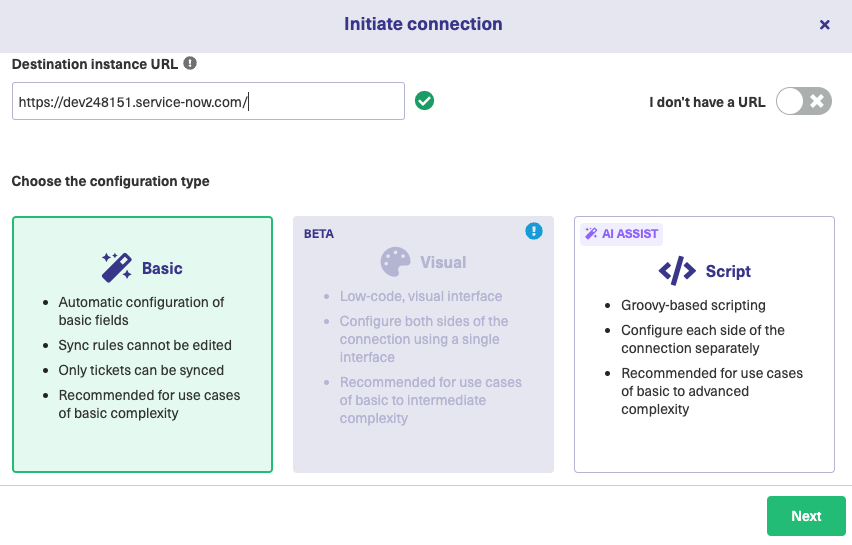
In Zendesk’s Exalate screen, click “Initiate connection”. If you’ve just installed Exalate, a help popup will guide you toward it.

After this, you will be prompted to enter the destination URL. In our case, it will be ServiceNow since we are initiating the connection from the Zendesk instance.
Exalate checks if it is installed on the destination side. After a quick verification, some more fields will appear. These allow you to select the configuration mode type of your connection.
You can select anyone from the Basic or Script mode. The Basic mode has automatic mappings of basic Zendesk and ServiceNow fields to sync. You cannot change these mappings. It is suitable for simple synchronization use cases. Exalate also offers a Free Plan for synchronizing using the Basic mode. It offers up to 1000 free syncs per month.
Note: Learn more about the Free Plan here.
But we recommend you use the Script mode since it comes with an intuitive scripting engine that helps you configure the sync rules. Using this mode, you can sync almost any kind of information between Zendesk and ServiceNow. It is suitable for complex or advanced use cases.
Exalate also offers you the flexibility to upgrade from the Basic mode to the Script mode anytime you want!
For the purpose of this document, we will have a look at both these modes.
Continue with the Basic mode
The Basic mode is easy to start with, as you can set up your first synchronization immediately. We will see how that is done in this section.
When you select “Basic” as your configuration mode, click “Next”.

Next, verify if you have admin access to the ServiceNow instance. Click yes if you have access and no if you don’t. In case you don’t have access, Exalate generates a unique invitation code for you. You need to copy-paste this code manually on the ServiceNow side.
Whatever you choose, click “Initiate” after.
After Exalate verifies admin access, the connection using the Basic mode is established successfully.
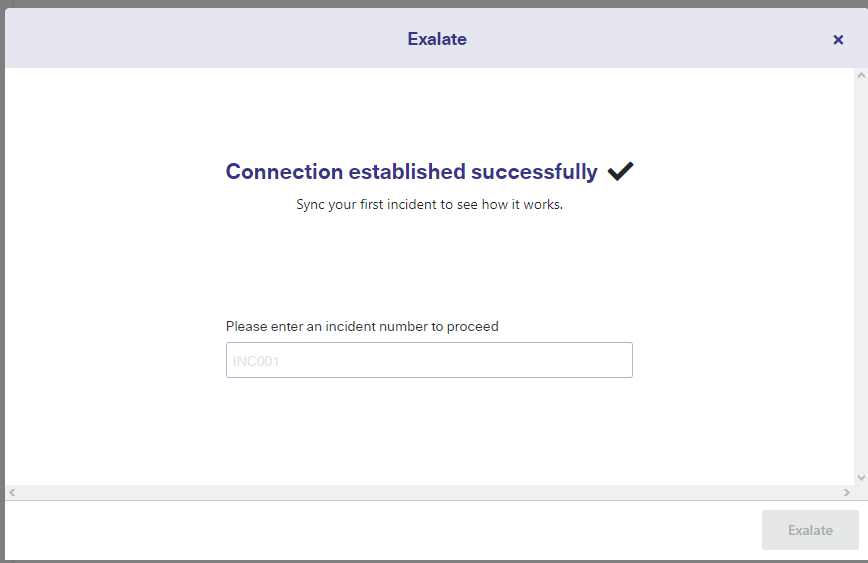
Enter the Incident number that you want to sync on the ServiceNow side.
If you navigate to the Zendesk side right now, you will see the same screen but asking you to enter the ticket key. It is shown below.
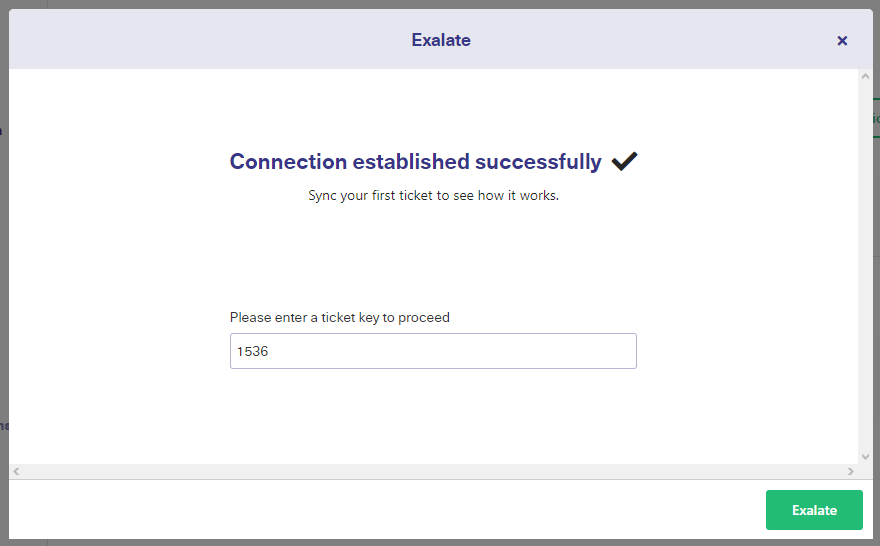
Once the incident or ticket key is entered, don’t forget to click “Exalate”.
It takes a little while to synchronize the entity you have entered.
Wait for some time and see the successful synchronization status.
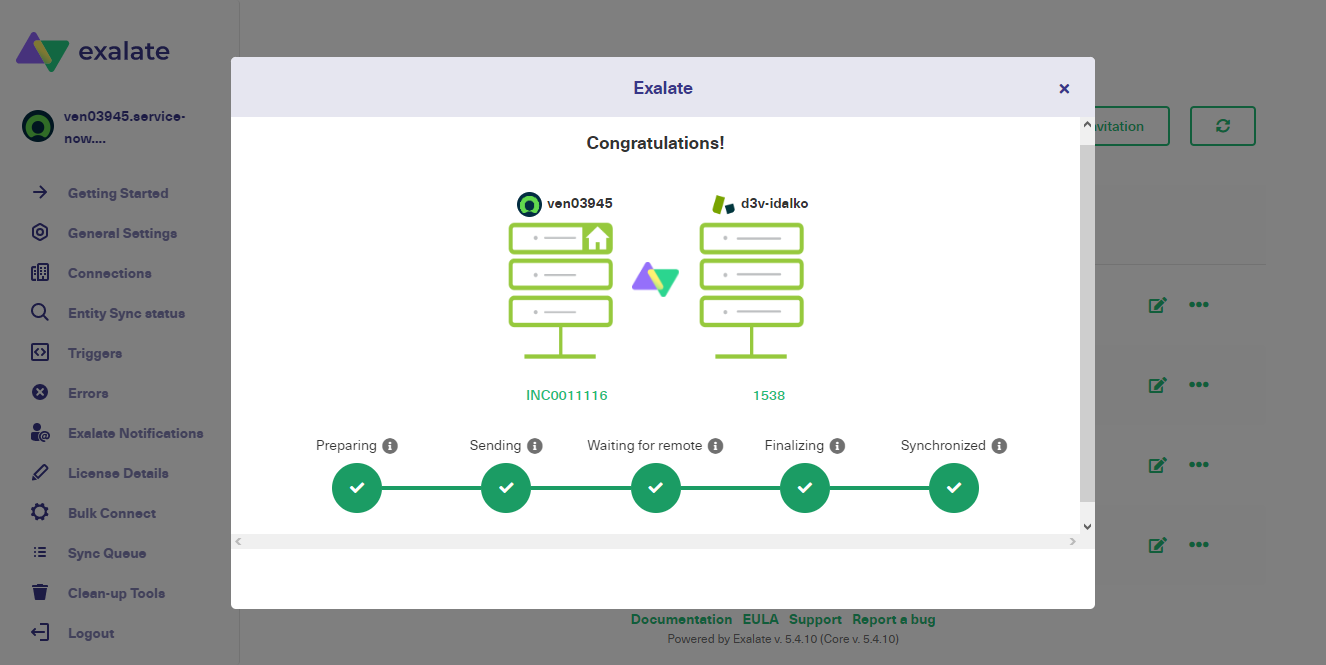
You can click on the links generated to go to the respective incident or ticket.
Using the Basic mode, you can sync Zendesk tickets and ServiceNow incidents as shown. You can even create automatic synchronization triggers(we will cover them shortly) or even sync existing entities in bulk using the “Bulk Connect” option.
Continue with the Script Mode
Select “Script” from the options given and click “Next”.
Enter names for your local and destination instances, and Exalate will combine them to name the connection.
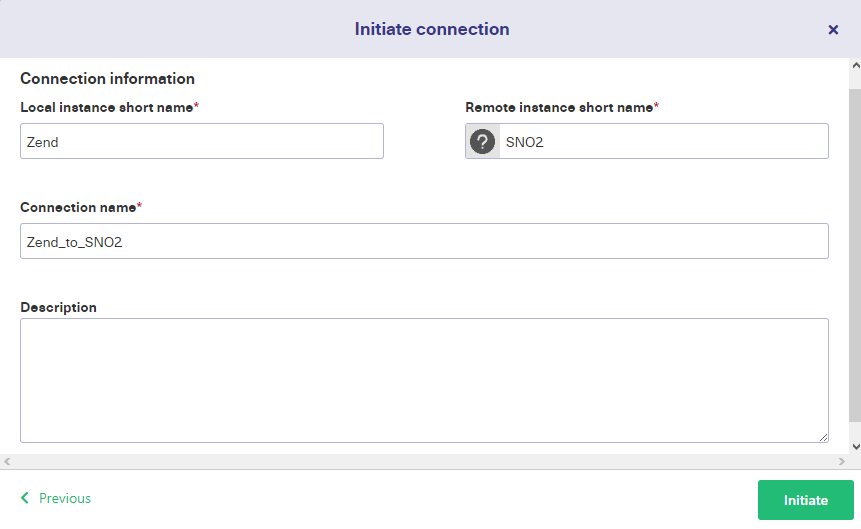
You can also enter a description to help you identify the connection later. That’s especially useful if you have many connections or users. Click “Initiate” to continue.

An invitation code will be generated. Copy it by clicking the button and keep it somewhere safe.
Now you need to proceed further on the ServiceNow side.
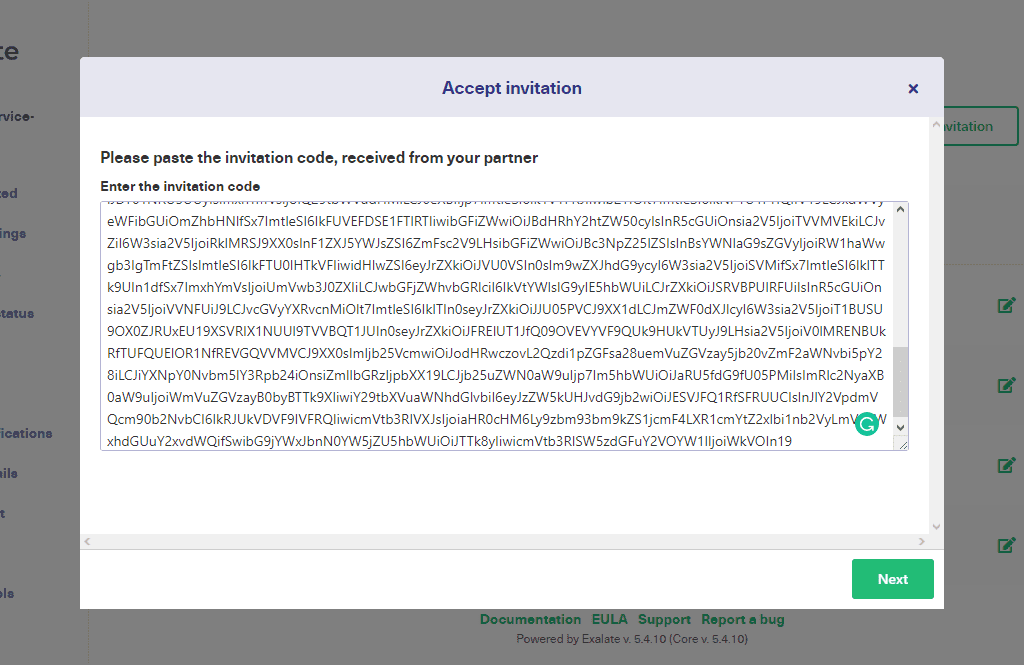
Log in to your ServiceNow node. Navigate to “Connections” in the left-hand menu and click “Accept Invitation”. A pop-up will appear with a field to paste in your invitation code. Do so, and click “Next”.
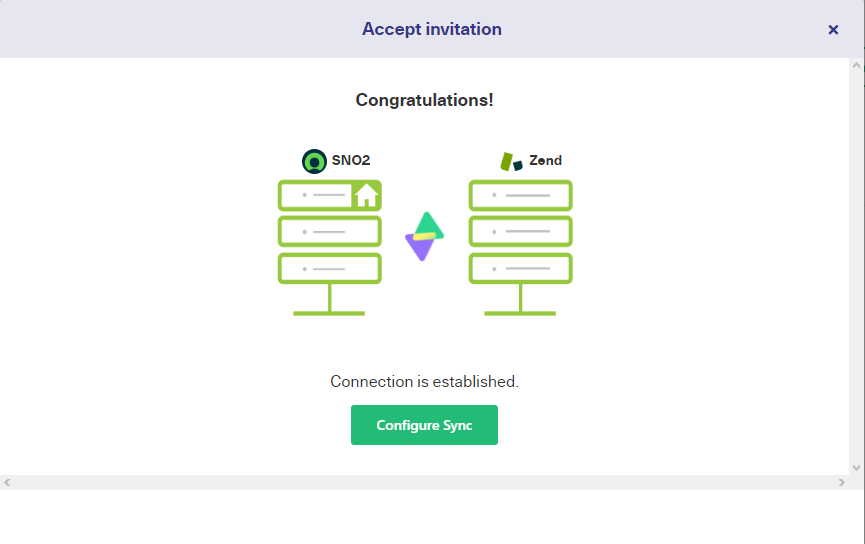
You’ll see a confirmation screen saying the connection is established. Next, click “Configure Sync”. You’ll be shown a video showing you how to configure the connection. Then, you’re taken to an edit connection screen where you can make these changes. I’ll talk more about that in steps four and five.
At this point, your connection is up and running. All that remains is to choose what is synchronized, and when that takes place.
Step 4 – Configure Your Connection to Determine What Gets Shared
In this step, you’ll learn how to control what is exchanged via the integration. If you’ve just finished step 3, you should already be looking at the edit connection screen. If not, hover over the newly added connection in the connections list, and click the edit connection icon to get there.
You can do this in either Zendesk or ServiceNow. I’m using ServiceNow. Here, “Incoming sync” refers to data coming into ServiceNow from Zendesk. “Outgoing sync” refers to data sent from ServiceNow to Zendesk. If you do this in Zendesk, those relationships are reversed.
The edit connection screen has tabs for “Rules,” “Trigger,” “Statistics,” and “Info.” The statistics and info screen are useful if you want to know how many items are being synchronized and the details of your connection.
Look at the “Rules” tab. Outgoing rules are at the top, and incoming at the bottom. You can click on either field to edit it. Each rule describes how the fields in ServiceNow map to those in Zendesk. In some cases, the same name is used, e.g. replica.description = entity.description. In others, it is different, such as replica.summary = replica.short_description .
You can remove any rule by deleting it, or disable it temporarily by commenting out the line, using “//”. You can also adjust the lines to match different fields or specific values. If you changed the incoming sync description line to entity.description = replica.summary, then ServiceNow’s entities would get their description from the summary field of synced Zendesk tickets.
If you changed it to entity.description = ‘from Zendesk’, then the description field would include that specific text, telling you that it was synchronized with a Zendesk ticket.
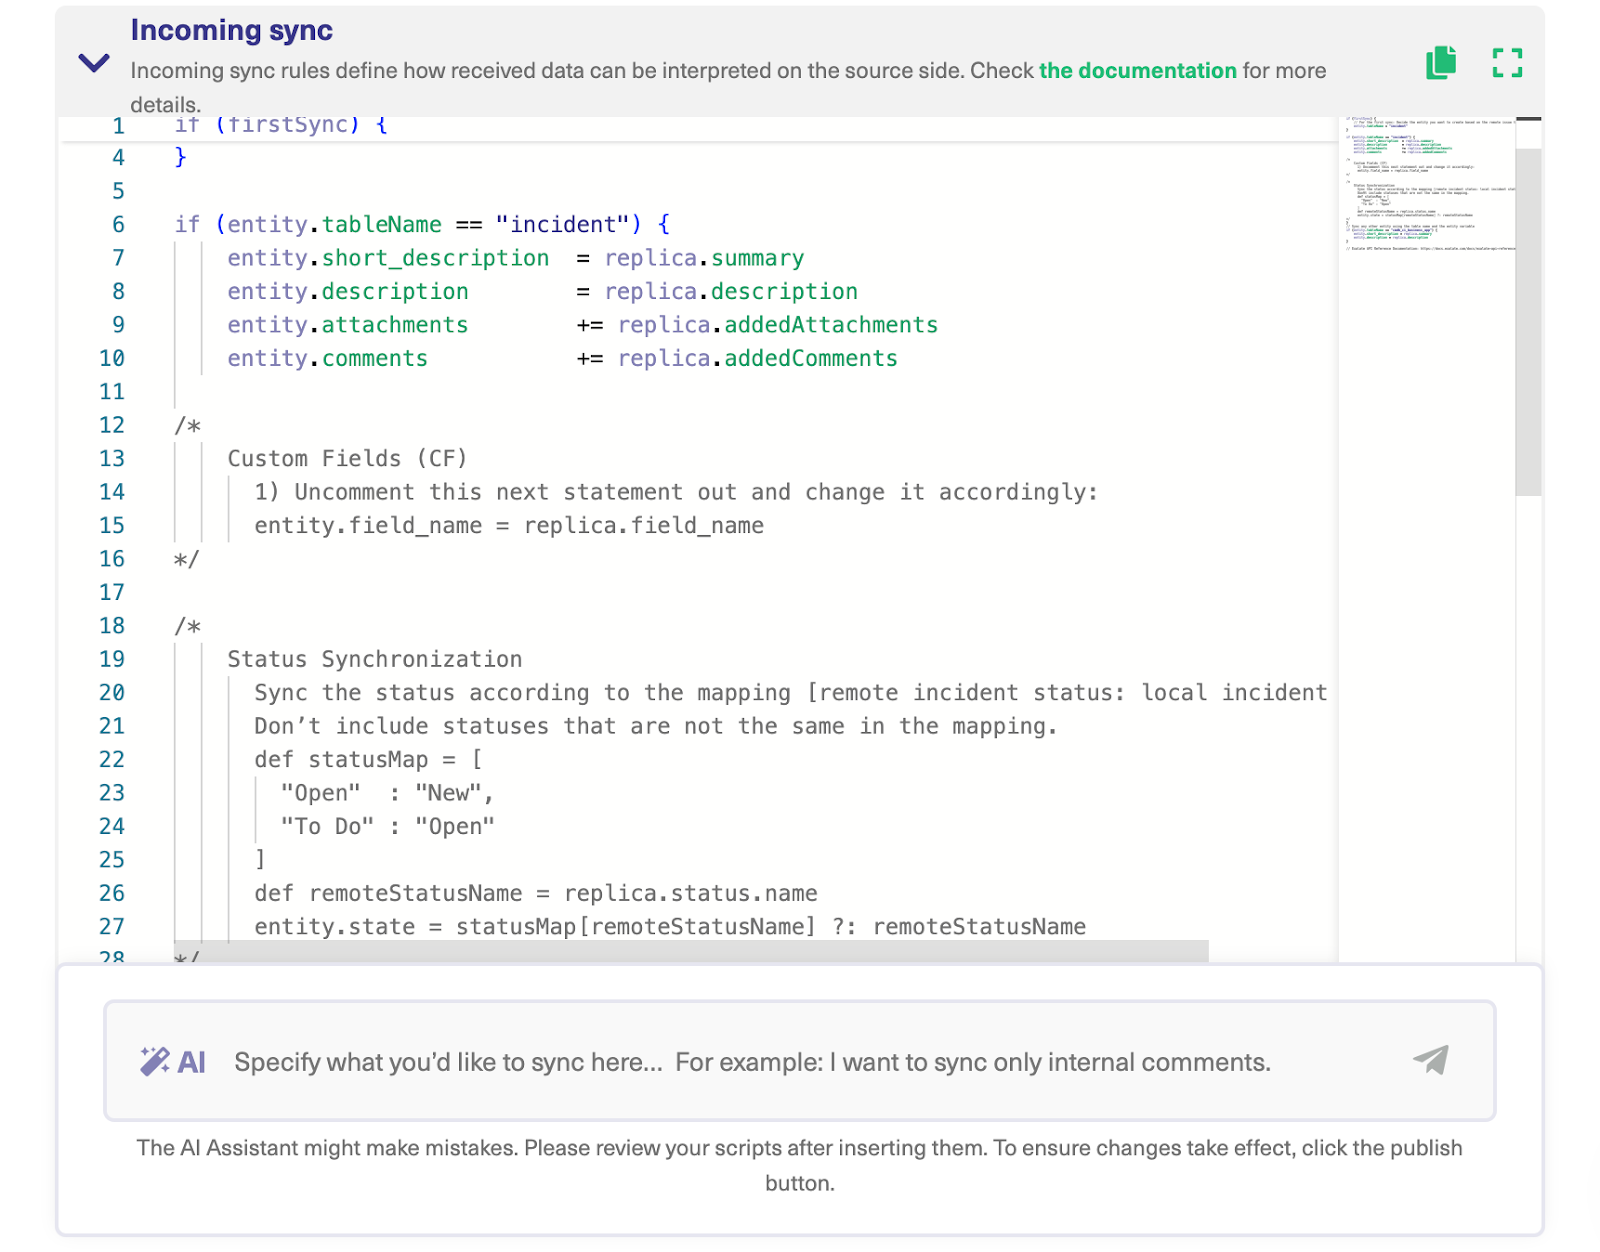
Connections in Script Mode Using AI Assist
The Script Mode allows you to generate and optimize scripts using the AI Assist feature — which appears as a tab under both the incoming and outgoing sync rules.
How does it work?
Enter your sync requirements into the chat box, and AI Assist will generate scripts based on your input, existing configurations, and Exalate’s scripting API.
It is also important to note that AI is not perfect. So, you need precise and detailed prompts to ensure the best results.
Let’s say you want to obtain the user info from a ServiceNow incident and make it appear in the comments of a ticket raised in Zendesk; the prompt could look something like this:
“I want to get user info from an incident to appear in the comments of a Zendesk ticket.”
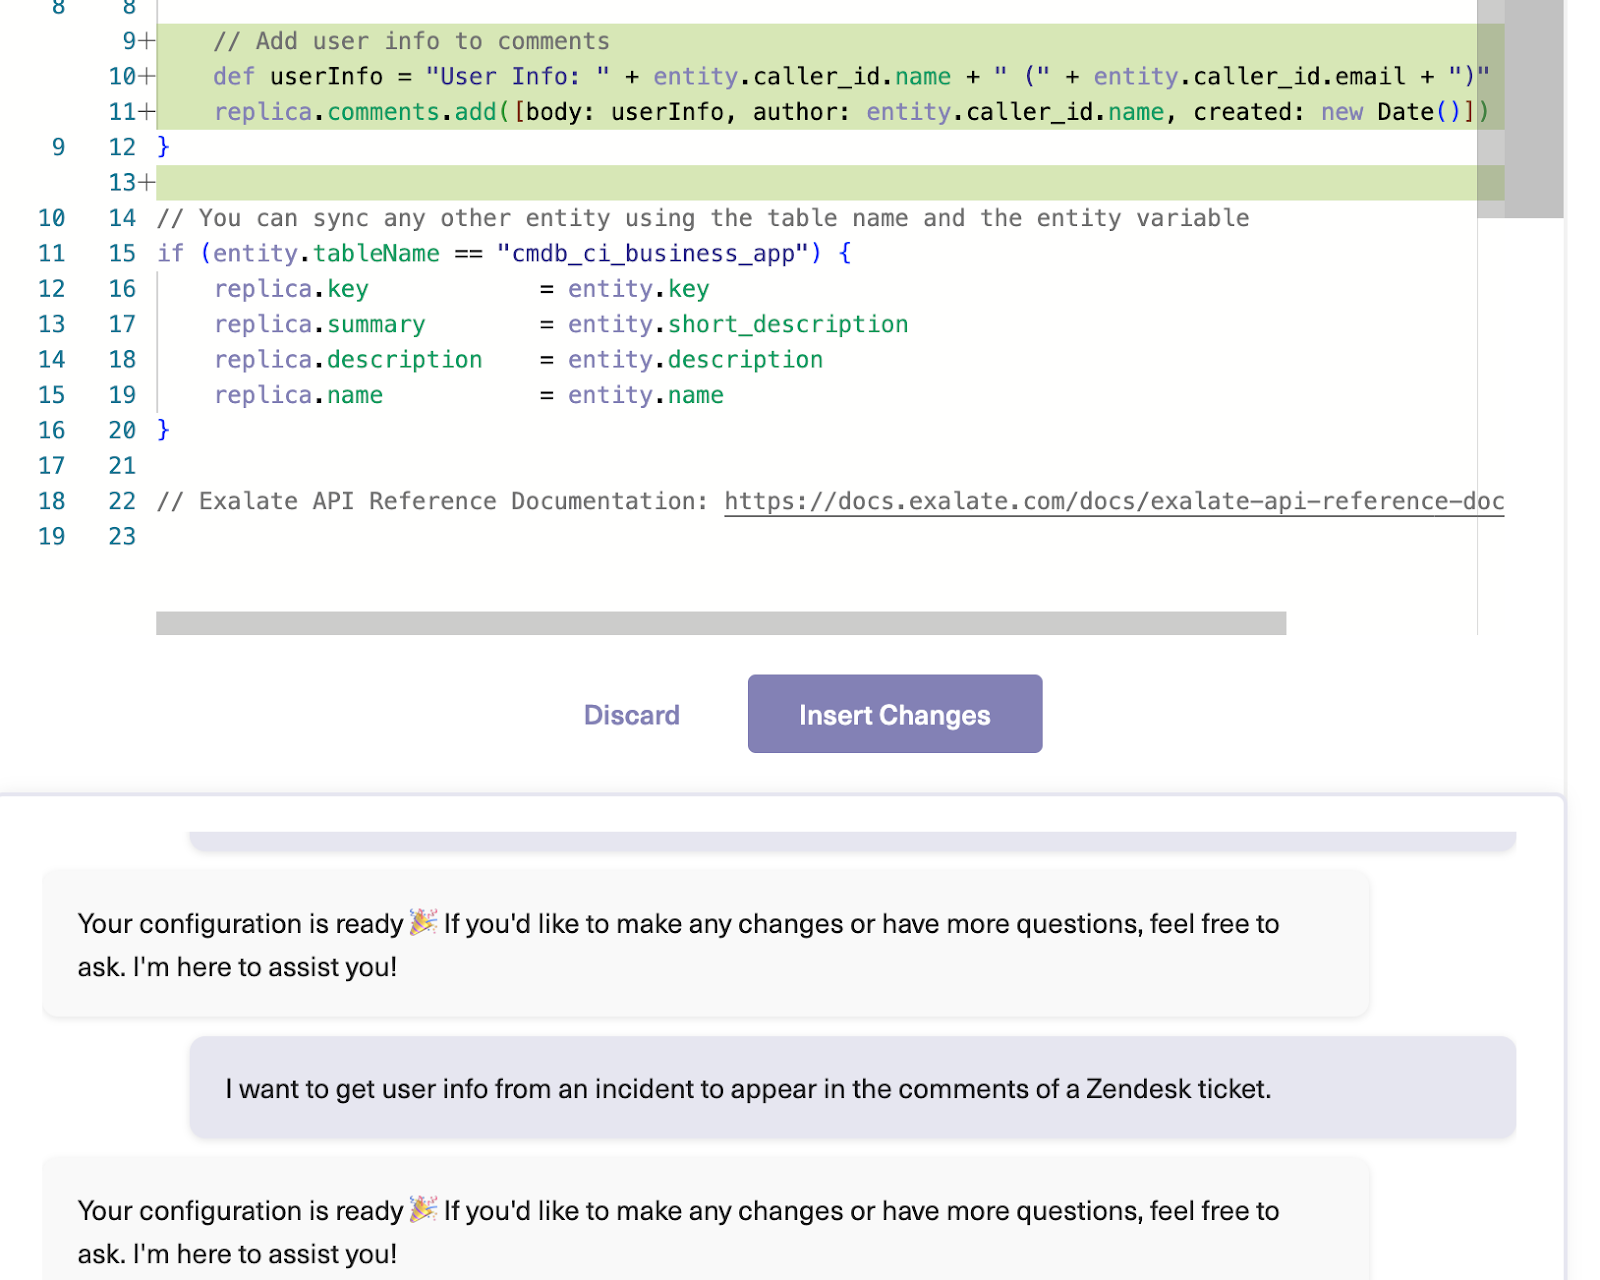
After a moment, the script will be generated, with suggested changes highlighted in green and red. The green scripts are suggested additions, while the red scripts are suggested deletions.
If the new snippet works for you, click on “Insert Changes”. Otherwise, you can discard the suggested code. If needed, you can refine your prompt and, once satisfied, publish the changes.
There are all sorts of things you can do with this. You could assign synced items to a specific person, or give them a higher priority than other items. It’s up to you.
Step 5 – Set Up Automated Synchronization Triggers
Now let’s see how we can control when synchronization takes place. Click the “Triggers” tab.

The first time you use this screen, you won’t see any listed triggers. Let’s change that. Click the “Create trigger” button.

On the add trigger screen, you can pick a trigger type from the drop-down box at the top.
You also need to create a rule in the “If” field. In the screenshot above, I’ve used urgency = 1, to synchronize urgent items.
There’s a link to this documentation you can click to see more about the kind of rules you can set. These are platform-specific, so take care to use rules that match what you’re working in.
There’s also a space to add notes, so you or others on your team can figure out what you were doing later on.
Finally, do not forget to turn on the “Active?” toggle if you want the trigger to work. That makes it easy to activate or deactivate the trigger as needed, later.
Once you’ve set everything up, click the “Add” button, and your trigger will be created. You’ll see it listed on the triggers screen.
Step 6 – Start Synchronizing Tasks
After you click “Publish”, your Zendesk ServiceNow integration is created with the rules you have set. It should now regularly sync tickets that match your rules, so check back soon to confirm that it has done so. For performance reasons, synchronization doesn’t take place every second. Why not make a cup of coffee, then come back and have a look?
You can edit the connection at any time to change its function. You can also set up multiple connections to handle different tasks. From the connections list, you can quickly disable and enable them. Good luck with it, and have fun!
Technical Use Cases For Zendesk ServiceNow Integration
Here are some scenarios where you can integrate Zendesk with ServiceNow. The permutations and possibilities are endless, but let’s focus on in-demand use cases.
Maintain Priority Across Platforms
When a ticket is coming from Zendesk to ServiceNow (or the other way around), it has to bear the same priority in order to convey the same degree of urgency to both sides.
If the ServiceNow change request has a high priority, the Zendesk request should automatically reflect this. On the Zendesk side, triggers can also be set to escalate and sort the tickets automatically.
This is important for high-priority tickets with displeased customers. So the service team on the other side will also understand how to prioritize the problem.
Relay Progress Updates
In the same way that you want to convey urgency and priority, the progress updates also need to reach the involved stakeholders on time.
That’s why admins need to sync the state of the ServiceNow entity with the status of the Zendesk ticket.
So once the ticket is set to “In Progress”, the team working with ServiceNow will see the state change to “Open”—no need for manually reaching out to request updates.
Create a Network of Interconnectivity
ServiceNow to Zendesk integration provides a lot of opportunities to keep teams and organizations working on the same initiative in sync.

Here is a common scenario.
A customer opens a ticket reporting a bug on Zendesk. Based on the mapping and trigger configurations, a change request is automatically created for the developers on the ServiceNow side.
Now, the devs can escalate the ticket further to the QA team using Azure DevOps for further review before getting back to the customer. Teams can filter out unnecessary information without cluttering their environment.
That’s how connectivity is created without one side hounding the other for updates. Every detail about the bug is available in real time.
Learn how to align your support and development teams.
Provide Additional Information
When you sync ServiceNow and Zendesk, the fields are mapped across entities on both sides: summary to description, comment to comment, and status to state.
But what if you have more information like customer mood that needs to go to a dedicated field?
That’s when custom field sync comes in. Tools like Exalate allow admins to sync Zendesk custom fields with ServiceNow custom fields. This makes it possible to obtain additional information and context beyond the usual.
Track New Releases
When an organization launches a new product, an influx of ServiceNow incidents, problems, change requests, and other entities is expected. At the same time, the Zendesk ticket volume will increase.
If both systems are connected, stakeholders will be able to track the overall customer mood and reception of the new product. They can spot issues with the new release faster and accelerate the timeline for addressing them.
How to Get Your Zendesk ServiceNow to Deliver Consistently
Based on my experience as an integration specialist, here are some tried and tested best practices for Zendesk and ServiceNow integration:
- Invest in security features to boost the protection of your sensitive information at rest and in transit. Use authentication protocols and role-based access controls to monitor and limit user activity.
- Work with every side of the sync to develop a strategy for mapping and approving transactions as well as to confirm which entities should be part of the sync for maximum impact. This is important for collaborations between different organizations, especially for mergers and acquisitions.
- Know when to use one-way or two-way syncs based on the compliance requirements and the service-level agreement. One-way syncs can work for straightforward collaborations, such as fetching the incident number from ServiceNow. Two-way syncs help both sides keep track of the priority of the ServiceNow incident and Zendesk ticket.
- Run tests in a sandbox environment for every script or trigger before implementing it on highly sensitive projects. This will help you spot potential issues and bottlenecks before implementing the integration in a cross-company collaboration.
- Conduct seminars and explainer videos to teach your team members the fundamentals of configuring and making changes to connections.
- Log all errors and performance issues. Evaluate the report to figure out the best strategy for improving the performance of the integration tool for Zendesk and ServiceNow.

Conclusion
Now that you have successfully set up your Zendesk ServiceNow Integration, your teams can share information without lifting a finger. Anytime either team wants to change the configuration, they can do so without causing each other problems.
You can also control what data is shared and with whom it is shared, so your security or your sensitive information is not put at risk. This way, you and your team can focus on the priorities while working in your own familiar environment.
If you’ve found this useful, but have teams on other platforms like Jira or ServiceNow, take a look at our guides for connecting Jira to Zendesk or Jira to ServiceNow.
Frequently Asked Questions
Does Zendesk integrate with ServiceNow?
Zendesk integrates with ServiceNow using native solutions from IntegrateCloud as well as third-party integration tools, which are available in the marketplace of both platforms.
What can I integrate between ServiceNow and Zendesk?
Exalate supports the integration of any ServiceNow entity, including incidents, change requests, CMDB, problems, customer cases, RITMs, epics, scrums, stories, enhancements, etc. At the same time, users can sync any default or custom field within a Zendesk ticket.
How do I connect Zendesk to ServiceNow?
To connect Zendesk to Azure DevOps, you’ll need to find a third-party integration solution from the marketplace. This solution (Exalate, Skyvia, etc.) usually fetches data from one platform’s API and sends it across to the other.
Can I use a no-code tool to integrate Zendesk with ServiceNow?
Yes, you can use no-code tools to integrate Zendesk with ServiceNow. No-code integration solutions provide you with pre-built connectors, eliminating the need to write lines of code for one sync to start. Some no-code integration tools include Zapier, Exalate (Basic Mode), and SnapLogic.
How much does Exalate cost for Zendesk to ServiceNow integration?
Exalate is priced based on multiple factors. We recommend you get in touch with our team for a quote. You can book a short call or message us on the chat on this page.
Recommended Reading: