Many organizations run into the same problem: IT teams work in Freshservice while customer support lives in Freshdesk. When these systems are not in sync, both teams waste time manually copying ticket details between platforms.
Freshservice Freshdesk integration fixes this by automatically syncing tickets, updates, and data between platforms. IT teams get customer context without asking, support stays informed about resolutions, and customers get faster fixes.
In this guide, I’ll cover everything you need to know about connecting Freshservice and Freshdesk. You’ll learn what the integration does, why it matters, and how to choose the right solution that delivers real value for both teams.
Key Takeaways
- Freshservice to Freshdesk integration connects IT service management with customer support, enabling seamless data flow and eliminating manual work between teams.
- The integration delivers faster customer resolutions, eliminates duplicate data entry, provides cross-team visibility, automates ticket routing, and improves reporting by linking customer satisfaction with IT performance.
- When choosing an integration, evaluate sync direction, field mapping flexibility, real-time versus scheduled sync, conflict resolution, setup complexity, security controls, scalability, and pricing.
- Common use cases include escalating customer issues to IT, tracking IT incidents affecting customers, MSP multi-client management, provisioning requests, bug tracking, license management, and change management.
- Exalate supports filtering by brand/group/tags, real-time sync within seconds, custom field mapping, bidirectional private notes, and bulk historical data connection.
- Organizations implement Freshservice to Freshdesk integration for unified service delivery, faster resolution times, proactive customer communication, and reduced operational costs across teams.

How Does Freshservice to Freshdesk Integration Work?
Freshservice to Freshdesk integration connects your IT service management system (Freshservice) with your customer support platform (Freshdesk) to enable automatic data synchronization and workflow automation between teams.
Here’s a practical example: A customer emails your support team about slow website performance. Your support agent creates a ticket in Freshdesk. The integration automatically generates a corresponding incident in Freshservice for your IT team to investigate the server work.
Once IT resolves the work, the status updates flow back to Freshdesk, and your support agent can close the customer ticket with full context about what was fixed.
Integrations can be configured as one-way (data flows in a single direction) or bidirectional (changes sync both ways), depending on your workflow requirements.
Advanced solutions support real-time sync that updates within seconds, while simpler setups may sync on scheduled intervals.
Why Integrate Freshservice With Freshdesk?
- For a better customer experience: Your support agents can immediately escalate technical issues to IT to help customers get faster resolutions because the handoff is automatic.
- To eliminate duplicate data entry: Nobody wants to copy ticket details between systems manually. The integration tool handles it automatically, saving time and reducing errors.
- To provide full visibility across teams: Support can see when IT is working on infrastructure issues that might cause customer complaints. At the same time, IT can see patterns in customer-reported problems that point to bigger system issues.
- To streamline workflows: Freshservice to Freshdesk integration allows you to route issues to the right team automatically based on ticket content. You can use it to set up triggers so certain types of support tickets always create IT incidents, or vice versa.
- To optimize resources: Integrating Freshdesk and Freshservice prevents both teams from working on the same problem simultaneously. This helps teams to focus IT resources on issues that actually impact customers.
- To enable proactive communication: When IT identifies a service disruption, the integration automatically creates maintenance notifications in Freshdesk. Support can proactively inform affected customers before complaints arrive.
- For MSP and partner environments: Managed service providers need to route client requests to the correct IT team while maintaining data privacy. The integration allows separate Freshdesk instances for each client while connecting to a unified Freshservice workspace for operations.
- To maintain security and compliance: Enterprise integrations come with encryption tools and role-based access control (RBAC), ensuring support agents only see customer-relevant information while IT teams access the full technical context.
What Should I Consider When Choosing a Freshservice and Freshdesk Integration Tool?
- Determine whether you need one-way sync or bidirectional sync where updates flow both ways.
- Look for integrations that let you map default and custom fields between the two platforms.
- Check whether the integration updates instantly or on a schedule (every 15 minutes, hourly). Real-time sync works well for incidents or requests that need urgent attention.
- Make sure you can control which tickets get synced. Look for conditional triggers based on ticket type, priority, or keywords.
- The integration needs clear rules for handling conflicts. Does one system win, or does it merge changes?
- Verify that conversations and files flow between platforms. Your teams need full context, not just ticket metadata.
- Consider whether it’s no-code with templates or requires scripting. Think about your team’s technical skills and how much maintenance you can handle.
- Ensure the integration respects user permissions in both systems. You don’t want support agents accidentally seeing sensitive IT infrastructure details.
- Review the pricing model: flat rate, per-user, or based on sync volume. Factor in whether you need ongoing support or if it’s a one-time setup fee.
- Verify the integration provides ISO certification, role-based access control (RBAC), encryption of data both in transit and at rest, and JWT authentication for API access.
- If you’re connecting more than two systems, verify the tool supports mesh, star, or hub-and-spoke architectures.
- For complex workflows, check whether the integration provides full script control for data transformations, conditional routing, and field-level security.
Freshservice and Freshdesk Integration: Native vs Third-Party Tools
Native Freshworks Integration Capabilities
Freshdesk-Freshservice Connector
Freshworks provides marketplace apps that handle basic ticket syncing without third-party tools or custom development. You’ll find these in the Freshworks Marketplace under each product’s integrations section.
What it handles well:
- Basic ticket creation from Freshdesk to Freshservice
- Status synchronization for standard workflows
- Default field mapping (subject, description, priority)
- Thread-based collaboration within tickets
Limitations:
- Limited custom field transformation
- No conditional sync based on complex business rules
- Single-direction sync for most scenarios
- Restricted to the Freshworks ecosystem only
Freshworks Unified Platform
If you’re using both products under the same Freshworks account, you get built-in connectivity through the unified platform. This includes shared customer data, unified reporting dashboards, and cross-product user management.
API-Based Custom Integration
Both Freshservice and Freshdesk offer REST APIs for building custom integrations. You can use webhooks to trigger actions in one system based on events in the other, though this requires ongoing development resources to maintain.
Freshworks Workflow Automator
Set up rules like “create an incident in Freshservice when a high-priority ticket is created in Freshdesk with specific keywords.” This works for straightforward automation but struggles with complex multi-step workflows.
When You Need Third-Party Integration Tools
Native integrations handle basic field mapping and one-way sync effectively, but they fall short for:
- Complex conditional logic
- Multi-directional sync patterns (updates flowing to/from multiple systems)
- Custom field transformations
- Granular control over sync behavior
- MSP environments (multiple client instances with data isolation)
- Enterprise security requirements
- Multi-platform connectivity

Calculate time and money savings from automated bidirectional sync.
Why Organizations Choose Exalate for Freshservice-Freshdesk Integration
Mid-market and enterprise organizations choose Exalate for Freshservice-Freshdesk integration due to:
- Multi-party connectivity: Sync data across partners, vendors, MSPs, and suppliers without exposing internal systems. Each organization maintains its own workspace configuration while data flows securely between instances.
- Enterprise-grade security: ISO 27001:2022 certified with JWT authentication, role-based permissions, encryption of data both in transit and at rest, and compliance-ready audit logs.
- Workspace-based configuration: Each organization manages its own integration settings without dependencies. IT teams configure Freshservice settings, support teams manage Freshdesk rules, and neither needs admin access to the other system.
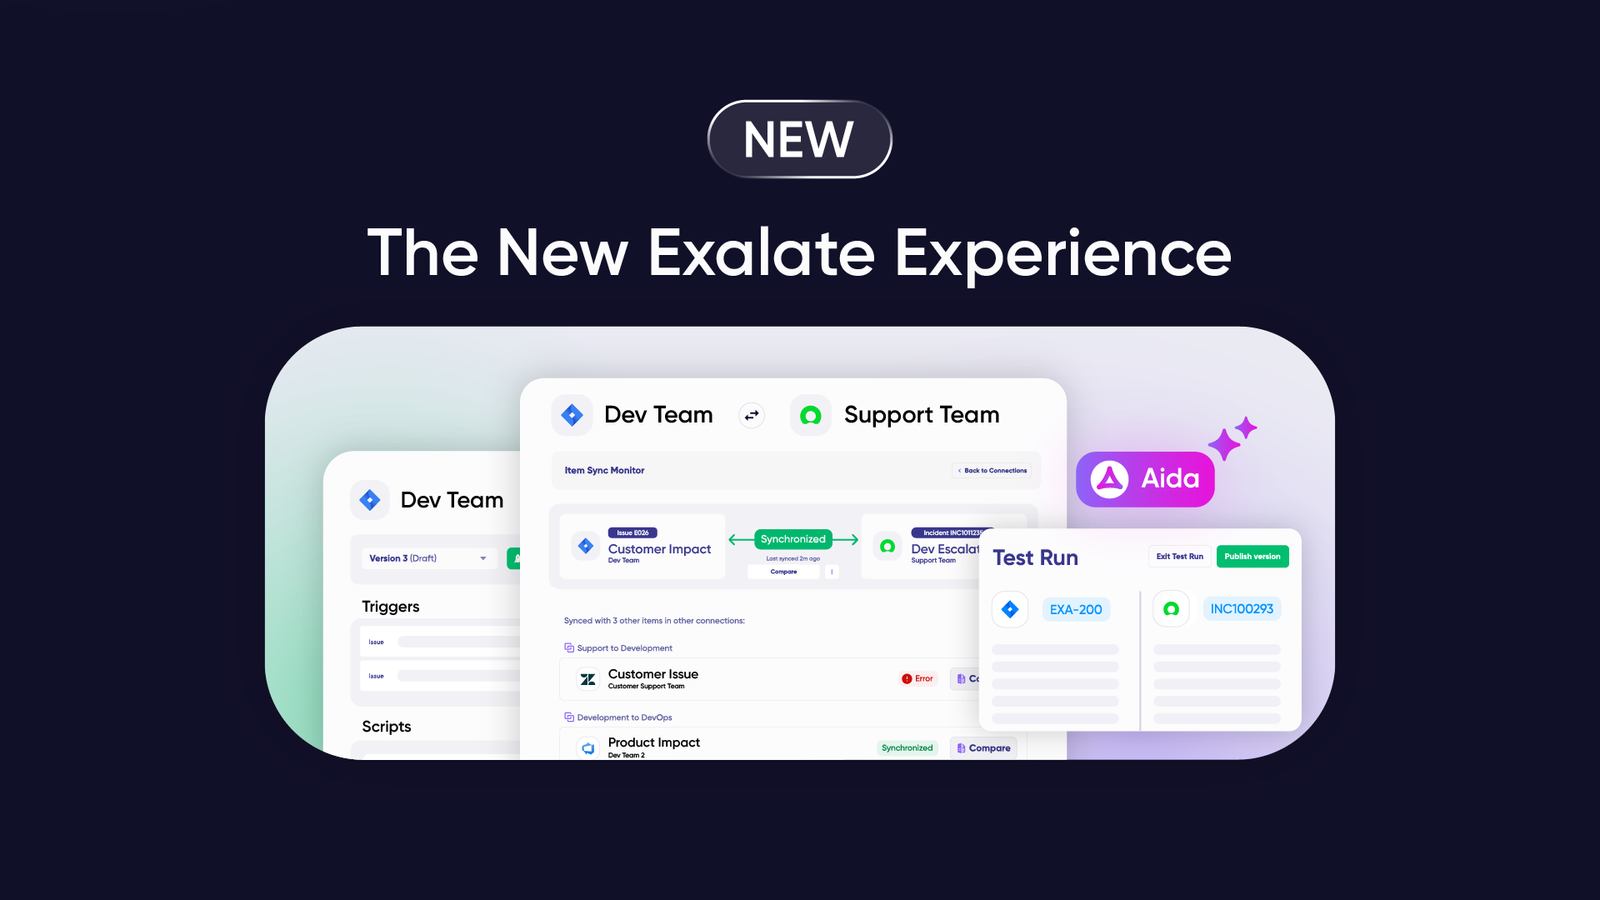
- AI-assisted configuration through Aida: Aida provides AI-powered integration setup by converting natural language prompts into working sync scripts. Instead of writing complex field mappings manually, you describe what you need, and Aida generates the configuration.
- Full script control: Groovy scripting capabilities enable advanced customization for data transformations, conditional logic, and field-level security. You get operational control over your sync without vendor dependencies.
- Trigger-based automation: Set up triggers that automatically replicate tickets and execute workflows across connected systems based on priority, category, keywords, or custom field values.
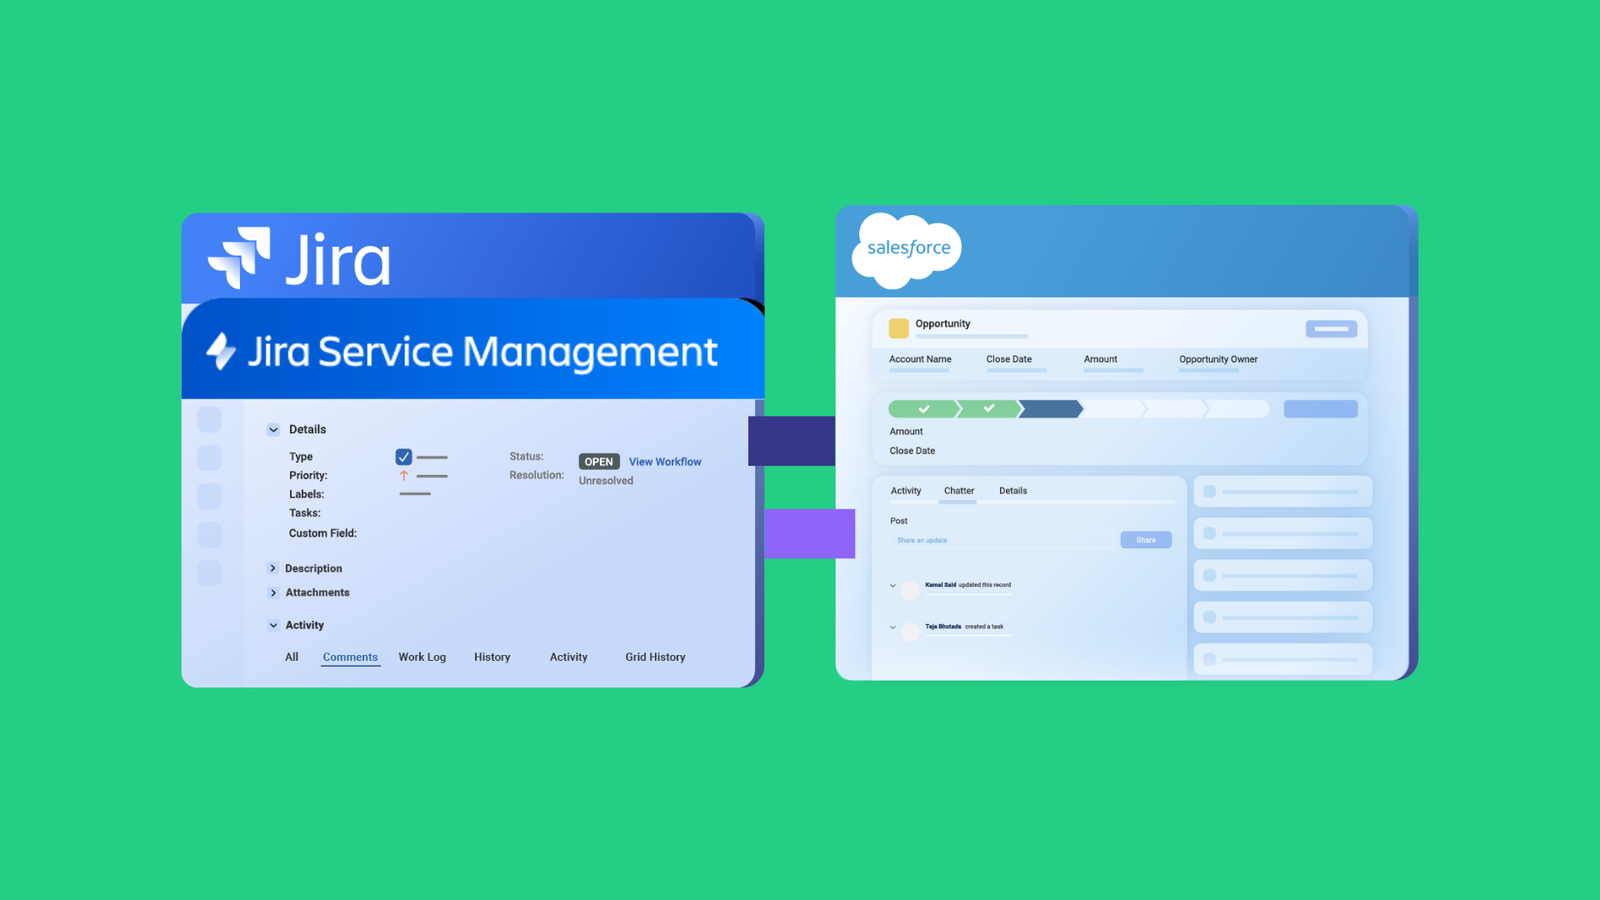
- Multi-platform support: Connect Freshservice and Freshdesk to Jira, ServiceNow, Zendesk, Salesforce, Azure DevOps, Azure DevOps Server, Asana, Freshservice, Freshdesk, GitHub, and other platforms simultaneously.
- Managed services option: Dedicated integration engineers handle field mapping, script development, and ongoing configuration adjustments as your workflows evolve.
How to Implement Freshservice-Freshdesk Integration Using Exalate
This step-by-step tutorial walks you through configuring a Freshservice-Freshdesk integration using Exalate’s workspace-based setup.
1. Create Your Exalate Account and Initial Setup
Navigate to the Exalate integrations page to begin.
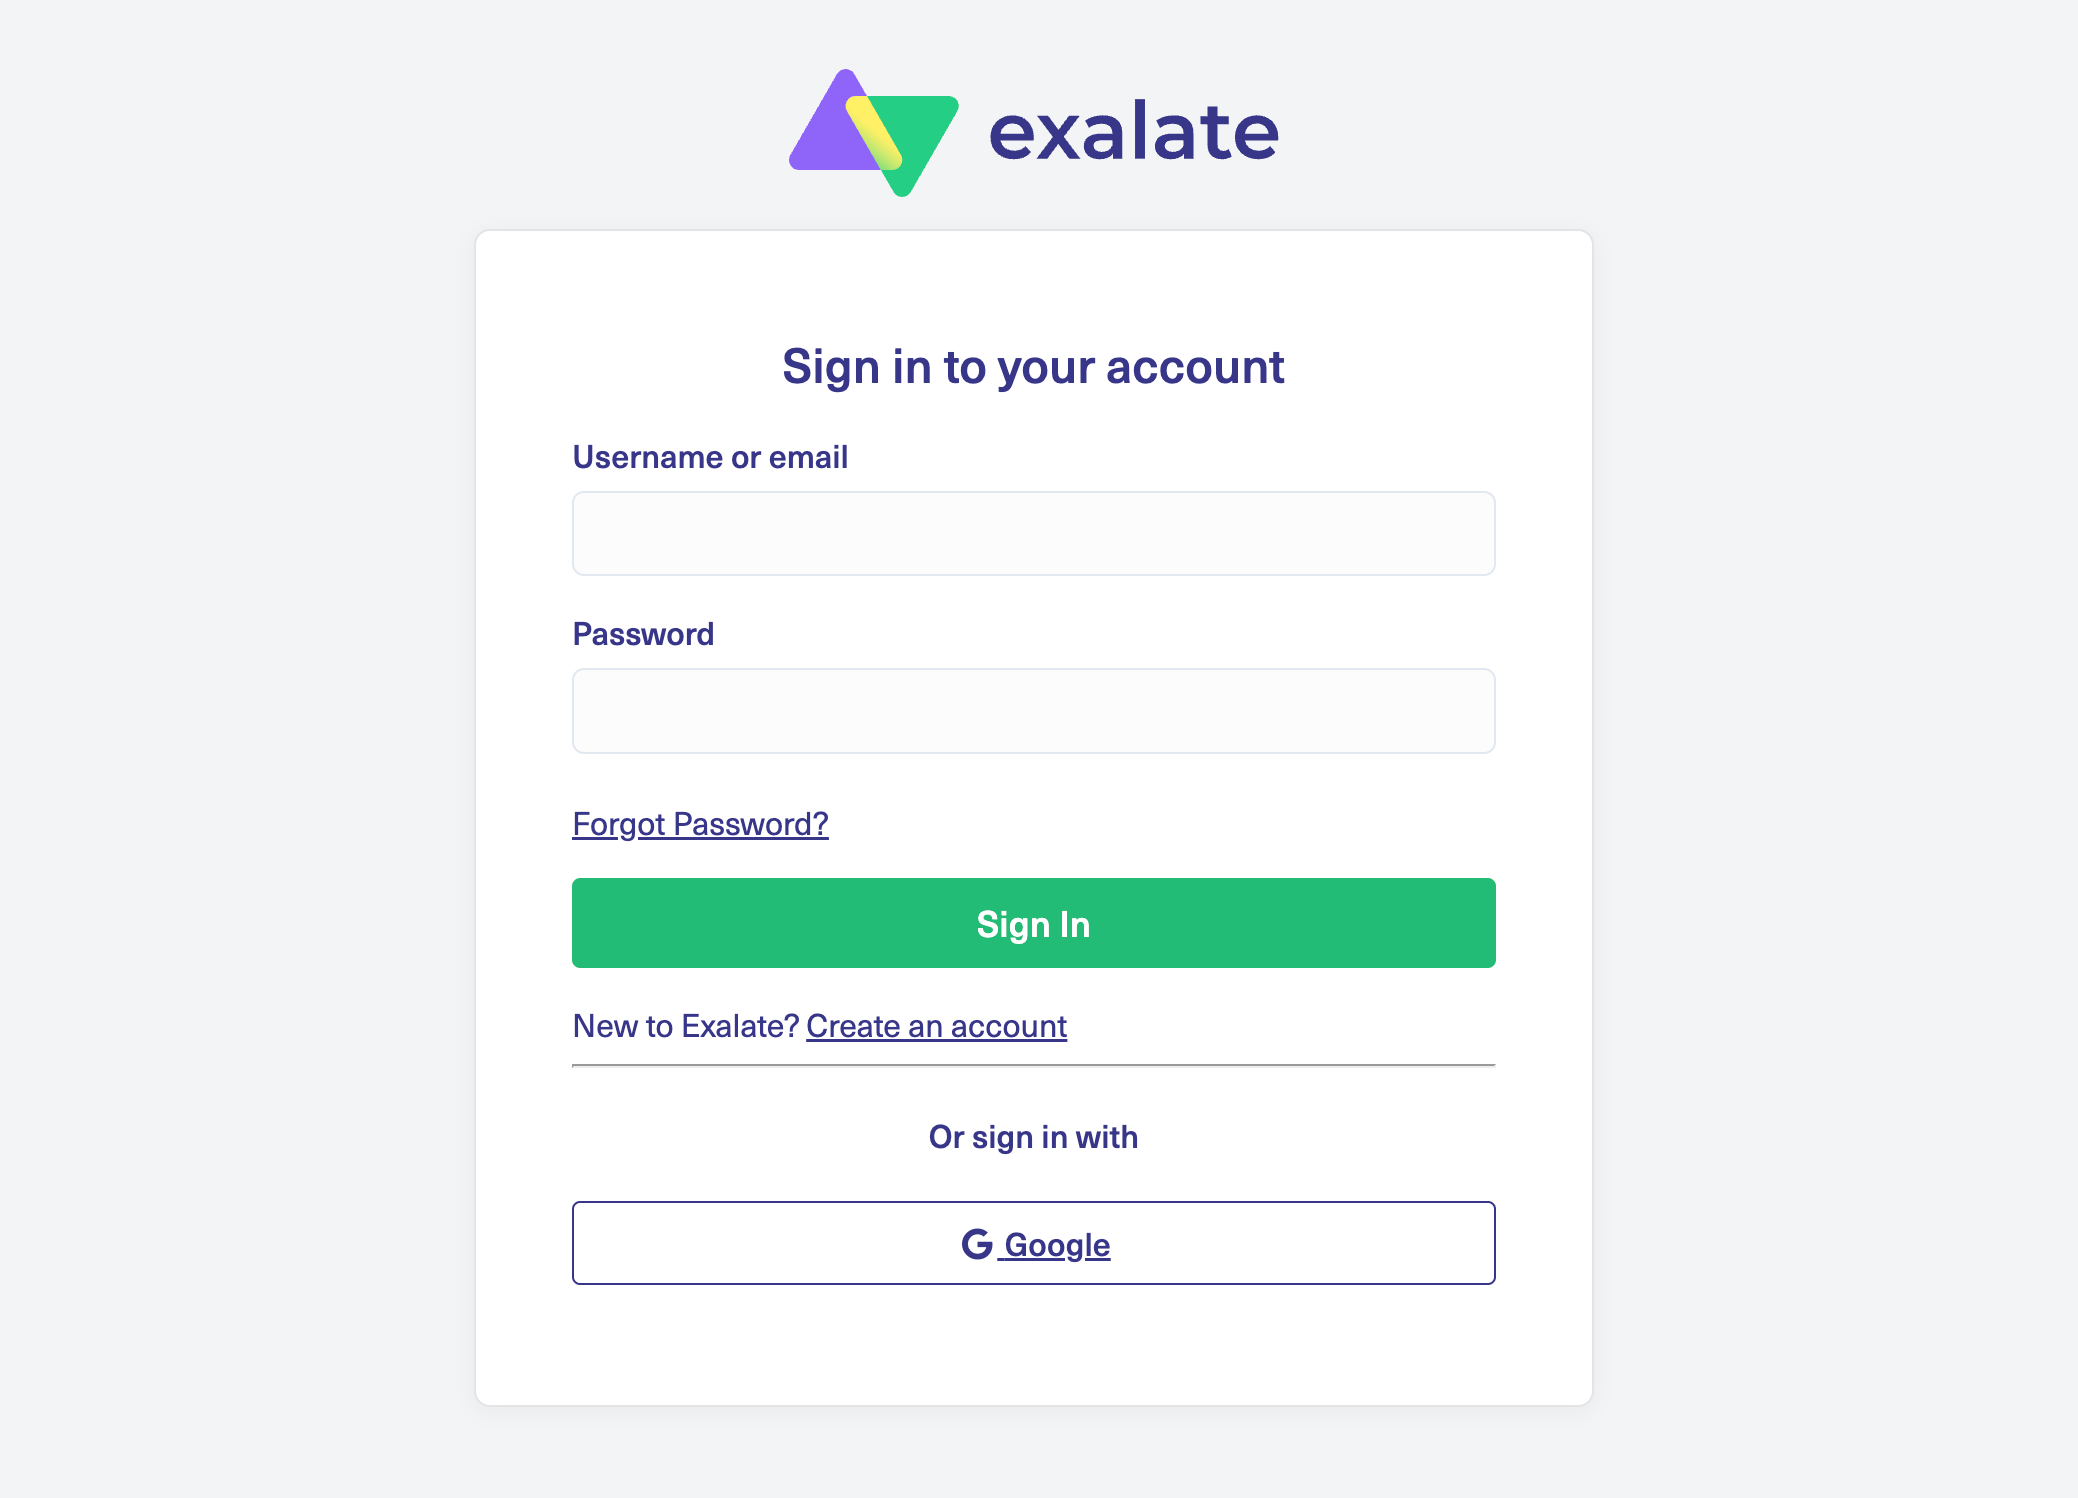
If you’re new to Exalate, create an account by entering your email address for verification, or sign up directly using your Google account. Existing users can log in with their credentials.
2. Set Up Your Integration Workspace
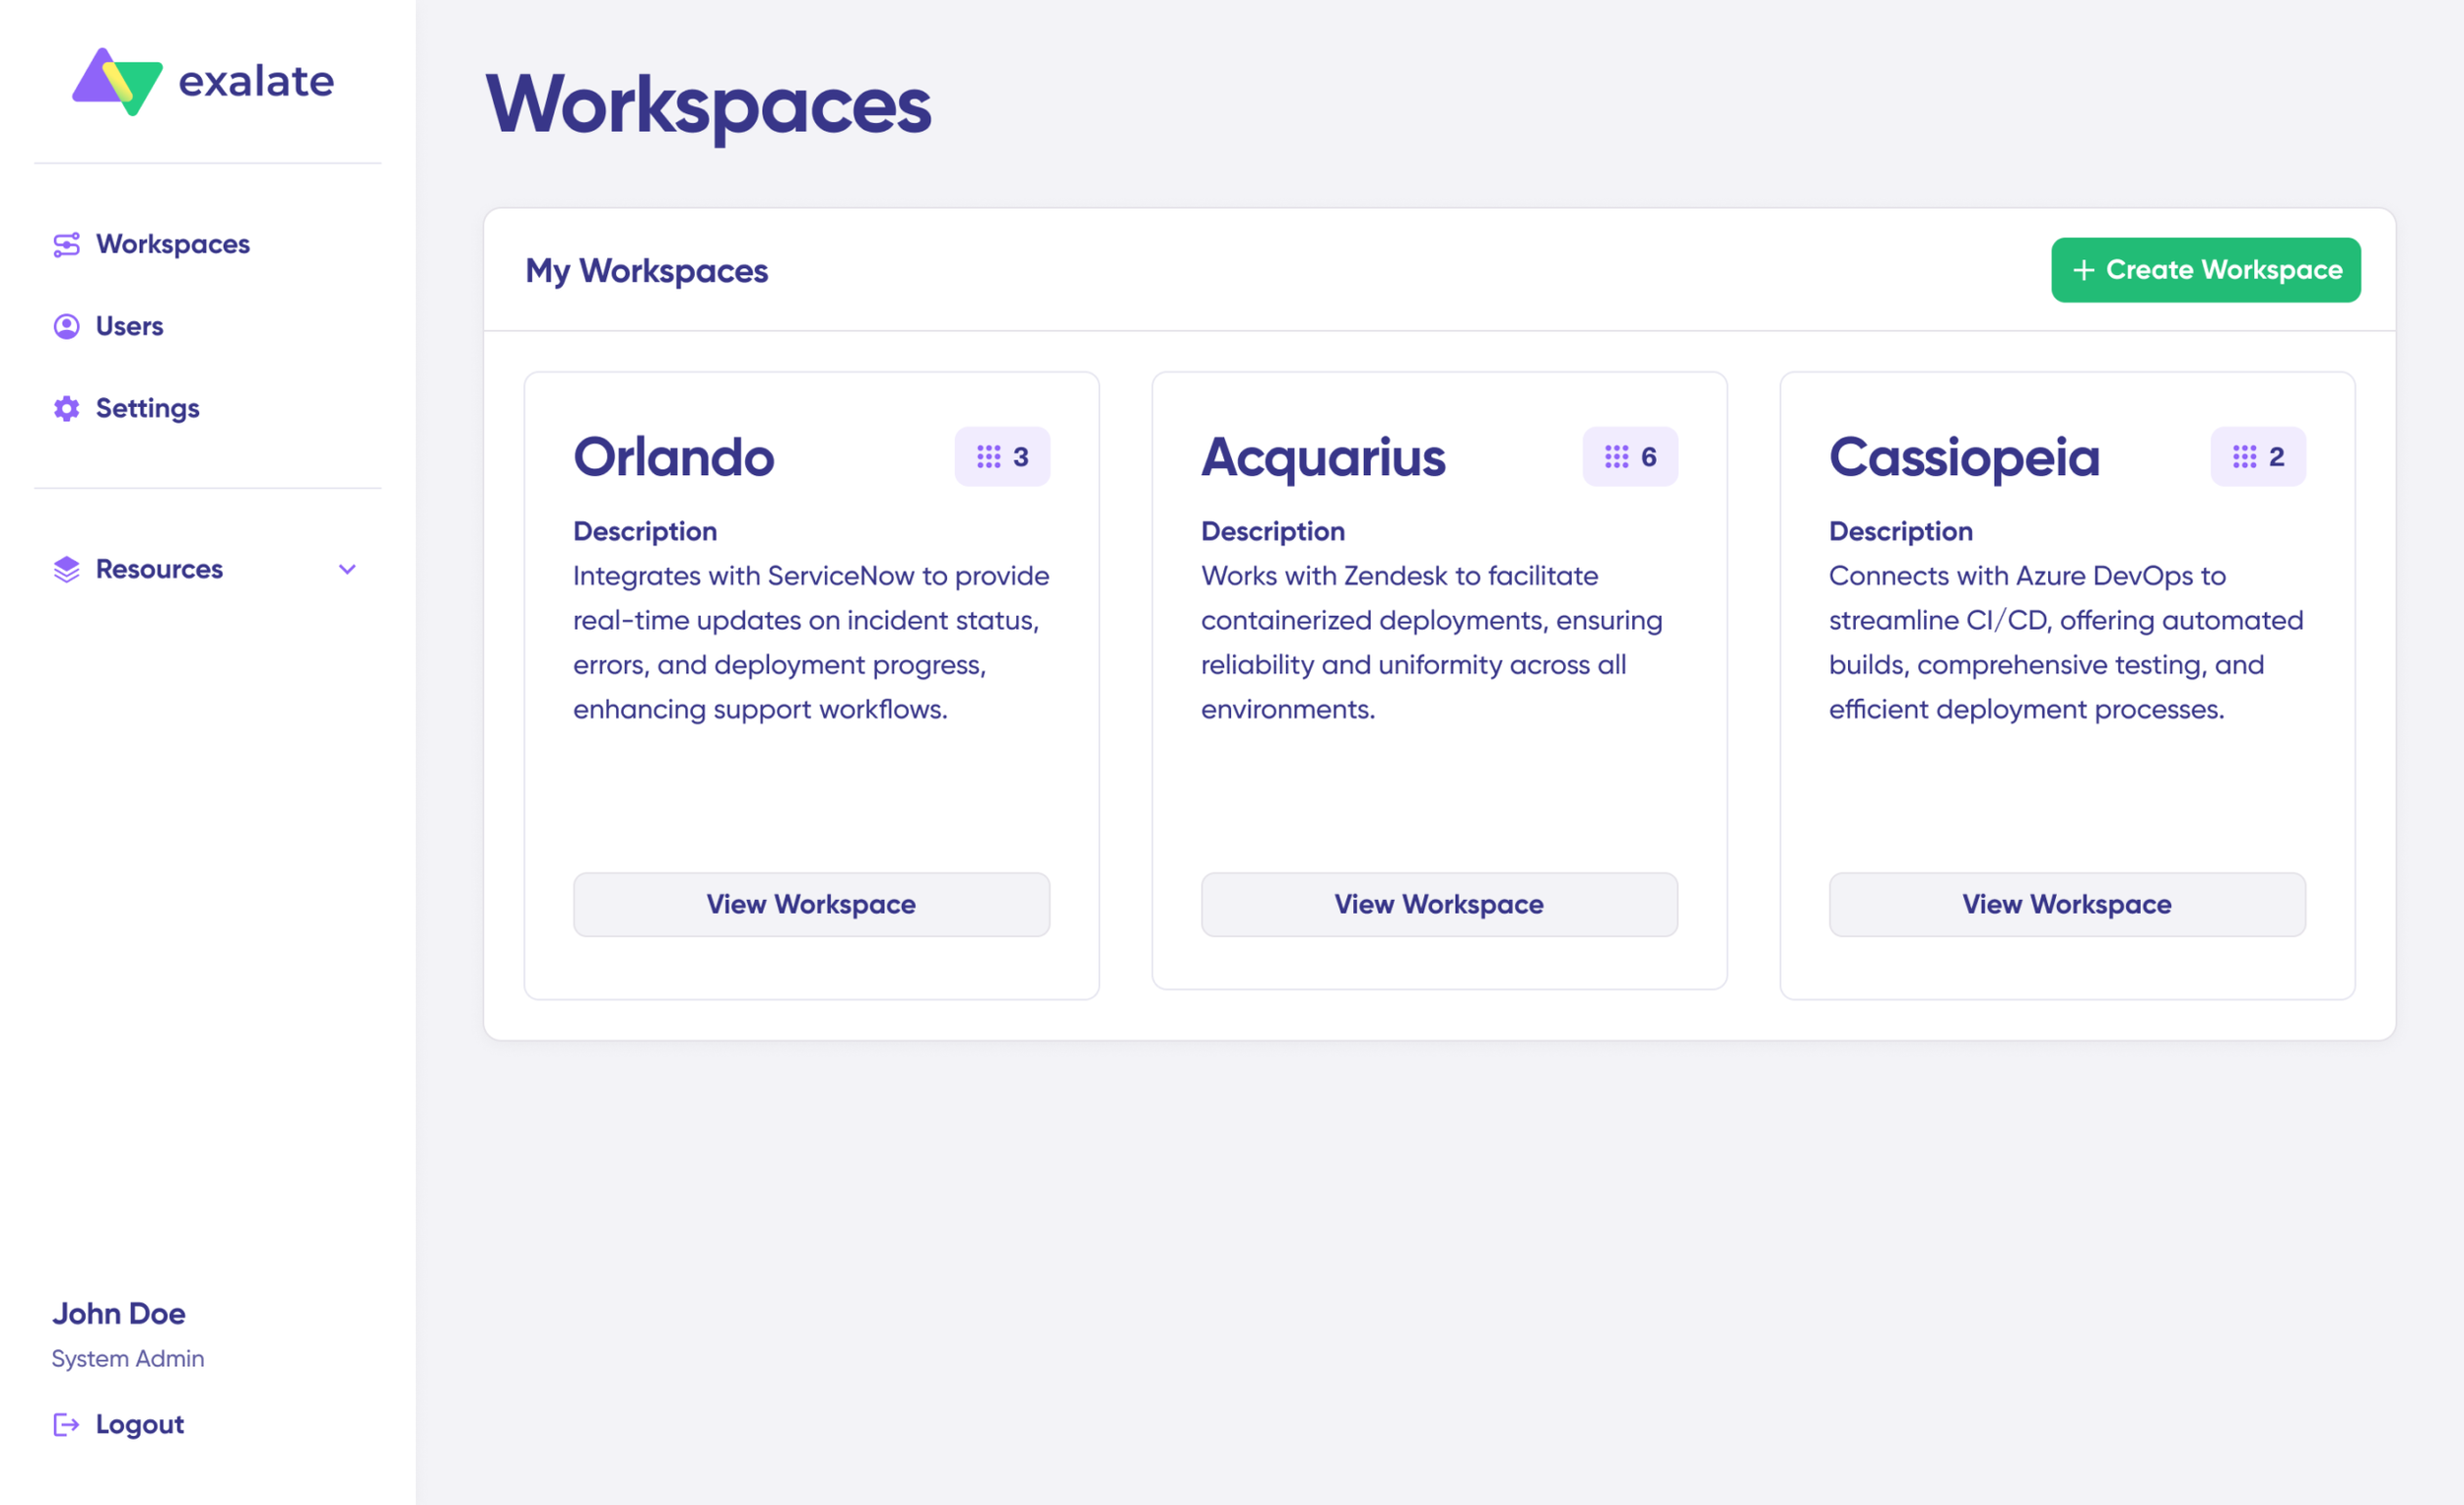
Workspaces serve as organizational containers for all your integrations and connections. Navigate to the “Workspaces” tab to view your existing workspaces. For first-time users, click the “+ Create Workspace” button.
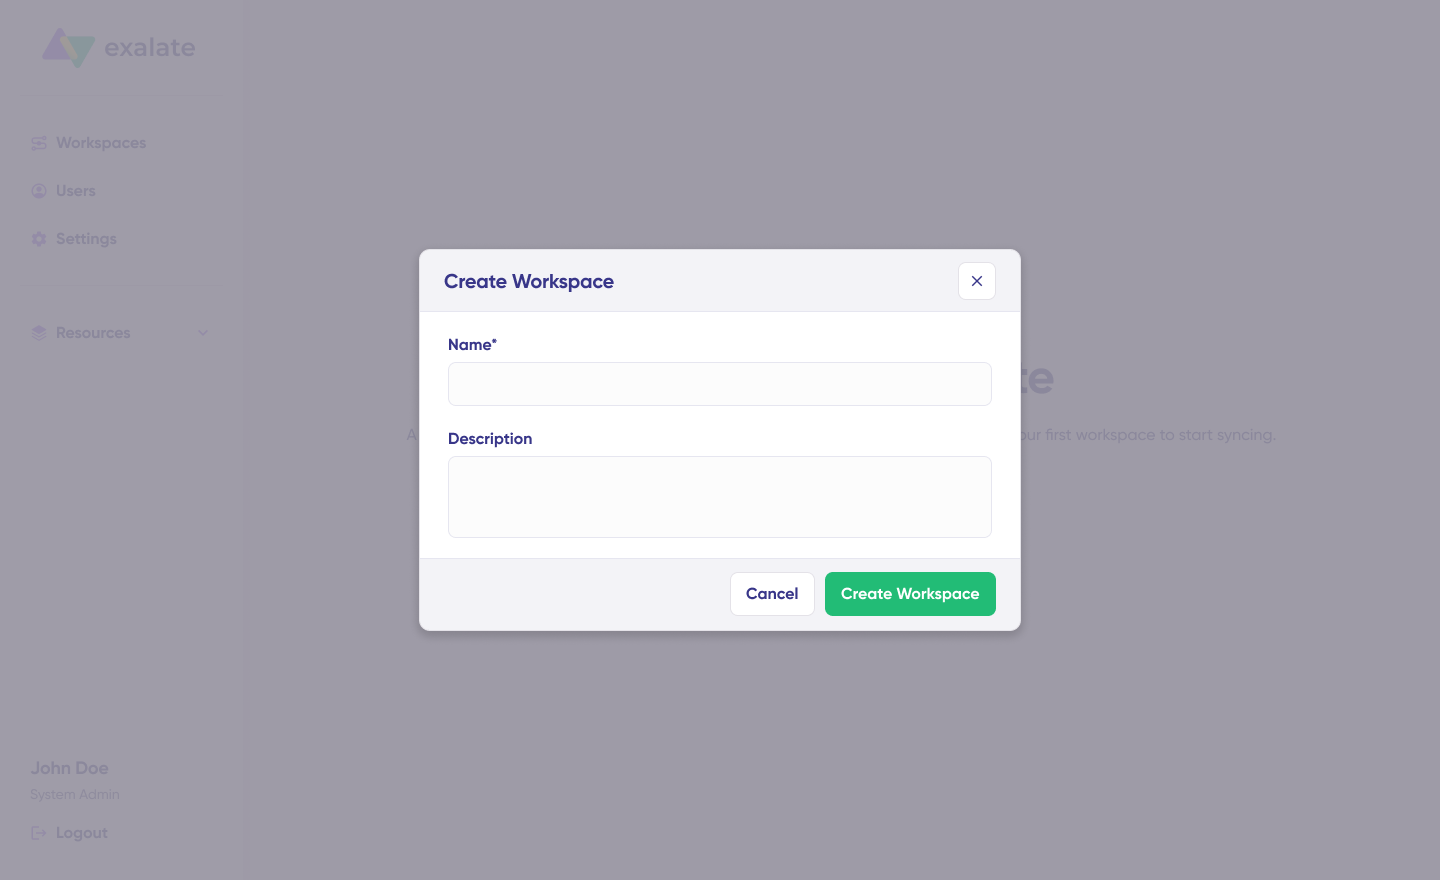
Provide a descriptive name and optional description for your workspace, then click “Create workspace” to proceed.
3. Establish Your Freshservice-Freshdesk Connection
Within your workspace, access the “Connections” tab to view all active integrations. From here, you can edit existing connections or create new ones.
Prerequisites: You’ll need an active Exalate account with at least one workspace and authentication credentials for both Freshservice and Freshdesk.
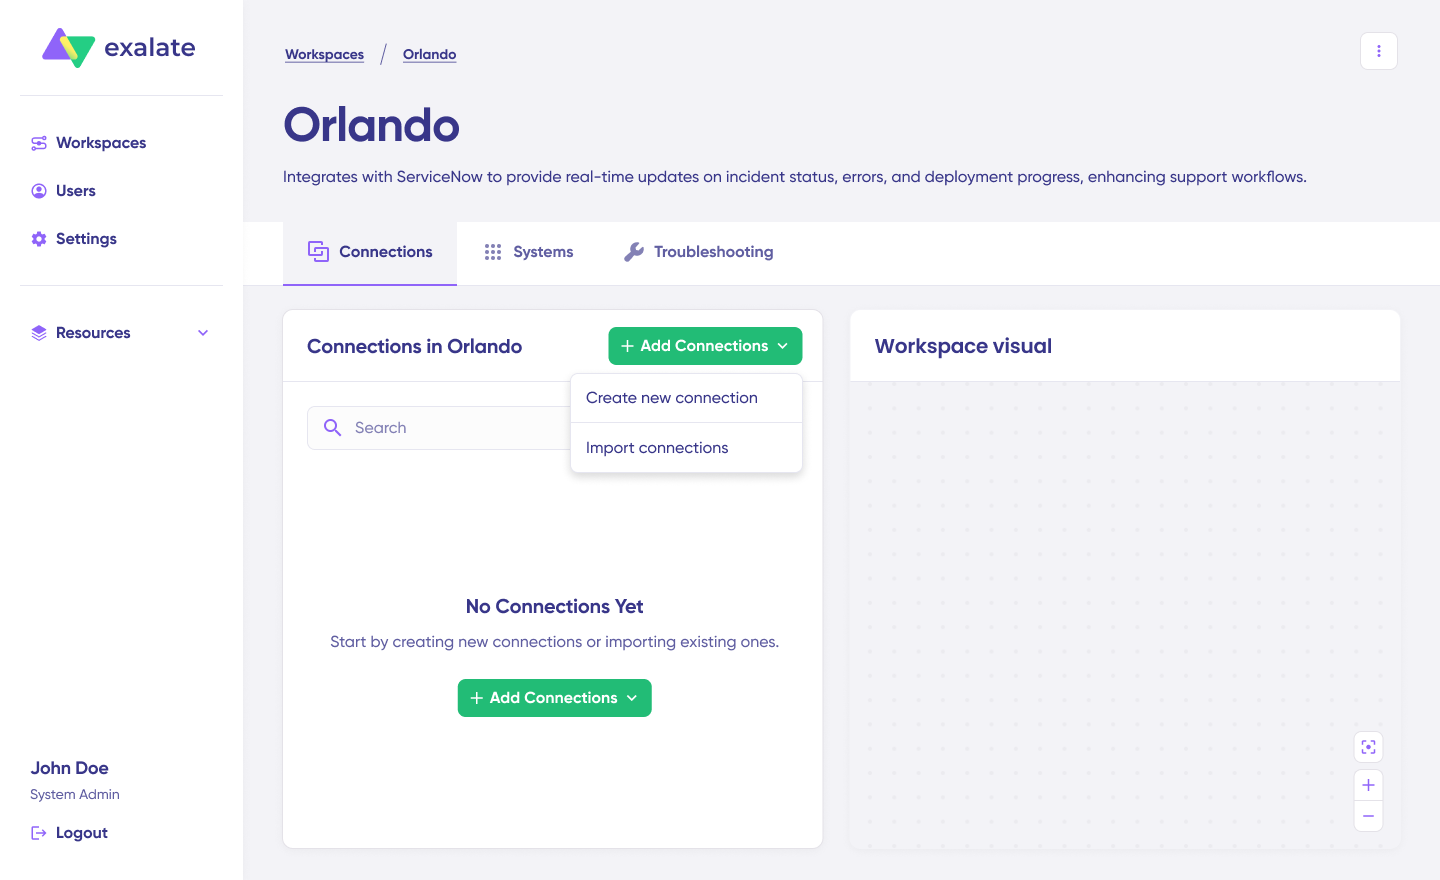
Click “+ Add connections” > “Create new connection”.
Define your first system (System A). Choose either Freshservice or Freshdesk—the order doesn’t matter. Enter the system name and its instance URL (for example, yourcompany.freshservice.com or yourcompany.freshdesk.com).
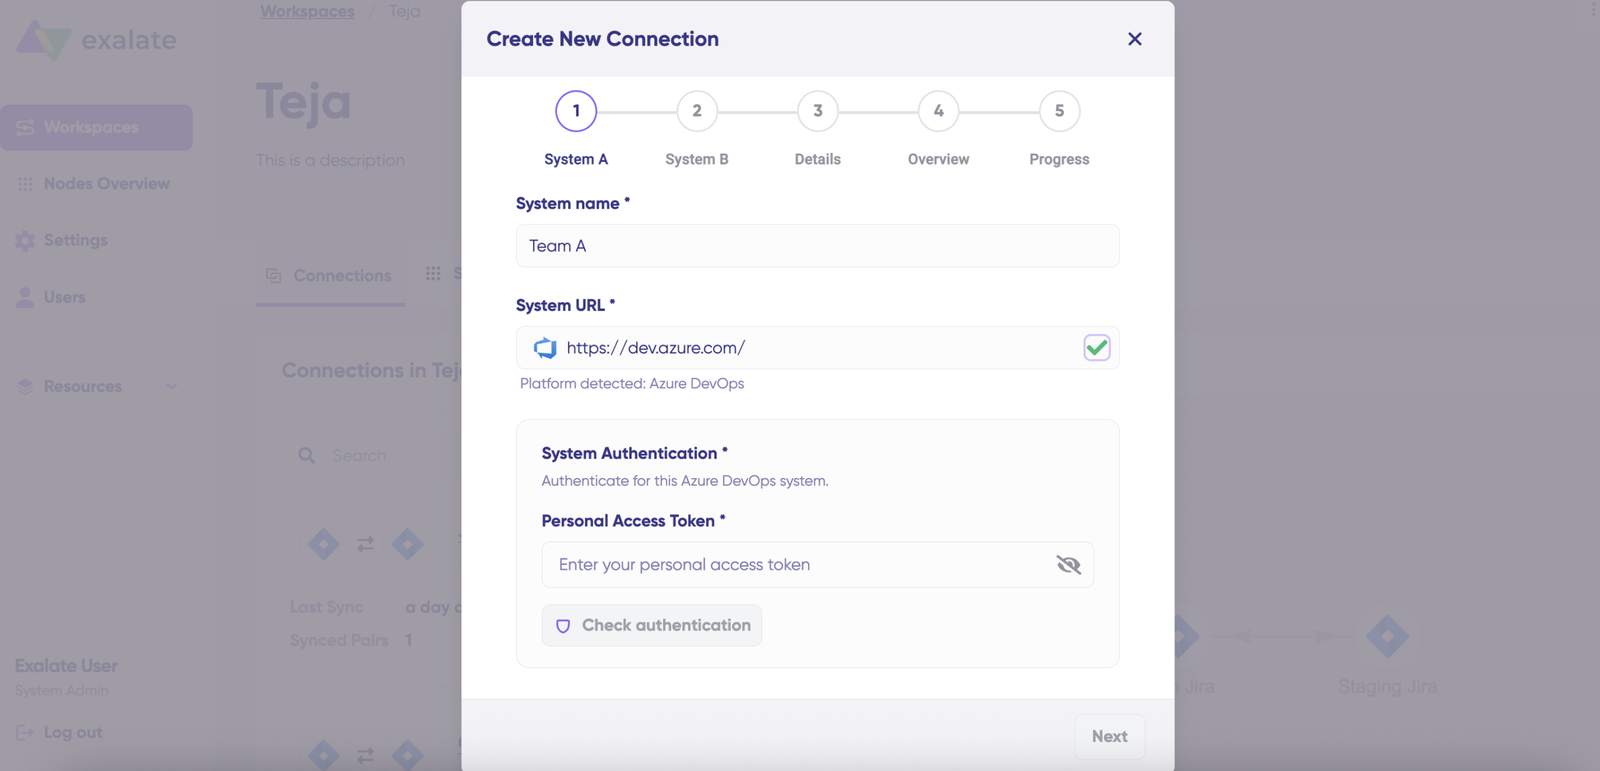
Exalate performs automatic validation when you enter the URL. If this system already exists in your current workspace, authentication happens automatically. If it belongs to a different workspace, the system registers as new for your current workspace.
For new systems, provide authentication credentials. Both Freshservice and Freshdesk support Basic authentication using your username and password.
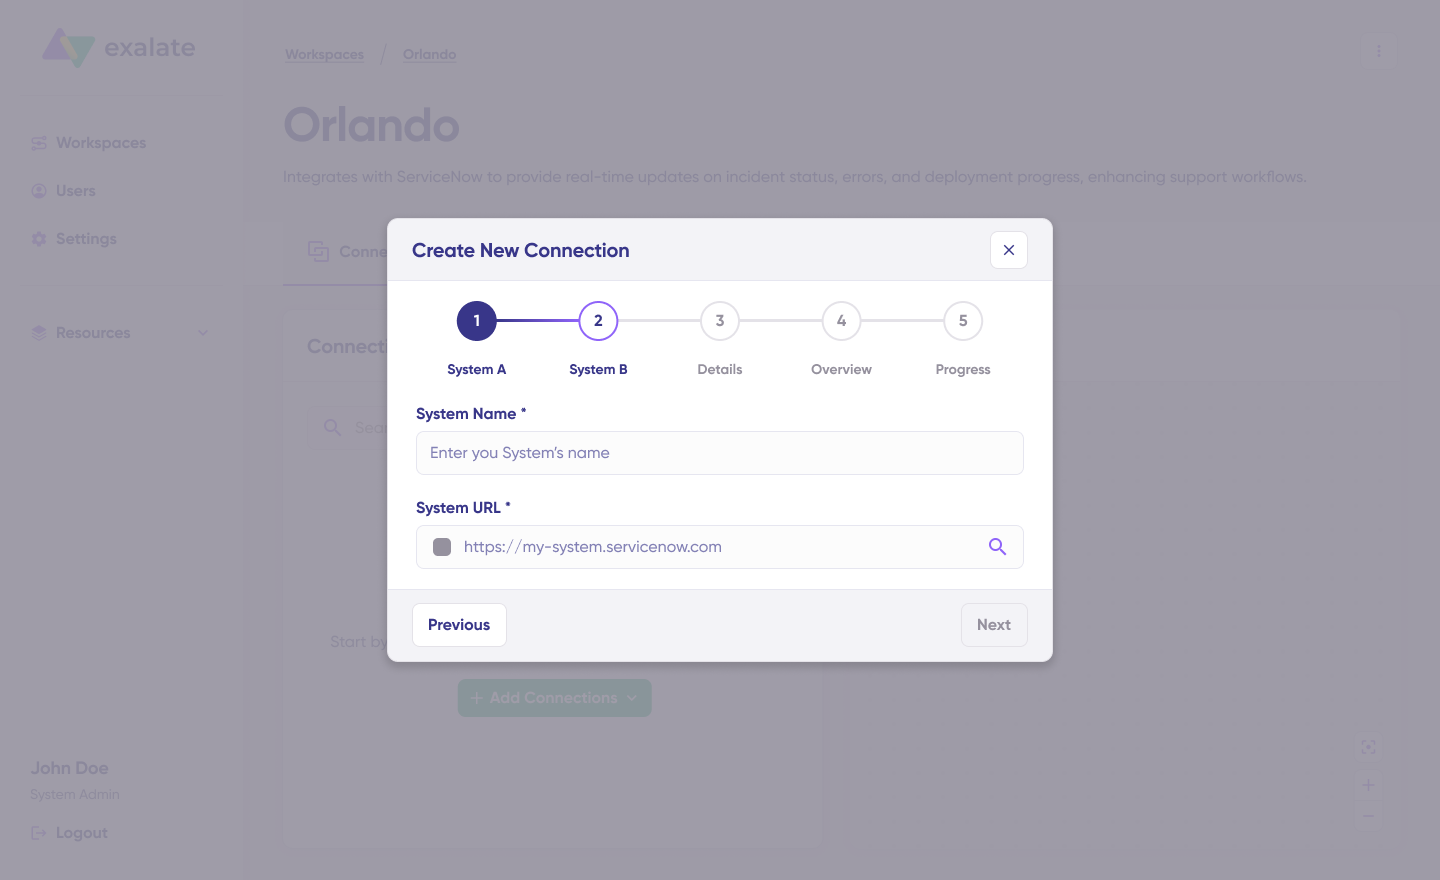
Repeat this process for your second system (System B), following the same authentication steps
Assign a descriptive name and optional description to your connection, then click “Next”. Review all connection details for accuracy and click “Create connection”.
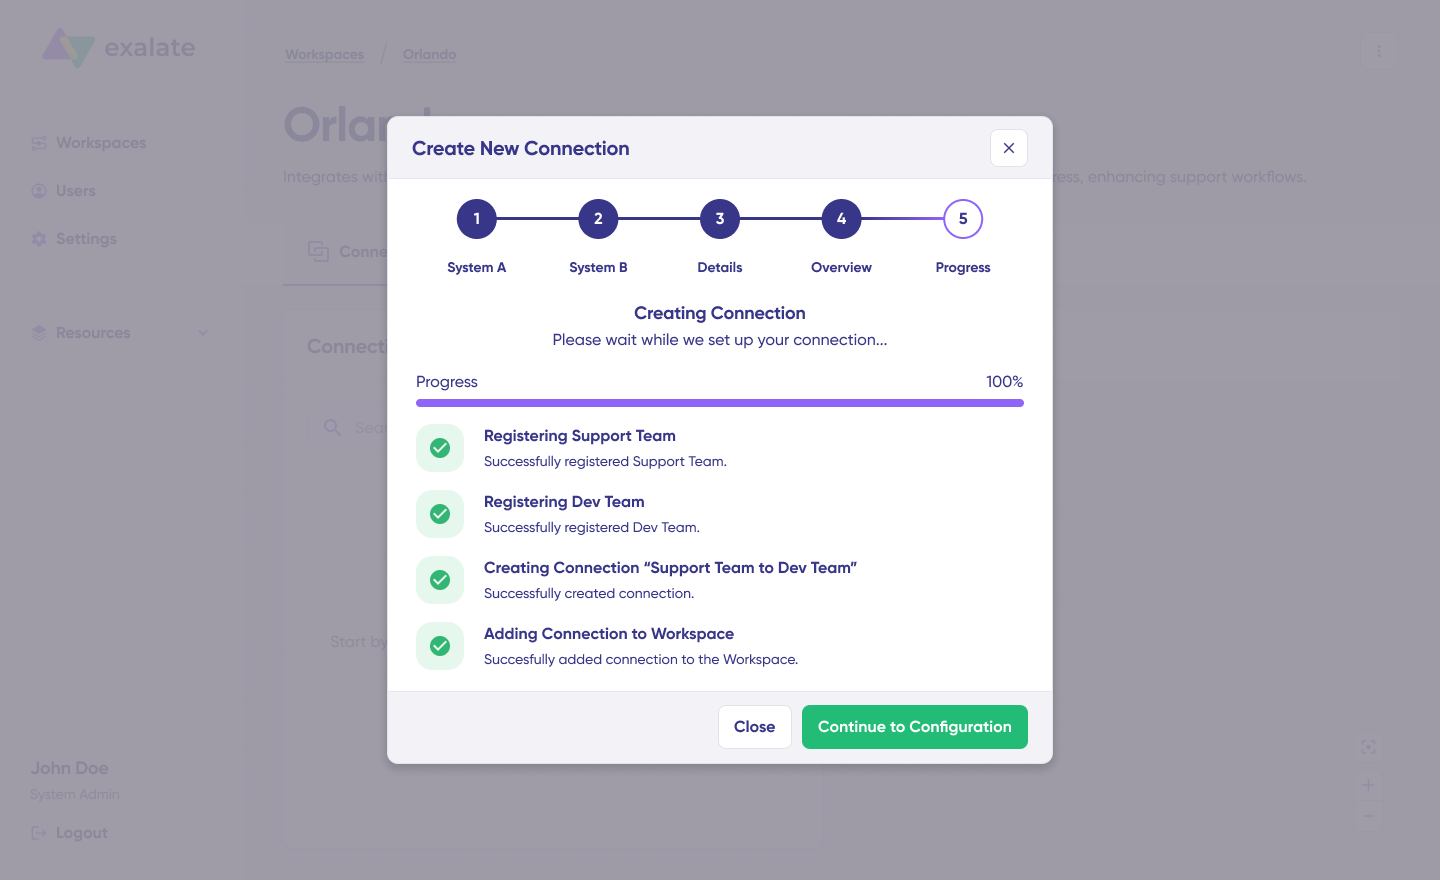
Once the connection is created, select “Continue to configuration” and choose which Freshservice or Freshdesk environment you want to use for synchronization. Click “Build & continue” to proceed.
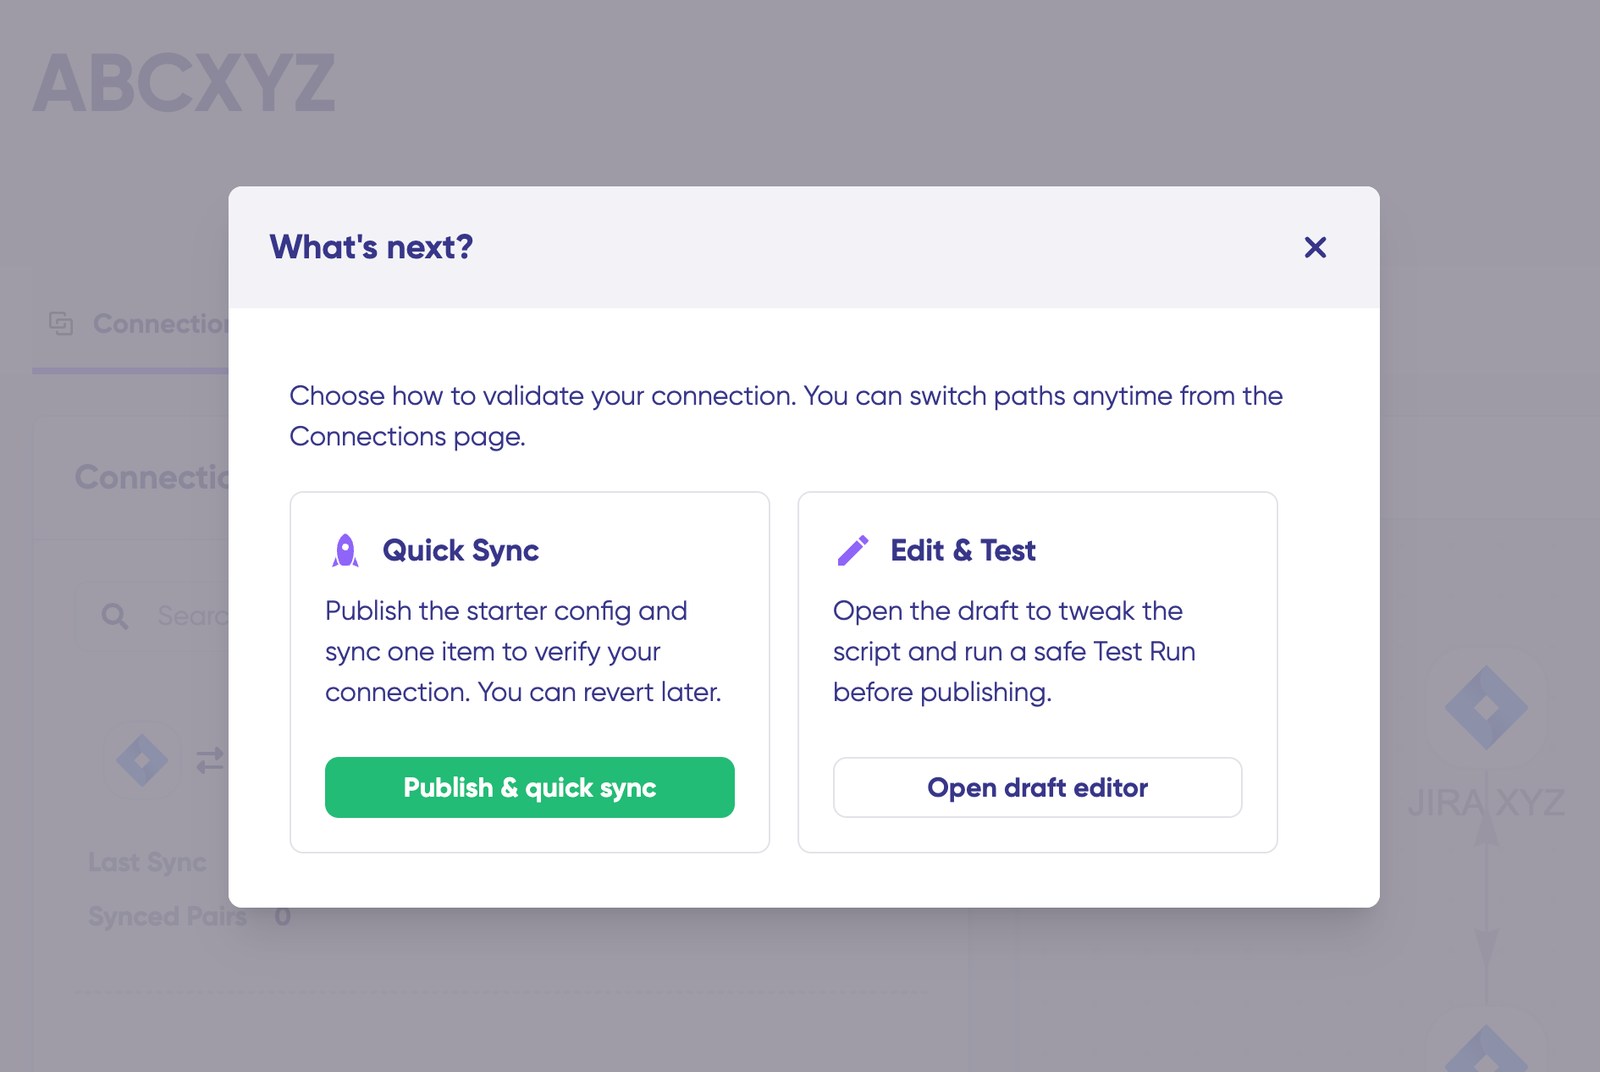
You now have two configuration paths: “Quick sync” or “Edit & Test.” Let’s explore both options.
4. Quick Sync: Verify Your Connection with a Test Sync
The Quick Sync option lets you synchronize a single ticket between Freshservice and Freshdesk to verify your connection works correctly. This is an optional but recommended validation step.
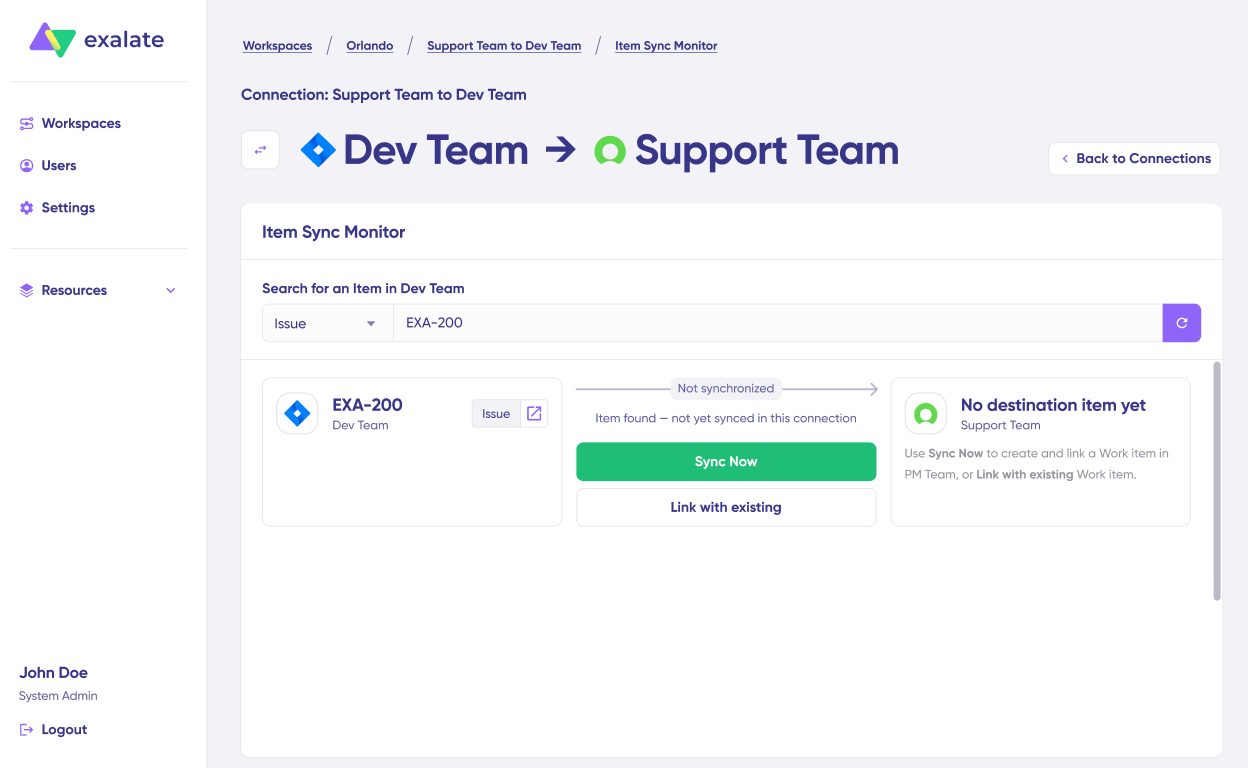
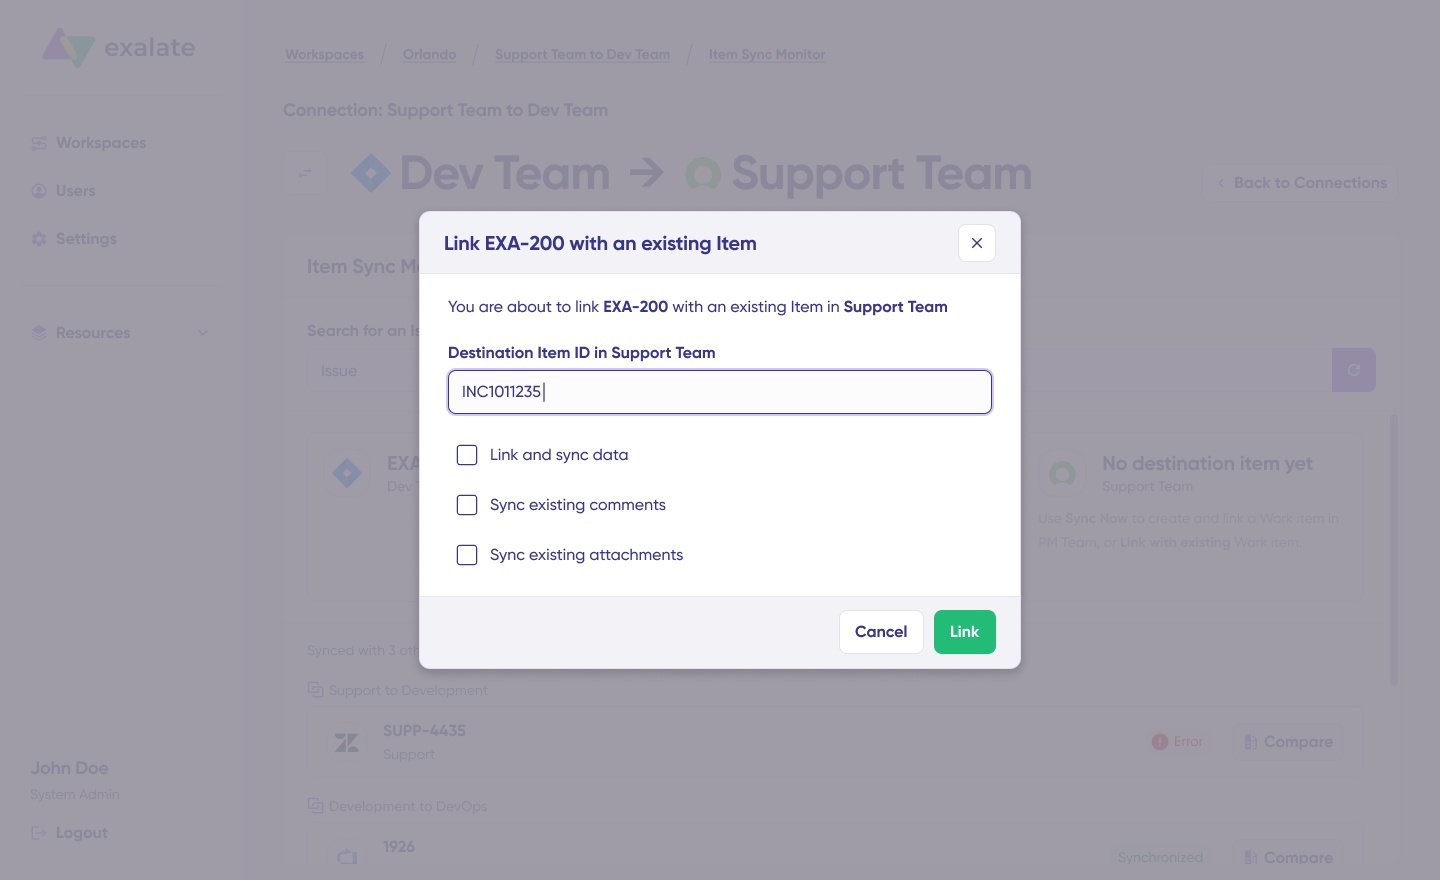
In the “Item sync monitor” section, enter either a Freshservice ticket number (incident or service request) or a Freshdesk ticket ID. Click “Sync Now” to initiate synchronization for a new item, or select “Link with existing” to connect two pre-existing tickets.
During synchronization, you’ll receive real-time status updates. Once complete, view both synchronized tickets by opening them in new windows.

You can also compare how the synced items appear and how changes are applied across both systems.
5. Edit & Test: Configure Advanced Sync Rules
For customized synchronization beyond default settings, click “Create a new version” or select “Open latest draft.” This approach prevents accidental modifications to your active configuration. The system automatically saves all changes to your draft.
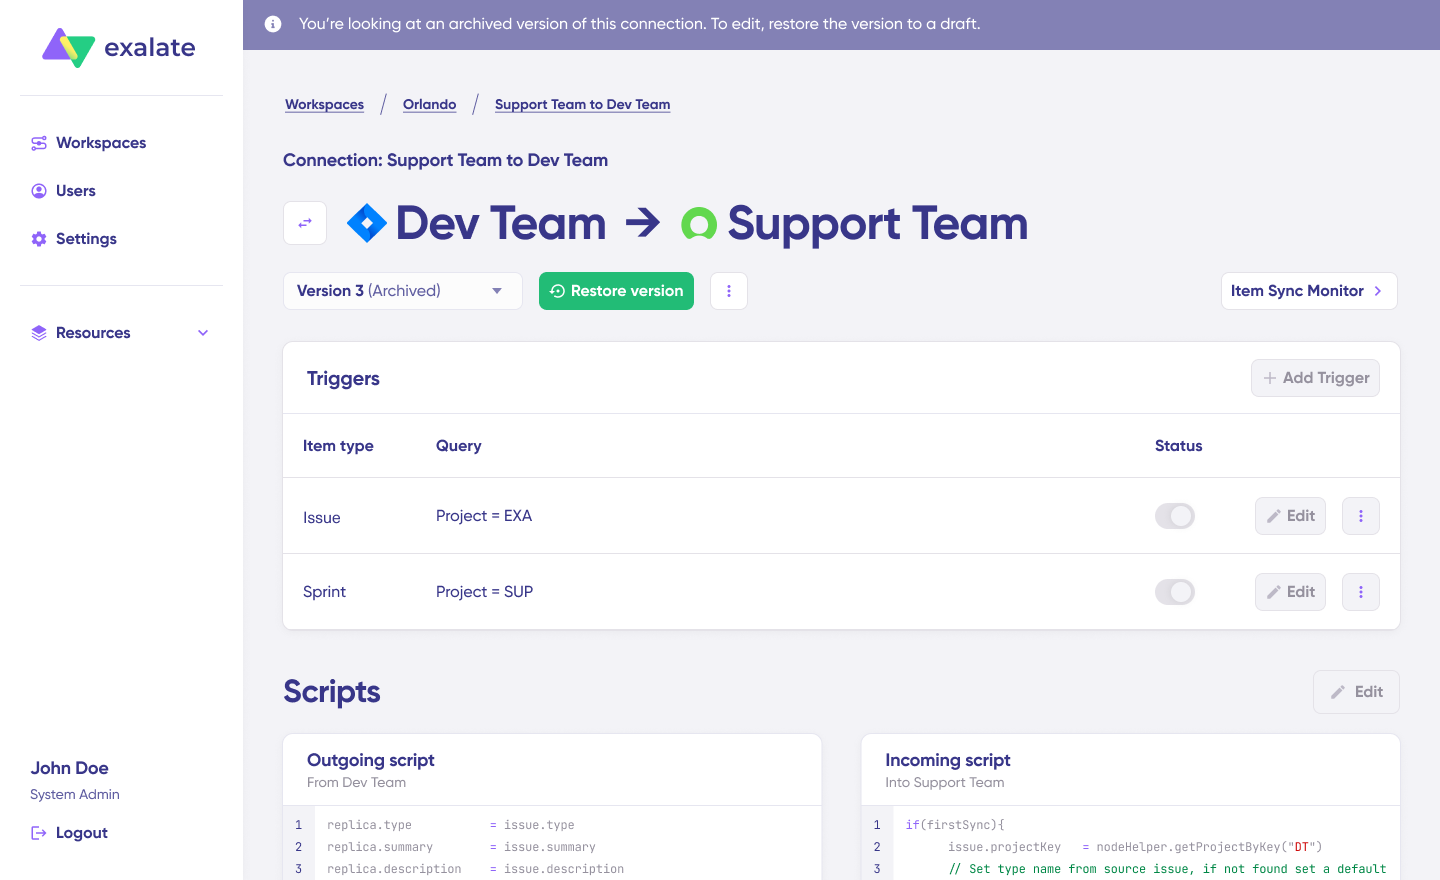
Click the “Edit” button to access the script editor, where you’ll configure sync rules.
Sync rules use Groovy-based scripts that enable custom data transformations, field mappings, and conditional logic. This flexibility accommodates complex workflows and advanced use cases specific to your organization.
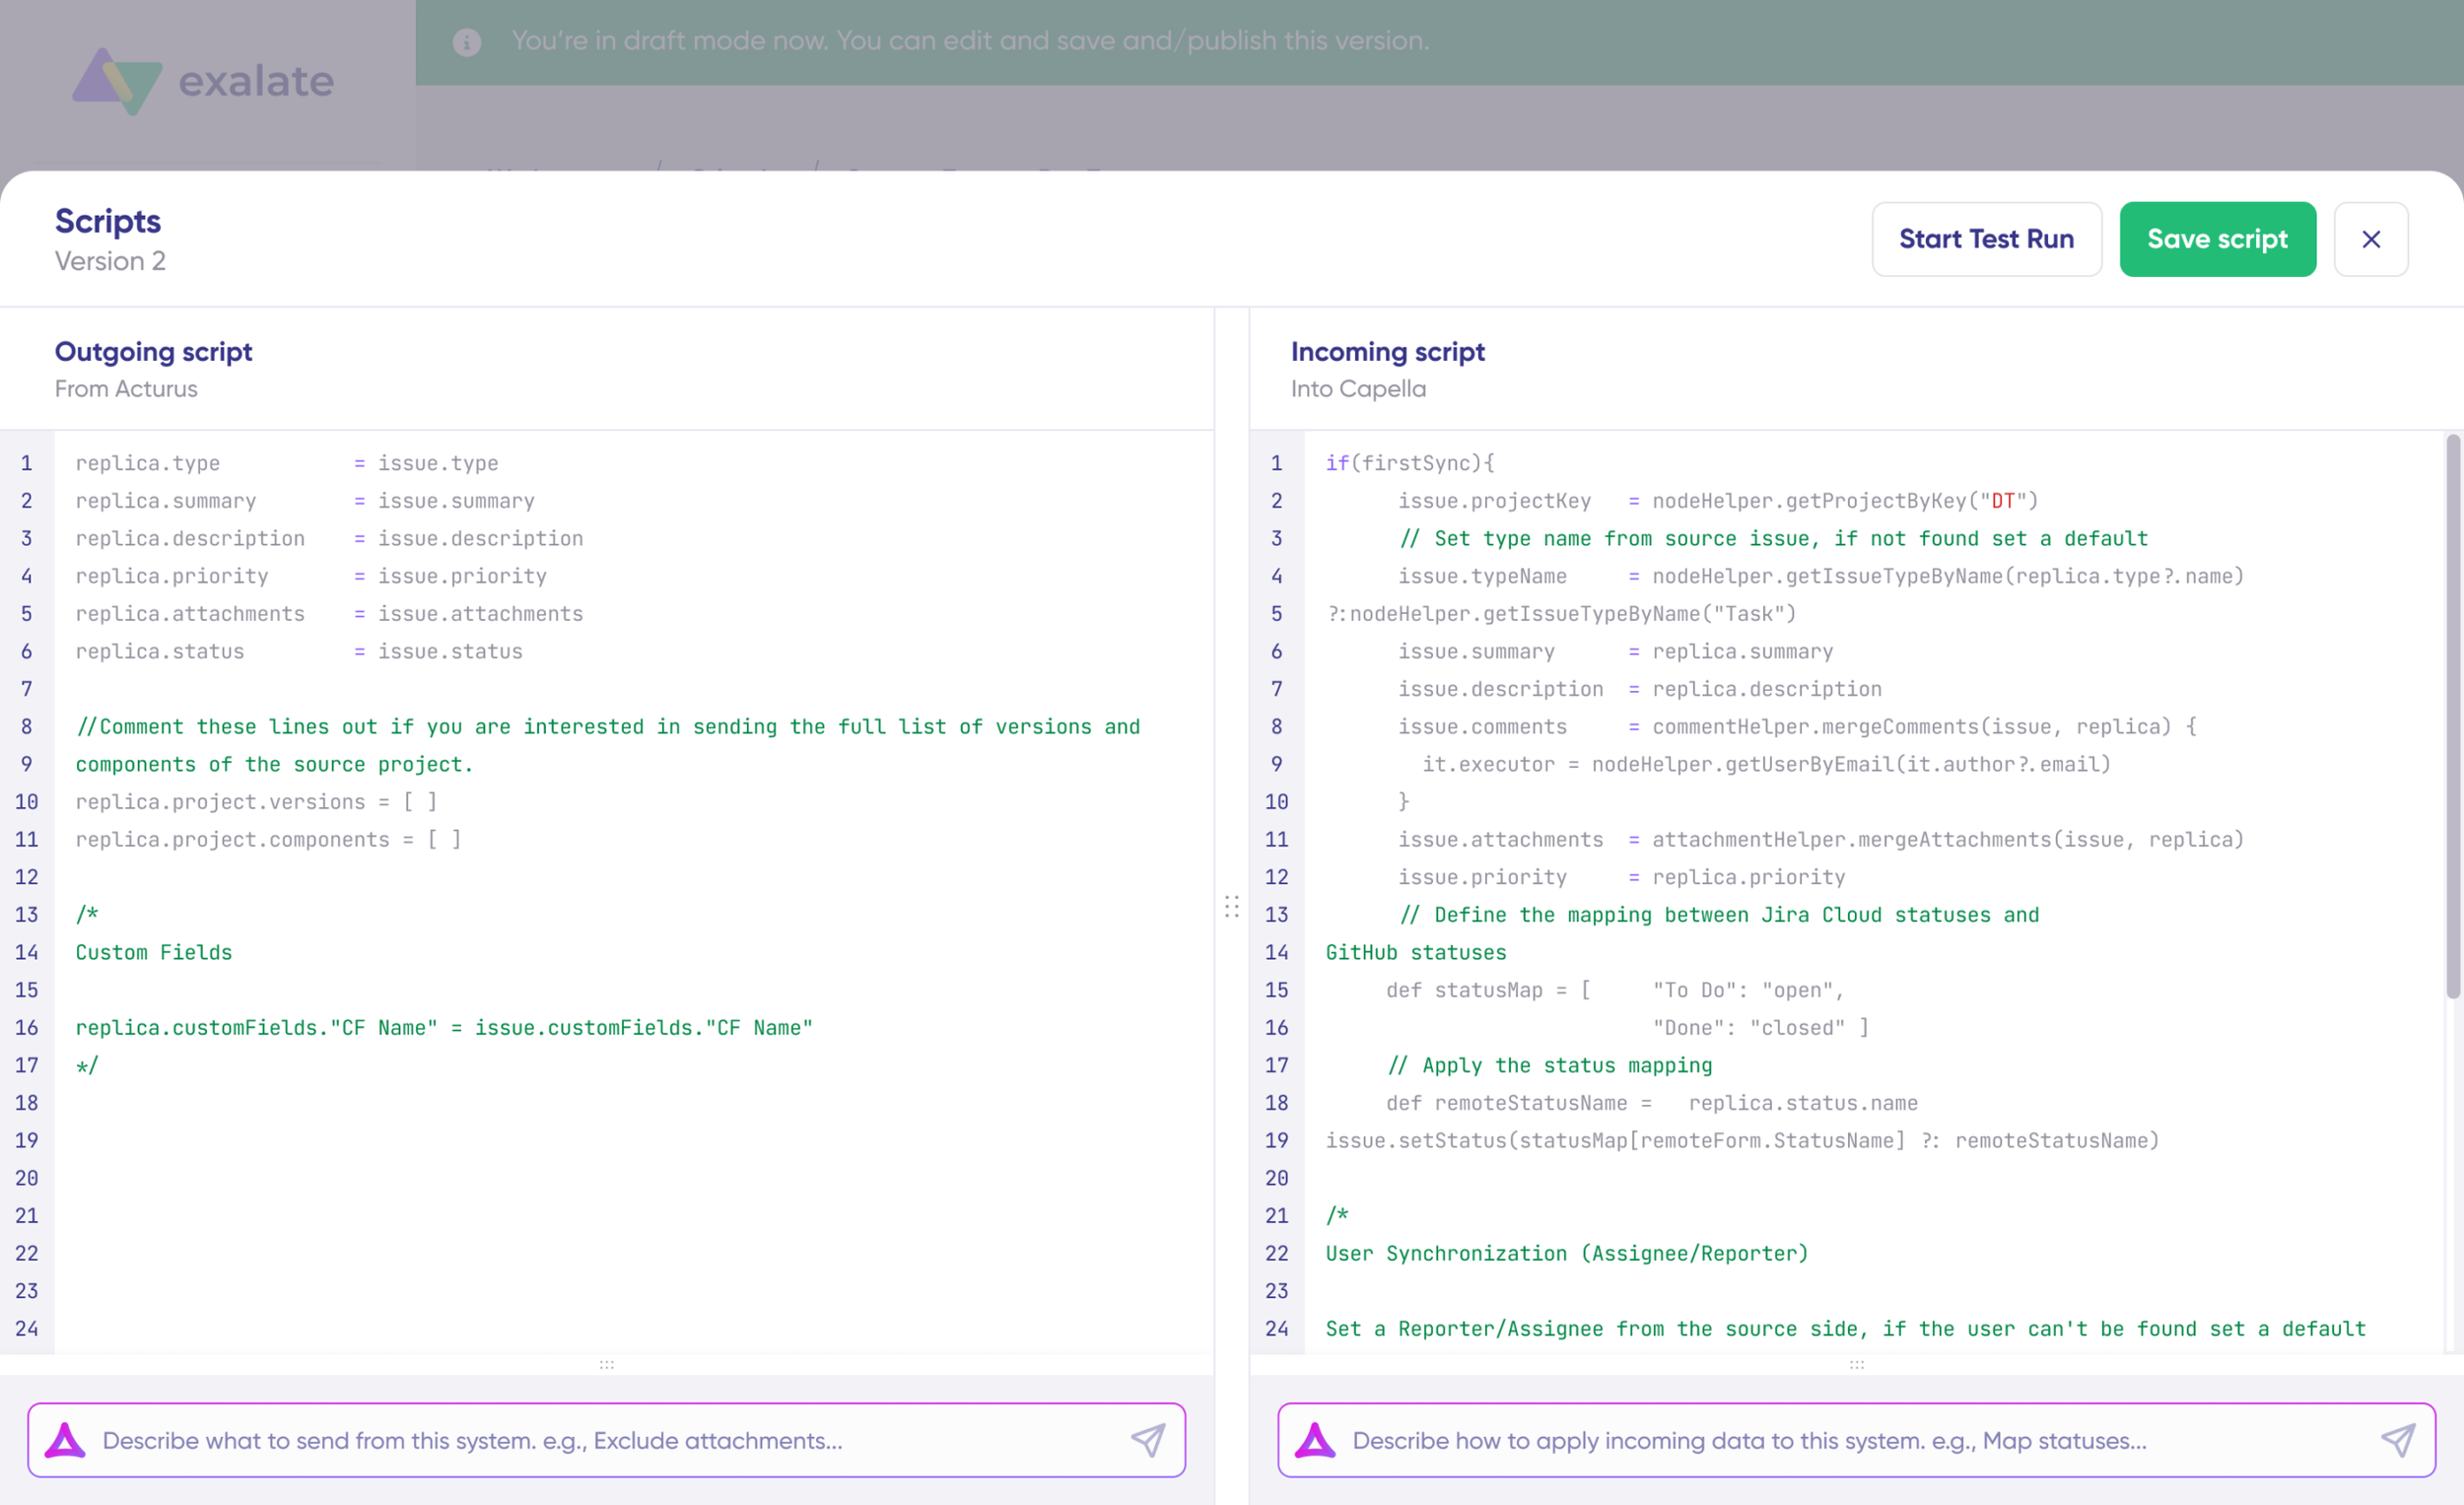
Click the bidirectional arrow icon next to the connection name to change sync direction. Scripts are divided into outgoing and incoming sections.
- Outgoing script (from Freshservice to Freshdesk): Defines what ticket data leaves Freshservice and how it’s prepared for Freshdesk
- Incoming script (to Freshdesk from Freshservice): Defines how incoming data from Freshservice maps to Freshdesk fields
These script roles reverse when you change the sync direction.
Replica functions as the data payload carrying information between synchronized tickets. It exists in JSON format and contains all the field values being exchanged.
To customize what syncs, you can manually edit the scripts. For example, to prevent attachments from syncing from Freshdesk to Freshservice, remove the attachment-related script line from the Freshdesk outgoing script.
Supported fields for synchronization:
- Freshservice: Incidents and service requests fields, including summary, description, status, priority, urgency, impact, due date, requester, agent, category, subcategory, attachments, notes (public and private), custom fields, and any additional fields accessible via REST API.
- Freshdesk: All default and custom ticket fields, including subject, description, status, priority, type, source, group, agent, requester, tags, attachments, conversations (public and private notes), custom fields, and more.
6. Use Aida for AI-Assisted Configuration
Aida streamlines script configuration by generating Groovy code based on natural language prompts, eliminating the need for manual scripting expertise.
Aida appears in both outgoing and incoming script sections—select the appropriate side based on what you’re configuring.
How Aida helps with sync configuration:
For Outgoing scripts, describe what data should leave your system. Examples:
- “Exclude attachments from syncing”.
- “Only sync high-priority tickets”.
For Incoming scripts, describe how incoming data should map to your system. Examples:
- “Map Freshservice status values to Freshdesk status values”
- “Convert Freshservice priority levels to Freshdesk priority levels”.
Aida analyzes Exalate’s scripting API and your existing configuration, then generates working Groovy scripts with proper field mappings.
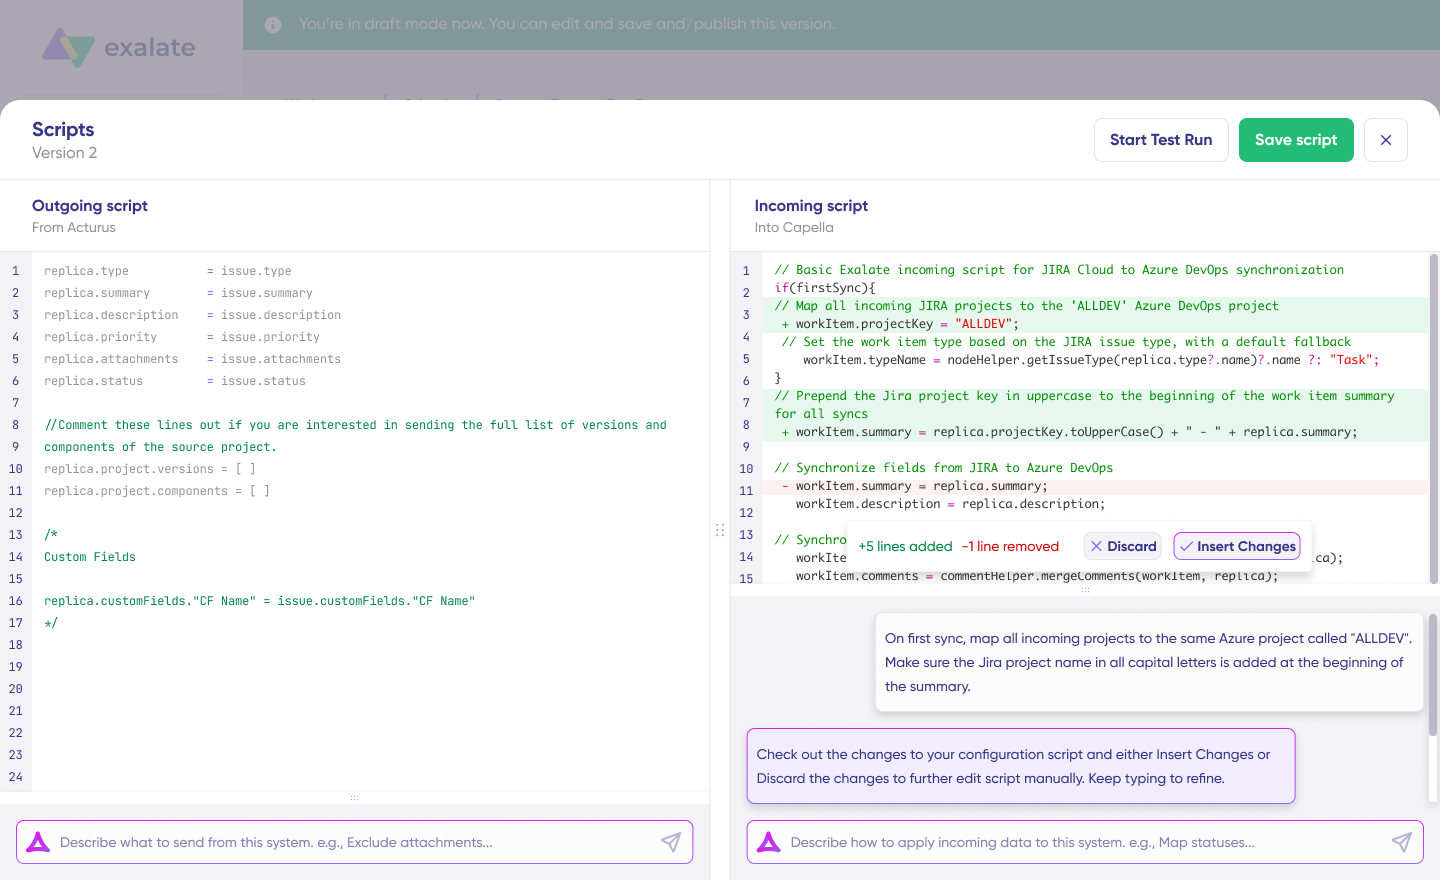
After Aida generates scripts, review the proposed changes carefully. Green highlighting indicates new lines that will be added. Red highlighting shows lines that will be removed. You can choose to “Insert” the suggested changes or “Discard” them if they don’t match your requirements.
The outgoing and incoming scripts operate independently, and so does Aida. Maintain a separate context and direction for each prompt to get the best results.
Important note: While Aida significantly accelerates configuration, always review the generated code before applying it to ensure it matches your specific workflow requirements.
7. Test Run: Validate Configuration Before Going Live
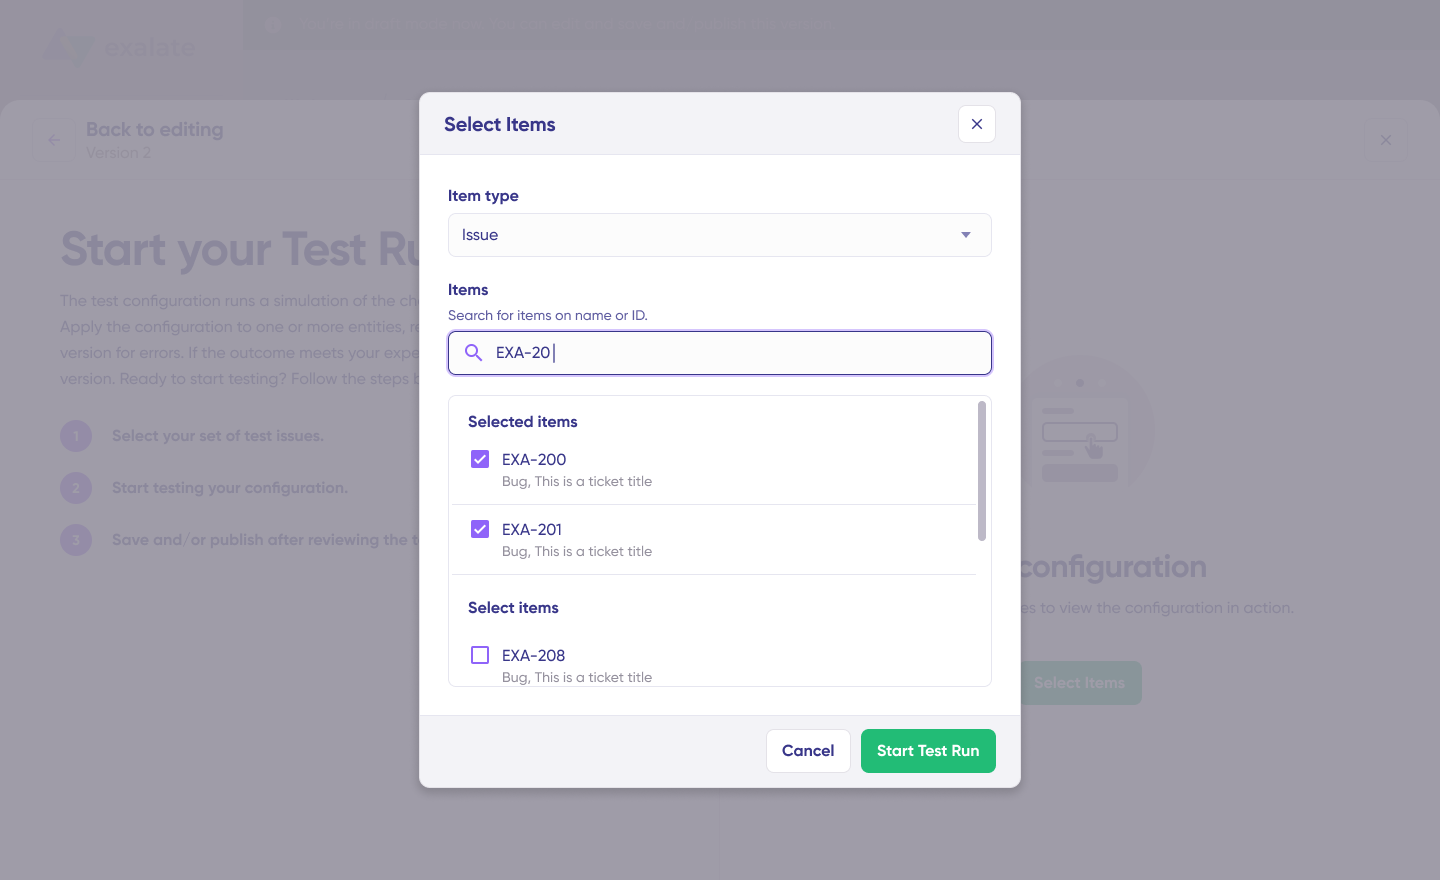
Once your sync scripts are configured, save your work by clicking “Save script,” or immediately test them using the “Start Test Run” option.

Click “Select Items” to choose which tickets you want to test. You can select multiple tickets from either Freshservice or Freshdesk. After selection, click “Start Test Run.”
The test run displays all incoming and outgoing replicas for each selected ticket in separate tabs. Review how your sync configuration applies to the tickets, preview the replica data structure, and verify that field mappings appear correct.
If the results don’t match expectations, return to the script editor, adjust your configuration, and test again. Continue this cycle until the synchronization behavior matches your requirements.

Deploy your configuration to production only when you’re confident it works as intended. This validation process prevents configuration errors from affecting live ticket data.
When you’re satisfied with your testing results, click “Publish Version” to activate your configuration for live synchronization between Freshservice and Freshdesk.

All configuration versions for a connection are accessible in the “Version” dropdown menu. Versions can have three states:
- Active: Currently running in production
- Draft: Editable version not yet published
- Archived: Previous versions saved for reference or rollback
8. Configure Triggers for Automatic Synchronization
Triggers define which tickets automatically sync based on conditions or filters you specify. Without triggers, you’d need to manually initiate each sync.
Click the “+Add trigger” button to create synchronization triggers. Triggers are platform-specific and use each system’s native query language.
Freshservice trigger examples:
filter = new_and_my_open> Sync new and open tickets
Freshdesk trigger examples:
priority: 1 AND status: 2 OR urgency: 3> Sync tickets with priority of 1 and status of 2 or urgency of 3.
Use advanced filter syntax specific to each platform to define precise trigger conditions. Save your triggers by publishing the changes.
10. Troubleshoot Sync Errors with Aida
Aida AI provides context-aware troubleshooting suggestions directly within the error interface, helping you resolve issues faster than traditional debugging methods.

Navigate to the “Troubleshooting” tab in your workspace. Locate the error you want to diagnose and hover over it. Click the Aida icon that appears next to the error message.
A modal window displays Aida’s AI-generated analysis, including:
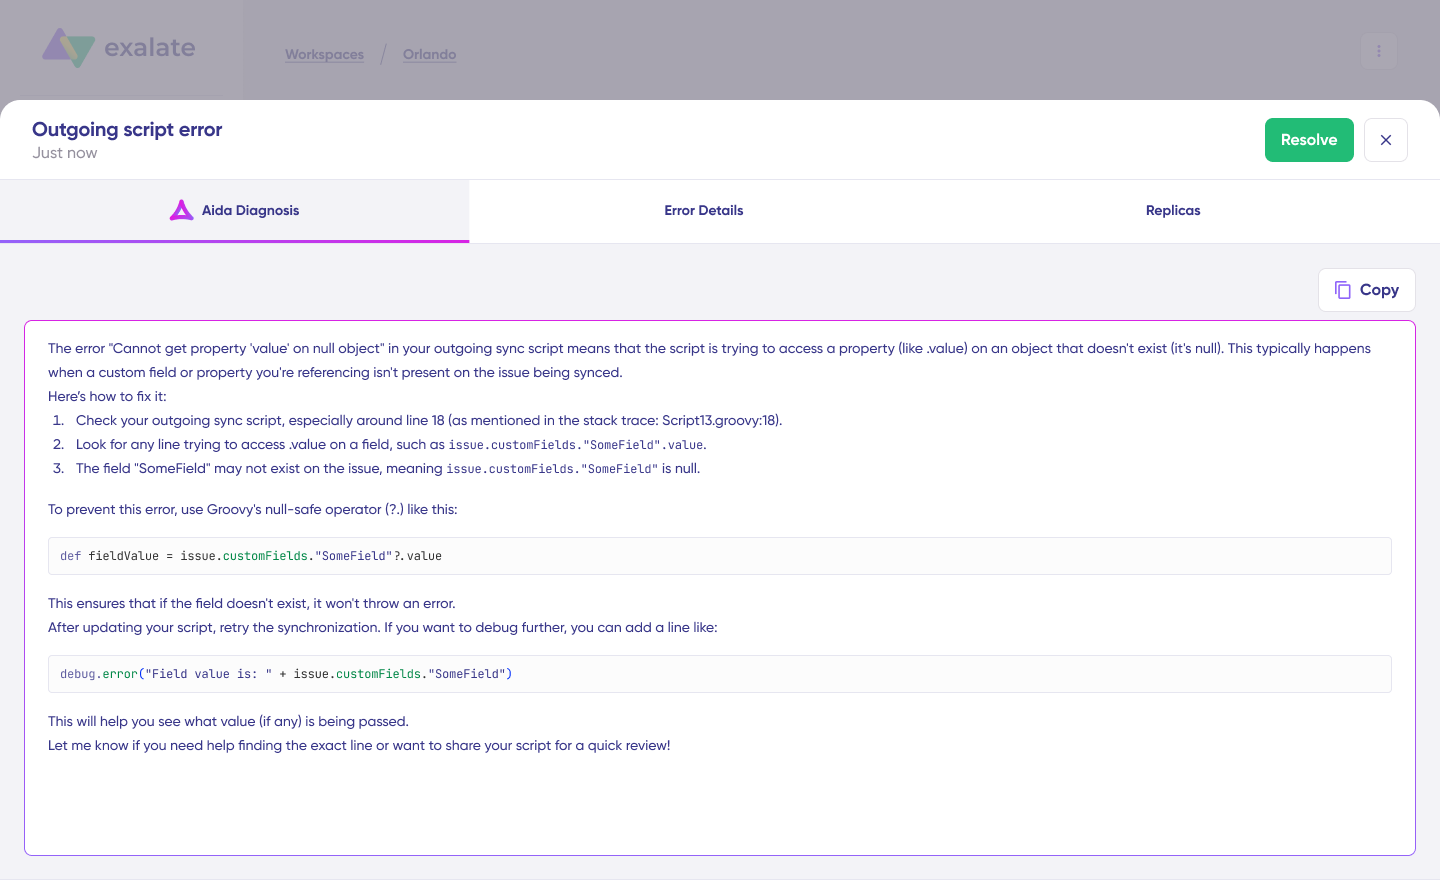
- Brief explanation: Clear description of what caused the error
- Proposed solution: Specific steps to resolve the issue
- Full analysis: Extended context about the error (click “View Full Analysis”)
- Error details: Complete stack trace for technical debugging (click “Error details”)
- Replicas: Raw JSON data structure for in-depth analysis
After reviewing Aida’s suggestion, click “Resolve” to apply the fix and retry the failed synchronization.
Your Freshservice-Freshdesk integration is now fully operational. Tickets will sync automatically based on your configuration, enabling seamless collaboration between IT and support teams.
What Are the Use Cases for Freshservice-Freshdesk Integration?
Case 1. Escalating Customer Tickets to IT
Challenge: Support agents identify technical problems during customer interactions but lack visibility into IT infrastructure or resolution timelines. They spend time explaining issues to IT, and customers wait while teams coordinate.
Solution: When a support agent tags a Freshdesk ticket with “Server Issue” or “Infrastructure,” the integration automatically creates a Freshservice incident with all customer context. IT receives the full conversation history, attachments, and timeline without support having to explain everything twice.
Real-world application: A SaaS company uses this workflow to escalate performance complaints. When customers report slow load times, support creates a Freshdesk ticket. The integration automatically generates a Freshservice incident tagged “Performance,” routes it to the DevOps team, and includes customer impact details. DevOps investigates server work, updates the incident, and those updates flow back to Freshdesk.
Case 2. Hardware and Software Provisioning Requests
Challenge: Employees submit access requests or equipment needs through customer-facing portals, but IT doesn’t see these requests in their workflow system. Requests get lost between platforms, delaying onboarding and frustrating new hires.
Solution: Employee requests submitted through Freshdesk portals automatically create procurement or provisioning tasks in Freshservice. IT sees these in their standard workflow queue with all necessary details like employee information, department, and manager approval.
Real-world application: A financial services firm manages new hire onboarding through this integration. New employees request laptops, monitors, and software licenses through a Freshdesk form. The integration creates a Freshservice service request with the equipment list, automatically assigns it to procurement, and tracks fulfillment. Once IT ships the equipment, the status updates back to Freshdesk, and HR receives notification that the equipment is ready.
Case 3. Incident Communication and Coordination
Challenge: During major outages, support receives hundreds of tickets about the same underlying infrastructure issue. Support teams manually update each ticket, wasting time that should go toward customer communication.
Solution: IT updates a single Freshservice incident during the outage, and the integration automatically updates all related customer tickets in Freshdesk with status information. Support sees real-time updates about resolution progress without manually checking with IT.
Real-world application: An e-commerce platform experienced a payment gateway outage affecting 5,000 customers. Support received 400 tickets within 30 minutes. IT created one Freshservice incident, updated it with “payment processor issue identified, working with vendor.”
Case 4. MSP Management of Multiple Client Environments
Challenge: Managed service providers serve multiple clients, each requiring separate support portals and data privacy. But IT teams need a unified view of all client work without exposing one client’s data to another.
Solution: MSPs maintain separate Freshdesk instances for each client while connecting them all to a centralized Freshservice workspace. The integration routes client support requests to the appropriate IT team while maintaining data isolation. IT sees all client work in one queue without clients seeing each other’s information.
Real-world application: An MSP managing 40 clients implemented this pattern. Each client has their own Freshdesk portal for submitting tickets. The integration connects all 40 Freshdesk instances to one Freshservice workspace, where IT technicians see a unified queue sorted by priority and SLA. When IT resolves work, updates sync back only to the relevant client’s Freshdesk.
Case 5. External Partner and Vendor Collaboration
Challenge: External partners report issues through customer-facing systems, but you need internal IT tracking without exposing internal infrastructure details or granting partners access to your ITSM system.
Solution: Partners submit issues through Freshdesk, which automatically creates tickets in your internal Freshservice instance. The integration maintains separation between external-facing and internal systems while keeping workflows connected.
Real-world application: A manufacturing company’s supply chain partners report logistics issues through a Freshdesk portal. The integration creates Freshservice incidents for the operations team with full partner context. Operations investigates, coordinates with warehouses, and updates the incident. Status updates flow back to Freshdesk, where partners see resolution progress without accessing internal systems.
Case 6. Change Management for Customer-Facing Services
Challenge: When IT plans maintenance, upgrades, or changes affecting customer-facing services, support teams don’t learn about downtime until customers start complaining. This creates unnecessary ticket volume and damages customer relationships.
Solution: IT change requests in Freshservice automatically create notifications or scheduled maintenance tickets in Freshdesk. Support teams prepare canned responses and proactively email affected customers about maintenance windows.
Real-world application: A cloud hosting provider schedules infrastructure maintenance through Freshservice. When IT creates a change request for weekend database migration causing 2-hour downtime, the integration automatically creates a maintenance notification in Freshdesk. Support receives the notification 48 hours in advance, prepares customer communication templates, and emails affected customers about the maintenance window.
Best Practices for Freshservice-Freshdesk Integration
Check out the following recommended best practices to get the most out of your Freshservice and Freshdesk integration:
- Define which workflows need integration before you start building. Map out specific scenarios rather than syncing everything.
- Don’t replicate every ticket between systems. Use filters to sync only IT-related support tickets or customer-impacting incidents. This keeps both platforms clean and reduces noise for your teams.
- Align priority levels, categories, and statuses between platforms so they make sense to both teams. Decide whether all comments should sync or just internal notes. Some conversations between support and customers don’t need to clutter IT tickets.
- Define which team owns which ticket type. Once a ticket moves from support to IT, decide whether support should still update it or if IT takes full ownership.
- Configure alerts so teams know when tickets are escalated, updated, or resolved. Don’t rely on people manually checking both systems for changes.
- Run the integration with a small team first. Work out the kinks in field mapping, sync rules, and workflows before rolling it out company-wide.
- Write down what triggers syncs, which fields map where, and how conflicts are handled. This will help create continuity even when the personnel change.
- Check whether your sync rules still make sense as your workflows evolve. What worked with 50 tickets a day might not work with 500.
- Make sure support and IT understand how the integration works, what gets synced, and what they need to do differently. The best integration fails if people don’t know how to use it.
- Keep an eye on sync delays, failed syncs, and API rate limits. Set up alerts for when things break so issues don’t pile up silently. Some key metrics to monitor include sync success rates, failure frequency, user adoption, and satisfaction scores.
Frequently Asked Questions
Can I map custom fields between Freshservice and Freshdesk?
Yes, Exalate supports mapping both default and custom fields between Freshservice and Freshdesk. You can sync all default fields (summary, description, status, priority, urgency, attachments, inline images, due date), custom fields you’ve created, and any fields available via REST APIs. The integration handles different field types with automatic data transformations—dropdowns map to dropdowns, dates convert to correct formats, and multi-select fields sync properly.
For complex mappings, Aida provides AI-assisted configuration where you describe what fields should sync, and it generates the mapping logic. For advanced scenarios, you have full script control to write custom transformation rules.
How does Exalate handle private notes and comments?
Exalate gives you complete control over what comments sync between systems. You can configure the integration to:
- Sync all comments (public and private)
- Sync only public comments
- Keep internal notes private on each side
- Sync comments one-way (Freshdesk to Freshservice only, or vice versa)
This is configured per connection, so different integration patterns can have different comment sync rules based on your workflow requirements.
Can I sync only specific ticket types between Freshservice and Freshdesk?
Yes, Exalate includes powerful filtering capabilities to control which tickets sync. You can filter based on:
- Ticket type (incidents, service requests, changes)
- Priority or urgency levels
- Category or subcategory
- Keywords in subject or description
- Custom field values
- Brand, group, or tag assignments
- Any combination of the above
For example, you might sync only high-priority customer-facing incidents from Freshdesk to Freshservice while keeping internal IT work items separate.
Can I integrate Freshservice and Freshdesk with other tools simultaneously?
Yes, Exalate supports multi-platform connectivity, allowing you to sync Freshservice and Freshdesk with 40+ other platforms simultaneously, including:
- Jira Cloud
- ServiceNow
- Zendesk
- Salesforce
- Azure DevOps (Cloud and Server)
- Asana
- GitHub
View all supported integrations.
Can I map multiple Freshdesk tickets to a single Freshservice incident?
Yes, Exalate supports many-to-one relationships where multiple Freshdesk tickets link to a single Freshservice incident. This is valuable for:
Pattern identification: Multiple customer reports about slow performance linked to one IT infrastructure incident, helping IT see the scope of impact.
MSP environments: Different client Freshdesk tickets link to a single Freshservice incident when the root cause affects multiple clients.
Customer privacy: External partner tickets link to internal IT incidents without exposing sensitive operational details.
Each Freshdesk ticket maintains its own customer communication thread while sharing resolution information from the central Freshservice incident.
How does Exalate ensure data security during integration?
Exalate maintains enterprise-grade security with:
- ISO 27001:2022 certification
- TLS 1.2 and 1.3 encryption
- JWT access tokens, Basic Auth, and multi-factor authentication
- Granular permissions ensure users only see data appropriate to their role.
- GDPR-ready with data processing agreements
Visit our Trust Center for detailed security documentation, certifications, and compliance information.
Recommended Reads:
- Freshdesk Jira Integration in the Age of Customer Satisfaction
- Freshdesk Zendesk Integration For Smoother Ticket Management
- How Freshservice Salesforce Integration Unifies Sales and Support Operations
- How to Get the Most out of Your Workflow Integration
- Automated Integration: A Key to Scalable and Agile Business Operations