Help desk applications help organizations understand customer concerns before escalating them to the right department.
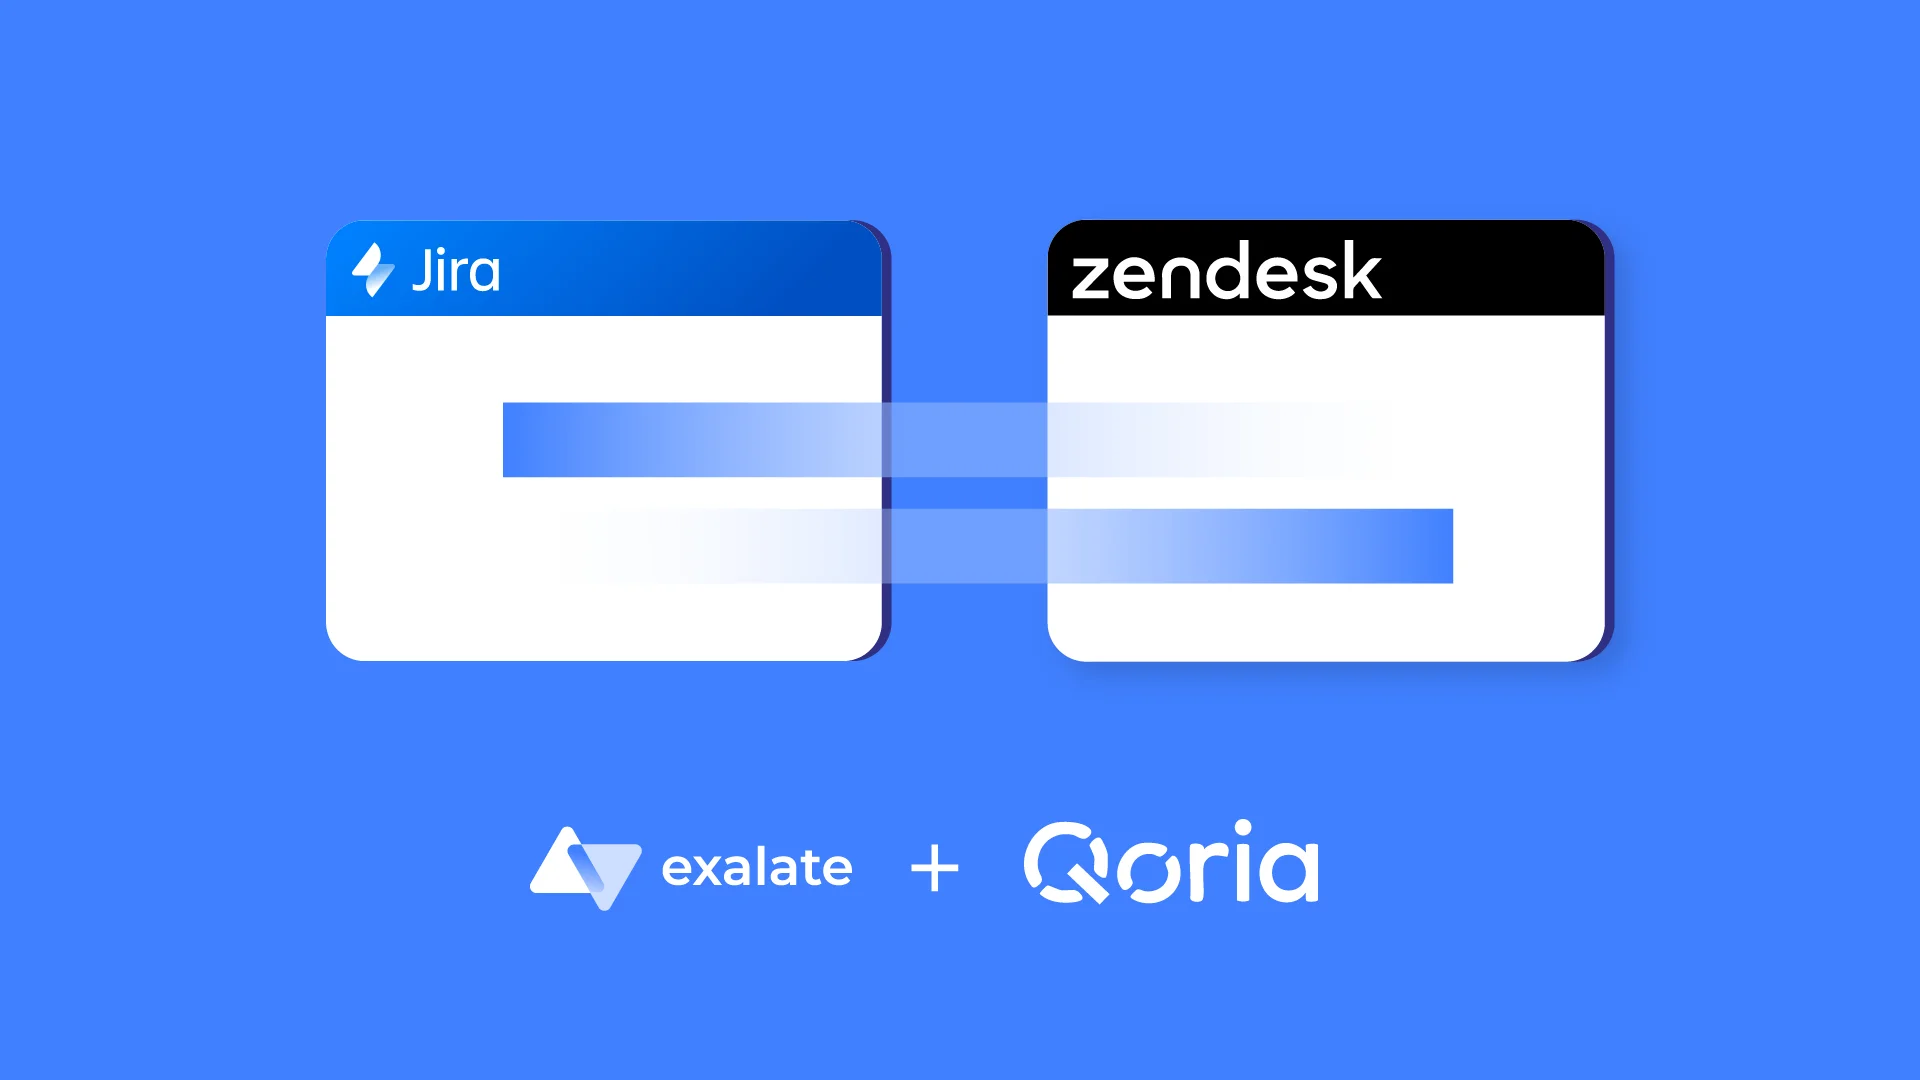
To that end, managers can integrate Freshdesk and Zendesk as part of the same customer support ecosystem. One of the primary reasons is to ensure that teams on both platforms have the same historical and real-time context to deliver accurate customer service.
And that’s where Freshdesk Zendesk integration comes in.
To get both systems to interact and exchange relevant information, you need to connect them with a third-party integration solution.
This guide covers how to set up a Zendesk to Freshdesk integration, what to look for in an integration solution, practical use cases, and how Exalate handles these scenarios.
Key Takeaways
- Freshdesk Zendesk integration connects two help desk platforms so teams can share ticket data, comments, and customer context in real time without switching systems.
- MSPs and enterprises benefit most from this integration when outsourcing support, managing M&A transitions, or collaborating with external partners using different platforms.
- Look for integration solutions that offer AI-assisted configuration, Groovy-based scripting for advanced customization, and enterprise-grade security.
- Exalate enables bidirectional syncs with full control over which fields and entities transfer between platforms, plus automated triggers for ticket escalation workflows.
- Beyond Freshdesk and Zendesk, Exalate supports multi-platform scenarios including Jira, ServiceNow, Azure DevOps, Freshservice, Salesforce, and Asana.

What is Freshdesk Zendesk Integration?
Freshdesk Zendesk integration is the process of connecting both systems to bridge the compatibility gap and ensure smooth data transfer between them.
When teams integrate Freshdesk with Zendesk, there’s an expectation that each side wants to stay in their own system while obtaining access to all key information from the other side.
Here’s a practical example: A logistics company using Freshdesk wants to outsource customer support to an MSP using Zendesk. An integration solution helps both sides connect their help desks to share updates and monitor progress in real time. The contents of any ticket coming into Zendesk immediately transfer to Freshdesk as an incident, problem, or feature request.
In a multi-platform integration scenario, the Freshdesk ticket can further escalate to development teams using Azure DevOps, Azure DevOps Server, Jira Service Management, or even Asana for project tracking. All updates sync in real time.
Benefits of Zendesk to Freshdesk Integration
Organizations integrate help desk applications like Freshdesk and Zendesk for several operational advantages:
- Increased operational efficiency: Help desk integration improves transparency, ticket resolution accuracy, and decision-making speed. Teams get a unified view of support tickets, recurrent patterns, critical incidents, and customer pain points.
- Fix broken silos between organizations: Integrating Zendesk and Freshdesk eliminates information barriers between large organizations or collaborating partners. Both sides access more data since they’re always in sync.
- Smoother M&A transitions: Freshdesk and Zendesk integration streamlines the migration of knowledge bases and ticket repositories during mergers, reducing data duplication and onboarding friction.
- Reduced technology costs: Instead of forcing platform standardization across teams, integration lets each group use their preferred tool while maintaining data continuity.
- Improved ticket close rates: With shared context and automated escalation, support teams resolve tickets faster while maintaining high customer satisfaction scores.
- Better collaboration with external partners: MSPs, vendors, and contractors can work alongside internal teams without requiring access to internal systems.
What to Consider When Choosing an Integration Solution
When evaluating integration solutions for Zendesk and Freshdesk, these features matter most:
Scalability
Any integration tool should adapt to increasing workloads and unexpected ticket surges during product releases or security incidents. The solution should handle growing ticket volumes without requiring additional maintenance or infrastructure changes.
AI-Assisted Configuration
Look for solutions with AI-powered features that simplify the setup process. Exalate’s Aida, for example, uses natural language processing to help users generate sync scripts through conversational prompts rather than manual coding.
Customizability Through Scripting
The solution should support custom connections and allow users to script their own syncs using languages like Groovy. This is especially important for advanced use cases where standard field mappings don’t fit your workflow.
Reliability and Error Handling
Read independent reviews to understand how the integration handles network outages, API rate limits, and platform downtimes. Built-in retry mechanisms and intuitive error logs make troubleshooting faster.
Security and Compliance
Consider all necessary security measures to protect information at rest and in transit. Look for:
- ISO 27001 certification
- Role-based access controls (RBAC)
- Encryption protocols for data in transit and at rest
- JWT-based authentication
- Full scripting control over your sync side
For detailed security information, visit the Exalate Trust Center.
Pricing Structure
Integration tools should come with transparent, predictable pricing. Exalate offers subscription-based plans that scale with your needs. Avoid solutions that charge per ticket or per sync, as costs can become unpredictable with high volumes.
Support for Multiple Platforms
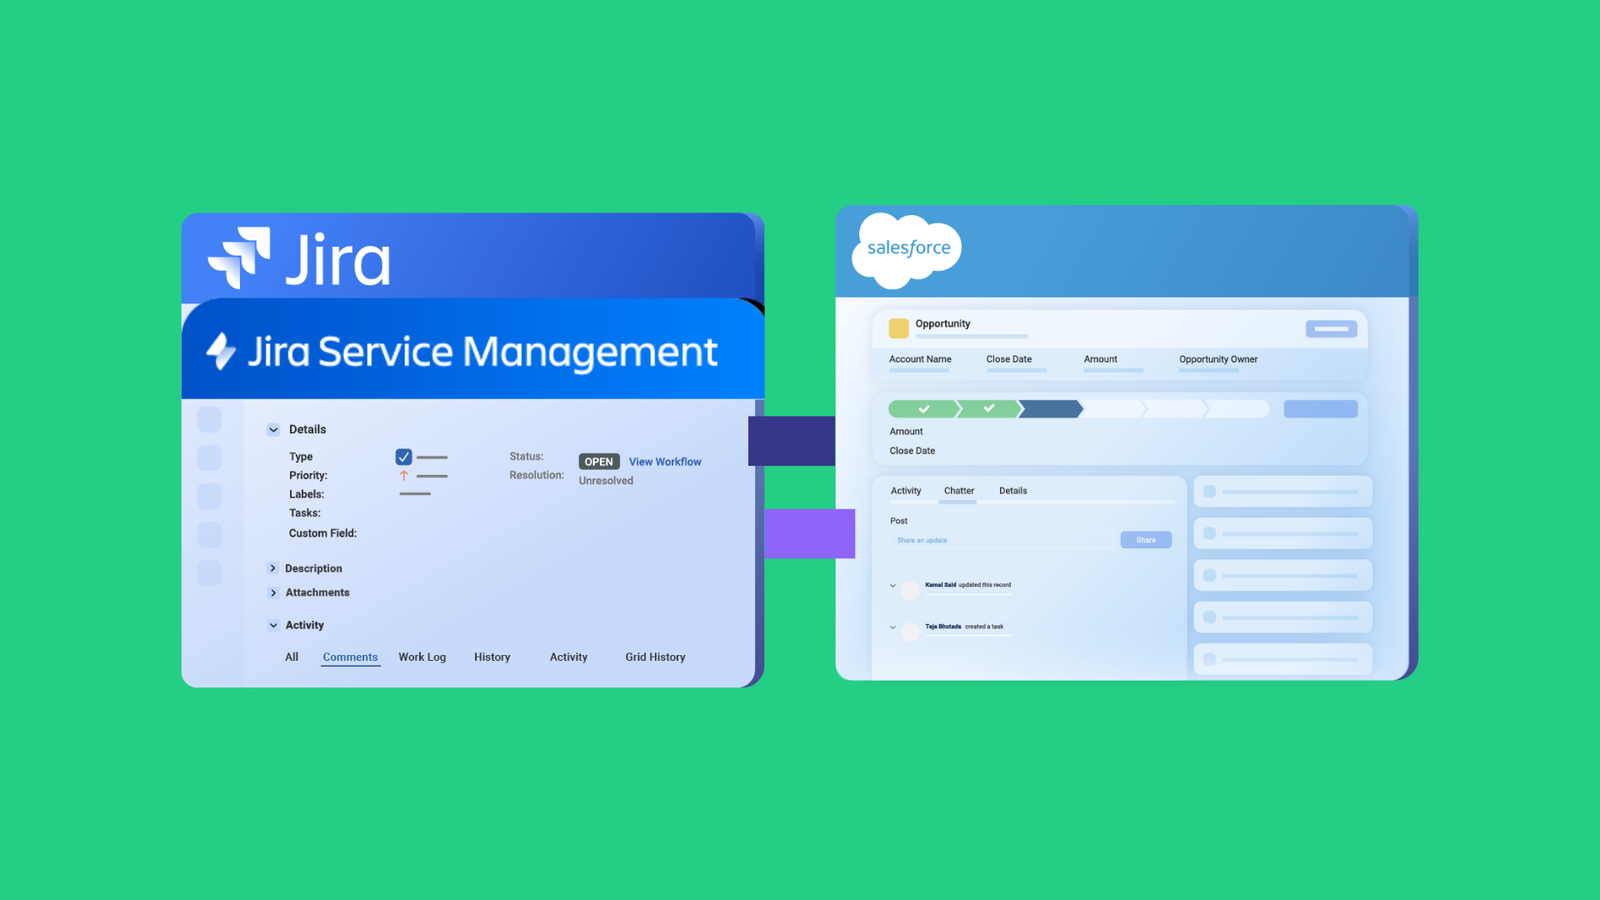
Beyond Freshdesk and Zendesk, consider whether you’ll need to integrate additional platforms. Exalate supports Jira Service Management, ServiceNow, Salesforce, Azure DevOps, Azure DevOps Server, Freshservice, Asana, and custom connectors for platforms without native support.
Why Enterprises Choose Exalate for Help Desk Integration
Exalate is an AI-powered integration platform that supports one-way and two-way custom connections between service desk platforms, including Jira Service Management, Freshdesk, Freshservice, Zendesk, ServiceNow, and Salesforce.
Groovy-Based Scripting for Full Control
For complex use cases, Exalate provides Groovy-based scripting that gives you complete control over:
- Which fields sync between platforms
- Data transformations during transit
- Conditional logic for when syncs should trigger
- Custom field mappings and value translations
Aida: AI-Assisted Integration
Exalate includes Aida, an AI assistant that helps generate and modify sync scripts through natural language. Instead of writing Groovy code from scratch, you describe what you want to sync, and Aida generates the configuration.
Automated Triggers
Exalate uses automated triggers: event-based conditions that control how each individual sync works. You can configure triggers to:
- Only escalate high-priority tickets automatically
- Route tickets based on custom field values
- Sync specific ticket types to specific destinations
- Each side of the integration can set up its own triggers independently.
Enterprise-Grade Security
Exalate maintains ISO 27001 certification and implements comprehensive security controls:
- Role-based access control for admin functions
- Encryption of data in transit and at rest
- JWT-based authentication between nodes
- Full script and operational control over your sync side
- Complete audit capabilities
Multi-Platform Support
Beyond the Freshdesk-Zendesk connection, Exalate enables integration across your entire tech stack:
- ITSM platforms: ServiceNow, Jira Service Management, Freshservice
- DevOps tools: Azure DevOps, Azure DevOps Server, Jira Software
- CRM systems: Salesforce, HubSpot
- Project management: Asana, Monday.com
- Custom connectors for additional platforms
How to Integrate Freshdesk and Zendesk with Exalate: Step-by-Step Guide
This walkthrough shows you how to configure a Freshdesk Zendesk integration using Exalate’s synchronization platform.
Step 1: Create Your Exalate Account
Head to the Exalate integrations page and set up a new account. Already have one? Simply log in.
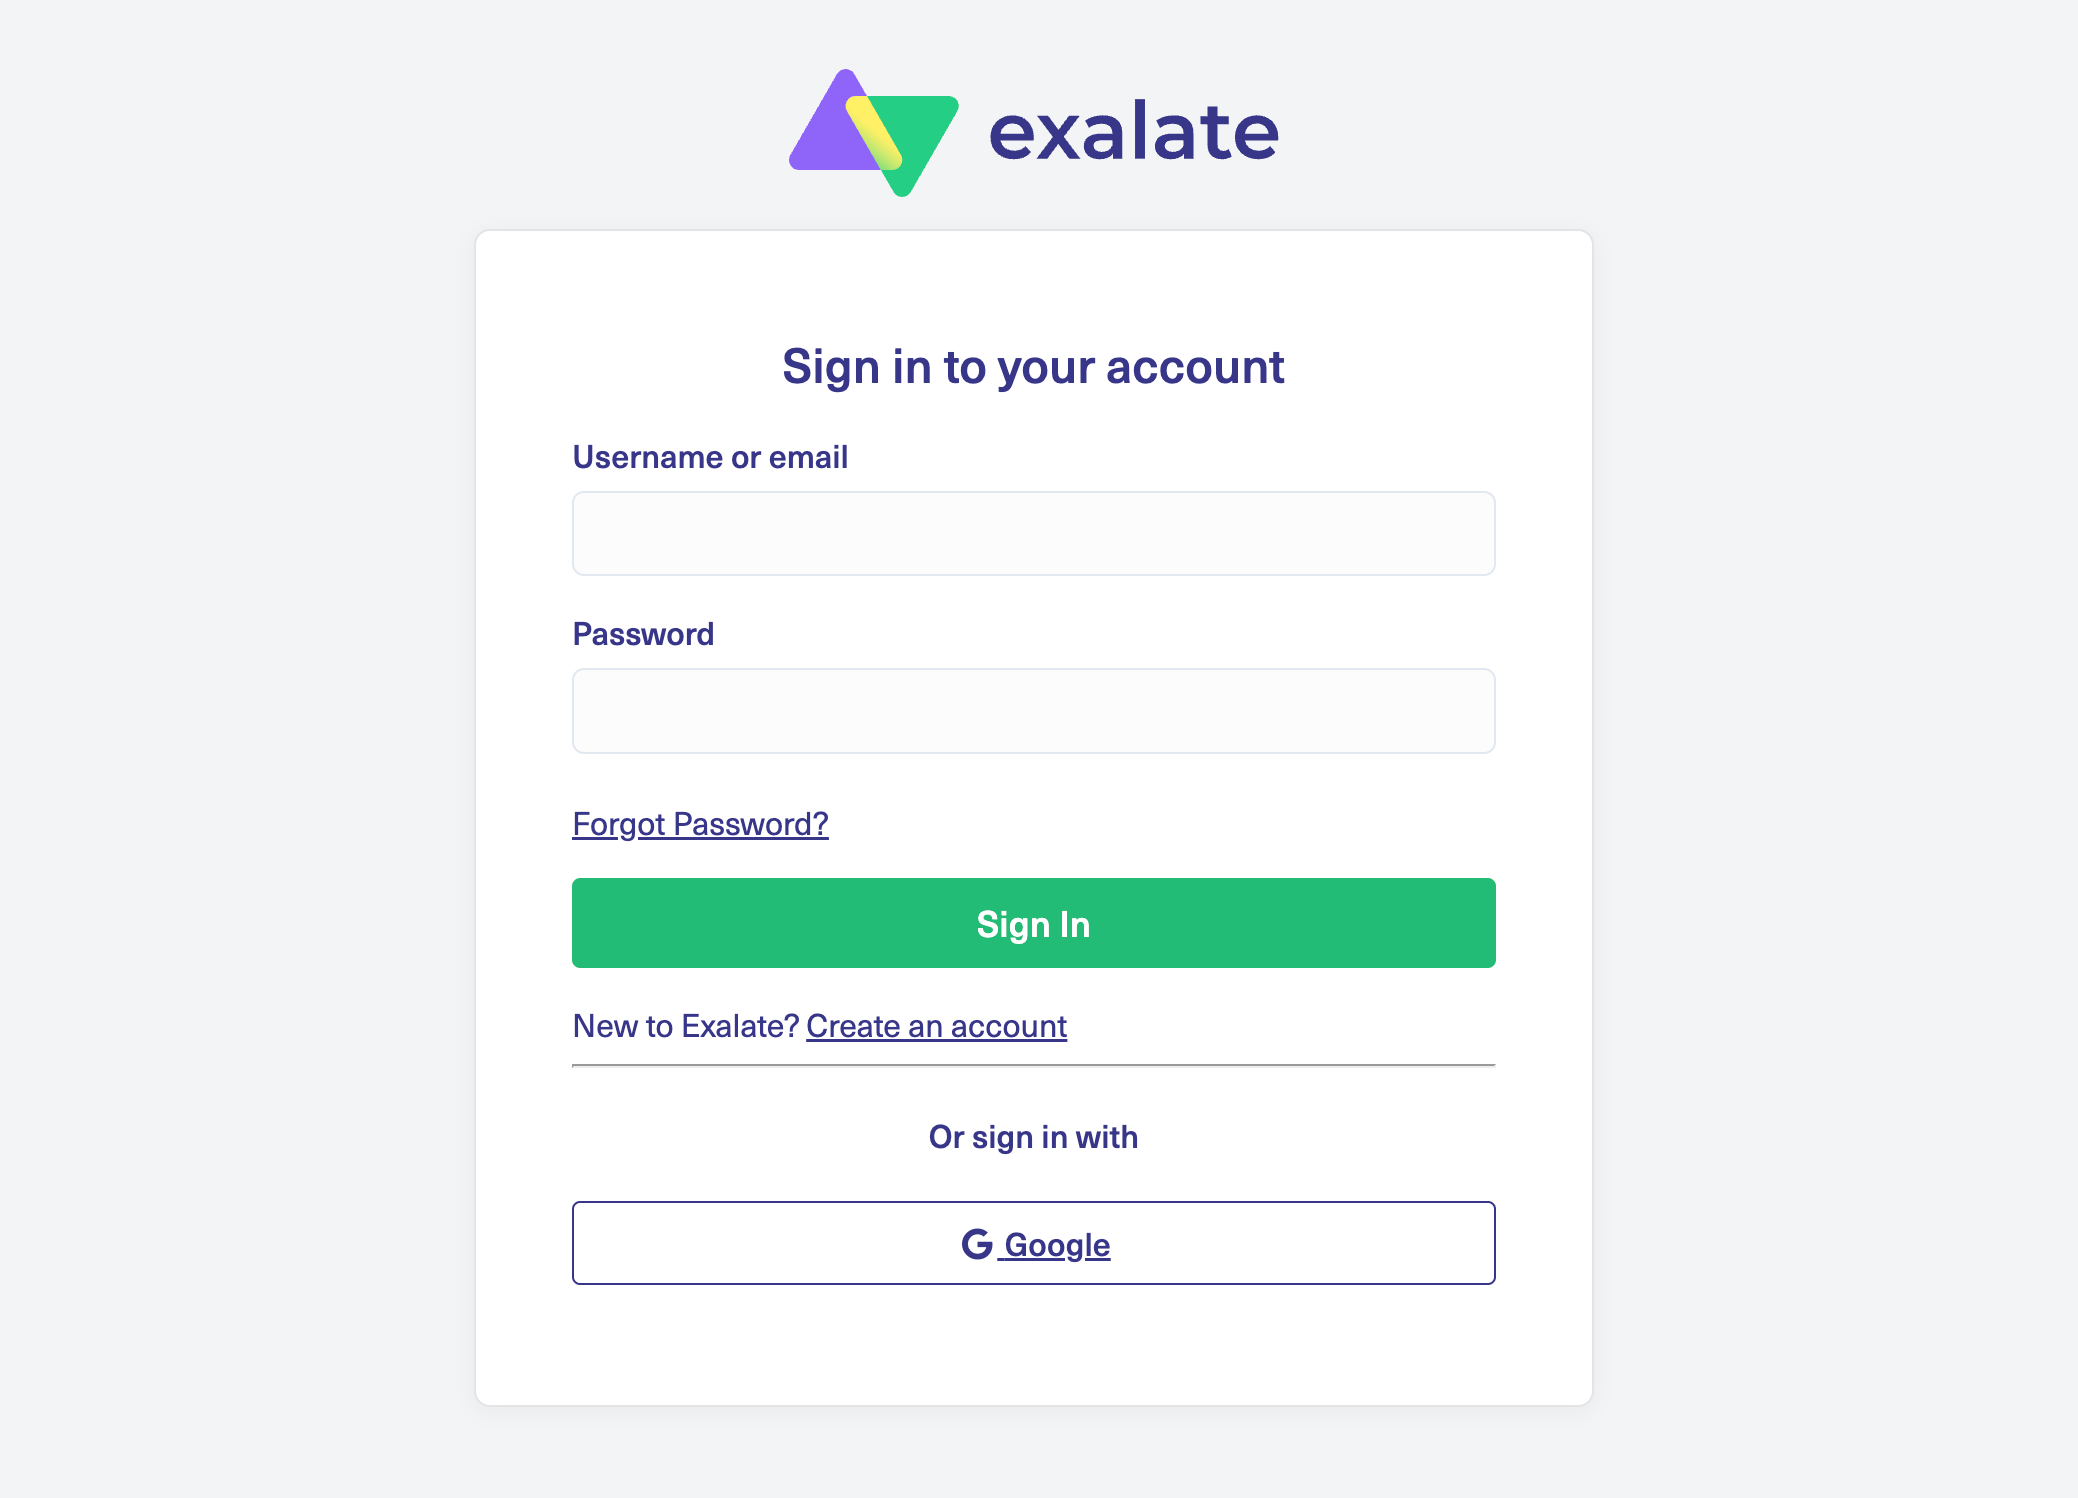
You can register using your email (with verification) or sign up directly through Google authentication.
Step 2: Set Up a Workspace
Workspaces let you organize and manage all your integrations from a central location.
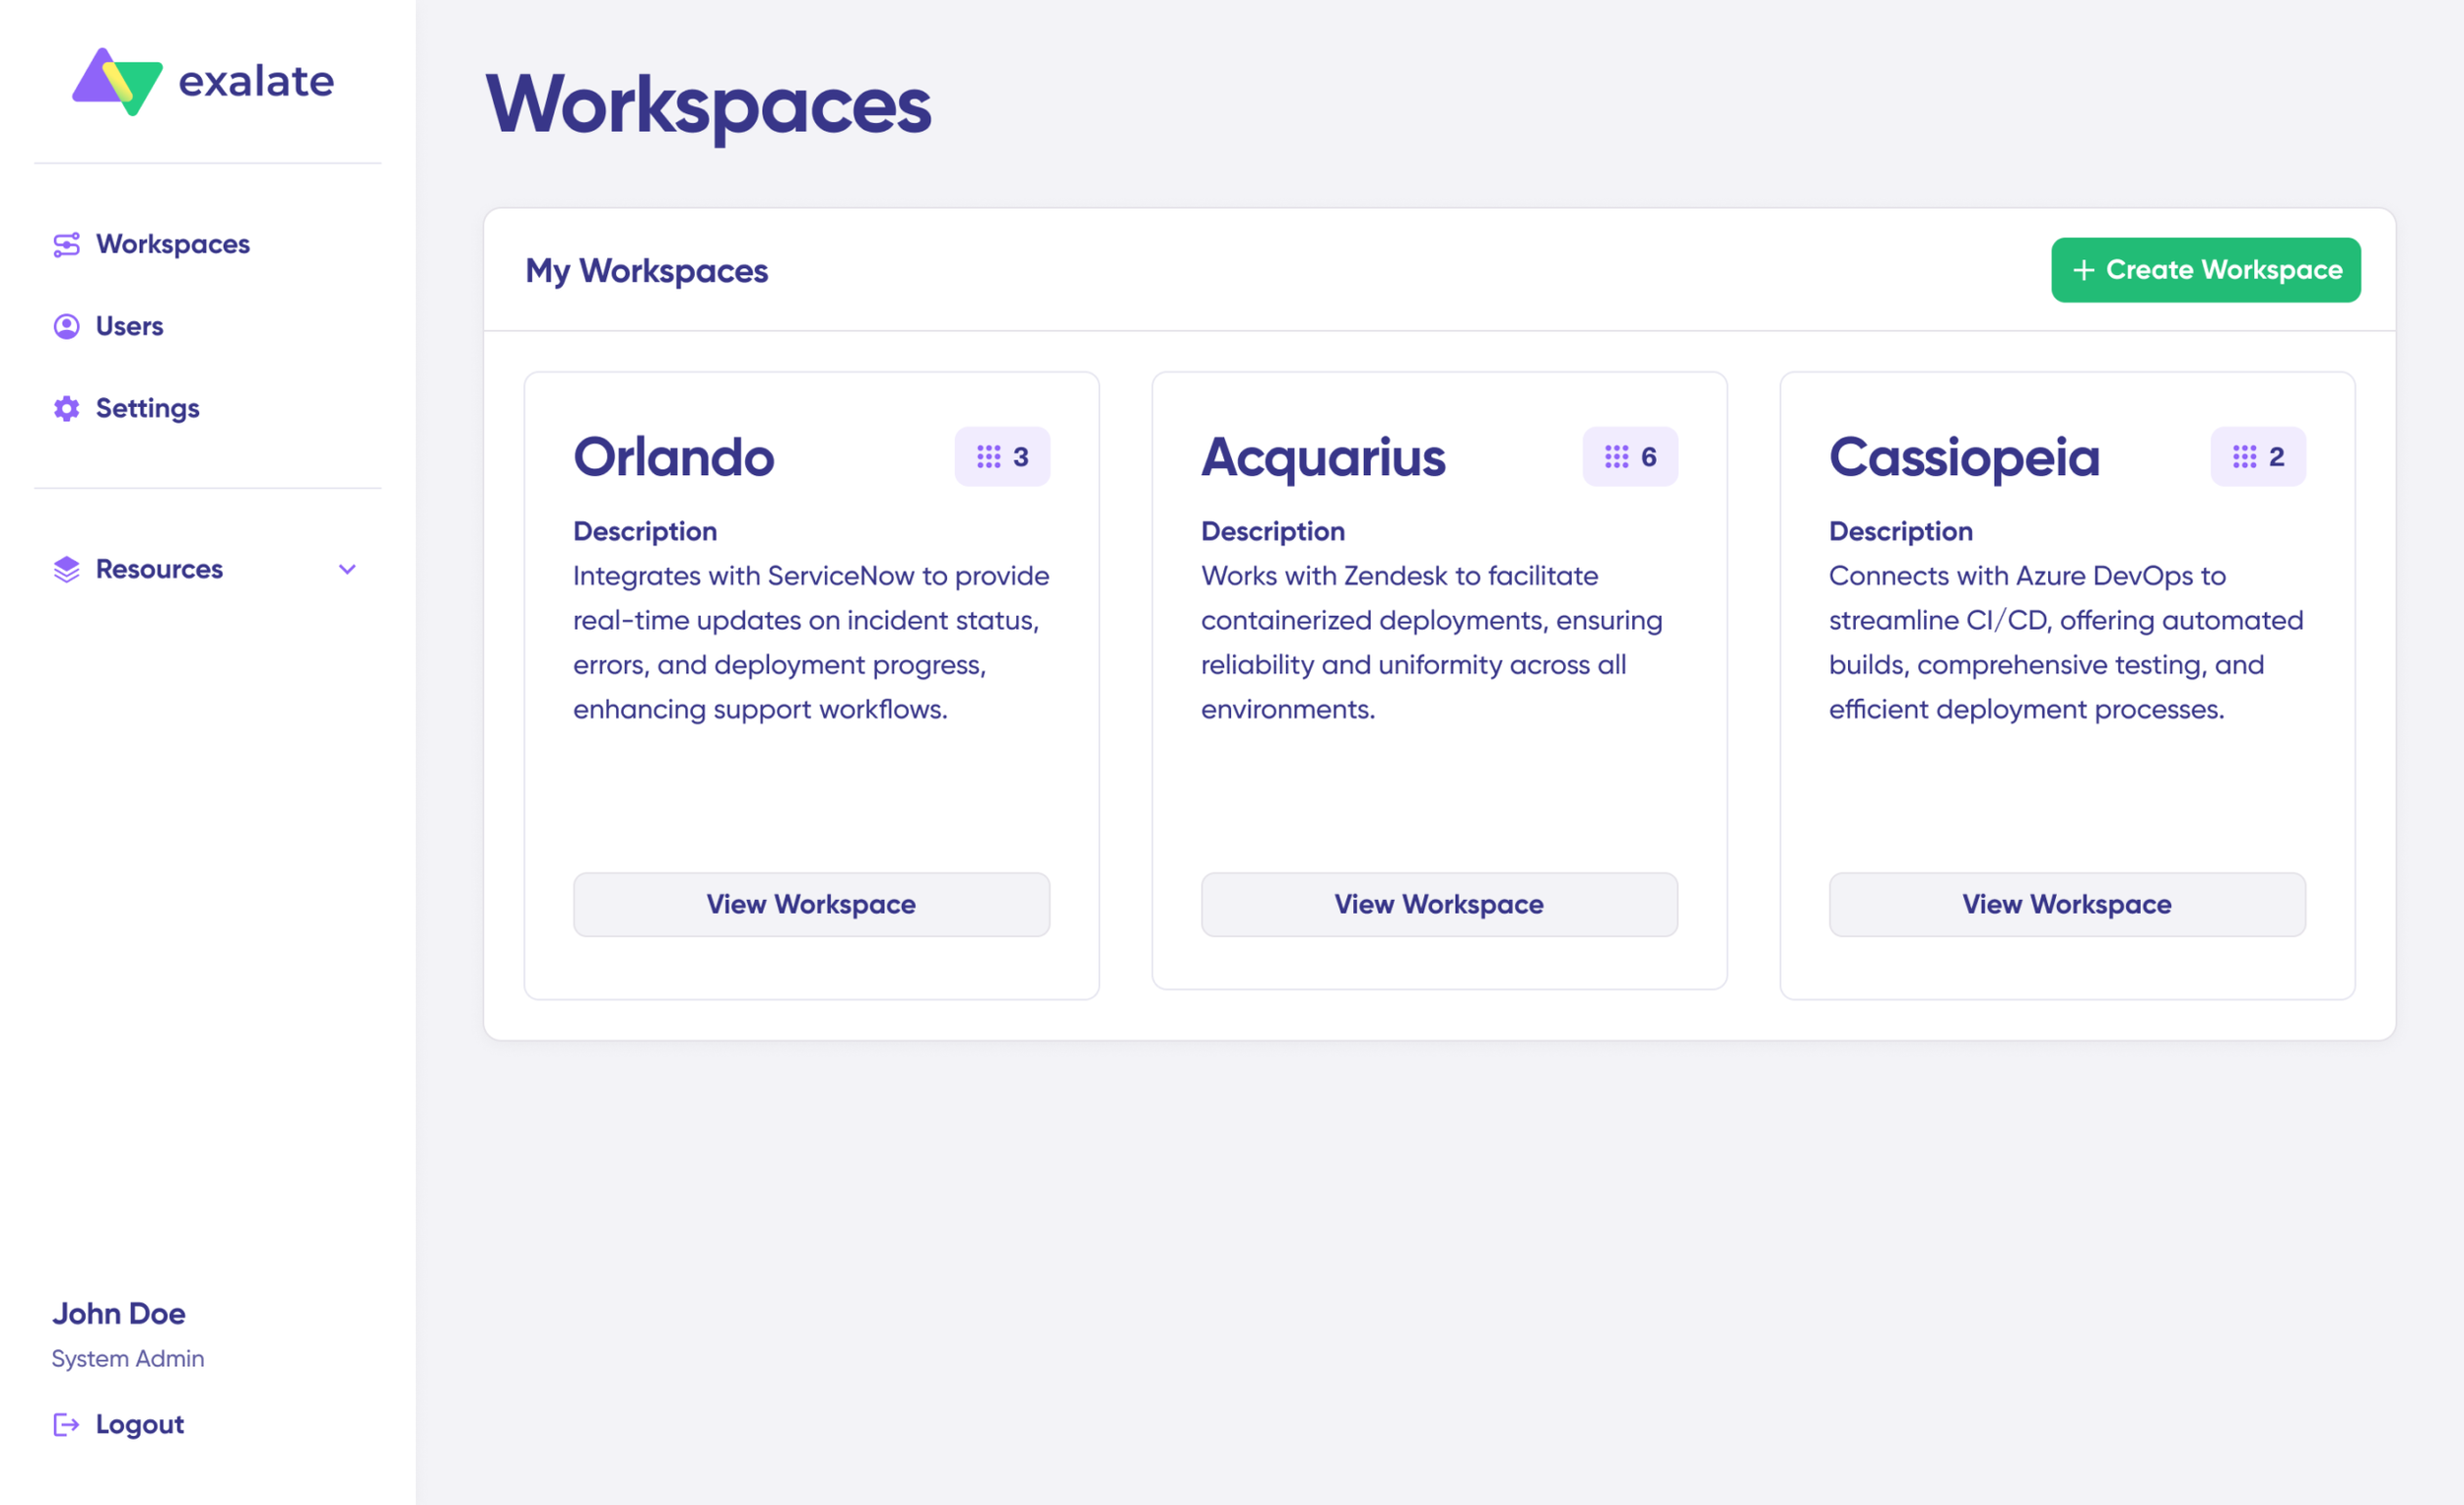
Access your existing workspaces under the “Workspaces” tab, or create a new one by clicking “+ Create Workspace.”
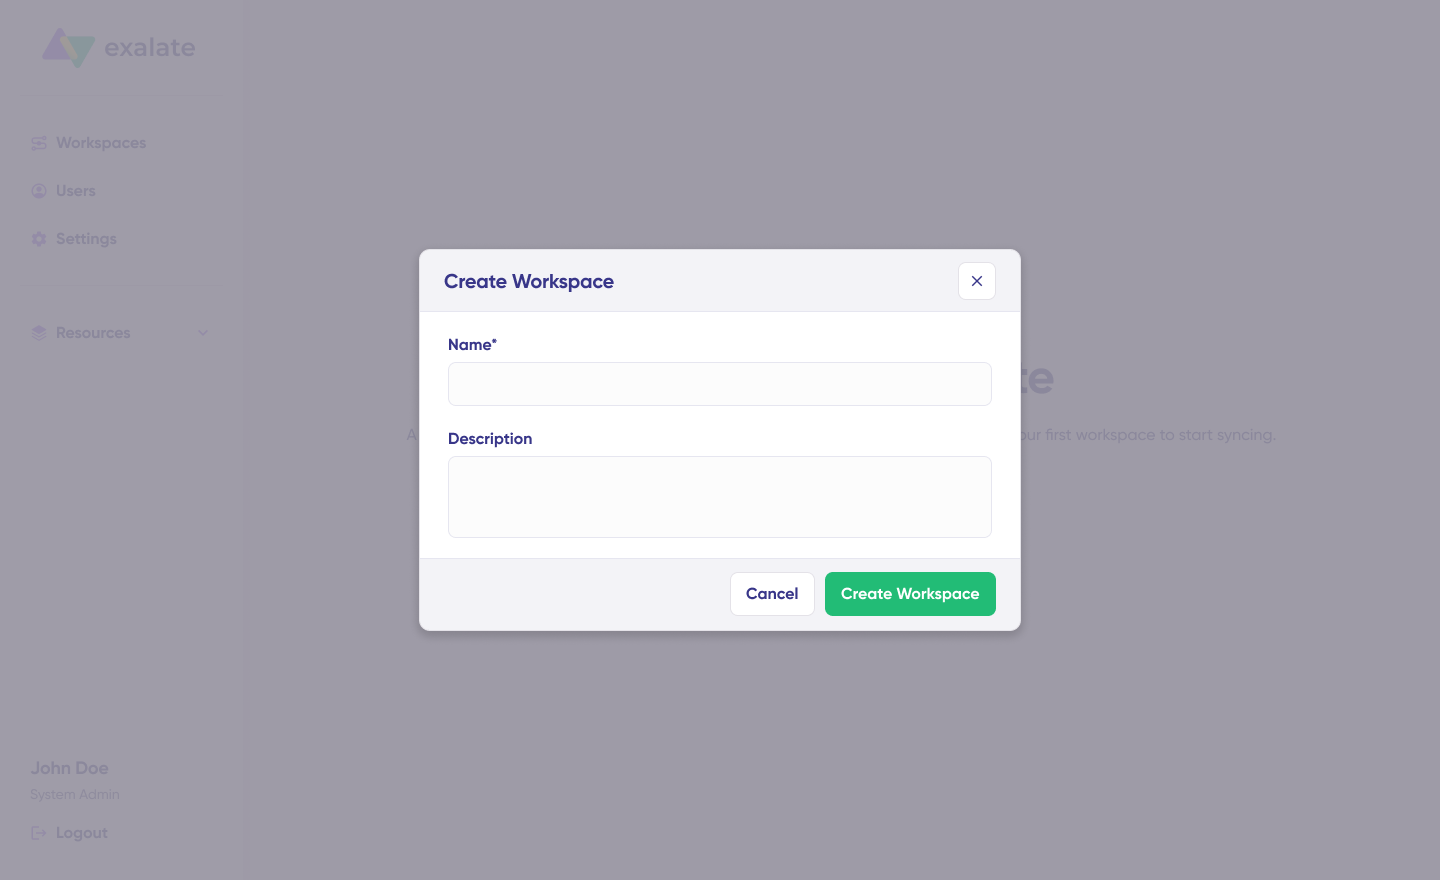
Provide a name and description for your workspace, then click “Create workspace” to proceed.
Step 3: Build Your First Freshdesk-Zendesk Connection
With your workspace ready, you can establish a connection between your help desk platforms. View existing connections under the “Connections” tab, where you can also edit and review connection details.
Note: Creating a connection requires an active Exalate account with at least one Workspace, plus access credentials for both Freshdesk and Zendesk.
Configure Your Systems
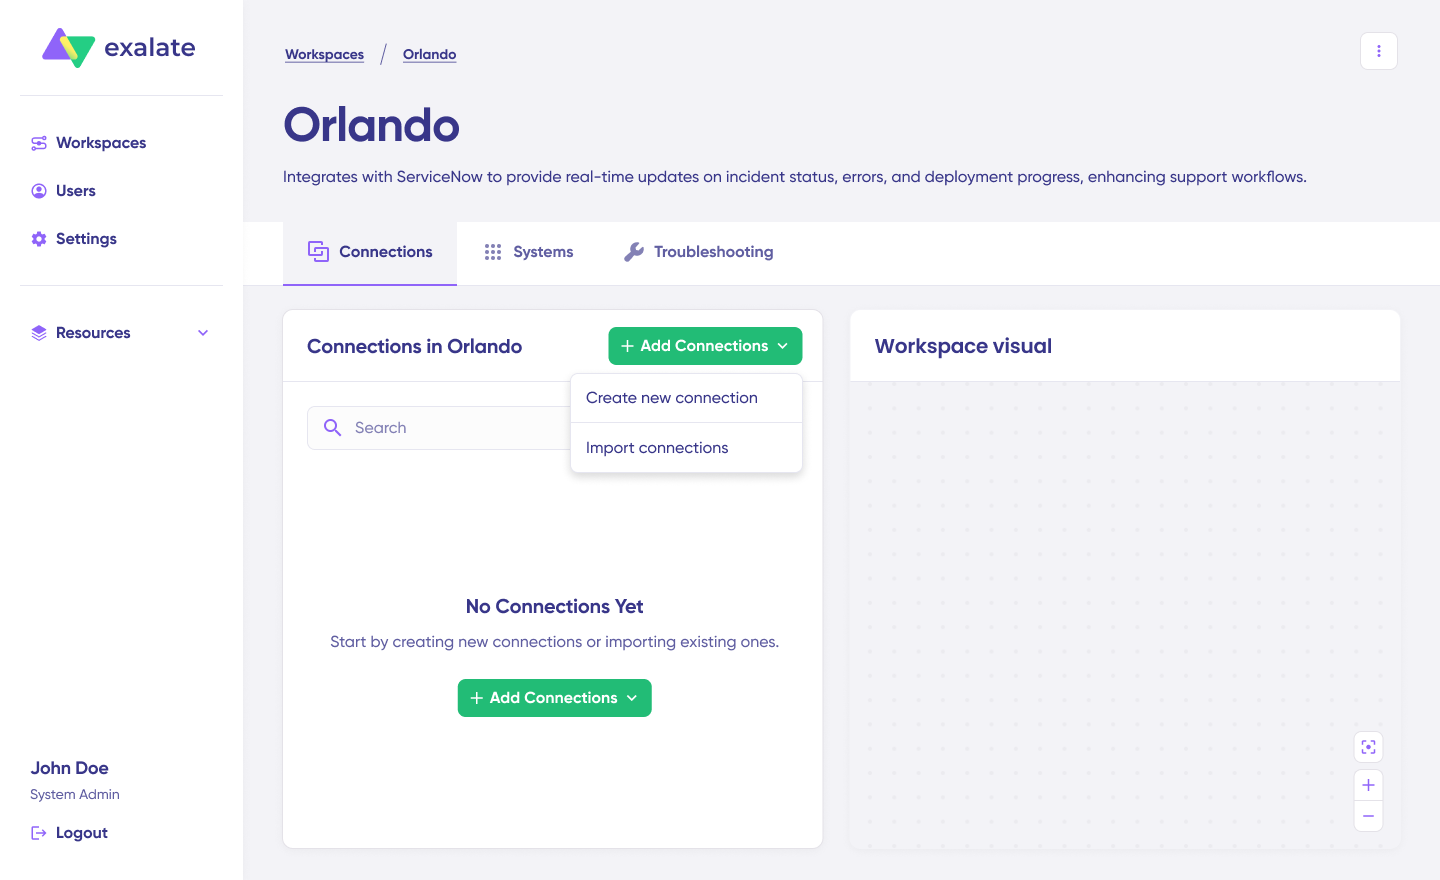
Click “+ Add connections” > “Create new connection.”
Enter the name for your first system—either Freshdesk or Zendesk. The order doesn’t matter. Let’s say you start with Zendesk. Enter your Zendesk subdomain URL (e.g., yourcompany.zendesk.com).

Behind the scenes, Exalate checks your system. If it’s already part of your current workspace, authentication happens automatically. If the system belongs to a different workspace, it gets registered for your current workspace.
For new systems, you’ll need to enter authentication details. Both platforms support Basic Auth with username and API key/token.
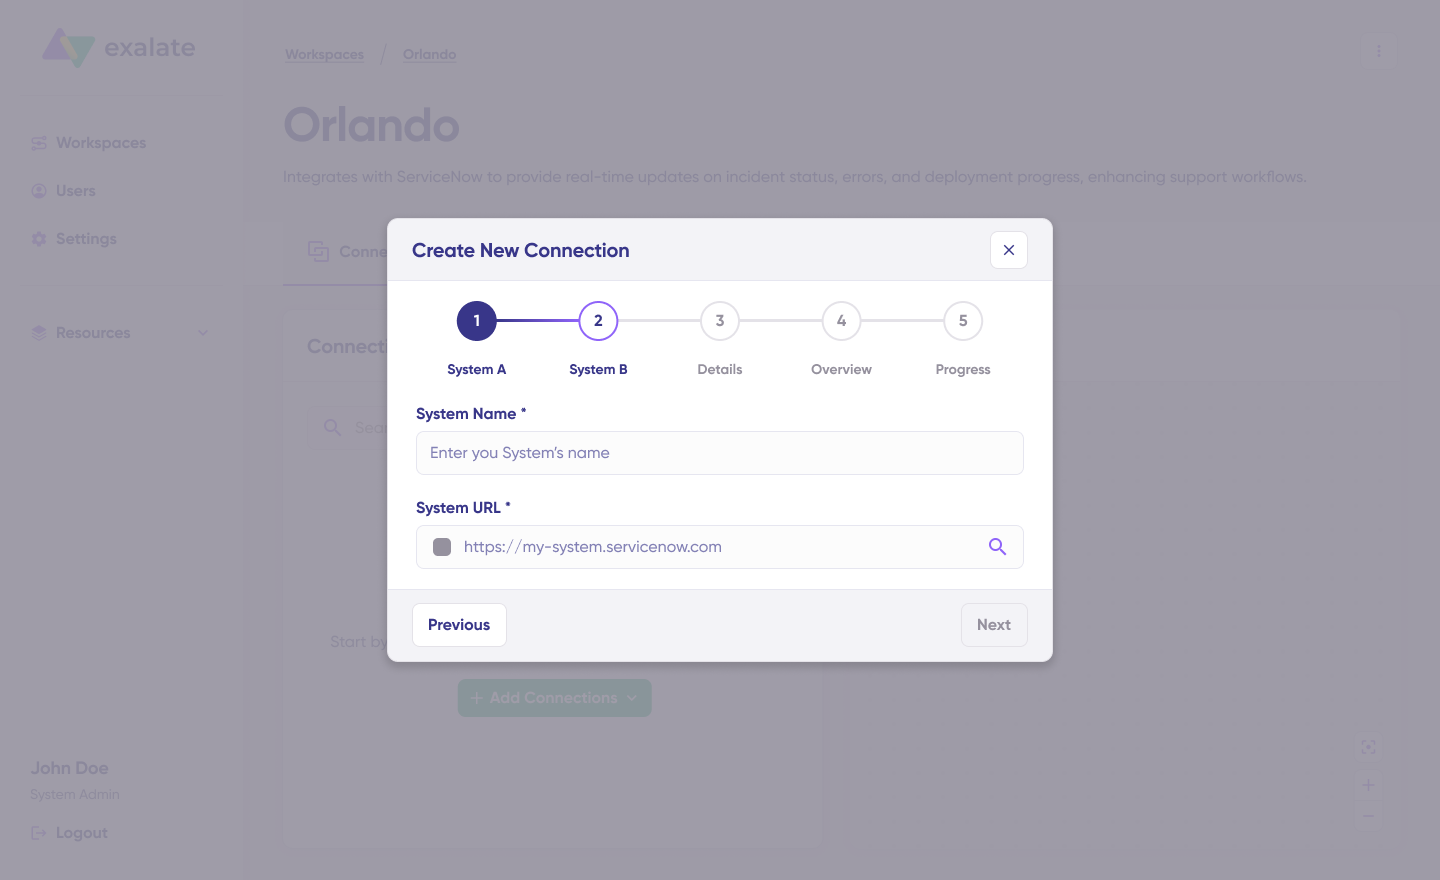
Repeat this process for Freshdesk using your Freshdesk domain URL (e.g., yourcompany.freshdesk.com).
Name your connection and add a description. Click “Next.” Review the details and click “Create connection.”
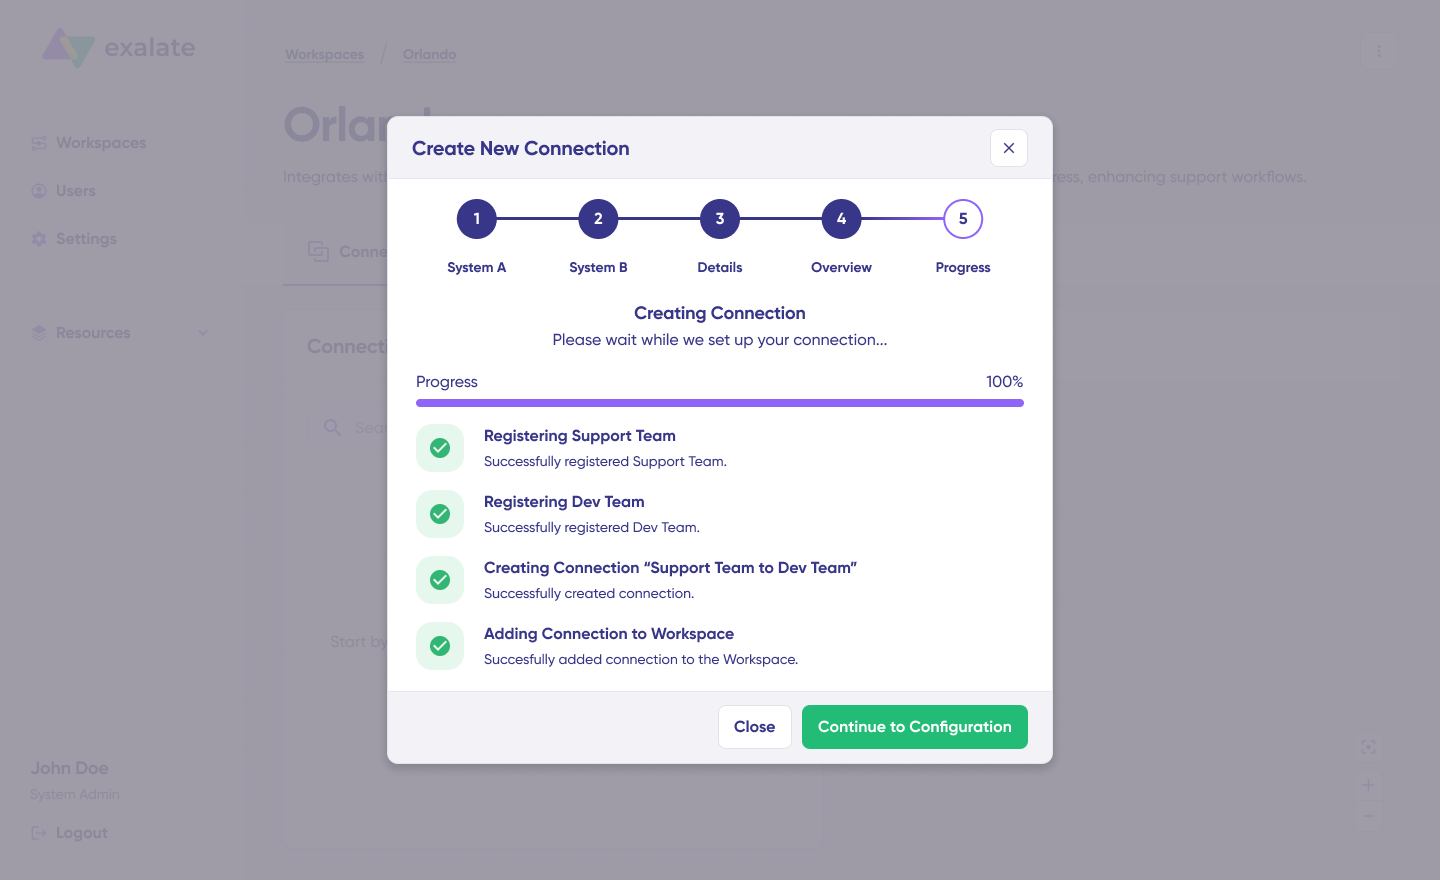
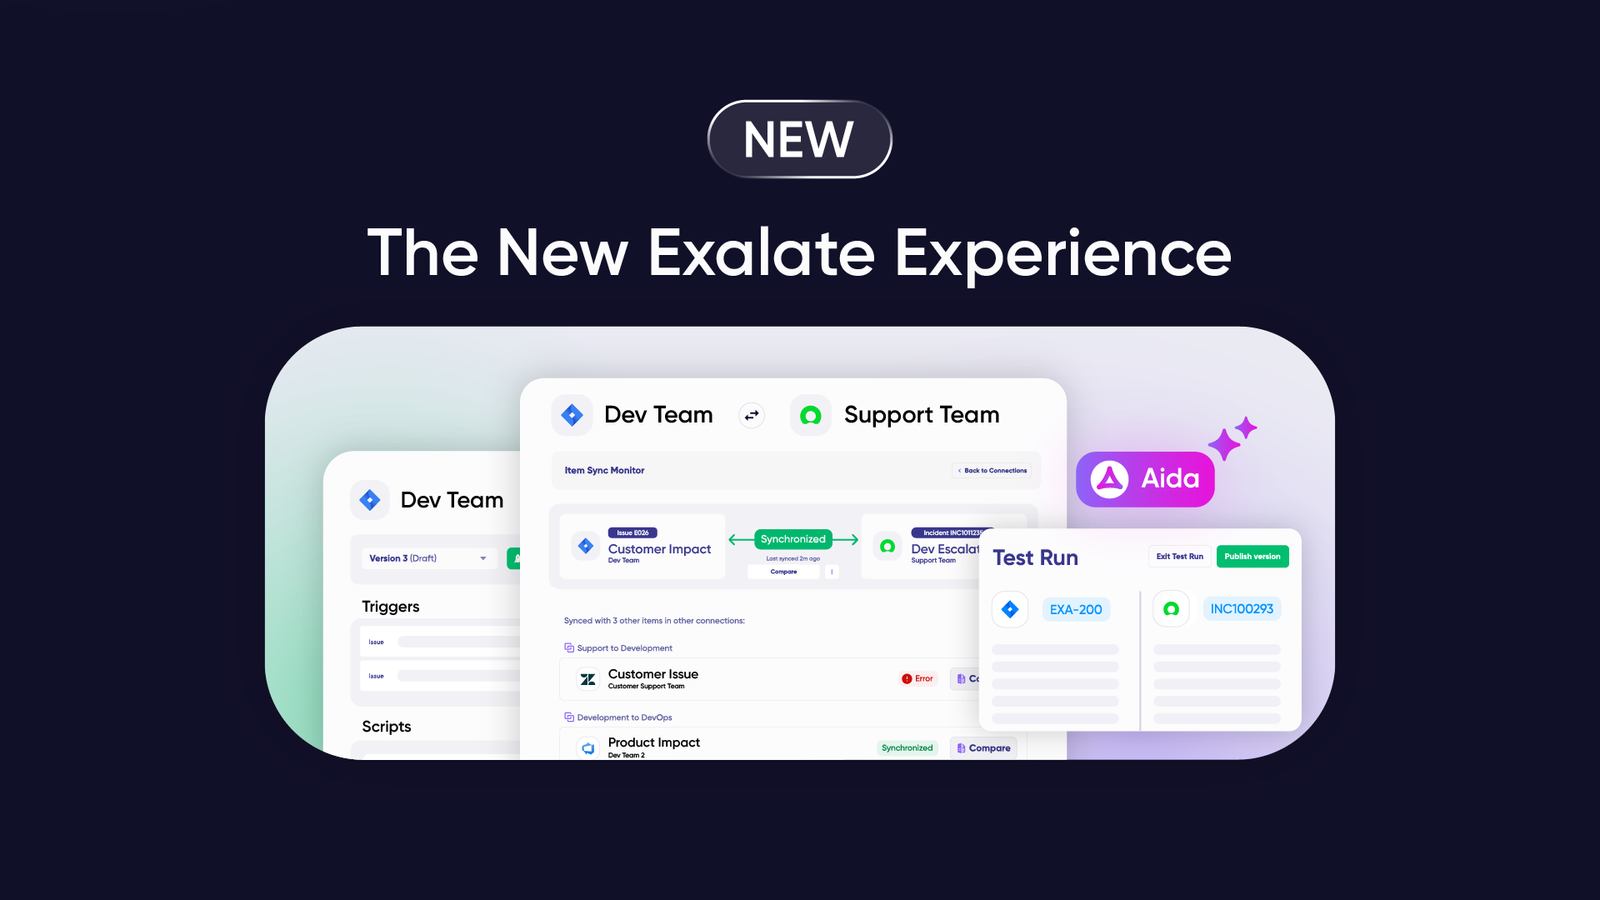
Once complete, select “Continue to configuration” and choose either a Zendesk view or a Freshdesk group for synchronization. Click “Build & continue.”
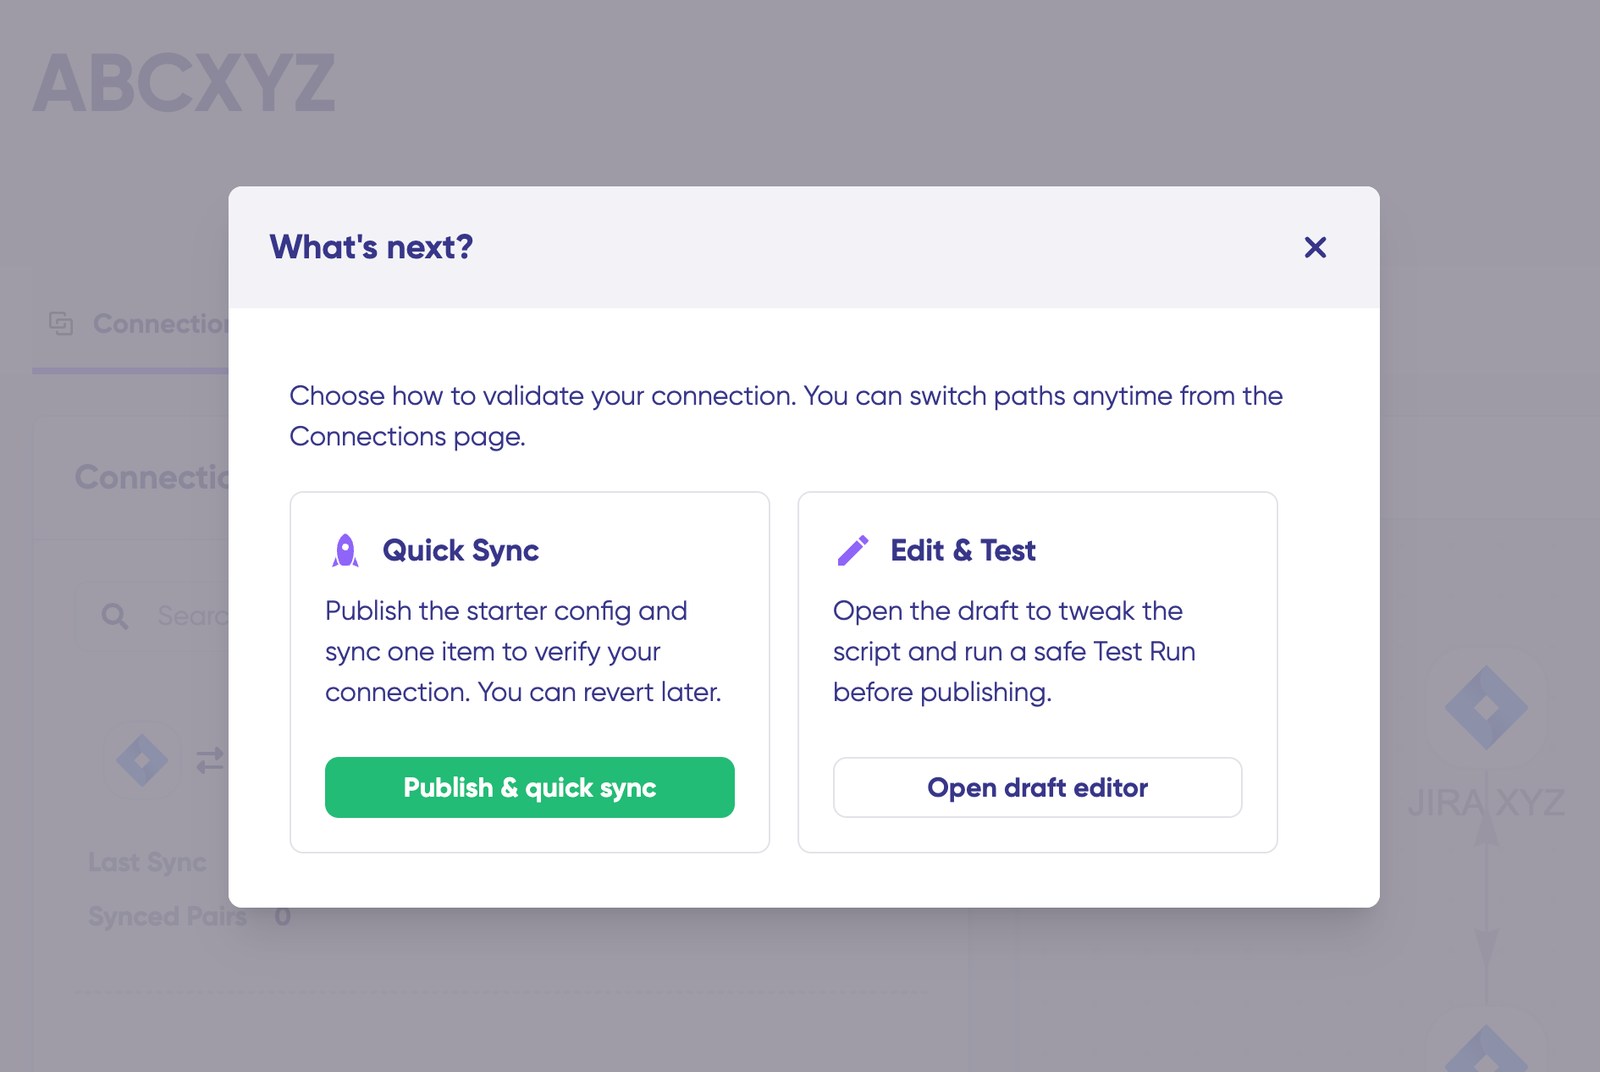
You now have two paths forward: “Quick sync” and “Edit & Test.”
Step 4: Quick Sync—Verify Your Connection
This optional step lets you sync a single item between Freshdesk and Zendesk to confirm everything works.
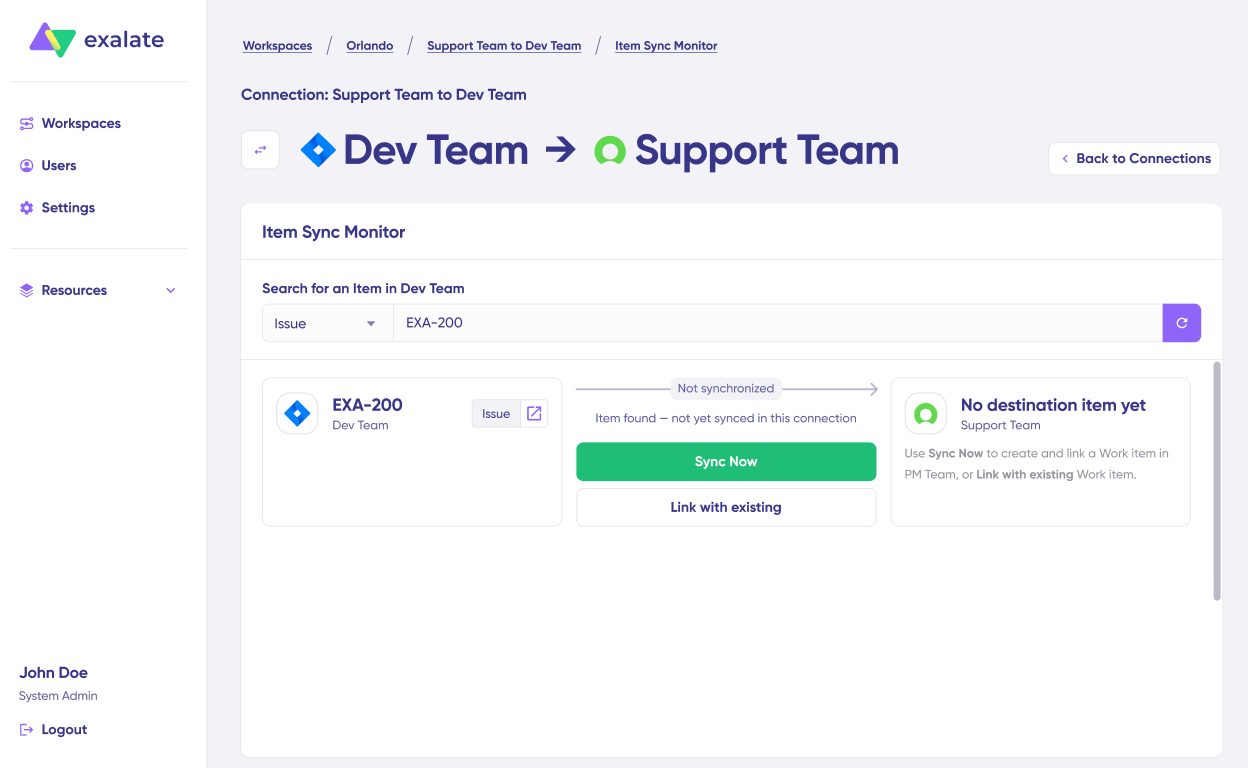
Under the “Item sync monitor,” enter either:
- A Zendesk ticket ID (the numeric identifier from your ticket URL)
- A Freshdesk ticket number (found in your ticket details)
Click “Sync Now” to push the item through. To link two existing tickets that should be paired, use “Link with existing” instead.
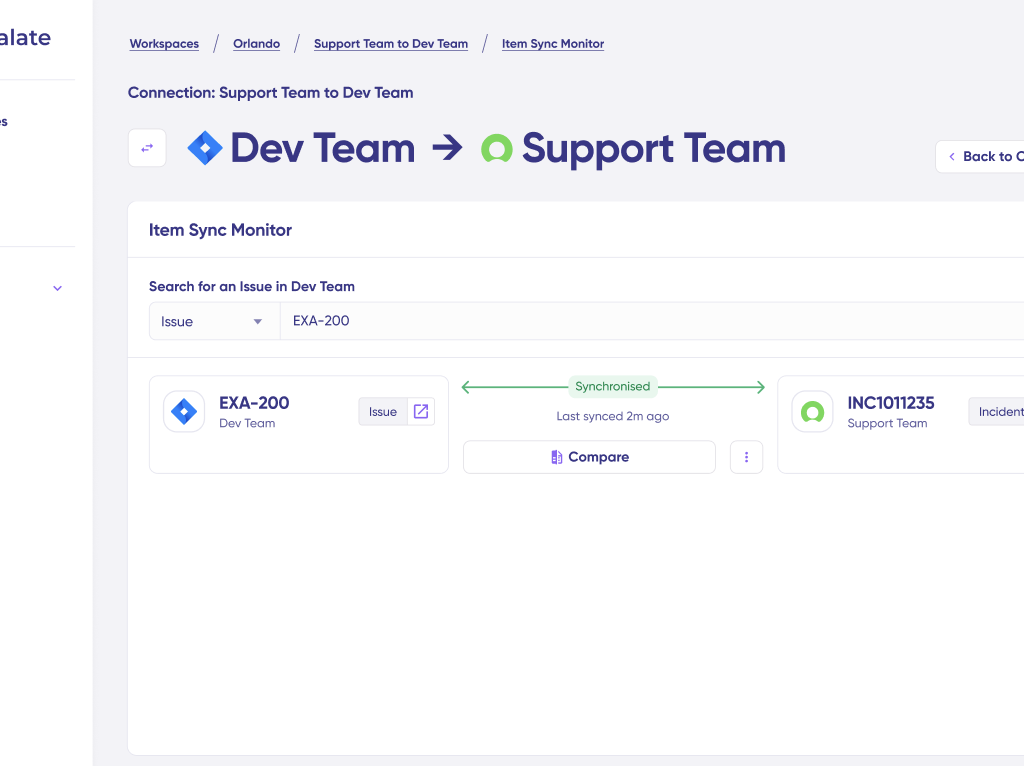
You’ll see status updates as the sync progresses. Once complete, open both synced tickets in new windows to verify the data transferred correctly.
Use the comparison view to preview how synced items will appear and how field changes get applied.
Step 5: Edit & Test—Customize Your Sync Rules
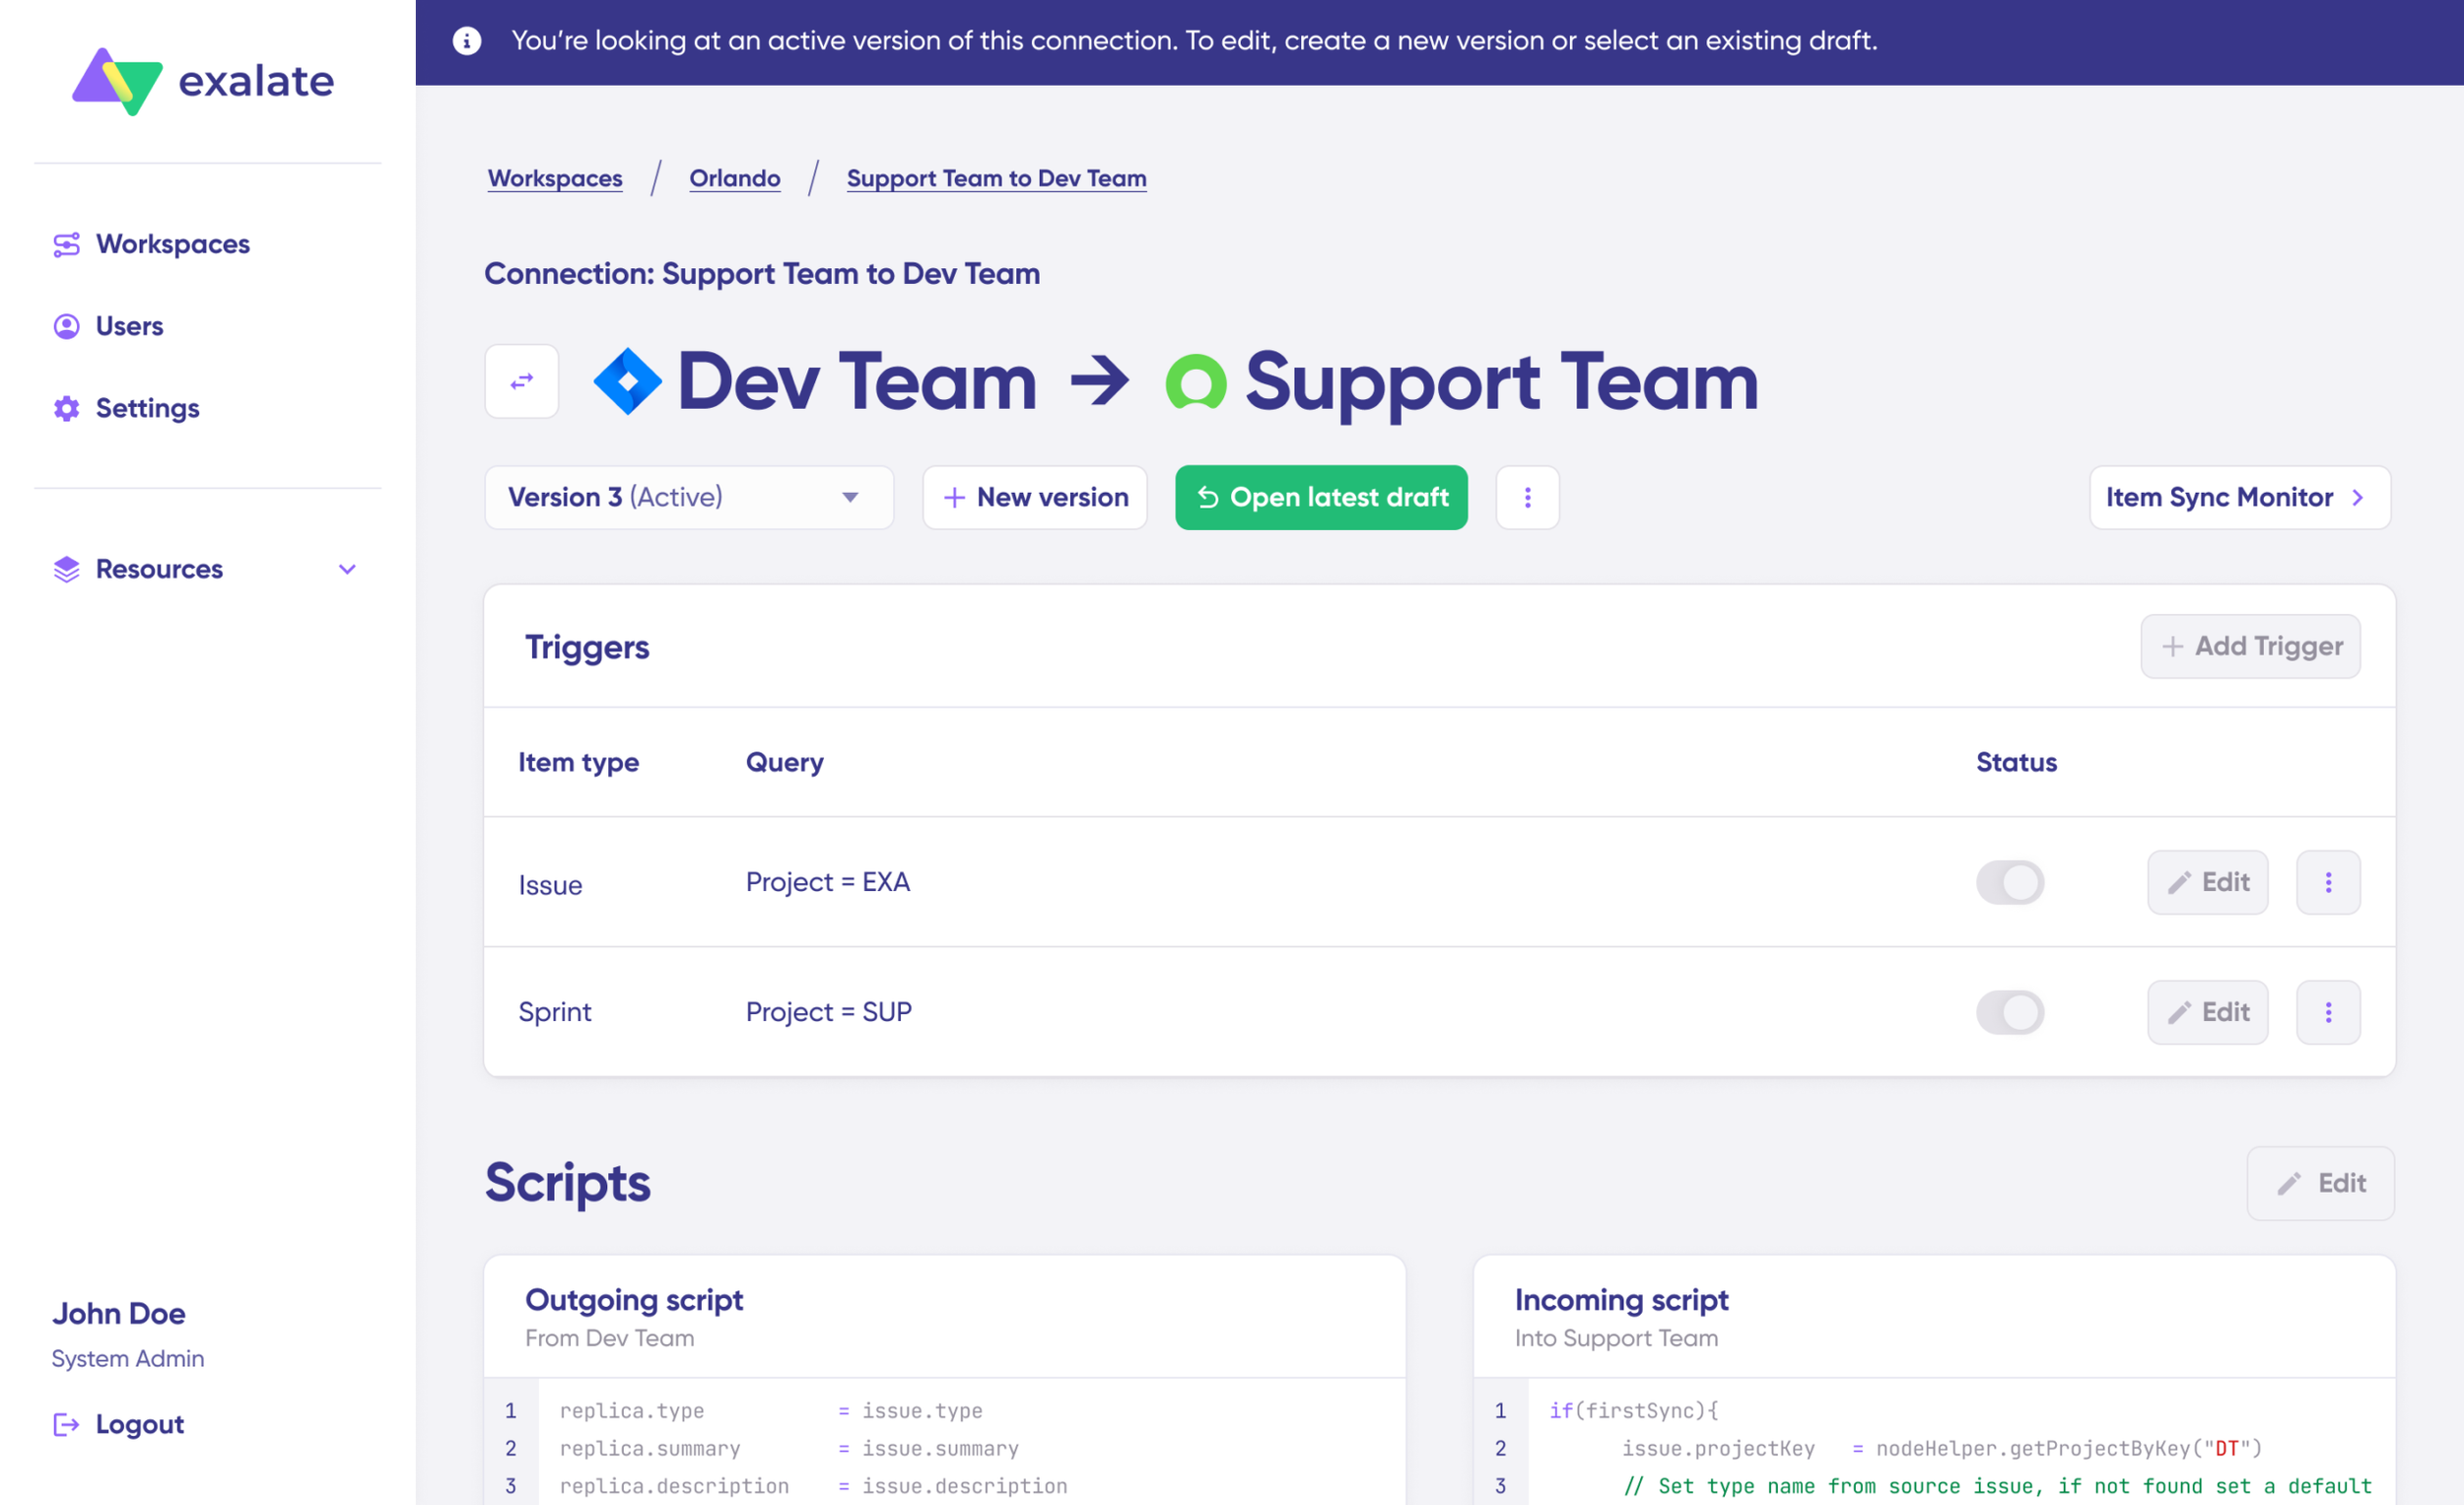
To modify your sync configuration, click “Create a new version” or select “Open latest draft.” This protects your live configuration from accidental changes. All draft modifications save automatically.
Click “Edit” to open the script editor and adjust your sync rules.
Understanding Sync Rules
Sync rules use Groovy-based scripts that let you define custom data logic, field mappings, and conditional flows for complex workflows.
Change the sync direction by clicking the two arrows next to the connection name. Scripts are divided into incoming and outgoing sections:
- If syncing Zendesk → Freshdesk: The outgoing script defines what leaves Zendesk; the incoming script controls how that data maps to Freshdesk ticket fields (subject, description, status, priority, requester, custom fields, etc.)
- If syncing Freshdesk → Zendesk: The outgoing script defines what leaves Freshdesk; the incoming script maps values to Zendesk ticket properties (subject, comment body, assignee, collaborators, tags, custom fields, etc.)
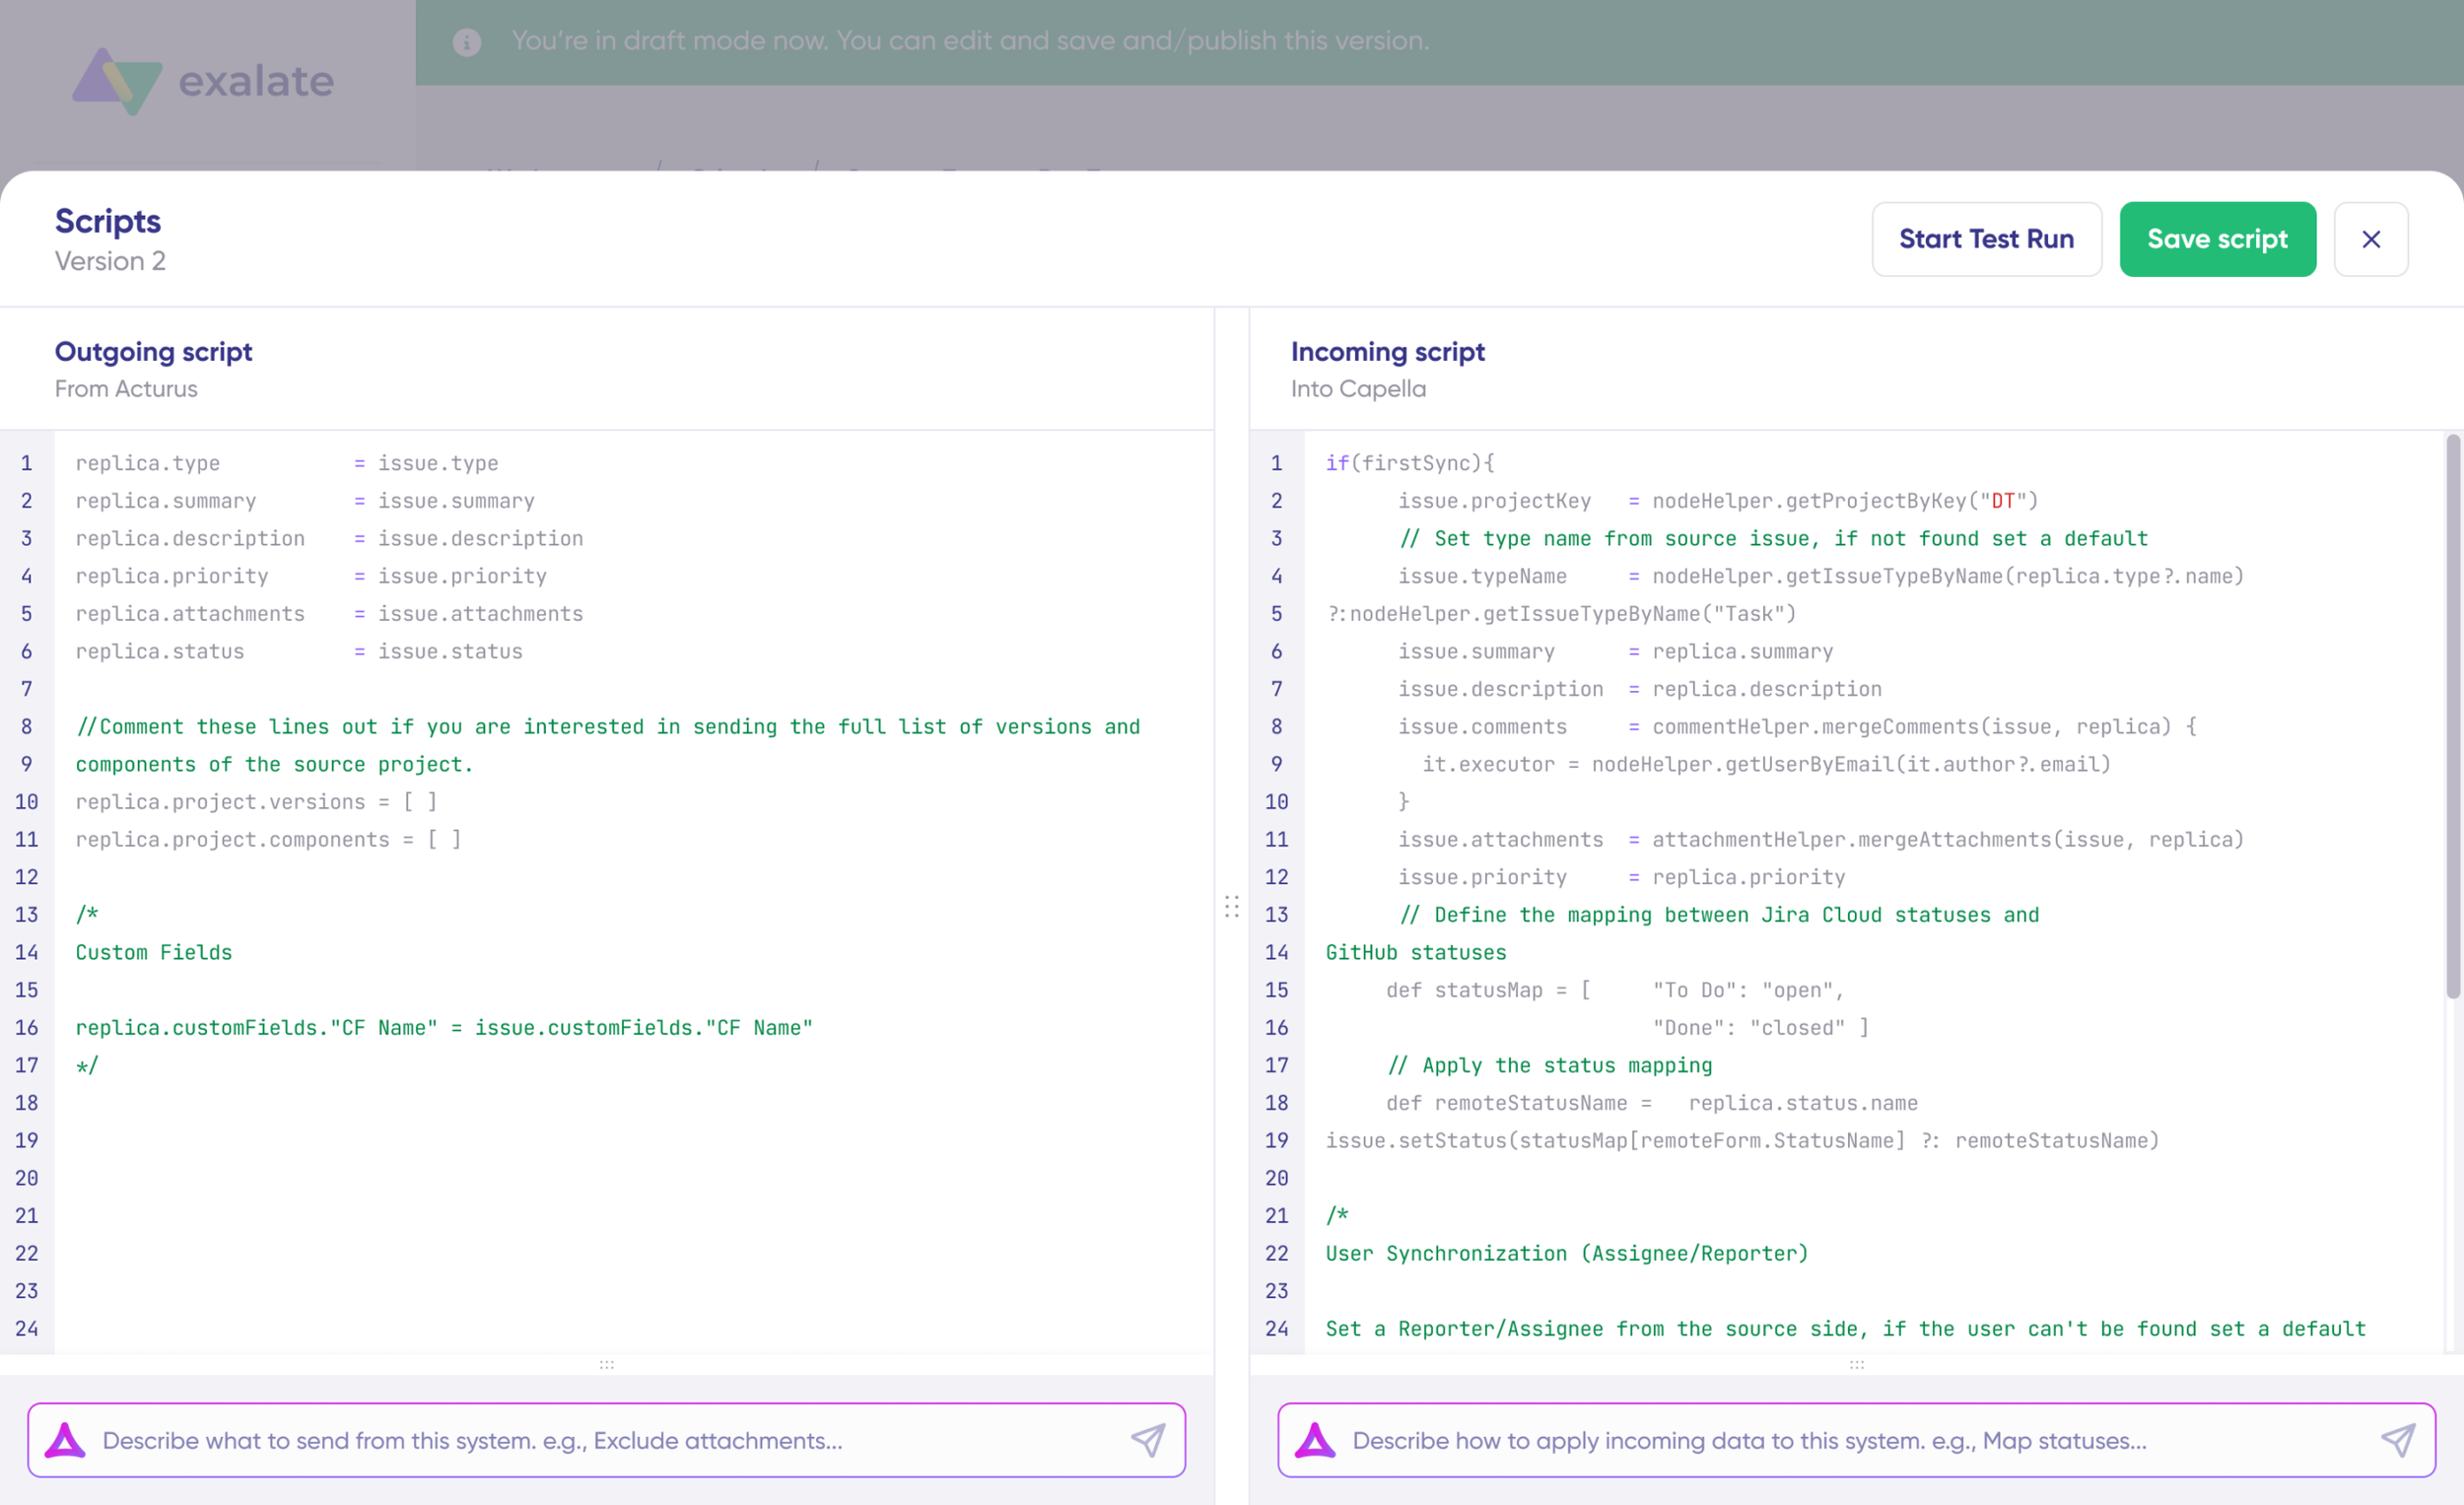
The Replica functions as a message payload carrying the actual data between synced tickets. It exists in JSON format and includes ticket properties like:
- Freshdesk fields: subject, description, status, priority, type, source, requester email, responder, group, tags, custom_fields, attachments, conversations (notes/replies)
- Zendesk fields: subject, description, status, priority, type, assignee_id, group_id, requester_id, collaborator_ids, tags, custom_fields, comments, attachments
To sync specific values, you can write the script yourself. To exclude data—say, preventing attachments from syncing between Zendesk and Freshdesk—remove that line from the outgoing script.
Step 6: Use Aida for AI-Assisted Configuration
If you’d rather skip manual scripting, use Exalate’s AI-assisted configuration feature called Aida to generate sync scripts automatically. Aida appears in both incoming and outgoing script sections.
Aida helps with two distinct tasks:
For Outgoing scripts: Describe what data should leave your system.
- Example prompt: “Only sync high-priority tickets”.
For Incoming scripts: Describe how incoming data should apply to your system.
- Example prompt: “Set a default agent if assignee can’t be found”
Based on Exalate’s scripting API and your existing scripts, Aida generates working Groovy code with proper field mappings.
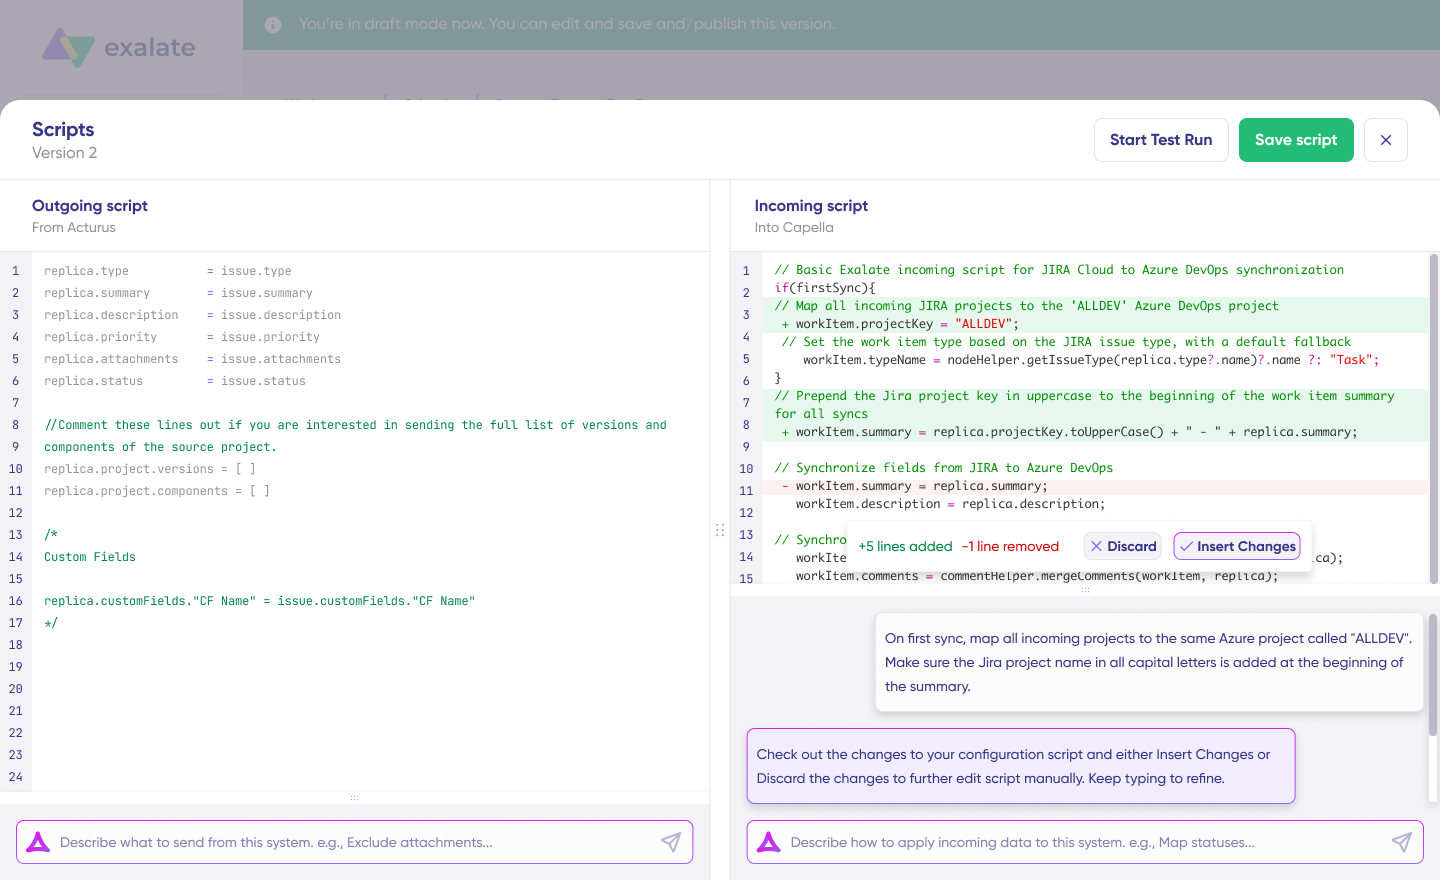
After Aida drafts your script:
- Green highlights show new lines being added
- Red highlights show lines being removed
You can “Insert” to accept or “Discard” to reject Aida’s suggestions.
The outgoing and incoming scripts operate independently. Aida maintains a separate context for each. Keep your prompts focused on the relevant direction.
Note: Aida is helpful, but like any AI tool, always review generated code before applying it.
Step 7: TestRun—Validate Before Going Live

With your sync scripts ready, click “Save script” or proceed to dry run them using “Start Test Run.”
Select the tickets you want to test; you can choose multiple items from either Freshdesk or Zendesk. Click “Start Test Run.”
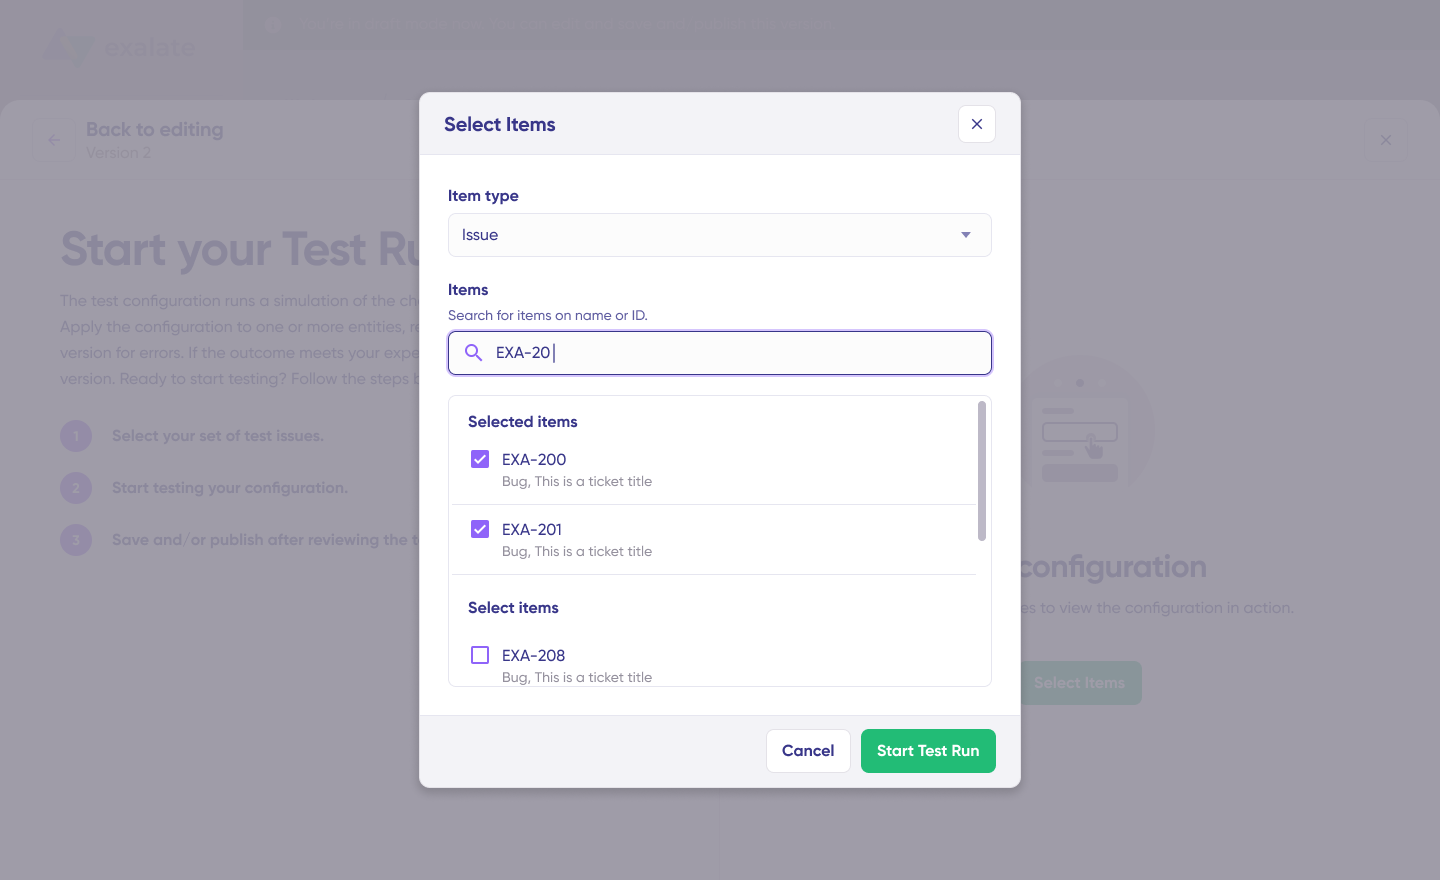
You’ll see incoming and outgoing replicas for each selected ticket in their respective tabs. Preview how your configuration will apply:
- Check that Freshdesk ticket fields (priority, status, requester, custom fields) map correctly to Zendesk
- Verify that Zendesk ticket properties (assignee, group, tags, comments) transfer accurately to Freshdesk
- Confirm attachments and conversations sync as expected
If something looks off, return to the editor, adjust your scripts, and test again.

Deploy only when you’re confident it works. This safety net prevents errors from affecting live data.
Once everything matches your requirements, click “Publish Version” to apply the updated configuration to your live synchronization.
All versions for a connection appear in the “Version” dropdown with three possible states:
- Active: Currently running in production
- Draft: Editable, not yet live
- Archived: Previous versions stored for reference
Step 8: Configure Triggers for Automatic Syncing
To start your sync automatically, set up Triggers: conditions or filters that determine which tickets enter the synchronization.
Examples:
- Sync all Zendesk tickets with
tag = "escalate-to-freshdesk" - Sync all Freshdesk tickets assigned to a specific group
- Sync Zendesk tickets with
priority = urgent - Sync Freshdesk tickets where t
ype = "Problem"
Click “+Add trigger” to create triggers. These are platform-specific:
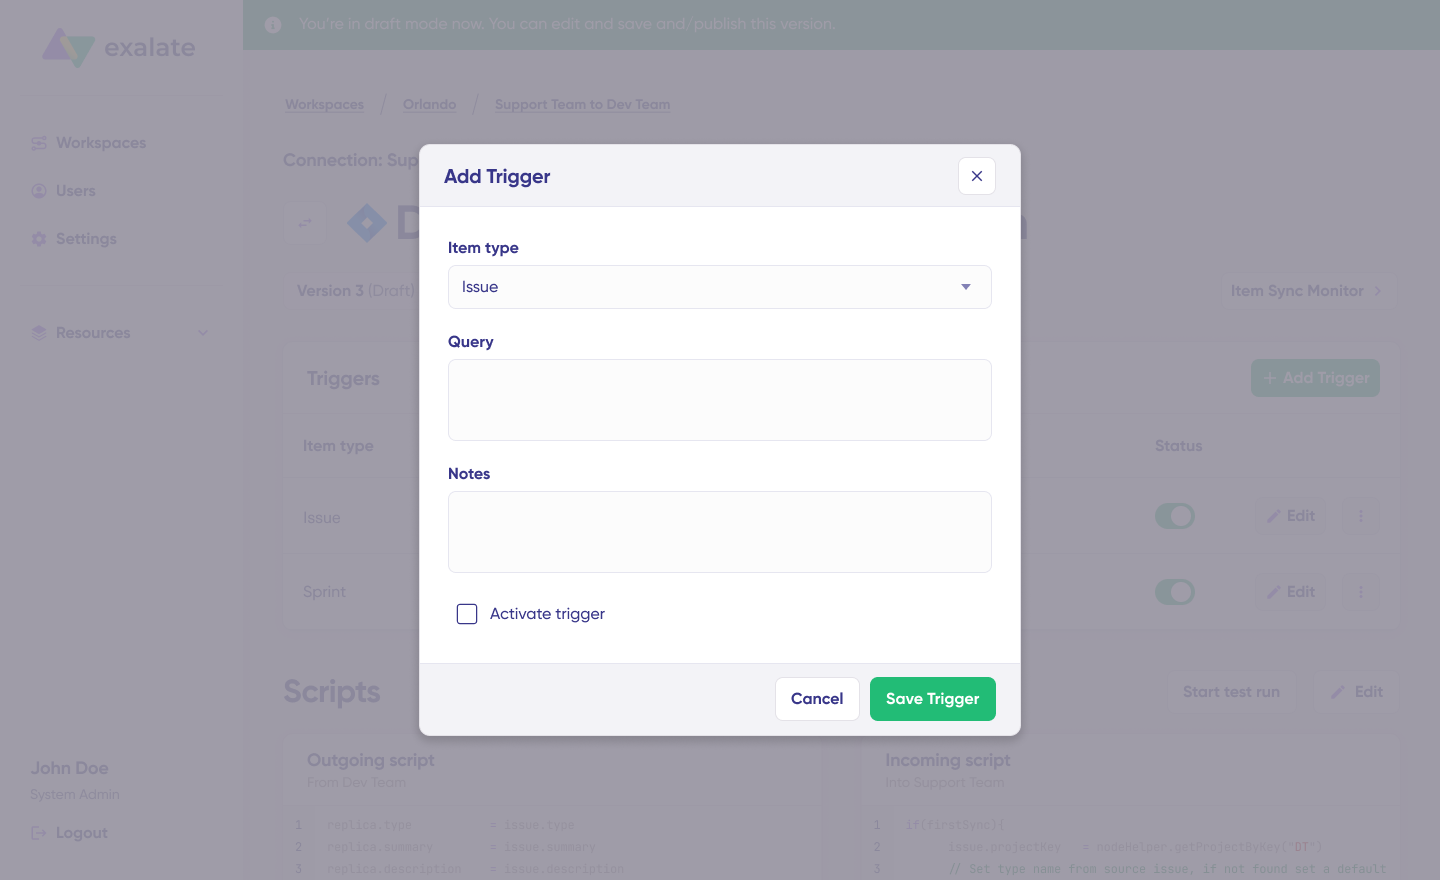
For Zendesk: Use Zendesk’s search query syntax to filter tickets by status, priority, tags, assignee, group, or custom field values.
For Freshdesk: Use Freshdesk filter conditions to target tickets by priority, status, type, group, agent, tags, or custom fields.
Save your changes by publishing them.
That’s it. Your synchronization will run automatically based on the sync rules and triggers you’ve configured. Tickets matching your trigger conditions will sync between Freshdesk and Zendesk without manual intervention.
Keep in mind that troubleshooting sync errors is a normal part of managing script-based integrations like Exalate, especially when you’re configuring complex field mappings between different help desk systems.
Step 9: Troubleshooting with Aida
Aida also helps you diagnose and resolve sync errors with context-aware suggestions.
If an error occurs:
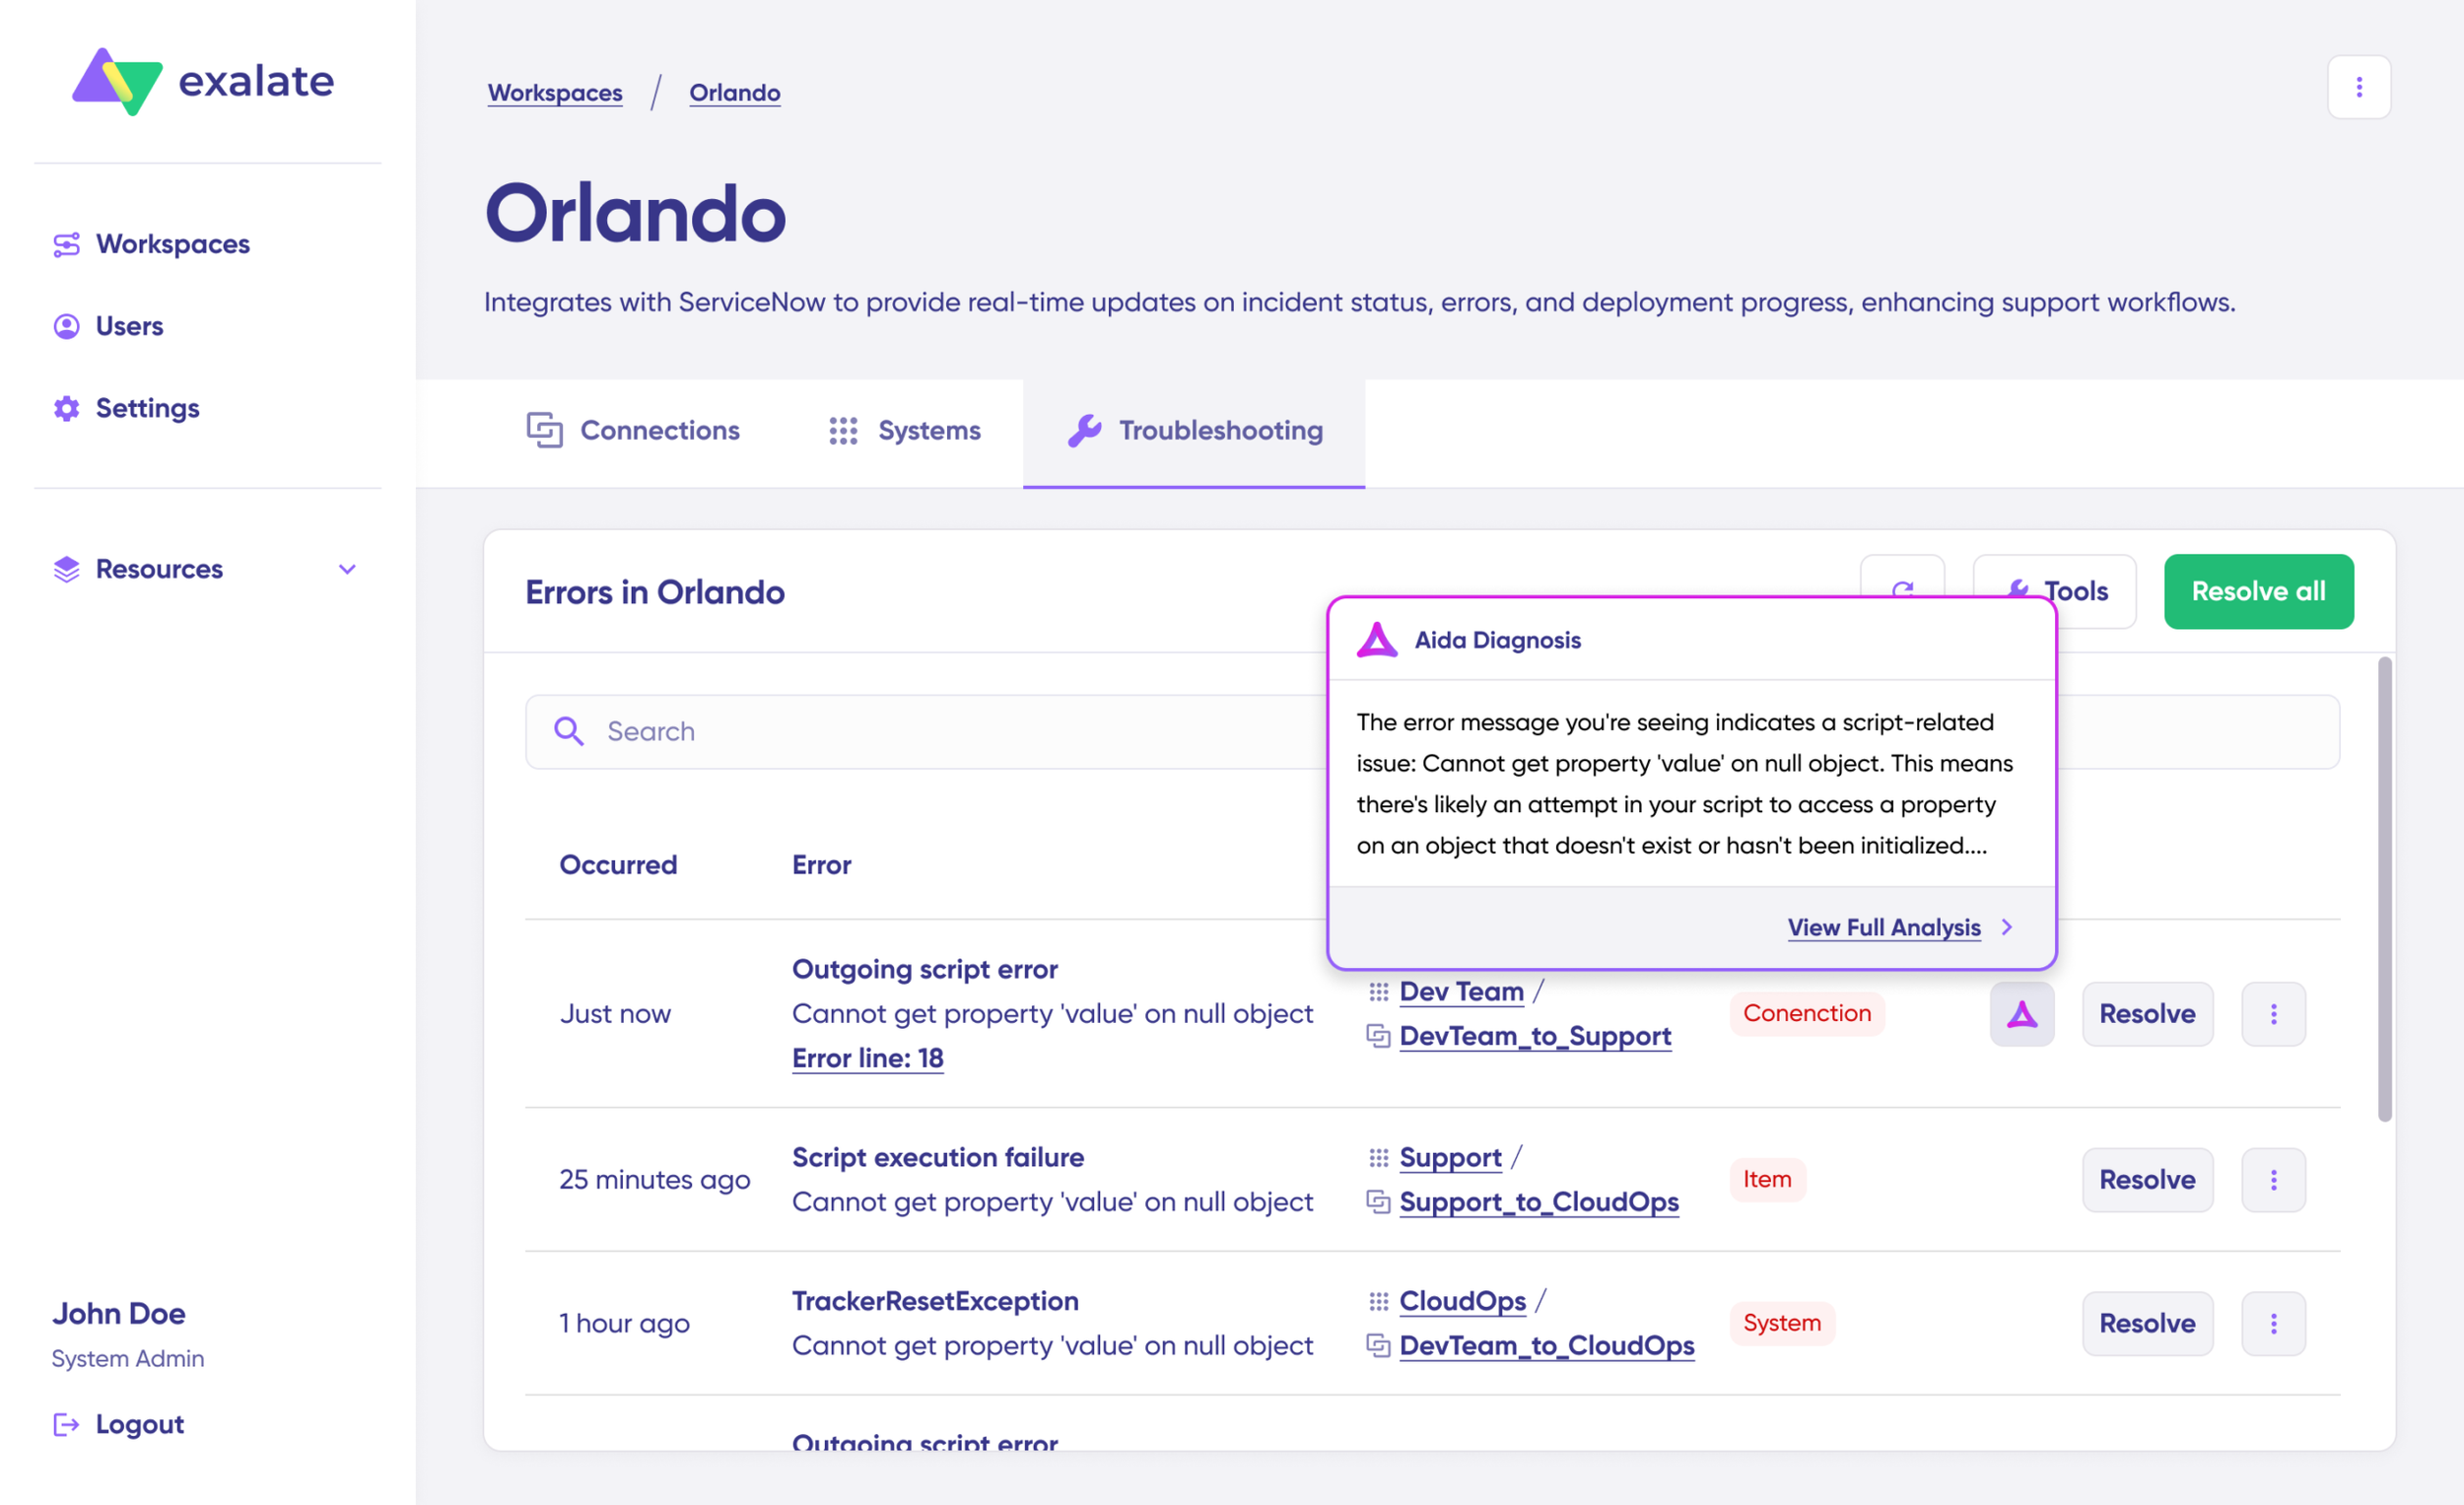
Go to the “Troubleshooting” tab in your workspace. Hover over the error you want to investigate and click the Aida icon.
Review the AI-generated explanation and proposed solution in the modal window. Click “View Full Analysis” for additional context.
Access “Error details” to copy the stack trace or “Replicas” to inspect the JSON data. Choose “Resolve” to apply fixes and retry the failed sync.
Common issues Aida can help diagnose include field mapping errors between Freshdesk and Zendesk, missing required fields (like requester email), custom field type mismatches, and status value translation problems.
Use Cases for Freshdesk Zendesk Integration
Here are practical applications for Freshdesk integration with Zendesk across different business scenarios.
Use Case 1: MSP-Client Ticket Synchronization
Challenge: An MSP using Zendesk needs to support multiple clients who use Freshdesk internally. Manual ticket copying creates delays, and agents lack context from the client side.
Solution: Bidirectional integration syncs tickets between the MSP’s Zendesk instance and each client’s Freshdesk. Ticket fields, including descriptions, requester information, assignees, comments, attachments, and custom fields transfer automatically.
Real-World Application: A logistics company outsources L1 support to an MSP. When a customer submits a ticket to the MSP’s Zendesk, it immediately appears in the company’s Freshdesk with full context. Internal teams can add private notes that don’t sync back, while public updates flow both directions.
Use Case 2: Platform Migration During M&A
Challenge: A company acquiring another organization needs to migrate support operations from Freshdesk to Zendesk without losing historical tickets or disrupting ongoing support.
Solution: Exalate handles the migration by syncing existing tickets while both platforms remain operational. Once migration completes, the integration can be disabled or maintained for ongoing collaboration.
Real-World Application: During an acquisition, the acquiring company needs to preserve 18 months of ticket history. Instead of manual export/import, they set up bidirectional sync to migrate tickets progressively while both teams continue working.
Use Case 3: Multi-Brand Partner Network
Challenge: A company works with multiple partners, distributors, and contractors who each use different help desk platforms. Coordinating support across this network requires constant email threads and manual updates.
Solution: Exalate’s cross-company integration connects partners regardless of their platform. The company’s Freshdesk instance connects to partners using Zendesk, ServiceNow, or Jira Service Management.
Real-World Application: A hardware manufacturer connects with field service partners across regions. When a warranty issue comes in through Freshdesk, it automatically routes to the appropriate regional partner’s Zendesk with all diagnostic information attached.
Use Case 4: Tiered Support Escalation
Challenge: L1 support using Zendesk needs to escalate complex tickets to L2 teams using Freshdesk, then to engineering teams using Azure DevOps or Jira. Each handoff loses context and creates delays.
Solution: Configure automated triggers to escalate tickets based on priority, type, or custom criteria. Each escalation includes full ticket history and relevant fields.
Real-World Application: An urgent ticket arrives in Zendesk and gets escalated to L2 in Freshdesk. When L2 determines it’s a bug, the ticket automatically creates a work item in Azure DevOps with all support context attached. Engineering updates flow back through the chain.
Use Case 5: Consolidated Incident Management
Challenge: Multiple related tickets come in across different channels and platforms. Support teams lack visibility into whether issues are connected.
Solution: Sync multiple related Zendesk tickets to a single Freshdesk incident. Agents working on resolution see the full scope of recurring issues and their direct customer impact.
Real-World Application: During a service outage, 50 tickets come into Zendesk. These link to a single Freshdesk incident that tracks the root cause investigation. When the incident resolves, all linked tickets update automatically.
Use Case 6: Development Team Collaboration
Challenge: Support teams in Freshdesk need to collaborate with development teams using Azure DevOps or Jira without requiring developers to access the help desk or support agents to use dev tools.
Solution: Integrate Freshdesk with Azure DevOps, Azure DevOps Server, or Jira Software. Bug reports from support automatically create work items in dev tools, and status updates sync back to support.
Real-World Application: A support agent identifies a bug pattern across multiple Freshdesk tickets. They create an escalation that generates an Azure DevOps work item. When developers update the work item status or add notes, support sees these updates without leaving Freshdesk.
How Exalate Handles Freshdesk Zendesk Integration
Setting up a sync between Zendesk and Freshdesk allows both systems to interact and exchange data without manual copying or duplicate entry.
Exalate provides an AI-assisted scripting engine for setting up mapping rules that control how entities and fields map between platforms.
You can also use Exalate to move tickets to a new platform for internal migration and external mergers.
Frequently Asked Questions
What is Freshdesk Zendesk integration?
Freshdesk Zendesk integration connects these two help desk platforms to enable automatic data synchronization. This allows teams using either platform to access shared ticket information, comments, and customer context without manual data entry or switching between systems.
Can I sync tickets bidirectionally between Freshdesk and Zendesk?
Yes. Exalate supports full bidirectional synchronization where changes in either platform automatically update the other. You can also configure one-way sync if your use case only requires data to flow in a single direction.
What data can be synced between Freshdesk and Zendesk?
Standard syncable data includes ticket fields (subject, description, status, priority), requester information, assignee data, comments (public and private), attachments, tags, and custom fields. The specific fields depend on your configuration and mapping rules.
How does AI-assisted configuration work in Exalate?
Exalate’s Aida uses natural language processing to help you set up integrations. You describe what you want to sync in plain language, and Aida generates the Groovy scripts needed to implement that configuration. You can then refine the scripts manually if needed.
Is Exalate secure for enterprise use?
Yes. Exalate maintains ISO 27001 certification and implements enterprise security standards, including role-based access control, data encryption in transit and at rest, JWT-based authentication, and full audit capabilities. Visit the Trust Center for detailed security documentation.
Can I integrate Freshdesk or Zendesk with other platforms beyond these two?
Exalate supports integration with multiple platforms, including ServiceNow, Jira Service Management, Jira Software, Salesforce, Azure DevOps, Azure DevOps Server, Freshservice, Asana, and others. Custom connectors are available for platforms without native support.
How does Exalate handle API rate limits?
Exalate includes built-in rate limit management that queues sync operations to avoid exceeding platform API limits. This prevents sync failures during high-volume periods without requiring manual intervention.
Can I control which tickets sync and which don’t?
Yes. Exalate’s trigger system lets you define conditions that determine which tickets enter the sync. You can filter by priority, ticket type, custom field values, or any other criteria available in your Groovy scripts.
Does the integration require technical expertise to set up?
Basic integrations can be configured using Aida’s AI-assisted setup without coding knowledge. Advanced configurations benefit from Groovy scripting experience, but Exalate’s support team and documentation provide guidance for complex use cases.
What resources does Exalate provide?
Exalate offers documentation, community forums, and direct support channels. Enterprise customers receive dedicated support with faster response times and access to integration engineers for complex configurations.
Can each side of the integration have different sync rules?
Yes. Exalate’s architecture allows each side to maintain independent control over their sync configuration. The Freshdesk admin can determine what data leaves their instance, while the Zendesk admin controls what they accept and how it maps to their fields.
Recommended Reads
- Freshdesk Jira Integration in the Age of Customer Satisfaction
- How To Use Freshdesk Salesforce Integration For Better Sales
- How to Integrate Zendesk and Salesforce in 5 Steps
- Zendesk Integrations: Sync Zendesk & other Platforms
- How to Sync Statuses and Custom Fields between Zendesk and Salesforce
- How to Sync Side Conversations between Zendesk and Jira