GitHub is popular amongst the software community for a good reason. It allows collaborating on software code with colleagues or even complete strangers. It comes loaded with project management and version control features as well.
GitHub Enterprise is GitHub packed, designed, and delivered for enterprise-level control over security, collaboration, and administration.
Jira, which comes with state-of-the-art project management features, is equally admired by the software community.
Hence, a GitHub Enterprise Jira integration can lead to snowballing team collaborations and engagements. It can help bridge the gap between the teams commonly using these platforms: the development team and the project management team.
Let us see why integrating GitHub Enterprise (Cloud) and Jira can be beneficial to these teams firsthand. Then delve deeper into the kind of tools available in the market to make such an integration possible, and lastly, take a step-by-step approach towards implementing it.
Benefits of a GitHub Enterprise Jira Integration
Getting the best of both these tools can lead to better insights for smarter decision-making. Let us understand why that is so.
As I mentioned, Jira has advanced features to manage work items (Jira used to call them issues) through custom-made or predefined templates that are easy to follow and implement. Besides this, it can be used to implement tailor-made workflows suitable for any kind of team and has better reporting capabilities, thus helping you set expectations beforehand.
GitHub Enterprise has a lot of features it already inherits from GitHub.com, like creating and managing unlimited repositories, project management capabilities, work tracking, version control, etc.
It can be deployed either: on-premise or on a cloud. It can be used by both small and large organizations alike because, in essence, they all want smarter collaboration, elegant security features like the ability to control access at the organization-wide level, and multiple deployment options leading to simplified administration.
Why Integrate GitHub Enterprise and Jira?
If both these tools work hand-in-hand, it will lead to full visibility of useful information and transparency in work that happens across teams and projects. The wealth of information lying in these individual tools, if acknowledged and integrated, can not only take your business profits forward but also leave you with a richer customer experience.
But if you do it manually, it leads to costly, time-consuming errors that can surely be avoided if the right solution is in place.

A GitHub Enterprise Jira integration would mean automating the information exchange between these tools in real-time, bi-directionally, however, and whenever you want. It can also filter data shared between Jira and GitHub Enterprise, so it can be viewed in the most useful format.
You will also get the best of both tools, leading all the team members to sing the same song.
But before you take your first step out of the door to implement it (literally), pause for a second and have a look at just a few use cases I had in mind to help you resolve why integration is needed in the first place.
GitHub Enterprise Jira Integration Use cases
Such integration can bring together diverse teams so they can have access to the same data in the tool of their choice, and deal with it according to their specific needs.
Dev and Quality Assurance Teams
GitHub Enterprise serves greater control at the organizational and user level, making it a preferred choice to manage source codes by the dev team. This code sitting in GitHub needs to be passed over to the Quality Assurance team to ensure it follows all legal/ regulatory requirements, and above all, to test it, so bugs aren’t propagated to production.

Likewise, bugs raised in Jira need to be reflected in the GitHub environment to be taken up and worked on by the dev team. This can happen smoothly and automatically using a Jira GitHub integration.
For instance, commits from certain Managed users (members of your dev team) on GitHub enterprise can raise work items to move under the Review status in Jira to be taken up by the QA team.
Dev and Project Management/ Engineering Teams
Of course, the dev team works best with GitHub Enterprise, but it can become a hindrance when the project management or engineering teams use Jira. Each of them has pre-decided workflows, and tracking them would mean manually duplicating information about work or tasks back and forth.
If you choose to integrate GitHub Enterprise and Jira, then information can be synced automatically, leading to less friction and manual errors. You can also choose to stay in your existing workflows and still get correct status updates in both tools.

If you have developers belonging to different organizations in GitHub Enterprise working for you, then you can choose to assign specific tasks to them depending on their role and technical expertise. They can then work within GitHub for managing their commits or pull requests. Such changes can be reflected in Jira, for your internal team to prioritize work items and work on the roadmap ahead. And then you would want these internal discussions to remain private.
All of this and much more can be achieved through integration and you can manage both the public and the private parts of your workflows like a seasoned professional.
Dev and Customer Support
Jira Service Management handles customer queries like a pro. But what you might not see clearly is the pain they go through when they need to manually pass information about a particular ticket to be taken up by the dev team. They most probably write a long email detailing the work to the dev team and click the send button. Then follow it up through another round of emails or phone calls and repeat.

But you can make their life a little easier than having them handle such manual tasks if you do opt for a GitHub Enterprise Jira integration.
For instance, you can create a trigger that when a ticket is assigned to a particular developer or has a certain label, then it creates a work item in GitHub automatically. This is just the tip of the iceberg; a lot of advanced scenarios can also be handled if these tools are integrated.

But then how do you do all this the right way?
Choosing the Right Tool for a GitHub Enterprise Jira Integration
When you have such tools in place and various apps on their marketplaces, you most probably head there first thing. You might find it the easiest way to go with the native way to accomplish a Jira GitHub Enterprise integration. But just because it is so, doesn’t mean you should.
You better ask yourself these questions first when it comes to integrating these tools:
#1 Is my integration secure?
The information being shared must be secure at all costs. And it’s not an understatement. Proper security mechanisms like encrypted information exchange, HTTPS, token mechanisms, etc. must be in place. Then choose a tool that gives you exactly this. Also, attention should be given to check if the tool is ISO 27001 certified.

Of course, a major part of this question is answering how the information being sent or received is handled at either end. Let me explain this a little.
#2 Does decentralized integration increase security?
There are a lot of fields and different types of work that are exchanged between GitHub and Jira. Now people viewing this at either end are not interested in seeing all the information, but might be interested in a bit of it.
Having a tool that implements such filtering would mean getting to choose what you want to send and also decide on how and what information you want to receive. But while doing so, you don’t want to inform the other side every time your integration or its requirements change, do you?

Decentralized integration is essentially this: getting to choose independently what information you want to send and how you want to deal with incoming information.
This, as you can already predict, will help you protect your information from unauthorized access. The admin on the other side won’t be messing up your sync, as you have full control over your integration.
#3 Is the integration tool flexible to adapt to complex or advanced integration cases?
Now we know that integrations are volatile in nature. They can change at any time since your understanding of the integration deepens, and hence, requirements mature.
You may want to share something completely new, want to stop receiving certain information, or want to set different triggers for information exchange. You might even want to combine all these together and come up with completely new rules. Only a flexible integration tool will be able to handle all this.
#4 Is the integration reliable enough to handle downtimes and system failures?
Downtimes and failures are as much a fact as they are a pain. But if such downtimes lead to failing integrations, is it worth all your efforts?

If your integration tool resumes the stopped synchronization from the point of failure and applies changes in the same order as their initiation, then you won’t need to worry about downtimes anymore.
#5 Will the tool integrate the platforms I already use?
It’s necessary that the integration tool supports a lot of different platforms because it would be that much easier for you to scale your existing integration to include a newer platform and expand your network.
It should support popular applications like Jira, GitHub, ServiceNow, Salesforce, Zendesk, Azure DevOps, and so on.
#6 Where can I find such a solution?
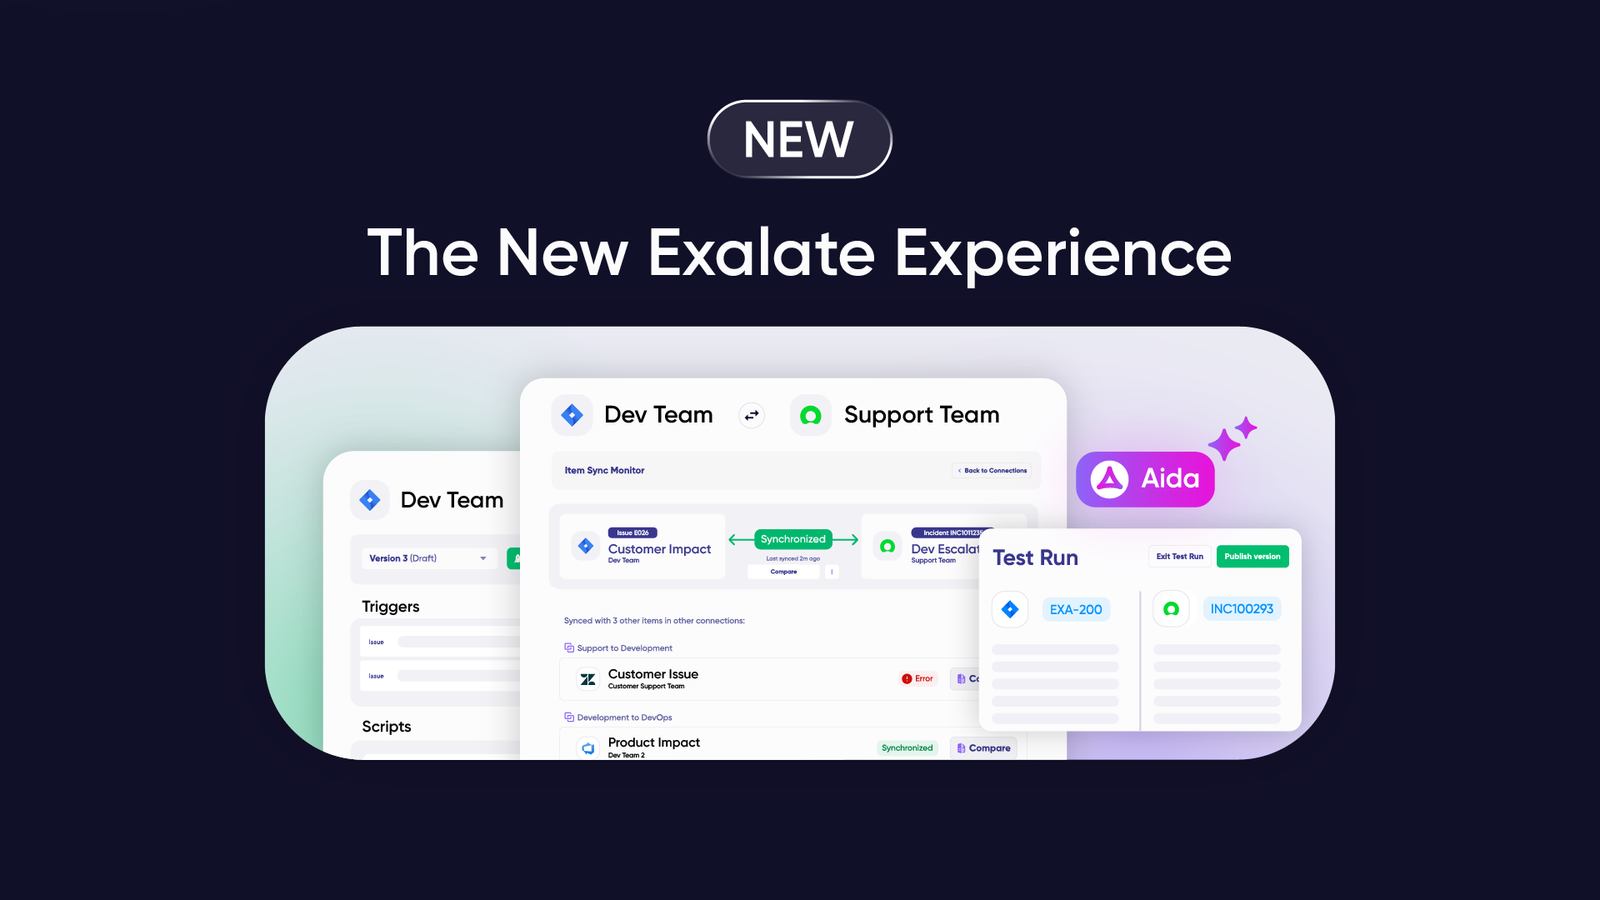
We are here to answer this one, too. The tool I have chosen for this article is called Exalate. And it ticks the “yes” box to all the questions above.
Exalate is a bi-directional synchronization solution that integrates different work management systems like Jira, the GitHub suite (GitHub Enterprise Cloud and GitHub Cloud), Salesforce, ServiceNow, Azure DevOps, Zendesk, and more.
- It is the only solution on the market that supports decentralized integration implemented through incoming and outgoing sync processors that filter data to be sent and received independently.
- It uses security mechanisms like encrypted file transfer, JWT-based tokenization, HTTPS protocol, role-based access control, etc. You can have a look at its security and architecture whitepaper to learn more.
- Its intuitive Groovy-based scripting engine makes it flexible enough to handle even the most complex or advanced integration cases.
- Its scripting engine comes with AI Assist, which uses AI-powered suggestions to generate scripts from natural-language prompts. Depending on your preferences, you can implement or discard these scripts.
- It uses a transactional sync engine that queues up all changes that need to be applied and breaks them down into atomic steps. So, in case your firewall or system is being upgraded/ any other scheduled (or unscheduled) maintenance work comes up, the sync changes can be applied in the correct order automatically.
- It comes with an integrated retry mechanism to resume syncs from the point of interruption in case of downtimes or system failures.
Let’s now see how we can implement a GitHub Enterprise Jira integration using Exalate.
How to Implement a GitHub Enterprise Jira Integration
In this section, we will have a look at 6 simple steps to get your integration up and running.
You begin by installing Exalate on both your GitHub Enterprise Cloud and Jira environment.
Note: Exalate is also available for Jira on-premise. But for the sake of this blog, we will consider a Jira Cloud instance. You can find the steps for installing it on Jira on-premise here.
After that, you need to create a connection between your GitHub and Jira instance. A connection first authenticates both the source and destination sides (i.e Jira and GitHub). Once authenticated, it acts like a secure pipe that allows information to be passed back and forth.
After setting up the connection, you decide what information needs to be sent and received, before finally seeing how to set up automated sync triggers that allow information to be exchanged after certain conditions are met.
Let’s detail the steps now.
Step 1: Install Exalate on GitHub Enterprise
Let’s start by installing Exalate on GitHub first. You can start from either side.
Note: Exalate is now only available for GitHub Enterprise Cloud but will soon be available for Server, too.
To set up Exalate for your GitHub Enterprise instance, head over to its marketplace from within GitHub.
In the search field, enter “Exalate”.
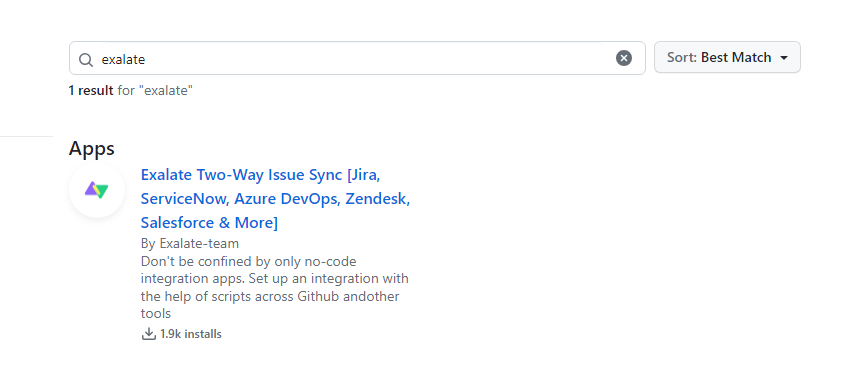
Now, click on the name of the app: “Exalate Two-Way Issue Sync”.
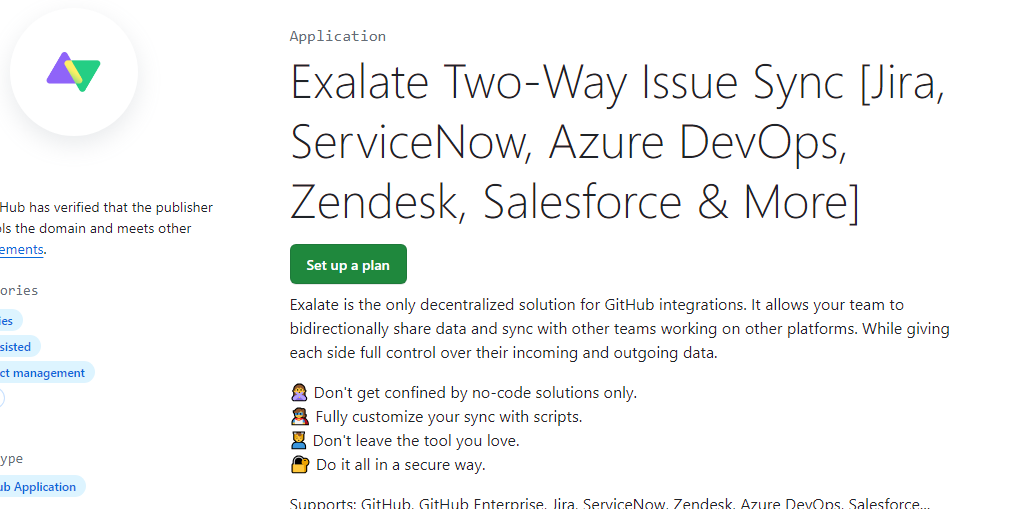
Click “Set up a plan”.
And you will automatically be redirected to the bottom of the page, where you can click on the “Install it for free” button.
On the next page, you will get to see your order summary. Remember, this is a 30-day trial you are opting for. So, review the order and click “Complete order and begin installation”.
Next, you will be required to choose the account on which you want Exalate to be installed.
By default, it is the one you have currently logged in from. But you can choose a different account or organization by clicking on the “Cancel” button in the image below and then choosing the necessary one.
If it is the current one, then click “Install”. You will be redirected to the Exalate admin console.
Remember to save this link for future reference, so you can access this console.
Currently, you have given permission to “All repositories”, but you can change that later, too.
Now, Exalate would need read-and-write permissions for work items and pull requests in your GitHub instance. Do it by clicking “Authorize Exalate Issue Sync”.
On the next screen, fill up a simple form. This will help verify your Exalate for GitHub instance, activate an evaluation license, and set up an admin account for notifications.
Click “Agree and Submit” to finish the procedure.
Go to your inbox, and click on the email you must have received from Exalate. Click on “Verify Exalate instance” in the email.
After a successful verification, you have successfully installed Exalate on your GitHub Enterprise instance.
To log in to your Exalate admin console, create a personal access token and save it somewhere safe so you can use it to log in later.
Step 2: Install Exalate on Jira
Now you need to install Exalate on your Jira Cloud instance from the Atlassian Marketplace. You can find the details here.
And you can also find the steps to install it on Jira on-premise here.
To begin with, you can go to the marketplace through your Jira Cloud instance itself, or click this link directly to save some time.
From your Jira cloud, click “Apps” in the top-center of the screen, and then “Manage Your Apps”.
Under “Atlassian Marketplace” on the left-hand menu, click “Find new apps” and in the “Search for apps” bar, type “Exalate”.

Make sure to choose the right one: “Exalate Jira Issue Sync & more”.
Click “Try it free” in the top-right corner. Then click the “Start Free Trial” button.
That’s all you need to install Exalate on the Jira Cloud. You will get notifications of the status of your installation. Once done, click the “Get Started” button to see your Exalate console in Jira.
Step 3: Create a Connection between your Jira and GitHub Instance
As we have already mentioned, a connection needs to be first established. For this, you have to go to the “Connections” screen on the left-hand side of the Exalate console on Jira Cloud. This screen displays the different connections you have created. If this is your first time, then it will be blank.
Note: To navigate to the “Connections” tab in Jira, in case you aren’t there already, click on “Apps” in Jira and select “Exalate” from the list. You will find the Exalate Console on the left-hand menu. From there, click “Connections”.
For a connection, one side initiates the connection and the other side accepts the invitation.
Remember, the user interface is the same for all applications Exalate supports, so it doesn’t matter if you start from GitHub or Jira. We have started from the Jira side here. Click on the “Initiate Connection” button shown below.

On the “Initiate Connection” pop-up, you are supposed to enter the destination URL. In our case, the destination is the GitHub instance. So, copy the Exalate URL for your GitHub instance and paste it into the text box.
Note: You can find the URL by clicking the General Settings menu in the Exalate console.
A brief check is performed to check if Exalate has been installed on the destination side. If yes, more options are available.
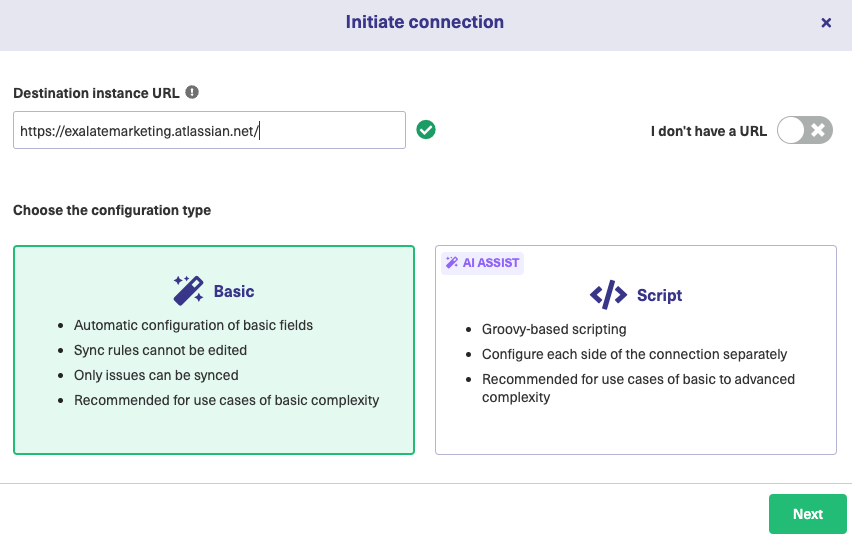
These options allow you to choose the configuration mode for the connection. There are 2 modes, as shown above: The Basic mode and the Script mode.
We will have a look at both these modes one by one.
Continue with the Basic Mode
The basic mode is for simple use cases where only the summary, description, and comments are synced. You cannot change the default values in this mode. To change them, you need to upgrade to the Script mode. Hence, this mode can be used if you want to see the working of Exalate firsthand.
There is a Free Plan that Exalate offers, which supports connections created using the Basic mode only. You can read more about it here.
Once you select “Basic” on the screen above, click “Next”.
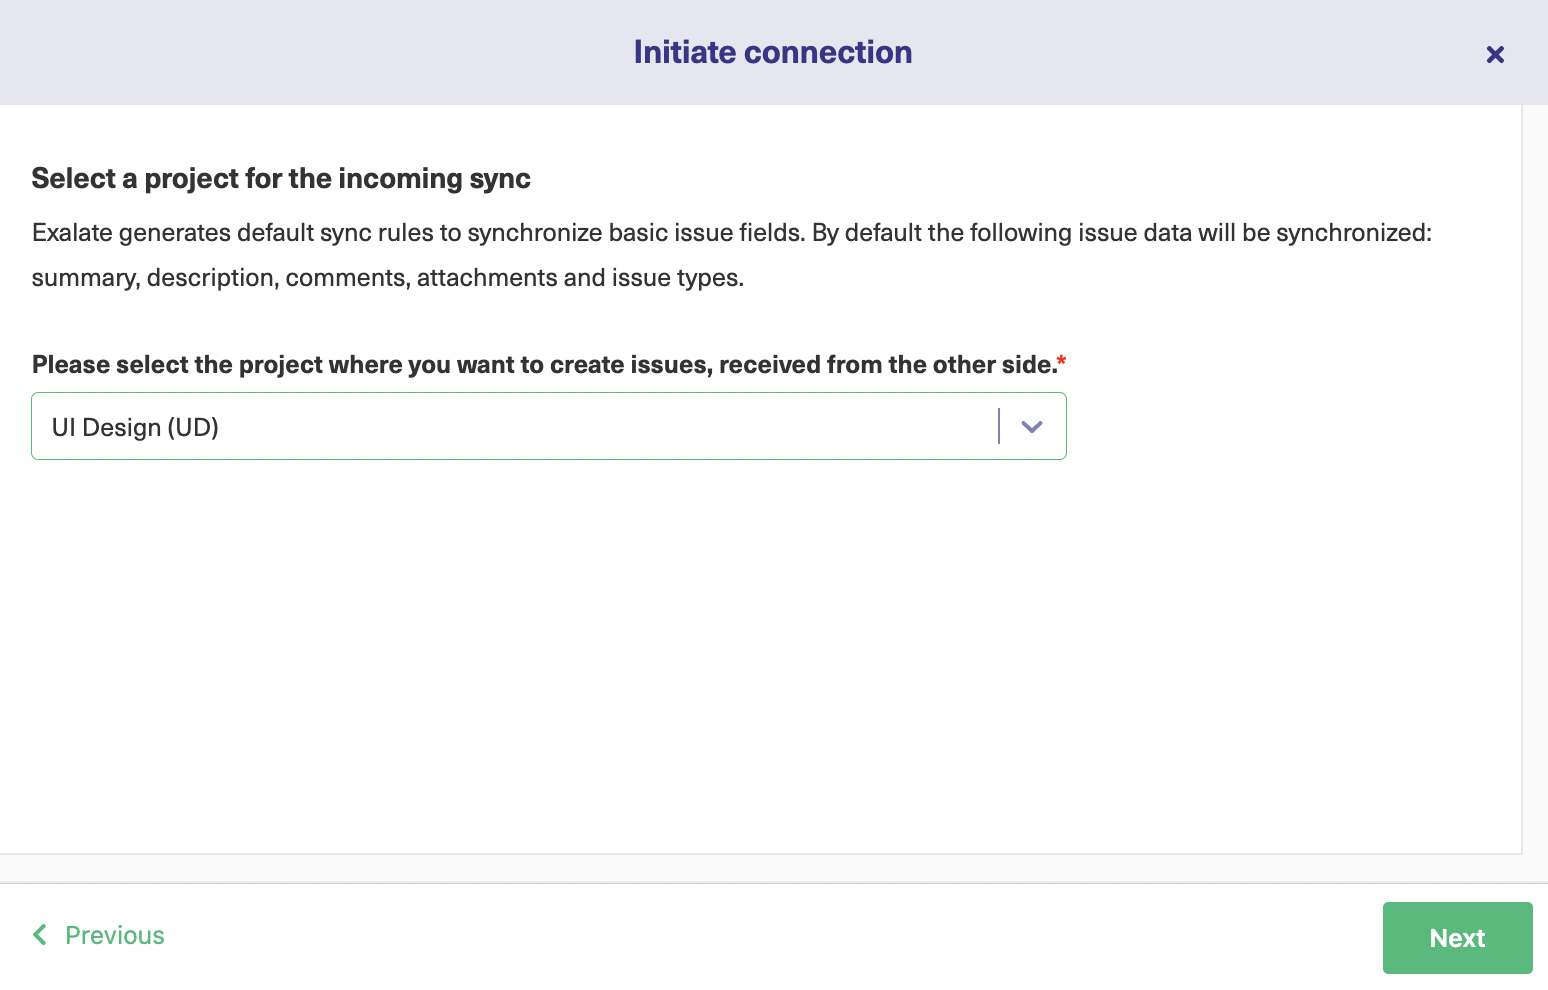
You then need to select the project you want to sync work items from.
The next screen will ask you to verify admin access to the other side. Click “Yes, I have admin access” if you have access, else click “No, I don’t have admin access”. In such a case, you will be required to copy and paste a secret invitation code over to the GitHub side. We will see how that can be done when we get to the Script mode.
I do have access, so I’m clicking yes.
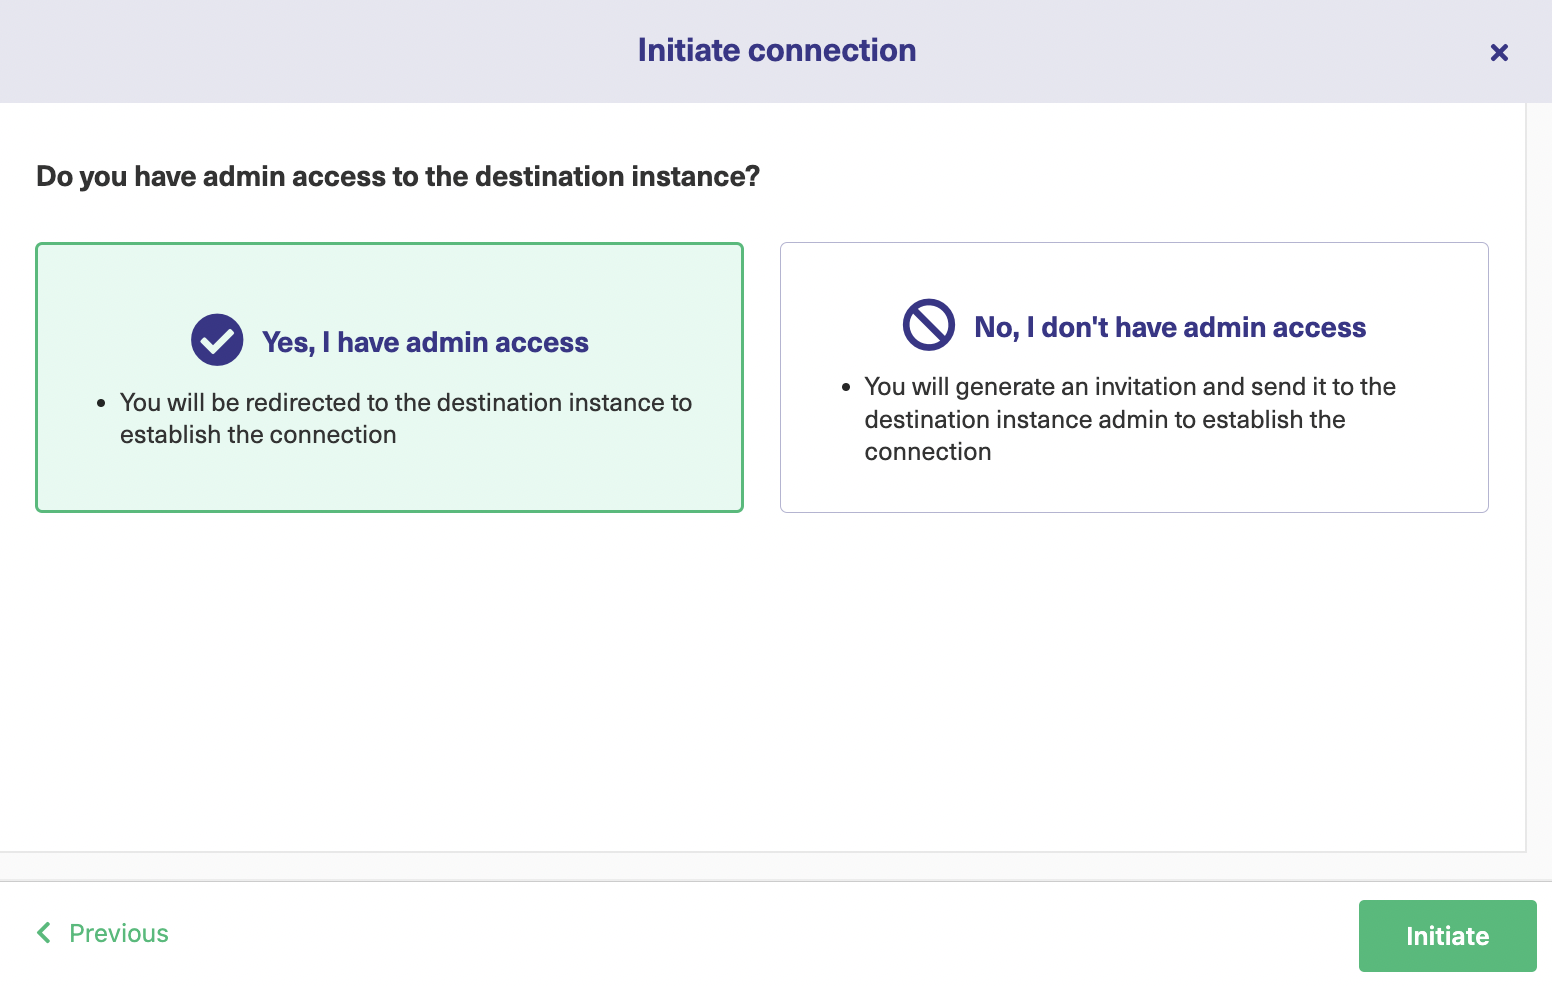
This will redirect you to the GitHub side successfully if the access is verified.
There, you must select the repository you need to sync work into. Choose this from a drop-down list just like you chose the project on the Jira side.
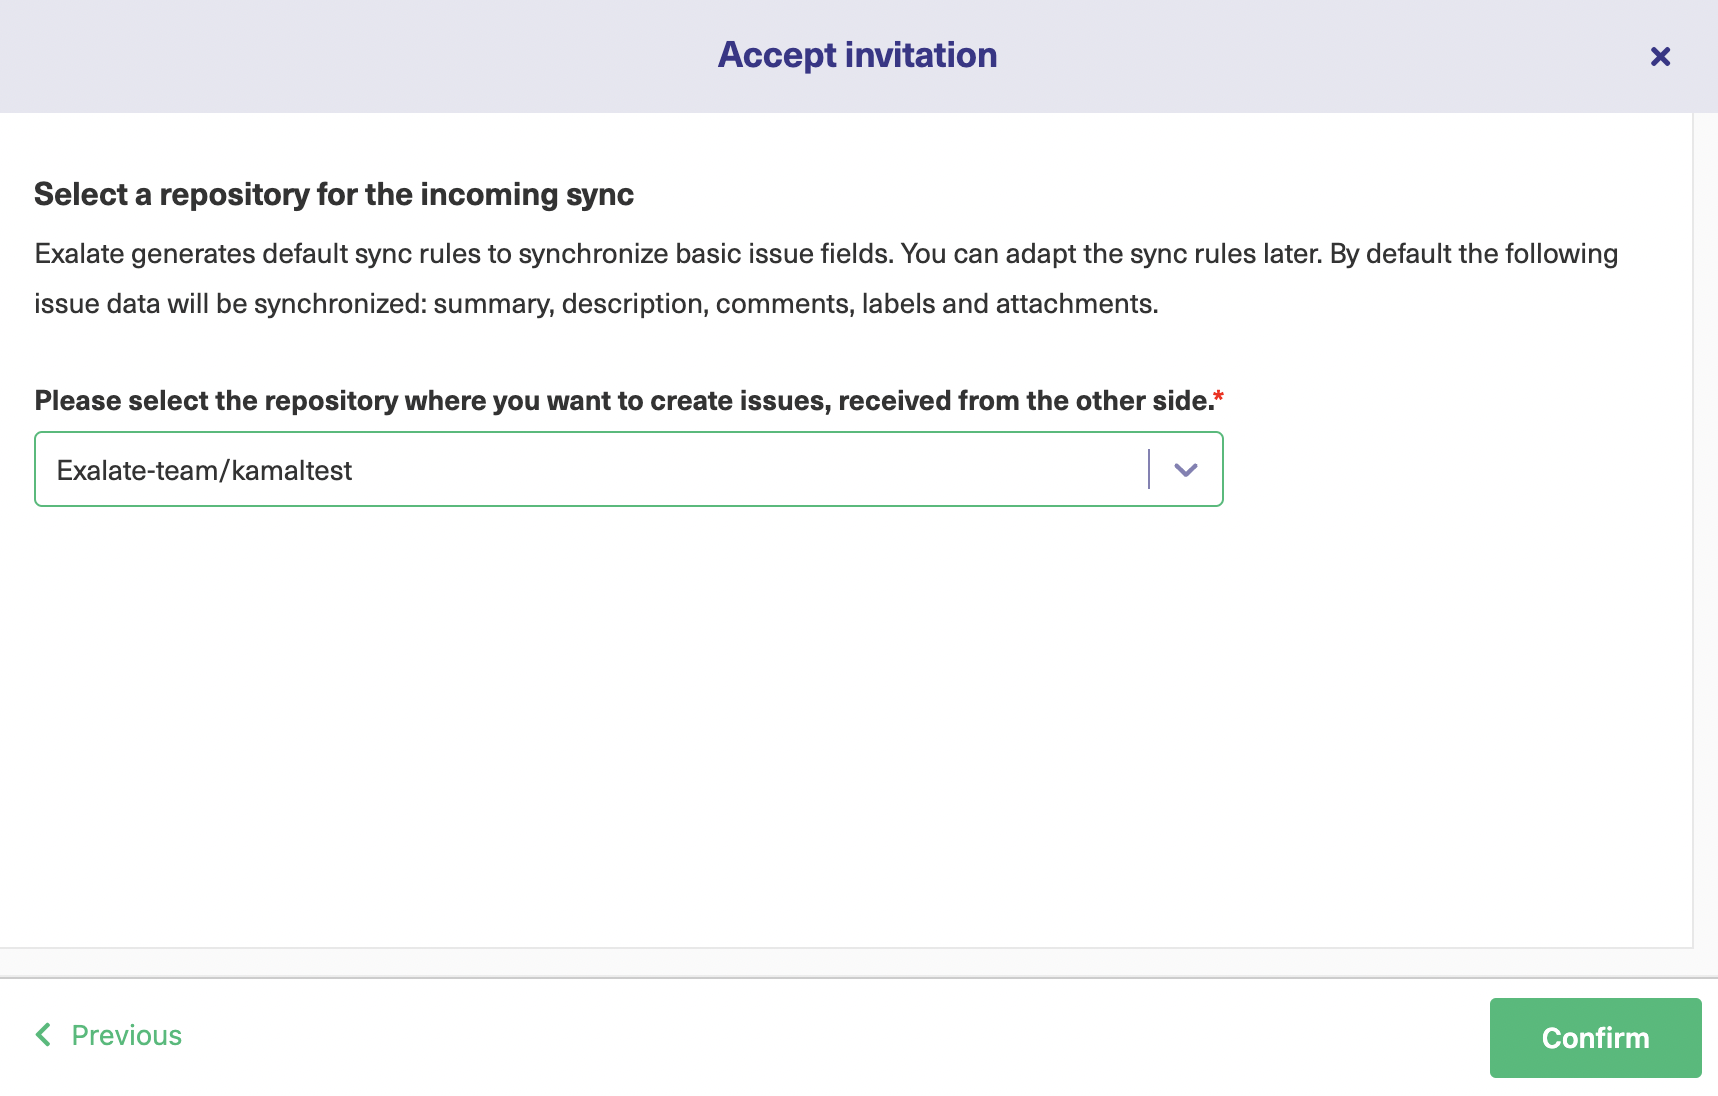
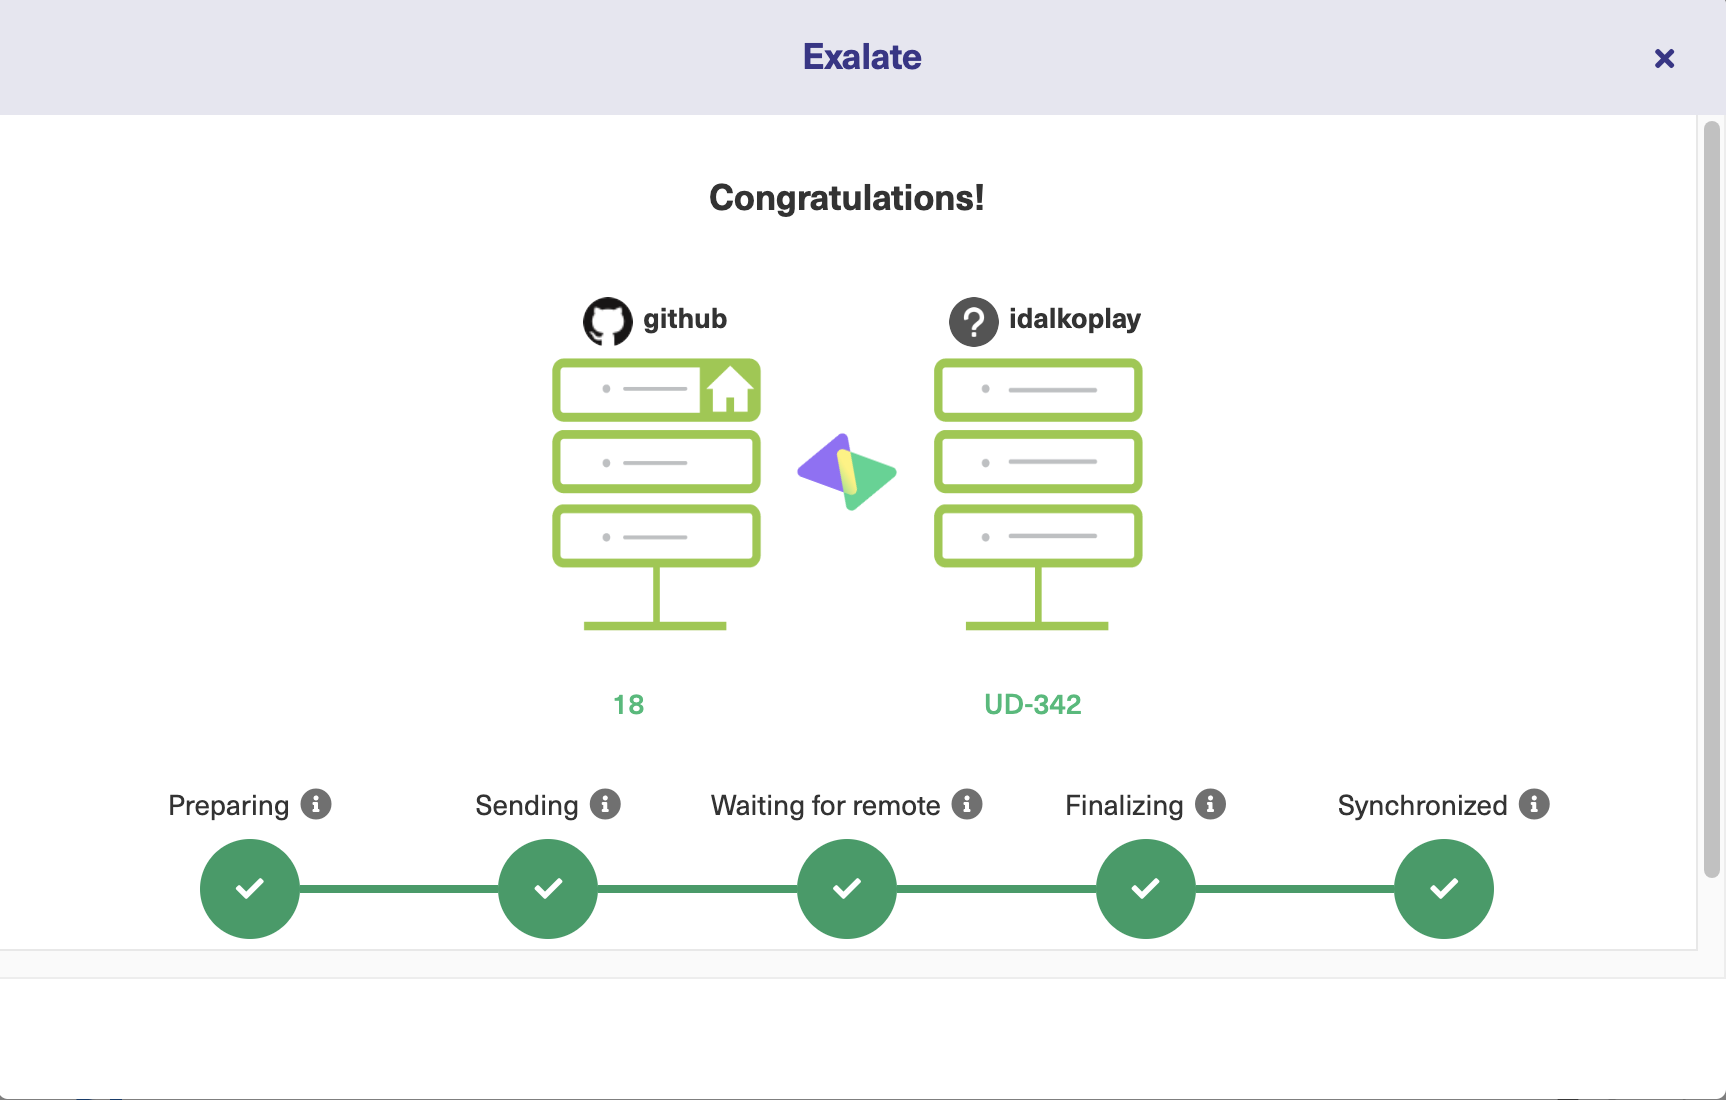
Once you click “Confirm”, it’s time you enter the work key you want to sync to the other side. So enter the key and click “Exalate”.
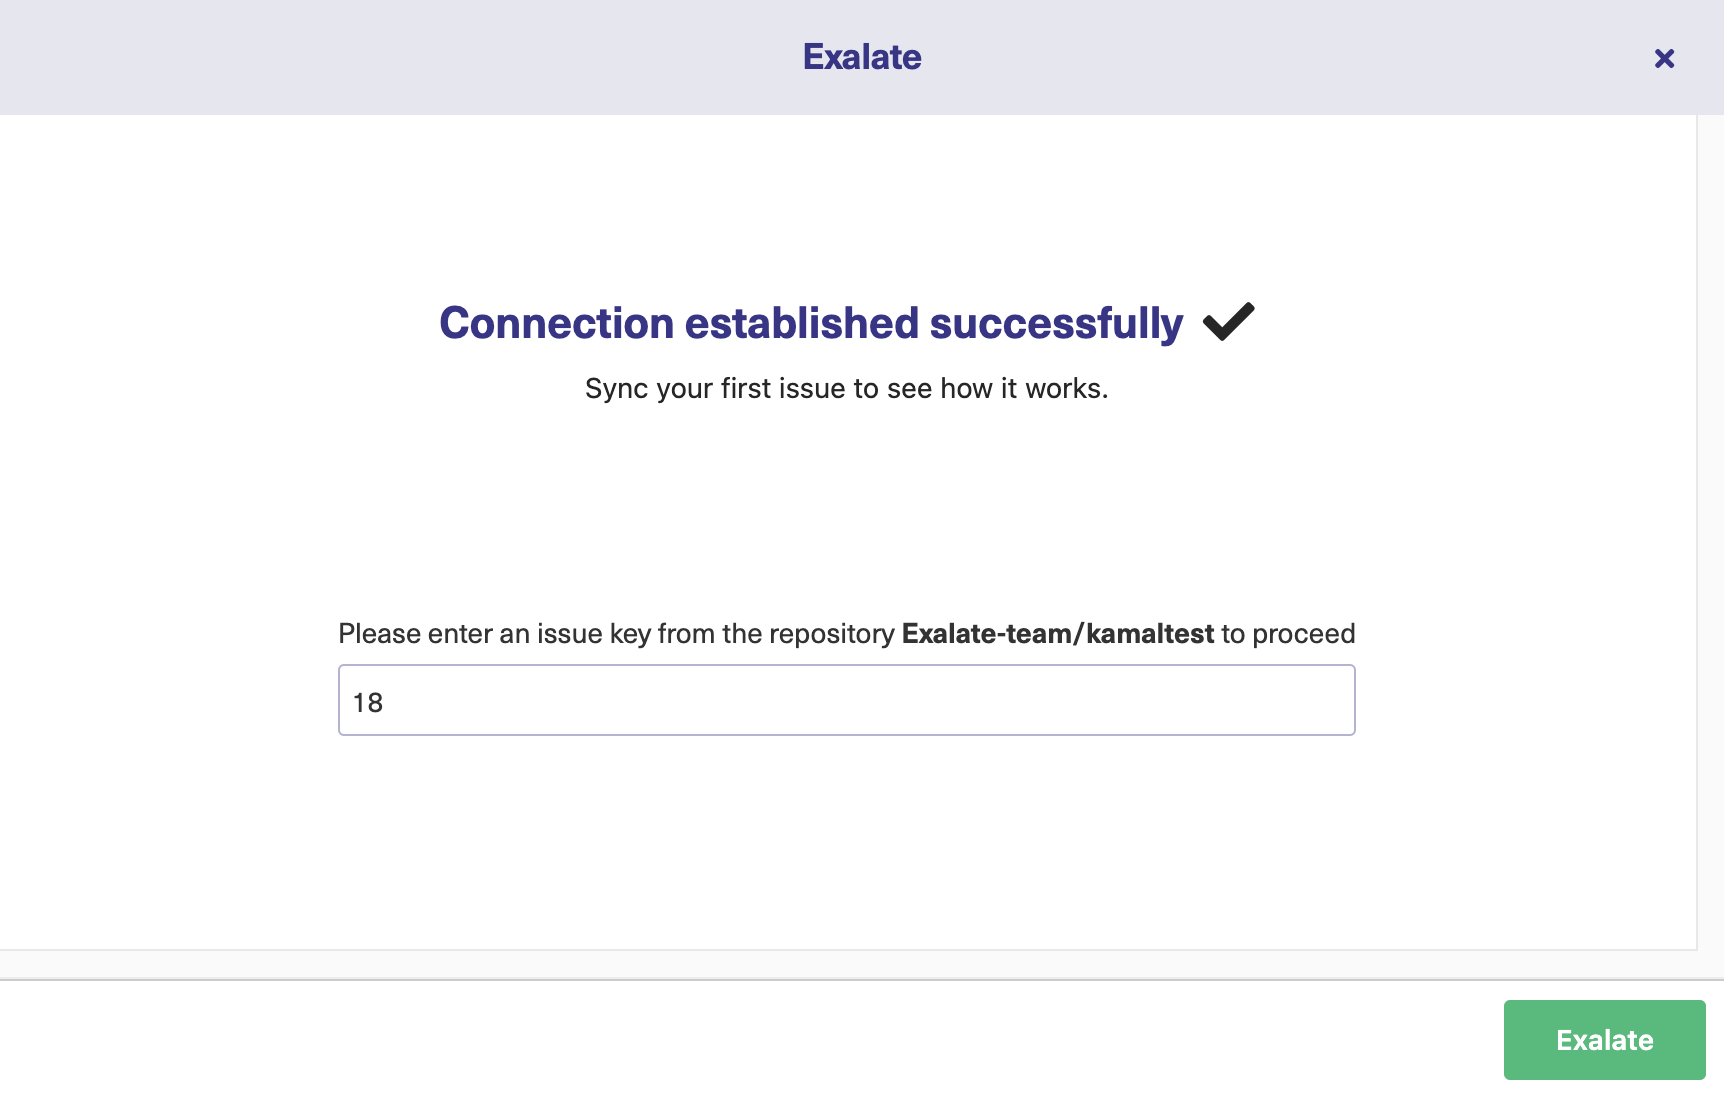
Wait for some time. Appropriate status messages for your sync will be displayed.
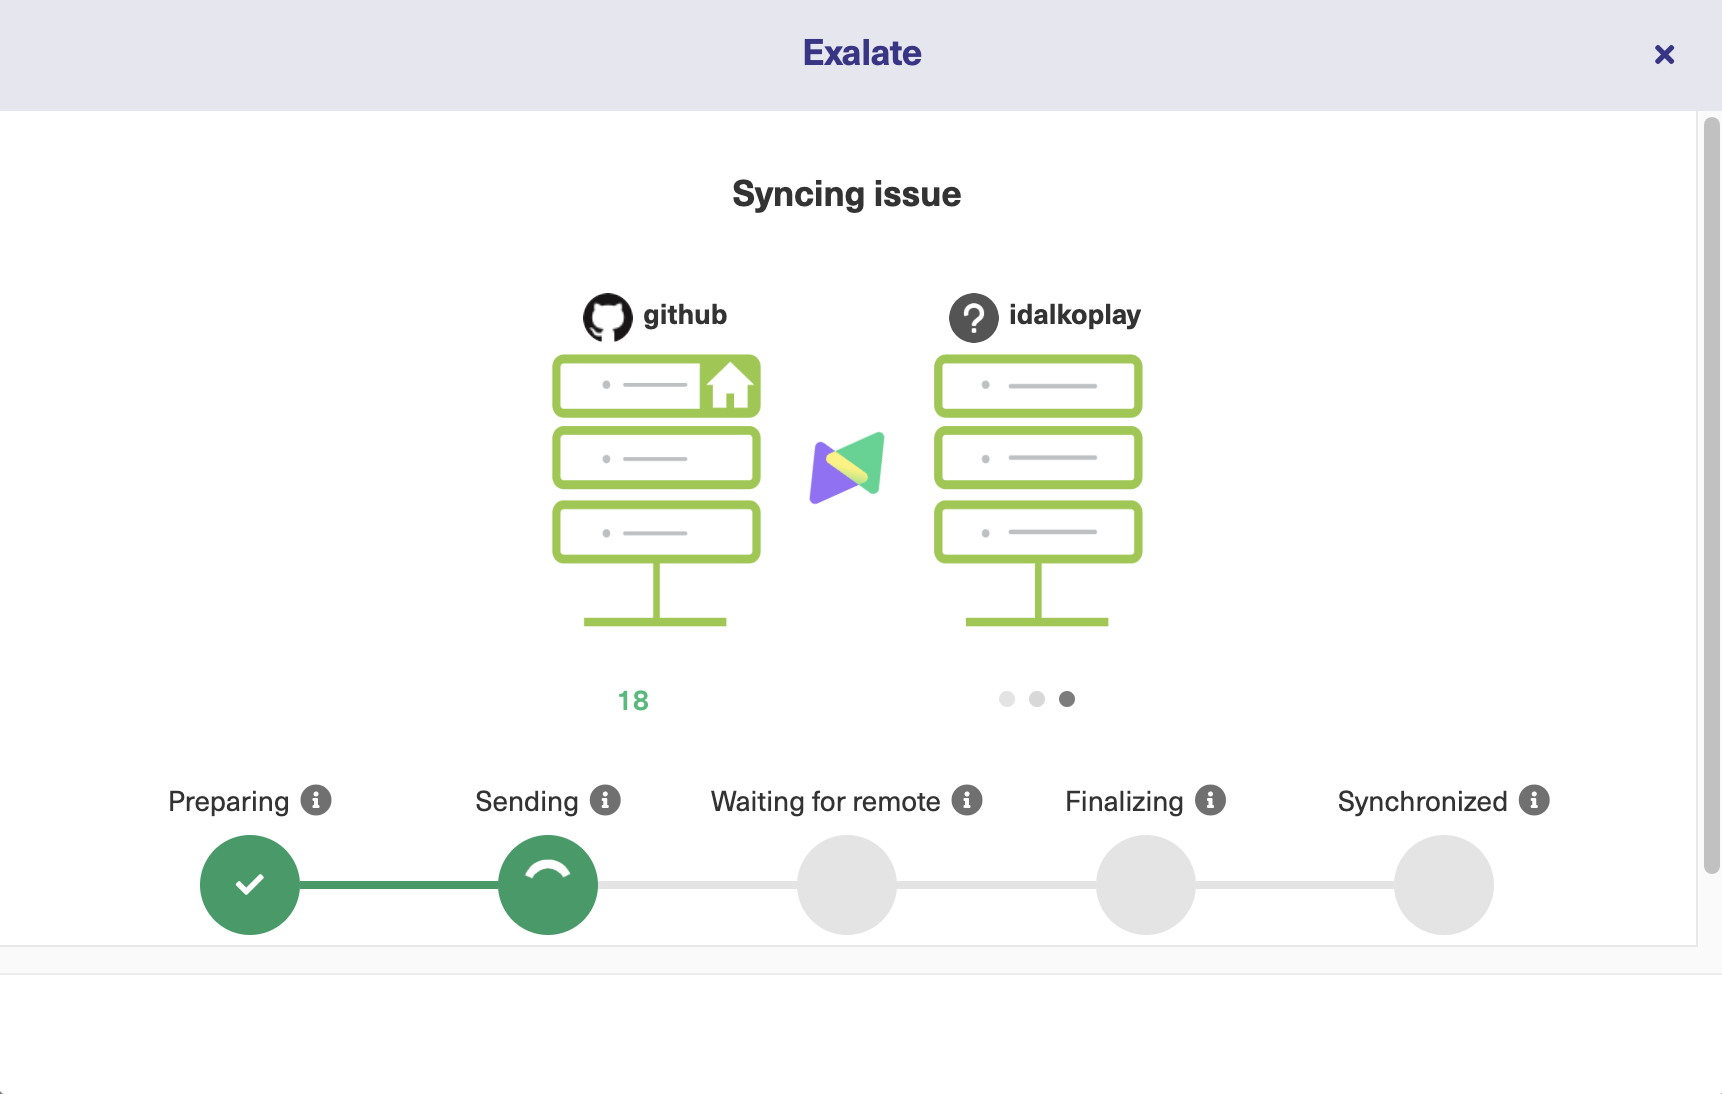
And bingo! You have your first successful sync. You can follow the links under the work name to go to the respective work item.
Continue with the Script Mode
With the Script mode, you can configure advanced mappings and sync almost any kind of information between GitHub and Jira. This is because it comes with Groovy scripts that are customizable to suit whatever you want to sync between the 2 applications.
So you can adapt it for complex or advanced integration use cases easily.
We recommend that you try this mode out to use Exalate to its full potential.
Note: If you are using the Basic connection, you can easily upgrade the connection to a Script one.
So now select “Script” on the screen that allows you to choose the configuration modes and hit “Next”.
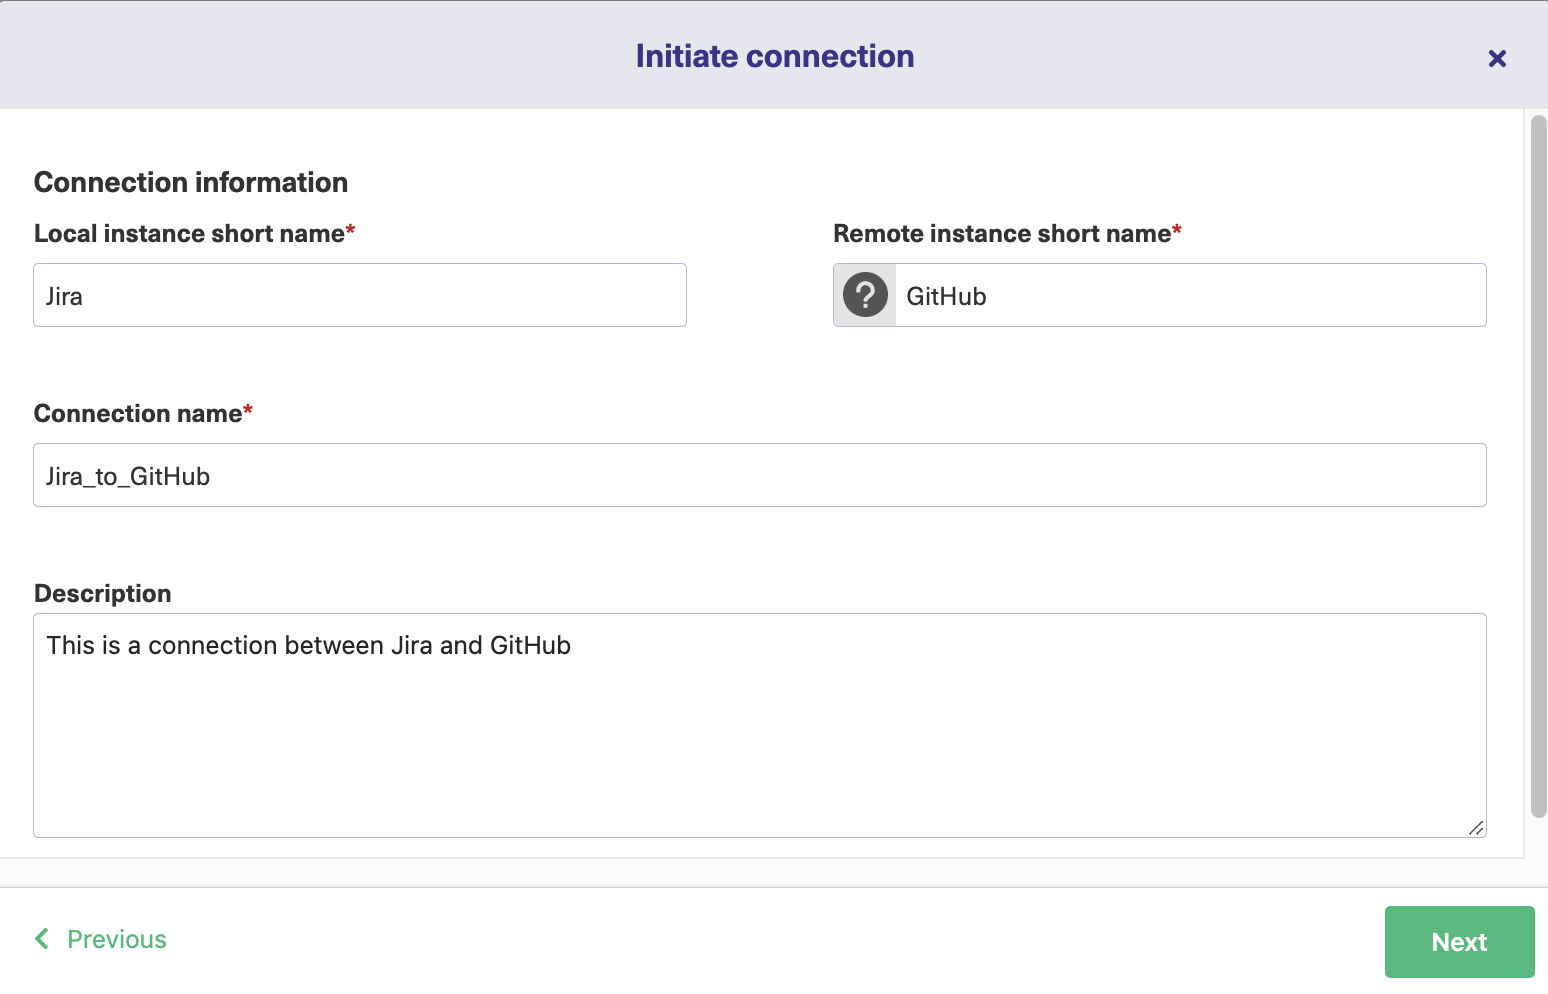
You will be required to name the local and remote instances now.
Since we are initiating the connection from the Jira side, our local instance will be Jira, and our remote instance will be the GitHub instance. Once you give these names, a connection name will automatically be created by joining the two names together, but you can change it if you want.
Also, don’t forget to enter a description for the connection, since it will be helpful if you have a lot of them. Once you get all the details right, click “Next”.
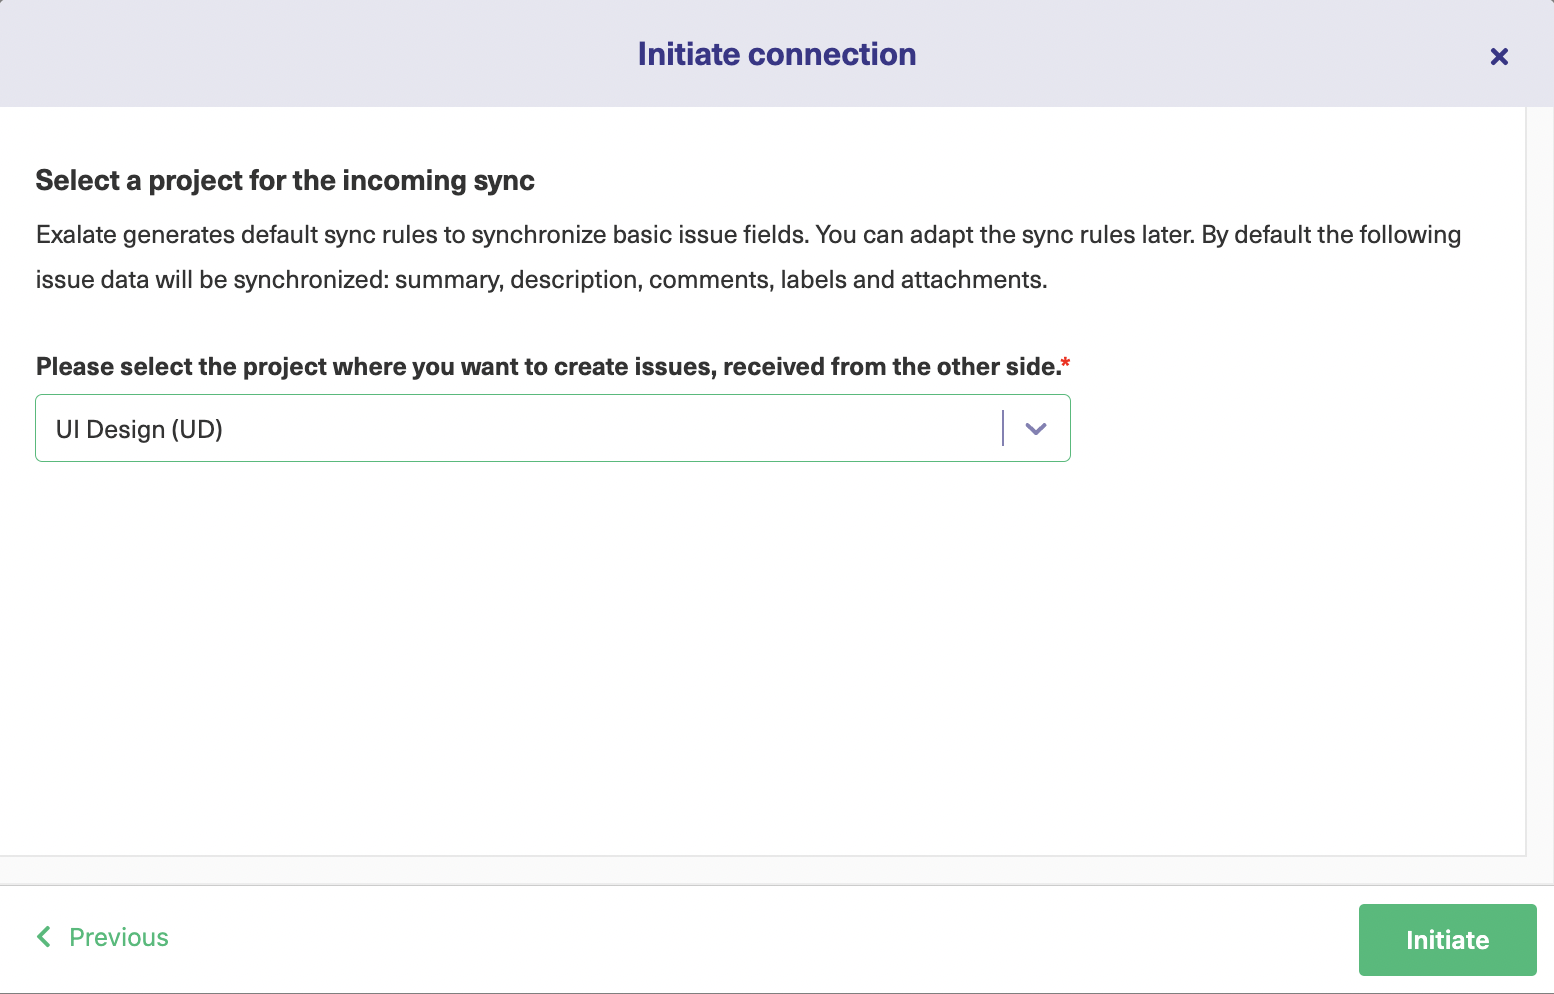
Just like you selected the project on the Jira side for the Basic mode connection, select the correct one now and click “Initiate”.
An invitation code will be generated. This works as a secret code that helps you authenticate both the communicating instances and contains some other information, like the type of connection, etc.
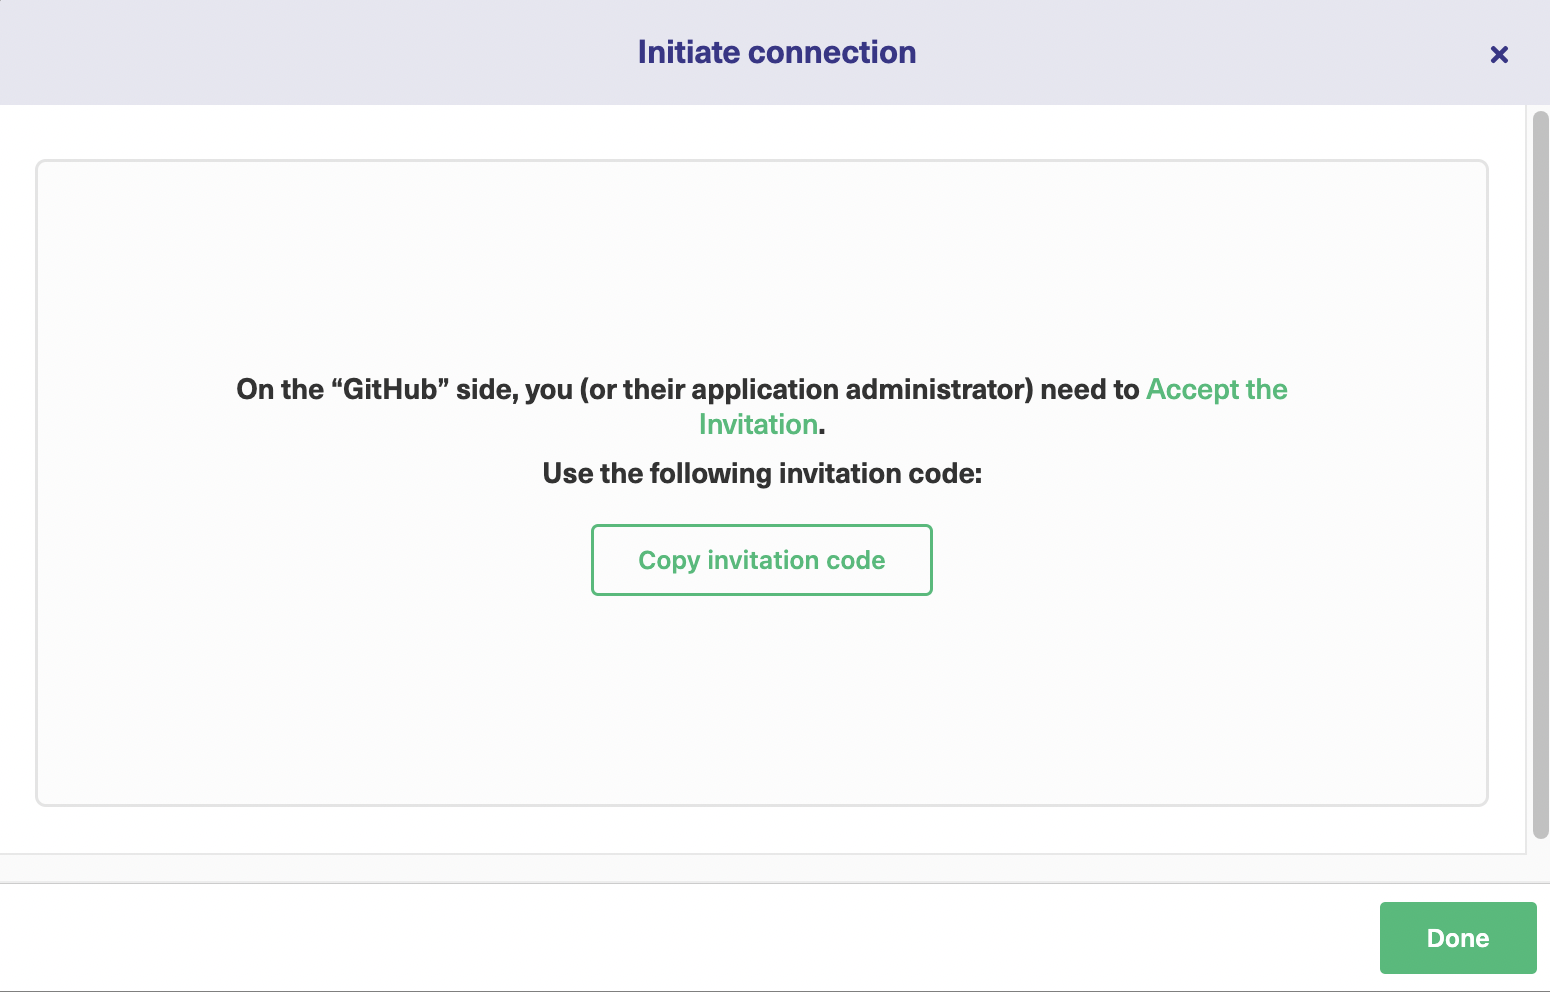
To copy the code, click “Copy invitation code” and “Done”.
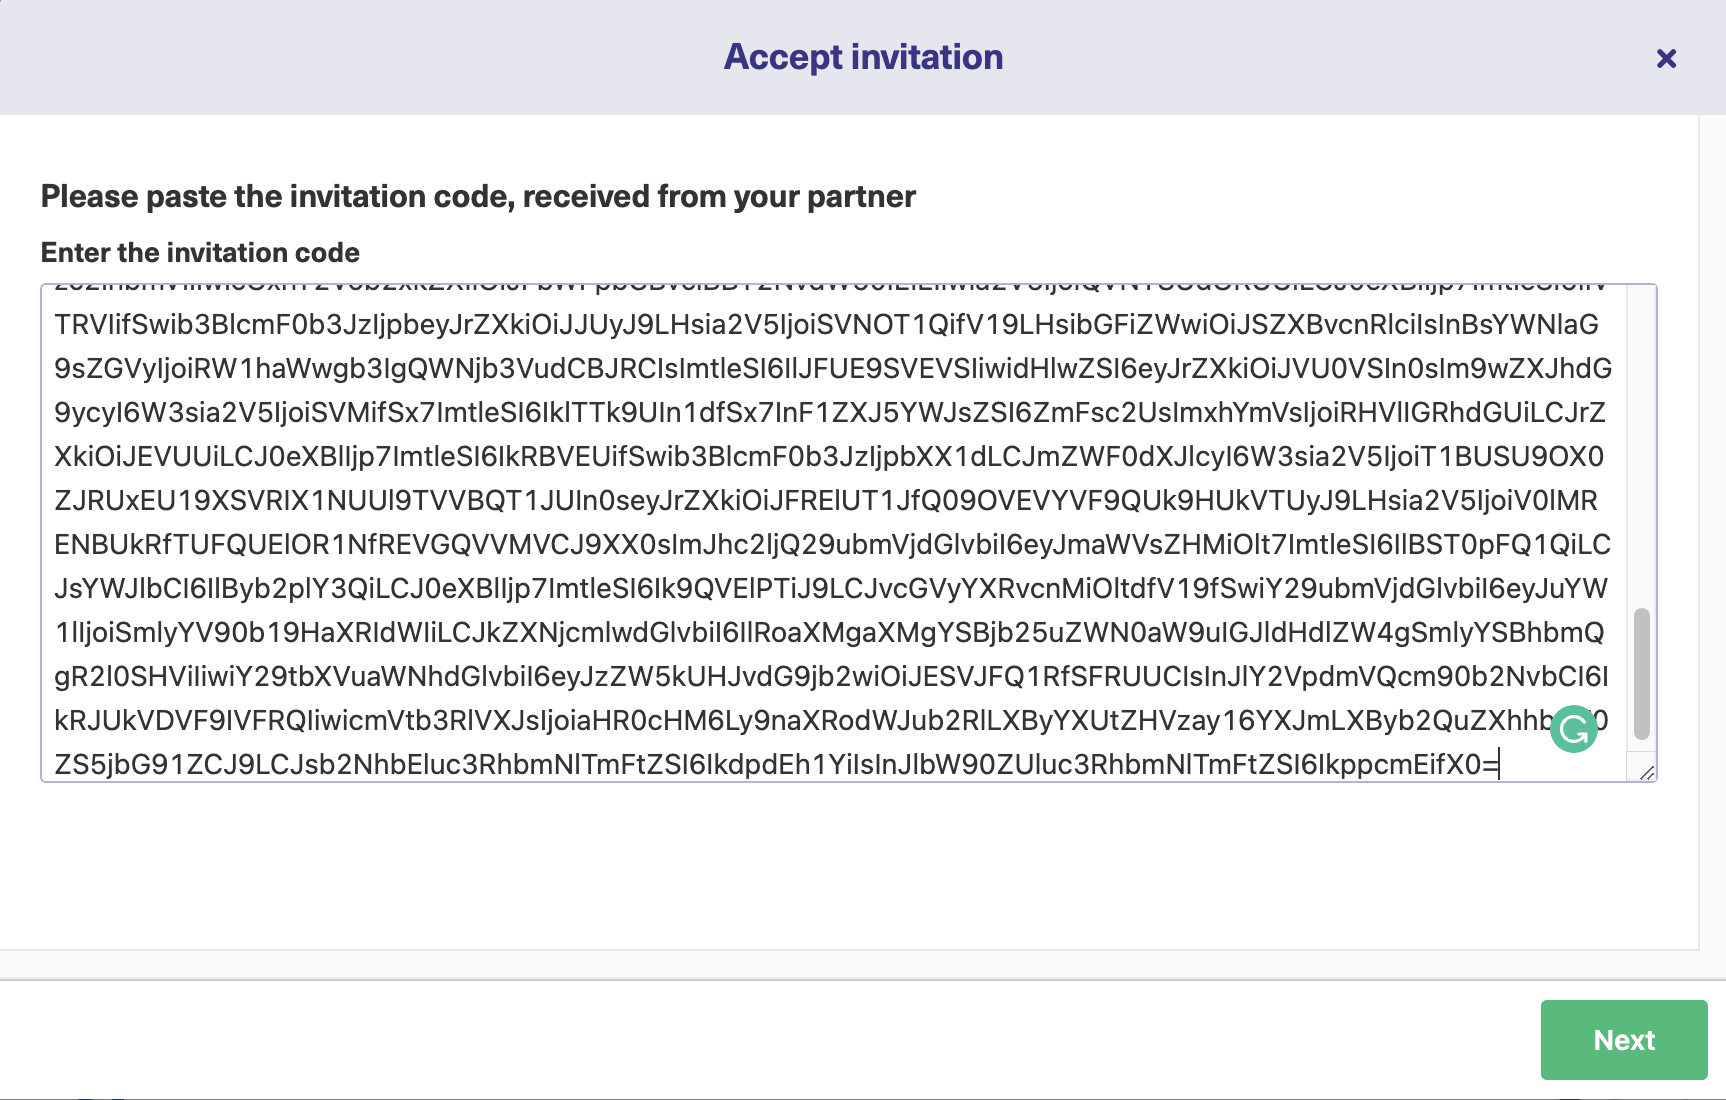
Now, proceed to your GitHub instance and under the “Connections” tab, click “Accept Invitation”.
In the text box that appears next, paste the invitation code you just copied. Then click “Next”.
Again, select the repository on the GitHub instance and click “Confirm”.
You will get notified when the connection is successful.
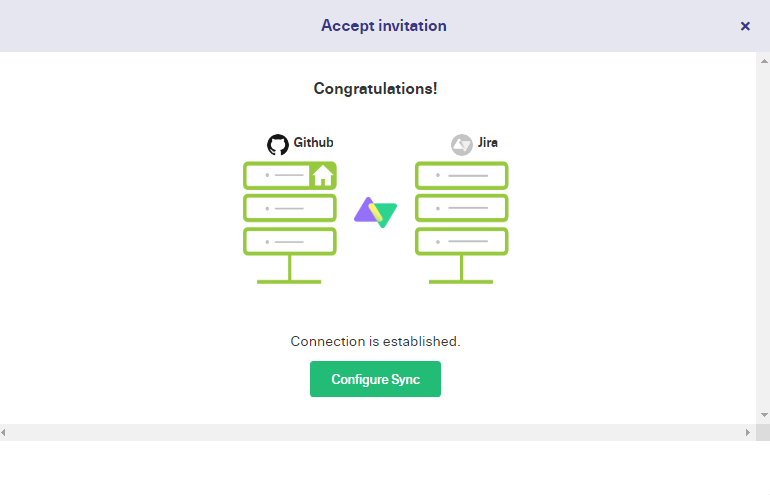
Proceed to the next step.
Step 4: Configure the Connection to Determine What Information to Share
Now that you have set up the initial connection, it’s time you decide what information must be sent and received between the 2 applications.
Maybe you want to create a new work item in GitHub once a work status in Jira is changed to “Review”. You can do all this by configuring the connection to decide what information to send and how you want to deal with the information received, and then create triggers for setting the conditions for information exchange.
For this, you can click “Configure sync”.
If not, then you can go to the “Connections” tab in the Exalate admin console, and from there, click the edit connection icon shown in front of the connection name you have just created.
A quick look at this screen will show you what different connections you have created, how many work items are there under sync, and the status (Active, Pending, Deactivated, Error) of each. You can also choose to edit the connection here and delete it, too.
The configuration screen looks like this:
This screen has 4 tabs: “Rules”, “Triggers”, “Statistics”, and “Info”.
We are covering the “Rules” in this section, whereas “Triggers” will be seen in Step 5.
The “Statistics” tab will give you an overview of your synchronization. Information about the number of work you have under sync, the date you last synced, etc is displayed.
The “Info” tab displays rather general information about the connection. It gives the name, the description (that you can edit), and the type of connection. It also shows the destination instance URL. Connections can either be public, private, or local. You can learn more about these types here.
Moving ahead to the “Rules” tab.
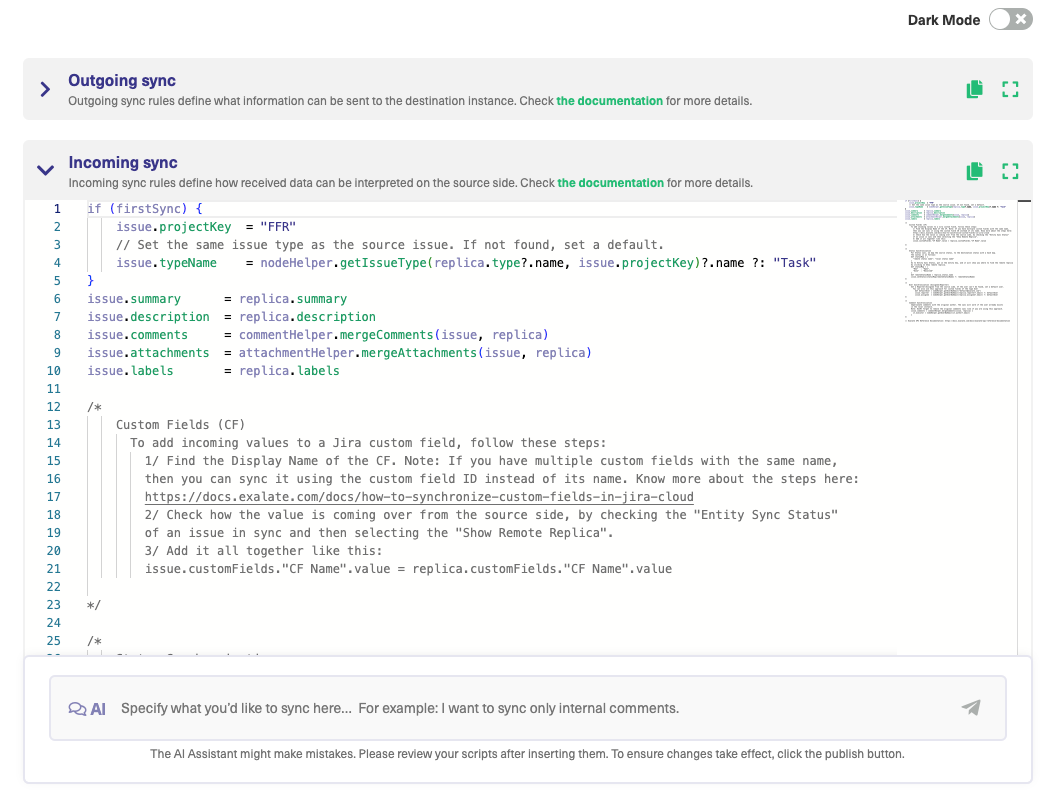
As seen, there are 2 sections: Outgoing sync and Incoming sync. As their name suggests, they are used to define what information must be sent and what must be received. Note that they’re independent of each other and need to be configured on either side.
So, for instance, the Outgoing sync on the GitHub side will define what information must be sent to Jira, and the Incoming sync will define what information must be received from Jira, and the same on the Jira side as well.
A closer look at each section (Outgoing and Incoming) will show you that there are scripts that are predefined for every connection, telling us what information is being exchanged. These are written in the Groovy scripting language, and if you are already familiar with it, this will be easy for you. Even if you aren’t, understanding and working with scripts is not as scary as it sounds.
Let’s deep dive a little and see how they are organized.
If you have a look at the Outgoing sync of GitHub, you will come across something like: replica.description=issue.description.
What this line means is that the description of the work item is saved into something called a replica. This replica acts like an empty placeholder that holds all the information you need to exchange between the two instances.
The same statement on Jira’s Incoming sync section will be mapped as issue.description=replica.description. So you are now saving the description of the work item from GitHub into the work description of Jira.
This is the kind of mapping evident in the images above.
If there is certain information you don’t want to send or receive, then you simply remove it from the respective section.
For instance, if you don’t want to sync comments from Jira to GitHub, then you can either remove the line or comment it as shown below.
If you want to start sending new information, you can simply add that in the respective section. You can also assign specific values to the fields. For instance, replica.description = “From GitHub” on Jira’s Incoming sync would mean all the synced work items from GitHub will have the description “From GitHub”.
We have a lot of script helpers on our documentation site that can help you get started easily.
Connections in Script Mode Using AI Assist
The Script Mode allows you to generate and optimize scripts using the AI Assist feature, which appears as a tab under both the incoming and outgoing sync rules.
How does it work?
Enter your sync requirements into the chat box, and AI Assist will generate scripts based on your input, existing configurations, and Exalate’s scripting API.
It is also important to note that AI is not perfect. So, you need precise and detailed prompts to ensure the best results.
Let’s say you want to sync task lists and assignee between Jira and GitHub; the prompt could look something like this:
“I need a script to help me sync task lists and assignee between Jira and GitHub.”

After a moment, the script will be generated, with suggested changes highlighted in green and red. The green scripts are suggested additions, while the red scripts are suggested deletions.
If the new snippet works for you, click on “Insert Changes”. Otherwise, you can discard the suggested code. If needed, you can refine your prompt and, once satisfied, publish the changes.
Now is the time you start syncing the information automatically.
Step 5: Create Triggers to Start Automatic Information Exchange
Once you have decided on the information to be exchanged, let us see how you can start the process automatically. This is done with the help of triggers. These are conditions you set for the sync to start.
To create triggers, click on the “Triggers” tab shown in the edit configuration screen. It looks like this.
Note: You can create triggers from the left-hand Exalate menu as well. But while creating triggers, you also need to select the name of the connection.
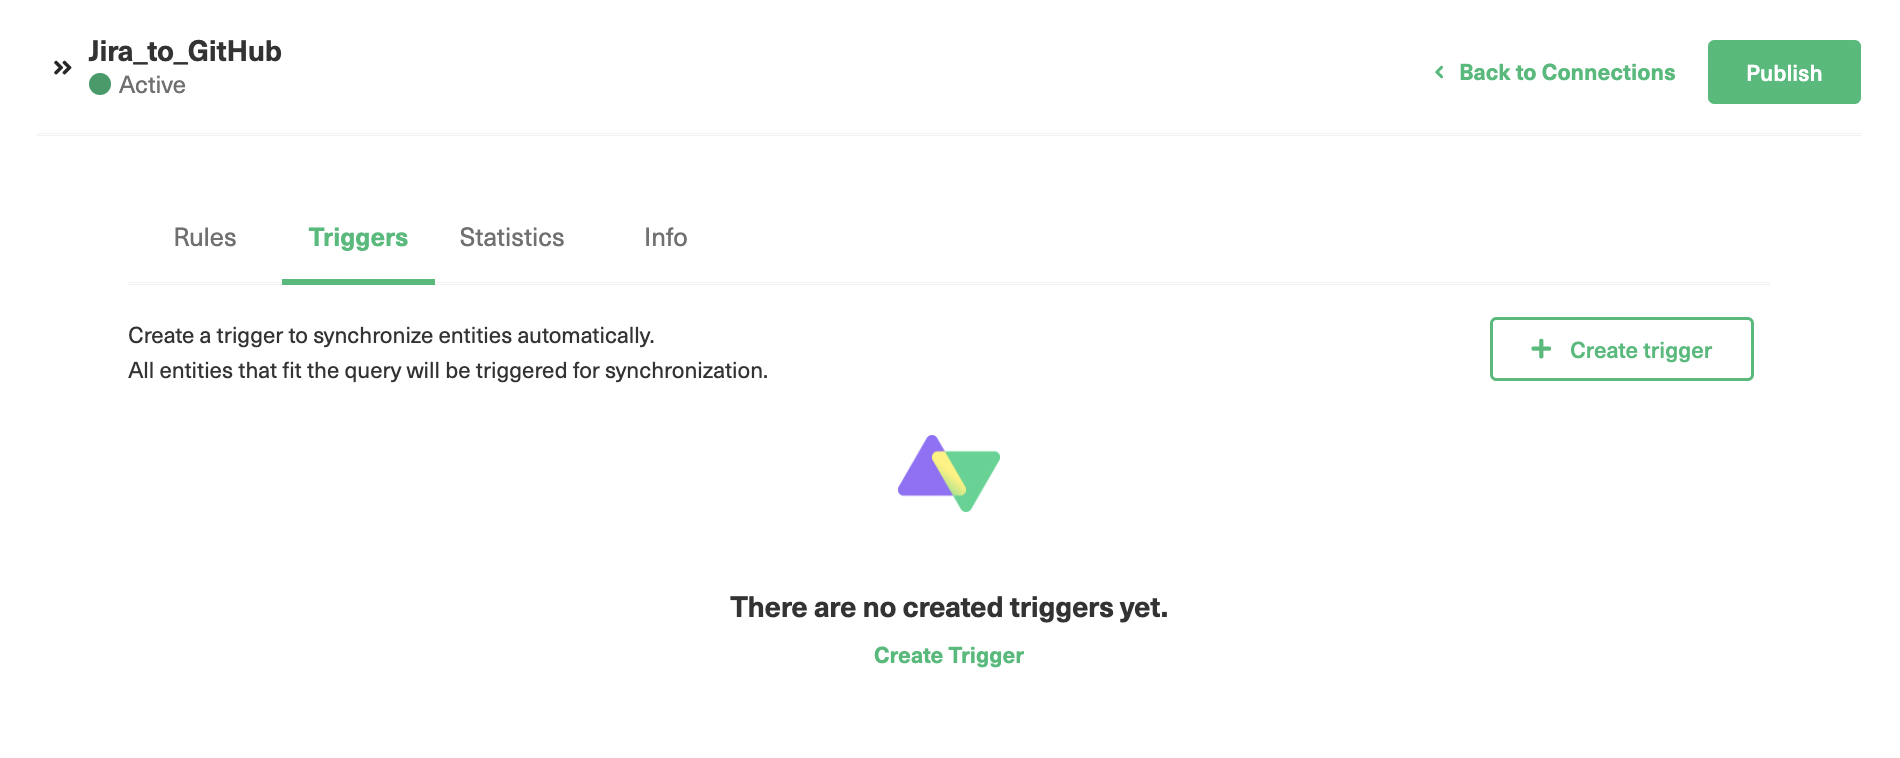
If this is the first time you are creating triggers, then this screen is blank, otherwise, you can view all the triggers you have created for your connection here.
Click on the “Create trigger” button, and an “Add trigger” pop-up will appear.
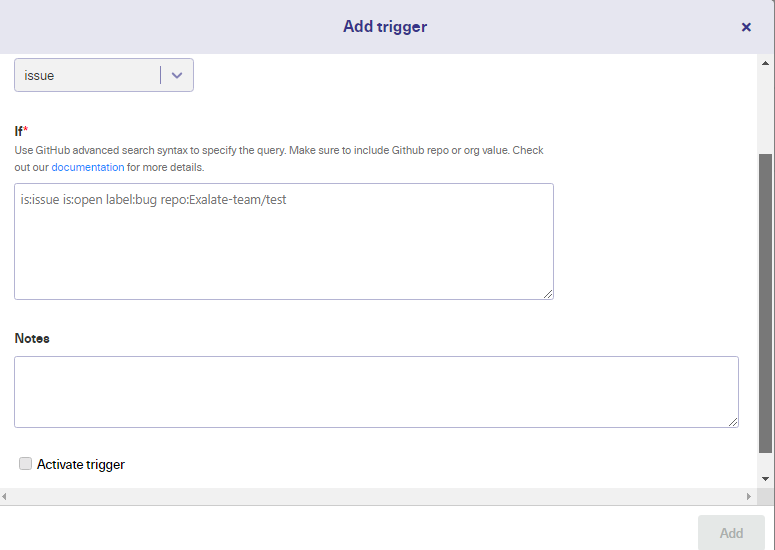
Let us have a look at the different fields here.
Firstly, you need to select the entity type to which you need to apply the trigger. I have selected a work item here.
The “If” section decides the condition you want to set and is platform-specific. On the GitHub side, advanced search syntax is used to filter work, whereas JQL (Jira Query Language) is used on the Jira side.
You can also add notes if you want.
Toggle the “Active” switch to activate the trigger, and lastly click on “Add”.
Once you add the trigger, you can see it on the previous screen.
You can choose to edit or delete the trigger here. You can also sync issues in bulk that satisfy the trigger condition by clicking on the 3 dots in front of its name.
As seen, we are creating a trigger for syncing only Bugs that have a label=devteam over to GitHub.
Once you work on finalizing the triggers, “Publish” the changes to apply them.
Step 6: Synchronize Information
Through all the steps we have seen above, the ways in which you can start your sync with Exalate are:
- Sync work items created through Basic connections following Step 1.
- Sync work items through triggers.
- Bulk Connect existing work items.
- Bulk Exalate work items fulfilling the trigger conditions.
Happy syncing!
Conclusion
Both Jira and GitHub Enterprise are popular tools for code development and project collaboration. So if integrated, they can uncover useful business insights and get teams to collaborate faster and better.
But selecting the right solution for such an integration is extremely important. So we saw some criteria that you can consider while choosing such a solution. We also saw how Exalate gives you flexibility, reliability, decentralized integration, and security as its feature offerings, in addition to the variety of integrations it supports.
And then we saw how a GitHub Enterprise Jira integration can be achieved in a step-by-step manner using Exalate.
Frequently Asked Questions
How can I connect Jira with GitHub?
You can connect Jira with GitHub using third-party applications from the GitHub Marketplace. These tools allow organizations to sync their GitHub repositories with their Jira workspace.
Why do I need to integrate Jira and GitHub?
You need to integrate Jira and GitHub in order to share information between both platforms. Updates to your GitHub repo will reflect automatically within your Jira work, epic, or story. This makes it easier for teams to collaborate.
Can I sync my GitHub repo with my Jira project?
Yes, you can sync your GitHub repo with your Jira project. You can map fields like work items, comments, pull requests, and updates.
What tool can I use to automate Jira and GitHub sync?
You can automate your Jira to GitHub syncs using a third-party solution called Exalate. This solution allows you to set triggers and write custom scripts for your connection instead of having to move everything manually.
How do I sync comments between Jira and GitHub?
You can sync comments between Jira and GitHub by mapping the comment field in your repository to a specific Jira epic. Tools like Jira Software for GitHub and Exalate can help you choose what to sync.
Recommended Reads:
- Jira Integrations: Integrate Jira and Other Systems Bidirectionally
- GitHub Salesforce Integration: How to Set up a Sync in 6 Steps
- How to set up a Jira Salesforce Integration
- How to Set up a ServiceNow GitHub Integration
- How to Set up a Jira GitHub Integration
- Jira ServiceNow Integration: How to Set up an Integration in 6 Steps
- Jira to Jira Integration: The Comprehensive Guide to Jira Sync