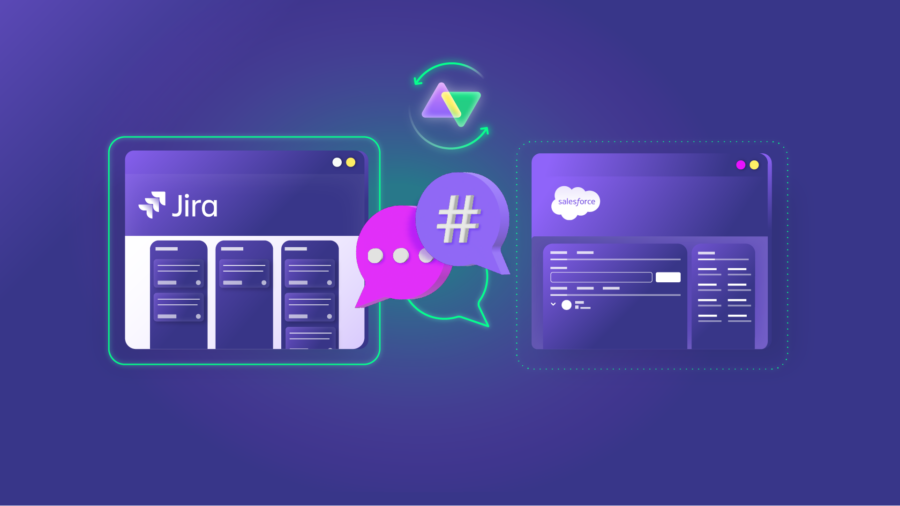
A Jira Salesforce integration use case can be an interesting one, an amalgamation of business and technical teams.
In this article, we’ll discuss an advanced comment use case that allows syncing threads of comments and user mentions between these 2 platforms so that they speak the same language.
The use case is implemented between a Jira Cloud and a Salesforce instance.
The following are the key requirements:
An issue (or a ticket) created in Jira is synced over to the Salesforce instance as a Case. It might as well be any other Salesforce object.
Basic fields like summary, description, and comments are synced between Jira Cloud and Salesforce.
Threaded replies to comments (chatter feed capability) from Salesforce are synced to Jira. Comments from Jira are reflected in Salesforce.
User mentions in Jira tags the correct corresponding user in Salesforce (if the user exists on both systems).
Comment formatting is maintained.
The Challenges
There is a transformation challenge between the 2 instances. Since Salesforce uses HTML internally to represent comments and Jira uses Wiki Markup, there are inherent differences in formatting between these 2 platforms. These must be addressed correctly.
There is a fully supported “chatter feed” functionality in Salesforce that allows threaded replies to comments. Jira does not have similar functionality. The challenge then is to reflect these replies back in Jira.
The Solution: Exalate
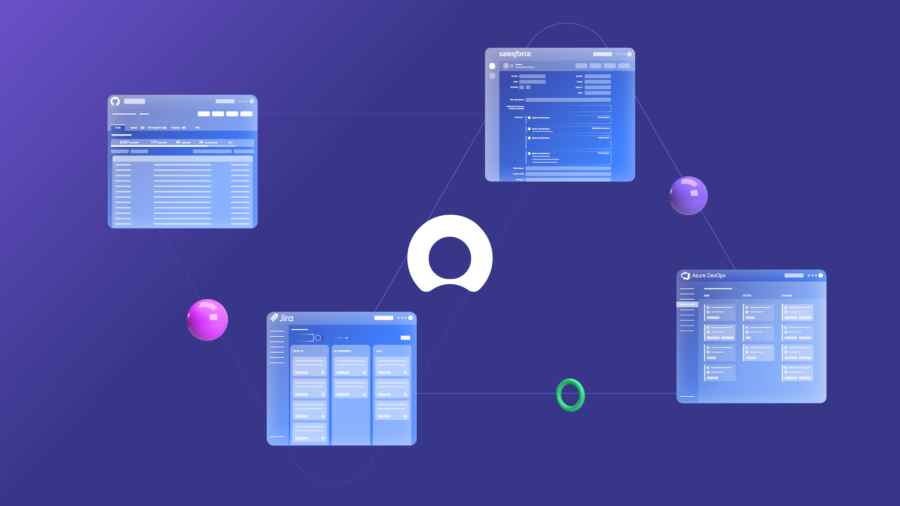
Exalate is a one-way or two-way synchronization solution that supports multiple platforms like Jira, Salesforce, Azure DevOps, GitHub, Zendesk, etc.
Its intuitive Groovy-based scripting engine allows you to implement advanced use cases. The Sync rules can be modified to set up deeper integrations. In addition to this, you can use Triggers and set up advanced automatic synchronization too.
Note: The Exalate Academy is a great way to learn more about Exalate. Give it a try!
How to Implement Advanced Comment Sync Using Exalate
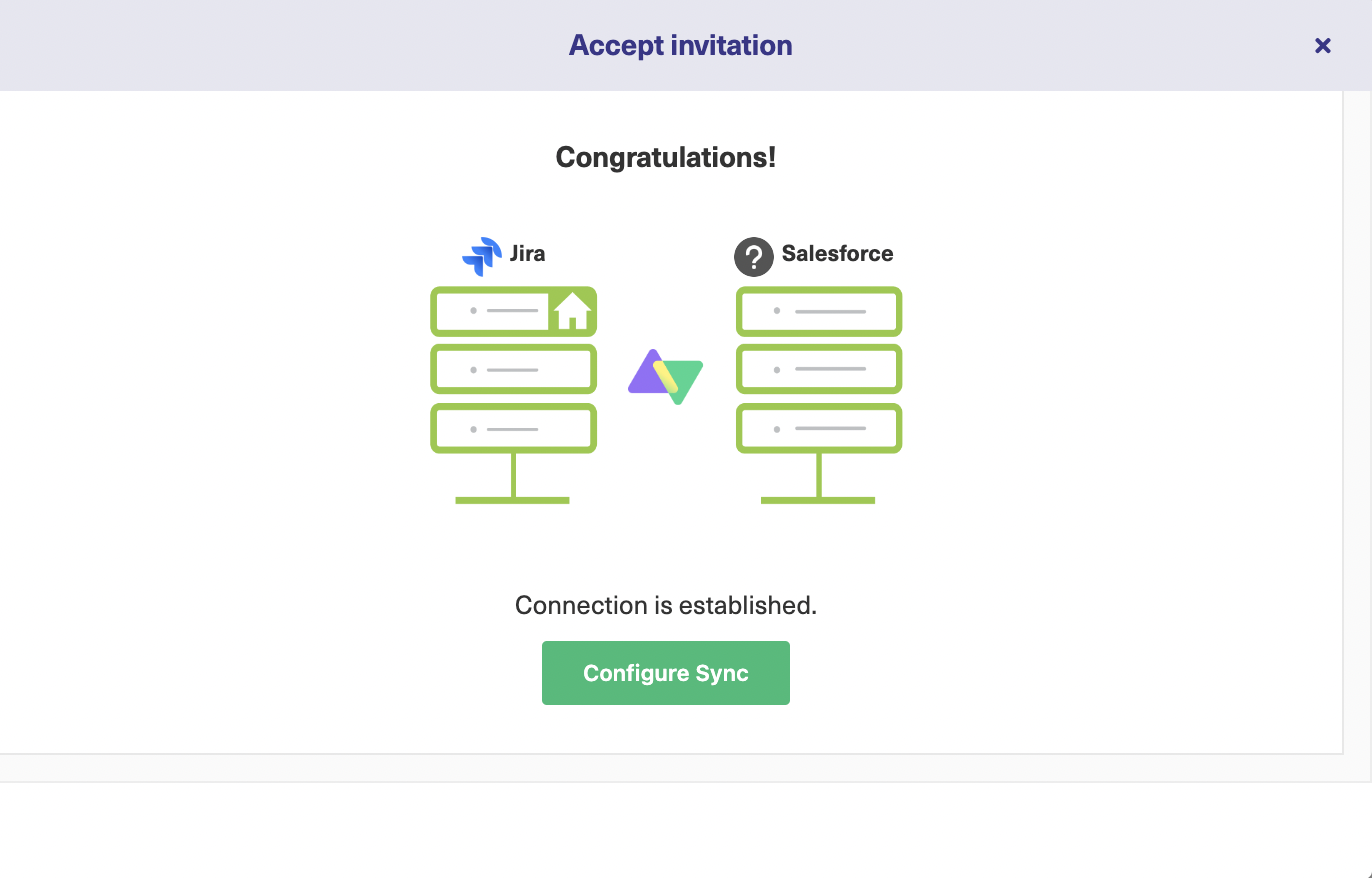
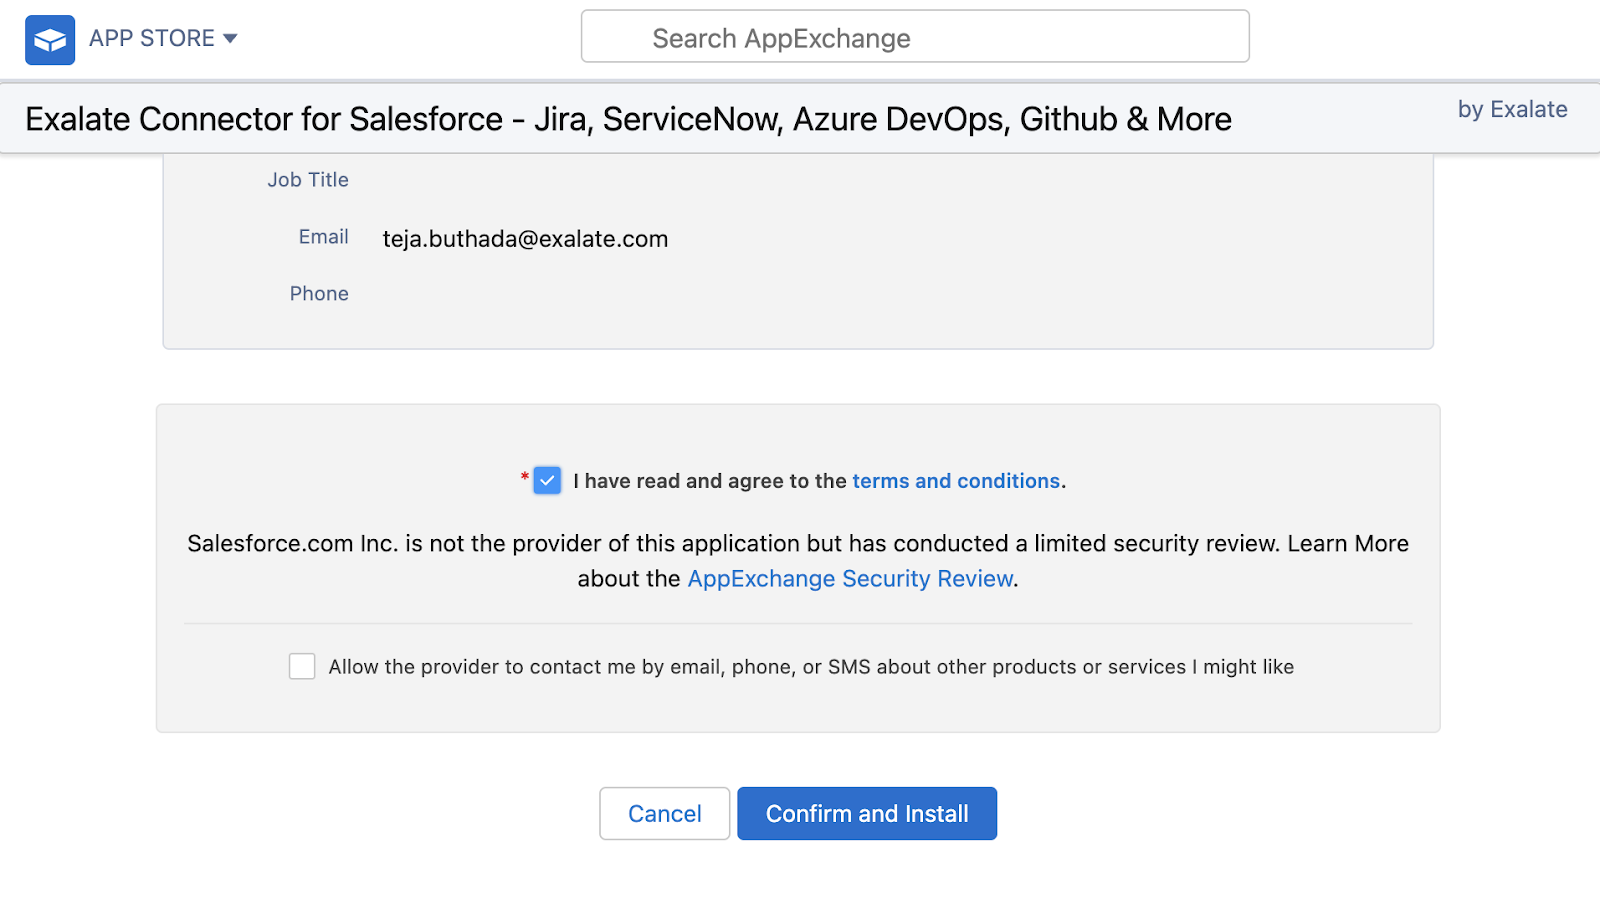
You should create in Script Mode a connection between the platforms.
Note: You can learn more about setting up a connection between Jira and Salesforce through the Getting Started guide or read this complete Jira Salesforce Integration guide.
The Implementation Using Exalate
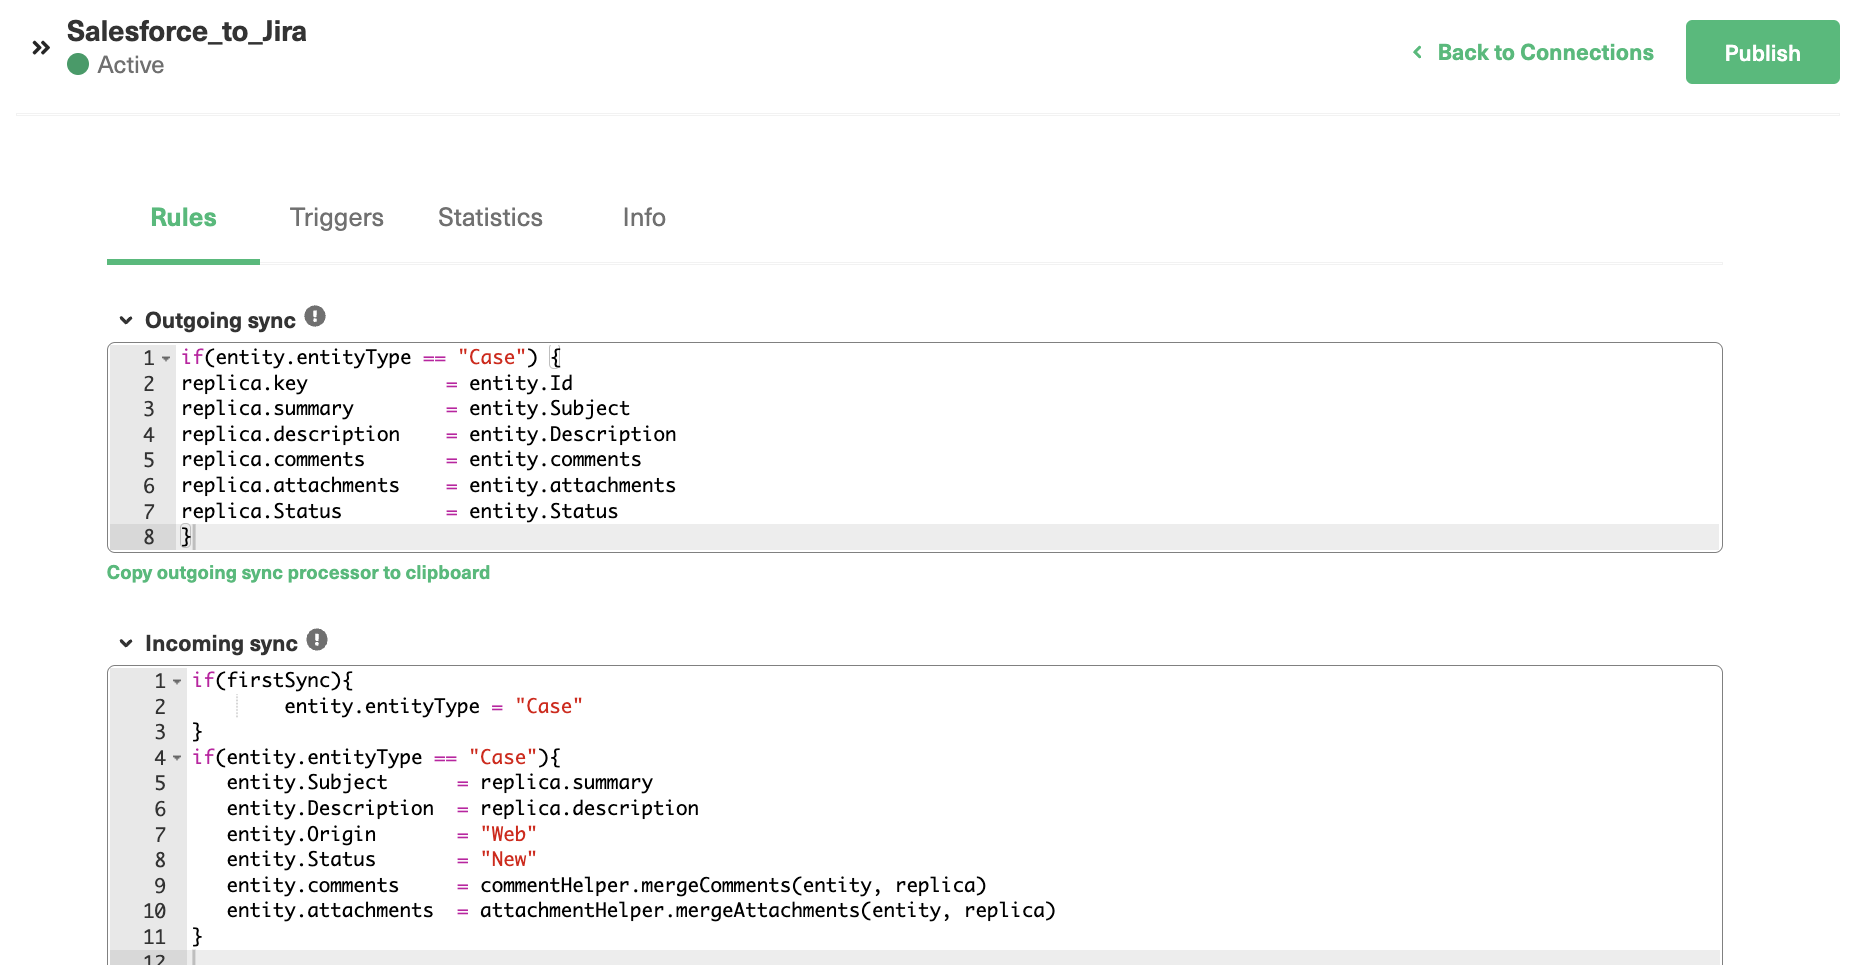
Once the Connection has been created, you need to configure the Sync Rules.
These rules are Groovy-based scripts that control what information to send and receive between the 2 platforms.
You can click on the “Configure Sync” button after the Connection has been set up to configure these rules or you can also edit the Connection in the “Connections” tab in the Exalate Console.
Rules are present at both ends of the synchronization. The “Outgoing Sync” on the Jira side decides what information must be sent from Jira to Salesforce and the “Incoming Sync” decides what and how information must be received from Salesforce.
The same exists in the Salesforce instance.
The scripts you see are generated by default when the Connection has been created. So common fields like summary, description, comments, etc are already there and can be synchronized out-of-the-box.
Now, we need to edit them to accommodate our sync requirements.
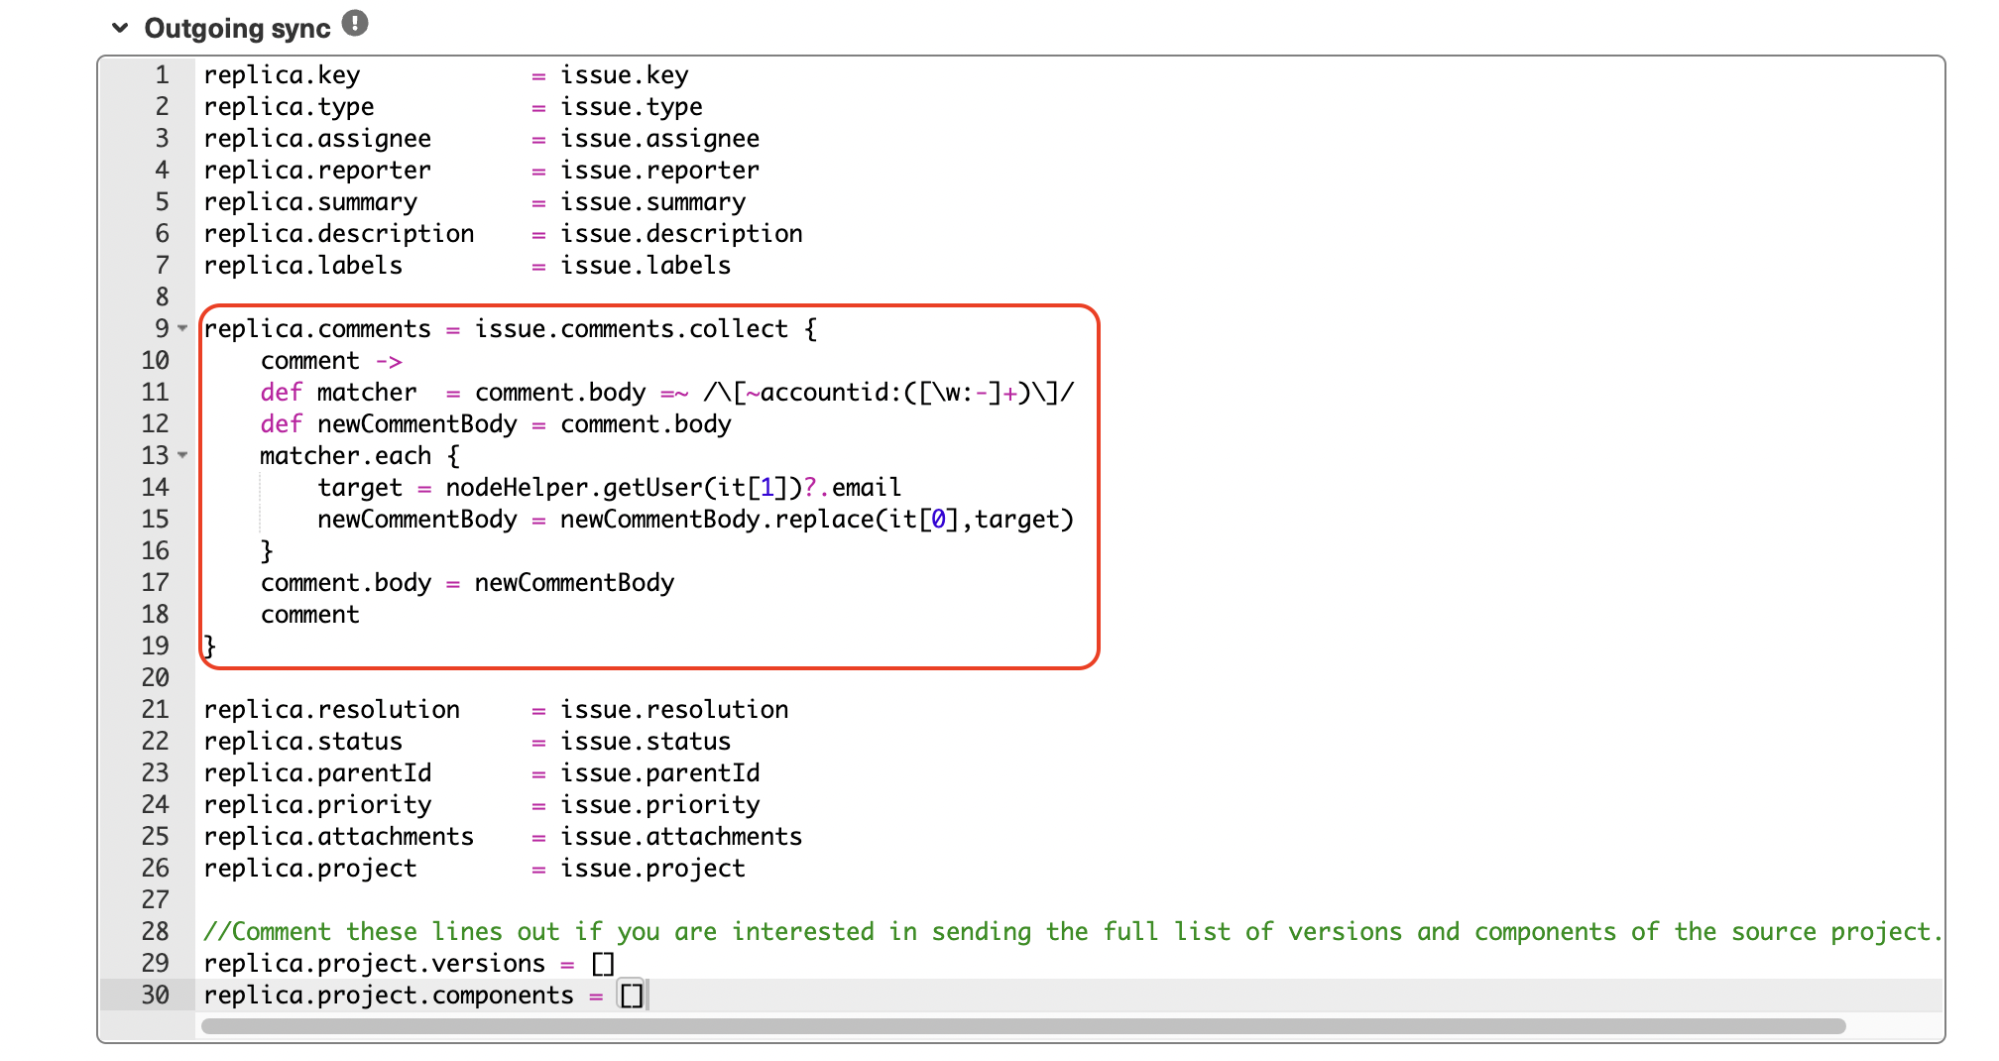
Jira: Outgoing Sync
replica.key        	= issue.key
replica.type       	= issue.type
replica.assignee   	= issue.assignee
replica.reporter   	= issue.reporter
replica.summary    	= issue.summary
replica.description	= issue.description
replica.labels     	= issue.labels

replica.comments = issue.comments.collect {
    comment ->
    def matcher  = comment.body =~ /\[~accountid:([\w:-]+)\]/
    def newCommentBody = comment.body
    matcher.each {
        target = nodeHelper.getUser(it[1])?.email
        newCommentBody = newCommentBody.replace(it[0],target)
    }
    comment.body = newCommentBody
    comment
}

replica.resolution 	= issue.resolution
replica.status     	= issue.status
replica.parentId   	= issue.parentId
replica.priority   	= issue.priority
replica.attachments	= issue.attachments
replica.project    	= issue.project

//Comment these lines out if you are interested in sending the full list of //versions and components of the source project.

replica.project.versions = []
replica.project.components = []
The Outgoing sync looks like this.
Here’s what happens in the script:
The collect method iterates over the comments array of the Jira issue and transforms them before assigning them to the replica (to be sent to the other side).
The transformation taking place is at the heart of handling user mentions. The script extracts them in the comment body and replaces them with the email address of that user instead. The replica will now contain the comment not with the Jira-specific mention, but rather with an email address corresponding to the mentioned user.
Note: Replica works as a payload to pass information between the two applications.
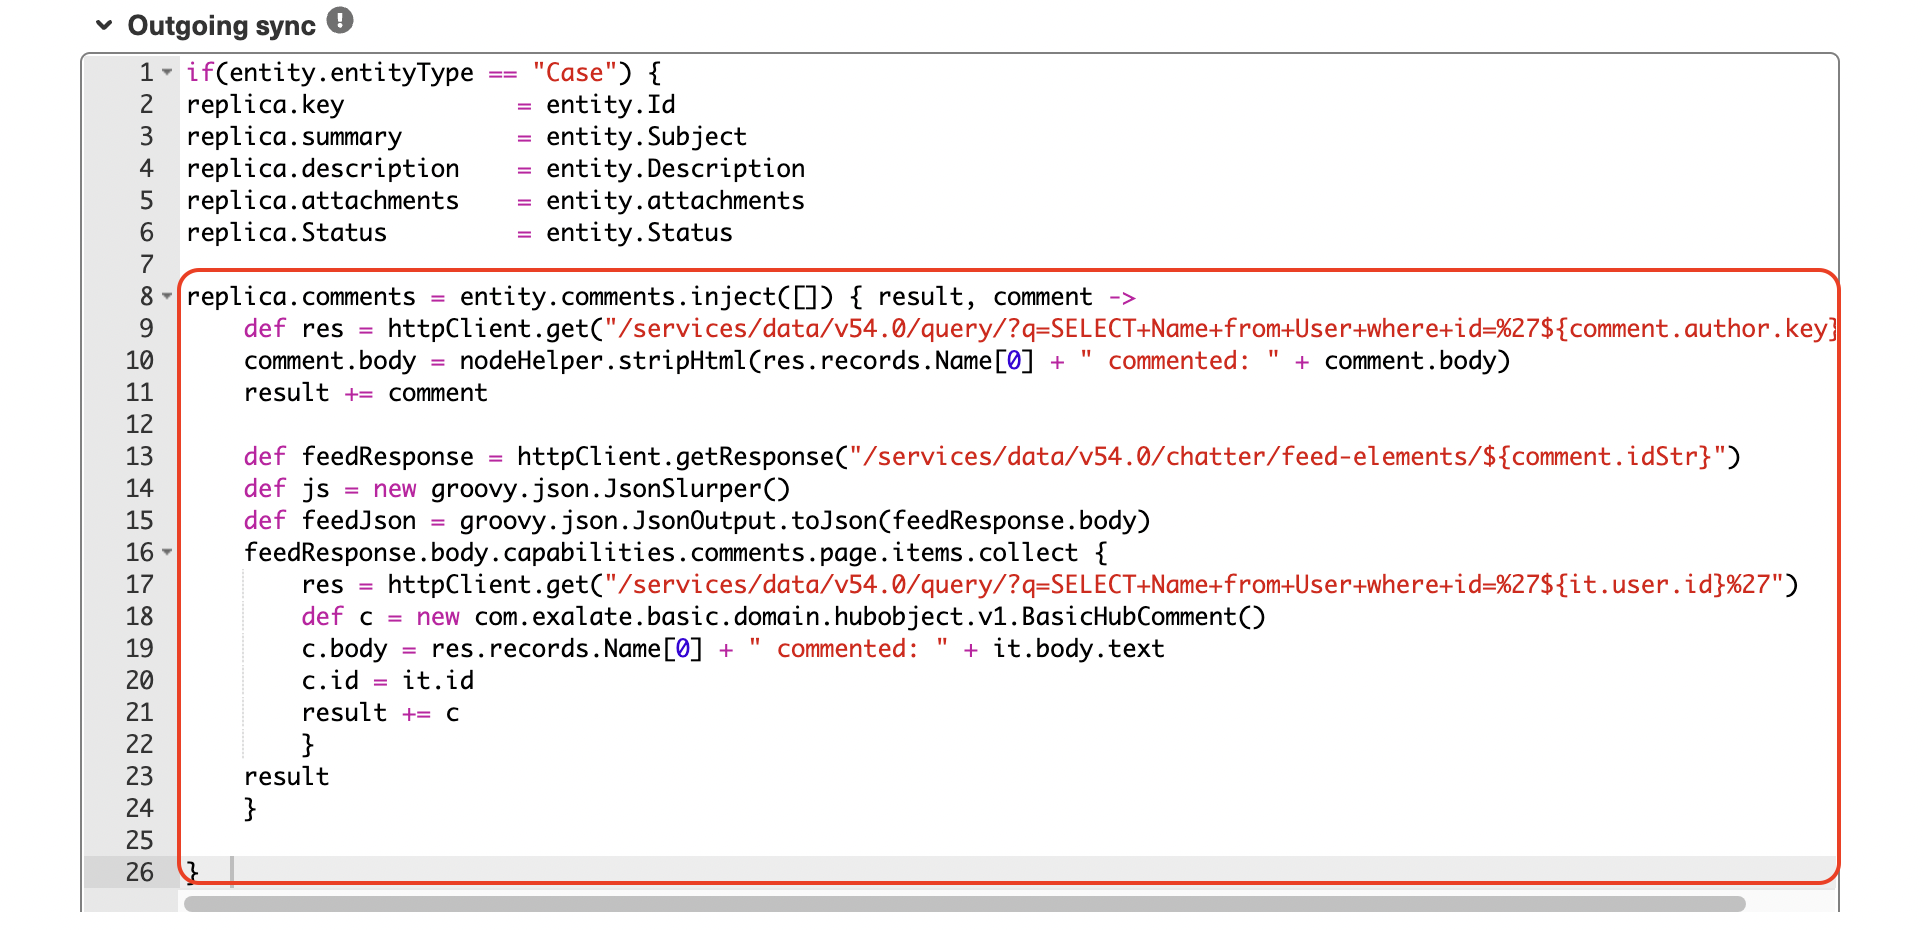
Salesforce: Outgoing Sync
if(entity.entityType == "Case") {
replica.key        	= entity.Id
replica.summary    	= entity.Subject
replica.description	= entity.Description
replica.attachments	= entity.attachments
replica.Status     	= entity.Status

replica.comments = entity.comments.inject([]) { result, comment ->
    def res = httpClient.get("/services/data/v54.0/query/?q=SELECT+Name+from+User+where+id=%27${comment.author.key}%27")
    comment.body = nodeHelper.stripHtml(res.records.Name[0] + " commented: " + comment.body)
    result += comment

    def feedResponse = httpClient.getResponse("/services/data/v54.0/chatter/feed-elements/${comment.idStr}")
    def js = new groovy.json.JsonSlurper()
    def feedJson = groovy.json.JsonOutput.toJson(feedResponse.body)
    feedResponse.body.capabilities.comments.page.items.collect {
        res = httpClient.get("/services/data/v54.0/query/?q=SELECT+Name+from+User+where+id=%27${it.user.id}%27")
        def c = new com.exalate.basic.domain.hubobject.v1.BasicHubComment()
        c.body = res.records.Name[0] + " commented: " + it.body.text
        c.id = it.id
        result += c
        }
    result
    }

}
The Outgoing Sync script looks like this.
Here’s what happens in the script:
The inject method iterates over all the comments and performs several operations:
For each Salesforce comment, the script first fetches the username of the comment author and appends it to the comment body (so that it can be reflected on Jira as such). In addition, the script employs the stripHtml() method to transform the HTML formatted Salesforce comments into plain text to be properly reflected on the Jira side. We add this main comment to the result variable temporarily.
For each Salesforce main comment, the script then fetches associated threaded replies and populates them in the feedResponse. Each of these threaded replies is then sanitized by removing HTML and appending the author’s name to the comment body. They are then added to the result variable.
This result, once the iterations are over, contains the main comments and threads that have already been transformed. It is then assigned to the replica to be sent over to the Jira side.
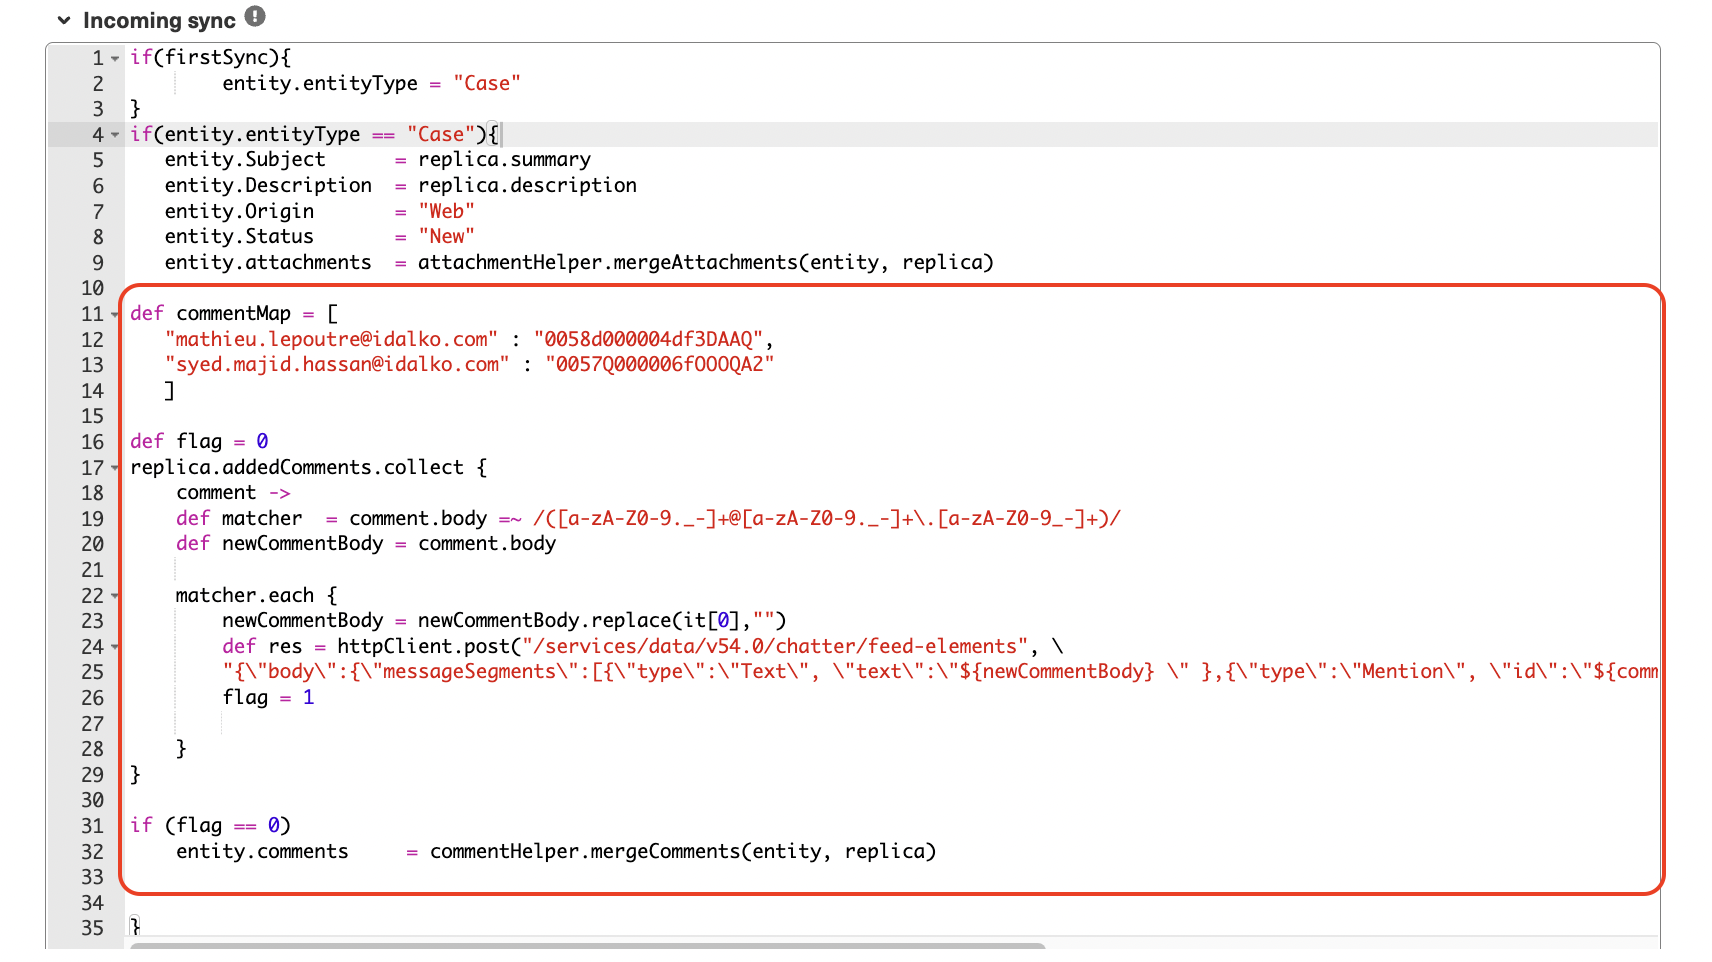
Remember that when sending comments from the Jira side, we replaced the user mentions with the email addresses. So, in Salesforce we create a mapping called commentMap that maps the email addresses to the corresponding Salesforce User IDs.
The next step is to iterate over the comments contained in the replica and for each comment extract the email address, map it using the commentMap and then replace the email address in the comment with the Salesforce mention of the mapped user.
Jira: Incoming Sync
There is no need to modify this since the default behavior is sufficient for our use case.
Output
Once the code is inserted into the respective outgoing and incoming syncs, comments, and threaded replies will automatically be reflected in Jira.
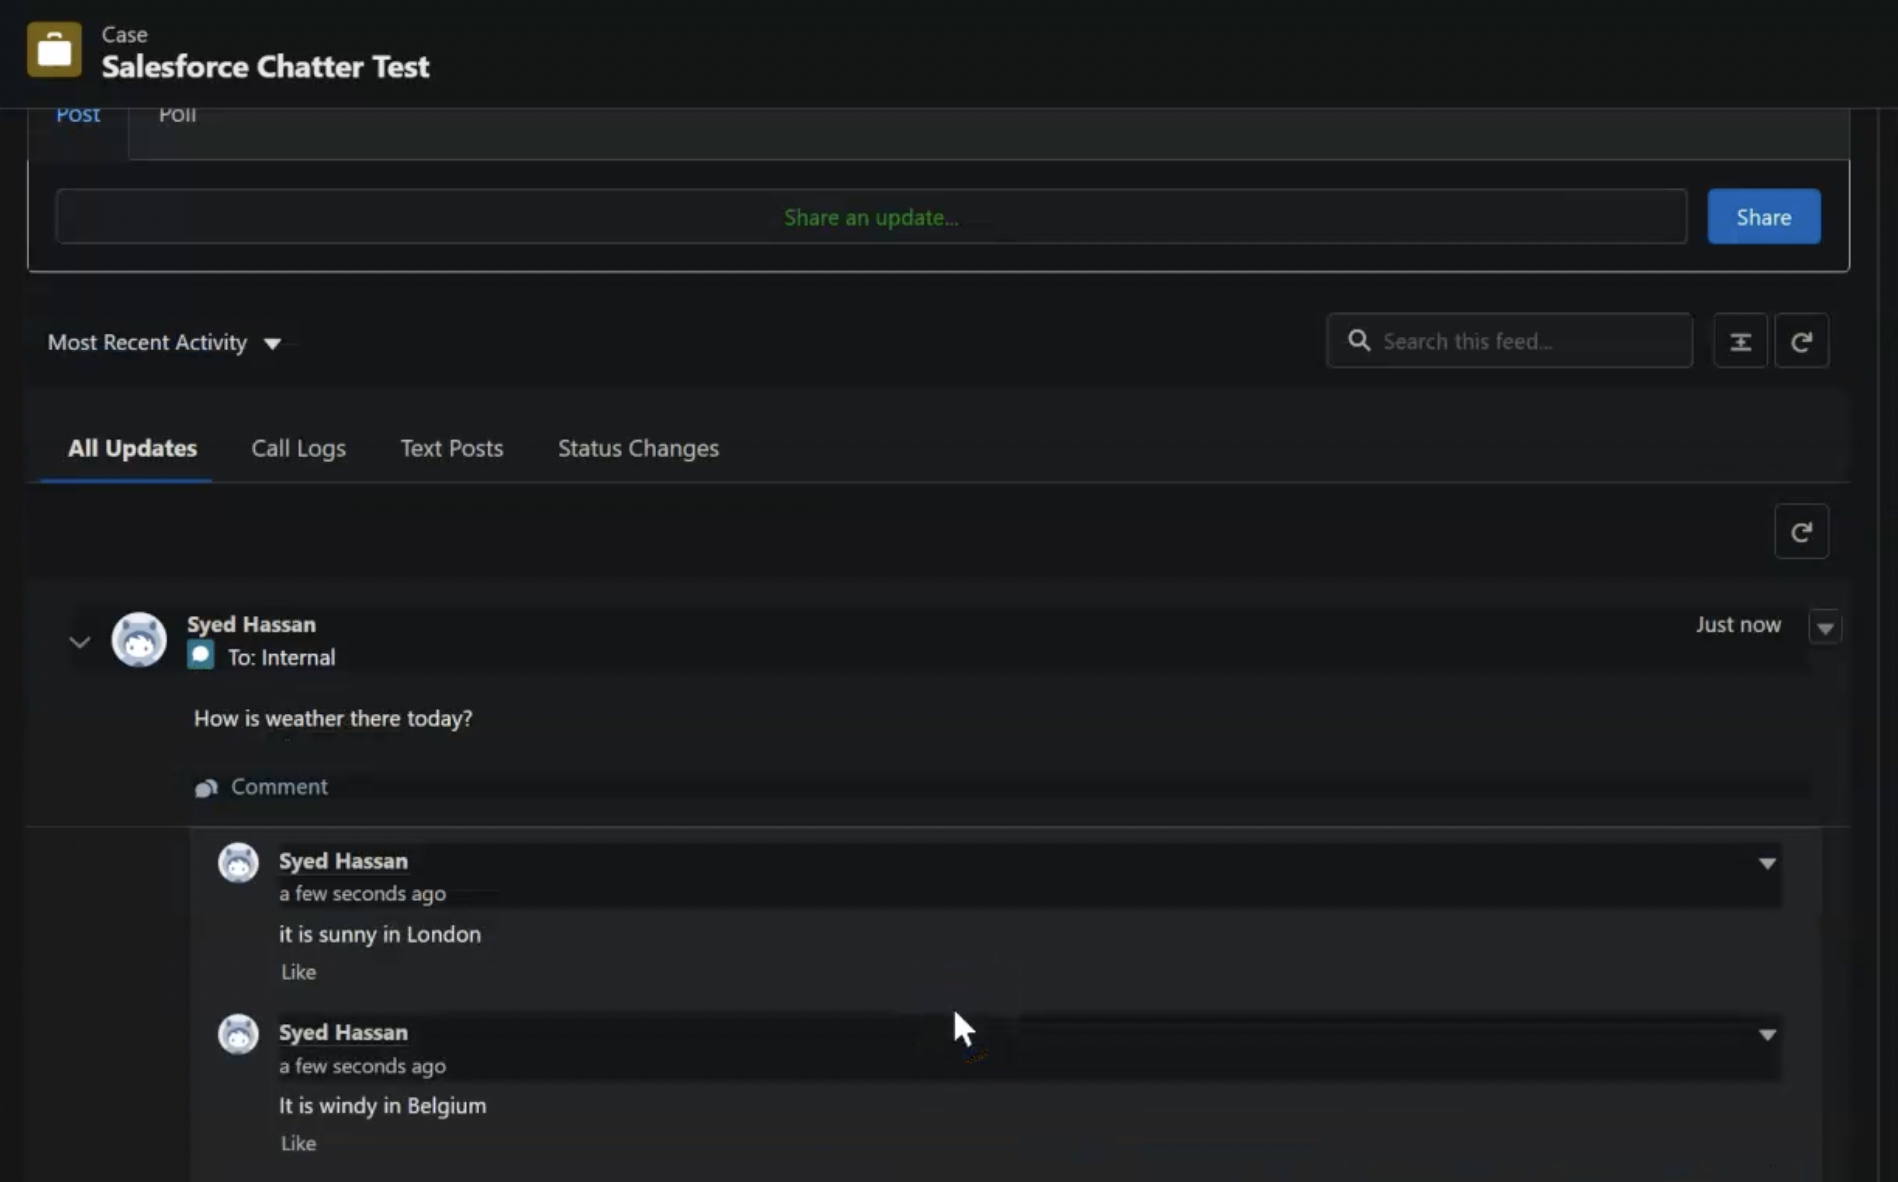
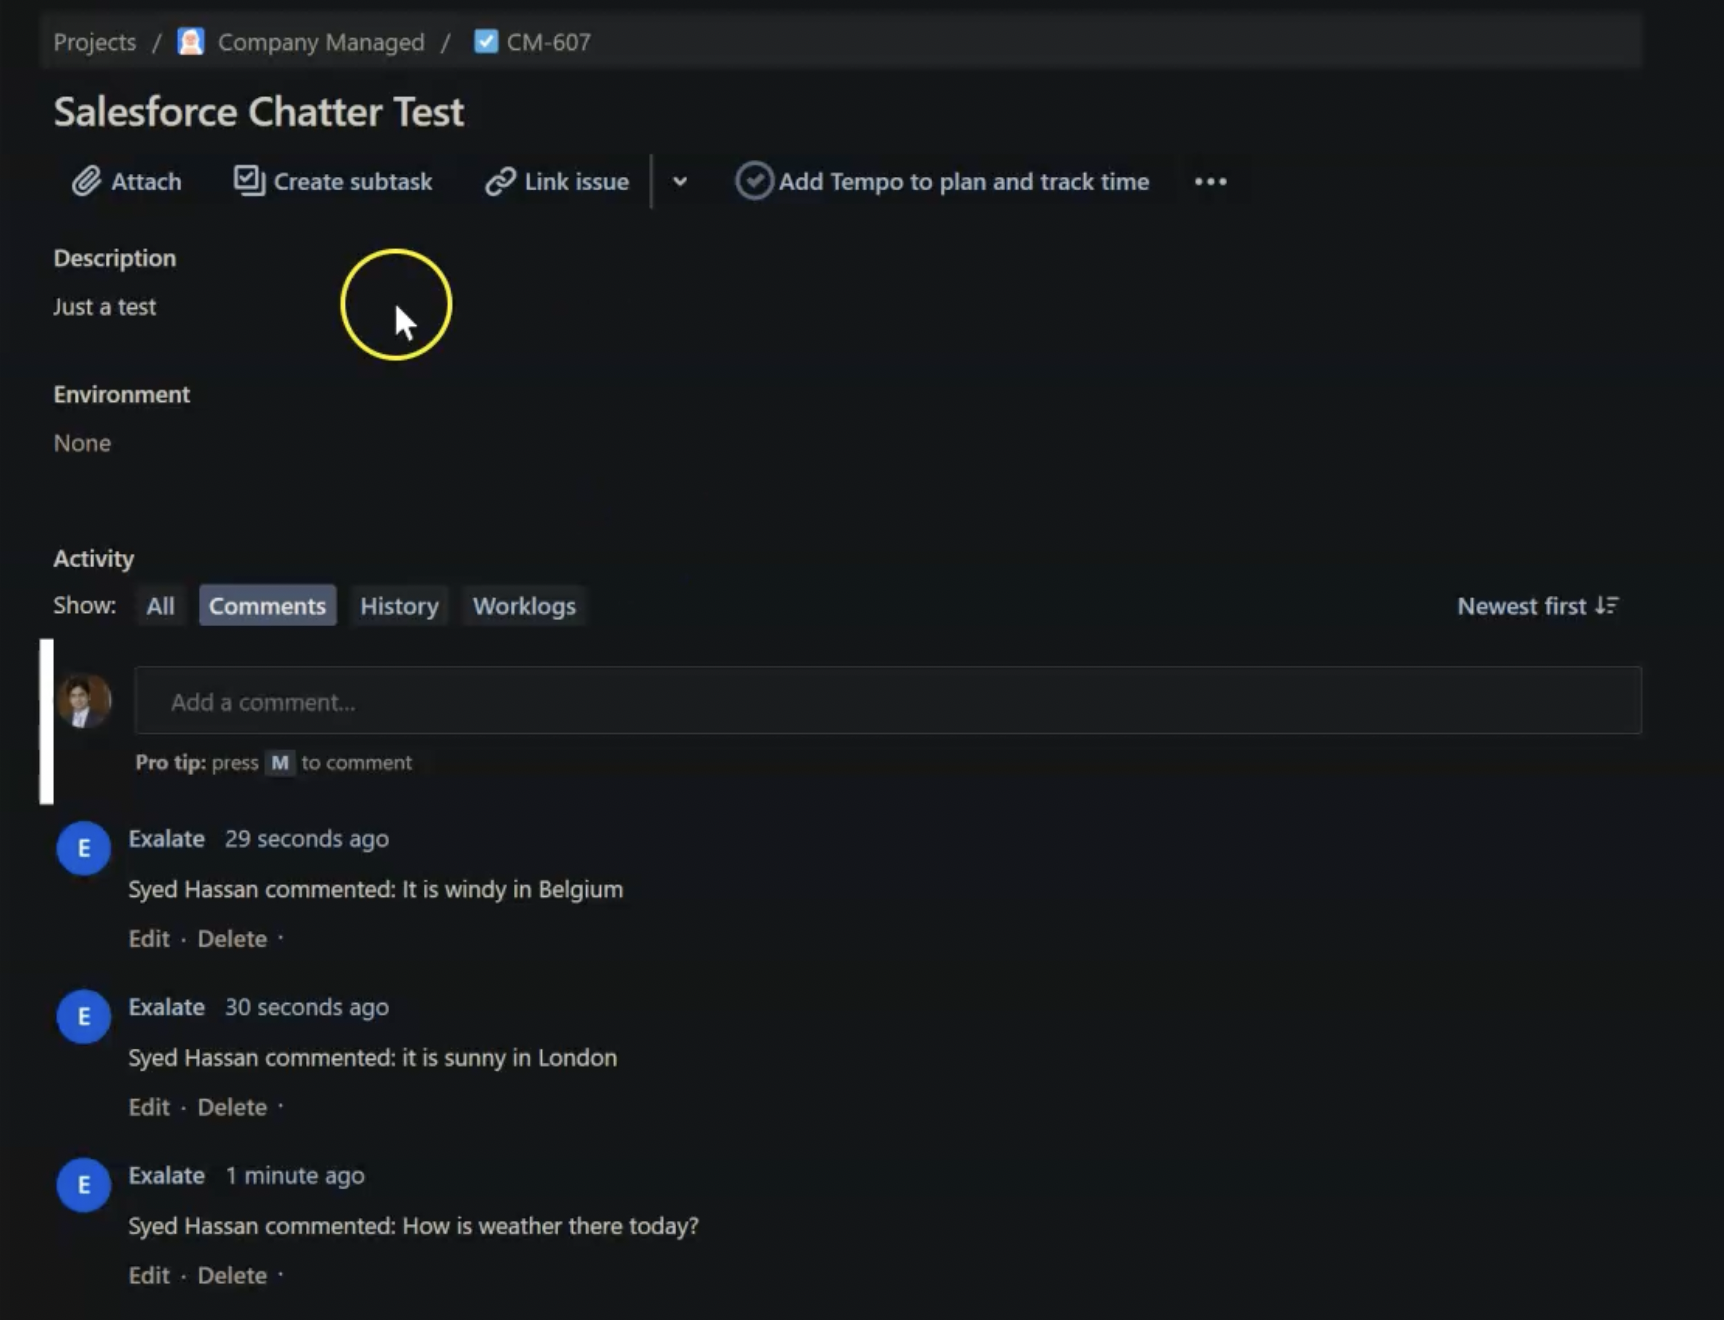
So when you insert a threaded comment in Salesforce.
All of them get reflected in Jira.
Also, user mentions in Jira will tag the corresponding user in Salesforce, if he/ she exists.
So mention a user in Jira.
And see the corresponding user being tagged in Salesforce.
Conclusion
In this article, we just saw an example of an advanced comment sync between Jira and Salesforce. A lot of other advanced sync requirements can also be implemented using Exalate because of its support for Groovy-based scripts.
Book a demo with Exalate to learn more about how it can be customized for your specific scenario.
ServiceNow has grown considerably from IT infrastructure services to supporting security, development, customer service, HR, and other teams. It has set a benchmark for its potential to detect anomalies and automate digital workflows and processes.
ServiceNow integrations extend the ability of ServiceNow by reducing siloed functional areas to increase productivity and efficiency.
So information can flow from other 3-rd party systems or applications into ServiceNow. At the same time, information from within ServiceNow can be displayed in other apps or systems.
This blog aims to explain why there is a need for ServiceNow integrations and the benefits it brings to teams. It also discusses the technologies ServiceNow natively offers for such integrations and explores other alternatives.
We then see a practical implementation of ServiceNow integrations using a 3-rd party app called Exalate. And finally, we end the blog by discussing a few best practices for ServiceNow integrations.
So let’s get started.
The Need for ServiceNow Integrations
ServiceNow’s bread and butter is incident management and resolution. However, it is not limited to only that. It also extends to other functional areas. So different teams like HR, software development, operations, etc. can use it just as easily.
These teams also need to interact with other teams using completely different applications like Jira, Salesforce, Azure DevOps, GitHub, etc. In fact, they might also want to interact with other ServiceNow instances their partners or suppliers use.
Maybe your service desk agents using ServiceNow need to escalate incidents to the dev team using Jira after they perform a root cause analysis. You want to resolve incidents faster to be more efficient.
But if you rely on transferring these incidents manually, then it’s easy to make errors and introduce delays for customers, further impacting your incident resolution times.
So there is a need for Jira and ServiceNow integrations to automate business functions between both platforms. All the information exchange is automatic, in real-time, and visible to the correct stakeholders within their own application. It will digitalize workflows and enrich the customer experience.
This is what ServiceNow essentially stands for and believes in the first place.
And who knows, this might just be the beginning! With the right technology and approach such ServiceNow certified integrations can enable a global network of B2B integrations blurring information boundaries.
ServiceNow Integrations: An Interconnected ServiceNow Ecosystem
Remember, the main aim of cloud integrations with ServiceNow is not to take the teams away from their original source of information but to streamline procedures and workflows to make their day-to-day operations easier.
Essentially, this means pulling data from external systems and displaying it within ServiceNow. It also includes displaying data from ServiceNow into these external systems.
ServiceNow integrations can take place in different ways:
Data is moved across ServiceNow and different applications such that processes are automated end-to-end. For instance, sending ServiceNow incidents to Jira or Azure DevOps to facilitate the development workflows. ServiceNow coins this as Process integrations.
Simple data exchange between different applications and ServiceNow. The transfer of such data can either be one-way or two-way, depending on the requirement. It can be pulling data from a data source (or database) and displaying it within ServiceNow. This is called Data integrations by ServiceNow.
Display publicly available information within the ServiceNow platform. This is an example of UI Integration. In this case, a certain <iframe> in ServiceNow is launched into another portal or vice versa. For instance, display a live report in another system.
ServiceNow integrations can either be batch-based or event-based.
Batch-based integrations allow you to exchange information in batches or in bulk. This can include information stored in CSV, Excel, or any other format.
Whereas, event-based integrations allow data to be exchanged whenever a certain event occurs. For instance, when an incident of urgency=1 and Priority=High, belonging to a specific Assignment group is encountered, a ServiceNow record needs to be passed over to the development team using Azure DevOps or Jira. Alongwith the required information, time-related information can also be synced for high-priority incidents.
Let’s look at the benefits of ServiceNow integrations.
Benefits of a ServiceNow Integration
If ServiceNow, as an ITSM solution, becomes the single source of truth for your organization connecting different teams and increasing collaborations, it can reap a lot of benefits:
Easily route or reroute incidents within platforms you use and automate processes across different departments or even across different companies (cross-company integration). Give away tedious, manual, repetitive tasks and let go of Excel sheets and to-do lists.
Better insights and reporting capabilities through data analytics tools that ServiceNow provides can help track customer requests, identify patterns, and deal with problems early on. It can also measure key performance indicators like problem resolution times and agreed-on SLAs so as to develop an overall rich customer experience. Also, all the team members will have better visibility of every operation and process and can take advantage of this transparency to work efficiently.
The customization capabilities of ServiceNow are well-known and scalable. If these advantages are percolated to other platforms through integrations, it can increase productivity and enhance its performance further.
Sometimes you need to connect multiple ServiceNow instances such that its pre-built applications like ITSM, HRSM, or CSM must integrate. This can bring diverse ServiceNow instances supporting diverse functions to be tied together within a single (or multiple) enterprise(s). This can help MSPs or MSSPs (using these instances) come together under a single workflow and increase productivity.
Further dwelling on the practical aspects of ServiceNow integrations, let’s see a few common use cases.
Common Use Cases for ServiceNow Integrations
Integration between ServiceNow and Other Applications
Let’s have a look at a few use cases when ServiceNow is connected to other commercially available work management systems like Jira, Azure, GitHub, Salesforce, Zendesk, etc.
Service Desk and Development Teams
Streamlined workflows and faster resolutions between the support and the development teams are the most important measures of delightful customers and increased business. This can happen when all the necessary – and only the required information – is passed between applications they use.
The time taken for an incident to flow across to the development team and be pushed back to the support team for resolution can open up insights. Insights where you can identify bottlenecks and patterns early on and take corrective actions.
Due to this increased transparency, efficiency increases by default. For instance, patch releases, if required, can be expedited, keeping the customer at the center of the business.
After all, this is what sound business judgments are all about.
IT and Business Teams
ServiceNow Integrations can provide end-to-end connectivity between IT and business teams. Business teams get valuable feedback (queries, problems, feature requests, etc) from customers, for instance, cases, in Salesforce.
If this feedback is handed over to the IT teams, they can help in making the product more valuable, incorporating proactive improvements. Information can then pass between these multiple applications such that all the teams work towards common business goals.
Integration between Different ServiceNow Instances
Sometimes, there is a need to connect multiple ServiceNow instances. Such integrations are often viewed as snaps (duplicate snapshots of 2 ServiceNow instances) of each other, but in reality, it is more than that.
Connecting MSPs to Multiple Clients
Managed service providers have to deal with multiple clients often not using the same application as the provider. Maybe they both use different ServiceNow instances. There is a need to pass some (not all) data between them.
Also, multiple clients can have different information requirements. Managing all this information through ServiceNow HR integrations can strengthen the relationship between the MSPs and their clients and make everyone’s life easier.
Having got an idea about the what and why of ServiceNow integrations, let’s get into the practical aspects of how such integrations can be achieved.
Native Ways to Implement ServiceNow Integrations
There are different technologies and methods it supports for integrating ServiceNow with external systems.
Exploring Various Integration Technologies Offered by ServiceNow
Depending on the most popular scenarios, like Incident Management, CMDB, Problem Management, etc., here is a comprehensive ServiceNow integrations list:
Web Services
ServiceNow allows all data objects to be used as web services for one or two-way data integration. Dynamic modifications to existing and new objects are directly published as Direct Web Service.
Another way is through its Mapped Web Service, which allows mapping the incoming data into final target tables.
There is a Scripted Web Service where data is sent and received between systems through triggers. So it’s more of an event-based service like we discussed above.
External data can also be loaded via import sets in ServiceNow.
Information can be pulled via a data source directly using a JDBC connection. Various data sources can be loaded, like Excel and CSV files, etc.
ServiceNow can also pull user data from your instance’s existing LDAP server for integration.
Other industry standard technologies like SOAP, REST, or WSDL are also supported.
ServiceNow API integrations and command-line functions can also be done using a MID Server.
A few single-sign-on technologies have been identified and provided integration for. This facilitates faster assimilation into the platform you use. This technique is also customizable through scripting, so you can incorporate it for your own SSO environment.
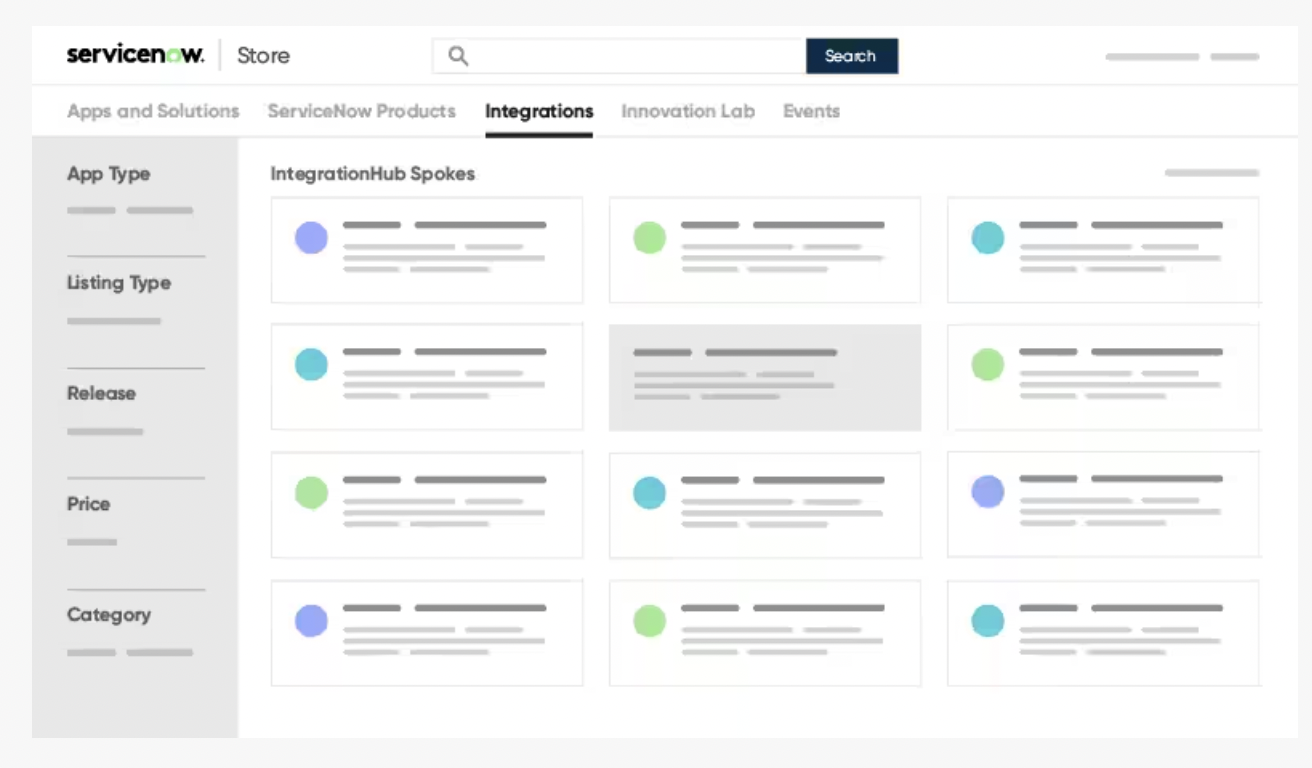
ServiceNow Store Integrations that are built by ServiceNow or its partners. The support for the integration is usually provided by the vendor.
IntegrationHub allows you to integrate ServiceNow with any API-enabled systems. By far, this is the most popular option for ServiceNow integrations.
It reflects the customization capability of ServiceNow for integrations by extending the functionality of its Flow Designer. IntegrationHub uses 3rd party APIs as a part of its flow and triggers information exchange. An example of such a trigger can be an incident being created or updated. It achieves this in the form of different spokes. Each spoke is application-specific. There are spokes for Jira, GitHub, GitLab, Salesforce, etc., to connect ServiceNow with these platforms. There are around 175+ pre-built integration spokes. ServiceNow also realizes the need to connect multiple ServiceNow instances with the help of an eBonding Spoke. This allows you to connect different ServiceNow instances with almost no code and is available OOB (no need for a subscription) with ServiceNow.
Custom Integrations in ServiceNow allow you to use the platform’s own interfaces and build an integration from scratch. These are beneficial for very specific use cases but generally need to be maintained for the long term by the customers themselves. So they aren’t recommended.
As seen, there are a lot of ways to achieve integrations with ServiceNow natively, so it’s safe to say that you can choose to let your ServiceNow instance communicate with any other application of your choice.
But there are also a few caveats we must consider here.
Challenges of Implementing ServiceNow Native Integrations
Though at the onset, it may sound simple to implement the ServiceNow-provided integrations, often it is not.
When it comes to business decisions like these, it is important to have a look at what you expect from such an integration and whether it would be of any value, functionally and economically.
With ServiceNow-provided integrations, ServiceNow often sits at the orchestrating seat and drives them forward. Systems involved in such an integration are tightly coupled, creating dependencies and additional overheads for maintenance.
The main requirements of integrations in ServiceNow that can be fulfilled are limited at times in terms of capabilities since they are based on templates and patterns that are inherently provided. So they are perfect if you just want to automatically pull data from an external system and display it within ServiceNow or vice versa.
Nevertheless, for some advanced requirements, data mapping can be done using different technologies and methods we saw above. But then doing so requires additional coding efforts and additional resources. Not to mention the time taken to even get started is huge. It’s like building a bazooka to kill a mosquito!
For certain customizations in IntegrationHub, a request to the creator of the Spoke needs to be made. So it’s not always very simple.
Most of the ServiceNow-provided integrations are available for free, but some, like IntegrationHub, require a separate subscription. At times, the cost for this is too high, considering the efforts required to set up a simple integration.
Moreover, in IntegrationHub, since you aren’t able to pick a single integration, you can end up paying for the 175+ integration spokes that you might not even use.
And we still haven’t explored the role of 3-rd party vendors who also provide ServiceNow integrations. It’s time we do that.
Using 3rd-Party Apps for ServiceNow Integrations
There are various integrations in ServiceNow, which you can find in the store.
They are professionals and experts in ServiceNow integrations so it makes sense to discuss how we can use them to integrate ServiceNow with other applications.
But we must not be shooting in the dark.
To even reach a conclusion, there must be thorough research and an understanding of what the solution would bring to the table. Keep a few guidelines in your mind.
Checklist for Selecting the Right ServiceNow Integrations App
Security
The most important part of any integration, without any doubt, is security. This is because the entire essence of any integration lies in sharing data across different applications, and you don’t want unauthorized access to that data or accidental leaking of information.
So having an integration solution supporting encryption, secure file transfer protocols, role-based access control, etc., is a must. A common application can be found in ServiceNow security operations integrations.
A lot of companies are also concerned about where, what, and how data, would reside once it leaves their company or their ServiceNow instance.
Decentralized Integration
An important requirement for many scenarios is for the solution to support decentralized integration. All the solutions, including the ones provided by ServiceNow are centralized, meaning a single interface works as a controller for the integration.
And trust me, there is nothing wrong with this approach.
But now imagine a scenario where both the integrating platforms have equal and independent rights to choose how they want to send and receive information. This can happen without messing with each other’s integration setups or even informing the other side (unless required).
So you simply choose to send (or filter) information that is absolutely necessary to the other side and also decide what you want to receive from the other end independently.
Loosely- Coupled Systems
Continuing the point above, the systems in a decentralized integration setup are intrinsically loosely coupled. When systems don’t depend on each other (avoiding a single point of failure) it increases the overall scalability.
So it’s very easy to add just another point of integration and connect with a new partner.
Flexibility
With integrations, you always have a lot of options. Because there is no “one-size-fits-all” kind of scenario. Requirements change and so does the way in which data exchange is handled. Sometimes, you might have extremely complex needs that have to be implemented by integrating at a deeper level with the platforms.
Now, all of this, as I mentioned before, can also be achieved with ServiceNow-provided integrations or with other solutions in the market.
But the point here is the ease with which this can be achieved.
How much time and effort would the task require? Is it something that the solution can achieve in less time with minimal tweaking and native support for deep integrations? Is there an option to use AI? And in the end, is it all even worth it? Would it help in reducing your organization’s technical debt?
Having a solution flexible enough to implement any and every integration requirement should be your best shot.
Price
Last but not least, perhaps the most important point businesses want to consider is the price of the integration solution. Please be mindful: this is not the same as the cost of an integration, which is a completely different ball game.
Are you paying too much for a simple integration, or are you paying a reasonable price for an advanced integration? These are just some of the few questions you must ask yourself.
Well, are we getting somewhere with all of this?
Yes, I have an integration solution that can be a fit here.
Exalate: a 3-rd Party Integration Solution for ServiceNow Integrations
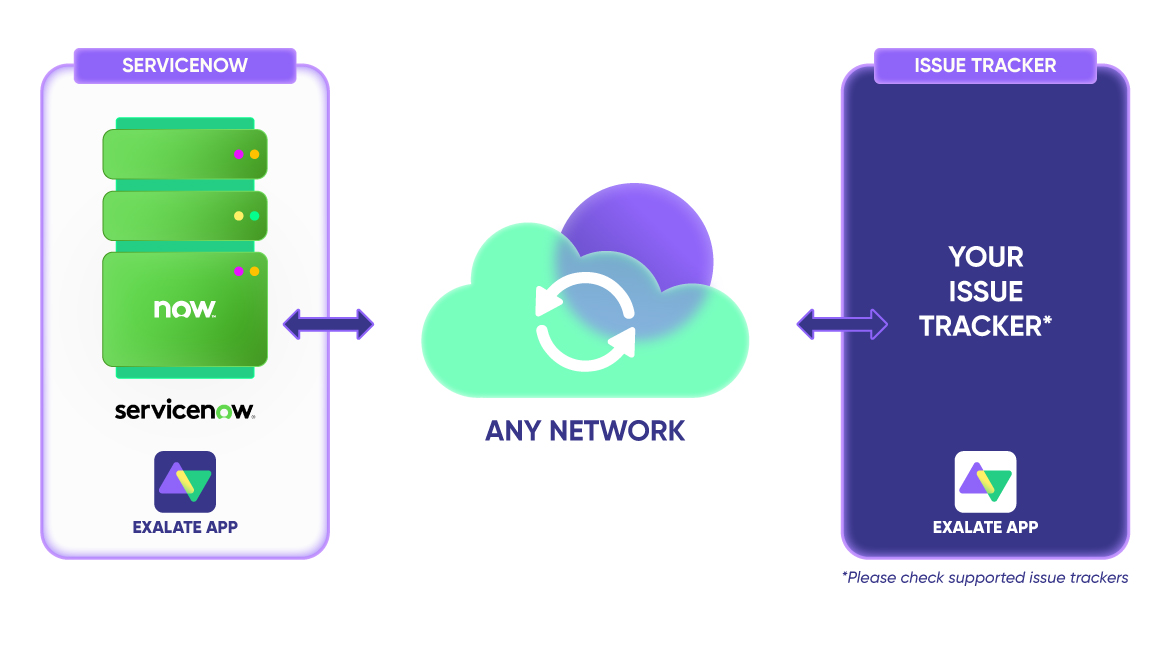
Exalate is a one or two-way integration solution with the capability to provide bespoke integrations for different ITSM, ITOM, CRM, or other work management systems.
It supports integrations for ServiceNow, Jira, GitHub, Azure DevOps, Salesforce, Zendesk, etc, and you can use its Integration as a Service to set up an integration between any two platforms, including legacy systems.
It supports a smaller range of platforms as compared to IntegrationHub but the integration that can be delivered is way deeper. Because it comes with a built-in intuitive scripting engine that allows you to customize mappings and the overall logic to an advanced level.
It is also the only solution that supports decentralized integration, and as we discussed, gives equal and independent rights to either side of the integration.
Plus, it keeps the integrating systems loosely coupled and increases security since both sides decide what information they want to expose.
Let’s see a step-by-step walkthrough on how to use Exalate to set up ServiceNow integrations.
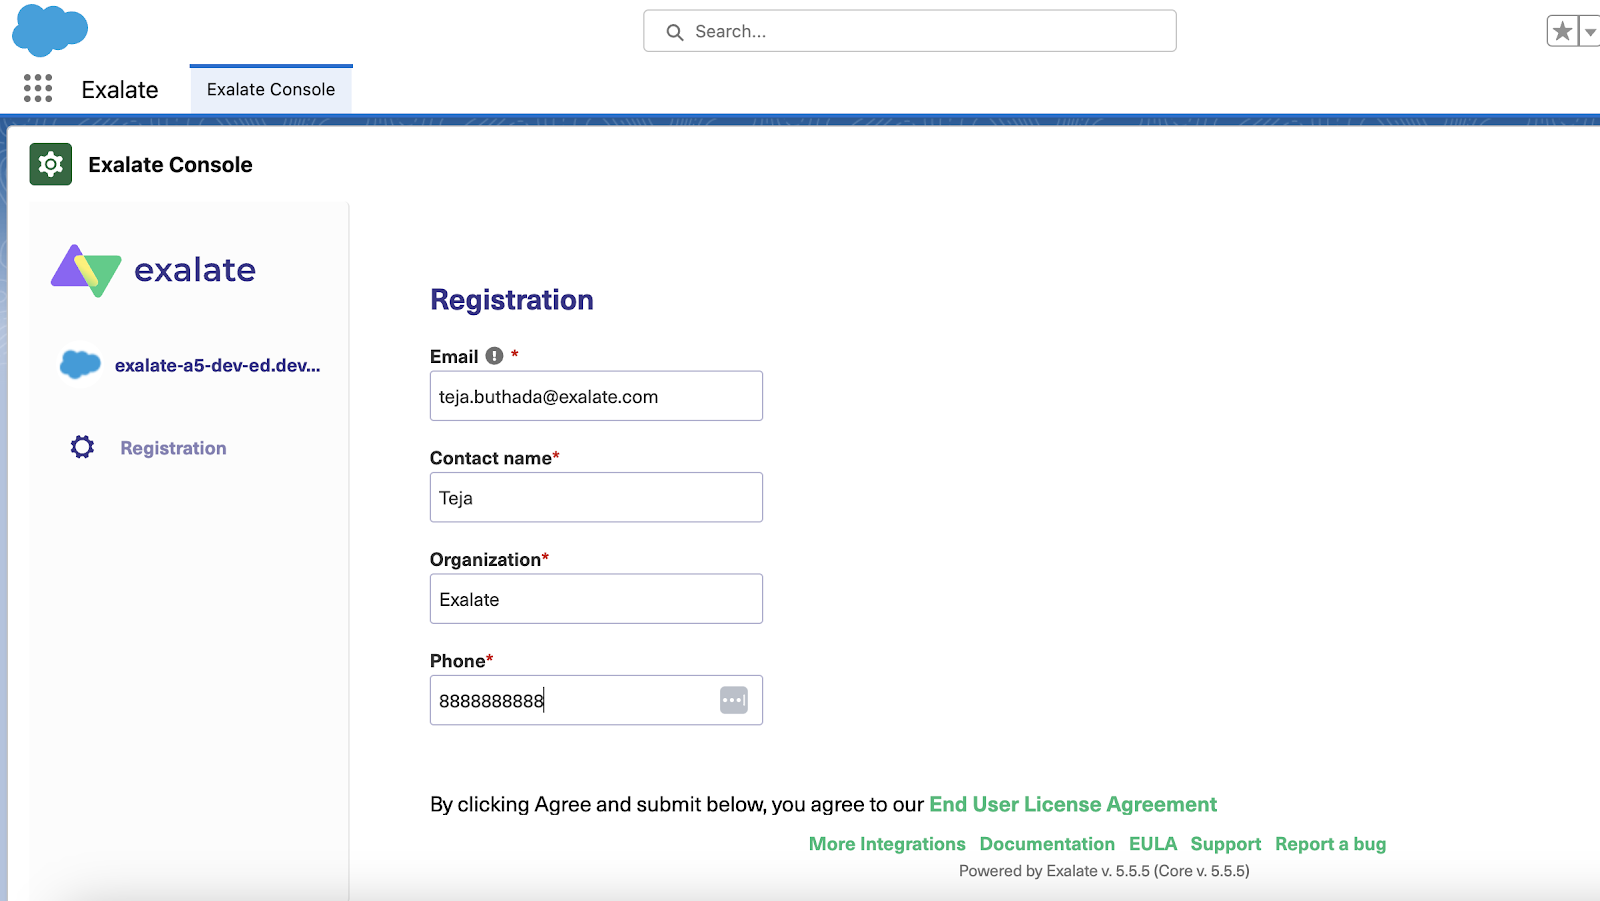
How to Set up ServiceNow Integrations with Other Apps or Systems
Note: You can watch the Exalate Academy tutorials if you are a visual learner.
Step 1: Install Exalate on ServiceNow and the Other Application
The first step is to install Exalate on ServiceNow and then on the other platforms (Jira, Azure DevOps, ServiceNow, GitHub, Zendesk, Salesforce, etc).
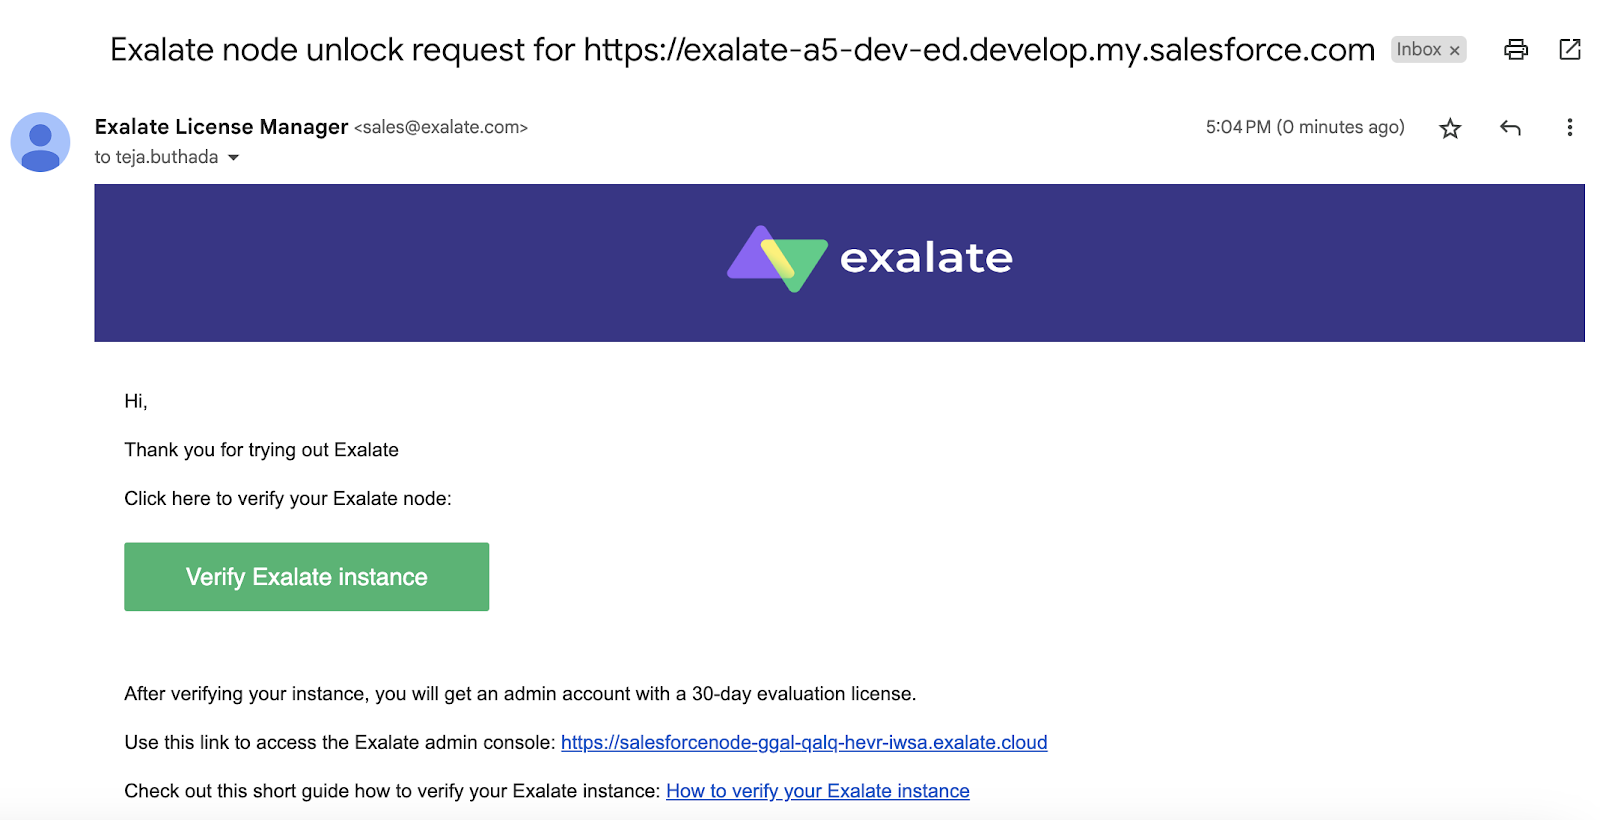
You can request your Exalate for ServiceNow and other instances via the integrations page. Fill in the required information and our team will reach out to you with the Exalate node.
Note: Exalate for ServiceNow can also be installed on docker.
Step 2: Connect ServiceNow and the Other Application
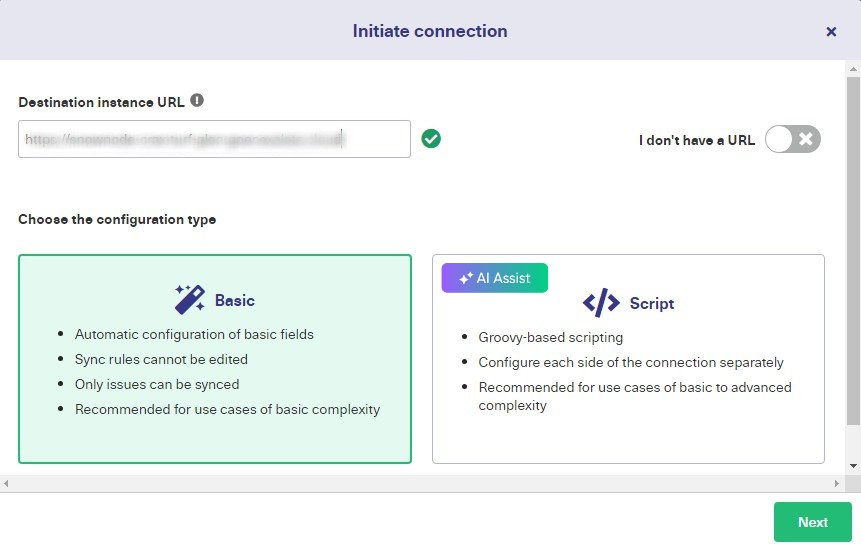
To start syncing information, you first need to set up a connection between ServiceNow and the other application.
One side initiates the connection and generates an invitation code. The other side accepts the connection invitation using this invitation code. A connection generates a link between the 2 platforms so you can synchronize information.
It doesn’t matter which side starts initiating the connection, the Exalate UI remains the same.
Assume we start initiating the connection from ServiceNow.
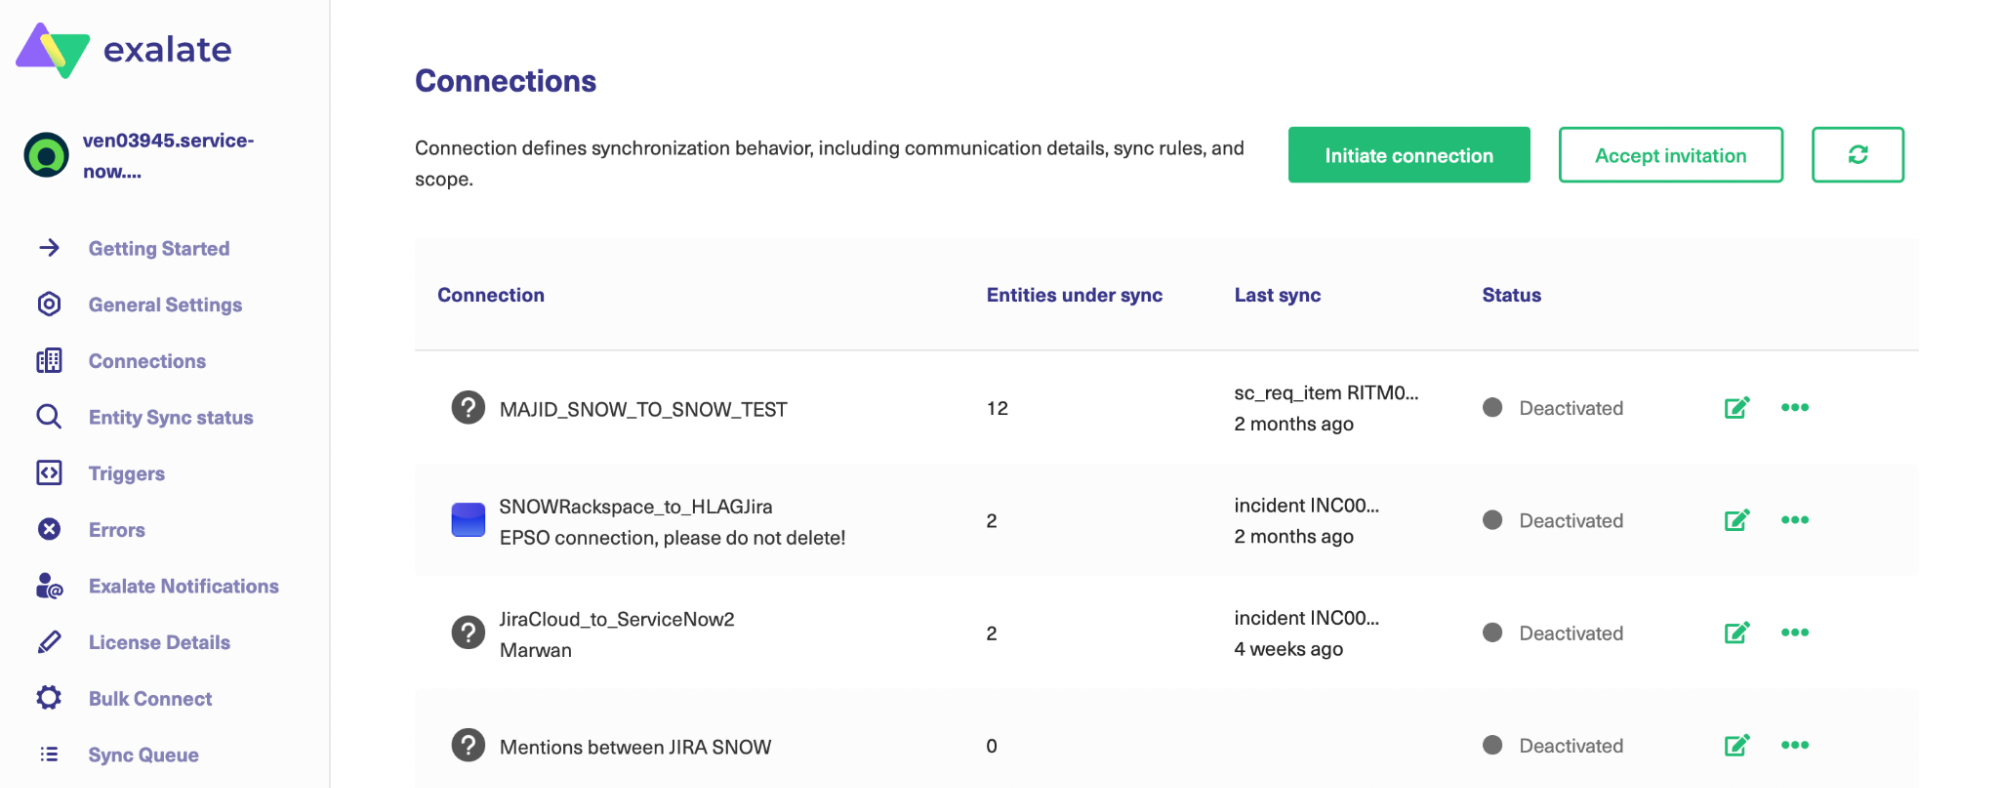
Navigate to the “Connections” screen in the Exalate console on the left-hand side menu bar.
Click on the “Initiate Connection” button.
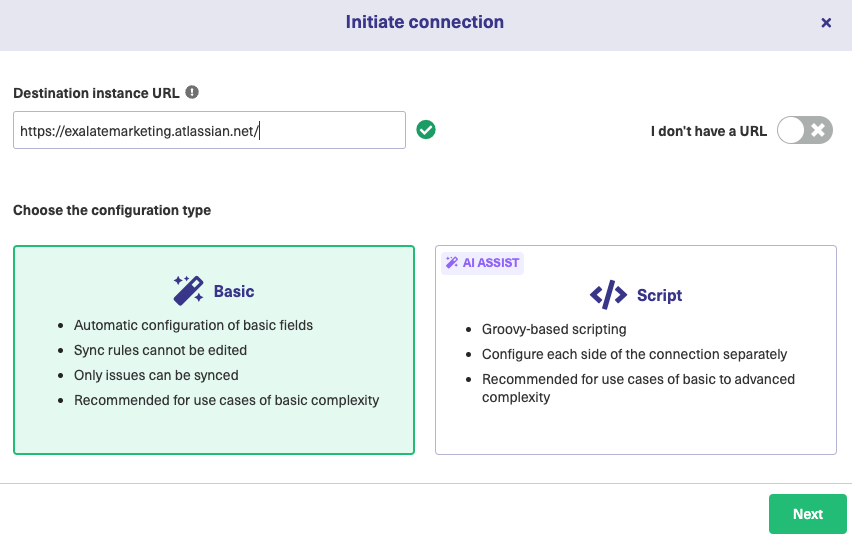
Enter the “Destination Instance URL”. The destination instance URL is the URL of the application you need to sync with. I have considered Jira in this example. But it can be any other application Exalate supports.
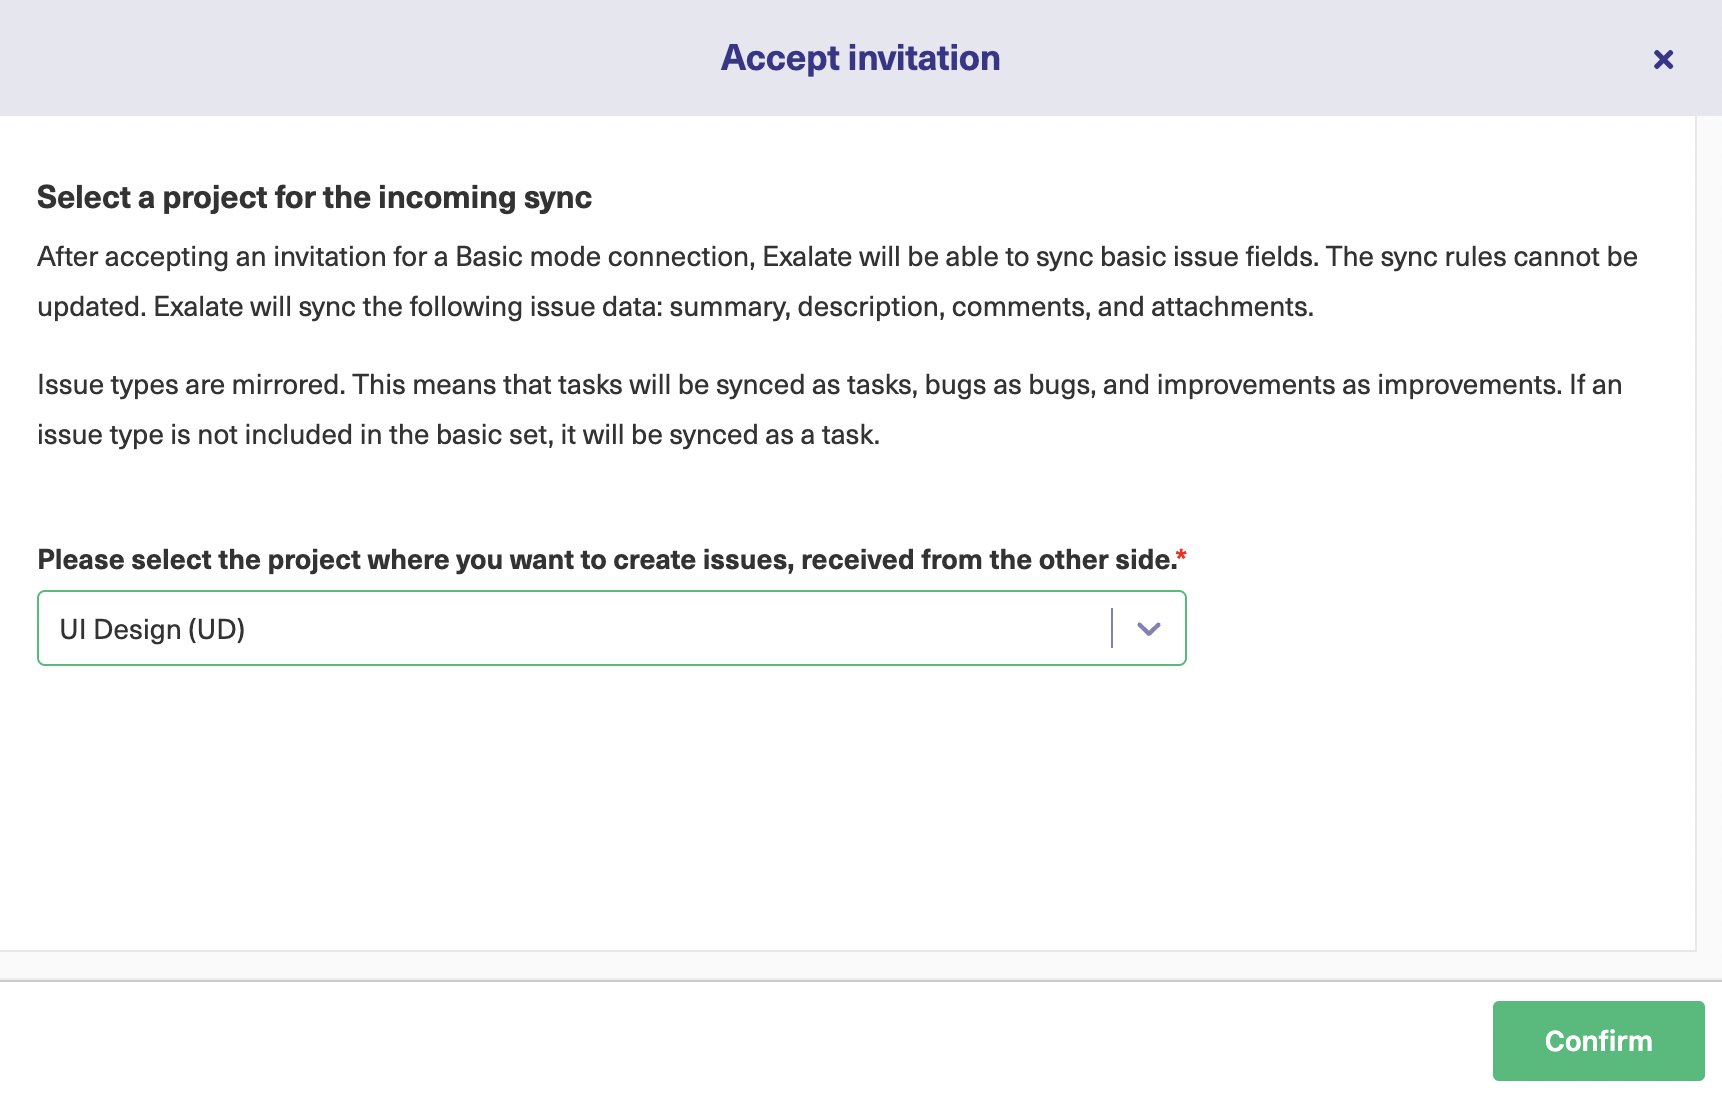
You will need to choose between the Basic and the Script mode.
The Basic mode supports pre-defined field mappings between the different systems that cannot be configured. You can sync only incidents in ServiceNow using the Basic mode. It comes with a Free Plan that allows you 1000 free syncs per month. It lets you test out your sync easily.
The Script mode is where the real power of Exalate lies.
It works on a Groovy-based scripting engine and you can specify and manipulate the fields you want to share. You can also define how to map them and automatically control the sync the way you want. This mode also comes equipped with AI. We will see how that works in the Script mode section.
Let’s have a look at the Basic mode first before we go to the Script mode.
The Basic Mode
Select “Basic” in the option above and click “Next”.
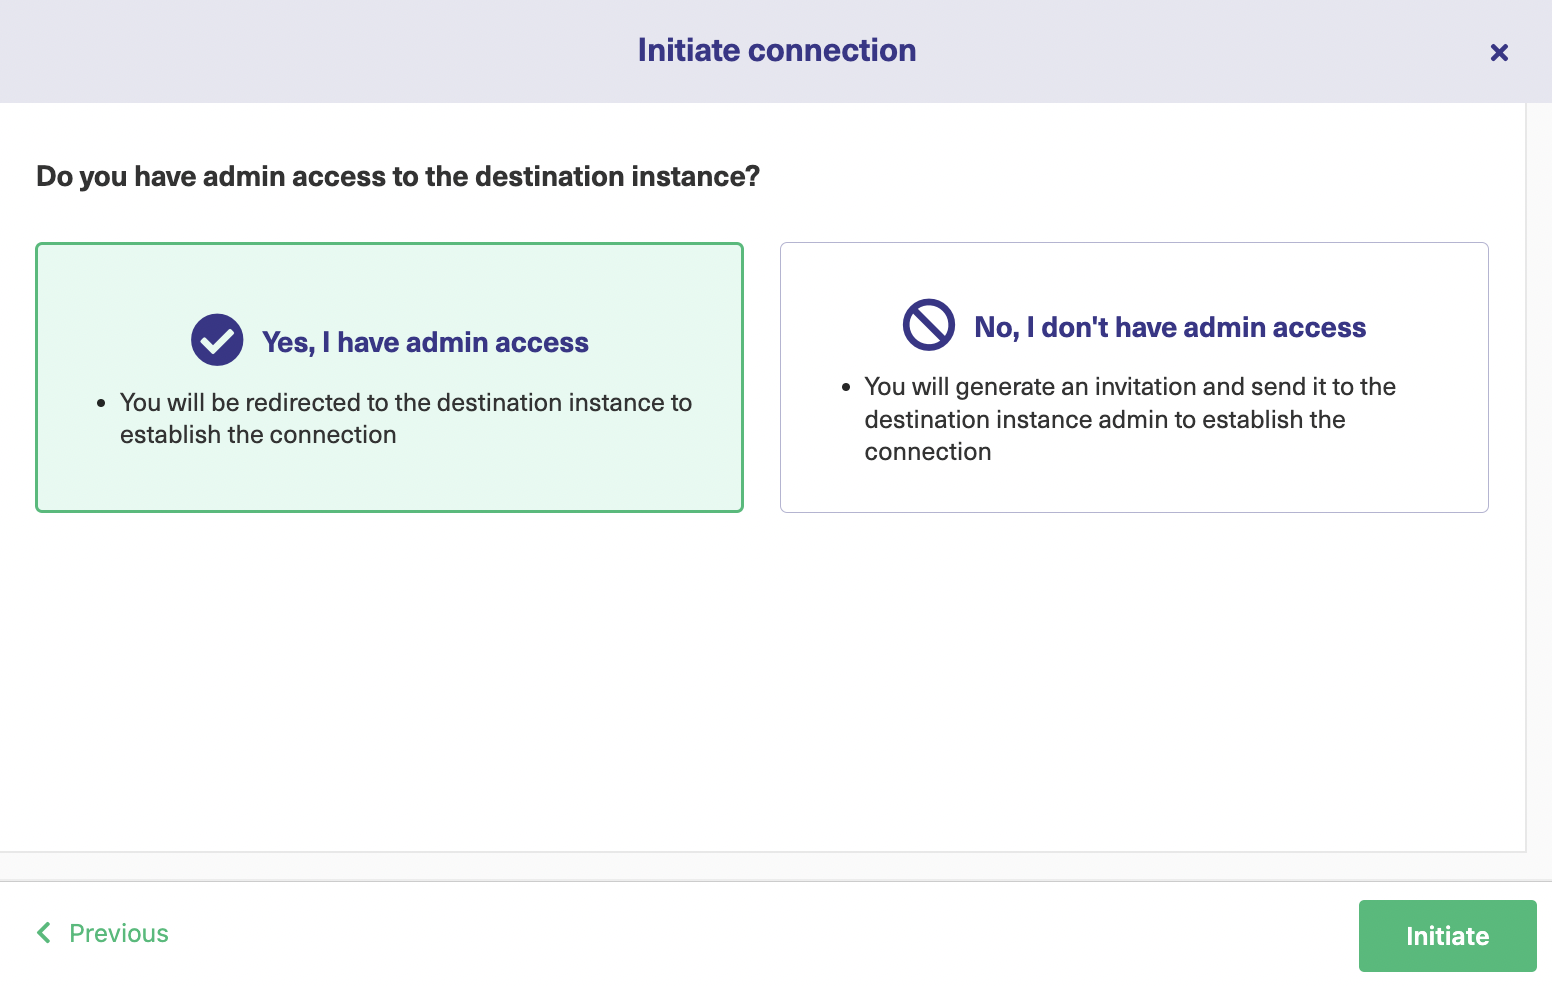
You will need to verify if you have admin access to the destination instance or not.
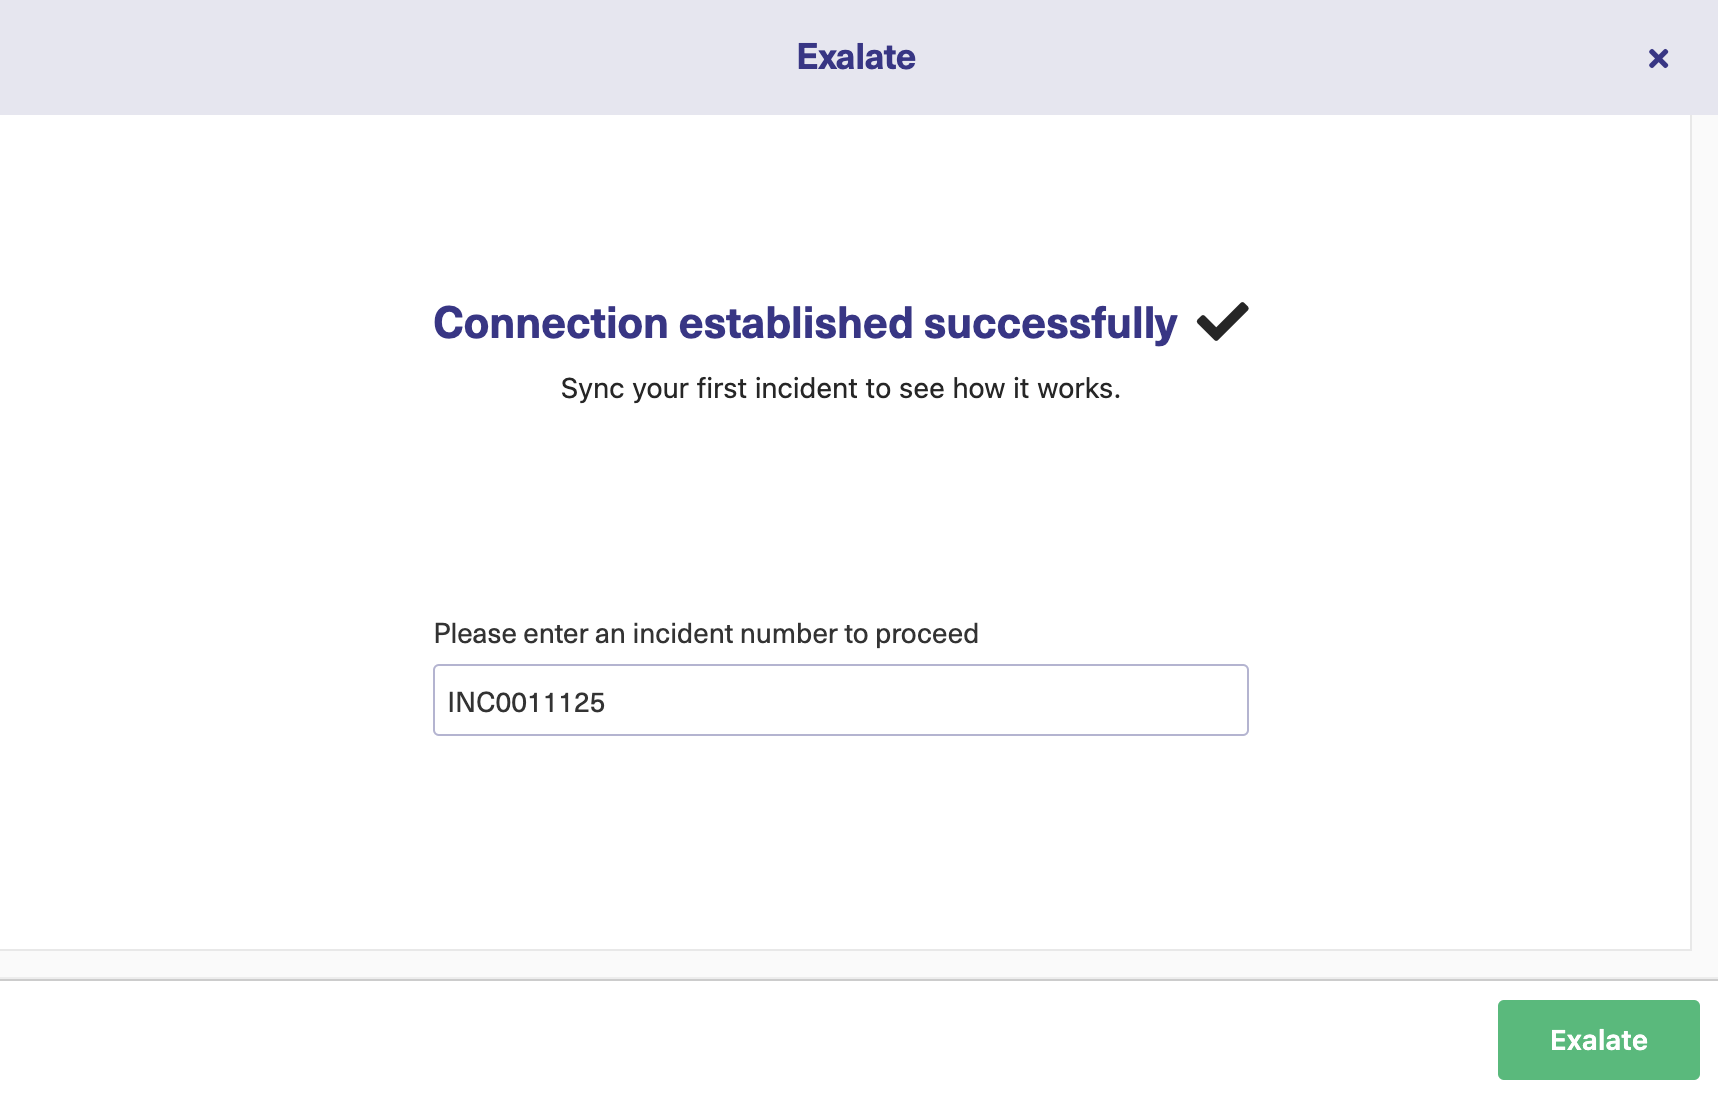
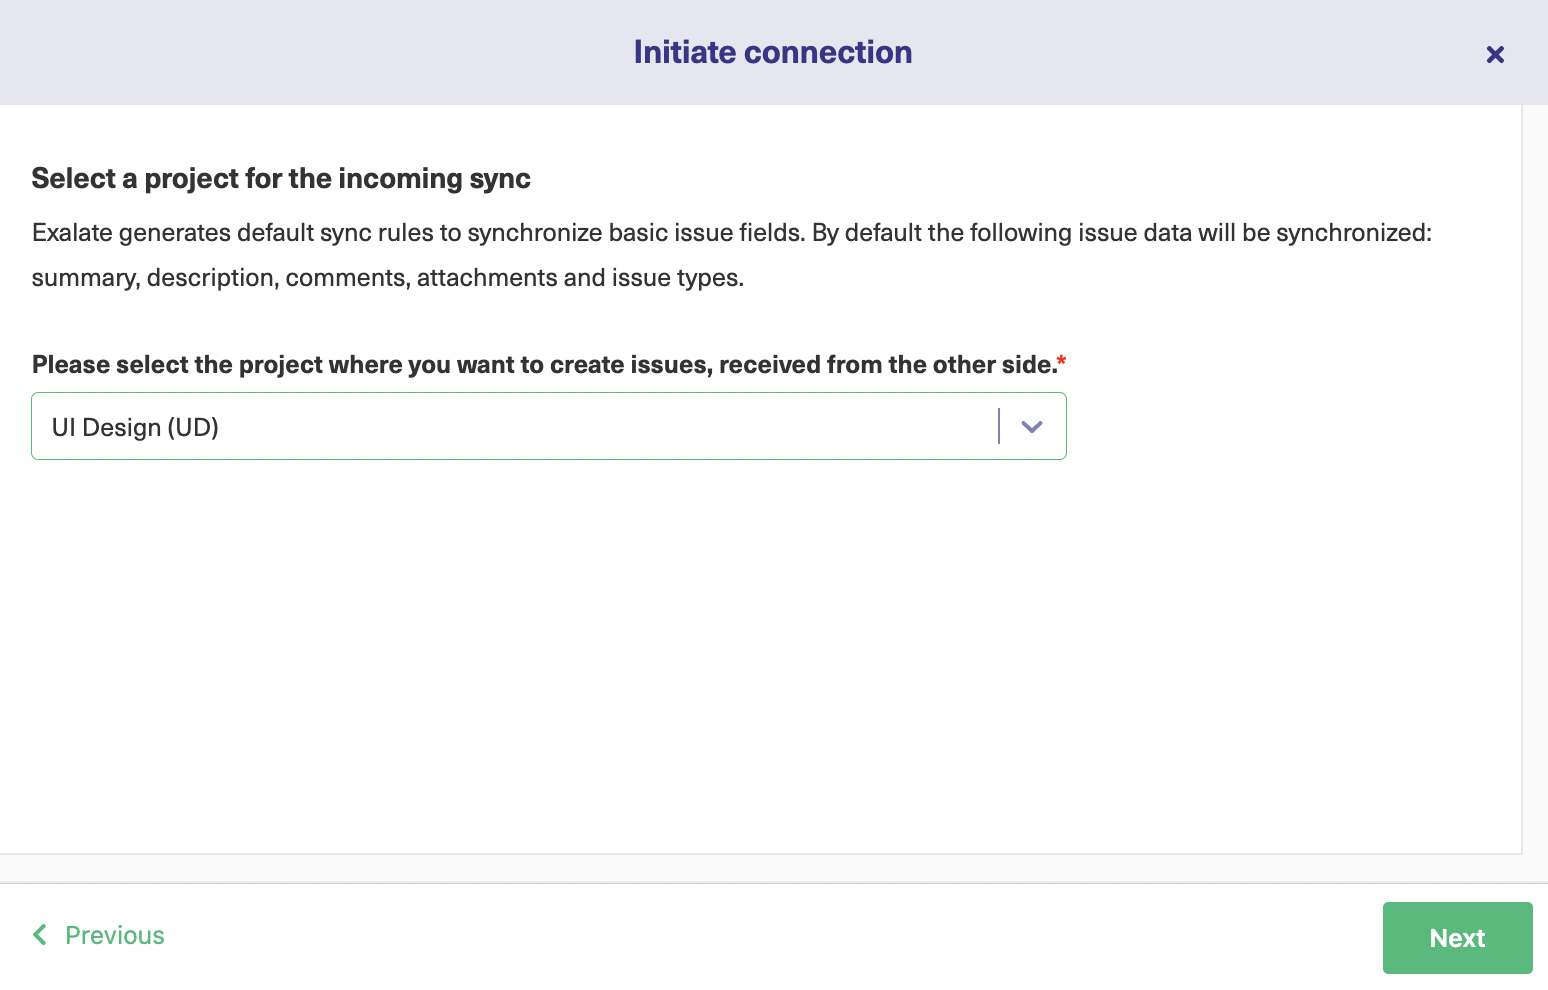
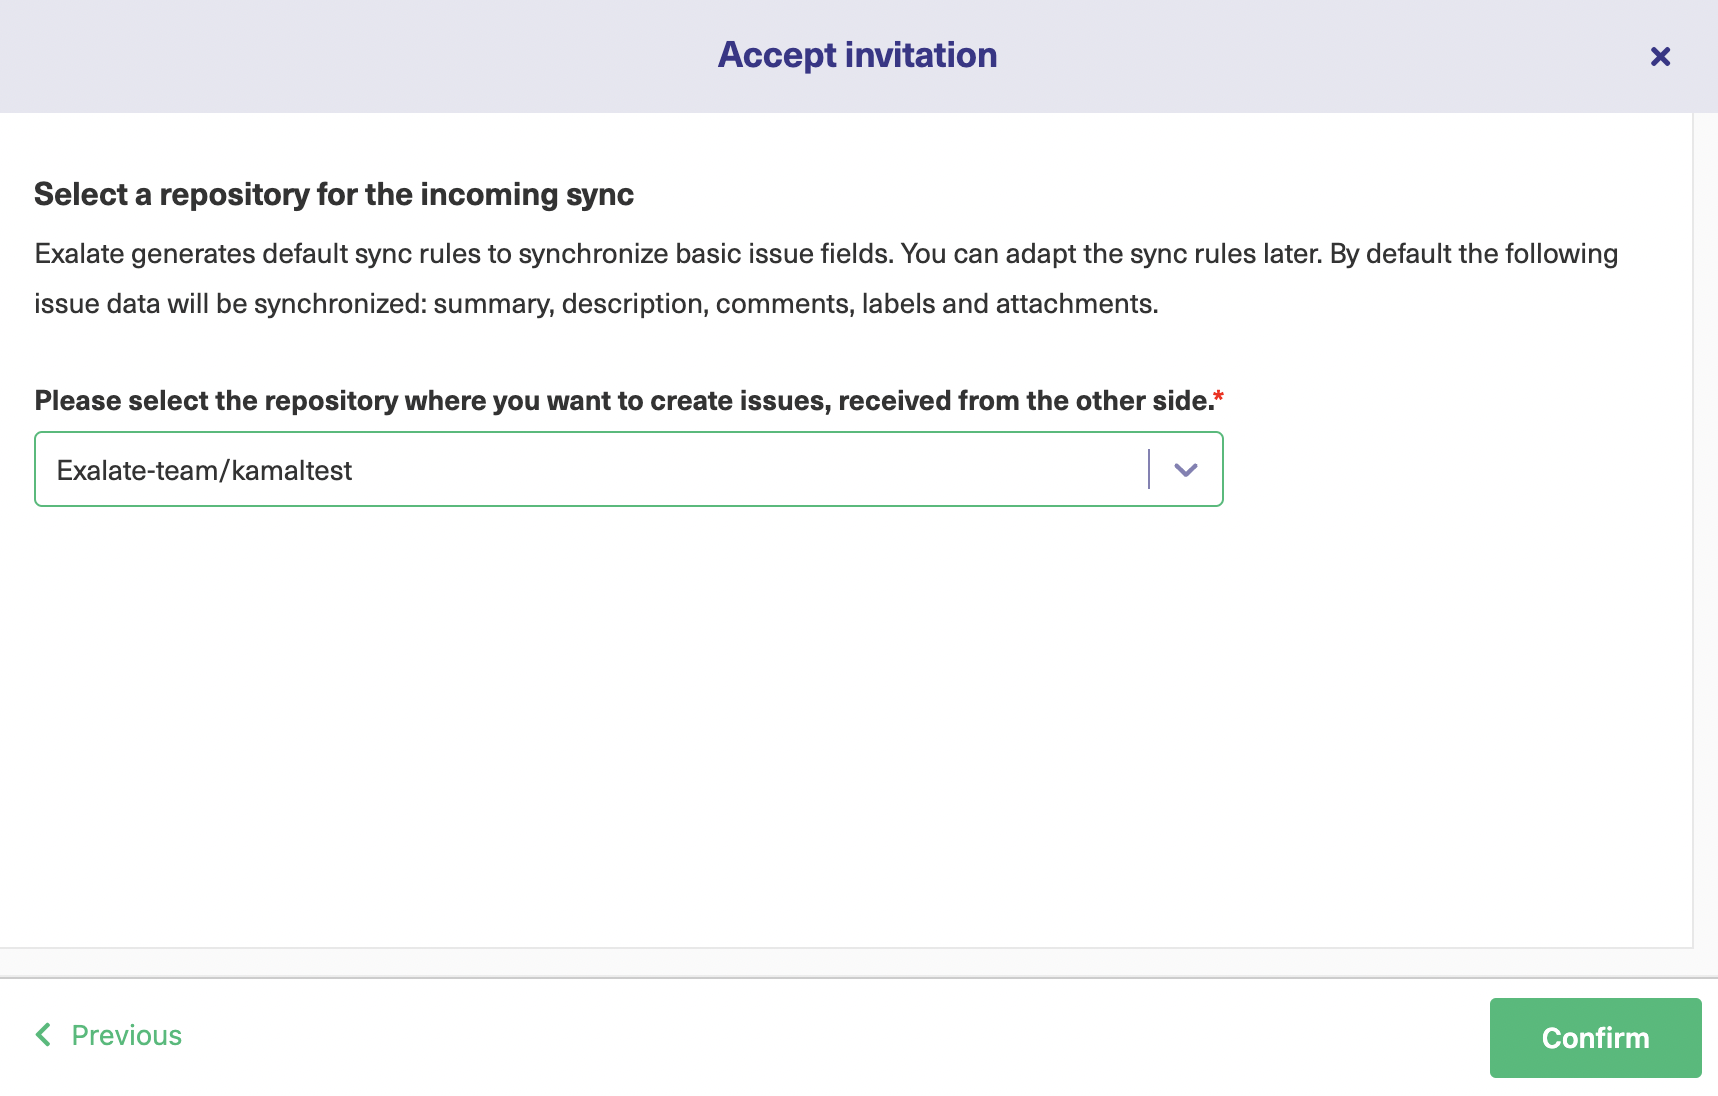
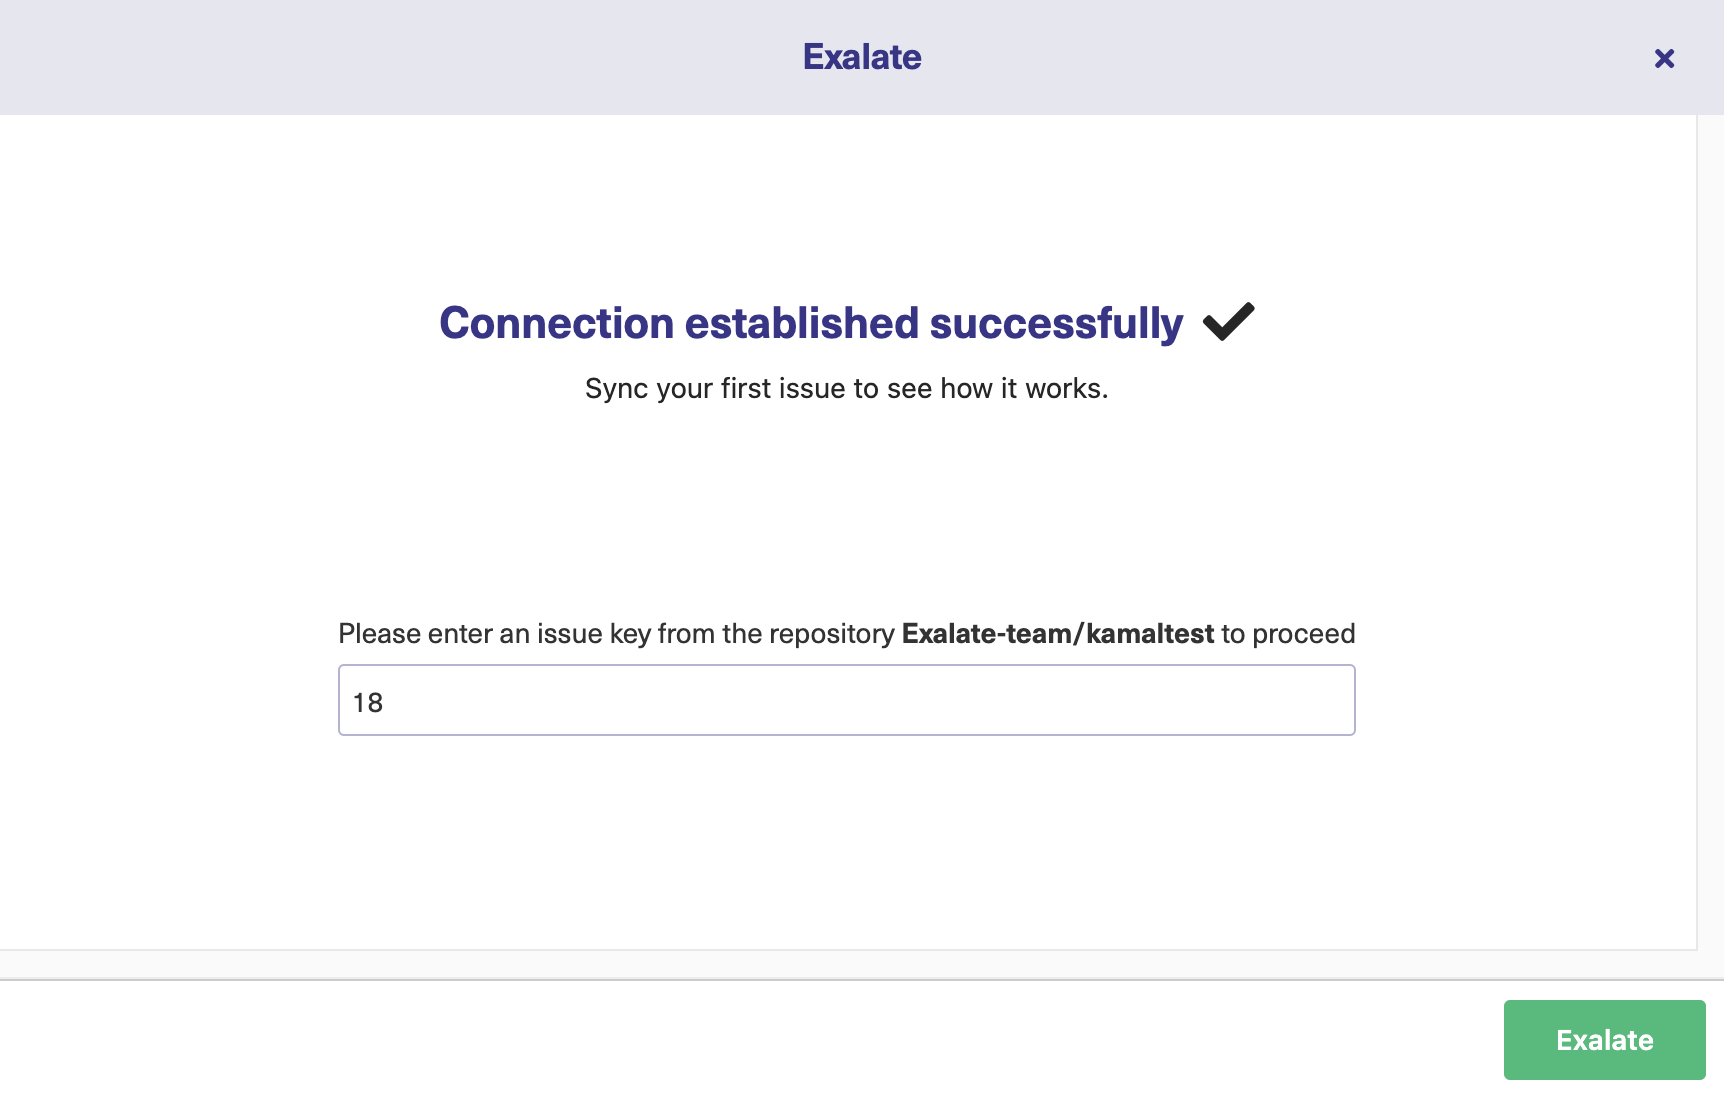
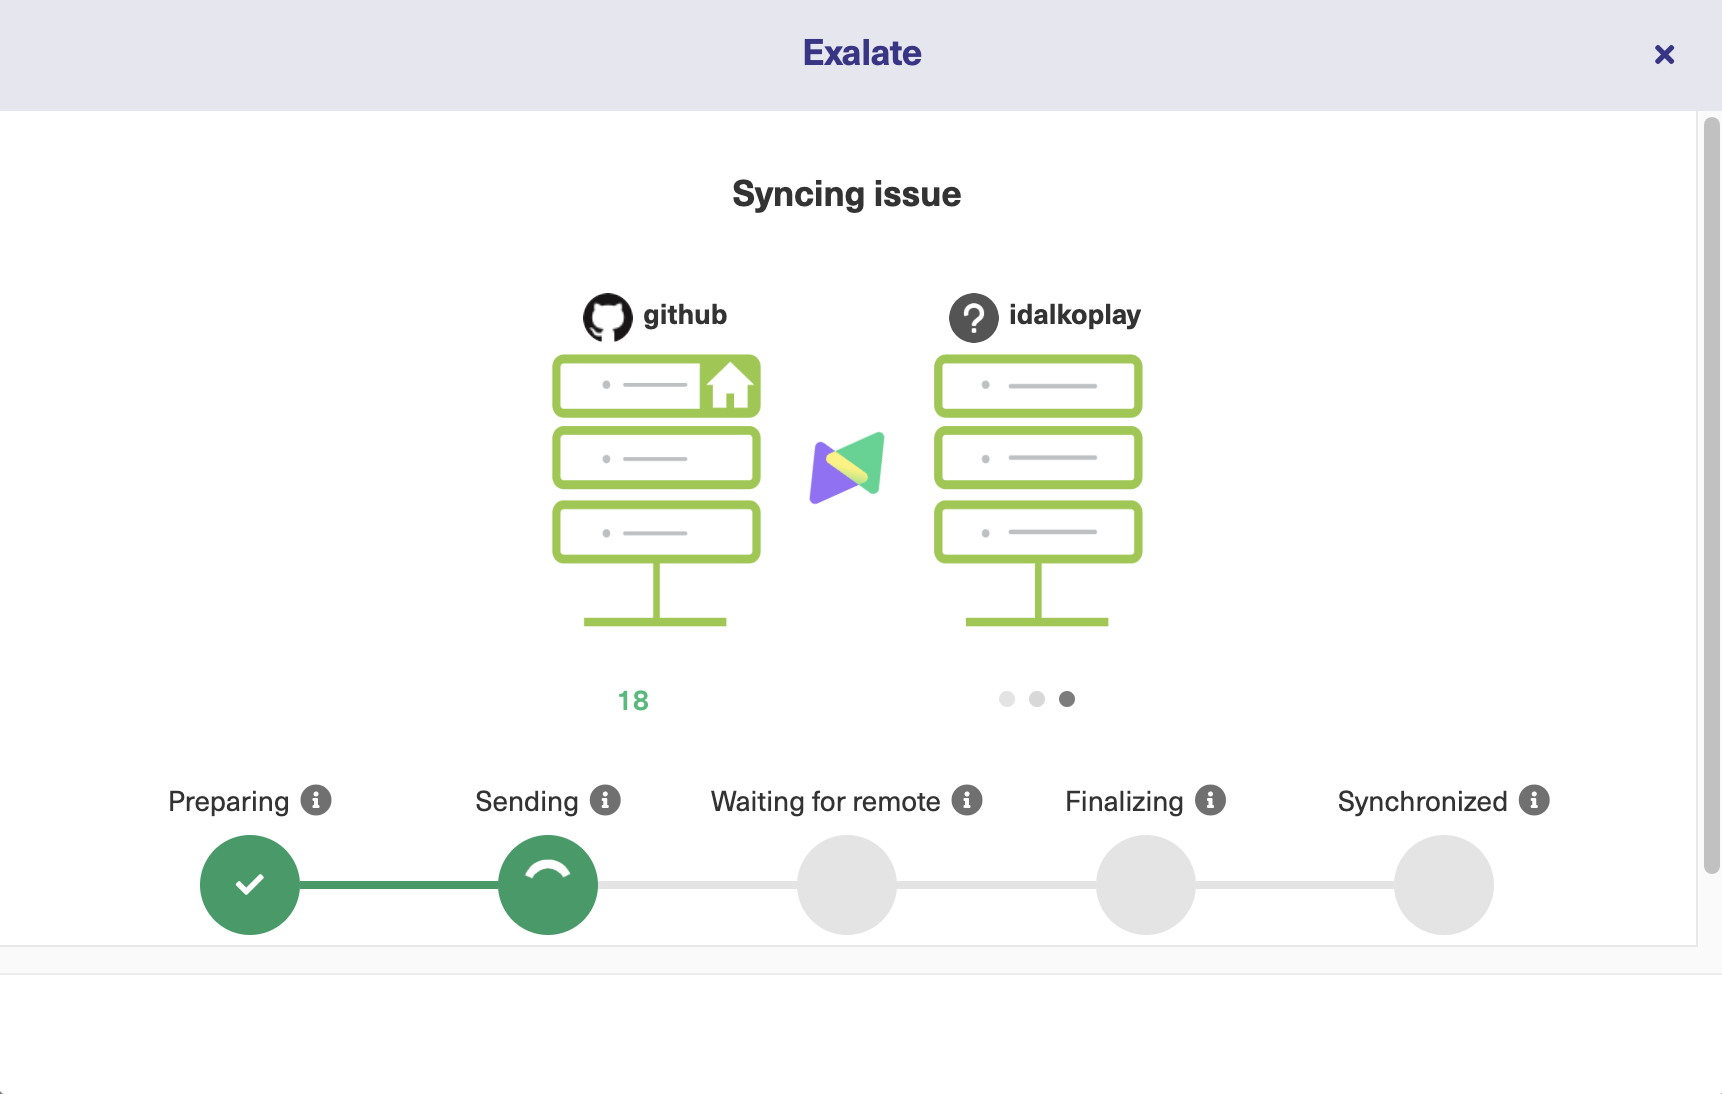
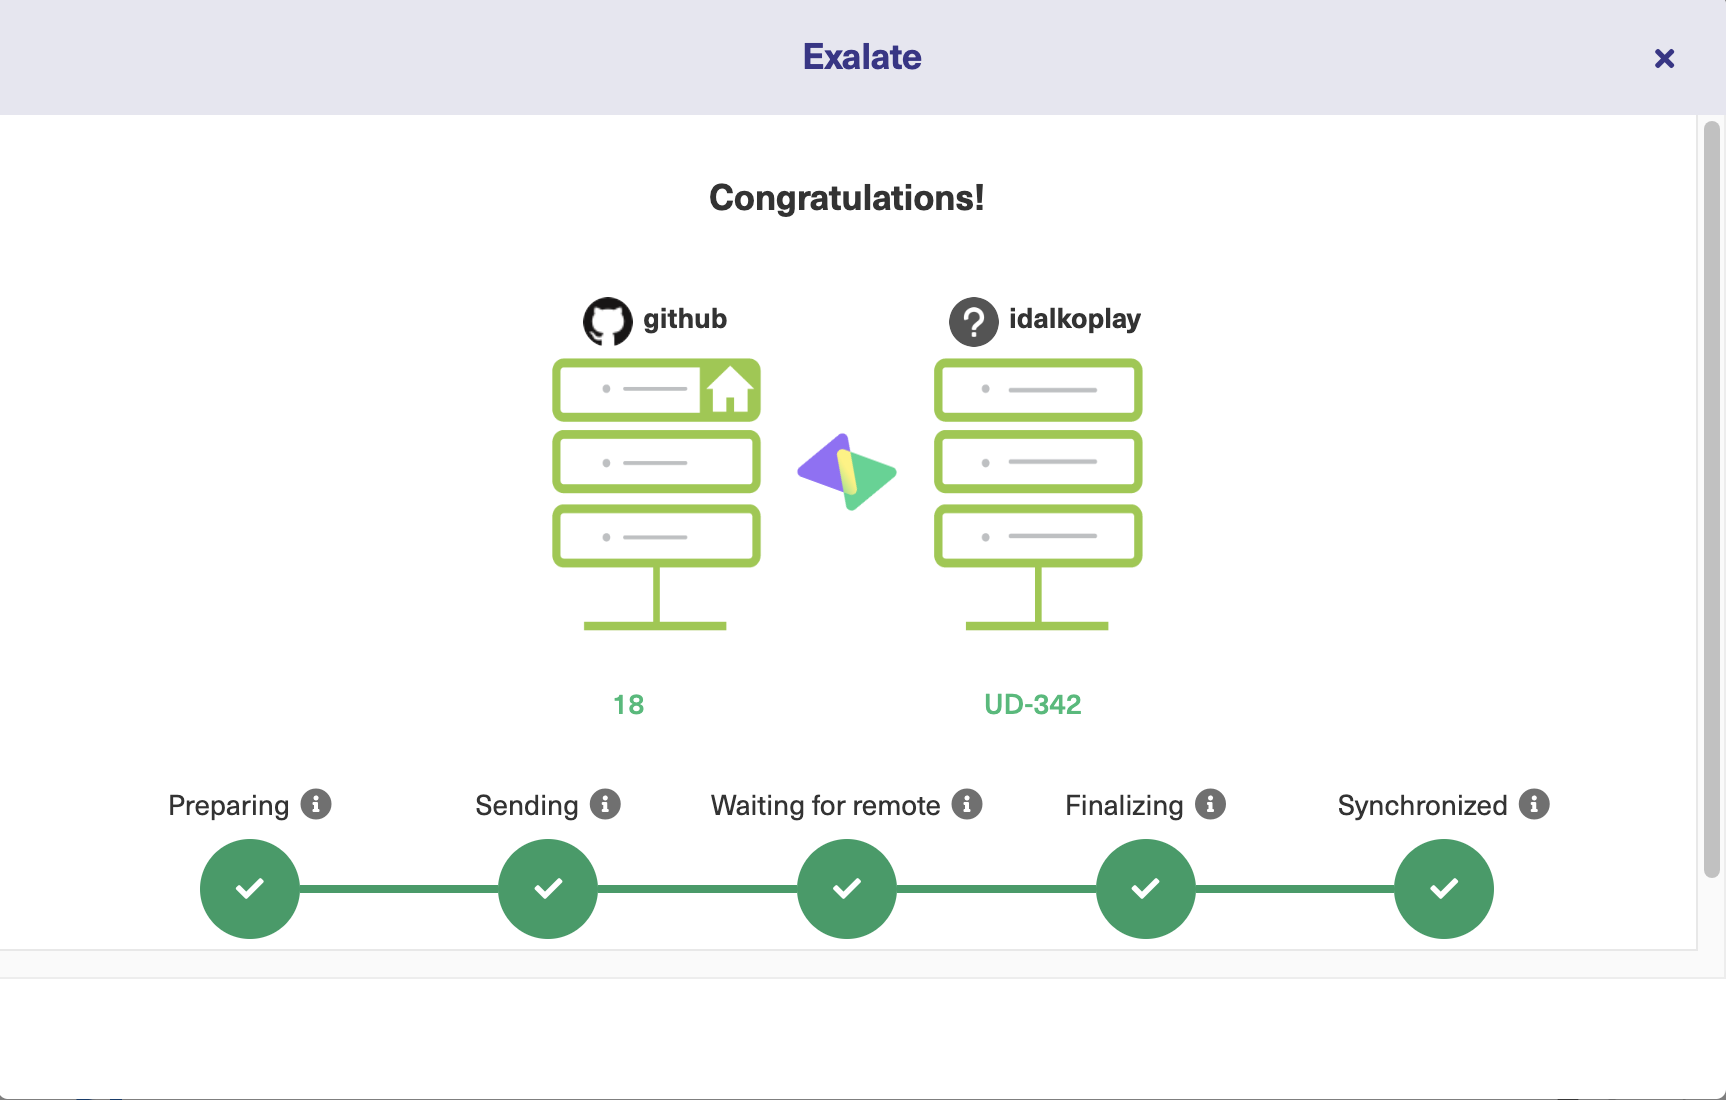
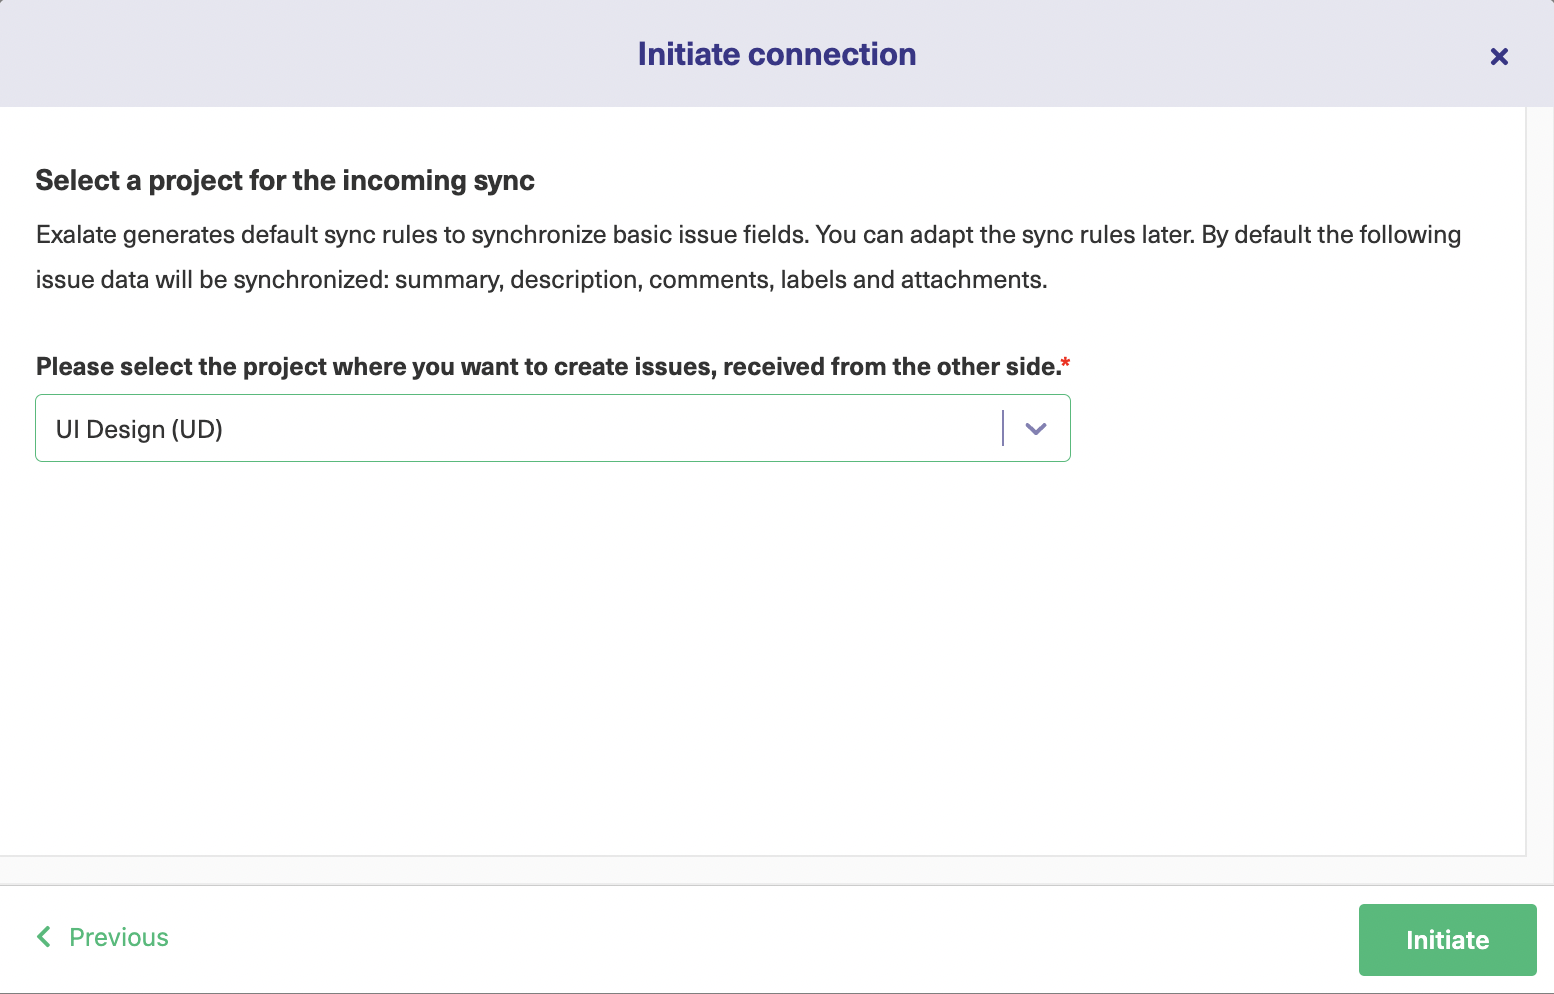
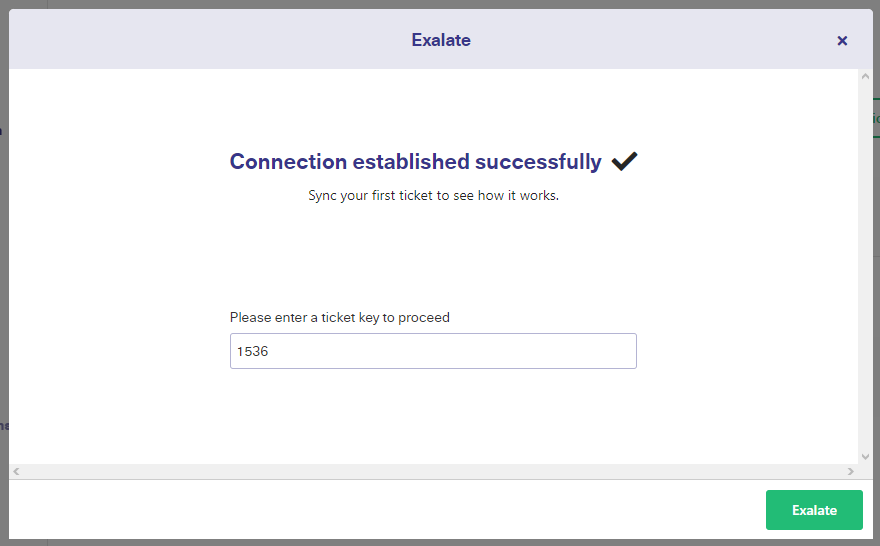
Once that is done, depending on the destination instance you would either need to select a project in Jira and Azure DevOps or a repository in GitHub, or if no such concept exists then the connection is successfully established.
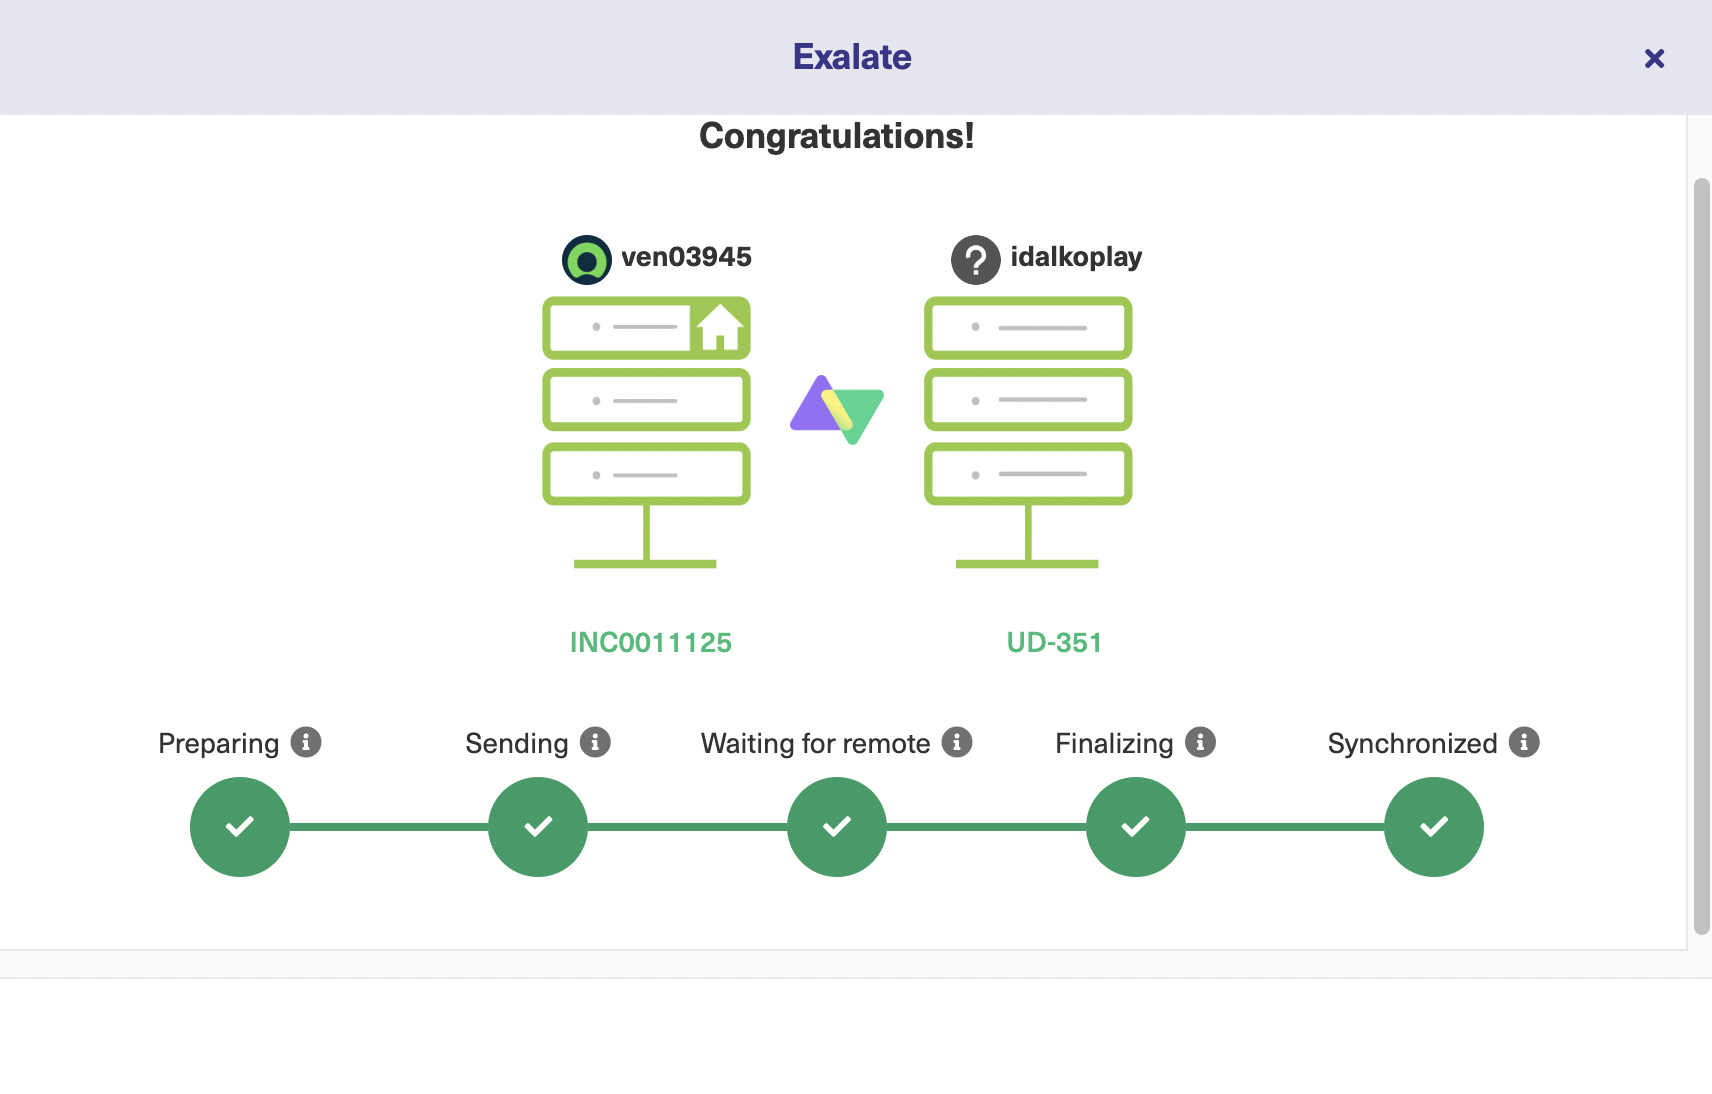
You can enter the incident number.
And see the result of your synchronization immediately.
You can also choose to filter incidents that can be synced using the basic mode automatically with the help of triggers or you can even sync entities in bulk.
The Script Mode
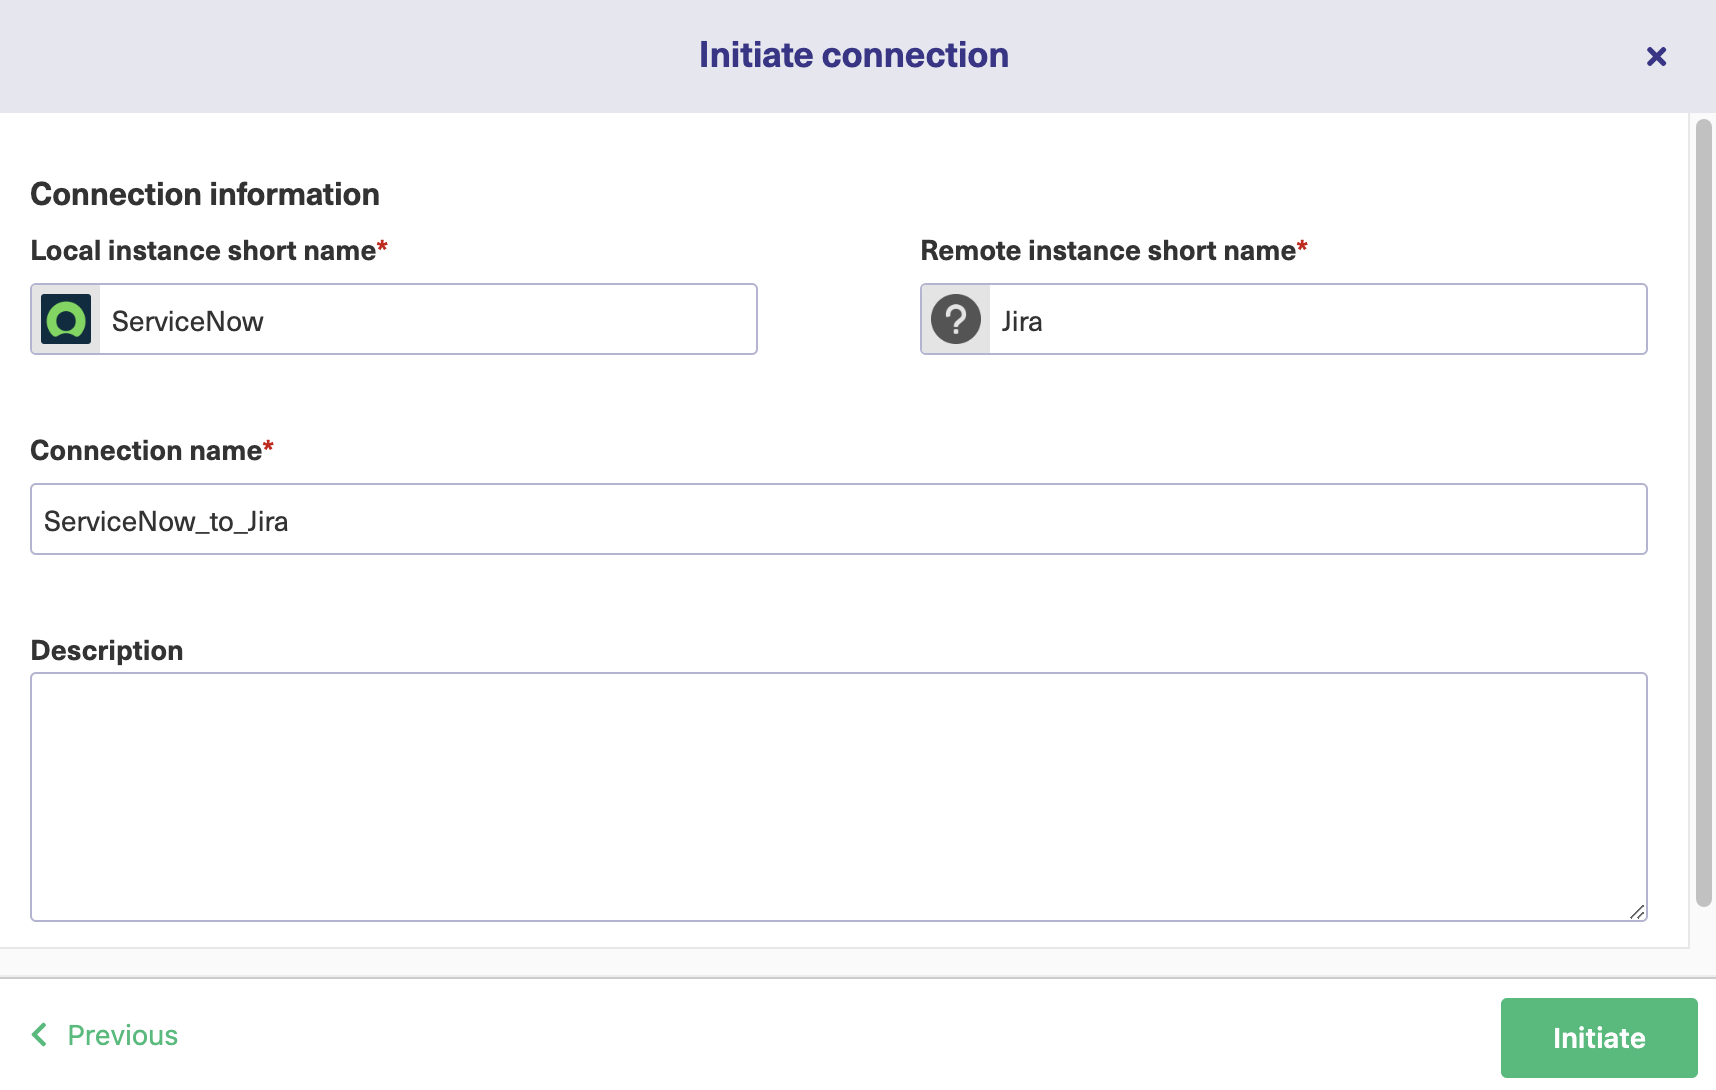
Choose “Script” and click “Next”.
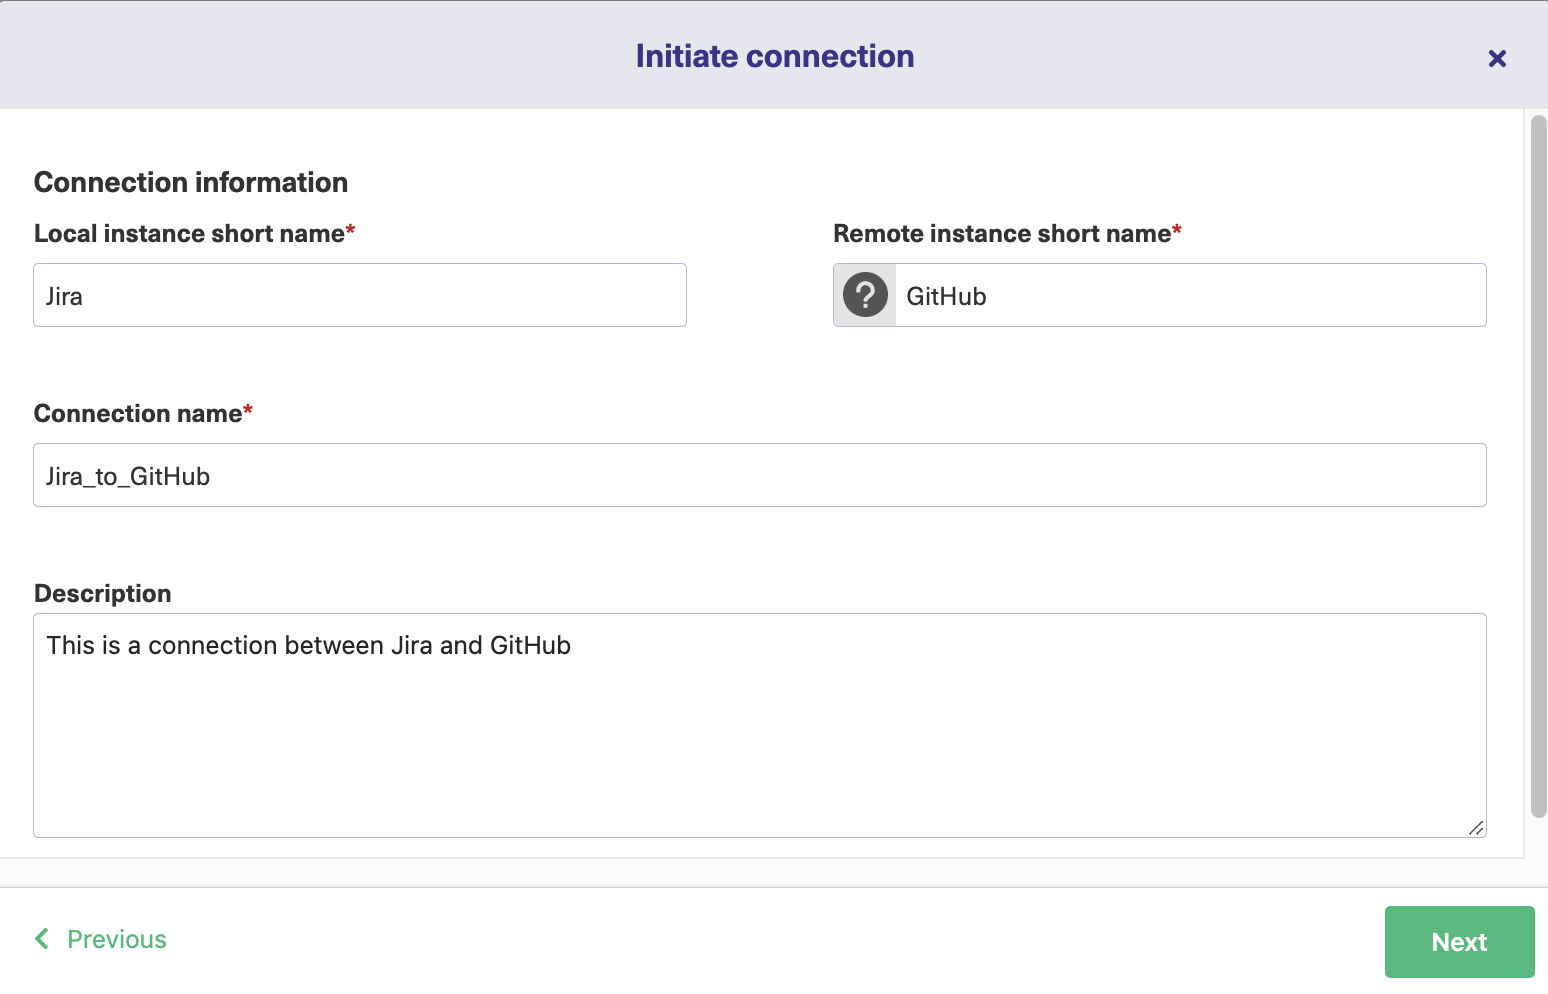
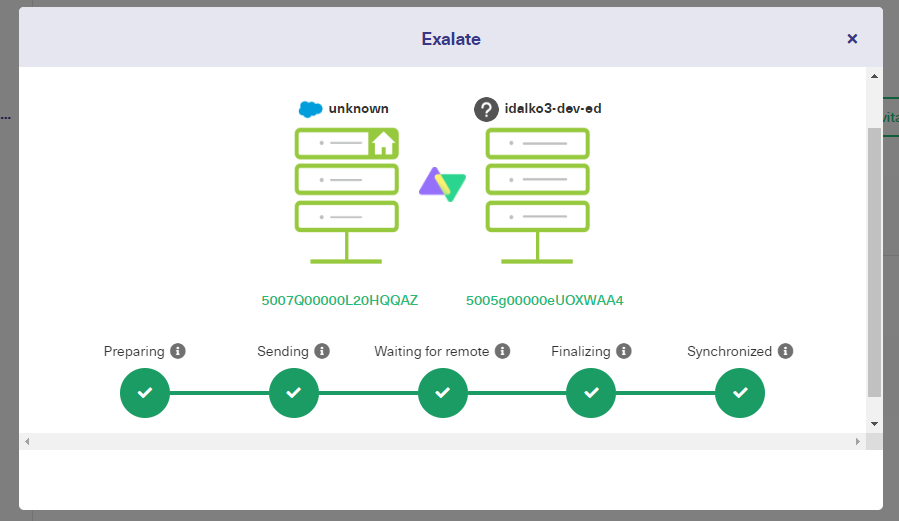
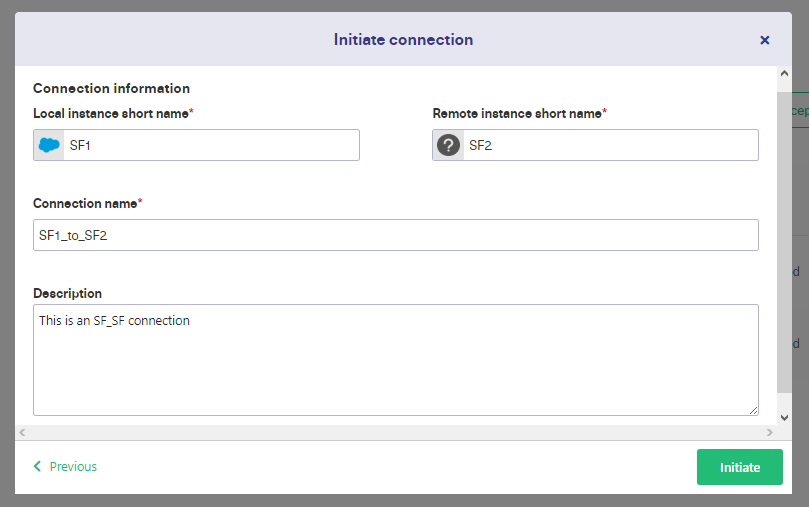
Enter the connection details. Give a short name to the local instance and a short name to the remote instance. A connection name is automatically generated. You can change it if you want to.
Click “Next”.
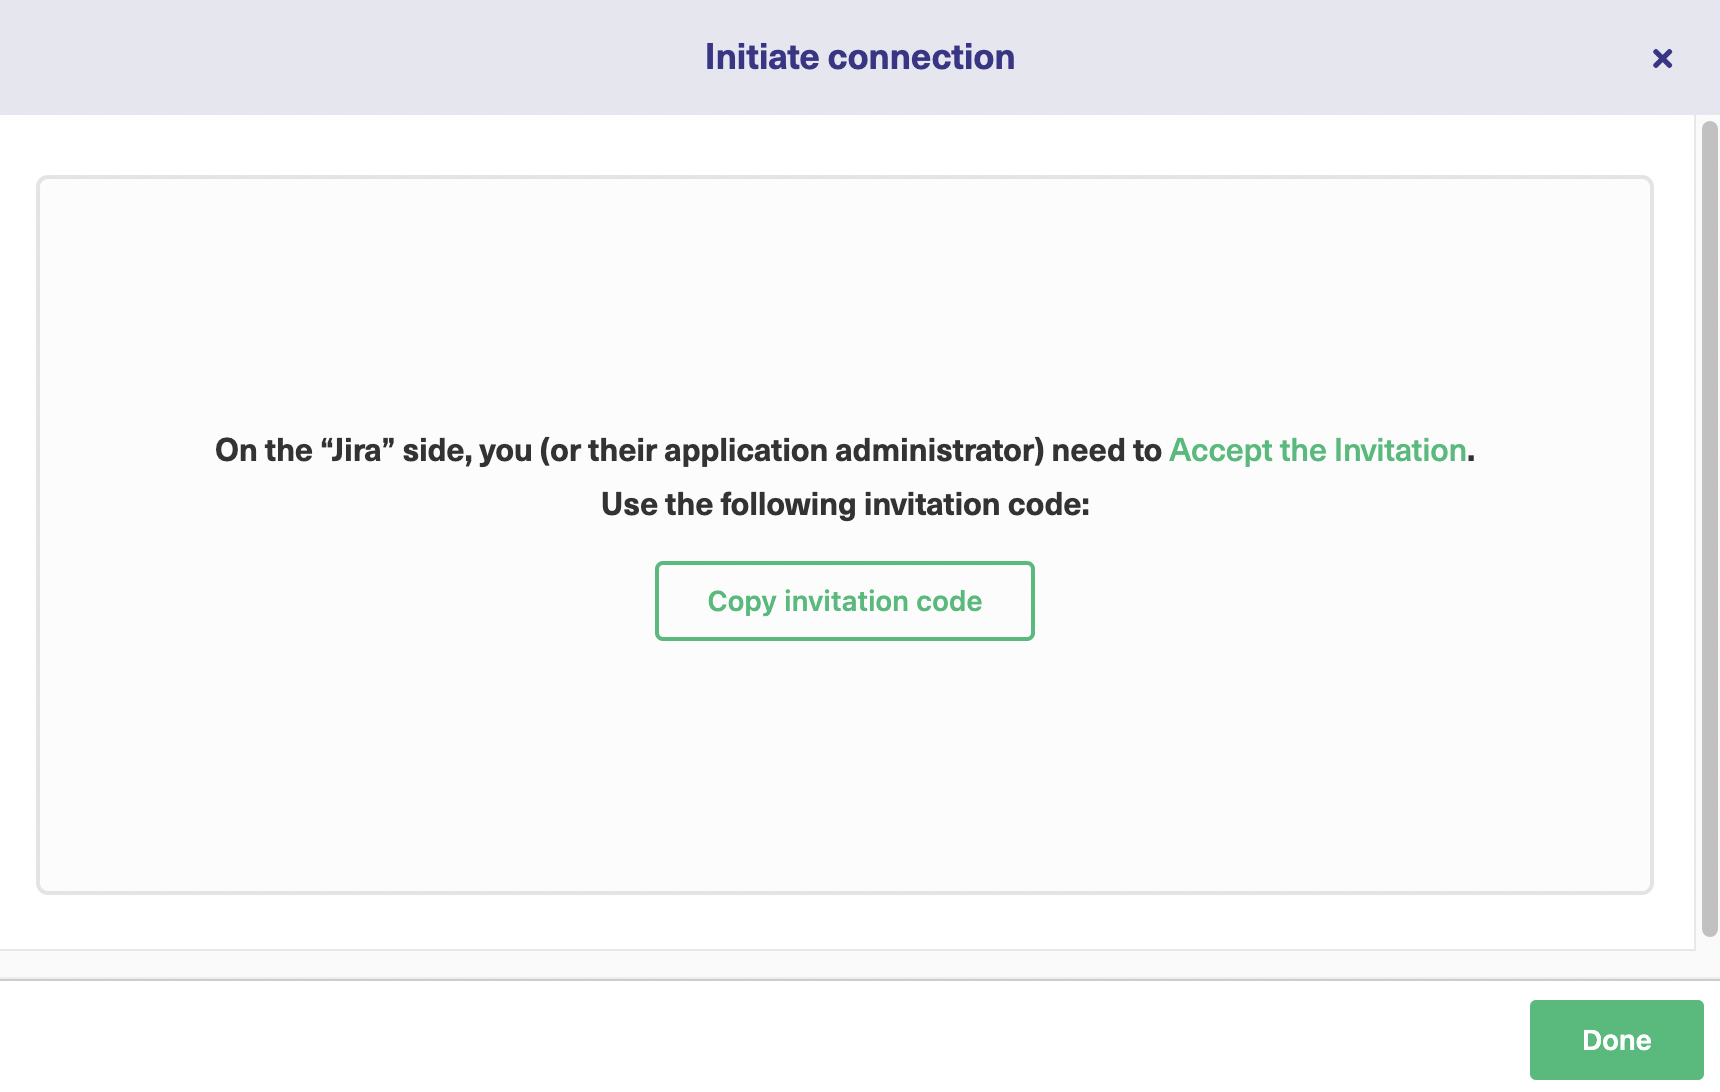
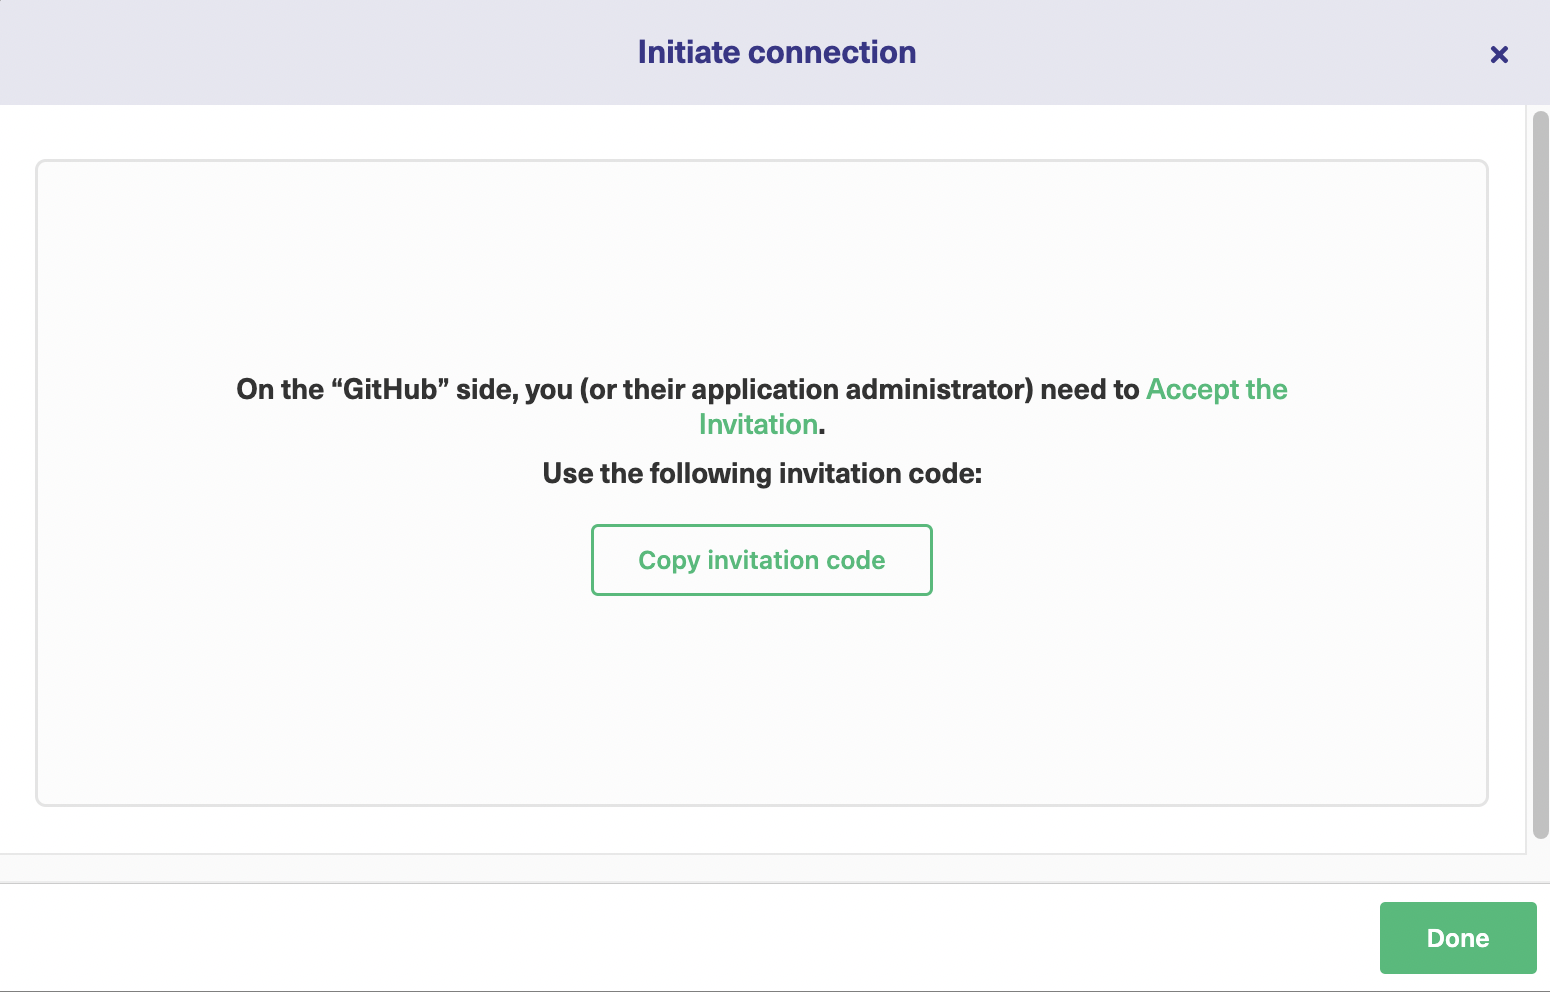
An invitation code is generated. This needs to be copied and pasted into the destination instance.
So click on “Copy invitation code” and save it somewhere safe. Then click “Done”.
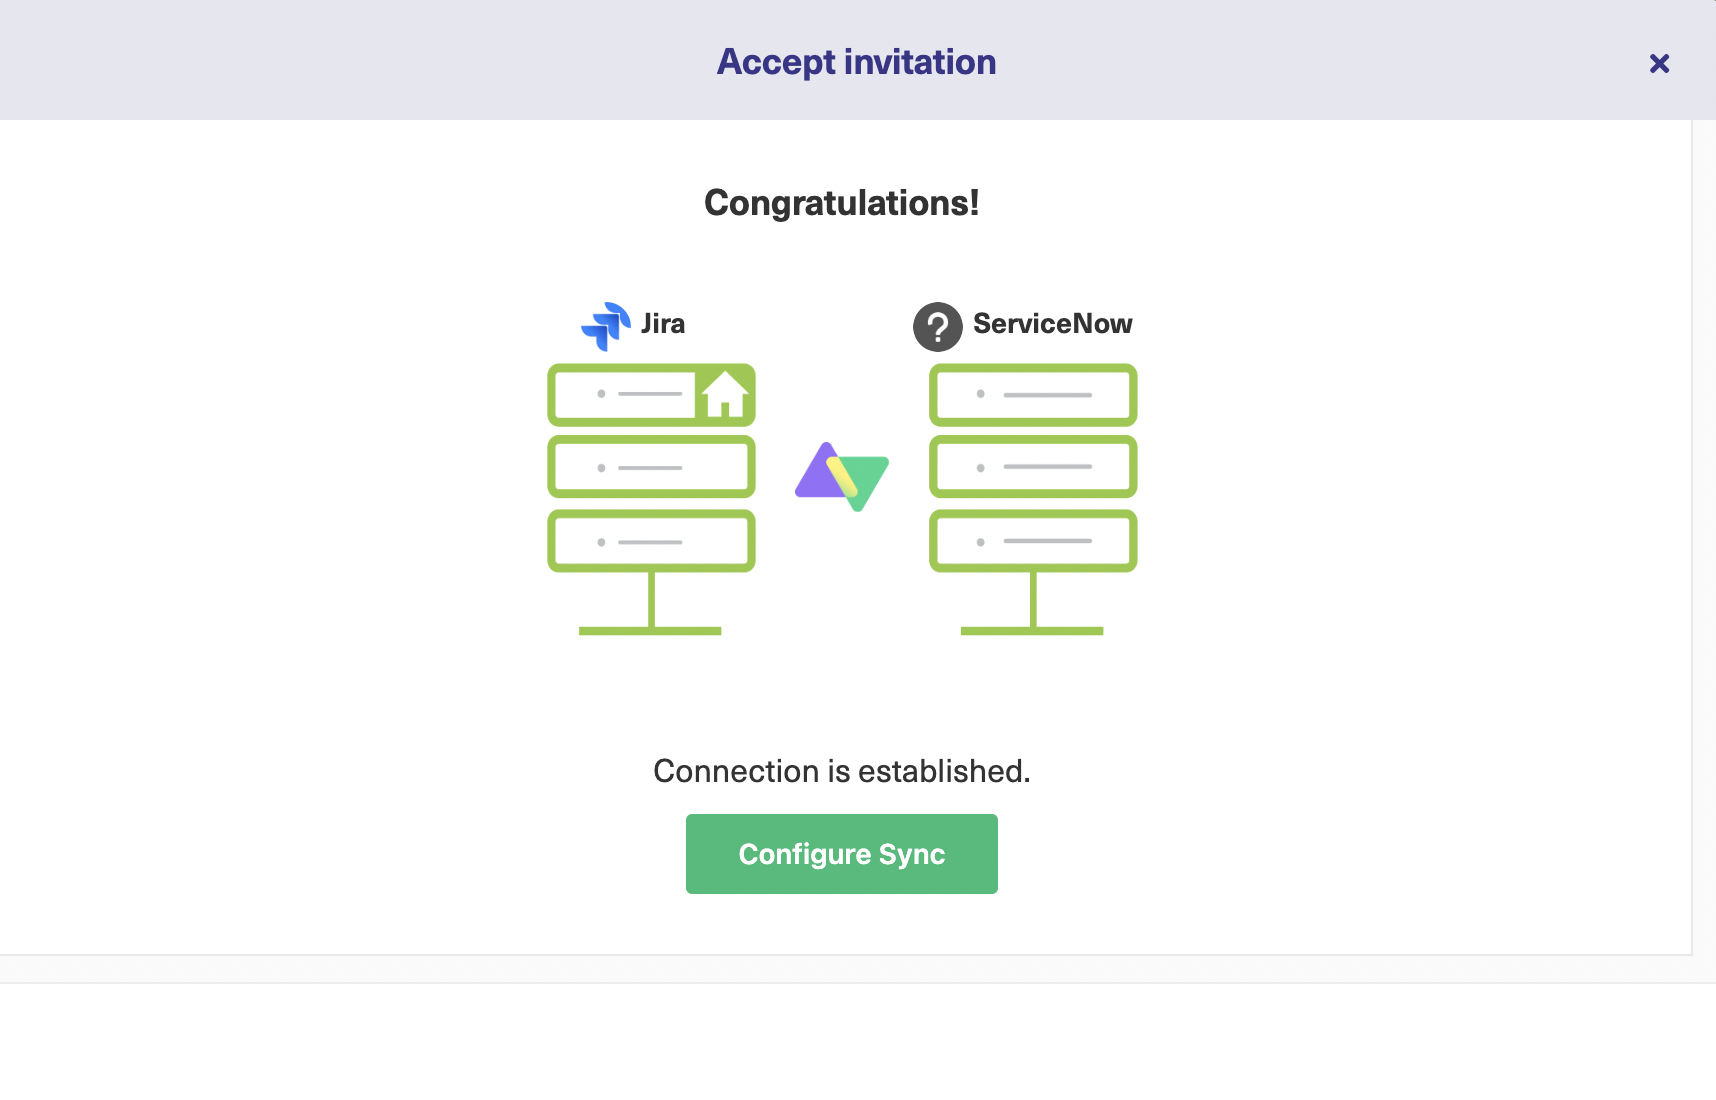
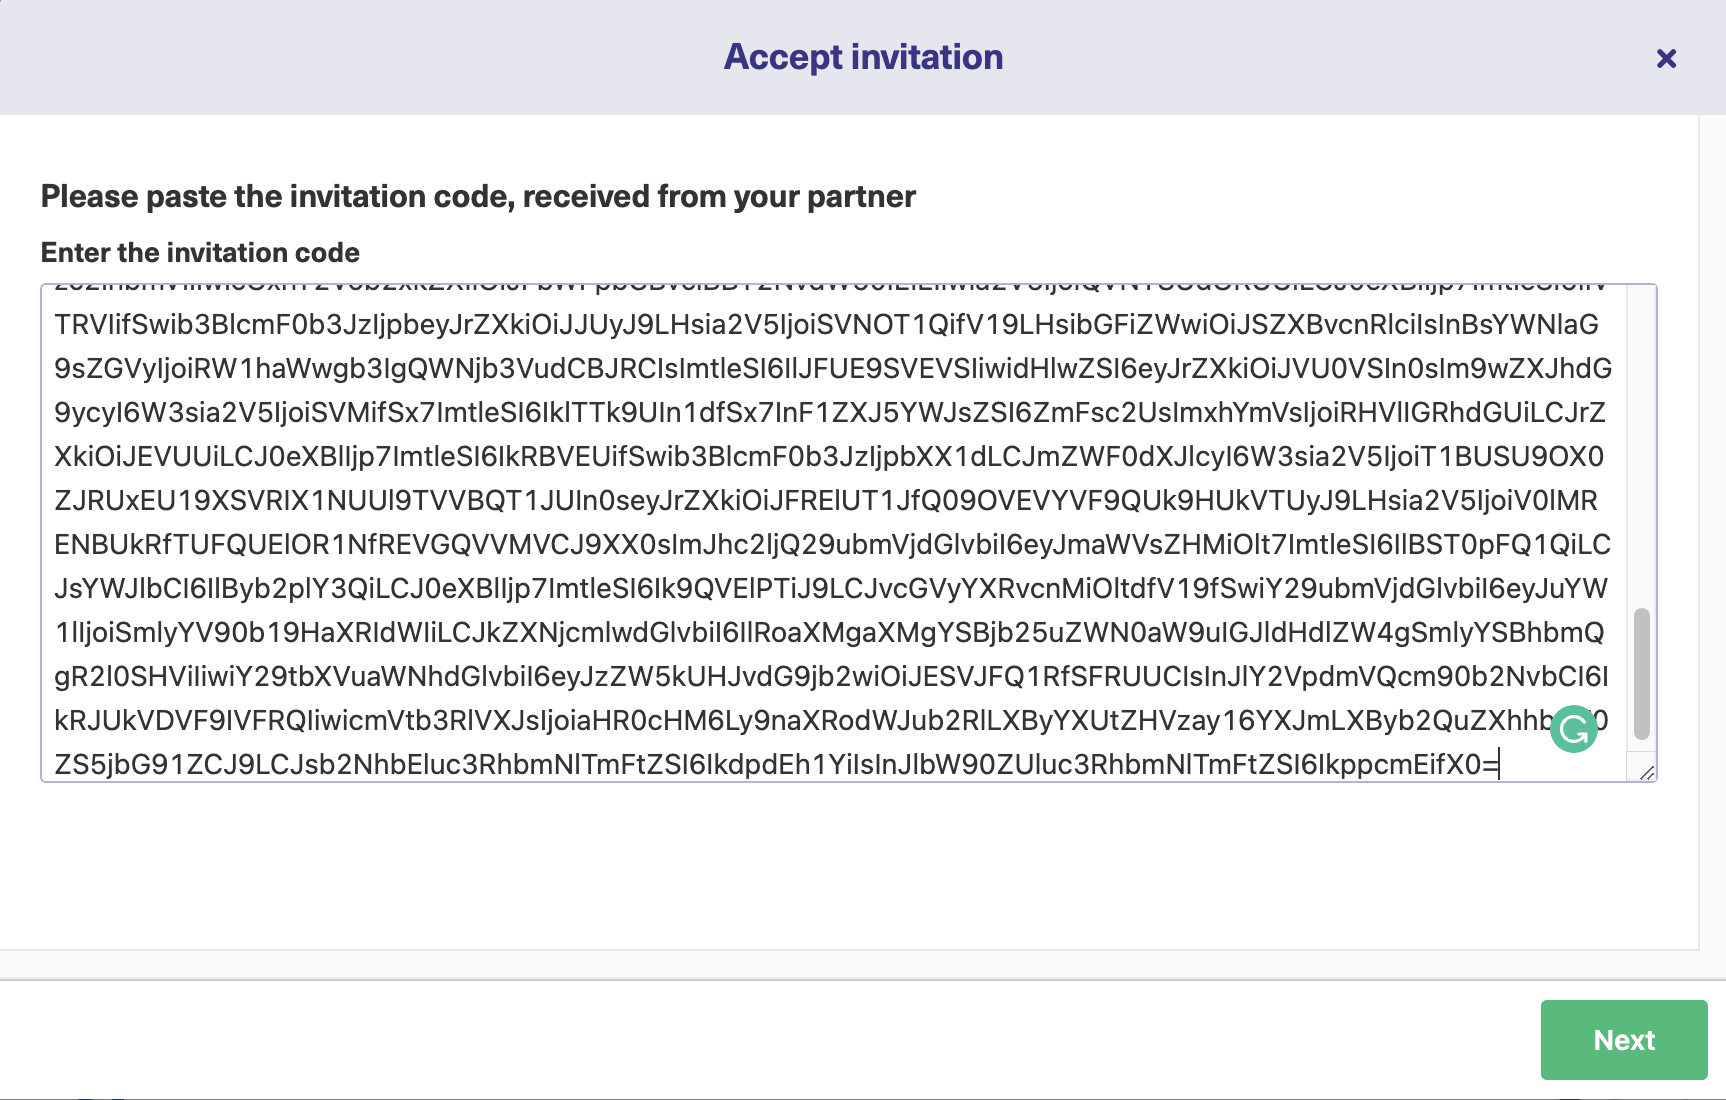
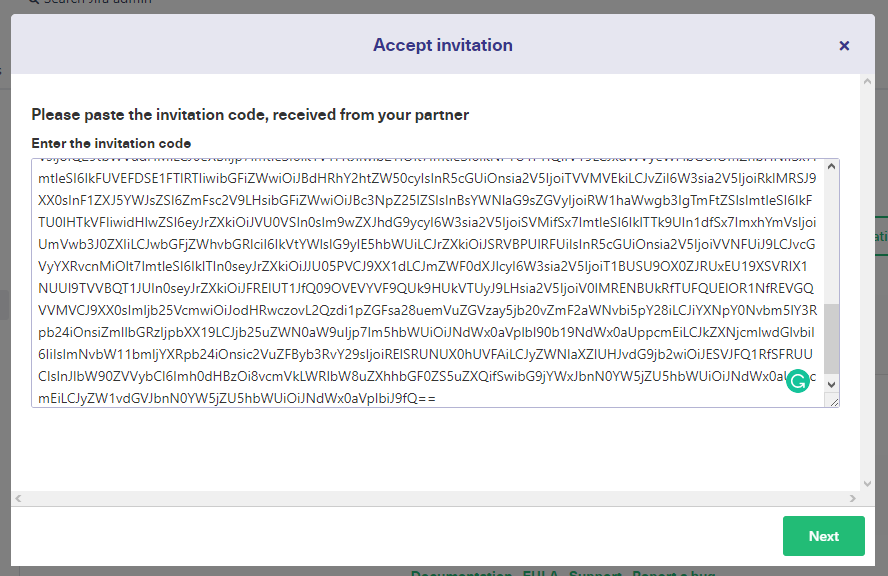
On the destination instance, go to the Exalate console and select the “Connections” tab.
This time around, click the “Accept invitation” button.
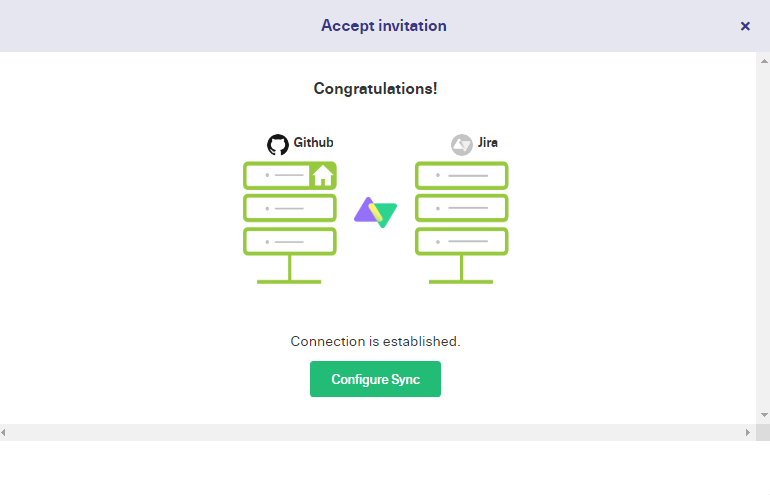
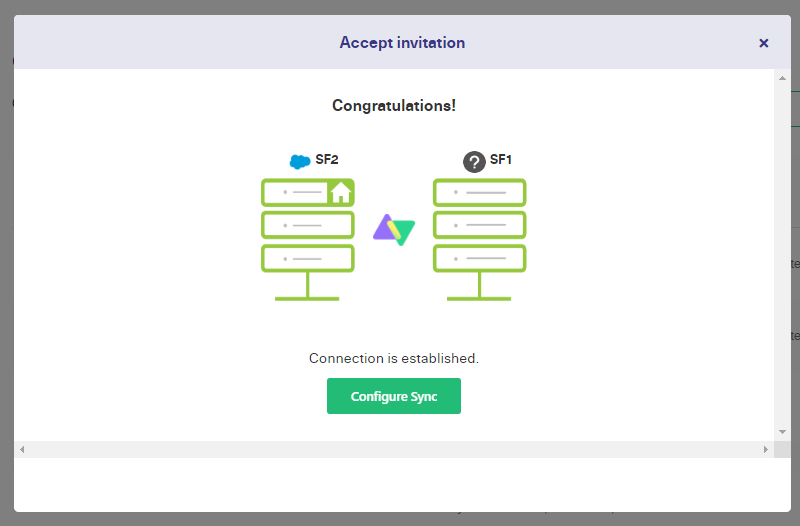
Paste the code you have just copied. Again, depending on the destination instance, you will either be required to choose a project or a repository, or the connection will be successfully established.
Step 3: Configure the Connection to Decide What to Share
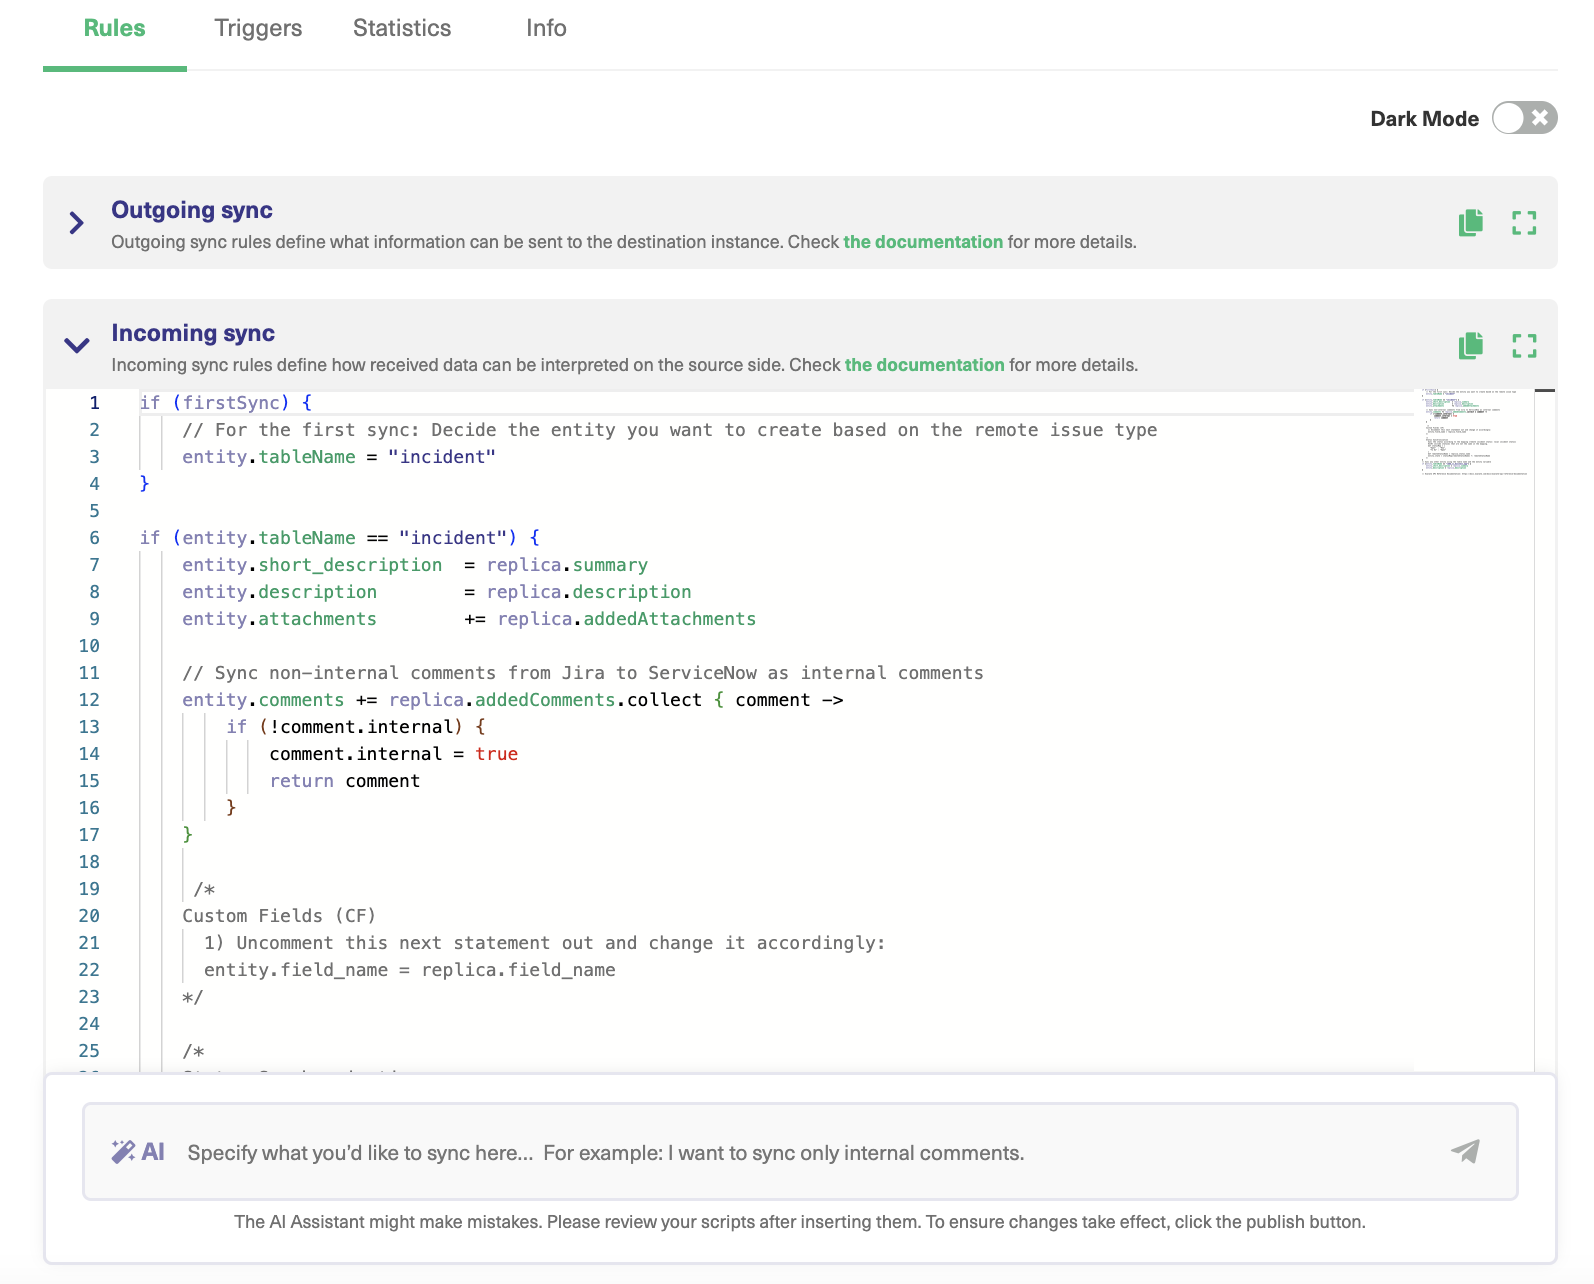
On the previous screen, if you click “Configure Sync” you will be shown a panel that looks like this:
“Rules” and the “Triggers” tabs are the ones we need here.
Rules are Groovy scripts that let you control the information flow.
There are Incoming and Outgoing sync scripts present on both integrating sides. They control the information flowing out and coming into the platforms. Each line corresponds to a particular field that needs to be synced.
In the “Outgoing sync” on the ServiceNow side, the line replica.description=entity.description, means that the description of the ServiceNow entity is copied into something called a replica.
Replica acts like an empty envelope in which you fill in the contents you need to transfer to the other side. This content is unraveled at the destination instance and applied according to the rules defined in its “Incoming sync”.
If you don’t want to send a particular field, simply delete the line.
You can also choose to add new lines of code to send or receive new information.
Check out the Getting started guide on the Exalate documentation to see how these initial steps work out with Exalate or refer to the Script Helpers for advanced scripting logic.
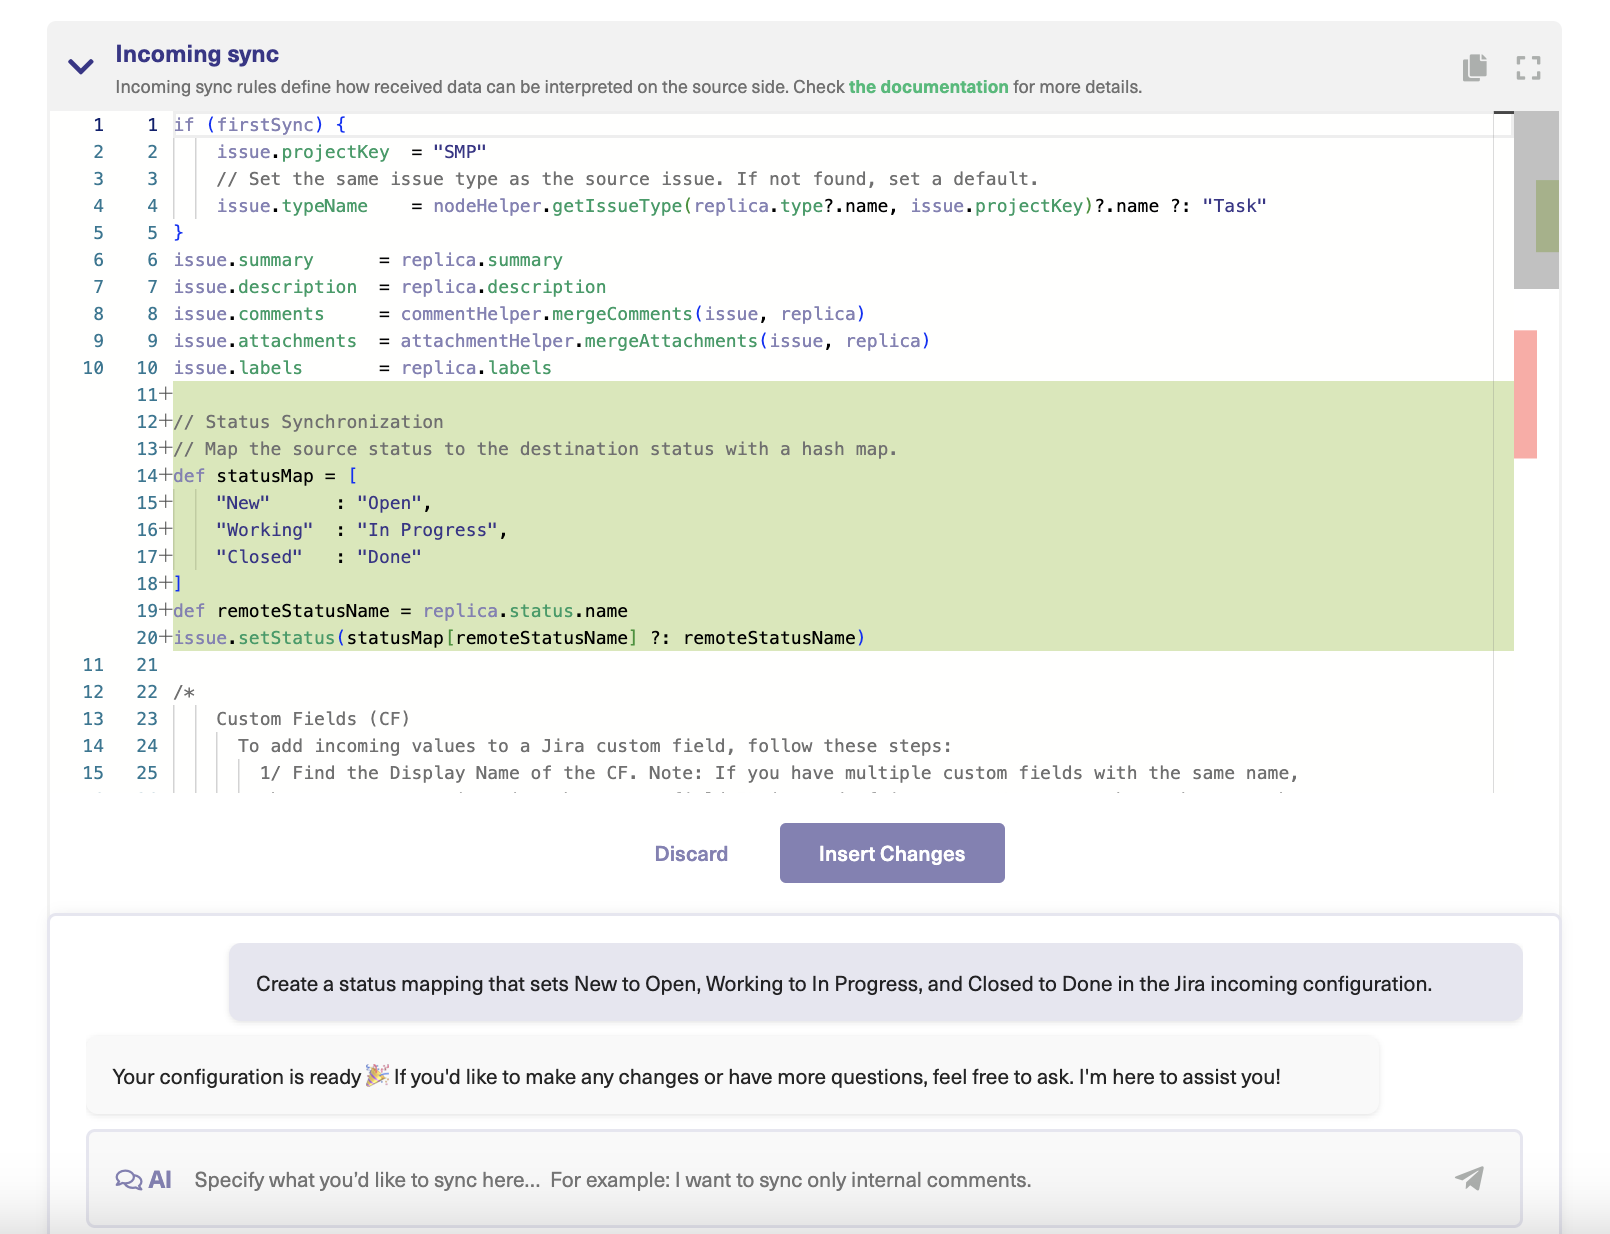
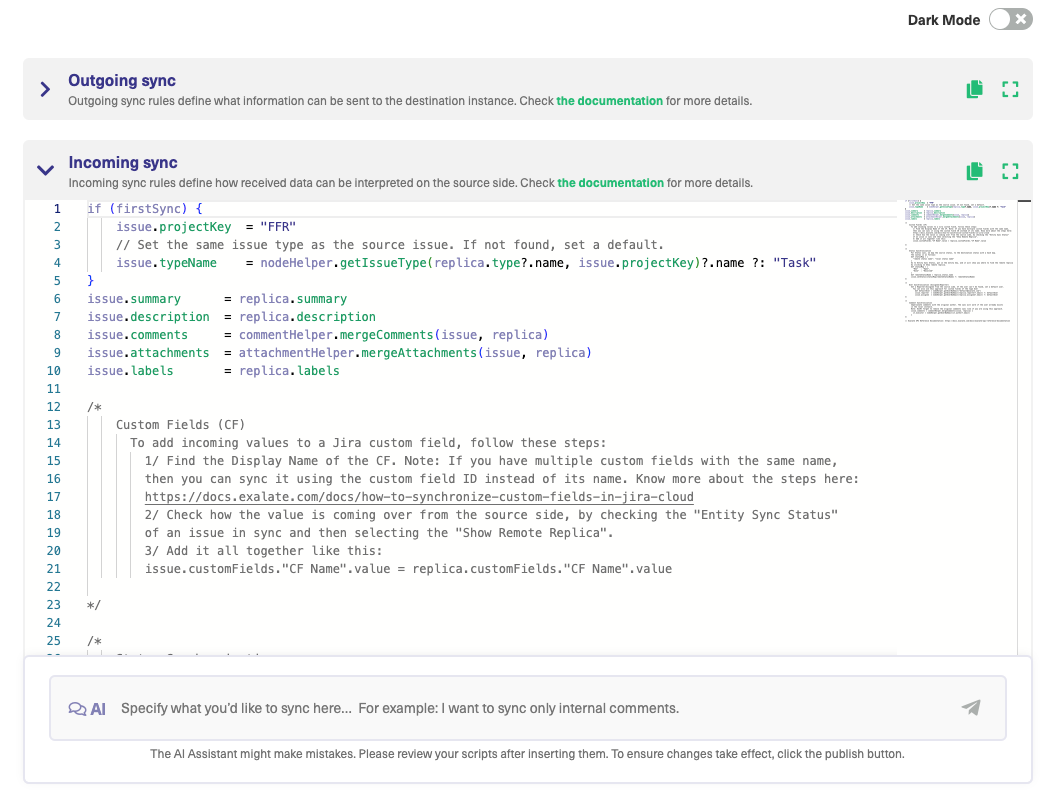
Use AI Assist for Configuring Your ServiceNow Integrations
Exalate’s Script mode now features AI Assist, accessible via a chat window in both the incoming and outgoing sync rules tabs. Simply type in your sync requirements, and AI Assist will generate the necessary scripts for you.
The scripts are created based on your input, current configurations, and Exalate’s scripting API, and should appear shortly.
In the generated script, red lines show what will be removed, while green lines indicate new additions. You have the option to accept, reject, or refine these changes, adjusting your prompt as needed. Once you’re satisfied, remember to publish your changes.
Like any AI tool, AI Assist isn’t perfect and can sometimes miss the mark. To achieve the best results, ensure your prompts are as clear and specific as possible.
For instance, if you need to map statuses between Jira and ServiceNow, you could enter something like this into the AI chat:
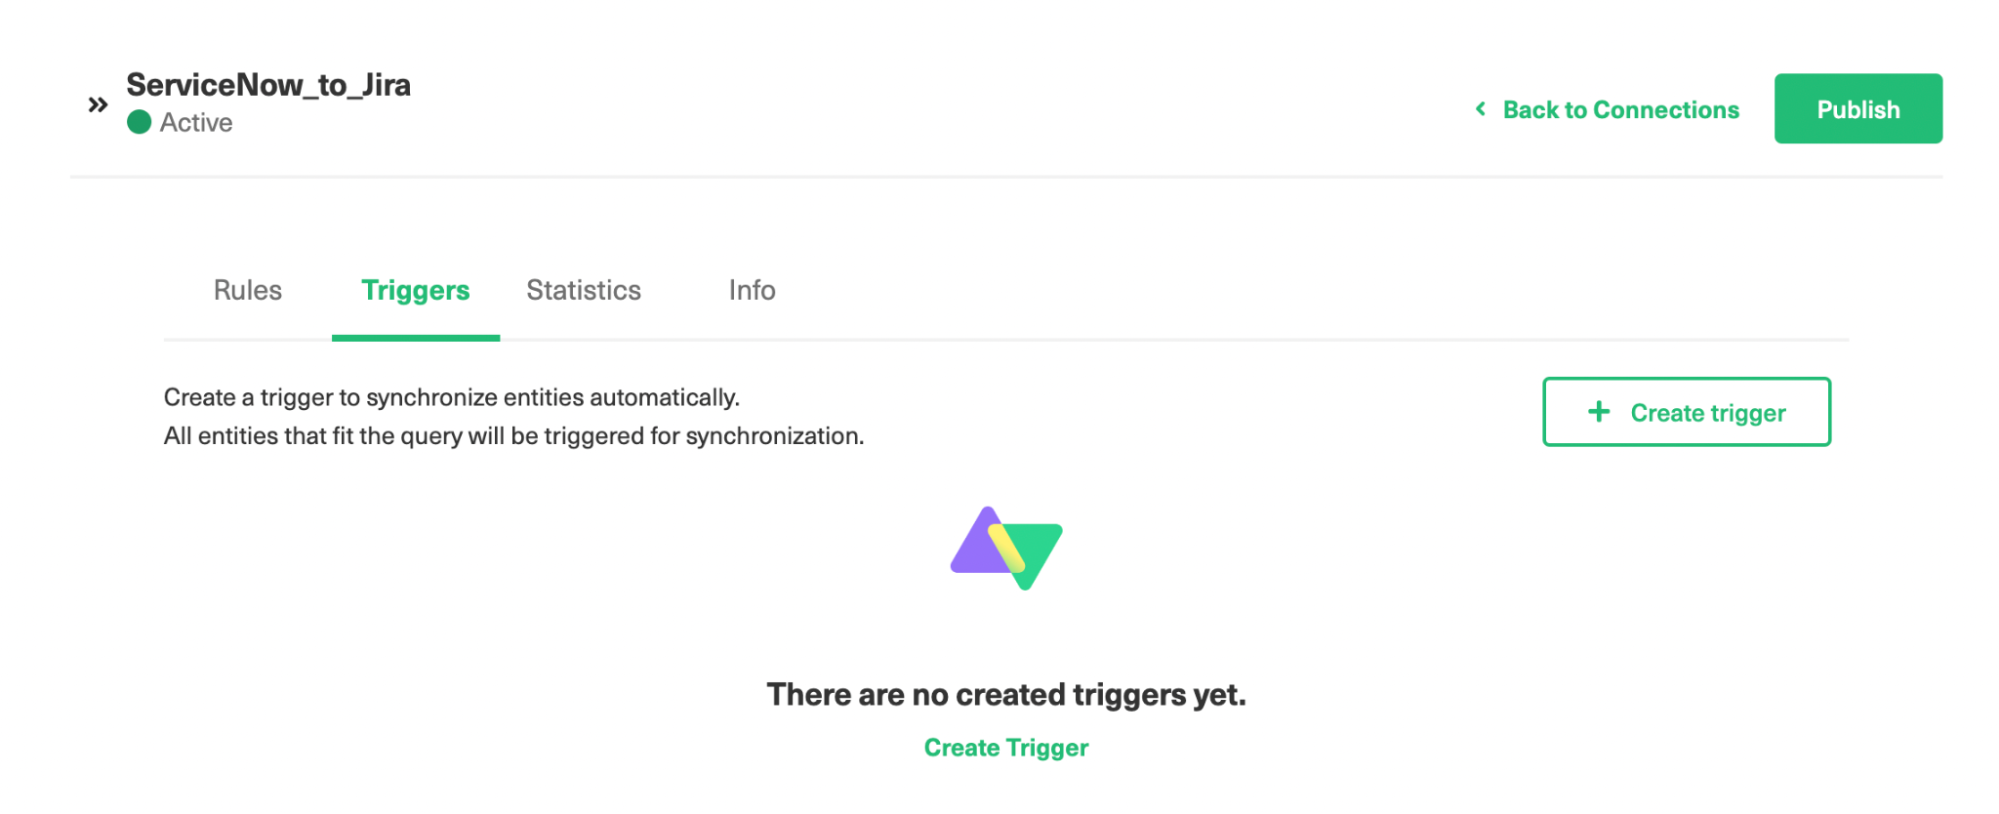
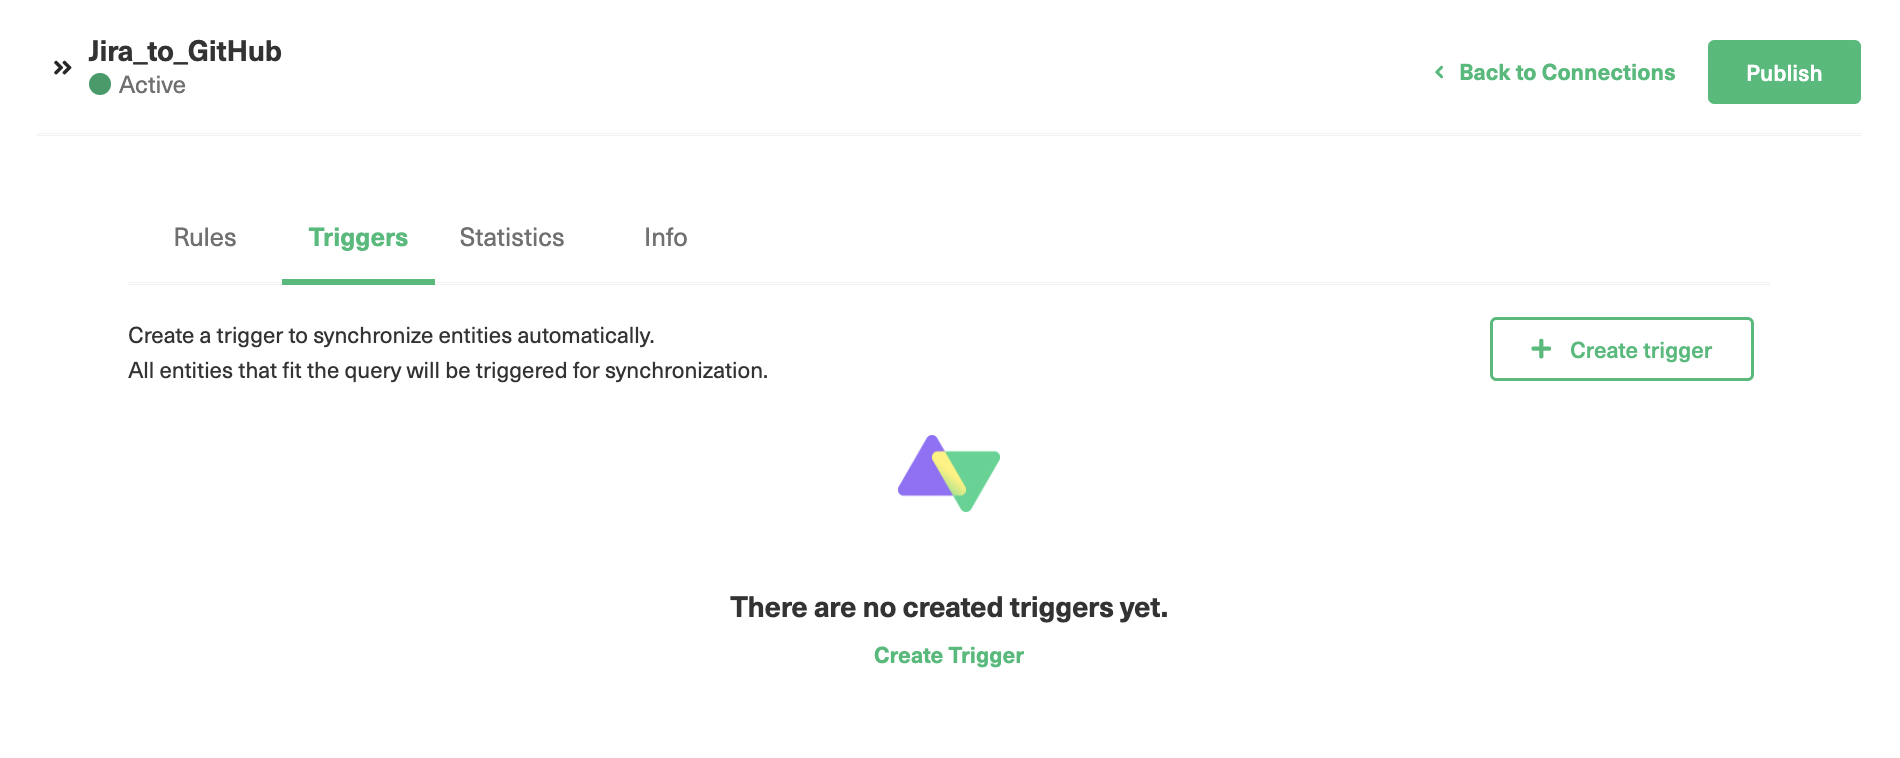
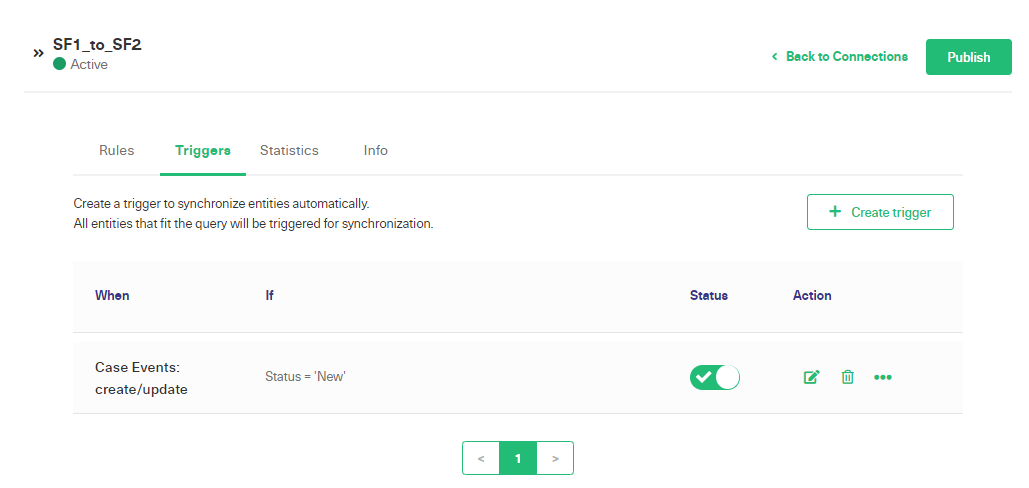
Step 4: Start Automatic Synchronization Using Triggers
Once you have decided what information must be sent and received, you might want to start the synchronization process automatically based on certain events.
This is done via Triggers in Exalate. Based on the conditions (filters) you set, sync will happen in accordance with the Sync Rules.
Triggers are platform-specific and need to be set on both sides of the integration if you want a two-way sync.
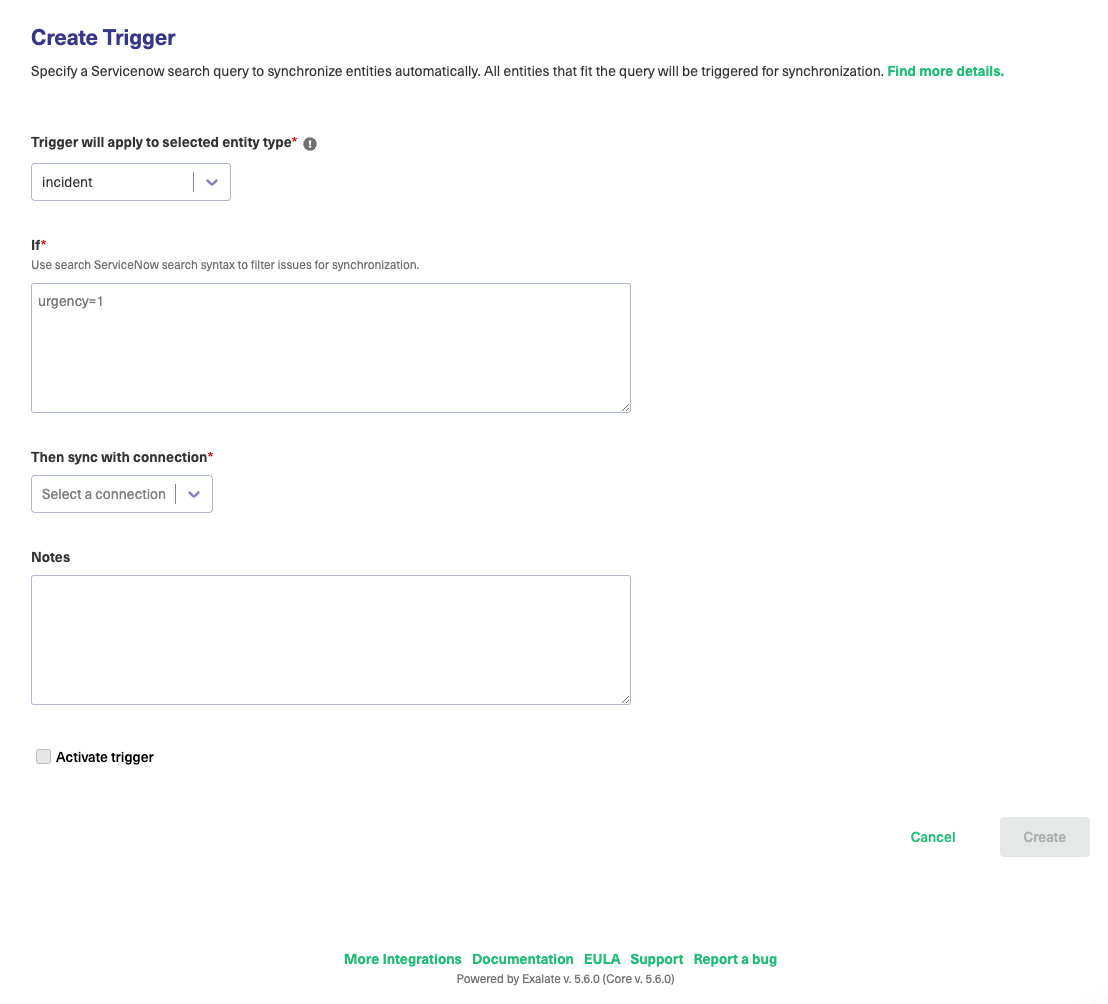
To create one, click the “Create Trigger” button.
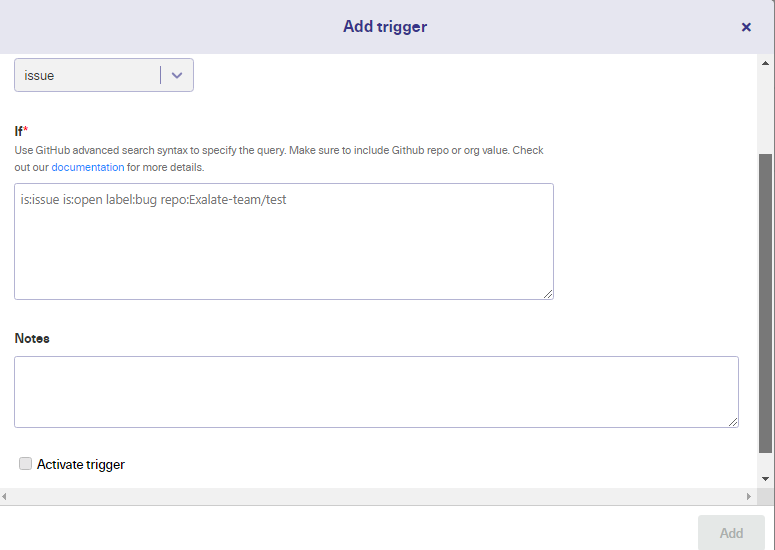
Choose the entity you want to set the trigger for.
On the ServiceNow side, you can choose between incidents, RITMs, problems, change requests, etc. In the “If” section, use the ServiceNow search syntax. Entities that meet the conditions are automatically synced.
You can write advanced triggers like syncing incidents assigned to a particular person or syncing incidents that have a particular text in a comment or description.
Once done, leave some notes and activate the trigger.
You can see the trigger you just created in the list.
You can choose to sync all the existing entities that satisfy the trigger conditions using the “Bulk Exalate” option.
After you have made changes to the Connection in Steps 3 and 4, hit the “Publish” button to apply them.
Step 5: Start the Synchronization
Honestly, there is nothing you need to do in terms of starting the sync.
It will start automatically based on the triggers you have set up. If for some reason it doesn’t, grab some coffee and by the time you are back, it will be working just fine.
If there are some issues with the triggers or rules, you can also troubleshoot and find out what’s going wrong.
Best Practices for ServiceNow Integrations
The possibilities with integrations are huge and you can go downhill in a short amount of time without realizing what went wrong.
So let’s look at a few best practices and see how you can make the most out of your ServiceNow Integration.
To be honest, these are not specific to only ServiceNow, they stand true for all kinds of integrations.
Set a goal for your integration and define the requirements early on. Ask questions like:
Do I really need integration in the first place?
What other ways are there to connect the platforms I use every day?
What business value will the integration bring?
Which processes will the integration have an impact on? If all the answers point towards integration, you know you have headed the correct way.
Stressing on the above point a little, make sure you chalk down to the finest details what data needs to be exchanged, at what time, what workflow is expected to be automated, how it is mapped to the destination instance, and so on.
Involve the right stakeholders in the process from the beginning. Right from the inception, design, and implementation to the maintenance of the integration. They can be the platform admins, the implementation team, data architects, solution architects, information security consultants, or absolutely anyone you think can add value to the project.
Explore the technologies and options available for integrating your systems. We have discussed ServiceNow integrations here (and I hope it brought some clarity) but they might as well be Jira integrations or Salesforce integrations. This is an important step to put your integration in full throttle. Also, check how the integration handles your data and GDPR requirements since it is an important part of an integration.
Make sure to not rush through the integration. It is a time-consuming process, accept it, especially the trial and error or the POC part. So give it that kind of time. Your integration can be complex and can take time to set up. Acknowledge that instead of rushing through and being left with a clumsily-working high-maintenance result.
Sometimes, you can have obvious solutions to your problems. For instance, JDBC works really well if you want a one-way integration between a data source and ServiceNow, i.e., just pulling the data from the source and displaying it in ServiceNow. For two-way integrations between different platforms, you can use a web service or a MID server, or a third-party app like Exalate.
Determine how and where the system you want to connect with is located. Is it inside the customer’s network and needs update via a MID server or is it across company borders? You can involve a subject matter expert and get the right direction in this case.
With ServiceNow, you already have basic system integrations like eBonding, Google Maps, etc. Understand and use these technologies. For advanced integrations, go to the experts.
Some tools like IntegrationHub support workflow automation and focus on that alone, whereas some others like Exalate focus on deeper integrations that involve a lot of advanced integration requirements. Be sure to have this understanding from the beginning. If in doubt, check how you can make the right decision between IntegrationHub and Exalate.
There is a lot that can happen with integrations and the sky’s the limit. And with the right approach, it becomes unstoppable. So choose wisely and decide what works best for you.
Conclusion
We have come a long way. Having started with understanding the needs and benefits of ServiceNow Integration, we also saw a few use cases to get a practical view of how such integrations can be envisioned.
You also learned all about the native ServiceNow-provided integration technologies and methods. As opposed to these, we had a look at why 3-rd party applications can also be a good choice.
We then briefly touched on an integration solution called Exalate, which has a distributed architecture and supports decentralized integration, an intuitive scripting engine, and so on.
Finally, we saw how ServiceNow integrations can be implemented using Exalate before closing the journey with a few best practices.
There is always more to learn, so feel free to book a demo with Exalate if you think it can be the right solution for you and see where that leads you.
Frequently Asked Questions
What are ServiceNow Integrations?
ServiceNow integrations help establish connections between ServiceNow, a popular ITSM platform, and other applications, databases, or services. These integrations help automate workflows and tasks, centralize information, and improve overall organizational efficiency by connecting ServiceNow with other critical business systems.
What is REST API integration in ServiceNow?
REST API integration in ServiceNow refers to the capability of ServiceNow to interact with other systems using the Representational State Transfer (REST) architectural style. ServiceNow provides a RESTful API that allows developers to make HTTP requests to perform operations on ServiceNow data and functionalities.
However, this method of integration requires a lot of development effort and technical resources. It’s also difficult to scale the integration. Hence, external integration software vendors like Exalate can help achieve the same results with minimal effort.
ServiceNow integrates with various applications, including CRM systems (Salesforce, Microsoft Dynamics), collaboration platforms (Microsoft Teams, Slack), project management platforms like Jira, development platforms like GitHub and Azure DevOps, other ServiceNow instances, and many more.
Which tool is used to integrate ServiceNow?
You can use third-party integration tools such as Exalate to integrate ServiceNow with other applications uni or bi-directionally. This tool allows you to create custom Groovy scripts to sync any kind of ServiceNow entities like Incidents, Problems, Change Requests, RITM, etc.
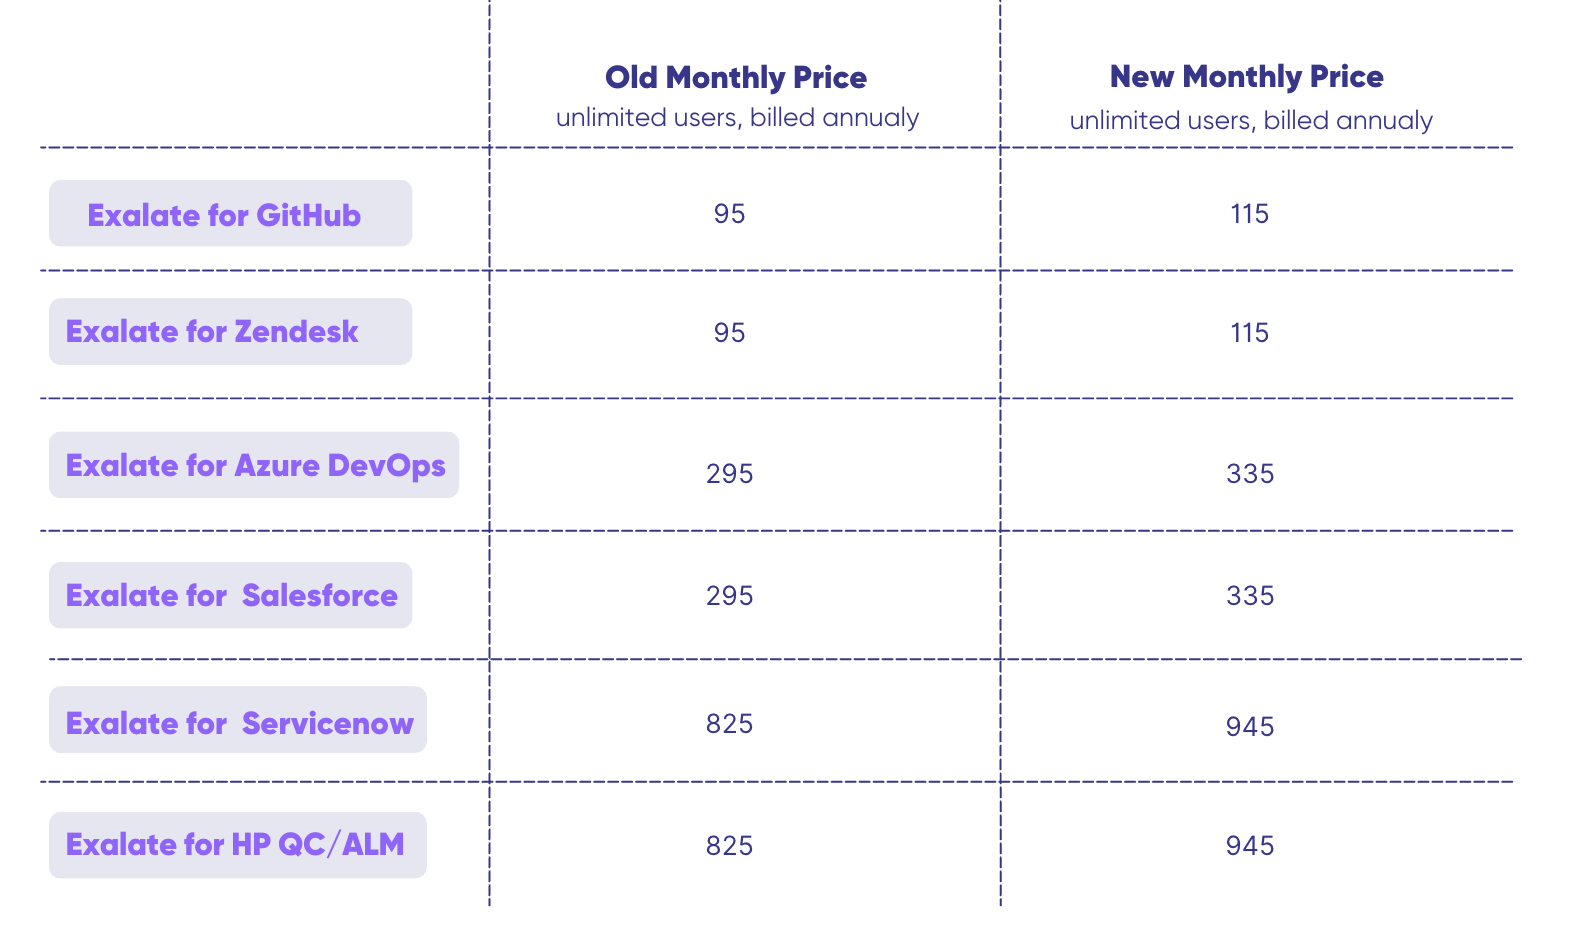
Starting February 15, 2023, we are increasing prices for all Exalate products and services by approximately 15%.
Exalate infrastructure relies on many other tools, which have already increased their prices. We also want to ensure that the level of service delivery remains in line with your expectations and beyond.
What does it mean for you?
The current pricing will apply to quotes and purchases made before February 15, 2023.
Once the pricing change goes into effect on February 15, new customers will pay updated prices immediately
The new prices also apply to renewals after February 15, 2023. If you decide to renew before this date, the current pricing is retained. That includes Server maintenance renewals as well.
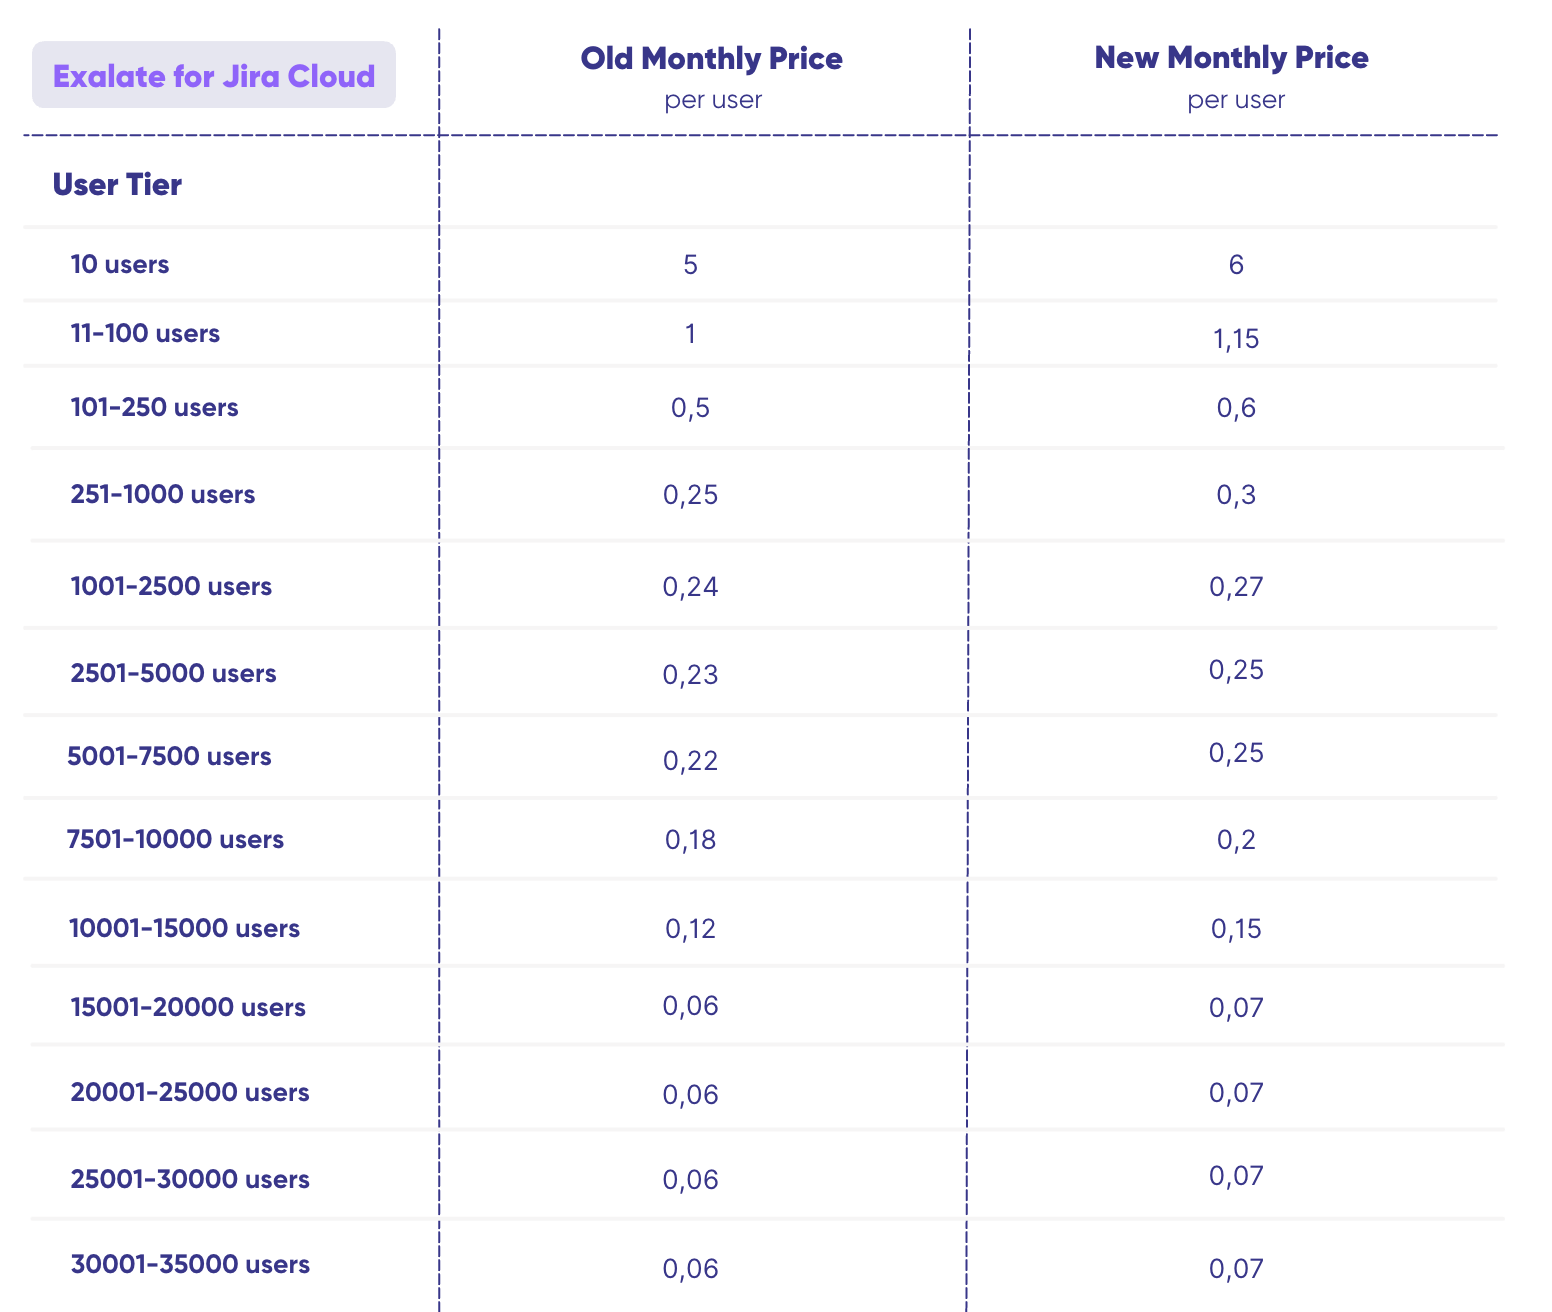
Exalate for Jira Cloud
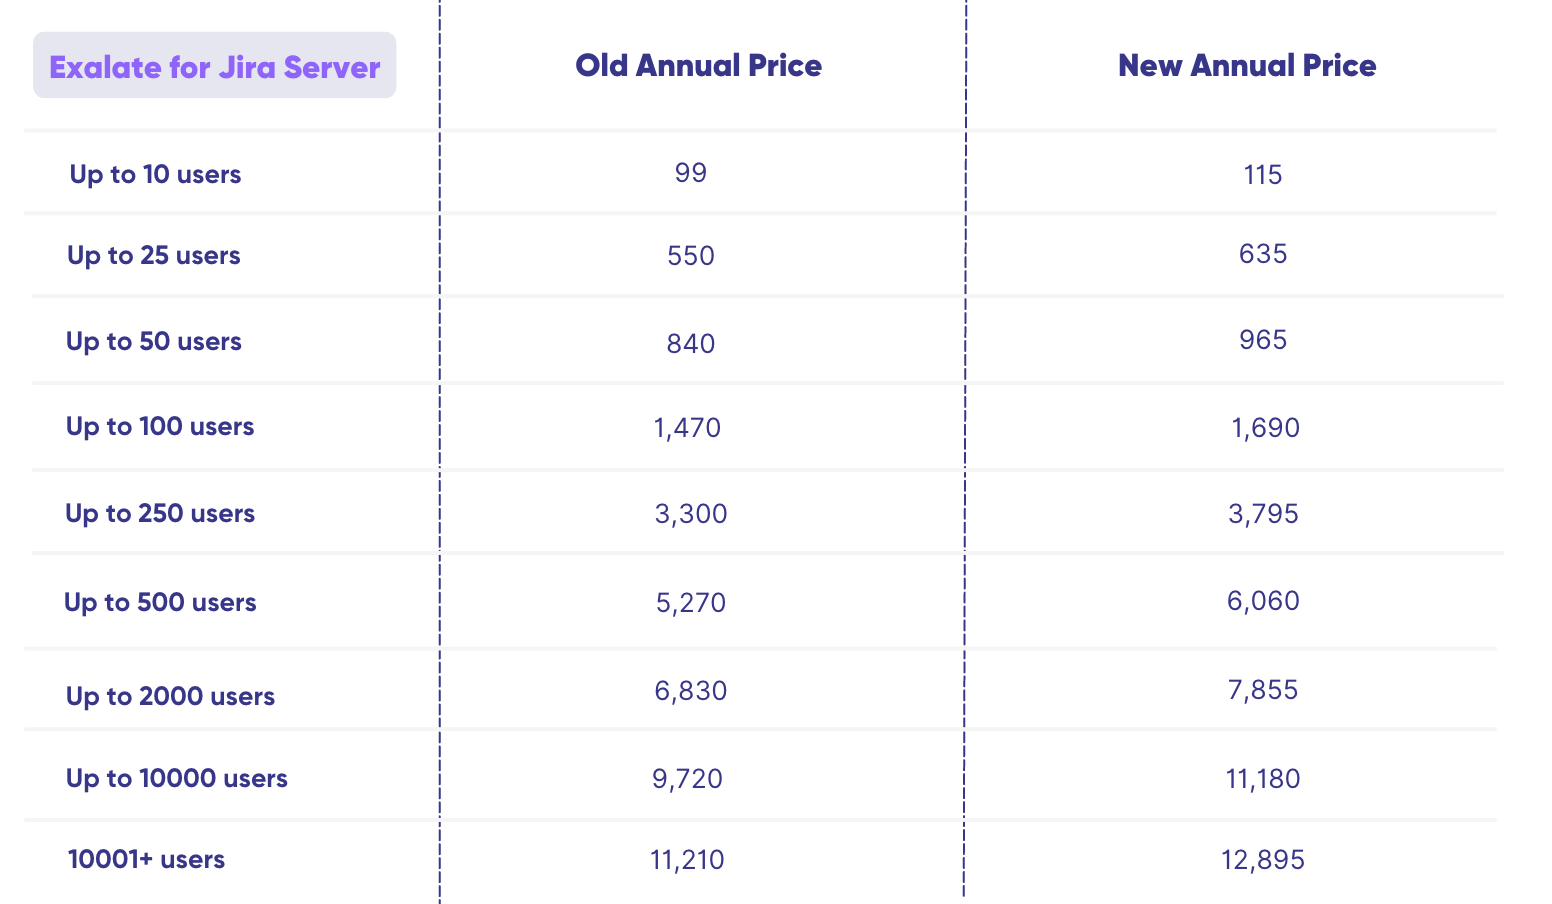
Exalate for Jira Server
Exalate for Jira Data Center
Exalate for Other Systems
FAQs:
Can I still purchase Exalate at an old price if my quote is already issued? Yes, if your quote is still valid.
Can I request a quote with an old price before February 15? Yes, you can still request a quote before February 15. Quotes are valid for 30 days.
Can I purchase a subscription for more than 1 year at the old price? Yes, that is possible, if you ask for a quote before 15 February and the payment is done before the quote is expired.
Does it mean I should pay the new price when the renewal time comes? Yes, after February 15, 2023, the new prices apply to renewals.
This article was written by Celina Kuziemko from Appsvio.
HubSpot is one of the most popular and intuitive CRM platforms. It powers customer support, sales, marketing, and other teams by using customer data. You can simply examine the data you need for automated reporting on sales activity, productivity, and salesperson performance.
Now imagine it in combination with Jira, one of the best project management tools used by different teams. Yes, it’s time for a HubSpot Jira integration.
How to Boost your CRM with a HubSpot Jira Integration
HubSpot Jira integration is all about speeding up the ticket service and Support Team’s daily work. Teams using HubSpot and Jira separately had to hop between tabs to check out clients’ deals, contact data, etc.
It’s a challenge for marketing, sales, and support teams to manage data correctly in order and find the data you need right away and not do it manually back and forth (like asking or looking around for some customer’s data).
Imagine a situation where the Support Team works with Jira and HubSpot, toggling between the two. And there are new tickets from customers waiting to be resolved.
First, you need to check who the customer is, which company that is, what deals you have with them, and how you can contact them.
You simply waste your time going back and forth between Jira and HubSpot looking for information you already have.
Wouldn’t it be more convenient to have all the data you need in Issue view? It would simplify data management and please your customers with fewer questions and faster service.
There are some significant benefits of a HubSpot Jira integration that are worth mentioning before we move to setting up the integration:
The service agent doesn’t lose context.
Service representatives can avoid hopping back and forth between Jira and HubSpot to look up information about the client who is filing the problem. Furthermore, they would need to check this information in available reports on the Vendor profile without integrating data from Atlassian Marketplace with HubSpot. Only some agents have access to do so.
Additionally, product owners can benefit from customer data. Additionally, they typically do not have access to the Marketplace.
The customer doesn’t feel overwhelmed by the number of questions.
On the issue view, you have immediate access to all the customer-related data you require. By doing this, you may avoid adding a dozen or more fields to the request form that would question the client about the apps or hosting they use. The agent is under no obligation to converse with the requester and inquire about licensing concerns. The service representative is totally committed to assisting the reporter and resolving the issue.
You have access to data from HubSpot.
Each team member has access to data in HubSpot. The Jira administrator chooses which values are displayed on the issue for security concerns. As a result, no one will need to be given access to HubSpot.
Agents also don’t need to bombard the sales team members who have access to HubSpot because they already have access to all the data they require. It’s important to note that the integration functions whether the business employs a free or premium HubSpot license.
As you can see, it’s not overstated to say that a HubSpot Jira integration means a single source of truth for customers’ data.
Thousands of contacts, data, and deals can be automatically displayed in one tool (Jira). Tickets can be solved faster by giving your teams easy access to the data they need.
You can set up a Hubspot Jira integration with apps available on the Atlassian Marketplace. Depending on whether you need to use HubSpot or Jira more, choose the one that suits you.
In this article, we focus on an app that supports Jira.
It fills the gap of missing integration for companies that use both tools: Jira Cloud and HubSpot CRM.
This tool is dedicated to teams that use Jira at first and then HubSpot because integration is done in Jira views. This integration works for free and paid HubSpot accounts. So let’s check how it can help boost your CRM.
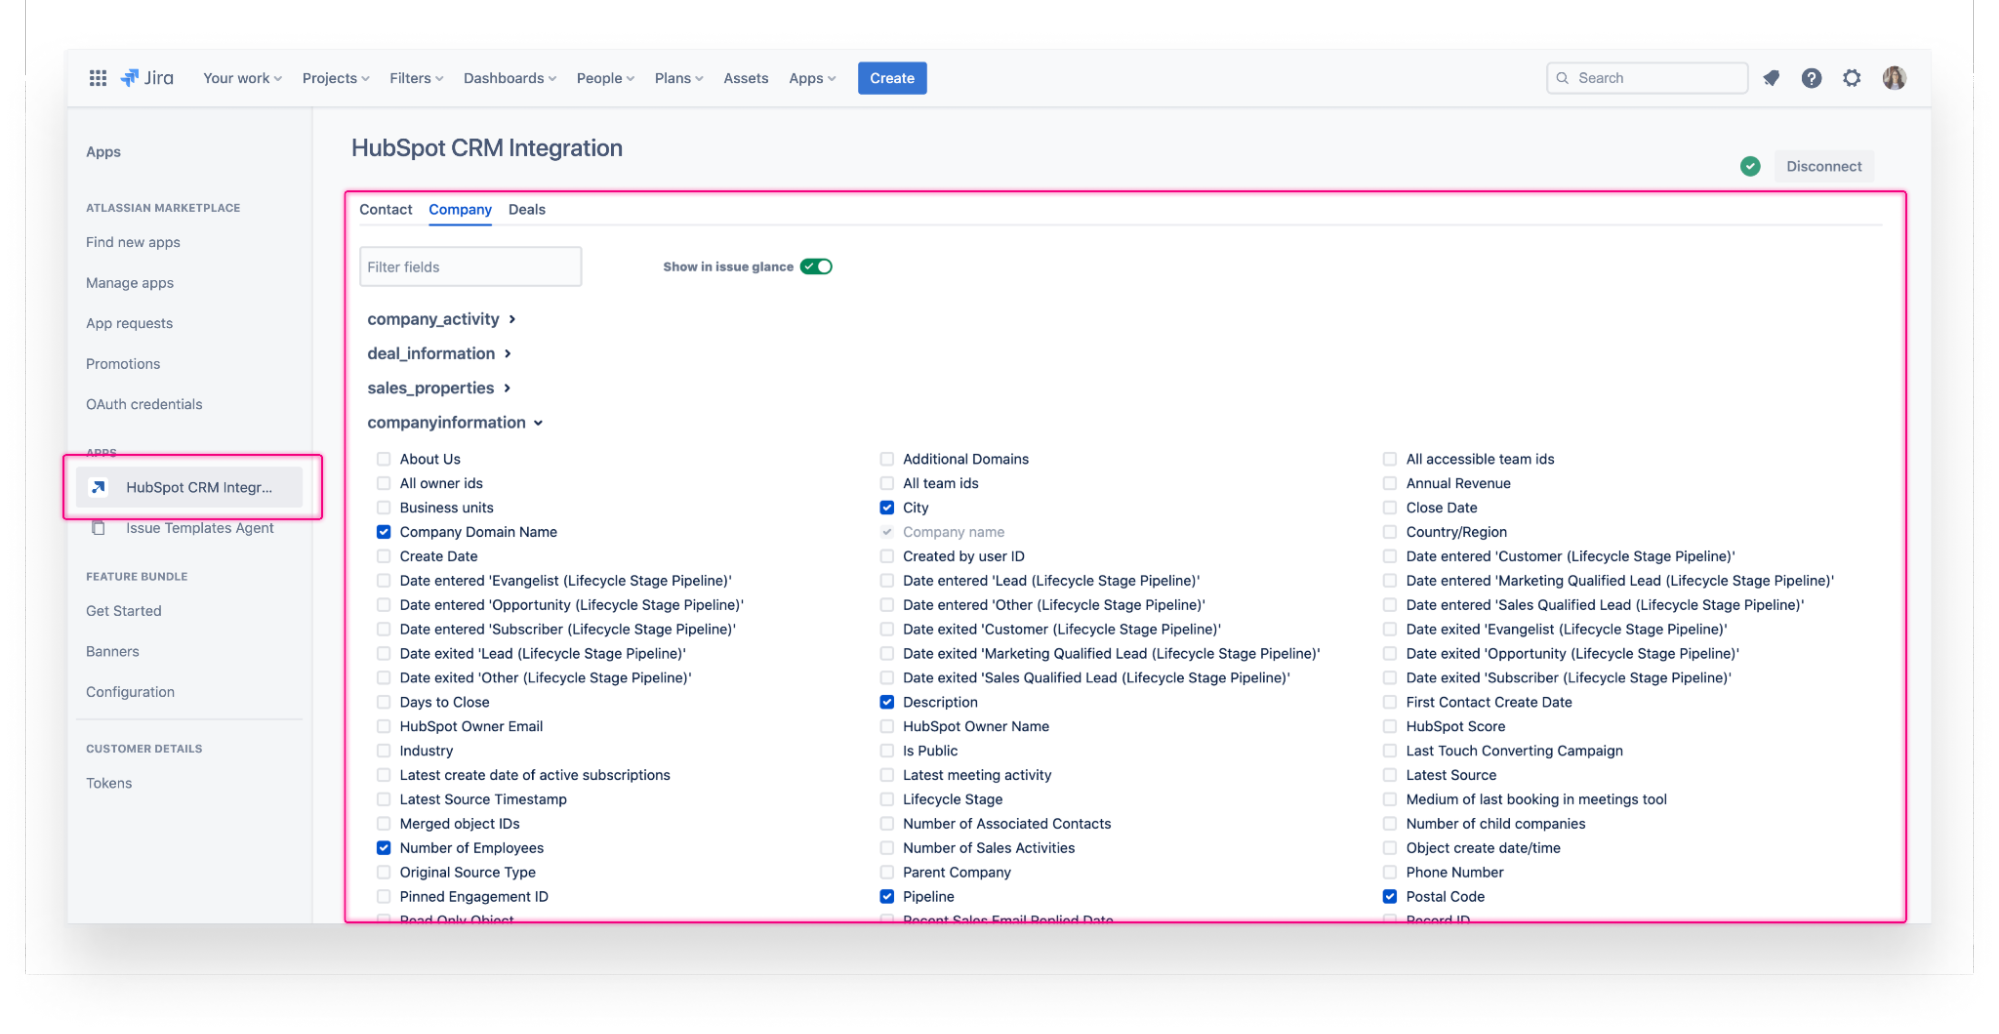
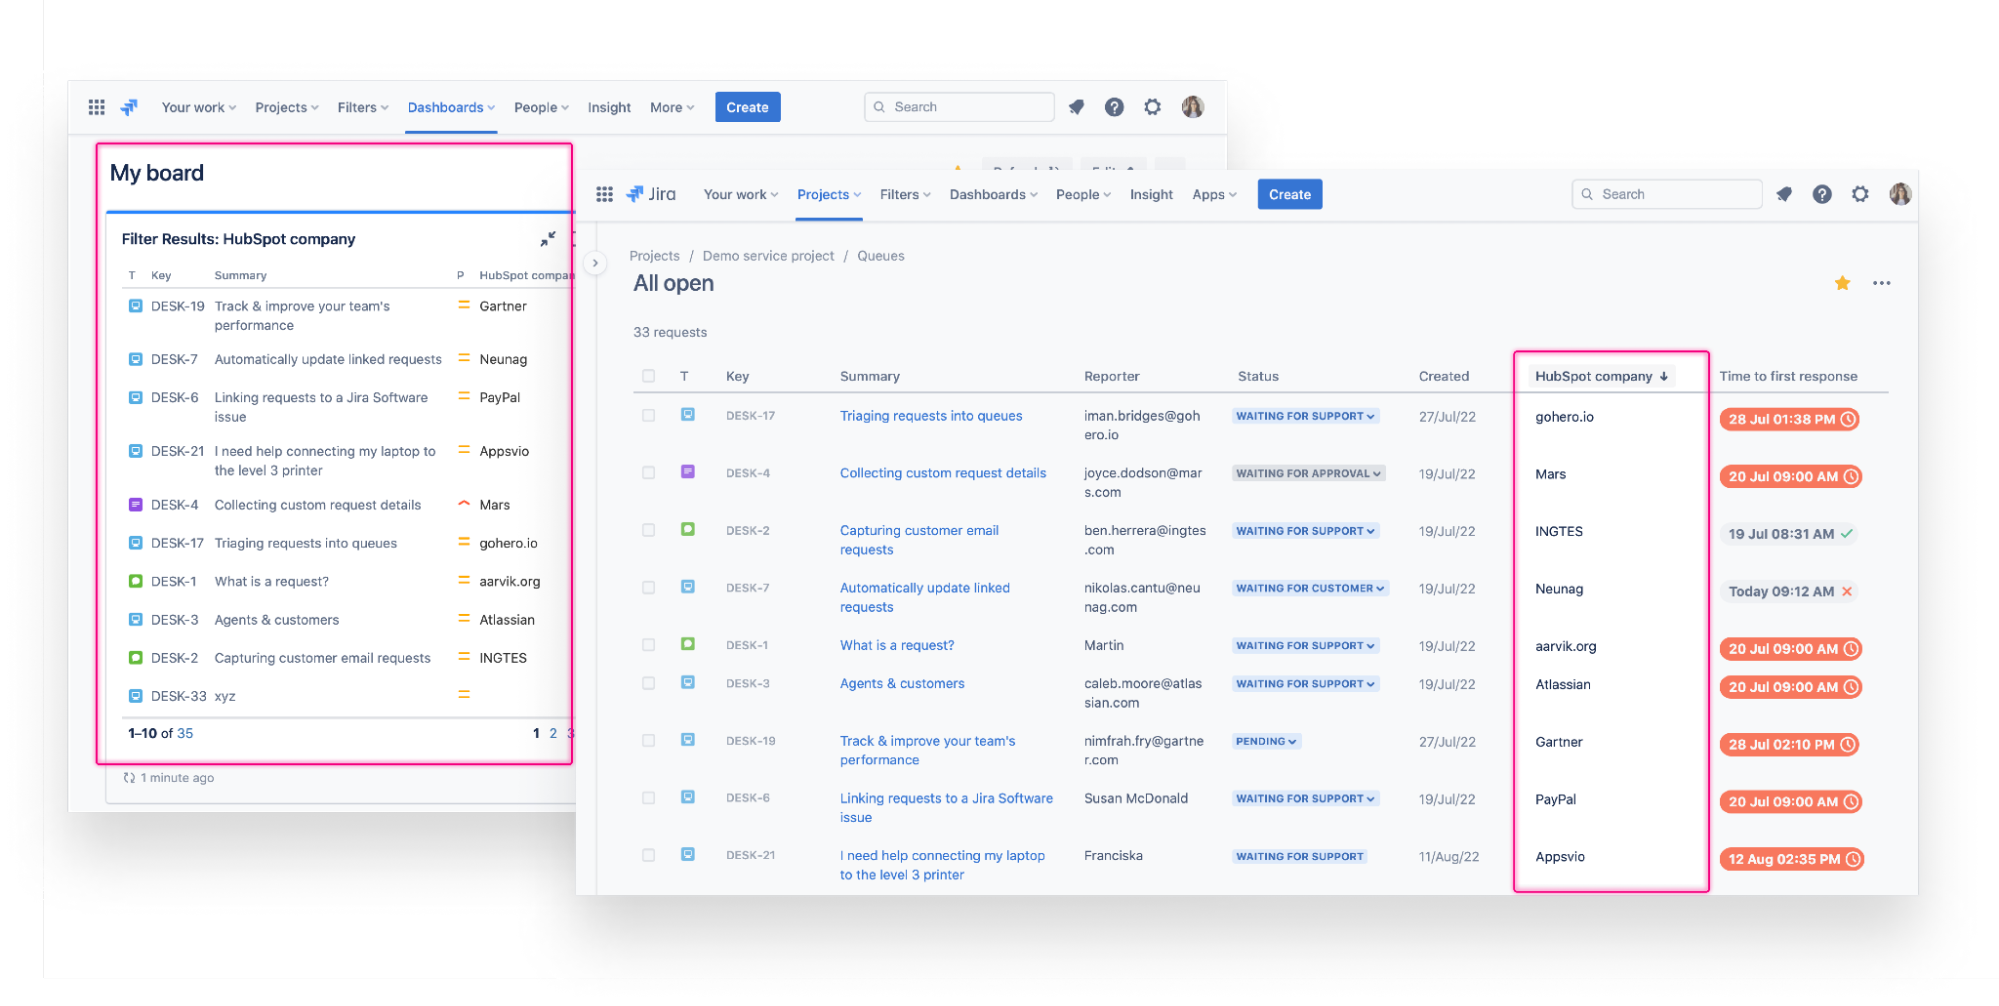
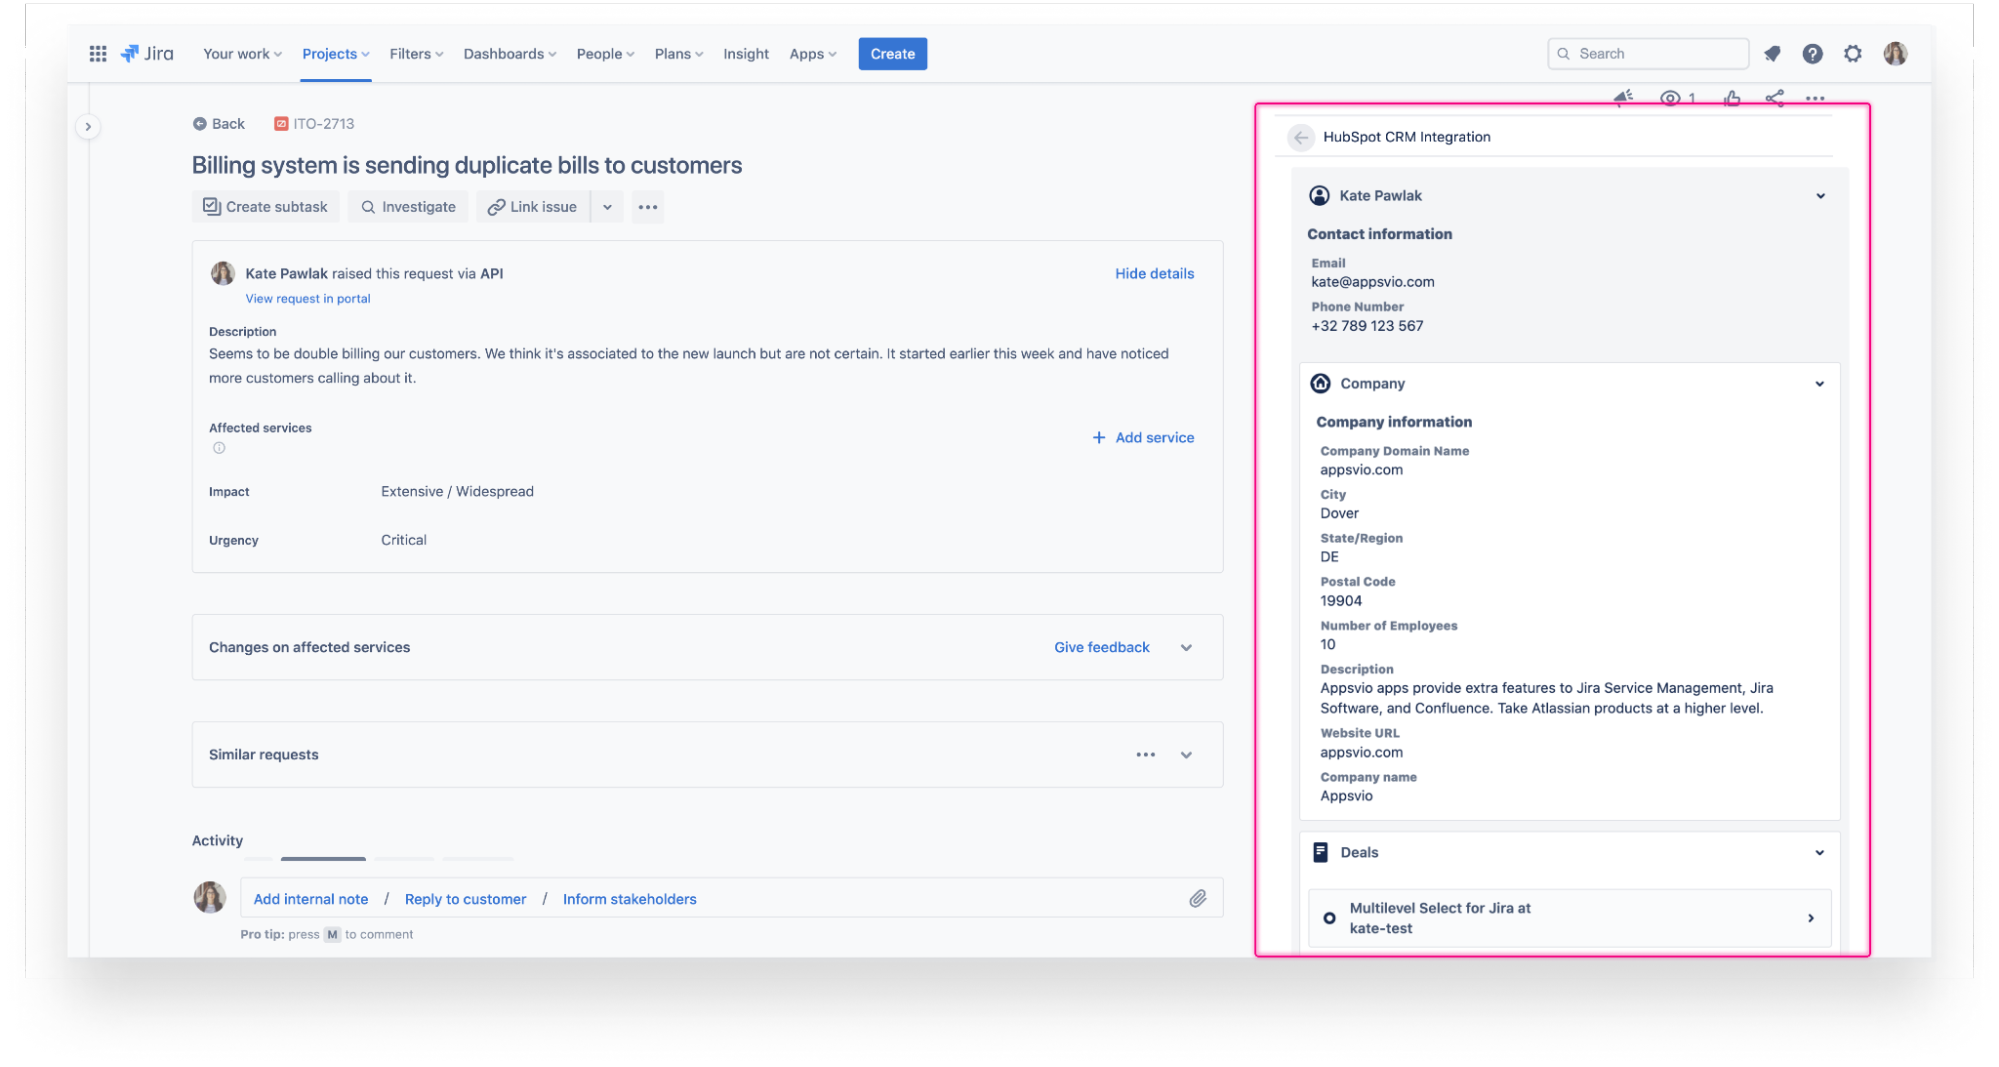
The integration lets you view rich customer data within Jira Cloud issues without switching between tools.
Users can choose HubSpot properties to display on the issue view. All groups from Hubspot are available to select. It is possible to view the reporter’s properties from the following objects:
Contact
Company
Deals
Users can customize and choose which properties should be displayed on the Issue View. As you can see, plenty of them and every single one existing in HubSpot can be added to Jira. Deals Type, revenue, activity, content, email, .etc.
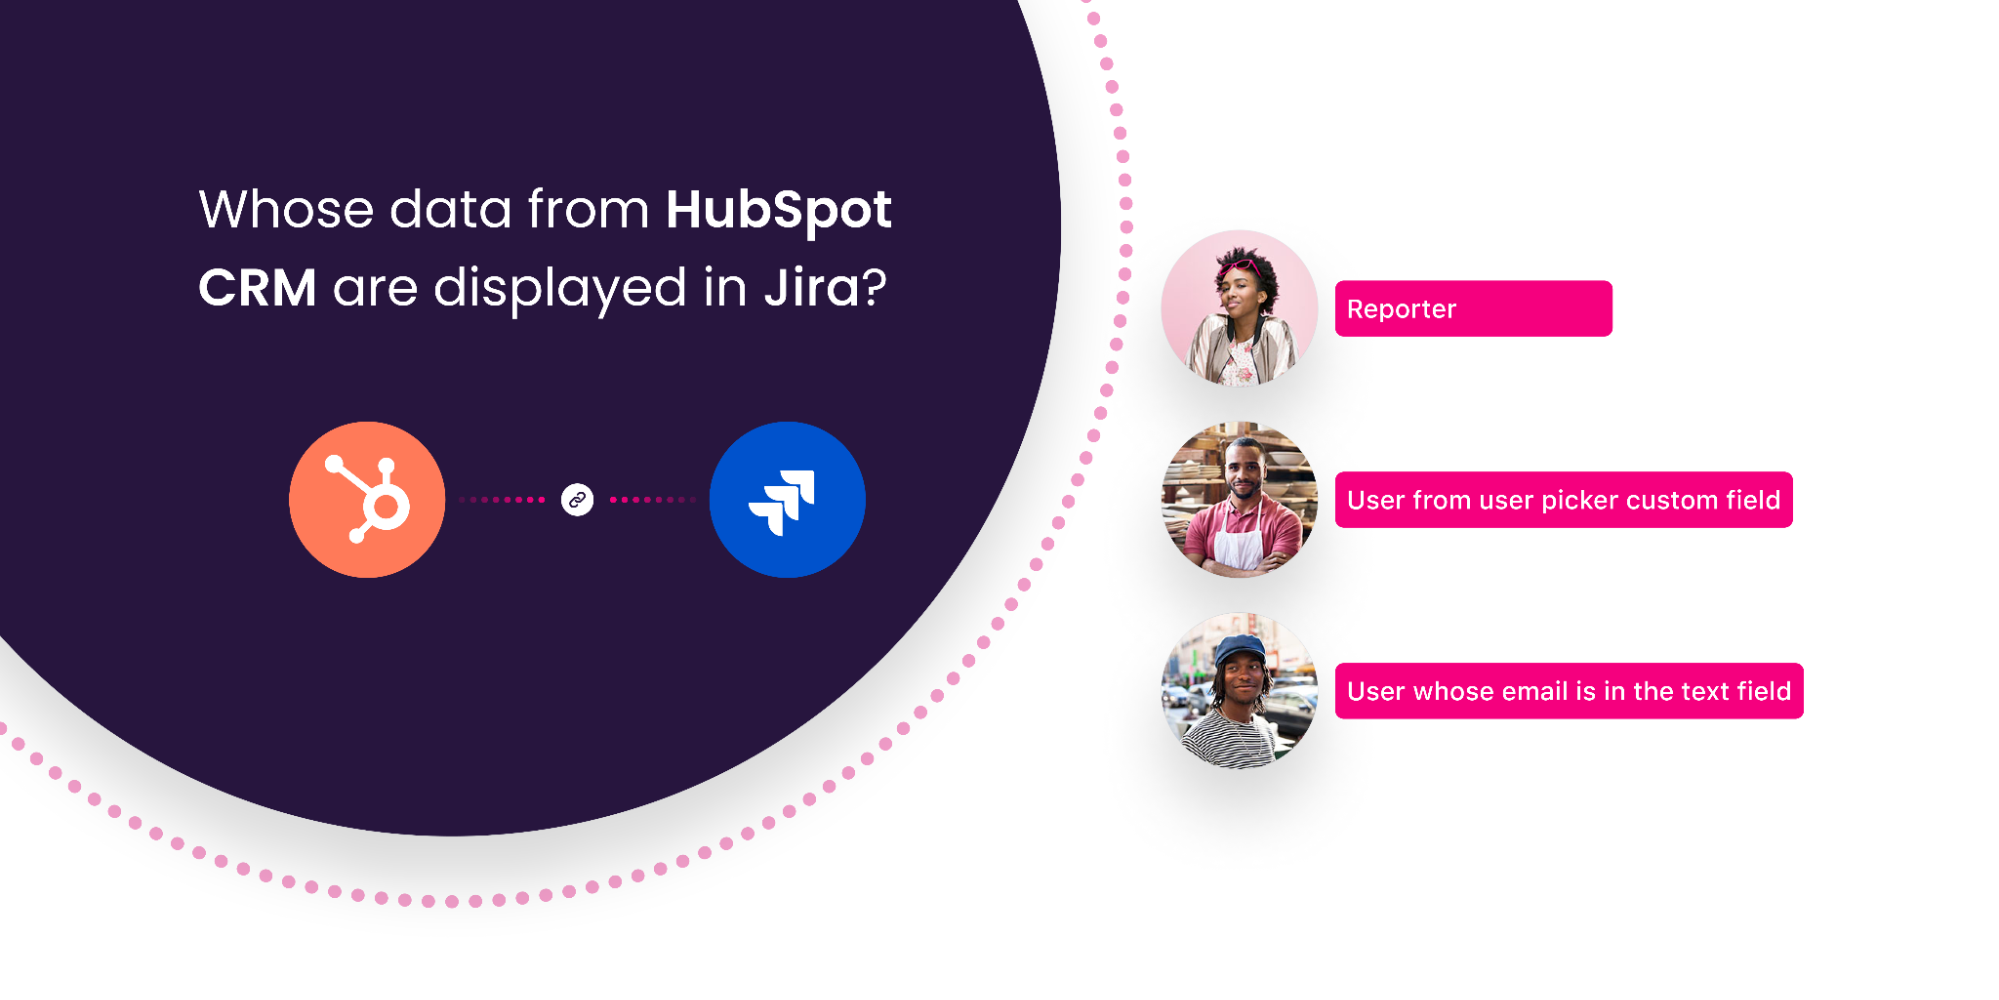
It is also possible to choose another user whose data is displayed. Not only the reporter’s data can be used, but also the person in whatever user picker field with email in a textbox can (it all depends on the configuration the user needs).
HubSpot CRM for Jira provides 2 custom fields: single and multi-select type.
The user defines which object it should display: Deal, Contact, or Company. After adding the field to the view, it is possible to mark that the specific ticket refers to a particular company.
The objects are linked with the HubSpot object right away on the issue view, so it’s easy to find it in the CRM system.
What’s more, thanks to the fact that it is a custom field, it’s possible to use this data in the issue navigator, quickly search for requests, create filters, and later show them in fields on the dashboard.
The screenshot below displays all support tickets that have the HubSpot Company field filled in. This way, we can easily make some boards with statistics.
The properties are displayed right in the issue view. But what if data in properties has changed?
When the data is altered in HubSpot, for example, when a contact person is replaced or changes last name due to marriage or when a client has a new phone number, it will automatically update in the Jira issue view. So what’s happening in HubSpot reflects in Jira.
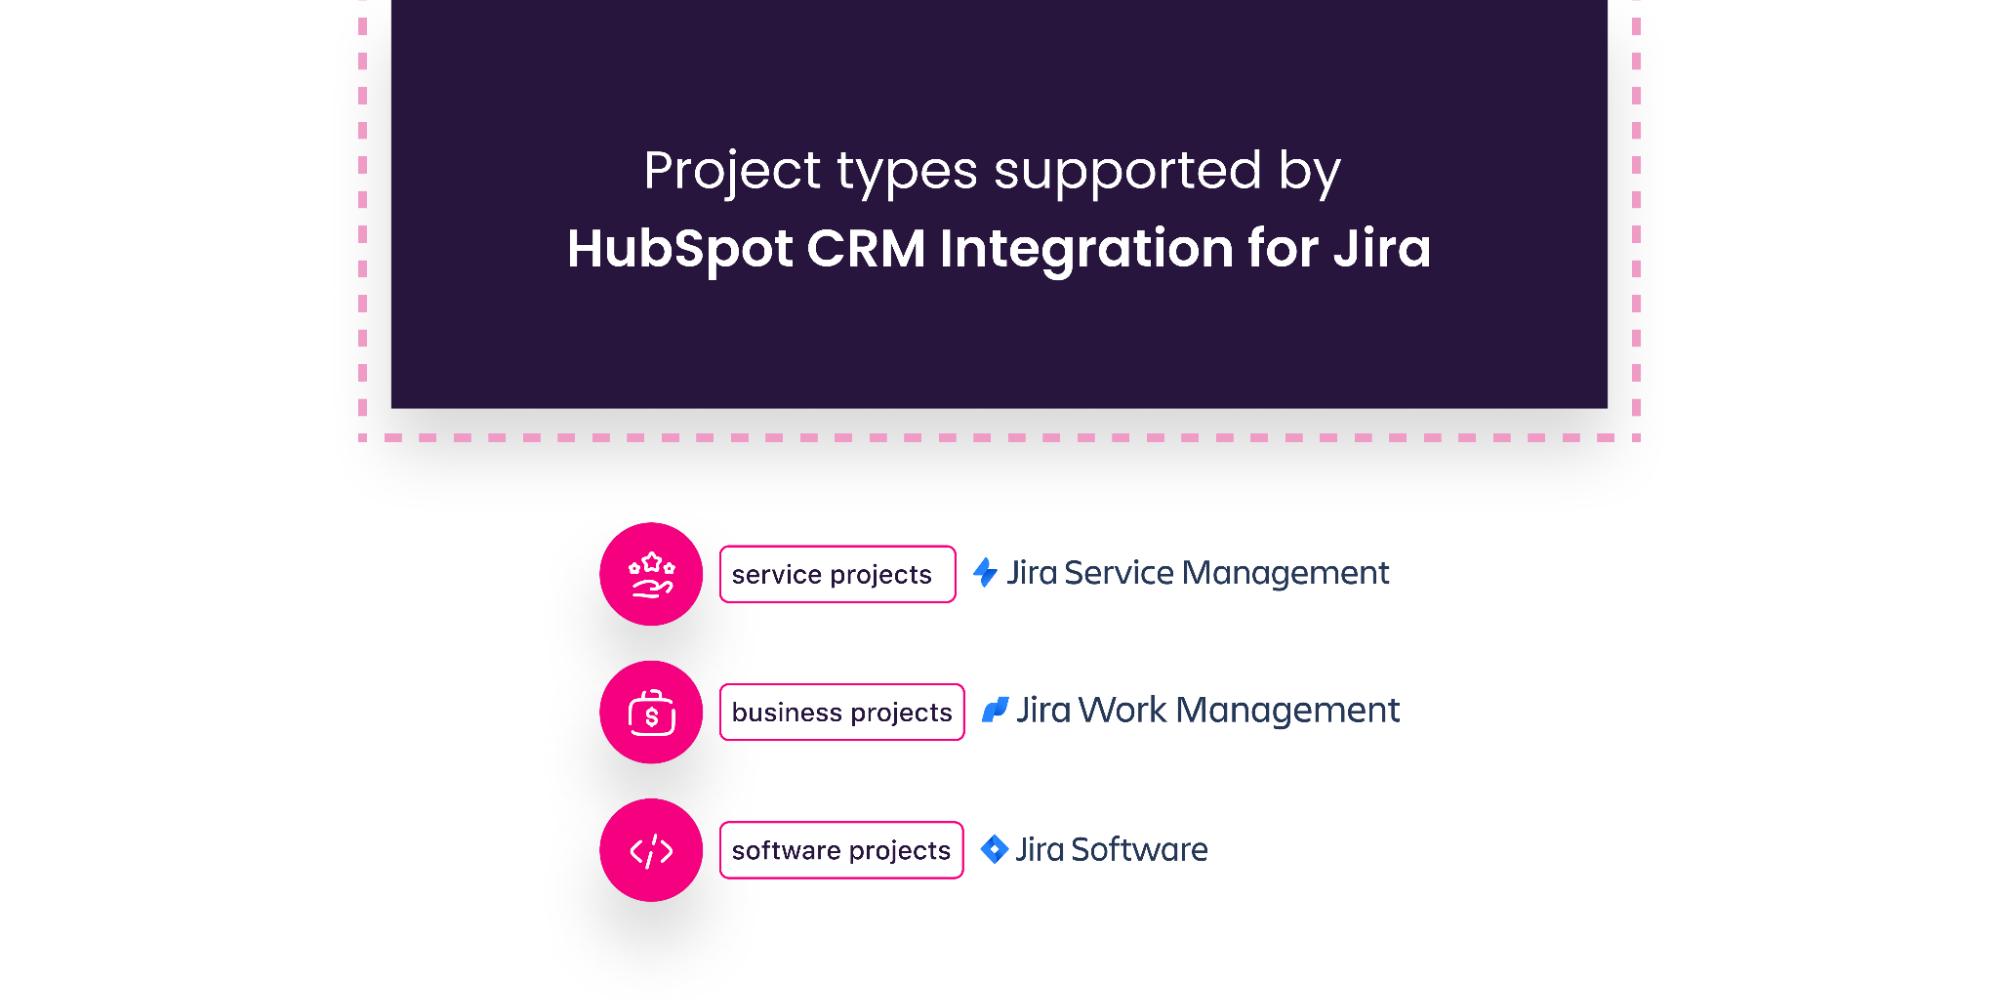
All HubSpot contacts are matched to Jira users and customers via their email addresses. As a result, you can see information about the reporter in all types of projects: business (from Jira Work Management), software (from Jira Software), and service (from Jira Service Management).
HubSpot Jira Integration Common Use Cases
Optimizing Support Service
One of the typical use cases is actually the case of the app developers themselves which led to the birth of HubSpot CRM Integration for Jira.
Appsvio deployed a CRM after forming their business and they went for HubSpot CRM. In addition, they use Jira Service Management’s support channel for communicating with customers. Obviously, they needed to switch between the 2 platforms all the time.
For instance, a customer would have a query about licensing an app without mentioning it specifically in the ticket. So the team had to copy the customer’s email, sign into HubSpot, and check his information there, including details regarding the product he had purchased.
Appsvio initially entered all the information of their clients, both potential and current, manually. Obviously, checking for changes requires a lot of effort and regular attention.
After reading the reports, they copied the data from the Vendor profile on the Atlassian Marketplace. Each license, whether evaluation-only or commercial, is designated as a Deal in HubSpot.
To maintain order, they made a new properties group that gathered information from the Marketplace, such as App, Hosting type, Maintenance window, and License size. Getting Atlassian Marketplace and HubSpot CRM to synchronize was too much manual work and Appsvio wanted to display this data on Jira problems. But that presented one additional issue.
That’s how the app was born. Creating a HubSpot Jira integration app allowed them to improve the support experience directly, impacting customer experience indirectly as well.
Improving Processes
The other case is a story of 2 employees working in different teams. Only one has access to HubSpot due to license limitations.
Kate is a service agent, and she receives a ticket from a customer about an app license. The customer hasn’t mentioned which application he is referring to. So Kate has to ask the Sales team for help because she doesn’t have access to HubSpot. It takes 3 emails to find somebody who can help and to get an answer.
Now, if a HubSpot Jira integration was in place, Kate could still have the data she needed without needing HubSpot access.
And the whole process would have been much faster and less time-consuming for others.
Speeding up the ticket service means customer satisfaction and eventually reduces the costs, too.
With a HubSpot Jira integration, Kate could do it on her own and answer the customer faster without involving other teams.
Conclusion
HubSpot CRM allows you to handle an unlimited amount of users and data and guarantees effective activity management within the marketing and sales teams. Jira on the other hand is the go-to tool for many developers and engineering teams.
So in this article, we discussed why we need to integrate these 2 systems and how a HubSpot Jira integration can make collaboration much smoother between different teams without them needing to leave their environment. The teams no longer need to manually copy and paste data from one platform to another.
This article was written by Anna Odrynska from AlphaServe.
Customer service is much more than a warm and pleasant greeting, it requires a strategy and tools that facilitate communication between customers and companies. One of these platforms is Zendesk which offers customer interactions, anticipates needs, optimizes profitability, increases sales, and runs new customer acquisition campaigns.
But what happens when customer service needs in-depth professional analysis? Out of this need, Zendesk Power BI Integration creates common ground for deeper business analysis and better customer understanding.
5 Reasons to Connect Zendesk to Power BI
Zendesk is one of the biggest and most famous Customer Service tools in the world. This platform connects different modes of communication between the customer and the company through a ticketing system.
Power BI is a Microsoft analysis service that offers interactive visualizations and business intelligence in a simple interface so that users can create charts and dashboards by themselves.
For companies that need more reporting power and analytical muscle than the Zendesk system offers by default, Zendesk Power BI connection is the next level in business intelligence.
With this integration in place, you can gather, analyze, and visualize Zendesk data in Microsoft Power BI, giving better insight into business operations and customer interactions, therefore enabling companies to make more informed decisions based on real data.
Connecting Zendesk to Power BI provides an analytic solution with a number of benefits:
Generate Zendesk Custom Reports and Data Panels
Integrating BI tools with Zendesk allows for optimizing, cleaning, exporting, and transforming Zendesk data into visual dashboards. That will make it possible to analyze all the information in depth and find patterns. For example, export tickets from Zendesk to Power BI provide its visual Zendesk custom reports that help create successful projects and make informed predictions. That increases the service level and productivity of the company.
Create, Direct, and Optimize Marketing Strategies
Zendesk data export to Power BIoffers a global vision of the customer support process, which provides insight into the purchasing behavior of each client with dashboards, diagrams, and reports. As a result, it enables companies to correct and redirect those that did not have good results and promote those that have.
Control Team Productivity
Zendesk controls your sales and customer service activities, hunts down important data about the team’s productivity, and signs the amount of work. In the case of Zendesk Power BI integration, you achieve key insights that aid the customer service team with a detailed review of ticket metrics, statistics, adjustments, etc.
Increase Data Range
Zendesk works well for statistical data reports of customer interactions. But it’s lacking when a business needs to create insightful and comprehensive reports for complex business analytics.
Exporting Zendesk data to Power BI and combining it with other software data sources permits receiving in-depth structured charts and multiple data visualization with focused insights for further complete analysis.
Update Data in Real Time
The Power BI platform allows users to update the dashboards in real-time once in a certain time frame. It provides an opportunity to point out problems in Zendesk customer service and to identify opportunities for further solutions.
Any report or dashboard can display and update data and images in real-time when Power BI offers scheduled refreshes for this.
How to Set up Zendesk Power BI Integration
There is no native integration between Zendesk and Power BI. In this case, a solution like Power BI Connector for Zendesk by Alpha Serve comes into play. It provides an easy setup to get started.
So here we will show in detail how to connect Zendesk to Power BI.
You don’t have to be techy to be able to set up this integration. It takes just a few minutes to start working.
So let’s get started!
First, you need to install the application. So go to Power BI Connector by Alpha Serve page, select the plan and press the Free trial button.
Follow the installation steps. After the application has been installed, it should be accessible in the Navigation panel.
Configure Power BI Connector for Zendesk
You need to configure the application once you’ve installed it.
Follow these steps:
Connect the Power BI Connector app to your Zendesk account;
Enable the application and set up plans and billing. Roles and restrictions for Zendesk users can also be applied on this step.
If you haven’t ever created a Zendesk API Access token, you need to create it as it will be requested during the login process to Power BI.
You will now be able to create data sources and export your Zendesk Support data to Power BI.
In addition, you can connect your Zendesk Sell module to the Power BI Connector app and export your sales data from Zendesk Sell to Power BI using Power BI Connector.
Now you’re ready to start your first Zendesk data export – you just need to create your first data source!
How to do that?
In the Navigation panel, click and open the Power BI Connector for the Zendesk app. Next, choose Connectors.
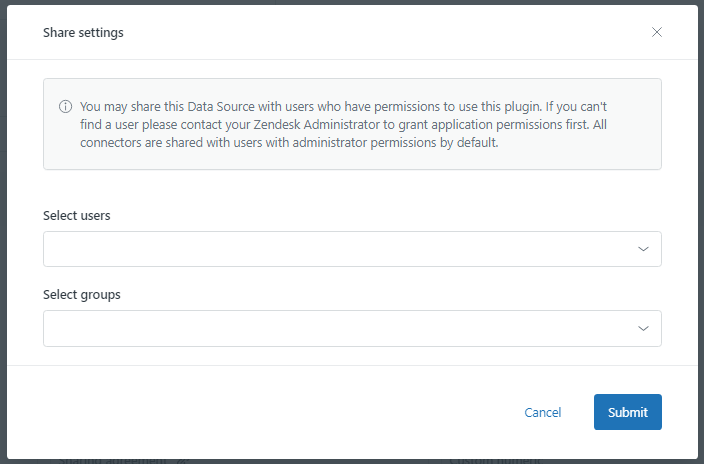
In the newly opened page, select Create a Data Source. Add the Name, and Description, and choose User or Groups to Share Settings.
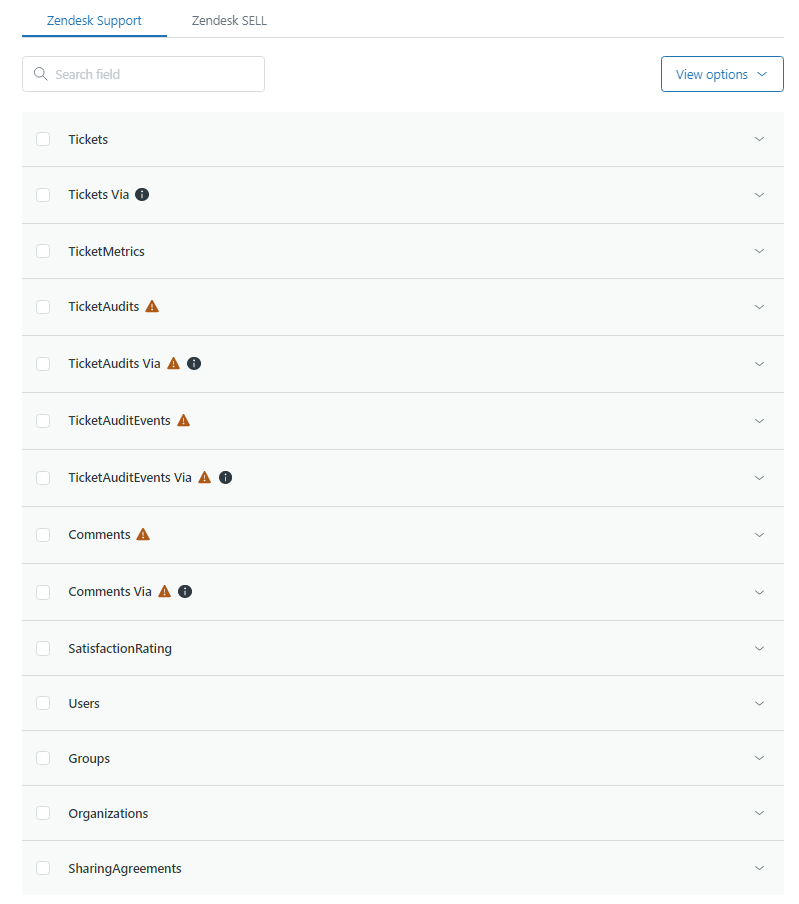
You can easily navigate between the Support and Sell tabs where you’ll see all the fields available for export.
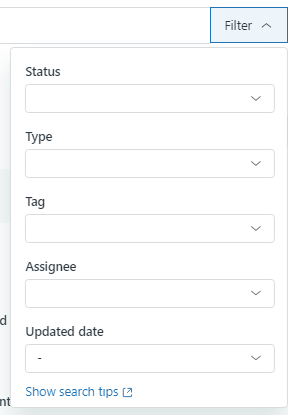
To narrow down the data selection, pick only the fields you need for your Power BI Zendesk report. You can also apply filters to choose a certain date range (for example, by ticket status, type, tag, etc):
Press the Save button to confirm the changes.
Import Zendesk Data to Microsoft Power BI
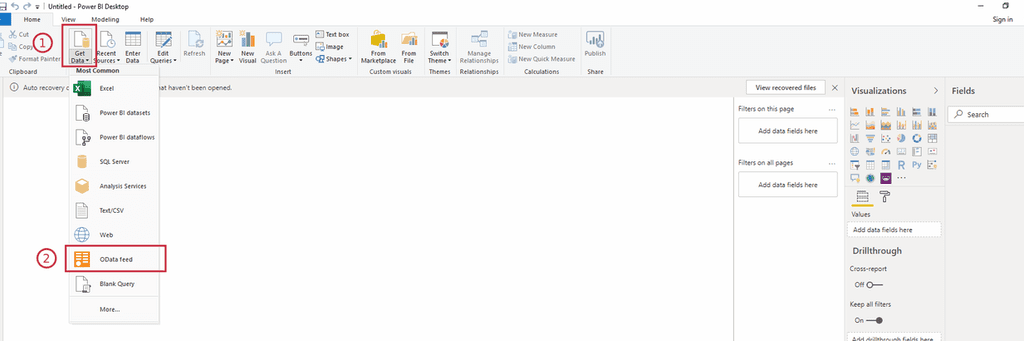
To work with Power BI, use a URL to import data to your Power BI Desktop, generated by Power BI Connector for Zendesk.
Copy the URL of your connector, generated by the app.
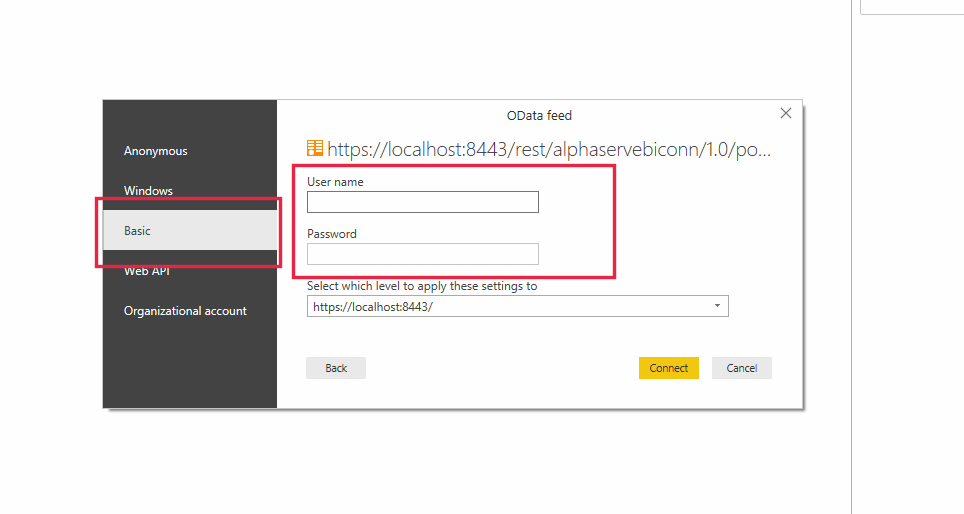
Open Power BI Desktop and click Get Data (1) > OData feed (2) and paste the URL.
Sign up by basic authorization in Power BI with your personal Zendesk login information (Email as a username and API token as a password).
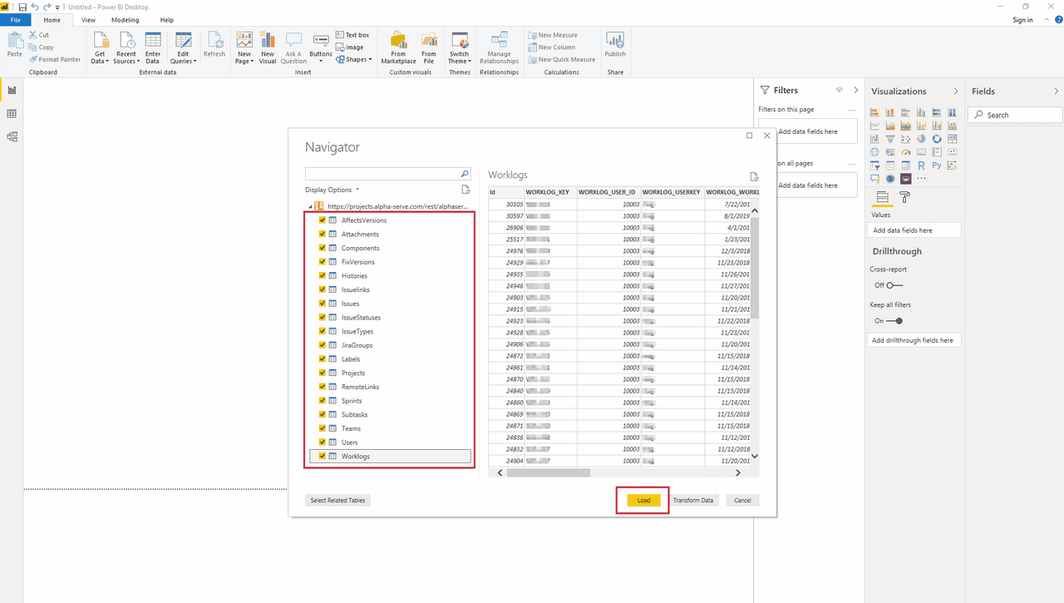
Choose the necessary tables and press the Load button.
Thereupon, Zendesk data will be loaded into Power BI.
Now you can start creating visual dashboards and graphs based on imported Zendesk data.
To do this, select the visualization type and choose the data you want to display.
Power BI Zendesk Connector Use Cases
As businesses grow, it becomes quite difficult for companies to manage the data that is generated regularly. That becomes a challenge when a user wants to engage Zendesk data to drive business decisions.
For this reason, there is a need to implement a BI system that effectively analyzes data and helps businesses discover useful information, makes reports, suggests conclusions, and supports better decision-making.
Here are the most common use cases for the Zendesk Power BI connector.
Zendesk Ticket Analysis and Support Agent Performance
Integrating Zendesk with Power BI permits you to visualize your data into dashboards with complex Zendesk ticket reports and support agent performance analysis. The power BI service desk is crucial in terms of individual performance control as well as agent use.
Performance index can help customer support departments determine which support agents are doing the best, just as to insight ways for additional required refinement. These metrics will help increase your team’s efficiency, and as a result, it will improve employees’ and customer service together.
Identify Trends In Zendesk Ticket Volume by Support Channel
The number of tickets resolved is one more important indicator of success. If things go well, open and solved tickets trend lines go parallel in the service desk. Tracking these metrics per week ensures that you are up to date with the latest market trends according to ticket volume.
For instance, if solutions are steadily behind, obviously you will have to recruit more employees or search for different solutions to improve efficiency.
Customer Evaluation Survey
Zendesk in cooperation with Power BI offers a global vision of the sales process and other departments in one place.
Another critically important metric for customer service is customer satisfaction ratings. Companies can measure indicators of satisfaction with customer opinion polls which can manage following ticket solutions. As soon as customers complete them, the dashboard will change according to successful interactions or will point out tickets that should be improved in terms of customer expectations.
Final Word
Zendesk is a platform with a lot to offer. However, its integration with Power BI can give the best of both worlds in the same console upgrade customer service, and raise sales targets.
Zendesk Power BI integration allows us to improve the relationship with a potential customer, deeply learn customer interaction, and identify weak points through multiple dashboards with complex reports and the ensuing insights.
Real-time visualization of Zendesk data on the same dashboard makes it easy to find and suggest immediate solutions based on reviewed information that improves sales optimization efforts.
As a result, all this makes it possible to improve your sales and customer service.
NVISO is a global cybersecurity company based in Brussels, Belgium with offices around Europe. It helps its customers prevent, detect, and respond to security issues in an optimal way to achieve, what they call, a stronger security posture.
As a Managed Security Service Provider, NVISO provides professional services ranging from security design and assessment to incident response and threat hunting.
They have a 24/7 incident hotline in place meaning that the customers can get emergency support whenever there is a breach or a security issue.
NVISO has also designed a third-party risk assurance framework that includes the initial evaluation of the risk profile of the supplier. It is used to tailor the depth of the assessment and can also optimize the cost of each assessment.
When it comes to integrating multiple systems, especially in the context of cross-company integration, security becomes a highly critical issue for a lot of users. As an experienced expert in the field, NVISO aims to address these security risks by ensuring that communication between any two parties is safeguarded.
Alexander Sinno, Head of Managed Security Services and specialist in building cybersecurity fusion centers at NVISO, tells us more about his experience with Exalate and why it has been a good fit for their set of tools in the cybersecurity domain.
Why Exalate? • Smoother, streamlined, and secure communication with customers • Cost effectiveness • High customization • Frictionless experience • Workflow optimization • Ecosystem benefits • Excellent support
Challenges
• Communication gap between MSP and its customers • Security risk of single-point contact • Ticket-based security incident management • Learning curve and frustration of adding another ITSM tool
Before adopting an integration solution, the typical workflow for NVISO was to raise a security incident to a customer mainly through tickets and emails. Which actually came at the risk of being reliant on a single point of contact instead.
It was much more efficient for NVISO to have multiple points of contact to ensure that somebody would pick up that ticket, add it as a task, and start the communication. That could allow for immediate ticket creation in their customer’s ITSM ticketing tool so they could easily communicate back to their analysts by raising a comment in their own tool.
The analyst would then respond back to the customer by placing different types of attachments for the customers to see. Since the customer could also raise attachments back to NVISO, the process would be a lot less confusing for both sides.
With the fast-paced growth in the work management systems, it’s crucial to have an integration solution in place. Everybody has their own solution and workflow and they wouldn’t want just to leave their environment and work in a new one.
Alexander explains that some organizations already have 2-3 ITSM tools, so adding yet another tool was not an option for them since it can quickly get frustrating and messy as they’d need to learn how the new tool works.
That’s why it made more sense to stick to their own tool and integrate it with the other one(s).
Solutions
• Building an in-house integration solution • Adopting an integration solution
So NVISO started the integration journey by building its own solution. The solution actually worked but the maintenance was quite expensive and it made more sense to work with a partner like Exalate who had a lot of experience in the field and was overall more cost-effective.
The reason why NVISO started using Exalate in the first place was to give their customers the autonomy of staying their own tool while integrating with NVISO’s Jira. Because their customers wanted to give NVISO access to their essential data without going back and forth via email. And that could simply be implemented by an integration solution like Exalate.
“We have had an excellent customer experience with Exalate. They are always responsive and ready to resolve any problems we or our customers might face.”
Alexander Sinno, Head of Managed Security Services – NVISO
It was highly crucial for NVISO to make sure data was handled properly due to GDPR and data residency purposes, especially since they dealt with customers’ security incidents.
“The advantage of Exalate’s decentralized architecture is that it’s not like a new learning curve for the customers to get into a new platform and figure out how they need to operate. They can just operate as they normally do, and that makes a huge impact on the overall outcome of security incidents.”
Alexander Sinno, Head of Managed Security Services – NVISO
Results
• Autonomy of systems (working from the comfort of a familiar environment) • Cost-effectiveness • Workflow optimization • Easy network expansion
NVISO works with customers who use multiple task management systems like Jira and ServiceNow. They manage their security incidents and take care of their cybersecurity in general. And as Exalate grows and supports more platforms, NVISO will build new service templates to ensure that each customer’s integration looks exactly the same depending on the tool they use.
A lot of MSPs face some difficulty when it comes to ITSM syncing. But for NVISO, Exalate soon became a differentiating value since they were able to approach their customers using their own ITSM through Exalate.
“Exalate is a competitive advantage for us as an MSSP since it enables us to have a close and smooth collaboration with our customers and find workaround bottlenecks. That is something both sides appreciate a lot because we are not merely another partner to our customers but are in fact an extension of their team. And that is NVISO’s strategic vision as a managed security service provider.”
Alexander Sinno, Head of Managed Security Services – NVISO
Now everything could be handled in a clear two-way communication between the MSSP and the customers. That has specifically made the whole process a lot smoother for their customers.
Since customers don’t need to switch or log in to another tool and can have NVISO take care of their incidents via Exalate, they are actually interested in implementing such an integration.
“Expanding the network is quite easy with Exalate. Every customer wants this, so I could see that in the future we have the majority of our customers on Exalate moving forward because that’s the most optimal way for us to work with them.”
Alexander Sinno, Head of Managed Security Services – NVISO
Measurable Benefits
Being able to implement ITSM integration is actually a competitive advantage for NVISO as they can have a closer relationship with their customers. It’s like they’re just another person in their ticketing tool, having a conversation.
On the other hand from an operational perspective, it’s quite efficient for the analysts to be able to talk directly to multiple people (or a team of people) who are in one ticket queue in their ITSM syncing tools, their process, or their workflow that they are used to.
“The fact that Exalate is a very extensible and flexible product is quite an impressive feature for us. We can even build our own integration on top of it, and it actually shows that the developers and the engineers behind the product do really know what they are doing. Plus we have had an excellent customer experience.”
Alexander Sinno, Head of Managed Security Services – NVISO
Typical Use Case
One of the most typical use cases NVISO implements with Exalate for all its customers (as an MSSP) is to automatically generate tickets for them so then they can easily sync comments, attachments, statuses, etc between platforms.
They have actually made a template out of this (platform-specific) and they keep this template consistent so they can use it for the new customers who join their Exalate ecosystem.
NVISO actually positions itself as the central hub (working in Jira) and using Exalate, connects to its customers (who are mostly on ServiceNow).
As NVISO keeps expanding its Exalate network, more customers are proactively asking to join the network since the communication between the service provider and the customers is handled much more smoothly.
“Exalate is stable, flexible, customizable, and pretty easy to set up and use. And that is just what we need to expand our network.”
Alexander Sinno, Head of Managed Security Services – NVISO
Alexander explains that NVISO has got a lot on its roadmap, like expanding into monitoring for ICS (Industrial Control System), helping customers protect the power grid and the natural gas line, and things like that. They are counting on Exalate as the streamliner between them and their different security services.
They are also looking to expand their network with Exalate so that they won’t only communicate with one team but with multiple ones in different companies. In a way that the right team (the owner of the asset) can be contacted at the right time when needed.
Agile development helps software firms adopt lightweight, iterative development cycles. The development methodology emphasizes small, manageable teams with cross-functional collaboration for frequent updates and releases.
While Agile relies on massive cultural shifts in code development and testing, the model also necessitates a novel approach to implementing security in Agile.
This article discusses pertinent risks that arise from improper implementation of security techniques while delving into the best practices for securing an Agile development cycle.
Risks of Not Considering the Security in Your Agile Development
Agile processes typically open up production and development environments to distributed teams, leading to leakage of important information due to authorization creep. While Agile methodologies have evolved to accommodate innovation and time-bound delivery, security often takes a back seat since security assessments slow down development.
Security practices are particularly challenging to implement uniformly across the software development life cycle. The build cycle is continuous, and security tests need to be carried out outside the development workflow. This presents various security risks for the organization, including:
Insufficient Policies Governing the Use of Open-Source Components
The core principle of Agile is to discourage re-inventing the wheel. Additionally, teams are encouraged to include open-source and commercial proprietary solutions to shorten development lifecycles. However, though such open-source integrations offer various advantages, they also introduce significant security risks that may impact development.
A typical scenario is when developers are unaware of module dependencies and the number of code libraries they are importing. As a result, tracking open-source code changes is complex to manage, making it challenging to ensure the software works reliably and securely.
Reliance on open-source integrations also complicates extracting information about specific vulnerabilities and fixes discovered by the contributing community. In the absence of defined policies that govern open-source integrations, tool selection, and tech stack management, unveil challenges to mitigate threats.
Unlimited Access to Development Pipelines and Source Code Repositories
Agile promotes efficient collaboration among cross-functional, distributed teams that follow an iterative development approach. To ensure teams work on a single source of truth, organizations rely on public and private source code repositories for maintaining, sharing, and versioning codes.
While repositories enable seamless version control, teams often fail to interpret the version of source code in use, making it difficult to pinpoint specific vulnerabilities and apply the mitigation.
Additionally, when pushed into source code repositories, privately-crafted code exposes vulnerable entry points. Malicious actors target such exposed repositories to identify hidden functionalities and then combine them with reconnaissance tactics to orchestrate attacks.
Insecure Management of Sensitive Data
The modern Agile development process integrates multiple sources for organization-wide analytics and data operations. A complex integration requires systematic and accurate classification of data to control the level of access to sensitive organizational data.
Besides this, chunks of test data produced by the test team are often a real cut of the live data. Though such data is used internally for testing purposes, the absence of adequate data sanitization invites attack vectors to abuse vulnerabilities.
Most Agile organizations lack the policies to protect their data from internal threat actors. Due to the lack of strict data classification policies, team members are usually unaware of a comprehensive security requirement, data sensitivity, and their responsibility in safeguarding it. The collaboration rate required for seamless delivery also makes it difficult for a security team to implement security controls.
Security Methodologies in Agile Development
Agile software development introduces organization-wide cultural changes focusing on modular, more manageable cross-functional teams. While these changes enable development that is highly flexible and responsive to evolving requirements, organizations require the adoption of special techniques to secure code and deployment environments.
Following are some of the best practices to secure applications in an Agile environment:
Securing Agile Delivery Pipelines
The Agile methodology emphasizes Continuous Integration (CI) and Continuous Delivery (CD) pipelines to enable quicker deployments. To minimize security risks, Agile teams should consider integrating automated testing mechanisms into every stage of the SDLC. In addition, all commits made by the development team should go through security experts to ensure the application developed is secure.
Apart from manual code reviews, there should also be static code analyzers integrated with the CI pipeline and automated unit tests for running scheduled checks. Active security audits and automatic security checks are also recommended during the CI/CD process to help identify security vulnerabilities before a code moves to production.
The cost of identifying a security vulnerability at an early stage is considerably less compared to finding one in production, which can lead to severe consequences, including sensitive data theft, substandard application performance, and loss of reputation.
Compared to traditional practices, an Agile process presents a shift in development practices that should be accompanied by changes in organizational culture toward security practices. It is recommended that security professionals engage with developers to form an approved guideline of coding standards, design patterns, and design decisions.
Organizations should also undertake diligent threat modeling while formulating continuous security training that focuses on behavioral change rather than just awareness. Security professionals should also document secure development criteria on shared platforms so that other organizations can reference them in their processes.
Firms can also enable Agile security practices by instrumenting security policies in newly developed microservices, applications, integrations, and APIs.
Adopt Passive Reviews
The agile development methodology is characterized by shorter iterations, quick builds, and frequent releases for new features. It is, therefore, necessary to review all application changes that require iteration and how they affect the system’s security before committing them.
Passive code reviews help QA professionals understand applications without having to scan every single line of source code. Instead, QA professionals can skim through the code, and the code review systems monitor their movements around the codebase and offer timely, appropriate supplementary information for the source code. Some passive review security tools also generate model diagrams that visualize the logic implemented by the code, simplifying troubleshooting.
Ensure Proactive Controls for Agile Development Teams
An organization should support developers in implementing controls that promote a secure code development practice. OWASP lists various security techniques that ensure all tiers of the application are built, emphasizing security. Some of these techniques include:
Defining security requirements – Agile methods should be built on industry standards, past vulnerabilities, and applicable laws to ensure the product satisfies all security properties.
Utilizing security libraries and frameworks – These libraries and frameworks have embedded security measures to protect code against design and implementation flaws that lead to security flaws.
Keeping data stores secure – Teams should ensure both NoSQL and relational databases are kept safe using secure queries, authentication, configuration, and communication.
Encoding and escaping data – Encoding and escaping data are used to prevent injection vulnerabilities. Escaping involves using special characters to avoid misinterpretation of strings, while Encoding refers to the translation of characters into equal values with different formats, making them inaccessible to malicious interpreters.
Other proactive controls for comprehensive Agile security include Input Validation, Identity and Access Management (IAM), Error & Exception Handling, and Security Logging & Monitoring.
Secure Agile Development FAQs
How Does Security in Agile Development Differ from Traditional Development Approaches?
While Agile and Traditional security rely on adopting similar security policies, the implementation of security features varies widely. In Agile methods, rapid release cycles imply frequent security test runs, which means that a detailed code analysis may ultimately slow down development and delivery.
To tackle this, security risk indicators should be set to match the delivery rate, enabling Agile teams to undertake security reviews while dealing with frequent changes. Agile security practices should also be categorized into those completed at the beginning of development and those implemented during every sprint, depending on whether they need to be performed once or continuously.
Why do Agile Teams Fail to Secure Sensitive Data?
The most common mistake for Agile teams trying to secure sensitive information is improper data classification. Most teams fail to specify the data that needs special protection, making it difficult to enforce an effective data classification policy.
Additionally, software development teams fail to optimally encrypt sensitive data in transit or at rest, making it easily accessible to threat actors. Another point of concern occurs when teams misuse cloud storage platforms, storing credentials and configuration data without correctly interpreting the provider’s security policies. This makes it challenging to implement a comprehensive strategy from a security perspective.
GitHub is popular amongst the software community and for a good reason. It allows collaborating on software code with colleagues or even complete strangers. It comes loaded with project management and version control features as well.
GitHub Enterprise is GitHub packed, designed, and delivered for enterprise-level control over security, collaboration and administration.
Jira, which comes with state-of-the-art project management features, is equally admired by the software community.
Hence, a GitHub Enterprise Jira integration can lead to snowballing team collaborations and engagements. It can help bridge the gap between the teams commonly using these platforms: the development team and the project management team.
Let us see why integrating GitHub Enterprise (Cloud) and Jira can be beneficial to these teams firsthand. Then delve deeper into the kind of tools available in the market to make such an integration possible, and lastly take a step-by-step approach towards implementing it.
Benefits of a GitHub Enterprise Jira Integration
Getting the best of both these tools can lead to better insights for smarter decision-making. Let us understand why that is so.
As I mentioned, Jira has advanced features to manage issues through custom-made or predefined templates that are easy to follow and implement. Besides this, it can be used to implement tailor-made workflows suitable for any kind of team and has better reporting capabilities, thus helping you set expectations beforehand.
GitHub Enterprise has a lot of features it already inherits from GitHub.com, like creating and managing unlimited repositories, project management capabilities, issue tracking, version control, etc.
It can be deployed either: on-premise or on a cloud. It can be used by both small and large organizations alike because, in essence, they all want smarter collaboration, elegant security features like the ability to control access at the organization-wide level, and multiple deployment options leading to simplified administration.
Why Integrate GitHub Enterprise and Jira?
If both these tools work hand-in-hand, it will lead to full visibility of useful information and transparency in work that happens across teams and projects. The wealth of information lying in these individual tools, if acknowledged and integrated, can not only take forward your business profits but also leave you with a richer customer experience.
But if you do it manually, it leads to costly, time-consuming errors that can be surely avoided if the right solution is in place.
A GitHub Enterprise Jira integration would mean automating the information exchange between these tools in real-time, bi-directionally, however, and whenever you want. It can also filter data shared between Jira and GitHub Enterprise, so it can be viewed in the most useful format.
You will also get the best of both tools, leading all the team members to sing the same song.
But before you take your first step out of the door to implement it (literally), pause for a second and have a look at just a few use cases I had in mind to make your resolve why integration is needed in the first place.
GitHub Enterprise Jira Integration Use cases
Such integration can bring together diverse teams so they can have access to the same data in the tool of their choice, and deal with it according to their specific needs.
Dev and Quality Assurance Teams
GitHub Enterprise serves greater control at the organizational and user level making it a preferred choice to manage source codes by the dev team. This code sitting in GitHub needs to be passed over to the Quality Assurance team to ensure it follows all legal/ regulatory requirements, and above all to test it, so bugs aren’t percolated to production.
Likewise, bugs raised in Jira need to be reflected in the GitHub environment to be taken up and worked on by the dev team. This can happen smoothly and automatically using a Jira GitHub integration.
For instance, commits from certain Managed users (members of your dev team) on GitHub enterprise can raise an issue to move under the Review status in Jira to be taken up by the QA team.
Dev and Project Management/ Engineering Teams
Of course, the dev team works best with GitHub Enterprise, but it can become a hindrance when the project management or engineering teams use Jira. Each of them has pre-decided workflows and tracking them would mean manually duplicating information about issues or tasks back and forth.
If you choose to integrate GitHub Enterprise and Jira, then information can be synced automatically, leading to lesser friction and manual errors. You can also choose to stay in your existing workflows and still get correct status updates in both tools.
If you have developers belonging to different organizations in GitHub Enterprise working for you, then you can choose to assign specific tasks to them depending on their role and technical expertise. They can then work within GitHub for managing their commits or pull requests. Such changes can be reflected in Jira, for your internal team to prioritize issues and work on the roadmap ahead. And then you would want these internal discussions to remain private.
All of this and much more can be achieved through integration and you can manage both the public and the private parts of your workflows like a seasoned professional.
Dev and Customer Support
Jira Service management handles customer queries like a pro. But what you might not see clearly is the pain they go through when they need to manually pass information about a particular ticket to be taken up by the dev team. They most probably write a long email detailing the issue to the dev team and click the send button. Then follow it up through another round of emails or phone calls and repeat.
But you can make their life a little easier than having them handle such manual tasks if you do opt for a GitHub Enterprise Jira integration.
For instance, you can create a trigger that when a ticket is assigned to a particular developer or has a certain label, then it creates an issue in GitHub automatically. This is just the tip of the iceberg; a lot of advanced scenarios can also be handled if these tools are integrated.
But then how do you do all this the right way?
Choosing the Right Tool for a GitHub Enterprise Jira Integration
When you have such tools in place and various apps on their marketplaces, you most probably head there first thing. You might find it the easiest way to go with the native way to accomplish a Jira GitHub Enterprise integration. But just because it is so, doesn’t mean you should.
You better ask yourself these questions first when it comes to integrating these tools:
#1 Is my integration secure?
The information being shared must be secure at all costs. And it’s not an understatement. Proper security mechanisms like encrypted information exchange, HTTPS, token mechanisms, etc. must be in place. Then choose a tool that gives you exactly this. Also, attention should be given to check if the tool is ISO 27001 certified.
Of course, a major part of this question is answering how the information being sent or received is handled at either end. Let me explain this a little.
#2 Does decentralized integration increase security?
There are a lot of fields and different types of issues that are exchanged between GitHub and Jira. Now people viewing this at either end are not interested in seeing all the information but might be interested in a bit of it.
Having a tool that implements such filtering would mean getting to choose what you want to send and also decide on how and what information you want to receive. But while doing so, you don’t want to inform the other side every time your integration or its requirements change, do you?
Decentralized integration is essentially this, getting to choose independently what information you want to send and how you want to deal with incoming information.
This, as you can already predict, will help you protect your information from unauthorized access. The admin on the other side won’t be messing up your sync, as you have full control over your integration.
#3 Is the integration tool flexible to adapt to complex or advanced integration cases?
Now we know that integrations are volatile in nature. They can change at any time since your understanding of the integration deepens and hence requirements mature.
You may want to share something completely new want to stop receiving certain information or want to set different triggers for information exchange. You might even want to combine all these together and come up with completely new rules. Only a flexible integration tool will be able to handle all this.
#4 Is the integration reliable enough to handle downtimes and system failures?
Downtimes and failures are as much a fact as they are a pain. But if such downtimes lead to failing integrations, is it worth all your efforts?
If your integration tool resumes the stopped synchronization from the point of failure and applies changes in the same order as their initiation, then you won’t need to worry about downtimes anymore.
#5 Will the tool integrate the platforms I already use?
It’s necessary that the integration tool supports a lot of different platforms because it would be that much easier for you to scale your existing integration to include a newer platform and expand your network.
It should support popular applications like Jira, GitHub, ServiceNow, Salesforce, Zendesk, Azure DevOps, and so on.
#6 Where can I find such a solution?
We are here to answer this one too. The tool I have chosen for this article is called Exalate. And it ticks the “yes” box to all the questions above.
Exalate is a bi-directional synchronization solution that integrates different work management systems like Jira, the GitHub suite (GitHub Enterprise Cloud and GitHub Cloud), Salesforce, ServiceNow, Azure DevOps, Zendesk, and more.
It is the only solution on the market that supports decentralized integration implemented through incoming and outgoing sync processors that filter data to be sent and received independently.
It uses security mechanisms like encrypted file transfer, JWT-based tokenization, HTTPS protocol, role-based access control, etc. You can have a look at its security and architecture whitepaper to learn more.
Its intuitive Groovy-based scripting engine makes it flexible enough to handle even the most complex or advanced integration cases.
Its scripting engine comes with AI Assist, which uses AI-powered suggestions to generate scripts from natural-language prompts. Depending on your preferences, you can implement or discard these scripts.
It uses a transactional sync engine that queues up all changes that need to be applied and breaks them down into atomic steps. So in case your firewall or system is being upgraded/ any other scheduled (or unscheduled) maintenance work comes up, the sync changes can be applied in the correct order automatically.
It comes with an integrated retry mechanism to resume syncs from the point of interruption in case of downtimes or system failures.
Let’s now see how we can implement a GitHub Enterprise Jira integration using Exalate.
How to Implement a GitHub Enterprise Jira Integration
In this section, we will have a look at 6 simple steps to get your integration up and running.
You begin with installing Exalate on both your GitHub Enterprise Cloud and Jira environment.
Note: Exalate is also available for Jira on-premise. But for the sake of this blog, we will consider a Jira Cloud instance. You can find the steps for installing it on Jira on-premise here.
After that, you need to create a connection between your GitHub and Jira instance. A connection first authenticates both the source and destination sides (i.e Jira and GitHub). Once authenticated, it acts like a secure pipe that allows information to be passed back and forth.
After setting up the connection, you decide what information needs to be sent and received, before finally seeing how to set up automated sync triggers that allow information to be exchanged after certain conditions are met.
Let’s detail the steps now.
Step 1: Install Exalate on GitHub Enterprise
Let’s start by installing Exalate on GitHub first. You can start from either side.
Note: Exalate is now only available for GitHub Enterprise Cloud but will soon be available for Server, too.
To set up Exalate for your GitHub Enterprise instance, head over to its marketplace from within GitHub or simply click on this link.
In the search field there, enter “Exalate”.
Now click on the name of the app: “Exalate Two-Way Issue Sync”.
Click “Set up a plan”.
And you will automatically be redirected to the bottom of the page, where you can click on the “Install it for free” button.
On the next page, you will get to see your order summary. Remember this is a 30-day trial you are opting for. So review the order and click “Complete order and begin installation”.
Next, you will be required to choose the account on which you want Exalate to be installed.
By default, it is the one you have currently logged in from. But you can choose a different account or organization by clicking on the “Cancel” button in the image below and then choosing the necessary one.
If it is the current one, then click “Install”. You will be redirected to the Exalate admin console.
Remember to save this link for future reference, so you can access this console.
Currently, you have given permission to “All repositories”, but you can change that later too.
Now Exalate would need read-and-write permissions for issues and pull requests in your GitHub instance. Do it by clicking “Authorize Exalate Issue Sync”.
On the next screen, fill up a simple form. This will help verify your Exalate for GitHub instance, activate an evaluation license, and set up an admin account for notifications.
Click “Agree and Submit” to finish the procedure.
Go to your inbox, and click on the email you must have received from Exalate. Click on “Verify Exalate instance” in the email.
After a successful verification, you have successfully installed Exalate on your GitHub Enterprise instance.
To log in to your Exalate admin console, create a personal access token and save it someplace safe so you can use it to log in later.
Step 2: Install Exalate on Jira
Now you need to install Exalate on your Jira Cloud instance from the Atlassian marketplace. You can find the details here.
And you can also find the steps to install it on Jira on-premise here.
To begin with, you can go to the marketplace through your Jira cloud instance itself, or click this link directly to save some time.
From your Jira cloud, click “Apps” in the top-center of the screen, and then “Manage Your Apps”.
Under “Atlassian Marketplace” on the left-hand menu, click “Find new apps” and in the “Search for apps” bar, type “Exalate”.
Make sure to choose the right one: “Exalate Jira Issue Sync & more”.
Click “Try it free” in the top-right corner. Then click the “Start Free Trial” button.
That’s all you need to install Exalate on the Jira cloud. You will get notifications of the status of your installation. Once done, click the “Get Started” button to see your Exalate console in Jira.
Step 3: Create a Connection between your Jira and GitHub Instance
As we have already mentioned, a connection needs to be first established. For this, you have to go to the “Connections” screen on the left-hand side of the Exalate console on Jira Cloud. This screen displays the different connections you have created. If this is your first time, then it will be blank.
Note: To navigate to the “Connections” tab in Jira, in case you aren’t there already, click on “Apps” in Jira and select “Exalate” from the list. You will find the Exalate Console on the left-hand menu. From there, click “Connections”.
For a connection, one side initiates the connection and the other side accepts the invitation.
Remember the user interface is the same for all applications Exalate supports, so it doesn’t matter if you start from GitHub or Jira. We have started from the Jira side here. Click on the “Initiate Connection” button shown below.
On the “Initiate Connection” pop-up, you are supposed to enter the destination URL. In our case, the destination is the GitHub instance. So copy the Exalate URL for your GitHub instance and paste it into the text box.
Note: You can find the URL by clicking the General Settings menu in the Exalate console.
A brief check is performed to check if Exalate has been installed on the destination side. If yes, more options are available.
These options allow you to choose the configuration mode for the connection. There are 2 modes, as shown above: The Basic mode and the Script mode.
We will have a look at both these modes one by one.
Continue with the Basic Mode
The basic mode is for simple use cases where only the summary, description, and comments are synced. You cannot change the default values in this mode. To change them, you need to upgrade to the Script mode. Hence this mode can be used if you want to see the working of Exalate firsthand.
There is a Free Plan that Exalate offers, that supports connections created using the Basic mode only. You can read more about it here.
Once you select “Basic” on the screen above, click “Next”.
You then need to select the project you want to sync issues from.
The next screen will ask you to verify admin access to the other side. Click “Yes, I have admin access” if you have the access, else click “No, I don’t have admin access”. In such a case you will be required to copy and paste a secret invitation code over to the GitHub side. We will see how that can be done when we get to the Script mode.
I do have access, so I’m clicking yes.
This will redirect you to the GitHub side successfully if the access is verified.
There you must select the repository you need to sync issues into. Choose this from a drop-down list just like you chose the project on the Jira side.
Once you click “Confirm”, it’s time you enter the issue key you want to sync to the other side. So enter the key and click “Exalate”.
Wait for some time. Appropriate status messages for your sync will be displayed.
And bingo! You have your first successful sync. You can follow the links under the issue name to go to the respective issue.
Continue with the Script Mode
With the Script mode, you can configure advanced mappings and sync almost any kind of information between GitHub and Jira. This is because it comes with Groovy scripts that are customizable to suit whatever you want to sync between the 2 applications.
So you can adapt it for complex or advanced integration use cases easily.
We recommend that you try this mode out to use Exalate to its full potential.
Note: If you are using the Basic connection, you can easily upgrade the connection to a Script one.
So now select “Script” on the screen that allows you to choose the configuration modes and hit “Next”.
You will be required to name the local and remote instances now.
Since we are initiating the connection from the Jira side, our local instance will be Jira and our remote instance will be the GitHub instance. Once you give these names, a connection name will automatically be created by joining the two names together, but you can change it if you want.
Also, don’t forget to enter a description for the connection since it will be helpful if you have a lot of them. Once you get all the details right, click “Next”.
Just like you selected the project on the Jira side for the Basic mode connection, select the correct one now and click “Initiate”.
An invitation code will be generated. This works as a secret code that helps you authenticate both the communicating instances and contains some other information like the type of connection, etc.
To copy the code, click “Copy invitation code” and “Done”.
Now proceed to your GitHub instance and under the “Connections” tab, click “Accept Invitation”.
In the text box that appears next, paste the invitation code you just copied. Then click “Next”.
Again select the repository on the GitHub instance and click “Confirm”.
You will get notified when the connection is successful.
Proceed to the next step.
Step 4: Configure the Connection to Determine what Information to Share
Now that you have set up the initial connection, it’s time you decide what information must be sent and received between the 2 applications.
Maybe you want to create a new issue in GitHub once an issue status in Jira is changed to “Review”. You can do all this by configuring the connection to decide what information to send and how you want to deal with the information received and then create triggers for setting the conditions for information exchange.
For this, you can click “Configure sync”.
If not, then you can go to the “Connections” tab in the Exalate admin console, and from there, click the edit connection icon shown in front of the connection name you have just created.
A quick look at this screen will show you what different connections you have created, how many issues are there under sync, and the status (Active, Pending, Deactivated, Error) of each. You can also choose to edit the connection here and delete it too.
The configuration screen looks like this:
This screen has 4 tabs: “Rules”, “Triggers”, “Statistics”, and “Info”.
We are covering the “Rules” in this section, whereas “Triggers” will be seen in Step 5.
The “Statistics” tab will give you an overview of your synchronization. Information about the number of issues you have under sync, the date you last synced, etc is displayed.
The “Info” tab displays rather general information about the connection. It gives the name, the description (that you can edit), and the type of connection. It also shows the destination instance URL. Connections can either be public, private, or local. You can know more about these types here.
Moving ahead to the “Rules” tab.
As seen, there are 2 sections: Outgoing sync and Incoming sync. As their name suggests they are used to define what information must be sent and what must be received. Note that they’re independent of each other and need to be configured on either side.
So for instance, the Outgoing sync on the GitHub side will define what information must be sent to Jira and the Incoming sync will define what information must be received from Jira, and the same on the Jira side as well.
A closer look at each section (Outgoing and Incoming) will show you that there are scripts that are predefined for every connection telling us what information is being exchanged. These are written in Groovy scripting language and if you are already familiar with it, this will be easy for you. Even if you aren’t, understanding and working with scripts is not as scary as it sounds.
Let’s deep dive a little and see how they are organized.
If you have a look at the Outgoing sync of GitHub you will come across something like: replica.description=issue.description.
What this line means is that the description of the issue is saved into something called a replica. This replica acts like an empty placeholder that holds all the information you need to exchange between the two instances.
The same statement on Jira’s Incoming sync section will be mapped as issue.description=replica.description. So you are now saving the description of the issue from GitHub into the issue description of Jira.
This is the kind of mapping evident in the images above.
If there is certain information you don’t want to send or receive, then you simply remove it from the respective section.
For instance, if you don’t want to sync comments from Jira to GitHub, then you can either remove the line or comment it as shown below.
If you want to start sending new information you can simply add that in the respective section. You can also assign specific values to the fields. For instance, replica.description = “From GitHub”on Jira’s Incoming sync would mean all the synced issues from GitHub will have the description “From GitHub”.
We have a lot of script helpers on our documentation site that can help you get started easily.
Connections in Script Mode Using AI Assist
The Script Mode allows you to generate and optimize scripts using the AI Assist feature — which appears as a tab under both the incoming and outgoing sync rules.
How does it work?
Enter your sync requirements into the chat box, and AI Assist will generate scripts based on your input, existing configurations, and Exalate’s scripting API.
It is also important to note that AI is not perfect. So, you need precise and detailed prompts to ensure the best results.
Let’s say you want to sync task lists and assignee between Jira and GitHub; the prompt could look something like this:
“I need a script to help me sync task lists and assignee between Jira and GitHub.”
After a moment, the script will be generated, with suggested changes highlighted in green and red. The green scripts are suggested additions, while the red scripts are suggested deletions.
If the new snippet works for you, click on “Insert Changes”. Otherwise, you can discard the suggested code. If needed, you can refine your prompt and, once satisfied, publish the changes.
Now is the time you start syncing the information automatically.
Step 5: Create Triggers to Start Automatic Information Exchange
Once you have decided on the information to be exchanged, let us see how you can start the process automatically. This is done with the help of triggers. These are conditions you set for the sync to start.
To create triggers, click on the “Triggers” tab shown in the edit configuration screen. It looks like this.
Note: You can create triggers from the left-hand Exalate menu as well. But while creating triggers, you also need to select the name of the connection.
If this is the first time you are creating triggers, then this screen is blank, otherwise, you can view all the triggers you have created for your connection here.
Click on the “Create trigger” button and an “Add trigger” pop-up will appear.
Let us have a look at the different fields here.
Firstly you need to select the entity type to which you need to apply the trigger. I have selected an issue here.
The “If” section decides the condition you want to set and is platform-specific. On the GitHub side, advanced search syntax is used to filter issues, whereas JQL (Jira Query Language) is used on the Jira side.
You can also add notes if you want.
Toggle the “Active” switch to activate the trigger and lastly click on “Add”.
Once you add the trigger, you can see it on the previous screen.
You can choose to edit or delete the trigger here. You can also sync issues in bulk that satisfy the trigger condition by clicking on the 3 dots in front of its name.
As seen, we are creating a trigger for syncing only Bugs that have a label=devteam over to GitHub.
Once you work on finalizing the triggers, “Publish” the changes to apply them.
Step 6: Synchronize Information
Through all the steps we have seen above, the ways in which you can start your sync with Exalate are:
Sync issues created through Basic connections following Step 1.
Bulk Exalate issues fulfilling the trigger conditions.
Happy syncing!
Conclusion
Both Jira and GitHub Enterprise are popular tools for code development and project collaboration. So if integrated, they can uncover useful business insights and get teams to collaborate faster and better.
But selecting the right solution for such an integration is extremely important. So we saw some criteria that you can consider while choosing such a solution. We also saw how Exalate gives you flexibility, reliability, decentralized integration, and security as its feature offerings, in addition to the variety of integrations it supports.
And then we saw how a GitHub Enterprise Jira integration can be achieved in a step-by-step manner using Exalate.
Frequently Asked Questions
How can I connect Jira with GitHub?
You can connect Jira with GitHub using third-party applications from the GitHub Marketplace. These tools allow organizations to sync their GitHub repositories with their Jira workspace.
Why do I need to integrate Jira and GitHub?
You need to integrate Jira and GitHub in order to share information between both platforms. Updates to your GitHub repo will reflect automatically within your Jira issue, epic, or story. This makes it easier for teams to collaborate.
Can I sync my GitHub repo with my Jira project?
Yes, you can sync your GitHub repo with your Jira project. You can map fields like issues, comments, pull requests, and updates.
What tool can I use to automate Jira and GitHub sync?
You can automate your Jira to GitHub syncs using a third-party solution called Exalate. This solution allows you to set triggers and write custom scripts for your connection instead of having to move everything manually.
How do I sync comments between Jira and GitHub?
You can sync comments between Jira and GitHub by mapping the comment field in your repository to a specific Jira epic. Tools like Jira Software for GitHub and Exalate can help you choose what to sync.
Over the years, CRM and Salesforce have become inseparable and tightly bonded. That’s why companies looking to share CRM data are exploring Salesforce to Salesforce integration.
Such integration would allow data sharing (for instance, Leads and Opportunities) and updates between different Salesforce instances. This will help achieve close collaboration with different partners or businesses, helping you improve your customer experience.
So in this article, I’ll use some Salesforce to Salesforce integration examples to highlight the benefits of connecting CRMs. I’ll then show you how to set up your own connection using robust Salesforce integration solutions.
Why Integrate Multiple Salesforce Instances?
Data is gold and, if mined correctly, can help teams share expertise and grow together steadily.
But when this information is passed manually between teams, it leads to discrepancies and errors.
Plus, you need to filter the exchanged data, as you don’t want to send all the information in compliance with security or data regulatory requirements.
When filtering is done manually, it can lead to friction between team members or collaborating partners in different organizations.
To avoid that, a two-way Salesforce CRM integration is the way out.
It will deal with all the above problems like a cakewalk, providing a few extra toppings like secure, automatic, filtered, reliable, and real-time bi-directional information exchange.
This gives the other party the most accurate representation of the information it needs to see without exposing any confidential information.
To elaborate a little on how exactly it will be beneficial, let’s have a look at a few scenarios where exchanging information between multiple Salesforce instances can help companies collaborate and communicate effectively.
Salesforce to Salesforce Integration: Common Use Cases
Connecting Sales and Marketing Teams
Sales and marketing teams use Salesforce day in and day out. But what these teams probably lack is collaboration on common customer enhancement goals, as they might be stuck in their respective Salesforce instances.
In this Salesforce to Salesforce integration example, organizations and managers share customer information in the form of Accounts, Opportunities, Leads, etc., and design campaigns or other marketing initiatives around them.
Both sides can explore the treasure house of information within individual Salesforce instances to open up new avenues for fulfilling customer experience goals.
Improving the Efficiency of Sales and Customer Service Teams
To enrich and nurture your relationship further with your customers, the sales and customer service teams can use point-to-point integration between Salesforce instances.
Cases, Tasks, and Opportunities always have valuable insights into customer behavior, feedback, problems, and queries. So getting early access to such information and proactively dealing with it can improve your sales metrics.
Growing and Diversifying your Connections with Partners and Businesses
Allowing multiple Salesforce organizations (instances) to integrate expands your partnerships with newer business interests, in turn targeting a broader customer base and increasing the services to offer.
This also allows vendors to diversify their business operations, wherein such different partners could bring in their expertise to provide a package of services to their customers.
This brings us to the point of actually implementing Salesforce integration end-to-end.
2 Ways to Integrate Multiple Salesforce Instances
Using The Native Salesforce Functionality
The platform provides a native integration called “Salesforce to Salesforce” which allows users to exchange records and stay updated.
But to use this feature, you must consider Salesforce to Salesforce integration limitations, such as the ability to share a maximum of 100 tasks per related Salesforce record.
To understand more about rest API integration in Salesforce, check out the guidelines here.
If you have simple out-of-the-box use cases, this standard Salesforce to Salesforce rest API integration is the sure option.
But if you have custom or advanced integration needs, then you can use Apex.
Here lies the real challenge:
Apex is a powerful medium that allows you to extend the native capabilities of Salesforce to include custom and advanced business logic. Still, it boils down to implementing an integration, which is too much work.
Also, Apex isn’t designed for the complex integration processing that is expected from typical Salesforce integration tools; it is also subject to governor limits defined by Salesforce.
In lieu of this, AppExchange has ready-made apps that allow you to integrate multiple Salesforce instances easily. So here is a tool that can checkmark almost all your integration needs.
Using the Exalate App for a Salesforce to Salesforce Integration
Exalate is a Salesforce integration software that allows you to bidirectionally sync information in real time between two (or more) Salesforce instances.
You can also use it to sync data between Salesforce and other applications like Jira, GitHub, ServiceNow, Zendesk, and more. Check out Exalate’s integrations page for more info.
Let’s see why Exalate is the right choice to handle a complex Salesforce to Salesforce integration:
It provides secure information exchange through role-based access controls, encrypted information exchange, use of HTTPS, etc. You can learn more about its security features in this whitepaper.
It has an intuitive Groovy scripting engine that allows you to configure advanced or complex integration use cases. So, in this way, it is flexible. You can also use AI along with the Script mode to simplify the script generation process.
You don’t have to worry about downtimes or outages with Exalate in place. This app resumes operations in case of breakdowns and ensures uninterrupted information flow without the need for manual intervention.
But the question remains: how do you achieve such a Salesforce to Salesforce integration using Exalate?
So let’s see how!
How to Set up a Salesforce to Salesforce Integration in 5 Steps
If you’re a video person, watch this step-by-step Salesforce to Salesforce integration video that talks about syncing custom objects, syncing statuses, and much more.
Step 1: Install Exalate on Salesforce
The first step is to install Exalate on Salesforce. Since we are integrating two Salesforce instances, you would need to install it on the other instance as well.
To begin, request your free trial by clicking on the button below.
You will then need to decide where you want to install Salesforce: either “Install in This Org” or in a Sandbox org. My preference was to install it in the current org.
After making your selection, scroll down to the bottom of the screen and carefully review the terms and conditions. Once you are ready, click on “Confirm and Install” to initiate the installation process.
Next, you’ll be prompted to choose the users for whom you want to install Salesforce. Keep in mind that you can always adjust this later on. In my case, I opted for “Install for All Users” and clicked on “Install”.
Now, you’ll need to “Approve Third-party Access” by clicking on “Continue”. This step allows Exalate to access necessary data. Once the approval is given, the installation process will be completed. Click on “Done” to finalize the setup.
Next, navigate to your Salesforce instance and proceed to create a connected app. Remember to save the “Consumer Secret” and “Consumer Key” generated during this process. Then, within your instance, go to “Apps” and search for “Exalate”.
To request an Exalate node, provide the previously saved “Consumer Secret” and “Consumer Key”, and then click on “Request Node”.
You’ll be prompted to click on “Allow” to grant access permissions to Exalate. Afterward, enter your personal details and click on “Agree and Submit”. Now, simply wait for an email from the Exalate License Manager.
Once you receive the email, click on “Verify Exalate instance” to be redirected to the Exalate admin console.
From this point on, you can proceed to establish a connection between your instances.
Note: Exalate accesses Salesforce through APIs. Salesforce has its guidelines for API Access add-ons.
For example, API access is accessible by default in Enterprise accounts, but it is not the case with other accounts like Professional. Learn more about the different Salesforce editions Exalate supports on this documentation page.
Note: To log in to your Salesforce Exalate node, follow this process.
Let’s proceed to the next step.
Step 2: Connect Your Salesforce Instances
Go to the “Connections” tab in the left-hand menu of the Exalate console on any one of the Salesforce instances. It doesn’t matter which instance you start from; Exalate has a uniform interface on all applications.
Then click on “Initiate Connection”.
Enter the destination instance URL. This will be the URL of the other Salesforce instance. Copy it from the address bar and paste it into the text box shown in the image below.
After Exalate performs a check of whether the app is available on the destination instance or not, it will give you further options to proceed. These options include choosing the configuration mode.
Exalate supports 2 configuration modes: Basic and Script.
The Basic mode is free and is configured automatically for you. It works well for basic sync use cases and is quite suitable for testing the connection you have just established.
You can sync only “Cases” with the Basic mode. It also comes with a Free Plan that allows you up to 1000 free syncs per month.
The Script mode is what makes Exalate compatible with almost any scenario. It is more advanced and lets you decide what you want to share with the other side and how you want to map the information coming from the other side. It is also powered by AI. We will learn more about it in the coming section.
It comes in Groovy scripting language, which is not very difficult for non-technical users to understand. There is also elaborate documentation on sample scripts that can come in handy when you get stuck.
We will cover this mode in a while. Let’s continue with the Basic mode for now.
Connections with the Basic Mode
Once you select “Basic”, click “Next”.
You then need to verify if you have admin access to the other Salesforce instance. Don’t worry if you don’t. An invitation code will be generated. You can copy and paste it on the other side in this case.
If you have access, click “Yes, I have admin access”. Then, you will be redirected to the other instance to verify the access and establish the connection.
On the next screen, you can test the connection you have just created by entering the Case number in the text box given and then clicking “Exalate”.
After a brief pause, you can see the Case getting synced to the other side. As shown in the image below, you can even click on the respective links and head over directly to the particular Case.
Now let’s move ahead with the Script mode.
Connections with the Script Mode
Initiate the connection in the same manner as you just did. But now, instead of choosing “Basic”, choose “Script”. And then click “Next”.
Now you need to enter a name for your local Salesforce instance and one for the remote instance. A connection name by combining both of these names will be auto-generated, but you can change it if you want.
Don’t forget to add a description. It will help you identify your connection amongst a long list. Click on “Initiate” once you have entered all the details on this page.
Now an invitation code is generated. This is a unique secret code to authenticate both instances. “Copy invitation code” and make sure to paste it somewhere safe. Once you copied it, click “Done”.
Then go to the other Salesforce instance. On the “Connections” tab, click the “Accept invitation” button this time. On the text box, paste the code you have just copied and click “Next”.
In a few seconds, the connection is successfully created.
You can now configure it to decide what and how you want to send and receive information.
Step 3: Configure the Connection to Share Data
You can continue to configure the sync by clicking the “Configure Sync” button on the screen above.
If you don’t choose to do it immediately, you can go back to your “Connections” anytime and click on the edit connection button in front of your connection name.
Both approaches will redirect you to a page that shows 4 tabs:
Rules
Triggers
Statistics
Info
Statistics show how many items you are sharing and the details of when you have last synced them.
The Info tab gives information about the type of connection. You can find the destination instance URL here. You can edit the description of the connection here, too.
The Rules tab has two sections: The “Outgoing Sync” decides what information should be sent and the “Incoming Sync” decides how you want to map the information coming from the other side.
Each line corresponds to a field you want to sync. For instance, replica.description = entity.Description in the Outgoing sync would mean that the description of the case is sent over to the other side. Replica acts like an empty placeholder to dump information you want to send to the other side.
Likewise, in the incoming sync, you take contents from the replica and place it under the appropriate fields, i.e., entity.Description = replica.description, meaning that the replica’s description is copied to the description of the Salesforce entity.
Note that these rules exist at either end, so each side can decide what it needs to send and receive. The syncs are written in Groovy scripting language.
To stop sending or receiving certain information, you can simply choose to comment or delete that particular line. So if you delete replica.description = entity.Description in the outgoing sync section means the description won’t be synced to the other side.
You can even choose to have a fixed field description, for instance, replica.description = ‘synced from the sales team’.
You can also add some text at the beginning of the description, for instance,
replica.description = ‘synced from the sales team’ + entity.Description.
To send additional information, you can add scripts in the existing sync rules section.
For instance, if you want to send Tasks in addition to Cases from one Salesforce instance to the other, you can add the following script in the “Outgoing sync”:
Don’t forget to map the corresponding Task details in the “Incoming sync” of the other Salesforce instance here. This way, you can even set up the most advanced configuration between the instances.
There is no need to get bogged down by so much code. There are a lot of script helpers that can help you with advanced processing.
Use AI Assist with Script Mode
Exalate’s script mode now comes with AI Assist, available as a chat window in both the incoming and outgoing sync rules tabs. Just describe your sync requirements in the chat, and AI Assist will generate the necessary scripts for you.
These scripts are created based on your input, existing configurations, and Exalate’s scripting API.
Remember, like any AI, AI Assist isn’t perfect and may occasionally make mistakes. So, be as clear and specific as possible with your prompts.
Here’s an example of how you can use it:
Let’s say you need to map case statuses between multiple Salesforce instances. You can type something like this in the AI chat:
For incoming sync: “Create a status mapping that sets New to Open, Working to In Progress, and Escalated to Done in the Jira incoming configuration.”
The AI will generate the script in a few moments.
Lines in red show what will be removed from the current script, while green lines represent the new additions. You can accept or reject the changes, and if needed, adjust your prompt. Once everything looks good, publish your changes.
Step 4: Create Automated Sync Triggers
One benefit of modern Salesforce integration software is that it allows users to automate connections using triggers.
To create triggers on Exalate, click the “Triggers” tab. If you don’t have any triggers yet, the screen will be empty. So start creating a new trigger by clicking “Create trigger”.
Select the Salesforce entities to which the trigger will apply, for instance, Case, Account, Product, Opportunity, etc.
Then in the next section, you can enter the details of the Case in the fields provided to create a trigger. There are a lot of options in the “More” section as well.
For instance, you can choose to sync Cases belonging to a particular company, in which case you need to write the name of the company in the provided text box.
Once you write your query, scroll down and fill in some notes for the trigger. This will help you identify the purpose of your trigger.
And then activate the trigger by clicking on the “Activate trigger” checkbox
On the previous screen, you will be able to see your trigger listed. You can choose to edit or delete it from this screen. You can even choose to sync existing Salesforce objects, fulfilling the condition of the trigger by clicking the three dots next to its name and selecting “Bulk Exalate”.
Finally, publish the changes you have made so they can be reflected in your sync.
Step 5: Start the Synchronization
There are various ways you can start your synchronization with Exalate.
You can use the Basic mode to sync, as shown in step 2.
You can create triggers, as shown in step 4.
You can “Bulk Exalate” Salesforce entities satisfying the trigger conditions.
Or you can manually sync a particular entity by clicking on the “Exalate” sync panel on the Salesforce object page. You just need to select the connection name through which you want to sync and click “Exalate”. This panel will also show you the status of your synchronization.
Another way to sync is using the “Bulk Connect” option that allows you to sync existing Salesforce records present in both instances.
This is all you need to know about how Exalate can help you achieve your integration.
Things to Consider When Using Exalate
If you want to choose the best Salesforce integration, here are things to consider.
Defined User Roles and Responsibilities
It is important to define user roles and responsibilities, especially in an integration setup. Such a filter is necessary to avoid friction between team members.
As an appropriate measure, you can label the items correctly and clearly so everyone on the team stays on the same page and is aware of what needs to be done in case of a discrepancy or error.
With Exalate, admins can filter items to even the most granular level. For instance, you can filter them according to the username field so things can be handled differently for teams or individuals.
Access to the Exalate app
You need proper access control mechanisms to ensure authorized people have access to the Exalate app. This requirement is important in an integration setup to ensure your information does not end up in the wrong hands or to avoid regulatory violations.
Such permissions are already set up while during, but you can change them later if needed.
Notification Handling
When dealing with newer integration apps like this, it is tempting to overload users with every little sync. But the trick is to keep it simple at first and then layer on complexities over time.
A plan must be in place so that only the required and minimum number of users are notified in case something goes wrong or to have updates about necessary syncs. This will ensure no one misses important notifications.
What are the Common Salesforce to Salesforce Integration Mistakes?
Some mistakes to avoid during Salesforce integration across companies and teams include the following:
Propagating bad data practices
Lack of comprehensive documentation
Not training your staff to use the integration solution.
Ignoring data rate and API limits, and other regulations
Not testing the endpoints before you start exchanging data
Improper data mapping between fields, objects, and projects
Inadequate communication with partners, vendors, MSPs, etc.
Limiting your sync to template connectors and default mappings
Ignoring performance analytics instead of drawing insights from them
Not cleaning your data before integrating with other teams and organizations.
Conclusion
Data integration in Salesforce is a tricky subject that can lead to disaster. But if handled carefully and with proper planning, Salesforce data integration tools can make your life a lot easier.
We saw how this could be true for a Salesforce to Salesforce integration where you can expand your business to include newer partners and your business teams to work towards common customer goals.
We covered the native Salesforce integration API. Then, we moved on to see how to get your integration to work using a cross-company Salesforce integration partner called Exalate.
And lastly, we saw how Exalate can integrate multiple Salesforce instances in 5 easy steps and pointed out a few things that can make your integration path a smoother one.
Looking for Salesforce integration consulting? Book a demo with our Exalate engineers right away.
Frequently Asked Questions
Why integrate multiple Salesforce orgs?
By integrating multiple Salesforce orgs, your business teams can experience a seamless and error-free data exchange across different departments. Through ERP integration with Salesforce, you can extend Salesforce beyond its default capabilities.
How do I integrate Salesforce with Salesforce?
You can integrate multiple Salesforce instances using the “Salesforce to Salesforce” default functionality. You can also use third-party integration solutions like Exalate to set up custom-made one-way or two-way automatic syncs between two Salesforce instances.
Can I migrate data from one Salesforce org to another?
Yes, you can migrate data between two Salesforce orgs. You can sync all the related data and records and maintain the relationships between them. There are a lot of third-party Salesforce integrations available in the market to perform this operation.
Can I set up a bi-directional integration between Salesforce and other tools?
Yes, you can set up uni or bi-directional sync between Salesforce and other applications. You can sync any Salesforce records (even custom ones) and their related records and set up automatic sync triggers to start the information exchange.
What is an example of Salesforce to Salesforce integration?
If you have multiple sales teams working remotely, you can integrate data under the Salesforce integration cloud. This way, you can get useful insights about customer behavior. You can also understand how different teams interact with customers.
How do I connect Salesforce to Salesforce using REST API?
To use REST APIs to connect multiple Salesforce instances, you can make HTTP requests to the Salesforce REST API endpoints and interact with its data and functionalities. This allows you to perform operations such as querying, creating, updating, and deleting records, as well as executing custom Apex REST services. However, this needs a lot of technical expertise and work. So it’s advisable to use third-party integration tools or hire a Salesforce integration architect.
Models are important because they provide us with both a representation of an entity and a template to work with. In the same vein, a Service Integration and Management (SIAM) model provides organizations with guidance on vendor management among multiple suppliers of IT services.
Developing an effective SIAM model entails discovering the best approach for an organization working in a multi-vendor operating model.
This article unpacks what the SIAM operating model involves, and how it provides the strategic framework for IT departments to productively manage multiple vendors.
A comprehensive understanding of SIAM is a necessary prerequisite to successfully implementing a SIAM model. So, if you’re still new to SIAM, you can check out our guide on SIAM here first.
What is a SIAM Model?
At its core, SIAM is an IT service delivery model. SIAM can be defined as an “operating model which organizations adopt when working in a multi-service provider model”.
In this model, the SIAM provider is mandated to act on behalf of the business in managing services from multiple IT delivery towers. The purpose of a SIAM model is to ensure IT multisourcing delivery and multisourcing integration are seamless and strategic.
There’s a lot of flexibility in a SIAM operating model so it’ll also appeal to those seeking a broad set of ideas for implementation.
Below are some of the high-level considerations to kickstart a SIAM process model:
Processes are an indisputable part of an organization’s SIAM model
Though SIAM relies on processes, SIAM is NOT a process
The SIAM model requires a collaborative approach to be successful
There isn’t a one-size-fits-all so many service providers have their own SIAM model and method of working for each ITIL process
With each service provider bringing their processes, standards, and frameworks, adopting SIAM might seem to be a recipe for disaster. However, SIAM ensures consistency by adopting a best-in-breed, multi-tenant model that will meet business requirements through strategic management.
Achieving an ideal SIAM model for an organization requires governance (strategic, tactical, and operational), management, coordination, and integration. This model can be well adapted for a B2B integration set-up as well. So we must study it in that context.
Transitioning to an Operational SIAM Model
To implement SIAM, an organization has to transition to a SIAM model. This will focus on using the high-level considerations highlighted in the previous section, along with an emphasis on multi-service governance.
Most of the attention on building an effective SIAM model will focus on processes. This is because processes are repeated tasks that allow organizations to establish their preferred approach to solving a problem.
But whatever the environment, the SIAM methodology includes the following:
Practices
Processes
Functions
Roles
Structural elements
Moreover, processes must be allocated to suitable layers in the SIAM model. However, this allocation can differ with each implementation of SIAM. Nevertheless, these processes have to be aligned with other parts of the SIAM model, especially the following:
SIAM practices
SIAM layers
Governance layers
Structural elements
As part of the overall SIAM model, each party in the SIAM ecosystem has to augment and adapt its process and practices to integrate with the process model.
What a SIAM Operating Model Involves
Too often, SIAM is confined to the process areas described in ITIL, the popular ITSM best practice framework. Though the SIAM process is grounded in service management, however, SIAM isn’t meant to replace ITSM.
So, how does deploying a SIAM operating model differ from ITSM?
Well, ITSM was created to manage IT services for the business. On the other hand, SIAM was established to provide governance and control to these IT services on behalf of the business. However, SIAM has a broader scope than this.
You can also have a look at how to implement a cross-company integration (across multiple companies) using SIAM and ITIL 4 to get an idea of how they can go hand-in-hand without one replacing the other.
As we have noted in the service integration and management article, “the topic of supplier management” is more related to SIAM as it covers the entire service lifecycle.
Therefore, SIAM extends beyond the typical incident, problem, and change management to encompass the entire service lifecycle. Its capabilities range from idea conception, and demand management, to service portfolio management, etc.
SIAM implementation requires a collaborative approach because many service providers have their own method of working for each ITIL process.
Organizations should outline their SIAM model with the following in mind to have sustainability:
Specify principles and policies
Governance framework
Outline roles and responsibilities
Process models, practices, and structural elements
Outline of services
Service providers to be retired
The SIAM Model as the Antidote to Large Managed Service Contracts
The explosion of information technology and digitization unleashed an avalanche of IT services upon an organization. IT Service Management (ITSM) emerged to help organizations manage the end-to-end delivery of these IT services.
So, before there was a need for a SIAM model, ITSM already existed. However, ITSM mainly concerns itself with the lifecycle activities of IT services such as its creation, design, delivery, and support.
Moreover, the velocity of change in digital technology would soon usher in another shift in the IT management landscape. With the information technology (IT) ecosystems changing at such a rapid pace, even the most skilled IT generalists were no longer capable of providing its increasingly specialized needs.
As a result of this specialization, outsourcing was needed so organizations could get the expertise they required for sophisticated and niche tasks, especially infrequently used ones. Other factors such as costs, and the need to focus on the core business functions also accelerated the trend towards outsourcing.
Outsourcing Conundrums with the SIAM Model as the Solution
However, the rise of outsourcing didn’t make IT departments obsolete. Most organizations still keep in-house IT professionals who are typically tasked with administrative duties like database management, overseeing the efficacy of networks, and supporting employee IT needs. The rest is typically outsourced to vendors and managed service providers.
But despite their seeming price advantages, single-vendor paradigms soon proved inadequate as one-shop solutions. Furthermore, most single-vendor solutions are insufficient to handle the multitudinous scope of IT problems. In addition, organizations don’t usually want to be held hostage by the rigidity of single vendor lock-in.
Hence, this outsourcing arrangement eventually gave rise to multi-vendor supplier ecosystems, along with an increasingly complex IT value chain. But cracks quickly appeared in this arrangement too.
Organizations soon discovered that their most vexing problems with subcontracting to third parties were:
Very little transparency
Not enough quality control on outcomes
This new reality, in turn, created the need for supplier management, especially in a multi-source environment.
To be viable, this environment had to provide cross-process, cross-functional, and cross-provider integration where all parties:
understand their roles, responsibilities, and context in the system,
are adequately empowered to deliver them,
and can be held accountable for the outcomes they have been tasked to deliver.
The SIAM model helps an organization outsource IT responsibility so it can focus on its core business. The objective of using SIAM is to enable IT departments to maximize scarce resources, through coordinating resources – both internal and external – effectively and efficiently, and in the process, providing the best results and outcomes for an organization.
So, a SIAM model isn’t a theoretical exercise. Rather, it grew from a practical shift towards the outsourcing of specialist resources or skills which required managing the resultant multiple suppliers of IT services.
Building the Right SIAM Model
As we have seen, SIAM is a service model that exists to provide good practice methods to manage multiple suppliers of IT services.
The SIAM ecosystem must include three main layers, namely:
The owner or customer organization (with retained capabilities): the singular, accountable role that ensures the process is defined, executed, and evaluated correctly
The service integration function: implements an effective cross-service provider organization while providing operational governance to service providers
Service provider(s)
While the customer organization owns the contractual relationships with external service providers, the service integration function is where end-to-end service governance, integration, management, and coordination are performed.
Service Integrator
The service integrator role can be carried out by one or more organizations, including the customer organization. Regardless of the number of organizations providing this role, it should still be considered as a single logical service integrator.
Based on the configuration of the service integrator, four SIAM models align with the most common situations adopted by organizations.
Internal service integrator
External service integrator
Hybrid service integrator
Lead suppliers as service integrators
The service integrator is the most important role in the SIAM model. This is because SIAM’s process execution is likely to involve multiple stakeholders who don’t have homogenous practices, tools, processes, and documents. Although service providers have their respective processes, they nonetheless have to be integrated as part of an overall model with defined rules, interactions, and controls.
This is complex and requires a service integrator to manage integration across diverse providers. The service integrator has to navigate a moving technological landscape, processes across provider networks, several service management frameworks and practices, diverse corporate cultures with every ecosystem member, and juggle complex contractual and personal relationships.
Internal Service Integrator
In this model, internal control is the name of the game. Here, the control of vendors is in-house and not outsourced to any third party.
The advantage of this model is its cost-effectiveness. However, for it to work effectively, a single logical entity has to be charged with its implementation. They also need to have sufficient authority to carry out their role; otherwise, this model is unlikely to produce the expected results.
Because it’s inside the organization, it’s often managed through targets and internal agreements.
External Service Integrator
In this SIAM model, an independent service integrator – likely a specialist – is responsible for managing vendor relationships on behalf of the customer organization.
This service provider isn’t part of the customer organization. As such, its performance is usually managed through a contract with the customer organization and service level agreements.
Hybrid Service Integrator
This approach combines both the internal and external service provider models. In this mode, the responsibilities of the service integrator are spread across the customer organization and one of the service providers.
In practice, the configuration might look like this: the client mandates an internal resource group to manage the smaller vendors while an external service integrator handles the relationship with the more critical vendors.
Lead Supplier as Service Integrator
In this model, one of the existing service providers becomes responsible for the management of other vendors, in addition to their existing service delivery role. To pull off this kind of arrangement, there needs to be a high degree of trust between the customer organization and the service provider.
The Complexity and Challenge of the SIAM Process Model
A SIAM model must clearly define the policies and principles, establishing ownership of the roles and responsibilities for these three layers.
Although the SIAM model is a process, SIAM transcends end-to-end process management. So, the role of process management isn’t diminished within SIAM. On the contrary, SIAM adds more depth to process management since process execution is likely to involve multiple stakeholders.
Because of such complexity, it’s necessary to give heightened focus to clearly defining roles and responsibilities following these key principles:
All definitions should be relevant to the SIAM model
Each defined role must include the necessary knowledge, skills, competencies, and capabilities
Integration and collaboration capabilities must be included in the definitions where appropriate
the customer organization, the service integrator, and the service providers must each have separate definitions of roles to ensure there’s no duplication or overlap
The Key Benefits of a SIAM Model
SIAM can be used globally and in various organizations since it applies to more than just IT services. This is because it is relevant to any environment where services are sourced from a number of service providers.
However, the added benefit of SIAM is that we can derive inspiration from “other best practices, frameworks, methodologies, and standards used for IT and ITSM.”
These advantages that accrue to the SIAM model should encourage organizations to adopt it:
Reduces operational risk: Instead of relying on a single service provider, the SIAM model provides organizations with the guardrails to spread operational risks across multiple service providers
Greater access to expertise: the SIAM model enables organizations to gain access to “best-in-class” skills across a wider range of technologies from a broader range of suppliers
Agility in meeting demands: provides organizations the ability to respond and meet the increasingly complex demands of business
Increased accountability: SIAM contracts and their scope provide greater transparency and allow organizations to hold service providers accountable for their part of the end-to-end service chain
Increased flexibility and nimbleness: SIAM provides organizations the ability to adapt to a flexible model that allows service providers to be onboarded and offboarded easily.
Takeaway
SIAM can be implemented through various models. However, the basic concept remains consistent – a single entity managing IT service delivery and value chains.
SIAM models need to evolve, just as recent updates in ITIL 4 present a paradigm shift for IT teams. So, SIAM models need to incorporate a flexible approach to multisource service integration.